
KH 969 - CD Radio EBENCH - Free user manual and instructions
Find the device manual for free KH 969 EBENCH in PDF.

| Product Type | Portable Stereo Radio CD with Cassette Recorder and CD Player |
| Brand | EBENCH |
| Model | KH 969 |
| Mains Power Supply | 230 V ~ 50 Hz |
| Battery Power Supply | 8 UM-2 batteries (C size) |
| Tuner | FM / AM |
| FM Stereo Display | Yes (LED) |
| Bass Amplifier | Yes (On/Off switch) |
| CD Player | Yes, programmable up to 20 tracks |
| Cassette Recorder | Yes, with automatic recording (ALC) |
| Headphone Jack | Stereo, 3.5 mm |
| Speakers | 2 (left and right) |
| FM Antenna | Telescopic |
| CD Functions | Play, pause, skip, search, repeat (track/all), programming |
| Cassette Functions | Play, record, fast forward/rewind, pause, auto stop |
| Recording | From radio or CD |
| Safety | Protect from rain and moisture; do not open the device |
| Maintenance | Clean the playback and recording heads regularly |
| Certificate | Complies with EC directives (low voltage, EMC) |
Frequently Asked Questions - KH 969 EBENCH
User questions about KH 969 EBENCH
0 question about this device. Answer the ones you know or ask your own.
Ask a new question about this device
Download the instructions for your CD Radio in PDF format for free! Find your manual KH 969 - EBENCH and take your electronic device back in hand. On this page are published all the documents necessary for the use of your device. KH 969 by EBENCH.
USER MANUAL KH 969 EBENCH
17 Frequency indicator
FM stereo LED indicator
19 Cassette compartment
20 Cassette record button
21 Cassette play button
22 Cassette rewind button
23 Cassette fast forward button
24 Cassette stop/eject button
25 Cassette pause button
26 Speaker left
27 Speaker right
28 Stereo headphones jack
29 Fine tuning knob
30 AC socket (power inlet)
31 Battery compartment door
Technical Information
Supply voltage: 230V 50Hz (mains operation)
Battery operation: 8 x UM-2 batteries
Radio: FM/MW
CD player: 20 track programmable
Cassette recorder: Automatic recording level control (ALC)
Headphones jack: Stereo, 3.5 mm
Mains operation
Before operating please check that the VOLTAGE of your unit and the local mains supply VOLTAGE are identical.
Battery operation
Disconnect the mains lead from the unit and remove it from the mains socket. Open the battery compartment door (31) and insert 8 No. UM-2 batteries (C size). Pay attention to the polarity of the batteries.
Radio
Set the function switch (1) to "Radio" and the waveband switch (2) to the desired waveband. Using the tuning knob (29) select the desired radio station and adjust the volume with the volume control knob (5). To switch off the radio just set the function switch (1) to "CASSETTE".
FM stereo indicator
In order to listen to a VHF station in stereo, set the band selector switch (2) to "FM ST."
The FM stereo led indicator (18) lights up when a stereo broadcast is being received. In many areas FM reception is poor or variable.
This can result in considerable background noise. In this case set the band selector switch (2) to "FM".
Antennas
The FM antenna (3) must be fully extended for the best reception of FM broadcasts. The reception of MW broadcasts is handled by a built-in antenna. To improve the quality of reception, turn the whole unit (in the appropriate direction).
Bass boost
To listen to music at low volume set the bass boost (6) to "ON". This amplifies the lower frequencies and emphasises the bass. To switch off the bass boost feature, press the button again.
Cassette deck
- Playing cassette tapes
To open the cassette compartment press the stop/eject button (24). Insert the cassette into the cassette compartment (19) and close the door again. Set the function switch (1) to "CASSETTE", press the play button (21) and turn the volume control knob (5) to the desired volume. Stop the cassette playing by pressing the stop/eject button (24).
- Fast forward and backward
To move the tape fast forward or backward press the fast forward button (23) or the fast backward button (22).
- Pause
The tape can be stopped temporarily in play or record mode by pressing the pause button (25). Press the pause button (25) again to carry on playing or recording again.
Autostop
The cassette motor is automatically stopped when the tape reaches the end during playing or recording.
CAUTION! Press the stop/eject button (24) every time after use to prolong the life of and prevent damage to the cassettes and cassette drive.
Recording from the built-in radio
- Tune to the desired radio station (see section "RADIO" for description). Adjust to get the best reception of the radio station.
- Insert an empty cassette into the cassette compartment (19).
- Press pause button (25).
- Press record button (20). When starting to record press the pause button (25). The integral automatic control [Automatic Level Control (ALC)] automatically ensures the best recording quality. Changing the volume has no effect on the recording.
- To pause the recording press the pause button (25). To continue recording again press the pause button (25) once more.
- To stop recording press the stop/reject button (24).
- The cassette drive stops automatically once the end of the tape has been reached.
Compact Disc
- Playing compact disks / start
Note: If skipping of tracks occurs when you play a CD, try turning the volume down. Under no circumstances open the CD compartment whilst the CD is in play mode.
- To open the CD compartment, lift the cd door (4). Insert a CD into the CD compartment and close the cd door (4) again. Set the function switch (1) to the "CD" position.
- When the CD compartment is closed following the insertion of a CD, the cd led display (13) shows the total number of tracks on the CD, and then the drive stops.
- When the CD compartment is open or empty, the cd led display (13) shows "00" and then the drive stops.
- Play/pause
- After pressing the play/pause button (12) in "STOP" mode, the first track on the CD will be played. The play/pause led display (14) lights up. The cd led display (13) shows the number of the track currently being played.
- Press the cd play/pause button (12) once for a temporary pause in playing. The LED display indicating play/ pause (14) flashes.
- Playing is paused but the CD spins faster. A further press on the cd play/pause button (12) continues play from a previous pause.
- Pressing once on the cd stop button (11) in PLAY or PAUSE mode stops play mode.
Repeat
- To repeat a track: Pressing the repeat button (10) once causes the repeat led display (15) to light up and flash continuously. The relevant piece of music is repeated.
- To repeat all the tracks: Pressing the repeat button (10) twice causes the repeat led display (15) to light up continuously. The whole CD is then played again.
- To cancel the repeat function: Press the repeat button (10) until the repeat led display (15) is turned off.
- Skipping tracks and search mode
-
If during play or pause mode the cd skip forward button >>" (7) or cd skip backward button "<=" (8) is pressed once, then the next or last track respectively will be played.
-
If during play mode the cd skip forward button >> (7) or cd skip backward button << (8) is pressed and held down, the unit will search forwards or backwards for the track (or within the track) with an audible increase in speed.
Program mode
- By pressing the program button (9) once in CD STOP MODE, the program led display (16) lights up. With the cd skip forward button ">>" (7) or cd skip backward button "<=" (8) go to the track you want. The cd led display (13) shows the number of the track currently being played. Then press the program button (9) once more to store the desired title.
- Repeat the steps above until all the tracks you want are stored. You can store a total of 20 tracks.
- Press the cd play/pause button (12) once to play the PROGRAMMED track.
- To erase the PROGRAMMED tracks, just open the cd door (4).
Stereo headphones jack
To listen to the music using the headphones insert the stereo headphone plug into the stereo headphones jack (28) and adjust the volume to suit. During use of the headphones the speakers are automatically switched off.
Recording from the CD
- Set the function control switch (1) to the "CD" position.
- Insert the CD with the label uppermost into the CD compartment.
- Insert a cassette into the cassette compartment (19) and press the cassette deck pause button (25).
- The unit will record when the record button (20) and the play button (21) are pressed down simultaneously. The unit is automatically set for the best recording quality by the integral ALC facility.
- Starts the CD and go to the desired TRACK (see CD PLAYER). Release the cassette deck pause button (25) to start recording.
- To interrupt recording temporarily press the pause button (25). Press the pause button (25) again to continue recording.
- To stop recording press the cassette deck stop/reject button (24). Finally stop the CD playing by pressing the CD player's cd stop button (11).
WARNING! DANGER OF ELECTRIC SHOCK • DO NOT OPEN

WARNING: Always protect the unit from rain and moisture to avoid the danger of fire or electrical short circuit. Do not remove the cover under any circumstances. The control lights are spot welded in place. The components inside the unit are not intended to be user-serviceable. Servicing and repair are to be carried out only at a service centre.
Servicing
- Cleaning the tape heads
Remove dust and tape debris from the tape heads regularly. Dirt on the tape heads will reduce the quality of recording and playback.
Statement of conformity
We, Kompernaß Handelsgesellschaft mbH, Burgstr. 21, D-44867 Bochum, Germany, hereby declare that this product conforms with the following EC regulations: EC low voltage regulations, Electromagnetic compatibility, Applicable harmonised standards.
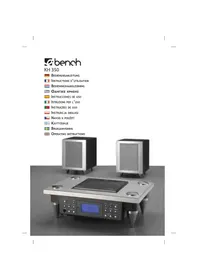
Type/Description: Portable stereo radio and cassette recorder with CD player KH 969
Bochum, 28.02.03

Hans Kompernaβ
- Managing Director
Radiofunctions: FM / AM
- Technical Information
- Mains operation
- Battery operation
- Radio
- FM stereo indicator
- Antennas
- Bass boost
- Cassette deck
- - Playing cassette tapes
- - Fast forward and backward
- - Pause
- Autostop
- Recording from the built-in radio
- Compact Disc
- - Playing compact disks / start
- - Play/pause
- Repeat
- - Skipping tracks and search mode
- Program mode
- Stereo headphones jack
- Recording from the CD
- WARNING! DANGER OF ELECTRIC SHOCK • DO NOT OPEN
- Servicing
- Statement of conformity
Brand : EBENCH
Model : KH 969
Category : CD Radio