
SENSIA 200D CONNECT - Digital Radio PURE - Free user manual and instructions
Find the device manual for free SENSIA 200D CONNECT PURE in PDF.

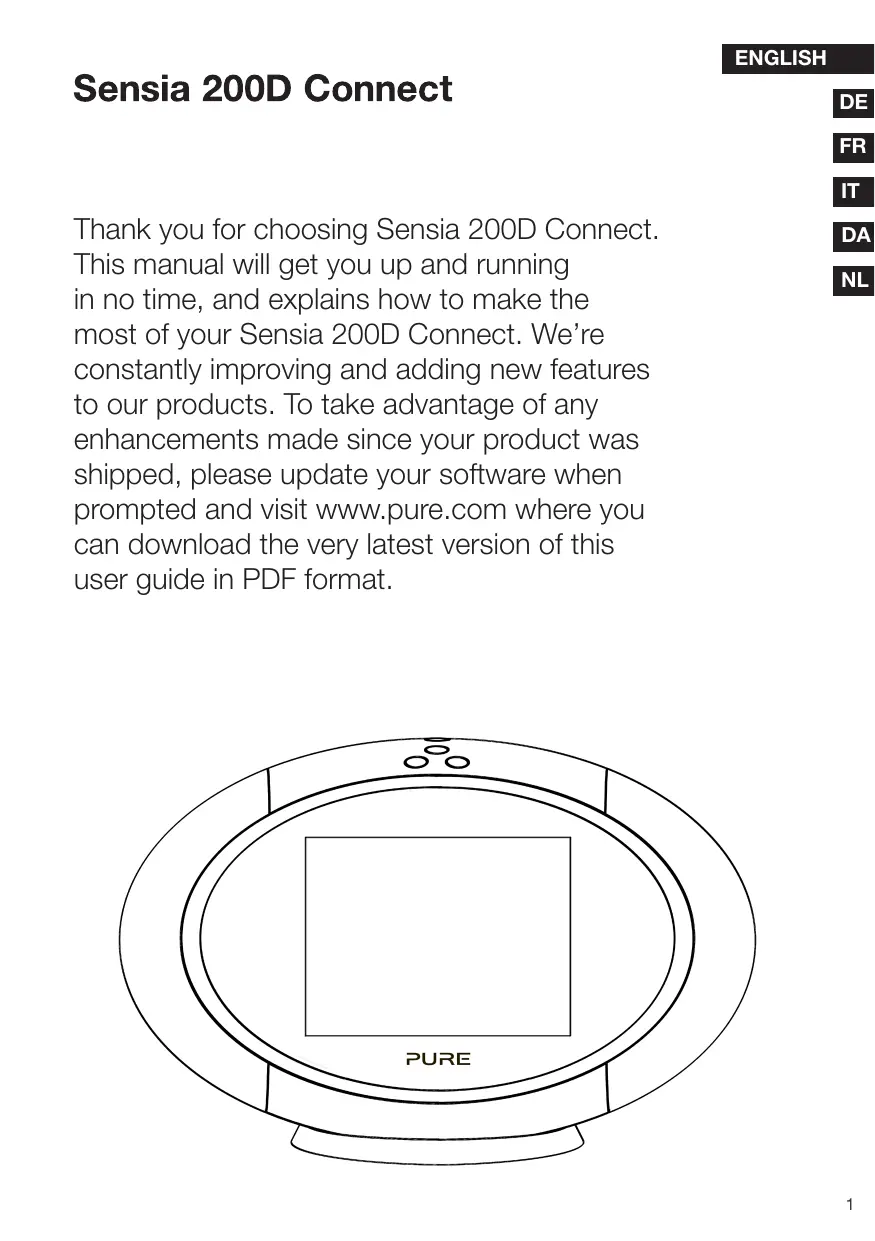


| Product type | Connected digital radio (DAB/DAB+/DMB-Radio, FM, Internet) |
| Brand | Pure |
| Model | Sensia 200D Connect |
| Dimensions (without base) | 166 mm x 280 mm x 180 mm |
| Weight (without battery) | 1.9 kg |
| Power supply | Mains adapter 230/110 V AC – 14.3 V DC; optional rechargeable battery ChargePAK F1 |
| Display | Capacitive TFT touch screen 5.7 inches, 64k colors, 640 x 480 pixels |
| Speakers | Two 3-inch wideband speakers, 30 W RMS |
| Connections | USB 2.0 port (USB stick, Ethernet adapter), 3.5 mm mini-jack auxiliary input, 3.5 mm mini-jack headphone output |
| Network | Wi-Fi 802.11b/g (WEP, WPA/WPA2), Ethernet 10/100 Mbps via optional USB adapter |
| Main functions | DAB/DAB+/FM/Internet radio, Pure Connect, Pure Music (subscription), Pure Tag, recording to USB stick, alarms, timer, photo slideshow, Facebook/Twitter/Picasa access |
| Presets | 30 DAB, 30 FM, unlimited Internet favorites |
| Supported audio formats | WMA (V9), AAC, MP3, MP2 |
| Maintenance and cleaning | Clean only with a dry cloth |
| Safety | Do not expose to water, do not block ventilation, do not install near heat sources, keep antenna more than 20 cm from people, use supplied adapter |
| Spare parts and repairability | Battery ChargePAK F1 (optional), USB Ethernet adapter (optional); repair by qualified personnel |
| Warranty | 2 years (material and workmanship defects) |
| General information | CE certification, C-Tick; compliant with directive 1999/5/EC |
Frequently Asked Questions - SENSIA 200D CONNECT PURE
User questions about SENSIA 200D CONNECT PURE
0 question about this device. Answer the ones you know or ask your own.
Ask a new question about this device
Download the instructions for your Digital Radio in PDF format for free! Find your manual SENSIA 200D CONNECT - PURE and take your electronic device back in hand. On this page are published all the documents necessary for the use of your device. SENSIA 200D CONNECT by PURE.
USER MANUAL SENSIA 200D CONNECT PURE
Thank you for choosing Sensia 200D Connect. This manual will get you up and running in no time, and explains how to make the most of your Sensia 200D Connect. We're constantly improving and adding new features to our products. To take advantage of any enhancements made since your product was shipped, please update your software when prompted and visit www.pure.com where you can download the very latest version of this user guide in PDF format.
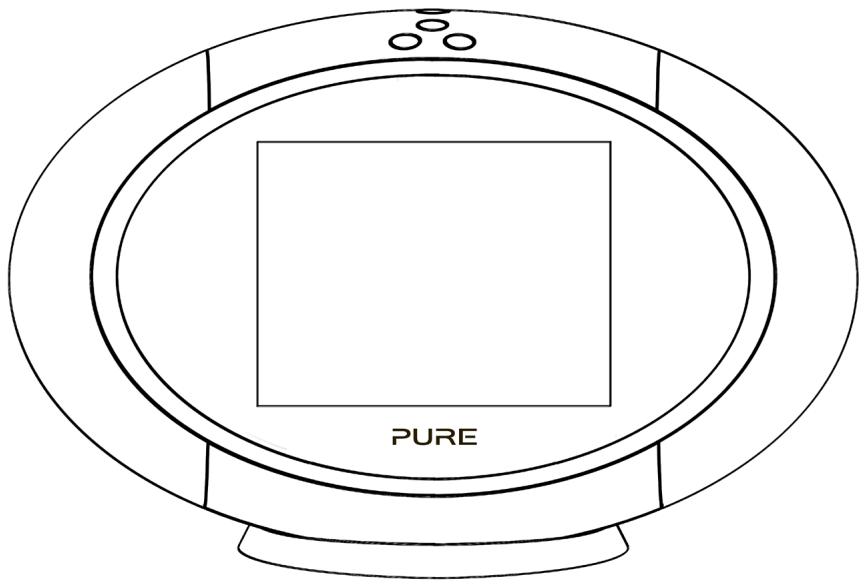
Safety Instructions

- Read these instructions - All the safety and operating instructions should be read before this product is operated.
- Keep these instructions - The safety and operating instructions should be retained for future reference.
- Heed all warnings - All warnings on the appliance and in the operating instructions should be adhered to.
- Follow all instructions - All operating and use instructions should be followed.
- Do not use this apparatus near water - The appliance should not be used near water or moisture - for example, in a wet basement or near a swimming pool, and the like.
- Clean only with dry cloth.
- Do not block any ventilation openings. Install in accordance with the manufacturer's instructions.
- Do not install near any heat sources such as radiators, heat registers, stoves, or other apparatus (including amplifiers) that produce heat.
- Do not defeat the safety purpose of the polarized or grounding plug. A polarized plug has two blades with one wider than the other. A grounding plug has two blades and a third grounding prong. The wide blade or the third prong is provided for your safety. If the provided plug does not fit into your outlet, consult an electrician for replacement of the obsolete outlet.
- Only use attachments/accessories specified by the manufacturer.
-
Unplug the apparatus during lightning storms or when unused for long periods of time.
-
Refer all servicing to qualified personnel. Servicing is required when the apparatus has been damaged in any way, such as power supply cord or plug is damaged, liquid has been spilled or objects have fallen into the apparatus has been exposed to rain or moisture, does not operate normally, or has been dropped.
- Do not install this equipment in a confined or built-in space such as a bookcase or similar unit. The ventilation should not be impeded by covering the ventilation openings with items such as newspaper, tablecloths, curtains etc.
- WARNING: To reduce the risk of fire or electric shock, do not expose this apparatus to rain or moisture. The apparatus should not be exposed to dripping or splashing. Objects filled with liquids, such as vases, should not be placed on the apparatus.
- WARNING: The direct plug-in adapter is used to disconnect the device and should remain readily operable.
- WARNING: The remote batteries should not be exposed to excessive heat such as sunshine, fire or the like.
- This equipment is a Class II or double insulated electrical appliance. It has been designed in such a way that it does not require a safety connection to electrical earth.
- Separation distance of at least 20cm must be maintained between the antenna of the product and all persons.
- The power rating marking is located on the rear of the main unit.

Damage to hearing can occur with consistent exposure to high volume when using headphones. Always check the volume level before inserting headphones into your ears.
Use of headphones while operating a vehicle is not recommended and is illegal in some areas. Stop listening to your Move if you find it distracting while operating any type of vehicle or performing any other activity that requires your full attention.
4 Getting started
4 Introduction
4 Network setup
4 Touchscreen interface
5 Controls and connectors
6 Control buttons
6 Remote Control
7 Switching on Sensia for the first time
8 Connecting Sensia to your network
8 Preparing Sensia for Wi-Fi Setup
8 Using the Wi-Fi wizard
9 Changing Sensia viewing modes
9 Browse mode
10 Play mode
11 View mode
12 Listening to digital or FM radio
13 Listening to Pure Connect content
13 Selecting Internet radio
14 Listening to other internet content
15 Pure Music
15 Accessing Pure Music on Sensia
15 Pure Tag
16 Media Panel options
16 Displaying a slide show of your pictures from a media server
16 Adjusting slide show settings
17 Listening to audio from a USB memory stick
17 Streaming audio from a Media Server
18 Controlling audio playback
18 Recording radio programmes
18 Instant recordings
18 Timed recordings
19 Using the Pure Jongo wireless multiroom function on Sensia
19 Streaming from a smartphone or tablet
20 Streaming from a Pure Jongo compatible device
20 Streaming to a Pure Jongo compatible device
21 Setting alarms and timers
21 Setting an alarm
21 Switching an alarm on/off
21 Skipping an alarm
21 Snoozing a sounding alarm
21 Cancelling a sounding alarm
22 Changing the snooze time
22 Setting the sleep timer
23 Basic settings
23 Autotune
23 Display
23 Language
23 Changing time/date settings
23 Changing the time format/time zone
24 Advanced settings
24 Manual Wi-Fi setup
24 Connecting Sensia to the Internet with an Ethernet cable
25 Static IP address configuration
25 Clearing network settings
26 Updating the software
26 Software update options
26 Updating the software using the network connection
26 Updating the software using the USB port
26 Displaying details on the current software version
27 Installing the ChargePAK F1
28 Technical specifications
29 Pure Warranty Statement for Australia
Getting started
Introduction
You can use Sensia 200D Connect to:
- Listen to FM and digital radio.
Control or be part of a Pure Jongo wireless multiroom system. - Act as a media player by streaming music from your PC or network.
- Access Pure Connect for thousands of internet radio stations, podcasts and more.
- Connect a USB memory stick to record live radio or play any stored music.
- Access the Pure Music streaming service.*
- Identify and purchase songs by using the Pure Tag service.*
View photos from your network or the internet. - Monitor and update Facebook and Twitter.
View a news feed or the weather.
Note: Sensia 200D Connect will be referred to as Sensia throughout the rest of this user guide.
Network setup
In order to access the Pure Connect service or use media streaming you will need to connect Sensia to your network. You can connect Sensia to your network using a wireless (Wi-Fi) or wired connection. If you want to use the wired connection method, you will need to plug the optional USB Ethernet adapter into the USB port on the back of Sensia. See page 8.
We recommend using the wireless connection method, which allows you to position your Sensia anywhere within range of your wireless connection. The wireless connection method also has the advantage of leaving the USB port free, enabling you to carry out USB and playback. See page 18.
Touchscreen interface
The touchscreen on Sensia features a number of common controls:
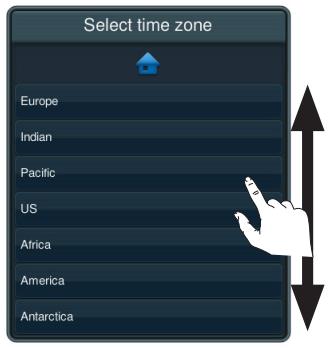
Options Lists
Use your finger to scroll up or down the list and tap the option that you want to choose.
Buttons
Tap the button with your finger to select the required option.
Controls and connectors
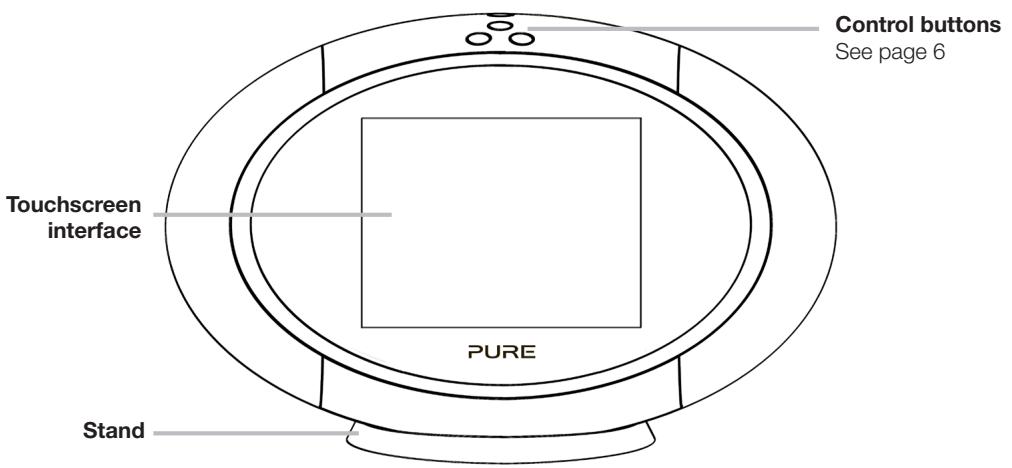
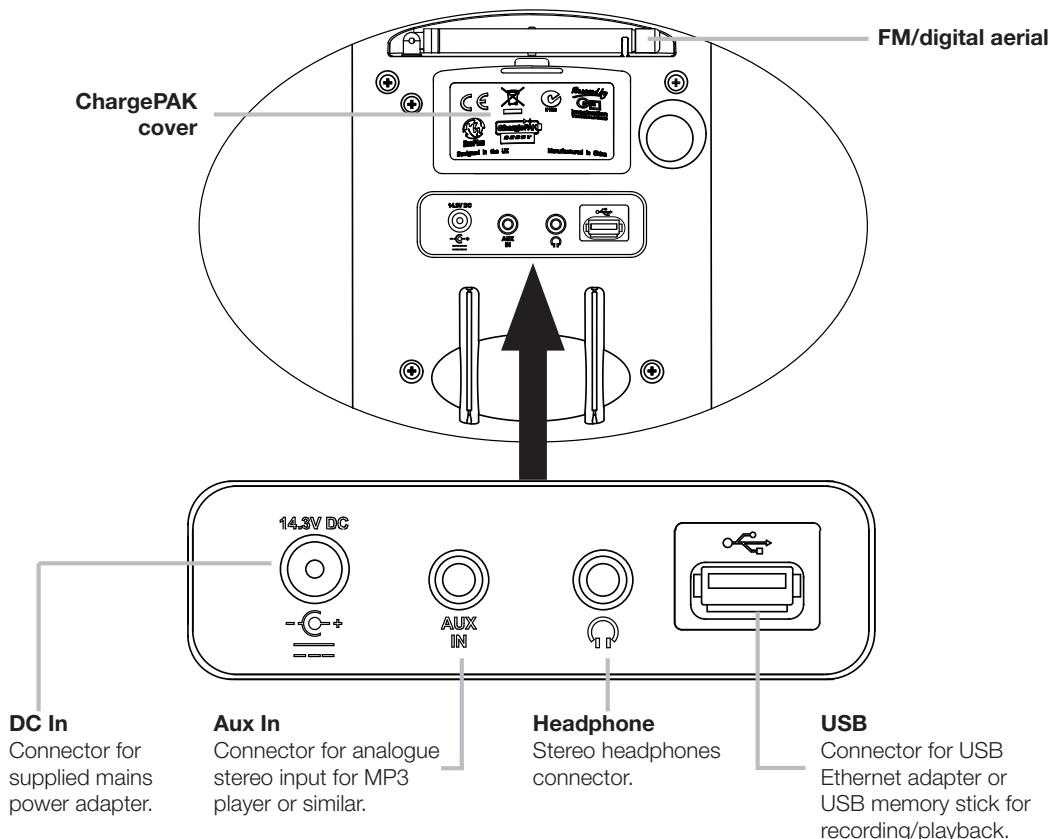
Control buttons
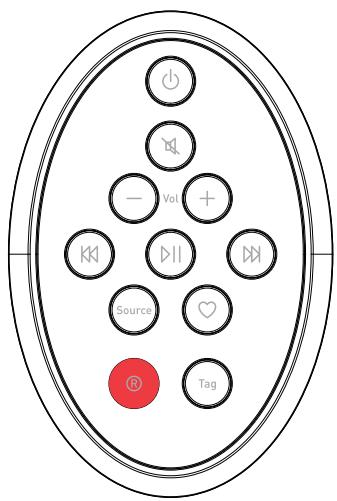
Remote Control

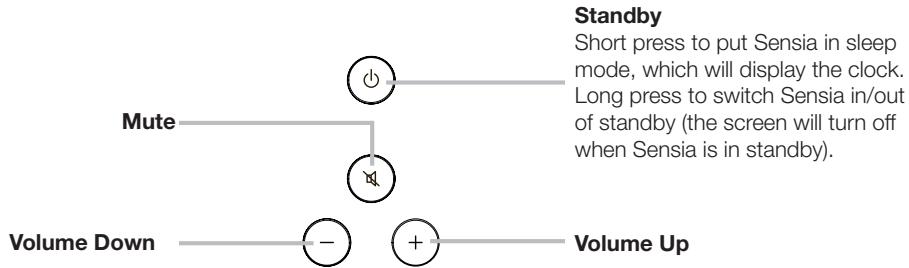
Standby
Short press to put Sensia in sleep mode, which will display the clock.
Long press to switch Sensia in/out of standby (the screen will turn off when Sensia is in standby).

Mute
Press to mute volume.
- Vol +
Press to adjust volume up or down.
and
Skip to beginning of current track or go to previous or next track. Hold to rewind or fast forward.
Play/pause current track.
Source
Press to switch between Digital radio, Pure Connect, Network/USB media, FM radio and Auxiliary input.

Favourites
Press to scroll through the stations in your favourites list for the selected radio source or your Pure Connect favourites.
Record
Press to record digital or internet radio to a USB memory stick. See page 18.
Tag
Press to use Pure Tag to identify the song that is playing on a digital, FM or internet radio station. See page 15.
Switching on Sensia for the first time
Note: If you have a ChargePAK F1 rechargeable battery (sold separately) fit it now before plugging Sensia in.
See page 27 for more information.
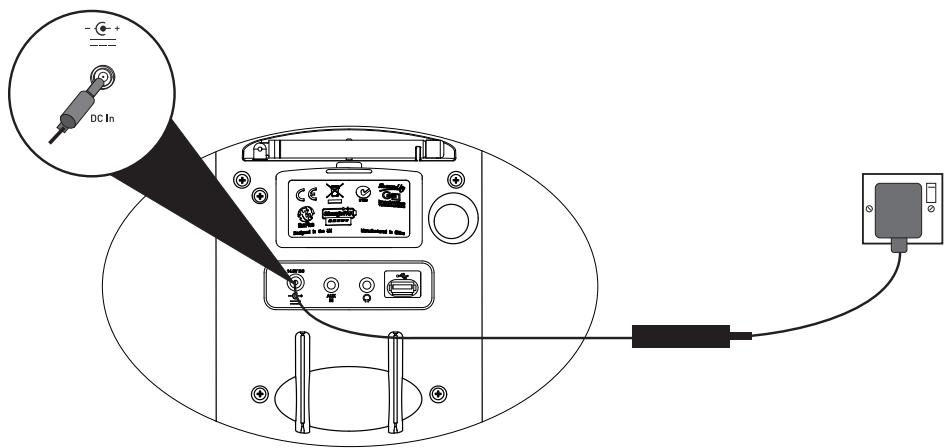
- Connect the power lead into the power socket on the back of Sensia.
- Plug the mains adapter into a live mains socket.
- Sensia will switch on.
- Tap the language that you want to use on the user interface.
- Scroll down to the region you are in and tap to confirm the time zone for your region.
- Scroll to your nearest city and tap to confirm the time zone for your city.
- Tap an option to turn demo mode on/off. Demo mode is a screenshot that runs after two minutes of inactivity.
- A Quick start guide will display, explaining how to use the view controls. Tap to continue.
- Sensia will perform an autotune for digital stations and tune to a station when complete.
- Sensia will display the Play view when the autotune has completed.
Connecting Sensia to your network
To listen to internet radio, connect to a media player, access Twitter, Weather, RSS Newsreader, Picasa and Facebook, you will need to connect Sensia to your network. We recommend using the Wi-Fi wizard to connect Sensia to your network. To setup your network manually see "Advanced settings" on page 24.
Note: The Wi-Fi wizard will automatically start if you have not set up your network settings and you select Pure Connect or Network/USB media as the audio source.
Preparing Sensia for Wi-Fi Setup
- Tap the Browse button in the top right-hand corner of the screen to display the Browse view.
- Position Sensia in range of your wireless network.
- Tap Settings to display the Settings menu.
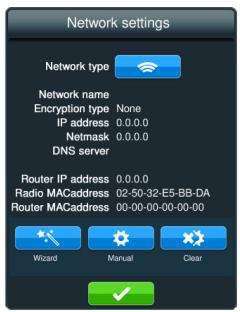
- Tap Network to display the Network Settings menu.
- Tap the icon next to Network type to display
- A summary of your wireless settings will display on Sensia.
- To set up the wireless connection on Sensia using the wizard, tap the Wizard button and follow the steps outlined below.
Using the Wi-Fi wizard
- Tap the name of the wireless network you want to connect to.
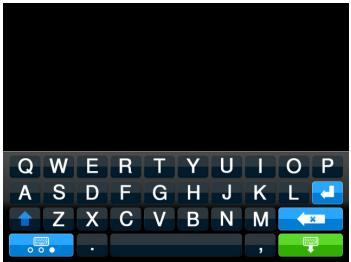
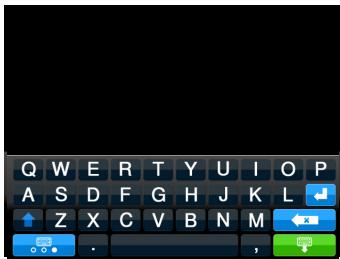
- If your wireless network has security enabled, enter the security key using the on-screen keyboard.
Note: Your Wi-Fi key can normally be found on your router. If unsure, contact your Internet Service Provider.
Note: Your Wi-Fi key is case sensitive so you will need to enter it exactly as shown. To change between upper/ lower case, tap the key.
- Wait while Sensia connects to your network.
- Sensia will return to Browse view after connecting to your wireless network.
Changing Sensia viewing modes
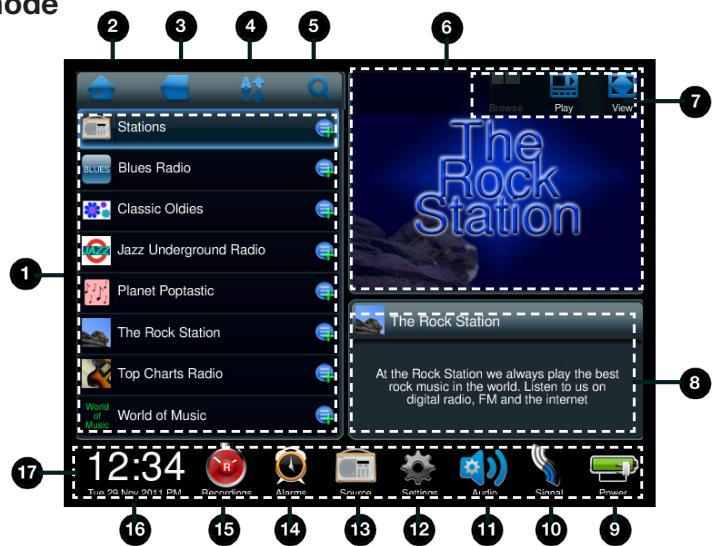
Sensia has three main viewing modes, Browse, Play and View. The Browse mode allows you to select sources and browse for content, the Play mode shows the media panel and controls, the View mode maximises the media panel so that it takes up the whole screen. When you select a new source, Sensia defaults to the Play mode.
Browse mode
| No. | Item | Description |
| 1 | List Panel | To navigate the list panel use your fingertip to scroll the list panel up or down and tap a station/track to begin listening. |
| 2 | Home | Tap the Home icon to go back to the home for the current source. |
| 3 | Back | Tap to return to the last view. |
| 4 | Quick Jump | Tap the Quick Jump icon to open the Quick Jump Box. Tap a letter to jump to the first station or track beginning with that letter. |
| 5 | Search | Tap the Search icon to search for stations or tracks. |
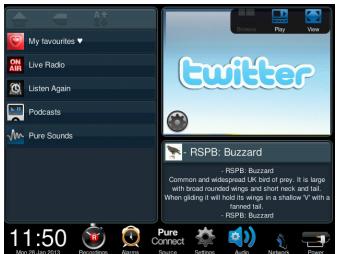
| 6 | Media Panel | Displays screens associated with the media playing, or other visuals of your choice such as photos, weather, Facebook, Twitter or a news feed. Slide left/right and/or up/down. |
| 7 | View controls | Tap these buttons to change the Sensia view (Browse mode, Play mode and View mode). |
| 8 | Information panel | Displays any data associated with the radio station or media file. |
| 9 | Power | Indicates if Sensia is connected to mains or if it is using a ChargePAK. If Sensia is using a ChargePAK, this indicates the amount of power left in the ChargePAK. |
| 10 | Signal Strength | Tap to display more information about the strength of the FM/Digital and Wi-Fi signal. |
| 11 | Audio | Tap to adjust the bass, treble and boost the auxiliary input volume. |
| 12 | Settings | Tap to view/change settings, including network, display and language. |
| 13 | Source | Tap to change the audio source. |
| 14 | Alarms | Tap to set the alarms and change the timer settings. |
| 15 | Recordings | Tap to set timed recordings. |
| 16 | Clock/Date | Tap to change the time and date settings on Sensia. |
| 17 | Icon Bar | Displays the time and icons that relate to the function being used. |
Play mode
The controls in Play mode differ depending on the Source that has been selected.

| No. | Item | Description |
| 1 | Icon Bar | Displays the time and icons that relate to the media being listened to. |
| 2 | Playback controls/Recording space | Tap the icon of the control you want to use. These controls are only active if the media being played can be controlled, e.g. music files from a USB memory stick, Media Player or from Pure Music, or Podcasts. If you are carrying out a timed recording to a USB memory stick, the amount of time left before the timed recording will end is indicated by the bar above the playback controls. |
| 3 | Media Panel | Displays screens associated with the media playing, or other visuals of your choice such as photos, weather, Facebook, Twitter or a news feed. Slide left/right and/or up/down. |
| 4 | Media Title | When playing music, displays the name of the track. When listening to a radio station, displays the name of the radio station. |
| 5 | View controls | Tap these buttons to change the view (Browse mode, Play mode and View mode). |
| 6 | Media Information | When playing music, displays information about the artist and album. When listening to a radio station displays information about the radio show. |
| 7 | Record | Tap to instantly record the live radio broadcast (digital and Internet radio only). See page 18. |
| 8 | Tag | Tap to use the Pure Tag service to identify the name of the song that is being played. See page 15. |
| 9 | Favourites | Tap to add the radio station to your favourites. See page 14. |
| 10 | Clock/Date | Tap to change the time and date settings. |
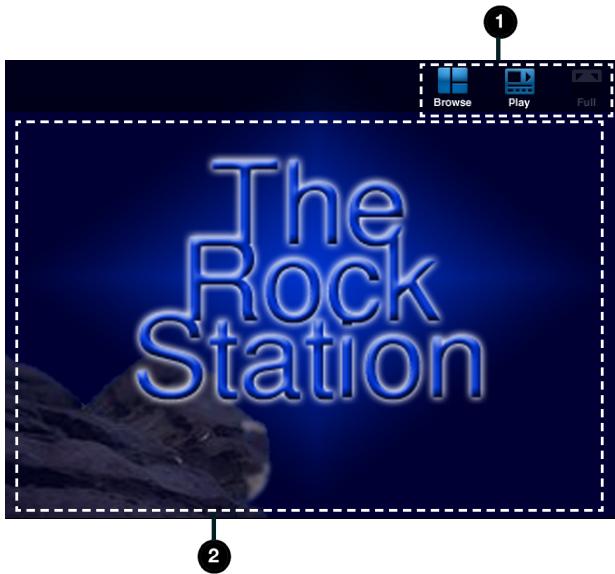
View mode
| No. | Item | Description |
| 1 | View controls | Tap these buttons to change the view (Browse mode, Play mode, and View mode). |
| 2 | Media Panel | Displays any artwork associated with the radio station/music playing. |
Listening to digital or FM radio
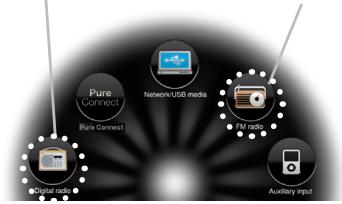
Digital radio
FM radio
Selecting digital/FM radio
- Tap Source to display the Source menu.
- Tap Digital radio or FM radio.
Changing digital stations
- Tap Browse to display the Browse view.
- Tap Stations to display a list of available digital radio stations.
- Scroll to the radio station that you want to listen to and tap to tune into the station.
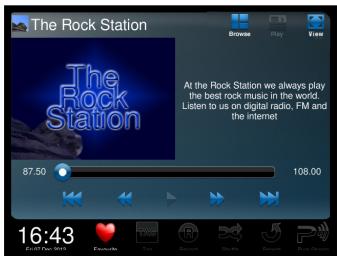
Changing FM stations
Tap the seek buttons to automatically scan for the next station. The scan will stop when a station with a strong signal is found.
Alternatively, tap the manual tuning buttons to manually scroll to the required frequency.
Saving your favourite stations
- Tap the Play icon in the Media panel.
- Tap the Favourite icon so that it highlights in red
- The radio station will be added to your favourites.
Selecting a favourite FM station
- Tap Source to display the Source menu.
- Tap FM radio.
- Tap Browse to display the Browse view.
- Tap the name of the radio station that you want to listen to in the list panel.
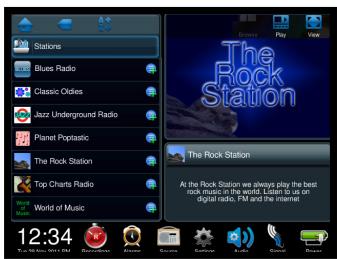
Selecting a favourite digital station
- Tap Source to display the Source menu.
- Tap Digital radio.
- Tap Browse to display the Browse view.
- Tap the Digital radio favourites folder.
- Tap the name of the radio station that you want to listen to in the list panel.
Listening to Pure Connect content
Pure Connect allows you to explore thousands of radio stations, BBC listen again programmes, podcasts and Pure Sounds. To use Pure Connect, you will need to connect Sensia to your network. See page 8 for more information.
After connecting Sensia to your network, you can register your radio on the Pure Connect website. We recommend registering your radio as this allows you to manage your radio and Pure Connect favourites and access subscription services like Pure Music and Pure Tag.
To register your Sensia:
- Go to connect.pure.com on your PC or Mac.
- Login with your account details or register for an account.
- After logging in, click Devices to display your registration code. You will be asked to enter this code into your Sensia when you try to select Pure Connect as a source.

Pure Connect
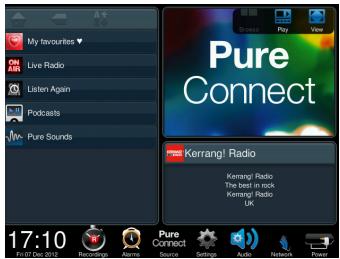
Selecting Internet radio
- Tap Source to display the Source menu.
- Tap Pure Connect.
Searching for internet stations
- Tap Browse to display the Browse view.
- Tap the Live radio icon.
- Tap the search icon on the top right of the list panel. This will open the search options in the visual panel to the right. You can search for stations based on the criteria described below:
Name
Tap to search for a radio station by name. Type the name that you want to search for using the on-screen keyboard. Tap to confirm.
Genre
Tap to search for a radio station based on the genre, e.g., station content. Tap the genre to confirm.
Language
Tap to search for a radio station based on its broadcasting language. Tap the language to confirm.
Country
Tap to search for a radio station based on the country that it is broadcasting from. Tap the country to confirm.
Quality
Tap to search for a radio station based on the audio quality. Tap the audio quality level that you want from one (low) to five (high).
- Tap the Search button when you have finished specifying the search criteria. Any radio stations that have been found matching the specified criteria will display in the List Panel.
Using Quick Jump
Tap the Quick Jump icon at the top left of the list panel to open the Quick Jump box. Tap a letter to jump to the first station or track beginning with that letter.
Saving your favourites stations/Pure Connect favourites
- Tap the Favourite icon so that it highlights in red
- The radio station will then be listed in the My favourites list. If you have multiple folders/devices in your Pure Connect account then your Pure Connect favourites will be saved under the folder associated with this Sensia (default name "Sensia 200D Connect")
Listening to other internet content
- Tap Source to display the Source menu.
- Tap Pure Connect.
- Then tap on one of the following content types:
Listen again
Tap this option to access the BBC Listen Again service, which lets you catch up with any BBC radio shows that you might of missed. These archived radio programmes are available to listen to for a set period of time after the live broadcast.
Podcasts
Podcasts are pre-recorded audio shows on a wide variety of subjects such as comedy, arts, business and culture, for you to enjoy anytime.
Pure Sounds
Our library of sounds, from birdsong to cityscapes, rolling thunder to sports cars.
Pure Music
Pure Music is a cloud-based on-demand subscription service that gives you instant access to millions of music tracks. You can only see this option when you have an active Pure Music subscription. See page 15 for more information.
Selecting a favourite internet station
- Tap Source to display the Source menu.
- Tap Pure Connect.
- Tap the My favourites icon.
- Tap the name of the folder that your favourite radio station is located in.
- Tap the name of the radio station that you want to listen to in the list panel.
Pure Music
Pure Music is a cloud-based on-demand subscription service that gives you instant access to millions of music tracks from one of the world's largest music catalogues covering almost every conceivable artist and genre. You can listen to Pure Music on our music streaming and radio systems, on an Apple or Android device running the Pure Connect app or on the Pure Connect website.
Pure Music is only available in certain countries. Please see http://connect.pure.com for details.
Accessing Pure Music on Sensia
- Tap Source to display the Source menu.
- Tap Pure Connect.
- Tap Pure Music.
- Tap one of the following icons:
My Tracks
Tap this icon to access the tracks that you have purchased from Pure Connect.
Catalogue
Tap this icon to browse or search the complete Pure Music catalogue on your Sensia.
By playlist
Tap this icon to listen to playlists created by you at connect.pure.com.
Pure Tag
The Pure Tag service can be used to identify, bookmark and purchase tracks that are playing on a digital, FM or internet radio station. In addition to accessing your favourite music tracks, the Pure Tag service also automatically back catalogues any music by similar artists that you might be interested in, allowing you to explore something completely new or rediscover forgotten favourites.
Note: To access your tagged tracks list, you will need to log in to your Pure Connect account at connect.pure.com.
- Tap the Tag icon in the icon bar.
- Sensia will identify the name of the song that is being played and allow you to buy it (or stream it if you have Pure Music).
Note: To use the Pure Tag service, your Sensia will need to be connected to your network and you will need a Pure Connect account. See page 13 for more information on setting up a Pure Connect account.
Media Panel options
By default the Media Panel will display pictures related to the radio station you are listening to, or artwork related to the track being played. Alternatively you can choose to display a slide show of your own photographs from a media server or access internet content from Twitter, Weather, RSS Newsreader, Picasa or Facebook. Sensia needs to be connected to your network to access most of these options and you will need to be a member of Facebook, Twitter or Picasa if you want to use them.
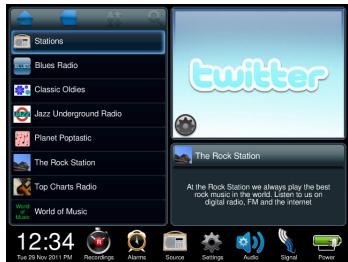
Accessing Facebook, Twitter, Picasa and more
Swipe the Media Panel to the left or right until Twitter, Weather, RSS Newsreader, Picasa or Facebook is displayed then swipe up or down to choose which one you want to access.
Changing settings and getting help
To edit settings or the login details, tap the cog icon in the bottom left hand corner of the Media Panel.
To view help information (where available) tap the help icon in the Media Panel.
Displaying a slide show of your pictures from a media server
You can view pictures on Sensia from a media server on your network. The pictures are displayed in the form of a slide show. To view pictures from a media server, carry out the following:
- Tap the Browse view button.
- Tap Source.
- Tap Network/USB media.
- Wait while Sensia searches for pictures on any available media servers on your network.
- The list panel will display a list of the media servers that have been found on your network.
- Tap the media server that you want to connect to.
- Navigate to the area where the pictures are located.
- Tap the play icon to start viewing the pictures.
Adjusting slide show settings
- Tap the Media Panel.
- Tap the cog icon that appears in the bottom left hand corner.
- Adjust the slide duration by tapping on the top and bottom of the photo timer to select the required number of seconds.
- Tap to save the slide show settings.
Listening to audio from a USB memory stick
Sensia can be used to play music by connecting a USB memory stick to the USB port on the back of Sensia. The audio file types that Sensia supports include WMA (Standard V9), AAC, MP3 and MP2. By default, Sensia looks for audio on your network if you have not connected a USB memory stick to the back of Sensia.
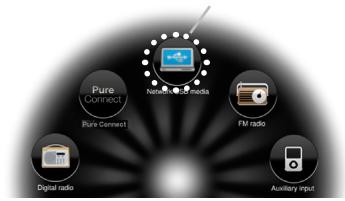
Network/USB media
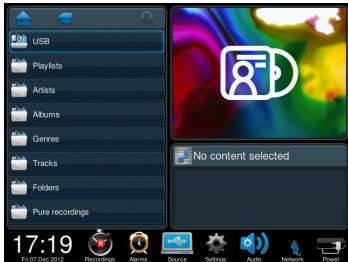
To listen to tracks from a USB memory stick:
- Tap Source.
- Tap Network/USB media.
- Wait while Sensia searches for available media servers.
- The list panel will display a list of the media servers that have been found on your network.
- The contents of your USB memory stick will be shown.
- Navigate to your tracks and tap to play.
Streaming audio from a Media Server
You can stream music stored on your computer or on a UPnP-compatible Network Attached Storage device to Sensia. To stream music from your computer you will need to install media server software on it.
We recommend that you download our Pure Flowserver software from connect.pure.com. Alternatively, you can use another media server, such as Windows Media Player 11.
For help with downloading and installing Flowserver, for both Mac and PC, or on setting up Windows Media Player as a server, follow our step-by-step guides at http://support.pure.com.
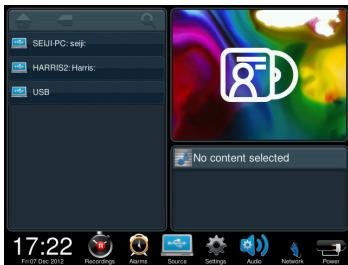
To listen to tracks from a media server, ensure that Sensia is in Browse view and carry out the following:
- Tap Source.
- Tap Network/USB media.
- Wait while Sensia searches for available media servers.
- The list panel will display a list of the media servers that have been found on your network.
- Tap the server that you want to connect to.
- Navigate to the area where the audio is located.
Controlling audio playback
If you are streaming audio on Sensia from either a USB memory stick or Media Server, you can control the playback using the remote or on Sensia as follows:
- Tap the Play icon in the information panel.
- You will now be able to play, pause and skip tracks by clicking the respective icons.
Recording radio programmes
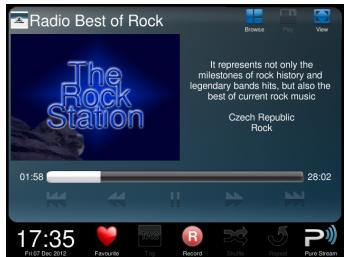
Sensia allows you to record live radio from Pure Connect and digital radio. You can either schedule recordings or record instantly. To record, you need to connect a USB memory stick to the USB port on the back of Sensia. The length of time that you can record depends on the amount of space available on your USB memory stick and the station that you are recording. A 2GB USB memory stick can record around 15 to 30 hours of digital or internet radio (based on the most common station data rates of 128kbps and 64kbps, respectively). If your USB memory stick runs out of space during a recording, Sensia will stop recording and display a message.
Instant recordings
To record instantly you will need to:
- Tap Source to display the Source menu.
- Tap Pure Connect or Digital radio.
- Tune into the station that you want to record to and tap the Record icon in the icon bar or on the remote to begin recording.
Timed recordings
Note: To use timed recording, the radio station must be set up as a favourite. For more information on creating a favourite internet radio station, see page 14. For more information on creating a favourite digital station, see page 12.
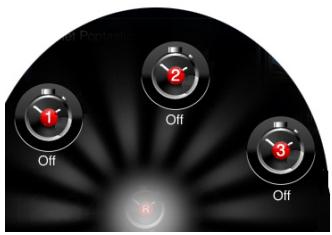
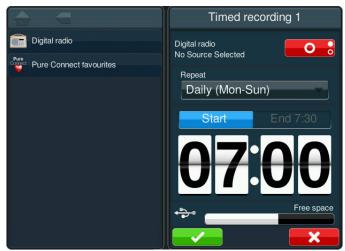
- Tap Recordings to display the Recordings menu and tap the icon of the timer that you want to set.
- To record from a digital radio station, tap Digital radio favourites and select the station from the list. To record from an internet radio station, tap Pure Connect favourites and select the station from the list.
- Tap the button at the top to toggle the recording on or off
- Tap the Occurrence drop-down menu to specify how often the recording should occur.
- Tap Start to specify the recording start time.
- Adjust the recording start time by tapping on the top and bottom of the clock to flip through the minutes and hours.
- Tap End to specify the recording end time.
- Adjust the recording end time by tapping on the top and bottom of the clock to flip through the minutes and hours.
- To exit and save the recording tap . To exit and discard all changes tap × .
Note: When you are scheduling a recording, the amount of space that is currently available on your USB memory stick is indicated in black on the free space bar at the bottom of the Timed recording screen.
Using the Pure Jongo wireless multiroom function on Sensia
To use the Pure Jongo wireless multiroom function on Sensia you will need to be connected to a network and use either the Pure Connect app or a Jongo compatible device.
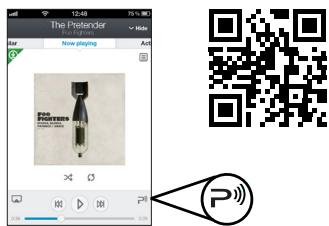
iOS Pure Connect App
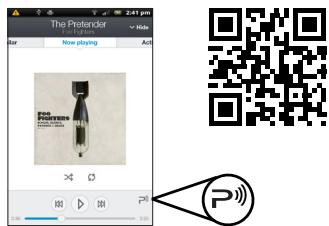
Android Pure Connect App
Streaming from a smartphone or tablet
You can use the Pure Connect app to stream music stored on your smartphone or tablet, Internet radio stations, on-demand radio programmes, podcasts and music from the Pure Music subscription service to Sensia. The Pure Connect app also allows you to stream to multiple Jongo multi-room Compatible devices simultaneously and control their volume individually.
You can download the Pure Connect app on your smartphone or tablet from the Apple App Store or Google Play.
Selecting a Pure Jongo compatible device in the Pure Connect app
- Tap the Pure Stream P^ icon on your iOS or Android device to view a list of Pure Jongo compatible devices that have been detected on your network.
- Tap the device that you want to stream to.
You will now be able to stream audio to your Jongo compatible device. For more information on how to use the Pure Stream app, please see the help supplied with the app.
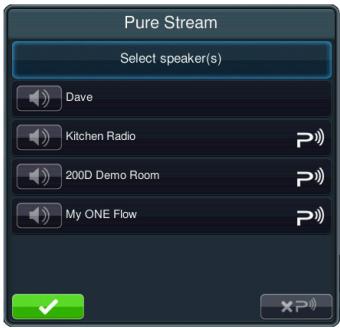
Streaming from a Pure Jongo compatible device
Refer to your Pure Jongo compatible device user guide for more information on streaming to Sensia. For more information on Jongo compatible Pure music streaming and radio systems visit www.pure.com.
Streaming to a Pure Jongo compatible device
Carry out the following to stream internet and digital radio or audio from your network/USB device from Sensia to a Pure Jongo compatible device.
- Tap Source to display the Source menu.
- Tap the audio source that you want to stream to your Jongo compatible device (Pure Connect, Digital radio or Network/USB media).
- Ensure that you are in Play mode by tapping the Play icon in the information panel.
- Tap the Pure Stream icon in the icon bar to open the Pure Stream menu.
- Tap the devices that you want to stream the Sensia audio/digital internet radio to.
Any audio or radio playing on Sensia will now be streamed to the specified devices.
Adjusting the volume on Pure Jongo compatible devices from Sensia
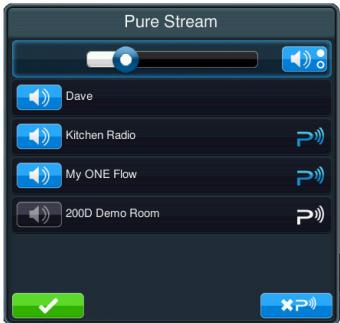
You can adjust the volume on the Jongo compatible devices you are streaming to on an individual basis or collectively as a group. By default, Sensia adjusts the volume on all connected Pure Jongo compatible devices as a group.
To adjust the volume on Pure Jongo compatible devices as a group:
-
Toggle the buttons next to the devices you want to adjust the volume of so that they turn blue.
-
Use the volume controls on the top of Sensia or the slider control to adjust the volume.
To adjust the volume on a single Pure Jongo compatible device:
- Toggle the buttons next to the device you want to adjust the volume of so that it displays
- Use the volume slider control next to the device to adjust the volume.
Disconnecting Pure Jongo compatible devices from Sensia
Tap the icon to disconnect any streaming Pure Jongo compatible devices from Pure Stream.
Setting alarms and timers
Setting an alarm
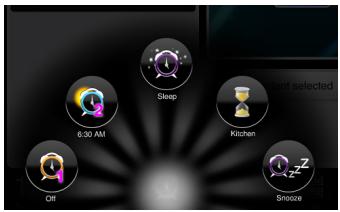
Sensia has two alarms. The alarms can tune into a digital or FM radio station, an internet radio station via Pure Connect or sound a tone.
- Tap Alarms to display the Alarms menu.
- Tap the Alarm 1 or Alarm 2 icon.
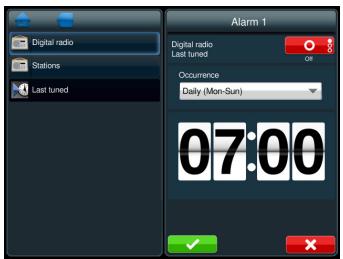
- Tap to select the source you wish to play when the alarm is activated. For all sources except digital radio you can select from a favourite or the last item you listened to. For digital radio alarms, you can choose the last station you listened to, or any station from the list.
- Tap the button at the top to toggle the alarm on or off.
- Tap the Occurrence drop-down menu to specify the alarm frequency.
- Adjust the alarm time by tapping on the top and bottom of the clock to flip through minutes and hours.
- To exit and save the alarm, tap . To exit and discard all changes tap × .
Note: Any alarms that are set will not go off if Sensia is being powered by a ChargePAK.
Switching an alarm on/off
- Tap Alarms to display the Alarm icons.
- Tap the Alarm 1 or Alarm 2 icon.
- Tap the button at the top to toggle the alarm on or off
- The alarm icon at the bottom of the screen will change to indicate that the alarm has been set.
Skipping an alarm
Tap the button at the top right of the screen until the skip icon is shown to keep the alarm active but skip to the next occurrence of the alarm, e.g., If a public holiday is occurring the following day and you do not want the alarm to go off, you can tap Skip so that the alarm does not sound the next day and automatically resumes the following day.
Snoozing a sounding alarm
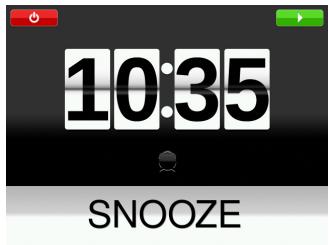
- Tap Snooze to snooze a sounding alarm for the specified time (default 9 mins). See below for more information on changing the snooze time. The snooze icon will display on the screen.
- The alarm will reactivate after the snooze time has expired.
Cancelling a sounding alarm
Tap the red button that appears on the screen to cancel the alarm and put Sensia in Sleep mode.
Tap the green button that appears on the screen to cancel the alarm and switch on Sensia.

Changing the snooze time
- Tap Alarms to display the Alarms menu.
- Tap the Snooze icon.
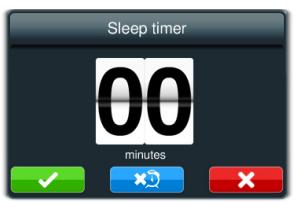
- Adjust the snooze time by tapping on the top and bottom of the snooze timer to select the required number of minutes.
- Tap to start the timer.
Setting the sleep timer
You can use the sleep timer to put Sensia in sleep mode after a specified period of time.
Note: If Sensia is running on a ChargePAK, Sensia will turn off after the specified sleep time.
- Tap Alarms to display the Alarm icons.
- Tap the Sleep icon.
- Adjust the sleep time by tapping on the top and bottom of the sleep timer to select the required number of minutes.
- Tap to save the settings.
Cancelling the sleep timer
Tap the button to cancel the sleep timer.
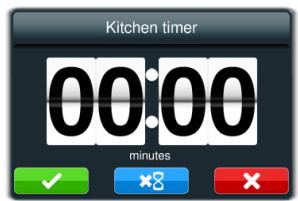
Setting the kitchen timer
You can use the kitchen timer to make Sensia sound a tone after a specified period of time.
- Tap Alarms to display the Alarms menu.
- Tap the Kitchen icon.
- Adjust the kitchen timer by tapping on the top and bottom of the kitchen timer to select the required number of minutes.
- Tap to start the timer.
Cancelling the kitchen timer
Tap the × 8 button to cancel the kitchen timer.
Using the auxiliary input
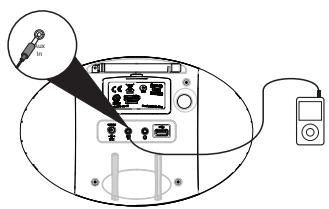
Connect an auxiliary device
Connect the line out or headphone socket of your auxiliary device to the Aux In socket on your Sensia using a suitable cable.
Selecting the auxiliary input
- Tap Source to display the Source menu.
- Tap Auxiliary input.
- The Auxiliary input screen will display.

Autotune
You can use the autotune function to automatically scan for new digital radio stations and remove inactive ones.
Note: This setting is only visible when Digital Radio is selected as the audio source.
- Tap Settings to display the Settings menu.
- Tap the Autotune icon.
- The number of stations found will be displayed during the autotune.
- When the autotune has finished, Sensia will tune to the last station that you were listening to.
Display
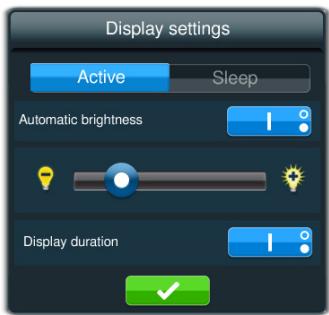
You can use the display settings to change how the screen appears when Sensia is on and in sleep.
- Tap Settings to display the Settings menu.
- Tap the Display icon.
- Tap Active to change the brightness level when Sensia is on. To change how the screen appears when Sensia is in Sleep mode, tap Sleep.
- Tap the button to toggle Automatic brightness on or off
- Use your fingertip to slide the Brightness slider to the left and right.
- Tap the button to toggle the Display duration to on or timed
- Tap to save the brightness setting.
Language
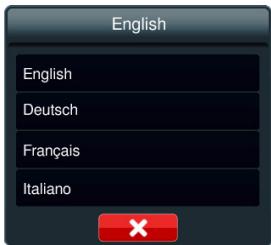
To change the language:
- Tap Settings to display the Settings menu.
- Tap the Language icon.
- Tap the required language.
Changing time/date settings
The time and date on Sensia are automatically set by Pure Connect or the FM or digital radio signal. You can manually change the time format and the time zone.
Changing the time format/time zone
- Tap the time to display the time/date menu.
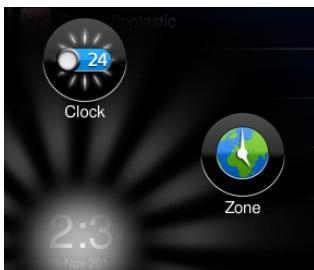
- Tap the Clock 24 icon to toggle between 12 and 24 hours.
- Tap the Zone icon to display the time zone menu.
- Scroll down to the region you are in and tap to confirm.
- Scroll to your nearest city/country and tap to confirm.
Note: Any time or date updates received by an FM or digital radio broadcast will override manual settings
Advanced settings
Manual Wi-Fi setup
- Tap Settings.
- Tap Network.
- Tap the icon next to Network type so that is displayed.
- A summary of your wireless settings will display on Sensia.
- Tap the Manual button.
- Enter the SSID of your network in the Network box.
- Select the encryption type of your wireless network from the Encryption drop-down list below.
Note: Please check your wireless router configuration to find out the type of encryption that is being used on your wireless network.
- Tap the button next to IP setup to choose the method that you want to use for IP setup. To use DHCP, toggle the button so that DHCP is displayed and tap and proceed to the next step. To use a static IP address, toggle the button until is displayed and tap See page 25 for more information on how to configure a static IP address.
- Wait while Sensia connects to the network.
- Sensia will display the home screen after connecting to the wireless network.
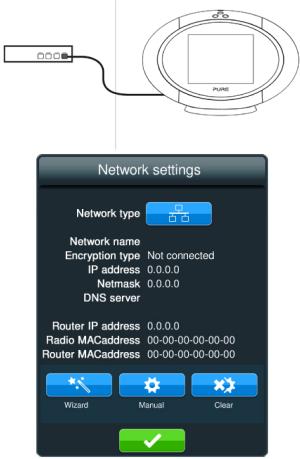
Connecting Sensia to the Internet with an Ethernet cable
- Connect the USB Ethernet adapter to the USB connector on the back of Sensia.
- Connect an Ethernet cable to the USB adapter to an Ethernet port on your router.
- Tap Network to display the Network Settings menu.
- Tap the icon next to Network type so that is displayed.
- A summary of your Ethernet settings will display on Sensia.
- To setup the Ethernet connection on Sensia with a wizard, tap the Wizard button and follow the steps. To setup the Ethernet connection manually, tap the Manual button and configure a static IP address as described overleaf
- Tap the button when you have finished setting up the Ethernet settings.
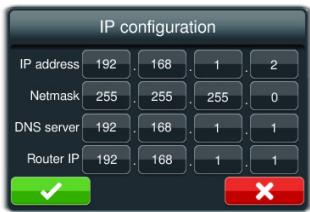
Static IP address configuration
- Enter the IP address that you want to assign to Sensia into the IP Address box.
- Enter the subnet mask that you want to assign to Sensia into the Net mask box.
- Enter the IP address of the DNS server being used on your network.
- Enter the IP address of your network's default gateway into the Router IP box.
- Tap to save any changes made.
Clearing network settings
If you are having problems with your network connection, you may need to reset your network settings. To do this, carry out the following:
-
Tap the Clear icon.
-
The Clear network settings dialogue box will appear. Tap clear the network settings back to default. Tap X to retain the current network settings.
Updating the software
Software update options
If an automatic software update is available for Sensia, a message will appear on the screen informing you that Sensia will update to the latest version. To proceed with the upgrade, tap the OK button.
Note: In order for automatic software updates to work, Sensia will need to be connected to your network.
Note: Do not switch off Sensia while a software update is taking place.
Sensia can also be updated manually by using either the network connection or the USB port.
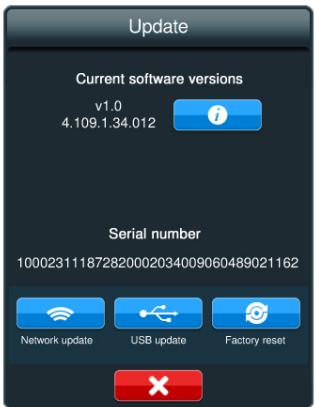
Updating the software using the network connection
- Tap Settings to display the Settings menu.
- Tap the Update icon.
- Tap the Network update icon.
- Sensia will connect to the internet to search for available software updates.
- If an update is available, Sensia will begin to update the software.
Updating the software using the USB port
Contact Pure technical support: (http://support.pure.com) for more information on how to update Sensia to the latest software version.
Displaying details on the current software version
To display more information about the software version that is currently loaded on Sensia:
- Tap Settings to display the Settings menu.
- Tap the icon.
- A dialogue box will open, which summarises the main features/fixes of the software version that is currently loaded on Sensia.
- Tap X to return to the Settings menu.
Installing the ChargePAK F1
- Switch Sensia off and disconnect from the mains power supply.
- Open the battery compartment.
- Position ChargePAK so that the contacts are facing the battery compartment and the tab is at the top and insert ChargePAK into the battery compartment.
- Replace the battery cover and connect your product to a power supply.
- ChargePAK will begin charging.
Note: When charging your ChargePAK for the first time or after an extended period of inactivity it is recommended that it is charged for around 24 hours to ensure full battery power. If ChargePAK is completely flat, there may be a slight delay before the battery charging indicator is displayed.
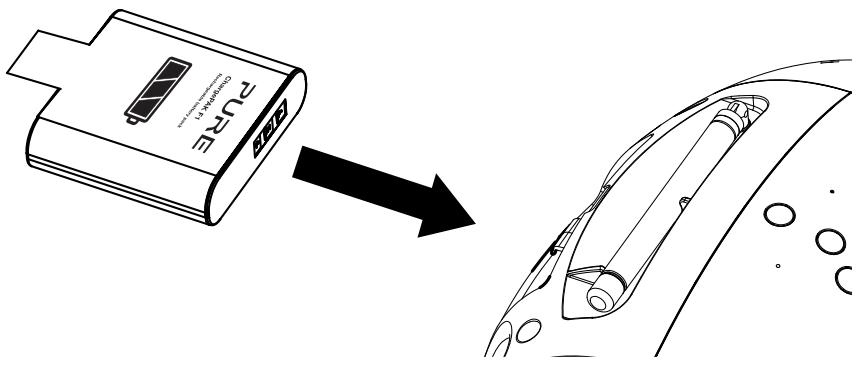
Note: It is normal for your ChargePAK to get warm, especially during charging. Your ChargePAK will give years of trouble-free use under normal circumstances, but like all rechargeable batteries its efficiency will gradually reduce with age.
Important: Sensia can only be powered with a Pure ChargePAK F1 and is not compatible with any other batteries, either disposable or rechargeable, or any other ChargePAK model.
Technical specifications
Radio Digital (DAB/DAB+/DMB-Radio), FM and internet radio (Wi-Fi).
Network Wi-Fi: 802.11b and 802.11g supported with WEP and WPA/WPA2 encryption.
Ethernet (requires optional adapter): 10/100Mbps
Media streaming Audio codecs supported include WMA (Standard V9), AAC, MP3, MP2. Media streaming requires UPnP server or PC/MAC running UPnP server software (supplied upon registration to connect.pure.com).
Speakers Two full-range 3" drive units.
Audio power output 30W RMS.
Input connectors USB 2. 14.3V DC power adapter socket (230/110V supplied) ChargePAK connector.
3.5mm Line-in for auxiliary devices.
Output connectors 3.5mm headphone socket.
Controls 5.7" touchscreen display, standby button, mute button, volume up button, volume down button.
Remote Infrared remote control.
Presets 30 digital, 30 FM and unlimited internet radio favourites.
Display 5.7" Capacitive sensing, 64k colour, 640 x 480 pixel TFT display.
Mains power supply 230/110V AC to 14.3V DC external power adapter.
ChargePAK Optional ChargePAK F1 in-unit rechargeable battery pack.
Dimensions 166mm high x 280mm wide x 180mm deep (excluding stand).
Weight 1.9kg (excluding ChargePAK).
Aerial Captive telescopic aerial; internal Wi-Fi aerial.
Approvals CE marked. Hereby, Pure, declares that this Band II LPD device is in compliance with the essential requirements and other relevant provisions of Directive 1999/5/EC.
The Declaration of Conformity may be consulted at http://www.pure.com/R&TTE-DoC. ETSI EN 300 401 compliant.
Australian C-Tick N1600 and Electrical Safety.
Warranty information
Imagination Technologies Ltd. warrants to the end user that this product will be free from defects in materials and workmanship in the course of normal use for a period of two years from the date of purchase. This guarantee covers breakdowns due to manufacturing or design faults; it does not apply in cases such as accidental damage, however caused, wear and tear, negligence, adjustment, modification or repair not authorised by us. Should you have a problem with your unit please contact your supplier or contact Pure Support at http://support.pure.com.
Disclaimer
Imagination Technologies Limited makes no representation or warranties with respect to the content of this document and specifically disclaims any implied warranties of merchantability or fitness for any particular purpose. Further, Imagination Technologies Limited reserves the right to revise this publication and to make changes in it from time to time without obligation of Imagination Technologies Limited to notify any person or organization of such revisions or changes.
Trademarks
Sensia 200D Connect, Pure, the Pure logo, Imagination Technologies, and the Imagination Technologies logo are trademarks or registered trademarks of Imagination Technologies Limited. Version 2 March 2013.
Copyright
Copyright © 2013 Imagination Technologies Limited. All rights reserved. No part of this publication may be copied or distributed, transmitted, transcribed, stored in a retrieval system, or translated into any human or computer language, in any form or by any means, electronic, mechanical, magnetic, manual or otherwise, or disclosed to third parties without the express written permission of Imagination Technologies Limited.
Disposal of Waste Electrical & Electronic Equipment
This symbol on the product or on its packaging indicates that this product should not be treated as household waste. Instead it should be handed over to a suitable collection point for the recycling of electrical and electronic equipment. By ensuring this product is disposed of correctly, you will help prevent potential negative consequences for the environment and human health, which could otherwise be caused by inappropriate waste handling of this product. The recycling of materials will help to conserve natural resources. For more detailed information about recycling of this product, please contact your local council office, your household waste disposal service or the shop where you purchased the product.
Pure Warranty Statement for Australia
This statement replaces any reference to warranty which may be contained elsewhere within this manual.
What do you need to do now?
Option 1: You can register your purchase on-line at https://www.pure.com/au/register/register.asp
Option 2: Or you can do nothing other than keep your proof of purchase as evidence of your purchase date. This proof of purchase would need to be presented if warranty service was ever required.
If you have any questions about your warranty you can call us toll free .... 1800 988 268
What's covered by this warranty?
- Pure agrees to refund, repair or replace, at your election, without charge to you, any part found to be defective during the warranty period.
- If equipment has been used according to its accompanying instruction manual and is used in a domestic situation, a two year warranty period applies (excludes rechargeable ChargePAK where fitted. A one year warranty period applies to all ChargePAKs).
How do you make your claim?
Call 1800 988 268 for instructions on how to return your Pure product for warranty service or go to http:// support.pure.com/au/ and complete the contact us form.
What's NOT covered by this warranty?
Under this express warranty Pure will not be liable for loss or damage of any kind whatsoever, whether direct, indirect, incidental, consequential or otherwise.
- Replacement of parts due to normal wear and tear
- Products with serial number defacement, modification or removal
- Water damage or corrosion caused by dampness
- Any damage or deterioration due to shipment
- Any product which has been subjected to misuse, abuse or accident
Australian consumers - The benefits to the consumer given by this express warranty are in addition to other rights and remedies of the consumer under a law in relation to the goods or services to which this warranty relates. Our goods come with guarantees that cannot be excluded under the Australian Consumer Law, You are entitled to a replacement or refund for a major failure and for compensation for any other reasonably foreseeable loss or damage. You are also entitled to have the goods repaired or replaced if the goods fail to be of acceptable quality and the failure does not amount to a major failure.
Pure is distributed and supported in Australia by PIONEER ELECTRONICS AUSTRALIA PTY LTD, 5 ARCO LANE, HEATHERTON, VICTORIA, 3202.
Sensia 200D Connect
EN
DEUTSCH
Australian C-Tick N1600 and Electrical Safety.
Garantieerklarung

m = 311
25 Installation of ChargePAK F1
Visingen Now Playing
Installation at ChargePAK F1
Australian C-Tick N1600 and Electrical Safety.
Garantie-informatie
Imagination Technologies Limited
Home Park Estate
Kings Langley
Herts,WD4 8LZ
United Kingdom
http://support.pure.com
Pure
Friedrich-Ludwig-Jahn
StraBe 2-14
64589 Stockstadt/Rhein
Germany
http://support.pure.com/de
Pure Australasia Pty Ltd
PO Box 5049
Wonga Park
Victoria 3115
Australia
sales.au@pure.com
http://support.pure.com/au
PURE
www.pure.com
connect.pure.com
www.facebook.com/pure
- Safety Instructions
- Getting started
- Connecting Sensia to your network
- Changing Sensia viewing modes
- Listening to digital or FM radio
- Listening to Pure Connect content
- Pure Music
- Pure Tag
- Media Panel options
- Listening to audio from a USB memory stick
- Streaming audio from a Media Server
- Controlling audio playback
- Recording radio programmes
- Using the Pure Jongo wireless multiroom function on Sensia
- Setting alarms and timers
- Basic settings
- Advanced settings
- Updating the software
- Installing the ChargePAK F1
- Technical specifications
- Pure Warranty Statement for Australia
- Getting started
- Introduction
- Network setup
- Touchscreen interface
- Options Lists
- Buttons
- Controls and connectors
- Control buttons
- Remote Control
- Standby
- Mute
- and
- Source
- Favourites
- Record
- Tag
- Switching on Sensia for the first time
- Connecting Sensia to your network
- Preparing Sensia for Wi-Fi Setup
- Using the Wi-Fi wizard
- Changing Sensia viewing modes
- Play mode
- Listening to digital or FM radio
- Selecting digital/FM radio
- Changing digital stations
- Changing FM stations
- Saving your favourite stations
- Selecting a favourite FM station
- Selecting a favourite digital station
- Listening to Pure Connect content
- Selecting Internet radio
- Searching for internet stations
- Name
- Genre
- Language
- Country
- Quality
- Using Quick Jump
- Saving your favourites stations/Pure Connect favourites
- Listening to other internet content
- Listen again
- Podcasts
- Pure Sounds
- Pure Music
- Selecting a favourite internet station
- Accessing Pure Music on Sensia
- My Tracks
- Catalogue
- By playlist
- Pure Tag
- Media Panel options
- Accessing Facebook, Twitter, Picasa and more
- Changing settings and getting help
- Displaying a slide show of your pictures from a media server
- Adjusting slide show settings
- Listening to audio from a USB memory stick
- Streaming audio from a Media Server
- Controlling audio playback
- Recording radio programmes
- Instant recordings
- Timed recordings
- Using the Pure Jongo wireless multiroom function on Sensia
- Streaming from a smartphone or tablet
- Selecting a Pure Jongo compatible device in the Pure Connect app
- Streaming from a Pure Jongo compatible device
- Streaming to a Pure Jongo compatible device
- Adjusting the volume on Pure Jongo compatible devices from Sensia
- Disconnecting Pure Jongo compatible devices from Sensia
- Setting alarms and timers
- Setting an alarm
- Switching an alarm on/off
- Skipping an alarm
- Snoozing a sounding alarm
- Cancelling a sounding alarm
- Changing the snooze time
- Setting the sleep timer
- Cancelling the sleep timer
- Setting the kitchen timer
- Cancelling the kitchen timer
- Using the auxiliary input
- Connect an auxiliary device
- Selecting the auxiliary input
- Autotune
- Display
- Changing time/date settings
- Changing the time format/time zone
- Advanced settings
- Manual Wi-Fi setup
- Connecting Sensia to the Internet with an Ethernet cable
- Static IP address configuration
- Clearing network settings
- Updating the software
- Software update options
- Updating the software using the network connection
- Updating the software using the USB port
- Displaying details on the current software version
- Installing the ChargePAK F1
- Technical specifications
- Warranty information
- Disclaimer
- Trademarks
- Copyright
- Disposal of Waste Electrical & Electronic Equipment
- Pure Warranty Statement for Australia
- What do you need to do now?
- What's covered by this warranty?
- How do you make your claim?
- What's NOT covered by this warranty?
- Sensia 200D Connect
- Garantieerklarung
- Installation of ChargePAK F1
- Visingen Now Playing
- Installation at ChargePAK F1
- Garantie-informatie
- Pure
- Pure Australasia Pty Ltd
Brand : PURE
Model : SENSIA 200D CONNECT
Category : Digital Radio