
CRF 1600 - Laser rangefinder LEICA - Free user manual and instructions
Find the device manual for free CRF 1600 LEICA in PDF.

| Product type | Laser rangefinder |
| Brand | LEICA |
| Model | CRF 1600 |
| Magnification | 7x |
| Objective diameter | 24 mm |
| Exit pupil | 3.4 mm |
| Field of view | 115 m at 1,000 m / 6.5° |
| Maximum range | Approx. 1,460 m |
| Minimum range | Approx. 10 m |
| Measurement accuracy | ±1 m up to 500 m, ±2 m up to 1,000 m, ±0.5% beyond |
| Diopter adjustment | ±3.5 dpt |
| Power supply | Lithium battery 3V type CR2 |
| Battery life | Approx. 2,000 measurements at 20°C |
| Dimensions (L x H x D) | 75 x 34 x 113 mm |
| Weight (with battery) | Approx. 220 g |
| Operating temperature | -10 to 55°C |
| Storage temperature | -15 to 75°C |
| Water resistance | 30 minutes at 1 m depth |
| Housing material | Carbon fiber reinforced plastic, matte lacquered / die-cast aluminum |
| Laser type | Class 1, invisible, eye-safe |
| Laser beam divergence | Approx. 0.5 x 2.5 mrad |
| Maximum measurement time | Approx. 0.9 s |
| Display | 4-digit LED |
| Measurement units | Metric (m/cm) or imperial (yd/in) |
| Included accessories | Battery, carrying strap, Cordura case, warranty card |
| Care and cleaning | Clean the lenses with a damp cloth then a chamois leather. Do not use alcohol or chemicals. Do not open the device. |
| Safety | Class 1 laser, eye-safe. Avoid looking directly into strong light sources. Do not throw batteries into fire. |
| Spare parts | Eyecup, carrying strap available from Leica customer service. |
Frequently Asked Questions - CRF 1600 LEICA
User questions about CRF 1600 LEICA
0 question about this device. Answer the ones you know or ask your own.
Ask a new question about this device
Download the instructions for your Laser rangefinder in PDF format for free! Find your manual CRF 1600 - LEICA and take your electronic device back in hand. On this page are published all the documents necessary for the use of your device. CRF 1600 by LEICA.
USER MANUAL CRF 1600 LEICA
1 Secondary button
2 Main button
3 Eyecup with
a. Dioptric scale
4 Eyelet for carrying cord
5 Eyepiece
6 Battery compartment cover
7 Battery compartment
8 Lens
9 Laser transmission optics
SCOPE OF DELIVERY
- Range finder
- 1 lithium battery 3V, type CR2
- Carrying cord
Cordura case
Warranty card
LEICA RANGEMASTER CRF 1600
Order no. 40 528
Warning
As with any binoculars, to prevent eye injury avoid looking directly at bright sources of light when using your LEICA RANGEMASTER CRF 1600.
FOREWORD
Dear Customer,
All over the world, „Leica“ is synonymous with top quality precision engineering with extreme reliability and a long life.
We wish you a great deal of enjoyment and success with your new LEICA RANGEMASTER CRF 1600.
This range finder emits invisible infrared impulses that are not harmful to the eyes and uses an integrated microprocessor to calculate the distance to an object from the reflected signal component. In addition, it detects environmental and usage conditions, which it combines with the measured range to determine and indicate corrections to the holdover to obtain different selectable ballistic curves.
It features an outstanding scope with 7 × magnification, which enables a reliable bearing even under difficult conditions, and is easy to operate and functional.
To ensure that you get the best out of this high-quality and versatile laser range finder, we recommend reading these instructions first.
CONTENTS
Nomenclature 18
Scope of delivery 18
Foreword 19
Disposal of electrical and electronic equipment 21
Attaching the carrying cord 22
Inserting and changing the battery 22
Battery charge level 23
Use with and without glasses 24
Dioptric compensation 24
Setting the unit of measure 25
Range finding 26
Scan mode 26
Operating range and accuracy 27
Display of atmospheric conditions 28
Holdsover display 28
Setting the zeroing range 29
Determining the ballistic curve 30
Setting the ballistic curve 30
Indication of set ballistic curve and zeroing range 31
Care/cleaning 32
Spare parts 32
Troubleshooting 33
Technical data 34
Leica Academy 35
Leica on the Internet 35
Leica Information Service 35
Leica Customer Service 35
Appendix / Ballistic tables 146
DISPOSAL OF ELECTRICAL AND ELECTRONIC EQUIPMENT
(Appplies within the EC, and for other European countries with segregated waste collection systems)
This device contains electrical and/or electronic components and should therefore not be disposed of in general household waste! Instead it should be disposed of at a recycling collection point provided by the local authority. This costs you nothing. If the device itself contains removable batteries or rechargeable batteries, these should first be removed and, if necessary, properly disposed of (refer to the specifications in the manual for your device).
More information on this subject can be obtained from your local authority, your disposal company or the shop where you bought this product.
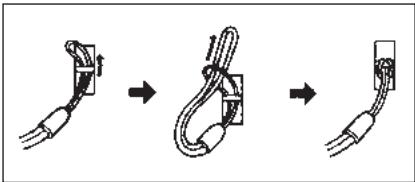
ATTACHING THE CARRYING CORD
Feed the small loop on the carrying cord through the eyelet (4) on the housing of the LEICA RANGE-MASTER CRF 1600. Then thread the end of the cord through the small loop and pull tight, so that the resulting loop is securely around the eyelet on the housing.
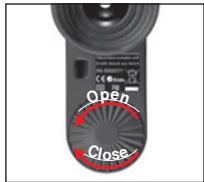
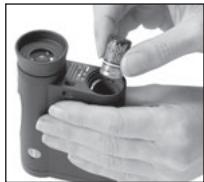
INSERTING AND CHANGING THE BATTERY
The LEICA RANGEMASTER CRF 1600 is powered by a 3 Volt lithium battery (e.g. Duracell DL CR2, Ucar CR2, Varta CR2, or other CR2 types).
- Open the cover (6) on the battery compartment (7) by turning it anticlockwise.
- Insert the battery so that the positive contact goes in first (as shown by the markings in the battery compartment).
- Close the cover again by turning it clockwise.
Notes:
- Cold conditions impair the battery performance. At low temperatures the LEICA RANGEMASTER CRF 1600 should be kept as close to the body as possible and a new battery should be installed.
- If the LEICA RANGEMASTER CRF 1600 will not be used for a long period, the battery should be removed.
- Batteries should be stored in a cool dry place.
Attention:
- Batteries should never be put in a fire, heated, recharged, taken to pieces or broken apart.
- Used batteries may not be disposed of as normal, household waste as they contain toxic materials that harmful to the environment. To ensure that they are properly recycled, they should be returned to the dealer or disposed of as special waste (at a collection point).
BATTERY CHARGE LEVEL
A weak battery is indicated by a flashing measured value and target mark display. Once the display starts flashing, at least another 100 measurements are possible, with a gradually reducing range.
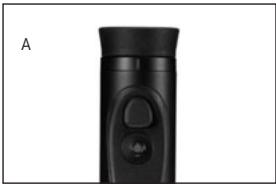
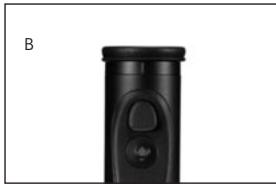
USE WITH AND WITHOUT GLASSES
Users who do not wear glasses can leave the rubber eyecup (3) raised (Figure A, as supplied). This position gives the correct distance between the LEICA RANGE-MASTER CRF 1600 and the eye.
When using with glasses, the eyecup should be pressed down (Figure B).
DIOPTRIC COMPENSATION
Dieptric compensation enables you to adjust the sharpness of the target mark to the optimum value for you. Simply aim the LEICA RANGEMASTER CRF 1600 at a distance object and adjust the target mark until it has optimum sharpness by turning the eyecup (3). The target mark appears when you press the main button (2). You can read the set value on the "+" or "-" scale (3b) on the eyecup.
Dieptric compensation is available for vision defects of up to ± 3.5 diopters.
SETTING THE UNIT OF MEASURE
The LEICA RANGEMASTER CRF 1600 can be set to metric units or the Imperial units more commonly used in the USA, i.e. either meters/Celsius/millibars or yards/Fahrenheit/PSI (pounds per square inch) for distance/temperature/atmospheric pressure respectively. This setting also determines the holdover display (in centimeters or inches) and the available ballistic curves (see page 148).
Setting:
- Briefly press the main button (2 / < 3s)
- The target mark appears.
- Press and hold the secondary button (1 / ≥ 3s) .
- S ld appears below the target mark. The display flashes to indicate that a setting can be made.
Note:
For all settings: The relevant displays disappear 3 seconds after you last press one of the two buttons. The previously saved settings/values are retained.
- Briefly press the secondary button twice.
EU US appears below the target mark.
- Briefly press the main button.
- EUdisappears, and the target mark and US continue to flash.
- Select your preferred units of measure by (repeatedly) pressing the secondary button, US for Imperial as used in the USA, or EU for metric.
The relevant displays continue to flash.
Note:
The current setting can always be seen in the display - if metric values are selected, a dot appears to the bottom right of the target mark.
6. Save your setting by briefly pressing the main button.
- The saved setting and the target mark light up continuously for 2 seconds for confirmation and then disappear.
RANGEFINDING
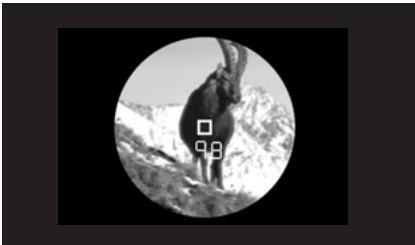
To measure the distance to an object, you must aim directly at it. To do this, activate the target mark by pressing the main button (2) once.
When you release the button, the target mark remains lit for around another 8 seconds. With the button held down, the target mark remains lit continuously. While it is lit, aim at the object and press the main button again to measure the range, and the measured value is then displayed. The target mark disappears briefly during the measurement. As long as the target mark remains lit, you can carry out another measurement at any time by pressing the main button again.
If the distance to the object is less than 10 meters, the measuring range is exceeded or the object is not sufficiently reflective, _ appears in the display. When the display disappears, the LEICA RANGEMASTER CRF 1600 shuts down automatically.
SCAN MODE
The LEICA RANGEMASTER CRF 1600 can also be used for continuous measurements: Holding down the main button (2) the second time it is pressed switches the unit to scan mode after around 2.5s and it then performs continuous measurements. This can be seen by a change in the display: Around every 1 second, a new measured value is shown. Scan mode is particularly useful for measuring the range to small or moving targets.
Notes:
- In scan mode the ballistic correction value (see p. 31) is only displayed after the last measurement, not before.
- Because of the continuous measurements, power consumption is greater in scan mode than for single measurements.
OPERATING RANGE AND ACCURACY
The measuring accuracy of the LEICA RANGEMASTER CRF 1600 is up to ± 1 meter/yard. The maximum range is achieved with well reflecting target objects and a visual range of around 10km / 6.2 miles. The measuring range is influenced by the following factors:
| Range | Longer | Lower |
| Color | White | Black |
| Angle to lens | Perpendicular | Acute |
| Object size | Large | Small |
| Sunlight | Low (cloudy) | High (midday sun) |
| Atmospheric conditions | Clear | Hazy |
| Object structure | Homogeneous (wall of building) | Non-homogeneous (bush, tree) |
In sunlight and with good vision, the following ranges and accuracies can be achieved:
Range approx. 10m / yds to 1460m / 1600yds
Accuracy approx. ± 1m / yds up to 500m / yds approx. ± 2m / yds up to 1000m / yds approx. ± 0,5% over 915m / 1000yds
DISPLAY OF ATMOSPHERIC CONDITIONS
For accurate calculation of the impact point (see following section), the LEICA RANGEMASTER CRF 1600 also determines three of the most important general conditions when measuring the range: the inclination of the unit, the temperature and the atmospheric pressure. You can display the relevant values at any time.
To do this, briefly press the secondary button (1) when the target mark or the range is displayed.
- Below the target mark (or instead of the range), the following will appear in turn for around 2 seconds each:
Angle of inclination
- Temperature
- Atmospheric pressure
HOLDOVER DISPLAY
If required, the LEICA RANGEMASTER CRF 1600 will display the corresponding holdover after the measured range. When used for hunting/shooting, this enables the unit to provide valuable information for the shooter in firing the most accurate shot possible. In addition to the range, the calculation is based on the general conditions discussed in the previous section and the ballistic curve you have specified.
Notes:
- The displayed holdover value / correction value (see also p. 31) is always shown in cm for a range of 100m or in inches for 100 yards.
The correction value for the range actually measured is automatically converted to 100m / 100 yds. The major advantage of this is that the correction value can be set directly on the riflescope, i.e. without elaborate prior conversion.
Example:
If IBS / H7 is displayed and you use a rif scope on which an adjustment by one graduation (click) results in a correction of 1cm/100m, you can make the required correction easily by turning by 7 graduations upwards. The same applies for ballistic reticles.
- Holdover corrections for ranges above 500m are not shown due to the overall uncertainty factors.
Important:
The holdover display is explicitly intended as a guide. Regardless of whether you use this information, the final assessment of the hunting situation and firing of an expert shot is, as always, your responsibility alone.
-
Briefly press the main button (2 / < 3s)
-
The target mark appears.
-
Press and hold the secondary button (1 / ≥ 3s) .
-
SId appears below the target mark. The display flashes to indicate that a setting can be made. This also applies to all subsequent displays up to saving the setting in step 5.
-
Briefly press the main button.
The display changes to 100.
- Briefly pressing the secondary button several times selects the required zeroing range.
-100[m],
-200[m] or
- GEE [m], or
- 100 [y] or
-200[y]
-
Save your setting by briefly pressing the main button.
-
The saved setting is displayed for 2 s as confirmation and then disappears.
DETERMINING THE BALLISTIC CURVE
For precision adjustment of the holdover calculation to different calibers, bullet types and weights, you can choose from 12 different ballistic curves. These differ in terms of the zeroing range to which the riflescope on the weapon is adjusted. In the appendix, you will find five corresponding tables (see p. 146), three for zeroing ranges in meters and two in yards. In the table corresponding to the set zeroing range, find the ballistic curve that is the closes to the impact point data provided by the ammunition manufacturer.
Example:
The rifle is adjusted to 100 meters, therefore Table 1 is applicable. Meanwhile, -15.0cm at 200m is specified as the impact point for the ammunition used. In the corresponding column, this is close to the value 14.5cm in row EU7 - this is therefore the appropriate ballistic curve.
SETTING THE BALLISTIC CURVE
-
Briefly press the main button (2 / < 3s)
-
The target mark appears.
-
Press and hold the secondary button (1 / ≥ 3s) .
-
S ld appears below the target mark. The display flashes to indicate that a setting can be made. This also applies to all subsequent displays up to saving the setting in step 6.
-
Briefly press the secondary button.
-
The display changes to BRILL(istics).
-
Briefly press the main button.
The display changes to
$$ \begin{array}{l} - E U 1 o r \ - U S 1. \ \end{array} $$
-
Press the secondary button several times to select the required ballistic curve, i.e.
-
EU1 to EU12 or
- US 1 to US 12, or,
if you want the range to be displayed without the holdover correction,
-Off.
-
Save your setting by briefly pressing the main button.
-
The saved setting is lit continuously for 2 s as confirmation and then disappears.
If a ballistic curve is set, after each range measurement the range value is first displayed for 2 s, then the calculated holdover for 6 s. This display is made up of a figure (for centimeters or inches) and H or L (for high or low).
Examples:
L (for an EU ballistic curve) means that you must hold 1cm lower to shoot accurately
4H (for a US ballistic curve) means that you must hold 4 inches higher to shoot accurately.
INDICATION OF SET BALLISTIC CURVE AND ZEROING RANGE
If you want to check your settings, e.g. because of a changed hunting situation or a long time between uses, you can quickly display the 2 values at any time.
To do this, briefly press the secondary button twice when the target mark or the range is displayed.
-
Below the target mark (or instead of the range), the following will appear in turn for around 2s each:
-
The set ballistic curve (see p. 30)
- The set zeroing range (see p. 29)
CARE/CLEANING
Your LEICA RANGEMASTER CRF 1600 does not require any special care. Coarse particles of dirt such as sand should be removed with a soft brush or blown away. Marks such as fingerprints on the front lens and eyepiece lenses can be cleaned with a damp cloth and then wiped off with a soft, clean leather or dust-free cloth.
Important:
Do not exert heavy pressure when wiping highly soiled lens surfaces. Although the coating is highly abrasion resistant, it can be damaged by sand or salt crystals. The housing should be cleaned only using a damp leather. There is a risk of static building up if dry clothes are used.
Alcohol and other chemical solutions may not be used to clean the lens or the housing.
Every LEICA RANGEMASTER CRF 1600 has a serial number in addition to its model name. Note this number in your documentation for security.
Attention:
Never open the unit.
SPARE PARTS
Should you ever require spare parts for your LEICA RANGEMASTER CRF 1600, such as eyepiece cups or a carrying cord, please contact our Customer Service department (for address, see p. 35) or your national Leica agent (for addresses, see Warranty Card).
TROUBLESHOOTING...
| Problem | Cause | Remedy |
| The image is not circular when viewing. | a) The viewer's pupil is not located in the eyepiece exit pupil. b) The position of the eyecup does not match that for correct use with and without glasses. | a) Correct the eye position. b) Correct the adjustment: If wearing glasses, push down the eyecup; without glasses, it should remain raised (see p. 24). |
| Display not focused | Dioptric compensation not exact. | Repeat dioptric compensation see p. 24). |
| When measuring the range, the display shows _____. | a) Above or below measuring range b) Object is not sufficiently reflective | Refer to measuring range information (see p. 27) |
| Display flashes or no measurement is possible | Weak battery | Replace battery (see p. 22) |
TECHNICAL DATA
| Magnification | 7x |
| Lens diameter | 24 mm / 15/16in |
| Exit pupil | 3.4 mm / 9/64in |
| Twilight number | 13 |
| Geometric luminous intensity | 11.8 |
| Field of view (at 1,000m/yd) / | 115 m/yd / 6.5° |
| Exit pupil distance | 15 mm / 19/64in |
| Prism type | Roof-type |
| Lens coating on lenses | High Durable Coating (HDC™) and hydrophobic Aqua-Dura coating on external lenses |
| on prisms | Phase correction coating P40 |
| Diopter compensation | ±3,5 dpt. |
| Suitable for use when wearing classes | Yes |
| Operating temperature | -10 to 55°C / 14 to 131°F |
| Storage temperature | -25 to 75°C /-13 to 167°F |
| Water tightness | For 30 min: Impermeable to water pressure at up to 1 m/yd depth |
| Housing / chassis material | Carbon fiber reinforced plastic, soft lacquered / die-cast aluminum |
| Maximum range | approx. 1460 m / 1600 yds |
| Minimum range | approx. 10 m/yds |
| Measuring accuracy | approx. ±1 m/yd up to 500 m/yds / approx. ±2 m/yds up to 1000 m/yds / approx. ±0.5% over 915 m/1000 yds |
| Display/Unit of measure | 4-digit LED/choice of meters/centimeters or yards/inches |
| Battery | 3V lithium battery, type CR2 |
| Battery life | approx. 2,000 measurements at 20°C |
| Laser | Invisible, safe for eyes in compliance with EN and FDA Class 1 |
| Laser beam divergence | approx. 0.5 x 2.5 mrad |
| Maximum measurement duration | approx. 0.9 s |
| Dimensions (W x H x D) | approx. 75 x 34 x 113 mm / 2 61/64 x 111/32 x 4 29/64 in |
| Weight (with battery) | approx. 220 g / 7.76 oz |
LEICA ACADEMY
Our various seminars allow participants to discover the Leica values and the fascination of expert use of Leica products, all in a practical, contemporary form. The content of the courses are focused on use of the products and offer an array of practical ideas, information and advice. More details, along with the current seminar program, are available from:
Leica Camera AG
Leica Academy
Oskar-Barnack-Str. 11
D-35606 Solms
Current information about products, newly introduced products, events and the Leica company is available on our homepage on the Internet at:
http://www.leica-camera.us
http://www.leica-camera.co.uk
LEICA INFORMATION SERVICE
The Leica information service can provide you with an answer to any technical application questions relating to the Leica range either in writing, on the telephone or by e-mail.
Leica Camera AG
Information Service
PO Box 1180
D-35599 Solms
Leica AG's customer service centre, or the repair service of the Leica national offices, is available to assist you in maintaining your Leica equipment or in case of damage.
Leica Camera AG
Customer Service
This is a Class B product based on the standard of the Voluntary Control Council for Interference from Information Technology Equipment (VCCI). If this is used near a radio or television receiver in a domestic environment, it may cause radio interference. Install and use the equipment according to the instruction manual.
FCC NOTE: (U.S. ONLY)
This equipment has been tested and found to comply with the limits for a Class B digital device, pursuant to Part 15 of the FCC Rules. These limits are designed to provide reasonable protection against harmful interference in a residential installation. This equipment generates, uses, and can radiate radio frequency energy and, if not installed and used in accordance with the instructions, may cause harmful interference to radio communications. However, there is no
guarantee that interference will not occur in a particular installation. If this equipment does cause harmful interference to radio or television reception, which can be determined by turning the equipment
off and on, the user is encouraged to try to correct the interference by one or more of the following measures:
Reorient or relocate the receiving antenna.
- Increase the separation between the equipment and receiver.
- Connect the equipment into an outlet on a circuit different from that to which the receiver is connected.
- Consult the dealer or an experienced radio/TV technician for help.
FCC CAUTION:
To assure continued compliance, follow the attached installation instructions and use only shielded interface cables with ferrite core when connecting to computer or peripheral devices.
Any changes or modifications not expressly approved by the party responsible for compliance could void the user's authority to operate this equipment.
Trade Name: LEICA
Model: RANGEMASTER CRF 1600
Responsible party/
Support contact:
Leica Camera Inc.
1 Pearl Court, Unit A
Allendale, New Jersey 07401
Tel.: +1 201 995 0051 232
Fax: +1 201 995 1684
repair@leiacamerausa.com
THIS DEVICE COMPLIES WITH PART 15
OF THE FCC RULES.
Operation is subject to the following two conditions:
(1) This device may not cause harmful interference, and
(2) this device must accept any interference received, including interference that may cause undesired operation.
This Class B digital apparatus complies with Canadian ICES-003
LEICA RANGEMASTER CRF 1600

Tested To Comply
With FCC Standards
FOR HOME OR OFFICE USE
Chere clientele, cher client,
WAT MOET IK DOEN ALS...
Ybaxaemblnokynatelb,
Mapka Leica cnaBntcBO BCEM MPe BbCOaHnIMKaueCTBOM,TOUHOI MEXaHIOKOB CoTuHaNm C NCKJLOHTeBHOH NaEJeXHOCTbIO JdJIteBbIMcPcOKOMCJyX6bl.
MbI JeKaem Bam nOlyuNt b MHO r yOboNtCBnI aO6Bt cXoPoXIN xe3yNbTaTob C BaUIM HOBbIM daMbHomepOM LEICA RANGEMASTER CRF 1600.
3TOT dIaIbHomep OTCbIaET HeBUNIMbIe IJRA3a N 630anachbIe INHpaKpaChbIe IMNpyIbCbI c NOMOoJIbV BCTpoeHHOrO MKNpOnpoUeCCopa paCCuITbIbAET paCtOAHme DO o6BeKta NO OTPaXeHOMy CnHAlly. KPOME TOTO OH yUHTbIAE TcIOBNI OKpyKaHOSeI Cpebl N kCnLIyatauIN, 6bIaRdapar KOToPbIM (BMecTe C n3MepeHHbIM paCtOHNMy) ONpeJeTn OTobpaJaet COOTBCTBYOUYIO KOPpeKtuN ToCKn HABODKn DJIra Pa3JIuHbIX, BbIbIpaEMbIX 6aJIInCTnuecknx KpMBbIX.
JaHbI JaJIbHOpE OcHaueH 3aMeuTeJbHOJ,
7-n KpaTHoN npUeJIbHOJ ONTIKoH, KOtOPaR
No3BOJrAeBbIOJIbHTb TOUHbIe N3MepeHnra
daJe npN He6JIaONpRIbTHbIX yCNOBIAx;
XapaKTepriyETcF yHKUOHaJIbHOCTbIO n
npocToTOy npaBJIeHnra.
ДлгTOROуTObblBmORnnpaBnHOB NOLTB0BaTBCBCEMnBO3MOXHOCTAMN 3TOFO BbICOKOKaYeCTBeHORNOuYHBePcALBOHORO IaERpEOIaJIbHeMoHEMO, mIeKoMEHnyEm Bam ChauJaIpoUHTaB DAHHyIO HNCTpyKlNUO.
OJJIABJIEHNE
HaumehOBaHne deTaeIe 128
KoMnJIeKT noCTaBKn 128
PpeinCloBne 129
yTnIIN3aIaIyIeKtpnuecknxI 31
KpenennepeMeika 132
UctaHOBka n 3ameHa 6aTapeu 132
CTepeHb3apJa6aTapei 133
IcnoB3OBaHne c n 6e3 ouKOB 134
PerynipobKa dnoontprn 134
Hacpoika KeenaemoeinHnIcbln3MepeHnna 135
I3mepenhe paocToHHn 136
PexkIM ckaHnpOBaHnA 136
ДаьhoeТиЗМерЕнИ NToUHOCTb 137
HnDnKaIaTMOcΦepHbIX yCIOBNI 138
INHnKaIaTouKnHaBOIDKn 138
HactpoiKa paCtOHHnIa TOnHOro BbICTpeLa 139
EcIn paCToHne do oBekTa coCTaJIeT MeHee 10 MeTPOB, INI ecIN IpeBbIeHa daJIbHOct bN3MepeHn INI OBeKT HeOCTaTOHO OTPaJaETc, TO NIOBITcN INHdkALmra
Послес Того Кас Индikалгona Norachet, ДалбНOMep LEICA RANGEMASTER CRF 1600Будет abOTMATIМЕСКИ ВБКИОУЧ.
PEKIM CKAHIOBAHNA
CnmoiBdoIaBbHomepa LEICA RANGEMASTER CRF 1600 BblOINHTb I3MepeHMe BO3MOXHO TaKKe B HneppeBIBHOM pexkIMe pa6oTb: EcIn pRi BTOpOM HAKATMI IaBHOI KHONK (2) npOIOJXbTe ee yDcpKMBaTb, TO IO NCTeHEmN PPM.2,5 CekyHd Pm6Op
PeeKJIIOHITcB PEXMCKaHINPOBAHH, INbEyET
HneppeBIBHO BblIOINHTb I3MepeHHe.3To BVIDHO
POn MEHauoiSe iNDnKaUIN. PO NCTeHEmN PIM.
1CEkyHdbI b6yET nOKa3AHO HOBOE I3MepeHHO
3aueHHe. PExMM cKaHINPOBAHH OOC6EHNO yD6eHpn
I3MepeHmHa He6OJIbuxx IN OOBVKnBbXbO6BeKtax.
Yka3aHnHa:
B pexmke cahnpobAHnno npabOCHny K0eΦHnueHT 6aIINCTnK (cm. CTP. 141) 6ydet OTObpaJen ToTbKO no OKOHauHN nOcneHnE mmepeHH, Ho He paHbIe.
BpeKIMe cKaHnPOBaHnI prn BbINoHNHeHn HnepepbIbHbIX n3MpeHnI nOtpe6JIeHne 3JeKtPOaHEpRmG 60NbIe, cHem npBbIOHNHeHn EInHnUHbIX n3MpeHnI.
| Дальноctы дійстпь | б oneself | мен�e |
| Ц breast | Белý | Чернý |
| Уголук | пэрпэндікунларны | octрý |
| объektivnyВеличима obъekta | б oneself | маленýкý |
| Солпочné CBET | мало(облачно) | MHORO(палундінhoeсолпунe) |
| Atmosфера у粱овý | яCHO | Туман |
| Стуруktура obъekta | ODнорodная(стна дома) | Неборodная( куст, дерево) |
PnCOnHeHOM CBeTe N XopoWeB VNIMOCTN DaIbHOCTb DeiCTBn I TOuHOCTb 6yDyT IMeTb TAKHe BEINUHNbl:
JaIbHOCTB DeIcTBn npm.OT 10Mdo 1460 M
Touhoctb npM.OT ± 1 Mdo500M npM.OT ± 2 Mdo1000M npM. ± 0,5% Ha1000M
Инд�示ацьу ATMOCФЕРьIX YCLOBи
Дяп расуета плохени.ToКи пладань (СM. Csyedушп радд)ДалнHomep LEICA RANGEMASTER CRF 1600doJONHHTeBNoО npdeIeRrBoВбрЯ ИЗмер�псpacTOnBТрВaxБнчИО6OxNcYCIOBn:нakJOLOyUcTpoiCtBA,tempeatuy nAtMOsCEPHeOdЯВaLHNe.ДаныteЗнEHnBuMOжепPoSCMOTpeTb В lo6ObEврЯ.
Длэ STOу 6bIcTPO hXaMITE BCNOMORAteJbHyIO KhONkIy (K), kOrda OTObpaXaetcR Bn3nPna Mapka nnn paCtOaHmE.
- BbICTPO HaxMMTE rIaBHyIO KHOKNy (2/ < 3c).
-ПОВИТСА ВИЗИРHAМAPKa.
- HaxMNte u ydepKmBaIte BCNOMOraTeNbHyO KhoNkY (1/≥3c).
-Пов ВИЗМРОН Марков поВИТС 5 1d. ИнДИКATOP мгмат и COОшат TEM CambIM,TO MOЖHO BblONHЛь HabТроуКУ.ЗTO OTHOCITС N KO CBEM OCTaJIbHbM I INДИКAUZIMdo COxpaneHЯ NaCTpoKи HA Wae 6.
3.БыстpoHAxMnTeBCNOMOraTeNbHyIO KHOIky.
-Инданкацяи NGMehNTbca Na BRILL(uctka).
TEXHNUECKNEXAPAKTEPNUKNI
- Tables 1, 2 and 3 show the ranges in meters and the holdover corrections in centimeters, while tables 4 and 5 use yards and inches.
-
All values are applicable for:
-
An atmospheric pressure of 1013mbar
A temperature of 20^
Horizontal shots
Remarques:
Trademark of the Leica Camera Group
Design subject to alterations without notice.
日 =Marquedeposee
Sousreserve de modifications.
© 2005 Leica Camera AG
© 2005 Leica Camera AG
ΦπμmEnHb3hakΓpynnbLeicaCamera
© = 3apernctpnpoBaHHbI TOBapHbI 3HAK
Mbl octabnem 3a co6oI npaBO Ha n3MeHHeNe KOHCTpyKUnn Nn3aHa.
© 2005 Leica Camera AG