
DIGILUX2 - Camera LEICA - Free user manual and instructions
Find the device manual for free DIGILUX2 LEICA in PDF.

User questions about DIGILUX2 LEICA
0 question about this device. Answer the ones you know or ask your own.
Ask a new question about this device
Download the instructions for your Camera in PDF format for free! Find your manual DIGILUX2 - LEICA and take your electronic device back in hand. On this page are published all the documents necessary for the use of your device. DIGILUX2 by LEICA.
USER MANUAL DIGILUX2 LEICA
We wish you a great deal of pleasure and success using your new LEICA DIGILUX 2. The high performance LEICA DC VARIO-SUMMICRON 7-22,5mm f/2-2.4 ASPH.large angle zoom lens will give you excellent picture quality and, thanks to its wide range of focal lengths, will open up a host of picture composition options, particularly for landscape and interior photography.
Thanks to its fully automatic programmed exposure control mode and autofocus feature, the LEICA
DIGILUX 2 provides uncomplicated photography.
Alternatively, you can take over picture composition yourself at any time using the manual settings.
You can select from numerous special functions to improve the picture quality even in very difficult exposure conditions.
Please read these instructions so that you can make the most of your LEICA DIGILUX 2's capabilities.
These instructions are printed on 100 % chlorine free bleached paper, whose high- quality manufacturing process protects the water and is environmentally friendly.
This is a Class B product based on the standard of the Voluntary Control Council for Interference from Information Technology Equipment (VCCI). If this is used near a radio or television receiver in a domestic environment, it may cause radio interference. Install and use the equipment according to the instruction manual.
FCC Note: (U.S. only)
This equipment has been tested and found to comply with the limits for a Class B digital device, pursuant to Part 15 of the FCC Rules. These limits are designed to provide reasonable protection against harmful interference in a residential installation. This equipment generates, uses, and can radiate radio frequency energy and, if not installed and used in accordance with the instructions, may cause harmful interference to radio communications. However, there is no guarantee that interference will not occur in a particular installation. If this equipment does cause harmful interference to radio or television reception, which can be determined by turning the equipment off and on, the user is encouraged to try to correct the interference by one or more of the following measures:
- Reorient or relocate the receiving antenna.
- Increase the separation between the equipment and receiver.
- Connect the equipment into an outlet on a circuit different from that to which the receiver is connected.
- Consult the dealer or an experienced radio/TV technician for help.
FCC Caution:
To assure continued compliance, follow the attached installation instructions and use only shielded interface cables with ferrite core when connecting to computer or peripheral devices.
Any changes or modifications not expressly approved by the party responsible for compliance could void the user's authority to operate this equipment.
Trade Name: LEICA
Model No.: DIGILUX 2
Responsible party/
Support contact: Leica Camera Inc.
156 Ludlow Avenue
Northvale, New Jersey 07647
Tel.: +12017679608
Fax: +12017678666
e-mail: olesin@aol.com
This device complies with Part 15 of the FCC Rules. Operation is subject to the following two conditions: (1) This device may not cause harmful interference, and (2) this device must accept any interference received, including interference that may cause undesired operation.
This Class B digital apparatus complies with Canadian ICES-003
LEICA DIGILUX 2

Tested To Comply
With FCC Standards
FOR HOME OR OFFICE USE
Contents
Foreword 98
Warning notices 103
Scope of delivery 103
Designation of parts 104
Displays
Function displays
In record mode / 106
In review mode 110
Menu items
In the main menu with the record modes REc..112
In the setup menu with the
record modes XoSETUP 112
In the main menu with review mode l PLAY...113
In the setup menu with
review mode 80 SETUP 113
Quick guide
Presents 114
Taking photographs 114
Viewing pictures 115
Enlarging pictures in the viewfinder/monitor 115
Deleting pictures 115
Formatting the memory card 115
Detailed guide
Preparation
Attaching the carrying strap 116
Attaching/removing the lens hood 116
Charging the battery 116
Loading the battery in the camera/ Removing the battery from the camera 117
Charge level displays 118
Mains operation 118
Inserting and removing the memory card 119
The most important settings/controls
Turning the camera on/off 120
Selecting the record and review modes l /□/ 120
Shutter release button 121
Viewfinder and monitor 121
- Switching between electronic viewfinder and monitor 121
-Diopter settings in the electronic viewfinder 121
- Switching the displays 121
The menu system 122
Presets
Setting the menu language i+ LANGUAGE 124
Setting the viewfinder and monitor brightness FINDER/MONITOR 124
Setting the time and date ④ CLOCK SET 124
Setting automatic switch off ±b^z POWER SAVE . 125
Setting the key acknowledgement (response) tones and shutter sounds BEEP 126
Setting the resolution PICT.SIZE 126
Setting the compression rate QUALITY 127
Setting the white balance WwW.BALANCE 128 Setting the function for automatic or one of the fixed settings
AUTO/ / / / / / / / / / / / / / / / / / / / / / / / / / / / / / / / / / / / / / / / / / / / / / / / / / / / / / / / / / / / / / / / /
Manually setting the white balance 129
Fine adjustment of the white balance WB WB ADJUST 129
Setting the ISO speed 150 SENSITIVITY 130
Setting the picture properties (contrast, sharpness, color saturation) PICT.ADJ. 130
Record mode - /
Adjusting the focal length 131
Using the optical zoom 131
Using the digital focal length extension D.ZOOM 131
Setting the distance 131
Automatic focusing/Autofocus 131
- Close-up autofocus mode 132
-Using autofocus spot metering SPOT AF 132
-Metering memory-lock 132
Manual focusing MF 133
The magnification function MF, MF ASSIST 133
Setting the exposure 134
Taking photographs with programmed automatic exposure mode P 134
- Shifting program mode 135
Taking photographs with speed priority mode T 135
Taking photographs with aperture priority mode A 136
Taking photographs with manual setting of shutter speed and aperture M 137
Selecting the exposure metering method 137
Multi-field metering 137
Center-weighted metering [O] 137
Spot metering [·] 138
The histogram 138
Exposure compensation 2 138
Taking photographs with automatic exposure bracketing 139
Flash photography
Taking photographs with the built-in flash unit 140
-Flash range 142
-Indirect flash 142
Taking photographs with the flash synchronized to the end of the exposure FLASH SYNC. 143
Flash exposure compensation 144
Taking photographs with external flash units . . 144
Immediate viewing after the shot
Using automatic review of the last picture AUTO REVIEW 146
Viewing pictures with the VIEW- function 146
-Deleting pictures during viewing. 147
Additional functions
Exposure series 148
Selecting the exposure frequencyBURST RATE 148
Pictures with sound AUDIOREC. 149
Video recording / MOTION IMAGE 149
Animation recording FLIP ANIM. 151
Taking photographs with the self-timer 153
Calling up menu functions with the quick set button FUNCTION 153
- Setting the functions that should be called up with the quick selection button - CUSTOM SET. 153
-Using the quick set button FUNCTION 154
Review mode -
Reviewing single pictures 155
Rotating the shots RotATE 155
Reviewing single pictures with sound 156
Setting the volume 156
Simultaneous review of nine single pictures/
Enlarging and trimming when reviewing single pictures 156
Reviewing video recordings 158
Deleting pictures 158
Deleting single pictures 159
Deleting multiple pictures simultaneously. 159
Deleting all pictures on the memory card . 160
Protecting pictures ON PROTECT 160
Protecting single pictures/
Removing protection 160
Protecting multiple pictures/
Removing protection 161
Removing protection for all pictures 161
Formatting the memory card [格式] FORMAT 162
Print order (DPOF) settings on the
memory card DPOF PRINT 162
Print order settings for a single picture 163
Deleting individual print order settings 163
Print order settings for multiple pictures 163
Deleting all print order settings 164
Print order settings for an index print 164
Additional functions
Adding sound to existing pictures AUDIO DUB. 165
Reducing the resolution after recording RESIZE 166
Changing the trimming after recording TRIMMING 167
Resetting all individual menu settings XR RESET 169
Creating new folder numbers NO.RESET .170
Automatic review of a series of pictures SLIDE SHOW 170
Presenting all pictures on the memory card 170
Presenting marked pictures 171
Deleting all markings 172
Playback with AV equipment VIDEO OUT 172
Data transfer to a computer/Printing with direct connection to a printer 173
Connecting and transferring the data in MASS STORAGE mode 174
Connecting and transferring the data in PTP mode 175
Remote control mode via the USB connection 176
Printing copies by direct USB connection
to a printer 176
Printing single copies 177
Printing all copies set by DPOF marking 177
The Epson PIM (Print Image Matching) format 178
Installing the enclosed software 179
Miscellaneous
Accessories 180
Spare parts 180
Storing the camera 181
Care and maintenance instructions
General care instructions 181
Maintenance instructions For the camera 182
For the battery 182
For the mains/charging unit 182
For memory cards 183
Storage 183
Data structure on the memory card 183
Warning messages 184
Malfunctions and troubleshooting 185
Index 186
Technical data 188
Warning notices
- You should use exclusively the recommended accessories to prevent faults, short circuits or electric shock.
- Do not expose the device to moisture or rain.
- Do not attempt to remove parts of the housing (covering); specialist repairs can only be carried out in authorized service centers.
Notes:
- Some components of this device contain small amounts of mercury or lead. Disposal of these elements may be subject to specific environmental protection regulations in your country. For information on correct disposal or recycling please contact the competent authorities or a representative of the suppliers and manufacturers of electronic products. (http://www.eiae.org)
-
Please ensure that you observe copyright laws. Recording and publishing media that have already been recorded, such as tapes, CDs or other published and broadcast media may violate copyright laws.
-
This applies equally to all of the software supplied.
- The SD logo is a registered trademark.
- Other names, company or product names referred to in this manual are trademarks or registered trademarks of the relevant companies.
Scope of delivery
Before using your LEICA DIGILUX 2 for the first time, please check that the accessories supplied are complete.
A. Battery
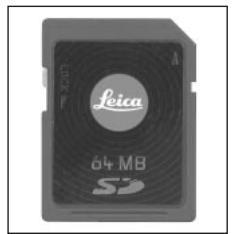
B. 64 MB SD memory card (in antistatic container)
C. Mains/charging unit
D. Mains lead
E. Connecting lead mains/charging unit - camera
F. USB connecting lead
G. A/V lead
H. Carrying strap
I. Lens hood
J. Cover for lens hood
K. Lens cap
L. 3 CD-ROMs


Designation of parts
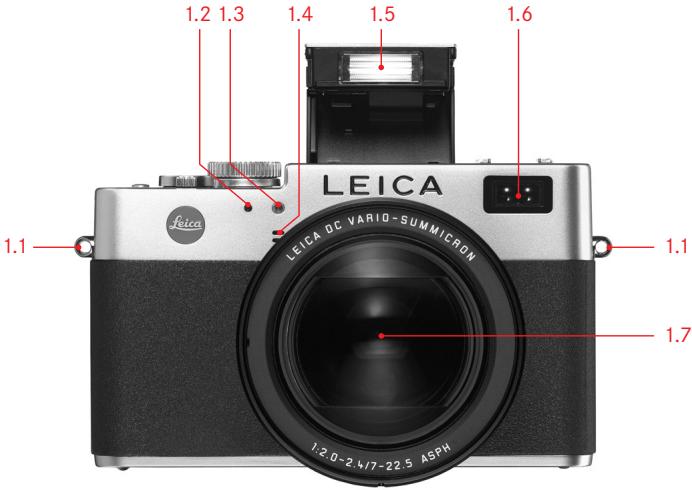
Front view
1.1 Eyelet for carrying strap
1.2 IR sensor for white balance
1.3 Self-timer LED
1.4 Microphone
1.5 Flash reflector (folded out)
1.6 Autofocus sensor window
1.7 Lens LEICA DC VARIO-SUMMICRON 7-22.5 mm f/2-2.4 ASPH. with
a. Screw mount for filters
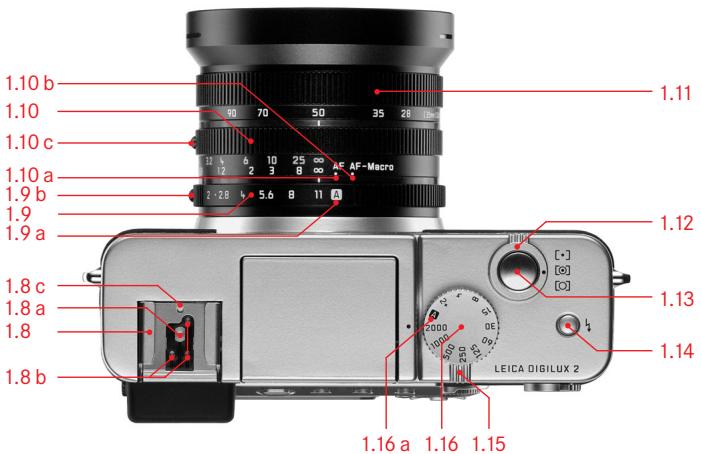
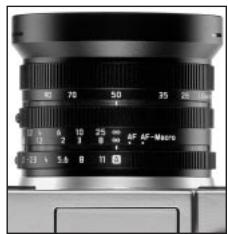
1.11 Focal length setting ring
1.12 Selector ring for exposure metering methods [[]] / [[]] / [[])
1.13 Shutter release button
1.14 Button for selecting the flash mode (↓)
1.15 Record/review selector (>/< )/< )
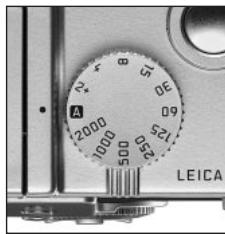
1.16 Shutter speed setting dial with click-stop positions, incl. a. Position for automatic control (A)
Top view
1.8 Flash unit shoe with
a Central (firing) and
b Control contacts, as well as
c Hole for locking pin
1.9 Aperture setting ring with
a Locking position for automatic control (A), and
b Release button
1.10 Distance setting ring with locking positions for
a Autofocus (AF),
b Near zone autofocus (AF-Macro), and
c Release button
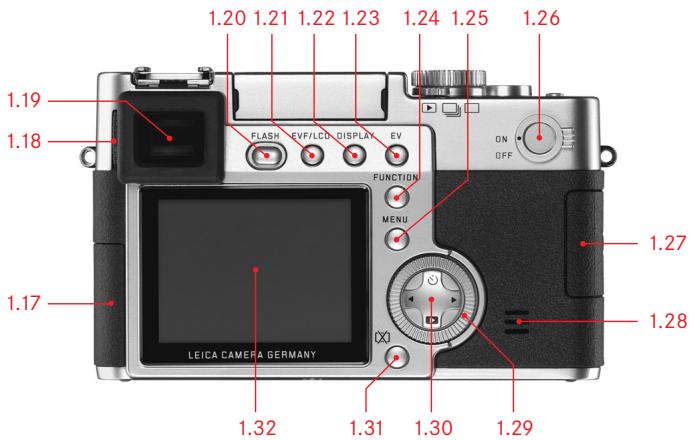
Rear view
1.17 Protective flap over the socket door
1.18 Diopter setting roller
1.19 Viewfinder window
1.20 Button for folding out the flash reflector (FLASH)
1.21 Button for switching between viewfinder and monitor display (EVF/LCD)
1.22 Button for selecting the display form (DISPLAY)
1.23 Button for exposure compensation, automatic exposure bracketing and flash exposure compensation (EV)
1.24 Quick set button (FUNCTION)
1.25 Button for switching the menu system on/off, and/or to confirm entries (MENU)
1.26 Main switch (ON/OFF)
1.27 Protective flap over the memory card slot
1.28 Speaker
1.29 Central setting ring for navigating within the menus/for setting the selected menu items/functions, for scrolling among the pictures, for program shift, and for enlarging/reducing the pictures viewed
1.30 Direction pad for navigating within the menus/for setting the selected menu items/functions, and with the upper edge (心) for selecting the self-timer function with the right edge for scrolling among the pictures with the lower edge () for calling up the last picture and for confirming entries with the left edge for scrolling among the pictures
1.31 Button to delete pictures ([X])
1.32 LCD monitor
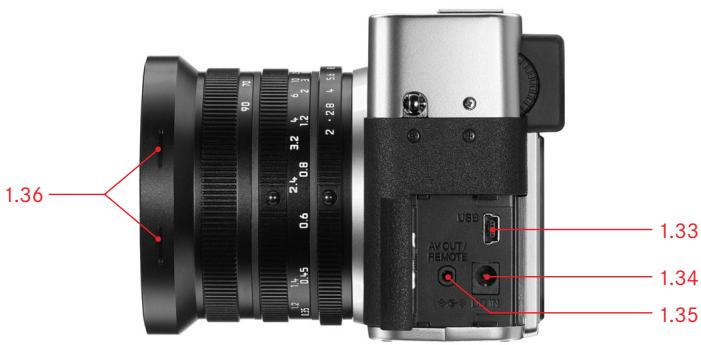
Left view
1.33 USB socket (5-pole, for connecting to computers and printers)
1.34 DC IN socket (for external power supply)
1.35 A/V OUT/REMOTE socket (for connecting to A/V devices and remote release)
1.36 Retaining grooves for lens hood
Right view
1.37 Memory card slot
1.38 Retaining grooves for lens hood
Bottom view
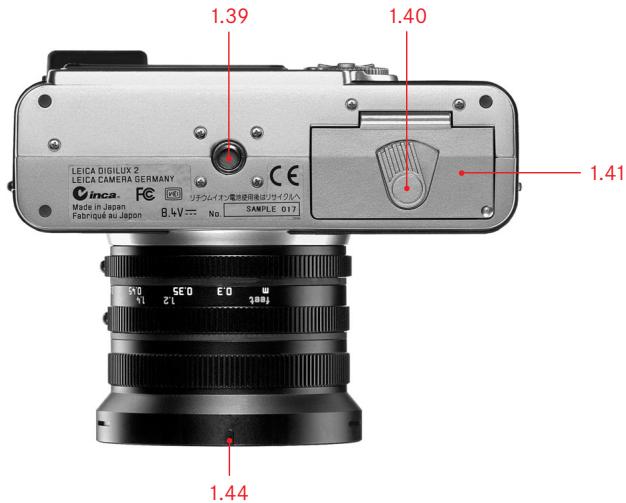
1.39 Tripod mount thread
1.40 Locking lever for battery compartment cover
1.41 Battery compartment cover
1.42 Battery compartment (see p. 117)
1.43 Battery sprung locking catch (see p. 117)
1.44 Mounting guide for lens hood
Lens hood
1.45 Locking buttons
1.46 Locking clips
1.47 Mounting guide
Mains/charging unit
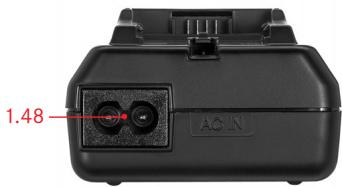
1.48 AC IN socket for mains lead
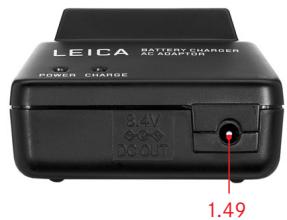
1.49 DC OUT socket for connecting lead to the camera
1.50 Red (POWER) LED to indicate mains connection
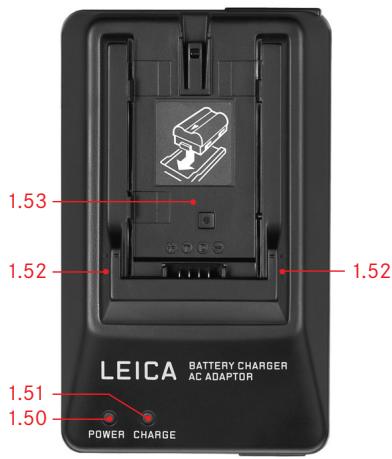
1.51 Green (CHARGE) LED to indicate charging
1.52 Insertion markings
1.53 Charging bay for battery
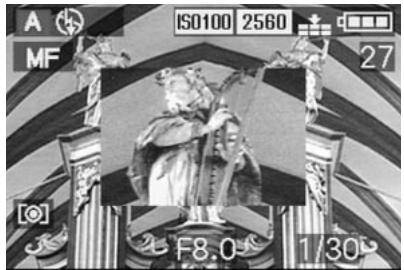
Displays
Function displays
2.1 In record mode
2.1.1 Exposure mode
a P Programmed automatic exposure mode
b A Aperture priority mode
c T Speed priority mode
d M Manual setting of shutter speed and aperture
e Video recordings
2.1.2 Flash mode of the built-in flash unit (flashing red if the flash is not ready, lit up red when shutter release button is pressed to pressure point and the flash unit is activated [not in mode g], otherwise white [yellow in mode f]; switches to mode g automatically in video recording, only mode g with attached external flash unit)
a Automatic flash activation (not with exposure mode M)
b A Automatic flash activation with pre-flash (not with exposure mode M, and/or synchronization to the end of the exposure)
c Manual flash activation
d Manual flash activation with pre-flash (not with synchronization to the end of the exposure)
e S Automatic flash activation with slower shutter speeds (not with exposure modes T/M)
f S Automatic flash activation with pre-flash and slower shutter speeds (not with exposure modes T/M, and/or synchronization to the end of the exposure)
g Flash switched off and/or not folded out
2.1.3 White balance
(goes out when switching to video recording)
a No display: automatic setting
b For daylight
c For cloudy conditions
d For halogen lighting
e For electronic flash units
f B7N For black and white pictures
g For manual setting (depending on the additional manual fine adjustment b/c/d/e/g appear red [for warmer color reproduction] or blue [for cooler color reproduction], otherwise white)
2.1.4 ISO speed
(does not appear with video recording)
a ISO100 ISO 100
b ISO200 ISO 200
c ISO400 ISO400
2.1.5 Resolution
(does not appear with video recording)
a 2560 2560x1920
b 2048 2048 x 1536
c 1600 1600x1200
d 1280 1280x960
e 640 x 480
f HDTV 1920 x 1080
2.1.6 Compression rate
(does not appear with video recording)
a RAW Raw data storage without
compression
(only possible with resolution 2560)
b Very low
c Low
d Normal
alternatively to 2.1.6:
2.1.7 Image frequency
(appears only with video recordings)
a 10fps 10 Shots per second
b 30fps 30 Shots per second
2.1.8 Battery charge level
a Sufficient capacity
b Falling capacity
c Insufficient capacity
d -Replacement or recharging necessary
2.1.9 Flash exposure compensation set, including compensation value
(appears in the area of 2.1.37 with autofocus mode)
alternatively to 2.1.9:
2.1.10 External flash unit attached
(shashing red if flash not ready, otherwise white, appears in the area of 2.1.37 with autofocus mode)
a Automatic flash activation
not with exposure mode M
b Manual flash activation
Automatic flash activation with
slower shutter speeds
(not with exposure modes T / M )
d Flash unit off
2.1.11 Focus/exposure setting
(appears only when the shutter release button is pressed to pressure point, not with manual focusing)
a Flashing: Focusing not possible
b Permanently lit: Focusing and exposure set and locked
2.1.12 Sound recording on
(in principle with video recordings)
2.1.13 Risk of blurring
(appears only with exposure modes P / T i.e. with automatic setting of the shutter speeds, when shutter release button is pressed to pressure point, and shutter speeds slower than 130s)
2.1.14 Counter
a 83 Number of pictures remaining
(If memory capacity is low, 0 flashes as a warning)
b Recording time remaining
(for video recordings, if memory capacity is low, OS flashes as a warning)
2.1.15 Picture recording
(appears only briefly in all modes except video recording and sound recording)
2.1.16 2.1.14 Saving data to card
(appears only briefly after taking the picture)
2.1.17 Histogram
(appears only when activated, yellow when flash unit is switched on, and/or with shutter speeds slower than 12 s, otherwise white)
2.1.18 Shutter speed
(appears immediately with manual setting, i.e. with exposure modes T / M , after tapping the shutter release button with automatic setting, i.e. with exposure modes P/A, red after pressing the shutter release button to the pressure point when the setting range is exceeded with exposure modes P/T/A, otherwise white)
2.1.19 Indication for setting the slowest shutter speeds with the central setting dial
(only when setting the shutter speed dial to the position 2+)
2.1.20 Aperture value
(appears immediately with manual setting, i.e. with exposure modes A/M, after tapping the shutter release button with automatic setting, i.e. with exposure modes P/T, red after pressing the shutter release button to pressure point when the setting range is exceeded with exposure modes P/T/A, otherwise white)
2.1.21 Indication of program shift option (appears only with exposure mode P)
2.1.22 Indication of shifted pair of values (appears only with exposure mode P and after shifting)
2.1.23 Exposure compensation set, including compensation value (not with exposure mode M and video recording
alternatively to 2.1.18-2.1.23:
2.1.24 Time and date
(appears only briefly after turning on the camera and/or after setting the data)
2.1.25 Light balance
(appears only with exposure mode M)
2.1.26 Automatic exposure bracketing activated (crossed out and flashing in red when shutter release button is pressed to pressure point with flash unit attached, or switched on and activated [function combination not possible], otherwise white, not with video recording)
2.1.27 Exposure metering method
a [O] Center-weighted exposure metering
b [O] Multi-field metering
c [·] Spot metering
2.1.28 Synchronization to the end of the exposure
(not in conjunction with flash modes with pre-flash 2.1.2 b/d/f)
2.1.29 Indication that spot exposure metering is switched on
2.1.30 Spot autofocus metering field (not with video recording)
2.1.31 Normal autofocus metering field (not with video recording)
alternatively to 2.1.29-2.1.31:
2.1.32 Self-timer switched on/running (flashing in blue during delay, otherwise white) a 2 seconds delay b 10 seconds delay
alternatively to 2.1.29-2.1.31:
2.1.33 Sound recording in progress (appears only during recording, microphone flashes in blue, triangles alternate from black to red in a 1 s-rhythm)
2.1.34 Exposure series function on, including image frequency
(crossed out when automatic exposure bracketing is switched on at the same time [function combination not possible], not with video recording)
a H 2,7 pictures per second
b L 1 picture per second
alternatively to 2.1.34:
2.1.35 Animation recording function
2.1.36 Digital focal length extension switched on, including extension factor
(appears in the area of 2.1.34 with single mode)
2.1.37 Focusing mode
a no display: Autofocus
b Autofocus including near zone
c MF manual focusing
2.2 In review mode
2.2.1 Review mode
2.2.2 Picture with print order setting (DPOF) (characters white for set print job, green for slide show)
2.2.3 Protected picture (appears in position b if added sound recording is on)
alternatively to 2.2.1-3:
2.2.4 AUDIO DUB Added sound recording on (not possible with RAW data storage, appears in conjunction with display 2.2.18)
2.2.5 Picture with sound recording (in principle with video recordings)
2.2.6 Resolution (see 2.1.5, not with video recordings)
Alternatively:
2.2.7 Video recording
2.2.8 Compression rate (see 2.1.6, not with video recordings)
Alternatively:
2.2.9 10fps/30fps Image frequency (only with video recordings, see 2.1.7)
2.2.10 Battery charge level (see 2.1.8)
2.2.11 Folder/picture number
2.2.12 Continuous picture numbers/total number of pictures on memory card used
2.2.13 Saving data to card (appears only briefly while adding sound recording)
2.2.14 Information for picture shown
(appears only if activated, see p. 121, not with added sound recording)
a Histogram (see 2.1.17)
b Exposure mode (see 2.1.1)
c Aperture (see 2.1.20)
d Shutter speed (see 2.1.18)
e ISO speed (see 2.1.4)
f Flash function (see 2.1.2)
a No display: picture without flash b Flash picture without pre-flash c Flash picture with pre-flash d Flash unit off
g White balance (see 2.1.3)
h Exposure metering method (see 2.1.27)
2.2.16 Indication for playback of a video recording (only if video recording is available)
Alternatively:
2.2.17 PLAY AUDIO Indication for playback of a sound recording (only if sound recording is available)
Alternatively:
2.2.18 Added sound recording on (not possible with RAW data saving, appears in conjunction with display 2.2.4)
Alternatively:
2.2.19 Sound recording in progress (appears only during recording, microphone flashes alternately in blue/white, triangles alternate from black to red in a 1s-rhythm)
2.2.15 Picture date and time for picture shown
In the main menu with the recording
modes-REC
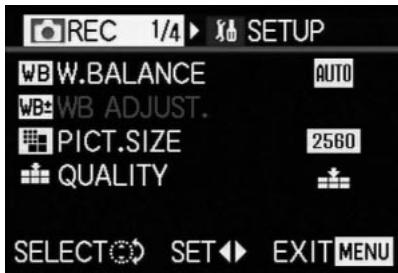
REC 1 / 4 (1st page)
3.1 WB W.BALANCE White balance
3.2 WB ADJUST. White balance fine adjustment
3.3 PICT.SIZE Resolution
3.4 QUALITY Compression rate
REC 2/4 (2nd page)
3.5 SPOT AF Spot autofocus
3.6 ISO SENSITIVITY ISO speed
3.7 BURST RATE Frame frequency for
series exposures
3.8 AUDIO REC. Sound recording
REC 34 (3rd page)
3.9 D.ZOOM Digital focal length extension
3.10 FLASH SYNC. Flash synchronization to the end of the exposure
3.11 PICT.ADJ. Picture properties
3.12 MOTION IMAGE Video recording
REC 4 / 4 (4th page)
3.13 FLIP ANIM. Animation creation
In the setup menu with the recording modes - SETUP
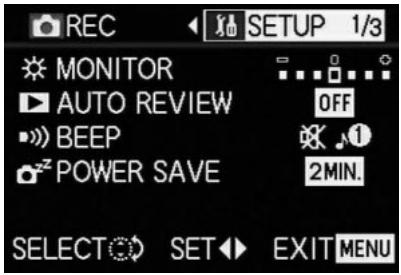
XoSETUP1/3(1st page)
3.14 FINDER/MONITOR Viewfinder/monitor brightness
3.15 AUTO REVIEW Automatic review of the most recent picture
3.16 BEEP Key acknowledgement (response) tones
3.17 POWER SAVE Automatic camera switch off
SETUP2/3 (2nd page)
3.18 MF MF ASSIST Viewfinder/monitor magnification function for manual focusing
3.19 CUSTOM SET Compilation of the quickly accessible menu items
3.20 NO. RESET Reset the picture number
3.21 CLOCK SET Time and date
SETUP3/3 (3rd page)
3.22 XR RESET
Simultaneous resetting of all individual settings
3.23 USB USB MODE
Data transfer mode
3.24 i+ LANGUAGE
Language
In the main menu with review mode -▶ PLAY
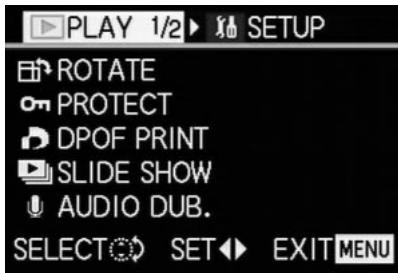
PLAY 12 (1st page)
3.25 ROTATE Rotating the image
3.26 ON PROTECT Protection
3.27 DPOF PRINT Print order settings
3.28 SLIDE SHOW Automatic review of all pictures
3.29 AUDIO DUB.Adding sound recording
PLAY2/2 (2nd page)
3.30 RESIZE Reducing the resolution
3.31 TRIMMING Changing the trimming
3.32 [格式] FORMAT Formatting the memory card
In the setup menu with review mode - Setup
XoSETUP1/3(1st page)
3.14 FINDER/ Viewfinder/monitor
MONITOR brightness
3.33 REVIEW ON LCD Automatic display
switching for VIEW
function
3.34 VOLUME Volume of sound
3.16 BEEP Key acknowledgement
playback
(response) tones
SETUP2/3 (2nd page)
3.17 POWER SAVE Automatic camera
3.21 CLOCK SET Time and date
3.23 USB USB MODE Data transfer mode
3.35 VIDEO OUT TV standard
SETUP3/3 (3rd page)
3.24 i+ LANGUAGE Language
Quick guide
You will need the following items:
Camera
- Battery (A)
Memory card (B)
- Mains/charging unit (C)
- Mains lead (D)
- Connecting lead mains/charging unit - camera (E)
Presets
- Set the main switch (1.26) to OFF.
- Place the battery (A) in the mains/charging unit to charge it up (see p. 116).
- Connect the mains/charger (C) to charge the battery (see p. 116).
- Place the charged battery in the camera (see p. 117).
- Insert the memory card (B) (see p. 119).
- Set the main switch (1.26) to ON.
- Set the date and time (see p. 124).
- Set the desired menu language (see p. 124).
- Set the ideal diopter value for your eye on the viewfinder (1.18/1.19) (see p. 121).
Taking photographs
- Set
a. the record/review lever (1.15) to single picture mode (□, see p. 120),
b. the distance setting ring (1.10) to the position marked with AF (1.10 a, see p. 131),
c. the aperture setting ring (1.9) to its position marked with A (1.9 a, see p. 134),
d. the shutter speed setting dial (1.16) to its position marked with A (1.16 a, see p. 134), and
e. the metering method selector (1.12) to multifield metering ([0], see p. 137).
(The settings recommended above ensure simple, quick and reliable photography for your first attempts with the LEICA DIGILUX 2. Details on the various modes/functions can be found in the relevant sections on the pages indicated.)
- Press the shutter release button (1.13) to the first pressure point to activate the focusing (see p. 131).
- Press the shutter release button all the way down to take the photograph.
Viewing pictures
For quick viewing within the record modes:
- press down on the direction pad (1.30) to view the last picture taken.
- Press left or right on the direction pad to view other pictures.
For unlimited viewing time:
- set the record/review lever (1.15) to review (▶, see p. 120).
- Press left or right on the direction pad to view other pictures.
Enlarging pictures in the viewfinder/monitor
(possible in record and review modes)
Turn the central setting dial (1.29) towards the right (clockwise) for an enlarged view of the displayed picture (see p. 146, 157).
Deleting pictures
(possible in record and review modes) Press the delete button (1/1.31) and follow the instructions in the viewfinder/monitor (1.19/32).
Formatting the memory card
- Set the record/review (1.15) lever to review (see p. 120).
- In the main review menu select the item FORMAT (3.32, further steps required, see p. 122/160) to delete all of the data on the memory card.
Detailed guide
Preparation
Attaching the carrying strap

Attaching/removing the lens hood
The scope of delivery of the LEICA DIGILUX 2 includes a removable lens hood ideally tailored to the paths of the rays. It is attached straight with its guide (1.47) opposite the corresponding groove in the lens front mount (1.44). When attaching it, the clips (1.46) of the lens hood lock it in the corresponding retaining grooves in the lens front mount (1.36/38). It can be removed from the lens easily when the locking buttons (1.45) are pressed.
The lens hood should always be used to minimize annoying reflections and light coming in from the side in poor photographic conditions. It provides effective protection against contrast-reducing stray light and also against damage and soiling of the front lens, e.g. from raindrops or accidental fingerprints.
Notes:
- In flash photography (see p. 140), in particular close-up shots, the attached lens hood may cause shadows.
- The LEICA DIGILUX 2 is supplied with two lens caps (J/K), one for use with, and one for use without the attached lens hood. One of these caps should always be attached to protect the front lens when you are not taking photographs.
Charging the battery
The LEICA DIGILUX 2 is powered by a powerful and fast-charging lithium-ion battery (A).
Caution:
- Only the battery types named and described in these instructions, or those cited and described by Leica Camera AG, may be used in the camera.
- The batteries may be charged only with the devices specifically designed for this purpose, and only precisely as described below.
- The use of batteries contrary to these Instructions and the use of the wrong battery types may lead to an explosion.
- The mains/charging unit supplied should be used exclusively for charging these batteries and to power this camera (mains operation, see p. 118). Do not attempt to use it for any other purposes.
-
Ensure that the mains outlet used is freely accessible.
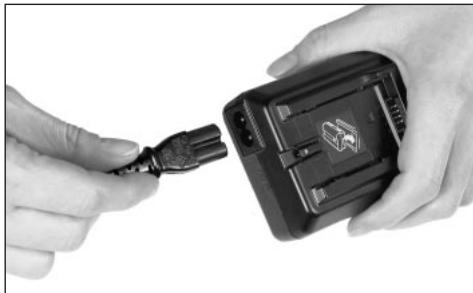
-
Connect the mains lead (D) to the mains/charging unit (C), i.e. connect the smaller plug on the mains lead to the socket marked AC IN~ (1.48) and the mains plug to the wall outlet. The red LED, marked POWER (1.50) lights up.
-
Place a battery with its contacts facing forwards and down (with its front edge at the level of the external markings on the side there, 1.52) flat in the charging bay (1.53) of the mains/charging unit. Push it forwards as far as it will go (as shown in the charging bay). In the correct position, the green LED, marked with CHARGE (1.51) lights up to confirm that charging is in progress.
Once charging has taken place - approx. 110 min. - the green LED goes out. Then, the mains/charging unit should be disconnected from the mains. However, there is no risk of overcharging.
- Remove the battery by moving it backwards slightly, and then lift it out of the charging bay.
Notes:
- The batteries can only be charged in the mains/charging unit, i.e. they are not charged in the camera during mains operation (see p. 118).
-
Lithium ion batteries such as those used in the LEICA DIGILUX 2 do not develop any "memory effect". They can therefore be charged at any time regardless of the current charge level. If the battery is only partially discharged when charging commences, it takes correspondingly less time to fully charge it.
-
Only charge the batteries if their temperature and room temperature are between 10 and 35^ C .
- The batteries warm up during the charging process. This is normal and not a malfunction.
- If the green LED flashes at around 1Hz after charging has begun, this indicates a charging error. In this case, disconnect the mains/charging unit from the mains and remove the battery. Ensure that the above temperature conditions are met and then restart the charging process. If the problem persists, please contact your dealer, the Leica office in your country or Leica Camera AG.
- Defective batteries should be disposed of according to the manufacturer's specifications.
Loading the battery in the camera/ Removing the battery from the camera
- Set the main switch (1.26) to OFF.
- Open the battery compartment cover (1.41) by turning the locking lever (1.40) to the right. The spring-loaded cover then opens automatically.
- Insert the battery into the compartment with its contacts facing forwards. Press it into the compartment (1.42) until the light gray sprung locking catch (1.43) moves over the battery to hold it in place.
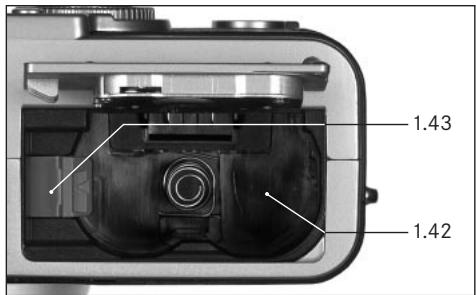
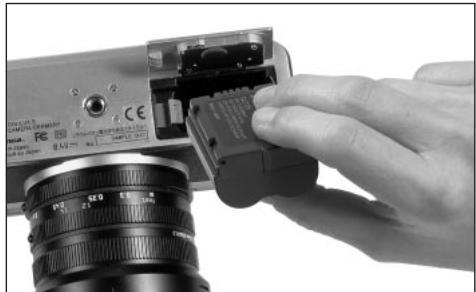

- Close the battery compartment cover and turn the locking lever to the left.
To remove the battery, follow these instructions in reverse order. The light grey sprung locking catch in the battery compartment must be pushed to the side to unlock the battery.
Important: Removing the batteries can result in the settings you made in the menus being reset (see p. 122).
With a fully charged battery and the 64 MB SD memory card supplied, the following recording/review times are then available:
| For taking pictures | approx. 180 min |
| For review | approx. 350 min |
Charge level displays (2.1.8/2.2.10)
The charge level of the battery is displayed in the viewfinder/monitor (1.19/32) (not if the mains/charging unit is connected, see below).

Sufficient capacity

Falling capacity

Insufficient capacity

Replacement or recharging necessary
Notes:
- Remove the battery, if you will not be using the camera for a long period of time. When doing so, turn the camera off using the main switch first.
- The date and time must be reset after 24 hours at the latest after the capacity of a battery in the camera has expired (see p. 124).
Mains operation
You can also operate the camera from the mains using the mains/charging unit, so that you will not be restricted by the battery capacity.
- Set the main switch (1.26) to OFF.
- Connect the mains lead as described under "Charging the battery", p. 116 to the mains/charging unit.
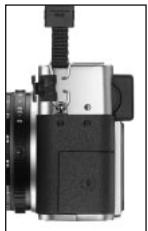
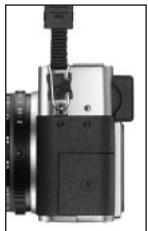
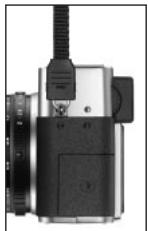
- Open the locking protective flap (1.17) over the socket door on the left-hand side of the camera by pressing/pulling it slightly backwards in the direction of the arrow. The spring-loaded cover then opens automatically.
- Connect the DC connecting lead (E). Any side of it is plugged into the DC IN socket (1.34) of the camera.
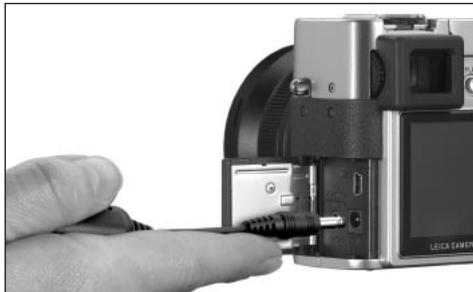
Important: Use only the connecting lead supplied.
Notes:
- The battery is not charged during mains operation, even if it is in the mains/charging unit.
- The battery does not have to be left in the camera for mains operation.
- When operating the camera from the mains, the camera gets warm – this is quite normal and is not a malfunction.
- The camera should not be disconnected from the mains/charging unit during mains operation.
To close the flap - after removing the plug - press it and push it forwards until it locks into place.
Inserting and removing the memory card
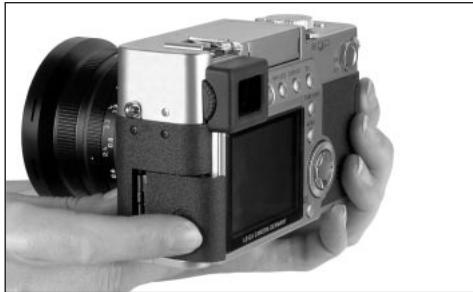
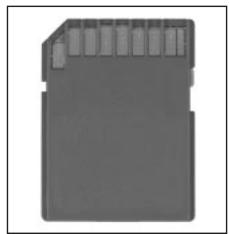
The LEICA DIGILUX 2 saves the picture data on an extremely compact SD (secure digital) card. Alternatively, MultiMedia cards can be used. SD memory cards and MultiMedia cards are small, light and removable external storage media. SD memory cards, particularly those with high capacity, allow pictures to be taken and reviewed much more quickly. They have a write protection switch, which you can use to lock the card against data being unintentionally saved or deleted. This switch takes the form of a slider on the nonbeveled side of the card; the data is protected in the lower position, marked with LOCK. SD memory cards and MultiMedia cards are available from various suppliers and with various capacities. A 64 MB SD memory card is included with the LEICA DIGILUX 2.
Notes:
- Do not touch the memory card contacts.
-
When using MultiMedia cards, the monitor screen can temporarily go off during video recording, this is not a malfunction.
-
Set the main switch (1.26) to OFF.
- Open the protective flap (1.27) over the memory card slot on the right-hand side of the camera by pressing/pulling it slightly backwards in the direction of the arrow. The spring-loaded cover then opens automatically.
- Insert the memory card (B) into the slot (1.37) with the contacts at the back and with the beveled corner pointing upwards. Push it in against the spring resistance until you hear it click into place.
- Close the flap again, by pressing it down and sliding it forwards until it locks into place.
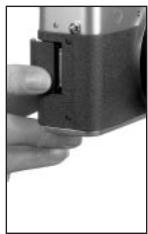
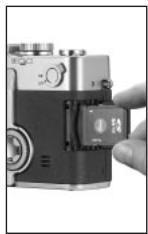
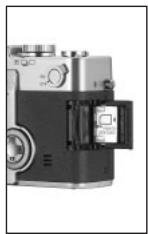
To remove the memory card, follow these instructions in reverse order. For unlocking, the card - as specified in the cover - it must first of all be pushed a little further in.
Notes:
- If you cannot insert the memory card, check that it is aligned correctly.
- If you cannot close the cover after removing the memory card, try it again after inserting and removing the memory card.
- When you open the protective flap (1.27) (a) or remove the memory card (b), a corresponding warning message appears in the viewfinder/monitor instead of the relevant displays:
a. MEMORY CARD DOOR OPEN
b. NO MEMORY CARD, also, flashing, the symbol
- Do not open the flap and do not remove the memory card or the battery for as long as the symbol for recording a picture (2.1.15) and/or data saving on card (2.1.16) can be seen in the monitor or viewfinder. Otherwise, the data on the card can be destroyed and the camera may malfunction.
- As electromagnetic fields, electrostatic charge, as well as defects on the camera or the card can lead to damage or loss of the data on the memory card, we recommend that you also transfer the data to a computer and save it there (see p. 173).
- For the same reason, we recommend that you always store the card in the antistatic plastic container supplied.
The most important settings/controls
Switching the camera on/off
The camera is turned on and off using the main switch (1.26). This is done by turning it to the appropriate position, marked with OFF and ON. The viewfinder or monitor image (1.19/32) appears (possibly only until the camera automatically switches to the stand-by mode, see p. 125).
Selecting the record and review modes -
□/□/
Use lever 1.15 to set the camera to single image recording (right position), to series exposure recording (middle position), or to review mode
(1eft position, cf. the relevant sections from p. 131/155).
With the menu system (see p. 122) it is possible in the record modes
to switch within the single image mode to the video (see p. 149) and the animation functions (see p. 151),
to select the picture frequency within the series exposure mode (see p. 148).
Shutter release button
The shutter release button (1.13) works in two stages. Pressing it lightly (to the pressure point) activates automatic focusing (see p. 131) and exposure metering (see p. 137) and control (see p. 134) and locks the respective values determined (see p. 132), or activates the camera again and switches on the viewfinder/monitor (1.19/32) if it was previously in standby mode (see p. 125).
Pressing the shutter release button all the way down takes the picture or begins sound and/or video recording. Both types of recording are transferred to the memory card. Sound and video recordings are ended by completely depressing the shutter release button again.
Notes:
- The menu system can be used to select or set key acknowledgement (response) tones and shutter sound, and to adjust their volume (see p. 126).
- The shutter release button should be pressed gently and not jerkily to prevent blurring. Before completely depressing the shutter release button make sure that focusing/autofocus (if switched on) and exposure metering have been completed, i.e. the green LED (2.1.11) lights up in the viewfinder/monitor. If you do not do this, out-of-focus or blurred pictures are possible (see p. 131/132).
Viewfinder and monitor
The LEICA DIGILUX 2 has two LCDs (Liquid Crystal Displays), one performs the viewfinder function (1.19) and another in the form of the monitor (1.32). When the camera is ready for operation one of them is always switched on. Either of them can be used in recording or review mode and they reproduce the entire image field as well as the selected data and information (see "The Displays", p. 106).
Switching between electronic viewfinder and monitor
To change the LCD press the EVF/LCD button (1.21). This must be done separately for and in the recording and review modes as switching affects only the mode currently in use. Consequently, the LCD changes when switching between the modes if the monitor has been activated in one and the viewfinder in the other.
Note: Pictures that have been taken can also be viewed immediately on the monitor even if the viewfinder was used (see "Viewing pictures with the VIEW function", p. 146).
Diopter settings in the electronic viewfinder
For optimum viewing of the subject and the displays in the viewfinder, it is necessary to adjust the diopter setting for your eye. To do this, use the click-stopped roller (1.18) on the left next to the viewfinder window (1.19) to set the viewfinder image so that you can see it in sharply including the displays.
Switching the displays
The button to select the displays (DISPLAY, 1.22) is used to select whether the viewfinder or monitor image appears without or with function displays in the recording modes, also with histogram (see p. 138), or whether it appears only with gridlines.
In review mode, you can select between a monitor screen without or with function displays or with expanded function displays.
You scroll through the different display options in an endless loop and select them by pressing the button once or several times. The sequences:
In record mode
With function displays - with function displays including histogram - with gridlines - without function displays
In review mode
With function displays - with expanded function displays - without function displays
The menu system
Many of the LEICA DIGILUX 2 modes and functions are operated using a menu system (see also pp. 112/113), which is shown clearly and step by step in the viewfinder/monitor (1.19/32). You can select the appropriate menu items to set the different functions and the various record and review modes.
You can also use this menu system to set all other functions, such as the date and time or the volume of the acknowledgement (response) tones and shutter sound.
Most of the settings in the menu system are essentially made in the same way, regardless of whether they relate to functions in the main or setup menus.
Notes:
Essentially:
- You can used the direction pad (1.30) to navigate in any direction.
- The central adjustment dial (1.29) allows quicker and easier navigation in vertical and - in some sub-menus - in horizontal direction.
Depending on whether the next adjustment step can be made only with the direction pad or optionally with one of the two operating elements, the following appears in the bottom line of the viewfinder/monitor image: just SET or both SELECT and SET
-
Some functions in the record modes that are not listed in the menus are also set via a menu system. This is the case for the function groups called up via the button to select the flash mode (1.14, see p. 140), to set exposure and flash exposure compensations as well as automatic exposure bracketing (1.23, see pp. 138/144/139), as well as the quick selection button (1.24, see p. 153). Here, simply pressing opens the corresponding menu. These functions are essentially set as described below.
-
Press the MENU button (1.25) to open the menu system.
-
In the record modes, the record menu then appears, in the review mode the review menu (see p. 112/113).
- When they are opened, the menus are always in their initial positions - marked in yellow: RECR 1/4 in record mode and PLAY 1/2 in review mode. As a maximum of four menu items can be listed at any one time (five in the review menu), to assist in orientation a group of figures to the right of the title show the page currently displayed (left-hand figure) and how many there are in total (right-hand figure).
Note: While a picture is being reviewed with the VIEW function (see p. 146), the menu system cannot be opened.
If you want to open up the relevant setup menu 山 SETUP 1 / 3 (otherwise you can continue directly from point 3 below):
-
Press right on the direction pad.
-
The relevant menu items appear; otherwise the displays normally correspond to the those in the record or review menus.
You can exit this menu again by pressing left on the direction pad.
-
By pressing up or down on the direction pad, or by turning the central adjustment dial, select the menu item where you want to make a setting.
-
The currently activated menu items are marked in yellow.
You can scroll through the menu items in an endless loop, which means you can reach them in either direction.
-
You can then press right and/or left on the direction pad to set the function of the selected menu item.
-
The currently selected option is marked in yellow.
Note: In the record menus, some menu items have sub-menus. The settings for these are described in the appropriate sections.
- Your settings are saved, either by pressing up or down on the direction pad, or by turning the central adjustment dial to select another function, or by leaving the menu system by pressing the MENU button once or twice.
Presets
Setting the menu language - LanguaGE
The language used in the default setting of the menu system is English, i.e. all menu items initially appear with their English names. They are therefore cited so in these Instructions.
German, French, Spanish, Italian, Japanese or Chinese can also be selected as alternative menu languages.
Setting the function
In one of the setup menus _D SETUP 3 / 3 (see pp. 112/113/122) select LANGUAGE (3.24) and follow the further menu instructions.
- Apart from a few exceptions (button names, short designations) all linguistic information changes.
Setting the viewfinder and monitor brightness - FINDER/MONITOR
The brightness of the viewfinder and monitor images on the LEICA DIGILUX 2 can be set so that you can adjust it optimally for any situation, i.e. the prevailing light conditions. The setting only concerns the LCD currently in use, i.e. it is separate for the viewfinder and the monitor.
Note: The brightness setting affects the battery life: the brighter, the higher the power consumption and, therefore, the shorter the battery life.
Setting the function
-
Use the EVF/LCD button (1.21) to select the viewfinder or monitor LCD, depending on where you want to change the brightness. It makes no difference whether you are in record or review modes.
-
In one of the setup menus 山 SETUP 1 / 3 (see pp. 112/113/122) select the menu item FINDER, or MONITOR (3.14) and follow the further menu instructions.
-
The level selected is shown by the yellow bars on the scale.
Setting the time and date - ④ CLOCK SET
The date can be set anywhere between 2000 and 2099. The 24-hour clock is used to display the time.
Setting the data
-
In one of the setup menus X_D SETUP 2/3 (see pp. 112/113/122) select the menu item CLOCK SET (3.21).
-
Press right on the direction pad (1.30).
-
The complete date - with a yellow border - then appears. The group of figures that can be set is marked by yellow arrows pointing up and down.

-
Use the direction pad or the central adjustment dial to set the desired numeric value. The other numeric values and the month are selected with the direction pad and then set in basically the same way.
-
After setting the year, press right on the direction pad to go to the next line, where the sequence in which the figures are shown can be adjusted. You can use the direction pad or the central adjustment dial to select between month/day/ year (M / D / Y) day/month/year (D / M / Y) or year/month/day (Y / M / D)
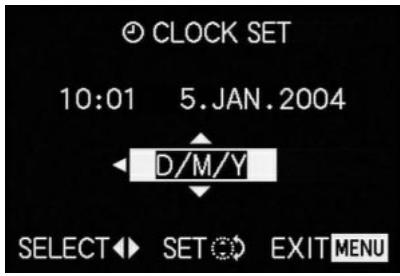
- Press the MENU button (1.25) twice to save your setting and to exit the menu system.
- Check whether the date and time are set correctly by turning the camera off and then back on again.
Note: Even if no battery is used or if it is flat and the mains/charging unit is not connected, the date and time setting is stored by a built-in buffer battery for around 24 hours. However, after this period, the data and time have to be reset as described above.
At the latest 24 hours after the capacity of a battery remaining in the camera has expired, the date and time must be reset as described above.
Setting automatic switch off - O^ POWER SAVE
This function switches the camera to stand-by mode after a certain length of time, which saves power, for example by deactivating the viewfinder and monitor LCDs. You can choose whether you want to activate this function and, if so, after how long you want the camera to switch to stand-by. In this way, you can tailor this function to your own personal working methods and also significantly extend the life of your battery charge.
Notes:
- If you are running the camera directly from the mains using the mains/charging unit, automatic switch off is not available.
- If automatic switch off is activated and the battery needs to be charged, you should turn the camera off at the main switch (1.26) before connecting the mains/charging unit to the camera socket. If you leave the camera turned on in this situation, malfunctions are possible.
Setting the function
In one of the setup menus _b^b SETUP 1 / 2 / 3 (see pp. 112/113/122) select the menu item
z POWER SAVE (3.17) and follow the further menu instructions.
Note: Even if the camera is in stand-by mode, it can be turned on again at any time by pressing the shutter release button (1.13) or by turning it off and back on with the main switch (1.26).
Setting the key acknowledgement (response) tones and shutter sounds - BEEP
With the LEICA DIGILUX 2, you can decide whether you want your settings and other functions to be acknowledged by an acoustic signal - two volumes are available, or whether operation of the camera and actually taking photographs should be predominantly free of noise.
The following acknowledgements are available:
a. Various beep tones for shutter release button pressed halfway (focus and exposure metered and locked), settings with the direction pad, and the VIEW function (see p. 146), and
b. Shutter sound after a picture has been taken.
Notes:
The factory setting is with all sound turned off.
- While the key acknowledgement tones can also be set in the review mode setup menu, the shutter sound can only be set in the setup menu of the record modes.
- Turning on key acknowledgement tones automatically activates shutter sound.
Setting the functions
- In the record setup menu _D SETUP 1 / 3 (see p. 112/122) select the menu item BEEP (3.16).
- Open the relevant sub-menu with the direction pad (1.30).
- The sub-menu for the two sound groups - BEEP and SHUTTER appears. The possible settings are listed in the 2nd line.
- Use the direction pad to make your selection: (loud beep), (quiet beep) or (no beep).
The following steps 4-5 are only required if you want to change the shutter sound. Otherwise, you can continue as described in point 6 onwards.
- Use the direction pad or the central adjustment dial (1.29) to select SHUTTER.
- The possible settings are listed in the 2nd line of the lower sound group.
- Use the direction pad to select one of the three shutter sounds -1/23
- Press the MENU button (1.25) to confirm your setting and to exit the menu system.
Setting the resolution - PICT.SIZE
Picture data recording is possible with six different numbers of pixels, i.e. resolutions. This allows you to adjust the pictures precisely to the intended use or to the available memory card capacity.
At the highest resolution (which also means the largest data volume), which you should select for optimum quality for larger prints, it is of course possible to save considerably fewer pictures to a card than at the lowest resolution, which is perfectly adequate for sending a picture by e-mail or for a website.
Notes:
- Together with raw data saving (RAW, see next section), the resolution is automatically switched to 2560 independently of the current setting.
- For video recordings (see p. 149) the resolution is set to 320 × 240 pixels.
The possible resolutions and the resulting numbers of pictures
| PICT.SIZE | Resolution | Compression rate | Number of pictures |
| 2560 | 2560 x 1920 | Any | 58/29/14/5¹ |
| 2048 | 2048 x 1536 | all except RAW | 88/45/22² |
| 1600 | 1600 x 1200 | all except RAW | 125/63/32² |
| 1280 | 1280 x 960 | all except RAW | 184/96/49² |
| 640 | 640 x 480 | all except RAW | 553/298/161² |
| HDTV | 1920 x 1080 | all except RAW | 125/63/32² |
1 With normal/low/very low compression rate/raw data saving
2 With normal/low/very low compression rate
Note: The details in the table relate to the 64 MB memory card supplied and the default settings. If you change the compression rate and/or resolution, the resulting number of pictures will be different.
Setting the function
In the main record menu REC 1 / 4 (see pp. 112/ 122) select the menu item PICT.SIZE (3.3) and follow the further menu instructions.
- The original viewfinder/monitor screen appears again with the corresponding display (2.1.5 a/b/c/d/e/f) and the resulting number of pictures remaining (2.1.14).
Setting the compression rate - QUALITY
Picture data recording is possible with four different compression rates. This allows you to adjust the pictures precisely to the intended use or to the available memory card capacity.
Of course, less compressed data, which contains more picture information and should be selected for further processing in photographic programs, allows you to save considerably fewer pictures per memory card than with higher compression, i.e. with reduced picture information, which is perfectly adequate for sending a picture by e-mail or for a website.
Notes:
- Together with raw data saving - RAW, the resolution is automatically switched to 2560 independently of the current setting (see previous section).
- The compression rate for video recordings cannot be changed.
-
A high compression rate can result in very fine structures in the subject being lost.
-
The remaining number of pictures or recording time shown in the monitor does not necessarily change each time you take a picture. This depends on the subject, as very fine structures result in higher data volumes, homogenous surfaces in lower volumes. The details in the table are based on an average file size for the set resolution. The file sizes are often smaller, depending on the picture content and the compression rate, which means that the remaining memory capacity is then greater than previously calculated and displayed.
- The possible compression rates and the resulting number of pictures can be found in the table in the previous section.
Setting the function
In the main record menu REC 1 / 4 (see p. 112/122) select the menu item QUALITY (3.4) and follow the further menu instructions.
- The original viewfinder/monitor screen appears again with the corresponding display (2.1.6 a/b/c/d) and the resulting number of pictures remaining (2.1.14).
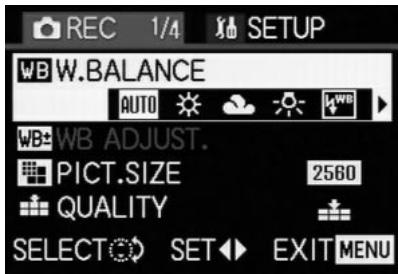
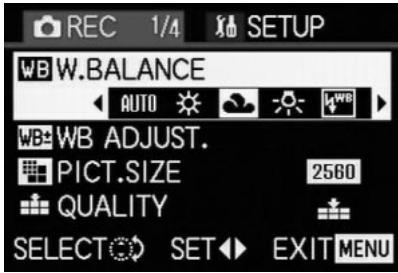
Setting the white balance - WB W.BALANCE
In digital photography, white balance ensures neutral, i.e. natural, reproduction of color in any light. It is based on the camera being preset to reproduce a particular color as white.
With the LEICA DIGILUX 2, you can choose from six different settings:
- AUTO - Automatic control, which almost always provides neutral results,
- four fixed presets for the most common light sources,
e.g. for external shots in sunshine,
e.g. for external shots in cloudy conditions,
e.g.for indoor pictures with halogen lights,
- e.g. for indoor pictures with (predominantly) electronic flash lighting, and
- a manual setting.
Furthermore, there is another setting for black and white pictures (BW) and also the opportunity to balance the four fixed presets and the manual adjustment with fine adjustment (WB WB ADJUST, see next section) precisely to the current photographic conditions and/or your own ideas.
Notes:
- For the simplest operation, white balance for video recording is set to automatic setting.
- The specified white balance setting is effective in all exposure modes.
Setting the function for automatic or one of the fixed settings - AUTO/ / / /
-
In the main record menu REC 1 / 4 (see pp. 112/ 122) select the menu item WB W. BALANCE (3.1).
-
Select the desired option by pressing left or right on the direction pad:
-
If you have selected manual white balance, the right-hand arrow flashes to indicate that further settings are required (see below).
Note: If you have accidentally entered the manual setting sub-menu (by pressing right on the direction pad again, see below), you can return to the higher menu level by pressing the MENU button (1.25).
If you want to select automatic or one of the four fixed settings, proceed as follows:
- Press the MENU button (1.25) to confirm your setting and to exit the menu system.
- The original viewfinder/monitor screen appears again with the corresponding display (2.1.3 a/b/c/d/e/f).
If, however, you have selected manual white balance, further settings need to be made after the 2nd step. To do this, proceed as follows:
Manually setting the white balance -
- Open the relevant sub-menu by pressing right on the direction pad.
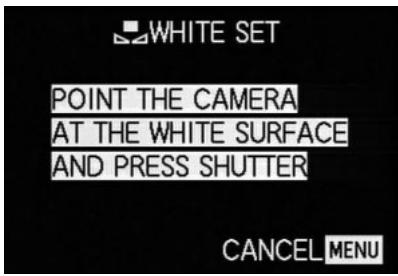
- Aim the camera at an object that you know is white or neutral gray. It should fill the frame in the viewfinder/monitor.
-
Press the shutter release button (1.13) all the way down.
-
When the setting has been made, which can be seen in the viewfinder/monitor screen, the original image with the relevant display appears there again (2.1.3 g).
Fine adjustment of the white
balance - WB WB ADJUST
If one of the four fixed presets or the manual setting of the white balance has been set, the LEICA DIGILUX 2 allows further fine adjustment. In this connection, a warmer, i.e. slightly redder, or cooler, i.e. slightly bluer, color reproduction can be deliberately and sensitively achieved, e.g. to rule out color casts from specific lighting situations or, vice versa, to deliberately create a specific light mood.
Setting the function
In the main record menu REC 1 / 4 (see pp. 112/ 122) select the menu item W8B WB ADJUST (3.2) and follow the further menu instructions.
- During setting, the effect can be followed on the viewfinder/monitor screen, at the same time the symbol for the white balance function set that is to the left of the scale changes from white to red or blue.
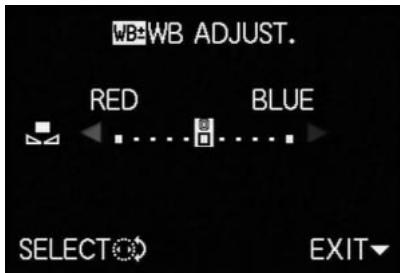
After setting, the original viewfinder/monitor screen appears again with the relevant red or blue display (2.1.3 b/c/d/e/g).
Note: Fine adjustment only concerns the white balance function that has been set. If it is to be done for another white balance function, this has to be set and then the fine adjustment has to be made again.
Setting the ISO speed - SENSITIVITY
In traditional photography, the ISO value is selected to take account of the light-sensitivity of the film being used. More sensitive films allow faster shutter speeds and/or smaller apertures, or vice versa, at the same brightness.
The ISO setting on the LEICA DIGILUX 2 also allows the shutter speed/aperture value to be adjusted to meet the requirements of the relevant situation, in three steps.
The optimum picture quality is obtained at ISO 100, the lowest of the three possible settings. The two higher sensitivities of ISO 200 and ISO 400 result in increasing "graininess". This effect can be compared with the "graining" of highly sensitive films.
Note: In the video recording mode the speed is set to ISO 100.
Setting the function
In the main record menu REC^2 /4 (see p. 112/122) select the menu item SENSITIVITY (3.6) and follow the further menu instructions.
- The original monitor screen appears again with the corresponding display (2.1.4 a/b/c).
Setting the picture properties (contrast, sharpness, color saturation) - PICT.ADJ.
One of the many advantages of electronic photography over traditional photography is that it is very easy to change critical properties of a picture, i.e. those that determine its character. While photographic software - after recording and transfer to a computer - provides great scope for doing this, the LEICA DIGILUX 2 itself allows you to influence three of the most important picture properties even before taking the picture:
- The contrast, i.e. the difference between light and dark areas, determines whether a picture appears as more "flat" or "brilliant". As a consequence, the contrast can be influenced by increasing or reducing this difference, i.e. by making light areas lighter and dark areas darker.
-
Sharpness reproduction - at least of the main subject - by using the correct distance setting is a prerequisite for a successful picture. In turn, the impression of sharpness given by a picture is, to a great extent, determined by the contour sharpness, i.e. how small the light/dark transition is on contours in the picture. The sharpness effect can therefore be changed by increasing or reducing these areas.
-
The color saturation determines whether the colors in the picture appear as "pale" and pastel-like or "bright" and colorful. While the lighting and weather conditions (hazy/clear) are given conditions for the picture, the reproduction can definitely be influenced here.
Alongside the normal (STD/Standard), i.e. unchanged reproduction, for each of the three picture properties you can - independently - also selected a weakened (LOW) or strengthened (HIGH) option.
Setting the function
In the main record menu REC 3 / 4 (see pp. 112/ 122) select the menu item PICT. ADJ. (3.11) and follow the further menu instructions.
Note: The operating steps within the 2nd and 3rd line of the sub-menu are only necessary if you want to change sharpness (SHARPNESS) and/or color saturation (SATURATION).
Record mode
Adjusting the focal length
The lens of the LEICA DIGILUX 2, the LEICA DCVARIO-SUMMICRON 7-22.5 mm f/2-2.4 ASPH., is a high-performance and fast 3 × zoom lens, whose focal length range corresponds to that of a 28 - 90 ~mm lens for the 35 ~mm -format. It therefore allows the photographing of both larger groups of people or larger rooms from closer up as well as picture composition concentrated on individual sections of the subject, e.g. for portraits, from medium ranges.
Using the optical zoom
The focal length is set manually with the front ring on the lens (1.11). The size of the ring, its smooth running and the knurling allow much quicker and more precise setting than would be possible with a motor zoom. At the same time, manual setting helps the battery capacity to be used economically.
Using the digital focal length
extension - D.ZOOM
In addition to the 3 × zoom range of the lens, the digital focal length extension allows a further significant reduction in the size of the trimmed area, i.e. the reproduction of the center of the subject with a 2 × or 3 × enlargement. In total, this results in focal length ranges of 56 - 180 ~mm (with 2 × ) or 84 - 270 ~mm (with 3 × , both 35 ~mm -equivalent).
The use of this function has no other influence on zooming itself, or on other operation of the camera.
Note: The digital focal length extension works by reducing the size of the sensor area used and therefore - depending on the factor used - leads to a corresponding reduction in resolution.
Setting the function
In the main record menu REC 3 / 4 (see pp. 112/ 122) select the menu item D. ZOOM (3.9) and follow the further menu instructions.
- The relevant display (2.1.36) appears on the viewfinder/monitor screen.
Setting the distance
The LEICA DIGILUX 2 offers both automatic and manual setting of the distance in the range from 30cm to .With automatic setting, the autofocus system allows a choice between a normal' function, which does without the extreme near zone for an optimum working speed and ranges from 60~cm to and the macro setting, which covers the entire range. Manual setting is done, as is setting to one of the two AF functions, with the distance setting ring (1.10). To change from the manual to the automatic range and, vice versa, the release button (1.10c) must be kept depressed while the ring is being turned, but not while changing between the two AF positions (1.10 a/b).
Automatic focusing/Autofocus
The distance, and thus the sharpness, is automatically measured and set when the shutter release button is pressed to the pressure point (1.13, see p. 121) if one of the two AF modes is set. This is done together with exposure metering (see p. 137) and (in the automatic modes) exposure control (see also sections from p. 134).
- To confirm the correct setting and that it has been saved (see p. 131), the green dot in the viewfinder/monitor screen (2.1.11) lights up.
The measurement is made according to the autofocus metering methods set - 'normal' or SPOT AF (3.5) - in the areas marked by the two frames of different sizes in the center of the image field (2.1.30/31, see also pp. 106/132).
Important: If the AF system cannot set the correct focus, e.g. if the distance to the subject measured is outside the available range, the green dot flashes as a warning.
However, the shutter release button is not locked!
Close-up autofocus mode - AF-Macro
The LEICA DIGILUX 2 also allows close-up photographs up to a distance of 30cm with automatic distance setting. This macro function gives framefilling pictures of small objects (smallest object field: 11.5× 15.3cm from a distance of 30~cm , with maximum focal length setting).
- When setting the AF macro position the symbol (2.1.37 b) appears in the viewfinder/monitor screen as an indication.
Note: The macro function is also available for video recordings (图1).
Using autofocus spot metering - SPOT AF
In certain situations, or for certain subjects, it can be crucial for the effect that particular details are reproduced perfectly sharp and correctly exposed. For portraits, for example, it is normally recommended that the eyes are very well-defined.
With a metering area much smaller than the standard area, spot measurement allows you to selectively focus on this kind of details and - and it is still automatic.
This metering method is particularly appropriate - in conjunction with metering memory-lock (see below) - for parts of subjects that are to be placed off-center for composition reasons.
Note: Autofocus spot metering is not available with video recording.
Setting the function
In the main record menu REC 2 / 4 (see pp. 112/ 122) select the menu item SPOT AF (3.5) and follow the further menu instructions.
- In the center of the original viewfinder/monitor screen the spot metering frame (2.1.30) appears instead of the frame for the normal AF metering area (2.1.31).
Metering memory-lock
For composition reasons, it can be beneficial not to have the main subject in the center of the picture. However, the autofocus metering area is then normally focused on a section of the subject that is significantly closer or farther away - the result with the modes AF and AF Macro (see pp. 131/132) would be that the main subject is out of focus. In principle, the same applies for the exposure modes P, T and A (see pp. 134/135/136) with respect to differences in brightness.
In such cases the LEICA DIGILUX 2's metering memory-lock function allows you to first of all measure the main subject and then to retain this setting until you have decided on your final trimming and want to take the picture.
Note: You can lock measured values for any number of times before taking the picture.
The procedure:
-
Aim at the part of your subject to which the focus and exposure are to be aligned with the frame (the relevant autofocus metering area, 2.1.30/31) or, in the case of spot exposure metering, with the smaller metering area and the blue cross hairs (2.1.29) in the viewfinder/monitor (1.19/32) and press the shutter release button (1.13) to the pressure point.
-
As soon as the focus and exposure have been set and locked, the green dot appears as confirmation (2.1.11).
-
Continue to hold the shutter release button halfway down and then select your final trimming by moving the camera.
- Press the shutter release button all the way down to take the photograph.
Manual focusing - MF
For certain subjects and situations, it can be beneficial to set the focus yourself, rather than using autofocus (see the previous sections). For example, if the same setting is needed for several pictures and using metering memory-lock (see p. 132) would therefore involve more effort, or if the setting for landscape pictures is to be kept at infinity, or if you want to focus on particular details, which are even smaller than the Spot AF metering area (see 132), or if poor, i.e. very dark, lighting conditions do not allow any or only slower AF mode.
The manual focus set with the central ring (1.10) on the lens can be controlled in both LCDs (1.19/32).
- In the viewfinder or monitor, the relevant display appears (MF, 2.1.37 c).
Instead of a confirmation signal for a correct setting, the magnification function (MF, MF ASSIST) is optionally available as a focusing aid (see the next section).
Notes:
-
Manual focusing, however without the magnification function (see next section), is also possible during video recording (1). In AF mode (see p. 131) as soon as video recording has started by pressing the shutter release button, the last setting is locked, i.e. the focus cannot be changed any more during the entire sequence, not even if the distance setting ring is turned during that time.
-
If the setting is made in the wide-angle range, it is possible that the focus will no longer be correct after zooming in to the telephoto range due to the shallower depth of field. The opposite is also possible to a lesser extent, which means that corrections may need to be made. As a consequence, we recommend that you always set the focus in the telephoto range.
- Depending on the AF metering range set (see p. 131), the associated displays (2.1.30/31) also remain visible, but in this case they are meaningless.
The magnification function - MFQ, MF ASSIST
The bigger details of the subject are shown in the viewfinder or monitor, the better their focus can be assessed, and the more accurate the focusing. For this purpose, the LEICA DIGILUX 2 offers an optional help of a magnification function, where a central section of the viewfinder/monitor screen is reproduced in enlarged form.
This section can, also optionally, either - with an approx. 4× magnification - be limited to the middle of the viewfinder/monitor screen, so that the margin of the actual picture remains in view (e.g., so that you can also view the framing at the same time), or - with approx. 8× magnification - be switched to the whole area of the LCDs (e.g., to be able to compare the focus of several subject details with each other).
Setting the function
In the record setup menu _D SETUP 2 / 3 (see pp. 112/ 122) select the menu item MFQ MF ASSIST (3.18) and follow the further menu instructions.
(MF1 = magnified trimmed area in center of viewfinder/monitor screen; MF2 = magnified trimmed area in the whole viewfinder/monitor screen area).
- When the function is activated, the 'magnified image' then appears briefly (approx. 2 s) whenever the distance setting ring is turned.
Setting the exposure
The LEICA DIGILUX 2 offers you a choice of four exposure modes, with which you can adjust the camera perfectly to your preferred working method or the relevant subject.
All modes are chosen and manual settings of the relevant values are made with the lens aperture setting ring (1.9) and the shutter speed dial (1.16). Both of these operating elements have manual setting ranges with click-stop positions - for the aperture setting ring in 13 -steps, and the speed dial in whole steps, and they each also have an automatic position marked with A (1.9 a/1.16 a).
Both automatic positions are protected against accidental adjustments: on the aperture setting ring, the release button (1.9 b) must be kept depressed when changing from the manual range to the automatic position and back again. In the less 'vulnerable' shutter speed dial, the much more noticeable clickstops serve this purpose.
Shutter speeds of 12 s and slower – on the shutter speed dial this corresponds to position 2 + - are set with the central setting dial (1.29): towards the left (anticlockwise) for faster, towards the right (clockwise) for slower speeds.
- As an indication of this, (2.1.19) appears in the viewfinder/monitor when the shutter speed dial is set to 2+ .
Notes:
- Depending on the prevailing light conditions, the brightness of the monitor screen can differ from that of the actual pictures taken. Particularly for long exposures on dark subjects, the monitor screen appears considerably darker than the - correctly exposed - picture.
- If your main subject is to be off-center, and cannot be detected by the autofocus metering area, you should use the exposure/focus metering memory-lock function (see p. 132).
- In the case of slow shutter speeds where there is a risk of blurring, the warning (2.1.13) also appears.
- To prevent blurred pictures with dark subjects where a flash is not used 艹 , or with the flash modes 艹 / 艹 艸 (2.1.2 g/e/f, see p. 140) and the generally slower shutter speeds, you should hold the camera steady, i.e. support it or use a tripod.
- If the automatic review function is set AUTO REVIEW, (3.15, see p. 146) the picture will appear in the viewfinder/monitor for around 2 s after it has been taken.
-
If you have set an automatic switch off time (see p. 125), the camera automatically switches to an energy-saving stand-by mode after the selected time. You can activate it again either by pressing the shutter release button or by turning if off and back on again.
-
The significantly smaller sensor size - compared to the 24 × 36 mm format - and the considerably shorter focal lengths that result influence the composition: due to the considerable depth of field at full stop and also the minimal differences between adjacent apertures, you need to open up much more than in 35mm cameras to reduce the depth of field and even the smallest possible depth of field still has a significantly bigger expansion.
Taking photographs with programmed automatic exposure mode - P
For fast, fully automatic photography. In this mode, the exposure is controlled by the automatic setting of shutter speeds and apertures.
Here, the LEICA DIGILUX 2 uses shutter speeds in the range of 8 s to 1/4000 s and apertures from 2-11.
To set this mode, turn
- the lens aperture setting ring (1.9) to its A position (1.9 a), and
-
the shutter speed dial (1.16) also to its A position (1.16 a).
-
In the viewfinder/monitor screen this mode is displayed by P (2.1.1 a).
What to do next:
-
Aim at your subject with the rectangle (autofocus metering area 2.1.30/31) and press the shutter release button (1.13) to its pressure point.
-
The shutter speed (2.1.18) and aperture (2.1.20) are set automatically and displayed in the viewfinder/monitor (in white). In addition, the indication of the possibility to use the program shift function also appears (2.1.21, see next section).
If even the fully opened or closed aperture in conjunction with the slowest or fastest shutter speed results in under or over exposure, this is indicated by red values.
If the automatically set pair of values for the intended composition appears appropriate:
- press the shutter release button all the way down to take the photograph.
If not, you can change the pair of values before pressing the shutter release button:
Shifting program mode
Shifting the program mode curve combines the reliability and speed of fully automatic exposure control with the possibility of being able at any time to vary the speed/aperture combination selected by the camera according to your ideas.
This is possible both with the direction pad (1.30) and the central setting dial (1.29). For example, if you are taking sports photographs and prefer to use fast speeds and a large aperture, turn it to the left (anticlockwise). If, on the other hand, you would rather have a large depth of field (small aperture) and accept the associated slower speeds that are necessary, then turn it to the right (clockwise) (e.g. for landscape photography).
The overall exposure, i.e. the brightness of the image, remains unchanged.
- With all pairs of values set by shifting, a corresponding indication (2.1.22). also appears This allows the automatic default pair of values can be recognized at any time.
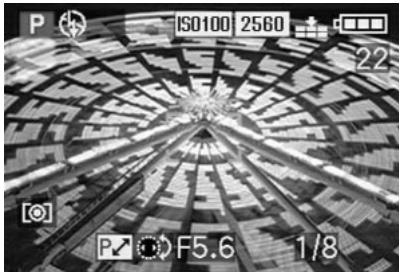
The graphic below shows the available shift ranges.
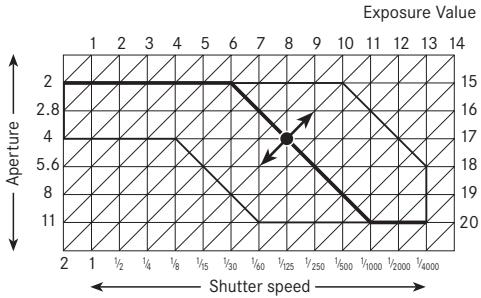
Taking photographs with speed priority mode - T
The speed priority mode automatically controls the exposure with manual setting of the shutter speed. It is therefore particularly well suited for taking pictures of moving subjects, where the sharpness of the movement portrayed - which is determined by the shutter speed used - is the crucial element of composition. By manually pre-selecting an appropriately fast shutter speed, you can therefore prevent unwanted blurring of the movement - you can "freeze" your subject. Or, in reverse, you can express the dynamics of the movement with a deliberate "wiping" effect using a correspondingly slower shutter speed. Shutter speeds in the range of 8 s to 12000 s can be set.
To set this mode, turn
- the lens aperture setting ring (1.9) to its A position (1.9 a), and
- the shutter speed dial (1.16) to the desired value.
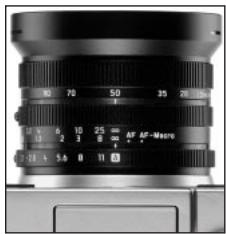
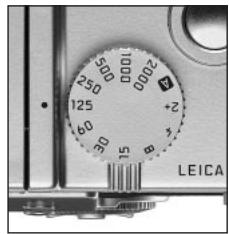
- In the viewfinder/monitor screen this mode is displayed by T (2.1.1 c). In addition, the manually set shutter speed appears - in white - (2.1.18).
What to do next:
-
Aim at your subject with the rectangle (autofocus metering area 2.1.30/31) and press the shutter release button (1.13) to its pressure point.
-
The automatically set aperture (2.1.20) is displayed - in white - in the viewfinder/monitor. If even the fully opened or closed aperture in conjunction with the set shutter speed results in under or over exposure, this is indicated by red values.
-
Press the shutter release button all the way down to take the photograph.
Note: After the exposure setting has been locked (see p. 132), and as long as the shutter release button is kept depressed, the shutter speed/aperture combination can be changed by selecting another shutter speed.
Taking photographs with aperture priority mode - A
Aperture priority mode automatically controls the exposure with manual setting of the aperture. It is therefore particularly well suited for taking pictures where the depth of field - which is determined by the aperture used - is the crucial element of composition. By manually pre-selecting an appropriately low aperture value (= large aperture) you can reduce the depth of field, for example in a portrait to let a face "stand out", i.e. be shown clearly in front of an unimportant or distracting background. Or, in reverse, with a correspondingly high aperture value (= small aperture) you can increase the depth of field, in order to reproduce everything from the foreground to the background clearly in a landscape photograph.
Aperture values from 2.0 to 11.0 can be set, in 13 steps.
To set this mode, turn
-
the lens aperture ring (1.9) to the desired value, and
-
the shutter speed dial (1.16) to its A position (1.9 a).
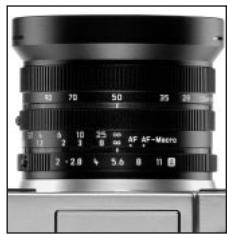
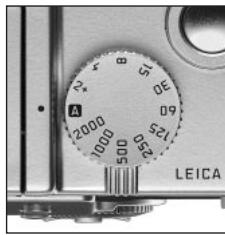
- In the viewfinder/monitor screen this mode is displayed by A (2.1.1 b). In addition, the manually set aperture appears - in white - (2.1.20).
Note: After the exposure setting has been locked (see p. 132), and as long as the shutter release button is kept depressed, the shutter speed/aperture combination can be changed by selecting another aperture value.
What to do next:
-
Aim at your subject with the rectangle (autofocus metering area 2.1.30/31) and press the shutter release button (1.13) to its pressure point.
-
The automatically set shutter speed (2.1.18) is displayed - in white - in the viewfinder/monitor. If even the slowest or fastest shutter speed in conjunction with the set aperture results in under or over exposure, this is indicated by red values.
-
Press the shutter release button all the way down to take the photograph.
Taking photographs with manual setting of shutter speed and aperture - M
If, for example, you want to achieve a particular effect, which is only possible with a quite specific exposure, of if you want to ensure that several pictures with different trimming have an absolutely identical exposure, then you can use manual setting of the shutter speed and aperture.
Shutter speeds in the range from 8 s to 1/2000 s can be set on the LEICA DIGILUX 2, and aperture values from 2-11 in 1/3 steps.
To set this mode, turn
- the lens aperture ring (1.9) to the desired value, and
- the shutter speed dial (1.16) also to the desired value.
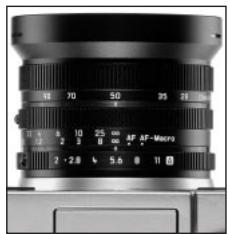
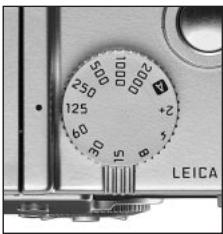
- In the viewfinder/monitor screen this mode is displayed by M (2.1.1 d). In addition, the manually set shutter speed (2.1.18) and aperture (2.1.20) appear - in white.
What to do next:
-
Aim at your subject with the rectangle (autofocus metering area 2.1.30/31) and press the shutter release button (1.13) to its pressure point.
-
The light balance (2.1.25) appears additionally, with the yellow mark on the scale indicating precisely - in 13 EV increments - the deviation of the set pair of values of the correct exposure within the range of ±2 EV, or if the mark is at the triangles to the left or right, a deviation of at least 2 EV.
-
If necessary, align the shutter speed and/or aperture on the basis of the light balance and/or the histogram (see p. 138) to the desired exposure.
-
Press the shutter release button all the way down to take the photograph.
Selecting the exposure metering method
The LEICA DIGILUX 2 offers you a selection of 3 exposure metering methods. They allow adjustment to the prevailing light conditions, the situation, and your style of work, and your creative ideas.
Multi-field metering - [O]
With this metering method, the camera automatically analyses the brightness differences in the subject and, by comparing them with programmed brightness distribution patterns, arrives at the likely position of the main subject and the corresponding best (compromise) exposure.
By consequence, this method is particularly suitable for spontaneous, uncomplicated but reliable photography even under difficult conditions.
Center-weighted metering - [O]
This metering method allocates the highest weighting to the center of the image field, but also records all other areas.
In conjunction with metering memory-lock in particular (see p. 132) it allows selective adjustment of the exposure to particular sections of the subject with simultaneous consideration of the entire image field.
Spot metering - [·]
This metering feature concentrates exclusively on a small field in the center of the image.
It allows exact measurement of small or tiny details for precise exposure – preferably in conjunction with manual setting (see p. 137) – and is therefore primarily suitable for (static) subjects, where you can afford to spend time taking the picture.
For example, in backlit pictures it is normally necessary to prevent the darker background causing underexposure of the main subject.
With a metering area much smaller than the standard area, spot metering allows you to selectively evaluate this kind of details and – and it is still automatic.
The setting is made by turning the click-stopped selector ring 1.12, so that the black dot is opposite the symbol for the desired metering method.
- In the viewfinder/monitor the relevant symbol appears [O]/[O]/[•] (2.1.27 a/b/c)
The histogram
The histogram (2.1.17) shows the distribution of brightness in the photograph. In this connection, the horizontal axis corresponds to the tones from black (left) through gray to white (right). The vertical axis corresponds to the number of pixels in each brightness.
This form of representation allows - alongside the image itself - an additional, quick and simple assess-
ment of the exposure setting, both before and after taking the picture. The histogram is particularly suitable for manual setting of the exposure (see p. 137) or to check the automatic exposure control (P, T, A; see pp. 134/135/136).

A: Mainly dark pixels, only a few bright ones: under exposure
B: The majority of pixels have average brightness: correct exposure
C: Mainly bright pixels, only a few dark ones: over exposure
Notes:
- The histogram is not available in conjunction with video recording (图), nor with simultaneous review of reduced or enlarged photographs (see pp. 146/156).
- In record mode the histogram should be understood as a "tendency display", and not as a representation of the exact numbers of pixels.
- When playing back a picture the histogram can differ slightly from that while the picture was taken.
Exposure compensation -
Exposure meters are calibrated to an average gray scale value (18% reflection), which corresponds to the brightness of a normal, i.e. average photographic subject. If the relevant subject detail does not meet these requirements, for example large areas of snow or, in the opposite case, a black steam locomotive filling the frame, it is necessary to carry out an appropriate exposure compensation.
Particularly when taking several pictures one after another, e.g. to ensure the correct exposure for subjects such as those described above, or if for a particular reason you want a series of pictures to deliberately have a slightly lower or higher exposure, exposure compensation is a very useful function: once set it remains effective until it is (deliberately) reset (see p. 132) unlike metering memory-lock.
Note: Exposure compensation is not possible with video (B) and animation recording (FLIP ANIM.) nor in the exposure mode M.
Setting the function
Press the EV button (1.23) once and follow the further menu instructions.
- The corresponding sub-menu appears. It contains a scale from +2 to -2 EV with 1/3 EV increments and a digital display, that, together with the yellow mark, indicate your setting.
After setting, the original viewfinder/monitor screen appears again with an indication of the activated function and the compensation value (2.1.23).
Note: The EV button is used to set several kinds of functions. They scroll through in an endless loop and can therefore be selected by repeatedly pressing the button.
Taking photographs with automatic exposure bracketing -
Many attractive subjects are very rich in contrast, i.e. they have both very light and very dark areas. The resulting effect can be quite different, depending on
which sections you base your exposure on. In such cases, you can use automatic exposure bracketing to produce several alternatives with graduated exposure. You can then select the most appropriate picture for further use.
Three graduations are available: 13, 23 and 1EV, as well as 2 numbers of pictures: 3 or 5.
Exposures are in the following sequence: correct exposure, under exposure, over exposure; with 5 pictures there are 2 additional exposures with intermediate values in the corresponding sequence.
Notes:
Automatic exposure bracketing is not possible with video ( ) and sound ( ) recordings, or in conjunction with flash mode. If the flash unit is turned on, only one picture is taken. The same applies to pictures with raw data storage and to series of 5 pictures with the highest resolution (2560) and the lowest compression rate ( ).
Depending on the available shutter speed/aperture combination, the working range of the automatic exposure bracketing can be limited.
- An bracketing series is only ever activated for a single process, i.e. to repeat it, you have to set it again.
Setting the function
Press the EV button (1.23) twice and follow the further menu instructions.
- The corresponding sub-menu appears. It contains a scale from -1 to +1 EV with 13 EV increments, in which the yellow marks indicate your setting, as well as two symbols for series of 3 and 5 pictures. The desired graduation is set with the central setting dial (1.29), the number by pressing up on the direction pad (1.30).

After setting, the original viewfinder /monitor screen appears again with an indication of the activated function (2.1.26).
Note: The EV button is used to set several kinds of functions. They scroll through in an endless loop and can therefore be selected by repeatedly pressing the button.
Flash photography
Taking photographs with the built-in flash unit
The LEICA DIGILUX 2 has a built-in flash unit (1.5) that rests folded up in the camera housing when it is not in use. For flash photography, it must be partially (see p. 142) or fully folded our and thus switched on. Flash exposures are controlled by the camera using a pre-flash measurement. For this purpose, a metering flash is triggered immediately before the main flash. The amount of light reflected then determines the strength of the main flash through guide number adjustment.
Depending on the exposure mode used (see p. 134) and depending on the synchronization moment chosen (see p. 143), up to seven different flash modes are available for various photography situations (see Table).
4A
Automatic flash activation
This is the standard mode. The flash is always activated automatically when, because of poor lighting conditions, long exposure times on freehand shots could lead to blurring, for example, in a dimly lit room and outdoors, at twilight or in poor weather.
↓A
Automatic flash and pre-flash activation
to reduce "red eye" effect.
"Red eye" effect is caused by light from the flash reflecting off the cornea straight back to the camera and can occur when taking portrait and group photos. It is therefore best if the people being photographed do not look straight at the camera. As the effect is worsened when the pupils are wide open in conditions of low lighting, when taking photographs indoors for example, you should switch on as much room lighting as possible, so that the pupils become narrower.
Due to the pre-flash, which is triggered shortly before the main flash by pressing the shutter release button, the pupils of the person looking at the camera contract to reduce the "red eye effect".
Manual flash activation
For backlit pictures, where your main subject does not fill the frame and is in shadow, or in cases where you want to moderate high contrasts (e.g. in direct sunlight) (fill-in flash).
As long as this mode is activated, the flash unit is activated for every picture, regardless of the prevailing lighting conditions, otherwise the functioning corresponds exactly with those modes with automatic flash activation.
In this case, flash performance is controlled depending on the outdoor brightness metered: in poor light as with the automatic mode, with increasing ambient brightness, however, with reduced output (up to a maximum of -1^2 / _3EV ). The flash then works as a fill-in light, for example to illuminate dark shadows in the foreground or backlit subjects, in order to obtain more balanced lighting overall.
4
Manual flash and pre-flash activation
For the combination of the situations and functions described most recently above.
↓S
Automatic flash activation with slower shutter speeds
For simultaneous more appropriate (brighter) reproduction, particularly for dark backgrounds and flash fill-in for the foreground. To minimize the risk of blurring, the exposure time is not extended beyond 1/60 s in the other modes with flash activation. For pictures where the flash is used, this means that objects in the background, which the flash cannot reach, are often badly under exposed.
To take appropriate account of the available ambient light, the longer exposure times necessary in these exposure situations (up to 8 s) are permitted here.
S
Automatic flash and pre-flash activation with slower shutter speeds
For the combination of the situations and functions described most recently above.
(4)
Manual flash deactivation
For situations in which flash photography would be forbidden or inappropriate, or if you want to reproduce the prevailing lighting atmosphere in your pictures.
Setting the function
- Release the flash reflector by pressing the FLASH button (1.20) down as far as it will go. It then jumps automatically into its working position.
The corresponding display in the viewfinder/monitor (1.19/32) changes from
(2.1.2 g) to the mode previously set.
| Flash mode\Exposure mode | Programmed automatic exposure and aperture priority modes | Speed priority mode | Manual setting |
| \( \frac{1}{4}A \) | X | X | - |
| \( \frac{1}{4}A@ \) | X* | X* | - |
| \( \frac{1}{4} \) | X | X | X |
| \( \frac{1}{4}@ \) | X* | X* | X* |
| \( \frac{1}{4}S \) | X | - | - |
| \( \frac{1}{4}S@ \) | X* | - | - |
| \( \frac{1}{4} \) | X | X | X |
- Press the button (1.14) and follow the further menu instructions.
- The corresponding displays then appear in the viewfinder/monitor (2.1.2 a/b/c/d/e/f/g).
To fold in the flash reflector, it is pressed down until it locks both at the front and back.
Notes:
- The combination of modes 14 A , 14 and 14 S with synchronization to the end of the exposure 12 (see p. 143) is not possible. If the latter function is activated, they do not appear in the sub-menu. The same applies to the other combinations of functions that are not possible and are listed in the table above.
- It is only ever possible to take single pictures with the flash unit turned on, i.e. the flash cannot be used in conjunction with video (记录) recordings, exposure series (记录) and automatic exposure bracketing (记录).
- To prevent blurred pictures with the slower shutter speeds in the modes 12 S , 12 S and you should hold the camera steady, i.e. support it or use a tripod.
Alternatively, you can select a higher ISO-speed. However, you should bear in mind that this may result in increased "graininess".
Important: When using the flash in any mode, check that the main subject is within the appropriate flash range.
Flash range
The effective range of the flash depends on the aperture and the ISO speed set. For good results, it is crucial that the main subject is within the appropriate flash range. See the table below for details.
| Speeds in ISO | Maximum effective flash range | |
| At 28 mm | At 90 mm | |
| ISO 100 | 0.5–4.8 m | 0.5–4.0 m |
| ISO 200 | 0.7–6.7 m | 0.7–5.6 m |
| ISO 400 | 1.0–9.6 m | 1.0–8.0 m |
Indirect flash
The nearer the flash reflector and lens axis are to each other, the flatter, i.e. shadow-less, the lighting of the subjects. On the one hand, this is desired to prevent unpleasant deep shadows, on the other hand, sometimes we also want to reproduce the structure of a subject better by a corresponding pattern of shadows. A simple solution to the conflict is indirect
flash, where the flash light hits the subject only after reflection from a near surface, e.g. the ceiling. This means that the light falls much more softly because it is more diffuse and also comes from an angle.
The LEICA DIGILUX 2 allows the use of this technique, by locking the flash reflector to the rear again after unlocking (see the previous section). This means that it points up at an angle of approx. 60^
Other handling - including automatic control - corresponds exactly to the descriptions for 'normal operation'.
Notes:
- Due to the longer route for the flash light and the (usually low) reflections of the areas flashed, the range is reduced, possibly to a great extent.
- Reflective areas that do not have a neutral color, e.g. white or gray, can result in color casts in the picture.
Taking photographs with the flash synchronized to the end of the exposure - FLASH SYNC.
Flash photographs are illuminated by two light sources, the available light and the light from the flash. Parts of the subject that are exclusively or primarily illuminated by the flash are almost always reproduced extremely sharply (with correct focusing) due to the extremely short pulse of light. By contrast, all other parts of the subject - those that are sufficiently illuminated by the available light or illuminate themselves - are portrayed with different degrees of sharpness in the same picture.
Whether these parts of the subject are reproduced sharply or "blurred", and the degree of blurring, is determined by two independent factors.
- The length of the exposure, i.e. for how long these parts of the subject "act upon" the sensor and
- how quickly these parts of the subject - or the camera itself - are moving during exposure.
The longer the shutter speed/exposure time or the faster this movement, the more clearly the two - superimposed - parts of the picture can differ. With the flash fired at the normal moment, at the beginning of the exposure, i.e. immediately after the shutter is completely open, this can even lead to apparent contradictions, such as in the picture of the motorcycle (A), which is being overtaken by its own light traces.
The LEICA DIGILUX 2 gives you a choice between this normal flash firing moment and synchronization to the end of the exposure, i.e. immediately before the shutter begins to close again. In this case, the sharp image is located at the end of the movement. In the photograph (B), this flash technique gives a natural impression of movement and dynamics.
Notes:
- The combination of synchronization to the end of the exposure 12 nd with the flash modes 14 A, 14 and 14 S (see p. 140) is not possible. If it is activated when one of these modes is activated, they change to the corresponding modes without preflash.
- When using faster shutter speeds, in terms of the image there is hardly any difference, or only for rapid movements, between the two flash moments.
Setting the function
In the main record menu REC 3 / 4 (see pp. 112/ 122) select the menu item FLASH SYNC. (3.10) and follow the further menu instructions.
- The original viewfinder/monitor screen appears again with the corresponding display (2.1.28).
Flash exposure compensation -
This function can be used to selectively reduce or strengthen the flash exposure regardless of the exposure of the available light, e.g. in a picture taken outside in the evening, to lighten the face of a person in the foreground while retaining the lighting atmosphere.
Once set, a flash exposure compensation remains effective until it is (deliberately) reset.
Setting the function
Press the EV button (1.23) three times and follow the further menu instructions.
- The corresponding sub-menu appears. It contains a scale from +2 to -2 EV with 1/3 EV increments and a digital display, that, together with the yellow mark, indicate your setting.
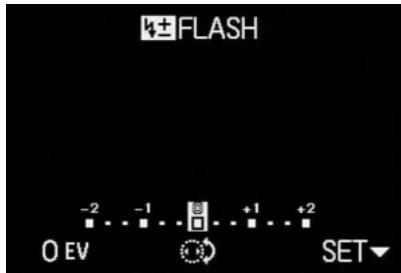
After setting, the original viewfinder/monitor screen appears again with an indication of the activated function and the compensation value (2.1.9).
Note: The EV button is used to set several kinds of functions. They scroll through in an endless loop and can therefore be selected by repeatedly pressing the button.
Taking photographs with external flash units
The ISO flash shoe (1.8) of the LEICA DIGILUX 2 also allows the use of more powerful, external flash units, preferably models that meet the SCA-3002 standard (with SCA-3502 M4 adapter), which in many cases can completely prevent "red eye effect" due to the larger distance of their flash reflectors from the lens axis. We specifically recommend the LEICA SF 24D (order no. 14 444)
The four flash modes without pre-flash are available for this (see Table).
Instructions for using external flash units:
-
As soon as an external flash unit is attached, the default flash modes with pre-flash function (14 A / 14 S ) / 14 S ) are changed to the otherwise same modes without pre-flash (14 A / 14 S / 14 S) and displayed accordingly in the viewfinder/monitor. However, when the flash unit is removed the camera is reset to the stored mode.
-
On the LEICA SF 24D, the mode TTL/GNC should be set to allow automatic control by the camera. When set to A, subjects with above or below average brightness may not be optimally exposed. When set to M, the flash exposure must be adjusted to the aperture and distance values specified by the camera by setting a corresponding reduced power output level.
| Flash mode\Exposure mode | Programmed automatic exposure and aperture priority modes | Speed priority mode | Manual setting |
| \( \boxed{50}\mathrm{\;A} \) | X | X | - |
| \( \boxed{40}\mathrm{\;A} \) | X | X | X |
| \( \boxed{30}\mathrm{\;S} \) | X | - | - |
| \( \boxed{20}\mathrm{\;A} \) | X | X | X |
-
For SCA-3002 standard flash units:
-
To retain the automatic flash exposure control, an SCA-3502 M4 adapter is needed.
-
It must be possible to set the flash unit to a mode that allows the camera's guide number calculation to control the flash power (Guide Number Control, see the relevant flash instructions).
-
For all other SCA system flash units and earlier adapters than the SCA-3502 M4:
-
The flash unit must be set to A or M.
-
For M, the reduced power output must be determined by guide number calculation and set manually on the flash unit.
-
For non-SCA flash units:
-
The only available flash modes are manual flash activation and deactivation (串) / (串)
- Only the exposure modes A and M can be used on the camera.
-
The flash unit must be set to A or M. For M, the reduced power output must be determined by guide number calculation and set manually on the flash unit. For A, the aperture settings on the camera and the flash unit must be the same.
-
For indirect flash (rotated or tilted flash reflector), the flash unit must be set to A mode.
- Do not use a cover for the flash shoe, as this will mechanically switch off the internal flash, and prevent it from being folded out.
Important:
- If an external flash unit is attached, it must also be turned on, i.e. ready to use, otherwise incorrect exposures and incorrect messages on the camera may result.
- If, on the other hand, you want to take pictures with a flash unit attached and turned on but without actually using the flash, the flash mode on the camera must be turned off.
Immediate viewing after the shot
Using automatic review of the last
picture - AUTO REVIEW
If automatic review is turned on, every picture is shown in the viewfinder/monitor immediately after it has been taken. This provides a quick and easy way for you to check whether the picture was taken successfully or you need to repeat it.
The function allows selection of the length of time for which the picture is to be shown (1 SEC/3 SEC), as well as another version (ZOOM), in which the picture is initially shown for approx. 1 s in original size, then for approx. 2 s a 3x-magnified section of the center of the image (helpful, for example, in better assessing the sharpness).
Note: The automatic review function is not available for use in conjunction with video recordings.
Setting the function
In the record setup menu X_D SETUP 1 / 3 (see pp. 112/ 122) select the menu item AUTO REVIEW (3.15) and follow the further menu instructions.
Viewing the pictures with the VIEW function
In contrast to the AUTO REVIEW function described in the previous section, which you have to activate in advance, you can use the VIEW function to view the pictures on the viewfinder/monitor (1.19/32) at any time without making any prior settings.
Notes:
- If you are using the exposure series function or automatic exposure bracketing, the last picture in the series is shown first. You can select the other pictures in the series as described under point 2.
- The VIEW function is not available for video recordings.
Setting the function
- Press down on the direction pad (1.30).
After a brief pause, the last photograph is shown on the monitor for around 10 s. The following also appear:
VIEW1X
as an indication of the activated function and the current magnification factor, as well as as an indication how to start deleting a picture (see pp. 147/158).
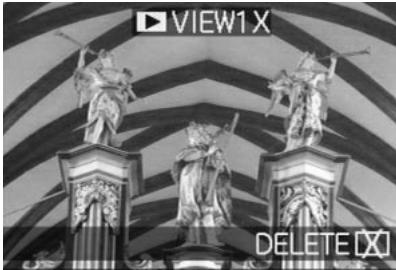
At any time, you can return to the original viewfinder/monitor screen, and thus to immediate readiness to take a picture by pressing the shutter release button (1.13), or by pressing the direction pad down again.
- While you are viewing one picture, you can also select any of your other pictures. To "scroll" through the pictures, press right or left on the direction pad.
-
While viewing a picture you can select a 4 × magnified section of the image by turning the central setting dial (1.29) towards the right. Turning to the right again leads to a further magnified, 8 × section.
-
Arrows appear on the 4 edges of the picture, to indicate how the trimmed area can be moved. The display in the header specifies the currently displayed enlargement level.
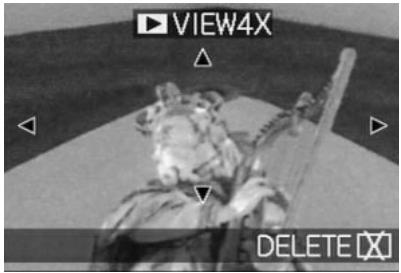
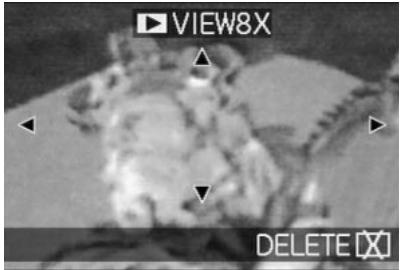
Notes:
- For as long as a picture is displayed in enlarged format, the direction pad is not available for selecting other pictures (see point 4).
-
In review mode (see p. 155) the picture can be enlarged up to 16x .
-
You can select any trimmed area of an enlarged view using the direction pad. To do this, press the direction (repeatedly) in which you want to move the trimmed area.
-
If the edge of the picture is reached in one or two directions, this is indicated by the fact that the corresponding arrows go out.
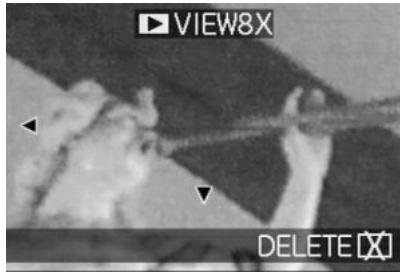
Deleting pictures during viewing
While a picture is shown in the monitor using this function, you can take this opportunity to delete it if you wish to do so. You can also delete several or all pictures simultaneously.
In all cases, this is done as described in the section "Deleting pictures", p. 158 described from point 2 onwards.
Important: Picture data is permanently deleted. You cannot subsequently retrieve it.
Additional functions
Exposure series
You can not only use the LEICA DIGILUX 2 to take single pictures but also to produce sequences of pictures. Picture frequencies of either 1 or 2.7 fps can be selected.
Notes:
- Exposure series are not possible when using the flash. If a flash function is activated, only one picture is taken.
- Exposure series are not possible together with video (▶) or sound recording (♣). The same applies to raw data storage (RAW). However, if both functions are activated, the relevant symbol appears in the viewfinder/monitor (2.1.34 a/b) crossed out.
- The maximum image frequency of 2.7 fps is only achieved with shutter speeds of 1/60 s or faster ( 1/4 s with 1 fps).
- Regardless of how many pictures are taken in a series, the VIEW and AUTO REVIEW functions always show the last picture in the viewfinder/monitor (1.19/32) first. The other pictures in the series can be selected by pressing right and/or left on the direction pad (1.30).
Setting the function
-
Set the record/review selector (1.15) to exposure series () .
-
In the viewfinder/monitor (1.19/32) one of the following symbols appears L / H (2.1.34 a/b)
Selecting the exposure
frequency-BURST RATE
-
In the main record menu REC 2 / 4 (see pp. 112/ 122) select the menu item BURST RATE (3.7) and follow the further menu instructions.
-
The corresponding display L / H (2.1.34 a/b) appears in the viewfinder/monitor.
-
Apart from operation of the shutter release button, the pictures are taken as described in the section "Taking photographs with programmed automatic exposure mode - P" (see p. 134). If you only press the shutter release button (1.13) briefly, the camera will still take single pictures. However, a series of pictures is taken for as long as you hold down the shutter release button (provided that the memory card has sufficient capacity).
Note: The maximum number of possible pictures in a series depends on the resolution and compression rate set. The exact details for the 64 MB memory card supplied can be found in the table below.
| Compression rate Resolution | Very low (###) | Low (###) | Normal (###) |
| 2560 | 3 | 5 | 9 |
| 2048 | 5 | 8 | 15 |
| 1600 | 8 | 15 | 28 |
| 1280 | 12 | 23 | 44 |
| 640 | 44 | 80 | 137 |
| HDTV | 8 | 14 | 27 |
Pictures with sound - AUDIO REC.
Single pictures can be taken with sound recording for a maximum of 5 s, for example accompanying sound or commentary on the picture.
Notes:
- Sound recordings are not possible together with exposure series (☑), automatic exposure bracketing (☑) or with raw data storage (RAW). Video recordings (☑) always include sound.
- The microphone (1.4) for sound recording is located on the front of the camera, thus mainly the ambient noises of the subject are recorded.
Setting the function
- In the main record menu REC 2 / 4 (see pp. 112/ 122) select the menu item AUDIO REC (3.8) and follow the further menu instructions.
-
The monitor shows the corresponding display (2.1.12).
-
Press the shutter release button (1.13) all the way down to take the photograph.
- The large microphone symbol in the center of the monitor flashes, while the 5 black triangles below it, showing the expired and remaining recording time, turn red successively at 1s intervals (2.1.33).
Note: It is not necessary to hold the shutter release button to continue sound recording.
Sound recording can be stopped at any time by pressing the shutter release button all the way down again. Sound recording ends automatically after 5 s.
Video recording - MOTION IMAGE
You can also use the LEICA DIGILUX 2 to produce video recordings. They are made in QuickTime (Movie) format with a resolution of 320 × 240 pixels. Whereas the resolution is a fixed preset, a picture frequency of between 10 fps and 30 fps can be chosen. The possible duration of your recording sequences depends on the capacity of the memory card you are using. The 64 MB card included with the camera allows you recording times of around 6 minutes or 2 minutes. The software required for review can be found on the CD ROMs supplied, or it can also be downloaded from the Internet free of charge: http://www.apple.com/quicktime/download
Note: Video recordings are always made with sound recording
Setting and using the mode
- Set the record/review selector (1.15) to one of the record modes / (see p. 120).
- In the main record menu REC 3 / 4 (see pp. 112/ 122) select the menu item MOTION IMAGE (3.12) and follow the further menu instructions. The following options are available:
ONE TIME - after a single video recording, the mode is deactivated,
or
ON - the mode is permanently activated (until it is switched off in the same way).
The picture frequency is selected with the
2nd function of the sub-menu (MOTION RATE).
- In the viewfinder/monitor (1.19/32) the corresponding displays (2.1.1 e) and (30 fps)
(2.1.7 a/b), and the signal for sound recording (2.1.12) then appear.
Note: A setting to ONE TIME is automatically reset to OFF when the camera is switched off or switches to stand-by mode. Consequently, this setting has to be made again prior to another video recording.
-
Specify your framing and press the shutter release button (1.13) to the pressure point.
-
When using one of the AF modes (AF/AF Macro, see pp. 131/132) the green dot (2.1.11 b) appears as soon as the focus has been set
Notes:
- When video recording starts (the first frame), the focus (when using one of the AF modes) and exposure settings are locked, i.e. they can no longer be changed while recording is in progress. By contrast, manual focusing (see p. 133) is available without limitations for the whole time.
-
If, when using one of the AF modes, you want to arrange your main subject off center at the start of recording, resulting in it not being covered by the autofocus metering area, but you still want the former to be the basis for focusing and exposure, you therefore have to proceed as described with metering memory-lock (see p. 132).
-
Press the shutter release button all the way down to start recording. This also starts sound recording.
- Pressing the shutter release button all the way down stops recording.
Video recording ends automatically when the memory card capacity is reached.
- In this case, the displays on the monitor disappear and MEMORY CARD FULL appears for a short time. The original displays then return, with the counter flashing and showing DS.
Notes:
-
In this mode, only digital focal length extension is available in the menu system D. ZOOM (see p. 131). To view the pictures, the review mode (see p. 155) must be used. By contrast, manual focusing MF (see p. 133) and zooming are still possible.
-
The (remaining) recording time shown on the monitor is an approximate value.
- When using MultiMedia cards, video recordings may suddenly be interrupted. This is due to their lower data transfer rate compared to SD memory cards.
- When using MultiMedia cards, the symbol for saving data to the card (2.1.16) may light up after a video recording, this is not a malfunction.
- Video scenes recorded on this camera may not play back on other cameras, or only in reduced quality.
Animation recording - FLIP ANIM.
This function of the LEICA DIGILUX 2 allows so-called animated films of up to approx. 100 single pictures and up to a length of approx. 20 s to be made. In animations, first of all single - and thus static - scenes are recorded, in which the subject is gradually - and usually only slightly - changed from one scene to the next. With the animation function, these are saved as a video file. They can subsequently be played back in a quick sequence, and thus generate an impression of movement with the familiar "jerky" effect.
Notes:
- In animation recordings, the resolution is automatically set to 320 × 240 pixels, the compression to normal.
Sound ( ) and exposure series ( ) as well as automatic exposure bracketing ( ) are not available in conjunction with the animation function. Nevertheless, noises may be heard during review on equipment without a MUTE function. - The playback of animation recordings is not possible with some other devices.
Setting the function
Creating a series of animated recordings
- In the main record menu REC 4 / 4 (see pp. 112/ 122) select the menu item FLIP ANIM. (3.13).
-
In the sub-menu, use the direction pad (1.30) to select IMAGE CAPTURE.
-
The original viewfinder/monitor screen appears again with the appropriate symbol (2.1.37). The number of possible single pictures is indicated under the counter (max. 100); e.g. REMAIN 99.
- Create the single pictures intended for the animation in the same way as described in the sections "Setting the distance", p. 131, and "Setting the exposure", p. 134.
Notes:
- Animation recordings can be made at any times, i.e. alternately with 'normal' recordings, and in any number (depending on the capacity of the memory card, see p. 127).
- All of the recordings made with the animation function are saved in a separate folder. Animation files are arranged in sequence there - just like the 'normal' recordings in their folders, too.
Every single recording can then be checked with the VIEW function and, as desired, deleted again immediately (see pp. 146/158).
Note: If there are several animation recordings in the relevant folder, they can also be viewed on this occasion.
Then, you can save the single pictures either as an animation, i.e. create a corresponding video file, or delete them again:
Saving the single pictures as animation
- Press the MENU button (1.25) to return to the sub-menu, select the menu line CREATE MOTION IMAGE, and open up the second sub-menu with the direction pad.
-
Select the desired picture frequency for playback (FRAME RATE) and then save the series of pictures (CREATE MOTION IMAGE again) according to the menu instructions.
-
In the viewfinder/monitor (1.19/32) the picture disappears and the corresponding confirmation of the procedure including the folder number appears briefly instead.
Important: If you do not delete a series of pictures (see below), it forms a part of a new animation file when the animation function is used again. In this case, each series is saved in the order of its creation and they are saved together as one new animation file.
Deleting the most recently created picture series
- Press the MENU button to return to the sub-menu, select the menu line DELETE STILL IMAGES and follow the further menu instructions.
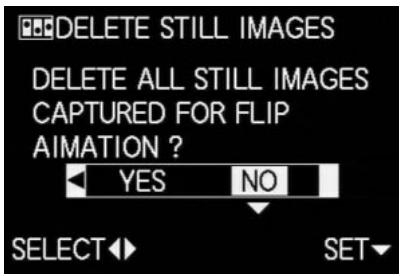
Important: With this function, only all pictures of the most recently created picture series can be deleted. Using a computer (see p. 173) it is even possible to subsequently delete single pictures, and thus also single recording series.
Ending the animation function
This is done with the MENU button according to the relevant menu instructions; this may have to be pressed up to 3x.
Viewing an animation
This is done precisely as described as in the section "Reviewing video recordings" (p. 158).
Notes:
- Even if an animation file is made up of several recording series, it is always played back as one unit, i.e. without interruption, with all recording series in a row and in the order in which they were saved.
- When 'scrolling' in the animation files saved on the card, however, only the first single picture of the animation file concerned is ever shown. If there are several animation files, this first picture of the first recording series is only ever shown irrespective of the time of recording and the order (including any 'normal' recordings made in the meantime), i.e. the pictures shown in this case are always the same ones.
- Animation files are not deleted when the menu function DELETE ALL (see p. 160) is used.
Taking photographs with the self-timer - The automatic shutter release button allows you to take a picture with a delay of either 2 or 10 s. This is particularly useful for group photographs, where you want to appear in the picture yourself or if you want to avoid the picture being out of focus due to camera shake when releasing the shutter. In such cases, we recommend that you mount the camera on a tripod.
Notes:
- Self-timer operation is not possible in conjunction with video recording.
- When the self-timer is activated, only single pictures are possible, i.e. exposure series and automatic exposure bracketing cannot be combined with self-timer mode. If exposure series are activated, the corresponding display appears crossed out (2.1.35).
Setting and using the function
-
By repeatedly pressing up on the direction pad (1.30), you can set the different function types. They scroll through in an endless loop as follows:
-
Self-timer mode with 10 s delay
- _2 Self-timer mode with 2 s delay
-
Self-timer off (= default setting)
-
In the viewfinder/monitor (1.19/32) the relevant symbol appears (2.1.32 a/b).
-
Press the shutter release button all the way down to take the photograph.
-
Progress - with 10 s delay - is indicated by flashing of the self-timer LED (1.4), first of all slowly (at 1Hz) and more quickly (at 2Hz) in the last 2 s. The display in the viewfinder/monitor flashes in blue during the delay (at 1.6 Hz).
With a 2 s delay, the displays flash as described above for the last 2 s.
The function can be cancelled at any time during self-timer delay by pressing the MENU button (1.25).
Note: Pressing the MENU button cancels the activated as well as any already running self-timer function.
Important: In self-timer mode, focus and exposure are not set when the shutter release button reaches its pressure point, but immediately before the picture is taken.
Calling up menu functions with the quick set button - FUNCTION
Some of the functions in the menus are used more often in practice than others, in particular with changing subjects and situations, or because the pictures
are intended for different uses, etc.. With the LEICA DIGILUX 2 you can specify the four most important functions of the record menu to you and then always call them up directly with the FUNCTION button (1.24) for quick operation.
Setting the functions that should be called up with the quick selection button -Custom SET.
-
In the record setup menu _B SETUP 2 / 3 (see pp. 112/122) select the menu item CUSTOM SET (3.19).
-
Open the corresponding sub-menu by pressing right on the direction pad (1.30).
-
The sub-menu appears. It contains four lines for assigning the four edges of the direction pad. In every line it is indicated which function of the edge concerned is assigned – indicated by the relevant arrow.
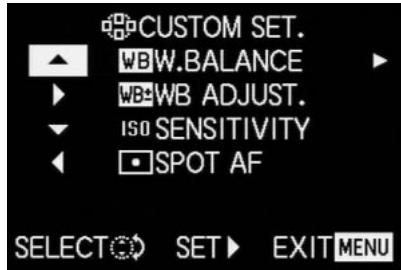
The following operation step is not necessary if you only want to change the function in the 1st line. In this case, proceed as described from point 4.
- By pressing the direction pad up or down or by turning the central setting dial (1.29), select the line in which you want to change the set function.
- Open the function list for assigning the line by pressing right on the direction pad.
Notes:

- All of the lines in the function list are the same and contain the whole main record menu, with the three functions brought together under
PICT. ADJ. (3.11) ① CONTRAST,
SHARPNESS and SATURATION being selectable directly here. - As a consequence, several edges can also be assigned the same function.
- By pressing up or down on the direction pad or by turning the central setting dial, select the function with which you want to assign the edge of the direction pad.
Note: The list is not an endless loop, i.e. only one direction of movement is possible at the start and end points.
- To
a. confirm your setting press right on the direction pad or
b. press left if you want to retain the original function.
- The sub-menu appears again.
The line edited contains either
a. the newly set or b. the original fu
If you want to change the functions in other lines, continue as described from point 3.
Otherwise, continue as follows:
- Depress the MENU button (1.25) twice to confirm your setting and to exit the menu system.
Using the quick set button - FUNCTION
-
Once the four edges of the direction pad have been assigned with the desired functions, these functions can then always be called up directly by pressing the relevant edge.
-
The corresponding sub-menu appears.
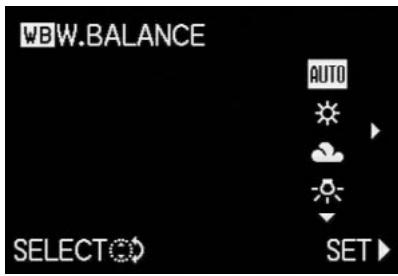
- The function options arranged in a vertical row correspond exactly to those in the normal menu items, except that these are arranged horizontally. The former can now be set especially quickly and simply by turning the central setting dial.
Reviewing single pictures
As already described in the sections "Using automatic review of single pictures - AUTO REVIEW" and "Viewing pictures with the VIEW function" (p. 146), pictures can be viewed in the viewfinder/monitor for a short time immediately after you have taken them. By contrast, review mode allows you to view the pictures at any time, with no time limit, e.g. to decide whether you want to delete a picture or to view other pictures on the memory card.
Notes:
- The LEICA DIGILUX 2 saves pictures according to the DCF standard (Design Rule for Camera File System).
- This camera reproduces picture data exclusively in JPEG format, although there are JPEG data records that cannot be viewed.
- It may not be possible to review files that have not been created by the LEICA DIGILUX 2, or the quality may be impaired. In this case, the viewfinder/monitor remains black and is displayed as the file number - (see below).
Setting the function/Selecting pictures
- Set the record/review selector (1.15) to review
- The last picture taken is shown in the viewfinder/monitor (1.19/32) and the displays for review mode appear (see p. 110).
- You can select the other saved pictures using the direction pad (1.30). Pressing left on the direction pad takes you to the pictures with lower numbers, right takes you to those with higher numbers. Holding it down (approx. 2 s) results in fast scrolling (the picture only changes when you release the direction pad). After the highest and lowest numbers, the series of pictures begins again in an endless loop, which means you can reach all pictures in either direction.
- The picture and file numbers in the viewfinder/monitor change accordingly.
Rotating the shots - RotATE
Many subjects can be portrayed better in portrait format, such as tall buildings or portraits that are not restricted to the face. The camera is turned accordingly to take such photographs. But so that this does not also have to happen when viewing the picture, the LEICA DIGILUX 2 allows the picture to be rotated in 90^ stages and thus 'align' the picture.
Note: Even a picture rotated by 90^ is shown completely in the viewfinder/monitor, i.e. without 'trimming'. As it has to be reduced for this, black areas appear to the left and right of it.
Setting the functions
- In the main review menu 12 (see pp. 113/122) select the menu item ROTATE (3.25).
-
Open the corresponding sub-menu by pressing right on the direction pad (1.30).
-
The sub-menu appears with the two directions of rotation - 90^ to the left/ 90^ to the right
-
Follow the further menu instructions.
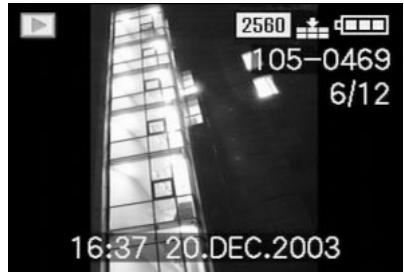
Reviewing single pictures with sound
As already described in the section "Pictures with sound" on p. 149, you can record sound to go with the pictures, if you want. The LEICA DIGILUX 2 can play back this sound along with the corresponding pictures. It can then be used later, for example as part of a presentation or as an aid to archiving.
Setting and using the function
Pictures for which a sound recording already exists are marked by the corresponding symbol [2] (2.2.5). The line PLAY AUDIO (2.2.17) also appears and an arrow to indicate how the sound recording can be played back.
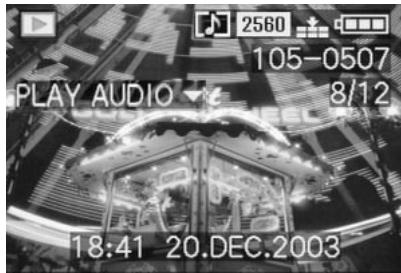
- During playback, PLAY AUDIO disappears.
Notes:
- For playback, make sure that the speaker (1.28) is not covered, e.g. by one of your fingers.
- Playback cannot be interrupted and it is not possible to select or set any other functions while it is in progress.
The playback volume can be adjusted to seven levels according to your preferences or the situation.
Setting the volume - VOLUME
In the review mode setup menu _空 SETUP 1 / 2 (see pp. 113/122) select the menu item VOLUME (3.34) and follow the further menu instructions.
- The setting is shown by the bar being marked in yellow, whereby the height indicates the volume.
Note: This also applies to the playback of video recordings (see p. 158), which are always made with sound recording.
Simultaneous review of nine single pictures/Enlarging and trimming when reviewing single pictures
The LEICA DIGILUX 2 allows you to simultaneously view up to 9 pictures in the viewfinder/monitor, e.g. to gain an overview or to find the picture you want more quickly. Conversely, it is also possible to enlarge
a single picture in the viewfinder/monitor by up to 16x, in order to study it more closely, and to freely select the trimmed area.
Reviewing several single pictures
Setting the function/Selecting pictures
-
The pictures just viewed are reduced by turning the central setting dial (1.29) to the left (anticlockwise).
-
Up to 9 pictures are shown in the viewfinder/monitor (1.19/32), including the picture previously being viewed at normal size, which is indicated by a yellow number.
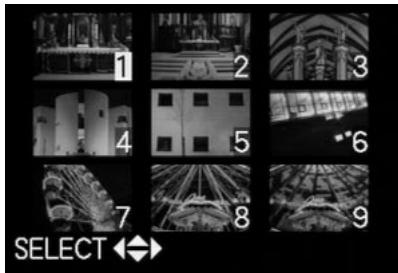
-
You can then use the direction pad (1.30) to "scroll" through the pictures in the relevant folder, i.e. select any of the other pictures (cf. "Reviewing single pictures", p. 155).
-
The selected picture is identified by a yellow number.
-
You can return each indicated picture to normal size by turning the central setting dial to the right (clockwise).
Enlarging the picture and selecting the trimming
Notes:
- It is not possible to enlarge the images or select the trimming for video recordings.
- The more the picture is enlarged, the more the quality of reproduction in the viewfinder/monitor is reduced, due to the proportionally lower resolution.
- It may not be possible to enlarge pictures created on other types of camera.
Setting the function/Selecting pictures
-
The pictures just viewed are enlarged by turning the central setting dial (1.29) to the right (clockwise).
-
The previous displays disappear from the viewfinder/monitor and the picture previously shown is enlarged by 2 ×
In addition, displays appear that indicate the relevant magnification factor (header), as well as (in the footers) the other possible reduction and/or magnification factors and DELETE [X] as an indication of how the picture shown can be directly deleted on this occasion (to delete
pictures see p. 158). At the same time, arrows appear on all 4 edges of the viewfinder/monitor screen to indicate how you can change the trimming.
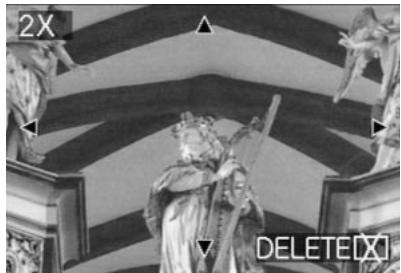
For even smaller trimmed areas, the enlargement factor can be increased to a maximum of 16x by repeatedly turning the central setting dial (up to 4x in total).
By turning the central setting dial to the left, the picture can be reduced again.
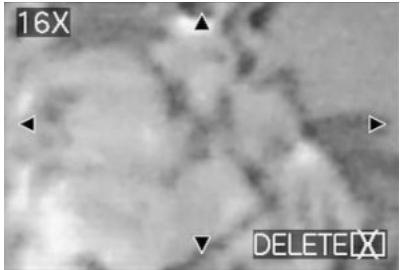
-
You can select any trimmed area of an enlarged view using the direction pad (1.30). To do this, press the direction in which you want to move the trimmed area.
-
If the edge of the original picture is reached in one or two directions, this is indicated by the fact that the corresponding arrows disappear.
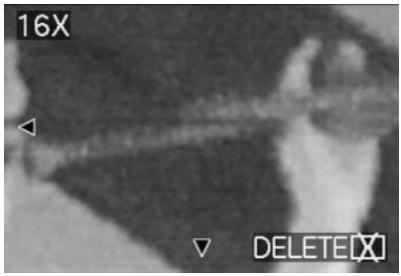
Reviewing video recordings
Just like single pictures, video recordings can be viewed on the viewfinder/monitor.
Notes:
- Only video recording files in QuickTime Motion JPEG format can be played back. Therefore, it may not be possible to play back video files that use other standards or those recorded using other cameras.
- When using memory cards with high capacity, fast rewind may be slower.
See "Reviewing single pictures with sound", p. 156 for details of setting the volume for the sound recording.
Setting the function/Selecting pictures
- Press left or right on the direction pad (1.30) to select the desired video recording file, marked with the corresponding symbol (2.2.7) (cf.: "Reviewing single pictures", p. 155).
- The first frame of the selected video recording is then shown. PLAY MOTION IMAGE (2.2.16) also appears, along with an arrow to indicate how the recording is played back.
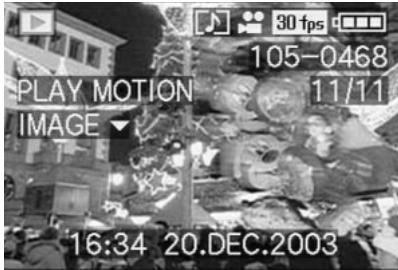
- To start playback of the video recording, press down on the direction pad. You can use the direction pad as described below at any time during playback.
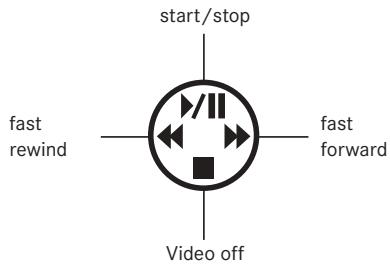
Deleting pictures - [x]
Pictures on the memory card can be deleted at any time. This can be useful, e.g. if you have already saved the pictures to other media, if you no longer need them or if you need to free up more memory space on the card.
The LEICA DIGILUX 2 also offers you the option of deleting single pictures, or several or all pictures at the same time, as required.
Notes:
- Deleting pictures is also possible when viewing with the VIEW function (see p. 146). The procedure is exactly the same as that described below.
- Protected pictures must first of all be unprotected, before they can be deleted. See the next section for details.
- Deleting a picture causes the subsequent pictures in the frame counter (2.2.11) to be renumbered according to the following pattern: If you delete picture no. 3, for example, what was previously picture no. 4 then becomes no. 3, while the picture that was previously no. 5 becomes no. 4 etc.. However, this does not apply to the numbering of the remaining picture files in the folder (2.2.12), which always remains unchanged.
Important: Pictures are permanently deleted.
You cannot subsequently retrieve them.
Setting the function
- Press the button (1.31).
- The sub-menu for deleting single pictures appears in the viewfinder/monitor (1.19/32).
The subsequent actions depend on whether you want to delete single pictures or several/all pictures simultaneously.
Deleting single pictures - [X] DELETE SINGLE
- Follow the further menu instructions.
![LEICA DIGILUX2 - Deleting single pictures - [X] DELETE SINGLE - 1](/content/2025/01/166016/images/f87f49b87b7c7177d3539c264f9b3522c077c1256f421ac73f94c65f8bb400da.jpg)
- After deleting, the next picture or the original picture, if it has not been deleted after all, appears in the viewfinder/monitor If the picture is protected (see p. 160), it also continues to be displayed and THIS PICTURE IS PROTECTED appears for a short time.
After leaving the menu system, the normal displays for the review mode appear again.
Deleting multiple pictures
simultaneously - [X] MULTI DELETE
With this function you can delete several pictures simultaneously.
-
Open the relevant viewfinder/monitor screen and follow the further menu instructions.
-
In the viewfinder/monitor first of all, the sub-menu appears to delete several or all pictures simultaneously, then up to 6 pictures in thumbnail format appear, each with their number, with the active picture being marked in yellow. The displays in the footer explain the subsequent actions.
![LEICA DIGILUX2 - simultaneously - [X] MULTI DELETE - 1](/content/2025/01/166016/images/f2517f968215142f153a9f7a993d6270bc5b1dc8720e7999471862bae57ce0f3.jpg)
Every picture to be deleted must be selected separately and marked
- The display appears in the relevant picture. If the picture is protected (see p. 160), it cannot be
marked and the corresponding display 01 flashes in red instead.
![LEICA DIGILUX2 - simultaneously - [X] MULTI DELETE - 2](/content/2025/01/166016/images/76f3613329066dfd1927a242dca5a2f02bbc4a06c201992914e75483a39c5d27.jpg)
Markings must also be cancelled separately correspondingly.
-
The display in the picture goes out again.
-
Press the button again and follow the further menu instructions.
-
In the viewfinder/monitor the sub-menu for deleting several pictures appears, then the pictures go out, the viewfinder/monitor screen goes blue and PLEASE WAIT... appears briefly. After deleting, the next picture or the original picture, if none have been deleted, appear, as well as the normal displays for the review mode.
Deleting all pictures on the memory card - ALL DELETE
-
Open the relevant viewfinder/monitor screen and follow the further menu instructions.
-
In the viewfinder/monitor the sub-menu for deleting several pictures simultaneously appears, then recording goes out in the background, the viewfinder/monitor screen goes blue and PLEASE WAIT... appears briefly while the is being being deleted.
Then NO VALID IMAGES TO PLAY or the original picture appears again, if it has not been deleted after all, as well as the normal displays for the review mode.
However, if the pictures included some with protection (see also next section), PROTECTED PICTURES REMAIN UNDELETED appears for a short time instead, and finally the first of these pictures and the normal displays for review mode reappear.
Protecting pictures - ON PROTECT
The pictures saved on the memory card can be protected against being accidentally deleted.
Notes:
- Even protected pictures are deleted when formatting the memory card (see also next section).
- If you attempt to delete protected pictures, warning messages appear in the viewfinder/monitor. When deleting single pictures: THIS PICTURE IS
PROTECTED, when deleting several or all pictures: PROTECTED PICTURES REMAIN UNDELETED. If
you still want to delete them, remove the protection as described below.
Protection is only effective on this camera.
- With SD memory cards you can prevent accidental deletion by sliding the card's write protection switch (see p. 119) to the position marked LOCK.
- Protected pictures cannot subsequently be given sound recordings (see p. 165).
Setting the function
-
In the main review menu 1/2 (see pp. 113/122) select the menu item Protect (3.26).
-
Press right on the direction pad (1.30).
-
The 3 function alternatives appear in the viewfinder/monitor (1.19/32),
- SINGLE (for single pictures),
-MULTI (for multiple pictures), and - CANCEL (canceling protection for all pictures).
The subsequent steps are different depending on the selected function.
Protecting single pictures/Removing protection - SINGLE
- Open the relevant viewfinder/monitor screen and follow the further menu instructions.
Note: During this step, you can also use right and left on the direction pad to select other pictures.
- In the viewfinder/monitor ON PROTECT THIS appears in the header, while the footers contain information about the further settings for the function.
A protected picture is marked with the display in the 2nd line, if protection is removed, it goes out again.
After leaving the menu system, the original viewfinder/monitor screen appears again with the relevant display (2.2.3).
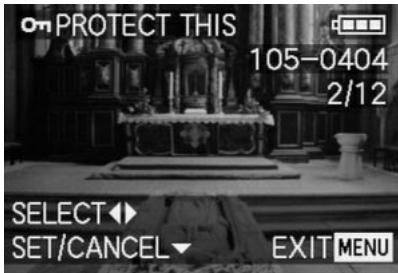
Note: This display also appears if a picture is selected that is already protected.
Protecting multiple pictures/
Removing protection - MULTI
- Open the relevant viewfinder/monitor screen and follow the further menu instructions.
- The picture and menu displays disappear from the viewfinder/monitor; they are replaced by up to 6 pictures in thumbnail format, each with their number, with the active picture being marked in yellow. The displays in the footers explain the subsequent actions.
Every picture to be protected must be selected separately and marked,
- The display l appears in the relevant picture.
markings must also be cancelled separately correspondingly.
- The display in the picture goes out again.
After protection, the small pictures and the displays in the viewfinder/monitor disappear, and the last activated picture appears again, along with the normal displays for review mode and, for pictures marked accordingly, the display for protected pictures (2.2.3).
Removing protection for all pictures - CANCEL
-
Open the associated sub-menu and follow the further instructions.
-
In the viewfinder/monitor the sub-menu for removing all protection settings appears, then the sub-menu goes out, the viewfinder/monitor screen goes blue, and PLEASE WAIT... appears briefly while protection is being removed. Then, the 1st menu level appears again and finally the last active picture and the normal displays for review mode appear again.
Formatting the memory card - [格式] FORMAT
It is not normally necessary to format (initialize) the memory card. However, if the error message
MEMORY CARD ERROR is shown, it is necessary to do so.
Nonetheless, we recommend formatting the memory card from time to time, as certain residual quantities of data (subsidiary information, particularly for sound recordings) can take up some of the memory capacity.
Important: When formatting, all information on the card, such as picture files, sound recordings and all other data, e.g. music files, is irretrievably lost. You should therefore make a habit of transferring all your pictures to a secure mass storage medium e.g. your computer's hard drive, as soon as possible.
Notes:
- Do not turn the camera off while the memory card is being formatted.
- If the memory card has been formatted in another device, such as a computer, you should reformat it in the camera.
- If the memory card cannot be formatted, you should ask your dealer or Leica for advice.
- When formatting the memory card, even protected pictures (see previous section) are deleted.
Setting the function
In the main review menu ^2 / 2 (see pp. 113/122) select the menu item (3.32) and follow the further menu instructions.
- The sub-menu for formatting the memory card appears in the viewfinder/monitor (1.19/32). If any pictures are saved on the card, DELETE ALL DATA ON THE MEMORY CARD appears. If no data is stored on the card, FORMAT THIS CARD appears.
If you previously selected YES, all pictures and displays go out, the viewfinder/monitor screen goes blue and PLEASE WAIT... appears briefly while the memory card is being formatted. Then, the display NO VALID IMAGE TO PLAY appears.
If you previously selected NO, the sub-menu disappears and the normal displays for review mode appear again.
Print order (DPOF) settings on the memory card - DPOF PRINT
As with traditional photography, you can have prints of digital pictures produced by a photographic studio or do it yourself on the appropriate machines, or print them yourself using compatible printers.
With your LEICA DIGILUX 2 you can prepare this kind of printing job in advance, by defining how many of which pictures you want to order on the memory card. This is done using the common DPOF standard (Digital Print Order Format).
The LEICA DIGILUX 2 also offers you the option of marking single pictures, or several, or all pictures at the same time accordingly, as well as defining individual print quantities of up to 99 units for each marked picture.
Notes:
- If the picture files are not compatible with the DCF standard, it is not possible to make print order settings on the memory card. This standard specifies the file structure.
- If print order settings made with this camera affect pictures that already have DPOF settings from other devices, those settings are overwritten.
Setting the functions
-
In the main review menu 12 (see pp. 113/122) select the menu item DPOF PRINT (3.27).
-
Open the sub-menu by pressing right on the direction pad (1.30).
-
The 4 function alternatives appear in the viewfinder/monitor (1.19/32),
- SINGLE (for single pictures),
-MULTI (for multiple pictures), - CANCEL (to cancel the settings for all
pictures), and
-INDEX (for an index print).
The subsequent steps are different depending on the selected function.
Print order settings for a single picture - SINGLE
- Open the relevant viewfinder/monitor screen and follow the further menu instructions.
Note: During this step, you can also use right and left on the direction pad to select other pictures.
- In the viewfinder/monitor DPOF SET THIS appears in the header, while the footer explains the subsequent actions and the COUNT 0 display marked in yellow acts as a counter for setting the desired number of copies.
To mark the picture as one for which print order settings already exist, the corresponding display D appears, including the number of copies set
The DISPLAY button (1.22) can be used at this stage to specify that the date on which the picture was taken should appear on the printed picture.
After leaving the menu system, the original viewfinder/monitor screen appears again with the symbol for print order settings, including the number of copies entered (2.2.2), and, if set, that for date printing (2.2.15).
Deleting individual print order settings
Settings that have already been made can be deleted at any time by repeating the menu system steps mentioned above, resetting the quantity to 0 and pressing the MENU button.
Print order settings for multiple pictures - MULTI
-
Open the relevant viewfinder/monitor screen and follow the further menu instructions.
-
The picture and menu displays disappear from the viewfinder/monitor; they are replaced by up to 6 pictures in thumbnail format, each with their number, with the active picture being marked in yellow. DPOF SET MULTI appears in the header, while the displays in the footers explain the subsequent actions and the COUNT 0 display marked in yellow acts as a counter for setting the desired number of copies.
Note: Every picture, of which copies are to be printed later, must be selected separately and marked and the number of copies must also be set,
- The display for the print order setting including the number of copies entered appears in the relevant picture.
Accordingly, the settings must also be cancelled separately.
- The display in the picture goes out again.
The DISPLAY button (1.22) can be used at this stage to specify that the date on which the pictures were taken should appear on the printed pictures.
- After leaving the menu system, the original viewfinder/monitor screen appears again. In addition, for pictures marked accordingly, the symbol for the print order setting appears including the number of copies entered (2.2.2), and, if set, that for date printing (2.2.15).
Deleting all print order settings - CANCEL
- Open the relevant viewfinder/monitor screen and follow the further menu instructions.
Note: The flashing arrow pointing to the right only appears if print order settings exist. If there are none, it is not possible to access the sub-menu and the subsequent steps.
- In the viewfinder/monitor the sub-menu for removing all print order settings appears, then the sub-menu goes out, the viewfinder/monitor screen goes blue, and PLEASE WAIT... appears briefly while the print order settings are being deleted.
The last picture activated and the normal displays for review mode then appear in the viewfinder/monitor.
Print order settings for an index print - INDEX
In addition to normal sized copies, many photographic studios also offer an "index print". This index print shows the pictures from a memory card in miniature format. They make it easier to order additional copies and are used as a simple form of archiving.
-
Open the relevant viewfinder/monitor screen and follow the further menu instructions.
-
The corresponding sub-menu appears in the viewfinder/monitor.
Note: The option CANCEL only appears if there is an existing order. In this case, SET appears instead of YES.
If SET or CANCEL have been selected,
- Recording in the background goes out briefly, the viewfinder/monitor screen goes blue, and PLEASE WAIT... appears while the order or deletion are being stored. The last picture activated and the normal displays for review mode then appear in the viewfinder/monitor.
Additional functions
Adding sound to existing pictures - AUDIO DUB. With the LEICA DIGILUX 2, you can add up to 10 s of sound recording to each picture at a later date, e.g. as commentary.
Notes:
- Pictures for which a sound recording already exists (see p. 149), are marked by the corresponding symbol [2.2.5]. The line PLAY AUDIO (2.2.17) also appears, along with an arrow to indicate how the recording is played back.
- Once recorded, a sound recording cannot be deleted, only overwritten with a new recording (see below from point 5 onwards).
Sound recordings cannot be added to protected pictures (see p. 160) or video recordings
Setting the function
- In the main review menu 12 (see pp. 113/122) select the menu item AUDIO DUB. (3.29) and follow the further menu instructions.
- In the viewfinder/monitor AUDIO DUB. appears along with the large microphone symbol (2.2.18) while the footer contains information about further settings for the function.
Note: During this step, you can also use right and left on the direction pad to select other pictures so that you can also add sound to them.
The following operating step is only necessary if a sound recording already exists for this picture. Otherwise, you can continue as described in point 4 onwards.
-
Open the associated viewfinder/monitor screen and follow the further menu instructions, i.e. select whether you want to overwrite the existing sound recording with a new one or whether you want to cancel your decision.
-
The sub-menu for adding a sound recording appears in the viewfinder/monitor.
-
To start the sound recording, press down on the direction pad (1.30).
-
The previously white microphone symbol turns blue and flashes for the duration of the recording. Below it, a row of 10 small black triangles appears, which successively turn yellow at one second intervals to show the progress of the maximum 10 s of recording time.
On the bottom line, only STOP remains on the right to indicate how the sound recording can be ended at any time.
The displays then return to their previous state, with the sound recording symbol [2.2.5] also appearing. While the data is being saved to the card, the corresponding display [2.2.13] also flashes for a short time.

Note: If there is insufficient memory capacity on the card to add a sound recording, the picture in the background disappears for a short time, the monitor screen turns blue and NOT ENOUGH MEMORY ON CARD appears.
- An on-going sound recording can be interrupted at any time by pressing down on the direction pad.
- Then, the displays change back to the state described at point 2, the sound recording symbol [2.2.5] also appears in the header.
- To turn off sound recording, press the MENU button (1.25).
- The last picture activated and the normal displays for review mode then appear in the viewfinder/monitor.
Reducing the resolution after
recording - RESIZE
You can reduce the resolution of a picture you have already saved at a later date. This is particularly recommended if you want to increase the remaining memory capacity of the card, send the picture as an e-mail attachment or use it as part of a website.
Notes:
- The resolution of video recordings (图), pictures with sound (图), pictures with a resolution of 640 × 480 pixels (640)), or 1920 × 1080 pixels (HDTV).
- For pictures saved with other devices, this may not be possible.
Setting the function
- In the main review menu 1 / 2 (see pp. 113/ 122) select the menu item RESIZE (3.30) and open the associated monitor screen.
If it is possible to reduce the resolution
RESIZE appears in the header, while the footer contains information about further settings for the function.

Note: During this step, you can also use right and left on the direction pad to select other pictures so that you can also reduce their resolution.
The following step is only necessary if it is not possible to reduce the resolution. Otherwise, you can continue as described in point 3 onwards.
- In these cases, choose one of the other pictures whose resolution you want to reduce.
-
Open the associated viewfinder/monitor screen.
-
The resolution of the picture currently displayed appears on the left in the viewfinder/monitor with the next-smallest resolution level below it. If other resolution levels are available, this is shown by an adjacent arrow.
The following step is only necessary if you want to reduce the resolution by more than one level.
Otherwise, you can continue as described in point 6 onwards.
-
Select the desired resolution.
-
Depending on whether only a lower resolution is available for the current setting, only a higher resolution or both, the different corresponding arrow symbols appear.
-
Press the direction pad down and follow the further menu instructions, i.e. choose whether you want to replace the original picture file with the new one with the reduced resolution or whether you want to cancel your decision and want to save the picture with the reduced resolution additionally to the picture with the original resolution.
-
In the viewfinder/monitor the sub-menu appears to select the picture files to be saved, then the picture and displays go out briefly, the viewfinder/monitor screen goes blue, and PLEASE WAIT... appears.
Then, the new record file appears with the reduced resolution, or that with the original resolution, and the viewfinder/monitor screen of point 3.
After saving, the last active picture and the normal displays for review mode appear again in the viewfinder /monitor.
Notes:
- New resolution versions replacing those with the original resolution also take on the originals' picture numbers.
- Versions saved with a different resolution are numbered in the same way as new pictures, i.e. regardless of the number of the original picture, they are added as the last picture.
- If the new picture file with the reduced resolution (and new picture number) was saved in addition to the original picture, the first can be selected by pressing right on the direction pad.
Changing the trimming after recording - TRIMMING
With the LEICA DIGILUX 2 you can change the trimming of pictures you have already saved at a later date. This trimming makes it possible to remove less important areas at one or more of the edges or to make the main subject more prominent, thereby optimizing the composition of the picture.
However, the following must be taken into account: If the (originally smaller) trimming is subsequently made as large as the original picture, this always means a simultaneous reduction in the resolution, as a lower number of pixels has to cover the same area.
Note: Trimming is not possible for video recordings (图), pictures with sound (图) or for those that have been saved using other devices.
Setting the function
-
In the main review menu ^2 / 2 (see p. 113/ 122) select the function TRIMMING (3.31).
-
Open the associated viewfinder/monitor screen by pressing right on the direction pad (1.26).
-
If it is possible to change the trimming
TRIMMING appears in the header, while the footer contains information about further settings for the function.
However, if it is not possible to change the trimming (for the reasons mentioned under "Note" above) the following appears instead:
- In the center of the screen THIS PICTURE CANNOT BE TRIMMED, and only one footer with notes on subsequent actions.
Note: You can also select the other pictures within this operation step so that you can change their trimming.
The following step is only necessary if it is not possible to change the trimming. Otherwise, you can continue as described in point 4 onwards.
-
In these cases, choose one of the other pictures whose trimming you want to change.
-
Open the next viewfinder/monitor screen by pressing down on the direction pad.
- The (single) footer contains information on subsequent actions.
- Use the central adjustment dial (1.29) to select the desired trimming. Turning to the right results in an enlarged, i.e. smaller trimmed area, turning to the left results in a reduced, i.e. larger trimmed area. 4 enlargement levels are available here:
- Arrows appear on the 4 edges of the picture, to indicate how the trimmed area can be moved. The display in the footer indicates whether further enlargement and/or reduction levels are possible, as well as information about subsequent actions.
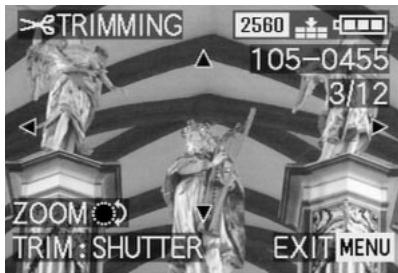
Notes:
- Enlarging the trimmed area is only possible after at least one previous reduction.
-
The smaller the selected trimmed area is, the more it can be moved off-center in point 6
-
Select the desired trimming using the direction pad.
-
In the viewfinder/monitor, the image "moves" in the direction you press on the direction pad.
Note: The edges of the original picture are the limits of where you can move. - If, when moving, you reach one or two of these edges, the relevant arrows disappear.
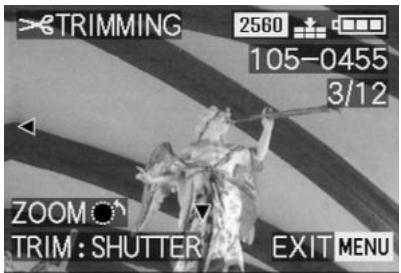
-
Press the shutter release button (1.13).
-
The sub-menu for selecting the picture files to be saved appears in the monitor.
-
Follow the further menu instructions, i.e. choose whether you want to replace the original picture file with the new one or if you want to cancel your decision and want to save the picture with the reduced trimming additionally to the picture with the original trimming.
-
The picture and displays disappear for a short time, the viewfinder/monitor screen goes blue, and PLEASE WAIT... appears.
Then the new record file with the changed trimming or that with the original trimming and the viewfinder/monitor screen of point 2 appears.
After saving, the last active picture and the normal displays for review mode appear again in the viewfinder/monitor.
Notes:
- New trimming versions replacing those with the original trimming also take on the originals' picture numbers.
- Versions saved with different trimming are numbered in the same way as new pictures, i.e. regardless of the number of the original picture, they are added as the last picture.
- If the new picture file with the changed trimming (and new picture number) was saved in addition to the original picture, the first can be selected by pressing right on the direction pad.
Resetting all individual menu settings - XR RESET With this function, you can reset all the settings you have previously made in the menu system, e.g. using a white balance for a particular lighting situation or activation of the AUTO REVIEW function (see p. 146) to their factory settings in one step.
Setting the function
-
In the record setup menu X SETUP 3 / 3 (see pp. 113/122) select XR RESET (3.22).
-
Open the first of the two associated sub-menus and follow the further menu instructions, i.e. for both menu groups select whether you want to reset all of your own settings to the factory settings or whether you want to cancel your decisions and keep your own settings.
-
First of all, the sub-menu for resetting the main menu appears, followed by a confirmation, then that for resetting the setup menu. After leaving the menu system, the original view finder/monitor screen appears again.
Creating new folder numbers - NO.RESET
The LEICA DIGILUX 2 writes the picture numbers to the memory card in ascending order. Initially, the corresponding files are all stored in one folder. However, you can create a new folder at any time, which you can use to store subsequent pictures, e.g. to group them together more clearly.
Setting the function
-
In the record setup menu X_D SETUP 3 / 3 (see pp. 113/122) select NO. RESET (3.20).
-
Press right on the direction pad (1.30) to open the associated sub-menu and follow the further instructions, i.e. choose whether you want to increase the original folder number by 1 and start picture numbering again (at 0001), or whether you want to cancel your decision and keep the folder number.
Note: The folder numbers, e.g. 100-0001 comprise two groups. The first groups of digits name the relevant folder, the second the consecutive picture number within the folder.
This ensures that there are no duplicated file names after the RESET function is used and the data is transferred to a computer.
Automatic review of a series of
pictures - SLIDE SHOW
With the LEICA DIGILUX 2 you can automatically play back a sequence of pictures saved on the memory card on the camera monitor or the screen of a connected computer or a TV set like a slide show. You can also select how long each picture is shown for and whether any sound recordings are to be played back at the same time. Using DPOF marking (see p. 162) you can also limit the function to pictures you have previously selected.
Notes:
Automatic review is not available for video recordings (1).
- The display time for pictures with sound is fixed, i.e. you cannot change the length of time such pictures are displayed.
- The DPOF markings for a slide show do not apply to print orders (see p. 162).
- DPOF markings made with this camera overwrite all existing markings, in particular those made with other devices.
Setting the function
-
In the main review menu 1/2 (see pp. 113/122) select the menu item SLIDE SHOW (3.28).
-
Open the sub-menu by pressing right on the direction pad (1.30).
The 2 function alternatives appear in the viewfinder/monitor (1.19/32),
- ALL (to present all pictures), and
DPOF (to present only the pictures marked accordingly).
The subsequent actions depend on whether you want to present all pictures or only those with the appropriate markings.
Presenting all pictures on the memory card - ALL
-
Open the relevant viewfinder/monitor screen and follow the further menu instructions.
-
The following appears in the viewfinder/monitor:
-
START to start the presentation
DURATION to select the display time - AUDIO for simultaneous playback of a sound recording (where available)
The following steps are only required if you want to change the display time (point 4; factory setting 1 s) or if you want to play back existing sound recordings (point 5). Otherwise, you can continue as described in point 6 onwards.
- In the line DURATION select the desired display time
- In the line AUDIO select whether any sound should be played back.
-
A presentation is started from the START line.
-
In the viewfinder/monitor ALL SLIDE SHOW appears for a short time in the header, with START SLIDE SHOW and STOP MENU in the center to indicate how the presentation can be stopped at any time. The slide show then begins.
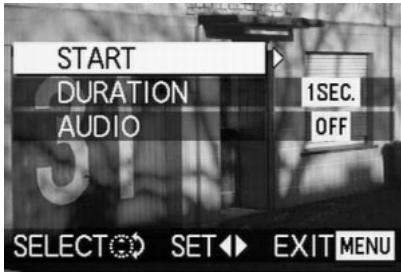
Notes:
- The presentation runs through in an endless loop, i.e. until it is stopped as described under point 7
-
The presentation cannot be stopped while a sound recording is being played back.
-
To stop the slide show, press the MENU button (1.25).
-
END OF SLIDE SHOW appears in the viewfinder/monitor for a short time, after which the last picture activated and the normal displays for review mode then appear again.
Presenting marked pictures - DPOF
-
Open the relevant viewfinder/monitor screen and follow the further menu instructions.
-
The following appears in the viewfinder/monitor:
-
START to start the presentation
DURATION to select the display time - AUDIO for simultaneous playback of a sound recording (where available)
DPOF SET for marking the desired pictures
- CANCEL ALL to delete all markings
The first two functions are, if desired, set as described above under "Presenting all pictures on the memory card" and points 4 (Changing the display time) and 5 (Playback of existing sound recordings). Otherwise, continue as follows.
-
Use the line DPOF SET to select each one of the pictures that you want to mark for the presentation. In principle, this is done exactly as described in the section "Print order (DPOF-) settings on the memory card - DPOF PRINT", p. 162.
-
In the viewfinder/monitor, the DPOF-Symbol (2.2.2) appears in green for the pictures marked accordingly, or for pictures for which print order settings have been made and that have therefore already been marked, only the color of the symbol changes from white to green.
The subsequent actions correspond to points 3-6 under "Presentation of all pictures on the memory card".
Deleting all markings - CANCEL ALL
- Open the relevant viewfinder/monitor screen and follow the further menu instructions.
Note: The flashing arrow pointing to the right only appears if the corresponding markings exist. If there are none, it is not possible to access the submenu and the subsequent steps.
- In the viewfinder/monitor, the sub-menu to cancel all DPOF markings for the presentation appears, and the original viewfinder/monitor screen appears after leaving the menu system.
PLAYback with AV equipment -VIDEO OUT
The LEICA DIGILUX 2 allows you to view or present your pictures on a TV or computer monitor, and therefore on a large screen. This also applies to all sound recordings, which can be played back on an audio system. The camera is connected to the TV via the A/V lead supplied, after it has been set to the TV standard applicable in your country - PAL or NTSC.
The camera's monitor screen ("Livecam") can also be reproduced on NTSC compatible TVs or computer monitors with a video input. The same applies to (brief) automatic or manual review of the picture just taken in the record modes (AUTO REVIEW/VIEW).
Notes:
- Do not use any leads other than the one supplied.
- If your TV has a scart socket rather than a cinch socket, you will also need an appropriate adapter.
- We recommend that you run the camera from the mains for this application (see p. 118)
- Please refer to the relevant manual for details of the required TV settings.
Selecting the TV standard
In the basic review menu X SETUP 2 / 3 (see pp.113/122) select the menu item VIDEO OUT (3.35) and follow the further menu instructions.
Connecting/Playing back pictures
- Turn off the camera and the TV.
- Plug the small individual strip plugs of the lead into the camera's "A/V OUT/REMOTE" socket (1.35) and plug the cinch plugs into the relevant sockets on the TV: the yellow plug in the video in socket, the white one in the audio in socket.
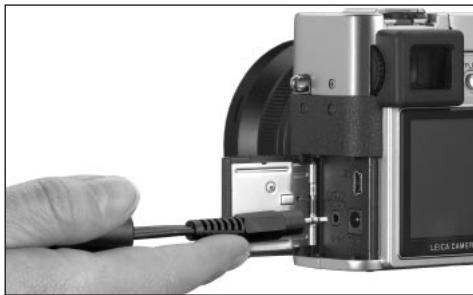
- Turn on the TV and switch to the AV channel.
-
Turn on the camera and set the Record/review selector (1.15) to review l .
-
The image set on the camera is then reproduced on the TV.
Data transfer to a computer/
Printing with direct connection to a printer
The LEICA DIGILUX 2 is compatible with the following operating systems:
- Microsoft®Windows®: Windows®98, Windows®ME, Windows®2000 with Service Pack 4, Windows®XP with Service Pack 1
- Apple® Macintosh®: Mac®OS 9, Mac®OS X
Various modes are available to transfer the data to a computer or to control the camera remotely via a computer, and for direct printout of the pictures. They have to be set in advance – according to the desired use. The factory setting – MASS STORAGE – is compatible with most operating systems.
The following Table lists the operating systems for the uses concerned.
PTP mode
This setting can only be used on the most up-to-date operating systems, such as Windows XP and MAC OS X. Here, the LEICA DIGILUX 2 is recognized as a "digital camera". The operating systems automatically launch Assistants for simple downloading of the pictures and video files, or offer direct access to picture editing programs, e.g.
AdobePhotoshopElements
| Compatible operating systems | ||
| USB mode | For use with computers | For direct connection of a printer to the camera |
| Mass Storage | Windows®XP with Service Pack 1, Windows®2000 Professional with Service Pack 4 Windows®ME, Windows®98 SE oder Mac®OS X (Version 10.1 or higher), Mac®OS 9.x | Models that support the USB Direct Print Standard |
| PTP | Windows®XP with Service Pack 1 or Mac®OS X | Models that support the PictBridge Standard |
| Remote control | Windows®2000, Windows®XP with Service Pack 1, Mac®OS X | - |
Setting the function
In one of the setup menus _D SETUP ^2 / 3 (see pp. 112/113/122) select the menu item USB
MODE (3.23) and then the desired mode according to the further menu instructions.
MASS STORAGE mode
The USB function is compatible with most operating systems. In this case, the computer recognizes the camera as an interchangeable hard disk or an external card reader.
With Windows® computers: The camera is displayed in Explorer with its own drive identifying letter.
With MAC® computers: The camera is displayed on the desktop with a symbol for a drive.
Remote control mode via the USB connection
This mode must be selected if the camera is to be used with the LEICA USB Remote Control Software (see p. 176).
Together, they allow control of the camera and immediate downloading of pictures to the hard disk from the computer. Furthermore, incremental pictures can also be set and controlled in this way.
To install the software please refer to the next section, instructions on use can be found in the help function within the program.
Notes:
- If the camera is connected to a computer, pictures and sound are not output via the A/V OUT/REMOTE socket (1.35).
- For further details, please refer to the additional computer connection information enclosed.
- The camera is equipped with a USB high-speed interface (USB 2.0). This allows extremely quick data transfer to computers with an interface of the same kind. For computers fitted only with a USB 1.1 interface, transfer is correspondingly slower.
- If you connect the LEICA DIGILUX 2 to a computer with a USB 1.1 interface, the operating system may generate a corresponding message that refers to this.
- If your computer is fitted with a USB 2.0 interface and you work with Windows® 2000, Service Pack 4 must be installed so that your computer's USB interface works properly; if you work with Windows® XP, you need Service Pack 1.
-
These Service Packs for the Microsoft® operating systems are available from Microsoft®. They each offer the most up-to-date corrections and supplements, such as improved drivers or improvements ensuring higher data security.
-
If you use a USB 2.0 connection, the following must be borne in mind:
- If connecting one or more devices to a computer, or if using a hub or an extension lead, malfunctions may result.
- If the camera is connected to the USB socket of a keyboard, malfunctions may result.
Important:
- Use only the USB lead supplied (F)
- For as long as data is being transferred from the camera to the computer, the connection must not be interrupted by removing the USB lead, as the computer and/or camera can 'crash'; the memory card may even be irreparably damaged. In this case, the camera function can be retrieved by briefly removing the battery or interrupting the mains supply.
-
For as long as data is being transferred from the camera to the computer, the camera must not be turned off or allowed to switch itself off automatically due to a lack of battery power, as this can cause the computer to 'crash'. If it is not being operated on the mains when the connection is activated, the battery must not be removed for the same reason. If the battery capacity should run out during data transfer, the relevant symbol (2.2.10, see p. 118) flashes: end data transfer, switch the camera off (see p. 120) and charge the battery (see p. 116).
-
We therefore recommend that you always run the camera from the mains to transfer data (see p. 118).
Connecting and transferring the data in MASS STORAGE mode
With Windows® 98 SE
- Insert the CD-ROM (L) entitled "LEICA Digital Camera Software" in your computer's drive. Then the installer is automatically launched (if you have not previously deactivated the AUTORUN function in the Windows settings). Otherwise, open your CD drive in Windows Explorer and start the installer by double clicking on the file "Setup.exe".
- Select the desired language.
- Click on "USB driver for Windows®98" to launch the installation process. As a result, the USB Mass Storage driver is copied to the hard drive.
- After LEICA USB Storage Driver Setup installation, click on "Finish" to end the process.
- Reboot the computer.
-
Set the LEICA DIGILUX 2 to the USB mode MASS STORAGE (see above),
-
switch to review mode (not record mode!), and
- connect it to a free USB port on your computer using the USB lead supplied. The camera is automatically detected as an additional "Removable drive". It contains the folder "DCIM" and the directory in which the pictures are saved, e.g. "100LEICA".
- From there, you can then copy the picture files into a folder of your choice on your hard drive using the normal Windows Explorer method.
Note: The programs ACDSee® 6 Power Pack, LEICA USB Remote Control Software and Quick Time® can also be installed from the LEICA Digital Camera Software installer.
With Windows®ME, Windows®2000, Windows®XP
- Set the LEICA DIGILUX 2 to the USB mode MASS STORAGE (see above),
- switch to review mode (not record mode!), and
- connect it to a free USB port on your computer using the USB lead supplied. The computer automatically detects the camera. With Windows®ME/2000/XP no more drivers need to be installed.
- You can therefore proceed as described above in items 6-9.
With MacOS 9 and MacOS X
- Set the LEICA D-LUX to review mode (not record mode!) and
- connect it to a free USB lead port on your computer using the USB lead (F) supplied.
- The computer automatically detects the camera, it appears as a symbol on the desktop.
- To transfer the data, open the DCIM folder by double clicking on the appropriate symbol. You will find individual directories called 100LEICA, 101LEICA, etc..
- From there, you can then copy the picture files into a folder of your choice on your hard drive in the normal way.
Connecting and transferring data in PTP mode With WindowsXP
- Set the LEICA DIGILUX 2 to the USB mode PTP (see above),
- switch to review mode (not record mode!), and
- connect it to a free USB port on your computer using the USB lead supplied.
- The computer automatically detects the camera and launches an Assistant to access the camera.
- Launch the item "Microsoft Scanner and Camera Assistant" or select a picture editing program, e.g. Adobe Photoshop Elements 2 if installed.
- Now follow the instructions on the screen.
Note: Do not select the point "Microsoft Office Document Imaging" This is primarily used to access documents via a scanner and is not compatible with digital cameras.
With Mac®OS X
- Set the LEICA DIGILUX 2 to the USB mode PTP (see above) and
- connect it to a free USB lead port on your computer using the USB lead (F) supplied.
- The computer launches an assistant to access the camera.
- You can now select iPhoto® or another compatible program to transfer the data to the computer or to edit them.
Note: The picture files can be transferred to other computers with an optional card reader for SD memory cards. Further details are available from your dealer.
Remote control mode via the USB connection with Mac® and Windows®
- Insert the CD-ROM (L) entitled "LEICA Digital Camera Software" in your computer's drive or download the most up-to-date version from the download area of the Leica homepage and install the software.
- Set the LEICA DIGILUX 2 to the USB mode (see above),
- set it to record mode (not to review mode!), and
- connect it to a free USB port on your computer using the USB lead supplied.
- The computer automatically detects the camera.
- Launch the LEICA USB Remote Control Software. More detailed instructions can be found in the help menu within the program.
Printing copies by direct USB connection to a printer
With the LEICA DIGILUX 2, you can print your pictures out quickly and easily. All you need to do is connect it directly to a printer that supports the USB Direct Print method using the USB lead supplied (F).
Notes:
- We recommend that you run the camera from the mains for this application (see p. 118).
- Depending on the printer type, set the camera to MASS STORAGE (see p. 174) or PTP (see p. 175).
- For further details, please refer to the printer manual.
Making the connection
- Insert a memory card into the camera (see p. 119).
- Turn on the camera (see p. 120).
- Connect the USB lead supplied. The smaller plug is inserted in the USB socket of the camera (1.33), the other in the corresponding socket on the printer.
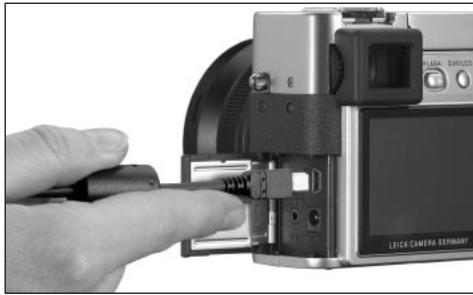
The corresponding sub-menu appears.
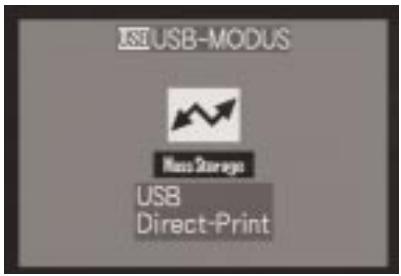
Note: This sub-menu only appears if you have already set DPOF markings for print orders (see p. 162). Otherwise, you should continue as described in point 6 onwards.
Printing single copies
- Press left of right on the direction pad (1.30) to select SINGLE PICTURE/printing a single picture.
- Open the next monitor screen by pressing down on the direction pad.
-
PLEASE SELECT THE PICTURE TO PRINT appears for approx. 2 s.
-
Select the desired picture by pressing left or right on the direction pad.
- Open the next monitor screen by pressing down on the direction pad.
The following step is only required if you want to print more than one copy of the selected picture. Otherwise, you can continue from point 10.
- Press up on the direction pad to get to the COUNT line.
- Select the desired number of copies by pressing right or left on the direction pad.
- Open the next monitor screen by pressing down on the direction pad.
-
Press left on the direction pad to select YES if you want to print the set number of the selected print or cancel your decision and select NO again by then pressing right on the direction pad if not (e.g., to change the amount).
-
The option currently set is marked in yellow.
-
To print the picture, press down on the direction pad.
-
The set number of copies and the amount printed so far are displayed in the monitor.
Notes:
- The printing process can be stopped at any time by pressing the MENU button (1.25).
- If more than 255 copies have been printed, the display in the monitor changes to —.
Printing all copies set by DPOF marking
- Press left or right on the direction pad to select DPOF/printing all orders saved on the card with DPOF marking (D, 2.2.2).
The subsequent actions are the same as those described above in points 10 to 12.
The Epson PIM (Print Image Matching) format
Print Image Matching allows print style commands to be integrated into each digital image. This information is defined by the camera at the time the picture is taken. This makes it the first system of its kind in the world. The printers and their advanced driver software give the photographer total control over the print quality. He can make the settings using the figures, or use the fully-automatic printing function based on the PIM settings in the camera.
The industry standard ExifPrint is based on PIM and makes this system easier to use. Print Image Matching II offers additional setting parameters and enables you to achieve optimum printing results when used in combination with ExifPrint.
Print Image Matching II mode allows you to transfer the PIM II data along with the images to a computer or directly to a printer, which means it is possible to print directly from the camera's memory card. The PIM II commands in the image determine how the data will be processed by the printer driver software.
In this way, the Print Image Matching II data in digital images represents information that was previously
missing. It therefore provides users with an additional option for defining print quality instructions.
However, the PIM II information can only be processed by a PIM II-compatible printer. There are printers that can be used with or without a computer. For use with a computer, the printer driver must have PIM II support. The PIM II software also has to be installed, so that the information in the digital camera image file's JPEG header can be read. For use without a computer, no additional software is required. It is sufficient to insert the memory card into a PIM II-compatible printer and run the print. PIM II technology ensure seamless interaction between digital cameras and printers and therefore optimum quality printed pictures as an end result.
Installing the enclosed software
3 CD-ROMs (L) are included with the LEICA DIGILUX 2. They are:
CD 1: LEICA Digital Camera Software
CD 2: SilverFast®DC SE 6 for Leica
CD 3: Adobe Photoshop Elements 2
CD1, LEICA Digital Camera Software, contains the following programs:
1.a ACDSee®6.0 PowerPack for Windows This package comprises ACDSee®6, ACD FotoCanvas®2.0, ACD FotoAngelo and ACD FotoSlate®3.0.
1.b ACDSee® 1.68 for Macintosh
2. LEICA USB Remote Control Software This program offers the opportunity to remotely control the LEICA DIGILUX 2 from a computer via a USB connection. In this connection, the pictures are immediately loaded on to the computer's hard disk. This means that almost unlimited storage space is available. Furthermore, this program can also be used to automatically operate the camera with interval and timer control. Moreover, the user's name can be stored in the camera so that it is saved in the file information photographer field for every picture taken.
3. Apple®QuickTime®(supplied only for Windows® because it is part of the operating system in Macintosh®computers)
This program is needed to reproduce the audio and video files created by the LEICA DIGILUX 2.
Installation
- Insert the CD-ROM (L) entitled "LEICA Digital Camera Software" in your computer's drive. Then the installer is automatically launched (if you have not previously deactivated the AUTORUN function in the Windows settings). Otherwise, open your CD drive in Windows Explorer and start the installer by double clicking on the file "Setup.exe".
- Select the desired language.
- In the installation screen select the programs that you want to install and follow the further instructions on the screen
CD 2 contains the program package SilverFast ^® DC SE 6 for Leica
SilverFast ^® DC-SE 6 allows a beginner to quickly and easily make brilliant pictures from his digital photographs. SilverFast ^® DC-SE 6 is equipped with practically all of the functions of the multi-award winning full version of SilverFast, but largely works with intelligent automatic functions. Integrated Quick-Time ^® Movies quickly familiarize you with the functions of SilverFast. The Virtual Light Table VLT is available without restrictions for organizing and managing large inventories of pictures. SilverFast ^® DC SE 6 can be upgraded to the full version SilverFast ^® DC-VLT or the professional alternative SilverFast ^® DC-Pro with raw data conversion at any time.
This program allows you to convert picture files created by the LEICA DIGILUX 2 in raw data format into other formats, making various optimizations to the pictures in the process. These include white balance, color corrections and edge definition. More information can be found in the online help within the SilverFast® software and the excellent instruction videos that demonstrate working with SilverFast® step-by-step.
Installation
With Macintosh® computers:
- Insert the CD in your CD or DVD drive.
- Open a window for the drive and launch the installation by double clicking and follow the instructions of the installation program.
With Windows® computers:
- Insert the CD in your CD or DVD drive.
- The installation program now starts automatically. Please follow the instructions. If installation does not start automatically, please open the Windows Explorer and click on your CD or DVD drive. In the right-hand window of Windows Explorer you will find the file "Setup.exe??.". Run this file and follow the instructions of the installation program.
CD 3 contains the program AdobePhotoshop Elements2
You can use this software to professionally edit the pictures taken with your LEICA DIGILUX 2.
Installation
With Macintosh® computers:
- Insert the CD in your CD or DVD drive.
- Open a window for the drive and launch the installation by double clicking and follow the instructions of the installation program.
With Windows® computers:
- Insert the CD in your CD or DVD drive.
- The installation program now starts automatically. Please follow the instructions. If installation does not start automatically, please open the Windows Explorer and click on your CD or DVD drive. In the right-hand window of Windows Explorer you will find the file "Setup.exe??.". Run this file and follow the instructions of the installation program.
Miscellaneous
Accessories
Cable release
The cable release LEICA CR-DC1 allows the LEICA DIGILUX 2 to be released from a distance of up to 90cm , e.g. to maintain a safety distance or an emergency escape distance when taking pictures of animals. For connection, the connecting plug (1.53) is inserted in the AV OUT/REMOTE socket of the camera (1.35). The function of the release (1.54) exactly corresponds to that of the camera release (1.13, see p. 121). The clip (1.55) can be used to connect the cable release to a shirt or trouser pocket so that both hands are free for other tasks. (Order no. 18 626).
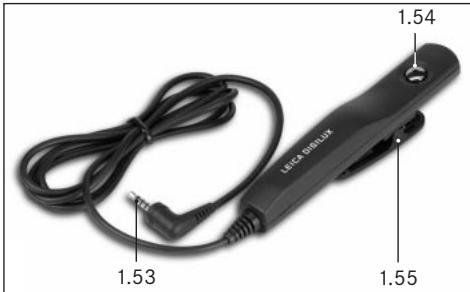
Leather case
High-quality case made of black, vegetable leather with a carrying strap. The camera can be stored in the camera case with the lens hood attached. Furthermore, it also has two internal compartments, where a
spare battery and memory cards can be stored (Order no. 18627).
Batteries
To ensure the power supply when using the camera for longer periods (e.g. at events, on trips, etc.) we recommend that you always have a spare battery with you (Order no. 18 601/18 602/18 603; Europe/USA/Japan version).
Filters
Especially for the LEICA DIGILUX 2 there are a number of filters allowing special photographic situations to be realized. Furthermore, an adapter is available that allows the use of common E72 filters (in that case only without lens hood):
Type Order no.
LEICA E69 UVa filter 18630
LEICA E 69 ND 4x filter 18 631
LEICA E 69 circular polarizing filter 18 632
Filter holder E72 18634
Spare parts Order no.
Mains/charger unit 18607
Lead set (USB, A/V, DC lead) 424-015.002-000
Carrying strap 439-612.036-000
Lens hood 423-066.030-000
Cover for lens hood 423-066.031-000
Lens cap 423-066.032-000
Storing the camera
If you are not using the camera for a longer period of time, we recommend that you:
- turn it off (see p. 120),
- remove the memory card (see p. 119), and
- remove the battery (see p. 117), (after 24 hours, the life of the integrated backup battery, the date and time entries are lost, see p. 124).
Care and maintenance instructions
General care instructions
Do not use the camera in the immediate vicinity of devices with powerful magnets or magnetic fields (e.g. microwave ovens, television sets, video games consoles).
- If you place the camera on or very close to a television set, its magnetic field could interfere with sound and picture recordings.
- The same applies to use close to mobile telephones.
- Strong magnetic fields, e.g. from speakers or large electric motors, can damage the stored data or the pictures.
-
The magnetic fields from microprocessors can interfere with sound and picture recordings.
-
If the camera does not work correctly as a result of the effects of magnetic fields, turn if off, remove the battery or unplug it from the mains, re-insert the battery or reconnect it to the mains and then turn it on again.
Do not use the camera in the immediate vicinity of radio transmitters or high-voltage power lines.
- Their magnetic fields can also interfere with sound and picture recordings.
Protect the camera from contact with insect sprays and other aggressive chemicals. Petroleum spirit, thinner and alcohol should never be used for cleaning purposes.
- Certain chemicals and liquids can damage the camera's housing or the surface finish.
- As rubber and plastics sometimes emit aggressive chemicals, they should not remain in contact with the camera for a long time.
Ensure that sand and dust cannot get into the camera, e.g. on the beach.
- Sand and dust can damage the camera and the memory card. You should pay particular attention to this when inserting and removing the card.
Ensure that water cannot get into the camera, e.g. when it is snowing or raining and on the beach.
-
Moisture can cause malfunctions and even irreparable damage to the camera and the memory card.
-
If salt water spray gets onto the camera, wet a soft cloth with tap water, wring it out thoroughly and wipe the camera with it. Then wipe the camera down thoroughly with a dry cloth.
The LEICA DIGILUX 2 is designed exclusively for private use. Do not use it for long-term observation or other commercial purposes.
- If used for a very long time, the resulting temperature inside the camera can cause malfunctions.
Monitor/viewfinder
- If the camera is exposed to significant temperature fluctuations, condensation can form on the viewfinder /monitor. Wipe it carefully with a soft, dry cloth.
- If the camera is very cold when turned on, the viewfinder/monitor screen will initially be slightly darker than normal. As soon as the LCD element warms up, it will reach its normal brightness again. The viewfinder/monitor is manufactured using a high-precision process. This ensures that of the that over 99.995% of the over 200,000 pixels work correctly and only 0.005% remain dark or are always bright. However, this is not a malfunction and does not impair the reproduction of the image. Cosmic radiation (e.g. on flights) can cause pixel defects.
Maintenance instructions
For the camera
- Unplug the mains/charging unit before you clean the camera.
- Only clean the camera with a soft, dry cloth. Stubborn dirt should first of all be covered with a well-thinned cleaning agent and then wiped off with a dry cloth.
For the battery
The rechargeable lithium ion batteries produce a current through internal chemical reactions. These reactions are also influenced by the external temperature and humidity. Very high or low temperatures reduce the life of the battery.
Always remove the battery, if you will not be using the camera for a long period of time. Otherwise, after several weeks the battery could become totally discharged, i.e. the voltage is significantly reduced, as the camera uses a low idle current (to save the date) even when it is turned off. A totally discharged battery cannot be recharged.
- Store the batteries only when they are fully discharged. For very long storage periods, it should be charged up and discharged again around once a year.
- Always keep the battery contacts clean and freely accessible. Protect the contacts from metal objects such as paper clips or pieces of jewelry, which can cause short circuits. A short circuited battery can get very hot and cause severe combustion.
- If the battery is dropped, check the housing and the contacts for any damage. Using a damaged battery can damage the camera.
- Batteries have a limited service life.
- Take damaged batteries to a collection point so that they can be properly recycled.
- Never throw the battery into a fire, as it can explode.
For the mains/charging unit
- If the batteries are warm, the charging process takes longer.
- If the mains/charging unit is used in the vicinity of radio receivers, it can interfere with the reception; make sure there is a distance of at least 1m between the devices.
- When the mains/charging unit is in use, it can make a noise (buzzing) – this is quite normal and is not a malfunction.
- When it is not in use, disconnect the mains/charging unit from the mains as otherwise it uses a certain (very small) amount of power even when the camera is turned off and the battery is not being used.
- Always keep the mains/charging unit contacts clean.
For memory cards
- While a picture is being stored or the memory card is being read, it should not be removed, the camera turned off or exposed to vibrations.
- To protect them, memory cards should always be stored in the yellow antistatic container supplied.
- Do not store the memory card where it will be exposed to high temperatures, direct sunlight, magnetic fields or static discharge.
- Do not drop the memory card or bend it, as this could damage the card and result in loss of the saved data.
Always remove the memory card, if you will not be using the camera for a long period of time. - Do not touch the contacts on the back of the memory card and keep them free of dirt, dust and moisture.
- We recommend formatting the memory card from time to time, as certain residual quantities of data (subsidiary information, particularly for sound recordings) can take up some of the memory capacity.
Storage
Always remove the battery and memory card when storing the camera.
- You should preferably store the camera in a closed and padded container so that nothing can damage it and it is protected from dust.
- Store the camera somewhere where it will be protected from high temperatures and humidity. When used in humid conditions, the camera should be completely free of all moisture before being stored away.
- To prevent the formation of fungus, do not store the camera in the leather case for long periods of time.
Data structure on the memory card
If the data saved on a card is transferred to a computer, the following folder structure is used:
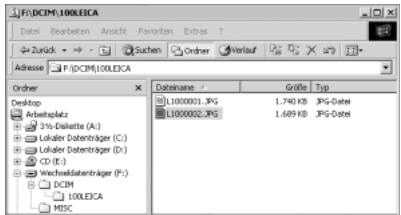
The 100LEICA, 101LEICA, etc. folders can be used to store up to 999 pictures.
- The MISC folder can be used to store pictures with printer order settings (DPOF).
- The animation files are stored in the PRIVATE1 folder
Warning messages
NO MEMORY CARD
Insert a memory card
THIS MEMORY CARD IS PROTECTED
Reset the write protection for the memory card.
NO VALID IMAGE TO PLAY
No pictures are saved on the inserted card. In order for review to take place, pictures first of all need to be taken or another card with saved pictures inserted.
MEMORY CARD FULL/NOT ENOUGH MEMORY IN THE CARD
Insert another memory card or delete pictures you no longer need.
MEMORY CARD ERROR (depending on the card this message may be issued with a delay)
It was not possible to access the memory card.
Remove it and re-insert it. The memory card may be damaged.
MEMORY CARD ERROR/FORMAT THIS CARD?
The data format on the memory card cannot be read by this camera. Format the memory card with this camera.
READ ERROR
The data on the memory card cannot be read. Open the desired picture again.
WRITE ERROR
The picture data could not be written to the memory card. Remove it and re-insert it or turn the camera off and back on. However, the memory card may be damaged.
MEMORY CARD DOOR OPEN
Close the cover.
SYSTEM ERROR
The lens functions malfunction when setting the rings.
Turn the camera off and back on again. If the error persists, you should consult your dealer or Leica Camera AG.
PLEASE SET THE CLOCK
This message appears the first time you use the camera or when you use it again after a long period of time, particularly if the battery was removed.
PLEASE CLOSE THE FLASH
Make sure that the reflector is fully locked, i.e. at the front and back.
THIS PICTURE IS PROTECTED
After removing the protection, the picture can be deleted or overwritten.
NO ADDITIONAL DELETE SELECTIONS CAN BE MADE
The number of markings possible for deletion (MULTI DELETE) has been exceeded.
THIS PICTURE CAN'T BE DELETED/
SOME PICTURES CAN'T BE DELETED
After removing the protection, the picture(s) can be deleted.
CAN'T BE SET ON THIS PICTURE/
CAN'T BE SET ON SOME PICTURES
The pictures on the memory card are not compatible with the DCF standard, therefore it is not possible to make print order settings or sound recordings.
THIS PICTURE CANNOT BE RESIZED
PLEASE WAIT
This message appears with shutter speeds that are too slow or if the camera is too hot.
Malfunctions and troubleshooting
- The camera does not respond when I turn it on.
1-1 Is the battery correctly inserted or the mains/charging unit correctly connected?
1-2 Does the battery have sufficient charge? Use a charged battery.
- The camera turns itself off again as soon as I turn it on.
2-1 Does the battery have sufficient charge to operate the camera? Charge the battery or insert a charged battery.
2-2 Is there any condensation? This occurs if the camera is moved from a cold place to a hot place. Wait until the condensation has evaporated.
- I cannot save a picture.
3-1 Is a memory card inserted?
3-2 The memory card is full. Delete pictures you no longer need before you take new ones.
- The viewfinder or the monitor remains dark.
4-1 Is the monitor or the viewfinder switched on?
- The picture I have just taken is not shown in the viewfinder or monitor
5-1 Is the AUTO-REVIEW function switched on (when the camera is switched on)?
5-2 When AUTO-REVIEW mode has been activated and the viewfinder switched on has automatic review been activated to the monitor (REVIEW ON LCD)?
- The viewfinder/monitor is too bright or too dark.
6-1 Set the brightness to your preference. - The picture(s) on the viewfinder/monitor is/are out of focus.
7-1 Switch on AF macro mode if the subject is less than 60cm away. -
The flash does not work.
8.-1 The flash unit is turned off; select another flash mode. -
I cannot review the picture.
9-1 Is a memory card inserted?
9-2 There is no data on the memory card.
9-3 The record/review selector is not set to one of the review modes.
- I cannot view the picture on a television.
10-1 Check whether the television and the camera are connected correctly.
10-2 Set the television to the AV input to which the camera is connected.
- The camera is connected to a computer but I cannot transfer data.
11-1 Check whether the computer and the camera are connected correctly.
12. The date and time are incorrect.
12-1 The camera has not been used for a long period, particularly if the battery has been removed. Set the date and time, as soon as the message PLEASE SET THE CLOCK appears. f you take pictures before then, the date and time are saved as 2003.1.1 00:00.
Index
Accessories 180
AF, see Distance setting 131
Animation recording 151
Aperture, Manually setting shutter speed and 137
Aperture priority 136
Autofocus, see Distance setting 131
Battery
Charge level displays 118
Charging 116
Inserting in/removing from the camera 117
Bracketing, see Exposure bracketing 139
Care instructions 182
Carrying strap, attaching 116
Center-weighted exposure metering 137
Color saturation, see Picture properties 130
Compression rate 127
Contrast, see Picture properties 130
Data structure on the memory card 183
Date and time 124
Deleting the picture 158
all pictures on the memory card 160
multiple pictures simultaneously 159
single pictures 159
while viewing 147
Designation of parts 104
Displays
In the record modes 106
In review mode 110
Distance setting 131
Automatic focusing/Autofocus 131
Close-up autofocus 132
Magnification function 133
Manual focus 133
Metering memory lock 132
Spot metering, autofocus 132
Enlarging, see Review mode and
Viewing the picture 146/156
Exposure bracketing 139
Exposure compensation 138
Exposure control 134
Aperture priority 136
Manual shutter speed and exposure settings . . 137
Programmed automatic exposure mode 134
Program shift 135
Speed priority 135
Exposure metering method 137
Center-weighted exposure metering 137
Multi-field metering 137
Spot metering 138
Exposure series 148
Flash photography
Flash exposure compensation 144
Indirect flash 142
Range 142
Synchronization to the end of the exposure 143
with the built-in flash unit 140
with external flash units 144
Focal length 131
Focal length extension, digital 131
Folder numbers, creating new 170
Formatting the memory card 162
Histogram 138
Installing the enclosed software 179
ISO sensitivity 130
Lens hood, Attaching/removing the 116
Maintenance instructions 182
Malfunctions and troubleshooting 185
Manual setting
of distance 133
of shutter speed and aperture 137
Memory card, inserting and removing 119
Menu items
In main menu in the recording modes 112
In main menu in review mode 113
In setup menu in the recording modes 112
In setup menu in review mode 113
Menu language 124
Menu system 122
Metering memory-lock, see Distance setting and
Exposure metering 132
Multi-field metering 137
Monitor, see Viewfinder and monitor 121
Mains operation 118
Noises (Key acknowledgement (response) tones and shutter noises) 126
Parts,Names of 104
Picture frequency 148
Picture properties (contrast, focus, color saturation) 130
Print Image Matching 178
Print order settings 162
Deleting all print order settings 164
Deleting individual print order settings 163
for one picture 163
for an index print 164
for multiple pictures 163
Printing copies 176
all DPOF marked copies 177
by direct USB connection to a printer 176
single prints 177
Program shift 135
Programmed automatic exposure mode 134
Protecting pictures 160
multiple pictures/Removing protection 161
Removing protection for all pictures 161
single pictures/Removing protection 160
Quick guide 114
Quick set button 153
Record and review modes 134
Resetting all individual menu settings 169
Resolution Reducing 166
Setting 126
Review mode 155
Enlarging 156
Nine single pictures simultaneously 156
Single pictures 155
Single pictures with sound 156
Trimming selection 156
Video recordings 158
with AV equipment 172
Review of a series of pictures, automatic 170
all pictures on the memory card 170
marked pictures 171
Rotating the shots 155
Scope of delivery 103
Self-timer 153
Sharpness, see Picture properties 130
Shutter priority 135
Shutter release button 121
Shutter speed, manual aperture setting and 137
Sound
Adding to existing pictures 165
Pictures with 149
Playback of pictures with sound 156
Spare parts 180
Spot metering, see Distance setting and
Exposure metering 138
Storing the camera 183
Switch off, automatic 125
Technical data 188
Transferring data to a computer 173
Trimming 131
Changing 167
Selecting, see Review mode 156
Turning the camera on/off 120
USB connection 176
Viewfinder and monitor 121
Diopter settings in the viewfinder 121
Setting brightness 124
Switching between viewfinder and monitor 121
Switching the displays 121
Viewing the picture (in record mode, immediately after recording)
with the AUTO REVIEW function
(automatic review) 146
with the VIEW function 146
Video recordings 149
Volume, Setting the (for playback of
sound recordings) 156
Warning messages 184
Warning notices 103
White balance 128
Zoom, optical 131
Device description and technical data
Camera
Recording type/format Digital camera, 2/3" CCD sensor with 5.24 million pixels, 5 million effective.
Resolution Variable: 2560x1920, 2048x1536, 1600x1200, 1280x960, 640x480, 1920x1080 (HDTV) pixels, 320x240 for video recordings.
Picture data compression rates Optionally: very low, low or normal data compression, raw data storage.
Data recording Still pictures: to JPEG,TIFF (RGB) and DPOF standards. Still pictures with sound recording: to JPEG standard, and 320× 240 pixels to QuickTime Motion JPEG standard. Video recording: to QuickTime Motion JPEG standard.
Storage media SD Memory Card and MultiMedia Card.
ISO Speed setting Automatic to ISO 100 / 21^ for video recordings, for other exposure modes optionally ISO 100 / 21^ , ISO 200 / 24^ or ISO 400 / 27^ .
White balance Optionally: Automatic, presets for daylight, cloud, halogen lighting, electronic flash, and for black and white pictures and manual setting.
Lens LEICA DC VARIO-SUMMICRON 7-22.5 mm f/2-2.4 ASPH. (corresponds to 28-90 mm with 35 mm-format); 13 lenses in 10 elements, 4 aspherical surfaces. Focal length change with ring on lens.
Digital focal length extension. Optionally: off, 2× or 3×
Distance setting range Automatic distance setting of 60~cm or 30~cm to infinity (AF, or AF Macro).
Manual distance setting 30cm to infinity with ring on lens, optionally magnification function as focusing aid.
Smallest object field 11.5 × 15.3 cm (from a distance of 30 cm with 90 mm setting).
Autofocus system Hybrid system with passive contrast comparison sensor and TTL metering via the image sensor, optionally normal or spot metering.
Exposure modes Programmed automatic exposure mode (P), program shift option, aperture priority (A), shutter speed priority (T) and manual setting (M). Fully automatic for video recordings.
Exposure metering Multi-field, center-weighted, spot, optionally with histogram display to analyze brightness distribution.
Metering memory-lock Pressing the shutter release button to the pressure point stores the distance (in the AF modes) and exposure values.
Exposure compensation ± 2EV in 1 / 3EV exposure increments.
Automatic exposure bracketing Variable: 3 or 5 pictures with 1/3, 2/3, or 1EV increments.
Shutter speed range Mechanical lens shutter as well as additional electronic shutter function. For P and A/T and M: 8 to 1/4000 s / 1/2000 s (with normal flash mode from 1/60 s ), for video recordings 1/30 to 1/4000 s .
Series exposures Optionally 1B/s or 2,7B/s, max. 3-137 pictures.
Flash modes automatic flash activation (not with exposure mode M), automatic flash activation with pre-flash (not with exposure mode M or synchronization to the end of the exposure), manual flash activation, manual flash activation with pre-flash (not with synchronization to the end of the exposure), automatic flash activation with slower shutter speeds (not with exposure modes T and M), automatic flash activation with pre-flash and slower shutter speeds (not with exposure modes T and M or synchronization to the end of the exposure), flash deactivated and/or not folded out.
Flash exposure compensation ± 2EV in 1 / _3EV exposure increments.
Working range of the built-in flash unit (for ISO 100 / 21^ ) 0.5 - 4.8m at 7mm WA),or 0.5 - 4.0m at 22.5mm (telephoto), guide number 10.
Recycling time of built-in flash unit approx. 7 s with fully charged battery.
Viewfinder Electronic color TFT LCD viewfinder with 235,000 pixels and all displays, adjustable by ± 4 diopters, can be used as an alternative to the monitor.
Monitor 2,5" transreflexive color TFT LCD with 211,000 pixels, can be used as an alternative to the viewfinder.
The displays see p. 112 and 121
Self-timer Delay optionally 2 or 10s (not for video recordings, display with flashing LED on the front of the camera as well as corresponding symbol in the viewfinder/monitor.
Turning the camera on/off With main switch on the back of the camera, optionally automatic switching off of the camera electronics after approx. 2 / 5 / 10 minutes (stand-by mode), reactivation by lightly pressing the shutter release button or switching the camera off and on again.
Connections 5-pin mini USB socket 2.0 high-speed for quick data transfer to the computer, EIAC type 3 socket DC-IN for direct current supply, AV OUT/REMOTE output with 2.5mm mini jack for picture and sound transfer to television/ audio system/computer, or remote release.
Compatibility EPSON Print Image Matching System (PIM 2.5), Digital Print Order Format (DPOF), Mac®OS 9.x- Mac®OS X, Windows®98/ ME/2000/XP
Operating voltage 8.4V
Power supply Lithium ion battery, 7.2 V, 1400 mAh
Mains/charging unit Input: Alternating current 100-240 V, 50/60 Hz, automatic reversing; Output: Direct current 8.4 V, 1.2 A.
Housing Housing in Leica Design made of solid, ultra-light magnesium, especially tactile rubber reinforcement. Side lugs for carrying strap. ISO flash shoe with central and control contacts for connection of external, more powerful flash units, e.g. the LEICA SF 24D.
Tripod thread A1/4 DIN 4503 (1 / 4)^n
Dimensions (WxHxD) 135× 82× 103mm
Weight approx. 630g / 705g (without/with battery)
Scope of Delivery Mains/charging unit with 2
connecting leads, lithium-ion battery, SD memory
card 64 MB,A/V lead, USB lead, carrying strap, lens
hood, 2 lens caps, CD-ROMs with: Adobe
PhotoshopElements2.0 (Windows/Mac),
ACDSee6.0 PowerPack (for Windows),
SilverFastDC-SE 6 for Leica (Windows/Mac),
LEICA USB Remote Control Software, ACDSee1.65
(Mac),AppleQuickTime6 (Windows),USB driver
for Windows98 SE
Construction, design and scope of delivery subject to change.