
Q 'Snow' - Camera LEICA - Free user manual and instructions
Find the device manual for free Q 'Snow' LEICA in PDF.


| Product Type | Digital Compact Camera |
| Model | Leica Q (Typ 116) 'Snow' |
| Lens | Leica Summilux 28mm f/1.7 ASPH. (11 elements in 9 groups) |
| Sensor | CMOS, 26.3 MP total / 24.2 MP effective |
| Image Stabilization | Optical (OIS) |
| Focusing | Contrast-based Autofocus (AFs, AFc) and Manual Focus with peaking |
| Exposure Modes | P, A, S, M; Scene programs (Sport, Portrait, etc.) |
| Shutter Speed | 30s – 1/2000s (mechanical), 1/2500s – 1/16000s (electronic) |
| ISO Range | Auto, ISO 100 – 50000 |
| Viewfinder | Electronic LCOS, 1280x960 px (3.68 MP), diopter adjustment ±3 |
| Monitor | 3" TFT LCD, 1,040,000 dots, touch-controlled |
| Video Recording | FHD 1920x1080p (60/30fps), HD 1280x720p (30fps), MP4 format |
| Storage | SD / SDHC / SDXC memory card |
| Connectivity | Micro USB 2.0, HDMI, Wi-Fi 802.11b/g/n, NFC |
| Battery | Leica BP-DC12 Li-ion, 7.2V, 1200mAh |
| Dimensions (WxHxD) | 130 x 80 x 93 mm |
| Weight | 590g (body only) / 640g (with battery) |
| Macro Range | 17 cm (from lens front) to 30 cm |
| Flash Sync | Up to 1/500s |
| Accessories Included | Battery, charger, USB cable, carrying strap, lens hood, lens cap, accessory shoe cover |
| Maintenance | Clean with soft dry cloth; avoid chemicals; store in dry place |
| Safety | Avoid strong magnetic fields; do not expose to water; use only approved accessories |
| Manufacturer | Leica Camera AG, Am Leitz-Park 5, 35578 Wetzlar, Germany |
Frequently Asked Questions - Q 'Snow' LEICA
User questions about Q 'Snow' LEICA
0 question about this device. Answer the ones you know or ask your own.
Ask a new question about this device
Download the instructions for your Camera in PDF format for free! Find your manual Q 'Snow' - LEICA and take your electronic device back in hand. On this page are published all the documents necessary for the use of your device. Q 'Snow' by LEICA.
USER MANUAL Q 'Snow' LEICA
Regulatory Information
natural_image
Line drawing of a mechanical component with a handle and circular parts (no text or symbols)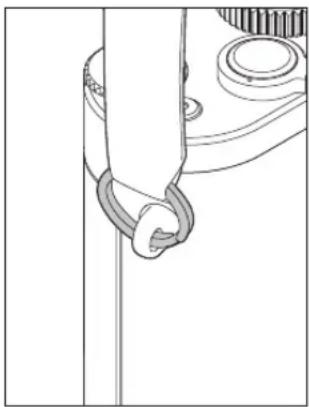
natural_image
Pure mechanical diagram showing a hook and gear assembly without any text or symbolsAKKU LADEN
natural_image
Diagram of a device with an attached cable and a power outlet, showing no text or symbols.LADESTATUS-ANZEIGE
natural_image
Technical line drawing of a mechanical component with a red circular feature and mounting holes (no text or symbols)natural_image
Technical diagram of a mechanical component with a red rotation arrow indicating clockwise motion (no text or symbols)Akku einsetzen
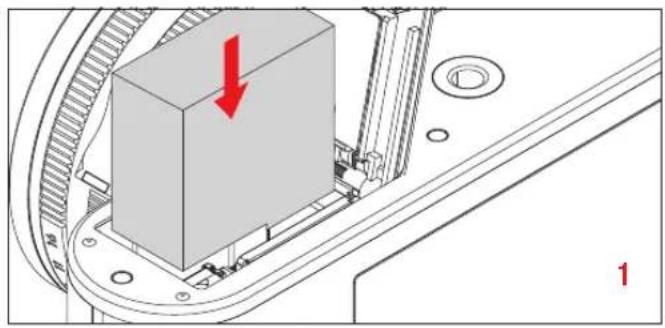
natural_image
Mechanical assembly diagram showing a 3D block mounted on a conveyor belt with a red arrow indicating direction (no text or symbols present)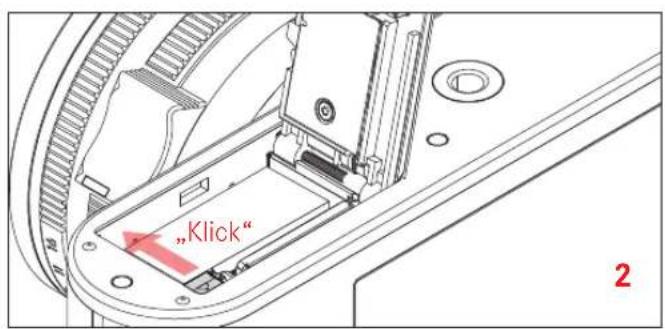
Akku herausnehmen
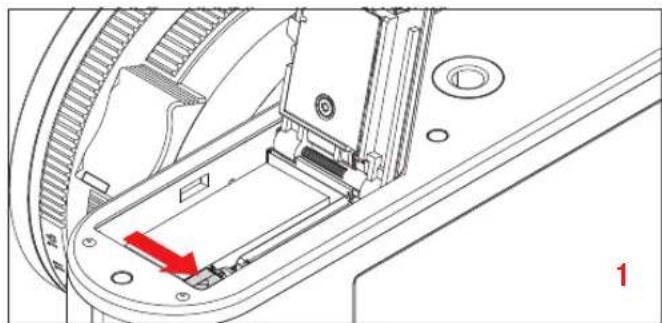
natural_image
Technical diagram of a mechanical assembly with a red arrow indicating a component (no text or symbols present)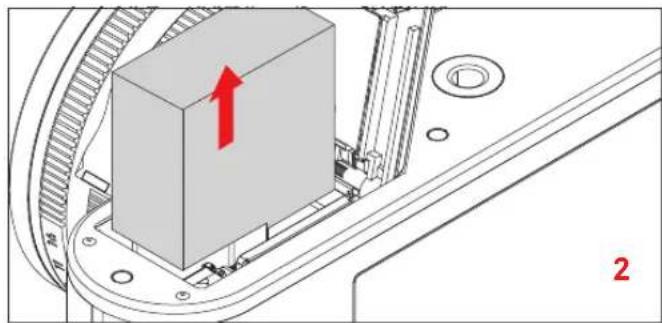
natural_image
Technical diagram of a mechanical assembly with a highlighted component and directional arrow (no text or symbols)Wichtig:
natural_image
Technical diagram of a mechanical assembly with a red arrow indicating a specific component (no text or symbols present)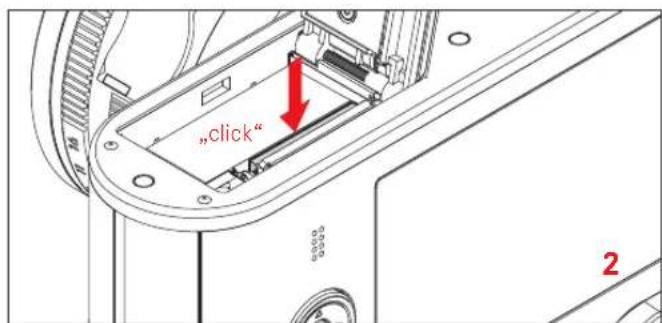
natural_image
Technical diagram of a mechanical component with a red curved arrow indicating rotation or force (no text or symbols present)AUFRUFEN EINES MENÜPUNKT-UNTERMENÜS
natural_image
Silhouette of three modern buildings with a white circular background and horizontal lines, no text or symbols present.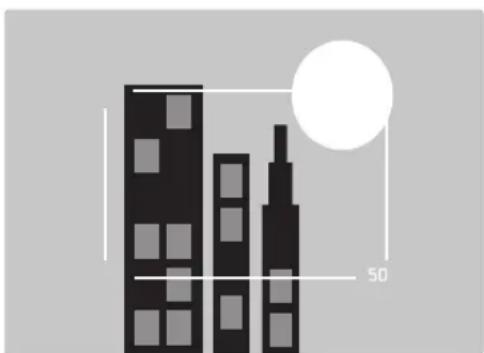
natural_image
Silhouette of three buildings with a large white circle and a 50-unit measurement label (no text or symbols on buildings)Hinweise:
natural_image
Two-panel illustration showing a house with a hand cursor and red circular icon, transforming from a house on the left to a church on the right (no text or symbols)Tastengesteuert
Tastengesteuert
Tastengesteuert
Tastengesteuert
Tastengesteuert
Tastengesteuert
Tastengesteuert
flowchart
graph TD
    A["Start"] --> B["Click with hand icons"]
    B --> C["Move on bus at 02:30"]
    C --> D["Close-up of hand icon"]
    D --> E["Move right, drop in hand icon"]
    E --> F["Close up, drop in hand icon"]
    F --> G["End"]
    G --> H["Video Trimming<br>Save as new<br>Overwrite<br>Preview"]
Tastengesteuert
WLAN Host Setup
natural_image
Illustration of a house with trees and a red arrow, no text or symbols presentProduct Support / Software Support
Am Leitz-Park 5
D-35578 Wetzlar
Telefon: +49(0)6441-2080-111 /-108
Telefax: +49(0)6441-2080-490
info@leica-camera.com / software-support@leica-camera.com
LEICA CUSTOMER CARE
FOREWORD
Dear Customer,
We wish you a great deal of pleasure and success using your new Leica Q. Thanks to its outstanding optical performance, the Leica Summilux 28mm f 1.7 ASPH. lens delivers exceptional picture quality.
With fully automatic program control, the Leica Q provides an uncomplicated photography experience. Alternatively, you can take over picture composition yourself at any time using the manual settings. You can select from numerous special functions to improve the picture quality even in critical exposure conditions. Please read these instructions so that you can make the most of your Leica Q's capabilities.
SCOPE OF DELIVERY
Before using your Leica Q for the first time, please check that the accessories supplied are complete.
a. Leica BP-DC12 battery
b. Battery charger BC-DC12 with exchangeable power cords
c. USBcable
d. Carryingstrap
e. Lens hood
f. Lenscap
g. Accessory shoe cover
h. Camera registration booklet with TAN for downloading image processing software (after registering the camera on the Leica Camera AG website)
i. Warranty card
This product is licensed under the AVC Patent Portfolio license for the personal use of a consumer or other uses in which the consumer does not receive remuneration to (i) encode video in compliance with the AVC standard ("AVC video") and/or (ii) decode AVC video that was encoded by a consumer engaged in a personal activity and/or was obtained from a video provider licensed to provide AVC video. No license is granted or shall be implied for any other use. Additional information may be obtained from MPEG LA, L.L.C. at HTTP://WWW.MPEGLA.COM.
Any other use, including but not limited to providing AVC video in exchange for remuneration may require a separate license agreement with MPEG LA, L.L.C. Additional information may be obtained from MPEG LA, L.L.C. at HTTP://WWW.MPEGLA.COM.
The production date of your camera can be found on the stickers in the Warranty Card and/or on the packaging. The date convention is: year/month/day.
CE
Declaration of Conformity (DoC)
Hereby, "Leica Camera AG" declares that this product is in compliance with the essential requirements and other relevant provisions of Directive 2014/53/EU.
Customers can download a copy of the original DoC to our R&TTE products from our DoC server:
www.cert.leica-camera.com
In case of further questions, please contact:
Leica Camera AG, Am Leitz-Park 5, 35578 Wetzlar, Germany
This product is intended for general consumer. (Category 3)
This product on purpose to connect to access point of 2.4 GHz WLAN.
In the menu, under Camera Information, you will find the specific approvals for this device under the point Regulatory Information.
WARNING MESSAGES
- Modern electronic elements react sensitively to electrostatic discharge. As you can easily pick up charges of tens of thousands of volts, by walking on synthetic carpets for example, a discharge can occur when you touch your camera, particularly if it is placed on a conductive surface. If only the camera housing is touched, this discharge is harmless to the electronics. However, despite built-in safety circuits, outer contacts such as those in the flash shoe should not be touched if at all possible for safety reasons.
- For any cleaning of the contacts, do not use an optical micro-fiber cloth (synthetic); use a cotton or linen cloth instead! Before touching the contacts, you can make sure you discharge any electrostatic charge by deliberately touching a heating or water pipe (conductive, earthed material). Please also avoid soiling and oxidation of the contacts by storing your camera in a dry location with the lens cap and flash shoe/viewfinder socket cap on.
- Use only the recommended accessories to prevent faults, short circuits, or electric shock.
- Do not attempt to remove parts of the housing (covers); qualified repairs can be carried out only at authorized service centers.
LEGAL INFORMATION
- Please ensure that you strictly observe copyright laws. The recording and publication of pre-recorded media such as tapes, CDs, or other published or broadcast material may contravene copyright laws.
• This also applies to all of the software supplied. - The SD, HDMI, and USB logos are registered trademarks. Other names, company and product names referred to in these instructions are trademarks or registered trademarks of the relevant companies.
DISPOSAL OF ELECTRICAL AND ELECTRONIC EQUIPMENT
(Applies within the EU, and for other European countries with segregated waste collection systems.)
This device contains electrical and/or electronic components and should therefore not be disposed of in general household waste! Instead it should be disposed of at a recycling collection point provided by the local authority. This costs you nothing. If the device itself contains replaceable or rechargeable batteries, these must be removed first and, if necessary, also be disposed of in line with the relevant regulations.
Further information on the subject is available from your local administration, your local waste collection company, or in the store where you purchased this device.
MEANING OF DIFFERENT INSTRUCTION CATEGORIES IN THESE INSTRUCTIONS
Note:
Additional information
Important:
Failure to observe the instructions may cause damage to the camera, accessories, or pictures.
Caution:
Failure to observe the instructions may cause personal injury.
CONTENTS
FOREWORD 132
SCOPE OF DELIVERY 132
NOTICES....134/135
IDENTIFICATION OF PARTS.... 138
GESTURE CONTROL 140
QUICK-START GUIDE....141
DETAILED INSTRUCTIONS
PREPARATIONS
ATTACHING THE CARRYING STRAP 142
CHARGING THE BATTERY 142
CHANGING THE BATTERY/MEMORY CARD 146
REMOVING/AFFIXING THE LENS HOOD 149
THE MOST IMPORTANT SETTINGS/CONTROLS
MAIN SWITCH....150
SHUTTER RELEASE BUTTON....151
MENU CONTROL 152
QUICK ACCESS TO MENU FUNCTIONS 157
CAMERA DEFAULT SETTINGS
MENU LANGUAGE 160
DATE/TIME 160
ENERGY-SAVING SETTINGS 161
ACOUSTIC SIGNALS 161
MONITOR/VIEWFINDER SETTINGS.... 162
Switching displays 162
PICTURE DEFAULT SETTINGS
FILE FORMAT 166
JPEG RESOLUTION....166
WHITE BALANCE....167
ISO SENSITIVITY 169
JPEG SETTINGS
Contrast, focus, color saturation ....170
Working color range 171
Image stabilization 171
PICTURE MODE
CHANGING THE TRIMMING....172
FOCUSING....174
AUTOMATIC FOCUSING 174
AFs (single) focus priority 174
AFc (continuous) = shutter release priority .....175
AF auxiliary light 175
AUTOFOCUS METERING METHODS....176
Multi-field metering 176
1-field metering 176
Subject tracking 177
Touch-controlled autofocus 177
Touch-controlled picture taking 178
Face detection 178
MANUAL FOCUSING....178
Auxiliary functions for manual focusing....179
EXPOSURE METERING AND CONTROL
Exposure metering methods 180
Multi-field metering 180
Center weighted metering 180
Spot metering 180
EXPOSURE CONTROL 181
The scene programs ....181
Exposure modes P, A, S, M 182
Shutter speed fine adjustment....182
AUTOMATIC PROGRAM- P 183
Change the preset shutter speed-aperture combinations (shift) .183
APERTURE PRIORITY - A 184
SHUTTER SPEED PRIORITY - S 184
MANUAL SETTING - M 185
METERING MEMORY LOCK 186
EXPOSURE COMPENSATION 187
AUTOMATIC BRACKETING 188
MINIATURE EFFECT 189
PANORAMIC PICTURES....190
TIME LAPSE PICTURES....192
FLASH MODE 194
Compatible flash units 194
Attaching the flash unit 195
Flash modes 195
Synchronization time period....196
Flash exposure compensation 197
ADDITIONAL FUNCTIONS
VIDEO RECORDINGS....198
SOUND RECORDING....199
RESETING PICTURE NUMBERS....203
USER PROFILES 203
REVIEW MODE....204
SWITCHING BETWEEN PICTURE AND REVIEW MODE ....204
VIEWING PICTURES IN PORTRAIT FORMAT 205
VIEWING PICTURE SERIES....206
SELECTING/SCROLLING THROUGH PICTURES 208
ENLARGING/REDUCING PICTURES 209
SELECTING THE DETAIL 211
DELETING PICTURES....212
PROTECTING PICTURES/CLEARING DELETE PROTECTION 216
VIDEO REVIEW 218
SLIDE SHOW....222
VIEWING WITH HDMI DEVICES....223
MISCELLANEOUS
TRANSFERRING DATA TO A COMPUTER 224
WIRELESS DATA TRANSMISSION AND
REMOTE CONTROL OF THE CAMERA 226
USING RAW DATA (DNG) 230
INSTALLING FIRMWARE UPDATES 231
ACCESSORIES....232
SPARE PARTS 235
SAFETY AND CARE INSTRUCTIONS 236
INDEX 242
APPENDIX
DISPLAYS 244
MENU ITEMS 251
TECHNICAL DATA....252
LEICA SERVICE ADDRESSES....255
DESIGNATION OF PARTS
Figures in the front and rear cover pages
Front view
01 Carrying strap fastening ring
02 Self-timer LED/AF auxiliary light
03 Lens
04 Filter thread
Top view
05 Macro-switch dial with
05a Index
06 Depth of field scale
07 Index for focusing
08 Focusing dial
09 Aperture setting dial with
09a Index
10 Lens hood thread
11 Protective dial thread
12 Lens hood
13 Microphones
14 Main switch
15 Shutter release button
16 Video record button
17 Thumb wheel
- For scrolling through menus and sub-menus
- For setting a value for exposure compensation, bracketing, and flash bracketing
- For enlarging/reducing pictures viewed
- For setting slow shutter speeds
18 Shutter speed dial
19 Accessory shoe (covering in place)
Rear view
20 MENU-button
- For opening the menu
- For saving menu settings and exiting sub-menus and menus
21 ISO button for opening the sensitivity menu
22 FN-button
- In picture mode for opening the set menu function
-
In review mode for opening the menu for
-
Protection
- Slide show
- WLAN
23 DELETE button
- For opening the delete menu
24 PLAY button
- For activating review mode
- For returning to full 1:1 picture review
25 Eyepiece
26 Diopter setting dial
27 Thumb button
28 Status LED
28a Red: Read/write operation SD card
28b Green: WLAN connection
29 Cover over USB and HDMI sockets
30 Direction pad
- For scrolling through menus and sub-menus
- For scrolling through the picture memory
- For moving the AF metering range frame
- For opening the menus for exposure compensation, bracketing, and flash exposure compensation
- For opening/configuring settings in the flash mode menu/opening sub-menus
- For opening/configuring settings in the self-timer menu/exiting menus and sub-menus without saving the menu settings
31 Set button
- For selecting monitor displays in picture and review mode
- Double tap the monitor at any location
32 Speaker
33 Monitor
View from right (cover opened)
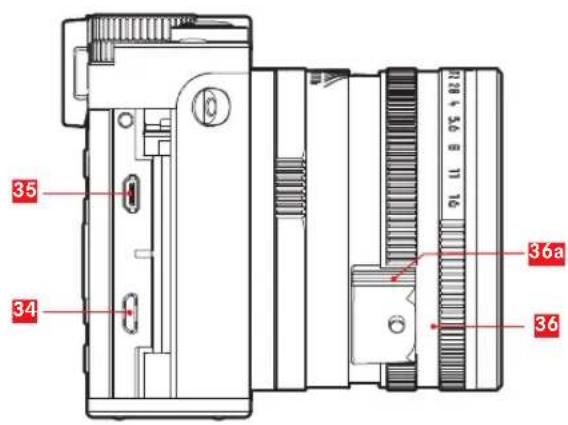
34 USB socket
35 HDMI socket
36 Finger grip on the focusing dial, with 36a Autofocus lock/unlock button
Bottom view
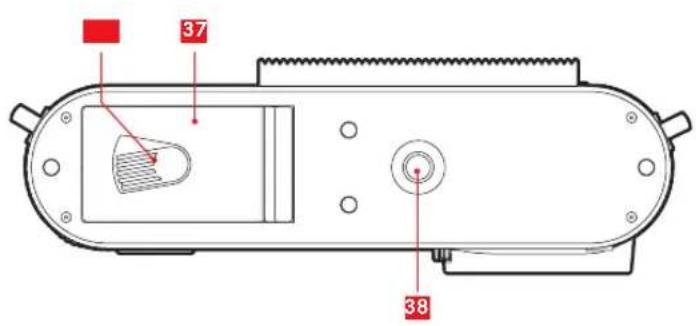
37 Cover for battery compartment and memory card slot with 37a Lock/unlock lever
38 Tripod thread A¼, DIN 4503 (1/4")
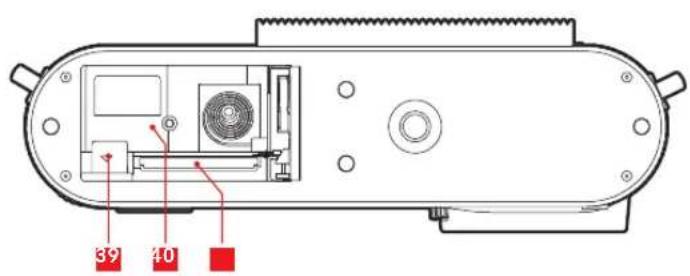
(cover opened)
39 Battery slide lock
40 Battery compartment
41 Memory card slot
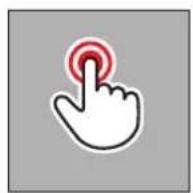
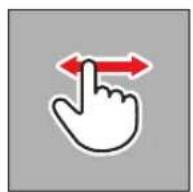
GESTURE CONTROL
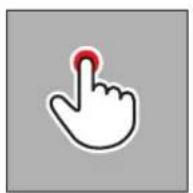
Some of the functions of the Leica Q can also be controlled on the touch-sensitive monitor using the gestures shown on the right.
Note:
A light touch is enough, do not press.
Tap Tap twice

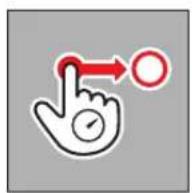
Drag and release

Swipe

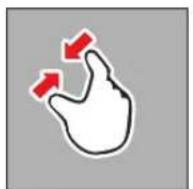
Push together
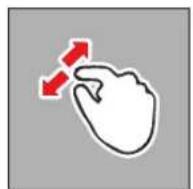
Pull apart
QUICK-START GUIDE
Required parts:
- Camera
- Battery
- Charger with appropriate power cable
- Memory card (not supplied)
Note:
The settings recommended here allow you to take good photographs easily, quickly, and reliably when you first start to try out the Leica Q. For details of the various modes/functions, refer to the corresponding sections on the specified pages.
Preparations:
- Attach a suitable mains plug to the charger (see page 145)
- Charge battery (see page 145)
- Set the main switch to OFF (see page 150)
- Insert the charged battery into the camera (see page 146)
- Insert the memory card (see page 148)
- Remove the lens cap
- Set the main switch to S (see page 150)
- Set the menu language (see page 152/160)
- Set the date and time (see page 152/160)
Taking photographs:
- Set the shutter speed dial and aperture setting dial to A
- Set the exposure metering method to ☐ee page 152/180)
- Set the focusing dial to AF (see page 152)
- Set the focus metering method to Multi Point (see page 172)
- Press the shutter release button to the first pressure point to activate focusing and exposure metering and save the values (see page 151)
- Push the shutter release button all the way down to take the photo
Viewing photographs:
Press the PLAY button
To view different pictures:
Press left or right on the direction pad
Enlarging pictures:
Turn the thumb wheel or use the "pull apart" gesture (see page 202)
Deleting pictures:
Press the DELETE button and select the required function from the menu that is opened (see page 212)
DETAILED INSTRUCTIONS
PREPARATIONS
ATTACHING THE CARRYING STRAP
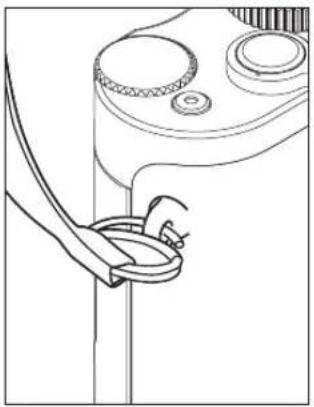
natural_image
Line drawing of a mechanical component with gears and a handle (no text or symbols)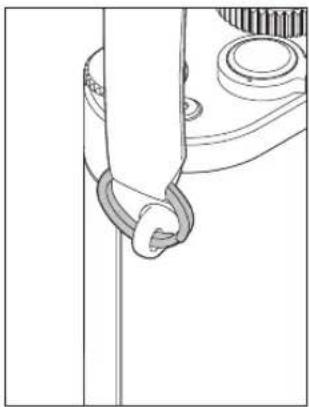
natural_image
Pure mechanical diagram showing a hook and gear mechanism without any text or symbolsCHARGING THE BATTERY
The Leica Q is powered by a lithium ion battery.
Caution:
- Only the battery types specified and described in this manual and/or specified and described by Leica Camera AG may be used in this camera.
• These batteries may only be used in the units for which they are designed and may only be charged exactly as described below. - Using the battery contrary to these instructions and using battery types not specified in these instructions may result in an explosion.
- The batteries must not be exposed to sunlight, heat, humidity, or condensation for long periods. To prevent a risk of fire or explosion, batteries must not be placed in a microwave oven or in a high-pressure vessel.
- Never throw batteries into a fire, as this can cause them to explode!
- Damp or wet batteries must not be charged or used in the camera under any circumstances.
-
Always ensure that the battery contacts are clean and freely accessible. Whilst lithium ion batteries are proofed against short circuits, they should still be protected against contact with metal objects such as paper clips or jewelry. A short-circuited battery can get very hot and cause severe burns.
-
If a battery is dropped, check the casing and the contacts immediately for any damage. Using a damaged battery can damage the camera.
- If the battery causes noise, becomes discolored, deformed, or overheated, or if any fluid leaks out, it must be removed from the camera or charger immediately and replaced. Continued use of the battery can cause overheating and a risk of fire and/or explosion.
- If liquid leaks out or you smell burning, keep the batteries away from heat sources. Leaked fluid can catch fire.
- Only the charger specified and described in these instructions, or chargers specified and described by Leica Camera AG, may be used. The use of other chargers that are not approved by Leica Camera AG can cause damage to the batteries and, in extreme cases, serious or life-threatening injuries.
- The charger supplied should be used exclusively for charging this battery type. Do not attempt to use it for other purposes.
- Ensure that the power socket used is freely accessible.
- Heat is generated during charging. Therefore batteries must not be charged in small, sealed, i.e. unventilated, spaces.
- The battery and charger must not be opened. Repairs may only be carried out by authorized service centers.
First aid:
- If battery fluid comes into contact with the eyes, there is a risk of blinding. Immediately wash the eyes thoroughly with clean water. Do not rub the eyes. Seek medical attention immediately.
- If leaked fluid gets onto the skin or clothing, there is a risk of injury. Wash the affected areas with clean water. Medical treatment is not required.
Caution:
Keep batteries out of the reach of children. Swallowing batteries can cause suffocation.
Notes:
- The battery can only be charged outside the camera.
- Batteries must be charged before starting up the camera.
- For the battery to charge, it must have a temperature of between 10^ and 30^ (otherwise the charger does not turn on or turns off again).
- Lithium ion batteries can be charged at any time, regardless of their current charge level. If a battery is only partly discharged when charging starts, it is charged to full capacity faster.
- Lithium ion batteries should only be stored partly charged, i.e. not when fully discharged or fully charged. For very long storage periods, batteries should be charged for around 15 minutes twice a year to prevent total discharge.
- The batteries warm up during the charging process. This is normal and not a malfunction.
- A new battery only reaches its full capacity after it has been fully charged and – by use in the camera – discharged 2 or 3 times. This discharge procedure should be repeated roughly every 25 cycles.
-
Rechargeable lithium ion batteries generate power through internal chemical reactions. These reactions are also influenced by the ambient temperature and humidity. To maximize the life of the battery, it should not be exposed to extremely high or low temperatures (e.g. in a parked car in summer or winter) for long periods.
-
Even with optimum conditions of use, every battery has a limited service life. After several hundred charging cycles, this becomes noticeable as the operating times become significantly shorter.
- In line with the applicable regulations (see page 135), defective batteries should be sent to an appropriate collection point for proper recycling.
- The replaceable battery supplies another back-up battery that is built into the camera. This back-up battery ensures that the date and time data entered is retained for up to 2 days. If this back-up battery becomes discharged it must be recharged by inserting a charged main battery. Once the replaceable battery has been inserted, the full capacity of the back-up battery is recovered after about 60 hours. This process does not require the camera to be turned on. However, in this case the date and time have to be entered again.
- Remove the battery if you will not be using the camera for a long period of time. When doing so, turn the camera off using the main switch first. Otherwise, after several weeks the battery could become totally discharged, i.e. the voltage is significantly reduced, as the camera uses a low no-load current (to save the settings) even when it is turned off.
PREPARING THE CHARGER
Connect the charger to a power source using the appropriate power cable for the local power sockets.
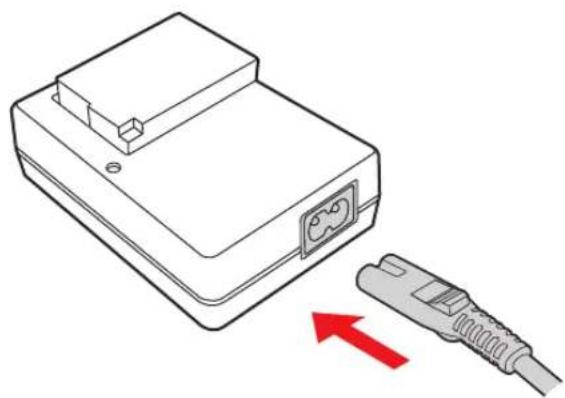
natural_image
Diagram of a device with an attached cable and a power outlet, showing no text or symbols.Note:
The charger automatically adjusts to the relevant mains voltage.
PLACING THE BATTERY IN THE CHARGER
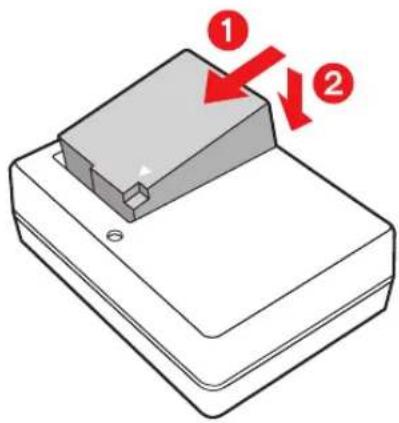
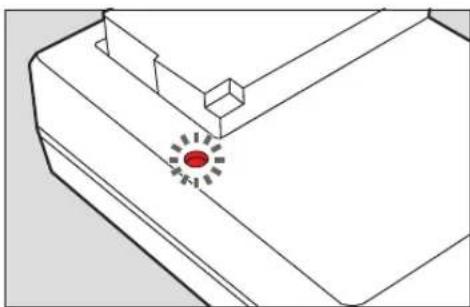
CHARGING STATUS DISPLAY
Correct charging is indicated when the green status LED is lit up. When it goes out, the battery is fully charged.
natural_image
Technical line drawing of a mechanical component with a red circular feature and mounting holes (no text or symbols)CHANGING THE BATTERY/MEMORY CARD
Turn off the camera, i.e. set the main switch to OFF
Open the battery compartment/memory card slot door
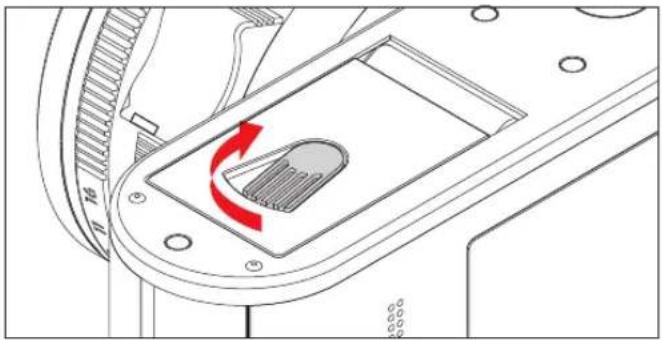
natural_image
Technical diagram of a mechanical component with a red circular arrow indicating rotation or movement (no text or symbols present)Inserting the battery
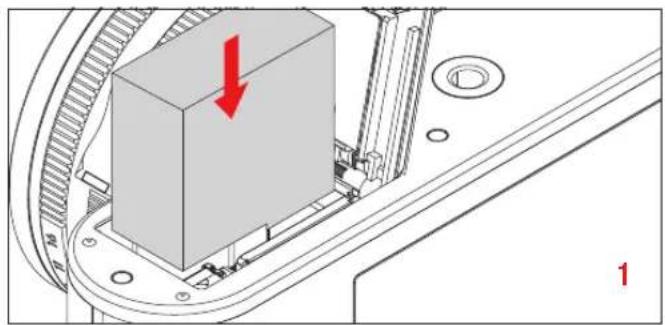
natural_image
Mechanical assembly diagram showing a component with a red arrow indicating direction, no text or symbols present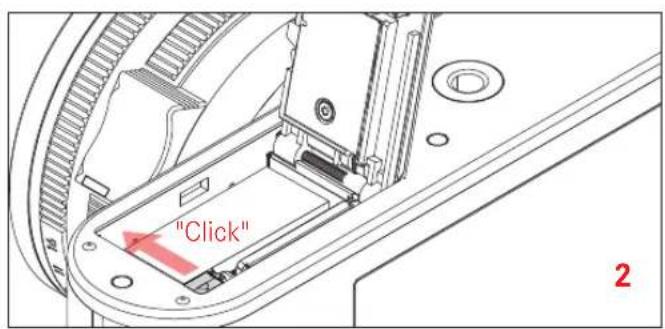
Removing the battery
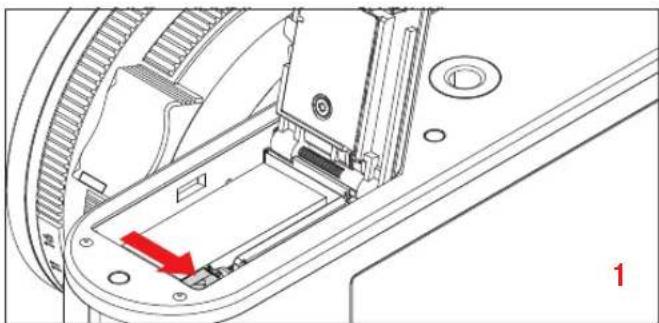
natural_image
Technical diagram of a mechanical assembly with a red arrow indicating a specific component (no text or symbols present)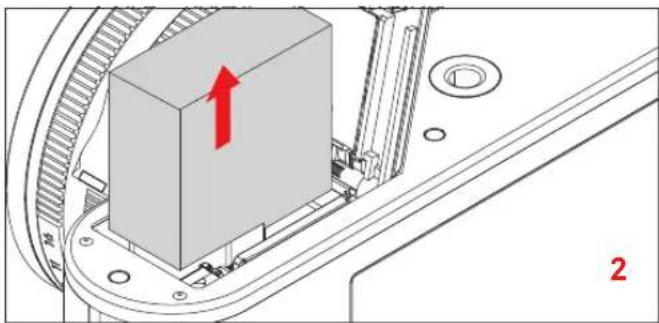
natural_image
Mechanical assembly diagram showing a gray box mounted on a mechanical component with a red arrow indicating direction (no text or symbols)Important:
Removing the battery with the camera turned on can delete the settings you have made in the menus and may damage the memory card.
Charge level display
The charge level of the battery is indicated on the monitor (see page 248).
Notes:
- Remove the battery if you will not be using the camera for a long period of time.
- The date and time must be reset after the capacity of a battery (approx. 3 month) in the camera has expired.
Inserting the memory card
SD, SDHC or SDXC memory cards can be used in the Leica Q.
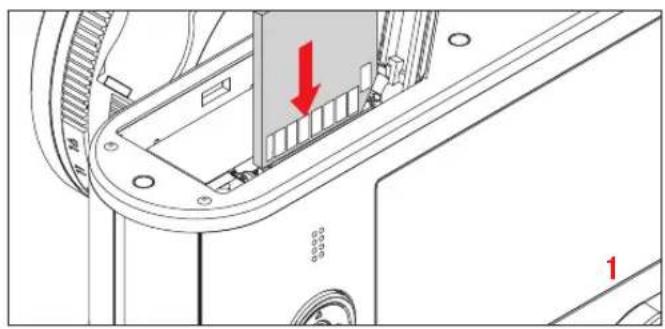
natural_image
Technical diagram of a mechanical assembly with a red arrow indicating a component, no visible text or symbols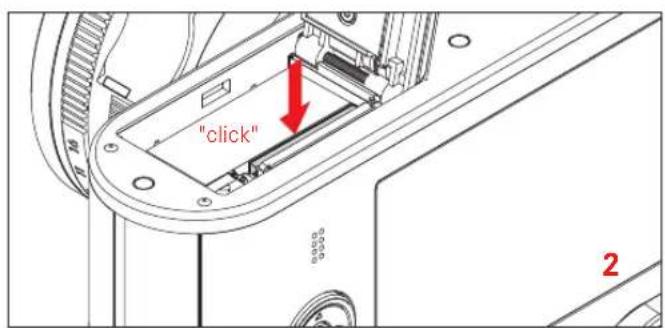
Removing the memory card
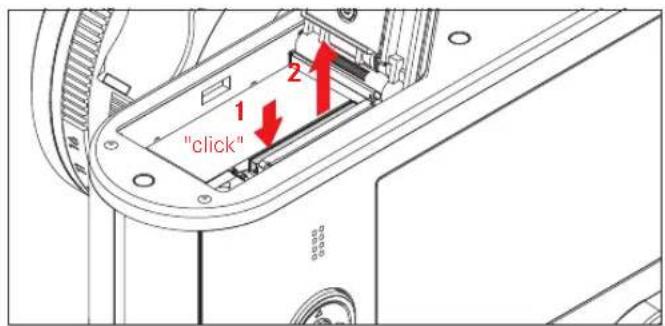
Notes:
- Do not touch the memory card contacts.
- If the memory card cannot be inserted, check that it is aligned correctly.
- The range of SD/SDHC/SDXC cards available is too large for Leica Camera AG to be able to completely test all available types for compatibility and quality.
Although using other card types is not likely to damage the camera or the card, some "no name" cards do not comply with the SD/SDHC/SDXC standards and Leica Camera AG is unable to provide any guarantee that they will function correctly.
• Video recordings in particular require a high write speed. - Do not open the door and do not remove the memory card or the battery while the status LED is lit to indicate that the camera is accessing the memory. Otherwise, the data on the card may be destroyed and malfunctions can occur in the camera.
-
As electromagnetic fields, electrostatic charges, and defects in the camera or the card can lead to damage or loss of the data on the memory card, we recommend that you also transfer the data to a computer and save it there.
-
For the same reason, it is recommended that the card is always stored in an antistatic case.
- It cannot be guaranteed that the camera will function properly when WLAN cards are used.
- SD, SDHC, and SDXC memory cards have a write protection switch, which can be used to prevent unintentional storage and deletion of pictures. This switch takes the form of a slider on the non-beveled side of the card; in the
lower position, marked LOCK, the data is protected.
Caution:
Keep batteries out of the reach of children.
Swallowing memory cards can cause suffocation.
Close the battery compartment/memory card slot door
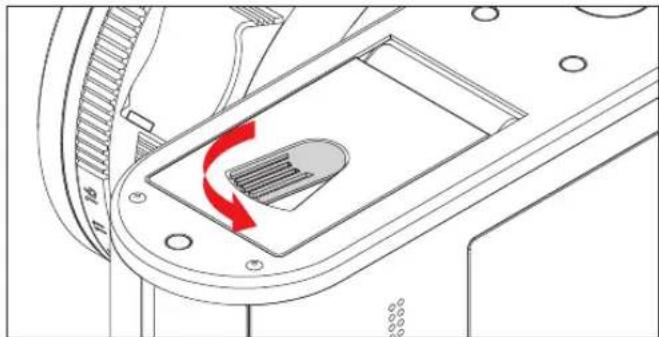
natural_image
Technical diagram of a mechanical component with a red curved arrow indicating rotation or force (no text or symbols present)Removing/affixing the lens hood
Affixing
- Twist off the protective ring thread by turning it counterclockwise
- Twist on the lens hood by turning it clockwise until it stops
Turn it in the opposite direction to remove.
Note:
Be sure to keep the protective ring thread in a place where it won't get lost.
THE MOST IMPORTANT SETTINGS/CONTROLS
MAIN SWITCH
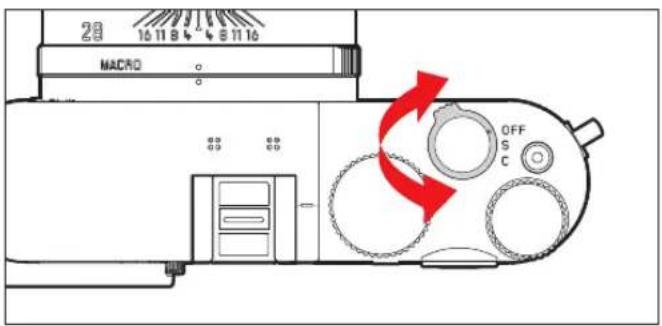
The Leica Q is turned on and off using the main switch:
- OFF = off
- S = Single pictures
- C = Continuous (picture series)
Continuous shooting picture frequency
Speeds of Low, Medium, or High are available.
-
Select Continuous Shooting in the menu and
-
select the desired setting in the corresponding sub-menu
- The monitor image appears when the camera is turned on.
Notes:
- If the main switch is set to C and the self-timer is used at the same time, only a single picture is taken.
- The maximum picture frequency is only reached at shutter speeds of 110 s and shorter.
- Regardless of how many pictures are taken in a series, the last picture is always shown first when they are reviewed. You can select the other pictures in the series by pressing right or left on the direction pad.
- In review mode, picture series are identified with ◆.
SHUTTER RELEASE BUTTON
The shutter release button works in two stages. Pressing it gently (to the pressure point) activates both the automatic focusing (if set) and the exposure metering and control systems, and saves the relevant settings/values. If the camera was previously in standby mode, this reactivates it and the monitor image appears again. Before pressing the shutter release button all the way down, check that the focusing/autofocus (if active) and exposure metering are complete (for details on exposure setting, AF, and the corresponding displays on the monitor refer to pages 180 and 248). Pressing the shutter button all the way down takes a picture.
Notes:
- The menu system can be used to select or set key acknowledgment (response) tones and shutter sound, and to adjust their volume.
- The shutter button should be pressed gently and not jerkily to prevent blurring.
MENU CONTROL
You can navigate in the menu using the MENU button and the direction pad. Alternatively, you can use the thumb wheel instead of the direction pad. Furthermore, touch control can also be used for some sub-menus.
On page 140 you will find a list of the gestures available for touch control.
OPENING THE MENU
Press the MENU button
- The menu list appears. The active menu option is underlined in red, with its characters in white. The respective setting is displayed on the right. The white field in the scrollbar on the left edge indicates which of the five pages of the menu list you are currently on.
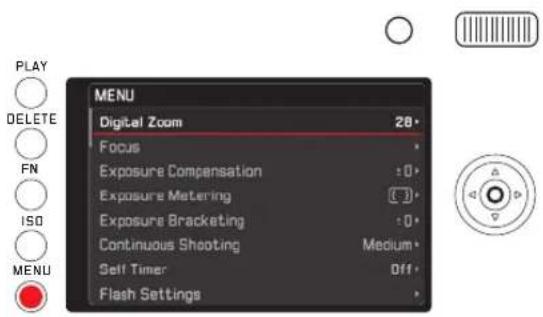
SCROLLING THROUGH THE MENU LIST
Press up/down on the direction pad or turn the thumb wheel


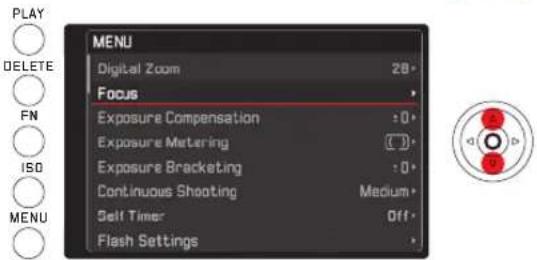
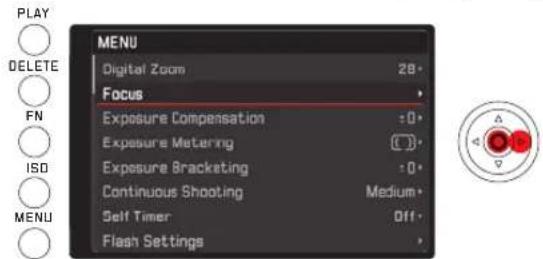
OPENING A SUB-MENU FOR AN OPTION
Press the right side of the direction pad or the set button
- A sub-menu appears. It may consist of the following elements:
- A list of setting options
- Another menu option list
- A setting scale.
The active sub-menu option is underlined in red, with its characters in white.


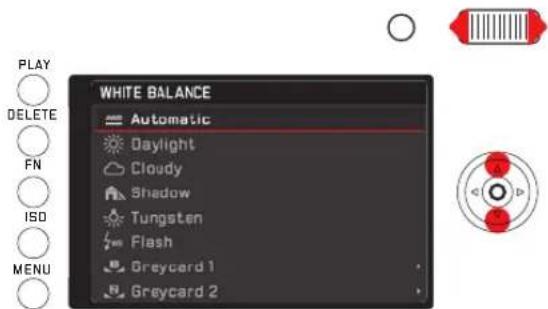
Selecting a setting/value in a sub-menu:
This "Level 1" sub-menu can be composed of the following elements:
a. List of setting options
Further procedure: Select one of the settings
Press up/down on the direction pad or turn the thumb wheel
• The currently active option changes.
Sub-menu option list
Further procedure (two steps):
Open respective menu points as described above under "Opening a Sub-Menu for an Option", then like a.
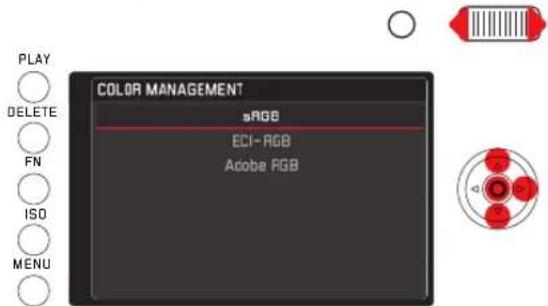
b. Setting scale
Further procedure:
Select a list value, alternately
- With the thumb wheel
- By pressing left or right on the direction pad
- By tapping on the desired value in the list
- By dragging the rectangle under the value list
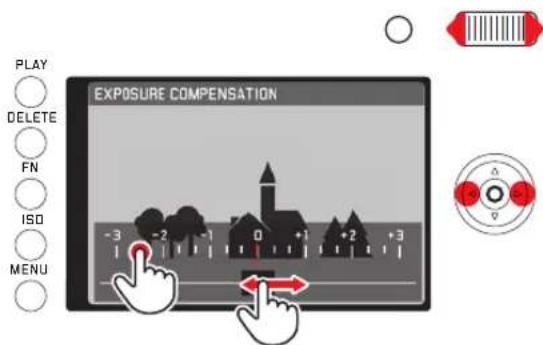
- The monitor image for picture mode reappears with a semi-transparent scale superimposed over it. The set value appears in the rectangle in the middle of the value list.
CONFIRMING A SETTING
Press the MENU button
- The menu list appears again, and the confirmed (new) setting is shown on the right in the active menu option line.
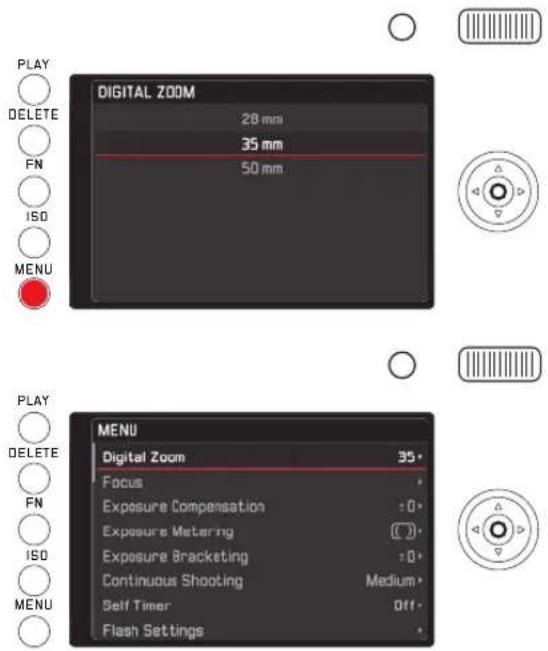
Exiting a sub-menu without confirming a setting
Press left on the direction pad or press the shutter release button
With the direction pad
- The menu list appears again, and the retained (previous) setting is shown on the right in the active menu option line.
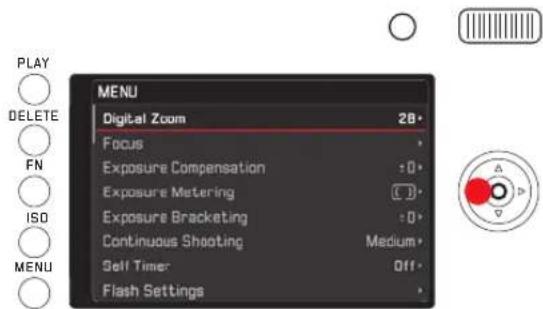
With the shutter release button
- The monitor image for picture mode appears.
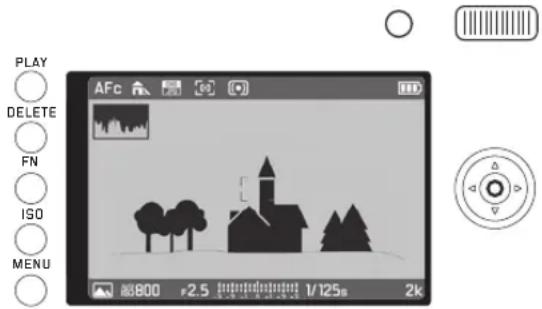
Note:
If the scale sub-menu is exited after being opened with the FN button, then the settings will be immediately adopted. In the case that the respective settings are not to be used, they must therefore be reset in the scale sub-menu.
Exiting the menu with confirmation of a setting
Press the MENU button
- The monitor image for picture mode appears. or
Press the shutter release button
- The monitor image for picture mode appears. or
Press the PLAY button
- The monitor image for review mode appears.
Notes:
- Depending on the other settings, some functions may not be available. In this case, the relevant option is displayed in dark gray in the menu and cannot be selected.
- The menu is normally opened at the position of the last option set.
- Some other functions are also controlled in the same basic way once they have been opened, by pressing the corresponding buttons:
- ISO for sensitivity
- DELETE for deleting image files/selecting the focus metering method (only in review or picture mode)
- FN for protecting image files or clearing delete protection (only in review mode)
By contrast with the menu functions, the settings for these functions can be confirmed with the shutter release button (by pressing to the first pressure point). Further details can be found in the relevant sections.
QUICK ACCESS TO MENU FUNCTIONS
The FN button facilitates quick operation. While in picture mode you can use it to directly access the menu function that you previously configured the button for, e.g. the function that you need most often. The following functions are available:
- White balance
- Exposure compensation
- Flash exposure compensation
- Exposure bracketing
- Scene program/exposure modes
- Photo file format
- Exposure metering method
- WLAN
- Self-timer
Configuration of the FN button
- Press and hold the FN button, or select FN button in liveView in the menu and
- select the desired function/function group in the sub-menu
In review mode, however, the FN button has a fixed function. It opens the menu used to access the protection and slide show sub-menu and provides direct access to the WLAN menu option.
Use of the FN button
Opening the established function/function group Press the FN button
Setting the functions/menu options opened by the FN button
The process for setting these functions or menu options varies depending on if the camera is in picture or review mode and depending on if it is opened by pressing the FN button or through the menu control.
Further details or peculiarities can be found in the descriptions of the individual functions in the respective sections.
In picture mode some menu options, such as
Exposure Compensation. Exposure Bracketing and Flash Exp. Compensation, as well as sub-menus such as Color temperature (White Balance) are set using touch control with it being possible to carry out one step alternatively using button control. This applies, for example, to the White Balance menu option when it is opened directly using the FN button (see below).
It works similarly for Protection, Slideshow, and WLAN sub-menus, which can be reached in review mode using the FN button: They too can be operated either through touch control or using buttons.
The following example describes the process involved for White Balance when opened using the FN button. The same principle works for all such menu options and sub-options in picture mode.
Start: The corresponding sub-menu has already been opened.
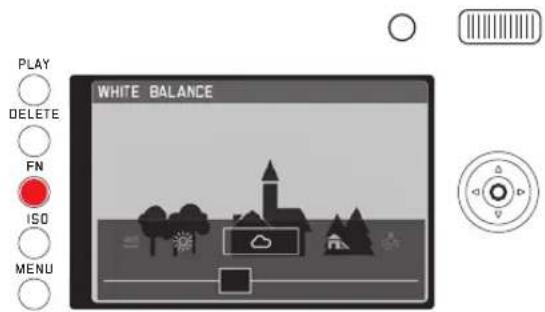
There are a few different ways to configure the desired settings. a. Using tapping
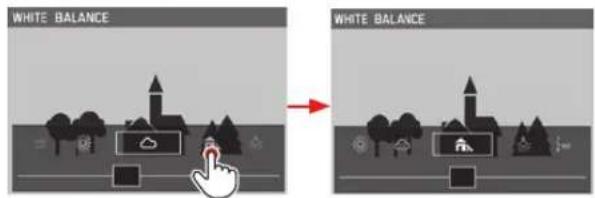
Note:
Functions/values that may not be shown in the monitor display at first can be reached by tapping on functions/values more than once or, in bigger steps, by tapping on the scrolling bar on the edge.
b. By dragging
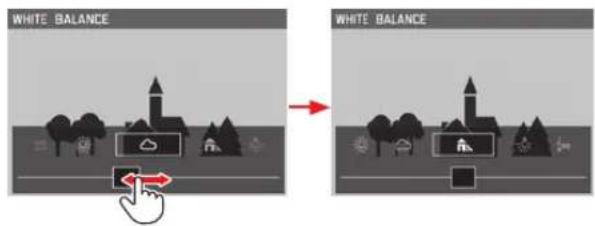
c. Using the direction pad or thumb wheel
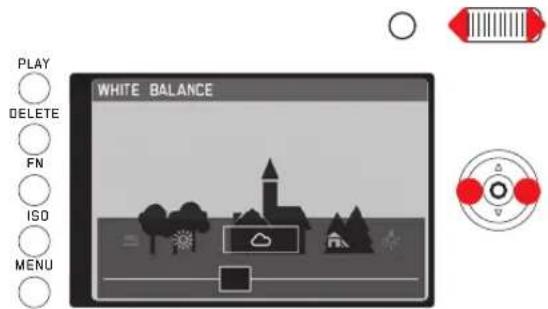
The set function need not be separately confirmed, it will be active immediately.
Protection, Slideshow, WLAN (in review mode)
Start: The menu has already been opened using the FN button.
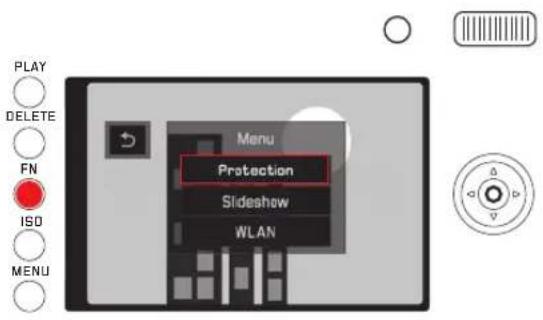
There are a few different ways to configure further settings, including those in the Protection and Slideshow sub-menus.
a. Using tapping
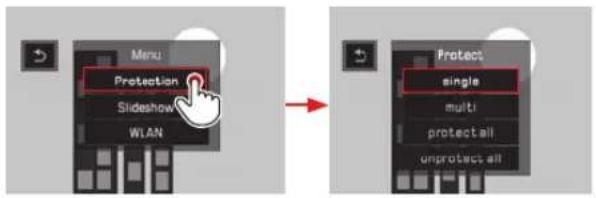
b. Using the direction pad or thumb wheel
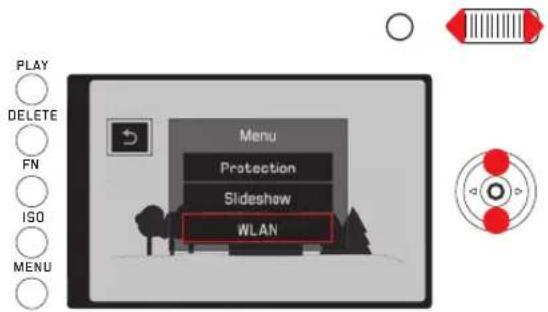
The further operation of WLAN however, can only be carried out in the normal menu using button control.
CAMERA DEFAULT SETTINGS
MENU LANGUAGE
Select Language in the menu and then select the desired setting in the sub-menu
DATE/TIME
- Select Date/Time in the menu
- Configure the desired settings in the sub-menu:
- Change values/settings: with the thumb wheel or by pressing up or down on the direction pad
- Switching between setting positions: Press left or right on the direction pad
- Press the set button to leave the sub-menu, the settings will be automatically confirmed
Note:
Even if no battery is inserted or the battery is depleted, an integrated back-up battery retains the date and time settings (approx. 3 month). However, after this time they have to be reset, see page 146.
ENERGY-SAVING SETTINGS
In order to increase battery life, you can have the monitor and/or camera shut off automatically after a specified period of time has passed.
- Select Power Saving in the menu,
- then Auto LCD Off or Auto Power Off in the sub-menu, and
- select the desired settings in the respective sub-menus
If these functions are active, the camera switches to energy-saving standby mode or the monitor switches off after the selected time.
Note:
Even if the camera is in standby mode, it can be activated again at any time by pressing the shutter release button or by turning it off and back on with the main switch.
ACOUSTIC SIGNALS
With the Leica Q you can decide whether you want your settings and some other functions to be acknowledged by an acoustic signal – two volumes are available – or whether operation of the camera and actually taking photographs should be predominantly free of noise.
- Select Acoustic Signal in the menu,
- then Volume in the sub-menu, and
- select the desired setting in the corresponding sub-menu
Setting the desired signals
- Select Acoustic Signal in the menu,
- then select one of the four options Shutter Sound, Keyclick, AF Confirmation, and SD Card Full in the sub-menu, and
- select the desired settings in the respective sub-menus
MONITOR/VIEWFINDER SETTINGS
Switching between monitor and viewfinder
The displays are the same, regardless of whether they appear on the monitor or viewfinder.
In the menu you can determine if displays are shown on the monitor or viewfinder. You can also determine if the switch should take place automatically. Additionally, you can also change the sensitivity of the corresponding sensor in the eyepiece in order to ensure that the switch happens reliably, which is especially helpful for eyeglass wearers.
- Select Display Settings in the menu,
- then EVF-LCD in the sub-menu, and
- select the desired setting in the corresponding sub-menu
Monitor brightness rendering
The brightness of the monitor display can be changed for optimized recognition and adjustment to different lighting conditions.
- Select Display Settings in the menu,
- then LCD Brightness, and
- select the desired setting in the corresponding sub-menu
Switching displays
In addition to the indicators on the upper and lower edge of the monitor image (see "The Displays", page 248) further information or auxiliary indicators are also available in the picture and review modes.
Selection of the desired indicators
For picture mode
- Select Photo Live View Setup in the menu,
- then Level Gauge, Grid, Clipping, or Histogram in the sub-menu, and
- turn the respective function on or off there
In review mode, the corresponding settings for Clipping and Histogram are configured similarly under the Play Mode Setup option.
Switching indicators
Press the set button
You scroll through the different options in an endless loop and select them by pressing once or several times.
In picture mode
| Shutter button pressed to the pressure point | ||
| Photo | - Upper and lower information lines- Grid*- Horizon*- Histogram*- Clipping* | - Lower information line- Grid* |
| Video | - Upper and lower information lines- Histogram* | |
| Photo without info | - Grid* |
In review mode
| With info | - Upper and lower information lines- Image number- Histogram*- Clipping* |
| Without info | - Picture only |
*If set
Note:
The last monitor image used will always appear when picture mode is switched on.
Histogram
The histogram depicts the brightness distribution in the picture.
The horizontal axis shows the tone values from black (left) through gray to white (right). The vertical axis corresponds to the number of pixels at each brightness level.
This form of representation - together with the impression of the picture itself - provides an additional quick and easy assessment of the exposure setting.
Notes:
- In picture mode the histogram should be regarded as a "trend indicator" and not as a depiction of the exact numbers of pixels.
- For a picture with flash, the histogram cannot represent the final exposure as the flash is fired after it is displayed.
- When viewing a picture, the histogram may differ slightly from that shown when taking the picture.
- The histogram is not available for simultaneous review of several reduced pictures or for enlarged pictures.
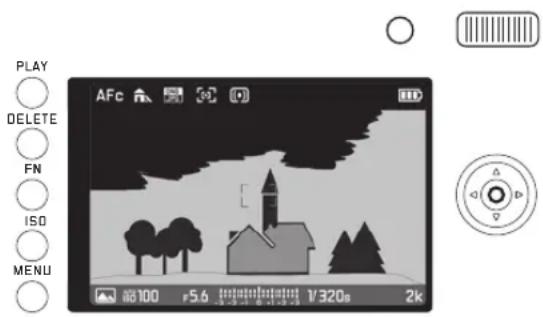
Clipping
The clipping indicator marks bright areas in a picture without detail, meaning that they would be displayed this way (when taking the picture) or were displayed this way (when reviewing). These areas will blink in black.
This way the clipping indicator makes it possible to easily and precisely check and possibly even adjust the exposure setting.
Notes:
- The clipping indicator cannot be used with video recordings.
- The clipping indicator is available when viewing both the entire picture and a section of it, but not when simultaneously viewing 12 or 30 reduced pictures.
- The clipping indicators always relate to the detail of the part of the picture currently being displayed.
Horizon
Integrated sensors make it possible for the Leica Q to show its alignment. This indicator enables you to align the camera precisely in the longitudinal and transverse axes to capture critical subjects, e.g. architecture pictures taken from a tripod.
- For the longitudinal axis, two long lines are shown on the monitor image to the left and right of the screen's center. They appear green when the camera is oriented correctly and red when it is slanted. For the transverse axis, two green double lines directly to the left and right of the picture's center indicate the starting point. When the camera is slanted they turn white and a short red line appears above and below.
Notes:
• The indicator precision amounts to ≤1°.
- The horizon cannot be used with video recordings.
Grid
The grid divides the image field into nine fields of the same size. It facilitates things such as picture composition and exact camera orientation.
Note:
The grid indicator cannot be used with video recordings.
PICTURE DEFAULT SETTINGS
FILE FORMAT
Images can be recorded in JPG and DNG + JPG formats (picture raw data format).
Setting the function
This menu option can be opened in two ways, either directly with the FN button (as long as it has been configured for this function, see page 157) or using menu control. The settings that follow also vary.
With the FN button
Press the FN button (multiple times)
The two variations are set up in an endless loop.
- The set format appears in a window below in the middle of the monitor image. It will disappear after 4s, further steps to change settings can only be taken within this period of time.
Using menu control
- Select Photo File Format in the menu,
- select the desired setting in the corresponding sub-menu
Note:
The indicated remaining number of pictures or recording time are an approximation, as the file size for compressed images can vary considerably depending on the subject of the photograph.
JPEG RESOLUTION
If the JPG format is selected, pictures can be taken with four different resolutions (numbers of pixels). This allows you to adjust the setting precisely to the intended use or to the available memory card capacity.
- Select JPEG Resolution in the menu and
- select the desired setting in the corresponding sub-menu
Note:
Raw data (DNG format) is always stored at the maximum resolution regardless of the settings for JPEG images.
The different resolutions of a resolution level relate to the selected image section 28/35/50mm.
White balance
In digital photography, white balance ensures neutral, i.e. natural, reproduction of color in any light. It is based on the camera being preset to reproduce a particular color as white.
You can choose between several presets, automatic white balance, two fixed manual settings, and direct setting of the color temperature:
| AWB | Automatic white balance |
| For outdoor pictures in sunlight | |
| For outdoor pictures with cloudy sky | |
| For outdoor pictures with the main subject in shadow | |
| For illumination with light bulbs | |
| WB | For illumination with electronic flash |
| Memory slot for custom measured results | |
| Memory slot for custom measured results | |
| K | For manual color temperature input |
Fixed presets
Setting the function
This menu option can be opened in two ways, either directly with the FN button (as long as it has been configured for this function, see page 157) or using menu control. The settings that follow also vary.
With the FN button
- Press the FN button and
- select the desired function on the corresponding scale Details on how to proceed for the second step can be found on page n 157-158. The scale will disappear again after 4s, further steps to change settings can only be taken within this period of time.
Using menu control
- Select White Balance in the menu and
- select the desired setting in the corresponding sub-menu
Manual setting by metering:
Using the menu or set button will close it, but the manual metering will only be saved if the shutter button is pushed (2nd pressure point).
With the FN button
- Press the FN button
Using menu control
- Press the FN button or press right on the direction pad
- A yellow frame appears in the center of the monitor with an instruction below it.
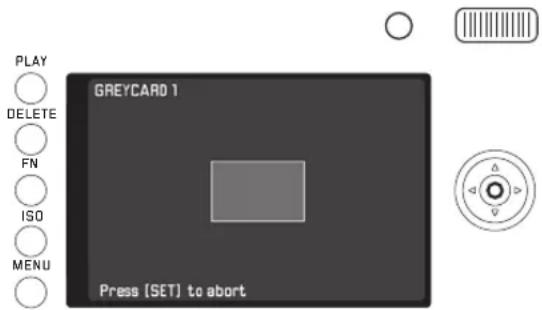
-
Aim the frame at a uniform white or gray object that completely fills the frame
-
Press the shutter button to carry out metering and save the result
The settings can then be retrieved using Mr. M2
Direct color temperature setting
Start: K has already been selected (see previous page) When configuring this function, there is only one step for which a difference exists between opening with the FN button and with the menu control.
With the FN button
- Press the FN button
Using menu control
- Press the FN button or press right on the direction pad
The further operation is identical in both cases.
- Select the desired value on the corresponding scale Details on how to proceed for the second step can be found on page 158.
The scale will disappear again after 4s, further steps to change settings can only be taken within this period of time.
ISO SENSITIVITY
The ISO setting specifies the possible shutter speed and aperture combinations at a particular brightness. Higher sensitivities allow faster shutter speeds and/or smaller apertures (for "freezing" rapid movements or to increase the depth of field), although this can also result in greater noise.
Setting the function
-
Press the ISO button and
-
The value list appears.
- Set the desired value there, either
- With the thumb wheel
- By pressing left or right on the direction pad
- By tapping on the desired value in the list
- By dragging the rectangle under the value list
- The set value will appear in the rectangle in the middle of the value list.
Within the AUTO option it is possible to limit the sensitivity range to be used (e.g. to control noise), and the slowest shutter speed to be used can also be specified (e.g. to prevent blurred pictures of moving subjects).
Setting the function
- Select Auto ISO Settings in the menu,
- then Maximum ISO or Max. exposure time in the sub-menu, and
- select the desired settings in the respective sub-menus
JPEG SETTINGS
Note:
The functions and settings described in the next two sections refer exclusively to pictures in the JPEG format. If the DNG file format is specified, these settings have no effect as in this case the image data is always saved in its original form.
Contrast, focus, color saturation
One of the many advantages of digital photography is that it is very easy to change critical properties of a picture, i.e. those that determine its character. With the Leica Q, you can influence three of the most important picture properties before you actually take the picture:
- The contrast, i.e. the difference between light and dark sections of the image, determines whether an image has a more “flat” or “brilliant” effect. As a consequence, the contrast can be influenced by increasing or reducing this difference.
- Focus display - at least of the main subject - using the correct focusing is a prerequisite for a successful picture. In turn, the impression of a picture being in focus is to a great extent determined by the edge sharpness, i.e. by how small the transition area between light and dark is at edges in the picture. The impression of being in focus can thus be changed by expanding or reducing these areas.
- The color saturation determines whether the colors in the picture tend to appear as “pale” and pastel-like or “bright” and colorful. While the lighting and weather conditions (hazy/clear) are given as conditions for the picture, there is definite scope for influencing the reproduction here.
For all three picture properties, you can independently choose between five levels.
Setting the function
- Select JPEG Settings in the menu,
- then Contrast, Saturation, or Sharpness in the sub-menu, and
- select the desired settings in the respective sub-menus
The Saturation sub-menu contains an additional setting, Monochrome, which is available for B/W pictures.
Working color range
The requirements in terms of color reproduction differ considerably for the various possible uses of digital picture files. Different color ranges have therefore been developed, such as the standard RGB (red/green/blue) that is perfectly adequate for simple printing. For more demanding image processing using the corresponding programs, e.g. for color correction, Adobe® RGB has become established as the standard in the relevant sectors. ECI is used in many cases for professional prepress work. The Leica Q makes it possible to set the camera to one of these three color ranges, meaning sRGB, Adobe RGE, or ECI-RGE.
Setting the function
- Select JPEG Settings in the menu,
- then Color Management in the sub-menu, and
- select the desired setting in the corresponding sub-menu
Notes:
- If you want to have your prints produced by major photographic laboratories, mini labs, or Internet picture services, you should select the SAGE setting.
- The Adobe RGB setting is only recommended for professional image processing in color-calibrated working environments.
Image stabilization
The worse the lighting conditions are when taking a picture, the slower the shutter speed has to be in order to achieve the right exposure. This can quickly lead to shutter speeds for which image blurring is a real problem. The optical picture stabilization of Leica Q can compensate for subjects that don't move or only move very slowly. Video recordings also benefit from a considerably steadier picture composition.
The system is effective to several shutter speed levels, this makes it possible for clear pictures to be produced using shutter speeds that are slower than what would normally be feasible for a good picture while holding a camera by hand.
Setting the function
- Select OIS in the menu and
- turn off or on in the sub-menu
PICTURE MODE
CHANGING TRIMMING
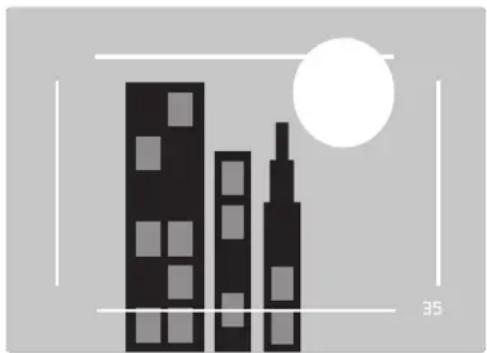
In addition to the picture trimming of the Leica Summilux 28mm f 1.7 ASPH.that is always shown, two other trimming sizes are also available to you. They correspond to the sizes that you would get with lenses possessing focal lengths of 35mm or 50mm. The thumb button configured with this function as part of the factory settings makes it possible to directly change to one of the three trimming sizes as desired. Separately from this, one default trim size can be set in the menu.
Configuration of the thumb button
- Selectthe Zoom/Lock Button in the menu and
- then Digital Zoom in the sub-menu
Using the thumb button
Press the thumb button
The focal lengths are organized in an endless loop so you can reach any one of the three by pressing multiple times.
Setting in the menu
- Select Digital Zoom in the menu and
- select the desired focal length in the sub-menu
Displays/picture composition
When using the 35mm or 50mm settings, a corresponding frame will appear delineating the respective trim section. Arrange the aspects of the subject that you want to capture within the respective frame.
natural_image
Silhouette of three modern buildings with a white circular background and horizontal lines, no text or symbols present.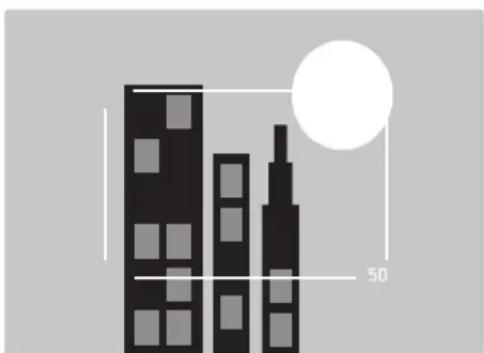
natural_image
Silhouette of three buildings with a large white circle and a 50-unit measurement label (no text or symbols on buildings)Notes:
- DNG files captured as a trim section always contain the full 28mm image field regardless of the settings, additional information in the data set ensure that the selected trim section is depicted. JPEG files on the other hand, contain only the respective trim section.
As a result, with DNG files trimming selections can be reversed afterwards while editing the photo, but this is not possible with JPEG files. - The trim section resolution is reduced accordingly in DNG as well as the JPEG format
- Exposure metering, automatic white balance, and multi-field/facial recognition AF modes all take the selected trim section as their basis for operation.
FOCUSING
On the Leica Q, the focusing can be set either automatically or manually. Both modes cover a distance ranging from 30cm to infinity, or 17cm to 30cm in the macro area.
AUTOMATIC FOCUSING/AUTOFOCUS
Two autofocus modes are available. The adjusting procedure for both is initiated by pressing down (1st pressure point) shutter button.
AFs (single) focus priority
- Hold down the AF lock/unlock button and turn the focusing dial to the AF position
- Press the shutter release button to the first pressure point to automatically determine, set, and store the focus and thus the distance.
- The part of the subject you are aiming at will come into focus.
- After that, the process ends even if you continue to hold the shutter release button at the first pressure point.
- As long as the shutter release button is held at the pressure point, the setting will be saved.
- It is not possible to take a picture before it comes into focus, even if the shutter button is pressed all the way down beforehand.
- A successful stored AF setting is indicated as follows:
- The color of the rectangle changes to green
- Multiple green rectangles may appear for multi-field metering
- An acoustic signal is produced (if selected).
Note:
Focusing and saving can be initiated and carried out with the thumb button if it has been configured with this function.
AFc (continuous) = shutter release priority
-
Hold down the AF lock/unlock button and turn the focusing dial to the AF position
-
Press the shutter release button to the first pressure point
- The part of the subject you are aiming at will come into focus.
- The process continues as long as the shutter release button is held at the pressure point. While the button is being held down the camera's settings are corrected, so other objects at other distances may be recognized by the metering system, or the distance to the camera of the part of the subject being photographed changes.
- These settings can only be saved by pressing the thumb button and the button must first be configured with this function (see page 186).
- Even if no part of the subject is in focus, a picture can be taken at any time.
Notes:
• Automatic focusing can also be controlled through touch (see page 177).
- The setting is stored along with the exposure setting.
- In certain situations the AF system is unable to set the distance correctly, e.g. when:
- The distance to the subject you are aiming at is outside the available range, and/or
- The subject is not sufficiently illuminated (see next section).
Such situations and subjects are indicated by:
• The color of the rectangle changing to red
- For multi-field metering, the display changing to a single red rectangle
Important:
The shutter release button is not locked, regardless of whether or not the focusing is correct for the relevant subject.
AF AUXILIARY LIGHT
The built-in AF auxiliary light extends the operating range of the AF system to take account of poor lighting conditions. If the function is active, the light comes on under these conditions as soon as the shutter release button or the thumb button is pressed.
Setting the function
- Select Focus in the menu,
- then AF Assist Lamp in the sub-menu, and
- select the desired setting there
Note:
The AF auxiliary light illuminates a range of approximately approx.
0.3 - 5m. Therefore, in poor lighting conditions AF mode is not available at distances beyond this limit.
AUTOFOCUS METERING METHODS
For optimum adjustment of the AF system to different subjects, situations, and picture composition ideas, you can choose between six AF metering methods on the Leica Q:
Setting the function
- Select Focus in the menu,
- then AF Mode in the sub-menu, and
- select the desired setting in the corresponding sub-menu
Multi-field metering
This metering method captures the subject with a total of 49 fields, thus offering maximum snapshot success.
- Successful focusing for the parts of the subject in question is indicated by the appearance of a green frame. If, on the other hand, it is not possible to focus, then a red frame will appear at the center of the screen.
1-field metering
This metering method records only the parts of the subject in the center of the monitor image. Thanks to the small metering range for 1-field metering, you can concentrate on tiny details of the subject.
With this metering method you can move the AF frame to any point on the monitor image, e.g. to make it easier to use for off-center subjects: This can happen in two ways.
Button control
Use the direction pad to move the AF frame to the desired position
You can return the frame to the central position at any time:
Double tap the monitor at any location
Touch control
- Touch the metering frame until red triangles appear
- Drag the metering frame to the desired position
Place the metering frame in the middle:
Double tap the monitor at any location
Note:
If the camera is turned off and then on again, the metering field will always start out in the middle.
Subject tracking
This mode is a variation of 1-field metering that can help to capture a focused picture of a moving subject. In order to accomplish this, focusing always occurs automatically after you have indicated which subject should be captured.
Procedure
- Move the metering field onto the desired subject
- Press down the shutter release button until you reach the first pressure point
- The metering system captures and saves the subject in the field.
- Hold down the shutter release button until you are ready to take the picture and
- the frame will "follow" the saved subject.
- Push the shutter release button all the way down to take the picture
Notes:
- Before the subject is saved, the metering field can be moved just as with 1-field metering.
- Tracking will work regardless of whether the AF mode is set to AFs or AFc.
- Tracking will end if the shutter release button is released before the picture is taken. In this case the metering field will remain at the last position reached.
Touch-controlled autofocus
In this AF mode you can initiate automatic focusing by tapping on the desired subject on the monitor screen. This can be at any desired location.
• AF metering field frame color in this mode:
| Blue | Mode activated, not yet in focus |
| Green | The selected subject has been successfully brought into focus, will turn blue again after the picture is taken, frame remains at last position tapped |
| Red | The selected subject has not been successfully brought into focus, will soon turn blue again, frame remains at last position tapped |
Notes:
- With this mode, the AF function cannot be initiated with the shutter release button, but it can be initiated with the thumb button as long as it has been configured with this function. When the function is initiated, the metering frame will start out at the last position it was used in.
- The tapped location of the metering frame is completely independent of any metering frames that may have been moved as part of 1-field metering.
- If the camera is turned off and then on again, the metering frame will always start out in the middle.
Touch-controlled picture taking
In this AF mode you can take a picture by tapping on the desired subject on the monitor screen. Operation of the AF function before taking the picture and the indicator given before and after taking the picture correspond to the descriptions in the previous section.
- In order to differentiate touch-controlled autofocus, the blue metering field frame will also have a blue cross in the middle.
Notes:
- The shutter release button will work the same, regardless of if this mode is activated or not.
- The tapped location of the metering frame is completely independent of any metering frames that may have been moved as part of 1-field metering.
- When this mode and the self-timer are set at the same time, the delay time will begin when the screen is tapped.
- As long as this mode is activated, the review mode cannot be opened using touch control.
Face detection
In this mode, the Leica Q automatically detects faces in the picture and focuses on the one at the shortest distance. If no faces are detected, multi-field metering is used.
Manual focusing
For certain subjects and situations, it can be beneficial to set the focus yourself, rather than using autofocus. For example, if you are using the same setting for several pictures and it would be more work to use metering memory lock, or if you want to keep the setting at infinity for landscape pictures, or if you want to allow no or only a slower AF mode in poor, i.e. very dark, lighting conditions.
Switching
- Hold down the lock/unlock button in the lens' finger grip and
- turn the focusing dial on the lens until the desired subject is shown in focus
Note:
The infinity setting is located shortly before the mechanical end is reached. The is necessary in order to ensure that optimal focus can be achieved under all circumstances - with different temperatures for example.
AUXILIARY FUNCTIONS FOR MANUAL FOCUSING
To make it easier to achieve precise settings or to increase the precision of a setting, the Leica Q offers two features:
- The enlarged display of a middle section.
Reason: The larger the details of the subject are shown, the better you can assess their focus and the more accurately you can set the focus.
• The identification of clearly focused subjects
You can have the edges of clearly focused subjects marked in color so that it is easier to recognize when the optimal setting has been reached.
The four available colors permit adaptation to any background.
Procedure
Settings
- Select Focus in the menu,
- then MF Assist in the sub-menu, and
- select the desired setting in the corresponding sub-menu
If you use Focus Peaking, then you will be able to select the marking color.
- Select Focus in the menu,
- then Focus Peaking Setting in the sub-menu, and
- select the desired setting in the corresponding sub-menu
Taking photographs
- Determine the trimming
- Turn the focusing dial of the lens so that the desired subject comes into focus and/or its edges are marked
- Enlarged display:
As soon as the focusing dial is turned, the monitor image switches to display a section that is enlarged by three times the normal size. An indicator will also appear showing the enlargement factor and offering the option of changing the enlargement factor with the set button.
When the set button is pressed, it can be increased to six times enlargement or the enlargement can be changed to any value in between.
The normal monitor image can be restored again at any time by pressing the thumb button.
Approx. 5s after the last turn of the focusing dial, the normal monitor image will appear again automatically.
The enlargement level that appears first is always the last one used.
• Marking of clearly focused subjects:
All subject details that are in focus at the set range are indicated by outlines in the selected color.
Note:
Subjects that are in focus are marked according to subject contrast, so on the basis of light/dark contrasts.
EXPOSURE METERING AND CONTROL
Exposure metering methods
To adjust to the prevailing lighting conditions, the situation, or your working method and compositional ideas, the Leica Q provides you with three exposure metering methods.
Setting the function
This menu option can be opened in two ways, either directly with the FN button (as long as it has been configured for this function, see page 157) or using menu control. The setting that follows also varies.
With the FN button
Press the FN button (multiple times)
The three variations are set up in an endless loop.
- The set metering method appears in a window below in the middle of the monitor image.
It will disappear after 4s, further steps to change settings can only be taken within this period of time.
Using menu control
- Select Exposure Metering in the menu and
- then choose the desired setting in the sub-menu
Multi-field metering -
With this metering method, the camera automatically analyses the brightness differences in the subject and, by comparing them with programmed brightness distribution patterns, arrives at the likely position of the main subject and the corresponding best exposure. As a result, this method is particularly suitable for spontaneous, uncomplicated, and yet reliable photography, even under difficult conditions, and therefore for use in conjunction with automatic program mode.
Center-weighted metering -
This metering method allocates the highest weighting to the center of the image field, but also records all other areas.
Particularly when used in conjunction with metering memory lock, it allows the exposure to be selectively adjusted to particular parts of the subject, while simultaneously taking account of the entire image field.
Spot metering -
This metering method is concentrated exclusively on a small area in the center of the image.
It allows exact measurement of small or tiny details for precise exposure - preferably in conjunction with manual setting. For backlit pictures, for example, you normally need to prevent the brighter surroundings causing underexposure of the main subject. The much smaller metering field with spot metering enables these subject details to be selectively evaluated.
EXPOSURE CONTROL
In order to facilitate optimal adaptation to the respective subject or to your preferred way of working, the Leica Q provides you with the four exposure control modes of automatic program, aperture priority, and shutter speed priority while also allowing you complete control to configure it manually.
The scene program
Under the Scene menu option you can chose from ten "expanded" automatic program variations that will make taking photographs easier and more reliable. Automatic "snapshot" for general use is one of these programs, eight of them are perfectly suited for the special demands of frequently encountered subject types, and one - Digiscoping - is designed for taking photographs when the camera is mounted on a spotting scope.
An additional three programs can also be found there:
| Miniature Effect | Restriction of the focus area to a vertical or horizontal strip within the image field |
| Panorama | Automatic creation of panoramic pictures |
| Time Lapse | Interval pictures |
You will find more detailed information on these three functions in the corresponding sections on pages 189, 190, and 192. In all of these functions, the shutter speed and aperture as well as a series of other functions are controlled automatically.
Setting the function
This menu option can be opened and set in two ways, either through direct access with the FN button (as long as it has been configured for this function, see page 157) or using menu control.
With the FN button
- Press the FN button and
- select the desired function/program on the corresponding scale
Details on how to proceed for the second step can be found on page 158. The scale will disappear again after 4s, further steps to change settings can only be taken within this period of time.
Using menu control
- Select Scene Mode in the menu and
- then PASM in the sub-menu if you want to work with one of the four exposure modes described initially, or the desired subject program
Taking a picture with the subject programs is done in much the same way as taking a picture with the automatic program described on page 183, with the exception of the fact that you will not need to set the shutter speed and aperture.
Note for using a subject program:
- The program shift function (see page 183) and some of the menu options are not available.
- The shutter speed dial and aperture dial are inoperable, meaning that setting them is irrelevant.
Exposure modes P, A, S, M
These four modes can be selected using the shutter speed dial and/or aperture dial. They both have manual adjustment ranges with stop positions - the shutter speed dial in full graduations, the aperture setting dial in 1/3 graduations, and both have an A position for automatic operation. Depending on the position of the shutter speed dial, the following additional settings can be configured using the thumb wheel:
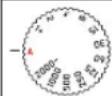 | Program shift |
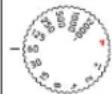 | Fine adjustment of the shutter speed in + - 13 EV increments |
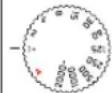 | -23 EV to 30s and T |
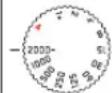 | + 23 EV to 116000 s |
Additionally, for P, S and A the exposure compensation can be set with the thumb wheel (see page 158/178)
Shutter speed fine adjustment
The set shutter speed is changed by 13 EV for each click of the thumb wheel, the adjustment range amounts to a maximum of 23 EV.
Examples:
- Set shutter speed/125s + the thumb wheel is turned left one click = 1/100s
- Set shutter speed/500s + the thumb wheel is turned right two clicks = 1/800s
Setting shutter speeds exceeding 1s
- Setting the shutter speed dial to 1 +
- Setting the desired shutter speed with the thumb wheel
Note:
Depending on the prevailing light conditions, the brightness of the monitor image can differ from that of the actual pictures taken. Particularly for long exposures on dark subjects, the monitor image appears considerably darker than the - correctly exposed - picture.
AUTOMATIC PROGRAM - P
For fast, fully automatic photography. The exposure is controlled by an automatic shutter speed and aperture setting.
Taking a picture in this mode
- Turn the aperture and shutter speed setting dials to their A positions
- Press the shutter release button to the pressure point
If the automatically set pair of values appears to be appropriate for the intended composition: - Push the shutter release button all the way down to take the photo
If not, you can change the value pair before taking the picture.
CHANGING THE PRESET SHUTTER SPEED/APERTURE COMBINATIONS (SHIFT)
Changing the preset values using the Shift function combines the security and speed of fully automatic exposure control with the freedom to adjust the speed/aperture combination selected by the camera to your own preferences at any time.
Setting the function
For faster shutter speeds, e.g. for sports shots, turn the thumb wheel to the right, for larger depth of field, e.g. for landscape shots, turn it to the left (provided you are prepared to accept the slower shutter speeds that this entails)
- Shifted value pairs are marked by a little star beside the F.
The overall exposure, i.e. the brightness of the image, remains unchanged. The adjustment range is limited to guarantee correct exposure.
To prevent accidental use, after each picture, and also if exposure metering is automatically turned off after 12s, the values revert to those set by the camera.
APERTURE PRIORITY - A
Aperture priority mode sets the exposure automatically according to the manually selected aperture. It is particularly suitable for pictures where the depth of field is the critical compositional element.
With a correspondingly low aperture value, you can reduce the depth of field range, for example to "crop" a face fully in focus from an unimportant or distracting background in a portrait or, conversely, you can use a correspondingly higher aperture value to increase the depth of field range so that everything from the foreground to the background is in focus in a landscape shot.
Taking a picture in this mode
- Turn the shutter speed setting dial to the A position
- Set the desired aperture value with the corresponding dial
- Press the shutter release button to the pressure point
If the automatically set shutter speed appears to be appropriate for the intended composition:
4. Push the shutter release button all the way down to take the photo
If not, you can change the aperture value before taking the picture.
Note:
Thumb wheel configuration as described on the previous page.
SHUTTER SPEED PRIORITY - S
Shutter speed priority mode sets the exposure automatically according to the manually selected shutter speed. Therefore, it is particularly suitable for pictures of moving subjects, where the sharpness of the movement depicted is the critical compositional element.
For example, with a correspondingly fast shutter speed you can avoid undesirable blurring of the movement, i.e. "freeze" your subject or, conversely, you can use a slower shutter speed to express the dynamic nature of the movement with a deliberate "blur effect".
Taking a picture in this mode
- Turn the aperture setting dial to the A position
- Set the desired shutter speed
- with the shutter speed dial - for full graduations
-
or with the thumb wheel if necessary in order to make fine adjustments in 12 increments
-
Press the shutter release button to the pressure point
If the automatically set aperture value appears to be appropriate for the intended composition:
- Push the shutter release button all the way down to take the photo
If not, you can change the shutter speed before taking the picture.
MANUAL SETTING - M
If, for example, you want to achieve a particular effect that is only possible with a very specific exposure, or if you want to ensure that several pictures with different trimming have an absolutely identical exposure, then you can set the shutter speed and aperture manually.
Taking a picture in this mode
- Set desired shutter speed/aperture values, shutter speed adjusted by full graduations with the shutter speed dial, and if necessary, adjusted with the thumb wheel for fine adjustment in 12 increments, aperture value adjusted with corresponding dial
- Press the shutter release button to the pressure point
- Exposure balance is achieved using the scale in the light meter:
- No white tick marks = correct exposure
-
White tick marks to the left or right of the central mark = under- or overexposure around the amount displayed or by more than ±3EV (exposure value)
-
If necessary, adjust the settings for a correct exposure so that only the central mark is displayed
If the set values and/or the exposure appears to be appropriate for the intended composition:
4. Push the shutter release button all the way down to take the photo
METERING MEMORY LOCK
For composition reasons, it can be beneficial not to have the main subject in the center of the picture. In such cases, the metering memory lock function - in P, S and A exposure modes, and with AF 1-field and spot metering modes - enables the main subject to be metered first and the relevant settings retained until you have determined your final trimming and take the picture. When set to factory settings, both locks are used with the shutter release button. You can, however, divide the lock functions between the shutter release button and the thumb button, or carry out both with the thumb button.
Selecting the thumb button function
- Select the Zoom/Lock Button setting in the menu and
- then AEL / AFL, AFL, or AEL in the sub-menu
Task sharing Functions
| Men setting Shutter release button Thumb button | ||
| Digital zoom* Exposure and focus - | ||
| AEL/AFL* - Exposure and focus | ||
| AFL* Exposure Focus | ||
| AEL* Focus Exposure |
*The functions each comprise setting and saving
Taking a picture with this function:
- Aim the AF frame at the part of your subject to which you want to adjust the focus and exposure
- Press the shutter release button and/or the thumb button to the first pressure point to set and store the focus and exposure
- Continue holding the shutter release button half way or holding the thumb button down and move the camera to determine the final trimming
- If necessary, continue to hold down the thumb button and push down completely on the shutter release button to take the picture
Note:
You can save any number of metering memory locks before taking the picture.
EXPOSURE COMPENSATION
Some subjects are made up predominantly of excessively light or dark surfaces, for example large areas of snow or a full-format black steam locomotive. In P, S, and A exposure modes, it may be more useful in such cases to set an appropriate exposure compensation instead of using metering memory lock each time. The same applies if you want to ensure an identical exposure for several pictures.
Setting the function
This menu option can be opened in two ways, either directly with the FN button (as long as it has been configured for this function, see page 157) or using menu control.
With the FN button
- Press the FN button (multiple times)
The three functions Exposure Compensation Exposure Bracketing, and Flash Exp. Compensation are arranged in an endless loop.
Using menu control
- Select Exposure Compensation in the menu
The further operation is identical in both cases.
- Select the desired value on the corresponding scale, details on how to proceed can be found on page 158. Values of +3 to -3EV are available in 12 EV increments.
- During setting, you can observe the effect on the monitor image, which gets darker or lighter. The set compensation value is displayed on the light meter in the normal monitor image. When the menu option is opened using the FN button, the scale will disappear again after 4s, further adjustments can only be made within this time.
Notes:
- If you set the exposure manually, exposure compensation is not possible.
- A set compensation remains active until it is reset to ☐, i.e. even after any number of pictures and even after turning off the camera.
AUTOMATIC BRACKETING
High contrast subjects that have both very bright and very dark areas can have very different effects, depending on the exposure. The automatic bracketing function enables you to take a series of three pictures with graduated exposure. You can then select the best picture for further use.
Setting the function
This menu option can be opened in two ways, either directly with the FN button (as long as it has been configured for this function, see page 157) or using menu control.
With the FN button
- Press the FN button (multiple times) The three functions Exposure Compensation, Exposure Bracketing, and Flash Exp. Compensation are arranged in an endless loop.
Using menu control
- Select Exposure Compensation in the menu and
- press the set button or press right on the direction pad
The next step is identical in both cases.
Select the desired graduation on the corresponding scale
Details on how to proceed can be found on page 158. When the menu option is opened using the FN button, the scale will disappear again after 4s, further adjustments can only be made within this time.
- The set graduations are displayed in red on the scale.
While your setting will become active immediately when made by opening the menu option with the FN button, extra confirmation is needed when opening it using menu control.
Press the set button
- Appears in the normal monitor image to the left of the light meter.
Notes:
- Depending on the exposure mode, the graduations are produced by changing the shutter speed (P/A/M) or the aperture (S).
- The sequence of the pictures is: correct exposure/underexposure/overexposure.
- Depending on the available shutter speed/aperture combination, the working range of the automatic bracketing function may be limited.
- A set bracketing setting remains active until it is reset to ± 0 , i.e. even after any number of pictures and even after turning off the camera.
MINIATURE EFFECT
With this function you can select which parts of the image field are shown in focus and, most importantly, which parts are out of focus. You can limit the focused areas to either a horizontal or vertical strip. You can change the width as well as the location of this strip within the image field.
The effect will make the picture look similar to a closeup photo with its characteristically shallow depth of field.
Setting the functions
- Select Scene Mode in the menu and
- then Miniature Effect in the sub-menu
• The monitor image will display
- Two white lines demarcating the area of the picture that will be in focus
- Indicators in the upper left and right that show how the strip is being changed
Change the orientation of the strip
Press up once on the direction pad while monitoring the indicator on the left (differs depending on starting position)
Change the location of the strip
Press up as many times as necessary on the direction pad while monitoring the indicator on the right (differs depending on orientation)
Change the width of the strip
Turn the thumb wheel, to the left = smaller, to the right = larger
Notes:
- The function is also available for use with video recordings.
- The function will remain active, even after a sequence or after the camera has been turned on and off. If you want to take normal pictures again, you will have to activate the desired function in the scene menu.
PANORAMIC PICTURES
With this function, Leica Q makes the process of creating panoramic pictures a snap. This can be done horizontally or also vertically.
Notes:
- Independent of the settings of the shutter speed dial and the aperture dial, panoramic pictures are basically executed using automatic program mode.
- The video record button will remain locked while panorama pictures are in progress.
- Regardless of the focal length setting, panoramic pictures are generally taken with 28mm.
- Regardless of the corresponding menu setting, panoramic pictures are generally stored in the JPEG file format.
- It is not possible to take panoramic pictures with the flash.
- The resolution of a panoramic picture depends on the direction of the picture and number of pictures taken. The maximum resolution (for 28mm) is approx. 8176x1920 pixels.
Setting the function
- Select Scene Mode in the menu and
- then Panorama in the sub-menu
• The monitor image will display
- A white horizontal or vertical line in the center of the picture
-
A progression display for the function to the left or right and centered
-
In order to switch between landscape or portrait orientation for the panorama, press any side of the direction pad
Creating a panoramic picture
- Orient the camera so that the planned left edge of the picture is not all the way to the left in the monitor image,
- press the shutter release button, and hold it down
- Pan the camera steadily in the direction indicated while using the white line to help keep from drifting up or down too much
Notes:
- If the camera is panned too slowly or too fast, then the camera will stop taking the picture and a corresponding notice will appear.
- The more unsteady the camera is and the more it moves up and down or side to side (depending on picture format), the smaller the height/width of the final panoramic picture will be.
- The maximum pivoting angle amounts to approx. 180^ .
4. Release the shutter release button to end the picture
When the shutter release button is first pressed down, pictures will automatically be taken quickly in succession.
After the picture series is completed, the camera will combine the individual pictures into a single picture.
Notes:
- Focus, white balance, and exposure are set to the optimal values for the first picture. This means that in certain circumstances, the finished panoramic picture may not show the optimal focus or brightness if the distance from the subject or ambient lighting differ considerably throughout the picture.
- Since several pictures are being patched together in order to create a panoramic picture, it is possible that certain subjects may appear distorted or the transition points may be visible.
- It will not be possible to take panoramic pictures in the following situations:
- Long-term pictures (with shutter speeds exceeding 160s )
- Together with the Time Lapse function
- With the following subject types or under the following picture-taking conditions, it is possible that panoramic pictures will be unsuccessful or that individual pictures will be patched together incorrectly:
- Monochromatic subjects or subjects possessing a single unified pattern throughout (sky, beach, etc.)
- Moving subjects (people, pets, vehicles, waves, flowers swaying in the breeze, etc.)
- Subjects whose colors or pattern change quickly (e.g. a TV screen)
- Dark places
- Subjects with uneven or flickering lighting (due to fluorescent light bulbs, candlelight, etc.)
- The function will remain active, even after a sequence or after the camera has been turned on and off. If you want to take normal pictures again, you will have to activate the desired function in the Scene Mode menu.
TIME LAPSE PICTURES
The Leica Q makes it possible to automatically take pictures of motion sequences over a long period of time in the form of picture series. In order to do this, you must define the start time of the series, the intervals between pictures, and the number of pictures.
Setting the function
- Select Scene Mode in the menu,
- then Time Lapse in the sub-menu, and
- one of the three options in the corresponding sub-menu
Set the starting time/interval between pictures
(between 1s and a maximum of 59 hr, 59 min, and 59s respectively)
- Set the desired time in the respective sub-menu using the direction pad and/or the thumb wheel
- Set the values: Press up or down on the direction pad or turn the thumb wheel
- Switching between value groups: Press left or right on the direction pad
- Save the settings with the set button
Note:
Be sure that the interval between pictures is longer than the expected shutter speeds, otherwise individual pictures may be skipped (such as with pictures taken at night).
Set the number of pictures
(maximum 9999)
- Set the desired amount in the Time Lapse Image Count sub-menu
The keyboard sub-menu can be operated differently.
- Select number or function "buttons":
- Alternatively with the thumb wheel, direction pad, or by tapping
- Confirmation "button" (confirm a value/the finished setting),
- Delete "button" (deletion of the respective last value)
- Back "button" (to previous menu level, without confirmation):
Alternatively with the set button or by tapping
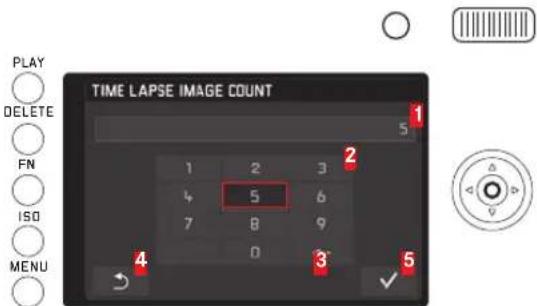
1 Edit line
2 Numeric pad
3 Delete "button"
4 Back "button"
5 Confirmation "button"
Creating a time lapse picture series
The exposure and focusing settings are no different from those of normal pictures, but it should be taken into account that the lighting conditions may change during the course of the picture series.
- The time until the first picture and the number of pictures are shown in the upper right corner of the monitor image.
Press the shutter release button to start the series - The remaining number of pictures will be displayed briefly between the pictures and a corresponding message will be displayed after the series has been completed.
Notes:
- The pictures in a series are saved as a group.
- If the camera is set to automatically turn off and no operations are carried out, it may shut off between the individual pictures and then turn on again.
- This does not make the camera suitable for use as a monitoring device.
- If the camera will be left unattended while taking time lapse pictures, take precautions to ensure that it won't get stolen.
- Time lapse photography carried out over a longer period of time at a cold location or in a place with high temperatures and humidity may result in malfunctioning.
- Under certain conditions it may not be possible to take time lapse pictures, depending on the picture interval or amount that has been set.
- Use a sufficiently charged battery.
- The taking of time lapse pictures will be interrupted or stopped in the following situations:
- If the battery loses its charge
- If the camera is turned off
If this happens while you are photographing a time lapse picture series, you may proceed by turning off the camera, changing the battery or memory card, and then turning the camera back on. The pictures that are taken after this will be saved in their own group.
- While time lapse pictures are being taken, neither a USB nor an HDMI microcable can be connected to the camera.
- Time lapse pictures cannot be taken with the panorama function.
- The function will remain active, even after a sequence or after the camera has been turned on and off. If you want to take normal pictures again, you will have to activate the desired function in the Scene Mode menu.
- In review mode, time lapse pictures are identified with 📄.
FLASH MODE
The camera determines the necessary flash power by firing one or more ranging flashes, fractions of a second before taking the actual picture. Immediately after this, at the start of exposure, the main flash is fired. All factors that influence the exposure (such as picture filter and changes to the aperture setting) are automatically taken into account.
COMPATIBLE FLASH UNITS
The following flash units can be used with the camera. They facilitate TTL flash metering and, depending on the configuration, a varying number of the functions described in this manual.
- With its compact dimensions and design that matches the camera, the Leica SF 26 system flash unit is the perfect solution. It is extremely easy to operate.
• Leica system flash units - Flash units that satisfy the technical requirements for a System 3000 System Camera Adaption (SCA), are fitted with the SCA-3502-M51 adapter, and allow guide number control.
Other commercially available attachable flash units with standard flash foot and positive center contact, and fired by the center contact (X contact) can also be used. We recommend the use of modern thyristor-controlled electronic flash units.
Attaching the flash unit:
- Turn off the camera and flash unit
- Pull the cover that protects the accessory shoe when not in use off towards the rear
- Slide the foot of the flash unit all the way into the accessory shoe and, if present, use the locknut to secure it and keep it from falling out.
This is important since changes in the position of the flash shoe could disrupt the required contacts, thus causing malfunctions.
The flash unit should be set to TTL mode to allow automatic control by the camera. When set to A, subjects with above or below average brightness may not be optimally exposed. When set to M, the flash exposure must be adjusted to the aperture and distance values specified by the camera by setting a correspondingly reduced power output level.
Note:
The flash unit must also be turned on, i.e. ready to use, otherwise there may be incorrect exposures and error messages on the camera.
FLASH MODES
Selecting the mode
- Select Flash Settings in the menu,
- then Flash Exp. Compensation in the sub-menu, and
- configure the desired setting on the scale of the corresponding sub-menu
Automatic flash activation - ♂A
This is the default mode. The flash is activated automatically whenever longer exposure times could lead to blurred pictures in poor lighting conditions.
Manual flash activation -
For backlit pictures where your main subject does not fill the entire frame and is in shadow, or in situations where you want to mitigate high contrasts, e.g. due to direct sunlight (fill flash).
As long as this mode is activated, the flash unit will be activated for every picture, irrespective of the prevailing lighting conditions.
Automatic flash activation with slower shutter speeds -7S
For simultaneous and more appropriate, i.e. brighter, reproduction of dark backgrounds and fill-in flash for the foreground. To minimize the risk of blurring, the shutter speed is not extended beyond 12 s in the other modes with flash activation. For pictures where the flash is used, this means that objects in the background, which the flash cannot reach, are often badly underexposed. To take adequate account of the available ambient light, the longer exposure times required in such situations (up to 30s) are allowed here.
Notes:
- Depending on the Auto ISO Settings it is possible that the camera may not support slower shutter speeds, as in such cases the increase in ISO sensitivity takes precedence.
- The maximum shutter speed can be specified using
Max exposure time.
SYNCHRONIZATION TIME PERIOD
Flash photographs are illuminated by two light sources, the available ambient light and the light from the flash. The time at which the flash is fired normally determines where the parts of the subject illuminated exclusively or predominantly by the flash are shown in the image field.
The conventional flash firing point at the beginning of the exposure can lead to apparent contradictions, e.g. a vehicle being "overtaken" by the light trail from its own tail lights.
The Leica Q allows you to choose between this conventional flash firing point and the end of the exposure:
In the example cited, the light trail from the tail lights then follows the vehicle as expected. This flash technique gives a more natural impression of movement and dynamics.
Setting the function
- Select Flash Settings in the menu,
- then Flash Sync in the sub-menu, and
- select the desired setting in the corresponding sub-menu
Note:
When using the flash with faster shutter speeds, in terms of the image there is no difference, or only a difference for rapid movements, between the two flash firing points.
FLASH EXPOSURE COMPENSATION
This function can be used to selectively reduce or strengthen the flash exposure regardless of the exposure of the available light, e.g. in a picture taken in the evening, to lighten the face of a person in the foreground while retaining the lighting atmosphere.
Setting the function
This menu option can be opened in two ways, either directly with the FN button (as long as it has been configured for this function, see page 157) or using menu control.
With the FN button
- Press the FN button (multiple times)
The three functions Exposure Compensation
Exposure Bracketing, and Flash Exp. Compensation are arranged in an endless loop.
Note:
Flash Exp. Compensation is only available with a mounted flash unit or a flash unit connected with an accessory shoe.
Using menu control
- Select Flash Settings in the menu,
- then Flash Exp. Compensation in the sub-menu, and
- press the set button or press right on the direction pad
The further operation is identical in both cases.
Select the desired value on the corresponding scale
Details on how to proceed can be found on page 158.
When the menu option is opened using the FN button, the scale will disappear again after 4s, further adjustments can only be made within this time.
Notes:
- Brighter flash illumination selected using a positive compensation requires a higher flash power, and vice versa. Therefore, flash exposure compensation has a more or less significant impact on the flash range: A positive compensation reduces the range, while a negative compensation increases it.
- A compensation setting remains active until it is reset to ± 0 (see step 2.), i.e. after any number of pictures and even after turning off the camera.
ADDITIONAL FUNCTIONS
VIDEO RECORDINGS
You can also use the Leica Q to make video recordings. The following functions are available:
Focal length/trimming
All available settings (see page 172)
Resolution
This function must be set for video recordings separately from the setting for photos.
Setting the function
- Select Video Resolution in the menu and
- then choose the desired setting in the sub-menu
Focusing
All options described on pages 174-175, however, selection of the shutter release and focus priority must be done separately for video recordings in autofocus mode.
Setting the function
- Select Video Settings in the menu,
- then Focus in Video in the sub-menu, and
- select the desired setting in the corresponding sub-menu
Exposure metering methods
All options described on page 180
Exposure control
Aperture, exposure time, and ISO sensitivity occur automatically.
Contrast, color saturation/rendering, focus
All options described starting on page 170, however, these options must be selected for video recordings separately from selection for photos.
Setting the function
- Select Video Settings in the menu,
- then Contrast, Saturation, or Sharpness in the sub-menu, and
- select the desired settings in the respective sub-menus
Color range
Video recordings are made with sRGB.
Stabilization
This function must be set for video recordings separately from the setting for photos.
Setting the function
- Select Video Settings in the menu,
- then Video Stabil. in the sub-menu, and
- select the desired setting in the corresponding sub-menu
Sound recording
Video recordings are normally recorded with sound. Sound is recorded in stereo using the built-in microphones. In order to achieve the desired volume or to improve audibility, you can adjust the sensitivity of the microphone to fit the recording situation.
Setting the function
- Select Video Settings in the menu,
- then Microphone Gain in the sub-menu, and
- select the desired setting in the corresponding sub-menu
To reduce any noise caused by wind, a damping function is available.
Setting the function
- Select Video Settings in the menu,
- then Wind elimination in the sub-menu, and
- select the desired setting in the corresponding sub-menu
Notes:
- Both the focusing and autofocus operations cause noises which are also recorded. In order to prevent this, you should refrain from using these functions during an ongoing recording.
Starting/ending the recording
Starting
Press the video record button
- A video recording in progress is indicated by a flashing red dot on the monitor. The remaining recording time is also displayed. At the same time, the status LED will also blink to show that the data is being recorded.
Ending
Press the video record button again
Note:
The view can be changed by pressing the set button.
Taking pictures while recording video
With the Leica Q you can briefly interrupt ongoing video recording in order to take one or more photos. Photographs are taken using the settings in the corresponding menu options and exactly as described in the corresponding sections.
Setting the function
- Select Video Settings in the menu, and
- then Photos during video recording, ON or OFF in the menu option
SELF-TIMER
You can use the self-timer to take a picture with a delay of either 2 or 12s. This is particularly useful for group photographs, where you want to appear in the picture yourself or if you want to avoid the picture being out of focus due to camera shake when releasing the shutter. In such cases we recommend that the camera is placed on a tripod.
Setting the function
This menu option can be opened and set in two ways, either directly with the FN button (as long as it has been configured for this function, see page 157) or using menu control.
With the FN button
- Press the FN button (multiple times)
The three functions (s delay time), (as delay time), and (out) are arranged in an endless loop.
- The set function appears in a window below in the middle of the monitor image.
Using menu control
- Select Selftimer in the menu and
- then the desired delay time or function in the sub-menu
While your setting will become active immediately when made by opening the menu option with the FN button, extra confirmation is needed when opening it using menu control.
Press the set button
Operation:
Push the shutter release button all the way down to take the photo
- The countdown is indicated by the flashing self-timer LED:
- 12s delay time: slowly at first, faster for the last 2s
2s delay time: as described above for the last 2s
The remaining time is counted down on the monitor.
Notes:
- A delay time in progress can be interrupted at any time by pressing the shutter button.
- It is only ever possible to take single pictures when the self-timer is active, i.e. picture series, automatic bracketing, and time lapse pictures cannot be combined with self-timer mode.
- In self-timer mode, the focus and exposure are not set when the shutter button or thumb button reaches its pressure point, but immediately before the picture is taken.
FORMATTING THE MEMORY CARD
It is not normally necessary to format memory cards that have already been used. However, if a card that has yet to be formatted is inserted for the first time, it must be formatted. In such cases the Format sub-menu appears automatically.
Nevertheless, it is recommended that the memory card be reformatted occasionally, as a certain amount of residual data (information accompanying pictures) can take up memory capacity.
Setting the function
- Select Format in the menu and
- then choose the desired function in the sub-menu
Notes:
- Formatting does not cause the data on the card to be irretrievably lost. Only the directory is deleted, which means that the existing files are no longer directly accessible. The data can be accessed again under certain circumstances using appropriate software.
Only the data that is subsequently overwritten by saving new data is actually permanently deleted.
We therefore recommend that you get into the habit of transferring all your pictures to a secure mass storage medium, e.g. the hard drive on your computer, as soon as possible.
- Do not turn the camera off while the memory card is being formatted.
- If the memory card has been formatted in another device, such as a computer, you should reformat it in the camera.
- If the memory card cannot be formatted, you should ask your dealer or the Leica Product Support (for address, see page 259) for advice.
- When formatting the memory card, even protected pictures are deleted.
RESETING PICTURE NUMBERS
The Leica Q saves the picture numbers in ascending order. Initially, the corresponding files are all stored in one folder. To structure the storage of pictures more clearly, you can create a new folder at any time so that subsequent pictures can be grouped together there.
Setting the function
- Select Reset image numbering in the menu
Notes:
- The file names (e.g. L1002345.jpg) are made up of two groups of numbers, 100 and 2345. The first three figures are the number of the relevant folder, the 4th to 7th figures are the consecutive picture number within that folder. This ensures that there are no duplicate file names after using the function and transferring the data to a computer.
- To reset the folder number to 100, format the memory card and reset the picture number immediately afterwards. This also resets the picture number (to 0001).
USER PROFILES
With the Leica Q, any combination of menu settings can be permanently stored, e.g. so that they can be retrieved quickly and easily at any time for recurring situations/subjects. A total of four memory slots are available for these combinations. Of course, you can also reset all menu options to the factory default settings.
Creating a profile
- Set the desired functions in the menu
- Select User Profile in the menu,
- then Save as Profile in the sub-menu
- Select the desired memory slot in the corresponding sub-menu
- Confirm the settings with the set button
Using a profile
- Select User Profile in the menu and select the desired memory slot in the sub-menu
Resetting all menu settings to the factory defaults:
- Select RESET in the menu and
- select the desired setting in the sub-menu
Note:
When resetting to the factory default settings, your settings for the date, time and language are not reset.
REVIEW MODE
Most settings can be configured and you can switch between picture and review mode in two ways - either with touch control or button control. A list of the gestures that can be used as part of touch control, including detailed descriptions, can be found on page 140.
SWITCHING BETWEEN PICTURE AND REVIEW MODE
Touch control
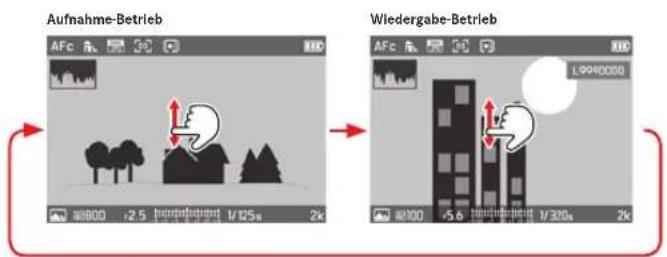
Switching from picture mode to review mode:
Press the PLAY button
Switching from review mode to picture mode:
Press either the shutter release button or the PLAY button
However, you can also review every picture automatically immediately after taking it.
Setting the function
- Select Auto Review in the menu and
- then the desired duration or function in the sub-menu
Displays
In review mode, known information about the picture is displayed in the headers and footers, and the picture number is also shown in the upper right.
If the histogram function is on, the diagram will also appear in the upper left side of the picture. If the clipping indicator is set, excessively bright areas in the image without any detail will be marked in red.
If there are no picture files on the memory card, then
No valid picture to play will be displayed instead.
Notes:
- If you have taken pictures using the continuous series, the automatic bracketing function, or the time lapse function, the last picture in the series is shown first, or the last picture saved if all pictures in the series have not yet been transferred from the camera's internal buffer memory.
- It may not be possible to view files created on another device on this camera.
- In some cases, the monitor image may not have the usual quality or the monitor will remain blank and only display the file name.
VIEWING PICTURES IN PORTRAIT FORMAT
If the camera was held horizontally when taking the picture, the picture is also displayed in this way. Portrait pictures on the other hand, so those where the camera is held vertically, are usually displayed with landscape orientation as well. This could be impractical with a camera held horizontally. The Leica Q offers a function that allows you to view the picture with the correct orientation every time.
Setting the function
- Select Display Settings in the menu,
- then Auto Rotate Display in the sub-menu, and
- select the desired setting in the corresponding sub-menu
- If Or is selected, portrait format pictures are automatically
displayed upright.
Notes:
- Portrait format pictures displayed upright are necessarily significantly smaller.
- Portrait pictures displayed using Auto Review will be shown unturned at first even when the Auto Rotate function is turned on.
- Pictures taken in portrait format can also fill the monitor when displayed in review mode. In order to accomplish this, just turn the camera accordingly.
VIEWING PICTURE SERIES
Picture series taken using series picture and bracketing, but particularly those taken with the time lapse function, may contain quite a few individual pictures. If all of these pictures were shown, it would become difficult to quickly find other individual pictures.
The Leica Q offers a function that allows such picture series to be displayed initially with a single "representative" picture.
Picture series are denoted by 📋 and time lapse picture series are denoted by 📋.
Setting the function
- Select Play Mode Setup in the menu,
- then Group display mode in the sub-menu, and
- select the desiredsetting in the corresponding sub-menu
- When On is selected, then "representative" pictures will be shown, with Off, all pictures from the respective picture series will be shown.
When On is selected, the pictures in a series will be combined in a group. A single "representative" picture will be shown for each of these groups, meaning that other pictures in the series cannot be opened. When Off is selected, however, it will be possible to scroll through all pictures in the respective series. Within each group, the pictures are numbered from 1 to x.
Regardless of the menu setting On, and without changing this setting, you can switch between these two options at any time while in review mode.
Press up or down on the direction pad
- and indicate that the function is turned on and indicates that the function is off.
Automatic review
In some instances, the automatic review of picture series can show the recorded sequences much better and more clearly than they would otherwise appear if you scroll through manually. This can be done with an existing picture series as well as with a video made from these pictures using the camera.
Before this feature can be used, it must be set to ☐n, so that the pictures are collected in a group.
Play back existing pictures
Tap on PLAY or press the set button
While in automatic review mode, you can open other pictures in the series at any time using the thumb wheel. You can also define the sequence and change time for each picture, while also having the opportunity to choose if the series should be saved as a video.
- Tap anywhere on the monitor or press the set button
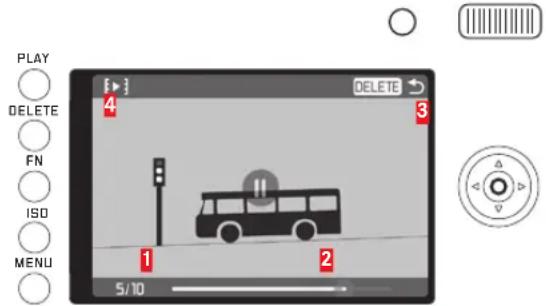
1 Counter, pictures shown/total number
2 Slide bar
3 Indication of which button can be used to stop review
4 Symbol for opening the sub-menu
- [▶] tap or press the direction pad left or right until [▶] is marked red
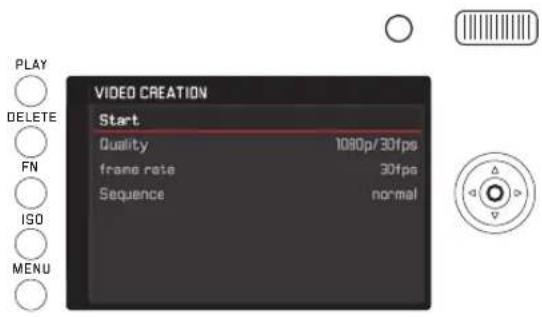
- In the Quality sub-menu select the desired video format, in the frame rate sub-menu select how long each picture should be shown, and in the Sequence sub-menu select the sequence (normal = forwards or reverse)
- Select Start in order to confirm the creation of the video
- An intermediary screen will appear. It will contain the processing time as well as a query.
- Start the process - Yes, or cancel - No
- A corresponding notification screen will appear briefly (while the data is being processed). It will also indicate that the process in progress can be stopped at any time by pressing the set button. The starting frame of the new video will then appear.
The video can be played back as described starting on page 218.
SELECTING/SCROLLING THROUGH PICTURES
Touch control
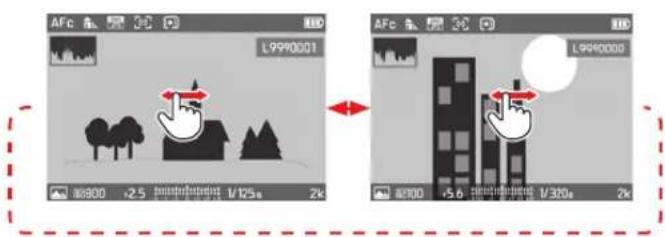
Button control
Press the direction pad right or left
Swiping to the right or pressing on the right will take you to newer pictures (with higher numbers) and swiping to the left or pressing on the left will take you to older ones (with smaller numbers).
The pictures are shown in an endless loop, meaning that once the last or first picture has been reached, the first or last picture will come before or after it.
ENLARGING/REDUCING PICTURES
Being able to enlarge a picture being reviewed makes it possible to get a better idea of how in focus it is.
Touch control
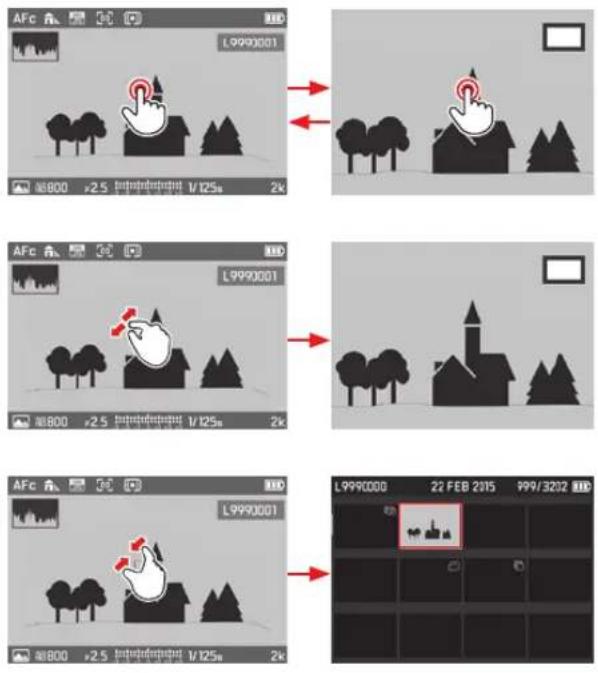
Button control
Turn the thumb wheel to the right (enlarge) or to the left (reduce) Enlargement occurs continuously, with the maximum being 1:1 (1 picture pixel = 1 monitor pixel)
You can view the picture back at its normal size any time by pressing the set button.
Simultaneous display of 12/30 pictures
Displaying 12 or 30 smaller pictures makes it possible to get an overall idea of what is there or to find a specific picture more quickly.
Touch control
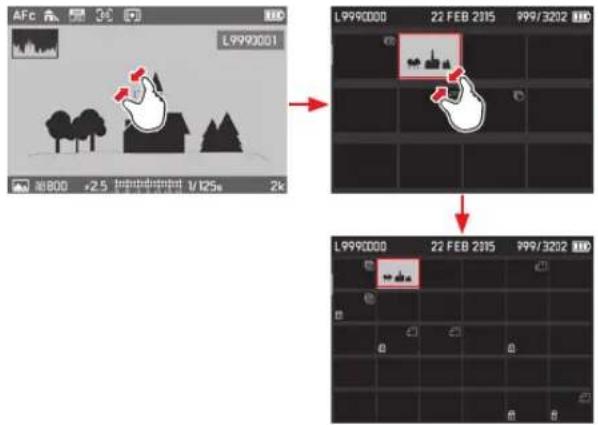
Button control
Turn the thumb wheel to the left, one click past the normal view = 12-picture view, two = 30-picture view
- The last picture to be shown at its normal size is marked by a red frame.
Notes:
- Enlarging cannot be performed on videos.
- When using an enlarged view or 12/30 display, the display with additional information cannot be opened.
- The more the picture is enlarged, the more the reproduction quality deteriorates – due to the proportionately lower resolution.
- It may not be possible to enlarge pictures taken using other camera types.
Select a picture in the 12/30 view
Touch control
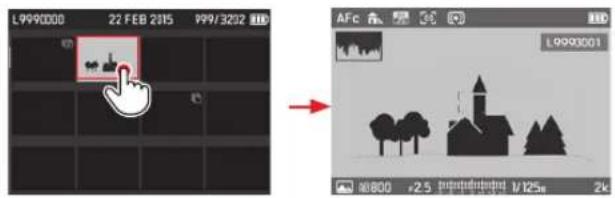
Button control
- By pressing on the corresponding side of the direction pad to select the desired picture
- Selected picture will be indicated by a red frame.
- Press the set button
• The selected picture will be shown at its normal size.
SELECTING THE DETAIL
In an enlarged display, you can move the detail from the center, e.g. to check the reproduction of off-center subject details.
Touch control
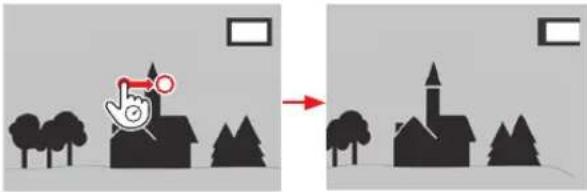
natural_image
Two-panel illustration showing a house with a red hat and a clock, transforming from a house on the left to a church on the right (no text or symbols)Button control
Press on the side of the direction pad that corresponds to the direction you want to move it in
• The approximate position of the detail in the picture is indicated.
DELETING PICTURES
Pictures on the memory card can be deleted at any time - as desired individually, several at a time, or all at the same time.
Important:
Deleting pictures is irreversible. Pictures cannot subsequently be recovered.
Opening the Delete function:
Press the DELETE button
• The delete menu appears.
Note:
Even when the delete menu is open, other pictures can be selected at any time by pressing left or right on the direction pad.
Leaving the delete menu without deleting pictures
Touch control
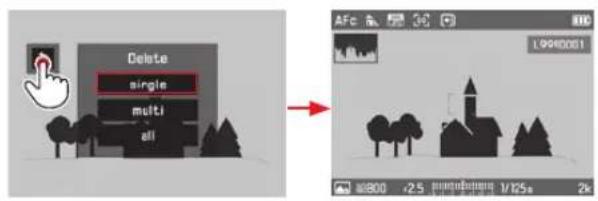
Button control
Press the PLAY button
or
- with the direction pad (press up or down) or select a thumb wheel symbol
- Press set button to confirm
Deleting single pictures
Touch control
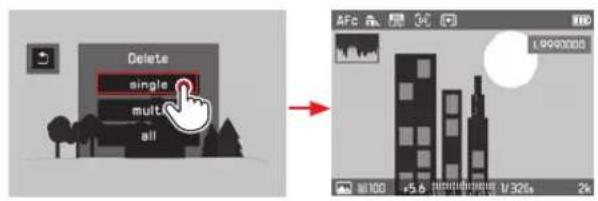
Button control
- With the direction pad (press up or down) or select thumb wheel single
- Press set button to confirm
• After deleting, the next picture appears.
If the picture is protected, it continues to be displayed and the message This file is protected appears briefly.
Important:
After the steps described above are carried out, the pictures will be immediately deleted without any additional confirmation queries.
Deleting more than one picture
Touch control
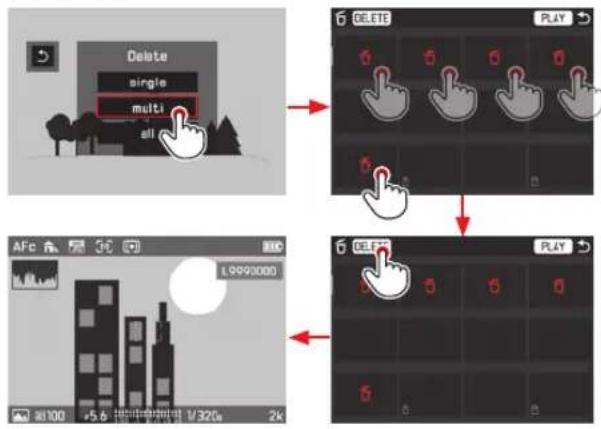
flowchart
graph TD
    A["Delete single multi all"] --> B["6 DELETE PLAY"]
    B --> C["6 DELF PLAY"]
    C --> D["5 5 5 5 5 5 5 5 5 5 5 5 5 5 5 5 5 5 5 5 5 5 5 5 5 5 5"]
Button control
- Select Mult with the direction pad or thumb wheel
- Press set button to confirm
• The 12-picture view is displayed.
- Press the set button again to mark the framed picture
• The framed picture is marked with - Select and mark additional pictures for deletion in the same way
Notes:
- Marks can be deleted with the same method used to place them.
- It is possible to leave the Mult sub-menu at any time without accepting the markings by pressing the PLAY button.
5. Press the DELETE button
- A corresponding notification window will appear briefly (during the deletion process) and then the next, undeleted picture.
Important:
After the steps described above are carried out, the pictures will be immediately deleted without any additional confirmation queries.
Deleting all pictures
Touch control
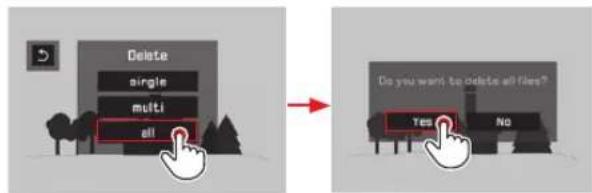
Button control
- Select All using the direction pad (press up or down) or thumb wheel,
• A query screen will appear to confirm you intention.
-
Select Yes or No with the direction pad (press left or right) or the thumb wheel, and
-
Press set button to confirm
• After the deletion process is complete, a corresponding notification screen will appear saying
No valid picture to play
PROTECTING PICTURES/CLEARING DELETE PROTECTION
The pictures stored on the memory card can be protected against accidental deletion. This protection can then be cleared at any time. Every step can be completed either with button or touch control, as described in the previous section.
Setting the function
- Press the FN button
- Select Protection
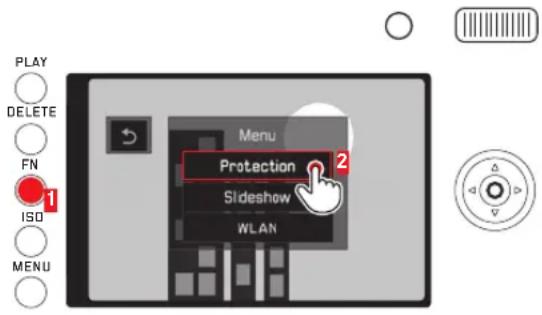
The steps that follow vary depending on if you want to clear delete protection or add protection to one, several, or all pictures.
Protecting single pictures/clearing delete protection for a single picture
3. Select Single
- The Protection sub-menu will disappear. If the picture was unprotected before, 📋 appears, if it was already protected, 📋 is no longer present.
Note:
Other pictures can also be selected when the Single function has been selected.
Protecting several pictures/clearing delete protection for several pictures
3. Select Multi
- The Protection sub-menu disappears. The 12-picture view appears, any protected pictures are marked with ☐.
- Select pictures to be protected or pictures for which protection should be deleted Protection for the selected photos is bestowed or deleted immediately.
- A brief message may appear indicating that it is processing your request. Afterwards, pictures that were unprotected before will have and this image will have been removed from those that were previously protected but no longer are.
5. Select PLAY
- The last picture marked appears with or without
Note:
It is possible to leave the Multi sub-menu at any time without accepting the markings by pressing the PLAY button.
Protect all pictures
3. Select Protect all
- The Protection sub-menu disappears. Afterwards, a brief message may appear indicating that your request is being processed, followed by the last picture viewed with 🔒.
Clearing delete protection for all pictures
3. Select Unprotect all
• The Protection sub-menu disappears.
Afterwards, a brief message may appear indicating that your request is being processed, followed by the last picture viewed without ☐.
VIDEO REVIEW
If a video recording is selected, PLAY ▶ appears on the monitor.
Start playback
Touch control
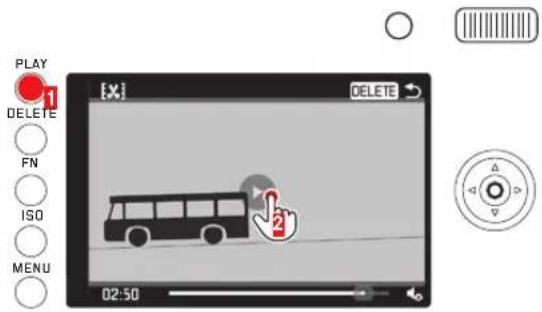
Button control
Press the set button
Opening the video and audio control symbols
(only during playback)
Touch control
![[x] DELETE 02:30 [6] DELETE 7 1 3 5 2 4 02:30](/content/2026/05/867748/images/1f541e8beaaa38cd8aebbd670202fbfaa2de23c36d7dcb34e800a1152ae78dd1.jpg)
Button control
Press the direction pad or set button, or turn the thumb wheel
1 Elapsed time
2 Slide bar with touch space
3 Pause playback
4 Volume
5 Volume slide bar with touch space
6 Shorten video
7 End playback
Notes:
- Opening the symbols stops playback.
• The symbols disappear after approx. 3s.
Pause playback
Touch control
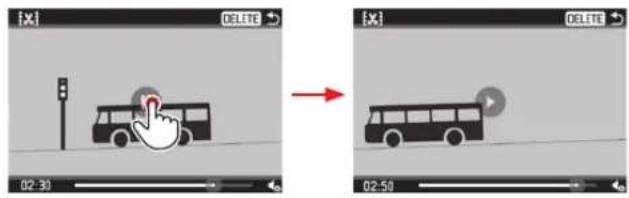
Button control
Press the set button
Continue playback starting at any given point
Touch control
![[x] DELETE 02:30 02:50](/content/2026/05/867748/images/6b9c50bc95b78179b51c1c48cc131a32493389cac5cef9337abae41a3835d05b.jpg)
Button control
Turn the thumb wheel (to the right = fast forward/to the left = rewind)
End playback
(Start: pause playback)
Touch control
![[X] DELETE 02:30 [ X ] DELETE 02:30](/content/2026/05/867748/images/7ebce78cb97fa8843bb2e4559e2a36d3b4e4ea16cbb2e0f26aad9b206d45be39.jpg)
Button control
- Press the direction pad right or left until is marked in red
- Press the set button
or press the
PLAY button
or press the
DELETE button
Setting volume control
(Start: pause playback)
Touch control
![[X] DELETE 02 30 [ X ] DELETE 02 30](/content/2026/05/867748/images/016f9703afd7d814e0b603ff1667465ae8626341d43e7ea373aa38fa52c85335.jpg)
Button control
- Press up or down on the direction pad
• The volume bar appears.
- Press the direction pad up (louder) or down (more quiet)
Note:
The sound is muted at the lowest position of the bar and the volume symbol will switch to 🔔.
Cutting of start and/or end sections
(Start: pause playback)
Touch control
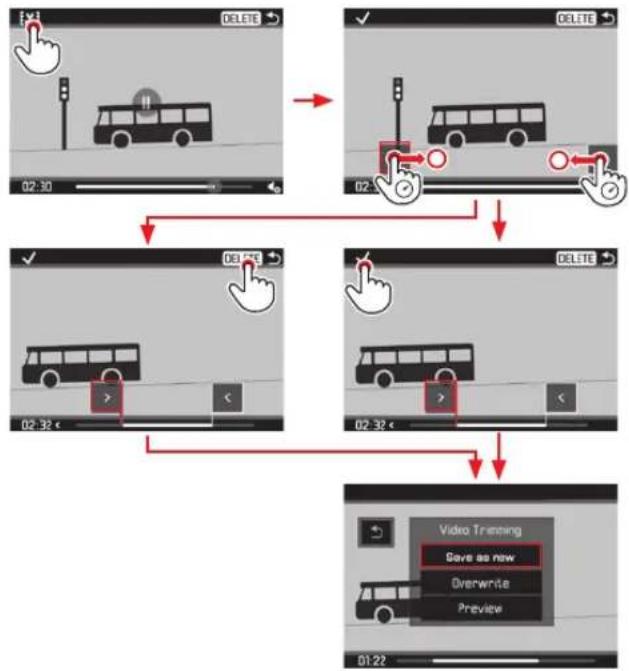
flowchart
graph TD
    A["Start"] --> B["Click with hand icon"]
    B --> C["Jumping at bus"]
    C --> D["Capture a circle on next hand"]
    D --> E["Insert mouse click"]
    E --> F["Video Training: Save as new"]
    F --> G["Overwrite"]
    G --> H["Preview"]
Button control
- Press the direction pad right or left until [x] is marked in red
- Press the set button
- Determine the cutoff points by pressing left or right on the direction pad.
• The selected cutoff point will be shown in red. - Move the cutoff points with the thumb wheel
- During the process, the respective time is displayed as well as the freeze frames for the selected start and end points.
- Press the direction pad up and then left or right until is marked red
- Press set button to confirm
• The Video Trimming sub-menu appears.
Further operation proceeds with the selection of one of three options from the Video Trimming sub-menu, either through touch control or with the use of the direction pad for selection and the set button for confirmation.
Save as new
The new video is saved and the original one is also retained.
Overwrite
The new video is saved and the original one deleted.
Preview
The new video is shown. It is neither saved, nor is the original one deleted.
- A corresponding notification may appear temporarily at first due to the time required for the data to be processed, then the first scene of the new video appears.
SLIDE SHOW
You can have pictures stored on the memory card displayed automatically one right after the other. For this feature, you can specify if all material, only the photos, or only the videos are shown and for how long each photo is shown. Every step can be completed either with button or touch control, as described in the section "Deleting Pictures" (see page 212).
Setting the function/starting the slide show
- Press the FN button
- Select Slideshow
- Select Duration
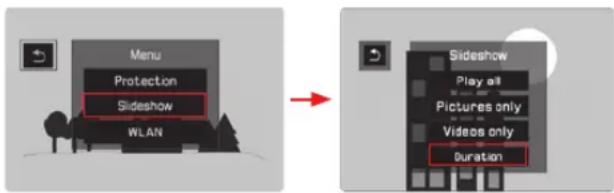
- Select the desired duration
Note:
Pictures in a series that have been compiled as a photo group using the menu setting (see page 206) will each be shown, regardless of the set picture duration. If you want all photos in the group to be shown for the set amount of time, then the corresponding menu setting must be changed. Videos are generally played back in full.
5. Select Play all, Pictures only, or Videos only
- A brief message will appear indicating that it is processing your request.
The slide show will then start automatically.
Ending the slide show
A slide show will run until you turn it off.
Tap anywhere on the monitor or press any button
VIEWING WITH HDMI DEVICES
The Leica Q enables you to view your pictures on a TV, projector, or monitor with HDMI input and thus in an optimum picture quality. You can also choose between four resolutions: 1080p, 1080, 720p, and +80p:
Setting the function
- Select HDMI in the menu and
- then choose the desired setting in the sub-menu
Connecting/viewing the pictures
- Insert the plugs on the HDMI cable into the HDMI sockets on the camera and the TV, monitor, or projector
- Turn on the TV, projector, or monitor; if the HDMI connection is not detected automatically, select the correct input
- Turn on the camera
- Activate review mode by pressing the PLAY button
Notes:
- An HDMI cable is required to connect to a TV, monitor, or projector.
- If the connected TV, monitor, or projector has a lower maximum rresolution than that set on the camera, it automatically switches to the maximum resolution of the connected device.
For example, if you have set 1080p on the camera but the connected device only has a maximum resolution of 480p, the camera changes the setting automatically. - For details of the required settings, refer to the instructions for the respective TV, projector, or monitor.
- The image reproduced on an external display does not contain any of the information shown in the camera monitor / viewfinder.
MISCELLANEOUS
TRANSFERRING DATA TO A COMPUTER
The Leica Q is compatible with the following operating systems:
Microsoft®: Windows® 7®/8®
Apple® Macintosh®: Mac® OS X (10.6) and later
The camera is equipped with a USB 2.0 high
speed interface for transferring data. This allows fast data transfer
to computers with the same kind of interface.
VIA THE USB CABLE CONNECTION AND USING THE CAMERA AS AN EXTERNAL DRIVE
With Windows operating systems:
The operating system detects the camera as an external drive and assigns it a drive letter. Transfer the picture data to your computer using Windows Explorer and save it.
With Mac operating systems:
The memory card appears as a storage medium on the desktop. Transfer the picture data to your computer using the Finder and save it.
Important:
• Use only the USB cable supplied.
- Do not interrupt the USB connection while data is being transferred as this can cause the computer and/or the camera to crash and may even cause irreparable damage to the memory card.
- The camera must not be turned off or should not shut down due to a lack of battery capacity while data is being transferred, as this can cause the computer to crash.
- For the same reason, the battery must never be removed from the camera while the connection is active. If the capacity of the battery runs low during data transfer, a screen appears with the battery capacity flashing. In this case cancel the data transfer, turn off the camera, and charge the battery.
WIRELESS DATA TRANSMISSION AND REMOTE CONTROL OF THE CAMERA
You can control the camera remotely using a smartphone/tablet or use the smartphone/tablet as an external storage medium. In order to do this, the "Leica Q" app must first be installed on your smartphone. This app is available in the Google Play Store™ for Android™ devices as well as the Apple App Store™ for iOS™ devices.
Note:
In this section, the term "smartphone" refers to smartphones as well as tablets.
Selecting the connection methods
There are two ways to establish a connection between your camera and your smartphone. If you have access to WLAN, the Client method may work best. When using this method, both the camera and smartphone are in the same WLAN network. If no WLAN is available, establishing a direct connection (Host) may be most practical. When using this method, the camera generates an access point where your smartphone can register.
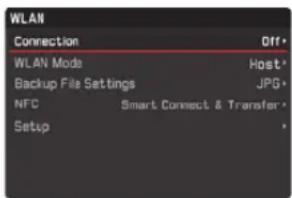
WLAN host setup
All of the settings under this menu option are preset at the factory. Under the menu option SSIO/network name you can change the name of the camera in the network. It is recommended that you retain the preset encryption method WPA2. Under menu option Password, you will be able to define a personal password.
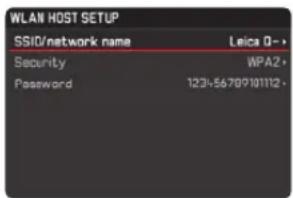
Establishing a connection with a smartphone in Host mode
Using an iOS device
Establishing a connection with QR code:
- Launch the 📄 Leica Q app on your iPhone and
- select QR Code
- Import the QR code shown on the camera using the 📄Leica Q app
- Install the "LEICA Q" profile on your iPhone
- First select Install, then Install, and then Done
- A message will appear in the web browser on the iPad or iPhone.
-
If a password is needed to unlock the iPhone, then this must be entered
-
Click the home button to close the web browser
-
Select and activate WLAN under Settings on the iPhone. Then select the SSID displayed on the camera (from the factory: Leica Q-******)
-
Return to the home screen and then launch the Qeica Q app
Using an Android device
Establishing a connection with QR code:
- Launch the Teica Q app on your Android device
- select QR Code
- Read the QR code shown on this device using the 📄Leica Q app
![CONNECT TO APP Press [SET] to abort PASSWORD: 123-5678910112 SSID: Leics 0-](/content/2026/05/867748/images/d26391fa84fa39d29b333dbfb53c8af1771bd34c3542022de59c45531182ae10.jpg)
Establishing a connection with SSID and password:
- Launch the Teica Q app on your Android device
- Select WLAN
- Select the SSID displayed on this device.
- Enter the password shown on this device (only when connection is established for the first time)
Establishing a connection with NFC:
- Launch the 📋 Leica Q app on your smartphone
- During the search operation carried out by the 📄 Leica Q app, hold the smartphone in the position shown in the diagram
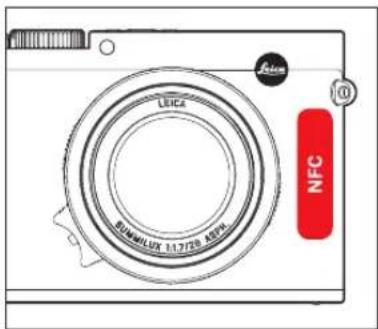
- Press Yes to confirm
- Once the connection has been established, the pictures captured by the camera will be shown on the smartphone in real time.
Notes:
- It may take a long time to establish a connection.
• The connected smartphones are registered on the camera.
WLAN CLIENT SETUP
For Client networking, you can select the available WLAN networks under the Setup menu option.
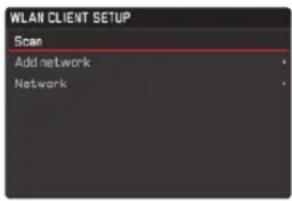
ESTABLISHING A CONNECTION WITH A SMARTPHONE IN Client MODE
- Select menu option WLAN and
- then WLAN Mode Client in the sub-menu
- Select the desired network in the Setup sub-menu and then enter in the access password
Note:
Using Add network you can establish a connection with a possibly hidden network by entering in the SSID, encryption method, and connection method.
WLAN FUNCTION OPTIONS
Take pictures using remote control
- Select WLAN
- Select Connection Remote control in the sub-menu
- Establish a connection with a smartphone
- Select Camera Control in the Leica Q app
- Take your pictures.
- The pictures taken are stored in the camera.
- The most important settings are available in the 📄 Leica Q app.
Back up pictures on the smartphone via WLAN
JPEG pictures captured on the camera are also displayed and saved on the smartphone.
- Select menu option WLAN and
- then Connection Backup in the sub-menu
- Establish a connection with a smartphone.
- Launch the Teica Q app on your smartphone.
- If you touch pictures, they will be enlarged on the display.
Notes:
- DNG files can only be saved on the camera's SD card.
- As part of the factory settings, the WLAN section of menu option Backup File Settings is set to JPG. With JPG + MP4, video recordings are also transmitted to your smartphone.
Notes:
- When using devices or computing systems that require more reliable security than WLAN devices, appropriate measures must be taken to ensure security and protect against disruptions to the systems used.
- Leica Camera AG does not accept any liability for damages arising from the use of the camera for purposes other than as a WLAN device.
- It is assumed that the WLAN function will be used in the countries where this camera is sold. If used in other countries than the one where the camera is sold, there is the risk that communications transmission conditions may be violated. Leica Camera AG does not assume any responsibility for violations of this kind.
- Please also notice that data transmitted and received wirelessly may be intercepted by third parties. We highly recommend that you activate encryption in the wireless access point settings in order to ensure that the information is secure.
- Don't use the camera in places where there are magnetic fields, static electricity, or disturbances, such as near microwaves. Otherwise the wireless transmissions may not reach the camera.
-
Using the camera near devices such as microwaves or cordless telephones that use the 2.4 GHz radio frequency wavelength may negatively affect the performance of both devices.
-
Do not connect to wireless networks you are not authorized to use.
- When the WLAN function is activated, the device will automatically search for wireless networks. When this happens, networks that you are not authorized to use (SSID: indicates the name used to identify a network over a WLAN connection) may be displayed. Do not attempt to connect to such a network, since this would be seen as unauthorized access.
USING RAW DATA (DNG)
During editing, you have the option of adjusting parameters such as noise reduction, gradation, sharpness etc. to achieve an optimum image quality.
INSTALLING FIRMWARE UPDATES
Leica is constantly working on developing and optimizing its products.
To this end, Leica Camera AG offers firmware updates as needed and these can be downloaded from our homepage. Once you have registered your camera, Leica Camera AG will notify you of all new updates.
To identify which firmware version is installed:
- Select Camera Information in the menu and
- then Firmware Version in the sub-menu
In the same sub-menu you can also call up other devices or country-specific registration marks or numbers.
ACCESSORIES
Important:
Use only the accessories specified and described here or by Leica Camera AG with the camera.
LEICA Q PROTECTOR
The protector allows free access to all operative elements of the camera without the need to remove the camera from the protector during use. A flap on the bottom provides access to the battery compartment/memory card slot and also contains a holder for an extra memory card. Made of high-quality black genuine leather. (Order no. 19 501)
HOLSTER LEICA Q
Half-shell belt holster. Combines comfortable wear, protection, and fast access to the camera. Made of black leather.
(Order no. 19 503)
High-quality genuine leather case in traditional design. The front section can be opened, allowing the camera to remain in the rear section of the case during use. A flap on the bottom provides access to the battery compartment/memory card slot and also contains a holder for an extra memory card.
(Order no. 19 502)
CARRYING STRAP
There are five varieties to choose from.
(Order no. 18 776 [with protective flap, leather, black]/18 777 [with protective flap, leather, cognac]/18 836 [leather, dark brown]/18 837 [leather, brown]/14 884 [Artisan & Artist, silk, green])
WRIST STRAP
There are five varieties to choose from.
(Order no. 18 782 [with protective flap, black]/18 783 [with protective flap, cognac]/18 838 [dark brown]/18 839 [brown]/14 885 [Artisan & Artist, silk, green])
MEMORY CARD/CREDIT CARD WALLET
Made of leather, compatible with an insert for up to three memory cards or without an insert for up to 3 credit cards. The back side of the insert can be used to clean the monitor of your camera. (Order No. 18 538 [black], 18 539 [cognac])
SYSTEM BAGS
"ARTISAN & ARTIST EDITION FOR LEICA"
A compact, especially fine system bag perfectly suited to carry light photography items on short trips and city trips. It combines the highest quality material with the finest working. A material mix of tough nylon and fine, black leather make it simultaneously weatherproof and very stylish.
(Order no. 14 883)
CREATIVE DAY BAG LEICA Q
Ergonomically cut, made of high-quality black leather. (Order no. 19 504)
LEICA Q HAND GRIP
The hand grip allows the camera to be held securely and carried conveniently. It is attached to the tripod thread on the camera using a knurled screw on the underside of the hand grip. The grip area features a screw thread for attaching the finger loop. (Order no. 19 505)
FINGER LOOP FOR HANDHOLD Q
The little loops made of rubber are attached to the hand grip with their screw and make it even easier to get a good grip on the camera. Available in three sizes. (Order no. 14 646 [s]/14 647 [m]/14 648 [l])
DISPLAY PROTECTIVE SHEET
This self-adhering sheet protects the monitor surface from scratches and even improves the visibility and clarity of the monitor screen by minimizing distracting reflections.
(Order no. 19 506)
UVA FILTER
This neutrally-colored filter can be used to protect the front lens. At the same time, it also minimizes blurriness and blue streaks caused by the disruptive UV rays in sunlight, particularly when taking pictures of the ocean and mountains. (Order no. 13 328)
FLASH UNIT
With its compact dimensions and design that matches the camera, the Leica SF 26 system flash unit is the perfect solution. It is also extremely easy to operate.
(Order no. 14 622)
TRIPODS/TRIPOD HEADS
Mounting the camera on a tripod prevents shaking, a prerequisite for getting truly clear, sharp pictures with longer shutter speeds. Leica offers several different models for a variety of uses.
Tripods
(Order no. 14 100 [small tripod], 14 101 [travel tripod, carbon])
Tripod heads
(Order no. 14 108 [ball and socket head short, silver], 14 109 [ball and socket head short, black], 14 110 [ball and socket head long, silver], 14 112 [ball and socket head long, black], 14 113 [ball and socket head 24, black])
REPLACEMENT PARTS Order no.
Power cable KOR.... 423-114.001-003
Power cable TW 423-114.001-004
Power cable EU....423-114.001-005
Power cable CHN 423-114.001-006
Power cable UK....423-114.001-007
Power cable AUS.... 423-114.001-008
Power cable US....423-116.001-020
Power cable JP 423-116.001-021
Lens hood....423-116.001-015
Li-ion battery BP-DC12 19 500
BC-DC12 charger....423-116.001-032
Lens cap....423-116.005-000
Carrying strap....439-612.060-000
Accessory shoe cover 423-116.001-013
SAFETY AND CARE INSTRUCTIONS
GENERAL SAFETY INSTRUCTIONS
Do not use your camera in the immediate vicinity of devices with powerful magnetic, electrostatic or electromagnetic fields (e.g. induction ovens, microwave ovens, television sets or computer monitors, video game consoles, cell phones, radio equipment).
- If you place the camera on or very close to a television set, its magnetic field could interfere with picture recordings.
- The same applies for use in the vicinity of cell phones.
- Strong magnetic fields, e.g. from speakers or large electric motors, can damage the stored data or the pictures. If the camera malfunctions due to the effects of electromagnetic fields then turn the camera off, remove the battery, and then turn the camera on again. Do not use the camera in the immediate vicinity of radio transmitters or high-voltage power lines. Their magnetic fields can also interfere with picture recordings.
- Protect the camera from contact with insect sprays and other aggressive chemicals. Petroleum spirit (cleaning solvent), thinner, and alcohol may not be used for cleaning. Certain chemicals and liquids can damage the camera's housing or the surface finish.
-
As rubber and plastics sometimes emit aggressive chemicals, they should not remain in contact with the camera for a long time.
-
Ensure that sand and dust cannot get into the camera, e.g. on the beach. Sand and dust can damage the camera and the memory card. Take particular care when inserting and removing the card.
- Ensure that water cannot get into the camera, e.g. when it is snowing or raining and on the beach. Moisture can cause malfunctions and even permanent damage to the camera and the memory card.
- If salt water spray gets onto the camera, wet a soft cloth with tap water, wring it out thoroughly, and wipe the camera with it. Then wipe down thoroughly with a dry cloth.
Important:
Use only the accessories specified and described in these instructions or by Leica Camera AG with the camera.
Monitor
- If the camera is exposed to significant temperature fluctuations, condensation can form on the monitor. Wipe it off carefully with a soft dry cloth.
- If the camera is very cold when turned on, the monitor image will initially appear slightly darker than normal. As soon as the monitor warms up, it will reach its normal level of brightness.
The monitor is manufactured using a high-precision process. This ensures that, of the total of around 1,040,000 pixels, more than 99.995% work correctly and only 0.005% remain dark or are always bright. However, this is not a malfunction and it does not impair the reproduction of the picture.
Sensor
• Cosmic radiation (e.g. on flights) can cause pixel defects.
Condensation
If condensation has formed on or in the camera, you should turn it off and leave it to stand at room temperature for around an hour. Once the camera temperature has adjusted to room temperature, the condensation will disappear by itself.
SAFETY NOTES ON USING CARRYING STRAPS
- Carrying straps are usually made of strong material. There is therefore a risk of strangulation.
- Use them only for their intended purpose as a carrying strap on a camera/on binoculars. Any other use carries the risk of injury and may possibly result in damage to the carrying strap and is therefore not permitted.
- Due to the risk of strangulation, carrying straps should not be used for cameras/binoculars during sporting activities where there is a high risk of getting caught by the carrying strap (e.g. climbing in the mountains and comparable outdoor sports).
- Keep carrying straps away from children. They are not toys and are potentially dangerous for children. Due to the risk of strangulation, it is not suitable for children to use them as carrying straps for cameras/binoculars.
CARE INSTRUCTIONS
- As any soiling also represents a growth medium for microorganisms, you should take care to keep the equipment clean.
For the camera
- Clean the camera only with a soft, dry cloth. Stubborn dirt should first be wetted with a well-thinned cleaning agent and then wiped off with a dry cloth.
- To remove marks and fingerprints, wipe the camera with a clean lint-free cloth. Tougher dirt in hard-to-reach corners of the camera body can be removed with a small brush.
- All mechanically operated bearings and sliding surfaces on your camera are lubricated. Please remember this if you will not be using the camera for a long period of time. To prevent the lubrication points becoming gummed up, the camera shutter should be operated several times every three months. It is also recommended that you repeatedly move and use all other controls.
For the lens
- Normally, a soft hair brush is sufficient to remove dust from the outer lens surfaces. However, in case of more stubborn dirt, they can be carefully cleaned with a very clean, soft cloth that is completely free of foreign matter, using circular motions from the inside to the outside. We recommend micro-fiber cloths (available from photographic and optical specialists) that are stored in a protective container and can be washed at temperatures of up to 40°C (without fabric softener, never iron!). Cloths for cleaning spectacles that are impregnated with chemicals should not be used as they can damage the lens glass.
- The lens cap supplied also protects the lens from fingerprints and rain.
For the battery
Rechargeable lithium ion batteries generate power through internal chemical reactions. These reactions are also influenced by the ambient temperature and humidity. Very high and low temperatures shorten the operating time and service life of the batteries.
- Always remove the battery if you will not be using the camera for a long period of time, as otherwise it could become totally discharged after several weeks, i.e. its voltage drops to a very low level.
- Lithium ion batteries should only be stored partly charged, i.e. not when fully discharged or fully charged (see the corresponding display). For very long storage periods, the battery should be charged for around 15 minutes twice a year to prevent total discharge.
- Always ensure that the battery contacts are clean and freely accessible. Whilst lithium ion batteries are proofed against short circuits, they should still be protected against contact with metal objects such as paper clips or jewelry. A short-circuited battery can get very hot and cause severe burns.
- For the battery to charge, it must have a temperature of between 10^ C and 30^ C (otherwise the charger will not turn on or off again).
- If a battery is dropped, check the casing and the contacts immediately for any damage. Using a damaged battery can damage the camera.
- Batteries have a limited service life.
- Send defective batteries to an appropriate collection point for proper recycling.
- Never throw batteries into a fire as this can cause them to explode.
For the charger
- If the charger is used in the vicinity of radio receivers, it can interfere with the reception; make sure there is a distance of at least 1m/3ft between the devices.
- When the charger is in use, it can make a noise (buzzing) – this is quite normal and is not a malfunction.
- When it is not in use, disconnect the charger from the mains as otherwise it uses a certain (very small) amount of power even when no battery is inserted.
- Always keep the charger contacts clean, and never short circuit them.
For memory cards
- While a picture is being stored or the memory card is being read, it must not be removed, and the camera must not be turned off or exposed to vibrations.
- For safety, memory cards should only ever be stored in the antistatic cover supplied.
- Do not store memory cards where they will be exposed to high temperatures, direct sunlight, magnetic fields or static discharge.
- Do not drop or bend memory cards as this can damage them and result in loss of the stored data.
- Always remove the memory card if you will not be using the camera for a long period of time.
- Do not touch the contacts on the rear of the memory card and keep them free of dirt, dust, and moisture.
- It is recommended that the memory card be reformatted from time to time, as fragmentation occurs when deleting, which can block some of the memory capacity.
Storage
- If you are not using the camera for a longer period of time, we recommend that you:
a. Turn off the camera
b. Remove the memory card
c. Remove the battery - A lens works like a magnifying glass if bright sunlight shines on the front of the camera. The camera must therefore never be set aside in strong sunlight without protection. Using the lens cap and keeping the camera in the shade (or immediately putting it away in the case) help to prevent damage to the interior of the camera.
- Store the camera preferably in a closed and padded container so that nothing can rub against it and it is protected from dust.
- Store the camera in a dry, adequately ventilated place, where neither high temperatures nor high humidity will occur. When used in humid conditions, the camera should be completely free of all moisture before being stored away.
-
Photo cases that became wet during use should be emptied to prevent damage to your equipment caused by moisture and any leather-tanning residue released.
-
To prevent fungal growth during use in hot, humid tropical climates, the camera equipment should be exposed to the sun and air as much as possible. Storage in airtight containers or cases is recommended only if a desiccant such as silica gel is also used.
- To prevent the formation of fungus, do not store the camera in a leather case for extended periods of time.
- Note down the serial number of your Leica Q, as this is extremely important in case of loss.
INDEX
Accessories 232
Acoustic signals (key acknowledgment (response) tones) .....161
AF auxiliary light....175
Aperture priority mode....184
Autofocus 174
Autofocus metering methods ....176
Battery, inserting and removing....146
Bracketing function, automatic....188
Care instructions....238
Carrying strap....142
Cautions 236
Color range....171/199
Color saturation....170
Contrast 170
Deleting pictures....212
Detail, selection of the, see Review mode
Digital zoom....172
Displays....244
DNG 166/230/250
Electronic viewfinder....162
Enlargement of pictures during review....209
Exposure compensation....187
Exposure control....181
Exposure metering methods....180
File format 166
Firmware downloads....231
Flash operation....194
Flash units 194
Focus setting aid....179
Focusing....174
Formatting of the memory card 202
HDMI viewing....232
Histogram....163
Info Service/Product Support, Leica 253
ISO sensitivity....169
Main switch 150
Manual exposure setting....185
Manual focusing....178
Memory card, inserting and removing....148
Menu control 152
Menu items....248
Menu language 160
Monitor....162
NFC....227
Parts, designation of ....138
Picture frequency, see main switch
Picture series, see main switch
Power off, automatic....161
Profiles 203
Program mode....183
Protecting pictures/clearing delete protection 216
Raw data 162/230/250
Repair service/Customer Care, Leica 253
Resetting all individual menu settings 203
Resolution....166/198/250
Review mode 204
Scope of delivery 132
Self-timer....201
Sharpness....170
Shutter button, see also Technical data....151
Shutter speed priority mode 184
Software 230
Sound recording 199
Spare parts 235
Stabilization 171/199
Storage....240
Technical data 252
Time and date....160
Time lapse pictures....172
Transferring data to a computer 224
Turning on/off, see main switch
USB connection....224
Video recordings....198
Viewfinder....162
Viewing the pictures, see Review mode
Volume 161/199/220
Warning messages 134
White balance 167
WLAN 226
APPENDIX
DISPLAYS
WHEN TAKING A PICTURE
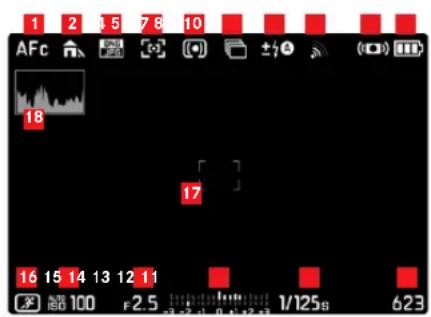
1 Autofocus mode
2 White balance
3 File format
4 Autofocus metering methods
5 Exposure metering method
6 Picture series, bracketing, time lapse pictures
7 Flash exposure mode, if necessary with indication of flash exposure compensation
8 WLAN activated
9 Stabilization activated
10 Battery charge level
11 Picture counter (pictures remaining)/elapsed video recording time (if there is not sufficient memory capacity, 1 flashes as a warning)
12 Shutter speed
13 Light scale
14 Aperture value
15 ISO sensitivity
16 Exposure mode (* = Note on changed time-aperture combination (only appears with automatic program and when a shift has occurred)
17 Autofocus metering methods
18 Histogram
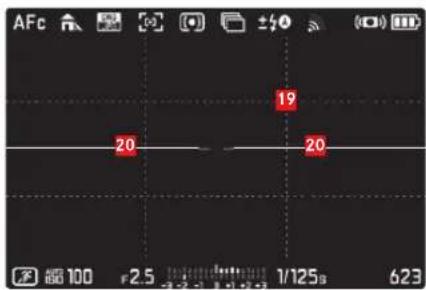
19 Auxiliary grid
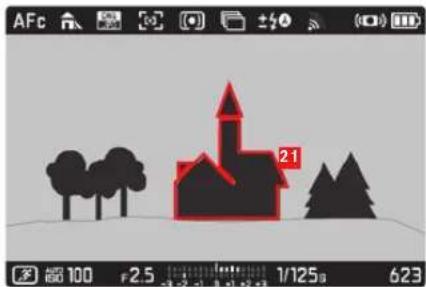
natural_image
Illustration of a house with trees and a clock face, no readable text or symbols21 Indication of in-focus edges (Peaking)
20 Water level
(long horizontal lines indicate camera tilt: red = tilted, green = horizontal; short horizontal line indicates vertical tilt: line is visible = vertical tilt, no line = no vertical tilt
IN REVIEW MODE
(with/without clipping displays)
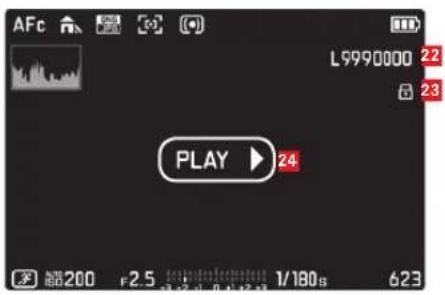
22 File number
23 Indication of a picture protected from deletion
24 Indication for playback of videos, time-lapse pictures and continuous shooting pictures
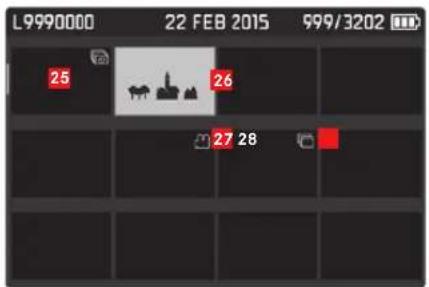
25 Time lapse pictures (grouped)
26 Selected picture
27 Video recording
28 Picture series (grouped)
![[x] 29 30 DELETE 35 31 02:30 33 32 34](/content/2026/05/867748/images/d689639dae2dc5428ec1832e9545efad318439c4274cca24ed8d12167a2ed8ec.jpg)
29 Symbol for opening video editing function
30 Symbol for exiting video playback mode
31 Setting volume control
32 Display for audio review ( kg = audio review deactivated)
33 Playback slider
34 Elapsed playback time
35 Symbol for interrupting playback (▷ = continue playback)
MENU OPTIONS
Page 1 Page
| Digital zoom | 172 |
| Focus | 175/176/179 |
| Exposure compensation | 187 |
| Exposure metering | 180 |
| Exposure bracketing | 188 |
| Continuous shooting | 150 |
| Self-timer | 101 |
| Flash settings | 195/196/197 |
Page 2 Page
| OIS | 171 |
| Scene mode | 181/189/190/192 |
| White balance | 167 |
| Photo file format | 166 |
| JPEG resolution | 166 |
| JPEG settings | 170/171 |
| Video resolution | 198 |
| Video settings | 198/199/200 |
Page 3 Page
| Acoustic signal | 161 |
| Auto ISO settings | 169 |
| Auto review | 204 |
| Power saving | 161 |
| FN button in LiveView | 157 |
| Zoom/lock button | 172/186 |
| Date/time | 160 |
| Display settings | 162/205 |
Page 4 Page
| Photo LiveView setup | 162 |
| Play mode setup | 162/205 |
| Reset image numbering | 203 |
| Language | 160 |
| HDMI | 223 |
| Format | 202 |
| Camera information | 133/231 |
| User profile | 203 |
Page 5 Page
| WLAN | 226 |
| RESET | 203 |
TECHNICAL DATA
Camera type Leica Q (Typ 116), digital compact camera
Picture format/aspect ratio 24 x 36mm/2:3
Lens Leica Summilux 28mm f 1.7 ASPH., 11 lenses in 9 groups, 3 aspherical lenses
Digital zoom Optionally approx. 1.25x (corresponding to 35mm) or approx. 1.8x (corresponding to 50mm)
Image stabilization and video recordings Optical compensation system for photo
Aperture range 1.7 to 16 in 13 EV increments
Picture sensor/resolution CMOS sensor, 26.3/24.2 million pixels (total/effective)
Dynamic range 13 aperture stops
Color depth 14Bit
Photo capture format Optional: DNG + JPG JPG
DNG/JPEG resolution 24MP (5952x3976 px), 12MP
(4256x2832px), 6MP (2976x1984px), 1.7MP (1600x1080px)
| Focal length 28mm | 35mm 50mm | ||
| 24/15/8 MP 6000 | x4000px 4800x32 | 00 px 3360x2240px | |
| 12/8/4 MP 4272x | 2848px 3424x228 | 8px 2400x1600px | |
| 6/4/2 MP 2976x1 | 984px 2384x1592 | px 1680x1120px | |
| 1,7/1,1/0,5 MP 16 | 00x1080px 1280x | 856px 896x600px |
Video recording format MP4
Video resolution/frame rate Optional: FHD 1920 x 1080p with 60 or 30 B/ or HD 1280 x 720p with 30 B/s
Sound recording format AAC
Microphone Stereo
Loudspeaker Mono
Storage media SD/SDHC/SDXC
ISO range Automatic, ISO 100 to ISO 50000,
White balance Automatic, default settings for: daylight, cloudy, halogen lighting, shadow, electronic flash, two manual settings with measuring, manual color temperature setting
Color range Optional for photos: sRGB, Adobe® RGB, ECI RGB
Focus/saturation/contrast Each selectable in 5 steps, for saturation also B/W
Focusing
Working range 30cm to ∞, with macro setting from 17cm
Setting Automatic (autofocus) or manual focusing, option of magnifying function and edge marking (focus peaking) available for manual setting
Autofocus system Contrast-based autofocus system
Autofocus modes AFS (shutter release only after successful focusing), AFC (shutter release possible at any time), AF setting can be saved
Autofocus metering methods 1-field (adjustable), multi-field, face recognition, subject tracking, optional setting/shutter release by touching the monitor
Exposure modes Automatic program, aperture priority, shutter speed priority, and manual setting.
Scene modes Fully automatic program, sport, portrait, landscape, night portrait, snow/beach, candlelight, sunset, digisco-ping, miniature effect, panorama, time lapse
Exposure metering methods Multi-field, center-weighted, spot.
Exposure compensation ±3EV in 13 EV increments.
Automatic bracketing Three pictures in graduations of up to 3EV, can be set in 12 EV increments.
Shutter type Mechanic and electronic
Shutter speeds 30s to 12000 s with mech. Shutter 12500 s to 116000 s with electr. shutter, in 13 increments, flash synchronization up to 1500 s
Picture series Optional 10/5/3B/s (H/M/L)
Self-timer Delay time either 2 or 12s
Viewfinder Electronic LCOS display, resolution: 1280x960 pixels x 3 colors (=3,68MP), aspect ratio: 4:3 adjustable ±3 diopter, with eye sensor for automatic switching between viewfinder and monitor
Monitor 3" TFT LCD monitor with approx. 1,040,000 pixels, touch control possible
WLAN Satisfies IEEE 802.11b/g/n standard (standard WLAN protocol), channel 1-11, encryption method: WLAN-compatible WPA™ / WPA2™, access method: infrastructure mode
NFC According to JIS X 6319-4 standard / 13.56MHz
Connections Micro USB socket (2.0), HDMI socket
Power supply Leica BP-DC12, lithium ion battery, rated voltage 7.2V = (7.2V D.C.), capacity 1200mAh, manufacturer: Panasonic Energy (Wuxi) Co., Ltd. made in China
Charger Leica BC-DC12, input: 100–240 V AC, 50/60Hz, automatic switching, output: 8.4V DC; 0.65A manufacturer: Shin Tech Engineering Ltd. made in China
Body In Leica design made of, extremely light magnesium and aluminum, two loops for the carrying strap, ISO accessory shoe with center and control contacts to connect flash units
Lens filter thread E49
Tripod thread A 14 DIN 4503 ( 14 )
Dimensions (WxHxD) approx. 130 x 80 x 93mm
Weight approx. 590/640g (without/with battery)
Scope of delivery camera, carrying strap, lens hood, lens cap, accessory shoe cover, battery (Leica BP-DC12), charger (Leica BC-DC12), power cable (EU, US, local power cable), USB cable Software Leica App for iOS® (free download remote control and picture transfer in Apple® App-Store®/Google® Play Store®)
Subject to changes in design and production.
LEICA PRODUCT SUPPORT
The Product Support Department at Leica AG can provide you with an answer to any technical questions relating to Leica products, including software supplied, either in writing, on the telephone, or by e-mail. They are also the contact point for purchasing advice and to order instruction manuals. Alternatively, you can send us your questions using the contact form on the Leica Camera AG homepage.
Leica Camera AG
Product Support / Software Support
Am Leitz-Park 5
D-35578 Wetzlar
Telephone: +49(0)6441-2080-111 /-108
Fax: +49(0)6441-2080-490
info@leica-camera.com / software-support@leica-camera.com
LEICA CUSTOMER CARE
For servicing your Leica equipment or in the event of damage, the Leica Camera AG Customer Care department or the repair service provided by authorized Leica agents in your country are available (see the Warranty Card for a list of addresses).
Leica Camera AG
Customer Care
Am Leitz-Park 5
D-35578 Wetzlar
Telephone: +49(0)6441-2080-189
Fax: +49(0)6441-2080-339
customer.care@leica-camera.com
EN

my point of view
Leica Camera AG | Am Leitz-Park 5 | 35578 WETZLAR | DEUTSCHLAND
Telefon +49 (0) 6441-2080-0 | Telefax +49 (0) 6441-2080-333 | www.leica-camera.com
- AKKU LADEN
- LADESTATUS-ANZEIGE
- Wichtig:
- AUFRUFEN EINES MENÜPUNKT-UNTERMENÜS
- Hinweise:
- Tastengesteuert
- WLAN Host Setup
- LEICA CUSTOMER CARE
- FOREWORD
- SCOPE OF DELIVERY
- CE
- Declaration of Conformity (DoC)
- WARNING MESSAGES
- LEGAL INFORMATION
- DISPOSAL OF ELECTRICAL AND ELECTRONIC EQUIPMENT
- MEANING OF DIFFERENT INSTRUCTION CATEGORIES IN THESE INSTRUCTIONS
- CONTENTS
- DETAILED INSTRUCTIONS
- PREPARATIONS
- THE MOST IMPORTANT SETTINGS/CONTROLS
- CAMERA DEFAULT SETTINGS
- PICTURE DEFAULT SETTINGS
- PICTURE MODE
- EXPOSURE METERING AND CONTROL
- ADDITIONAL FUNCTIONS
- MISCELLANEOUS
- APPENDIX
- DESIGNATION OF PARTS
- Front view
- Top view
- Rear view
- Direction pad
- Set button
- Speaker
- Monitor
- Bottom view
- GESTURE CONTROL
- Note:
- QUICK-START GUIDE
- Required parts:
- Preparations:
- Taking photographs:
- Viewing photographs:
- Enlarging pictures:
- Deleting pictures:
- ATTACHING THE CARRYING STRAP
- CHARGING THE BATTERY
- Caution:
- First aid:
- Notes:
- PREPARING THE CHARGER
- PLACING THE BATTERY IN THE CHARGER
- CHARGING STATUS DISPLAY
- CHANGING THE BATTERY/MEMORY CARD
- Important:
- Charge level display
- Inserting the memory card
- Removing the memory card
- Close the battery compartment/memory card slot door
- Removing/affixing the lens hood
- Affixing
- Continuous shooting picture frequency
- SHUTTER RELEASE BUTTON
- MENU CONTROL
- OPENING THE MENU
- SCROLLING THROUGH THE MENU LIST
- OPENING A SUB-MENU FOR AN OPTION
- Selecting a setting/value in a sub-menu:
- CONFIRMING A SETTING
- Exiting a sub-menu without confirming a setting
- Exiting the menu with confirmation of a setting
- QUICK ACCESS TO MENU FUNCTIONS
- Configuration of the FN button
- Use of the FN button
- Setting the functions/menu options opened by the FN button
- MENU LANGUAGE
- DATE/TIME
- ENERGY-SAVING SETTINGS
- ACOUSTIC SIGNALS
- Setting the desired signals
- MONITOR/VIEWFINDER SETTINGS
- Switching between monitor and viewfinder
- Monitor brightness rendering
- Switching displays
- Selection of the desired indicators
- Switching indicators
- Histogram
- Clipping
- Horizon
- Grid
- FILE FORMAT
- Setting the function
- With the FN button
- Using menu control
- JPEG RESOLUTION
- White balance
- Fixed presets
- Manual setting by metering:
- Direct color temperature setting
- ISO SENSITIVITY
- JPEG SETTINGS
- Contrast, focus, color saturation
- Working color range
- Image stabilization
- CHANGING TRIMMING
- Configuration of the thumb button
- Using the thumb button
- Setting in the menu
- Displays/picture composition
- FOCUSING
- AUTOMATIC FOCUSING/AUTOFOCUS
- AFs (single) focus priority
- AFc (continuous) = shutter release priority
- AF AUXILIARY LIGHT
- AUTOFOCUS METERING METHODS
- Multi-field metering
- 1-field metering
- Button control
- Touch control
- Subject tracking
- Procedure
- Touch-controlled autofocus
- Touch-controlled picture taking
- Face detection
- Manual focusing
- Switching
- AUXILIARY FUNCTIONS FOR MANUAL FOCUSING
- Settings
- Taking photographs
- Exposure metering methods
- Multi-field metering -
- Center-weighted metering -
- Spot metering -
- EXPOSURE CONTROL
- The scene program
- Note for using a subject program:
- Exposure modes P, A, S, M
- Shutter speed fine adjustment
- Examples:
- Setting shutter speeds exceeding 1s
- AUTOMATIC PROGRAM - P
- Taking a picture in this mode
- CHANGING THE PRESET SHUTTER SPEED/APERTURE COMBINATIONS (SHIFT)
- APERTURE PRIORITY - A
- SHUTTER SPEED PRIORITY - S
- MANUAL SETTING - M
- METERING MEMORY LOCK
- Selecting the thumb button function
- Taking a picture with this function:
- EXPOSURE COMPENSATION
- AUTOMATIC BRACKETING
- Press the set button
- MINIATURE EFFECT
- Setting the functions
- Change the orientation of the strip
- Change the location of the strip
- Change the width of the strip
- PANORAMIC PICTURES
- Creating a panoramic picture
- Release the shutter release button to end the picture
- TIME LAPSE PICTURES
- Set the starting time/interval between pictures
- Set the number of pictures
- Creating a time lapse picture series
- FLASH MODE
- COMPATIBLE FLASH UNITS
- Attaching the flash unit:
- FLASH MODES
- Selecting the mode
- Automatic flash activation - ♂A
- Manual flash activation -
- Automatic flash activation with slower shutter speeds -7S
- SYNCHRONIZATION TIME PERIOD
- FLASH EXPOSURE COMPENSATION
- VIDEO RECORDINGS
- Focal length/trimming
- Resolution
- Contrast, color saturation/rendering, focus
- Color range
- Stabilization
- Sound recording
- Starting/ending the recording
- Starting
- Ending
- Taking pictures while recording video
- SELF-TIMER
- Operation:
- FORMATTING THE MEMORY CARD
- RESETING PICTURE NUMBERS
- USER PROFILES
- Creating a profile
- Using a profile
- Resetting all menu settings to the factory defaults:
- REVIEW MODE
- SWITCHING BETWEEN PICTURE AND REVIEW MODE
- Displays
- VIEWING PICTURES IN PORTRAIT FORMAT
- VIEWING PICTURE SERIES
- Automatic review
- Play back existing pictures
- SELECTING/SCROLLING THROUGH PICTURES
- ENLARGING/REDUCING PICTURES
- Simultaneous display of 12/30 pictures
- Select a picture in the 12/30 view
- SELECTING THE DETAIL
- DELETING PICTURES
- Opening the Delete function:
- Leaving the delete menu without deleting pictures
- Deleting single pictures
- Deleting more than one picture
- Press the DELETE button
- Deleting all pictures
- PROTECTING PICTURES/CLEARING DELETE PROTECTION
- Protecting single pictures/clearing delete protection for a single picture
- Select Single
- Protecting several pictures/clearing delete protection for several pictures
- Select Multi
- Select PLAY
- Protect all pictures
- Select Protect all
- Clearing delete protection for all pictures
- Select Unprotect all
- VIDEO REVIEW
- Opening the video and audio control symbols
- Pause playback
- Continue playback starting at any given point
- End playback
- Setting volume control
- Cutting of start and/or end sections
- Save as new
- Overwrite
- Preview
- SLIDE SHOW
- Setting the function/starting the slide show
- Select Play all, Pictures only, or Videos only
- Ending the slide show
- VIEWING WITH HDMI DEVICES
- Connecting/viewing the pictures
- TRANSFERRING DATA TO A COMPUTER
- VIA THE USB CABLE CONNECTION AND USING THE CAMERA AS AN EXTERNAL DRIVE
- With Windows operating systems:
- With Mac operating systems:
- WIRELESS DATA TRANSMISSION AND REMOTE CONTROL OF THE CAMERA
- Selecting the connection methods
- Establishing a connection with a smartphone in Host mode
- Using an iOS device
- Using an Android device
- Establishing a connection with NFC:
- WLAN CLIENT SETUP
- ESTABLISHING A CONNECTION WITH A SMARTPHONE IN Client MODE
- WLAN FUNCTION OPTIONS
- Take pictures using remote control
- Back up pictures on the smartphone via WLAN
- USING RAW DATA (DNG)
- INSTALLING FIRMWARE UPDATES
- ACCESSORIES
- LEICA Q PROTECTOR
- HOLSTER LEICA Q
- CARRYING STRAP
- WRIST STRAP
- MEMORY CARD/CREDIT CARD WALLET
- SYSTEM BAGS
- "ARTISAN & ARTIST EDITION FOR LEICA"
- CREATIVE DAY BAG LEICA Q
- LEICA Q HAND GRIP
- FINGER LOOP FOR HANDHOLD Q
- DISPLAY PROTECTIVE SHEET
- UVA FILTER
- FLASH UNIT
- TRIPODS/TRIPOD HEADS
- Tripods
- Tripod heads
- REPLACEMENT PARTS Order no.
- SAFETY AND CARE INSTRUCTIONS
- GENERAL SAFETY INSTRUCTIONS
- Monitor
- Sensor
- Condensation
- SAFETY NOTES ON USING CARRYING STRAPS
- CARE INSTRUCTIONS
- For the camera
- For the lens
- For the battery
- For the charger
- For memory cards
- Storage
- INDEX
- Water level
- IN REVIEW MODE
- MENU OPTIONS
- TECHNICAL DATA
- LEICA PRODUCT SUPPORT
Brand : LEICA
Model : Q 'Snow'
Category : Camera