M380 VAPOREX - Steam cleaner DIRT DEVIL - Free user manual and instructions
Find the device manual for free M380 VAPOREX DIRT DEVIL in PDF.
User questions about M380 VAPOREX DIRT DEVIL
0 question about this device. Answer the ones you know or ask your own.
Ask a new question about this device
Download the instructions for your Steam cleaner in PDF format for free! Find your manual M380 VAPOREX - DIRT DEVIL and take your electronic device back in hand. On this page are published all the documents necessary for the use of your device. M380 VAPOREX by DIRT DEVIL.
USER MANUAL M380 VAPOREX DIRT DEVIL
[60% Baumwolle, 40% Polyester] +
Thanks for your purchase of our "Vaporex" steam cleaner and your confidence in us.
Your new "Vaporex" is a versatile steam cleaner that will help do a great many household jobs quickly and effectively.
The steam cleaner has low operating costs, works entirely without chemical solvents and leaves no residue. Its hot steam makes it easy to dissolve and remove dirt from all kinds of smooth, heat-resistant surfaces in your household, e.g. working areas and wall tiles.
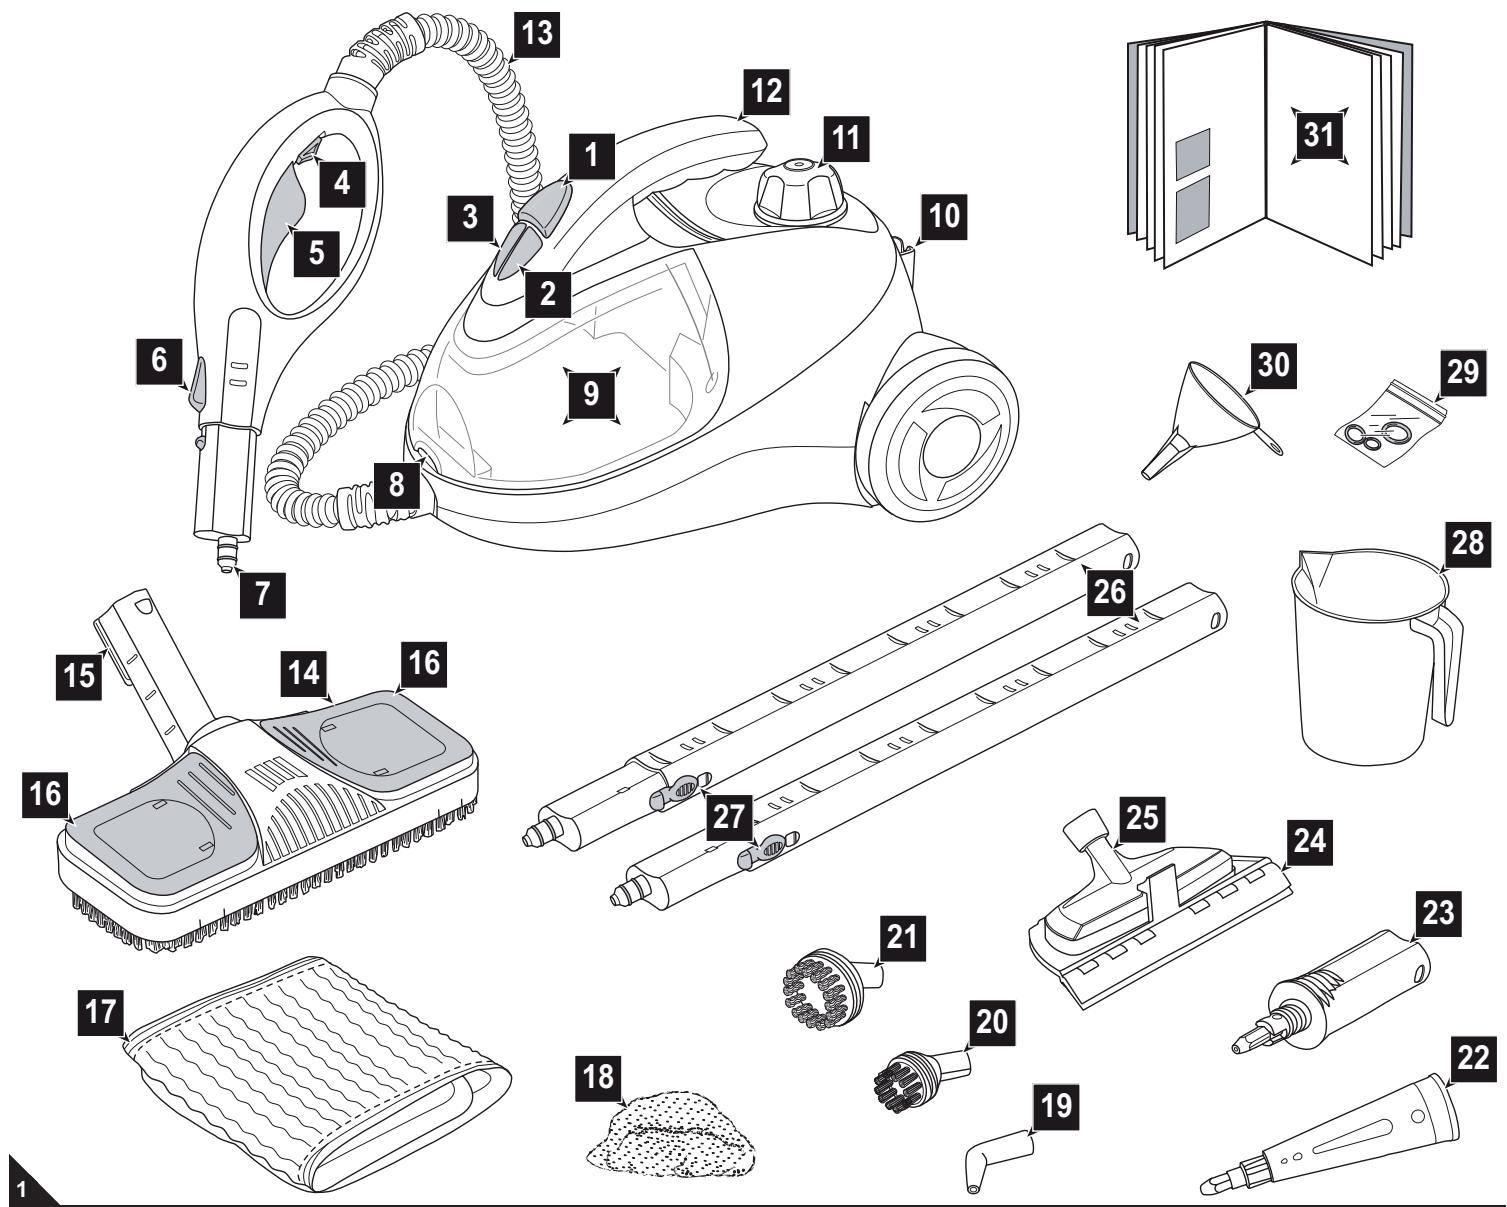
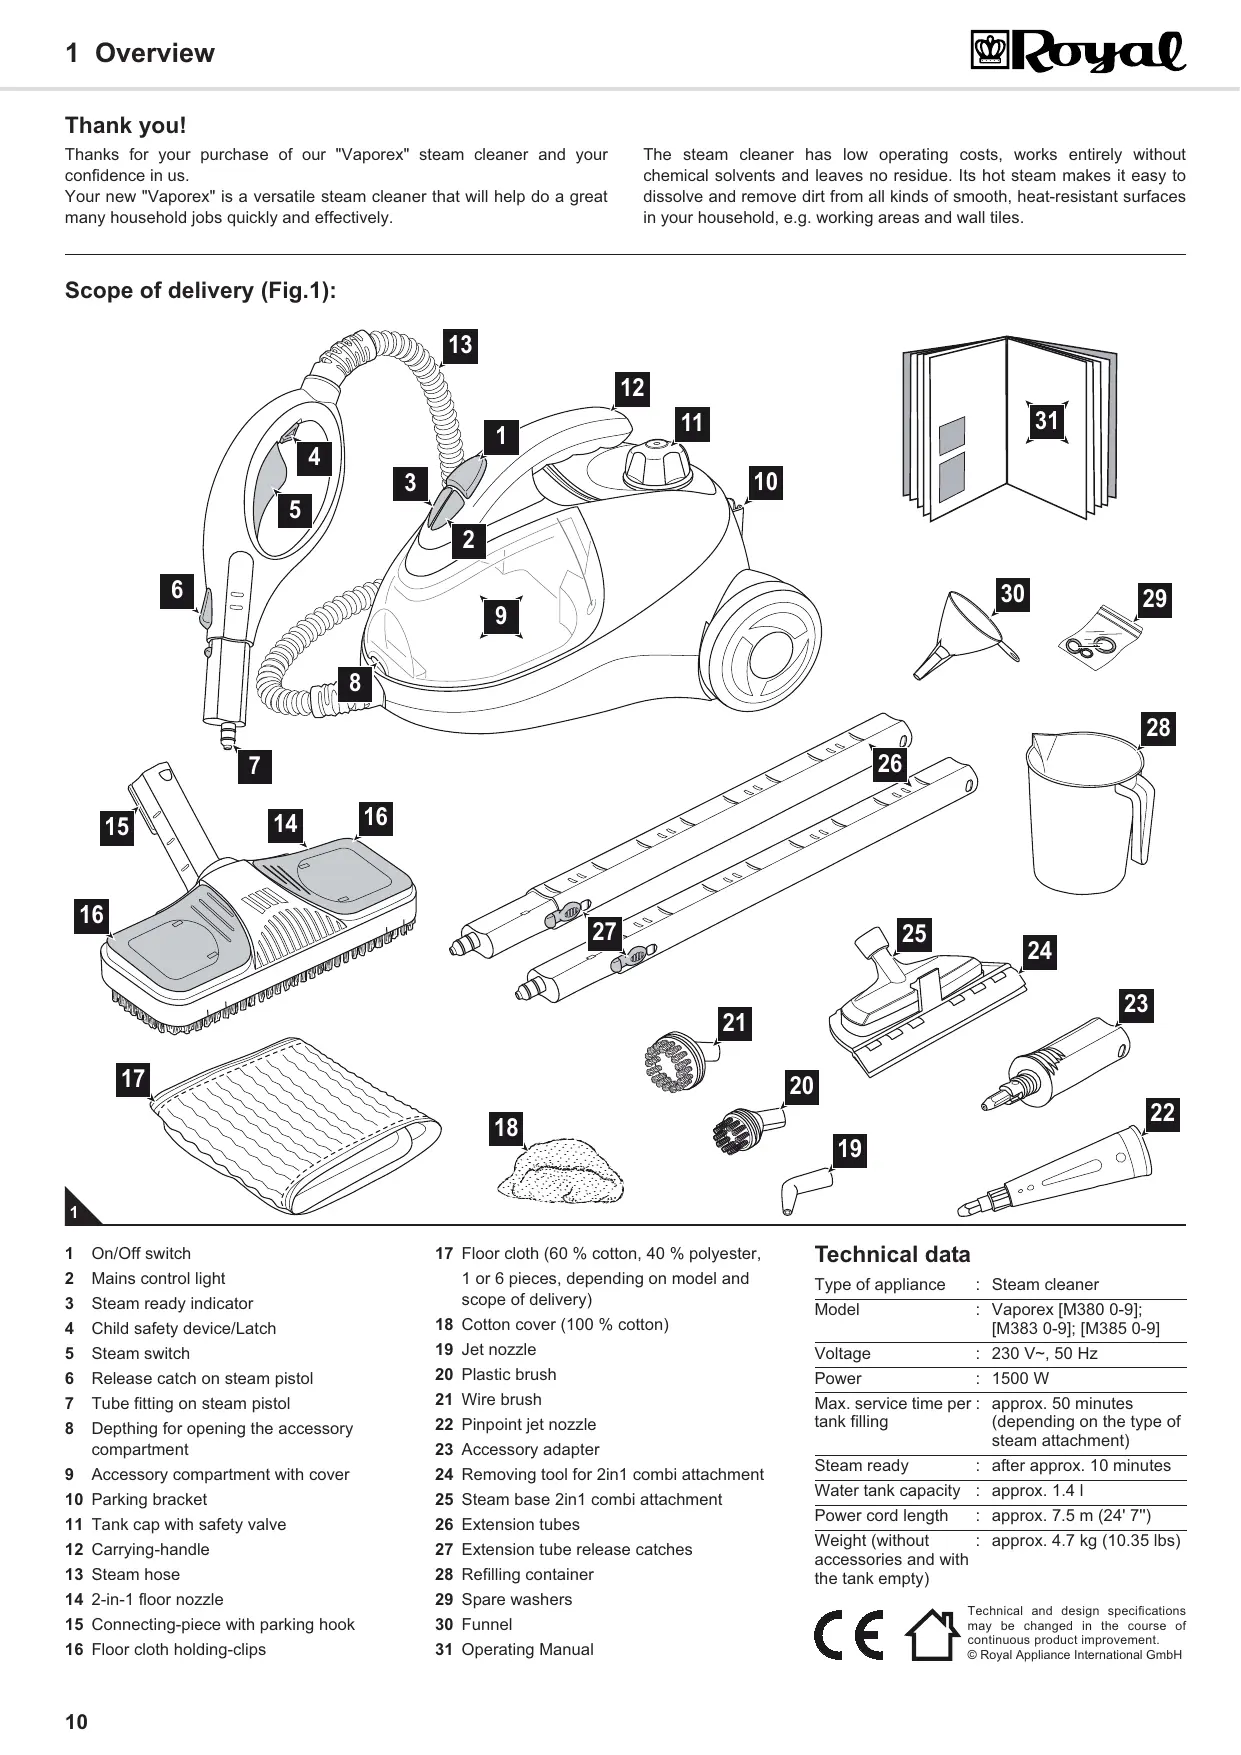
Scope of delivery (Fig.1):
1 On/Off switch
2 Mains control light
3 Steam ready indicator
4 Child safety device/Latch
5 Steam switch
6 Release catch on steam pistol
7 Tube fitting on steam pistol
8 Depthing for opening the accessory compartment
9 Accessory compartment with cover
10 Parking bracket
11 Tank cap with safety valve
12 Carrying-handle
13 Steam hose
14 2-in-1 floor nozzle
15 Connecting-piece with parking hook
16 Floor cloth holding-clips
17 Floor cloth (60% cotton, 40% polyester, 1 or 6 pieces, depending on model and scope of delivery)
18 Cotton cover (100% cotton)
19 Jet nozzle
20 Plastic brush
21 Wire brush
22 Pinpoint jet nozzle
23 Accessory adapter
24 Removing tool for 2in1 combi attachment
25 Steam base 2in1 combi attachment
26 Extension tubes
27 Extension tube release catches
28 Refilling container
29 Spare washers
30 Funnel
31 Operating Manual
Technical data
| Type of appliance | : Steam cleaner |
| Model | : Vaporex [M380 0-9]; [M383 0-9]; [M385 0-9] |
| Voltage | : 230 V~, 50 Hz |
| Power | : 1500 W |
| Max. service time per tank filling | : approx. 50 minutes (depending on the type of steam attachment) |
| Steam ready | : after approx. 10 minutes |
| Water tank capacity | : approx. 1.4 l |
| Power cord length | : approx. 7.5 m (24' 7") |
| Weight (without accessories and with the tank empty) | : approx. 4.7 kg (10.35 lbs) |

Technical and design specifications may be changed in the course of continuous product improvement. © Royal Appliance International GmbH
2.1 Re: Operating Manual
- Read this operating manual completely before working with the appliance. Keep the operating manual for reference.
- Include the operating manual if you pass the appliance on to someone else.
Non-compliance with these instructions can lead to serious injuries or damage to the appliance.
We take no responsibility for damages due to violations of these operating instructions.
2.2 Re: Certain groups of persons
This appliance can be used by children aged from 8 years and above and persons with reduced physical, sensory or mental capabilities or lack of experience and knowledge if they have been given supervision or instruction concerning use of the appliance in a safe way and understand the hazards involved. Children shall not play with the appliance. Cleaning and user maintenance shall not be made by children without supervision. Children must not be allowed to stand or sit on the appliance. Keep the appliance out of reach of people of these groups.
2.3 Re: Hot steam and hot parts of the appliance
Never direct the steam jet at persons, animals or plants. There is a danger of scalding. Always point the steam jet downwards towards the surface to be cleaned. Even then, take care that parts of your body never get into the steam jet. Never lay the steam pistol on its side when it's running.
- Do not direct the steam jet at electrical appliances, plug sockets, cables, etc. There is a risk of electric shock.
The appliance produces steam under pressure for cleaning purposes. Even after you have switched off the appliance, hot steam will be available for approx. 20 more minutes. This may escape, e.g. when the steam trigger is pulled accidentally. So, release excess steam right after switching off by pulling the steam trigger.
2.4 Re: Power supply
- Never touch the mains plug with wet hands. Always pull directly at the plug if you want to disconnect the appliance from the mains. Never pull on the cable as this could damage it.
- Never carry the appliance by its power cord. Take care that the power cord is not bent, pinched, rolled over or gets in contact with heat sources. Also take care that it does not become a stumbling-hazard.
If possible, avoid using extension cords. If you must use an extension cord, use only safety-certified, water-protected single extension cords (nomulti-socket distributors) designed for the power consumption of the appliance.
2.5 Re: Appropriate Use
Only use the steam cleaner to clean normally dirty smooth surfaces that can withstand the high temperature, pressure and moisture of hot steam.
Used with due care and skill, the steam cleaner can also be used to refresh carpets, drapes, clothing, etc.
Any other use is considered inappropriate and is prohibited. It is especially forbidden:
To use the appliance near explosive or easily flammable substances or on pressurized containers. There is a risk of fire or explosion or of the containers bursting.
To fill the water tank with liquids other than cold water (e. g. cleaning agents, etc.). Additives can be dangerous to your health or destroy the appliance.
2.6 If the appliance is defective
If the power cord of the appliance is damaged it must be replaced by the manufacturers, their authorised service representative or a similarly qualified person to avoid danger.
WARNING:
Warns you of possible health hazards.
ATTENTION:
Indicates possible hazards to material assets.
NOTE:
Highlights tips and information for you.
For reasons of safety we strongly recommend that even children aged from 8 years and above do not operate the device as they definitely cannot understand all specific dangers arising from it.
- Packing material must not be used to play with. There is danger of suffocation.
People with sensory problems, especially with reduced sensitivity for temperature differences, must use great caution when working with this appliance.
- Do not use the appliance to clean containers that are filled with water, other liquids or loose substances. Hot liquid or particles could be ejected.
Never open the water tank cap when the appliance is running. Before opening the tank cap, always switch off the appliance, disconnect it from the mains, discharge any remaining steam and let the appliance cool off for at least 30 minutes.
Let the hot appliance and its accessories cool off before touching them. Only the carry the appliance by its handle.
Take care not to use the steam cleaner on one spot for a longer period of time. Otherwise, the surface to be cleaned might be damaged.
■ Provide adequate ventilation during and after your cleaning-work.
Before connecting to the power supply, make sure that the voltage stated on the type plate matches the voltage of your plug socket. Only use sockets with a ground/safety contact.
- Never immerse the appliance in water or other liquids. Always use the supplied refilling container and funnel to fill the water tank. Keep the other parts of the appliance dry.
Only fill up the water tank after completing cleaning and when the mains plug is pulled out.
Always check the power cord for possible damages before using the appliance.
To operate it with the water tank empty.
To modify or repair the appliance on your own.
To use accessories not supplied by us.
To clean:
- Persons, animals or plants, including clothing that is still being worn.
- Surfaces that are dirtied by substances hazardous to health. The hot steam can dissolve these substances.
- Leather, furniture, uncoated, lacquered, oiled or waxed wood or parquet flooring, or surfaces made of soft plastic material. These might be damaged.
- Textiles made from acrylic fibre, Dralon, velvet or linen. These materials could be damaged by the temperature of the steam.
■ Never use a defective appliance or operate an appliance with a defective power cord. Bring or send defective appliances to a specialist dealer or to Royal Appliance Customer Services for repair. Address page 58, "International Service".
3.1 Unpacking
ATTENTION:
Always transport or ship the appliance in its original packaging to avoid damage. Keep the packaging for such an event. However, dispose of no longer needed packaging material properly.
- Unpack the appliance and its accessories (Fig. 1).
- Check that the contents are intact.
NOTE:
Immediately contact your dealer if you have found damage resulting from transport.
3.2 Filling the water tank
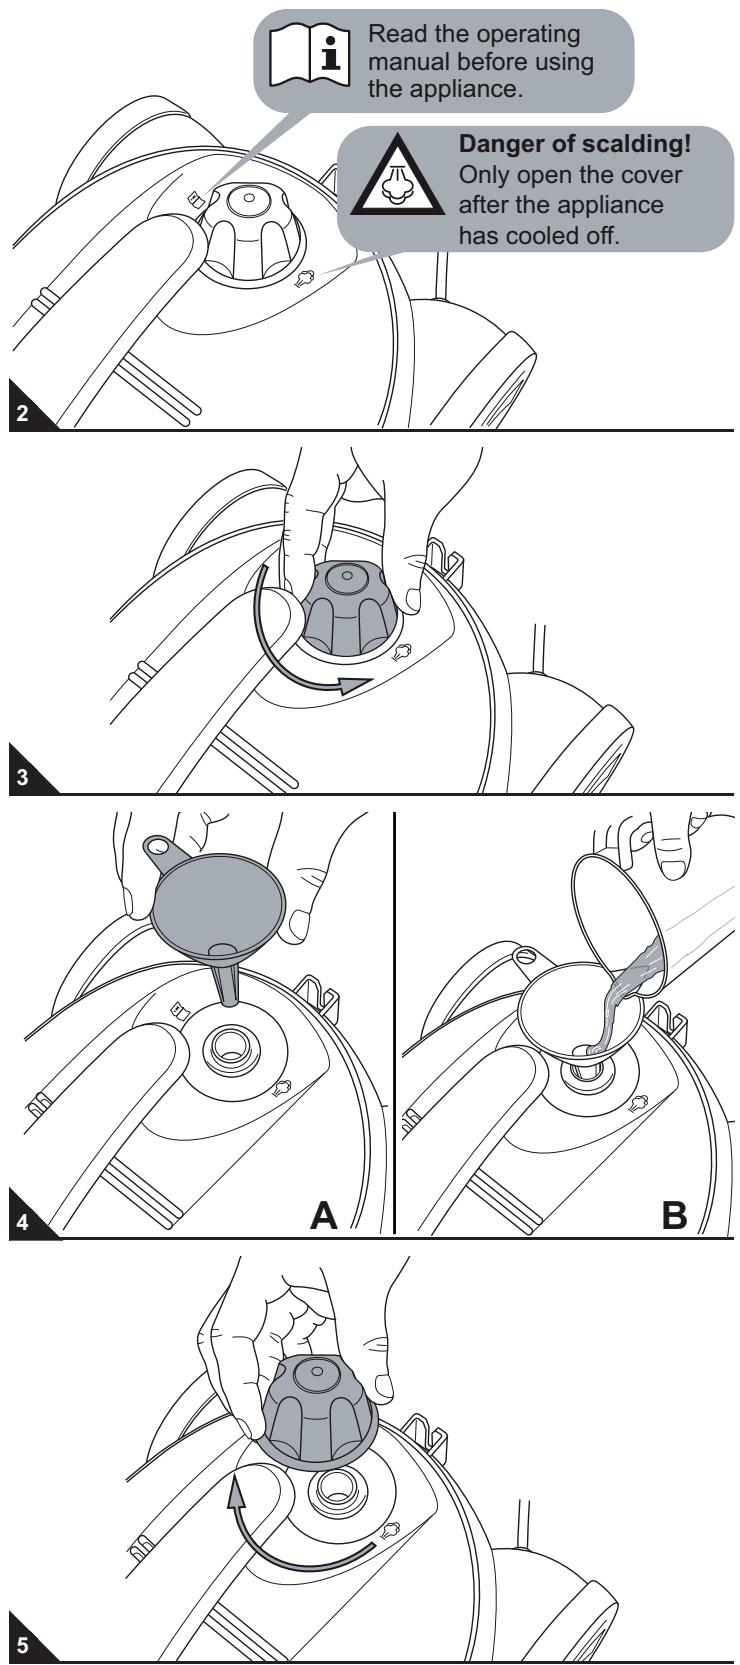
WARNING:
Danger of electric shock! Never fill an appliance with water when it is connected to the mains.
WARNING:
Danger of injury! Use no additives such as cleansers, alcohol, perfumes or chemicals in your water. These make the use of the appliance unsafe.
WARNING:
Risk of scalding! The water tank is under pressure as soon as the appliance is switched on. Even after disconnecting the appliance from the mains, steam pressure may remain:
- Pull out the plug after use.
- Discharge the steam by pressing the steam button.
- Allow the appliance to cool down for approx. 30 mins.
- Screw open cap.
If the cap still will not open after steps 1-4, push down the red pin in the cap. Only then can you unscrew the tank cap and fill the water tank as follows.
-
If the appliance was previously in operation:
-
Pull out the plug after use.
- Discharge the steam by pressing the steam button.
- Allow the appliance to cool down for approx. 30 mins.
- Screw open cap.
If the cap still will not open after steps 1.1-1.4, push down the red pin in the cap.
- Screw the tank cap counter-clockwise off the water tank (Fig. 3).
WARNING:
Risk of burns! The tank cap and the appliance parts in its proximity might still be hot. To refill it, use the funnel and refilling container supplied only.
- Fill the included filling container with cold, clear tap water up to the 0.7 litre mark.
NOTE:
The service life of the appliance can be extended by using distilled water instead of tap water. This is especially recommended in areas with hard water.
- Put the supplied funnel into the opening of the water tank (Fig. 4/A).
- Fill the water tank by emptying the refilling container into the funnel (Fig. 4/B).
- Fill the refilling a second time and slowly and carefully pour its contents into the water tank.
NOTE:
Do not overfill the tank. Be aware of any residual water in the tank.
- Refit the tank cap and fasten it by turning clockwise (Fig. 5). Check that it is securely fitted.
WARNING:
Risk of scalding! Only operate the appliance if the tank cap is securely screwed on.
3.3 Assembly
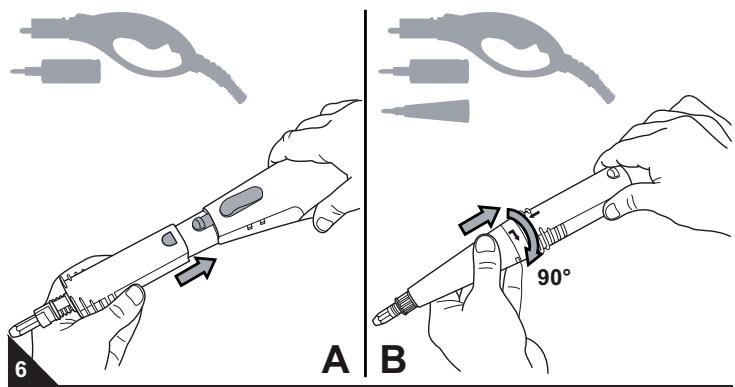
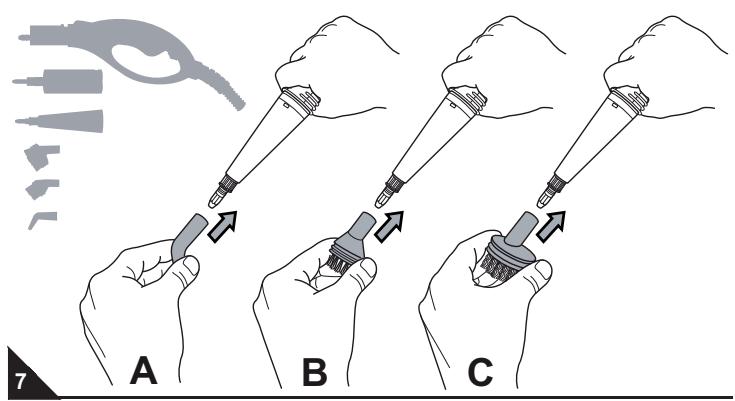

- Attaching accessory adapter and pinpoint nozzle:
NOTE:
The accessory adapter must be fitted before attaching the pinpoint nozzle. The accessory adapter may be attached directly to the steam pistol or, if necessary, to one of the extension tubes. You may use the pinpoint jet nozzle to clean hard-to-reach places like grooves, venetian blinds, toilet bowls, bathroom fixtures, etc.
- Push the accessory adapter all the way onto the connecting tube as shown (Fig. 6/A). You will feel and hear it snap into place.
NOTE:
To release the accessory adapter, push the release latch on the steam pistol.
- Fit the pinpoint jet nozzle to the accessory adapter so that the arrow markings on either part correspond (Fig. 6/B).
- Fasten the pinpoint jet nozzle by turning it in the direction of the arrow (Fig. 6/B).
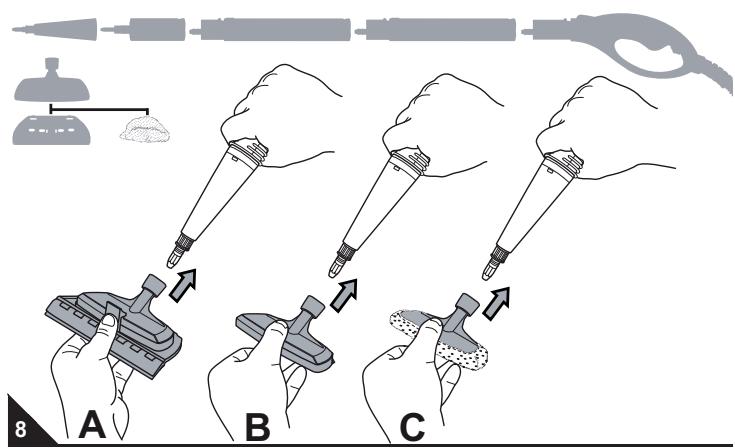
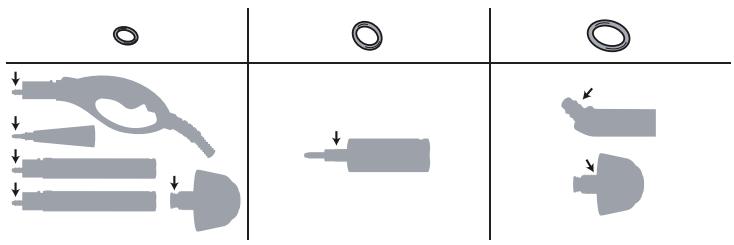
- Attaching further accessories:
NOTE:
All other supplied nozzles and brushes (except the floor nozzle) must be fitted to the pinpoint jet nozzle.
-
Push the desired attachment onto the pinpoint jet nozzle:
-
use the jet nozzle (Fig. 7/A), for applications similar to those of the pinpoint jet nozzle, but requiring an even finer steam jet;
- use the plastic brush (Fig. 7/B) to remove stubborn dirt that cannot be dissolved by steam power alone;
- use the wire brush (Fig. 7/C) to remove stubborn dirt from very hard-wearing surfaces;
- use the 2-in-1-combi attachment (Fig. 8/A) to steam-clean smooth polished surfaces;
- use the 2in1 combi attachment's steam base (Fig. 8/B) refreshing clothing or draperies;
- use the steam base with cotton cover (Fig. 8/C) for steam-cleaning carpets and upholstery while simultaneously picking up the dissolved dirt.
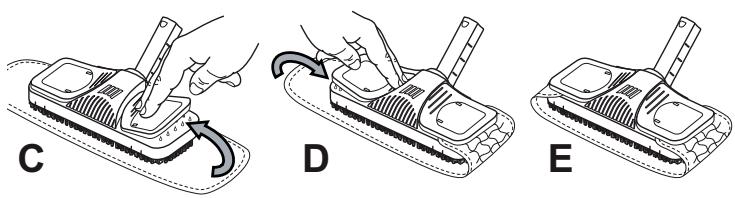
- Attaching extension tubes and floor nozzle:
- Stick the connecting-piece into the floor nozzle as shown (Fig. 9/A).
- Lock it by turning it by 180^ (Fig. 9/B).
- If necessary, attach a floor cloth under the clips provided on the floor nozzle (Fig. 9/C,D,E).
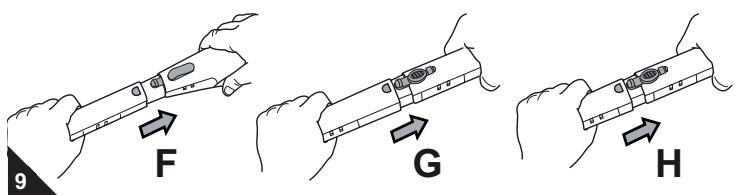
- Push an extension tube all the way onto the connecting tube as shown (Fig. 9/F). You will feel and hear it snap into place.
- If necessary, stick another extension tube all the way onto the extension tube you just attached. You will feel and hear it snap into place (Fig. 9/ G).
- Now stick the floor nozzle with the connecting-piece all the way onto the attached extension tube (Fig. 9/H). You will feel and hear the connecting piece snap into place.

3.4 Safety before use
WARNING:
Danger of injury! Check appliance and power cord before each use. A damaged appliance must never be used.
ATTENTION:
Before connecting the plug to the power supply, make sure that the voltage stated on the type plate matches the voltage of your plug socket. Only use plug sockets with a grounding contact.
ATTENTION:
Before starting cleaning, check whether the particular surface to be cleaned is suitable for steam cleaning. Always follow the cleaning recommendations of the material manufacturers. The steam cleaner is definitely not suitable for use on uncoated wooden floors, soft plastics and polished furniture. Cold Glass surfaces can shatter as a result of heat shock.
ATTENTION:
Operate the device only with the water tank filled. Although the appliance is fitted with an overheating protection, running it without water would shorten its service life.
NOTE:
The steam cleaner has an overheating protection device. It will switch off automatically if overheated (e.g. due to an empty water tank). If this happens, pull the mains plug and refill the water tank chapter 3.2, "Filling the water tank". Wait for about 45 minutes. Once the steam cleaner has cooled down you can switch it on again.
NOTE:
Have a cotton or microfibre cloth ready for follow-up wiping. This will absorb moisture if excess steam has been used. It will also pick up the softened dirt.
NOTE:
It is recommended to first sweep or vacuum-clean floors to remove loose dirt before using the steam cleaner on them.
NOTE:
Provide adequate ventilation during steam cleaning. Otherwise, the increased humidity after cleaning could, in the worst case, cause the formation of mould. Preferably operate the steam cleaner on warm days when the air can absorb more moisture without shedding it as condensation.
4.1 Steam cleaning

- Check that the water tank is full. If not, fill it (▷ chapter 3.2, „Filling the water tank”).
- Insert the mains plug into a socket with ground/safety contact (Fig. 10/A).
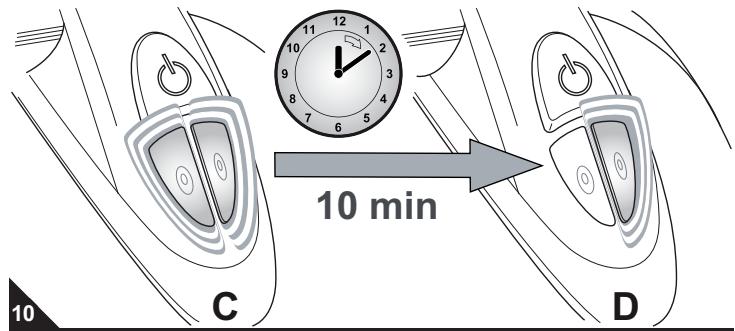
- Switch on the appliance with the on/off switch (Fig. 10/B). Both control lights are lit (Fig. 10/C). The appliance is now heating up.
- Wait for about 10 minutes until the steam ready indicator goes out (Fig. 10/D). The appliance is now ready for operation.
NOTE:
In order to maintain an adequate steam supply, the heating of the appliance and thus the steam ready indicator switch on from time to time.
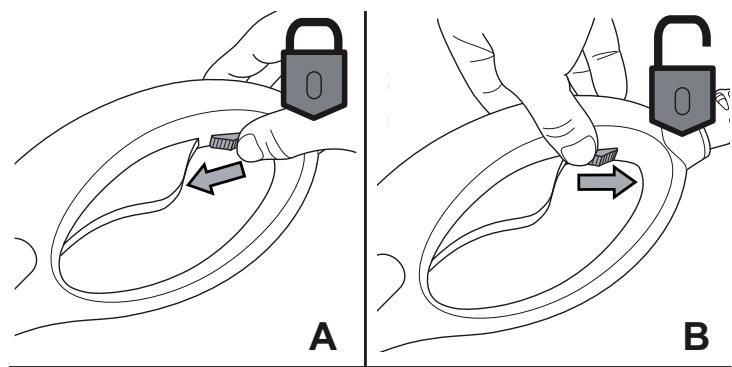
- Unlatch the child protection device by pushing it to the back (Fig. 11/B).
-
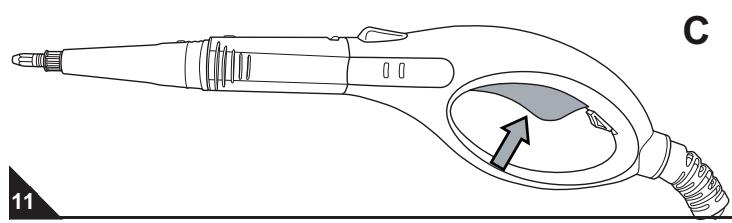
You can now pull the steam trigger on the steam pistol (Fig. 11/C).
-
A few drops of water will be ejected first.
- Collect these if you want to avoid puddles.
- After a short while, a steam jet will appear.
- The steam flow will stop as soon as you release the steam trigger.
- You can also regulate steam power and cleaning effect by varying the distance to the surface to be cleaned.
WARNING:
Risk of scalding! Always point the steam jet downwards towards the surface to be cleaned. Never lay the steam pistol on its side when it's running. When interrupting your work, always switch off the appliance and use up any remaining steam. When interrupting work to refill the water tank or to change attachments also pull the plug from the mains socket and engage the child safety device by pushing it forwards (Fig. 11/A).
WARNING:
Danger of falling! Always be especially careful when cleaning smooth floors as well as steps and stairs! Only work with moderate steam pressure when cleaning smooth floors, otherwise a moisture film will be left on the floor. Using less steam also ensures quicker drying and reduces the risk of slipping.
ATTENTION:
Do not operate the appliance on one spot for a prolonged time. Keep moving the appliance back and forth to loosen dirt on a larger area. Otherwise there will be increased danger of damaging the surface to be cleaned.
4.2 Steam-cleaning glass surfaces
CAUTION: Do not use on cold glass!
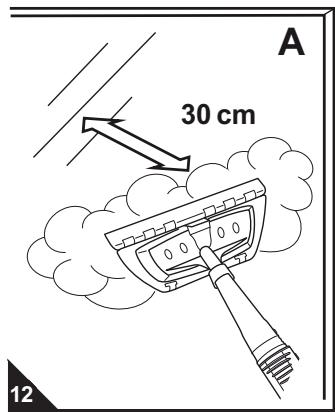
ATTENTION:
Cold Glass surfaces can shatter as a result of heat shock. Always warm glass surfaces before directly using steam on them. Do not work on window panes on cold days!
- Warm the glass surface to be cleaned by applying steam from a distance of 25 to 30~cm (10 to 12 inches) (Fig. 12/A).
- Reduce the distance to 15 to 20cm (6 to 8 inches) to evenly cover the glass surface with steam.
- Switch off the steam flow and engage the child safety device on the steam pistol.
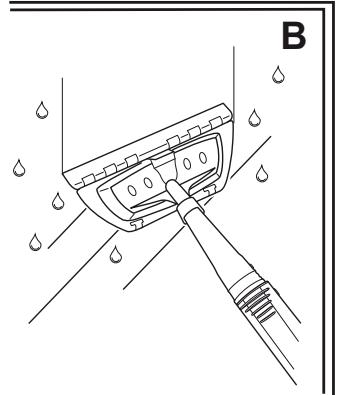
- Strip the water off of the glass surface with the rubber blade of the squeegee (Fig. 12/B).
- Wipe the rubber blade and the bottom edge of the glass surface dry after each pass of the squeezegee.
4.3 Refreshing upholstery and clothing
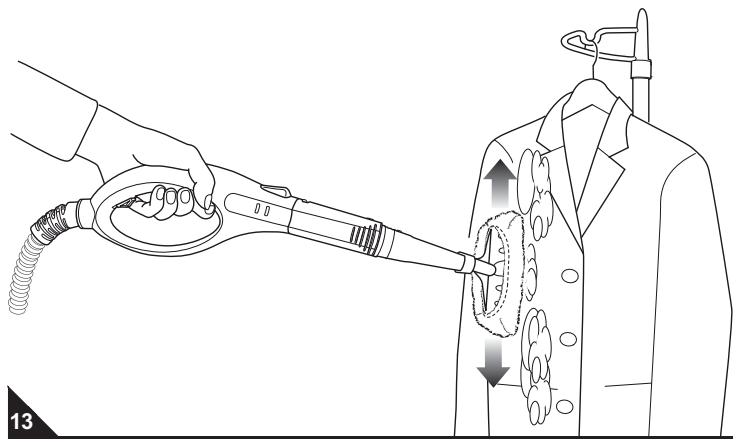
WARNING:
Danger of scalding! Never apply the steam jet directly to pieces of clothing while they are still being worn by persons or animals!
ATTENTION:
Before refreshing upholstery or clothes, make sure that their material and colour is suitable for steam cleaning. Always follow the cleaning recommendations of the material manufacturers.
NOTE:
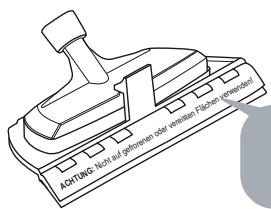
We recommend to always use the cotton cover (Fig. 13) when refreshing upholstery or clothing as this reduces the formation of condensation drops that can adversely affect the cleaning result.
5.1 After use
WARNING:
Risk of scalding! When interrupting your work, always switch off the appliance and use up any remaining steam. Pull the plug from the mains socket and engage the child safety device by pushing it forwards.
WARNING:
Danger of stumbling and falling! Coil the power cord and lay if safely beside the appliance until this has completely cooled off.
ATTENTION:
If you have been working with one of the two cotton cloths, take this off of the carrier immediately after the appliance has cooled down. Otherwise, germs and mould might develop.
- Switch off the appliance with the on/off switch (Fig. 10/B).
- Use up the remaining steam supply until the flow from the nozzle has stopped.
- Engage the child protection device by pushing it forwards (Fig. 11/A).
- Pull the mains plug from the socket.
- Coil the power cord and lay if safely beside the appliance.
- Now wait at least 30 minutes until all parts of the appliance have completely cooled off. After the appliance has cooled off, you may put it away, chapter 5.2, "Storage".
If you have used a cleaning-cloth:
- Remove the cooled-off cleaning cloth.
- Clean it, chapter 5.3, "Cleaning-cloth care".
5.2 Storage
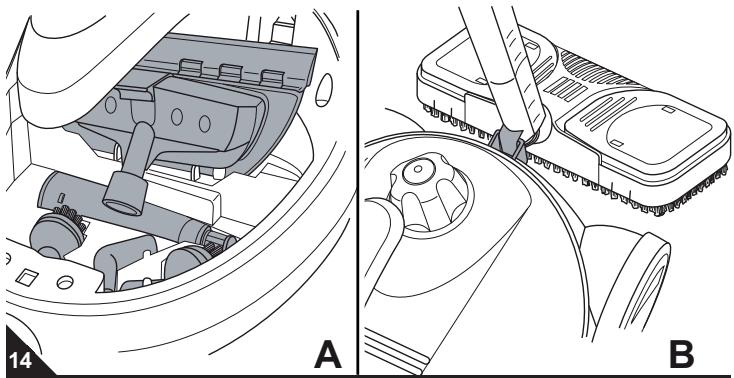
Store no longer needed accessories on their holders in the steam cleaner's accessory compartment (Fig. 14/A).
If necessary, park the floor nozzle in the provided parking bracket (Fig. 14/B).
If you want to store the appliance for a longer period of time, empty the water tank and let it dry completely.
Only stow away the appliance if it is completely dry.
Store the appliance in a cool, dry place, out of reach of children.
5.3 Cleaning-cloth care
WARNING:
Danger of scalding! The appliance continues to run. Even after you have pulled the mains plug from the socket, hot steam will continue to be available.
ATTENTION:
Wash the cleaning cloths after each cleaning session.
By all means care for the cleaning-cloths (Fig. 1/17, 18) as follows:
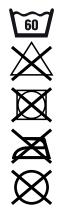
Wash them in the regular 60-degree cycle.
Do not use bleach.
Drying them on the line is best.
Do not iron.
Do not dry-clean.
5.4 Decalcifying the appliance
NOTE:
In areas with hard water, we recommend using distilled water in the appliance or at least to decalcify it more often.
NOTE:
If you use only distilled water, the appliance does not have to be decalcified.
NOTE:
To decalcify the appliance you may as an exception add biologic decalcifying agent to the water in the tank. This is the only exception.
Decalcify the appliance approx. every 6 months to extend its service life.
- Fill the water tank with clear, cold water and add biological decalcifier (available in stores). Follow the decalcifier manufacturer's instructions on use and dosage.
- Direct the steam pistol into a container which can collect the steam.
- Connect the appliance to the mains.
- Wait until the appliance is steam ready and then let the decalcifying solution run through for about five minutes.
- Then wait another 5 minutes with the appliance still plugged in.
- Repeat this procedure 3 times and dispose of the remaining solution.
5.5 Changing washers
- Remove the defective washer, or, if for any reason a washer has been missing, remove residues from its respective groove.
- Fit the appropriate washer from the supplied set of spare washers. Follow this table in selecting the correct washer. If the washer is too large for the groove, it will not seal correctly.
6.1 Before you send in the appliance

WARNING:
Danger of injury! Never use a defective appliance or operate an appliance with a defective power cord.
Before sending the appliance to Royal Appliance Customer Services, use the following table to check whether you can solve the problem yourself. If you cannot solve the problem yourself, call the following service telephone number.
| Problem | Possible cause Solution |
| The steam ready indicator (Fig. 1/3) does not light up after switching on or goes out shortly after switching on | The overheating protection device has triggered due to an empty water tank. Disconnect the power cord and fill the water tank (▷ chapter 3.2, „Filling the water tank“). |
| Water tank and/or heating elements are calcified. Decalcify the appliance (▷ chapter 5.4, „Decalcifying the appliance“). | |
| The appliance is steam ready, but no steam is produced when the steam trigger is pulled | The child safety device/lock (Fig. 1/4) of the steam switch (Fig. 1/5) is not released. Release the child safety device/lock of the steam switch (▷ chapter 4.1, „Steam cleaning“). |
| The steam channels are calcified. Decalcify the appliance (▷ chapter 5.4, „Decalcifying the appliance“). |
| Problem | Possible cause Solution |
| Tank cap cannot be opened after you have pulled the plug, discharged the remaining steam, and have allowed it to cool for at least 30 minutes. | The pressure in the water tank is still too high or the safety valve integrated into the tank cap is stuck. Press the steam button again to discharge any remaining steam. If this is not enough, press the red pin in the tank cap with a sharp object (e.g. a pencil) and release the tank cap for opening in this way. |
| The floor is spotty after cleaning | The cleaning-cloth may have been dirty or have become worn-out due to improper care. Replace the cloth with a clean or new one (▷ chapter 6.2, „Spare parts and accessories”). |
| Or you may have been cleaning too long in one place. Never work the steam cleaner on one spot for a too long time. |
NOTE:
If you cannot solve the problem following these instructions, contact our service hotline or the Royal Customer Service page 58, "International Service".
6.2 Spare parts and accessories

ATTENTION:
Only use original spare parts from the scope of delivery or those that you have acquired by reordering.
Spare parts and accessories are available from www.dirtdevil.de or from:
page 58, "International Service".
The following accessories and spare parts can be reordered:
| Item number./figure | Description |
| M384 | Vaporex accessory set (1 floor cloth [60 % cotton, 40 % polyester] + 2 cotton covers [100 % cotton]) |
| 0380002 | 2in1 combi carrier (1 steam base + 1 removing tool) |
| 0380007 | Vaporex brush set (1 jet nozzle, 1 wire brush, 1 plastic brush) |
6.3 Disposal
When the appliance has reached the end of its usefulness, especially if dysfunctions recur, disable it by pulling the mains plug out of the socket and cutting off the power cord.
Dispose of the appliance in compliance with environmental protection laws of your country. Electrical waste may not be disposed of together with domestic waste. Consult your local authorities or your dealer for advice on recycling.
6.4 Warranty
We grant a warranty of 24 months from the date of purchase for the distributed appliance.
Within this warranty period, we will remove all defects free of charge that are due to material or manufacturing faults, either by repair work or replacing the appliance or accessories, at our discretion (damage to accessory parts does not automatically lead to the entire appliance being replaced). Damages due to inappropriate use (operation on wrong voltage or type of current, connecting to unsuitable power supplies, breakage, etc.) are exempt from warranty, as are normal wear and minor defects that only negligibly affect the appliance's value or serviceability.
Interventions by unauthorised parties and the use of spare parts not supplied by Royal Appliance make the warranty null and void. Consumable parts are not included in the warranty and are therefore at the customer's expense!
The warranty is only valid if the date of purchase has been acknowledged by the dealer's stamp and signature on the warranty card or if a copy of the invoice is included with sent-in appliance. Warranty work does not extend the warranty period nor does it constitute a claim for a new warranty!
Send us the appliance with the water tank emptied and a short description of the defect in block capitals. Head your accompanying letter with the notice "warranty claim". Send it to the following address, including the warranty card or a copy of the purchase slip:
Royal
page 58, International Service".
Merci beaucoup!
Page 58, International Service.
Page 58, International Service

Kundenservice:
Royal Appliance International GmbH
Abt. Kundenservice
Jagenbergstraße 19
41468 Neuss
DEUTSCHLAND
Tel.: +49 (0) 180 - 501 50 50*
Fax: +49 (0) 2131 - 60 90 60 95
www.dirtdevil.de
info@dirtdevil.de
TD "MEDJIMURKA" D.D.
Trg Republike 6
40000 Cakovec
HRVATSKA
Tel.: +385 - 40 - 31 27 60
Fax: +385-40-32 86 61

Z.E.S. Goes B.V.
T.a.v. afd. Service
Pearyweg 1
4462 GT Goes
NEDERLAND
Tel: +31 - 113 - 24 07 00
Fax: +31-113-240750
dirtdevil@zesgoes.nl

Aspico Slovakia s r.o.
Kracanska 40/104
DSV Sp. z o.o. S.K.A. Gdynia,
Plac Kaszubski 8

OPM France Nant'Est enterprise
*€ 0.14 per minute from German landlines, maximum German mobile phone tariff € 0.42 per minute.
The cost of calls from abroad—outside Germany—depend upon the current prices of the respective foreign telephone company.