
CP7380 - Electric mower SOLAC - Free user manual and instructions
Find the device manual for free CP7380 SOLAC in PDF.
| Product Type | Precision electric trimmer for nose, ear, and contour hair |
| Brand | SOLAC |
| Model | CP7380 |
| Power supply | 1 AA battery (1.5 V) not included |
| Dimensions | Approximately 15 x 5 x 3 cm |
| Weight | Approximately 100 g |
| Interchangeable heads | Round head (nose/ears) and flat blade head (contour/beard) |
| Lighting | Integrated LED light for better visibility |
| Guide comb | Allows adjusting cutting length (different levels) |
| Cleaning | Cleaning brush included; clean after each use |
| Lubrication | Lubricating oil recommended for blades (not included) |
| Safety | Max depth 0.5 cm in ear/nose; do not use for eyelashes or near eyes |
| Included accessories | Round head, flat head, guide comb, brush, storage base, protective cover |
| Usage | Household use only |
| Recycling | Do not throw in trash; dispose at recycling point |
Frequently Asked Questions - CP7380 SOLAC
User questions about CP7380 SOLAC
0 question about this device. Answer the ones you know or ask your own.
Ask a new question about this device
Download the instructions for your Electric mower in PDF format for free! Find your manual CP7380 - SOLAC and take your electronic device back in hand. On this page are published all the documents necessary for the use of your device. CP7380 by SOLAC.
USER MANUAL CP7380 SOLAC
Solac is a registered Trade Mark
11/06
5-7·ESPANOL
8-10·ENGLISH
11-13 • FRANÇAIS
14-16 · DEUTsCH
17-19·PORTUGUES
20-22 • ITALIANO
23-25 • NEDERLANDS
26-28·ČESKY
29-31·POLSKA
32-34 • SLOVENSKY
35-38·MAGYAR
39-41·6bIrapck
42-44·HRVATSKA
45-47·ROMANA


- ESPÁÑOL
ATENCION
- Read these instructions carefully before using the appliance.
- For proper operation, the blades should be quite clean, with no traces of hair. For this purpose, clean them before and after each use with the supplied brush Fig. 1 (9).
- Keep out of the reach of children.
- Never immerse the appliance in water.
- Remove all elements from the inside or outside of the appliance used for protection during transport or for sales promotions, such as paper or plastic bags, plastic sheets, cardboard and stickers.
- Switch off the appliance when not in use, even if only for a moment.
- Do not use it with the guide combs damaged or broken or if any blade teeth are missing.
- Never use any accessory not recommended by Solac, as they could damage the appliance.
- The appliance is designed for home use. It can not be used on a continuous, uninterrupted basis.
- Do not attempt to trim your eyelashes. Never use the appliance near your eyes.
- Check the appliance frequently for signs of wear or damage. If these signs appear, or if the product has been used improperly, take it to an Authorised Service Centre.
- Electrodométricos Solac, S.A. hereby disclaims all liability for injuries or damage that could be caused to persons, animals or property due to the failure to heed these warnings.
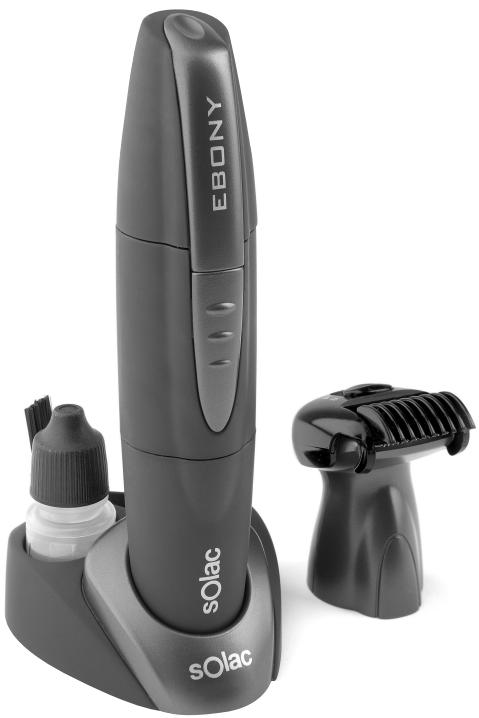
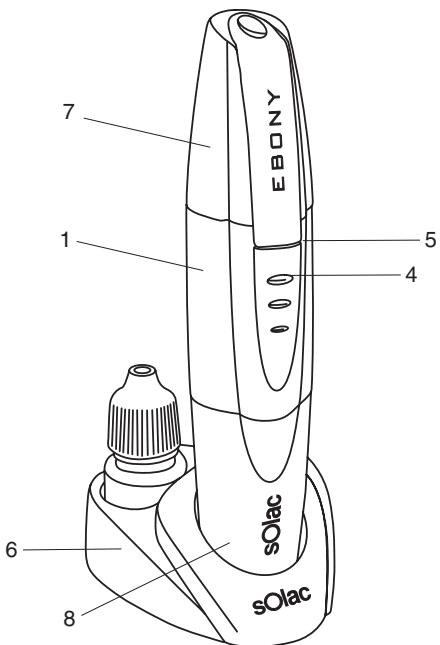
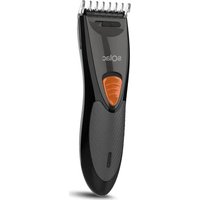
MAIN COMPONENTS FIG. 1
- Main body of the appliance
- Round head
- Flat blade head
- ON/OFF switch
- Light
- Storage base
- Protective head cover
- Protective battery cover
- Cleaning brush
- Guide comb
RECOMMENDATIONS
- Do not insert the blade of the round head (2) more than 0.5 cm into the ear or the nose, since it could damage the tympanum or the membrane of the nose.
- Make sure the head (2 or 3) is correctly adjusted to the base.
OPERATION:
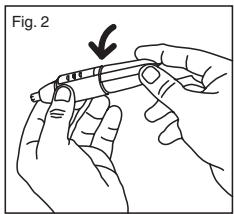
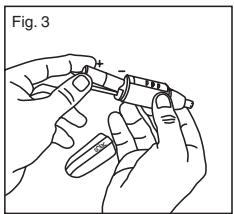
- This model works with an AA battery. To fit the battery, turn the protective battery cover Fig. 1(8) to the left until the r -symbol is in line with the , and pull on the cover. Fig. 2 Fit the battery in the appropriate place with the negative terminal (-) pointing to the head. Fig. 3.
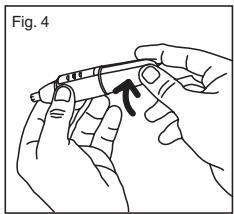
- Put the bottom cover back in position Fig. 1(8), ensuring that the symbol is in line with the symbol, and turn it until it is in line with the · symbol. Fig. 4
- When you turn it on Fig. 1(4), the light comes on Fig. 1(5), to help you locate the hair.
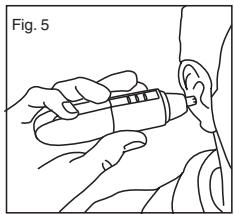
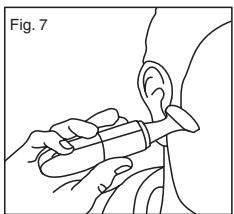
To trim ear hair:
- Use the round head Fig. 1(2)
- Turn on the appliance and insert it in the exterior of the ear. Fig. 5
- Carefully move the trimmer around the area with hair.
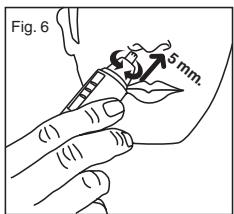
To trim nose hair:
- Use the round head Fig. 1(2)
- Turn on the appliance and insert it in the nose (do not insert it more than 0.5cm ). Fig. 6
- Remove the nose hair by moving the appliance in small circles.
To set the type of cuts (beard, sideburns, neck hair, etc.):
- Turn the appliance off.
- Turn the round blade head Fig. 1(2) to the right and remove it from the head base Fig. 1(1).
- Fit the flat blade head Fig. 1 (3), adjusting it to the guide and turn it to the left until it is correctly in place.
- Slide the blade along the desired cutting line without pressing on the skin to avoid cuts. Fig. 7
- Use the guide comb (10) to adjust the trimmed hair length. Place it on the flat blade and select the cutting level desired. The first time, we recommend that you start with the maximum length and gradually reduce it until you achieve the desired effect.
CLEANING:
- Clean the appliance after each use using the cleaning brush. Fig. 1 (9) to remove all the hair.
- For cleaning, make sure that the head is correctly positioned.
- You can clean the blades with the cleaning brush supplied with the kit (9).
Add lubricating oil to the blades as necessary.
- Finally, replace the protective cover Fig. 1(7) for correct maintenance.
- Keep the appliance and the blades on the supplied base Fig. 1(6) for convenient storage.

IMPORTANT!! When you want to dispose of the appliance, NEVER throw it in the rubbish bin. Take it to your nearest CLEAN POINT or the waste collection centre closest to your home for processing. You will thus be helping to take care of the environment.
FRANÇAISE
ATTENTION


Brand : SOLAC
Model : CP7380
Category : Electric mower