
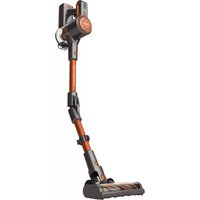
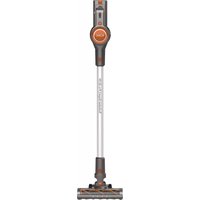
AS3260 - Vacuum Cleaner SOLAC - Free user manual and instructions
Find the device manual for free AS3260 SOLAC in PDF.

| Brand | SOLAC |
| Model | AS3260 |
| Appliance type | Canister vacuum cleaner with cyclonic technology |
| Power supply | Mains 220-240 V |
| Power cord | Length with yellow markers (ideal) and red (max) |
| Suction power | Adjustable by selector (ECOPTIMA and MAX levels) |
| Manual suction adjustment | Flap on the handle |
| Dust container capacity | With maximum level marking |
| Filtration system | Motor protection filter (washable) + exhaust air filter (replaceable) |
| Included accessories | Universal floor and carpet brush, parquet brush, crevice/ corner nozzle, furniture/ upholstery brush, telescopic metal tube, hose assembly |
| Parking stop function | Yes, by fixing the tube in the slot |
| Safety | Safety thermostat with automatic shutdown in case of overheating |
| Routine maintenance | Emptying the container, cleaning the motor filter, cleaning/ replacing the exhaust filter |
| Usage | Domestic only (dry vacuuming) |
| Repairability | Authorized technical service center |
| Weight | Not specified in the manual |
Frequently Asked Questions - AS3260 SOLAC
User questions about AS3260 SOLAC
0 question about this device. Answer the ones you know or ask your own.
Ask a new question about this device
Download the instructions for your Vacuum Cleaner in PDF format for free! Find your manual AS3260 - SOLAC and take your electronic device back in hand. On this page are published all the documents necessary for the use of your device. AS3260 by SOLAC.
USER MANUAL AS3260 SOLAC
AS3260.book Page 2 Thursday, January 14, 2010 1:29 PM


AS3260.book Page 3 Thursday, January 14, 2010 1:29 PM


. ESPÁÑOL
- Read these instructions carefully before using the appliance.
- This manual is an integral part of the product. Keep it in a safe place for future reference.
- This appliance is exclusively for household use and not for industrial use. It is dangerous to use it for any purpose other than the one indicated (e.g. vacuuming liquids, dust from construction work, cement, etc.)
Children must be supervised to ensure they do not play with the appliance. - This appliance is not to be used by persons (or children) whose physical, sensorial or mental capacities are impaired, or who have no experience or knowledge, unless supervised or instructed in the use of the appliance by a person responsible for their safety.
- Do not make any modifications or repairs to the appliance. In the event of any anomaly in the cord or any other part of the appliance, do not use it and take it to an authorised service centre.
- Do not use any parts or accessories not supplied or recommended by SOLAC.
- Before plugging the appliance into the mains, check that the indicated voltage is the same as in your home.
- Always unplug the appliance after use and before assembling or removing parts, and performing any maintenance or cleaning operations. Also unplug it in the case of a power cut. The appliance must be switched off before plugging or unplugging it into the mains
- Do not use the cord to hang up the appliance. Always unplug the appliance by pulling on the plug, and not the cord.
- Make sure the cord does not come into contact with sharp edges or hot surfaces. Do not leave the cord hanging over the edge of a table or worktop, to prevent children from pulling it and causing the appliance to fall.

Never immerse the appliance in water or any other liquid, and do not put it in the dishwasher.
-
Never handle the vacuum cleaner or the plug with wet hands.
-
Do not leave the appliance plugged into the mains unattended.
- Keep your vacuum cleaner away from heat sources.
- Never use the vacuum cleaner without the dust container or the protective filters correctly fitted.
Always keep the air intakes and outlets clear. - Keep hair, clothes, fingers or any other body part away from the air intakes and outlets.
- Do not use the vacuum cleaner to clean animals.
- Be very careful when using the vacuum cleaner on stairs.
- Do not use the appliance in confined spaces where explosive or toxic vapours can build up.
CAUTION! When you want to dispose of the appliance, NEVER throw it in the rubbish bin. Take it to the CLEAN POINT or waste collection centre closest to your home for processing. You will thus be helping to take care of the environment.
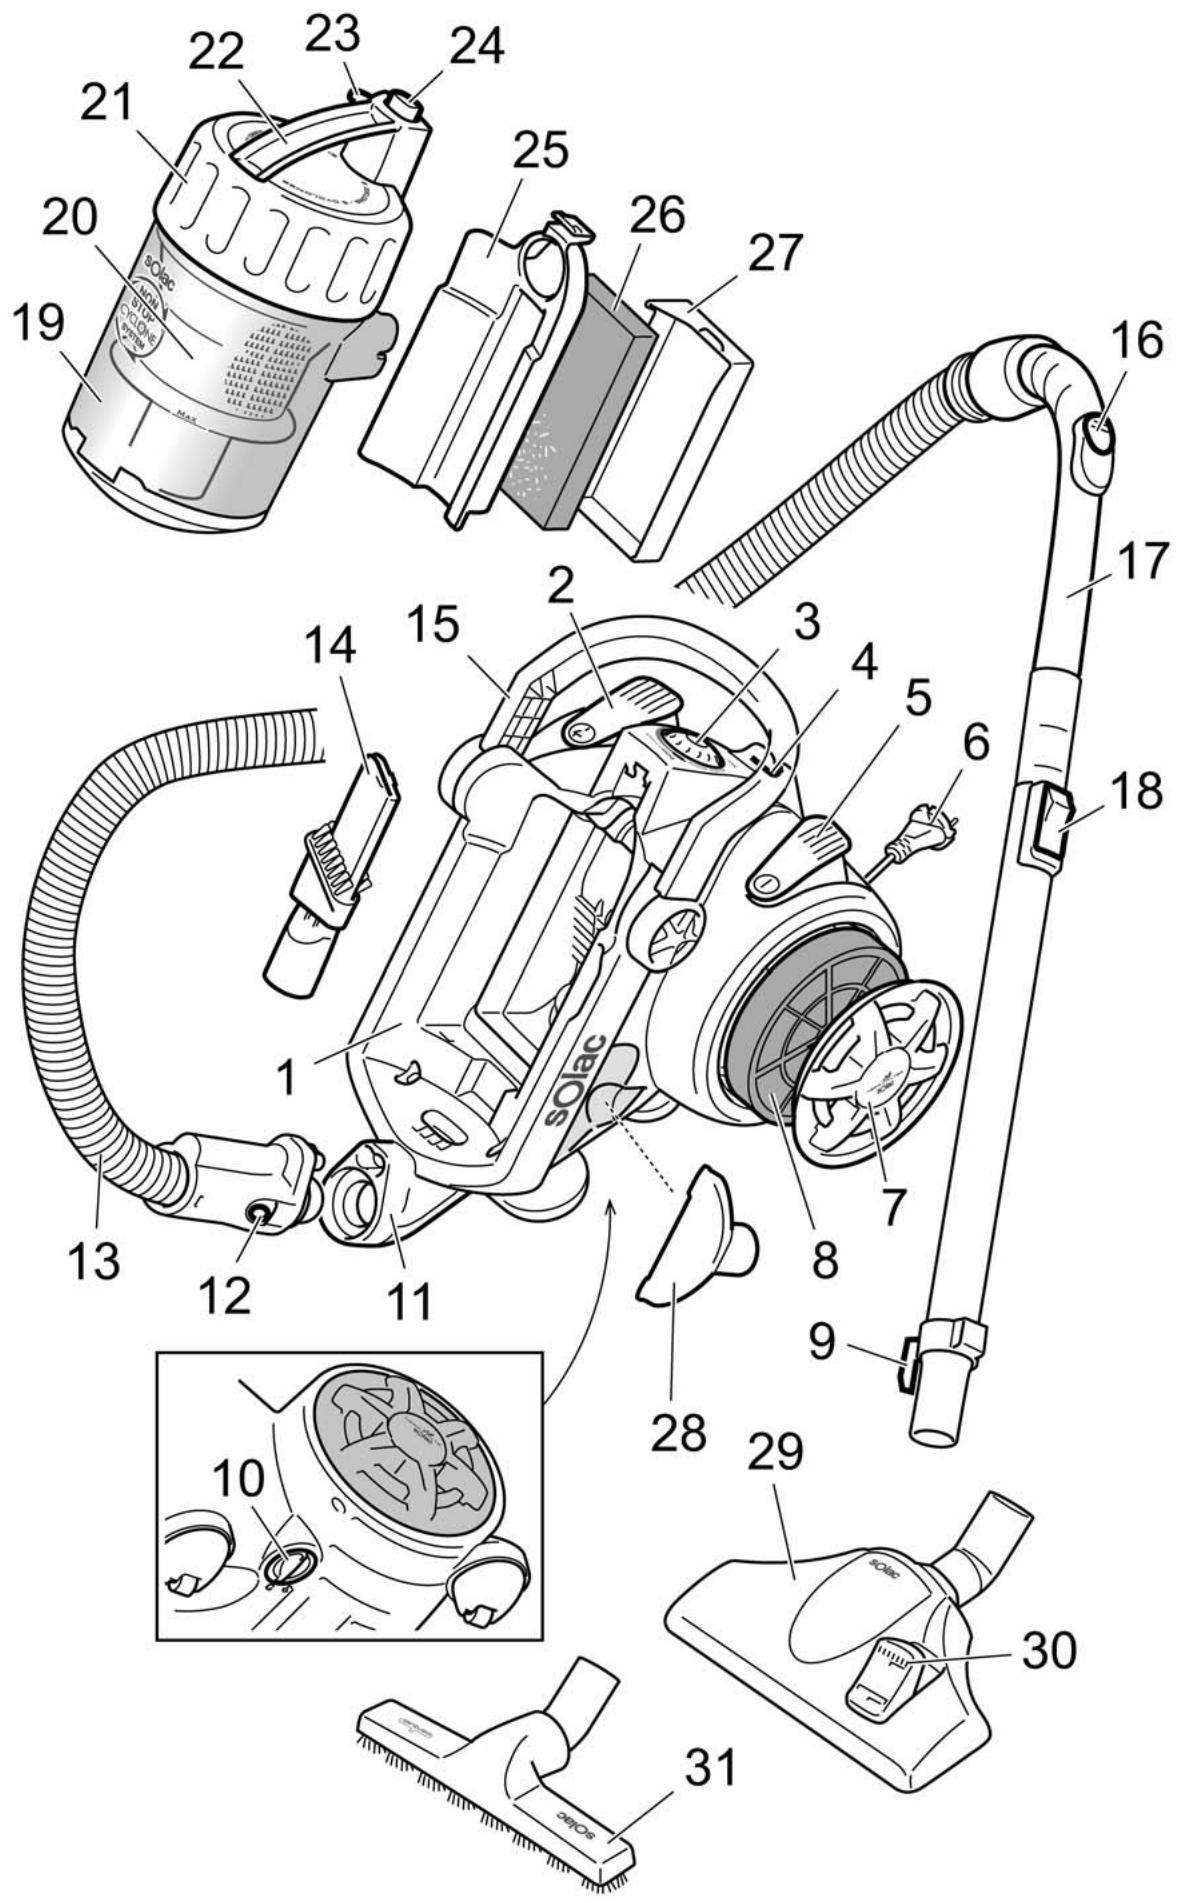
MAIN COMPONENTS
1 Main body
2 Cord-winder foot button
3 Power control with ECOPTIMA position
4 Groove for holding the brush while the appliance is temporarily stopped
5 On/off foot switch
6 Power cord
7 Air outlet filter cover
8 Air outlet filter
9 Storage hook
10 Air intake hose cover
11 Flexible hose connection
12 Release tabs for the flexible hose
13 Flexible hose
14 Tip for vacuuming grooves and corners
15 Carry handle
16 Manual suction regulator
17 Telescopic metal tube
18 Button for adjusting the telescopic tube height
19 Dust container
20 Inner dust container chamber
21 Dust container cover
22 Dust container handle
23 Button for opening dust container
24 Release button for dust container
25 Protection filter cover
26 Motor protection filter
27 Motor protection filter grille
28 Upholstery brush/furniture brush
29 All-purpose brush for floors and carpets
30 Retractile brush push button
31 Brush for parquet floors
USE
NON-STOP CYCLONE SYSTEM CYCLONIC TECHNOLOGY
The vacuumed dust enters the dust container (19) and remains suspended thanks to the Non-Stop Cyclone System cyclonic technology. Any dust particles that escape from the outer dust container chamber are retained in the inner chamber (20) before passing through the motor protection filter (26), thereby ensuring that the air leaving the appliance is free from dust particles.
This appliance has been designed exclusively for vacuuming floors, carpets, furniture and fabrics. Do not use it for any other purpose.
Never vacuum live ash, splinters, sharp objects, or liquids.
Never vacuum lit matches or cigarette butts. Do not vacuum toxic material (ammonia, etc.).
Completely remove all the elements used for transportation and packaging.
Unplug the appliance from the mains before adding or removing any accessories or performing any maintenance tasks.
Do not use the appliance above the height of the power cord.

1 Check that the dust container (19) and filters (8 and 26) are fitted correctly. See the following section (Cleaning and Conservation)
2 Insert the flexible hose (13) into the connection (10) until it clicks into place When you want to remove the hose, press the release tabs (12) at the same time.
3 Insert the telescopic metal tube (17).
4 Prepare the accessories required for the surface you want to clean. Insert the required accessory into the telescopic metal tube (17).
All-purpose brush for floors and carpets (29)
It can be used on all types of floors, as it is retractile and can adapt to the surface to be cleaned. To change the cleaning position of the brush, press the brush button (30) with your foot. We recommend cleaning hard floors, wood and parquet with the fibre brush extended, and cleaning carpets and rugs with the fibre brush retracted.
Brush for parquet floors (31)
It is recommended for use on parquet floors and hard floors (stoneware, ceramic, marble, etc.).
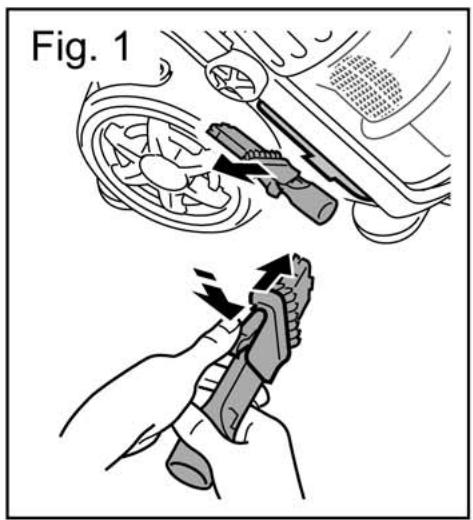
Vacuuming tip (14)
For narrow places, grooves and corners.
On delicate surfaces use the tip with its brush positioned on the edge. To do this, slide the small inserted brush towards the front of the tip while pressing the tab (fig. 1).
Furniture brush (28)
Suitable for furniture and upholstery.
- The length of the telescopic tube can be adjusted (17) by sliding the adjustment button (18) while moving both parts of the telescopic tube.
5 Pull the cord (6) out as far as the yellow mark (ideal length). If necessary, pull it out as far as the red mark, but no further.
6 Plug the appliance into the mains.
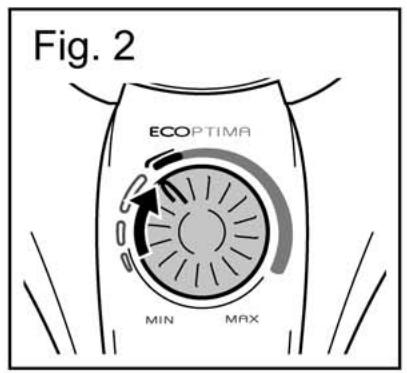
7 Adjust the suction power by turning the power control (3) to the required power level (fig. 2).
For daily cleaning use the ECOPTIMA power range. It has sufficient suction power with minimum power consumption. If you need more suction power for carpets or very dirty surfaces, turn the power control to the MAX position.
8 Switch the vacuum cleaner on by pressing the foot button (5).
You can also adjust the suction power by opening or closing the regulator on the handle (16). (Opening the valve reduces the power and closing it increases the power).
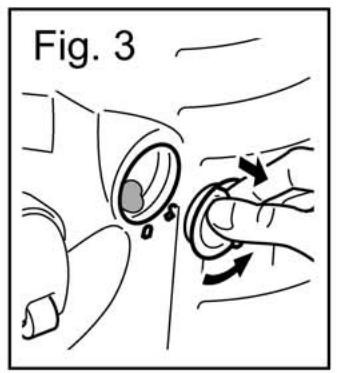
If, while using the appliance, you hear a sharp whistle unlike the usual sound, turn it off and unplug it. Check that the air intakes, outlets and filters are not blocked. If they are blocked, get rid of the cause of the blockage.
Turn the air intake hose cover (10) anti-clockwise and check it is not blocked (fig. 3).
While using the appliance, drag it along like a trolley. If you wish, you can use the handle (15) to carry the vacuum cleaner.
This appliance has a position known as "horizontal parking", which can be used for pausing from time to time during cleaning. This position is achieved by holding the telescopic tube by the hook in the groove (4) of the appliance body.
If you want, you can place the tip (14) and the furniture brush (28) in the accessory-holder.
9 Once you have finished, switch the appliance off by pressing the button (5). Unplug it and press the button (2) to wind up the cord. Hold the cord plug in your hand to prevent it from banging against the vacuum cleaner housing.


SAFETY THERMOSTAT
The system has a safety thermostat. If for any reason the vacuum cleaner should overheat, the thermostat will automatically shut off the appliance. If this should happen:
1 Press the on/off switch (5) and unplug the appliance from the mains.
2 Check that the air intakes and outlets are not blocked. If they are blocked, get rid of the cause of the blockage.
3 Empty the dust container (outer and inner chamber). See the next section "Cleaning and Conservation".
If the automatic shut-off was due to the motor overheating, wait for about one hour for the appliance to cool before turning it on again. You can reduce the waiting time by placing the appliance in a cool or well-ventilated place to allow the heat to dissipate.
CLEANING AND CONSERVATION
EMPTYING THE DUST CONTAINER (19)
The dust container (19) has a maximum level mark. Check the dust does not exceed that level.
1 Turn the carry handle (15) backwards to make the dust container (19) accessible.
2 Press the release button (24). This releases the dust container. (fig. 4).
3 Remove the dust container and hold it over the waste bin. Press the button (23) on the container (fig. 5) to empty the contents into the bin.
4 Turn the dust container cover (21) anti-clockwise and remove the inner chamber (20) (fig. 6). Empty the contents.
5 Clean the inner chamber (20) and dust container with a brush and wet cloth.
Check that the washed elements are completely dry before putting them back together.
Never immerse the inner chamber in water or any other liquid, nor put it in the dishwasher. Do not use abrasive products or solvents.
6 Put the inner chamber back into the container (check that the marks coincide).
7 Place the container cover (21) on the mark and turn it clockwise to the mark.
8 Put the dust container back inside the appliance. Push the container towards the appliance body while pressing the release button (24). This blocks the container.
CLEANING THE MOTOR PROTECTION FILTER (26)
It is advisable to inspect the motor protection filter from time to time, to ensure that it is operating correctly.
Once or twice a year, or if a reduction in suction power is detected, clean the protection filter. To do so:
1 Remove the dust container. See the previous section "Emptying the dust container (19)".
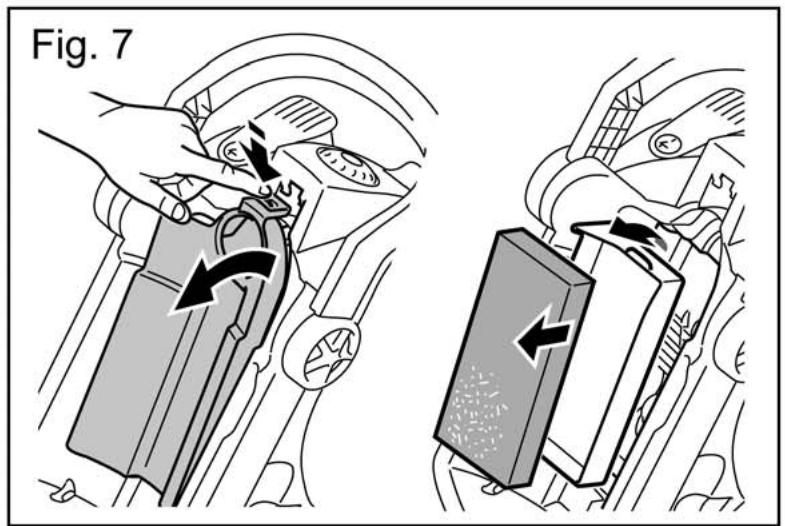
2 Remove the filter cover (25) by pressing the upper tab. Remove the grille (27) (fig. 7).
3 Remove the protection filter (26) from the grille (27) (fig. 7).
4 Wash the filter with tap water and leave it to dry completely.
The filter can be washed with warm water (max. 40^ ). Leave it to dry for 24 hours before replacing it.
5 Put the grille and motor protection filter back in their housing.
Never use the vacuum cleaner without the motor protection filter.
CLEANING AND REPLACING THE AIR OUTLET FILTER (8)
It is advisable to inspect the air outlet filter from time to time to ensure that it is operating correctly. Clean the filter thoroughly if you detect a reduction in the suction power of the appliance.
It is advisable to replace the air outlet filter once or twice a year, depending on how often you use the appliance.
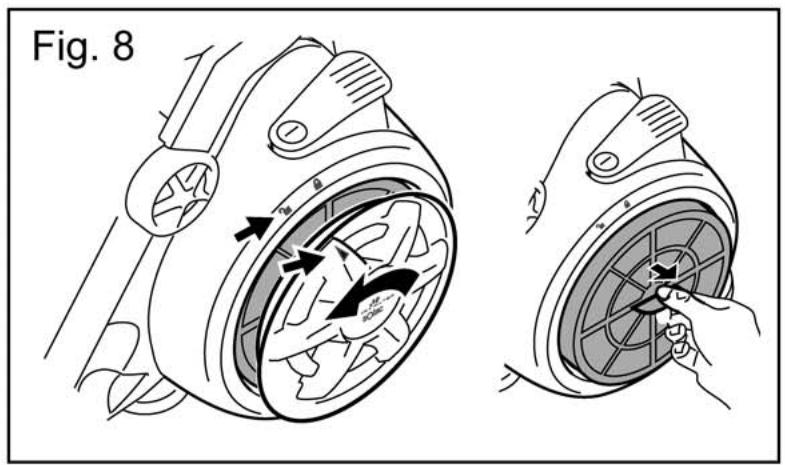
1 Turn the air outlet filter cover (7) anti-clockwise to the mark .
2 Remove the outlet filter (8) pulling it towards you (fig. 8).
3 Gently tap the outlet filter against the side of the waste bin to remove any excess dirt and dust.
Never use the vacuum cleaner without the air outlet filter.
4 Insert the air outlet filter in its housing.
5 Attach the air outlet filter cover (7). Position the mark on the cover facing the mark and turn clockwise to mark.
CLEANING THE APPLIANCE
Clean the appliance before using it for the first time, immediately after each use and after not using it for a long period of time. You will thus ensure the correct operation of the appliance and prolong its useful life.
Before cleaning the appliance, unplug it from the mains.
Check that no water gets into the appliance.
1 Clean the outside of the appliance with a damp cloth. Do not use any abrasive products or solvents.
. FRANÇAIS
INSTRUCTIONS DE SECURITÉ
VEILIGHEIDSTHERMOSTAAT
HET APPARAAT SCHOONMAKEN


- ESPÁÑOL
- MAIN COMPONENTS
- USE
- NON-STOP CYCLONE SYSTEM CYCLONIC TECHNOLOGY
- SAFETY THERMOSTAT
- CLEANING AND CONSERVATION
- EMPTYING THE DUST CONTAINER (19)
- CLEANING THE MOTOR PROTECTION FILTER (26)
- CLEANING AND REPLACING THE AIR OUTLET FILTER (8)
- CLEANING THE APPLIANCE
- FRANÇAIS
- INSTRUCTIONS DE SECURITÉ
- VEILIGHEIDSTHERMOSTAAT
- HET APPARAAT SCHOONMAKEN
Brand : SOLAC
Model : AS3260
Category : Vacuum Cleaner