 — Mode d'emploi PDF")
NSA-2400-1T - Network Storage (NAS) ZYXEL - Free user manual and instructions
Find the device manual for free NSA-2400-1T ZYXEL in PDF.

| Product type | Network Attached Storage (NAS) |
| Brand | ZYXEL |
| Model | NSA-2400-1T |
| Number of bays | 4 bays |
| Maximum capacity | Up to 8 TB (disks not included) |
| Processor | Marvell 88F6281 1.2 GHz |
| RAM memory | 512 MB DDR2 |
| Dimensions (W x D x H) | 220 x 170 x 150 mm |
| Weight | 2.5 kg |
| Power supply | 100-240 V AC, 50/60 Hz, 90 W |
| Network interfaces | 2 x Gigabit Ethernet RJ-45 |
| USB ports | 2 x USB 2.0 |
| Main functions | File server, media server, backup, RAID 0/1/5/10, iSCSI, FTP |
| Supported file systems | EXT3, EXT4, NTFS, FAT32 |
| Network protocols | CIFS/SMB, NFS, AFP, FTP, HTTP/HTTPS |
| Security | AES 256-bit encryption, integrated firewall |
| Management | Web interface, management client |
| Maintenance and cleaning | Clean with a soft, dry cloth; avoid liquids |
| Spare parts and repairability | Power supply, fan and hard drives replaceable |
| General information | 2-year warranty; compliant with class B NMB-003 |
Frequently Asked Questions - NSA-2400-1T ZYXEL
User questions about NSA-2400-1T ZYXEL
0 question about this device. Answer the ones you know or ask your own.
Ask a new question about this device
Download the instructions for your Network Storage (NAS) in PDF format for free! Find your manual NSA-2400-1T - ZYXEL and take your electronic device back in hand. On this page are published all the documents necessary for the use of your device. NSA-2400-1T by ZYXEL.
USER MANUAL NSA-2400-1T ZYXEL
About This User's Guide
Intended Audience
This manual is intended for people who want to configure the Product Name [short] using the web configurator. You should have at least a basic knowledge of TCP/IP networking concepts and topology.
Related Documentation
- Quick Start Guide
The Quick Start Guide is designed to help you get up and running right away. It contains information on setting up your network and configuring for Internet access.
Web Configurator Online Help
Embedded web help for descriptions of individual screens and supplementary information.
Supporting Disk
Refer to the included CD for support documents.
ZyXEL Web Site
Please refer to www.zyxel.com for additional support documentation and product certifications.
User Guide Feedback
Help us help you. Send all User Guide-related comments, questions or suggestions for improvement to the following address, or use e-mail instead. Thank you!
The Technical Writing Team,
ZyXEL Communications Corp.,
6 Innovation Road II,
Science-Based Industrial Park,
Hsinchu, 300, Taiwan.
E-mail: techwriters@zyxel.com.tw
Document Conventions
Warnings and Notes
These are how warnings and notes are shown in this User's Guide.

Warnings tell you about things that could harm you or your device.

Notes tell you other important information (for example, other things you may need to configure or helpful tips) or recommendations.
Syntax Conventions
- The Product Name [short] may be referred to as the "NSA", the "device" or the "system" in this User's Guide.
- Product labels, screen names, field labels and field choices are all in bold font.
- A key stroke is denoted by square brackets and uppercase text, for example, [ENTER] means the "enter" or "return" key on your keyboard.
- “Enter” means for you to type one or more characters and then press the [ENTER] key. "Select" or "choose" means for you to use one of the predefined choices.
- A right angle bracket (>) within a screen name denotes a mouse click. For example, Maintenance > Log > Log Setting means you first click Maintenance in the navigation panel, then the Log sub menu and finally the Log Setting tab to get to that screen.
- Units of measurement may denote the "metric" value or the "scientific" value. For example, "k" for kilo may denote "1000" or "1024", "M" for mega may denote "1000000" or "1048576" and so on.
- "e.g.," is a shorthand for "for instance", and "i.e.," means "that is" or "in other words".
Icons Used in Figures
Figures in this User's Guide may use the following generic icons. The NSA icon is not an exact representation of your device.
| NSA | Computer | Notebook computer |
| Server | DSLAM | Firewall |
| Telephone | Switch | Router |
SafetyWarnings

For your safety, be sure to read and follow all warning notices and instructions.
- Do NOT use this product near water, for example, in a wet basement or near a swimming pool.
- Do NOT expose your device to dampness, dust or corrosive liquids.
- Do NOT store things on the device.
- Do NOT install, use, or service this device during a thunderstorm. There is a remote risk of electric shock from lightning.
- Connect ONLY suitable accessories to the device.
- Do NOT open the device or unit. Opening or removing covers can expose you to dangerous high voltage points or other risks. ONLY qualified service personnel should service or disassemble this device. Please contact your vendor for further information.
- ONLY qualified service personnel should service or disassemble this device.
- Make sure to connect the cables to the correct ports.
- Place connecting cables carefully so that no one will step on them or stumble over them.
- Always disconnect all cables from this device before servicing or disassembling.
- Use ONLY an appropriate power adaptor or cord for your device.
- Connect the power adaptor or cord to the right supply voltage (for example, 110V AC in North America or 230V AC in Europe).
- Do NOT allow anything to rest on the power adaptor or cord and do NOT place the product where anyone can walk on the power adaptor or cord.
- Do NOT use the device if the power adaptor or cord is damaged as it might cause electrocution.
- If the power adaptor or cord is damaged, remove it from the power outlet.
- Do NOT attempt to repair the power adaptor or cord. Contact your local vendor to order a new one.
- Do not use the device outside, and make sure all the connections are indoors. There is a remote risk of electric shock from lightning.
- CAUTION: RISK OF EXPLOSION IF BATTERY (on the motherboard) IS REPLACED BY AN INCORRECT TYPE. DISPOSE OF USED BATTERIES ACCORDING TO THE INSTRUCTIONS. Dispose them at the applicable collection point for the recycling of electrical and electronic equipment. For detailed information about recycling of this product, please contact your local city office, your household waste disposal service or the store where you purchased the product.
- Do NOT obstruct the device ventilation slots, as insufficient airflow may harm your device.
This product is recyclable. Dispose of it properly.
Contents Overview
Introduction 23
Getting to Know Your NSA-2400 25
Introducing the Web Configurator 29
Status, Sharing and Network 41
Status Screens 43
Sharing Screens 51
Network Screens 71
Protect, Storage and Maintenance 79
Protect Screens 81
Storage Screens 95
Maintenance Screens 113
Troubleshooting 125
Appendices and Index 135
Table of Contents
About This User's Guide 3
Document Conventions 4
SafetyWarnings 6
Contents Overview 9
Table of Contents 11
List of Figures 17
List of Tables 21
Part I: Introduction 23
Chapter 1
Getting to Know Your NSA-2400 25
1.1 NSA-2400 Overview 25
1.1.1 Front Panel LEDs 26
Chapter 2 Introducing the Web Configurator 29
2.1 Web Configurator Overview 29
2.2 Accessing the NSA-2400 Web Configurator 29
2.2.1 Access the NSA-2400 Via NDU 29
2.2.2 Web Browser Access 30
2.3 Login 30
2.4 NSA-2400 Main Screen Overview 32
2.5 Global NSA-2400 Icons 33
2.5.1 Navigation Panel 34
2.5.2 Status Messages 35
2.5.3 Common Screen Icons 36
2.6 Forgot Your Password 37
2.6.1 NSA-2400 Sends Password 37
2.6.2 Reset the NSA-2400 38
Part II: Status, Sharing and Network 41
Chapter 3
Status Screens 43
3.1 Status Overview Screen 43
3.2 Active Sessions Screen 45
3.2.1 Session Example (Windows) 45
3.3 System Log 46
3.4 System Info 48
Chapter 4
Sharing Screens 51
4.1 Sharing Introduction 51
4.2 Sharing Overview 51
4.2.1 In Limbo and In Conflict 51
4.2.2 Sharing Overview Screen 53
4.3 Users 54
4.3.1 User Icons 55
4.3.2 Users Summary Screen 55
4.4 Adding a New User 56
4.4.1 User Names 56
4.4.2 Add a New User Screen 57
4.4.3 User Password Management 58
4.5 Groups 59
4.5.1 Group Icons 59
4.5.2 Groups Summary Screen 59
4.6 Adding a New Group 60
4.6.1 Group Names 60
4.6.2 Add A New Group Screen 61
4.7 Shares 62
4.7.1 Share Icons 62
4.7.2 Share Summary Screen 62
4.8 Adding a New Share 63
4.8.1 Share Names 63
4.8.2 Share Paths 64
4.8.3 Share Comments 65
4.8.4 EVERYONE & ANONYMOUS Share Access Rights 65
4.8.5 DFS 65
4.8.6 Add A New Share Screen 66
Chapter 5
Network Screens 71
5.1 Network Screens 71
5.2 Network Introduction 71
5.2.1 IP Address and Subnet Mask 71
5.2.2 DHCP 72
5.2.3 Windows/CIFS 72
5.2.4 FTP 72
5.3 Network Overview Screen 72
5.4 TCP/IP Screen 73
5.5 Windows/CIFS 75
5.5.1 Workgroup Security Mode 75
5.5.2 Windows Domain Security Mode 76
5.5.3 Windows/CIFS Screen 76
5.6 FTP Screen 78
Part III: Protect, Storage and Maintenance 79
Chapter 6
Protect Screens 81
6.1 Protection Methods 81
6.1.1 Configuration File Backup and Restoration 81
6.1.2 Genie Backup Manager 82
6.1.3 Snapshots 82
6.1.4 NSA Backup 83
6.2 Protect Overview Screen 84
6.3 Backup Summary 85
6.3.1 Schedule Backups 86
6.3.2 Creating/Editing Backups 86
6.3.3 Restoring Backups 88
6.3.4 Snapshot Summary 89
6.3.5 Schedule Snapshots 90
6.3.6 Creating/Editing Snapshots 91
6.3.7 Purging Snapshots 92
6.4 Scheduler Screens 93
6.4.1 Scheduler Screen 93
6.4.2 Scheduler Create/Edit Screen 93
Chapter 7
Storage Screens 95
7.1 Storage Introduction 95
7.2 Storage Overview Screen 95
7.3 Volumes and RAID 97
7.3.1 Choosing A Storage Method For a Volume 98
7.3.2 Volume Status 99
7.3.3 Resynchronizing a RAID 1 or 5 Volume 100
7.4 RAID 100
7.4.1 JBOD 101
7.4.2 RAID 0 102
7.4.3 RAID 1 102
7.4.4 RAID 10 103
7.4.5 RAID 5 104
7.4.6 RAID 5 SPARE 104
7.4.7 RAID and Data Protection 105
7.5 Volume Screen 105
7.6 Creating a New Internal Volume 106
7.7 Disk 108
7.7.1 Maintenance Mode 108
7.7.2 External Disks 108
7.7.3 Disk Replacement Restrictions 108
7.7.4 Disk Replacement and Volume Labels 109
7.7.5 Disk Screen 110
Chapter 8 Maintenance Screens 113
8.1 Maintenance Overview 113
8.1.1 HTTPS and SSL 113
8.1.2 Maintenance Overview Screen 114
8.2 Date/Time 115
8.2.1 Time Lag 115
8.2.2 Time/Date And External Domain Controllers 115
8.2.3 Pre-defined NTP Time Servers List 115
8.2.4 Date/Time Screen 116
8.3 Log Alert Screen 116
8.4 Security 118
8.4.1 Introduction to HTTPS 118
8.4.2 Security Screen 118
8.5 Configuration 119
8.5.1 Configuration Screen 119
8.6 Firmware Upgrade 121
8.6.1 Firmware Upgrade Screen 121
8.7 Shutdown 122
8.7.1 Shutdown Screen 122
Chapter 9 Troubleshooting 125
9.1 Troubleshooting Overview 125
9.2 Power, Hardware Connections, and LEDs 125
9.3 NSA-2400 Login and Access 127
9.3.1 How To Reset the NSA 127
9.4 Users Cannot Access The NSA-2400 131
9.5 Backups and Snapshots 132
9.6 External USB Disks 133
Part IV: Appendices and Index 135
Appendix A Product Specifications 137
Appendix B Log Messages 143
Appendix C Setting up Your Computer's IP Address 147
Appendix D Open Source Licences 161
Appendix E Legal Information 191
Appendix F Customer Support 193
Index 197
List of Figures
Figure 1 Example Application 26
Figure 2 NSA-2400 Front Panel LEDs 26
Figure 3 NDU Main Screen 30
Figure 4 NDA URL 30
Figure 5 NSA-2400 Login Screen 31
Figure 6 Administrator Already Logged In 31
Figure 7 Change Password Screen 32
Figure 8 Launch Setup Wizard Prompt 32
Figure 9 NSA-2400 Status Screen 33
Figure 10 Navigation Panel Links 34
Figure 11 Wrong Password 37
Figure 12 Generate Password 38
Figure 13 Status > Active Sessions 45
Figure 14 Session Example (Windows) 45
Figure 15 Status > System Log 46
Figure 16 System Info 48
Figure 17 Sharing > Overview 53
Figure 18 Sharing > Users 55
Figure 19 Add a New User 57
Figure 20 User Password Management 58
Figure 21 Sharing > Groups 59
Figure 22 Add a New Group 61
Figure 23 Sharing > Shares 63
Figure 24 Add a New Share 66
Figure 25 Public Share 69
Figure 26 Network > Overview 72
Figure 27 NSA Rebooting 74
Figure 28 Network > TCP/IP 74
Figure 29 Network > Windows/CIFS_Workgroup 76
Figure 30 Network > Windows/CIFS_Domain 77
Figure 31 Network > FTP 78
Figure 32 Protect > Overview 85
Figure 33 Protect > Backup 85
Figure 34 Protect > Backup > Schedule 86
Figure 35 Protect > Backup > Run Now 86
Figure 36 Protect > Backup > Edit 87
Figure 37 Protect > Backup > Restore 89
Figure 38 Protect > Snapshot 90
Figure 39 Protect > Snapshot > Schedule 91
Figure 40 Protect > Snapshot > Run Now 91
Figure 41 Protect > Snapshot > Create/Edit 91
Figure 42 Protect > Snapshot > Create/Edit 92
Figure 43 Protect > Scheduler 93
Figure 44 Protect > Scheduler > Create/Edit 94
Figure 45 Storage > Overview 96
Figure 46 Storage > Volume 105
Figure 47 Remove, Scan Or Expand A Volume 106
Figure 48 Create a New Internal Volume 107
Figure 49 Storage > Disk 110
Figure 50 Maintenance > Overview 114
Figure 51 Maintenance > Date/Time 116
Figure 52 Maintenance > Log Alert 117
Figure 53 Maintenance > Security 119
Figure 54 Maintenance > Configuration 120
Figure 55 Maintenance > FW Upgrade 121
Figure 56 Maintenance > Shutdown 122
Figure 57 Maintenance > Shutdown > Confirm Restart 123
Figure 58 Maintenance > Shutdown > Confirm Shutdown 123
Figure 59 Wrong Password 128
Figure 60 Generate Password 129
Figure 61 Log in With New Password 129
Figure 62 Power Adaptor Pinout. 141
Figure 63 Windows 95/98/Me: Network: Configuration 148
Figure 64 Windows 95/98/Me: TCP/IP Properties: IP Address 149
Figure 65 Windows 95/98/Me: TCP/IP Properties: DNS Configuration 150
Figure 66 Windows XP: Start Menu 151
Figure 67 Windows XP: Control Panel 151
Figure 68 Windows XP: Control Panel: Network Connections: Properties 152
Figure 69 Windows XP: Local Area Connection Properties 152
Figure 70 Windows XP: Internet Protocol (TCP/IP) Properties 153
Figure 71 Windows XP: Advanced TCP/IP Properties 154
Figure 72 Windows XP: Internet Protocol (TCP/IP) Properties 155
Figure 73 Macintosh OS X: Apple Menu 156
Figure 74 Macintosh OS X: Network 156
Figure 75 Red Hat 9.0: KDE: Network Configuration: Devices 157
Figure 76 Red Hat 9.0: KDE: Ethernet Device: General 158
Figure 77 Red Hat 9.0: KDE: Network Configuration: DNS 158
Figure 78 Red Hat 9.0: KDE: Network Configuration: Activate 159
Figure 79 Red Hat 9.0: Dynamic IP Address Setting in ifconfig-eth0 159
Figure 80 Red Hat 9.0: Static IP Address Setting in ifconfig-eth0 159
Figure 81 Red Hat 9.0: DNS Settings in resolv.conf 160
Figure 82 Red Hat 9.0: Restart Ethernet Card 160
Figure 83 Red Hat 9.0: Checking TCP/IP Properties 160
List of Tables
Table 1 Disk Drive LEDs 27
Table 2 NSA-2400 LEDs 27
Table 3 Global Labels and Icons 33
Table 4 Screens Summary 34
Table 5 Common Configuration Screen Icons 36
Table 6 System Overview 43
Table 7 Active Sessions 45
Table 8 System Logs 46
Table 9 Log Categories 47
Table 10 Log Severity Levels 47
Table 11 System Info 48
Table 12 In Limbo and In Conflict Example 53
Table 13 Sharing Overview 53
Table 14 User Icons 55
Table 15 Sharing > Users 55
Table 16 Add a New User 57
Table 17 Group Icons 59
Table 18 Sharing > Groups 60
Table 19 Add Group 61
Table 20 Share Icons 62
Table 21 Sharing > Shares 63
Table 22 Add Share 66
Table 23 Network > Overview 73
Table 24 Network > TCP/IP
Table 25 Network > Windows/CIFS 77
Table 26 Network > FTP
Table 27 Overview of Protection Methods 81
Table 28 Protect > Backup 85
Table 29 Protect > Backup > Edit 87
Table 30 Protect > Backup > Restore 89
Table 31 Protect > Snapshot 90
Table 32 Protect > Snapshot > Create/Edit 91
Table 33 Protect > Snapshot > Create/Edit 92
Table 34 Protect > Scheduler 93
Table 35 Protect > Scheduler > Create/Edit 94
Table 36 Storage > Overview 96
Table 37 RAID Quick Comparison 97
Table 38 JBOD 101
Table 39 RAID 0 102
Table 40 RAID 1 102
Table 41 RAID 10 103
Table 42 RAID 5 104
Table 43 Storage > Volume 105
Table 44 Create a New Internal Volume 107
Table 45 Storage > Disk 110
Table 46 Maintenance > Overview 114
Table 47 Default Time Servers 115
Table 48 Maintenance > Date/Time 116
Table 49 Maintenance > Log Alert 117
Table 50 Maintenance > Security 119
Table 51 Maintenance > Configuration 120
Table 52 Maintenance > FW Upgrade 122
Table 53 Maintenance > Shutdown 122
Table 54 Physical Features 137
Table 55 NSA-2400 Hardware Specifications 139
Table 56 NSA-2400 Firmware Specifications 139
Table 57 Power Consumption in Watts (W) 140
Table 58 Log Messages 143
PART I
Introduction
Getting to Know Your NSA-2400 (25)
Introducing the Web Configurator (29)
Getting to Know Your NSA-2400
This chapter introduces the main features and applications of the NSA-2400 (Network Storage Appliance).
1.1 NSA-2400 Overview
The NSA-2400 is a device for storing and sharing data that connects directly to your network via a Gigabit Ethernet port.
Its SATA-I (Serial Advanced Technology Attachment) hard disk serial links are compatible with all major hard drive manufacturers.
You can expand storage capacity by attaching compatible USB (2.0) drives to the USB ports.
Configure RAID (Redundant Array of Independent Disks) on your NSA-2400 so as your data is still protected even if one hard disk fails.
You can also protect your valuable data by using the snapshot and backup features on the NSA-2400.
Note: See the specifications appendix for more detailed information on all features of the NSA-2400.
The next figure shows an example application for the NSA-2400 in a small office network. AD is an Active Directory that contains the user names and passwords of all users that are allowed access to the NSA-2400. Users (U1, U2, U3) can all back up and share data on the NSA-2400. Important data stored on servers S1 and S2 may be also stored there. In addition to its internal drives, the NSA-2400 can also extend its storage capacity
It is recommended that the NSA-2400 is placed behind a firewall and/or IDP device to protect it.
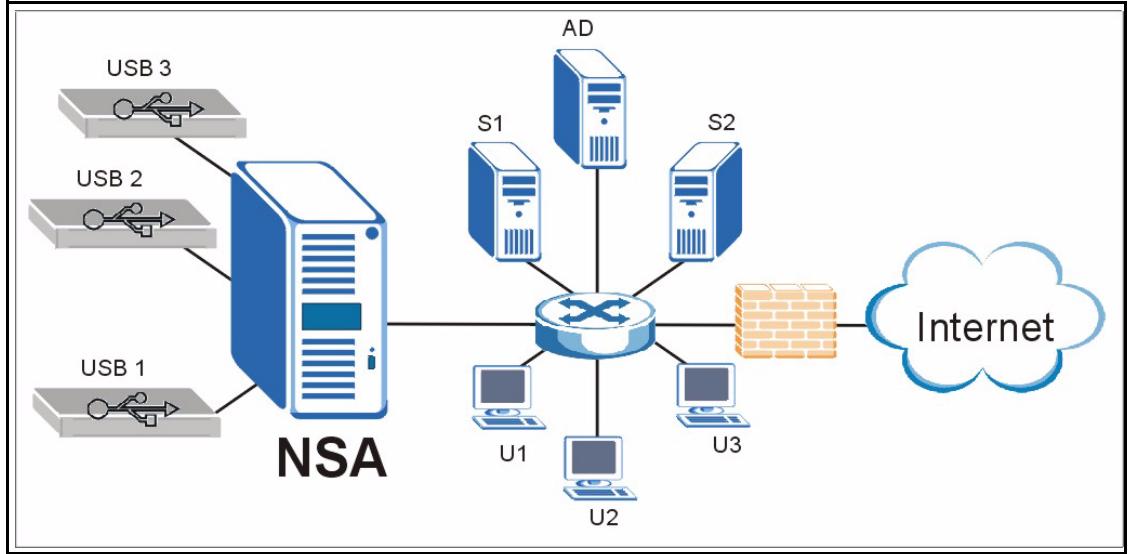
Figure 1 Example Application
1.1.1 Front Panel LEDs
The front panel LEDs tell you important information about the NSA-2400.
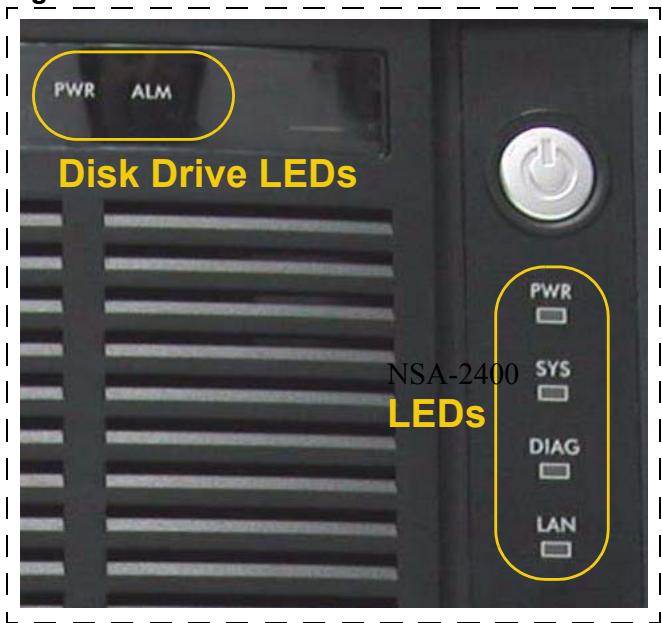
Figure 2 NSA-2400 Front Panel LEDs
The following table describes the disk drive LEDs. Refer to the Quick Start Guide to see how to install and remove hard drives from the disk trays.

Make sure the NSA-2400 is turned off when you install and remove hard drives from the NSA-2400.
This table describes the LEDs related to the hard disks.
Table 1 Disk Drive LEDs
| LED | COLOR | STAT US | DESCRIPTION |
| PWR | Green | Off | The hard disk drive tray is empty or not connected properly. |
| On | The hard disk drive is connected properly to the NSA-2400. | ||
| ALM | Red | Off | The hard disk drive is working properly if connected. |
| On | The hard disk drive has a problem. |
The following table describes the LEDs related to the NSA-2400 itself.
Table 2 NSA-2400 LEDs
| LED | COLOR | STATUS | DESCRIPTION |
| PWR | Green | Off | The NSA-2400 is turned off. |
| On | The NSA-2400 is turned on and receiving power. | ||
| SYS | Red | On | The NSA-2400 has passed system tests. |
| Blinking | The NSA-2400 is starting up or shutting down. Quick blinking indicates that your RAID volumes are in degraded mode. | ||
| Orange | On | The NSA-2400 is in maintenance mode because no disk volumes exist. | |
| Blinking | Firmware is being upgraded to the NSA-2400. | ||
| Green | On | The NSA-2400 has fully booted and is operating normally. | |
| DIAG | Red | Off | The DIAG LED is normally off. |
| Blinking | It blinks slowly when hard drives are resynchroning; the SYS LED is green at this time. It turns off after the hard drives resynch. It blinks quickly if there is a firmware upgrade or Flash reset failure; the SYS LED blinks orange (quickly) at this time too. | ||
| LAN | Green | Off | The LAN is not connected. |
| On | The NSA-2400 has a successful 10/100Mbps Ethernet connection. | ||
| Blinking | The 100M LAN is sending or receiving packets. | ||
| Orange | On | The NSA-2400 has a successful 1000Mbps Ethernet connection. | |
| Blinking | The 1000M LAN is sending or receiving packets. |
Introducing the Web Configurator
This chapter describes how to access the NSA-2400 web configurator and provides an overview of its screens.
2.1 Web Configurator Overview
The web configurator is an HTML-based management interface that allows easy NSA-2400 setup and management via Internet browser. Use Internet Explorer 6.0, Mozillafirefox 1.0, Netscape Navigator 7.0 or later versions of these browsers. The recommended screen resolution is 1024 by 768 pixels or higher.
In order to use the web configurator you need to allow:
- Web browser pop-up windows from your device. Web pop-up blocking is enabled by default in Windows XP SP (Service Pack) 2.
- JavaScripts (enabled by default).
2.2 Accessing the NSA-2400 Web Configurator
Make sure your NSA-2400 is properly connected and that your computer is in the same subnet as the NSA-2400 (refer to the Quick Start Guide or the appendices).
2.2.1 Access the NSA-2400 Via NDU
If you don't know the IP address of the NSA-2400, then use the NDU to find it. Refer to the Quick Start Guide to see how to install and run the NDU.
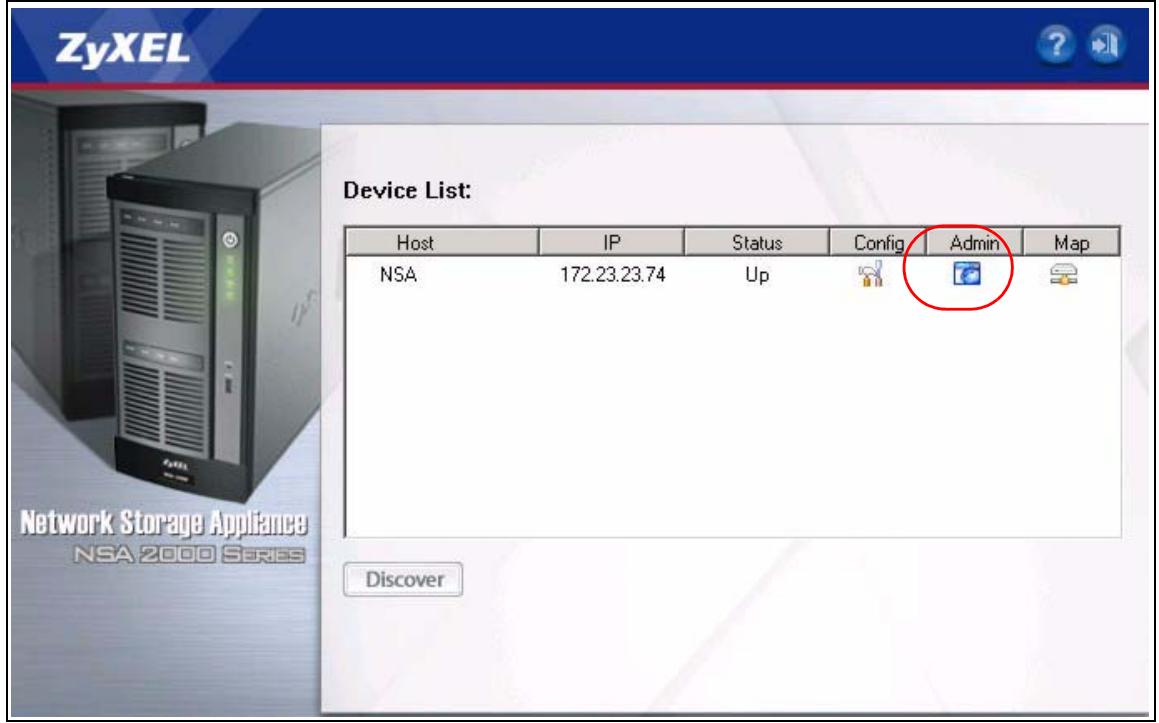
Figure 3 NDU Main Screen
From the NDU main page click the icon under Admin to see the web configurator screen login screen.
2.2.2 Web Browser Access
Open your browser and type in the IP address of the NSA-2400; 192.168.1.3 is the default IP address if one has not been assigned by a DHCP server.
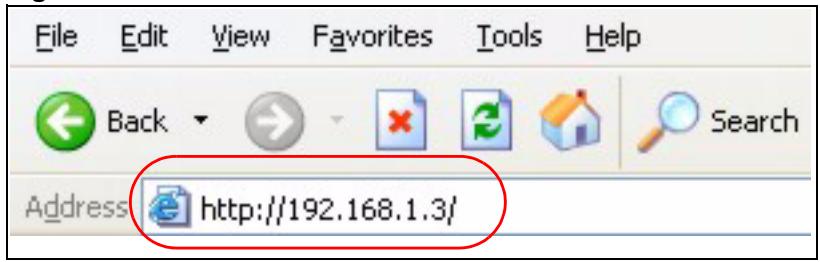
Figure 4 NDA URL
2.3 Login
The default user name and password are 'admin' and '1234' respectively. Enter your user name and password, then click Login. Non-admin users can change their passwords by using the username and password assigned to them in the Sharing > Users screen. See Section 4.4.3 on page 58 for details.
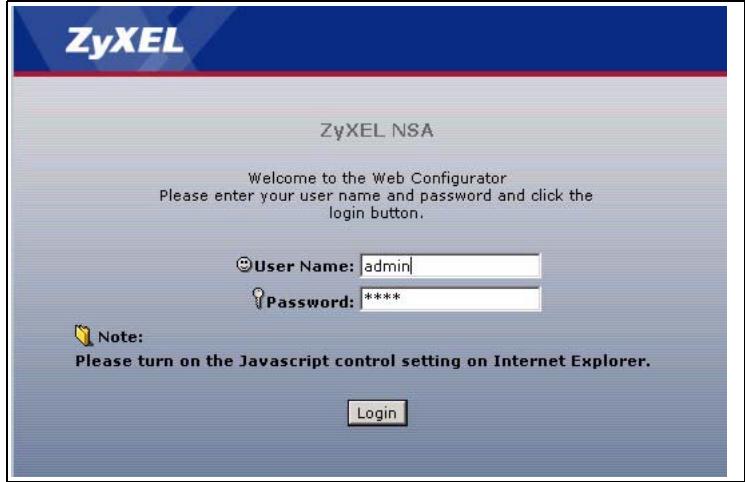
Figure 5 NSA-2400 Login Screen
If another admin is already logged in, you may force them to log out in the next screen.

Figure 6 Administrator Already Logged In
You should see a screen asking you to change your password (highly recommended) as shown next. Type a new password (and retype it to confirm) and click Apply or click Skip.
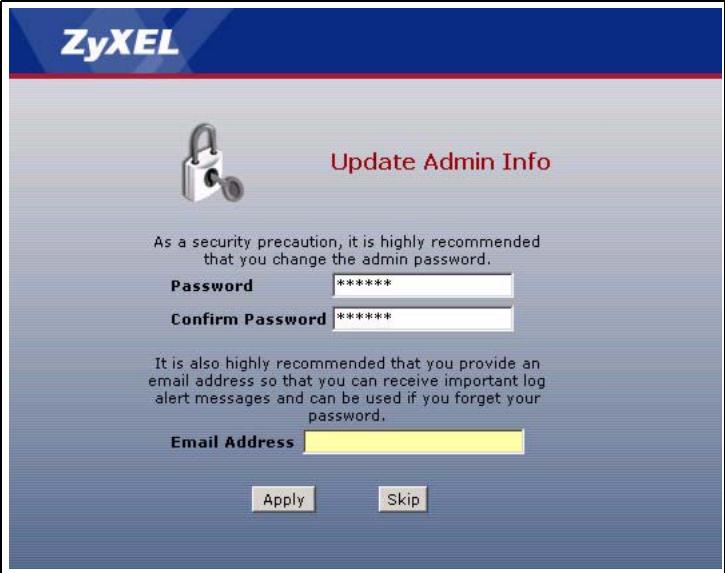
Figure 7 Change Password Screen
1 If this is your first time to log into the NSA-2400, you will see a screen asking you to launch the setup wizard. Run the wizard to set up the basic NSA-2400 settings. See the Quick Start Guide for information on the wizard screens.

Figure 8 Launch Setup Wizard Prompt
2.4 NSA-2400 Main Screen Overview
Admin users first see the Status Overview screen after they log in. See the next chapter for details on this screen.
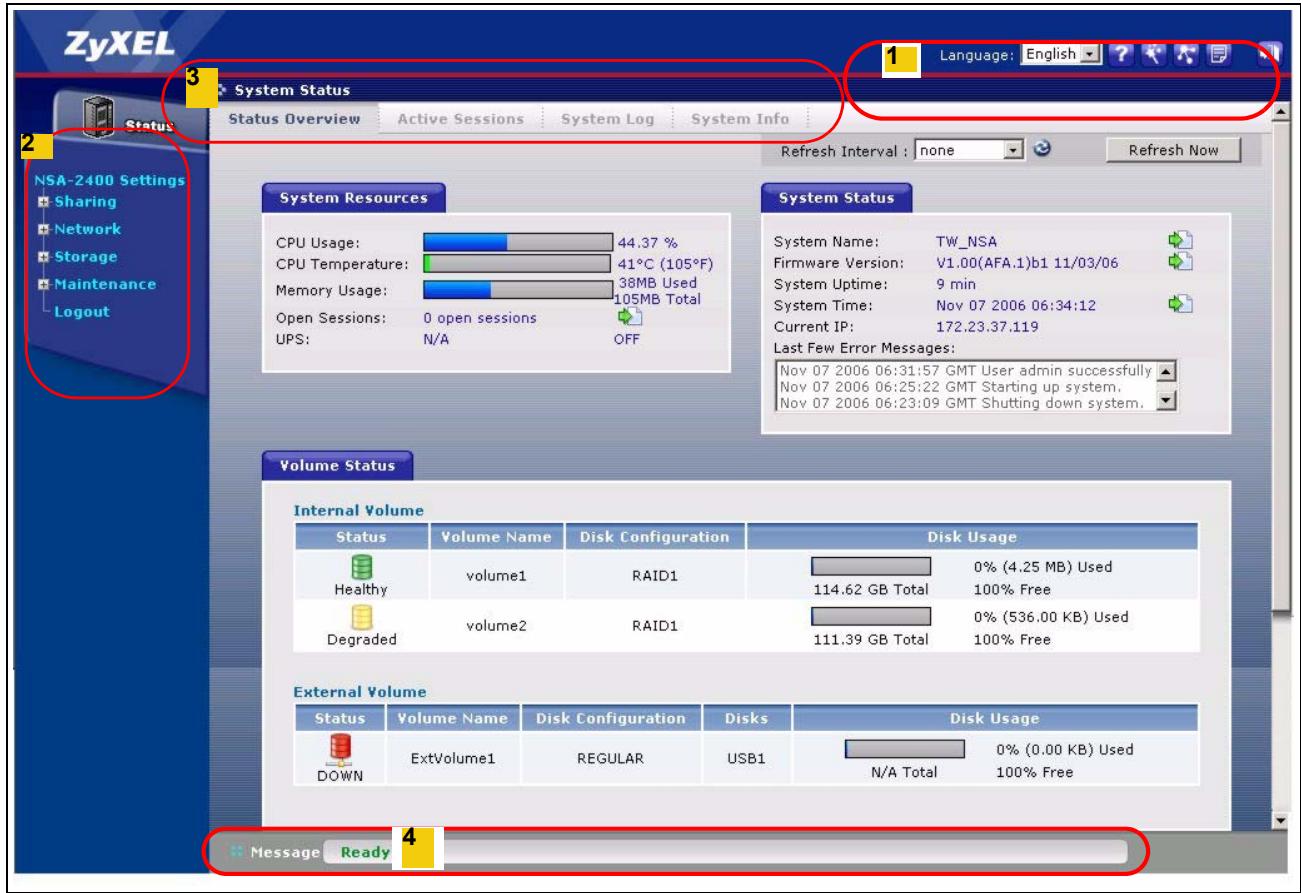
Figure 9 NSA-2400 Status Screen

The web configurator management session automatically times out if it is left idle for 15 minutes. Simply log back into the NSA-2400 if this happens to you.
2.5 Global NSA-2400 Icons
The icons and language label at the top-right of the screen (1) are visible from most screens. You may select the web configurator language from the drop-down list box here. The following table describes the 'global' icons and labels.
Table 3 Global Labels and Icons
| LABEL/ICON | DESCRIPTION |
| ? | Click this Help icon to open a web help page specific to the screen you are currently configuring. |
| Click this Wizard icon to open a sub-menu of wizard(s). | |
| Click this About icon to view copyright and the model name. | |
| Click thisLogout icon at any time to exit the web configurator. This is the same as clicking theLogout link at the bottom of the Navigation panel. |
2.5.1 Navigation Panel
The navigation panel on the left of the screen (2) contains screen links. Click a link to display sub-links. The sub-links are the same as the screen tabs (3), so you can either click a screen tab or a sub link to go to the same screen. There is no sub-link for the overview screen. Certain screens also contain hyperlinks that allow you to jump to another screen.
Click the Status icon to open the Status screens.
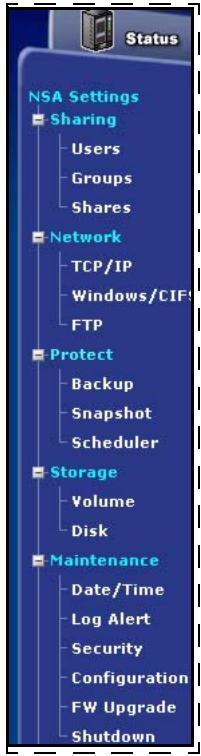
Figure 10 Navigation Panel Links
The following table describes the navigation panel screens.
Table 4 Screens Summary
| LINK | TAB | FUNCTION |
| Status | Status Overview | This screen shows system resources such as CPU usage and memory being used by the NSA-2400, system status and NSA-2400 internal and external volumes. |
| Active Sessions | This screen displays users who are currently using the NSA-2400. | |
| System Log | This screen displays recent NSA-2400 system logs. | |
| System Info | This screen displays NSA-2400 hardware and IP address information. | |
| Sharing | Overview | This screen displays statistics on users, groups and shares. |
| Users | Use this screen to create users who may use the NSA-2400. You may set user passwords, define storage limits per user, and associate users to a group(s). | |
| Groups | Use this screen to create groups and add group members. | |
| Shares | Use this screen to create shared folders to which you can allow users and/or groups read/write access rights. | |
| Network | Overview | This screen displays NSA-2400 IP address, CIFS and FTP information. |
| TCP/IP | Use this screen to assign a dynamic or static IP address and DNS information as well as an NSA-2400 host name. | |
| Windows/CIFS | Use this screen to define a WINS server and choose a workgroup or domain authentication method. | |
| FTP | Use this screen to enable FTP file transfer to/from the NSA-2400, set the number of FTP connections allowed and an FTP idle timeout. | |
| Protect | Overview | This screen displays NSA-2400 backup and snapshot information |
| Backup | Use these screens to create, edit, run, restore and delete backups. | |
| Snapshot | Use these screens to create, edit, run, restore and delete snapshots. | |
| Scheduler | Use these screens to set times for repeated runs of backups and snapshots. | |
| Storage | Overview | This screen displays NSA-2400 volume, disk and snapshot information. |
| Volume | Use the screen to create internal and external volumes. A volume is a fixed amount of storage on a disk. | |
| Disk | Use this screen to view internal and external disk information. | |
| Maintenance | Overview | This screen displays NSA-2400 date and time, log alert, HTTPS (SSL) and firmware version information. |
| Date/Time | Use this screen to chose a time zone and/or allow the NSA-2400 to synchronize with a time server. | |
| Log Alert | Use this screen to configure when/where to send e-mail alerts, and what mail server to use. | |
| Security | Use this screen to change the NSA-2400 login password and configure secure web connections to the NSA-2400 using HTTPS. | |
| Configuration | Use this screen to back up and/or restore the NSA-2400 configuration file and/or enable the NSA-2400 reset button to return the NSA-2400 to its default admin password and IP address. | |
| F/W Upgrade | Use this screen to upload new firmware to your NSA-2400. | |
| Shutdown | Use this screen to restart the NSA-2400 or shut it down. | |
| Logout | ClickLogout to exit the web configurator. This is recommended to prevent unauthorized administrator access to the NSA-2400. |
2.5.2 Status Messages
At the bottom of the screen the message text box (4) displays status messages as you configure the NSA-2400.
2.5.3 Common Screen Icons
The following table explains some icons that appear in several configuration screens.
Table 5 Common Configuration Screen Icons
| ICON | DESCRIPTION |
| Click the Edit icon to go to a screen where you can change the configuration settings of an entry. | |
| Click the Remove icon to delete an entry from the list. | |
| Click the Details icon to jump to related item's configuration screen. | |
| This is a user icon. Please see the sharing screens chapter for detailed information on variants of this icon. | |
| This is a group icon. Please see the sharing screens chapter for detailed information on variants of this icon. | |
| This is a share icon. Please see the sharing screens chapter for detailed information on variants of this icon. | |
| This icon represents a Healthy volume. | |
| This icon represents a Degraded volume. Click the Repair icon to fix a degraded RAID volume after you have replaced the faulty disk. | |
| This icon represents a Down volume. Click the Initialize icon to create a volume. | |
| This icon represents a Healthy disk. | |
| Click the Scan Disk icon to scan a hard disk drive for file system errors. | |
| Click the Expand Volume icon to expand a volume by up to the amount of snapshot reserved space less the amount of space currently being used by snapshots. | |
| Click the Unmount icon to unmount a volume when two volumes of the same name exist. See Section 7.7.4 on page 109 for details. | |
| Click the Mount icon to mount a volume when two volumes of the same name exist. See Section 7.7.4 on page 109 for details. | |
| Click the Disconnect icon before you remove an external hard drive so that you do not lose data that is being transferred to or from that hard drive. | |
| Click the Initialize icon for the NSA-2400 to create a volume on the (external) hard drive. | |
| Click the Locate icon to cause the LED on the external storage device to blink. | |
| Click the Repair icon to resynchronize a RAID volume after you replace a faulty hard disk. | |
| Click the Schedule icon to set a time for a backup or snapshot to run. | |
| In the Backup screen this is the Run Now icon used to perform a backup immediately. | |
| Click the Cancel icon to stop a backup while it is running. | |
| Click the Take Now icon to take a snapshot immediately | |
| Click the Images icon to see a summary of all snapshots available. |
2.6 Forgot Your Password
If you forget your password, you could have the NSA-2400 e-mail your password to you if you configured your e-mail address and mail server on the NSA-2400. Alternatively, if you didn't configure an e-mail address, then you will have to reset the NSA-2400.
2.6.1 NSA-2400 Sends Password
If you enter a wrong password, the NSA-2400 displays the following screen. Click the Forgot Your Password link to display the Forgot Your Password screen.
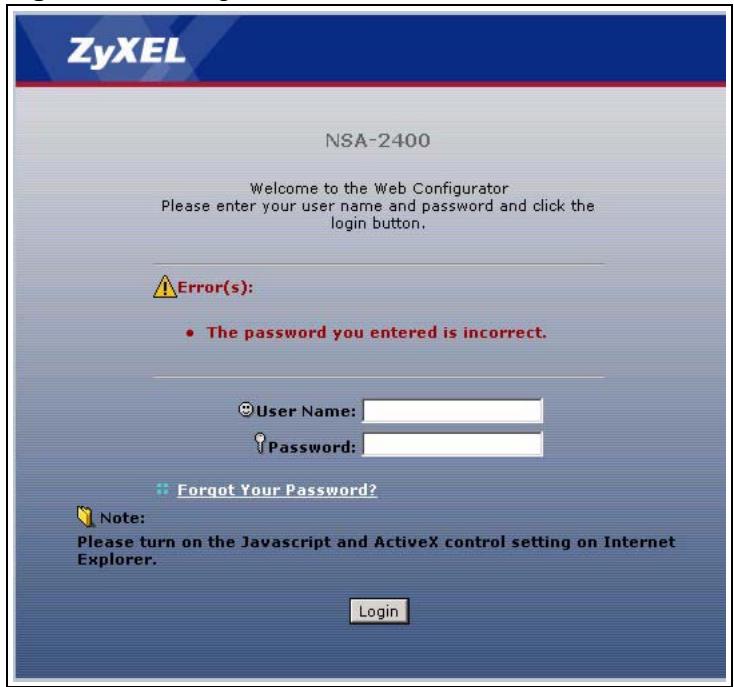
Figure 11 Wrong Password
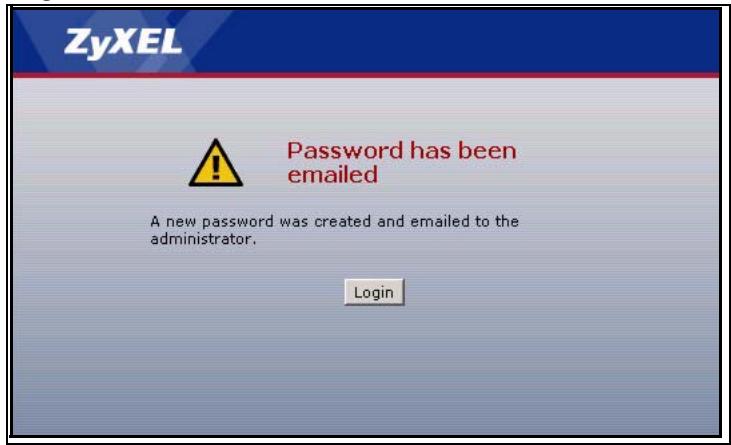
Click Continue to have the NSA-2400 e-mail a randomly generated password to the e-mail address you configured.

Figure 12 Generate Password
Click login to go to the NSA-2400 screen and enter the new e-mailed password there. You should change this password and then write down your new password and put it in a safe place.
Log in With New Password
2.6.2 Reset the NSA-2400
Alternatively, if you forget your password or cannot access the web configurator, use the RESET button at the front of the NSA-2400. You will NOT lose all NSA-2400 configurations but the IP address, subnet mask and admin password are all returned to the factory defaults.

You should check that the RESET button is enabled in the Maintenance > Configuration screen.
2.6.2.1 Procedure To Use The Reset Button
1 Press and hold the RESET button until you hear a beep, and then release it.
2 The NSA-2400 automatically restarts to complete the reset.
PART II
Status, Sharing and
Network
Status Screens (43)
Sharing Screens (51)
Network Screens (71)
This chapter introduces the Status screens of the NSA.
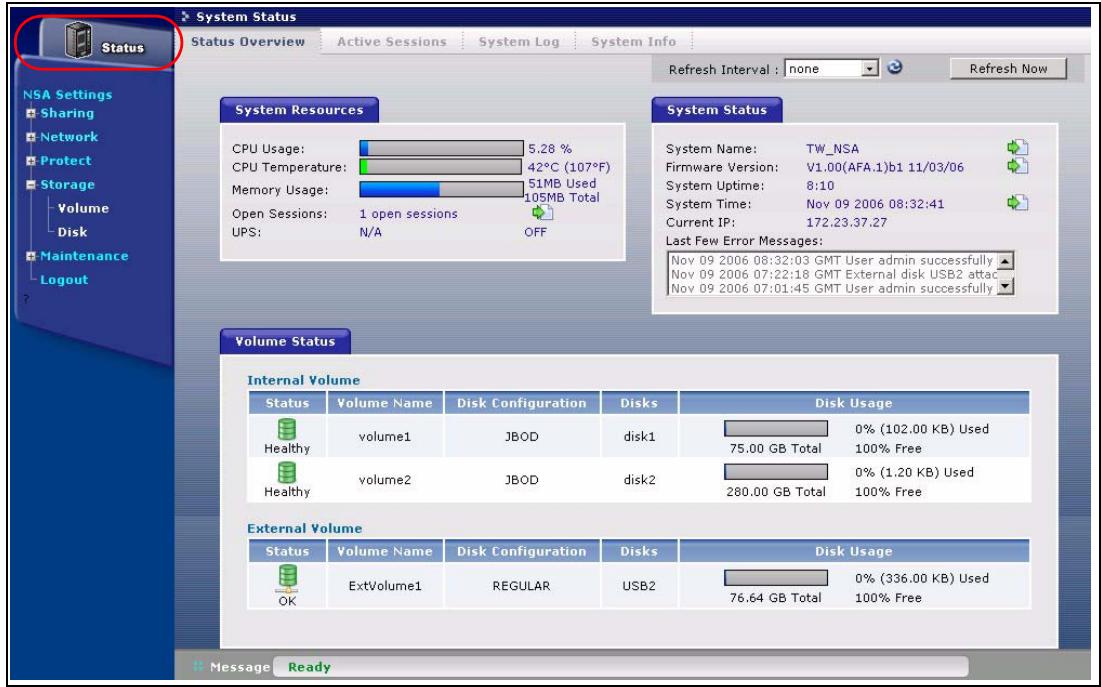
3.1 Status Overview Screen
The Status Overview screen is the first main web configurator screen you see after you log in (and complete the wizard the first time). To view the status screens, click the Status icon on the top-left of the navigation panel.
The following table describes the labels in this screen.
Table 6 System Overview
| LABEL | DESCRIPTION | |
| Refresh Interval: 20 seconds | Select a number of seconds or None from the drop-down list box to refresh all screen statistics automatically at the end of each time interval. | |
| Click the Refresh icon to immediately refresh the status screen statistics. | ||
| Refresh Now | Alternatively, click this button to immediately refresh the status screen statistics. | |
| System Resources | ||
| LABEL | DESCRIPTION | |
| CPU Usage | This displays CPU usage by all current processes since the last update. If too many users are using the NSA then the NSA may appear sluggish. | |
| CPU Temperature | This displays the current temperature of the NSA CPU. If the temperature is not within range (about 0° to 85°C) the NSA may malfunction. If the NSA overheats for example, turn it off and let it cool down. Make sure the fans are working and it is in a well ventilated place. | |
| Memory Usage | This number shows how much of the NSA's total memory is being used. | |
| Open Sessions | This shows the current number of active sessions. It is useful when you want to restart or shutdown the NSA so you can tell if there are users currently connected to the NSA. You should then contact each user to make sure that they disconnect from the NSA before you restart or shut it down. Click the view details link to go to the System Status > Active Sessions screen. | |
| UPS | This field displays whether an Uninterruptable Power Supply (UPS) is being used. A UPS is advisable to protect sensitive data stored on the NSA in the event of a power outage.A battery meter displays what percentage Uninterruptable Power Supply (UPS) battery power remains when an APC UPS is connected to an NSA USB port and is turned on. Power from the UPS is used when power from the mains is down and while the UPS has battery power.Power from the mains is used when the mains power returns; the APC UPS battery is recharged then too. This field displays N/A when no UPS is connected to the NSA or it is turned off. | |
| System Status | ||
| System Name | This displays the name which helps you find the NSA on the network. Click the update link to go to the Network > TCP/IP screen. Click the Modify button after the Server Name label in that screen to go to the Network > Windows/ClFS in which you can change the Server Name.You can enter up to 15 alphanumeric characters with minus signs allowed but not as the last character. The name must begin with an alphabetic character (a-z) and is NOT case sensitive. | |
| Firmware Version | This is the NSA firmware version and the date created. Click the update link to go to the Maintenance > Firmware Upgrade screen from which you can upload new firmware. | |
| System Uptime | This is the total time the NSA has been on since your last power-up. | |
| System Time | This displays the date (month/date/year) and time (hours/minutes/seconds). Click the update link to go to the Maintenance > Date/Time screen from which you can change the system time. | |
| Current IP | This displays the NSA's IP address. | |
| Last Few Error Messages | This displays the most recent (nine) error messages generated by the NSA. Click on a log entry to go to the Status > System Log screen. | |
| Volume Status | A volume is a storage area on a single disk or spread across a number of disks within a single file system. | |
| Internal Volume | This displays the volumes created on the NSA hard drives. | |
| External Volume | This displays the volumes created on USB hard drives connected to the NSA. USB ports are numbered in the order that you insert USB devices. | |
| Volume Name | This field shows the NSA-generated name for the volume. | |
| Disk Configuration | This field (also known as Type) shows what type of data storage system (a RAID type or JBOD) the volume is using. For external drives, it may show REGULAR or OK meaning that the NSA can read the volume but the volume wasn't created on the NSA. | |
| Disks | For external drives, this field shows USB1 for the first external hard drive you connect to the NSA (regardless of which USB port), USB2 for the second and USB3 for the third. | |
| Disk Usage | This field shows total disk size, the percentage of the volume being used and the percentage that is available. | |
3.2 Active Sessions Screen
The Active Sessions screen shows how many users are currently connecting to the NSA via CIFS and FTP (not web configurator).

Figure 13 Status > Active Sessions
The following table describes the labels in this screen.
Table 7 Active Sessions
| LABEL | DESCRIPTION |
| Type | This shows whether it's a Windows/CIFS or FTP connection to the NSA. |
| Share Name | This displays the shared folder name on the NSA that the user is connected to for CIFS sessions and is blank for FTP sessions. |
| User Name | This displays the name of the user connected to the NSA if one is defined and ANONYMOUS CIFS or ANONYMOUS FTP otherwise. |
| Connected At | This displays the date and time the user last connected to the NSA in day, month, date, hour, minute, second, year format. |
| IP Address | This displays the IP address of the computer connected to the NSA. |
3.2.1 Session Example (Windows)
Open windows explorer and type two back slashes followed by the NSA name or IP address. Initially you can only read and write to the Public folder until you create shares on the NSA. This session is then displayed as shown in Figure 13 on page 45.
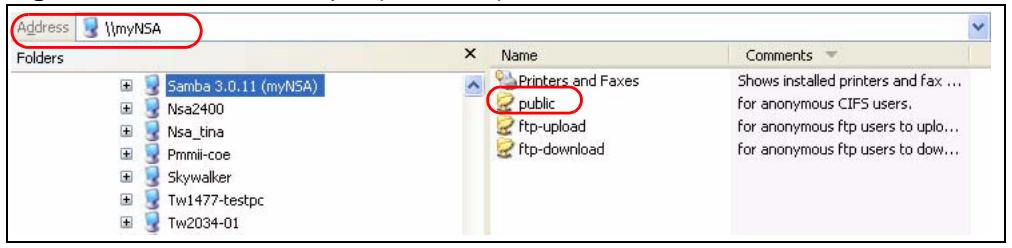
Figure 14 Session Example (Windows)
3.3 System Log
The following screen displays all NSA logs. There are at most 128 entries in the log. Older logs are removed by the system. You cannot download the log file via FTP or CIFS.
See the User Guide appendices for example log messages.

Figure 15 Status > System Log
The following table describes the labels in this screen.
Table 8 System Logs
| LABEL | DESCRIPTION |
| View All Logs | The screen always shows all logs by default. Choose a specific log category and then click Filter to view logs for just that category. |
| Filter | Click this button to just view log types selected in the list box above. |
| Time | This shows the date and time the log was created. |
| Class | This displays the log category; see Table 9 on page 47. |
| Severity | This displays how serious the log is rated by the NSA. See Table 10 on page 47 for more information. |
| Message | This displays a description of the log. |
| First/Prev | Use these hyperlinks to navigate to the first or previous log page. |
| Next/Last | Use these hyperlinks to navigate to the next or final log page. |
| Purge all Logs | Click this button to erase all logs from the NSA. This may be advisable when there is not much hard drive space on the NSA available. |
| Edit Log Alert Settings | Click this button to jump to the Maintenance > Log Alert page from where you can decide when to send alerts and where to send e-mails. |
The following table shows information on log categories.
Table 9 Log Categories
| LOG CATEGORY | DESCRIPTION |
| Network | This log category shows information on network configuration, setting changes and so on. |
| FTP | This log category shows FTP session related information. |
| CIFS | This log category shows Windows/CIFS session related information. |
| Security | This log category shows information on user account changes, web sessions and so on. |
| Storage | This log category shows disk, volume and RAID information. |
| Quota | This log category shows quota control information. |
| System | This log category shows all other system related messages. |
The following table shows information on log severity levels Levels range from 0 to 6 with 0 being the most severe level log and 6 being an informational log only. Log levels are not displayed in the logs and are for your reference only.
Table 10 Log Severity Levels
| LEVEL | DESCRIPTION |
| 0 | Emergency |
| 1 | Alert |
| 2 | Critical |
| 3 | Error |
| 4 | Warning |
| 5 | Notice |
| 6 | Info |
See the appendices for a table of example log messages.
3.4 System Info
Use this screen to view detailed NSA system and hardware information.

Figure 16 System Info
The following table describes the labels in this screen.
Table 11 System Info
| LABEL | DESCRIPTION |
| System Name | This displays the name which helps you find the NSA on the network. Click the update link to go to the Network> TCP/IP screen. Click the Modify button after the Server Name label in that screen to go to the Network > Windows/CIFS in which you can change the Server Name. You can enter up to 15 alphanumeric characters with minus signs allowed but not as an end character. The name must begin with an alphabetic character (a-z) and is not case sensitive. |
| Model Name | This displays the NSA model name. |
| Firmware Version | This is the NSA firmware version and the date created. Click the update link to go to the Maintenance > Firmware Upgrade screen from which you can upload new firmware. |
| BIOS Version RomFile Checksum ZLD Checksum Core Checksum | These four fields are to verify that a correct version of the firmware has been installed. Customer support may also request this information to help with troubleshooting. |
| CPU Info | This displays the type of CPU the NSA has. |
| Flash Memory Size | This displays the amount of non-volatile flash memory. Flash memory is used for storing NSA firmware and configuration files. |
| RAM Memory Size | This displays the amount of (volatile) RAM. The NSA uses RAM during system runtime. |
| Hardware Reset Button | This displays whether the reset button is enabled or not. Use the reset button to restore the factory default user name to "admin", default password to "1234", default IP address to 192.168.1.3 with subnet mask of 255.255.255.0. Check that the reset button is enabled in the Maintenance > Configuration screen. |
| IP Address | This displays the NSA's IP address. |
| IP Subnet Mask | This displays the NSA's subnet mask. |
| Default Gateway | This displays the NSA's default gateway. |
| MAC Address | This displays the NSA's unique physical hardware address (MAC). You need the MAC address to register the product at myZyXEL.com. Customer support may also request it for troubleshooting purposes. |
| UPS Info | This field displays whether an Uninterruptable Power Supply (UPS) is being used. A UPS is advisable to protect sensitive data stored on the NSA in the event of a power outage.A battery meter displays what percentage Uninterruptable Power Supply (UPS) battery power remains when an APC UPS is connected to an NSA USB port and is turned on. Power from the UPS is used when power from the mains is down and while the UPS has battery power.Power from the mains is used when the mains power returns; the APC UPS battery is recharged then too. This field displays N/A when no UPS is connected to the NSA or it is turned off. |
Sharing Screens
This chapter introduces the Sharing screens of the NSA.
4.1 Sharing Introduction
Use the Sharing screens to:
- Create and manage user accounts. Users are people who have access rights to the NSA and can store files there for later retrieval.
- Create and manage groups. A group is a set of users.
- Create and manage shares. A share is a set of users/groups access permissions mapped to a specific folder on a volume. It is equivalent to the Windows concept of a shared folder, but is independent of the folder. You can map a share to a network drive for easy and familiar file transfer for Windows users.
4.2 Sharing Overview
A Local user or group is a one created on the NSA when the NSA is in Workgroup mode.
Domain users and groups are created on a centralized Windows-based domain controller. This list is used by the NSA when authenticating users and/or groups that seek access to a share.
If a user belong to different groups with different access rights to the same share, then the more restrictive access right would apply, that is deny access overrides read access, overrides read-write access. For example, user Joe belongs to the Sales group. He has read access to the MIS share. The Sales group are denied access to this MIS share. Therefore, Joe is also denied access to the MIS share.

More restrictive access rights override less restrictive ones.
4.2.1 In Limbo and In Conflict
If a user or group is deleted in the domain controller, (but not on the NSA) then it appears as in limbo on the NSA.

A conflict users is a local user that has the same user name as that of a user on a domain controller. For example, if you first create local users and groups on the NSA (in Workgroup mode) and later you change to domain mode where you create (or there are already) identical users and groups, then they appear as in conflict on the NSA.
You cannot set a disk quota for users that are in conflict.
If you started in Domain mode and later you switch to Workgroup mode, the NSA will allow you to create user names and group names that already exist on the domain controller.
If the conflicting domain user's password and local user's password are NOT the same, than the two users are treated as two distinct users when using CIFS. Therefore, when using CIFS, each user can only access shares to which they have been given access rights.
However, if the domain user's password and local user's password are also the same, then only shares set to be accessible by the local user are actually accessible by both the domain user and local user. The NSA has no way to distinguish these two users as their passwords and user names are exactly the same.

During a conflict users situation, the local user takes precedence ONLY if the domain user and local user's passwords are the same.
The situation is different for conflicting users when using FTP. For FTP if there are conflict users, there will be no way for the FTP server to differentiate between the two user names. Therefore, both domain user and local user can log in through FTP using their respective passwords (regardless of whether they are the same or not) and be able to access all shares accessible by EITHER the local user or domain user.

It is possible for the conflicting domain user to log in via FTP and access shares that are supposed to be only accessible by the conflicting LOCAL user and vice versa.
4.2.1.1 In Limbo and In Conflict Example
Suppose there is a local user named u1 and a domain user named u1.
- Share 1 is configured to be only accessible by the local user u1.
- Share 2 is configured to be only accessible by the domain user u1.
- Share 3 is configured to be accessible by BOTH the local and domain u1.
The table below shows the actual accessibility of the above shares for the conflict users (local and domain u1) both when they have the same and when they have different passwords.
Table 12 In Limbo and In Conflict Example
| CONFLICT USER U1 | SHARE1 | SHARE 2 | SHARE 3 |
| Different Passwords | CIFS: Accessible by Local u1 only. FTP: Accessible by Domain AND Local u1. | CIFS: Accessible by Domain u1 only. FTP: Accessible by Domain AND Local u1. | CIFS: Accessible by Domain u1 AND Local u1. FTP: Accessible by Domain AND Local u1. |
| Same Passwords | CIFS: Accessible by Domain AND Local u1. FTP: Accessible by Domain AND Local u1. | CIFS: Inaccessible by either User or Domain u1. FTP: Accessible by Domain AND Local u1. | CIFS: Accessible by Domain AND Local u1. FTP: Accessible by Domain AND Local u1. |
4.2.2 Sharing Overview Screen
Click the Sharing link in the Navigation panel to access the Sharing > Overview screen. This is the first screen displayed.
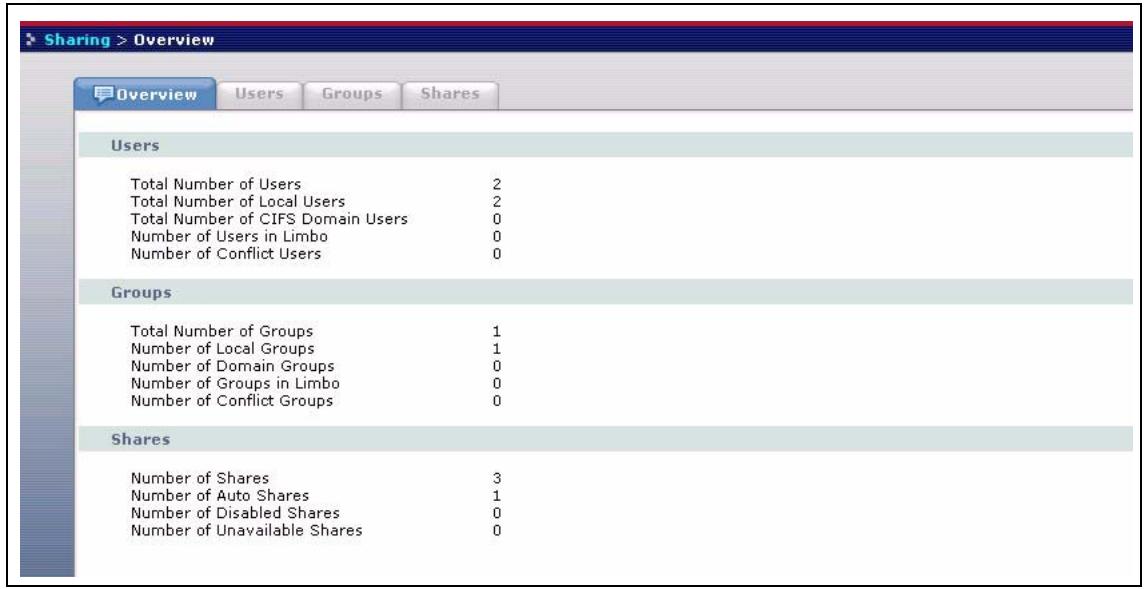
Figure 17 Sharing > Overview
The following table describes the labels in this screen.
Table 13 Sharing Overview
| LABEL | DESCRIPTION |
| Users | |
| Total Number of Users | This field displays the total number of user accounts created on the NSA and/or a centralized Windows-based domain controller. |
| Total Number of Local Users | This field displays the total number of users with accounts created on the NSA. |
| Total Number of CIFS Domain Users | This field displays the total number of users created on a centralized Windows-based domain controller when the NSA is functioning in Domain mode. |
| Number of Users in Limbo | This field displays the number of users who were once on the domain controller but the NSA (in Domain mode) is currently unable to determine if the user still exists on the domain controller. This may happen if he/she has been deleted on the domain controller or the NSA is unable to connect to the domain controller. In the latter case, all domain users would be in limbo. |
| Number of Conflict Users | A conflict users is a local user that has the same user name as that of a user on a domain controller. This field displays how many identical users there are. |
| Groups | |
| Total Number of Groups | This field displays the total number of groups created on the NSA and/or a centralized Windows-based domain controller. |
| Number of Local Groups | This field displays the total number of groups created on the NSA when the NSA is in Workgroup mode. |
| Number of Domain Groups | This field displays the total number of groups created on a centralized Windows-based domain controller when the NSA is functioning in Domain mode. |
| Number of Groups in Limbo | This field displays the number of groups who were once on the domain controller but the NSA (in Domain mode) is currently unable to determine if the group still exists on the domain controller. This may happen if the group has been deleted on the domain controller or the NSA is unable to connect to the domain controller. In the latter case, all domain groups would be in limbo. |
| Number of Conflict Groups | A conflict group is a local group that has the same group name as that of a group on a domain controller. This field displays how many identical groups there are. |
| Shares | |
| Number of Shares | This field displays the total number of shares (default and created) on the NSA. |
| Number of Auto Shares | Auto shares are shares that are automatically created by the NSA for supported external USB hard drives that are not backup drives. This field displays the number of these type external USB hard drives attached to the NSA. |
| Number of Disabled Shares | This field displays the number of shares that have been disabled on the NSA. |
| Number of Unavailable Shares | If a shared folder is deleted or moved, the share appears as 'unavailable' on the NSA. This field displays the number of such shares. |
4.3 Users
Use this screen to create and manage users who can store files on the NSA.
4.3.1 User Icons
The following table describes the user icons.
Table 14 User Icons
| ICON | DESCRIPTION |
| This is an enabled local user icon. | |
| This is an enabled domain user icon. | |
| This is a local user in conflict icon. | |
| This is a domain user in limbo icon. | |
| This is a disabled local user icon. You cannot disable a domain user. |
4.3.2 Users Summary Screen
Click the Sharing link in the Navigation panel and then click the Users link or the Users tab to access the Sharing > Users screen.
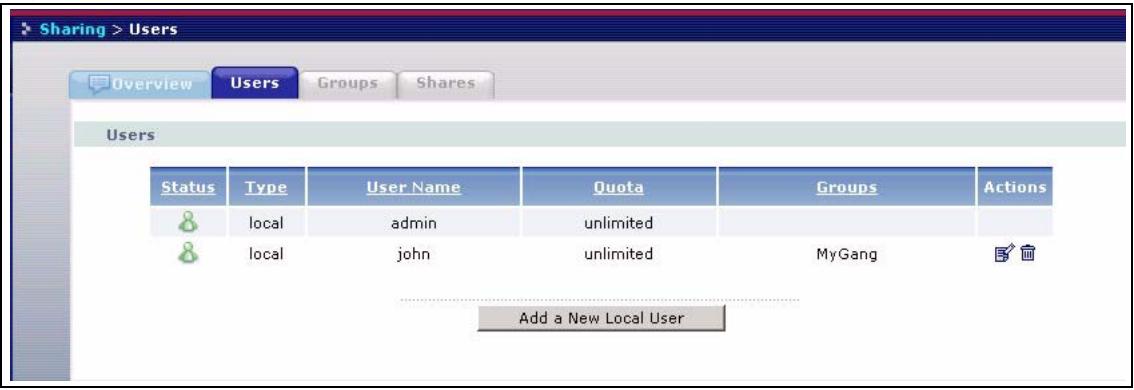
Figure 18 Sharing > Users
The following table describes the labels in this screen. See Table 14 on page 55 for icon details.
Table 15 Sharing > Users
| LABEL | DESCRIPTION |
| Status | This icon displays whether the account is enabled, disabled, in conflict or in limbo. |
| Type | This field displays whether the user is a local user with an account created on the NSA or a domain user created on a domain controller or active server directory. |
| User Name | This field displays the user name created when you add a new user. admin is the default NSA super user and cannot be deleted. |
| Quota | This field displays the maximum amount of storage space this user may occupy on the NSA. It is unlimited if none is specified. |
| Groups | This field displays the group(s) this user belongs to on the NSA. |
| Actions | This label displays the allowable action for that user. |
| Add a New Local User | Click this button to go to a screen to create a new user on the NSA. |
4.4 Adding a New User
Use this screen to add local users. Domain users must be added on the domain server. Click the Add a New Local User button in the screen shown previously to create a new NSA user account with NSA access password.
4.4.1 User Names
Enter a user name from one to 32 characters. The first character must be alphabetical (case insensitive, [A-Z a-z]); numeric characters are not allowed as the first character.
The user name can only contain the following characters:
- Alphanumeric A-z 0-9 (there is no unicode support)
Spaces - [underscores]
[periods] -
- [dashes]
Other limitations on user names are:
- All leading and trailing spaces are removed automatically.
- Multiple spaces within names are converted to a single space.
- User names are case insensitive. The user name cannot be the same (no matter the letter case) as an existing local user or domain user. For example, if there exists a domain user with the name 'BOB', you cannot create a local user named 'bob'. If you enter a user 'bob' but use 'BOB' when connecting via CIFS or FTP, it will use the account settings used for 'bob'.
- The user name cannot be the same as a system user name such as ANONYMOUS_CIFS, ANONYMOUS FTP, EVERYONE nor be the same as an existing local or domain user. Other reserved user names that are not allowed are:
bin
- daemon
ftp
- ftpguest
- nobody
- root
- smbguest
admin
4.4.2 Add a New User Screen

Figure 19 Add a New User
The following table describes the labels in this screen.
Table 16 Add a New User
| LABEL | DESCRIPTION |
| New User Information | |
| Enabled | You must select this check box in order for this user to be able to access the NSA. |
| User Name | Type a user name from 1 to 32 single-byte ASCII characters. See Section 4.4.1 on page 56 for more details on user names. |
| Email Address (optional) | Enter a valid e-mail address for this user. You can use up to 200 alphanumeric characters (periods and the underscore are also allowed) without spaces. |
| Password | Create a password associated with this user. You can type from one to 14 single-byte (no Chinese characters allowed for example) ASCII characters.Non-admin users can change their passwords by logging into the NSA web configurator using the username and password as defined here.After logging in, the Change Password screen is displayed. Enter a new password in that screen and confirm it by re-entering it. Non-admin users do not see other web configurator screens. |
| Password (confirm) | You must type the exact same password that you just typed in the above field. |
| Quota | This is the maximum amount of space this user is allowed per volume.Type a positive whole number (no floats, no negatives) as the maximum amount of storage (in MB) this user may use on the NSA. 0 MB means unlimited storage. The quota cannot exceed 500000000 MB. |
| New Group Membership | You need to first create groups on the NSA. A group is a set of users that have common NSA access rights. A user can belong to more than one group. More restrictive access rights override less restrictive ones.Choose what groups this user should be added to or removed from. You can select multiple groups by holding the [Ctrl] key while you click. |
| Available Groups | These are the groups that have been created on the NSA. Select the group(s) that you want the user to join and then click the Add Selected Group(s) button. You need to click Apply for the changes to take effect. |
| Group Membership | These are the groups that the user already belongs to on the NSA. Select the group(s) that you want the user to leave and then click the Remove Selected Group(s) button. You need to click Apply for the changes to take effect. |
| Add Selected Group(s) | Select the group(s) that you want the user to join from the Available Groups list and then click the Add Selected Group(s) button. You need to click Apply for the changes to take effect. |
| Remove Selected Group(s) | Select the group(s) that you want the user to leave from the Group Membership list and then click the Remove Selected Group(s) button. You need to click Apply for the changes to take effect. |
| Apply | Click this button to save your changes back to the NSA. |
| Cancel | Click this button to begin configuring this screen afresh. |

User-group membership edits are also updated in the corresponding Sharing > Groups > Edit Group screen.
4.4.3 User Password Management
Non-admin users may change their passwords themselves by logging into the NSA web configurator using the username and password as defined in the previous screen. After logging in, the Change Password screen is displayed. Enter a new password in that screen and confirm it by re-entering it.
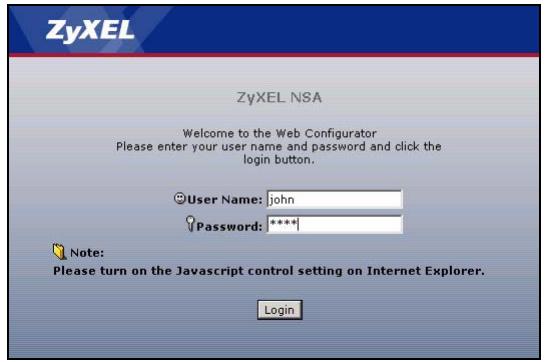
Figure 20User Password Management


Non-admin users do not see other web configurator screens.
4.5 Groups
Use this screen to create and manage groups. A group is a set of users.
4.5.1 Group Icons
The following group icons display under Status in the Group Summary screen.
Table 17 Group Icons
| ICON | DESCRIPTION |
| This is a local group icon. Groups cannot be disabled. | |
| This is a domain group icon. Groups cannot be disabled. | |
| This is a local group in conflict icon. | |
| This is a domain group in limbo icon. |
4.5.2 Groups Summary Screen
Click the Sharing link in the Navigation panel and then click the Groups link or the Groups tab to access the Sharing > Groups screen.
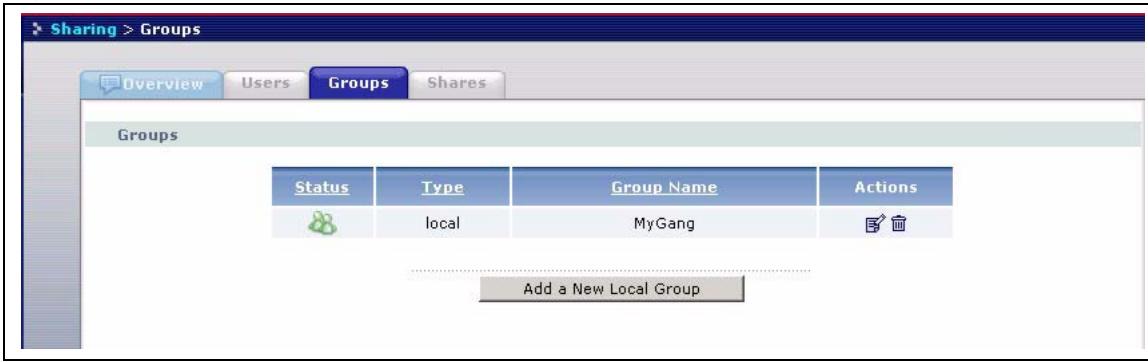
Figure 21 Sharing > Groups
The following table describes the labels in this screen. See Table 17 on page 59 for icon details.
Table 18 Sharing > Groups
| LABEL | DESCRIPTION |
| Status | This icon displays whether the group is enabled, in conflict or in limbo. Groups cannot be disabled. |
| Type | This field displays whether the group is a local group created on the NSA or a domain group created on a domain controller or active server directory. |
| Group Name | This field displays the group name created when you add a new group. |
| Actions | This label displays the edit and remove icons for all groups created on the NSA. Click the Edit icon to edit the corresponding existing group. Click the Remove icon to delete it. |
| Add a New Local Group | Click this button to go to a screen to create a new group on the NSA. |
4.6 Adding a New Group
Click the Add a New Local Group button in the screen shown previously to create a new group with specified NSA access rights.
4.6.1 Group Names
Enter a group name from one to 16 characters. The first character must be alphabetical (case insensitive, [A-Z a-z]); numeric characters are not allowed as the first character.
The group name can only contain the following characters:
- alphanumeric A-z 0-9 (there is no unicode support)
Spaces - [underscores]
[periods] -
- [dashes]
Other limitations on group names are:
- All leading and trailing spaces are removed automatically.
- Multiple spaces within names are converted to a single space.
- Group names are case insensitive. The group name cannot be the same (no matter the case) as an existing local group or domain group. For example, if there exists a domain group with the name 'BOB', you cannot create a local group named 'bob'. If you enter a group 'bob' but use 'BOB' when connecting via CIFS or FTP, it will use the account settings used for 'bob'.
The group name cannot be ANONYMOUS_CIFS, ANONYMOUS FTP, EVERYONE nor be the same as an existing local or domain group. Other reserved group names that are not allowed are:
- daemon
-
disk
ftp -
nobody
- lp
- root
- tty
- utm
4.6.2 Add A New Group Screen
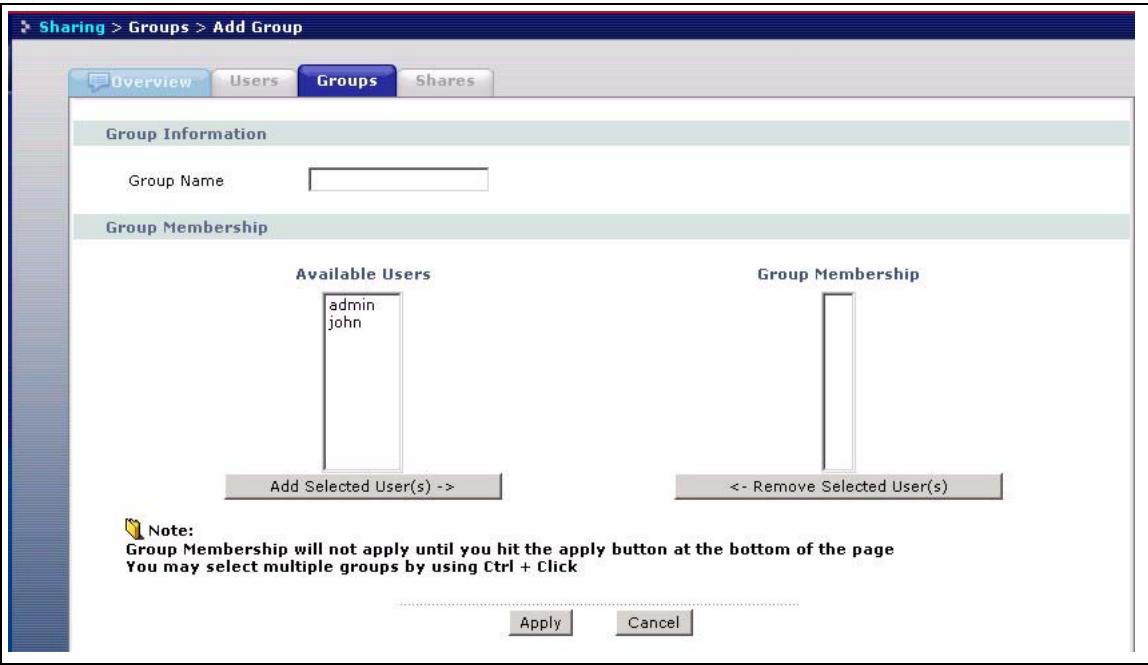
Figure 22 Add a New Group
The following table describes the labels in this screen.
Table 19 Add Group
| LABEL | DESCRIPTION |
| New Group Information | |
| Group Name | Type a group name from 1 to 16 single-byte ASCII characters. The first character must be alphabetical [A-Z a-z] (case insensitive) and cannot be a number. See Section 4.6.1 on page 60 for more information on group names. |
| Group Membership | A group is a set of users that have common NSA access rights. A user can belong to more than one group. Choose what users should be added to or removed from this group. You can select multiple users by holding the [Ctrl] key while you click. |
| Available Users | These are the users that have been created on the NSA. Select the user(s) that you want to join this group and then click the Add Selected User(s) button. You need to click Apply for the changes to take effect. |
| Group Membership | These are the users that already belong to this group on the NSA. Select the user(s) that you want to leave this group and then click the Remove Selected User(s) button. You need to click Apply for the changes to take effect. |
| Add Selected User(s) | Select the user(s) that you want to join this group from the Available Users list and then click the Add Selected User(s) button. You need to click Apply for the changes to take effect. |
| Remove Selected User(s) | Select the user(s) that you want to leave this group from the Group Membership list and then click the Remove Selected User(s) button. You need to click Apply for the changes to take effect |
| Apply | Click this button to save your changes back to the NSA. |
| Cancel | Click this button to begin configuring this screen afresh. |

Group-user membership edits are also updated in the corresponding Sharing > Users > Edit User screen.
4.7 Shares
Use this screen to create and manage shares. A share is a set of users/groups access permissions mapped to a specific folder on a volume. It is equivalent to the Windows concept of a shared folder, but is independent of the folder.
4.7.1 Share Icons
These are the share icons you will see in this screen.
Table 20 Share Icons
| ICON | DESCRIPTION |
| This is an available share icon. | |
| This is an unavailable share icon. | |
| This is a disabled share icon. |
4.7.2 Share Summary Screen
Click the Sharing link in the Navigation panel and then click the Shares link or the Shares tab to access the Sharing > Shares screen. The default shares on the NSA are shown in the following figure.
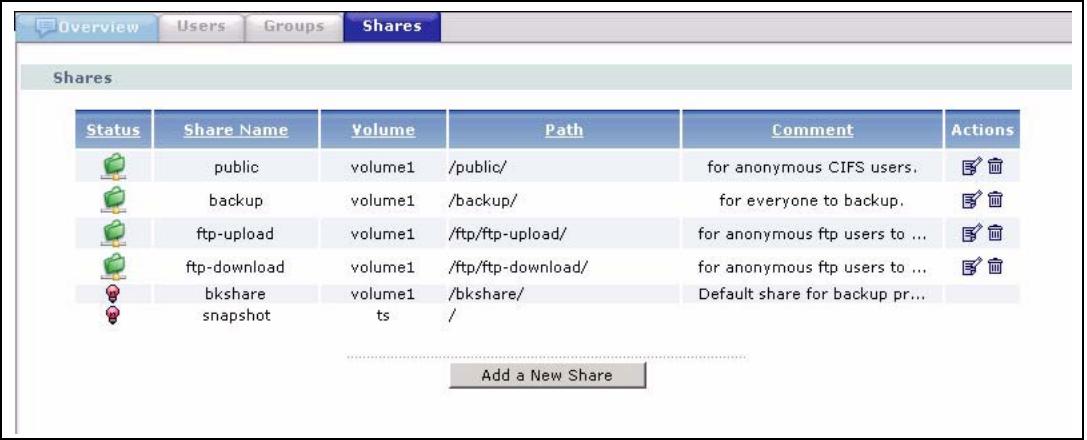
Figure 23 Sharing > Shares
The following table describes the labels in this screen. See Table 20 on page 62 for icon details.
Table 21 Sharing > Shares
| LABEL | DESCRIPTION |
| Status | This icon displays whether the share is available, unavailable or disabled. The default backup and snapshot shares cannot be deleted. |
| Share Name | This displays the name of the shared folder on the NSA. |
| Volume | This displays which storage area (volume) the share was created. The default shares are on volume1. |
| Path | This displays the location of the shared folder on the NSA. Forward slashes are used as path (folder tree branch) separators. Share paths that no longer exist are shown in red. |
| Comment | This is some description of the share as the (limited) share name may not be obvious enough for users to recognize clearly. |
| Actions | This displays the edit and delete icons for all shares created on the NSA. Click the Edit icon to edit the corresponding existing share. Click the Remove icon to delete it. |
| Add a New Share | Click this button to go to a screen to create a new share on the NSA. |
4.8 Adding a New Share
Click the Add a New Share button in the screen shown previously to create a new shared folder with optional access password.
4.8.1 Share Names
The share name can only contain the following characters:
- Alphanumeric A-z 0-9 (there is no unicode support)
Spaces - [underscores]
[periods] -
- [dashes]
Other limitations on share names include:
- All leading and trailing spaces are removed automatically.
- Multiple spaces within names are converted to a single space.
- Share names must be unique (they cannot be the same as other share names).
- Share names cannot use names reserved for "automatic shares" of external USB disk volumes be unique, for example, "USB[0-9]{1,2}", that is, a share named "USB" followed by a one or two digit number).
- The minimum character length of a share name is one character, that is a share name cannot be blank.
- The maximum character length of share name is 255 characters.
4.8.2 Share Paths
A share path is the full path to a folder on a volume that will be shared, for example, /mysna/topsecret/ugs/. This is independent from a "share name" which is the name shown for this share when accessing the share via CIFS or FTP. The path should start with a '/' (forward slash) followed by a parent folder, child folders leading to the folder that is to be shared.
The share path can include all characters including unicode characters (that is, you can use Chinese folder names for example) except for the following characters:
- [backslash] this will be converted to forward slash and interpreted as a path delimiter
- / [forward slash] this is always interpreted as a path delimiter, so a folder cannot include it in its folder name
: [colon] - [asterisk]
? [question mark] - "[double quote]"
- <[less than]
-
[greater than]
- | [pipe]
Please also note the following as regards share paths:
- If the share path is missing the root path slash (the first forward slash), the system will automatically add the initial slash.
- If the share path is missing the end trailing slash, the system will automatically add the trailing slash.
- If the share path has ' (backslashes) instead of ' /' (forward slashes) they will all be automatically converted to forward slashes.
- Share paths are case insensitive. If a share path already exists on the volume, for example, /My/Little/Corner/Of/The/World/) but the entered share path is the same as the existing path except the character case does not match (for example, /MY/liTTle/CORNER/oF/THe/wOrLd/), then the NSA automatically converts the path to match to the existing path's case. This is done because folder paths for CIFS on Windows systems are case insensitive. Case insensitivity does not include some special characters, so will not be converted to , neither to , and so on.
- The maximum share path length is 600 characters (the entire path string including slashes)
-
The share path cannot be blank
-
You cannot have an empty folder name, that is, two consecutive slashes (for example, '/ My//Corner/')
Each individual folder in the path (that is, the content between the slashes) cannot exceed 255 characters
4.8.3 Share Comments
Share comments are optional, so they can be blank. The maximum character length of a share comment is 255 characters. Share comments can contain any character except for the following:
- "[double quote]"
`[backquote] - <[less than]
- > [greater than]
4.8.4 EVERYONE & ANONYMOUS Share Access Rights
With an EVERYONE access right, you still need to log in. Every local user with an account on the NSA can access this share using their username and password. Users with accounts on a domain server cannot access shares with EVERYONE access rights.
With ANONYMOUS CIFS, no login is required. If you enter a valid user name but wrong password, the session is rejected. If the user name is invalid, then the session is considered 'anonymous'.
With ANONYMOUS FTP, you must enter either 'anonymous' or 'ftp' as the user name. Any other name is considered a user name, so must be valid and have a corresponding correct password.

If you are already logged into a share using your username and password, you will NOT be able to access a share that has ANONYMOUS CIFS or ANONYMOUS FTP only access rights (as these require 'no login'). If this is not your intention, it is recommended you set EVERYONE AND ANONYMOUS CIFS and/or ANONYMOUS FTP access rights to these type shares.
4.8.5 DFS
Distributed File System (DFS) is a network server component that makes it easier for you to find and manage data on your network. Through DFS, you can build a single hierarchical file system whose contents are distributed throughout your organization's WAN. It permits shares to be hierarchically connected to other Windows shares. Since DFS is a logical mapping, the physical location of data becomes transparent to your users and applications.
You can use DFS links when accessing the NSA using CIFS, not FTP.
4.8.6 Add A New Share Screen
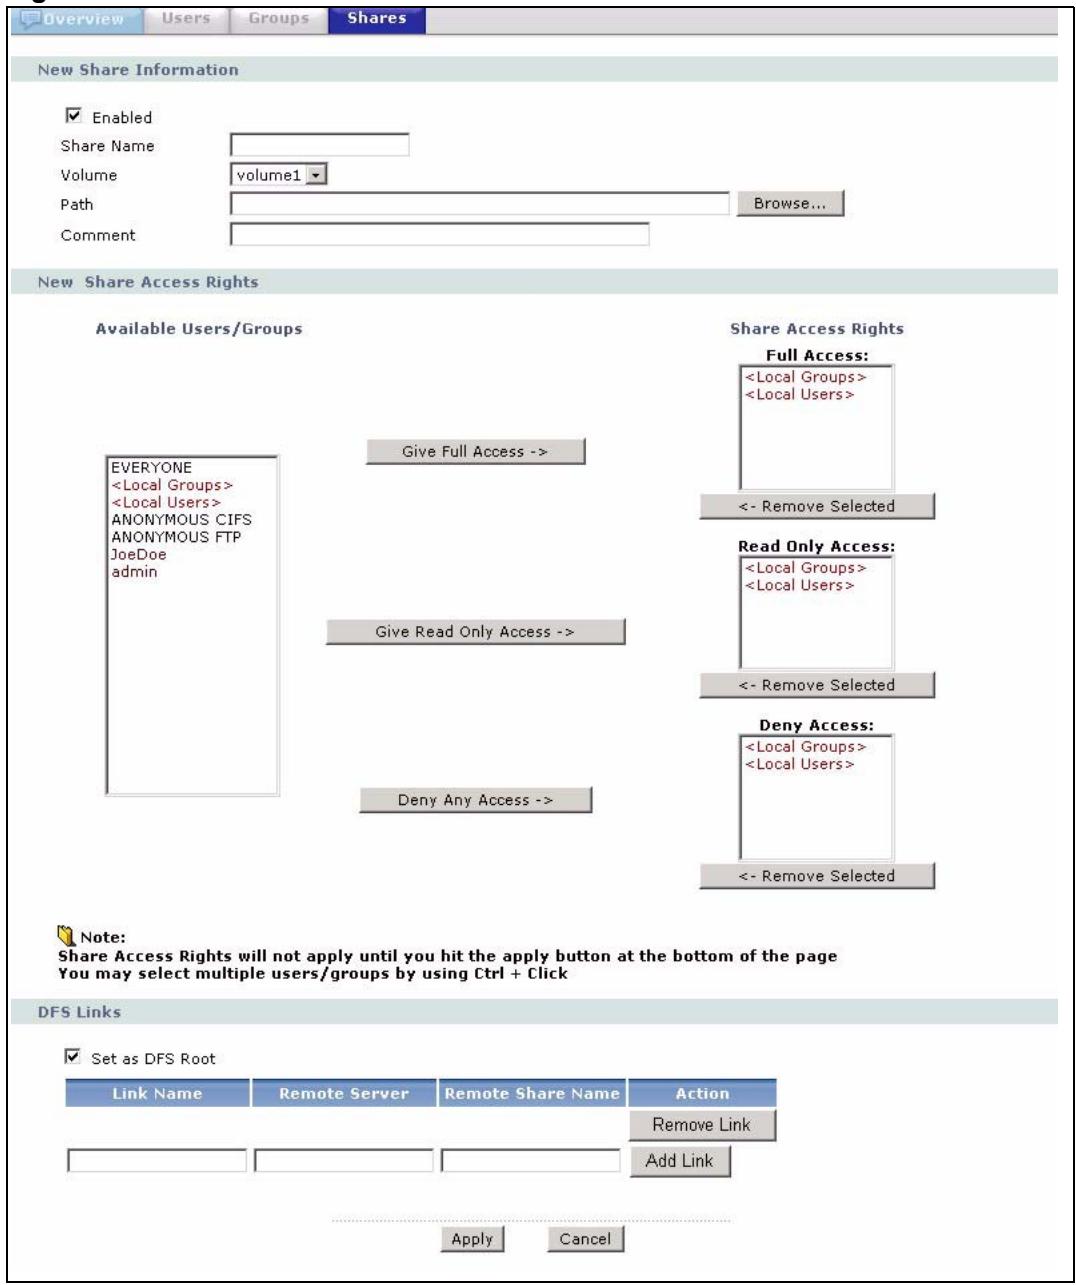
Figure 24 Add a New Share
The following table describes the labels in this screen.
Table 22 Add Share
| LABEL | DESCRIPTION |
| New Share Information | |
| Enabled | You must select this check box in order for a user or group to be able to access this share on the NSA. |
| Share Name | Type a share name from 1 to 255 single-byte ASCII characters. The name cannot be the same as another existing local share. See Section 4.8.1 on page 63 for more information on share names. |
| Volume | You should have already created volumes (a single accessible storage area with a single file system) on the NSA. |
| Path | Type the location of the share on the NSA using forward slashes as branch separators. See Section 4.8.2 on page 64 for more information on share paths. |
| Comment | Type some suitable descriptive text to further identify the share (in addition to its name) on the network. The comment text appears next to the share folder in Windows. See Section 4.8.3 on page 65 for more information on share comments. |
| New Share Access Rights | Use this part of the screen to assign access rights (full, read only or deny) to users and/or groups. EVERYONE means every local user who has an account on the NSA. ANONYMOUS means every user including people who do NOT have accounts on the NSA.See Section 4.8.4 on page 65 for more information on EVERYONE and ANONYMOUS share access rights. |
| Available Users/Groups | This box lists all users and groups created on the NSA. |
| Give Full Access -> | Select users and/or groups (you can select multiple users by holding the [Ctrl] key while you click) from the Available Users/Groups list box and then click this button to allow them full access (read, write and execute) to all files contained within this share. |
| Give Read OnlyAccess -> | Select users and/or groups (you can select multiple users by holding the [Ctrl] key while you click) from the Available Users/Groups list box and then click this button to allow them read-only access (they cannot modify nor execute) to all files contained within this share. |
| Deny Any Access -> | Select users and/or groups (you can select multiple users by holding the [Ctrl] key while you click) from the Available Users/Groups list box and then click this button to deny them any access (they cannot read, modify nor execute) to all files contained within this share. This share is not visible to those users and/or groups who access the NSA via FTP.Note: Where access conflict arises between users and/or groups, the most restrictive access right applies. |
| Share Access Rights | These boxes list what users and/or groups have what access rights to this share. |
| Full Access: | Select users and/or groups (you can select multiple users by holding the [Ctrl] key while you click) from this list box and then click the Remove Selected button to no longer allow them access to files contained within this share. These users and/or groups are then available to have other access rights to this share if you want. |
| Read Access: | Select users and/or groups (you can select multiple users by holding the [Ctrl] key while you click) from this list box and then click the Remove Selected button to no longer allow them access to files contained within this share. These users and/or groups are then available to have other access rights to this share if you want. |
| Deny Access: | Select users and/or groups (you can select multiple users by holding the [Ctrl] key while you click) from this list box and then click the Remove Selected button to deny them access to files contained within this share. These users and/or groups are then available to have other access rights to this share if you want. |
| Remove Selected | Select users and/or groups (you can select multiple users by holding the [Ctrl] key while you click) from one of the Full Access, Read Only Access or Deny Access list boxes and then click this button to no longer allow them access to files contained within this share. These users and/or groups are then available to have other access rights to this share if you want. |
| DFS Links | Distributed File System (DFS) is a share of other shares. |
| Set as DFS Root | A DFS root is a local share that serves as the starting point and host to other shares. Any shared resource can be published into the DFS name space. |
| Link Name | The name can be the same as another existing DFS link name. Name restrictions are the same as for share names (see Section 4.8.1 on page 63). |
| Remote Server | Type the IP address or domain name of the remote server. |
| Remote Share Name | This name should follow the same restrictions as an NSA file name in order for it to work properly with the NSA. |
| Action | Click the corresponding button to add or remove a DFS link. |
| Apply | Click this button to save your changes back to the NSA. |
| Cancel | Click this button to begin configuring this screen afresh. |
The following screen is an example of the default public share. Note that for anonymous CIFS users, no login is required (see Section 4.8.4 on page 65 for more information).
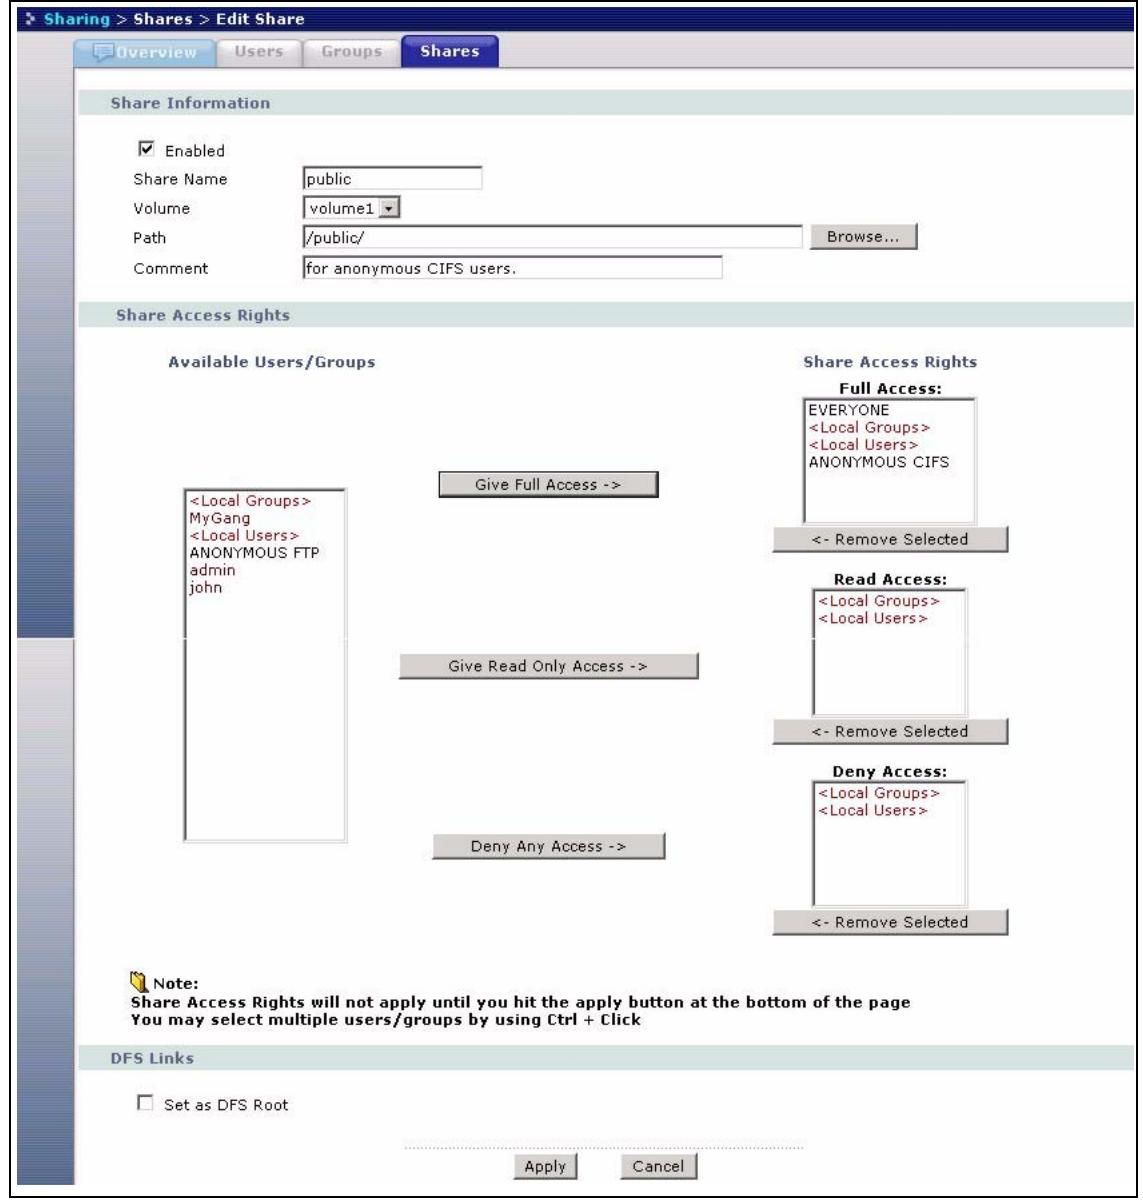
Figure 25 Public Share
Network Screens
This chapter discusses the network screens.
5.1 Network Screens
This section gives an overview of the various features included in the network configuration screens.
Use the network screens to:
View the network information
- Configure your TCP/IP information and DNS server address.
- Change your Windows/CIFS server name and workgroup name.
- Enable FTP and set connection limits.
5.2 Network Introduction
Click the Network link in the Navigation panel to access the Network > Overview screen. This is the first screen displayed.

You can click on the edit icons to go to the appropriate page to change the settings, or you can click on the appropriate tabs or navigation panel links instead.
5.2.1 IP Address and Subnet Mask
Similar to the way houses on a street share a common street name, so too do computers on a LAN share one common network number.
Where you obtain your network number depends on your particular situation. If the ISP or your network administrator assigns you a block of registered IP addresses, follow their instructions in selecting the IP addresses and the subnet mask. The subnet mask specifies the network number portion of an IP address.
5.2.2 DHCP
DHCP (Dynamic Host Configuration Protocol, RFC 2131 and RFC 2132) allows individual clients to obtain TCP/IP configuration at start-up from a server. You can configure the NSA as a DHCP client which means it is set to receive an IP address from a DHCP server. The NDU can help you discover the IP address of the NSA.
Alternatively, configure a static IP address for the NSA.
5.2.3 Windows/CIFS
Common Internet File System (CIFS) is a standard protocol supported by most operating systems in order to share files across the network.
CIFS runs over TCP/IP but uses the SMB (Server Message Block) protocol found in Microsoft Windows for file and printer access; therefore, CIFS will allow all applications, not just Web browsers, to open and share files across the Internet.
5.2.4 FTP
File Transfer Protocol (FTP) is an Internet file transfer service that operates on the Internet and over TCP/IP networks. A system running the FTP server accepts commands from a system running an FTP client. The service allows users to send commands to the server for uploading and downloading files.
5.3 Network Overview Screen
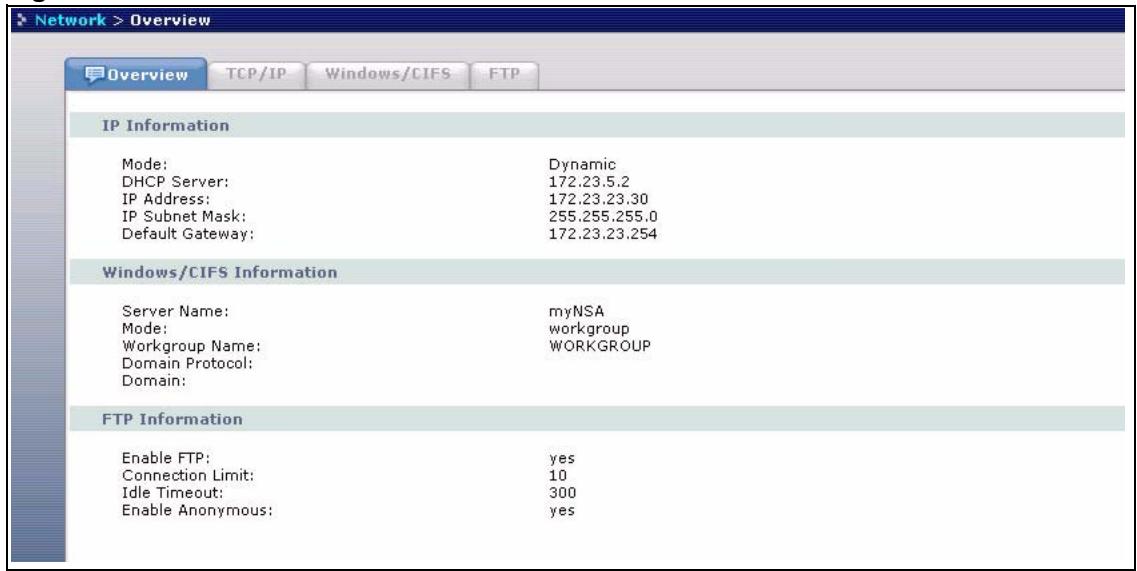
Figure 26 Network > Overview
The following table describes the labels in this screen.
Table 23 Network > Overview
| LABEL | DESCRIPTION |
| IP Information | |
| Mode | This field displays whether the NSA is receiving an IP address from a DHCP server (Dynamic) or whether it is assigned a static IP address. |
| DHCP Server | If the NSA is receiving an IP address from a DHCP server, this field displays the IP address of the DHCP (Dynamic Host Configuration Protocol) server. See Section 5.2.2 on page 72 for more details. |
| IP Address | This field displays the NSA IP address. |
| IP Subnet Mask | The subnet mask specifies the network number portion of an IP address. If you select Dynamic IP in the TCP/IP screen the subnet mask will be assigned by the DHCP server. If you select Static IP then your subnet mask will be what you type into this field. See Section 5.2.1 on page 71 for more details about IP subnet mask. |
| Default Gateway | If you select Dynamic IP in the TCP/IP screen the default gateway will be assigned by the DHCP server. If you select Static IP then you must type a gateway IP address in this field. |
| Windows/CIFS Information | |
| Server Name | This is the name of the NSA device. |
| Mode | This shows the Windows/CIFS mode, either Workgroup or Domain. |
| Workgroup Name | This field displays your workgroup name. |
| Domain Protocol | This field displays the windows domain protocol you are using. Select NT4 Domain or Active Directory Domain in the Windows/CIFS screen. |
| Domain | This is the domain name you have entered. |
| FTP Information | |
| Enable FTP | This field displays whether or not the NSA allows FTP connections. |
| Connection Limit | This is the maximum number of sessions allowed to access the NSA simultaneously via FTP. A single user may have multiple concurrent sessions. |
| Idle Timeout | This field shows the length of time in seconds that the FTP connection can be idle before timing out. |
| Enable Anonymous | This displays whether users are allowed to log into the NSA using an 'FTP' user name or 'anonymous' without giving a password. |
5.4 TCP/IP Screen
Use the Network > TCP/IP screen to an NSA dynamic or static IP address, subnet mask, default gateway and DNS servers.

The NSA automatically restarts after you apply changes in the TCP/IP or Windows/CIFS screens.
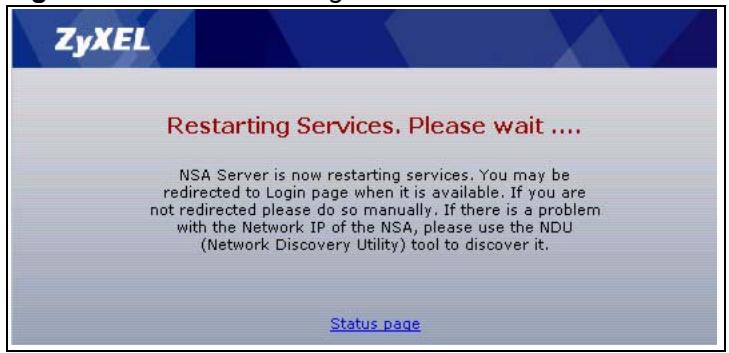
Figure 27 NSA Rebooting
Click the Network link in the Navigation panel and then click the TCP/IP link or the TCP/IP tab to access the Network > TCP/IP screen.
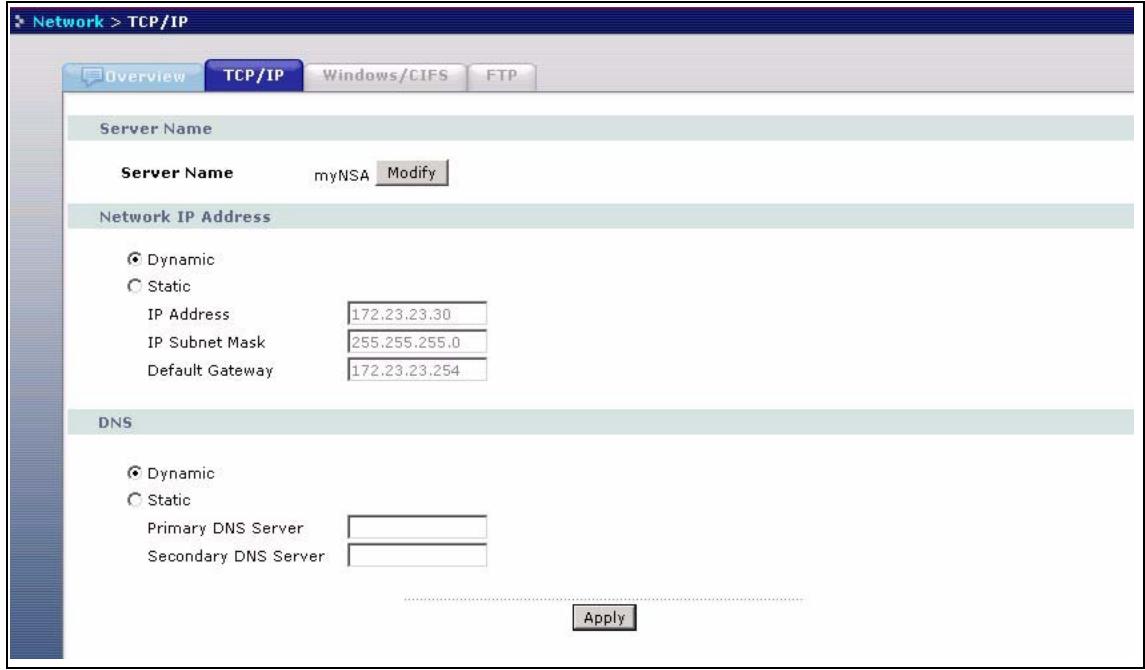
Figure 28 Network > TCP/IP
The following table describes the labels in this screen.
Table 24 Network > TCP/IP
| LABEL | DESCRIPTION |
| Server Name | |
| Server Name | This field shows the name you assigned to your NSA. |
| Modify | Click the Modify button to take you to the Windows/CIFS screen (the next tab) where you can change your server name. |
| Network IP Address | |
| Dynamic | Select the Dynamic checkbox to have a DHCP server automatically assign an IP address to your NSA. If none is assigned, then the NSA reverts to the default IP address of 192.168.1.3. |
| Static | Select the Static checkbox for the NSA to use fixed TCP/IP information. You MUST fill in all the following fields. |
| IP Address | Type an IP address in this field. |
Table 24 Network > TCP/IP
| LABEL | DESCRIPTION |
| IP Subnet Mask | Type an IP subnet mask in this field. |
| Default Gateway | Type a default gateway address in this field. |
| DNS | DNS (Domain Name System) is for mapping a domain name to its corresponding IP address and vice versa. The DNS server is extremely important because without it, you must know the IP address of a machine before you can access it. If you have the IP address(es) of the DNS server(s), enter them. |
| Dynamic | Select the checkbox to have the DHCP server automatically assign a DNS server address to your NSA. |
| Static | Select the checkbox to choose a static DNS server address. Type the DNS server IP address(es) into the fields below. |
| Primary DNS Server | Type a primary DNS server IP address. |
| Secondary DNS Server | Type a secondary DNS server IP address. |
| Apply | Click Apply to save your TCP/IP configurations. After you click Apply, the NSA restarts. Wait until you see the Login screen or until the NSA fully boots and then use the NDU to rediscover it. |
5.5 Windows/CIFS
Use this screen to configure your CIFS settings. In this screen you can set your server name, your WINS server, and specify if your NSA is a part of a workgroup or domain.

CIFS cannot be disabled on the NSA.

The NSA automatically restarts after you apply changes in the TCP/IP or Windows/CIFS screens.
5.5.1 Workgroup Security Mode
A workgroup is a group of computers on a network that can share files. On the NSA, use Workgroup Security Mode if the user names and passwords for these computers are maintained on the NSA. This is suitable for users using the Common Internet File System (CIFS) protocol for remote file access in a small-to-medium sized office.
5.5.2 Windows Domain Security Mode
A domain is a group of computers that are part of a network and share a common directory database. On the NSA, use Windows Domain Security Mode if you want centralized management of shared resources, services and user on a centralized Windows-based domain controller. You can create users and groups on the centralized Windows-based domain controller such as an active server directory, and the NSA checks this list when authenticating users and/or groups that seek access to a share. This is suitable for a large number of CIFS users where accounts are stored on an external server.
A domain is organized in levels and is administered as a unit with common rules and procedures. Each domain has a unique name. You must be logged on as an administrator to your local computer and have a valid user name and password to join your computer to a domain. If you do not know which user name and password to use, contact your network administrator.

The NSA time and date must be the same as the time and date on the external domain controller if the NSA is using one to import users and groups.
5.5.3 Windows/CIFS Screen
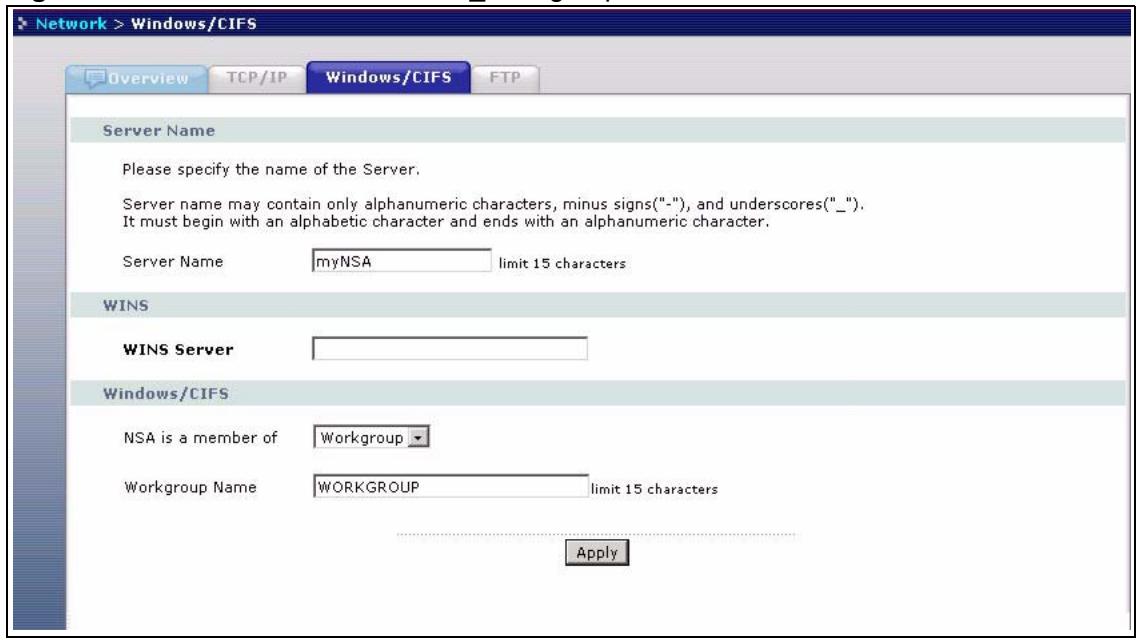
Figure 29 Network > Windows/CIFS_Workgroup
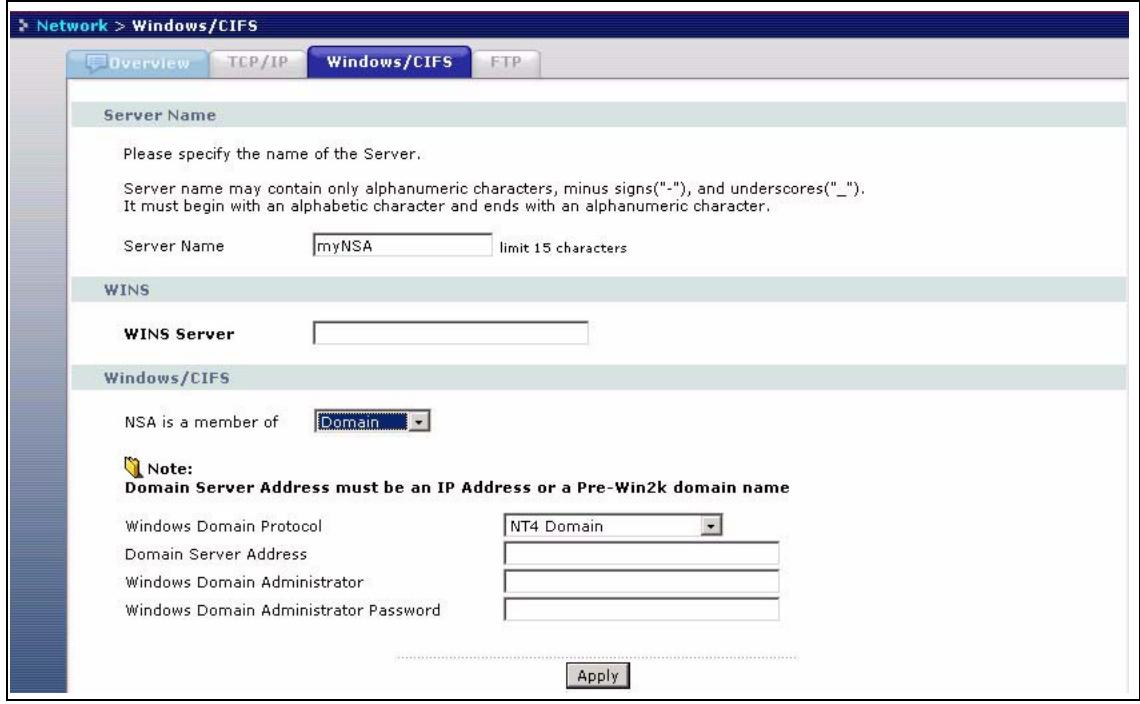
Figure 30 Network > Windows/CIFS_Domain
The following table describes the labels in these screens.
Table 25 Network > Windows/CIFS
| LABEL | DESCRIPTION |
| Server Name | |
| Server Name | Enter a name to identify your NSA on the network in this field. The NSA restarts after you change the NSA. |
| WINS | You can specify a WINS server which the NSA will use to resolve names to IP addresses. |
| WINS Server | Enter the WINS server name in this field. |
| Windows/CIFS | |
| NSA is a member of | A workgroup is a group of computers on a network that can share files. These user accounts are maintained on the NSA.A domain is a group of computers that are part of a network and share a common directory database. Domain users and groups are created on a centralized Windows-based domain controller.Select either Workgroup or Domain from the drop-down list box. |
| Workgroup Name | Type your workgroup name in this field if you selected Workgroup from the field above.The following fields apply if you selected Domain. |
| Windows Domain Protocol | Select a windows domain protocol if you selected Domain above. Choose NT4 Domain if your server uses a Windows NT operating system and Active Directory Domain if it uses a Windows 2000 or later operating system. |
| Domain Server Address | Type the IP address of the Windows server domain controller or a pre-Windows 2000 domain name. |
| Windows Domain Administrator | Administrator is the default Windows Domain Administrator. |
| Windows Domain Administrator Password | Type a password associated with the Windows Domain Administrator. |
| Apply | Click here to save your changes back to the NSA. |
5.6 FTP Screen
Use this screen to configure your NSA FTP settings. In this screen you can enable or disable FTP, set a connection limit, idle timeout, and enable or disable anonymous FTP access. See Section 5.2.4 on page 72 for more details on FTP.
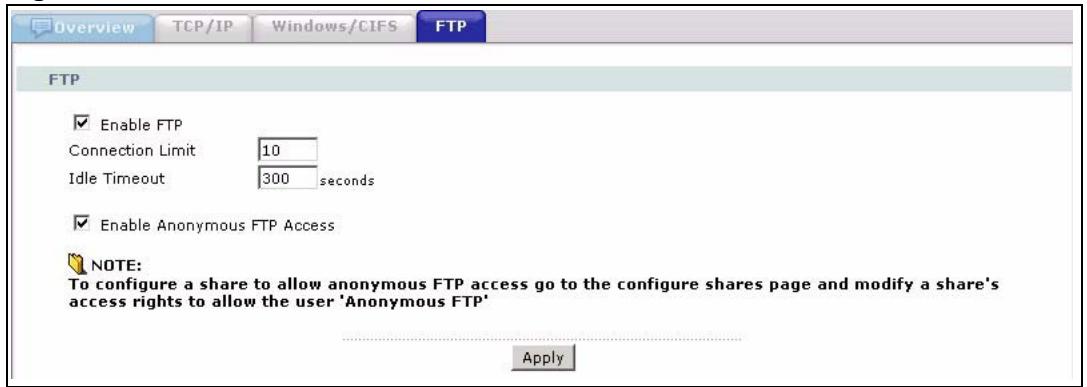
Figure 31 Network > FTP
The following table describes the labels in this screen.
Table 26 Network > FTP
| LABEL | DESCRIPTION |
| FTP | |
| Enable FTP | Select the Enable FTP checkbox to allow users to connect to the NSA via FTP; otherwise clear the check box. |
| Connection Limit | Enter the maximum number of concurrent connections allowed on the NSA in this field. |
| Idle Timeout | Enter the length of time that an FTP connection can be idle before timing out. |
| Enable Anonymous FTP Access | Select Enable Anonymous FTP Access to allow any user to log into the NSA using 'FTP' or 'anonymous' as a user name and no password. Any other name is considered a user name, so must be valid and have a corresponding correct password. |
| Apply | Click Apply to save your settings to the NSA. |
PART III
Protect, Storage and
Maintenance
Protect Screens (81)
Storage Screens (95)
Maintenance Screens (113)
Protect Screens
This chapter compares the different ways of protecting data on the NSA-2400 and explains how to use the Protect screens to create and schedule snapshots and external backups.
6.1 Protection Methods
There are a variety of ways to protect your data on the NSA-2400. Below is a summary table of what can be done in each situation.
Table 27 Overview of Protection Methods
| SITUATION | ACTION |
| Unexpected NSA-2400 behavior after configuration changes | Back up the NSA-2400 configuration file before you make major configuration changes. |
| Need to transfer data from your computer to the NSA after volume(s) have been created | Use the Genie Backup Manager. |
| Corrupt data files Data infected by virus Data files incorrectly deleted or modified | Create regular snapshots. |
| Hard drive malfunction. | Use RAID. |
| NSA malfunction Network down Natural disaster such as a fire or earthquake occurs where your NSA-2400 is located | Back up data to another NSA or external USB hard drive. |
The following sections describe these methods in more detail. See Section 7.4 on page 100 for more information on RAID.
6.1.1 Configuration File Backup and Restoration
Use the Maintenance > Configuration menus to create a file of your NSA configurations such as passwords, shares and volumes created, network settings and so on. If you're going to do some major configuration changes, then it is advisable to create a configuration backup file. If things go wrong after you make the configuration changes, you can always go back to the previous configuration by restoring an earlier configuration file.
If you forgot the NSA password, then reset the device to go back to the factory default configuration.

Configuration File Backup and Restoration does not affect data (your files and folders), volumes on the NSA.
6.1.2 Genie Backup Manager
Use the Genie Backup Manager to transfer data from your computer to the NSA. You could use Genie Backup Manager to back up from one NSA to another NSA but it's recommended you use the NSA Protect > Backup to do this (see Section 6.1.4 on page 83) as the latter would be faster.

The Genie Backup program uses the same network port as the NDU to discover the NSA. To avoid a port conflict, do not run the Genie Backup Manager at the same time as the NDU.
6.1.3 Snapshots
A snapshot is a record of changes to a (internal) volume at a particular moment in time. As it only records changes to files made in a volume, it's faster and takes up less space than a backup. Snapshots are good for data that changes often and needs to have high availability. If files within a volume become infected or corrupted, you can revert the volume back to a previous snapshot.
You can only create snapshots of a complete volume, not a single file or folder within a volume. If a volume is restored to a previous snapshot, then all files in that snapshot are returned to the state they were in at the time of the snapshot.
When you roll back to a previous snapshot, all intermediate snapshots between the rollback and the present are deleted. For example, say you had daily snapshots scheduled. Today is Friday and you decide to roll back to Monday's snapshot. Then the snapshots from Tuesday, Wednesday and Thursday are deleted after the rollback is completed.
You can continue to work, while the snapshot is taken. It's a good idea to save your open files first before taking a snapshot. Snapshots may get progressively slower as more are done but they are still very fast compared to backups (as only block changes are recorded).
6.1.3.1 Some Important Notes on Snapshots
1 Snapshots cannot be taken on external volumes or internal volumes using the BACKUP storage system.
2 If the reserved space for snapshots runs out, then all snapshots (including previously created ones) are lost. Make sure that you reserve enough space for snapshots.
3 Since a snapshot is a record of changes, if very large files (typically over 1GB) are transferred onto the volume, then that 'change' may be larger than the reserved space for the snapshot causing it to become invalid.
4 A snapshot just takes up as much space as it needs (within the reserved space). Reserved snapshot space can be decreased later, but not increased, so it's better to start off with a (not too) big reserved space.
5 If the disk associated with a volume fails, then all snapshots in that volume are lost.
6 The purging of snapshots occurs after the next snapshot is taken (unlike backup purges which occur before backup is done).
7 You cannot create snapshots with volumes created using this NSA-2400 release 1 (v1.00 AFA.0 C0) firmware. To overcome this, create a new volume using release 2 firmware, copy the old volume data over to the new volume and then recreate the old volume. If you don't have enough space to create a new volume, then use the Genie Backup Manager to transfer data from your old volume to your computer, recreate the old volume, and then use the Genie Backup Manager again to back up data from your computer to the newly created volume.
8 Up to 30 snapshots are allowed in total on the NSA.
9 The NSA uses EVMS (Enterprise Volume Management System) to create snapshots.
6.1.3.2 Snapshots Versus Backups
See Section 6.1.4 on page 83 for more information on backups.
1 A snapshot only records changes to files within a volume, so it's faster and takes up less space than backup.
2 You must create a snapshot of a complete volume, not on a single file or folder as you can do with a backup.
It's a good idea to take both snapshots and backups for the following reasons:
1 Snapshots may become invalid, so it's good to also have backups available in case that happens.
2 Backups may require several hours depending on the amount of data you have to back up (it's a good idea to schedule backups at non-peak times), so you should take a snapshot of your data before the backup is run. If a file becomes corrupt during the backup, you can still revert to the previous snapshot and back up again.
3 If files to be backed up are open at the time of the backup, then make sure that snapshots are allowed. If they are allowed and files are open at the time the backup is run, then backup first takes a snapshot and then copies the files from this snapshot.

If not enough snapshot space is left then the backup will cause your snapshots to become invalid. The backup will still proceed without the snapshot but if the open file changes during the backup, then the backup will fail.
6.1.4 NSA Backup
Use the Protect > Backup menus to create data backups to an external USB disk drive or another NSA over the network. Backup disks must be formatted by the NSA as a disk of type BACKUP. You cannot back up to other file systems such as NTFS, FAT, or FAT32.

NSA backup can only be done to another NAS with the same firmware version or an external USB disk that was formatted as 'Backup' volume type.
The NSA does not check if enough space is available before backup commences. The NSA first starts transferring files and if not enough space is available, then it issues a log or alert to tell you that the backup failed (due to lack of space) and deletes any files already transferred. The NSA deletes old backups first before a new backup is done (Purge). If you have a backup scheduled to begin at midnight, then at that time, the NSA checks your Purge settings and deletes files according to those settings before the actual backup takes place. If space on the backup NSA is a concern, then configure the NSA to delete old backups.
A full backup copies all files from your NSA to the backup device. It may take some time depending on how many files you have to back up.
It is not possible to run programs (like FDISK), that access the disk directly, while backup is running.
See also this related information:
- Section 6.1.3.2 on page 83 for a comparison of backups and snapshots.
- Section 7.4.7 on page 105 for a comparison of backups and RAID.
- Section 6.1 on page 81 for an overview of protection methods available on the NSA-2400.

To best protect data, you should back up data to another NSA or an external hard drive, and store in an off site location.
6.2 Protect Overview Screen
Click the Protect link in the navigation panel to see an overview of the Protect screens. Use the Backup screens to create new backups or edit existing ones. Use the Snapshot screens to create new snapshots or edit existing ones. Use the Scheduler screens to automate backups or snapshots. Either click on a link in the overview screen or a sub-link in the navigation panel to go to the related screen.
The Protect > Overview screen shows you how many backups, snapshots and schedules you have created or configured.
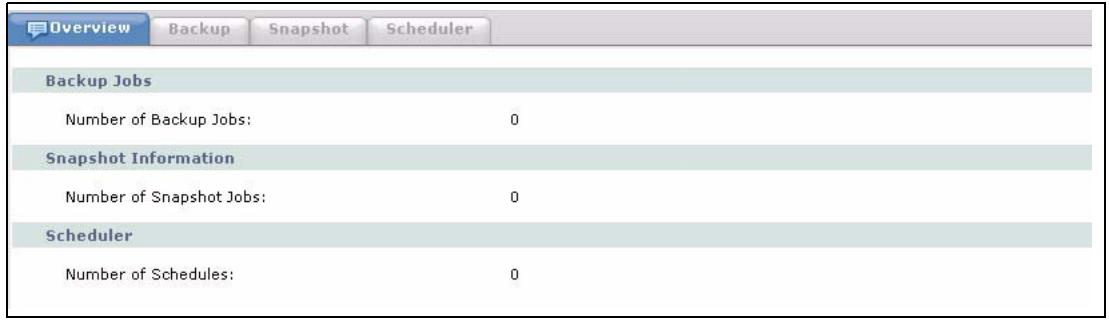
Figure 32 Protect > Overview
6.3 Backup Summary
Click the Backup link in the Navigation panel to access the Protect > Backup summary screen that shows a list of all backups created and scheduled. You can also edit or delete an existing backup or create a new one from here.

Figure 33 Protect > Backup
The following table describes the labels in this screen.
Table 28 Protect > Backup
| LABEL | DESCRIPTION |
| Job Name | This is the name of the backup |
| Description | This is some extra descriptive text on the backup |
| Backup Type | This displays normal backup type. |
| Actions | Use these icons to schedule, immediately run or edit or an existing backup. |
| Add a New Backup Job | Click this button to create a new backup (see also Section 6.3.3 on page 88). |
| Restore | Click this button to restore a previous backup from another NSA or external USB hard drive connected to the NSA. |
| Delete Selected Jobs | Select the check boxes of backups you want to delete and then click this button to delete those files on the backup NSA or external USB hard drive connected to the NSA. |
6.3.1 Schedule Backups
Click the schedule icon in the Action column in the Protect > Backup screen to schedule that backup. (You can also do this in the Protect > Scheduler screen, but if you do it in the Protect > Backup screen, then specific related backup information is already entered.)

Scheduler queues backups if a different backup is already going on at the time a backup is scheduled.
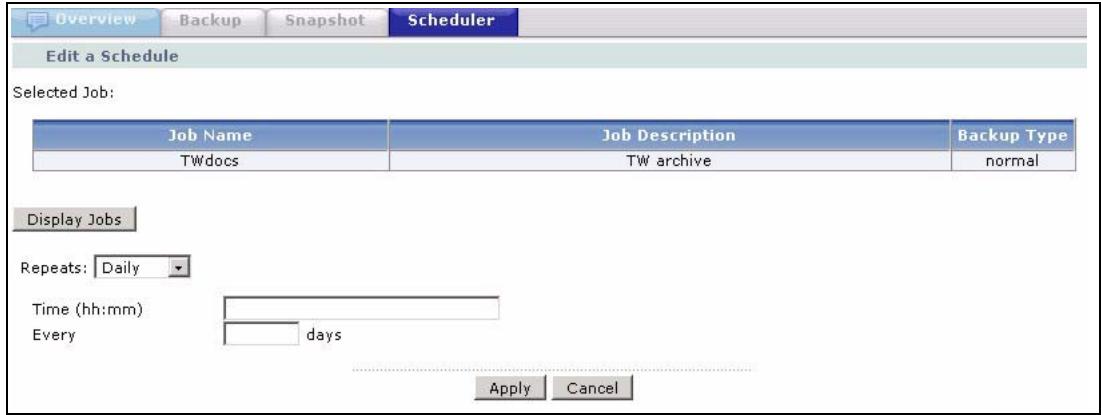
Figure 34 Protect > Backup > Schedule
See the Protect > Scheduler screen (Section 6.4 on page 93) in this User's Guide for more information on these fields.
Click the Run Now icon in the Action column in the Protect > Backup screen to immediately perform that backup. Click the Cancel button if you want to stop the backup.
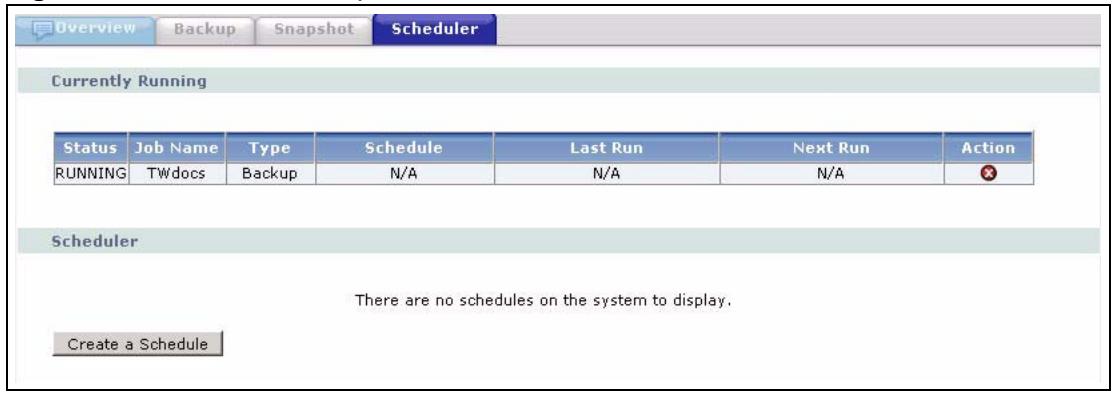
Figure 35 Protect > Backup > Run Now
6.3.2 Creating/Editing Backups
Click the edit icon in the Action column in the Protect > Backup screen to edit that backup or click Add a New Backup Job to create a new backup.

Figure 36 Protect > Backup > Edit
The following table describes the labels in this screen.
Table 29 Protect > Backup > Edit
| LABEL | DESCRIPTION |
| Backup Job Name: | This is a required field that uniquely identifies the backup. Type from one to 32 characters. All characters are allowed except /:"*?<>\\. |
| Backup Job Description: | Type from 0 to 60 characters to further describe this backup. |
| Where to Backup | |
| Backup Target | Choose where to save the backup. |
| Remote NSA | If you chose to back up to another NSA, then fill in the following fields in order to be able to access it. Click Test Connection to see if both NSAs can communicate. • Remote NSA Address • User Name • Password • Backup Share Path |
| External Disk | You only see this option if an external USB hard drive is connected to the NSA (for example USB1 ExtVolume 1) |
| What to Backup | |
| Files/Folders to backup: | This textbox shows the volume and path of the folder or files that you want to back up. |
| Modify | Click Modify and then browse to the files and shares that you want to back up. |
| Advanced Settings | |
| Backup Method: | A Normal backup is a complete copy of all files and folders selected. |
| Use Compression | Compression reduces the size of the file that you want to back up. Backup is then faster, but restoring may be slower, so if backup space is not a concern and recovery speed is, then turn off compression. |
| Purge Settings: | Use Purge to delete old backups. This purge policy applies to this specific backup only, unlike snapshot purge policies which apply to all snapshots. Purge runs first before a new backup is done. For example, if you have a backup scheduled to begin at midnight, then at that time, the NSA checks these settings and deletes files accordingly before backup takes place. If space on the backup NSA or disk is a concern, then configure the NSA to delete old backups. · Keep All Old Backups: Purge is in effect disabled. Select this if backup space is not a concern. · Keep only last backup files: All backup files older than the last one are deleted. You will not be able to recover files that existed (only) in those previous backups. Select this if backup space is limited and recovery of old files is not important. · Keep backups for a period of day(s): Backups older than the number of days you enter here are deleted. 0 days means that all old backups are deleted when a new one is done. |
| Apply | Click this button to save your changes back to the NSA. |
| Cancel | Click this button to begin configuring this screen afresh. |
6.3.3 Restoring Backups
Click the Restore button in the Protect > Backup screen to replace existing files with files saved previously.
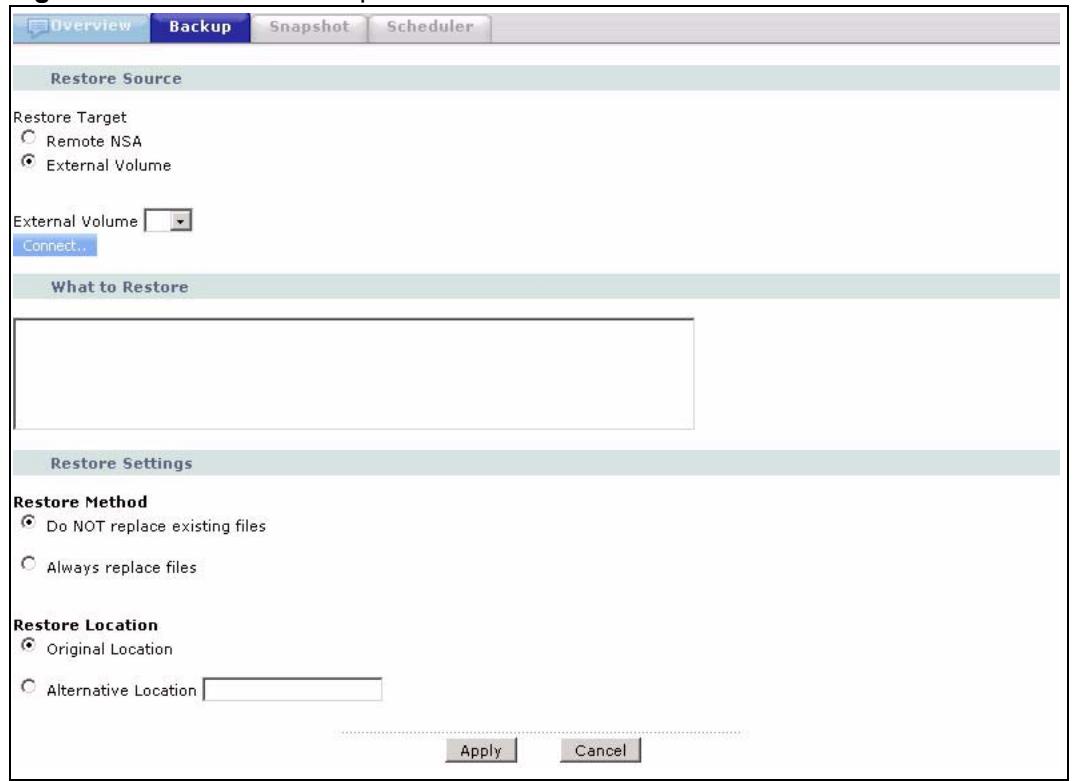
Figure 37 Protect > Backup > Restore
The following table describes the labels in this screen.
Table 30 Protect > Backup > Restore
| LABEL | DESCRIPTION |
| Restore Source | |
| Restore Target | Choose from where to save the backup. |
| Remote NSA | If you chose to restore from another NSA, then type in its IP address here. |
| External Disk | If you chose to restore from an external USB hard drive then choose which one to restore from here. |
| What to Restore | Choose which previously saved backup to restore here. |
| Restore Settings | |
| Restore Method | Choose whether files in the backup should replace existing file.s • Do NOT replace existing files • Always replace files |
| Restore Location | Choose whether to restore files to their original location on the NSA-2400 or specify a different location (on the NSA-2400) • Original Location • Alternative Location |
| Apply | Click this button to save your changes back to the NSA. |
| Cancel | Click this button to begin configuring this screen afresh. |
6.3.4 Snapshot Summary
Click the Protect link in the Navigation panel, then click the Snapshot sublink to access the Protect > Snapshot summary screen.
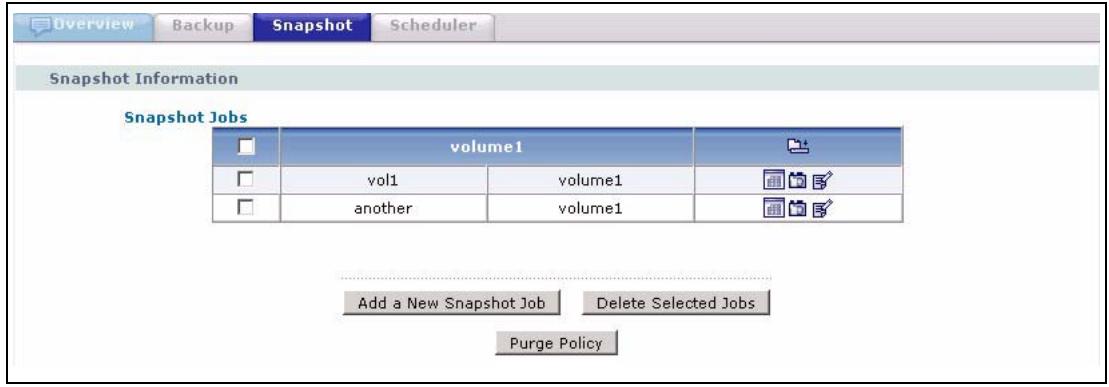
Figure 38 Protect > Snapshot
The following table describes the labels in this screen.
Table 31 Protect > Snapshot
| LABEL | DESCRIPTION |
| Job Name | This is the name of the snapshot. |
| Volume | A snapshot must be on done on a complete volume, and not a single file or folder. |
| Actions | Use these icons to see all snapshot images taken so far (icon at the top of the column), schedule, immediately run or edit an existing snapshot. |
| Add a New Snapshot Job | Click this button to create a new snapshot (see Section 6.3.7 on page 92). |
| Delete Selected Jobs | Select the check boxes of snapshots you want to delete and then click this button to delete them. |
| Purge Policy | Click this button to display a screen where you can configure when to delete old snapshots. |
| Overview Backup Snapshot Scheduler Purge Settings: Purge Settings will be applied when reserved space for snapshot is full, or the number of maximum snapshots reached.Do Nothing (all snapshots will be invalid)Delete Oldest Snapshot FirstDelete Largest Snapshot FirstKeep at least snapshot image(s)Apply Cancel | |
| You can also do this within the create/edit snapshot screen (see Section 6.3.7 on page 92 for details on these fields). |
6.3.5 Schedule Snapshots
Click the schedule icon in the Action column in the Protect > Snapshot screen to schedule that snapshot. (You can also do this in the Protect > Scheduler screen, but if you do it in the Protect > Snapshot screen, then specific related snapshot information is already entered.)
Figure 39 Protect > Snapshot > Schedule
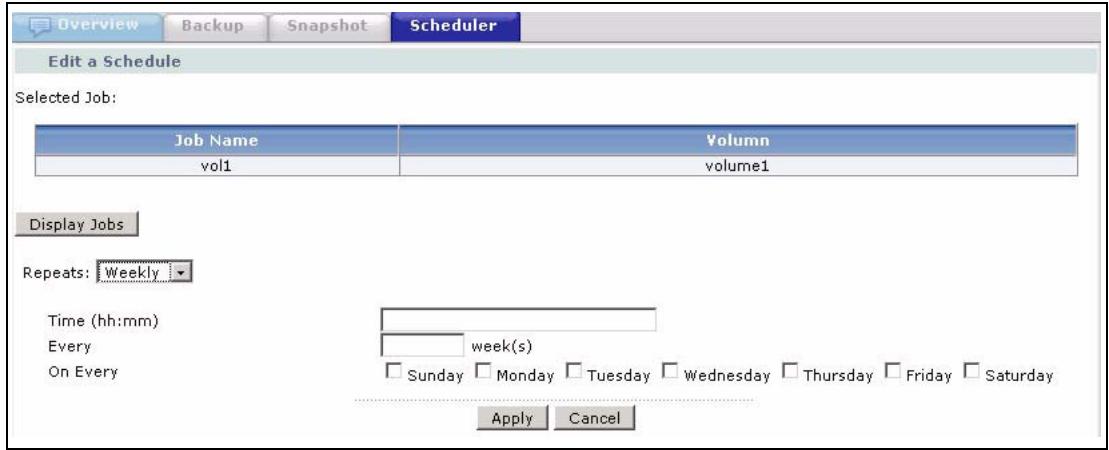
Figure 40 Protect > Snapshot > Run Now
See the Protect > Scheduler screen (Section 6.4 on page 93) in this User's Guide for more information on these fields.
Click the Run Now icon in the Action column in the Protect > Snapshot screen to immediately perform that snapshot. A screen pops up asking you to confirm.
Are You Sure you Want to Execute the Job NOW?
Currently there are 0 Active User Sessions on the system right now . This may affect how the Job will perform.
6.3.6 Creating/Editing Snapshots
Click the edit icon in the Action column in the Protect > Snapshot screen to edit that snapshot or click Add a New Snapshot Job to create a new snapshot.
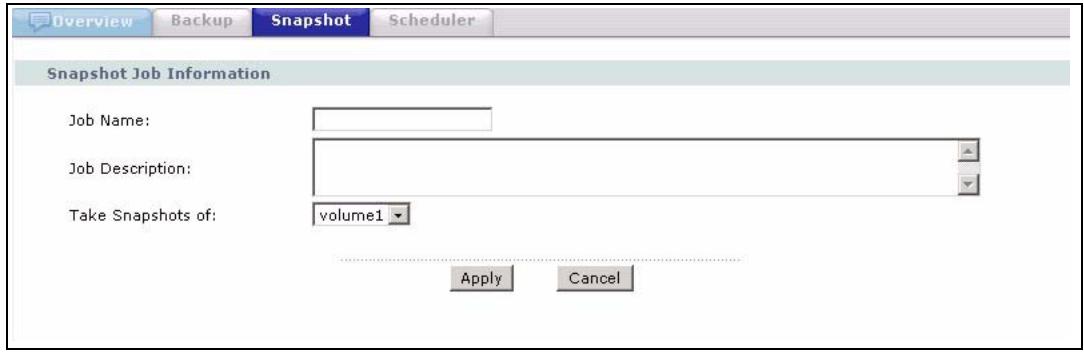
Figure 41 Protect > Snapshot > Create/Edit
The following table describes the labels in this screen.
Table 32 Protect > Snapshot > Create/Edit
| LABEL | DESCRIPTION |
| Snapshot Job Name: | This is a required field that uniquely identifies the snapshot. Type from one to 32 characters. All characters are allowed except V:***?<>。 |
| Snapshot Job Description: | Type from 0 to 60 characters to further describe this snapshot. |
| Volume Selection | A snapshot must be on done on a complete volume, and not a single file or folder. If a file in a volume become infected or corrupted, you must revert the whole volume back to its status in a previous snapshot. |
| Take Snapshots of | When creating a new snapshot, onlyvolumes that are already created on the NSA are available. |
| Apply | Click this button to save your changes back to the NSA. |
| Cancel | Click this button to begin configuring this screen afresh. |
6.3.7 Purging Snapshots
Click the Purge Policy button in the Protect > Snapshot screen to define a rule for automatically deleting snapshots.
Purge policies apply to all snapshots, unlike backup purge policies which apply only to specific backups.
Purge policies always run before new snapshots are taken.
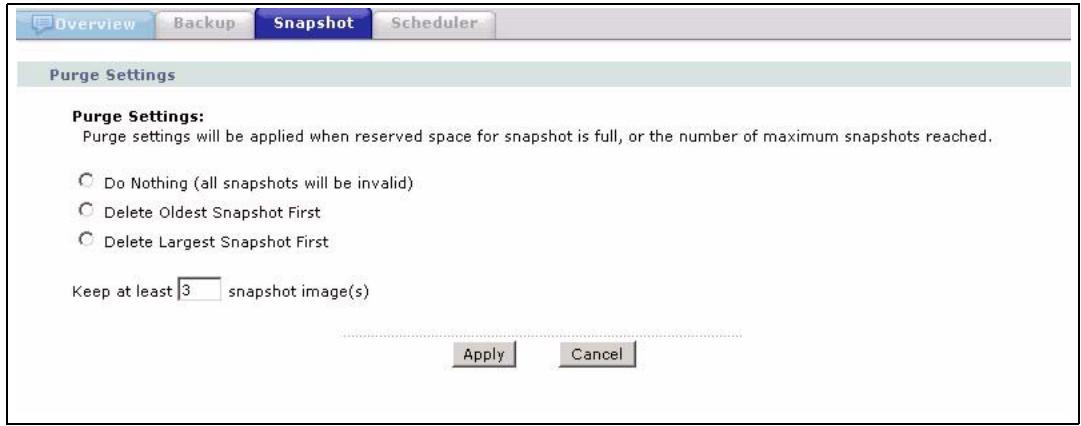
Figure 42 Protect > Snapshot > Create/Edit
The following table describes the labels in this screen.
Table 33 Protect > Snapshot > Create/Edit
| LABEL | DESCRIPTION |
| Purge Settings: | Purge settings are run each time a snapshot is scheduled. • Do Nothing (all snapshots will be invalid): No new snapshots can be taken until you manually delete old snapshots. • Delete Oldest Snapshot First: The oldest snapshot will be deleted each time a new snapshot is scheduled. • Delete Largest Snapshot First: The largest snapshot will be deleted each time a new snapshot is scheduled. As a snapshot is a file of changes since your previous snapshots, selecting this option may cause problems with rollback later. |
| Apply | Click this button to save your changes back to the NSA. |
| Cancel | Click this button to begin configuring this screen afresh. |
6.4 Scheduler Screens
Use these screens to automatically run backups or snapshots at the configured times. It is recommended you schedule large backups for times when your network is not busy, such as at night. If two events are configured to run at the same time, then one must wait until the other finishes running.
The scheduler uses the dates and times you configured on the primary NSA (not the backup) Maintenance > Date/Time screen. Some backups or snapshots may not run if you change the NSA date and time after having configured schedules.
6.4.1 Scheduler Screen
Click the Protect link in the Navigation panel and then click the Scheduler sub-link to access the Protect > Scheduler summary screen.
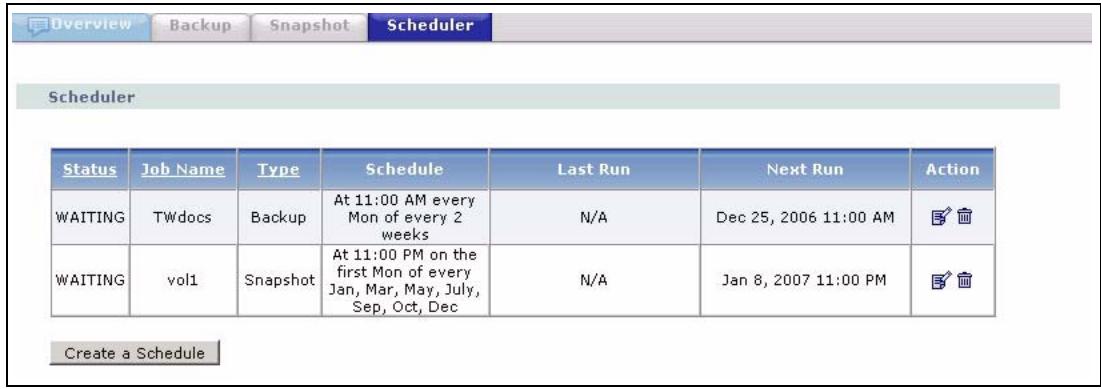
Figure 43 Protect > Scheduler
The following table describes the labels in this screen.
Table 34 Protect > Scheduler
| LABEL | DESCRIPTION |
| Status | This fields shows whether the backup or snapshot has been run yet.. |
| Job Name | This is the name of the backup or snapshot that's scheduled to be run automatically. |
| Type | This displays whether the schedule is for a backup or a snapshot. |
| Schedule | This shows the days and times the backup or snapshot will run. |
| Last Run | This shows the date and time the backup or snapshot was last run. |
| Next Run | This shows the date and time the backup or snapshot will run next.. |
| Action | Click the edit icon to edit an existing schedule or the delete icon to delete it. |
| Create a Schedule | Click this button to create a new schedule. |
6.4.2 Scheduler Create/Edit Screen
Click the Create a New Scheduled Task button in the Protect > Scheduler screen to create a new schedule. Click the edit icon in the Protect > Scheduler screen to edit an existing schedule.
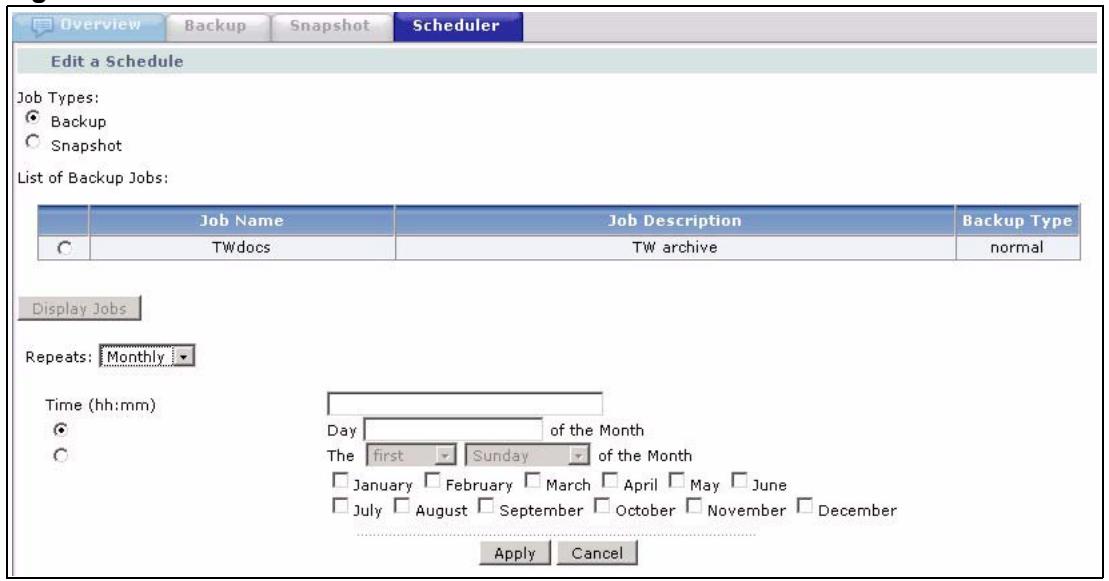
Figure 44 Protect > Scheduler > Create/Edit
The following table describes the labels in this screen.
Table 35 Protect > Scheduler > Create/Edit
| LABEL | DESCRIPTION |
| Edit a Scheduler | |
| Job Type: | Select whether the schedule is for a backup or snapshot. Backup is selected in this screen |
| List of Backup Jobs | The following table displays information on the backups or snapshots you have created. |
| Job Name | This displays the name of the backup or snapshot to be scheduled. |
| Job Description | This displays the description you typed for the backup. |
| Backup Type | This displays normal. |
| Display Jobs | Click this button to show details of the job selected. |
| Repeats | Select how often the job should run (Daily, Weekly or Monthly) |
| Time | Enter the time, day and/or month as appropriate for your selection above. |
| Apply | Click this button to save your changes back to the NSA. |
| Cancel | Click this button to begin configuring this screen afresh. |
Storage Screens
This chapter covers storage systems, volumes and disks on the NSA-2400.
7.1 Storage Introduction
Use the Storage screens to create and manage NSA-2400 volumes (internal and external), disks and reserve snapshot space.
See Section 7.3 on page 97 for more information on volumes.
See Section 7.7 on page 108 for more information on disks.
7.2 Storage Overview Screen
Click the Storage link in the Navigation panel to access the Storage > Overview screen. This is the first screen displayed.
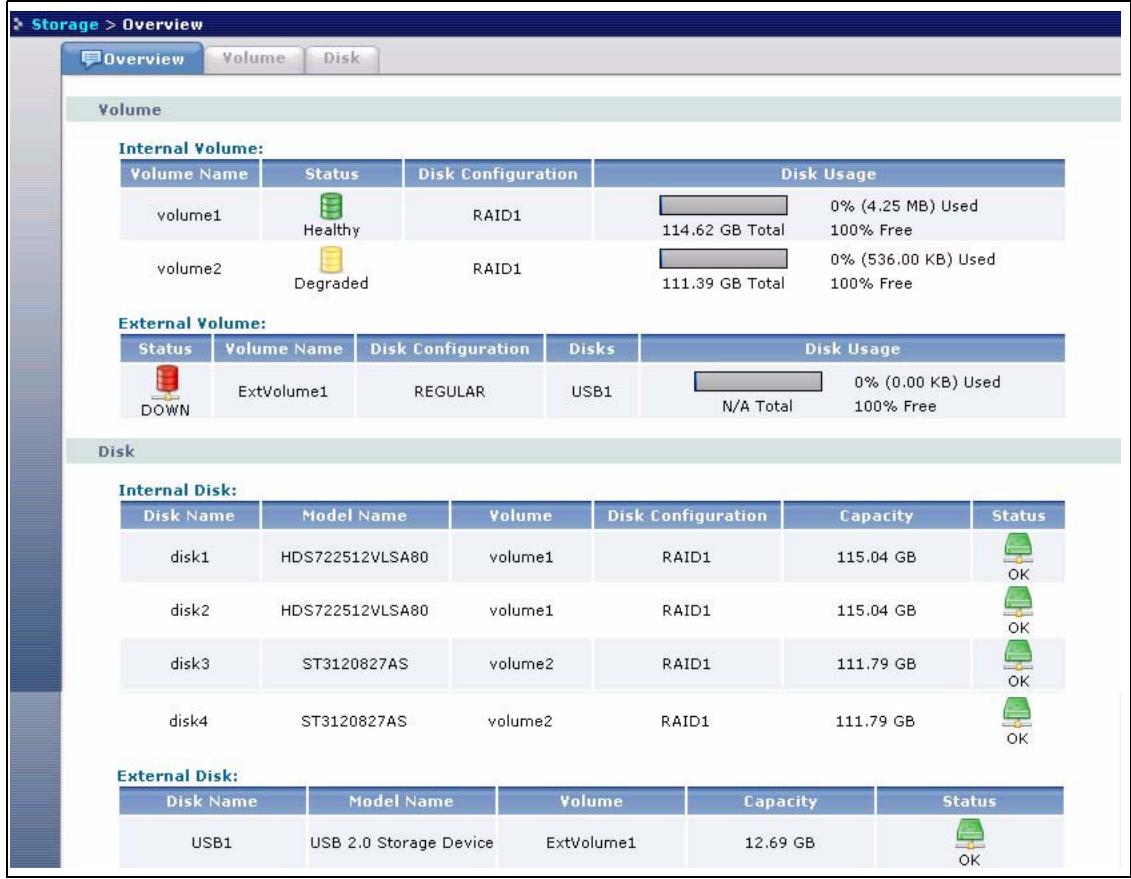
Figure 45 Storage > Overview
The following table describes the labels in this screen.
Table 36 Storage > Overview
| LABEL | DESCRIPTION |
| Internal/External Volume | These tables display information on all internal volumes (created on NSA internal disk drives) and external volumes (created on external disk drives attached to the NSA USB ports). See the volume screen for field details. |
| Volume Name | The NSA creates the volume name automatically. |
| Status | This field shows whether the volume is Healthy, Resyncching, Waiting Resynch, Degraded or Down. |
| Disk Configuration | This field shows which data storage system the volume is using. |
| Disk Usage | This field shows how many bytes of space on the volume are being used. |
| Internal/External Disk | This table displays information on all internal disk drives and external disk drives (attached to the USB port(s)). |
| Disk Name | The NSA creates the disk name automatically depending on how many disks you installed in the NSA. |
| Model Name | This is the hard disk number that identifies the disk. |
| Volume | This field shows the volume to which the disk belongs. |
| Disk Configuration | This field shows the volume storage system to which that disk belongs. |
| Capacity | This field shows the size of the disk in GB. |
| Status | This field displays OK if the (physical) disk is readable and Down if no data can be read from it. If Down, the disk may need to be scanned for errors or replaced. If it needs to be repaired or replaced, then you will have to resynchronize the volume. |
7.3 Volumes and RAID
A volume is a storage area on a disk or disks. You can create volumes on the internal disks and external disks attached to the USB port(s). You can spread a volume across internal disks but not between internal and external disks.
RAID (Redundant Array of Independent Disks) or JBOD is the storage method that the NSA-2400 uses. The storage method you use depends on how many disks you have and how many volumes you want to create. It's important that you consider this carefully as all data is deleted when you re-create a volume.

Back up your data before deleting or re-creating a volume!
For example if you originally have two disks configured at RAID 1, and you then buy two more disks and want to configure all four at RAID 5, you should first back up all your data on those disks (see the Genie Backup Manager utility on the included CD) and then restore your data later after you create the new volume type.
Below is a table that summarizes some attributes of the various RAID levels as supported on the NSA-2400. For capacity and storage efficiency, "S" is the size of the smallest drive in the array, and "N" is the number of drives in the array.
Storage efficiency assumes all drives are of identical size.
Performance rankings are approximations.
Table 37 RAID Quick Comparison
| RAID Level | 0 | 1 | 5 | 10 |
| Number of Disks | 2,3,4 | 2 | 4 | 4 |
| Capacity | S*N | S*N/2 | S*(N-1) | S*N/2 |
| Storage Efficiency | 100% | 50% | (N-1)/N | 50% |
| Fault Tolerance | None | YYYY | YYYY | YYYY |
| Availability | Y | YYYY | YYYY | YYYY |
| Read Performance | YYYY | YYYY | YYYY | YYYY |
| Write Performance | YYYY | YYYY | YY | YYYY |
7.3.1 Choosing A Storage Method For a Volume
The following is a guide to help you choose a storage method for the various number of disks supported on the NSA-2400. See Section 7.4 on page 100 for theoretical background on JBOD and the RAID levels used on the NSA-2400. Typical applications for each method are also shown there.
7.3.1.1 One Disk
If you only have one disk, you must use JBOD. All disk space is used for your data - none is used for backup. If the disk fails, then you lose all the data on that volume (disk).
7.3.1.2 Two Disks:
You may choose JBOD, RAID 0 or RAID 1. With two disks you could create:
- up to two JBOD volumes
-
one RAID 0 or RAID 1 volume
-
Choose JBOD for flexibility and maximum usage of disk space for data. You can either add an additional disk to your one-disk JBOD volume (and so don’t have to recreate shares, access rights etc.) or create a different JBOD volume (and create new shares, access rights etc.).
- Choose RAID 0 if performance matters more than data security. RAID 0 has the fastest read and write performance but if one disk fails you lose all your data on the volume. It has fast performance as it can read and write to two disks simultaneously. Performance may matter more than data security to gamers for example. This method may also be acceptable for data that is already backed up somewhere else.
- Choose RAID 1 if data security is more important than performance. Since RAID 1 mirrors data onto a second disk, you can recover all data even if one disk fails, but the performance is slower than RAID 0.
7.3.1.3 Three Disks
Choose a combination of JBOD and/or RAID 0 or RAID 1 for the reasons already outlined. With three disks you could create:
- up to three JBOD volumes
- one JBOD volume and one RAID 0 or RAID 1 volume
7.3.1.4 Four Disks
In addition to the JBOD, RAID 0 and RAID 1 choices, you may choose RAID 10, RAID 5 or RAID5_SPARE. With four disks you could create:
up to four JBOD volumes
- one or two JBOD volumes and one RAID 0 or RAID 1 volume
- two RAID 0 volumes or two RAID 1 volumes
- one RAID 0 volume and one RAID 1 volume
- one volume using one of RAID 10, RAID 5 or RAID5_SPARE
-
Choose RAID 10 for maximum data security but with just 50% of the available space for your data. You can recover all data even if two disks (not in the same RAID 1 array) fail. If two disks in the same RAID 1 array fail, then all data in the volume is lost. If two disks in different RAID 1 arrays fail, then you effectively have a RAID 0 configuration.
-
Choose RAID 5 if you need more disk space available for data and if up to one disk failure is acceptable. RAID 5 uses 75% of the available space for your data. All data can be recovered if one disk fails. If two disks fail then, all data in the volume is lost. If one disk fails, the volume is degraded and will perform more slowly than a healthy volume. You should shut down the NSA, replace the faulty disk and then resynchronize the volume to attain previous performance.
- Choose RAID5_SPARE if you need the volume to recover as soon as possible in the event of a disk failure. RAID5_SPARE operates as a RAID 5 with three disks while the fourth disk is on standby. The standby disk automatically comes into play if a disk in the 3-disk RAID5 volume fails. The advantage of RAID5_SPARE over RAID 5 is that if a disk fails, then the volume resynchronizes automatically with the standby disk and operates at healthy volume speed after the resynchronization. RAID5_SPARE uses 50% of the available space for your data.
7.3.1.5 External Disks
You can configure JBOD or BACKUP on external USB disks. Choose BACKUP if you intend to use the backup menus to copy data from the NSA internal drive(s) to an external USB drive.
7.3.2 Volume Status
You (the administrator) can see the status of a volume in the Status, Storage > Overview or Storage > Volume screens.
The NSA-2400 has the following classifications for the status of a volume:
- Healthy if all disks in the volume are OK and the file system is functioning properly.
- Resynching when you create or repair a RAID volume.
- Waiting Resync when there is already another volume resynchronizing. Only one volume can resynchronize at one time.
- Degraded when a volume is currently down, but can be fixed. Data access may be slower from a degraded volume, so it's recommended that you replace the faulty disk and repair the volume as soon as you can.
- Down when a volume is down and can not be fixed.
A down RAID volume cannot be used until you repair or replace the faulty disk(s) in the volume. Degraded means one of the disks in the RAID volume is not available but the volume can still be used. For a degraded volume, you should replace the faulty disk as soon as possible to obtain previous performance. See your Quick Start Guide for more information on replacing a disk. If there is already another volume resynchronizing, then you will see Waiting Resync as the volume status.
If it's down, then the only indication is that they can no longer transfer files to/from the shares in the down volume. If it's degraded, then file transfer to/from the shares in the degraded volume will be slower.

There is no explicit message from CIFS that tells users their volume is degraded or down.
7.3.3 Resynchronizing a RAID 1 or 5 Volume
Resynchronizing a RAID 1 or 5 Volume is done block-by-block, so the time it takes depends more on the size of your hard drive(s) than the amount of data you have on them.

You should not restart the NSA while the NSA is resynchronizing a volume as this will cause the synchronization to begin again after the NSA fully reboots.

You can access data on a RAID volume while it is resynchronizing, but it is not recommended.
7.4 RAID
This section contains theoretical background on JBOD and the RAID levels used on the NSA-2400. Skip to the next section if you already understand RAID and know what storage system you want to use on the NSA-2400.
Redundant Array of Independent Disks (RAID) is a method of storing data on multiple disks to provide a combination of greater capacity, reliability, and/or speed. JBOD (Just a Bunch Of Disks) is not a RAID storage method but it is included in this discussion.
These are some terms that you need to know in order to understand storage systems.
- Mirroring
In a RAID system using mirroring, all data in the system is written simultaneously to two hard disks instead of one. This provides 100% data redundancy as if one disk fails the other has the duplicated data. Mirroring setups always require an even number of drives.
- Duplexing
Like in mirroring, all data is duplicated onto two distinct physical hard drives but in addition it also duplicates the hardware that controls the two hard drives (one of the drives would be connected to one adapter and the other to a second adapter).
- Striping
Striping is the breaking up of data and storing different data pieces on each of the drives in an array. This allows faster reading and writing as it can be done simultaneously across disks. Striping can be done at the byte level, or in blocks. Byte-level striping means that the first byte of the file is sent to the first drive, then the second to the second drive, and so on. Block-level striping means that each file is split into blocks of a certain size and those are distributed to the various drives. The size of the blocks used is also called the stripe size (or block size).
- Parity
In mirroring 50% of the drives in the array are reserved for duplicate data. Parity is another way to allow data recovery in the event of disk failure using calculations rather than duplicating the data. If you have 'n' pieces of data, parity computes an extra piece of data. The 'n+1' pieces of data are stored on 'n+1' drives. If you lose any one of the 'n+1' pieces of data, you can recreate it from the 'n' that remain, regardless of which piece is lost. Parity protection is used with striping, and the "n" pieces of data are typically the blocks or bytes distributed across the drives in the array. The parity information can either be stored on a separate, dedicated drive, or be mixed with the data across all the drives in the array.

In the following figures, A1, A2, A3 and so on are blocks of data from the A file. Similarly, B1, B2, B3 and C1, C2, C3 ar blocks of data from the B and C files.
7.4.1 JBOD
JBOD allows you to combine multiple physical disk drives into a single virtual one, so they appear as a single large disk. JBOD can be used to turn several different-sized drives into one big drive. For example, JBOD could convert 5 GB, 10 GB, 15 GB, and 20 GB drives into one large logical drive of 50 GB. Moreover, since data isn't striped across disks, if one disk fails, you should just lose the data on that disk (but you may lose data in the whole volume depending on the nature of the disk failure). You can add disks to the JBOD volume later (using the Add disk to JBOD feature) and even remove them so JBOD offers a lot of flexibility. However JBOD read performance is not as good as RAID as only one disk can be read at a time and they must be read sequentially. The following figure shows three disks in a single JBOD volume. Data is not written across disks but written sequentially to each disk until it's full.
Table 38 JBOD
| A1 | B1 | C1 |
| A2 | B2 | C2 |
| A3 | B3 | C3 |
| A4 | B4 | C4 |
| DISK 1 | DISK 2 | DISK 3 |
7.4.2 RAID 0
RAID 0 spreads data evenly across two or more disks (data striping) with no mirroring nor parity for data redundancy, so if one disk fails the entire volume will be lost. The major benefit of RAID 0 is performance. The following figure shows two disks in a single RAID 0 volume. Data can be written and read across disks simultaneously for faster performance.
Table 39 RAID 0
| A1 | A2 |
| A3 | A4 |
| A5 | A6 |
| A7 | A8 |
| DISK 1 | DISK 2 |
RAID 0 capacity is the size of the smallest disk multiplied by the number of disks you have configured at RAID 0 on the NSA. For example, if you have four disks of sizes 100 GB, 150 GB, 150 GB and 200 GB respectively in one RAID 0 volume, then the maximum capacity is 400 GB (4 * 100 GB, the smallest disk size) and the remaining space (300 GB) is unused.
Typical applications for RAID 0 are non-critical data (or data that changes infrequently and is backed up regularly) requiring high write speed such as audio, video, graphics, games and so on.
7.4.3 RAID 1
RAID 1 creates an exact copy (or mirror) of a set of data on another disk. This is useful when data backup is more important than data capacity. The following figure shows two disks in a single RAID 1 volume with mirrored data. Data is duplicated across two disks, so if one disk fails, there is still a copy of the data.
Table 40 RAID 1
| A1 | A1 |
| A2 | A2 |
| A3 | A3 |
| A4 | A4 |
| DISK 1 | DISK 2 |
As RAID 1 uses mirroring and duplexing, a RAID 1 volume needs an even number of disks (two or four for the NSA).

When you use RAID 1 on the NSA-2400, you MUST use disks 1 and 2 in one RAID volume and/or disks 3 and 4 in the other; you cannot have disks 1 and 3 in the same RAID volume for example.
RAID 1 capacity is limited to the size of the smallest disk in the RAID array. For example, if you have two disks of sizes 150 GB and 200 GB respectively in one RAID 1 volume, then the maximum capacity is 150 GB and the remaining space (50 GB) is unused.
Typical applications for RAID 1 are those requiring high fault tolerance without need of large amounts of storage capacity or top performance, for example, accounting and financial data, small database systems, and enterprise servers.
7.4.4 RAID 10
RAID 10 (RAID 1 + 0 ) is a nested RAID where two RAID 1 arrays are stored on the physical disks with a RAID 0 array on top. It is a stripe of mirrors. RAID 1 provides redundancy while RAID 0 boosts performance. The following figure shows two disks in two RAID 1 arrays. Data is duplicated across two disks, so if one disk fails, there is still a copy of the data. These two arrays are configured as a single RAID 0 volume for faster performance.
Table 41 RAID 10
| RAID 0 | |||
| RAID 1 | RAID 1 | ||
| A1 | A1 | A2 | A2 |
| A3 | A3 | A4 | A4 |
| A5 | A5 | A6 | A6 |
| A7 | A7 | A8 | A8 |
| DISK 1 | DISK 2 | DISK 3 | DISK 4 |
Typical applications for RAID 10 are those requiring both high performance and reliability such as enterprise servers and high-end moderate-sized database systems. RAID 10 is often used in place of RAID 1 or RAID 5 by those requiring higher performance. It may be used instead of RAID 1 for applications requiring more capacity.
7.4.5 RAID 5
RAID 5 provides the best balance of capacity and performance while providing data redundancy. It provides redundancy by striping data across three disks and keeps the parity information (AP) on the fourth disk (in each stripe). In case of disk failure, data can be recovered from the surviving disks using the parity information. When you replace the failed disk, the reconstructed data is written onto the new disk. Resynchronize the volume to have it return to its original state. The following figure shows data stripped across three disks (A1 to A3 in the first strip for example) with parity information (AP) on the fourth disk.
Table 42 RAID 5
| A1 | A2 | A3 | AP |
| B1 | B2 | BP | B3 |
| C1 | CP | C2 | C3 |
| DP | D1 | D2 | D3 |
| DISK 1 | DISK 2 | DISK 3 | DISK 4 |
The capacity of a RAID 5 volume is the smallest disk in the RAID set multiplied by one less than the number of disks in the RAID set. For example, if you have four disks of sizes 150 GB, 150 GB, 200 GB and 250 GB respectively in one RAID 5 volume, then the maximum capacity is 450 GB (3 * 150 GB, the smallest disk size) and the remaining space (300 GB) is unused.
Typical applications for RAID 10 are transaction processing, relational database applications, enterprise resource planning and other business systems. For write-intensive applications, RAID 1 or RAID 1 + 0 are probably better choices, as the performance of RAID 5 will begin to substantially decrease in a write-heavy environment.
7.4.6 RAID 5 SPARE
RAID 5 SPARE operates as a RAID 5 with three disks while the fourth disk is on standby. The standby disk automatically comes into play if a disk in the volume fails. The advantage of RAID5_SPARE over RAID 5 is that if a disk fails, then the volume resynchronizes automatically with the standby disk and operates at healthy volume speed after the resynchronization.

You need four hard disks to use RAID 10, RAID 5 and RAID5_SPARE on the NSA-2400.
7.4.7 RAID and Data Protection
If a hard disk fails and you're using a RAID 1, RAID 10, or RAID 5 volume then your data will still be available (but at degraded speeds until you replace the hard disk that failed and resynchronize the volume). However, RAID cannot protect against file corruption, virus attacks, files incorrectly deleted or modified, or the NSA-2400 malfunctioning. See Section 6.1 on page 81 for what you should use in these cases to protect data on your NSA-2400.
7.5 Volume Screen
Click the Volume tab to display the volume summary screen as shown.
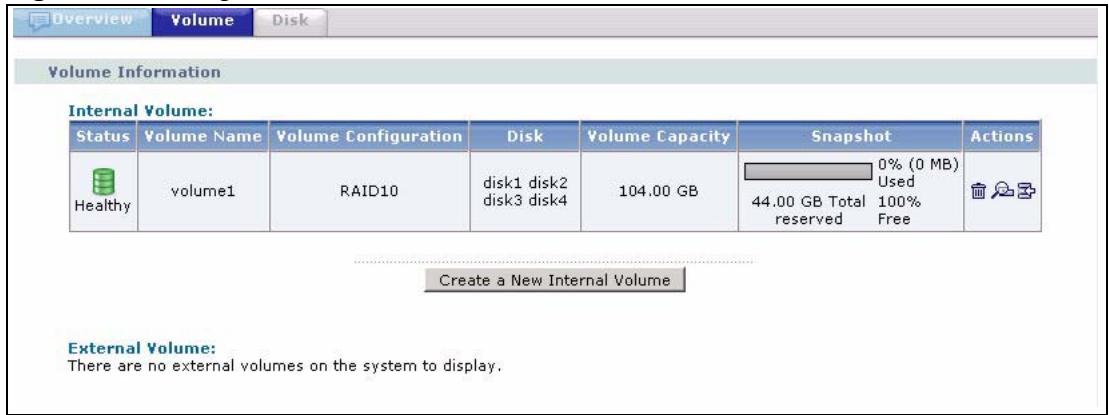
Figure 46 Storage > Volume
The following table describes the labels in this screen.
Table 43 Storage > Volume
| LABEL | DESCRIPTION |
| Volume Information | |
| Internal/External Volume: | These tables display information on volumes created on the NSA internal disk drives and on the NSA external disk drives attached to the USB port(s). |
| Status | This field shows Healthy, Resyncing, Waiting Resync, Degraded or Down; see Section 7.3.2 on page 99. If a volume is degraded, you should click the Repair icon after you have replaced the faulty disk. |
| Volume Name | This field shows the NSA-generated name for the volume. |
| Volume Configuration | This field shows what type of data storage system (a RAID type or JBOD) the volume is using. For external drives, it may show REGULAR meaning that the NSA can read the volume but the volume wasn't created on the NSA. |
| Disks | This field shows the hard disks that are in the volume. |
| Volume Capacity | This field shows the total size of the volume. |
| Snapshot | Snapshot just takes up as much space as it needs (within the reserved space). This field shows how much of the reserved space is currently being used for snapshots. |
| Actions | This field displays icons allowing you to remove, scan or expand a volume. You can expand a volume by up to the amount of snapshot reserved space less the amount of space currently being used by snapshots. This in effect decreases or eliminates spare snapshot reserved space.Note: All snapshots are lost if you run out of reserved snapshot space.Note: If you remove a volume (or change a volume type), all data in the volume disk(s) is erased.If there are conflicting volumes, you will see an Unmount icon in addition to these icons. See Section 7.7.4 on page 109 for more information on conflicting volumes. |
| Create a New Internal Volume | If you have disks available for a new volume, then click this button to create it. |
You see the following warning screens before you remove, scan or expand a volume.
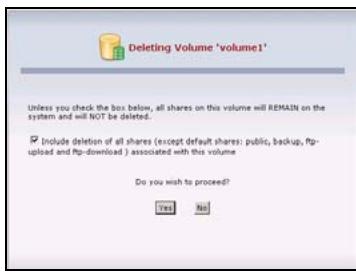
Figure 47 Remove, Scan Or Expand A Volume
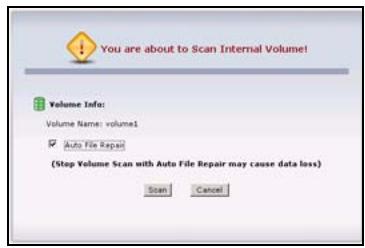
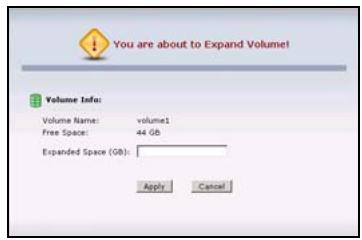
7.6 Creating a New Internal Volume
Click the Create a New Internal Volume button in the Volume screen as shown in Figure 46 on page 105 to create a new NSA internal disk drive volume.
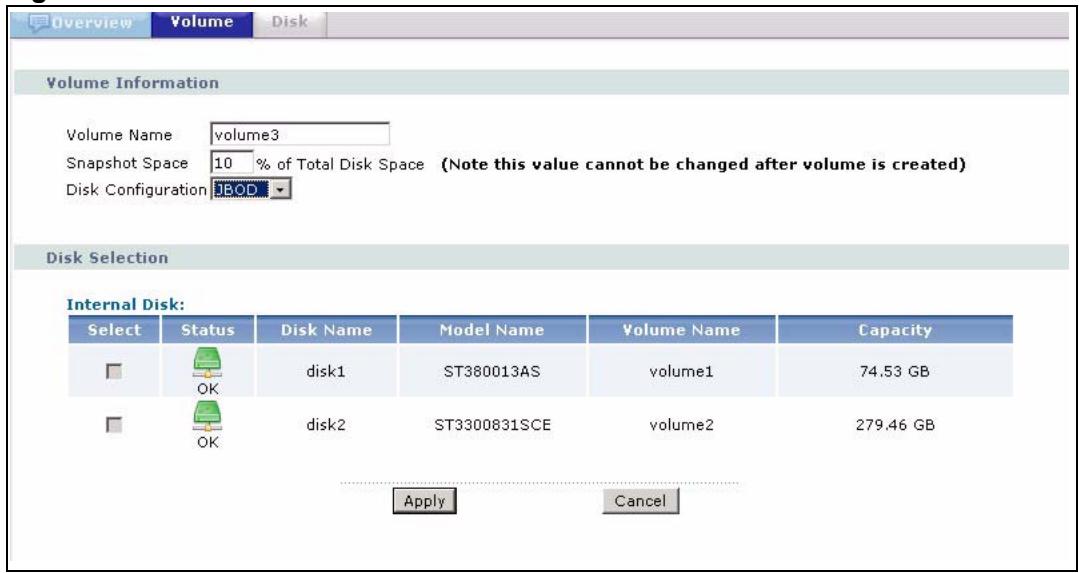
Figure 48 Create a New Internal Volume
The following table describes the labels in this screen.
Table 44 Create a New Internal Volume
| LABEL | DESCRIPTION |
| Volume Information | |
| Volume Name | Internal volume names are pre-defined. You cannot change them. |
| Snapshot Space | Type what percentage of the volume should be used for snapshots.Snapshots take up as much space as they need (within the reserved space).Note: Reserved snapshot space can not be increased later,so it's better to reserve enough space in thebeginning. All snapshots are lost if you run out of diskspace. |
| Disk Configuration | Use JBOD or RAID 0 if you want maximum capacity and/or maximum speed for your disks, and/or you have other means of protecting your data.Use RAID 1 if you want to mirror primary data to another disk(s) with high performance.Use RAID 10, RAID 5 or RAID%_SPARE if you have four disks and youwant to balance performance, hard disk capacity usage with data protection in case of disk failure.See Section 7.3 on page 97 and Section 7.4 on page 100 for more information on storage systems. |
| Disk Selection | |
| Internal Disk: | This table lists all hard disks installed inside the NSA. Use the Select check box(es) to choose which disks should make up this volume. A disk can only belong to one volume. |
| Apply | Click this button to save your changes back to the NSA. |
| Cancel | Click this button to begin configuring this screen afresh. |
7.7 Disk
You can view information on the NSA internal disks and external disks attached to the USB port(s) in this screen.
7.7.1 Maintenance Mode
If you have no internal NSA volumes (disks), then the NSA is in Maintenance Mode. When the NSA is in this mode you cannot create users, groups or shares on the NSA. You must first go to the Storage > Disk screen and create an internal volume (assuming you already have an internal disk installed).

You need to have at least one internal hard disk installed and an internal volume created before you can use an external hard disk.
7.7.2 External Disks
You may connect USB storage devices that support the following file systems to the NSA.
- Windows File Systems: NTFS (read only), FAT32 and FAT16.
If your USB storage device uses a NTFS file system, then the NSA can read files from it, but cannot write files to it. If you want to be able to write files to that storage device, then you should back up all data on the device (to an internal drive for example) and then click the Initialize icon for the NSA to create an XFS volume on the (external) hard drive. You can then both read and write to that hard drive and restore your data to it.
Linux File Systems:EXT2,EXT3 and XFS

Although the NSA can read previously-stored files and folders using double-byte characters (such as Chinese), it does not allow you to write new ones to an external drive using double-byte characters.
7.7.3 Disk Replacement Restrictions
See the Quick Start Guide for information on replacing disks in the NSA. When replacing a disk in a degraded or down RAID volume, the new disk must be at least the same size or bigger than the other disks that are already in the RAID volume, so as all data in the volume can be restored.
For example, if you have RAID with 250 GB disks, you must put in a 250 GB or bigger disk as a replacement in order to restore all original data in that volume. If you put a bigger disk, the extra space on the disk will not be used.
AFTER replacing the disk, go to the Storage>Disk page and click the Repair icon next to the new disk.

The NSA does not repair a disk automatically when you replace it; you must click Repair.
7.7.4 Disk Replacement and Volume Labels
When you create a volume, the NSA writes the volume label to the disk.

Deleting a volume removes volume label information on its disk(s). It is recommended that you first delete a volume before removing its disk(s).
If you remove a disk(s) without deleting its volume and you later put the disk(s) back in a different volume, problems may occur. For example, suppose you have two disks, Disk A and Disk B and you create two JBOD volumes, volume1 (with Disk A) and volume2 (Disk B). Later you remove Disk A and replace it with another disk, Disk C and you re-create volume1. (You did not delete volume1 when you removed Disk A.) Later you replace Disk B with Disk A. Disk A still retains the volume1 label, so at this point there are conflicting duplicate volumes since both Disk A and Disk C have the volume1 label.
7.7.4.1 Volume Conflict Resolution Procedure
Mount and unmount icons (only) appear in the Storage > Volume screen when two volumes of the same name exist. The NSA can only recognize unique volume names, so you must use these icons to delete a duplicate name. Follow this procedure to do that:
1 Click the Unmount icon in the Storage > Volume screen (Figure 46 on page 105) to unmount the volume you want to be volume 1 (disk A for example).
2 Click the Mount icon in the Storage > Volume screen (Figure 46 on page 105) to mount the volume you wish to delete (disk B for example).
3 Delete this volume 1 (Disk B).
4 Now mount the original volume 1 (Disk A).
7.7.4.2 Alternative Conflict Procedure
1 Shut down the NSA.
2 Remove the disk(s) in one conflicting volume. The other disk(s) that are in the other conflicting volume must remain connected.
3 Restart the NSA.
4 Open your browser and connect to the web configurator; verify that the volume is properly recognized.
5 Save a backup of this volume.
6 Once you have made the backup, go to Storage > Volume and delete this volume.
7 Shut down the NSA.
8 Put back the disk(s) you removed in step 1.
9 Restart the NSA.
10 The original volume should be visible in the web configurator and the previously conflicting volume should be shown as an available disk.
11 Go to Storage > Volume and create a new volume on the available disk.
12 Once the new volume is successfully created, restore your backup data (step 5) onto this new volume.
Conflicting volumes may also arise if you use JBOD and/or RAID 1.

To avoid conflicting volumes, delete a volume before you remove its disk(s).
7.7.5 Disk Screen
The following screen shows information on disks installed in the NSA-2400.
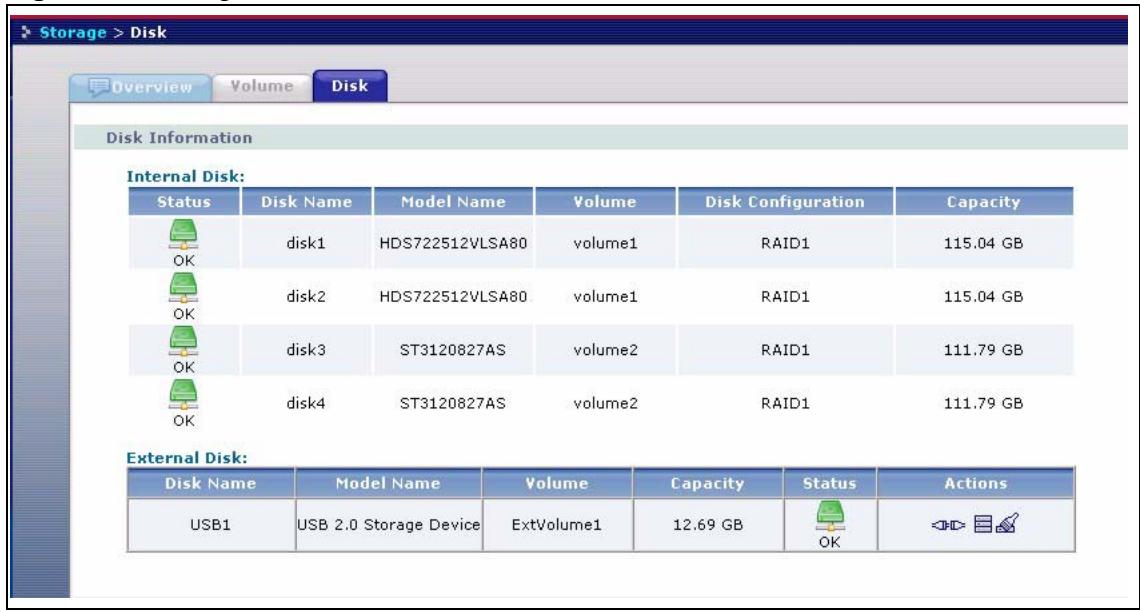
Figure 49 Storage > Disk
The following table describes the labels in this screen.
Table 45 Storage > Disk
| LABEL | DESCRIPTION |
| Disk Information | |
| Internal/External Disk: | These tables display information on the NSA internal and external disk drives (attached to the USB ports). |
| Disk Name | This field shows disk1, disk2, disk3 and/or disk4 for disks installed in the NSA disk trays labelled 1, 2, 3 and 4 respectively.It shows USB1, USB2 and/or USB3 for external USB disks; USB ports are not numbered, so USB1 represents the first device you connected to the NSA, USB2 the second and so on. If you're unsure of which external disk is connected to which port, then use the Locate icon to cause a LED on the external disk to blink. |
| Model Name | This is the hard drive model number that uniquely identifies a hard drive. |
| Volume | This field shows which volume the disk belongs to. It shows No Volume if it does not (yet) belong to a volume. |
| Disk Configuration | This shows the volume storage system to which the disk belongs. See Section 7.3 on page 97 and Section 7.4 on page 100 for more information on storage systems. |
| Capacity | This field shows the size of the hard disk. |
| Status | This field shows if the hard disk is functioning normally. |
| Action | Click the Scan Disk icon to scan a hard disk drive for bad sectors and file system errors. Note: All users must disconnect from the NSA before the disk scan can begin. For external hard disks, there are additional Disconnect, Locate and Initialize icons. Make sure to click the Disconnect icon before you remove an external drive so that you do not lose data that is being transferred to or from that hard drive. Click the Locate icon to cause the corresponding USB LED on the NSA to blink. Click the Initialize icon for the NSA to create a volume on the (external) hard drive. You can configure an external disk as either JBOD or BACKUP only! |
| Overview Volume Disk Volume Information Disk Name USB2 Volume Name ExtVolume1 Disk Configuration JBOD Snapshot Space 10 % of Total Disk Space (Note this value cannot be changed after volume is created) Apply Cancel |
Maintenance Screens
This chapter discusses the Maintenance screens.
8.1 Maintenance Overview
Use the maintenance screens to:
View system information
- Set the NSA-2400 date and time
View logs and configure where e-mail logs should be sent via e-mail
- Change your password and configure HTTPS
- Manage the NSA-2400 configuration file
- Upload new firmware
- Restart or shut down your NSA-2400
Click the Maintenance link in the Navigation panel to access the Maintenance > Overview screen. This is the first screen displayed.
8.1.1 HTTPS and SSL
HTTPS is HyperText Transfer Protocol over Secure Socket Layer, or HTTP over SSL. For more information about these protocols see Section 8.4.1 on page 118.
8.1.2 Maintenance Overview Screen
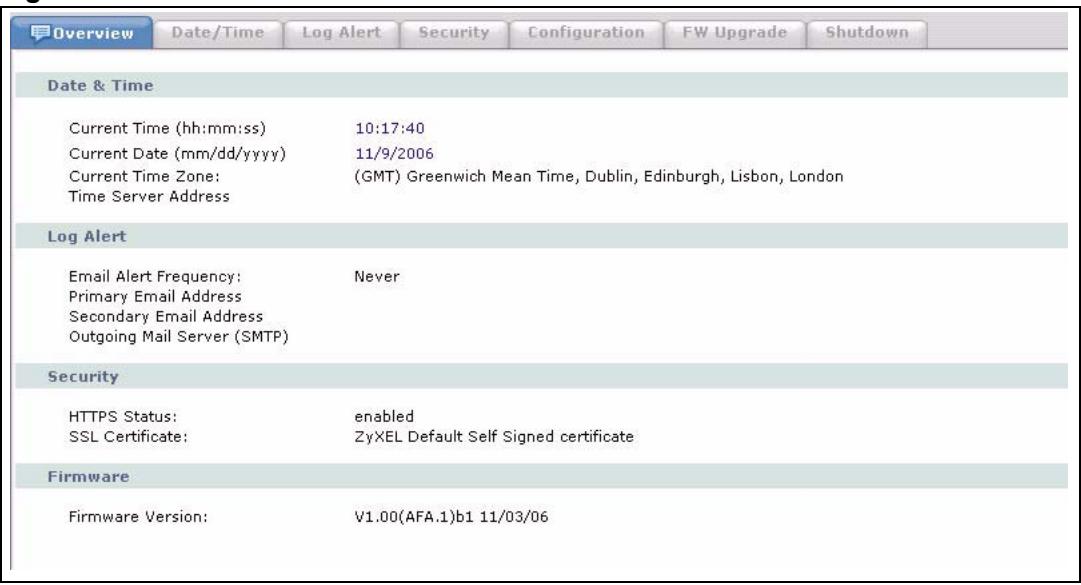
Figure 50 Maintenance > Overview
The following table describes the labels in this screen.
Table 46 Maintenance > Overview
| LABEL | DESCRIPTION |
| Date & Time | |
| Current Time | This field displays the time of your NSA-2400. The time is updated periodically from the time server. |
| Current Date | This field displays the date of your NSA-2400. The date is updated periodically from the time server. |
| Current Time Zone | This is the time zone of your location. This displays the time difference between your time zone and Greenwich Mean Time (GMT). |
| Time Server Address | This is the IP address or URL of your time server. |
| Log Alert | |
| Email Alert Frequency | This field displays how often the NSA-2400 should send e-mail alerts. |
| Primary Email Address | This field displays your primary e-mail address. It is necessary to enter your primary e-mail address in the Maintenance > Log Alert screen. |
| Secondary Email Address | This field displays your secondary e-mail address. |
| Outgoing Mail Server (SMTP) | This field displays the IP address of your outgoing mail server. |
| Security | |
| HTTPS Status | This field displays if HTTPS is enabled or disabled. You can click the Use Secure Connection checkbox in the Maintenance > Security screen to change this setting. |
| SSL Certificate | This field displays what type of SSL certificate your system is using. You can modify SSL by loading a different certificate in the Maintenance > Security screen. |
| Firmware | |
| Firmware Version | This field displays the version number of the firmware for your NSA-2400. |
8.2 Date/Time
Use this screen to select a time zone and a time server from which your NSA-2400 can get the time and date. This time is then used in NSA-2400 logs and alerts.
8.2.1 Time Lag
Time lag occurs when the time on the NSA-2400 falls behind the time on the time server. This may happen if:
- the time server is no longer reachable
- if the NSA-2400 is shut down often (the NSA-2400 internal battery keeps time when the NSA-2400 is shut down and this may cause possible variance)
- power surges occur.
The NSA-2400 gives no warning if time lag occurs. You should resynchronize the time after a power surge or after you have shut down the NSA-2400 several times.
8.2.2 Time/Date And External Domain Controllers
The NSA-2400 time and date must be the same as the time and date on the external domain controller if the NSA-2400 is using one. To ensure this, you could use your domain controller as your time server if it has this function. Select Set My Own Timeserver and then enter the domain controller's IP address in Time Server Address. You can then in turn, set your domain controller to use another time server on the Internet.
8.2.3 Pre-defined NTP Time Servers List
When you turn on the NSA-2400 for the first time, the date and time start at 2000-01-01 00:00:00. The NSA-2400 then attempts to synchronize with one of the following pre-defined list of time servers. A time server is a server that keeps the correct time. It can assign time to the NSA-2400.
The NSA-2400 tries to connect to the following pre-defined list of time servers if you do not specify one or it cannot synchronize with the time server you specified.

These are the time servers available on the NSA-2400 at the time of writing.
Table 47 Default Time Servers
| ntp.nasa.gov |
| pool.ntp.org |
| asia.pool.ntp.org |
| a.ntp.alphazed.net |
8.2.4 Date/Time Screen
Click the Maintenance link in the Navigation panel and then click the Date/Time link or the Date/Time tab to access the Maintenance > Date/Time screen.
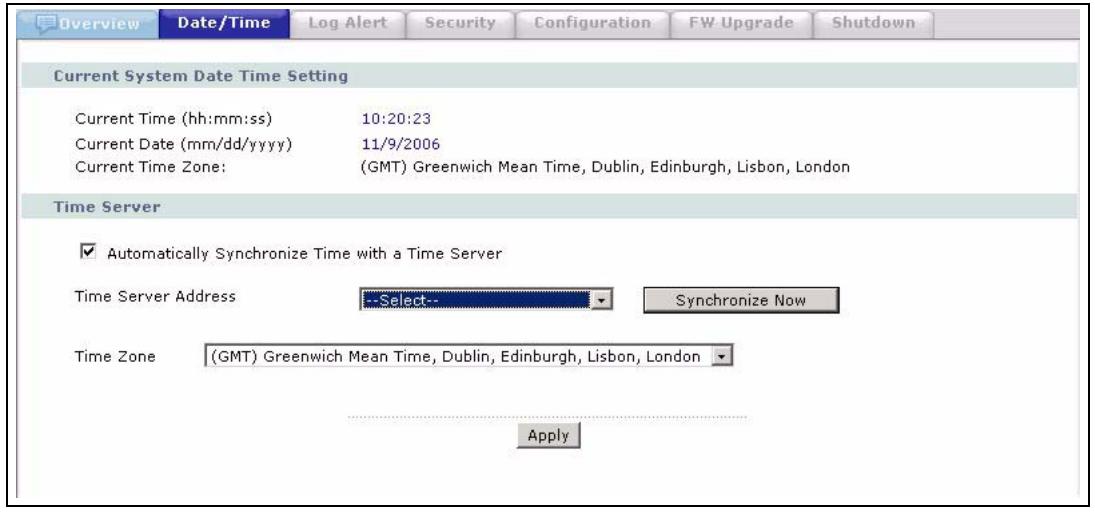
Figure 51 Maintenance > Date/Time
The following table describes the labels in this screen.
Table 48 Maintenance > Date/Time
| LABEL | DESCRIPTION |
| Current System Date Time Setting | |
| Current Time | This field displays the time of your NSA-2400. |
| Current Date | This field displays the date of your NSA-2400. |
| Current Time Zone | This field displays the time zone of your location. This will set the time difference between your time zone and Greenwich Mean Time (GMT). |
| Time Server | |
| Automatically Synchronize Time with a Time Server | Select this checkbox to have the NSA-2400 get the time and date from the time server you select in the Time Server Address field. |
| Synchronize Now | Click this button for the NSA-2400 to retrieve the correct time from the configured time server right away. |
| Time Server Address | Select a time server from the drop-down list box or select Specify my own time server and enter the time server you wish to use in the field below. Check with your ISP/network administrator if you are unsure of this information. |
| Time Zone | Choose the time zone of your location. This will set the time difference between your time zone and Greenwich Mean Time (GMT). |
| Apply | Click Apply to confirm your settings. |
8.3 Log Alert Screen
Use this screen to set how often the NSA-2400 should e-mail alerts, to where and via what e-mail server. An alert is an event that requires administrator attention.
Click the Maintenance link in the navigation panel and then click the Log Alert link or the Log Alert tab to access the Maintenance > Log Alert screen.
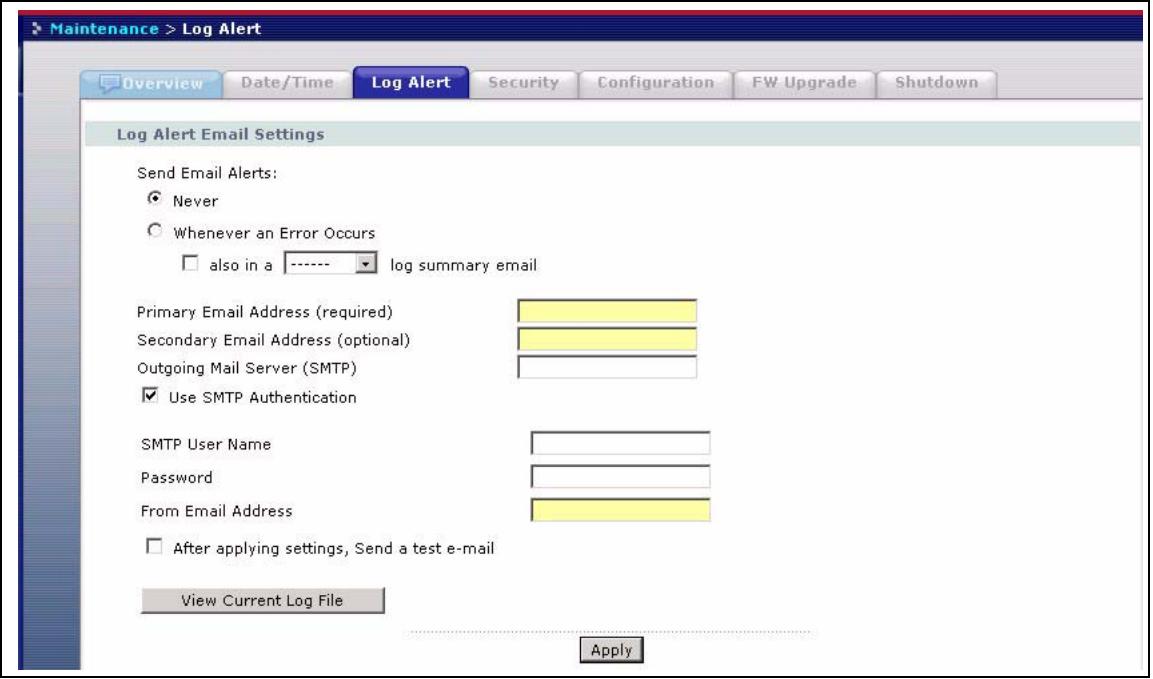
Figure 52 Maintenance > Log Alert
The following table describes the labels in this screen.
Table 49 Maintenance > Log Alert
| LABEL | DESCRIPTION |
| Log Alert Email Settings | |
| Send Email Alerts | This section allows you to set the e-mail alert options. You can decide how often to send e-mail alerts, to whom, and via which mail server. |
| Never | Select Never to not send e-mail alerts at all. |
| Whenever an Error Occurs | Select this option to only send e-mail alerts whenever a critical error occurs. |
| also in a (daily/weekly/monthly) log summary email | There are at most 128 entries in the log. Older logs are removed by the system. Select daily, weekly or monthly to determine how often e-mail alerts should be sent along with log summaries. Summary e-mail contains warnings logs. |
| Primary Email Address | Type the e-mail address of the person who should receive alerts. |
| Secondary Email Address | Type the e-mail address of another person who should receive alerts if you want. |
| Outgoing Mail Server (SMTP) | Type the IP address or URL of the mail server through which mail is sent. |
| Use SMTP Authentication | Select this check box if your e-mail server requires a user name and password. |
| SMTP User Name | Type your e-mail server user name here. |
| Password | Type your e-mail server password here. |
| From Email Address | Type the e-mail address of the sender of alerts here. Use an administrator e-mail address for example. |
| After applying settings, send a test e-mail | Select this checkbox to send a test e-mail (after you click Apply). Use this to test if the destination e-mail address and mail server addresses are reachable and correct. |
| View Current Log File | When you click the View Current Log File button you go to the System Status > System Log screen. It shows you your log history and allows you to filter which types of logs you want to see as well as purge the list. |
| Apply | Click Apply to save your settings. |
8.4 Security
Use this screen to change the admin password and elect to allow only HTTPS web connections to the NSA-2400.
8.4.1 Introduction to HTTPS
HTTPS (HyperText Transfer Protocol over Secure Socket Layer, or HTTP over SSL) is a web protocol that encrypts and decrypts web pages. Secure Socket Layer (SSL) is an application-level protocol that enables secure transactions of data by ensuring confidentiality (an unauthorized party cannot read the transferred data), authentication (one party can identify the other party) and data integrity (you know if data has been changed).
HTTPS relies upon certificates, public keys, and private keys.
HTTPS is used on the NSA-2400 so that you may securely access the NSA-2400 using the web configurator. The SSL protocol specifies that the SSL server (the NSA-2400) must always authenticate itself to the SSL client (the computer which requests the HTTPS connection with the NSA-2400), whereas the SSL client only should authenticate itself when the SSL server requires it to do so. You must apply for a certificate for the browser from a CA that is a trusted CA on the NSA-2400.

If you select Only Use Secure Connection (HTTPS), then the NSA-2400 allows HTTPS connections only. HTTP connection attempts are forwarded to HTTPS. If you clear Only Use Secure Connection (HTTPS), then the NSA-2400 allows both HTTP and HTTPS connections.
8.4.2 Security Screen
Click the Maintenance link in the Navigation panel and then click the Security link or the Security tab to access the Maintenance > Security screen.

Figure 53 Maintenance > Security
The following table describes the labels in this screen.
Table 50 Maintenance > Security
| LABEL | DESCRIPTION |
| Password | |
| Old Password | Type your old password in this field. |
| New Password | Type your new password in this field. |
| Retype to Confirm | Retype your new password in this field to confirm it. |
| Apply | Click Apply to confirm your password change. |
| Secure Connection | |
| ONLY Use Secure Connection (HTTPS) | Select the checkbox to only allow secure web (HTTPS) connections to the NSA-2400. HTTP connection attempts are forwarded to HTTPS. Clear the checkbox to allow both HTTP and HTTPS connections. |
| Apply | Click Apply to confirm your secure connection change. |
8.5 Configuration
Use the Configuration screen to back up or restore the NSA-2400 configuration settings and enable or disable the hardware reset button.
8.5.1 Configuration Screen
Click the Maintenance link in the Navigation panel and then click the Configuration link or the Configuration tab to access the Maintenance > Configuration screen.
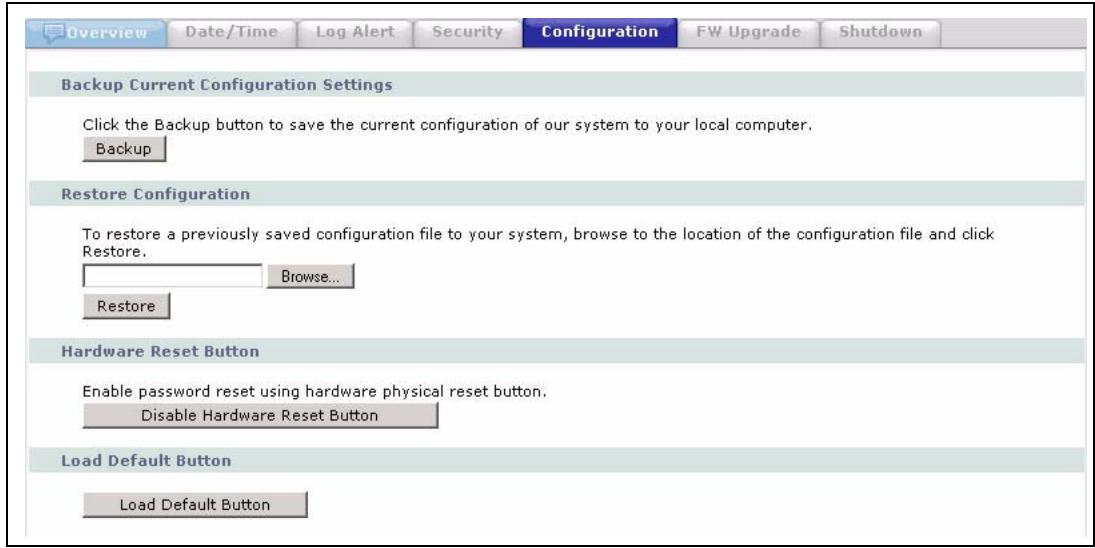
Figure 54 Maintenance > Configuration
The following table describes the labels in this screen.
Table 51 Maintenance > Configuration
| LABEL | DESCRIPTION |
| Backup Current Configuration Settings | |
| Backup | Click Backup to save the current configuration of the NSA-2400 to your computer. A pop-up screen appears asking you to confirm. Click OK to continue or Cancel to quit. |
| Restore Configuration | After you restore a configuration, if a share path does not exist, then it appears be in red. |
| Browse | Click Browse to locate a previously-saved configuration file. |
| Restore | Click Restore to load the previously-saved configuration file to the NSA-2400. This replaces your current NSA-2400 configuration settings with the settings in the previously-saved configuration file.A pop-up screen appears asking you to confirm. Click OK to continue or Cancel to quit. |
| Hardware Reset Button | This button resets the NSA-2400 to the default IP address, and default admin password. Hold the button in for six seconds to complete the reset. The NSA-2400 DIAG LED blinks quickly for three seconds when the reset is complete. |
Table 51 Maintenance > Configuration
| LABEL | DESCRIPTION |
| Enable/Disable Hardware Reset Button | When the screen button reads Disable Hardware Reset Button, it means the button on the NSA-2400 is already enabled. if you forget your (admin) password, you can use the reset button the device to reset it to ‘1234’ again. Click Disable Hardware Reset Button to stop anyone from resetting the physical hardware reset button on the NSA-2400. Note: If you disable the reset button, you will not be able to access the device if you forget your password. Make sure you write it down and keep it in a safe place. When the button on the screen reads Enable Hardware Reset Button, it means the reset button on the NSA-2400 is disabled. When you change the reset button setting, a pop-up screen appears asking you to confirm. Click OK to continue or Cancel to quit. |
| Load Default Button | Click this button to reload the factory default settings: • IP address: 192.168.1.3 • username: admin • password: 1234 |
8.6 Firmware Upgrade
Use this screen to upgrade the NSA-2400 firmware. You should first have downloaded the latest firmware files from the ZyXEL website.
8.6.1 Firmware Upgrade Screen
Click the Maintenance link in the Navigation panel and then click the FW Upgrade link or the FW Upgrade tab to access the Maintenance > FW Upgrade screen.
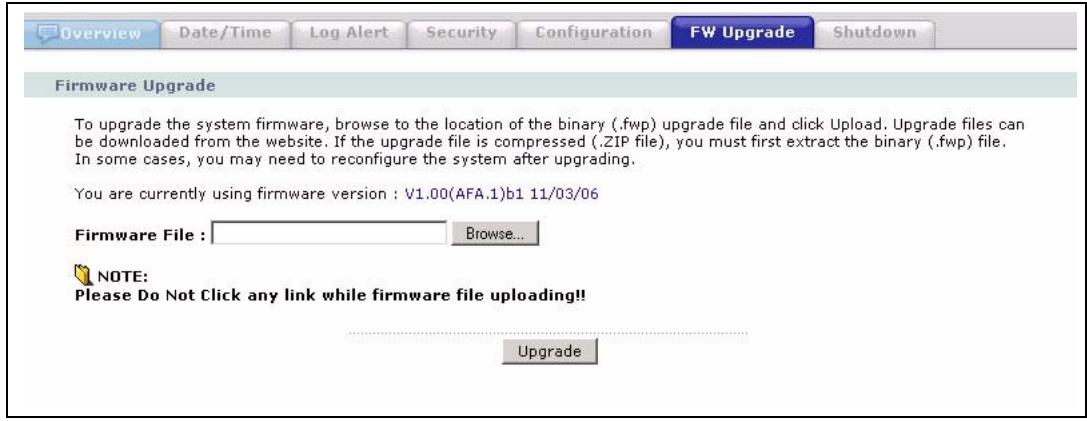
Figure 55 Maintenance > FW Upgrade
The following table describes the labels in this screen.
Table 52 Maintenance > FW Upgrade
| LABEL | DESCRIPTION |
| Firmware Upgrade | |
| Firmware File | Type the location of the firmware file you want to upload |
| Browse | Click Browse to find the file on your computer |
| Upgrade | Click Upgrade to upload the new firmware. The NSA-2400 automatically restarts after you upgrade. Wait until the restart completes before accessing the NSA-2400 again. If you interrupt the upgrade, then the NSA-2400 may become unusable. |
8.7 Shutdown
Use this screen to turn off the NSA-2400 or perform a software restart. A software restart is faster than turning the NSA-2400 off and then turning it on again. Before shutting down or restarting, check the System Status > Active Sessions screen to make sure that no one is logged into the NSA-2400 or transferring files to or from the NSA-2400.
8.7.1 Shutdown Screen
Click the Maintenance link in the Navigation panel and then click the Shutdown link or the Shutdown tab to access the Maintenance > Shutdown screen.
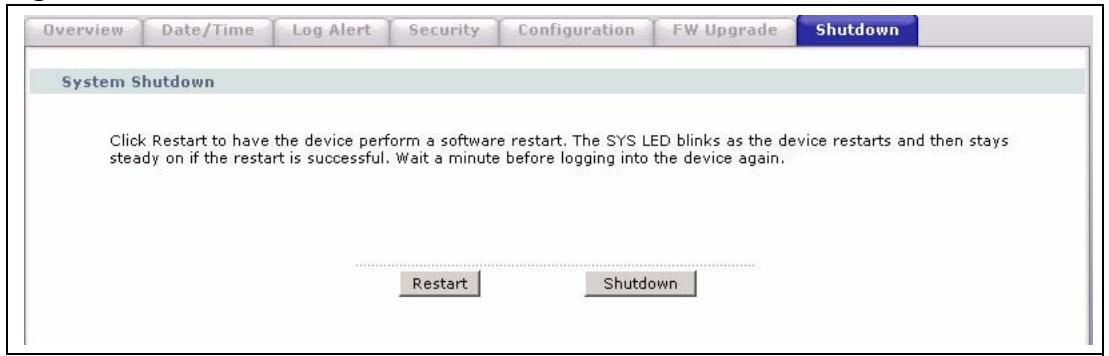
Figure 56 Maintenance > Shutdown
The following table describes the labels in this screen.
Table 53 Maintenance > Shutdown
| LABEL | DESCRIPTION |
| System Shutdown | |
| Restart | Click Restart to have the device perform a software restart. |
| Shutdown | Click Shutdown to shut down the system and restart it again later. |
When you click the Restart button a pop-up screen will appear asking you to confirm. Click OK to continue or Cancel to quit the restart.
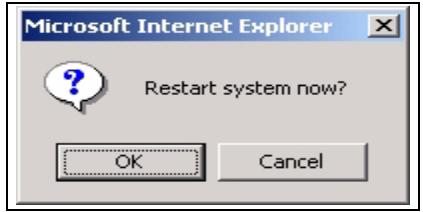
Figure 57 Maintenance > Shutdown > Confirm Restart
When you click the Shutdown button a pop-up screen will appear asking you to confirm. Click OK to continue or Cancel to quit the shutdown.
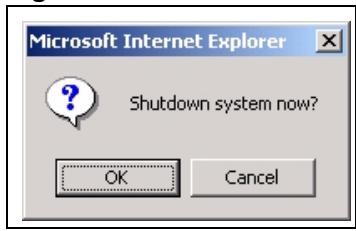
Figure 58 Maintenance > Shutdown > Confirm Shutdown
Troubleshooting
9.1 Troubleshooting Overview
This chapter offers some suggestions to solve problems you might encounter. The potential problems are divided into the following categories.
Power, Hardware Connections, and LEDs
- NSA-2400 Login and Access
How To Reset the NSA
- Users Cannot Access The NSA-2400
- Backups and Snapshots
- External USB Disks
9.2 Power, Hardware Connections, and LEDs

The NSA-2400 PWR LED does not turn on (no LEDs are on).
- Make sure the NSA-2400 is turned on.
- Make sure you are using the power adaptor or cord included with the NSA-2400.
- Make sure the power adaptor or cord is connected to the NSA-2400 and plugged in to an appropriate power source. Make sure the power source is turned on.
- Turn the NSA-2400 off and on.
- If the problem continues, contact the vendor.

The NSA-2400 SYS LED is (quickly) flashing red.
If the SYS LED is quickly flashing red then a RAID volume is in degraded mode. Degraded means one of the disks in the RAID volume is down but the volume can still be used (if you're using RAID 1 or RAID 5). What you have to do is turn the NSA-2400 off and replace the faulty disk. See your Quick Start Guide for information on replacing a disk and also Section 7.7.3 on page 108.

Do not remove or install hard drives while the NSA-2400 is turned on.. The NSA-2400 must be turned off before you remove or install hard drive(s).
After replacing the disk, turn on the NSA-2400, go to the Storage > Disk screen and click the Repair icon next to the new disk. If there is already another volume resynchronizing, then you will see Waiting Resync as the volume status.

The NSA-2400 SYS LED is orange or is flashing orange.
- If the SYS LED is steady on orange, then the NSA-2400 is in maintenance mode, which means no volumes exist. When the NSA is in this mode you cannot create users, groups or shares on the NSA. You must first go to the Storage > Volume screen and create an internal volume or go to the Storage > Disk screen (you must have an internal disk installed) and click the Initialize icon. See also Section 7.7.3 on page 108.
- If the SYS LED is flashing orange, then firmware is being upgraded to the NSA. Wait until the firmware upgrade is complete and the SYS LED turns steady green.

The NSA-2400 DIAG LED is flashing red
- It blinks slowly when hard drives are resynching; the SYS LED is green at this time. Wait until after the hard drives have synchronized and the LED turns off.
- It blinks quickly if there is a firmware upgrade. Wait until the firmware upgrade has completed and the DIAG LED turns off.
- If both the DIAG LED and the SYS LED (orange) are blinking quickly, then there may be a Flash reset failure and you should contact the vendor.

The disk drive PWR LED is off.
- Check that the NSA-2400 is on (see Power, Hardware Connections, and LEDs)
-
Turn the NSA-2400 off, remove the disk tray and make sure:
-
it is a SATA-1 compatible hard drive
- it is inserted correctly into the disk tray. Push the tray back into NSA disk bay until it snaps into place and push the latch up (see the NSA Quick Start Guide).
-
the hard disk is not faulty. You could either try a different hard disk or test the original hard disk in a different NSA or computer.
-
If the problem continues, contact the vendor.

The disk drive ALM LED is on.
- The hard disk has a problem. What you have to do is turn the NSA-2400 off and replace the faulty disk. See your Quick Start Guide for information on replacing a disk and also Section 7.7.3 on page 108. After replacing the disk, turn on the NSA-2400, go to the Storage > Disk screen and click the Repair icon next to the new disk. If there is already another volume resynchronizing, then you will see Waiting Resync as the volume status.
- If the problem continues, contact the vendor.

The LAN LED is off.
- Make sure the Ethernet cable is connected properly to the NSA-2400 and connected to another (Ethernet) device. Make sure the other device is turned on. If it's connected directly to a computer, make sure that the computer network card is working (ping 127.0.0.1 on the computer).
- Use another Ethernet cable. If you're connecting to a Gigabit Ethernet, make sure you're using an 8-wire Ethernet cable.
- If the problem continues, contact the vendor.
See Section 1.1.1 on page 26 for a description of NSA-2400 LEDs.
9.3 NSA-2400 Login and Access

I forgot the IP address for the NSA-2400.
- The default IP address is 192.168.1.3.
- Use the NDU (NSA Discovery Utility) to discover your NSA-2400. If you have admin privileges, you can directly change the IP address of the NSA-2400 using the NDU.
- If you changed the default password and you don't have the NDU, use the reset button to return the device to its factory default settings.
9.3.1 How To Reset the NSA
If you forget your password or cannot access the web configurator, use the RESET button at the front of the NSA (check that the RESET button is enabled in the Maintenance > Configuration screen).

You will not lose your data nor NSA-2400 configurations but the IP address, subnet mask and admin password are all returned to the factory defaults.
9.3.1.1 Procedure To Use The Reset Button
1 Press and hold the RESET button until you hear a beep, and then release it.
2 The NSA automatically restarts to complete the reset.

I forgot the password.
- The default password is 1234.
- If you forget your password, you could have the NSA-2400 e-mail your password to you if you configured your e-mail address and mail server on the NSA in the Maintenance > Log Alert screen. If you enter a wrong password, the NSA displays the following screen.
1 Click the Forgot Your Password link to display the Forgot Your Password screen.
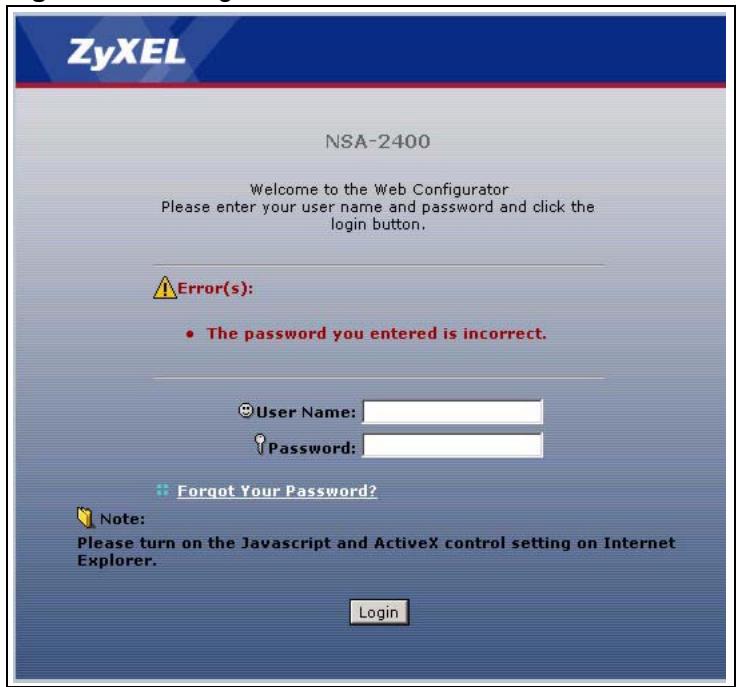
Figure 59 Wrong Password
2 Click Continue to have the NSA e-mail a randomly generated password to the e-mail address you configured.
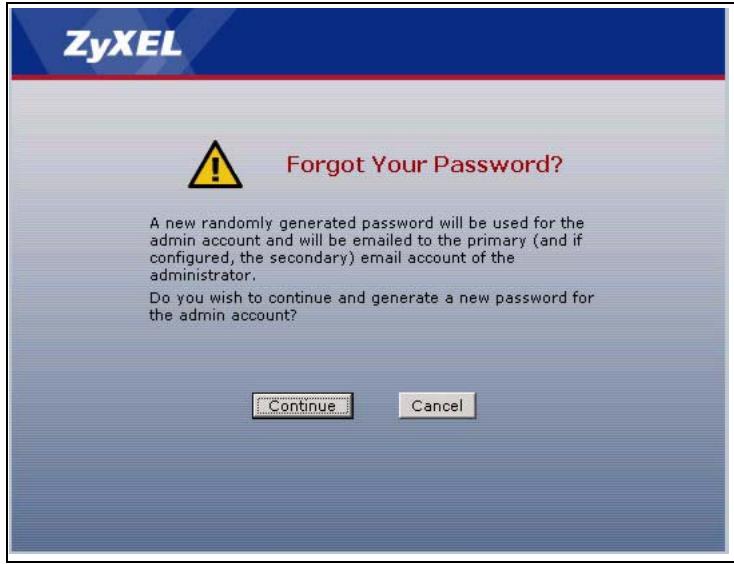
Figure 60 Generate Password
3 Click login to go to the NSA screen and enter the new e-mailed password there. You should change this password and then write down your new password and put it in a safe place.
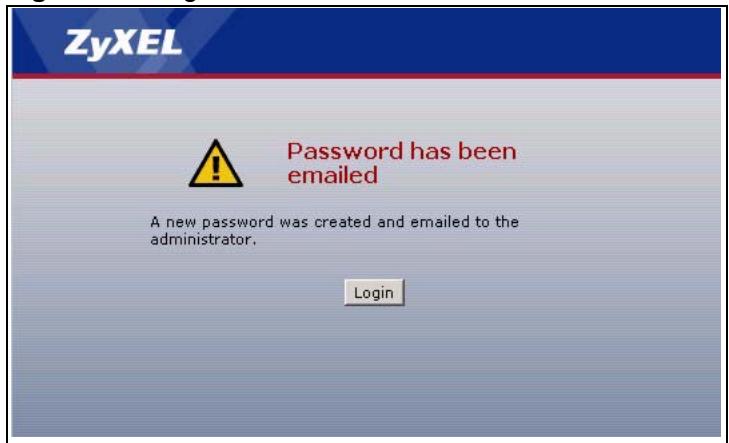
Figure 61 Log in With New Password
- If you didn't configure an e-mail address, then you will have to reset the NSA - see Section 9.3.1 on page 127.

The NDU cannot discover my NSA.
- Confirm that the computer running the NDU has a network connection. See the section on the NSA-2400's LAN connection for related information.
- The computer running the NDU can only discover NSA-2400s in the same subnet. NSA-2400s connected to the same switch or router as your NDU computer are usually in the same subnet unless the router is doing subnetting or the switch is implementing VLAN.
- The Genie Backup program uses the same network port as the NDU to discover the NSA. To avoid a port conflict, do not run the Genie Backup Manager at the same time as the NDU.

My NSA-2400 is in Maintenance Mode.
If you deleted the default volume and didn't create another volume, or you don't have an internal hard disk installed, you will see a Maintenance Mode screen. In Maintenance Mode, you MUST create an internal volume before you can use the NSA-2400.

A non-admin user wants to change her password.
Non-admin users can change their passwords directly. See Section 4.4.3 on page 58 for details on how to do that.

I cannot see or access the Login screen in the web configurator.
- Make sure you are using the correct IP address.
- The default IP address is 192.168.1.3.
- If you changed the IP address, use the new IP address.
- If you changed the IP address and have forgotten it, see the troubleshooting suggestions for I forgot the IP address for the NSA-2400.
- Check the hardware connections, and make sure the LEDs are behaving as expected. See the Quick Start Guide and Section 1.1.1 on page 26.
- Make sure your Internet browser does not block pop-up windows and has JavaScripts and Java enabled. See the Pop-up Windows appendix.
- Make sure your computer is in the same subnet as the NSA-2400.
- Reset the device to its factory defaults, and try to access the NSA-2400 with the default IP address. See Section 9.3.1 on page 127.
- If the problem continues, contact the network administrator or vendor.

I can see the Login screen, but I cannot log in to the NSA-2400.
- Make sure you have entered the user name and password correctly. The default user name is admin, and the default password is 1234. These fields are case-sensitive, so make sure [Caps Lock] is not on.
- Make sure that another administrator is not already logged in. Only one administrator can log into the NSA-2400 at any one time.
- Turn the NSA-2400 off and on.
- If this does not work, you have to reset the device to its factory defaults. See Section 9.3.1 on page 127.
9.4 Users Cannot Access The NSA-2400

A local user cannot access a share
- Check that the NSA is turned on and connected to the network. The local user should try to ping the NSA or use the NDU to discover it.
- The local user should check that he entered his login name and password correctly.
- Check if the share exists and has the correct access settings for this user.
- Check if the share has an ANONMYOUS or EVERYONE access right. If the user is already logged into a share using her username and password, she will NOT be able to access a share that has ANONYMOUS CIFS or ANONYMOUS FTP only access rights (as these require 'no login'). In this case she should log out and try to access the share again without logging in. See Section 4.8.4 on page 65 for more details.
- Check if the shared folder is a subfolder of another (parent) share. Check that the parent share's access rights do not conflict with the subfolder share. It is recommended that you do not create subfolder shares.
- Check if the user belongs to a group with conflicting access rights. DENY always takes precedence. If you allow a user FULL access to a share but set his group to DENY, then he will NOT be able to access the share.
- The local user should check if there are any existing mapped network drives to the NSA. He may need to disconnect existing CIFS connections as new CIFS connection may use previously-saved login information that may be different to NSA-2400 login.
- Check that the volume in which the share resides, exists and is not down or degraded. If the volume is down or degraded, then please see Section 9.2 on page 125.
- If the user is using DFS links, then he can only access the NSA using CIFS and not FTP.

A domain user can't access a share.
In addition to the checks listed previously for local users, you can perform these checks for domain users.
- Check that the domain controller is turned on.
- Check that the NSA-2400 time is synchronized with the domain controller. If the NSA time is set manually, make sure that the domain controller is also set manually to the same time. If the NSA is using a time server, make sure the domain controller is using the same time server and refresh the time on both devices. You could use your domain controller as your time server if it has this function. Select Set My Own Timeserver and then enter the domain controller's IP address in Time Server Address. You can then in turn, set your domain controller to use another time server on the Internet so that its time is accurate with the rest of the world.

The NSA-2400 time and date must be the same as the time and date on the external domain controller if the NSA is using one to import users and group.
9.5 Backups and Snapshots

I cannot make a backup.
- Check the logs to find the reason why the backup failed.
- Check that the external USB disk or NSA volume was formatted as BACKUP. Backup disks must be formatted by the NSA as a disk of type BACKUP. You cannot back up to other file systems such as NTFS, FAT, or FAT32.
- If you're backing up to another NSA-2400, check that it has the same firmware version as the NSA-2400 you're backing up from. You cannot back up to other NAS devices, computers or tape drives.
- Check that enough space is available on the external disk. If there isn't you may need to purge older backups or delete other files on the backup USB disk or NSA-2400 (see Section 6.3.3 on page 88)
- Check that there is not another backup being done. Scheduler queues backups when a different backup is already going on at the time a backup is scheduled.

I cannot take a snapshot
- Check the logs to find the reason why the snapshot failed.
- A snapshot must be done on a complete volume. Check that the volume is not down or degraded. If it is, then see Section 9.2 on page 125.
- Up to 30 snapshots in total are allowed on the NSA-2400. If you have reached this limit, then you will have to purge older snapshots before you can take new ones.
- Check that enough space is available on the volume. If there isn't you may need to purge older snapshots (see Section 6.3.7 on page 92)

The snapshot or backup does not run at the time configured.
- Check that the correct time is configured on the NSA-2400.
- Check that the NSA-2400 is able to access the time server from which it gets the time; see Section 8.2 on page 115.
9.6 External USB Disks

My external USB disk is read-only.
If your USB disk was formatted as NTFS, then it can be read-only by the NSA-2400 ((it may show REGULAR meaning that the NSA can read the volume but the volume wasn't created on the NSA). To solve this problem, re-format your USB disk to JBOD or BACKUP using the NSA-2400 (or FAT or FAT32 using a computer). See Section 7.5 on page 105 for information on volume creation using the NSA-2400 (recommended).

I can't create a volume on my external hard-disk.
You must install at least one hard disk and create an internal volume before you can use external USB hard drive(s) with the NSA-2400.
PART IV
Appendices and Index
Product Specifications (137)
Log Messages (143)
Setting up Your Computer's IP Address (147)
Open Source Licences (161)
Legal Information (191)
Customer Support (193)
Index (197)
Product Specifications
See also the Getting to Know Your NSA chapter for a general overview of the key features.
Feature Tables
Physical Features
These are the main external physical features.
Table 54 Physical Features
| USB Ports | Expand storage capacity by attaching compatible USB (version 2) hard drives to the USB ports. |
| Gigabit Ethernet Port | The 10/100/1000 Mbps auto-negotiating Ethernet port allows the NSA to detect the speed of incoming transmissions and adjust appropriately without manual intervention. It allows data transfer of either 100 Mbps or 1000 Mbps in either half-duplex or full-duplex mode depending on your Ethernet network. Use an 8-wire Ethernet cable for Gigabit connections. The port is also auto-crossover (MDI/ MDI-X) meaning it automatically adjusts to either a crossover or straight-through Ethernet cable. |
| SATA Interface | Serial ATA is a low cost interface technology that allows high speed data transfer. Serial ATA also allows more efficient internal airflow and also smaller chassis design. |
| Reset Button | If you forget your (admin) password, then use the reset button to restore the factory default password to “1234” (with user name “admin”), default IP address to 192.168.1.3 and subnet mask of 255.255.255.0. (Alternatively, you can use the web configurator ‘forget password’ feature.) |
| BIOS Reset Button | This button is for service personnel only. It is used to reset the BIOS settings to the ZyXEL default settings in the event the CMOS battery inside the NSA expires. This battery should not lose power for many years unless there's a battery failure or the NSA has been left powered off for an extended period of time. |
Firmware Features
These are some of the main firmware features of the NSA.
| RAID File Storage | Use RAID 0 if you want pure write speed and/or maximum capacity for your disks, and/or you have other means of protecting your data. Use RAID 1 if you have an even number of disks and want to mirror primary data to another disk(s). Use RAID 5 if you have four disks and you want to balance performance, hard disk capacity usage with data protection. If one disk fails, replace it and then re-synchronize to recover all data. |
| Backup | |
| Snapshot | A snapshot is a backup of your NSA data on the NSA. If files within a volume become infected or corrupted, you can revert the volume back to a previous snapshot. It's a good idea to create a snapshot before backing up data, to be sure you're backing up consistent data even if the backup is still running several hours later. |
| Disk Quota | Use the disk quota feature to stop one user(s) from using up all disk capacity by setting a limit on how much storage space he/she may use. |
| User Passwords | Configure a password for an individual User to restrict access to the NSA. Non-admin users can change their own passwords by accessing the web configurator. The Change Password screen appears when a username other than "admin" is entered. |
| Workgroup and Domain Security Modes | For Windows or Mac OSX users (using the Common Internet File System (CIFS) protocol for remote file access) you can configure Workgroup mode requiring users to log in with a user name and password. These user and group accounts are maintained on the NSA. For a large number of CIFS users where accounts are stored on an external server, you can use Domain security mode (Primary Domain Controller) |
| Client Support | Data can be shared among all Windows, Mac, Linux, and UNIX users that have FTP client software or CIFS file sharing support (such as Samba for Linux and UNIX users). |
| HTTP/HTTPS | Access the NSA using a regular web connection (HTTP) or an encrypted web connection (HTTPS) using secure socket layer (SSL). |
| DHCP (Dynamic Host Configuration Protocol) | DHCP (Dynamic Host Configuration Protocol) allows the NSA to obtain an IP address and subnet mask at start-up from a centralized DHCP server. Alternatively, you can give the NSA a static IP address and subnet mask. |
| Full Network Management | The embedded web configurator is an platform-independent web-based utility that allows you to easily access the NSA's management settings. |
| Firmware Upload and Configuration File Management | Upload new firmware to the NSA using the web configurator. You can also back up and restore the NSA configuration file containing all its settings to/from your computer. |
| NSA Discovery Utility (NDU) | Use the NDU from a Windows computer to find NSA(s) in your network, access the NSA login page, change its IP address configuration or map to a Windows network drive. |
| Genie Backup Manager | Genie Backup Manager is a tool for Windows users to create (and schedule) backups of data stored on their Windows computer to an NSA. |
| Time and Date | Configure a time server and set a time zone for your NSA to show the correct times in e-mail alerts and logs. |
| E-mail Alerts | Configure an e-mail to be sent to an NSA administrator whenever an error occurs or as a scheduled log summary. |
Specification Tables
The NSA-2400 hardware specifications are shown in the following table.
Table 55 NSA-2400 Hardware Specifications
| IP Address | 192.168.1.3 if the NSA cannot get an IP address from a DHCP server. |
| Subnet Mask | 255.255.255.0 (24 bits) if the NSA cannot get a subnet mask from a DHCP server. |
| DefaultUsername | admin |
| Default Password | 1234 |
| Dimensions | 140(W)*300(D)*305(H) mm |
| Weight | 7.8kg |
| Disk Trays | Four |
| Compatible Hard DisksA | SATA-I (Serial Advanced Technology Attachment) hard disk serial links The NSA also recognizes SATA-II compatible drives. |
| UPS | The NSA supports APC Uninterruptable Power Supply |
| CPU | VIA CPU (1.3 GHz) |
| CPU Operating Temperature | 0° to 85°C |
| Ports | |
| Ethernet | One auto-negotiating, auto MDI/MDI-X 10/100/1000B Mbps RJ-45 Ethernet port (10 Base-T/100 Base-TX/1000 Base-T) |
| USB v2.0 Storage | Two ports on rear panel and one on front panel. Windows: NTFS (read only), FAT32 and FAT16 Linux: EXT2, EXT3 and XFS |
| LEDs | PWR, SYS, DIAG and LAN |
| Reset Button | Restores factory default IP address and admin password (1234) |
| Operating Temperature | 0° C ~ 50°C |
| AC Input | Voltage: 100 - 240 V at 50 - 60 Hz Current: 2 A |
| Storage Temperature | -30°C ~ 60°C |
| Operating Humidity | 20% ~ 95% RH (non-condensing) |
| Storage Humidity | 20% ~ 95% RH (non-condensing) |
| Certifications | EMC: FCC Class B, CE-EMC Class B, C-Tick Class B, VCCI Class B Safety: CSA International, CE EN60950-1 |
A. Hard drives may not be included with your NSA.
B. Use an 8-wire Ethernet cable for Gigabit connections.
The NSA-2400 firmware specifications are shown in the following table
Table 56 NSA-2400 Firmware Specifications
| File Storage System | SINGLE, RAID 0, 1, 5 |
| Network Protocols | TCP/IP, UDP/IP DHCP Client FTP HTTP/ HTTPS |
| File Management | Distributed File System (DFS) Create/Delete System Volume |
| Network File Sharing Protocol | CIFS/SMB for Windows and Mac OSX HTTP for web browser FTP |
| Network Security | Authentication Share level Active Directory Services (ADS) Encrypted Network Login |
| Supported Clients | Windows 2000 Professional/Server Windows XP Home/Professional Windows Me Linux |
| Max no. of Users allowed | 200A |
| Maximum number of concurrent FTP sessions | 40A |
| Maximum number of concurrent CIFS sessions | 50A |
| System Management | Remote Management via Web Configurator (HTTP) Secure Remote Management via Web Configurator (HTTPS) NSA Discovery Utility (NDU) E-mail alerts |
| Logging/Monitoring | Centralized Logs |
| Firmware Upgrade | Web Configurator |
| Web Browsers Supported | Internet Explorer 6.0 and later versions. Firefox 1.07 and later versions. |
A. Limits may vary depending on user-share resource usage.
Power Consumption
The NSA-2400 was tested using the specified power sources with the external power adapter and with four hard drives installed.

This table is a laboratory test of NSA-2400 power consumption for your reference only.
Table 57 Power Consumption in Watts (W)
| POWER SOURCE | SYSTEM BOOT UP | SYSTEM READWRITE | SYSTEM IDLE |
| 240V/50Hz | 103 (peak) | 70 (peak) | 48.6 |
| 120V/60Hz | 105 (peak) | 72 (peak) | 47 |
| 100V/60Hz | 102 (peak) | 74 (peak) | 47.3 |
This is the external power adaptor pinout specification
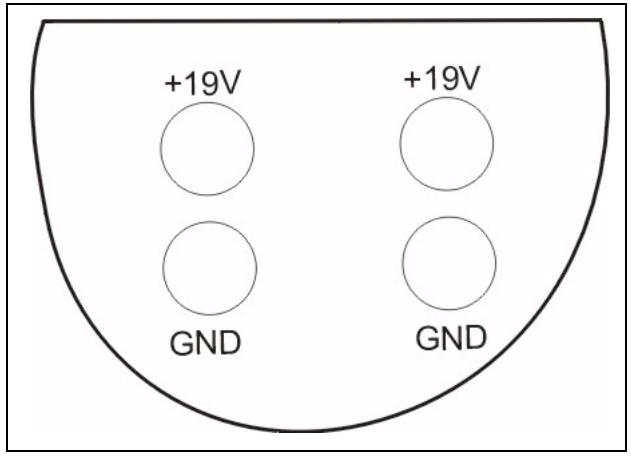
Figure 62 Power Adaptor Pinout.
Log Messages
This appendix shows some NSA-2400 log messages.
Log Messages
Table 58 Log Messages
| SEVERITY | MESSAGE | ARGUMENT(S) | ||||
| SECURITY | ||||||
| INFO | User {0} successfully log in from {1} | User name | IP | |||
| INFO | User {0} attempted to login from {1} | User name | IP | |||
| INFO | User {0} changed password | User name | ||||
| CRIT | Admin password changed | |||||
| WARNING | Failed login attempt from NDU at {0} | IP | ||||
| INFO | Admin log in from NDU at {0} | IP | ||||
| CRIT | Reset button pressed. Admin password and IP reset to factory default | |||||
| INFO | A new randomly generated password was e-mailed to admin | |||||
| CRIT | Unable to create new login in database {0} | errorMsg | ||||
| ERROR | Failed to change system user's password | |||||
| WARNING | {0} session IP changed from {1} to {2}\( ^A \) | User name | Original IP | New IP | ||
| WARNING | The User Agent (Browser Program) for {0} session has changed since first login.\( ^B \) | User name | ||||
| WARNING | Failed to update database on last access time for login | |||||
| FTP | ||||||
| INFO | User {0} log in from {1} | User name | IP | |||
| INFO | User {0} log out | User name | ||||
| INFO | Maximum connection limit changed to {0} | Connection limit | ||||
| INFO | Idle timeout changed to {0} seconds | Idle timeout | ||||
| INFO | Anonymous access {0} | Enabled/disabled | ||||
| INFO | FTP service {0} | Enabled/disabled | ||||
| INFO | FTP server restarted | |||||
Table 58 Log Messages (continued)
| SEVERITY | MESSAGE | ARGUMENT(S) | ||
| WARNING | Failed log in attempt from user {0} at {1} | User name | IP | |
| ERROR | Failed to mount shares for user {0} | User name | ||
| TCPIP | ||||
| INFO | IP changed to {0} | IP | ||
| INFO | Changed to {0} IP | Dynamic/Static | ||
| INFO | DHCP server assigned IP to {0} | IP | ||
| ERROR | Failed to obtain dynamic IP. Revert to 192.168.1.3 | |||
| INFO | Set server name to {0} | Server name | ||
| INFO | IP changed to {0} by NDU | IP | ||
| INFO | Changed to {0} IP by NDU | Dynamic/Static | ||
| CIFS | ||||
| INFO | Join workgroup {0} | Workgroup name | ||
| INFO | Join domain {0} | Domain name | ||
| STORAGE | ||||
| INFO | {0} created on {1} using {2} with {3} snapshot space | Volume name | Disks config | Snapshot % |
| INFO | {0} deleted from {1} | Volume name | Disks | |
| ERROR | Failed to create {0} | Volume name | ||
| ERROR | Failed to mount {0} | Volume name | ||
| INFO | {0} mounted | Volume name | ||
| ERROR | Failed to delete {0} | Volume name | ||
| INFO | Start scanning {0} | Volume name | ||
| INFO | Scanning {0} completed | Volume name | ||
| INFO | Scanning {0} cancelled | Volume name | ||
| ERROR | Scanning {0} failed | Volume name | ||
| ERROR | Failed to cancel scanning {0} | Volume name | ||
| INFO | Repairing RAID {0} [[1], {2}] | Volume name | Configuratio n | Disks |
| INFO | Repairing RAID{0} completed [[1], {2}] | Volume name | Configuratio n | Disks |
| ERROR | Repairing RAID{0} failed [[1], {2}] | Volume name | Configuratio n | Disks |
| INFO | External disk {0} attached | Disk name | ||
| INFO | External disk {0} detached | Disk name | ||
| INFO | Scanning external disk {0} | Disk name | ||
| INFO | Scanning external disk {0} completed | Disk name | ||
| ERROR | Scanning external disk {0} failed | Disk name | ||
| INFO | Scanning external disk {0} cancelled | Disk name | ||
| ERROR | Failed to cancel scanning external disk {0} | Disk name | ||
| INFO | RAID resync completed | |||
| CRIT | {0} on server {1} {{2}} failed. Please check. | Disk name | Hostname | IP |
| SYSTEM | ||||
| INFO | Set system time to {0} | Date/time | ||
| INFO | Change time zone to {0} | Time zone | ||
| INFO | Change time server to {0} | Time server IP | ||
| INFO | Synchronize with time server {0} | Time server IP | ||
| INFO | Create configuration backup file | |||
| INFO | Restore configuration from file {0} | Configuration file name | ||
| INFO | {0} hardware reset | Enabled/disabled | ||
| INFO | Upgrade firmware to version {0} | Firmware version | ||
| INFO | Shutting down system | |||
| INFO | Starting up system | |||
| CRIT | CPU temperature over 90 degree C | |||
| ERROR | Unable to convert date time format | |||
A. IP of a web configurator session changed
B. Browser type of the same web configurator session changed.
Setting up Your Computer's IP Address
All computers must have a 10M or 100M Ethernet adapter card and TCP/IP installed.
Windows 95/98/Me/NT/2000/XP, Macintosh OS 7 and later operating systems and all versions of UNIX/LINUX include the software components you need to install and use TCP/IP on your computer. Windows 3.1 requires the purchase of a third-party TCP/IP application package.
TCP/IP should already be installed on computers using Windows NT/2000/XP, Macintosh OS 7 and later operating systems.
After the appropriate TCP/IP components are installed, configure the TCP/IP settings in order to "communicate" with your network.
Windows 95/98/Me
Click Start, Settings, Control Panel and double-click the Network icon to open the Network window.
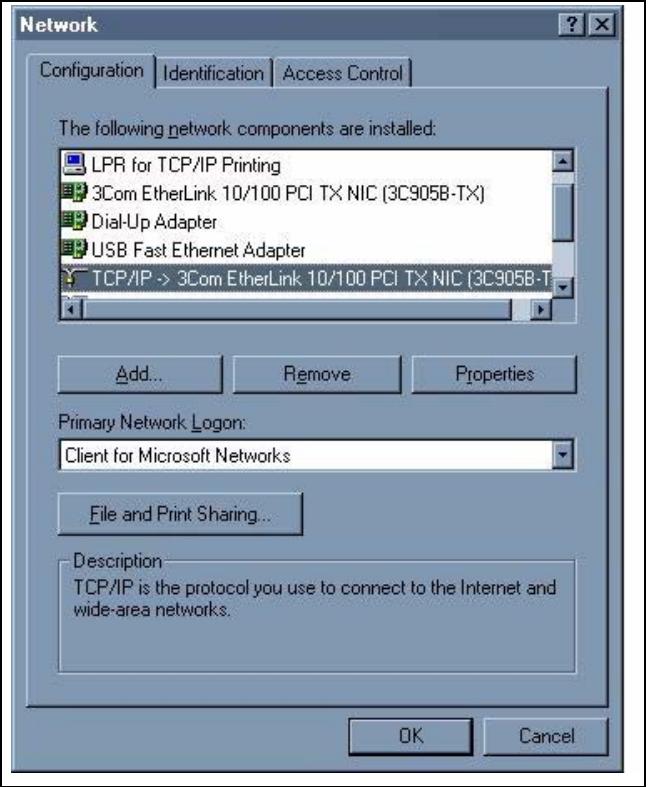
Figure 63 Windows 95/98/Me: Network: Configuration
Installing Components
The Network window Configuration tab displays a list of installed components. You need a network adapter, the TCP/IP protocol and Client for Microsoft Networks.
If you need the adapter:
1 In the Network window, click Add.
2 Select Adapter and then click Add.
3 Select the manufacturer and model of your network adapter and then click OK.
If you need TCP/IP:
1 In the Network window, click Add.
2 Select Protocol and then click Add.
3 Select Microsoft from the list of manufacturers.
4 Select TCP/IP from the list of network protocols and then click OK.
If you need Client for Microsoft Networks:
1 Click Add.
2 Select Client and then click Add.
3 Select Microsoft from the list of manufacturers.
4 Select Client for Microsoft Networks from the list of network clients and then click OK.
5 Restart your computer so the changes you made take effect.
Configuring
1 In the Network window Configuration tab, select your network adapter's TCP/IP entry and click Properties
2 Click the IP Address tab.
- If your IP address is dynamic, select Obtain an IP address automatically.
- If you have a static IP address, select Specify an IP address and type your information into the IP Address and Subnet Mask fields.
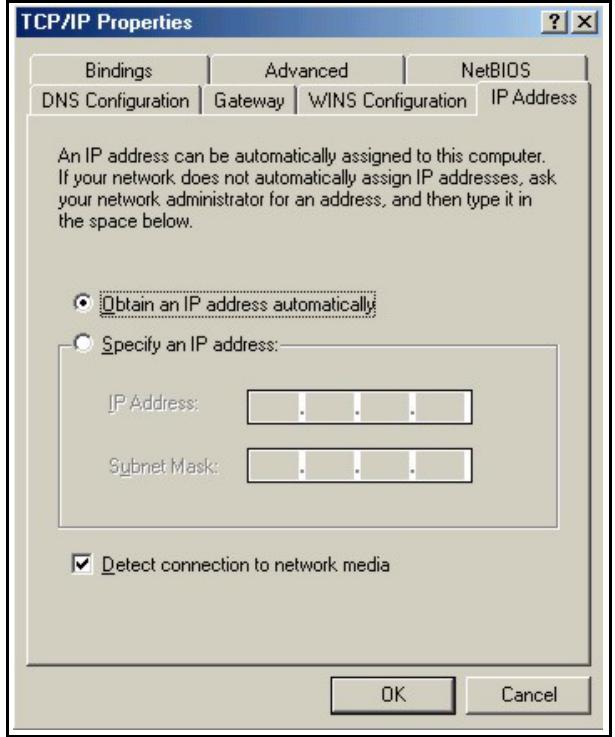
Figure 64 Windows 95/98/Me: TCP/IP Properties: IP Address
3 Click the DNS Configuration tab.
- If you do not know your DNS information, select Disable DNS.
- If you know your DNS information, select Enable DNS and type the information in the fields below (you may not need to fill them all in).
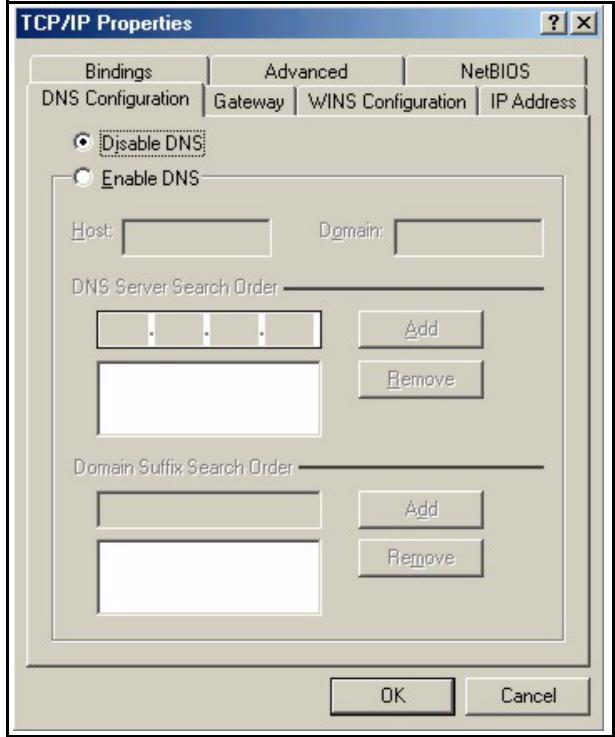
Figure 65 Windows 95/98/Me: TCP/IP Properties: DNS Configuration
4 Click the Gateway tab.
- If you do not know your gateway's IP address, remove previously installed gateways.
- If you have a gateway IP address, type it in the New gateway field and click Add.
5 Click OK to save and close the TCP/IP Properties window.
6 Click OK to close the Network window. Insert the Windows CD if prompted.
7 Restart your computer when prompted.
Verifying Settings
1 Click Start and then Run.
2 In the Run window, type "winipcfg" and then click OK to open the IP Configuration window.
3 Select your network adapter. You should see your computer's IP address, subnet mask and default gateway.
Windows 2000/NT/XP
The following example figures use the default Windows XP GUI theme.
1 Click start (Start in Windows 2000/NT), Settings, Control Panel.
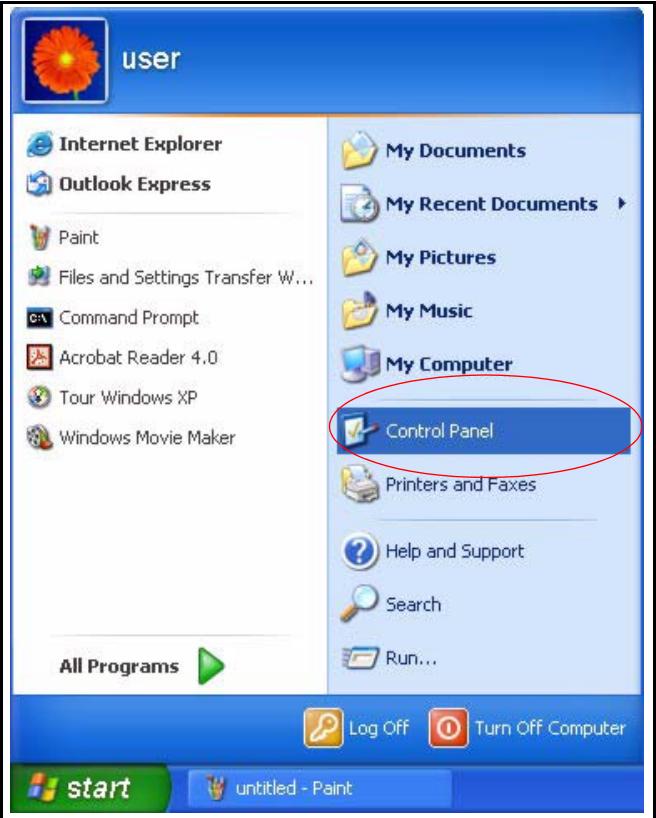
Figure 66 Windows XP: Start Menu
2 In the Control Panel, double-click Network Connections (Network and Dial-up Connections in Windows 2000/NT).
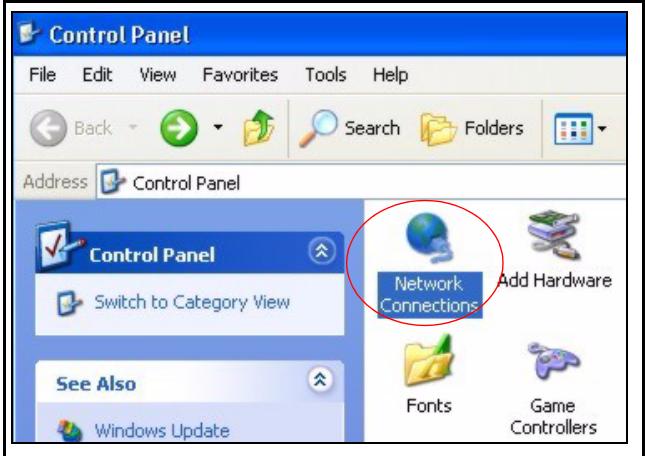
Figure 67 Windows XP: Control Panel
3 Right-click Local Area Connection and then click Properties.
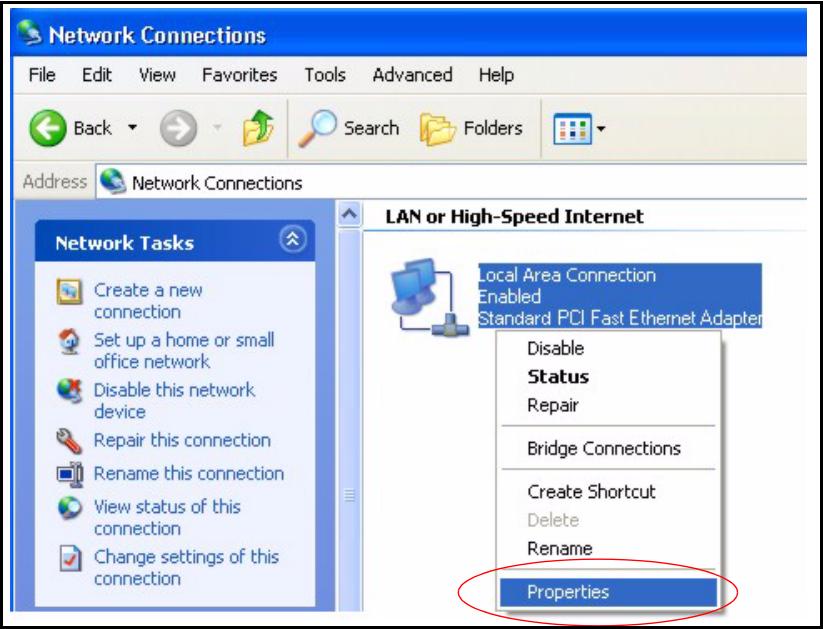
Figure 68 Windows XP: Control Panel: Network Connections: Properties
4 Select Internet Protocol (TCP/IP) (under the General tab in Win XP) and then click Properties.
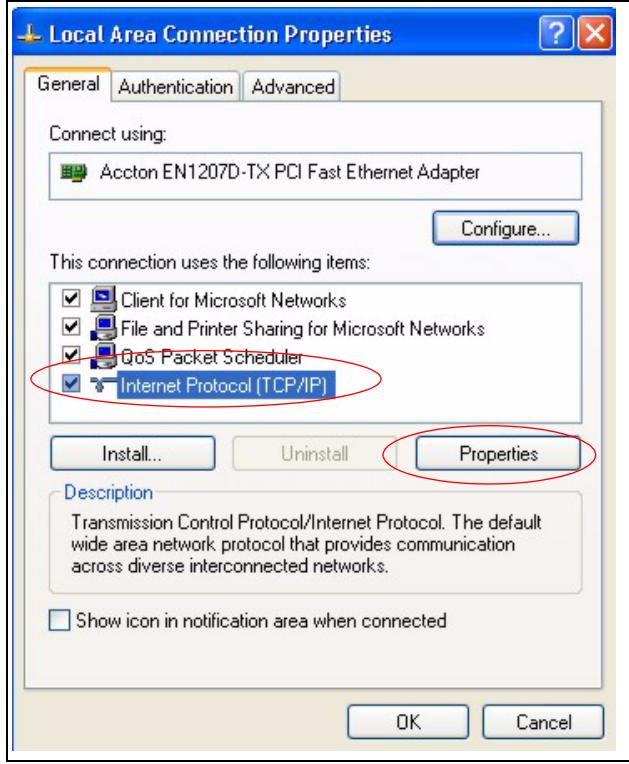
Figure 69 Windows XP: Local Area Connection Properties
5 The Internet Protocol TCP/IP Properties window opens (the General tab in Windows XP).
- If you have a dynamic IP address click Obtain an IP address automatically.
- If you have a static IP address click Use the following IP Address and fill in the IP address, Subnet mask, and Default gateway fields.
- Click Advanced.
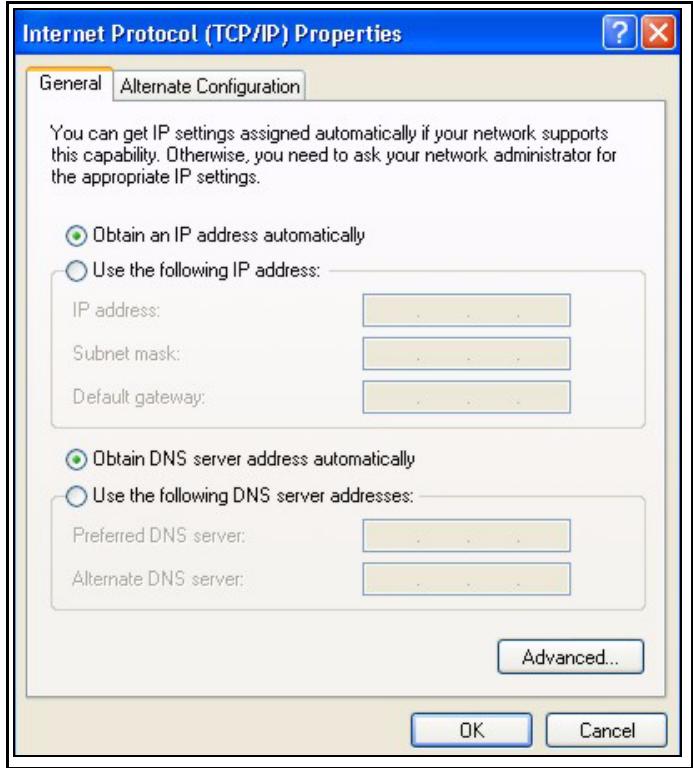
Figure 70 Windows XP: Internet Protocol (TCP/IP) Properties
6 If you do not know your gateway's IP address, remove any previously installed gateways in the IP Settings tab and click OK.
Do one or more of the following if you want to configure additional IP addresses:
- In the IP Settings tab, in IP addresses, click Add.
- In TCP/IP Address, type an IP address in IP address and a subnet mask in Subnet mask, and then click Add.
- Repeat the above two steps for each IP address you want to add.
- Configure additional default gateways in the IP Settings tab by clicking Add in Default gateways.
- In TCP/IP Gateway Address, type the IP address of the default gateway in Gateway. To manually configure a default metric (the number of transmission hops), clear the Automatic metric check box and type a metric in Metric.
- Click Add.
- Repeat the previous three steps for each default gateway you want to add.
- Click OK when finished.

Figure 71 Windows XP: Advanced TCP/IP Properties
7 In the Internet Protocol TCP/IP Properties window (the General tab in Windows XP):
- Click Obtain DNS server address automatically if you do not know your DNS server IP address(es).
- If you know your DNS server IP address(es), click Use the following DNS server addresses, and type them in the Preferred DNS server and Alternate DNS server fields.
If you have previously configured DNS servers, click Advanced and then the DNS tab to order them.
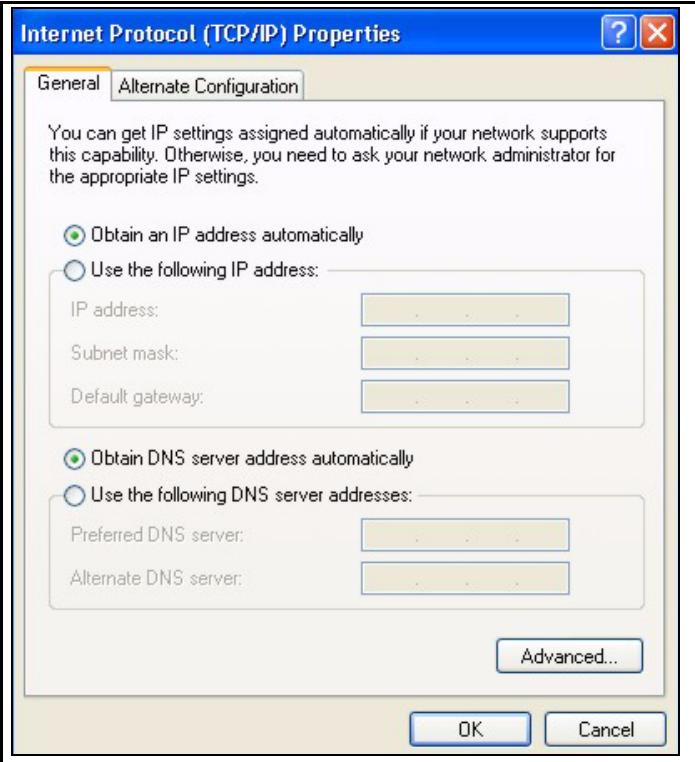
Figure 72 Windows XP: Internet Protocol (TCP/IP) Properties
8 Click OK to close the Internet Protocol (TCP/IP) Properties window.
9 Click Close (OK in Windows 2000/NT) to close the Local Area Connection Properties window.
10 Close the Network Connections window (Network and Dial-up Connections in Windows 2000/NT).
11 Restart your computer (if prompted).
Verifying Settings
1 Click Start, All Programs, Accessories and then Command Prompt.
2 In the Command Prompt window, type "ipconfig" and then press [ENTER]. You can also open Network Connections, right-click a network connection, click Status and then click the Support tab.
Macintosh OS X
1 Click the Apple menu, and click System Preferences to open the System Preferences window.
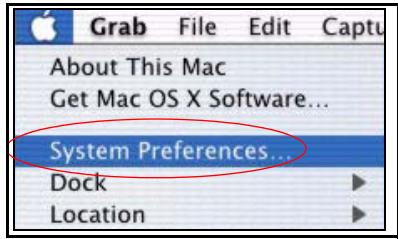
Figure 73 Macintosh OS X:Apple Menu
2 Click Network in the icon bar.
- Select Automatic from the Location list.
- Select Built-in Ethernet from the Show list.
- Click the TCP/IP tab.
3 For dynamically assigned settings, select Using DHCP from the Configure list.

Figure 74 Macintosh OS X: Network
4 For statically assigned settings, do the following:
From the Configure box, select Manually.
- Type your IP address in the IP Address box.
- Type your subnet mask in the Subnet mask box.
- Type the IP address of your gateway in the Router address box.
5 Click Apply Now and close the window.
6 Restart your computer (if prompted).
Verifying Settings
Check your TCP/IP properties in the Network window.
Linux
This section shows you how to configure your computer's TCP/IP settings in Red Hat Linux 9.0. Procedure, screens and file location may vary depending on your Linux distribution and release version.

Make sure you are logged in as the root administrator.
Using the K Desktop Environment (KDE)
Follow the steps below to configure your computer IP address using the KDE.
1 Click the Red Hat button (located on the bottom left corner), select System Setting and click Network.
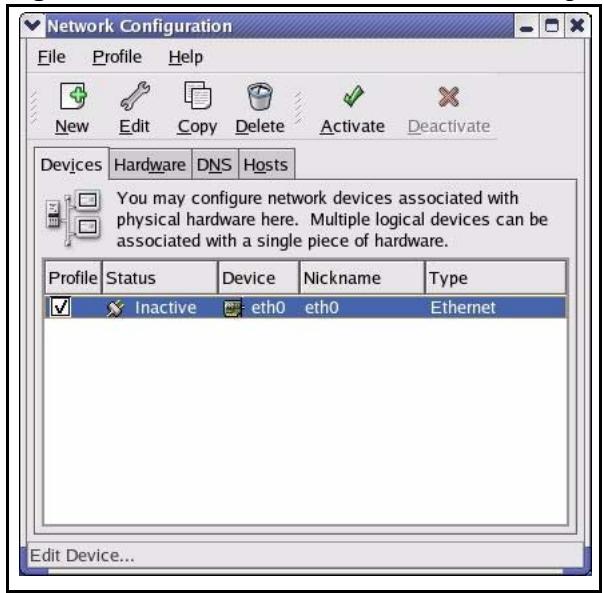
Figure 75 Red Hat 9.0: KDE: Network Configuration: Devices
2 Double-click on the profile of the network card you wish to configure. The Ethernet Device General screen displays as shown.
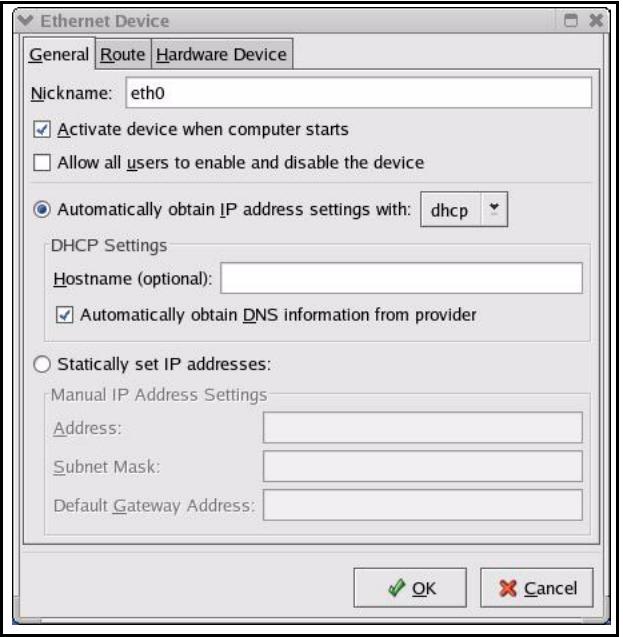
Figure 76 Red Hat 9.0: KDE: Ethernet Device: General
- If you have a dynamic IP address, click Automatically obtain IP address settings with and select dhcp from the drop down list.
- If you have a static IP address, click statically set IP Addresses and fill in the Address, Subnet mask, and Default Gateway Address fields.
3 Click OK to save the changes and close the Ethernet Device General screen.
4 If you know your DNS server IP address(es), click the DNS tab in the Network Configuration screen. Enter the DNS server information in the fields provided.
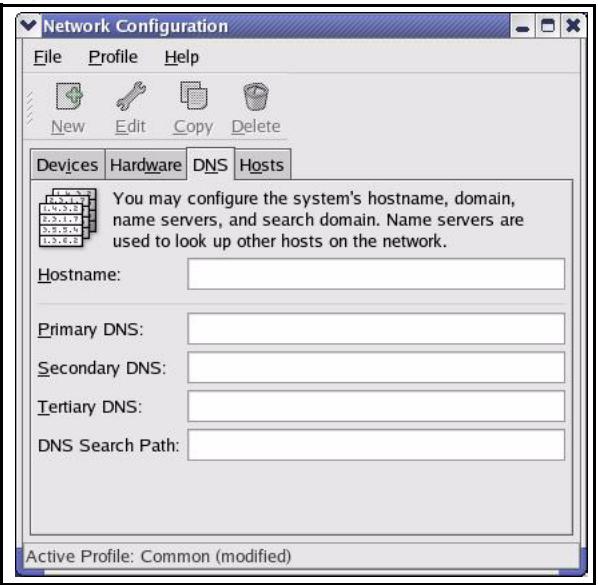
Figure 77 Red Hat 9.0: KDE: Network Configuration: DNS
5 Click the Devices tab.
6 Click the Activate button to apply the changes. The following screen displays. Click Yes to save the changes in all screens.
Figure 78 Red Hat 9.0:KDE: Network Configuration:Activate
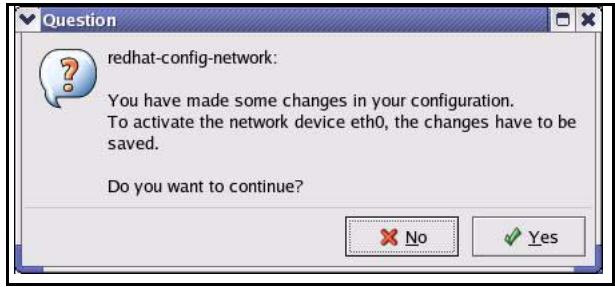
Figure 80 Red Hat 9.0: Static IP Address Setting in ifconfig-eth0
7 After the network card restart process is complete, make sure the Status is Active in the Network Configuration screen.
Using Configuration Files
Follow the steps below to edit the network configuration files and set your computer IP address.
1 Assuming that you have only one network card on the computer, locate the ifconfig-eth0 configuration file (where eth0 is the name of the Ethernet card). Open the configuration file with any plain text editor.
- If you have a dynamic IP address, enter dhcp in the BOOT PROTO= field. The following figure shows an example.
Figure 79 Red Hat 9.0: Dynamic IP Address Setting in ifconfig-eth0
DEVICE=eth0
ONBOOT=yes
BOOTPROTO=dhcp
USERCTL=no
PEERDNS=yes
TYPE=Ethernet
- If you have a static IP address, enter static in the BOOTPROTO= field. Type IPADDR= followed by the IP address (in dotted decimal notation) and type NETMASK= followed by the subnet mask. The following example shows an example where the static IP address is 192.168.1.10 and the subnet mask is 255.255.255.0.
DEVICE=eth0
ONBOOT=yes
BOOTPROTO=static
IPADDR=192.168.1.10
NETMASK=255.255.255.0
USERCTL=no
PEERDNS=yes
TYPE=Ethernet
2 If you know your DNS server IP address(es), enter the DNS server information in the resolv.conf file in the /etc directory. The following figure shows an example where two DNS server IP addresses are specified.
Figure 81 Red Hat 9.0: DNS Settings in resolv.conf
nameserver 172.23.5.1
nameserver 172.23.5.2
3 After you edit and save the configuration files, you must restart the network card. Enter./network restart in the /etc/rc.d/init.d directory. The following figure shows an example.
Figure 82 Red Hat 9.0: Restart Ethernet Card
[root@localhost init.d]# network restart Shutting down interface eth0: [OK] Shutting down loopback interface: [OK] Setting network parameters: [OK] Bringing up loopback interface: [OK] Bringing up interface eth0: [OK]
Verifying Settings
Enter ifconfig in a terminal screen to check your TCP/IP properties.
Figure 83 Red Hat 9.0: Checking TCP/IP Properties
[root@localhost]# ifconfig
eth0 Link encaps:Ethernet HWaddr 00:50:BA:72:5B:44 inlet addr:172.23.19.129 Bcast:172.23.19.255 Mask:255.255.255.0 UP BROADCAST RUNNING MULTICAST MTU:1500 Metric:1 RX packets:717 errors:0 dropped:0 overruns:0 frame:0 TX packets:13 errors:0 dropped:0 overruns:0 carrier:0 collisions:0 txqueuelen:100 RX bytes:730412 (713.2 Kb) TX bytes:1570 (1.5 Kb) Interrupt:10 Base address:0x1000
[root@localhost]#
Open Source Licences
Notice
Information herein is subject to change without notice. Companies, names, and data used in examples herein are fictitious unless otherwise noted. No part may be reproduced or transmitted in any form or by any means, electronic or mechanical, for any purpose, except the express written permission of ZyXEL Communications Corporation.
This Product includes software developed by the Apache Software Foundation under Apache License.
Apache License
Version 2.0, January 2004
http://www.apache.org/licenses/
TERMS AND CONDITIONS FOR USE, REPRODUCTION, AND DISTRIBUTION
- Definitions.
"License" shall mean the terms and conditions for use, reproduction, and distribution as defined by Sections 1 through 9 of this document.
"License" shall mean the copyright owner or entity authorized by the copyright owner that is granting the License.
"Legal Entity" shall mean the union of the acting entity and all other entities that control, are controlled by, or are under common control with that entity. For the purposes of this definition,
"control" means (i) the power, direct or indirect, to cause the direction or management of such entity, whether by contract or otherwise, or (ii) ownership of fifty percent (50%) or more of the outstanding shares, or (iii) beneficial ownership of such entity.
"You" (or "Your") shall mean an individual or Legal Entity exercising permissions granted by this License.
"Source" form shall mean the preferred form for making modifications, including but not limited to software source code, documentation source, and configuration files.
"Object" form shall mean any form resulting from mechanical transformation or translation of a Source form, including but not limited to compiled object code, generated documentation, and conversions to other media types.
"Work" shall mean the work of authorship, whether in Source or Object form, made available under the License, as indicated by a copyright notice that is included in or attached to the work (an example is provided in the Appendix below).
"Derivative Works" shall mean any work, whether in Source or Object form, that is based on (or derived from) the Work and for which the editorial revisions, annotations, elaborations, or other modifications represent, as a whole, an original work of authorship. For the purposes of this License, Derivative Works shall not include works that remain separable from, or merely link (or bind by name) to the interfaces of, the Work and Derivative Works thereof.
"Contribution" shall mean any work of authorship, including the original version of the Work and any modifications or additions to that Work or Derivative Works thereof, that is intentionally submitted to Licensor for inclusion in the Work by the copyright owner or by an individual or Legal Entity authorized to submit on behalf of the copyright owner. For the purposes of this definition, "submitted" means any form of electronic, verbal, or written communication sent to the Licensor or its representatives, including but not limited to communication on electronic mailing lists, source code control systems, and issue tracking systems that are managed by, or on behalf of, the Licensor for the purpose of discussing and improving the Work, but excluding communication that is conspicuously marked or otherwise designated in writing by the copyright owner as "Not a Contribution."
"Contributor" shall mean Licensee and any individual or Legal Entity on behalf of whom a Contribution has been received by Licensee and subsequently incorporated within the Work.
-
Grant of Copyright License. Subject to the terms and conditions of this License, each Contributor hereby grants to You a perpetual, worldwide, non-exclusive, no-charge, royalty-free, irrevocable copyright license to reproduce, prepare Derivative Works of, publicly display, publicly perform, sublicense, and distribute the Work and such Derivative Works in Source or Object form.
-
Grant of Patent License. Subject to the terms and conditions of this License, each Contributor hereby grants to You a perpetual, worldwide, non-exclusive, no-charge, royalty-free, irrevocable (except as stated in this section) patent license to make, have made, use, offer to sell import, and otherwise transfer the Work, where such license applies only to those patent claims licensable by such Contributor that are necessarily infringed by their Contribution(s) alone or by combination of their Contribution(s) with the Work to which such Contribution(s) was submitted. If You institute patent litigation against any entity (including a cross-claim or counterclaim in a lawsuit) alleging that the Work or a Contribution incorporated within the Work constitutes direct or contributory patent infringement, then any patent licenses granted to You under this License for that Work shall terminate as of the date such litigation is filed.
-
Redistribution. You may reproduce and distribute copies of the Work or Derivative Works hereof in any medium, with or without modifications, and in Source or Object form, provided that You meet the following conditions:
(a) You must give any other recipients of the Work or Derivative Works a copy of this License; and
(b) You must cause any modified files to carry prominent notices stating that You changed the files; and
(c) You must retain, in the Source form of any Derivative Works that You distribute, all copyright, patent, trademark, and attribution notices from the Source form of the Work, excluding those notices that do not pertain to any part of the Derivative Works; and
(d) If the Work includes a "NOTICE" text file as part of its distribution, then any Derivative Works that You distribute must include a readable copy of the attribution notices contained within such NOTICE file, excluding those notices that do not pertain to any part of the Derivative Works, in at least one of the following places: within a NOTICE text file
distributed as part of the Derivative Works; within the Source form or documentation, if provided along with the Derivative Works; or, within a display generated by the Derivative Works, if and wherever such third-party notices normally appear. The contents of the NOTICE file are for informational purposes only and do not modify the License. You may add Your own attribution notices within Derivative Works that You distribute, alongside or as an addendum to the NOTICE text from the Work, provided that such additional attribution notices cannot be construed as modifying the License. You may add Your own copyright statement to Your modifications and may provide additional or different license terms and conditions for use, reproduction, or distribution of Your modifications, or for any such Derivative Works as a whole, provided Your use, reproduction, and distribution of the Work otherwise complies with the conditions stated in this License.
-
Submission of Contributions. Unless You explicitly state otherwise, any Contribution intentionally submitted for inclusion in the Work by You to the Licensor shall be under the terms and conditions of this License, without any additional terms or conditions. Notwithstanding the above, nothing herein shall supersede or modify the terms of any separate license agreement you may have executed with Licensor regarding such Contributions.
-
Trademarks. This License does not grant permission to use the trade names, trademarks, service marks, or product names of the Licensor, except as required for reasonable and customary use in describing the origin of the Work and reproducing the content of the NOTICE file.
-
Disclaimer of Warranty. Unless required by applicable law or agreed to in writing, Licensee provides the Work (and each Contributor provides its Contributions) on an "AS IS" BASIS, WITHOUT WARRANTY OR CONDITIONS OF ANY KIND, either express or implied, including, without limitation, any warranties or conditions of TITLE, NONINFRINGEMENT, MERCHANTABILITY, or FITNESS FOR A PARTICULAR PURPOSE. You are solely responsible for determining the appropriateness of using or redistributing the Work and assume any risks associated with Your exercise of permissions under this License.
-
Limitation of Liability. In no event and under no legal theory, whether in tort (including negligence), contract, or otherwise, unless required by applicable law (such as deliberate and grossly negligent acts) or agreed to in writing, shall any Contributor be liable to You for damages, including any direct, indirect, special, incidental, or consequential damages of any character arising as a result of this License or out of the use or inability to use the Work (including but not limited to damages for loss of goodwill, work stoppage, computer failure or malfunction, or any and all other commercial damages or losses), even if such Contributor has been advised of the possibility of such damages.
-
Accepting Warranty or Additional Liability. While redistributing the Work or Derivative Works thereof, You may choose to offer, and charge a fee for, acceptance of support, warranty, indemnity, or other liability obligations and/or rights consistent with this License. However, in accepting such obligations, You may act only on Your own behalf and on Your sole responsibility, not on behalf of any other Contributor, and only if You agree to indemnify, defend, and hold each Contributor harmless for any liability incurred by, or claims asserted against, such Contributor by reason of your accepting any such warranty or additional liability.
END OF TERMS AND CONDITIONS
Version 1.1
Copyright (c) 1999-2003 The Apache Software Foundation. All rights reserved.
Redistribution and use in source and binary forms, with or without modification, are permitted provided that the following conditions are met:
Redistributions of source code must retain the above copyright notice, this list of conditions and the following disclaimer.
Redistributions in binary form must reproduce the above copyright notice, this list of conditions and the following disclaimer in the documentation and/or other materials provided with the distribution.
The end-user documentation included with the redistribution, if any, must include the following acknowledgment: "This product includes software developed by the Apache Software Foundation (http://www.apache.org/)." Alternately, this acknowledgment may appear in the software itself, if and wherever such third-party acknowledgments normally appear.
The names "Apache" and "Apache Software Foundation" must not be used to endorse or promote products derived from this software without prior written permission. For written permission, please contact apache@apache.org.
Products derived from this software may not be called "Apache", nor may "Apache" appear in their name, without prior written permission of the Apache Software Foundation.
THIS SOFTWARE IS PROVIDED 'AS IS' AND ANY EXPRESSED OR IMPLIED WARRANTY, INCLUDING, BUT NOT LIMITED TO, THE IMPLIED WARRANTY OF MERCHANTABILITY AND FITNESS FOR A PARTICULAR PURPOSE ARE DISCLAIMED. IN NO EVENT SHALL THE APACHE SOFTWARE FOUNDATION OR ITS CONTRIBUTORS BE LIABLE FOR ANY DIRECT, INDIRECT, INCIDENTAL, SPECIAL, EXEMPLARY, OR CONSEQUENTIAL DAMAGES (INCLUDING, BUT NOT LIMITED TO, PROCEDURE OF SUBSTITUTE GOODS OR SERVICES; LOSS OF USE, DATA, OR PROFITS; OR BUSINESS INTERRUsION) HOWEVER CAUSED AND ON ANY THEORY OF LIABILITY, WHETHER IN CONTRACT, STRICT LIABILITY, OR TORT (INCLUDING NEGLIGENCE OR OTHERWISE) ARISING IN ANY WAY OUT OF THE USE OF THIS SOFTWARE, EVEN IF ADVISED OF THE POSSIBILITY OF SUCH DAMAGE.
This software consists of voluntary contributions made by many individuals on behalf of the Apache Software Foundation. For more information on the Apache Software Foundation, please see http://www.apache.org/.
Portions of this software are based upon public domain software originally written at the National Center for Supercomputing Applications, University of Illinois, Urbana-Champaign.
This Product includes phpmvc software under LGPL license.
GNU LESSER GENERAL PUBLIC LICENSE
Version 2.1, February 1999
Copyright (C) 1991, 1999 Free Software Foundation, Inc.
59 Temple Place, Suite 330, Boston, MA 02111-1307 USA
Everyone is permitted to copy and distribute verbatim copies of this license document, but changing it is not allowed. [This is the first released version of the Lesser GPL. It also counts as the successor of the GNU Library Public License, version 2, hence the version number 2.1. Preamble
The licenses for most software are designed to take away your freedom to share and change it. By contrast, the GNU General Public Licenses are intended to guarantee your freedom to share and change free software--to make sure the software is free for all its users.
This license, the Lesser General Public License, applies to some specially designated software packages--typically libraries--of the Free Software Foundation and other authors who decide to use it. You can use it too, but we suggest you first think carefully about whether this license or the ordinary General Public License is the better strategy to use in any particular case, based on the explanations below.
When we speak of free software, we are referring to freedom of use, not price. Our General Public Licenses are designed to make sure that you have the freedom to distribute copies of free software (and charge for this service if you wish); that you receive source code or can get it if you want it; that you can change the software and use pieces of it in new free programs; and that you are informed that you can do these things.
To protect your rights, we need to make restrictions that forbid distributors to deny you these rights or to ask you to surrender these rights. These restrictions translate to certain responsibilities for you if you distribute copies of the library or if you modify it.
For example, if you distribute copies of the library, whether gratis or for a fee, you must give the recipients all the rights that we gave you. You must make sure that they, too, receive or can get the source code. If you link other code with the library, you must provide complete object files to the recipients, so that they can re-link them with the library after making changes to the library and recompiling it. And you must show them these terms so they know their rights.
We protect your rights with a two-step method: (1) we copyright the library, and (2) we offer you this license, which gives you legal permission to copy, distribute and/or modify the library.
To protect each distributor, we want to make it very clear that there is no warranty for the free library. Also, if the library is modified by someone else and passed on, the recipients should know that what they have is not the original version, so that the original author's reputation will not be affected by problems that might be introduced by others.
Finally, software patents pose a constant threat to the existence of any free program. We wish to make sure that a company cannot effectively restrict the users of a free program by obtaining a restrictive license from a patent holder. Therefore, we insist that any patent license obtained for a version of the library must be consistent with the full freedom of use specified in this license.
Most GNU software, including some libraries, is covered by the ordinary GNU General Public License. This license, the GNU Lesser General Public License, applies to certain designated libraries, and is quite different from the ordinary General Public License. We use this license for certain libraries in order to permit linking those libraries into non-free programs.
When a program is linked with a library, whether statically or using a shared library, the combination of the two is legally speaking a combined work, a derivative of the original library. The ordinary General Public License therefore permits such linking only if the entire combination fits its criteria of freedom. The Lesser General Public License permits more lax criteria for linking other code with the library.
We call this license the "Lesser" General Public License because it does Less to protect the user's freedom than the ordinary General Public License. It also provides other free software developers Less of an advantage over competing non-free programs. These disadvantages are the reason we use the ordinary General Public License for many libraries. However, the Lesser license provides advantages in certain special circumstances.
For example, on rare occasions, there may be a special need to encourage the widest possible use of a certain library, so that it becomes a de-facto standard. To achieve this, non-free programs must be allowed to use the library. A more frequent case is that a free library does the same job as widely used non-free libraries. In this case, there is little to gain by limiting the free library to free software only, so we use the Lesser General Public License. In other cases, permission to use a particular library in non-free programs enables a greater number of people to use a large body of free software. For example, permission to use the GNU C Library in non-free programs enables many more people to use the whole GNU operating system, as well as its variant, the GNU/Linux operating system.
Although the Lesser General Public License is Less protective of the users' freedom, it does ensure that the user of a program that is linked with the Library has the freedom and the wherewithal to run that program using a modified version of the Library.
The precise terms and conditions for copying, distribution and modification follow. Pay close attention to the difference between a "work based on the library" and a "work that uses the library". The former contains code derived from the library, whereas the latter must be combined with the library in order to run.
GNU LESSER GENERAL PUBLIC LICENSE TERMS AND CONDITIONS FOR COOPYING, DISTRIBUTION AND MODIFICATION
- This License Agreement applies to any software library or other program which contains a notice placed by the copyright holder or other authorized party saying it may be distributed under the terms of this Lesser General Public License (also called "this License").
Each licensee is addressed as "you".
A "library" means a collection of software functions and/or data prepared so as to be conveniently linked with application programs (which use some of those functions and data) to form executables. The "Library", below, refers to any such software library or work which has been distributed under these terms. A "work based on the Library" means either the Library or any derivative work under copyright law: that is to say, a work containing the Library or a portion of it, either verbatim or with modifications and/or translated straightforwardly into another language. (Hereinafter, translation is included without limitation in the term "modification".)
"Source code" for a work means the preferred form of the work for making modifications to it. For a library, complete source code means all the source code for all modules it contains, plus any associated interface definition files, plus the scripts used to control compilation and installation of the library. Activities other than copying, distribution and modification are not covered by this License; they are outside its scope. The act of running a program using the Library is not restricted, and output from such a program is covered only if its contents constitute a work based on the Library (independent of the use of the Library in a tool for writing it). Whether that is true depends on what the Library does and what the program that uses the Library does.
-
You may copy and distribute verbatim copies of the Library's complete source code as you receive it, in any medium, provided that you conspicuously and appropriately publish on each copy an appropriate copyright notice and disclaimer of warranty; keep intact all the notices that refer to this License and to the absence of any warranty; and distribute a copy of this License along with the Library. You may charge a fee for the physical act of transferring a copy, and you may at your option offer warranty protection in exchange for a fee.
-
You may modify your copy or copies of the Library or any portion of it, thus forming a work based on the Library, and copy and distribute such modifications or work under the terms of Section 1 above, provided that you also meet all of these conditions: a) The modified work must itself be a software library. b) You must cause the files modified to carry prominent notices stating that you changed the files and the date of any change. c) You must cause the whole of the work to be licensed at no charge to all third parties under the terms of this License. d) If a facility in the modified Library refers to a function or a table of data to be supplied by an application program that uses the facility, other than as an argument passed when the facility is invoked, then you must make a good faith effort to ensure that, in the event an application does not supply such function or table, the facility still operates, and performs whatever part of its purpose remains meaningful. (For example, a function in a library to compute square roots has a purpose that is entirely well-defined independent of the application. Therefore, Subsection 2d requires that any application-supplied function or table used by this function must be optional: if the application does not supply it, the square root function must still compute square roots.) These requirements apply to the modified work as a whole. If identifiable sections of that work are not derived from the Library, and can be reasonably considered independent and separate works in themselves, then this License, and its terms, do not apply to those sections when you distribute them as separate works. But when you distribute the same sections as part of a whole which is a work based on the Library, the distribution of the whole must be on the terms of this License, whose permissions for other licensees extend to the entire whole, and thus to each and every part regardless of who wrote
it. Thus, it is not the intent of this section to claim rights or contest your rights to work written entirely by you; rather, the intent is to exercise the right to control the distribution of derivative or collective works based on the Library. In addition, mere aggregation of another work not based on the Library with the Library (or with a work based on the Library) on a volume of a storage or distribution medium does not bring the other work under the scope of this License.
-
You may opt to apply the terms of the ordinary GNU General Public License instead of this License to a given copy of the Library. To do this, you must alter all the notices that refer to this License, so that they refer to the ordinary GNU General Public License, version 2, instead of to this License. (If a newer version than version 2 of the ordinary GNU General Public License has appeared, then you can specify that version instead if you wish.) Do not make any other change in these notices. Once this change is made in a given copy, it is irreversible for that copy, so the ordinary GNU General Public License applies to all subsequent copies and derivative works made from that copy. This option is useful when you wish to copy part of the code of the Library into a program that is not a library.
-
You may copy and distribute the Library (or a portion or derivative of it, under Section 2) in object code or executable form under the terms of Sections 1 and 2 above provided that you accompany it with the complete corresponding machine-readable source code, which must be distributed under the terms of Sections 1 and 2 above on a medium customarily used for software interchange. If distribution of object code is made by offering access to copy from a designated place, then offering equivalent access to copy the source code from the same place satisfies the requirement to distribute the source code, even though third parties are not
compelled to copy the source along with the object code.
- A program that contains no derivative of any portion of the Library, but is designed to work with the Library by being compiled or linked with it, is called a "work that uses the Library". Such a work, in isolation, is not a derivative work of the Library, and therefore falls outside the scope of this License.
However, linking a "work that uses the Library" with the Library creates an executable that is a derivative of the Library (because it contains portions of the Library), rather than a "work that uses the library". The executable is therefore covered by this License. Section 6 states terms for distribution of such executables. When a "work that uses the Library" uses material from a header file that is part of the Library, the object code for the work may be a derivative work of the Library even though the source code is not. Whether this is true is especially significant if the work can be linked without the Library, or if the work is itself a library. The threshold for this to be true is not precisely defined by law. If such an object file uses only numerical parameters, data structure layouts and accessories, and small macros and small inline functions (ten lines or less in length), then the use of the object file is unrestricted, regardless of whether it is legally a derivative work. (Executables containing this object code plus portions of the Library will still fall under Section 6.) Otherwise, if the work is a derivative of the Library, you may distribute the object code for the work under the terms of Section 6. Any executables containing that work also fall under Section 6, whether or not they are linked directly with the Library itself.
- As an exception to the Sections above, you may also combine or link a "work that uses the Library" with the Library to produce a work containing portions of the Library, and distribute that work under terms of your choice, provided that the terms permit modification of the work for the customer's own use and reverse engineering for debugging such modifications. You must give prominent notice with each copy of the work that the Library is used in it and that the Library and its use are covered by this License. You must supply a copy of this License. If the work during execution displays copyright notices, you must include the copyright notice for the Library among them, as well as a reference directing the user to the copy of this License. Also, you must do one of these things: a) Accompany the work with the complete corresponding
machine-readable source code for the Library including whatever changes were used in the work (which must be distributed under Sections 1 and 2 above); and, if the work is an executable linked with the Library, with the complete machine-readable "work that uses the Library", as object code and/or source code, so that the user can modify the Library and then relent to produce a modified executable containing the modified Library. (It is understood that the user who changes the contents of definitions files in the Library will not necessarily be able to recompile the application to use the modified definitions.) b) Use a suitable shared library mechanism for linking with the Library. A suitable mechanism is one that (1) uses at run time a
copy of the library already present on the user's computer system, rather than copying library functions into the executable, and (2) will operate properly with a modified version of the library, if the user installs one, as long as the modified version is interface-compatible with the version that the work was made with. c) Accompany the work with a written offer, valid for at least three years, to give the same user the materials specified in Subsection 6a, above, for a charge no more than the cost of performing this distribution. d) If distribution of the work is made by offering access to copy from a designated place, offer equivalent access to copy the above specified materials from the same place. e) Verify that the user has already received a copy of these materials or that you have already sent this user a copy. For an executable, the
required form of the "work that uses the Library" must include any data and utility programs needed for reproducing the executable from it. However, as a special exception, the materials to be distributed need not include anything that is normally distributed (in either source or binary form) with the major components (compiler, kernel, and so on) of the operating system on which the executable runs, unless that component itself accompanies the executable.
It may happen that this requirement contradicts the license restrictions of other proprietary libraries that do not normally accompany the operating system. Such a contradiction means you cannot use both them and the Library together in an executable that you distribute.
-
You may place library facilities that are a work based on the Library side-by-side in a single library together with other library facilities not covered by this License, and distribute such a combined library, provided that the separate distribution of the work based on the Library and of the other library facilities is otherwise permitted, and provided that you do these two things: a) Accompany the combined library with a copy of the same work based on the Library, uncombined with any other library facilities. This must be distributed under the terms of the Sections above. b) Give prominent notice with the combined library of the fact that part of it is a work based on the Library, and explaining where to find the accompanying uncombined form of the same work.
-
You may not copy, modify, sublicense, link with, or distribute the Library except as expressly provided under this License. Any attempt otherwise to copy, modify, sublicense, link with, or distribute the Library is void, and will automatically terminate your rights under this License. However, parties who have received copies, or rights, from you under this License will not have their licenses terminated so long as such parties remain in full compliance.
-
You are not required to accept this License, since you have not signed it. However, nothing else grants you permission to modify or distribute the Library or its derivative works. These actions are prohibited by law if you do not accept this License. Therefore, by modifying or distributing the Library (or any work based on the Library), you indicate your acceptance of this License to do so, and all its terms and conditions for copying, distributing or modifying the Library or works based on it.
-
Each time you redistribute the Library (or any work based on the Library), the recipient automatically receives a license from the original licensor to copy, distribute, link with or modify the Library subject to these terms and conditions. You may not impose any further restrictions on the recipients' exercise of the rights granted herein. You are not responsible for enforcing compliance by third parties with this License.
-
If, as a consequence of a court judgment or allegation of patent infringement or for any other reason (not limited to patent issues), conditions are imposed on you (whether by court order, agreement or otherwise) that contradict the conditions of this License, they do not excuse you from the conditions of this License. If you cannot distribute so as to satisfy simultaneously your obligations under this License and any other pertinent obligations, then as a consequence you may not distribute the Library at all. For example, if a patent license would not permit royalty-free redistribution of the Library by all those who receive copies directly or indirectly through you, then the only way you could satisfy both it and this License would be to
refrain entirely from distribution of the Library. If any portion of this section is held invalid or unenforceable under any particular circumstance, the balance of the section is intended to apply, and the section as a whole is intended to apply in other circumstances. It is not the purpose of this section to induce you to infringe any patents or other property right claims or to
contest validity of any such claims; this section has the sole purpose of protecting the integrity of the free software distribution system which is implemented by public license practices. Many people have made generous contributions to the wide range of software distributed through that system in reliance on consistent application of that system; it is up to the author/ donor to decide if he or she is willing to distribute software through any other system and a licensee cannot impose that choice. This section is intended to make thoroughly clear what is believed to be a consequence of the rest of this License.
- If the distribution and/or use of the Library is restricted in certain countries either by patents or by copyrighted interfaces, the original copyright holder who places the Library under this License may add an explicit geographical distribution limitation excluding those countries, so that distribution is permitted only in or among countries not thus excluded. In such case, this License incorporates the limitation as if written in the body of this License.
- The Free Software Foundation may publish revised and/or new versions of the Lesser General Public License from time to time. Such new versions will be similar in spirit to the present version, but may differ in detail to address new problems or concerns. Each version is given a distinguishing version number. If the Library specifies a version number of this License which applies to it and "any later version", you have the option of following the terms and conditions either of that version or of any later version published by the Free Software Foundation. If the Library does not specify a license version number, you may choose any version ever published by the Free Software Foundation.
- If you wish to incorporate parts of the Library into other free programs whose distribution conditions are incompatible with these, write to the author to ask for permission. For software which is copyrighted by the Free Software Foundation, write to the Free Software Foundation; we sometimes make exceptions for this. Our decision will be guided by the two goals of preserving the free status of all derivatives of our free software and of promoting the sharing and reuse of software generally.
NO WARRANTY
- BECAUSE THE LIBRARY IS LICENSED FREE OF CHARGE, THERE IS NOW WARRANTY FOR THE LIBRARY, TO THE EXTENT PERMITTED BY APPLICABLE LAW. EXCEPT WHEN OTHERWISE STATED IN WRITING THE COPYRIGHT HOLDERS AND/OR OTHER PARTIES PROVIDE THE LIBRARY "AS IS" WITHOUT WARRANTY OF ANY KIND, EITHER EXPRESSED OR IMPLIED, INCLUDING, BUT NOT LIMITED TO, THE IMPLIED WARRANTYES OF MERCHANTABILITY AND FITNESS FOR A PARTICULAR PURPOSE. THE ENTIRE RISK AS TO THE QUALITY AND PERFORMANCE OF THE LIBRARY IS WITH YOU. SHOULD THE LIBRARY PROVE DEFECTIVE, YOU ASSUME THE COST OF ALL NECESSARY SERVICING, REPAIR OR CORRECTION.
- IN NO EVENT UNLESS REQUIRED BY APPLICABLE LAW OR AGREED TO IN WRITING WILL ANY COPYRIGHT HOLDER, OR ANY OTHER PARTY WHO MAY MODIFY AND/OR REDISTRIBUTE THE LIBRARY AS PERMITTED ABOVE, BE LIABLE TO YOU FOR DAMAGES, INCLUDING ANY GENERAL, SPECIAL, INCIDENTAL OR CONSEQUENTIAL DAMAGES ARISING OUT OF THE USE OR INABILITY TO USE THE LIBRARY (INCLUDING BUT NOT LIMITED TO LOSS OF DATA OR DATA BEING RENDERED INACCURATE OR LOSSES SUSTAINED BY YOU OR THIRD PARTIES OR A FAILURE OF THE LIBRARY TO OPERATE WITH ANY OTHER SOFTWARE), EVEN IF SUCH HOLDER OR OTHER PARTY HAS BEEN ADVISED OF THE POSSIBILITY OF SUCHDAMAGES.
END OF TERMS AND CONDITIONS.
This Product includes apcid, apcupsd, autofs, device-mapper, evms, exim. Lm Sensors, mdadm, pam.mount, raidtools, samba, sg_utilities, smartmontools, vsftpd, xfsprogs and Linux kernel software under GPL license.
GNU GENERAL PUBLIC LICENSE
Version 2, June 1991
Copyright (C) 1989, 1991 Free Software Foundation, Inc.
59 Temple Place - Suite 330, Boston, MA 02111-1307, USA
Everyone is permitted to copy and distribute verbatim copies of this license document, but changing it is not allowed.
Preamble
The licenses for most software are designed to take away your freedom to share and change it. By contrast, the GNU General Public License is intended to guarantee your freedom to share and change free software--to make sure the software is free for all its users. This General Public License applies to most of the Free Software Foundation's software and to any other program whose authors commit to using it. (Some other Free Software Foundation software is covered by the GNU Library General Public License instead.) You can apply it to your programs, too.
When we speak of free software, we are referring to freedom, not price. Our General Public Licenses are designed to make sure that you have the freedom to distribute copies of free software (and charge for this service if you wish), that you receive source code or can get it if you want it, that you can change the software or use pieces of it in new free programs; and that you know you can do these things.
To protect your rights, we need to make restrictions that forbid anyone to deny you these rights or to ask you to surrender the rights. These restrictions translate to certain responsibilities for you if you distribute copies of the software, or if you modify it. For example, if you distribute copies of such a program, whether gratis or for a fee, you must give the recipients all the rights that you have. You must make sure that they, too, receive or can get the source code. And you must show them these terms so they know their rights.
We protect your rights with two steps: (1) copyright the software, and (2) offer you this license which gives you legal permission to copy, distribute and/or modify the software. Also, for each author's protection and ours, we want to make certain that everyone understands that there is no warranty for this free software. If the software is modified by someone else and passed on, we want its recipients to know that what they have is not the original, so that any problems introduced by others will not reflect on the original authors' reputations.
Finally, any free program is threatened constantly by software patents. We wish to avoid the danger that re-distributors of a free program will individually obtain patent licenses, in effect making the program proprietary. To prevent this, we have made it clear that any patent must be licensed for everyone's free use or not licensed at all.
The precise terms and conditions for copying, distribution and modification follow.
TERMS AND CONDITIONS FOR COOPYING, DISTRIBUTION AND MODIFICATION
-
This License applies to any program or other work which contains a notice placed by the copyright holder saying it may be distributed under the terms of this General Public License. The "Program", below, refers to any such program or work, and a "work based on the Program" means either the Program or any derivative work under copyright law: that is to say, a work containing the Program or a portion of it, either verbatim or with modifications and/or translated into another language. (Hereinafter, translation is included without limitation in the term "modification".) Each licensee is addressed as "you". Activities other than copying, distribution and modification are not covered by this License; they are outside its scope. The act of running the Program is not restricted, and the output from the Program is covered only if its contents constitute a work based on the Program (independent of having been made by running the Program). Whether that is true depends on what the Program does.
-
You may copy and distribute verbatim copies of the Program's source code as you receive it, in any medium, provided that you conspicuously and appropriately publish on each copy an appropriate copyright notice and disclaimer of warranty; keep intact all the notices that refer to this License and to the absence of any warranty; and give any other recipients of the Program a copy of this License along with the Program. You may charge a fee for the physical act of transferring a copy, and you may at your option offer warranty protection in exchange for a fee.
-
You may modify your copy or copies of the Program or any portion of it, thus forming a work based on the Program, and copy and distribute such modifications or work under the terms of Section 1 above, provided that you also meet all of these conditions:
a) You must cause the modified files to carry prominent notices stating that you changed the files and the date of any change.
b) You must cause any work that you distribute or publish, that in whole or in part contains or is derived from the Program or any part thereof, to be licensed as a whole at no charge to all third parties under the terms of this License.
c) If the modified program normally reads commands interactively when run, you must cause it, when started running for such interactive use in the most ordinary way, to print or display an announcement including an appropriate copyright notice and a notice that there is no warranty (or else, saying that you provide a warranty) and that users may redistribute the program under these conditions, and telling the user how to view a copy of this License. (Exception: if the Program itself is interactive but does not normally print such an announcement, your work based on the Program is not required to print an announcement.)
These requirements apply to the modified work as a whole. If identifiable sections of that work are not derived from the Program, and can be reasonably considered independent and separate works in themselves, then this License, and its terms, do not apply to those sections when you distribute them as separate works. But when you distribute the same sections as part of a whole which is a work based on the Program, the distribution of the whole must be on the terms of this License, whose permissions for other licensees extend to the entire whole, and thus to each and every part regardless of who wrote it. Thus, it is not the intent of this section to claim rights or contest your rights to work written entirely by you; rather, the intent is to exercise the right to control the distribution of derivative or collective works based on the Program. In addition, mere aggregation of another work not based on the Program with the Program (or with a work based on the Program) on a volume of a storage or distribution medium does not bring the other work under the scope of this License.
- You may copy and distribute the Program (or a work based on it, under Section 2) in object code or executable form under the terms of Sections 1 and 2 above provided that you also do one of the following:
a) Accompany it with the complete corresponding machine-readable source code, which must be distributed under the terms of Sections 1 and 2 above on a medium customarily used for software interchange; or,
b) Accompany it with a written offer, valid for at least three years, to give any third party, for a charge no more than your cost of physically performing source distribution, a complete machine-readable copy of the corresponding source code, to be distributed under the terms of Sections 1 and 2 above on a medium customarily used for software interchange; or, c) Accompany it with the information you received as to the offer to distribute corresponding source code. (This alternative is allowed only for noncommercial distribution and only if you received the program in object code or executable form with such an offer, in accord with Subsection b above.) The source code for a work means the preferred form of the work for making modifications to it. For an executable work, complete source code means all the source code for all modules it contains, plus any associated interface definition files, plus the scripts used to control compilation and installation of the executable. However, as a special exception, the source code distributed need not include anything that is normally distributed (in either source or binary form) with the major components (compiler, kernel, and so on) of the operating system on which the executable runs, unless that component itself accompanies the executable. If distribution of executable or object code is made by offering access to copy from a designated place, then offering equivalent access to copy the source code from the same place counts as distribution of the source code, even though third parties are not compelled to copy the source along with the object code.
-
You may not copy, modify, sublicense, or distribute the Program except as expressly provided under this License. Any attempt otherwise to copy, modify, sublicense or distribute the Program is void, and will automatically terminate your rights under this License. However, parties who have received copies, or rights, from you under this License will not have their licenses terminated so long as such parties remain in full compliance.
-
You are not required to accept this License, since you have not signed it. However, nothing else grants you permission to modify or distribute the Program or its derivative works. These actions are prohibited by law if you do not accept this License. Therefore, by modifying or distributing the Program (or any work based on the Program), you indicate your acceptance of this License to do so, and all its terms and conditions for copying, distributing or modifying the Program or works based on it.
-
Each time you redistribute the Program (or any work based on the Program), the recipient automatically receives a license from the original licensor to copy, distribute or modify the Program subject to these terms and conditions. You may not impose any further restrictions on the recipients' exercise of the rights granted herein. You are not responsible for enforcing compliance by third parties to this License.
-
If, as a consequence of a court judgment or allegation of patent infringement or for any other reason (not limited to patent issues), conditions are imposed on you (whether by court order, agreement or otherwise) that contradict the conditions of this License, they do not excuse you from the conditions of this License. If you cannot distribute so as to satisfy simultaneously your obligations under this License and any other pertinent obligations, then as a consequence you may not distribute the Program at all. For example, if a patent license would not permit royalty-free redistribution of the Program by all those who receive copies
directly or indirectly through you, then the only way you could satisfy both it and this License would be to refrain entirely from distribution of the Program. If any portion of this section is held invalid or unenforceable under any particular circumstance, the balance of the section is intended to apply and the section as a whole is intended to apply in other circumstances. It is not the purpose of this section to induce you to infringe any patents or other property right claims or to contest validity of any such claims; this section has the sole purpose of protecting the integrity of the free software distribution system, which is implemented by public license practices. Many people have made generous contributions to the wide range of software distributed through that system in reliance on consistent application of that system; it is up to the author/donor to decide if he or she is willing to distribute software through any other system and a licensee cannot impose that choice. This section is intended to make thoroughly clear what is believed to be a consequence of the rest of this License.
-
If the distribution and/or use of the Program is restricted in certain countries either by patents or by copyrighted interfaces, the original copyright holder who places the Program under this License may add an explicit geographical distribution limitation excluding those countries, so that distribution is permitted only in or among countries not thus excluded. In such case, this License incorporates the limitation as if written in the body of this License.
-
The Free Software Foundation may publish revised and/or new versions of the General Public License from time to time. Such new versions will be similar in spirit to the present version, but may differ in detail to address new problems or concerns. Each version is given a distinguishing version number. If the Program specifies a version number of this License which applies to it and "any later version", you have the option of following the terms and conditions either of that version or of any later version published by the Free Software Foundation. If the Program does not specify a version number of this License, you may choose any version ever published by the Free Software Foundation.
-
If you wish to incorporate parts of the Program into other free programs whose distribution conditions are different, write to the author to ask for permission. For software which is copyrighted by the Free Software Foundation, write to the Free Software Foundation; we sometimes make exceptions for this. Our decision will be guided by the two goals of preserving the free status of all derivatives of our free software and of promoting the sharing and reuse of software generally.
NO WARRANTY
-
BECAUSE THE PROGRAM IS LICENSED FREE OF CHARGE, THERE IS NO WARRANTY FOR THE PROGRAM, TO THE EXTENT PERMITTED BY APPLICABLE LAW. EXCEPT WHEN OTHERWISE STATED IN WRITING THE COPYRIGHT HOLDERS AND/OR OTHER PARTIES PROVIDE THE PROGRAM "AS IS" WITHOUT WARRANTY OF ANY KIND, EITHER EXPRESSED OR IMPLIED, INCLUDING, BUT NOT LIMITED TO, THE IMPLIED WARRANTYES OF MERCHANTABILITY AND FITNESS FOR A PARTICULAR PURPOSE. THE ENTIRE RISK AS TO THE QUALITY AND PERFORMANCE OF THE PROGRAM IS WITH YOU. SHOULD THE PROGRAM PROVE DEFECTIVE, YOU ASSUME THE COST OF ALL NECESSARY SERVICING, REPAIR OR CORRECTION.
-
IN NO EVENT UNLESS REQUIRED BY APPLICABLE LAW OR AGREED TO IN WRITING WILL ANY COPYRIGHT HOLDER, OR ANY OTHER PARTY WHO MAY MODIFY AND/OR REDISTRIBUTE THE PROGRAM AS PERMITTED ABOVE, BE LIABLE TO YOU FOR DAMAGES, INCLUDING ANY GENERAL, SPECIAL, INCIDENTAL OR CONSEQUENTIAL DAMAGES ARISING OUT OF THE USE OR
INABILITY TO USE THE PROGRAM (INCLUDING BUT NOT LIMITED TO LOSS OF DATA OR DATA BEING RENDERED INACCURATE OR LOSSES SUSTAINED BY YOU OR THIRD PARTIES OR A FAILURE OF THE PROGRAM TO OPERATE WITH ANY OTHER PROGRAMS), EVEN IF SUCH HOLDER OR OTHER PARTY HAS BEEN ADVISED OF THE POSSIBILITY OF SUCH DAMAGES.
END OF TERMS AND CONDITIONS
All other trademarks or trade names mentioned herein, if any, are the property of their respective owners.
This Product includes OpenLDAP software under the OpenLDAP Public License
The OpenLDAP Public License
Version 2.8, 17 August 2003
Redistribution and use of this software and associated documentation ("Software"), with or without modification, are permitted provided that the following conditions are met:
- Redistributions in source form must retain copyright statements and notices,
- Redistributions in binary form must reproduce applicable copyright statements and notices, this list of conditions, and the following disclaimer in the documentation and/or other materials provided with the distribution, and
- Redistributions must contain a verbatim copy of this document.
The OpenLDAP Foundation may revise this license from time to time. Each revision is distinguished by a version number. You may use this Software under terms of this license revision or under the terms of any subsequent revision of the license.
THIS SOFTWARE IS PROVIDED BY THE OPENLDAP FOUNDATION AND ITS CORIutors `AS IS" AND ANY EXPRESSED OR IMPLIED WARRANTY, INCLUDING, BUT NOT LIMITED TO, THE IMPLIED WARRANTY OF MERCHANTABILITY AND FITNESS FOR A PARTICULAR PURPOSE ARE DISCLAIMED. IN NO EVENT SHALL THE OPENLDAP FOUNDATION, ITS CORIutors, OR THE AUTHOR(S) OR OWNER(S) OF THE SOFTWARE BE LIABLE FOR ANY DIRECT, INDIRECT, INCIDENTAL, SPECIAL, EXEMPLARY, OR CONSEQUENTIAL DAMAGES (INCLUDING, BUT NOT LIMITED TO, PROCEDURE OF SUBSTITUTE GOODSOR SERVICES;LOSS OF USE,DATA,OR PROFITS;OR BUSINESS INTERRUIPTION) HOWEVER CAUSED AND ON ANY THEORY OF LIABILITY, WHETHER IN CONTRACT, STRICT LIABILITY, OR TORT (INCLUDING NEGLIGENCE OR OTHERWISE) ARISING IN ANY WAY OUT OF THE USE OF THIS SOFTWARE, EVEN IF ADVISED OF THE POSSIBILITY OF SUCH DAMAGE.
The names of the authors and copyright holders must not be used in advertising or otherwise to promote the sale, use or other dealing in this Software without specific, written prior permission. Title to copyright in this Software shall at all times remain with copyright holders.
OpenLDAP is a registered trademark of the OpenLDAP Foundation.
Copyright 1999-2003 The OpenLDAP Foundation, Redwood City, California, USA. All Rights Reserved. Permission to copy and distribute verbatim copies of this document is granted
This Product includes open SSL under the Open SSL License
Open SSL License
LICENSE ISSUES
The OpenssL toolkit stays under a dual license, i.e. both the conditions of the OpenssL License and the original SLeay license apply to the toolkit. See below for the actual license texts. Actually both licenses are BSD-style Open Source licenses. In case of any license issues related to OpenssL please contact openssl-core@openssl.org.
OpenSSL License
Copyright (c) 1998-2004 The OpenSSL Project. All rights reserved.
Redistribution and use in source and binary forms, with or without modification, are permitted provided that the following conditions are met:
Redistributions of source code must retain the above copyright notice, this list of conditions and the following disclaimer.
Redistributions in binary form must reproduce the above copyright notice, this list of conditions and the following disclaimer in the documentation and/or other materials provided with the distribution.
All advertising materials mentioning features or use of this software must display the following acknowledgment: "This product includes software developed by the OpensSL Project for use in the OpensSL Toolkit. (http://www.openssl.org/)
The names "OpenSSL Toolkit" and "OpenSSL Project" must not be used to endorse or promote products derived from this software without prior written permission. For written permission, please contact openssl-core@openssl.org.
Products derived from this software may not be called "OpenSSL" nor may "OpenSSL" appear in their names without prior written permission of the OpenSSL Project.
Redistributions of any form whatsoever must retain the following acknowledgment: "This product includes software developed by the OpenSSL Project for use in the OpenSSL Toolkit (http://wwwopenssl.org/)
THIS SOFTWARE IS PROVIDED BY THE OpensSL PROJECT "AS IS" AND ANY EXPRESSED OR IMPLIED WARRANTYES, INCLUDING, BUT NOT LIMITED TO, THE IMPLIED WARRANTYES OF MERCHANTABILITY AND FITNESS FOR A PARTICULAR PURPOSE ARE DISCLAIMED. IN NO EVENT SHALL THE OpensSL PROJECT OR ITS COLNTRIButors BE LIABLE FOR ANY DIRECT, INDIRECT, INCIDENTAL, SPECIAL, EXEMPLARY, OR CONSEQUENTIAL DAMAGES (INCLUDING, BUT NOT LIMITED TO, PROCEDURE OF SUBSTITUTE GOODS OR SERVICES; LOSS OF USE, DATA, OR PROFITS; OR BUSINESS INTERRUPTION) HOWEVER CAUSED AND ON ANY THEORY OF LIABILITY, WHETHER IN CONTRACT, STRICT LIABILITY, OR TORT (INCLUDING NEGLIGENCE OR OTHERWISE) ARISING IN ANY WAY OUT OF THE USE OF THIS SOFTWARE, EVEN IF ADVISED OF THE POSSIBILITY OF SUCH DAMAGE.
This product includes cryptographic software written by Eric Young (eay@cryptsoft.com). This product includes software written by Tim Hudson (tjh@cryptsoft.com).
Original SSLeay License
Copyright (C) 1995-1998 Eric Young (eay@cryptsoft.com) All rights reserved.
This package is an SSL implementation written by Eric Young (eay@cryptsoft.com). The implementation was written so as to conform with Netscape's SSL.
This library is free for commercial and non-commercial use as long as the following conditions are adhered to. The following conditions apply to all code found in this distribution, be it the RC4, RSA, lhash, DES, etc., code; not just the SSL code. The SSL documentation included with this distribution is covered by the same copyright terms except that the holder is Tim Hudson (tjh@cryptsoft.com).
Copyright remains Eric Young's, and as such any Copyright notices in the code are not to be removed. If this package is used in a product, Eric Young should be given attribution as the author of the parts of the library used. This can be in the form of a textual message at program startup or in documentation (online or textual) provided with the package.
Redistribution and use in source and binary forms, with or without modification, are permitted provided that the following conditions are met:
Redistributions of source code must retain the copyright notice, this list of conditions and the following disclaimer.
Redistributions in binary form must reproduce the above copyright notice, this list of conditions and the following disclaimer in the documentation and/or other materials provided with the distribution.
All advertising materials mentioning features or use of this software must display the following acknowledgement:
"This product includes cryptographic software written by Eric Young (eay@cryptsoft.com)"
The word 'cryptographic' can be left out if the routines from the library being used are not cryptographic related: -).
If you include any Windows specific code (or a derivative thereof) from the apps directory (application code) you must include an acknowledgement:
"This product includes software written by Tim Hudson (tjh@cryptsoft.com)"
THIS SOFTWARE IS PROVIDED BY ERIC YOUNG `AS IS" AND ANY EXPRESS OR IMPLIED WARRANTY, INCLUDING, BUT NOT LIMITED TO, THE IMPLIED WARRANTY OF MERCHANTABILITY AND FITNESS FOR A PARTICULAR PURPOSE ARE DISCLAIMED. IN NO EVENT SHALL THE AUTHOR OR CONTRIBUTORS BE LIABLE FOR ANY DIRECT, INDIRECT, INCIDENTAL, SPECIAL, EXEMPLARY, OR CONSEQUENTIAL DAMAGES (INCLUDING, BUT NOT LIMITED TO, PROCEDURE OF SUBSTITUTE GOODS OR SERVICES; LOSS OF USE, DATA, OR PROFITS; OR BUSINESS INTERRUPTION) HOWEVER CAUSED AND ON ANY THEORY OF LIABILITY, WHETHER IN CONTRACT, STRICT LIABILITY, OR TORT (INCLUDING NEGLIGENCE OR OTHERWISE) ARISING IN ANY WAY OUT OF THE USE OF THIS SOFTWARE, EVEN IF ADVISED OF THE POSSIBILITY OF SUCH DAMAGE.
The licence and distribution terms for any publicly available version or derivative of this code cannot be changed. i.e. this code cannot simply be copied and put under another distribution licence [including the GNU Public Licence.]
This Product include mod_SSL software under BSD license
BSD
Copyright (c) [dates as appropriate to package]
The Regents of the University of California. All rights reserved. Redistribution and use in source and binary forms, with or without modification, are permitted provided that the following conditions are met:
Redistributions of source code must retain the above copyright notice, this list of conditions and the following disclaimer.
Redistributions in binary form must reproduce the above copyright notice, this list of conditions and the following disclaimer in the documentation and/or other materials provided with the distribution.
Neither the name of the University nor of the Laboratory may be used to endorse or promote products derived from this software without specific prior written permission.
THIS SOFTWARE IS PROVIDED BY THE REGENTS AND COLLECTORS AS IS" AND ANY EXPRESS OR IMPLIED WARRANTYES, INCLUDING, BUT NOT LIMITED TO, THE IMPLIED WARRANTYES OF MERCHANTABILITY AND FITNESS FOR A PARTICULAR PURPOSE ARE DISCLAIMED. IN NO EVENT SHALL THE REGENTS OR COLLECTORS BE LIABLE FOR ANY DIRECT, INDIRECT, INCIDENTAL, SPECIAL, EXEMPLARY, OR CONSEQUENTIAL DAMAGES (INCLUDING, BUT NOT LIMITED TO, PROCEDURE OF SUBSTITUTE GOODS OR SERVICES; LOSS OF USE, DATA, OR PROFITS; OR BUSINESS INTERVENTION) HOWEVER CAUSED AND ON ANY THEORY OF LIABILITY, WHETHER IN CONTRACT, STRICT LIABILITY, OR TORT (INCLUDING NEGLIGENCE OR OTHERWISE) ARISING IN ANY WAY OUT OF THE USE OF THIS SOFTWARE, EVEN IF ADVISED OF THE POSSIBILITY OF SUCH DAMAGE.
This Product includes php software under the PHP License
The PHP License, version 3.0
Copyright (c) 1999 - 2006 The PHP Group. All rights reserved.
Redistribution and use in source and binary forms, with or without modification, is permitted provided that the following conditions are met:
- Redistributions of source code must retain the above copyright notice, this list of conditions and the following disclaimer.
- Redistributions in binary form must reproduce the above copyright notice, this list of conditions and the following disclaimer in the documentation and/or other materials provided with the distribution.
- The name "PHP" must not be used to endorse or promote products derived from this software without prior written permission. For written permission, please contact group@php.net.
-
Products derived from this software may not be called “PHP”, nor may “PHP” appear in their name, without prior written permission from group@php.net. You may indicate that your software works in conjunction with PHP by saying “Foo for PHP” instead of calling it “PHP Foo” or “phpfoo”
-
The PHP Group may publish revised and/or new versions of the license from time to time. Each version will be given a distinguishing version number. Once covered code has been published under a particular version of the license, you may always continue to use it under the terms of that version. You may also choose to use such covered code under the terms of any subsequent version of the license published by the PHP Group. No one other than the PHP Group has the right to modify the terms applicable to covered code created under this License.
- Redistributions of any form whatsoever must retain the following acknowledgment:
"This product includes PHP, freely available from http://www.php.net/.
THIS SOFTWARE IS PROVIDED BY THE PHP DEVELOPMENT TEAM `AS IS" AND ANY EXPRESSED OR IMPLIED WARRANTYES, INCLUDING, BUT NOT LIMITED TO, THE IMPLIED WARRANTYES OF MERCHANTABILITY AND FITNESS FOR A PARTICULAR PURPOSE ARE DISCLAIMED. IN NO EVENT SHALL THE PHP DEVELOPMENT TEAM OR ITS CONTRIBUTORS BE LIABLE FOR ANY DIRECT, INDIRECT, INCIDENTAL, SPECIAL, EXEMPLARY, OR CONSEQUENTIAL DAMAGES (INCLUDING, BUT NOT LIMITED TO, PROCEDUREMENT OF SUBSTITUTE GOODS OR SERVICES; LOSS OF USE, DATA, OR PROFITS; OR BUSINESS INTERUPTION) HOWEVER CAUSED AND ON ANY THEORY OF LIABILITY, WHETHER IN CONTRACT, STRICT LIABILITY, OR TORT (INCLUDING NEGLIGENCE OR OTHERWISE) ARISING IN ANY WAY OUT OF THE USE OF THIS SOFTWARE, EVEN IF ADVISED OF THE POSSIBILITY OF SUCH DAMAGE.
This software consists of voluntary contributions made by many individuals on behalf of the PHP Group.
The PHP Group can be contacted via E-mail at group@php.net. For more information on the PHP Group and the PHP project, please see http://www.php.net.
This product includes the Zend Engine, freely available at http://www.zend.com.
The above copyright notice and this permission notice shall be included in all copies or substantial portions of the Software.
THE SOFTWARE IS PROVIDED "AS IS", WITHOUT WARRANTY OF ANY KIND, EXPRESS OR IMPLIED, INCLUDING BUT NOT LIMITED TO THE WARRANTY OF MERCHANTABILITY, FITNESS FOR A PARTICULAR PURPOSE AND NONINFRINGEMENT. IN NO EVENT SHALL THE AUTHORS OR COPYRIGHT HOLDERS BE LIABLE FOR ANY CLAIM, DAMAGES OR OTHER LIABILITY, WHETHER IN AN ACTION OF CONTRACT, TORT OR OTHERWISE, ARISING FROM, OUT OF OR IN CONNECTION WITH THE SOFTWARE OR THE USE OR OTHER DEALINGS IN THE SOFTWARE.
This Product includes Sablotron software under MPL License
Mozilla Public License Version 1.1
- Definitions.
1.0.1. "Commercial Use" means distribution or otherwise making the Covered Code available to a third party.
1.1. "Contributor" means each entity that creates or contributes to the creation of Modifications.
1.2. "Contributor Version" means the combination of the Original Code, prior Modifications used by a Contributor, and the Modifications made by that particular Contributor.
1.3. "Covered Code" means the Original Code or Modifications or the combination of the Original Code and Modifications, in each case including portions thereof.
1.4. "Electronic Distribution Mechanism" means a mechanism generally accepted in the software development community for the electronic transfer of data.
1.5. "Executable" means Covered Code in any form other than Source Code.
1.6. "Initial Developer" means the individual or entity identified as the Initial Developer in the Source Code notice required by Exhibit A.
1.7. "Larger Work" means a work which combines Covered Code or portions thereof with code not governed by the terms of this License.
1.8. "License" means this document.
1.8.1. "Licensable" means having the right to grant, to the maximum extent possible, whether at the time of the initial grant or subsequently acquired, any and all of the rights conveyed herein.
1.9. "Modifications" means any addition to or deletion from the substance or structure of either the Original Code or any previous Modifications. When Covered Code is released as a series of files, a Modification is:
Any addition to or deletion from the contents of a file containing Original Code or previous Modifications.
Any new file that contains any part of the Original Code or previous Modifications.
1.10. "Original Code" means Source Code of computer software code which is described in the Source Code notice required by Exhibit A as Original Code, and which, at the time of its release under this License is not already Covered Code governed by this License.
1.10.1. "Patent Claims" means any patent claim(s), now owned or hereafter acquired, including without limitation, method, process, and apparatus claims, in any patent Licensable by grantor.
1.11. "Source Code" means the preferred form of the Covered Code for making modifications to it, including all modules it contains, plus any associated interface definition files, scripts used to control compilation and installation of an Executable, or source code differential comparisons against either the Original Code or another well known, available Covered Code of the Contributor's choice. The Source Code can be in a compressed or archival form, provided the appropriate decompression or de-archiving software is widely available for no charge.
1.12. "You" (or "Your") means an individual or a legal entity exercising rights under, and complying with all of the terms of, this License or a future version of this License issued under Section 6.1. For legal entities, "You" includes any entity which controls, is controlled by, or is under common control with You. For purposes of this definition, "control" means (a) the power, direct or indirect, to cause the direction or management of such entity, whether by contract or otherwise, or (b) ownership of more than fifty percent (50%) of the outstanding shares or beneficial ownership of such entity.
2. Source Code License.
2.1. The Initial Developer Grant.
The Initial Developer hereby grants You a world-wide, royalty-free, non-exclusive license, subject to third party intellectual property claims under intellectual property rights (other than patent or trademark) Licensable by Initial Developer to use, reproduce, modify, display, perform, sublicense and distribute the Original Code (or portions thereof) with or without Modifications, and/or as part of a Larger Work; and under Patents Claims infringed by the making, using or selling of Original Code, to make, have made, use, practice, sell, and offer for sale, and/or otherwise dispose of the Original Code (or portions thereof) the licenses granted in this Section 2.1 (a) and (b) are effective on the date Initial Developer first distributes Original Code under the terms of this License.
Notwithstanding Section 2.1 (b) above, no patent license is granted: 1) for code that You delete from the Original Code; 2) separate from the Original Code; or 3) for infringements caused by: i) the modification of the Original Code or ii) the combination of the Original Code with other software or devices.
2.2. Contributor Grant.
Subject to third party intellectual property claims, each Contributor hereby grants You a world-wide, royalty-free, non-exclusive license under intellectual property rights (other than patent or trademark) Licensable by Contributor, to use, reproduce, modify, display, perform, sublicense and distribute the Modifications created by such Contributor (or portions thereof) either on an unmodified basis, with other Modifications, as Covered Code and/or as part of a Larger Work; and under Patent Claims infringed by the making, using, or selling of Modifications made by that Contributor either alone and/or in combination with its Contributor Version (or portions of such combination), to make, use, sell, offer for sale, have made, and/or otherwise dispose of: 1) Modifications made by that Contributor (or portions thereof); and 2) the combination of Modifications made by that Contributor with its Contributor Version (or portions of such combination) the licenses granted in Sections 2.2 (a) and 2.2 (b) are effective on the date Contributor first makes Commercial Use of the Covered Code.
Notwithstanding Section 2.2 (b) above, no patent license is granted: 1) for any code that Contributor has deleted from the Contributor Version; 2) separate from the Contributor Version; 3) for infringements caused by: i) third party modifications of Contributor Version or ii) the combination of Modifications made by that Contributor with other software (except as part of the Contributor Version) or other devices; or 4) under Patent Claims infringed by Covered Code in the absence of Modifications made by that Contributor.
- Distribution Obligations.
3.1. Application of License.
The Modifications which You create or to which You contribute are governed by the terms of this License, including without limitation Section 2.2. The Source Code version of Covered Code may be distributed only under the terms of this License or a future version of this License released under Section 6.1, and You must include a copy of this License with every copy of the Source Code You distribute. You may not offer or impose any terms on any Source Code version that alters or restricts the applicable version of this License or the recipients' rights hereunder. However, You may include an additional document offering the additional rights described in Section 3.5.
3.2. Availability of Source Code.
Any Modification which You create or to which You contribute must be made available in Source Code form under the terms of this License either on the same media as an Executable version or via an accepted Electronic Distribution Mechanism to anyone to whom you made an Executable version available; and if made available via Electronic Distribution Mechanism, must remain available for at least twelve (12) months after the date it initially became available, or at least six (6) months after a subsequent version of that particular Modification has been made available to such recipients. You are responsible for ensuring that the Source Code version remains available even if the Electronic Distribution Mechanism is maintained by a third party.
3.3. Description of Modifications.
You must cause all Covered Code to which You contribute to contain a file documenting the changes You made to create that Covered Code and the date of any change. You must include a prominent statement that the Modification is derived, directly or indirectly, from Original Code provided by the Initial Developer and including the name of the Initial Developer in (a) the Source Code, and (b) in any notice in an Executable version or related documentation in which You describe the origin or ownership of the Covered Code.
3.4. Intellectual Property Matters
(a) Third Party Claims
If Contributor has knowledge that a license under a third party's intellectual property rights is required to exercise the rights granted by such Contributor under Sections 2.1 or 2.2, Contributor must include a text file with the Source Code distribution titled "LEGAL" which describes the claim and the party making the claim in sufficient detail that a recipient will know whom to contact. If Contributor obtains such knowledge after the Modification is made available as described in Section 3.2, Contributor shall promptly modify the LEGAL file in all copies Contributor makes available thereafter and shall take other steps (such as notifying appropriate mailing lists or unscrupulous) reasonably calculated to inform those who received the Covered Code that new knowledge has been obtained.
(b) Contributor Apes
If Contributor's Modifications include an application programming interface and Contributor has knowledge of patent licenses which are reasonably necessary to implement that API, Contributor must also include this information in the legal file.
(c) Representations.
Contributor represents that, except as disclosed pursuant to Section 3.4 (a) above, Contributor believes that Contributor's Modifications are Contributor's original creation(s) and/or Contributor has sufficient rights to grant the rights conveyed by this License.
3.5. Required Notices.
You must duplicate the notice in Exhibit A in each file of the Source Code. If it is not possible to put such notice in a particular Source Code file due to its structure, then You must include such notice in a location (such as a relevant directory) where a user would be likely to look for such a notice. If You created one or more Modification(s) You may add your name as a Contributor to the notice described in Exhibit A. You must also duplicate this License in any documentation for the Source Code where You describe recipients' rights or ownership rights relating to Covered Code. You may choose to offer, and to charge a fee for, warranty, support, indemnity or liability obligations to one or more recipients of Covered Code. However, You may do so only on Your own behalf, and not on behalf of the Initial Developer or any
Contributor. You must make it absolutely clear than any such warranty, support, indemnity or liability obligation is offered by You alone, and You hereby agree to indemnify the Initial Developer and every Contributor for any liability incurred by the Initial Developer or such Contributor as a result of warranty, support, indemnity or liability terms You offer.
3.6. Distribution of Executable Versions.
You may distribute Covered Code in Executable form only if the requirements of Sections 3.1, 3.2, 3.3, 3.4 and 3.5 have been met for that Covered Code, and if You include a notice stating that the Source Code version of the Covered Code is available under the terms of this License, including a description of how and where You have fulfilled the obligations of Section 3.2. The notice must be conspicuously included in any notice in an Executable version, related documentation or collateral in which You describe recipients' rights relating to the Covered Code. You may distribute the Executable version of Covered Code or ownership rights under a license of Your choice, which may contain terms different from this License, provided that You are in compliance with the terms of this License and that the license for the Executable version does not attempt to limit or alter the recipient's rights in the Source Code version from the rights set forth in this License. If You distribute the Executable version under a different license You must make it absolutely clear that any terms which differ from this License are offered by You alone, not by the Initial Developer or any Contributor. You hereby agree to indemnify the Initial Developer and every Contributor for any liability incurred by the Initial Developer or such Contributor as a result of any such terms You offer.
3.7. Larger Works.
You may create a Larger Work by combining Covered Code with other code not governed by the terms of this License and distribute the Larger Work as a single product. In such a case, You must make sure the requirements of this License are fulfilled for the Covered Code.
4. Inability to Comply Due to Statute or Regulation.
If it is impossible for You to comply with any of the terms of this License with respect to some or all of the Covered Code due to statute, judicial order, or regulation then You must: (a) comply with the terms of this License to the maximum extent possible; and (b) describe the limitations and the code they affect. Such description must be included in the legal file described in Section 3.4 and must be included with all distributions of the Source Code. Except to the extent prohibited by statute or regulation, such description must be sufficiently detailed for a recipient of ordinary skill to be able to understand it.
5. Application of this License.
This License applies to code to which the Initial Developer has attached the notice in Exhibit A and to related Covered Code.
6. Versions of the License.
6.1. New Versions
Netscape Communications Corporation ("Netscape") may publish revised and/or new versions of the License from time to time. Each version will be given a distinguishing version number.
6.2. Effect of New Versions
Once Covered Code has been published under a particular version of the License, You may always continue to use it under the terms of that version. You may also choose to use such Covered Code under the terms of any subsequent version of the License published by Netscape. No one other than Netscape has the right to modify the terms applicable to Covered Code created under this License.
6.3. Derivative Works
If You create or use a modified version of this License (which you may only do in order to apply it to code which is not already Covered Code governed by this License), You must (a) rename Your license so that the phrases "Mozilla", "MOZILLA", "MOZPL", "Netscape", "MPL", "NPL" or any confusingly similar phrase do not appear in your license (except to note that your license differs from this License) and (b) otherwise make it clear that Your version of the license contains terms which differ from the Mozilla Public License and Netscape Public License. (Filling in the name of the Initial Developer, Original Code or Contributor in the notice described in Exhibit A shall not of themselves be deemed to be modifications of this License.)
7. Disclaimer of warranty
Covered code is provided under this license on an "as is" basis, without warranty of any kind, either expressed or implied, including, without limitation, warranties that the covered code is free of defects, merchantable, fit for a particular purpose or non-infringing. The entire risk as to the quality and performance of the covered code is with you. Should any covered code prove defective in any respect, you (not the initial developer or any other contributor) assume the cost of any necessary servicing, repair or correction. This disclaimer of warranty constitutes an essential part of this license. No use of any covered code is authorized hereunder except under this disclaimer.
8. Termination
8.1. This License and the rights granted hereunder will terminate automatically if You fail to comply with terms herein and fail to cure such breach within 30 days of becoming aware of the breach. All licenses to the Covered Code which are properly granted shall survive any termination of this License. Provisions which, by their nature, must remain in effect beyond the termination of this License shall survive.
8.2. If You initiate litigation by asserting a patent infringement claim (excluding declaratory judgment actions) against Initial Developer or a Contributor (the Initial Developer or Contributor against whom You file such action is referred to as "Participant") alleging that:
such Participant's Contributor Version directly or indirectly infringes any patent, then any and all rights granted by such Participant to You under Sections 2.1 and/or 2.2 of this License shall, upon 60 days notice from Participant terminate prospectively, unless if within 60 days after receipt of notice You either: (i) agree in writing to pay Participant a mutually agreeable reasonable royalty for Your past and future use of Modifications made by such Participant, or (ii) withdraw Your litigation claim with respect to the Contributor Version against such Participant. If within 60 days of notice, a reasonable royalty and payment arrangement are not mutually agreed upon in writing by the parties or the litigation claim is not withdrawn, the rights granted by Participant to You under Sections 2.1 and/or 2.2 automatically terminate at the expiration of the 60 day notice period specified above.
any software, hardware, or device, other than such Participant's Contributor Version, directly or indirectly infringes any patent, then any rights granted to You by such Participant under Sections 2.1(b) and 2.2(b) are revoked effective as of the date You first made, used, sold, distributed, or had made, Modifications made by that Participant.
8.3. If You assert a patent infringement claim against Participant alleging that such Participant's Contributor Version directly or indirectly infringes any patent where such claim is resolved (such as by license or settlement) prior to the initiation of patent infringement litigation, then the reasonable value of the licenses granted by such Participant under Sections 2.1 or 2.2 shall be taken into account in determining the amount or value of any payment or license.
8.4. In the event of termination under Sections 8.1 or 8.2 above, all end user license agreements (excluding distributors and resellers) which have been validly granted by You or any distributor hereunder prior to termination shall survive termination.
9. Limitation of liability
Under no circumstances and under no legal theory, whether tort (including negligence), contract, or otherwise, shall you, the initial developer, any other contributor, or any distributor of covered code, or any supplier of any of such parties, be liable to any person for any indirect, special, incidental, or consequential damages of any character including, without limitation, damages for loss of goodwill, work stoppage, computer failure or malfunction, or any and all other commercial damages or losses, even if such party shall have been informed of the possibility of such damages. This limitation of liability shall not apply to liability for death or personal injury resulting from such party's negligence to the extent applicable law prohibits such limitation. Some jurisdictions do not allow the exclusion or limitation of incidental or consequential damages, so this exclusion and limitation may not apply to you.
10. U.S. government end users
The Covered Code is a "commercial item," as that term is defined in 48 C.F.R. 2.101 (Oct. 1995), consisting of "commercial computer software" and "commercial computer software documentation," as such terms are used in 48 C.F.R. 12.212 (Sept. 1995). Consistent with 48 C.F.R. 12.212 and 48 C.F.R. 227.7202-1 through 227.7202-4 (June 1995), all U.S. Government End Users acquire Covered Code with only those rights set forth herein.
11. Miscellaneous
This License represents the complete agreement concerning subject matter hereof. If any provision of this License is held to be unenforceable, such provision shall be reformed only to the extent necessary to make it enforceable. This License shall be governed by California law provisions (except to the extent applicable law, if any, provides otherwise), excluding its conflict-of-law provisions. With respect to disputes in which at least one party is a citizen of, or an entity chartered or registered to do business in the United States of America, any litigation relating to this License shall be subject to the jurisdiction of the Federal Courts of the Northern District of California, with venue lying in Santa Clara County, California, with the losing party responsible for costs, including without limitation, court costs and reasonable attorneys' fees and expenses. The application of the United Nations Convention on Contracts for the International Sale of Goods is expressly excluded. Any law or regulation which provides that the language of a contract shall be construed against the drafter shall not apply to this License.
12. Responsibility for claims
As between Initial Developer and the Contributors, each party is responsible for claims and damages arising, directly or indirectly, out of its utilization of rights under this License and You agree to work with Initial Developer and Contributors to distribute such responsibility on an equitable basis. Nothing herein is intended or shall be deemed to constitute any admission of liability.
13. Multiple-licensed code
Initial Developer may designate portions of the Covered Code as "Multiple-Licensed". "Multiple-Licensed" means that the Initial Developer permits you to utilize portions of the Covered Code under Your choice of the MPL or the alternative licenses, if any, specified by the Initial Developer in the file described in Exhibit A.
Exhibit A - Mozilla Public License.
"The contents of this file are subject to the Mozilla Public License Version 1.1 (the "License"); you may not use this file except in compliance with the License. You may obtain a copy of the License at http://www.mozilla.org/MPL/
Software distributed under the License is distributed on an "AS IS" basis, WITHOUT WARRANTY OF ANY KIND, either express or implied. See the License for the specific language governing rights and limitations under the License.
The Original Code is
The Initial Developer of the Original Code is
Portions created by _ are Copyright (C) _. All Rights Reserved.
Contributor(s):
Alternatively, the contents of this file may be used under the terms of the __ license (the “[] License”), in which case the provisions of [_] License are applicable instead of those above. If you wish to allow use of your version of this file only under the terms of the [] License and not to allow others to use your version of this file under the MPL, indicate your decision by deleting the provisions above and replace them with the notice and other provisions required by the [_] License. If you do not delete the provisions above, a recipient may use your version of this file under either the MPL or the [____] License.”
NOTE: The text of this Exhibit A may differ slightly from the text of the notices in the Source Code files of the Original Code. You should use the text of this Exhibit A rather than the text found in the Original Code Source Code for Your Modifications.
This Product includes expiate and krb5 software under the MIT License
The MIT License
Copyright (c)
Permission is hereby granted, free of charge, to any person obtaining a copy of this software and associated documentation files (the "Software"), to deal in the Software without restriction, including without limitation the rights to use, copy, modify, merge, publish, distribute, sublicense, and/or sell copies of the Software, and to permit persons to whom the Software is furnished to do so, subject to the following conditions:
The above copyright notice and this permission notice shall be included in all copies or substantial portions of the Software.
THE SOFTWARE IS PROVIDED "AS IS", WITHOUT WARRANTY OF ANY KIND, EXPRESS OR IMPLIED, INCLUDING BUT NOT LIMITED TO THE WARRANTY OF MERCHANTABILITY, FITNESS FOR A PARTICULAR PURPOSE AND NONINFRINGEMENT. IN NO EVENT SHALL THE AUTHORS OR COPYRIGHT HOLDERS BE LIABLE FOR ANY CLAIM, DAMAGES OR OTHER LIABILITY, WHETHER IN AN ACTION OF CONTRACT, TORT OR OTHERWISE, ARISING FROM, OUT OF OR IN CONNECTION WITH THE SOFTWARE OR THE USE OR OTHER DEALINGS IN THE SOFTWARE.
NOTE: Some components of the NSA-2400 incorporate source code covered under the Apache License, GPL License, LGPL License, BSD License, Open SSL License, OpenLDAP License, PHP License and MIT License. To obtain the source code covered under those Licenses, please contact ZyXEL Communications Corporation at: ZyXEL Technical Support.
End-User License Agreement for "NSA-2400"
WARNING: ZyXEL Communications Corp. IS WILLING TO LICENSE THE ENCLOSED SOFTWARE TO YOU ONLY UPON THE CONDITION THAT YOU ACCEPT ALL OF THE TERMS CONTAINED IN THIS LICENSE AGREEMENT. PLEASE READ THE TERMS CAREFULLY BEFORE COMPLETING THE INSTALLATION PROCESS AS INSTALLING THE SOFTWARE WILL INDICATE YOUR ASSENT TO THEM. IF YOU DO NOT AGREE TO THESE TERMS, THEN ZyXEL, INC. IS UNWILLING TO LICENSE THE SOFTWARE TO YOU, IN WHICH EVENT YOU SHOULD RETURN THE UNINSTALLED SOFTWARE AND PACKAGING TO THE PLACE FROM WHICH IT WAS ACQUIRED, AND YOUR MONEY WILL BE REFUNDED.
1.Grant of License for Personal Use
ZyXEL Communications Corp. ("ZyXEL") grants you a non-exclusive, non-sublicense, nontransferable license to use the program with which this license is distributed (the "Software"), including any documentation files accompanying the Software ("Documentation"), for internal business use only, for up to the number of users specified in sales order and invoice. You have the right to make one backup copy of the Software and Documentation solely for archival, back-up or disaster recovery purposes. You shall not exceed the scope of the license granted hereunder. Any rights not expressly granted by ZyXEL to you are reserved by ZyXEL, and all implied licenses are disclaimed.
- Ownership
You have no ownership rights in the Software. Rather, you have a license to use the Software as long as this License Agreement remains in full force and effect. Ownership of the Software, Documentation and all intellectual property rights therein shall remain at all times with ZyXEL. Any other use of the Software by any other entity is strictly forbidden and is a violation of this License Agreement.
3.Copyright
The Software and Documentation contain material that is protected by United States Copyright Law and trade secret law, and by international treaty provisions. All rights not granted to you herein are expressly reserved by ZyXEL. You may not remove any proprietary notice of ZyXEL or any of its licensors from any copy of the Software or Documentation.
4. Restrictions
You may not publish, display, disclose, sell, rent, lease, modify, store, loan, distribute, or create derivative works of the Software, or any part thereof. You may not assign, sublicense, convey or otherwise transfer, pledge as security or otherwise encumber the rights and licenses granted hereunder with respect to the Software. You may not copy, reverse engineer, decompile, reverse compile, translate, adapt, or disassemble the Software, or any part thereof, nor shall you attempt to create the source code from the object code for the Software. You may not market, co-brand, private label or otherwise permit third parties to link to the Software, or any part thereof. You may not use the Software, or any part thereof, in the operation of a service bureau or for the benefit of any other person or entity. You may not cause, assist or permit any third party to do any of the foregoing.
5. Confidentiality
You acknowledge that the Software contains proprietary trade secrets of ZyXEL and you hereby agree to maintain the confidentiality of the Software using at least as great a degree of care as you use to maintain the confidentiality of your own most confidential information. You agree to reasonably communicate the terms and conditions of this License Agreement to those persons employed by you who come into contact with the Software, and to use reasonable best efforts to ensure their compliance with such terms and conditions, including, without limitation, not knowingly permitting such persons to use any portion of the Software for the purpose of deriving the source code of the Software.
6.No Warranty
THE SOFTWARE IS PROVIDED "AS IS." TO THE MAXIMUM EXTENT PERMITTED BY LAW, ZyXEL DISCLAIMS ALL WARRANTYES OF ANY KIND, Either EXPRESSED OR IMPLIED, INCLUDING, WITHOUT LIMITATION, IMPLIED WARRANTYES OF MERCHANTABILITY AND FITNESS FOR A PARTICULAR PURPOSE. ZyXEL DOES NOT WARRANTY THAT THE FUNCTIONS CONTAINED IN THE SOFTWARE WILL MEET ANY REQUIREMENTS OR NEEDS YOU MAY HAVE, OR THAT THE SOFTWARE WILL OPERATE ERROR FREE, OR IN AN UNINTERTUPTED FASHION, OR THAT ANY DEFECTS OR ERRORS IN THE SOFTWARE WILL BE CORRECTED, OR THAT THE SOFTWARE IS COMPATIBLE WITH ANY PARTICULAR PLATFORM. SOME JURISDICTIONS DO NOT ALLOW THE WAIVER OR EXCLUSION OF IMPLIED WARRANTYES SO THEY MAY NOT APPLY TO YOU. IF THIS EXCLUSION IS HELD TO BE UNENFORCEABLE BY A COURT OF COMPETENT JURISDICTION, THEN ALL EXPRESS AND IMPLIED WARRANTYES SHALL BE LIMITED IN DURATION TO A PERIOD OF THIRTY (30) DAYS FROM THE DATE OF PURCHASE OF THE SOFTWARE, AND NO WARRANTYES SHALL APPLY AFTER THAT PERIOD.
7.Limitation of Liability
IN NO EVENT WILL ZyXEL BE LIABLE TO YOU OR ANY THIRD PARTY FOR ANY INCIDENTAL OR CONSEQUENTIAL DAMAGES (INCLUDING, WITHOUT LIMITATION, INDIRECT, SPECIAL, PUNITIVE, OR EXEMPLARY DAMAGES FOR LOSS OF BUSINESS, LOSS OF PROFITS, BUSINESS INTERRUPTION, OR LOSS OF BUSINESS INFORMATION) ARISING OUT OF THE USE OF OR INABILITY TO USE THE PROGRAM, OR FOR ANY CLAIM BY ANY OTHER PARTY, EVEN IF ZyXEL HAS BEEN ADVISED OF THE POSSIBILITY OF SUCH DAMAGES. ZyXEL'S AGGREGATE LIABILITY WITH RESPECT TO ITS OBLIGATIONS UNDER THIS AGREEMENT OR OTHERWISE WITH RESPECT TO THE SOFTWARE AND
DOCUMENTATION OR OTHERWISE SHALL BE EQUAL TO THE PURCHASE PRICE, BUT SHALL IN NO EVENT EXCEED $1,000. BECAUSE SOME STATES/COUNTRIES DO NOT ALLOW THE EXCLUSION OR LIMITATION OF LIABILITY FOR CONSEQUENTIAL OR INCIDENTAL DAMAGES, THE ABOVE LIMITATION MAY NOT APPLY TO YOU.
8. Export Restrictions
THIS LICENSE AGREEMENT IS EXPRESSLY MADE SUBJECT TO ANY APPLICABLE LAWS, REGULATIONS, ORDERS, OR OTHER RESTRICTIONS ON THE EXPORT OF THE SOFTWARE OR INFORMATION ABOUT SUCH SOFTWARE WHICH MAY BE IMPOSED FROM TIME TO TIME. YOU SHALL NOT EXPORT THE SOFTWARE, DOCUMENTATION OR INFORMATION ABOUT THE SOFTWARE AND DOCUMENTATION WITHOUT COMPLYING WITH SUCH LAWS, REGULATIONS, ORDERS, OR OTHER RESTRICTIONS. YOU AGREE TO INDEMNIFY ZyXEL AGAINST ALL CLAIMS, LOSSES, DAMAGES, LIABILITIES, COSTS AND EXPENSES, INCLUDING REASONABLE ATTORNEYS' FEES, TO THE EXTENT SUCH CLAIMS ARESE OUT OF ANY BREACH OF THIS SECTION 8.
9.Audit Rights
ZyXEL SHALL HAVE THE RIGHT, AT ITS OWN EXPENSE, UPON REASONABLE PRIOR NOTICE, TO PERIODICALLY INSPECT AND AUDIT YOUR RECORDS TO ENSURE YOUR COMPLIANCE WITH THE TERMS AND CONDITIONS OF THIS LICENSE AGREEMENT.
10. Termination
This License Agreement is effective until it is terminated. You may terminate this License Agreement at any time by destroying or returning to ZyXEL all copies of the Software and Documentation in your possession or under your control. ZyXEL may terminate this License Agreement for any reason, including, but not limited to, if ZyXEL finds that you have violated any of the terms of this License Agreement. Upon notification of termination, you agree to destroy or return to ZyXEL all copies of the Software and Documentation and to certify in writing that all known copies, including backup copies, have been destroyed. All provisions relating to confidentiality, proprietary rights, and non-disclosure shall survive the termination of this Software License Agreement.
12.General
This License Agreement shall be construed, interpreted and governed by the laws of Republic of China without regard to conflicts of laws provisions thereof. The exclusive forum for any disputes arising out of or relating to this License Agreement shall be an appropriate court or Commercial Arbitration Association sitting in ROC, Taiwan. This License Agreement shall constitute the entire Agreement between the parties hereto. This License Agreement, the rights granted hereunder, the Software and Documentation shall not be assigned by you without the prior written consent of ZyXEL. Any waiver or modification of this License Agreement shall only be effective if it is in writing and signed by both parties hereto. If any part of this License Agreement is found invalid or unenforceable by a court of competent jurisdiction, the remainder of this License Agreement shall be interpreted so as to reasonably effect the intention of the parties.
Legal Information
Copyright
Copyright © 2006 by ZyXEL Communications Corporation.
The contents of this publication may not be reproduced in any part or as a whole, transcribed, stored in a retrieval system, translated into any language, or transmitted in any form or by any means, electronic, mechanical, magnetic, optical, chemical, photocopying, manual, or otherwise, without the prior written permission of ZyXEL Communications Corporation.
Published by ZyXEL Communications Corporation. All rights reserved.
Disclaimer
ZyXEL does not assume any liability arising out of the application or use of any products, or software described herein. Neither does it convey any license under its patent rights nor the patent rights of others. ZyXEL further reserves the right to make changes in any products described herein without notice. This publication is subject to change without notice.
Certifications
Federal Communications Commission (FCC) Interference Statement
The device complies with Part 15 of FCC rules. Operation is subject to the following two conditions:
- This device may not cause harmful interference.
- This device must accept any interference received, including interference that may cause undesired operations.
This device has been tested and found to comply with the limits for a Class B digital device pursuant to Part 15 of the FCC Rules. These limits are designed to provide reasonable protection against harmful interference in a residential installation. This device generates, uses, and can radiate radio frequency energy, and if not installed and used in accordance with the instructions, may cause harmful interference to radio communications. However, there is no guarantee that interference will not occur in a particular installation.
Notices
Changes or modifications not expressly approved by the party responsible for compliance could void the user's authority to operate the equipment.
This Class B digital apparatus complies with Canadian ICES-003.
Viewing Certifications
1 Go to http://www.zyxel.com.
2 Select your product on the ZyXEL home page to go to that product's page.
3 Select the certification you wish to view from this page.
ZyXEL warrants to the original end user (purchaser) that this product is free from any defects in materials or workmanship for a period of up to two years from the date of purchase. During the warranty period, and upon proof of purchase, should the product have indications of failure due to faulty workmanship and/or materials, ZyXEL will, at its discretion, repair or replace the defective products or components without charge for either parts or labor, and to whatever extent it shall deem necessary to restore the product or components to proper operating condition. Any replacement will consist of a new or re-manufactured functionally equivalent product of equal or higher value, and will be solely at the discretion of ZyXEL. This warranty shall not apply if the product has been modified, misused, tampered with, damaged by an act of God, or subjected to abnormal working conditions.
Note
Repair or replacement, as provided under this warranty, is the exclusive remedy of the purchaser. This warranty is in lieu of all other warranties, express or implied, including any implied warranty of merchantability or fitness for a particular use or purpose. ZyXEL shall in no event be held liable for indirect or consequential damages of any kind to the purchaser.
To obtain the services of this warranty, contact ZyXEL's Service Center for your Return Material Authorization number (RMA). Products must be returned Postage Prepaid. It is recommended that the unit be insured when shipped. Any returned products without proof of purchase or those with an out-dated warranty will be repaired or replaced (at the discretion of ZyXEL) and the customer will be billed for parts and labor. All repaired or replaced products will be shipped by ZyXEL to the corresponding return address, Postage Paid. This warranty gives you specific legal rights, and you may also have other rights that vary from country to country.
Registration
Register your product online to receive e-mail notices of firmware upgrades and information at www.zyxel.com for global products, or at www.us.zyxel.com for North American products.
Customer Support
Please have the following information ready when you contact customer support.
Required Information
Product model and serial number.
Warranty Information.
- Date that you received your device.
- Brief description of the problem and the steps you took to solve it.
Corporate Headquarters (Worldwide)
- Support E-mail: support@zyxel.com.tw
Sales E-mail: sales@zyxel.com.tw
Telephone: +886-3-578-3942
Fax: +886-3-578-2439 - Web Site: www.zyxel.com, www.europe.zyxel.com
- FTP Site: ftp.zyxel.com, ftp.europe.zyxel.com
- Regular Mail: ZyXEL Communications Corp., 6 Innovation Road II, Science Park, Hsinchu 300, Taiwan
Costa Rica
- Support E-mail: soporte@zyxel.co.cr
Sales E-mail: sales@zyxel.co.cr
Telephone: +506-2017878
Fax: +506-2015098 - Web Site: www.zyxel.co.cr
- FTP Site: ftp.zyxel.co.kr
- Regular Mail: ZyXEL Costa Rica, Plaza Roble Escazú, Etapa El Patio, Tercer Piso, San José, Costa Rica
Czech Republic
E-mail: info@cz.zyxel.com
Telephone: +420-241-091-350
Fax: +420-241-091-359
Web Site: www.zyxel.cz
- Regular Mail: ZyXEL Communications, Czech s.r.o., Modranská 621, 143 01 Praha 4 - Modrany, Ceská Republika
Denmark
- Support E-mail: support@zyxel.dk
Sales E-mail: sales@zyxel.dk
Telephone: +45-39-55-07-00
Fax: +45-39-55-07-07
Web Site: www.zyxel.dk - Regular Mail: ZyXEL Communications A/S, Columbusvej, 2860 Soeborg, Denmark
Finland
- Support E-mail: support@zyxel.fi
Sales E-mail: sales@zyxel.fi
Telephone: +358-9-4780-8411
Fax: +358-9-4780 8448
Web Site: www.zyxel.fi - Regular Mail: ZyXEL Communications Oy, Malminkaari 10, 00700 Helsinki, Finland
France
E-mail: info@zyxel.fr
Telephone: +33-4-72-52-97-97
Fax: +33-4-72-52-19-20
Web Site: www.zyxel.fr
- Regular Mail: ZyXEL France, 1 rue des Vergers, Bat. 1 / C, 69760 Limonest, France
Germany
- Support E-mail: support@zyxel.de
Sales E-mail: sales@zyxel.de
Telephone: +49-2405-6909-0
Fax: +49-2405-6909-99
Web Site: www.zyxel.de - Regular Mail: ZyXEL Deutschland GmbH., Adenauerstr. 20/A2 D-52146, Wuerselen, Germany
Hungary
- Support E-mail: support@zyxel.hu
Sales E-mail: info@zyxel.hu
Telephone: +36-1-3361649
Fax: +36-1-3259100
Web Site: www.zyxel.hu
Regular Mail: ZyXEL Hungary, 48, Zoldlomb Str., H-1025, Budapest, Hungary
Kazakhstan
- Support: http://zyxel.kz/support
Sales E-mail: sales@zyxel.kz
Telephone: +7-3272-590-698
Fax: +7-3272-590-689
Web Site: www.zyxel.kz
- Regular Mail: ZyXEL Kazakhstan, 43, Dostyk ave., Office 414, Dostyk Business Centre, 050010, Almaty, Republic of Kazakhstan
North America
- Support E-mail: support@zyxel.com
- Sales E-mail: sales@zyxel.com
- Telephone: +1-800-255-4101, +1-714-632-0882
Fax: +1-714-632-0858
Web Site: www.us.zyxel.com - FTP Site: ftp.us.zyxel.com
- Regular Mail: ZyXEL Communications Inc., 1130 N. Miller St., Anaheim, CA 92806-2001, U.S.A.
Norway
- Support E-mail: support@zyxel.no
Sales E-mail: sales@zyxel.no
Telephone: +47-22-80-61-80
Fax: +47-22-80-61-81 - Web Site: www.zyxel.no
- Regular Mail: ZyXEL Communications A/S, Nils Hansens vei 13, 0667 Oslo, Norway
Poland
E-mail: info@pl.zyxel.com
Telephone: +48 (22) 333 8250
Fax: +48 (22) 333 8251
Web Site: www.pl.zyxel.com
Regular Mail: ZyXEL Communications, ul. Okrzej 1A, 03-715 Warszawa, Poland
Russia
- Support: http://zyxel.ru/support
Sales E-mail: sales@zyxel.ru
Telephone: +7-095-542-89-29
Fax: +7-095-542-89-25
Web Site: www.zyxel.ru - Regular Mail: ZyXEL Russia, Ostrovityanova 37a Str., Moscow, 117279, Russia
Spain
- Support E-mail: support@zyxel.es
Sales E-mail: sales@zyxel.es
Telephone: +34-902-195-420
Fax: +34-913-005-345
Web Site: www.zyxel.es
- Regular Mail: ZyXEL Communications, Arte, 215^a planta, 28033 Madrid, Spain
Sweden
- Support E-mail: support@zyxel.se
Sales E-mail: sales@zyxel.se
Telephone: +46-31-744-7700
Fax: +46-31-744-7701
Web Site: www.zyxel.se - Regular Mail: ZyXEL Communications A/S, Sjöporten 4, 41764 Göteborg, Sweden
Ukraine
- Support E-mail: support@ua.zyxel.com
- Sales E-mail: sales@ua.zyxel.com
Telephone: +380-44-247-69-78
Fax: +380-44-494-49-32
Web Site: www.ua.zyxel.com - Regular Mail: ZyXEL Ukraine, 13, Pimonenko Str., Kiev, 04050, Ukraine
United Kingdom
- Support E-mail: support@zyxel.co.uk
Sales E-mail: sales@zyxel.co.uk - Telephone: +44-1344 303044, 08707 555779 (UK only)
Fax: +44-1344 303034
Web Site: www.zyxel.co.uk
FTP Site: ftp.zyxel.co.uk - Regular Mail: ZyXEL Communications UK, Ltd.,11 The Courtyard, Eastern Road, Bracknell, Berkshire, RG12 2XB, United Kingdom (UK)
“+” is the (prefix) number you dial to make an international telephone call.
Index
A
access rights 51
active sessions 44, 45
anonymous 65
anonymous FTP 73
ANONYMOUS CIFS 65, 131
ANONYMOUS FTP 65, 131
anonymous FTP access 78
apache license 161
auto shares 54
B
backups
creating 86
purge settings 88
restoring 88
run now 86
schedule 86
C
certifications 139, 191
notices 191
viewing 192
change password 31
checksums 48
CIFS 75
CIFS Domain Users 53
Common Internet File System (CIFS) 72
common screen icons 36
compatible hard disks 139
computer's IP Address 147
configuration file
backup 120
restore 120
configuration file backup 81
connection limit 73
contact information 193
copyright 191
CPU
usage 44
customer support 193
D
date/time
lag 115
default NTP time servers 115
DFS Links 68
DFS root 68
DHCP (Dynamic Host Configuration Protocol) 72, 138
disabled shares 54
disclaimer 191
disconnect 111
disk drive LEDs 27
disk quota 138
disk replacement restrictions 108
disks
actions 111
configuration 111
replacement restrictions 108
summary 110
volume labels 109
distributed file system (DFS) 65, 140
DNS (Domain Name System) 75
domain controller
time 76
domain mode 138
domain security mode 76
domain server address 77
duplexing 100
E
email alerts 117
EMC 139
EVERYONE 65
expand 106
external disks 108
external domain controllers 115
F
FAT16 108
FAT32 108
FCC interference statement 191
file storage system 139
File Transfer Protocol (FTP) 72
firmware specifications 139
firmware upgrade 121
firmware version 44, 83, 114
FTP connection limit 78
FTP settings 78
G
Genie Backup Manager 138
port conflict 82
Gigabit Ethernet 137
global NSA Icons 33
GNU GENERAL PUBLIC LICENSE 171
GNU LESSER GENERAL PUBLIC LICENSE 164
group membership 58, 61
group name restrictions 60
H
hardware specifications 139
HTTP over SSL 113
HTTPS 113, 118
HTTPS status 114
1
icons
global 33
idle timeout
FTP 73
in conflict 51
Initialize 111
J
JavaScript 29
JBOD 97
L
LEDS
front panel 26, 27
liability 191
license 191
license Agreement for "NSA-2400" 187
load default button 121
locate 111
log alert 114, 116
log categories 47
log messages 143
log severity 47
logging/monitoring 140
login
username 30
M
maintenance mode 108
management session
timeout 33
MDI/MDI-X 137
message 143
mirroring 100
MIT License 186
mode
domain protocol 73
modes 51
domain 52
mount 109
Mozilla Public License 179
N
navigation panel
screen summary 34
NDU (NSA Discovery Utility) 29
network IP address 74
network protocols 139
network security 140
non-admin users 58
NSA backup
volume types 83
NSA Discovery Utility (NDU) 138
NSA-2400 26, 27
NTFS 108
NTP time servers 115
0
open source licences 161
Open SSL License 175, 176
OpenLDAP 175
OpenLDAP Public License 175
operating humidity 139
operating temperature 139
outgoing mail server (SMTP) 114, 117
P
parity 100
password 30
forgot?37
Patent 191
PHP License 178
pop-ups 29
power adaptor pinout 141
power consumption 140
primary domain controller 138
proof of purchase 192
public share 69
purge 83
Q
quota
user storage 57
R
RAID
background information 100
RAID (Redundant Array of Independent Disks) 25, 97
RAID and data protection 105
RAID file storage 138
RAID quick comparison 97
related documentation 3
repair 108
reset button 120, 137
disabling 121
restart 122
return material authorization (RMA) 192
rights 191
RMA 192
s
safety warnings 6
scan 106
schedule
creating 93
summary 93
Screens Summary 34
secure connection 114
secure socket layer (SSL) 113
security overview 118
serial ATA (SATA) 137
server name 74
Severity 143
share access rights
everyone 65
share comments 65
share name restrictions 63
share paths 64
shutdown 122
SMTP authentication 117
SMTP user name 117
snapshots 138
creating 91
Important Notes 82
purge policy 90, 92
run now 91
schedule 90
summary 89
versus backups 83
SSL certificates 114
status messages 35
storage humidity 139
storage temperature 139
striping 100
supported clients 140
synchronize time 116
syntax conventions 4
systeminfo48
system logs 46
system management 140
T
temperature 44
time out 33
time server 114
time server address 116
time zone 116
troubleshooting
backups 132
domain user share access 131
external disks 133
forgot password 127
LED indicators 125
ALM 127
DIAG 126
LAN 127
PWR 126
SYS 125
local user share access 131
login 130
maintenance mode 130
NDU discovery 129
non-admin passwords 130
overview 125
reset NSA 127
procedure 128
snapshots 132
web configurator access 130
U
unavailable shares 54
unmount 109
UPS 44
USB (version 2) 25
user name restrictions 56
user password management 58
user passwords 138
users
in conflict
disk quota 52
in limbo 51
V
volume
actions 106
choosing a storage method 98
external disks 99
four disks 98
one disk 98
three disks 98
two disks 98
conflict 109
creating 106
disk configuration 107
JBOD 101
RAID 97
RAID 0 102
RAID 1 102
RAID 10 103
RAID 5 104
RAID 5 spare 104
remove 106
resynchronizing 100
status 99
degraded 99
down 99
healthy 99
resynching 99
waiting resync 99
summary 105
W
warranty 192
period 192
web browsers supported 140
web configurator 29
browsers 29
windows domain administrator 77
windows domain administrator password 78
WINS Server 77
workgroup 52, 73, 138
workgroup security mode 75
Z
ZyXEL Communications Corporation 191
ZyXEL Limited Warranty
Note 192
BSD 178
- About This User's Guide
- Intended Audience
- Related Documentation
- User Guide Feedback
- Document Conventions
- Warnings and Notes
- Syntax Conventions
- Icons Used in Figures
- SafetyWarnings
- For your safety, be sure to read and follow all warning notices and instructions.
- Contents Overview
- Introduction 23
- Status, Sharing and Network 41
- Protect, Storage and Maintenance 79
- Appendices and Index 135
- Table of Contents
- Chapter 3
- Status Screens 43
- Chapter 4
- Sharing Screens 51
- Chapter 5
- Network Screens 71
- Part III: Protect, Storage and Maintenance 79
- Chapter 6
- Protect Screens 81
- Chapter 7
- Storage Screens 95
- Chapter 8 Maintenance Screens 113
- Chapter 9 Troubleshooting 125
- Part IV: Appendices and Index 135
- List of Figures
- List of Tables
- PART I
- Introduction
- Getting to Know Your NSA-2400
- NSA-2400 Overview
- Front Panel LEDs
- Introducing the Web Configurator
- Web Configurator Overview
- Accessing the NSA-2400 Web Configurator
- Access the NSA-2400 Via NDU
- Web Browser Access
- Login
- NSA-2400 Main Screen Overview
- Global NSA-2400 Icons
- Navigation Panel
- Status Messages
- Common Screen Icons
- Forgot Your Password
- NSA-2400 Sends Password
- Reset the NSA-2400
- Procedure To Use The Reset Button
- PART II
- Status, Sharing and
- Network
- Status Overview Screen
- Active Sessions Screen
- Session Example (Windows)
- System Log
- System Info
- Sharing Screens
- Sharing Introduction
- Sharing Overview
- In Limbo and In Conflict
- In Limbo and In Conflict Example
- Sharing Overview Screen
- Users
- User Icons
- Users Summary Screen
- Adding a New User
- User Names
- Add a New User Screen
- User Password Management
- Groups
- Group Icons
- Groups Summary Screen
- Adding a New Group
- Group Names
- Add A New Group Screen
- Shares
- Share Icons
- Share Summary Screen
- Adding a New Share
- Share Names
- Share Paths
- Share Comments
- EVERYONE & ANONYMOUS Share Access Rights
- DFS
- Add A New Share Screen
- Network Screens
- Network Screens
- Network Introduction
- IP Address and Subnet Mask
- DHCP
- Windows/CIFS
- FTP
- Network Overview Screen
- TCP/IP Screen
- Windows/CIFS
- Workgroup Security Mode
- Windows Domain Security Mode
- Windows/CIFS Screen
- FTP Screen
- PART III
- Protect, Storage and
- Maintenance
- Protect Screens
- Protection Methods
- Configuration File Backup and Restoration
- Genie Backup Manager
- Snapshots
- Some Important Notes on Snapshots
- Snapshots Versus Backups
- NSA Backup
- Protect Overview Screen
- Backup Summary
- Schedule Backups
- Creating/Editing Backups
- Restoring Backups
- Snapshot Summary
- Schedule Snapshots
- Creating/Editing Snapshots
- Purging Snapshots
- Scheduler Screens
- Scheduler Screen
- Scheduler Create/Edit Screen
- Storage Screens
- Storage Introduction
- Storage Overview Screen
- Volumes and RAID
- Choosing A Storage Method For a Volume
- One Disk
- Two Disks:
- Three Disks
- Four Disks
- External Disks
- Volume Status
- Resynchronizing a RAID 1 or 5 Volume
- RAID
- JBOD
- RAID 0
- RAID 1
- RAID 10
- RAID 5
- RAID 5 SPARE
- RAID and Data Protection
- Volume Screen
- Creating a New Internal Volume
- Disk
- Maintenance Mode
- External Disks
- Disk Replacement Restrictions
- Disk Replacement and Volume Labels
- Volume Conflict Resolution Procedure
- Alternative Conflict Procedure
- Disk Screen
- Maintenance Screens
- Maintenance Overview
- HTTPS and SSL
- Maintenance Overview Screen
- Date/Time
- Time Lag
- Time/Date And External Domain Controllers
- Pre-defined NTP Time Servers List
- Date/Time Screen
- Log Alert Screen
- Security
- Introduction to HTTPS
- Security Screen
- Configuration
- Configuration Screen
- Firmware Upgrade
- Firmware Upgrade Screen
- Shutdown
- Shutdown Screen
- Troubleshooting
- Troubleshooting Overview
- Power, Hardware Connections, and LEDs
- The disk drive ALM LED is on.
- The LAN LED is off.
- NSA-2400 Login and Access
- I forgot the IP address for the NSA-2400.
- How To Reset the NSA
- Procedure To Use The Reset Button
- I forgot the password.
- The NDU cannot discover my NSA.
- Users Cannot Access The NSA-2400
- A local user cannot access a share
- A domain user can't access a share.
- Backups and Snapshots
- I cannot make a backup.
- I cannot take a snapshot
- The snapshot or backup does not run at the time configured.
- External USB Disks
- PART IV
- Appendices and Index
- Product Specifications
- Feature Tables
- Physical Features
- Firmware Features
- Specification Tables
- Power Consumption
- Log Messages
- Setting up Your Computer's IP Address
- Windows 95/98/Me
- Installing Components
- Configuring
- Verifying Settings
- Windows 2000/NT/XP
- Macintosh OS X
- Linux
- Using the K Desktop Environment (KDE)
- Using Configuration Files
- Open Source Licences
- Notice
- Apache License
- GNU LESSER GENERAL PUBLIC LICENSE
- GNU LESSER GENERAL PUBLIC LICENSE TERMS AND CONDITIONS FOR COOPYING, DISTRIBUTION AND MODIFICATION
- NO WARRANTY
- GNU GENERAL PUBLIC LICENSE
- The OpenLDAP Public License
- Open SSL License
- Original SSLeay License
- BSD
- The PHP License, version 3.0
- Mozilla Public License Version 1.1
- Contributor Grant.
- Description of Modifications.
- Intellectual Property Matters
- Third Party Claims
- Contributor Apes
- Representations.
- Required Notices.
- Distribution of Executable Versions.
- Larger Works.
- Inability to Comply Due to Statute or Regulation.
- Application of this License.
- Versions of the License.
- New Versions
- Effect of New Versions
- Derivative Works
- Disclaimer of warranty
- Termination
- Limitation of liability
- U.S. government end users
- Miscellaneous
- Responsibility for claims
- Multiple-licensed code
- The MIT License
- End-User License Agreement for "NSA-2400"
- Restrictions
- Confidentiality
- 6.No Warranty
- 7.Limitation of Liability
- Export Restrictions
- 9.Audit Rights
- Termination
- 12.General
- Legal Information
- Copyright
- Disclaimer
- Certifications
- Federal Communications Commission (FCC) Interference Statement
- Notices
- Viewing Certifications
- Note
- Registration
- Customer Support
- Required Information
- Corporate Headquarters (Worldwide)
- Costa Rica
- Czech Republic
- Denmark
- Finland
- France
- Germany
- Hungary
- Kazakhstan
- North America
- Norway
- Poland
- Russia
- Spain
- Sweden
- Ukraine
- United Kingdom
- Index
- A
- B
- C
- D
- E
- F
- G
- H
- 1
- J
- L
- M
- N
- 0
- P
- Q
- R
- s
- T
- U
- V
- W
- Z
Brand : ZYXEL
Model : NSA-2400-1T
Category : Network Storage (NAS)