
PLA450 - Powerline Adapter ZYXEL - Free user manual and instructions
Find the device manual for free PLA450 ZYXEL in PDF.
| Product Type | Powerline Adapter with Wi-Fi Access Point |
| Dimensions (approx.) | 14.5 x 10.5 x 3.5 cm |
| Weight (approx.) | 200 g |
| Power Supply | 100-240 V AC, 50/60 Hz |
| Power Consumption | Less than 20 W |
| Powerline Standard | HomePlug AV |
| Powerline Speed | Up to 200 Mbps |
| Wi-Fi Standard | IEEE 802.11n (up to 150 Mbps) |
| Ports | 1 Ethernet port 10/100 Mbps (RJ-45) |
| Buttons | WPS, ENCRYPT, Reset |
| LED Indicators | Power, HomePlug, LAN, WLAN, WPS |
| Wireless Security | WPA-PSK, WPA2-PSK |
| Powerline Security | 128-bit AES encryption via ENCRYPT button or web configurator |
| Configuration | Web interface (default IP address 192.168.1.2) |
| Compatibility | All HomePlug AV adapters, Windows, Mac, Linux |
| Operating Temperature | 0°C to 40°C |
| Humidity | 10% to 90% (non-condensing) |
| Certifications | CE, R&TTE |
| Package Contents | PLA450, Ethernet cable, power cord, CD, quick start guide |
| Care and Cleaning | Clean with a soft, dry cloth. Do not use chemicals. |
Frequently Asked Questions - PLA450 ZYXEL
User questions about PLA450 ZYXEL
0 question about this device. Answer the ones you know or ask your own.
Ask a new question about this device
Download the instructions for your Powerline Adapter in PDF format for free! Find your manual PLA450 - ZYXEL and take your electronic device back in hand. On this page are published all the documents necessary for the use of your device. PLA450 by ZYXEL.
USER MANUAL PLA450 ZYXEL
Homeplug AV to WLAN AP/Bridge
Quick Start Guide
Version 3.60
1/2008
Edition 3
DEFAULT Login
IP Address http://192.168.1.2
Password 1234
CONTENTS
ENGLISH 2
DEUTSCH 18
ESPANOL 36
FRANÇAIS 52
ITALIANO 70
SVENSKA 88
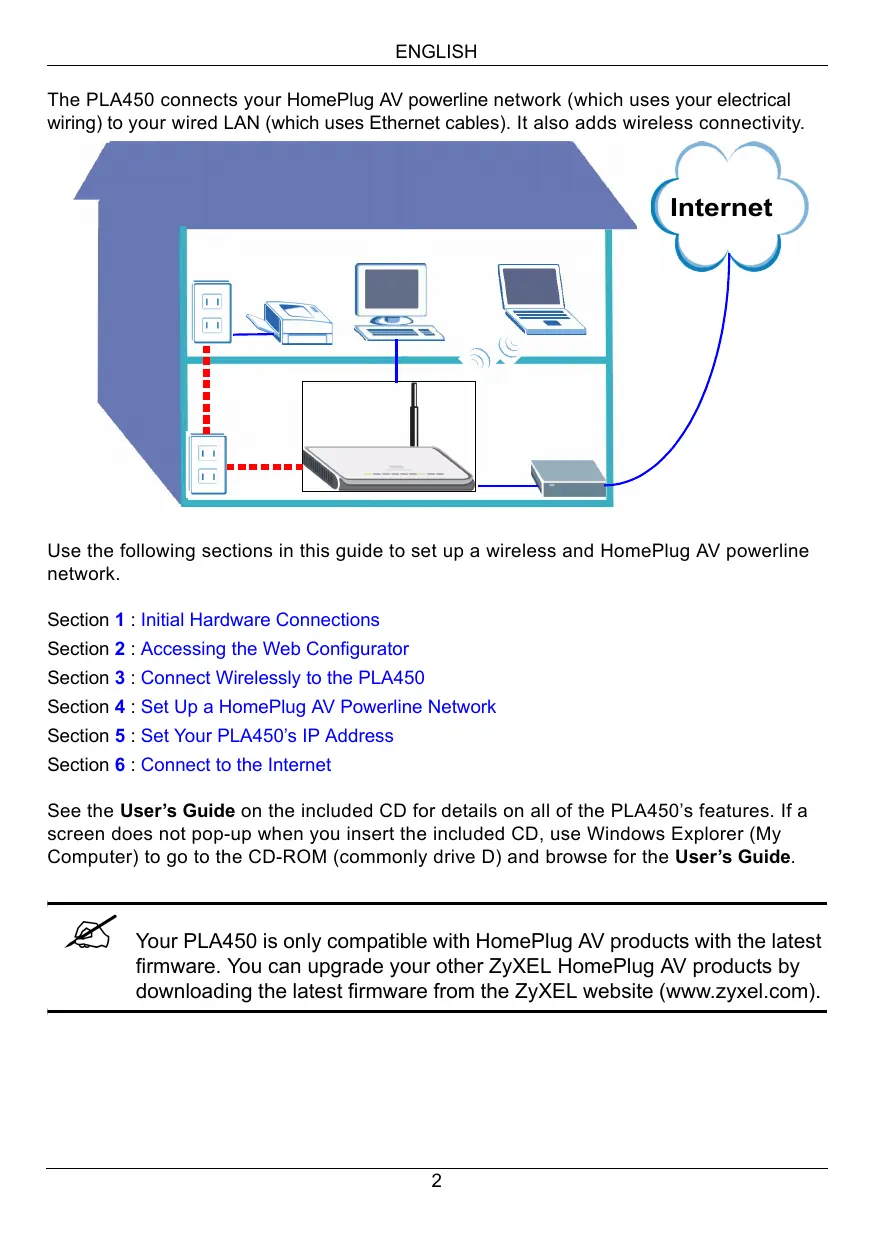
The PLA450 connects your HomePlug AV powerline network (which uses your electrical wiring) to your wired LAN (which uses Ethernet cables). It also adds wireless connectivity.
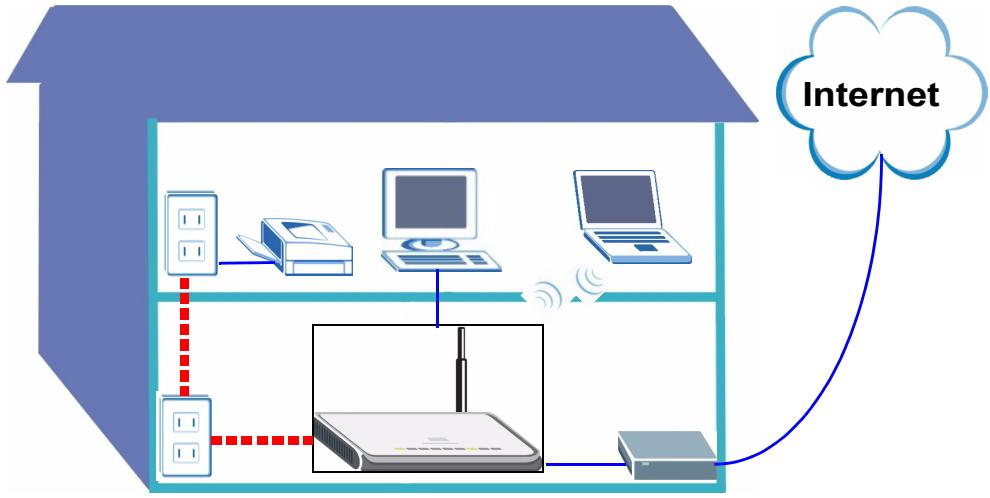
Use the following sections in this guide to set up a wireless and HomePlug AV powerline network.
Section 1: Initial Hardware Connections
Section 2: Accessing the Web Configurator
Section 3: Connect Wirelessly to the PLA450
Section 4: Set Up a HomePlug AV Powerline Network
Section 5 : Set Your PLA450's IP Address
Section 6: Connect to the Internet
See the User's Guide on the included CD for details on all of the PLA450's features. If a screen does not pop-up when you insert the included CD, use Windows Explorer (My Computer) to go to the CD-ROM (commonly drive D) and browse for the User's Guide.

Your PLA450 is only compatible with HomePlug AV products with the latest firmware. You can upgrade your other ZyXEL HomePlug AV products by downloading the latest firmware from the ZyXEL website (www.zyxel.com).
1 Initial Hardware Connections
1
3
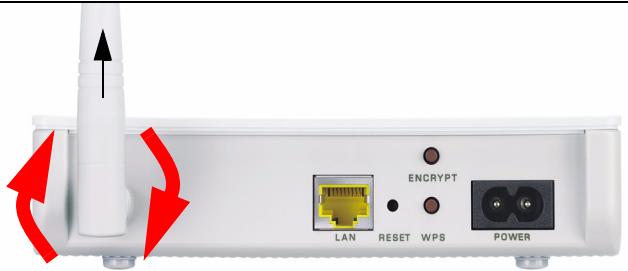
1 Screw the antenna clockwise onto the antenna connector. Make sure it is securely attached. Point the antenna up (perpendicular to the ground).
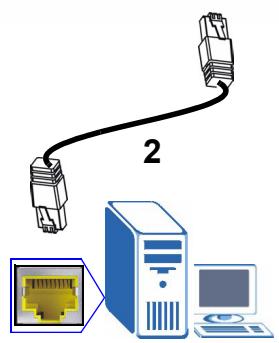
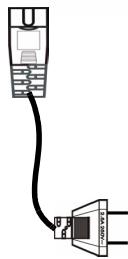
2 Use the yellow (Ethernet) cable to connect the PLA450's LAN port to the Ethernet port on your computer.
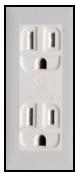
3 Use the included power cord to connect the POWER socket to an appropriate power source. This is also your powerline connection.
1.1 Look at the LEDs (lights)


- Power () : Blinks until the device is ready.
- HomePlug ( ): Turns on when connected to other HomePlug AV device(s).
- LAN (品): Turns on if the LAN connection to your computer is OK.
- WLAN () : Turns on if the wireless LAN feature is on.

If the power () or LAN (蜀) lights do not turn on, check your connections.
2 Accessing the Web Configurator
Access the PLA450's web configurator to enter or change settings on the PLA450.
2.1 Give Your Computer a Static IP Address
Follow these instructions for Windows XP. If you do not have Windows XP, see the appendix in the User's Guide on setting your IP address.
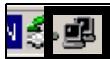
1 Click the network icon (usually in the bottom right of your computer screen).
2 Click Properties.
8:48AM
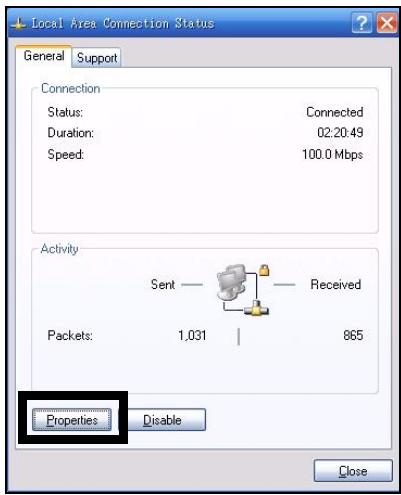
3 Select Internet Protocol (TCP/IP) (A). Then click Properties (B).
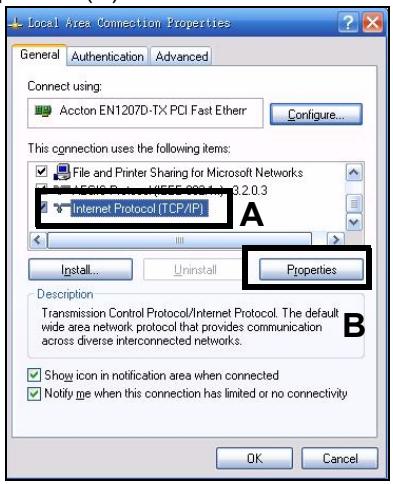

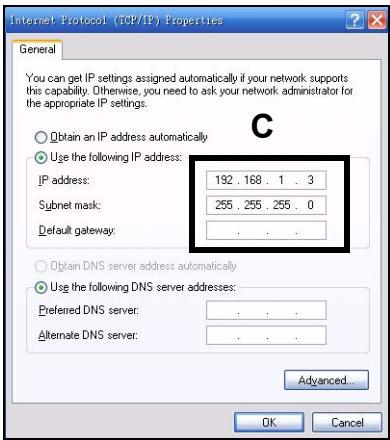
Make a note of your original settings in (C) in the following screen if you will return the computer to its original hardware connections after configuring the PLA450.
4 Type 192.168.1.x as the IP address, where x is a number between 3 and 254. Avoid IP addresses taken by other devices on your network, such as 192.168.1.2, which is the PLA450's default IP address. Type 255.255.255.0 as the Subnet mask. Click OK.
2.2 Log Into the Web Configurator
The PLA450's web configurator lets you enter and change settings.
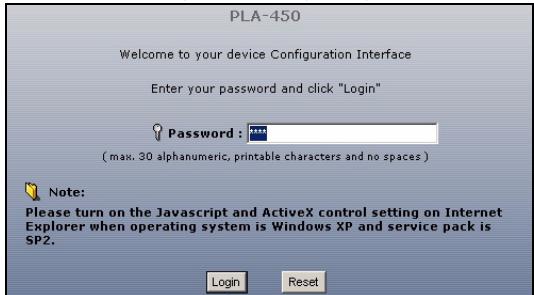
1 Launch an Internet browser (such as Internet Explorer). Enter "http://192.168.1.2" and click Go (or press [ENTER]).


If the login screen does not display, make sure your computer is using a static IP address between 192.168.1.3 and 192.168.1.254, as shown in section 2.1. If that doesn't work, check your web browser's pop-up settings (see the User's Guide for more information).
2 The default password (1234) is entered for you. Click Login.
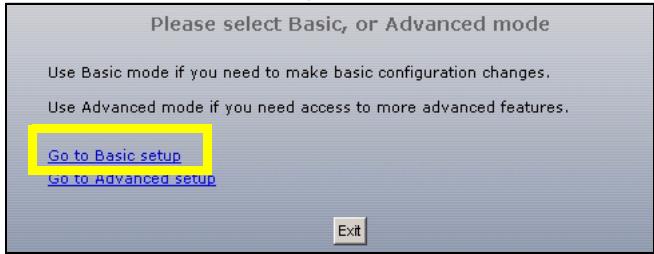
3 Change the password in the next screen and click Apply.
4 Click Go to Basic setup.
3 Connect Wirelessly to the PLA450
You can use either Wi-Fi Protected Setup (WPS) or the web configurator to set up your wireless connection and network.
If your wireless devices display the WPS logo, as shown below, use WPS to set up your wireless network. Go to Section 3.1 to set up your wireless network.

Wi-Fi PROTECTED
SETUP
If your wireless devices do not display the WPS logo, go to Section 3.2 to set up wireless settings on your PLA450 using the web configurator.
3.1 Connect Wirelessly with WPS
Use WPS to connect WPS-enabled wireless devices to your PLA450 one at a time.
1 Place a WPS-enabled device within range of the PLA450.
2 Press the WPS button on both devices. It doesn't matter which button is pressed first. You must press the second button within two minutes of pressing the first one.
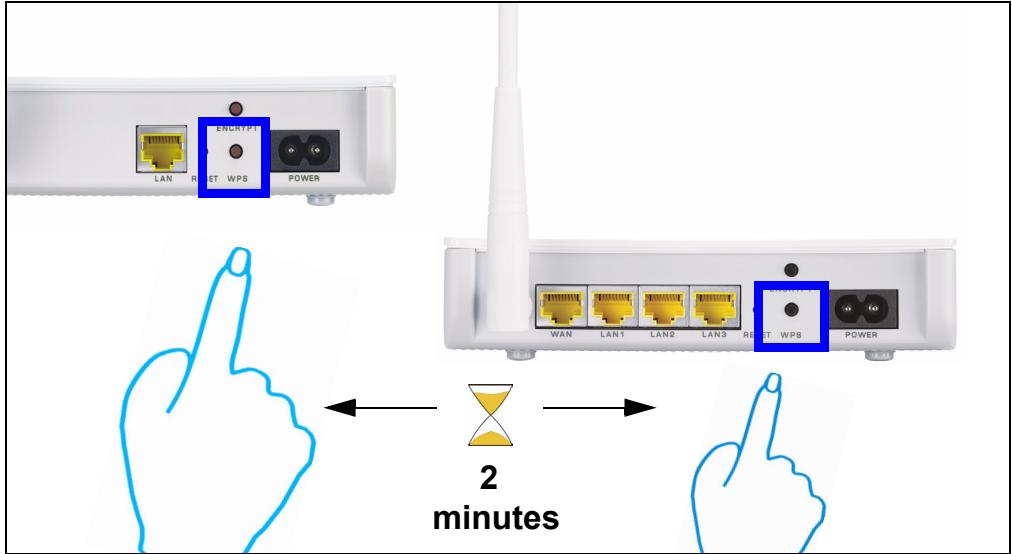

Your PLA450 has a WPS button located on its housing, as well as a WPS button available in the web configurator used to manage the PLA450. Other WPS-enabled devices will have at least one WPS button.
3 The WPS LED (O) on the PLA450 blinks for a few seconds, then shines steadily, indicating your devices are connected.

4 To add another WPS enabled device to your wireless network, press the WPS buttons on your PLA450 and your next WPS-enabled device.
Congratulations! When you have finished setting up your wireless network, go to Section 4.1 to set up your powerline network.
3.2 Manually Set up a Wireless Network
If your wireless devices are not WPS-enabled, use your computer to manually set up your wireless network.
3.2.1 Configure Your PLA450 With the Web Configurator
1 Click Network > Wireless LAN in the web configurator's navigation panel.
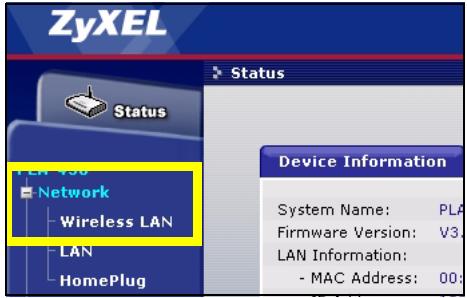
2 The following screen appears.
- Name: Enter a descriptive name (up to 32 printable English keyboard characters) for your wireless network.
-
Security Mode: Select WPA-PSK.
-
Pre-Shared Key: Type a pre-shared key. Use 8 to 63 English keyboard characters (including spaces and symbols). It is case-sensitive. Write it down to use in your wireless clients so they can connect to the PLA450.
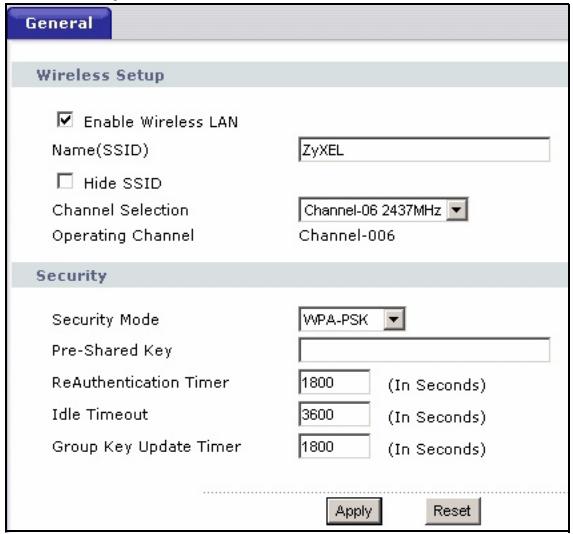

Write down the name and pre-shared key to use in the wireless clients later.
3 Click Apply. Congratulations! You have configured the PLA450's wireless settings and are now ready to connect your other wireless devices to the PLA450.
3.2.2 Set Up a Wireless Network
You can now connect wirelessly to your PLA450 from your computer and access the Internet. You will need the Network Name (SSID) and also the Pre-Shared Key if you set up security in the previous section. The connection procedure is shown here using Windows XP as an example.
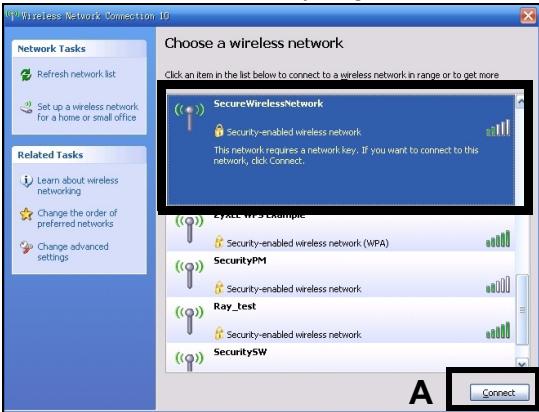
1 Right-click the wireless adapter icon in the bottom right of your computer monitor. Click View Available Wireless Networks.
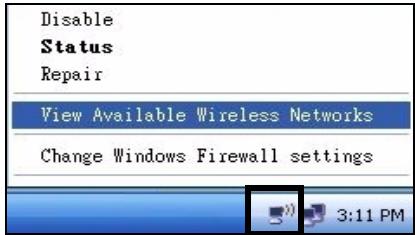
2 Select the SSID name you gave the PLA450 and click Connect (A).
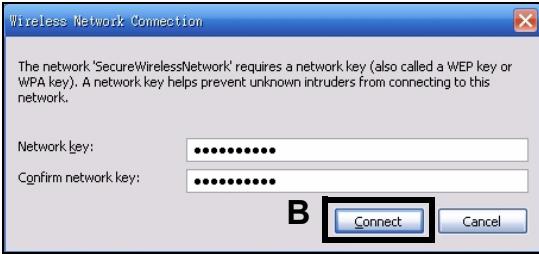
3 If you have set up wireless security, you are prompted to enter a password. Enter the Pre-Shared Key you set up in the previous section and click Connect (B).
You may have to wait a few minutes while your computer connects to the wireless network.
4 You should now be securely connected wirelessly to the PLA450.


If you cannot connect wirelessly to the PLA450, check you have selected the correct SSID and entered the correct security Key. If that does not work, ensure your network adapter is enabled by clicking on the wireless adapter icon and clicking Enable. See the User's Guide for more suggestions.
4 Set Up a HomePlug AV Powerline Network
You can use powerline adapters compatible with the HomePlug AV standard to set up a network on your standard electrical wiring.
- If your other powerline devices have ENCRYPT buttons, go to Section 4.1.
- If your other powerline devices do not have ENCRYPT buttons, go to Section 4.2.
4.1 Set Up a Powerline Network with ENCRYPT
Use the ENCRYPT button to set up a secure connection between your PLA450 and another ENCRYPT-enabled device (The PLA-400 v2 is shown as an example).

Use the ENCRYPT feature on two devices at a time.
1 Place the powerline devices close to each other, as you only have two minutes to press the ENCRYPT buttons on both devices. You can disconnect the devices from your computer or modem (or other networking equipment) if you need to, but the powerline devices need to be plugged into power outlets.
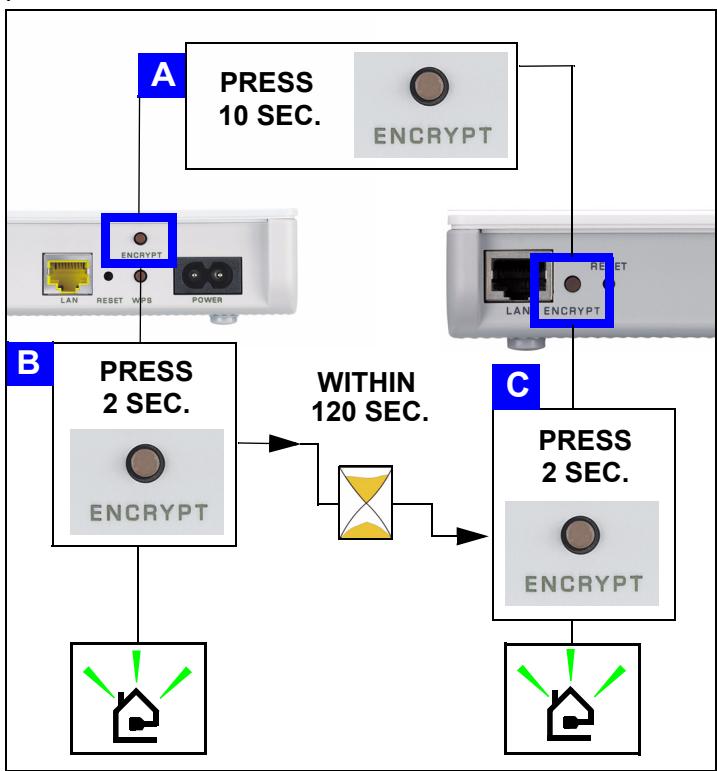
2 Press the ENCRYPT button at the rear of both of your devices for more than 10 seconds. This sets up a random network name.
3 Press the ENCRYPT buttons at the rear of your powerline devices for 1~2 seconds.
4 While the devices are connecting, the power (U) and HomePlug (L) lights blink. Also several times all lights blink at the same time and the HomePlug (L) light shows red.
5 Wait for about one minute while your powerline devices connect. The power (U) light is steady when the ENCRYPT process times out, the HomePlug (E) light is steady if you have a successful connection.

If the power () light does not blink, you have probably pressed the ENCRYPT button for too long. Try again, pressing the ENCRYPT button for 1~2 seconds.

If the HomePlug ( ) lights on both powerline devices do not light up, the powerline devices are not connected. Repeat steps 2 and 3 in this section. If that doesn't work, see the User's Guide for more suggestions.
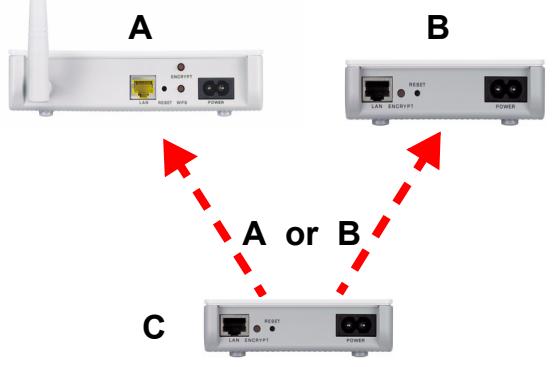
6 To add another powerline device (C) to your network, connect it with one of the powerline devices (A or B) already connected to your powerline network (See steps 2 and 3 in this section).
7 If you disconnected your computer or modem (or any other networking product connected to your powerline device) in step 1 of this section, you can now reconnect them.
Congratulations! This connects your powerline devices and any products you have connected to your powerline devices, such as your home computer or network modem.
Go to Section 5 to set up your Internet connection.
4.2 Set Up a Powerline Network Using the Web Configurator
Follow these steps to set up your HomePlug AV network for the first time.
1 Make sure your PLA450 and other HomePlug AV powerline devices are connected to power outlets and turned on.
2 Log into the web configurator if you haven't already and click Go to Basic setup. Click Network > HomePlug to begin setting up your network.
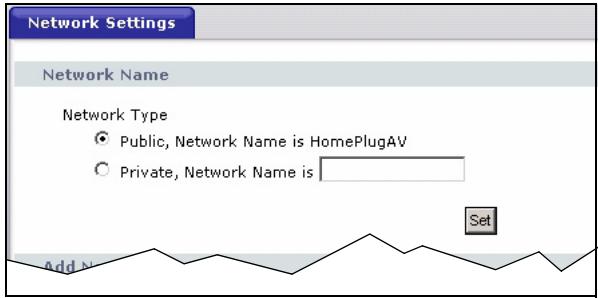
3 The Network Name is like a password for your network. A HomePlug AV adaptor can only access your network if it has the correct Network Name.
- Select Public, Network Name is HomePlugAV to set your Network Name to the default (HomePlugAV). Choose this less secure option to easily add a new HomePlug AV device (with the default network name) is connected to your wiring, without having to change its network password.
- Select Private, Network Name is and type a Network Name if you want to make your network more secure.
4 Click Set to set the Network Name.
5 All devices listed as Active in the My HomePlug Network table below now have the Network Name you selected. With the same Network Name they are now all on the same network.
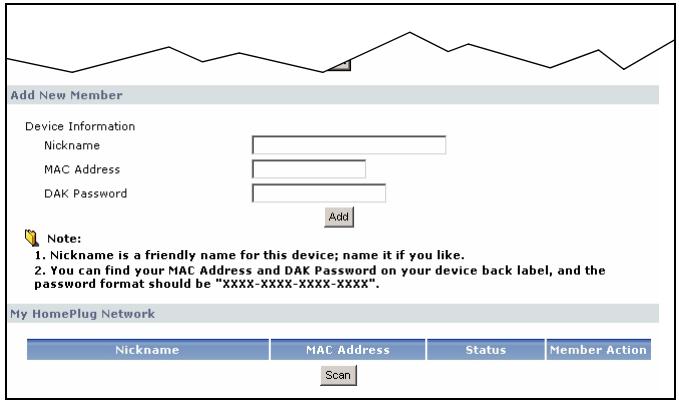
6 Add a new device to your network by typing its MAC Address and DAK Password in the Add New Member section. The DAK Password is found along with the MAC Address on a label attached to the device. The DAK (Device Access Key) is a password to access a powerline device. Then type a Nickname such as "Mary's room" to help you identify the device. Click Add. The device's should appear as Active in the My HomePlug Network table below.
- If a message MAC address error appears, check that the MAC Address is correctly entered.
- If a message DAK format error appears, check that the DAK Password is correctly entered.
7 Click Scan in the My HomePlug Network table to detect other HomePlug AV devices.
- If a device is Active, it is connected to your network.
- If a device is Out of Network your PLA450 has the details of this device but cannot detect it. Check it is connected to a power outlet and turned on.
-
If a device is Not Member, use the Edit icon.
-
If a device fails to appear in the table, try adding it in the Add New Member section. See Troubleshooting for more suggestions.
8 When you are finished setting up your powerline network, connect your powerline adapters to the devices you want on your network, such as computers and a router for connection to the Internet. See the diagram on page 3 for an example.
9 Congratulations! You have set up your powerline network. Go to the next section to configure your PLA450's IP address.

If you cannot access the powerline network, make sure that the network password is the same on all of your powerline adapters and that the DAKs for your powerline devices are typed correctly. If that doesn't work, make sure your powerline adapters are HomePlug AV compliant and have the latest firmware installed. See the User's Guide for more suggestions.
5 Set Your PLA450's IP Address
Set your PLA450's IP address to be on your network.
1 Click Network > LAN in the navigation panel.
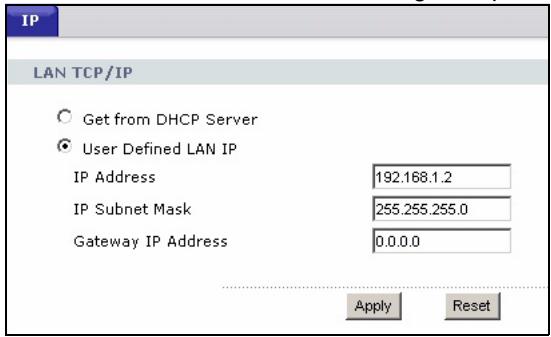
- Select Get from DHCP Server to get an IP address from a DHCP server on your network. If you have a router, it likely includes a DHCP server function.
- To use a specific (fixed) IP address, select User Defined LAN IP and enter it. You only need to change the subnet mask or default gateway if you have specific ones for the PLA450 to use.
2 Click Apply. Use the PLA450's new IP settings to connect to it.
3 Return your computer's IP address/subnet mask to their previous settings before you changed them in section 2.1.
The PLA450 is now ready to connect to your switch or router.
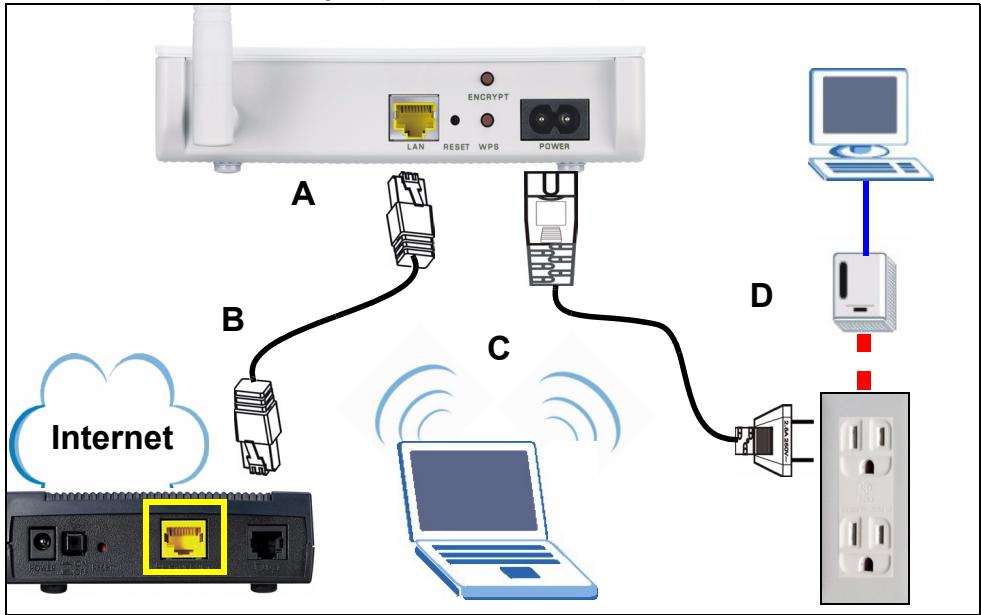
6 Connect to the Internet
1 Connect the PLA450's LAN port (A) to the Ethernet port on an Internet gateway (such as a DSL modem) (B) using the yellow (Ethernet) cable.
2 Make sure you are using a computer connected to the PLA450 through the wireless LAN (C) or the HomePlug AV powerline network (D).
3 Open an Internet browser (such as Internet Explorer). Enter "http://www.zyxel.com" and click Go (or press Enter). When you see the ZyxEL website, you know your network connection settings are properly configured.

If the PLA450 cannot communicate with the network, ensure that the PLA450 is using an IP address on the same subnet as your router. See your router's documentation for information on finding your router's IP address.
Procedure to View a Product's Certification(s)
1 Go to www.zyxel.com.
2 Select your product from the drop-down list box on the ZyXEL home page to go to that product's page.
3 Select the certification you wish to view from this page.
Section 6: Conectar a Internet
| File Edit View Favorites Tools Help |
| Address http://192.168.1.2 |

| File Edit View Favorites Tools Help |
| Address http://192.168.1.2 |

Section 6: Connessiona Internet
3 Concessione wireless at PLA450
Section 5: Stalla in PLA450s IP-adress
Section 6: Ansluta till Internet
| File Edit View Favorites Tools Help |
| Address http://192.168.1.2 |

5 Stalla in PLA450s IP-adress
Ställ in PLA450s IP-adress till ditt natverk.
- Quick Start Guide
- DEFAULT Login
- CONTENTS
- Initial Hardware Connections
- Look at the LEDs (lights)
- Accessing the Web Configurator
- Give Your Computer a Static IP Address
- Log Into the Web Configurator
- Connect Wirelessly to the PLA450
- Connect Wirelessly with WPS
- Manually Set up a Wireless Network
- Configure Your PLA450 With the Web Configurator
- Set Up a Wireless Network
- Set Up a HomePlug AV Powerline Network
- Set Up a Powerline Network with ENCRYPT
- Set Up a Powerline Network Using the Web Configurator
- Click Set to set the Network Name.
- Set Your PLA450's IP Address
- Connect to the Internet
- Procedure to View a Product's Certification(s)
- Concessione wireless at PLA450
- Stalla in PLA450s IP-adress
Brand : ZYXEL
Model : PLA450
Category : Powerline Adapter