
DMA-1000 - Digital media adapter ZYXEL - Free user manual and instructions
Find the device manual for free DMA-1000 ZYXEL in PDF.

User questions about DMA-1000 ZYXEL
0 question about this device. Answer the ones you know or ask your own.
Ask a new question about this device
Download the instructions for your Digital media adapter in PDF format for free! Find your manual DMA-1000 - ZYXEL and take your electronic device back in hand. On this page are published all the documents necessary for the use of your device. DMA-1000 by ZYXEL.
USER MANUAL DMA-1000 ZYXEL
Use your DMA-1000 to play audio, video and photo files on your TV instead of your computer monitor. The files can be on computers or a USB memory stick or hard drive.
The following figure shows the DMA-1000 connected to an Ethernet switch (S) and a TV. Computers A~C are connected to the Ethernet switch.
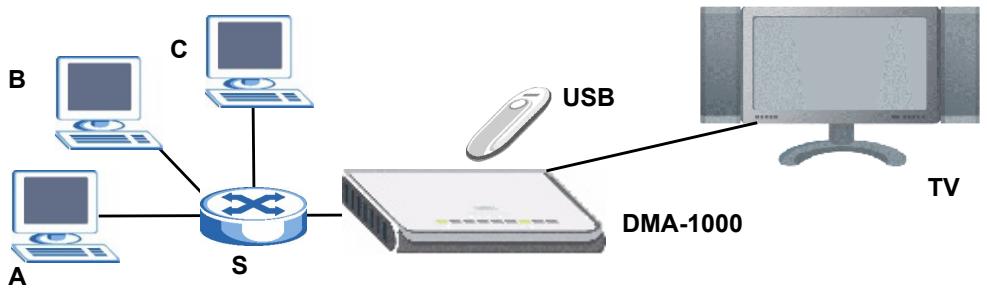
You need an HDMI cable if you will connect the DMA-1000 to a HDMI connector on your TV.

If you are using Windows Vista, see the Windows Vista Media Server appendix in the Users Guide (on the included CD) to let the DMA-1000 play files stored on your computer.
Install the included media server software to let the DMA-1000 play files stored on your computer. This software requires Windows XP. If you do not have Windows XP or do not want to install software, you can put your files on a USB stick. The USB stick connects directly to the DMA-1000 without need of the media server software or a computer.
Use the following sections in this guide (in the listed order) to view files on computers or on a USB stick.
Viewing Files on Computers
1 Install the Media Server Software
2 Connect Your DMA-1000
3 Share Your Files
4 Play Your Files
Viewing Files on a USB Stick
2 Connect Your DMA-1000
4 Play Your Files
1 Install the Media Server Software
You must install the media server software on each computer that you will use to share files with the DMA-1000.

You can only install the media server software on a Windows XP computer. See Requirements for more details.
1 Put the CD into your CD-ROM. Click Setup in the following screen.
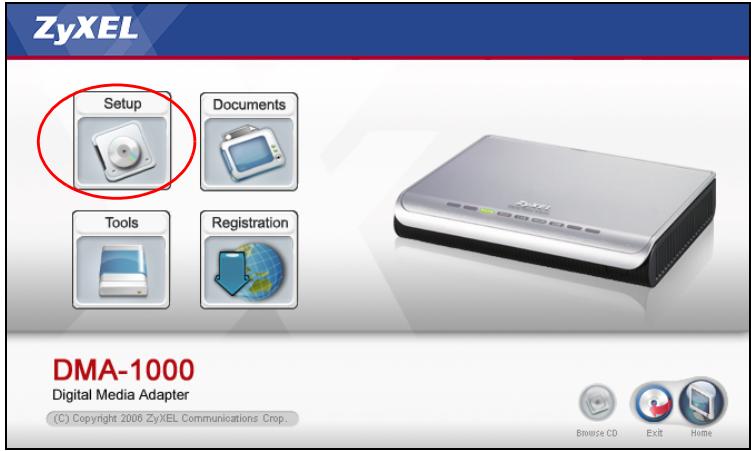

If this screen does not display, locate and double-click setup.exe.
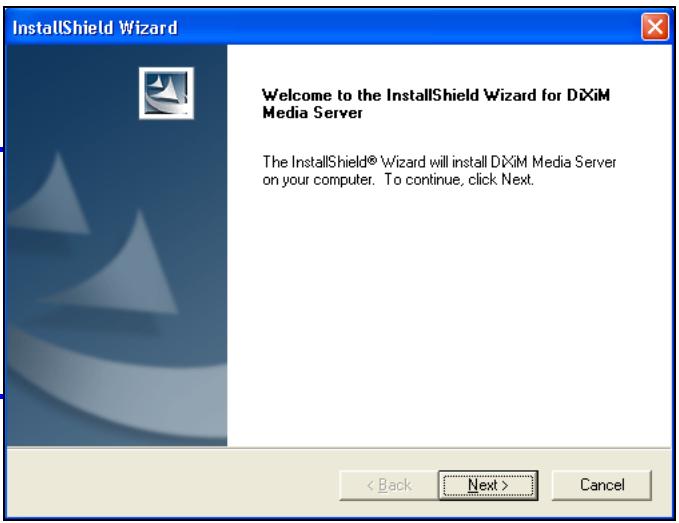
2 The installation wizard appears. Follow the directions to install the software.

See the requirements section if you have trouble installing or using the media server.
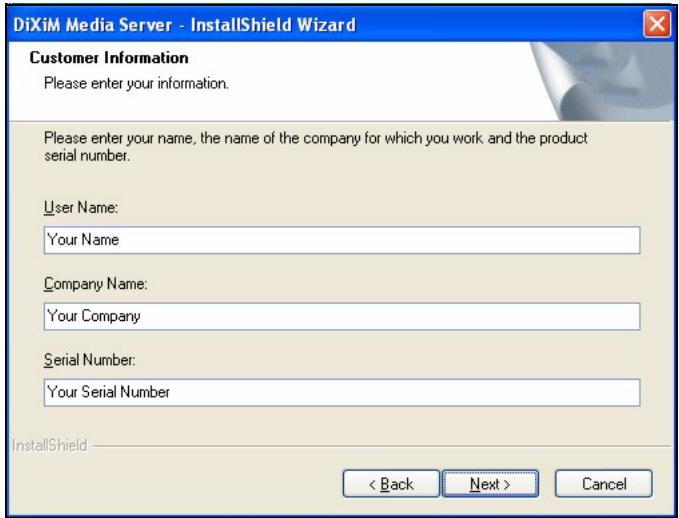
3 Enter your information in this screen. Enter a user name (up to 64 ASCII
characters recommended). The company name is optional (up to 64 ASCII characters recommended). Click Registration in the screen that opened when you inserted the CD-ROM (see page 3). Then click Media Server Serial Number to open a text file with a serial number. Copy and paste the serial number into the Serial Number field in the screen shown here.
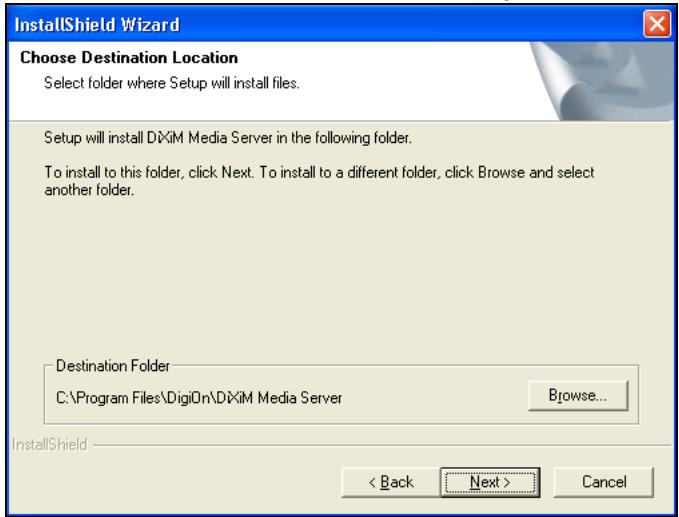
4 Select a destination for the software (or just leave the default).
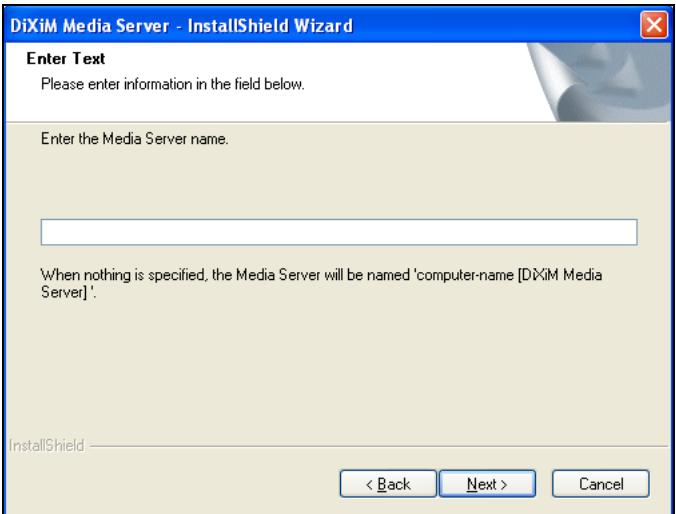
5 You can specify a name for the media server that the DMA-1000 displays on your TV. It is helpful to use unique names if you install the media server on multiple computers. Up to 34 ASCII characters recommended.
6 If you see a screen asking about configuring the Windows XP firewall, click Yes. This allows the DMA-1000 to access the files on your computer that you share.


Refer to the User's Guide if your computer has another software firewall (like ZoneAlarm for example) that you need to configure.
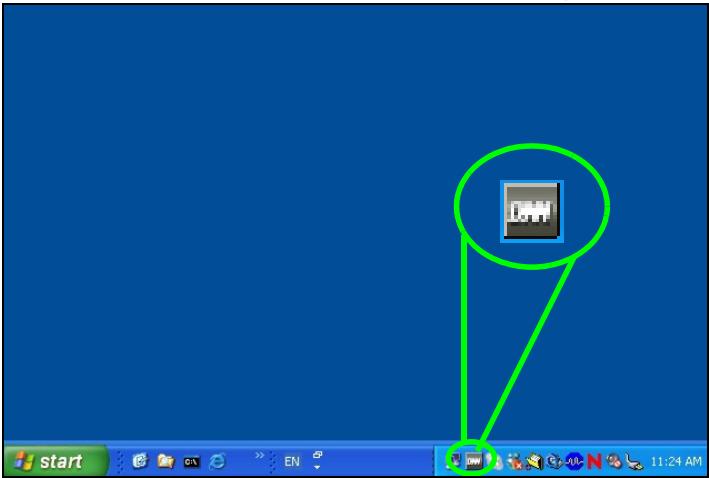
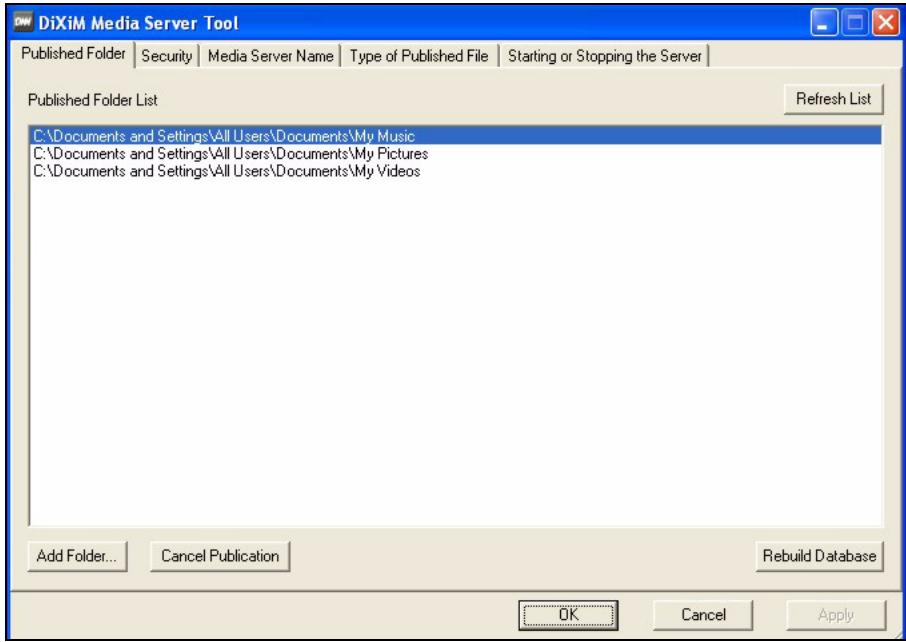
7 This icon displays in the system tray (usually in the bottom right corner) after the installation is done. Double-click the icon to open the server configuration screens.
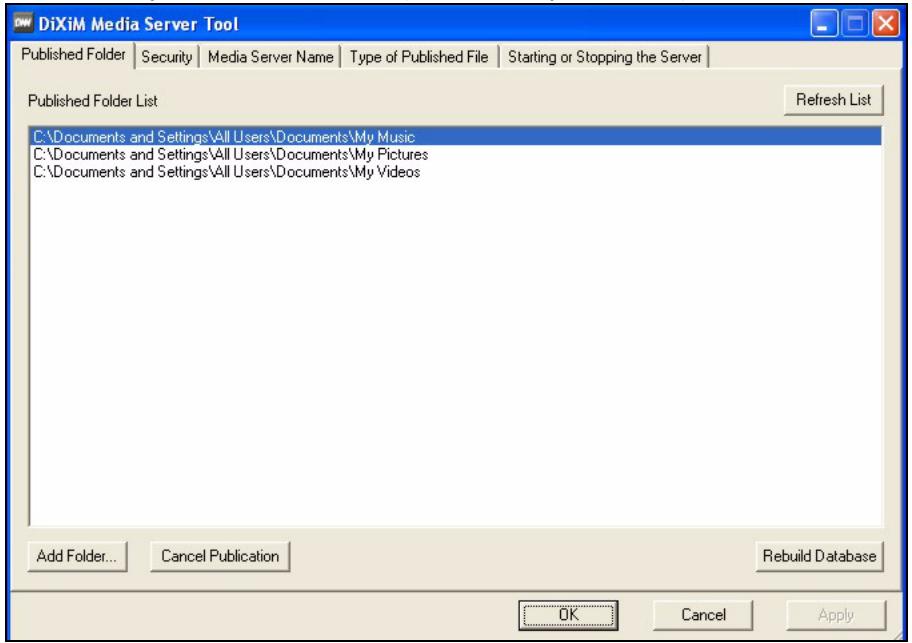
8 The Published Folder List lists folders of files that your computer will share with the DMA-1000.
- Your My Music, My Pictures and My Videos folders are included by default.
-
To share other files, click the Add Folder button and browse to select a folder that you want to share.
-
To remove a folder from the list, click it and then click Cancel Publication.
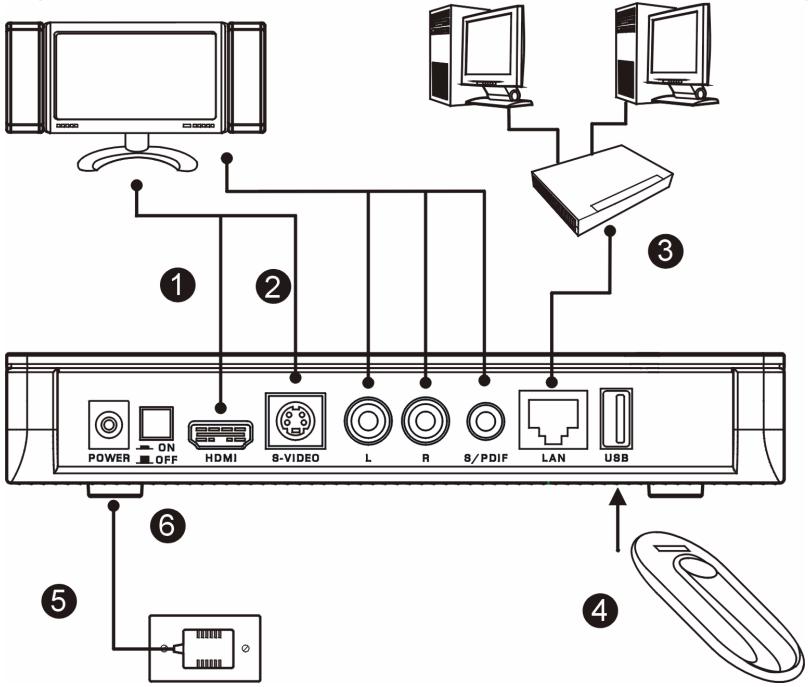
2 Connect Your DMA-1000
Turn off your TV before you connect the DMA-1000.
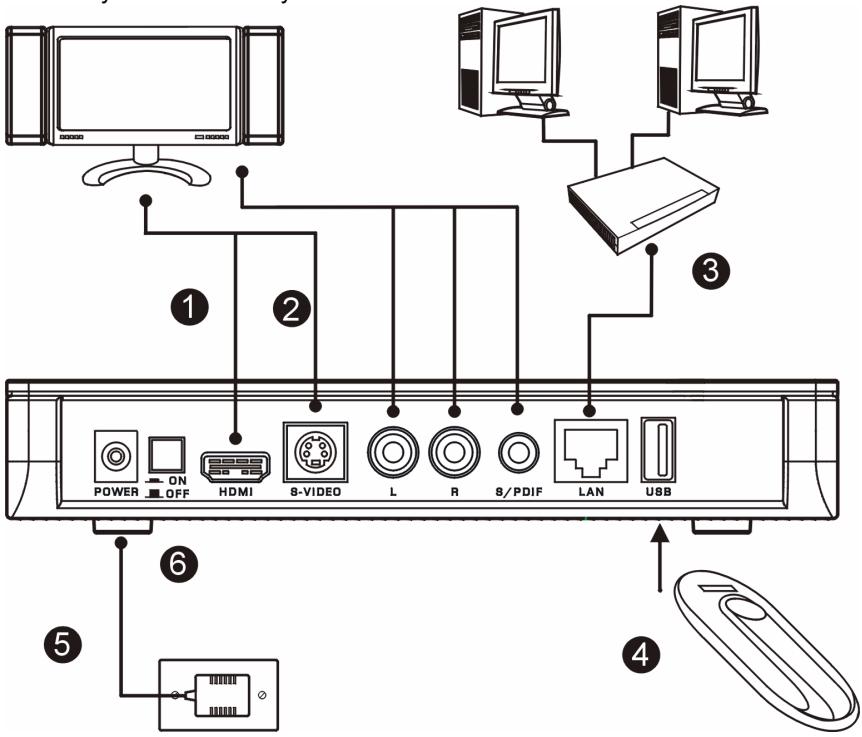
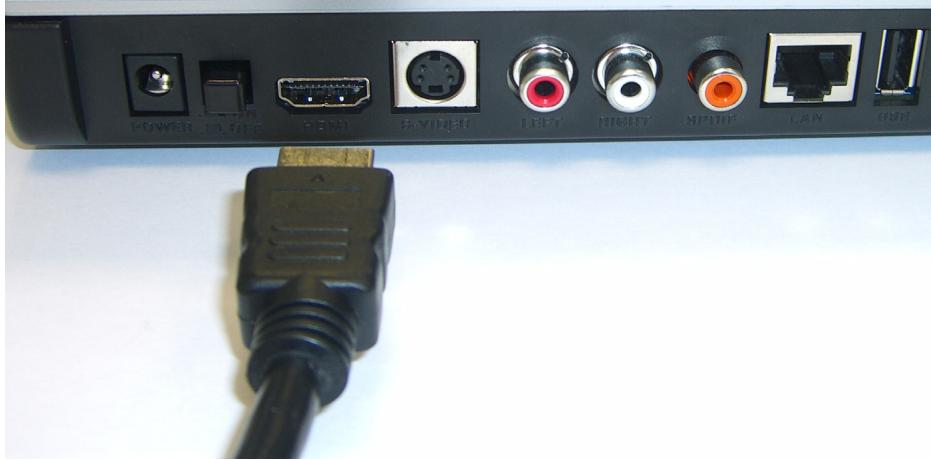
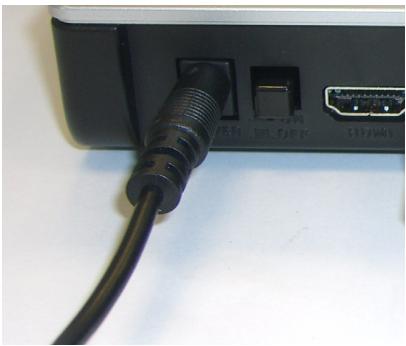
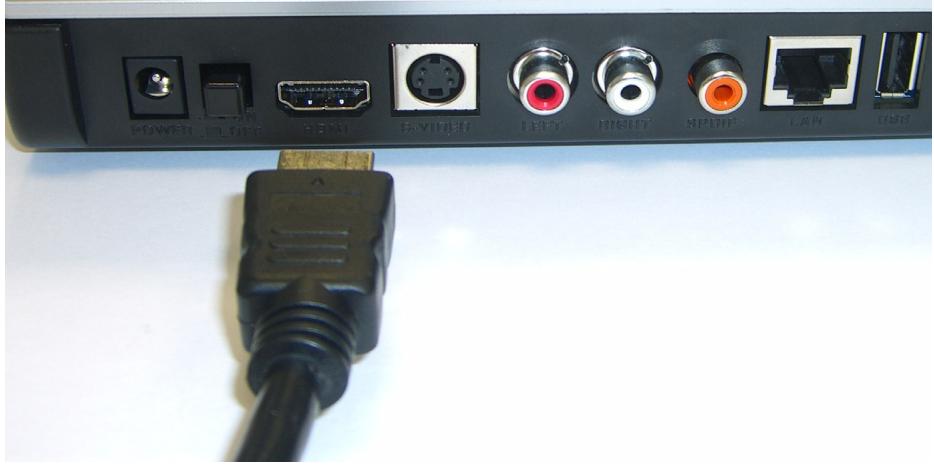
1 If your TV has a HDMI connector, use an HDMI cable to connect the DMA-1000's HDMI connector (shown) to the TV.
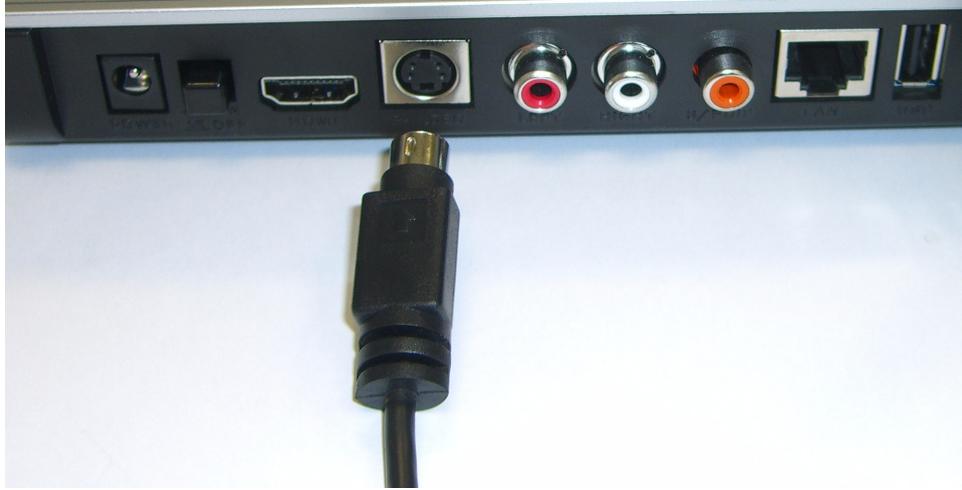
2 If your TV does not have an HDMI connector:
A Use an S-video cable to connect the DMA-1000's S-VIDEO connector (shown) to the TV.
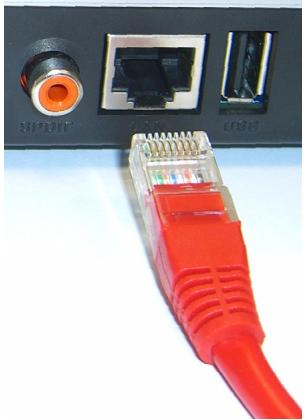
B If your TV or audio system has a coaxial S/PDIF jack, use an RCA cable to connect it to the DMA-1000's S/PDIF jack (shown).

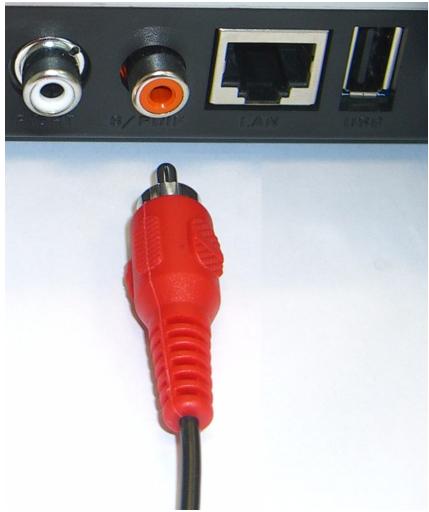
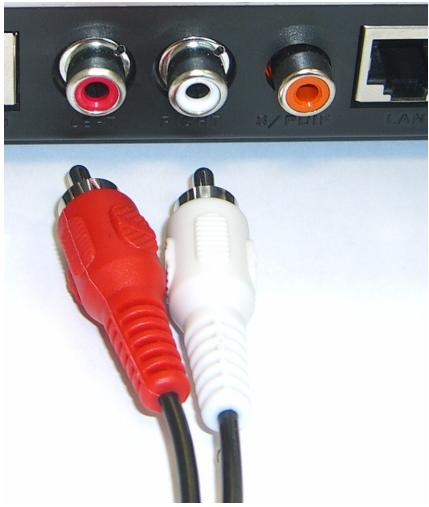
C If your TV or audio system does not have a coaxial S/PDIF jack, use RCA cables to connect it to the DMA-1000's LEFT and RIGHT jacks (shown).

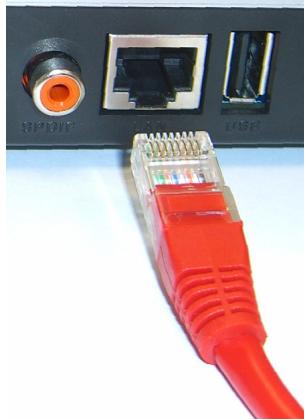
3 Connect the DMA-1000's LAN port if your content files are on your computer. The media server software should already be installed. Skip to the next step if you will only play files from a USB stick.
- Use the straight-through Ethernet cable (gray at the time of writing) to connect to an Ethernet switch, router or hub.
- Use the cross-over Ethernet cable (red at the time of writing) to connect directly to your computer.
4 If you want to play files from a USB memory stick, connect it to the DMA-1000's USB port. (This is optional if you connected the LAN port.)
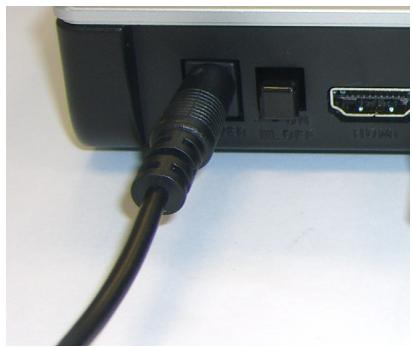
5 Connect the POWER socket to a power source using only the included power adaptor.
6 Your computer should already be turned on. Turn on the TV and the DMA-1000.
2.1 Check the LEDs (Lights)
Look at the front of the device.

1 The STATUS LED comes on.
2 The LAN light and/or the USB light turn on.

Check your connections if the lights do not come on.
3 Share Your Files
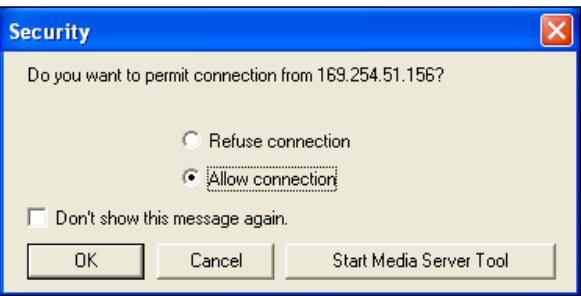
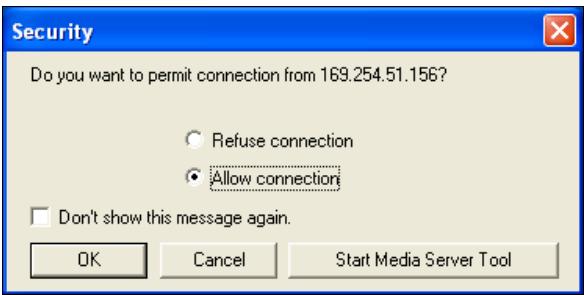
1 Look at your computer screen. Wait for the media server to detect the DMA-1000 and open a pop-up window with the DMA-1000's IP address. If the DMA-1000 does not get an IP address automatically, it uses Auto-IP to assign
itself an IP address. If your computer is also set to get an IP address automatically, the computer and the DMA-1000 will be able to communicate. See the User's Guide if you need to configure the DMA-1000 with a static IP address. Click anywhere in this window.

DiXIM Media Server Helper

169.254.51.156
Click here to allow or refuse connection from this client.

You may need to wait for two or three minutes. If the window still does not display, check the DMA-1000's LEDs and connections and use the power button to restart the DMA-1000.
2 Select Allow Connection and click OK.
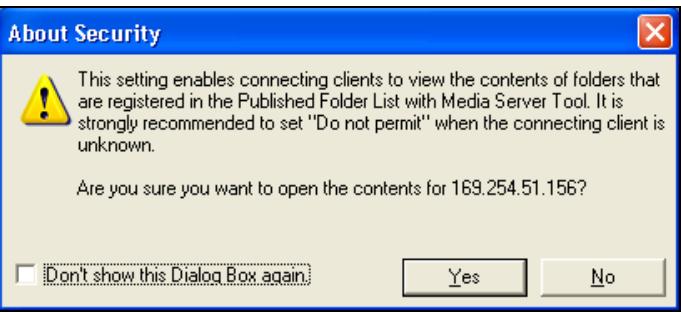
3 Click Yes to allow the DMA-1000 to access your published (shared) files.
4 Play Your Files

Set your TV's input to the DMA-1000's connection (either HDMI or S-Video). Remember to change it when you want to use other input.
1 Look at your TV. The DMA-1000 automatically sorts the files on the server into the MUSIC,VIDEO and PHOTO menus. Files on a USB stick are in the USB menu.
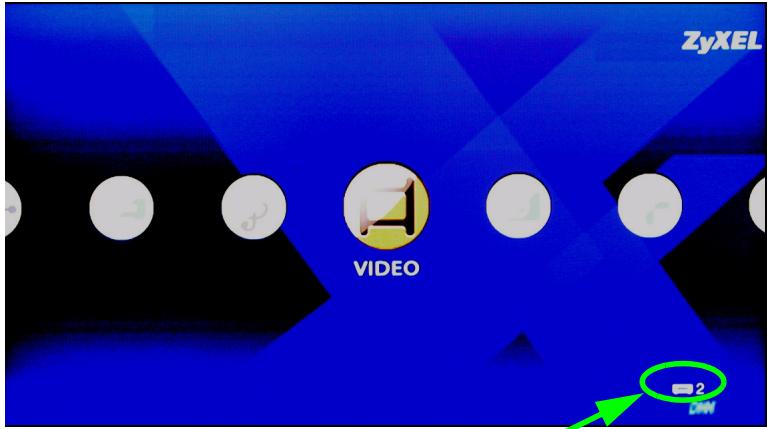
Number of media servers the DMA-1000 detected.
2 Install the remote control's batteries.
3 Point the remote control at the front of the DMA-1000.
4 Use the remote control to navigate the menus and play files.
Power switches between standby and operation modes.
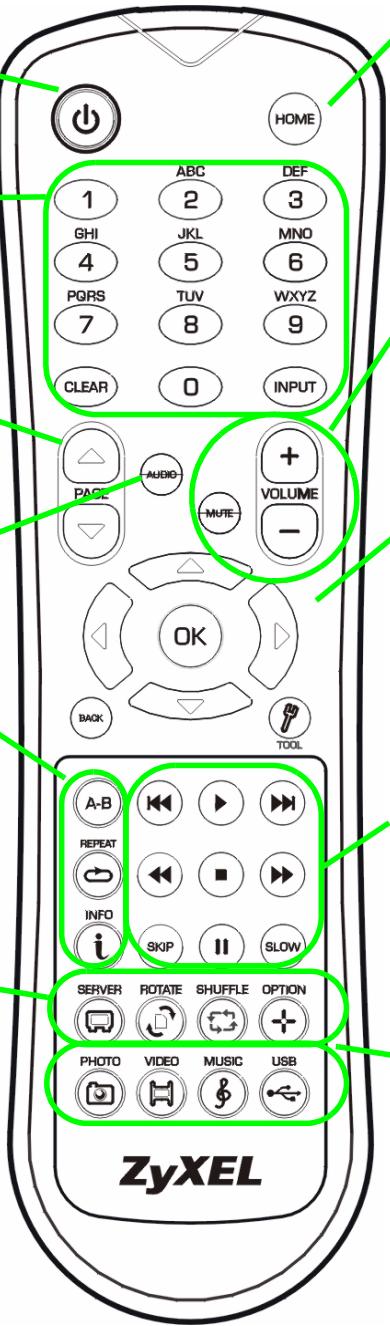
Use the 0 9 CLEAR and INPUT keys to input numbers (like for individual scenes or times).
PAGE up/down scroll up or down a list to the previous or next page.
AUDIO switches audio output between left, right and stereo speakers.
A-B lets you select start and stop times to repeat an interval.
REPEAT keeps playing (loops) the file.
INFO displays details about the playing file.
SERVER opens a menu where you select a media server.
ROTATE turns a photo 90^ clockwise.
SHUFFLE plays your playlist ( favorites) files in random order.
OPTION opens the menu where you configure the DMA-1000's settings.
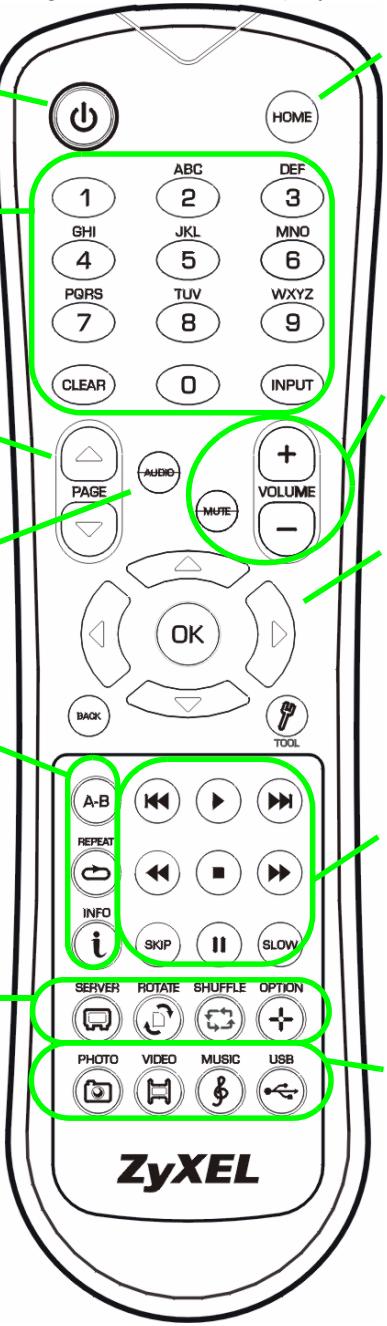
Return to the main menu.
MUTE turns off the sound.
VOLUME up/down adjust the volume.
Use the OK, BACK and arrow buttons to go through the menus and play your files.
TOOL opens the TOOL menu for additional options (see the User's Guide).
These buttons perform the previous, play, next, reverse, stop, fast forward, skip, pause and slow motion functions during file playback.
PHOTO opens a menu of picture files to view.
VIDEO opens a menu of video files to play.
MUSIC opens a menu of music files to play.
USB opens a menu of files on your USB device.
Example of Playing Video Files
1 Press the remote's VIDEO button to enter the VIDEO menu.
2 The video files are arranged in folders.
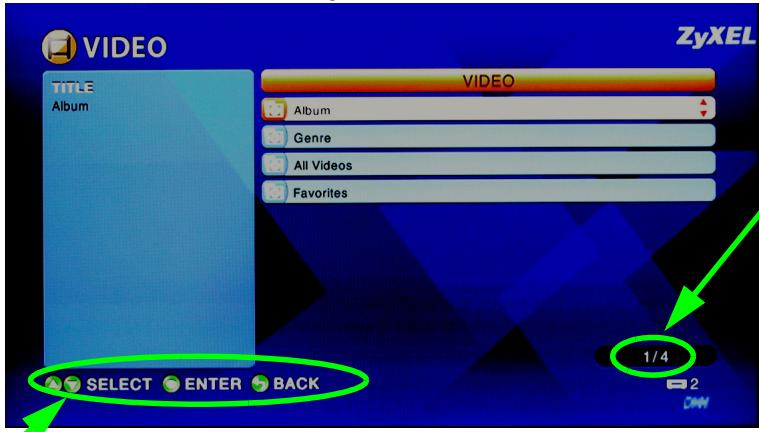
The number of the item currently selected followed by the total number of items in the menu.
Navigation instructions for the menu. In this example, use the arrow and OK buttons to select a folder to see the video files sorted by that criteria. Or use the BACK button to go up in the menu structure.
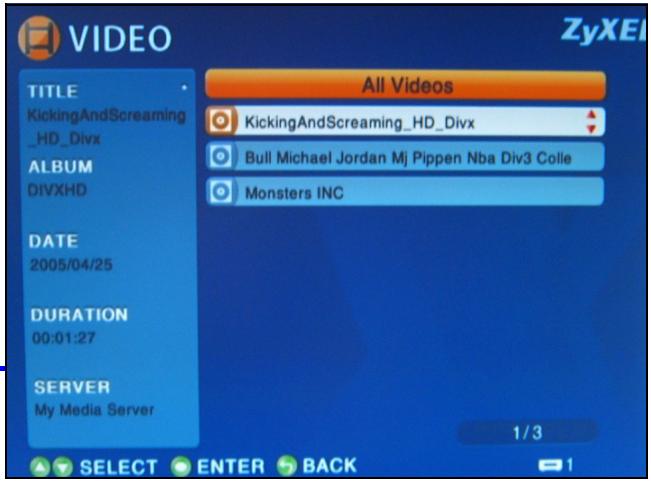
3 In this example, use the remote's arrow and OK buttons to select the All Videos folder. A list of all the video files displays on the right. Information about the currently selected file displays on the left.
4 Use the remote's arrow and OK buttons to select and play a video file.

Files with unsupported formats or codecs may not display properly.
The DMA-1000 supports the following file formats. See the User's Guide for more details.
| Audio | Dolby Digital, DVD-Audio, MPEG-1 and MPEG-2 Layers I, II and III(MP3), MPEG-2 BC multi-channel Layers I, II and III, MPEG-2 and MPEG-4 AAC-LC, WMA9. |
| Video | MPEG-1, MPEG-2 MP@ML, MPEG-4 simple and advanced simple profile, MPEG-4 AVI files and WMV version 9. |
| Photo | TIFF, PNG, GIF, BMP, JPEG and JPEG2000. |
Requirements

If you have trouble installing the media server software, make sure your computer meets the following requirements.
| Microsoft Windows XP Home Edition Service Pack 1 or above, Professional Service Pack 1 or above, or Media Center Edition 2005 Update Rollup or above. *You must be logged in as the administrator to install and use the media server. | |
| Software | Windows Media Player 9 or above Microsoft DirectX 9.0 or above |
| CPU | Celeron 1GHz or above, Pentium III or above (Pentium III 1GHz or above recommended) or compatible |
| Memory | 256MB or above recommended |
| Peripherals | CD-ROM drive |
| Hard Disk | 300MB or above. |
Procedure to View a Product's Certification(s)
1 Go to www.zyxel.com.
2 Select your product from the drop-down list box on the ZyXEL home page to go to that product's page.
3 Select the certification you wish to view from this page.
Click here to allow or refuse connection from this client.
(C) Copyright 2006 ZyXEL Communications Crop.

Browse CD

Exit

Home

Click here to allow or refuse connection from this client.
Click here to allow or refuse connection from this client.

Click here to allow or refuse connection from this client.
(C) Copyright 2006 ZyXEL Communications Crop.

Browse CD

Ex
Home

Ecnn 3TO OKHO He NOBnETCa ABTomatUeCKN, TO DBaXDbI UeKNHnte Ha npuIOKeHN setup.exe.
8 B cnncke Published Folder List (Cnncock ony6bnKOBaHHbIX npuBedeHbI npKn, KOtOpblcnoJIb3yOToTc coBMeCTHO BaAMM KOMNbHTopePOM n DMA-1000.
-
Baши папки My Music (Моя музьika), My Pictures (Мои рсунки) и My Videos (Mоe вдебе)doesablaHTcB 3TOT cncoc no ymoJIuaHnO.
-Дя COBmecTHoro IcnoJb3ObaHnЯ dpyrnx pAnok цeIKNHTe Ha KHOJIKe Add Folder (Добавиь пankу)и Вьбepnte пanky дя pybniKaunn Ha cepbepe. -
UdoJIbIbIbIbIbIbIbIbIbIbIbIbIbIbIbIbIbIbIbIbIbIbIbIbIbIbIbIbIbIbIbIbIbIbIbIbIbIbIbIbIbIbIbIbIbIbIbIbIbIbIbIBcKHOJcy CnKIOHcKcKcKcKcKcKcKcKcKcKcKcKcKcKcKcKcKcKcKcKcKcKcKcKcKcKcKcKcKcKcKcKcKcKcKcKcKcKcKcKcKcKcKcKcKcKcKcKcKcKc
2ПодклочениDMA-1000
IpeepoikloueHnem DMA-1000 Heo6xoIMo BbIKIOHTb TeJeBn3Op.
1 Ecni BaI TeIeBn3Op Imeet pa3bem HDMl, To K HeMy MoKHO NOdkNIOHTb pacnoJIOKeHnbl Ha DMA-1000 pa3bem HDMI npn nomOu n Ka6eYra HDMl, KOtOpbl He BXoNT K KOMPJIeKT NocTaBKn.
2 Ecni Baw TeBn3Op He IMeet pa3bemaHDMI:
A При поMuи Кавеля S-video coeHnTe pa3bembl S-VIDEO Baшero DMA-1000 n TeleBn3opa.

B Ecln BaIw TeIeBn3Op IIn ayDIOcNCTema OobpyDoBaHa KoakCnAJIbHbIM pa3bEmOM S/PDIF, To nCNoJIb3yIte Ka6eIb RCA nIpoKIIIOUeHn Ix K pa3bEmy S/PDIF (nokaah) BaUero DMA-1000.
Cecn BaW TeBn3Op nIyauNoCnCTema He IMeOT KoAKnAJIbHOrO pa3bema S/PDIF,To IcnoIb3yTe Ka6eni RCA dIy noKJIuHeHnIx K LEFT (JIEBOMY) n RIGHT (IPABOMY) pa3bemam (noka3aHo) BaWero DMA-1000.
3 Поdkлочи поТ LAN bawero DMA-1000, ecn ha KOMMbtepe haxoJrTcЯaJIbI dIy BOCpOu3BedeHnI. Ppr 3tOM yKe DoJnxHO 6bITb yCTaHOHe NOprpAMMHOe obecneueHne MeMa-cepBepa. Iponyctnte CneDyUoIsh War yCTaHOBKn, ecn Bbl 6yDeTe BOCpOu3BOIDHTb faJIbI TOJIbKO c KapTbI namrTn USB.
- IcnoIb3yIte npAmoi Ka6eIb Ethernet (ceporo cBetaHa MOMENT HAnicsaHnna 3TOrO pyKOBoDCTBa)ДлЯNodkNIOUeHnK KOMMyTaTOPu NII MauPpTu3aTOpy Ethernet.
- IcnoIb3yIte nepeKpeCTHbI Ka6eIb Ethernet (KpaCHOrO ZBetaHa MOMENT HAnicsaHnE 3TOrO pyKOBoODCTBa)ДЯ ПОДКЛIOUeHnE HeNOCpeIcTeBENHO KaBaIeMy KOMNbIoTepy.
4 Ecni Bbl XOTnTe BOCPOn3BOoInTb faJIbI C KapTb I naMraTn USB, To noDkNIOUHTe ee K USB-nopTy BaWero DMA-1000. (PpN noDkNIOUeHn K nopTy LAN (JIBC) 3TO Heo6a3aTeNbHO.).
5Подклочиpepo3etky POWER(ПИТAHNE)К
ЗлесТрocETи рп пOMОи BXODЯцero K
КOMПЛЕKT NOCTaBКи 6ЛOKA ПИТAHИ.
6 Baù KOMnbIOTep DóJXeH 6bITb BkJIouYe H 3TOT MOMeHT. BkJIIOHTe TeJIeBn3Op n DMA-1000.
Ecnn nHdkaTopbI He 3aropaIoTcra, To npOBepbTe coeDInHeHna.
3 COBmecThbI JocTyI K faiJaM
1 PocmoTpuTe Ha 3kpan KOMIbIoTepa. PioOxDInTe, poka Meiina-cepBep o6HapyKnt DMA-1000 n BbVeJeTe OkHo c IP-aDpeCom DMA-1000. Ecnn DMA-1000 He npolyuHT IP-aDpec aBTOMaTnueckn, To OH nCNoJIb3yeT

DiXIM Media Server Helper

169.254.51.156
Click here to allow or refuse connection from this client.
Функию Auto-IP Дя erо camocToЯтьHOro ha3NaueHЯ. EcIn BaW KOMnbIOTep TaKke noLyaaTe IP-aDpec abTomatUeCKn, To OH 6yDenT cnOco6eH CBra3aTbCЯ c DMA1000.EcIn Bam Heo6xOJIMo Ha3NaUHTb DMA-1000 cTaTnueckn IP-aDpec, To obpaTntecb K PykoBoDCTBy noIb3ObaTeJ. UeJKNHte Ha JIOboJ yAcTn 3TOr OkHa.

Bo3MOxHNO, Bam npuJeTcra pOdoXdaTb DBe-tpn MmHyTbI. EcJN OKHO He IPOBnEeTcra, To npOBepbTe nHdNKaTOpbI DMA-1000 n HaDeJXHocTb coeDInHeHn. Ipepe3aynCTte DMA-1000, nCnoJIb3yR KhONKy BkIIOUChEnr PNTaHn.
2 Bb6epnte Allow Connection (Pa3peuHt b noKJIuOHeHn) n UeJIKNHTe Ha KhoNKe OK.
NcNoJIb3yIte KHOJKN 0~9,
CLEAR (OuInCTnTb) n INPUT
(BBOD) (kak dny OTdJIbHbIX cueh nIIN KOINueCTBa noBOTOPOB).
PAGE up/down (CTpaHnca
BBepx/BHn3) BbIBoD
npebidyuee nn
nocJeIyUoIe cTpaHnCbI cnCKa.
AUDIO (Ayduno) -
nepeKJIIOUcaET ayDIO-BbIXOd MEXJy JIeBbIM, IpaBbIM KaHaJOM IN peXHMOM CTepeo.
A-B -no3B0JHOT BbIbpaTbBpemHaayalaN3aBepueHnIPOBTOIOUeO pparmenta
REPEAT (TobTop)-
BKNHouaETUKNJIuYeCKOe BOCnpon3BeVeHne paJna.
Bocnpoun3BedeHne BaWero CnNcKa npoun3BedeHn (n36paHHoro) B cnUyauHOM nopAKe.
OPTION (HactpoKn) -
OTKpbIbAeT MeHIO HAcTpOeK DMA-1000.
Bo3Bpat B rIaBHOe MeHIO
MUTE (3ByK) - BbIKJIIOUaET 3ByK.
KHONKIN VOLUME up/down (POMKOCTb +/-) NcNoJIb3yIOTcAДЯpeRyIpOBKIn POMKOCTN.
Click here to allow or refuse connection from this client.
