
HT-Q.BASS-125G - Washing machine Hillvert - Free user manual and instructions
Find the device manual for free HT-Q.BASS-125G Hillvert in PDF.


User questions about HT-Q.BASS-125G Hillvert
0 question about this device. Answer the ones you know or ask your own.
Ask a new question about this device
Download the instructions for your Washing machine in PDF format for free! Find your manual HT-Q.BASS-125G - Hillvert and take your electronic device back in hand. On this page are published all the documents necessary for the use of your device. HT-Q.BASS-125G by Hillvert.
USER MANUAL HT-Q.BASS-125G Hillvert
| Parameter description | Parameter value |
| Product name | Garden Dump Cart |
| Model | HT-Q.BASS-125G |
| Dimensions with handle [cm] | 1880x570x608 |
| Length of the handle [mm] | 990 |
| Weight [kg] | 23,95 |
| Maximum load [kg] | 350 |
| Capacity in litres [L] | 125 |
| Diameter of wheels | 13" |
1. GENERAL DESCRIPTION
DO NOT USE THE DEVICE UNLESS YOU HAVE THOROUGHLY READ AND UNDERSTOOD THIS USER MANUAL.
To increase the product life of the device and to ensure a trouble-free operation, use it in accordance with this user manual and regularly perform the maintenance tasks. The technical data and specifications in this user manual are up to date. The manufacturer reserves the right to make changes associated with quality improvement.

ATTENTION! Read all safety warnings and all instructions. Failure to follow the warnings and instructions may result in serious injury or even death.
Whenever „device“ or „product“ are used in the warnings and instructions, it shall mean Garden Dump Cart.
2. Usage safety

ATTENTION! Read all safety warnings and all instructions. Failure to follow the warnings and instructions may result in serious injury or even death.
Whenever „device“ or „product“ are used in the warnings and instructions, it shall mean Garden Dump Cart.
• Do not put more than 350 kg into the load area
• The product is not intended for children, it is not a toy.
- Distribute the load weight evenly over the entire surface.
• Do not store components on plastic edges.
• In case of damage or destruction of any of the components, it is necessary to cease using them.
- Do not use the truck on surfaces / areas that may cause damage of tires.
• The tire inflation pressure must not exceed 30 PSI (2.07 BAR).
- Device description
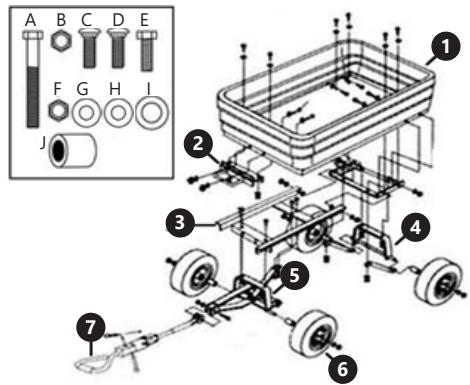
- Load box
- Blocking assembly
- Frame
- Rear axle
- Front axle
- Wheels
- Handle
- Mounting kit
A. Bolt M8x60 (x1)
B. Nut M8 (x13)
C. Carriage bolt M8x20 (x4)
D. Carriage bolt M8x20 (x4)
E. Bolt M8x20 (x4)
F. Wheel nut (x4)
G. Washer M8 (x1)
H. Washer M8 (x12)
I. Washer M12 (x4)
J. Wheel separator
-
Strut
-
Front axle support
- Plastic coupling
-
Yoke
-
Preparation for work / working with the device
Assembling of the product:
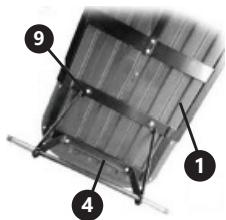
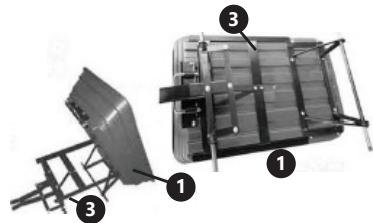
- Fasten the rear axle (4) to the load box (1) using the mounting kit (C, H, B). Fasten the right and left strut by means of the M8x20 screw (2x C), washers (2x H) and nut (2x B).
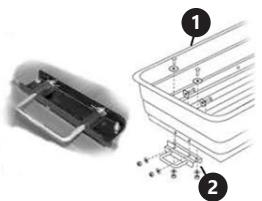
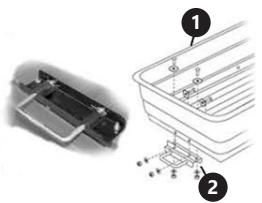
- Screw the locking unit (2) to the load box (1) by means of the M8x20 screw together with the washer and the nut (4x D + H + B).
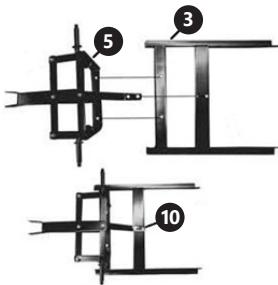
- Fasten the front axle (5) to the frame (3) by means of the M8x20 screw, the washer and the nut (E + H + B). Then fasten the support (10) to the frame (3) using the mounting kit (E + H + B).
- After installing the front axle, the frame (3) must be fastened to the plastic load box (1) using the M8x20 screw, the washer and the nut (D + H + B).
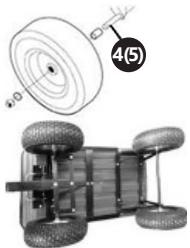
- In the course of installing the wheels, it is necessary to firstly put the separators (J) on the axle (4/5), then the wheel (6) and then secure with the washer and the nut (I + F).
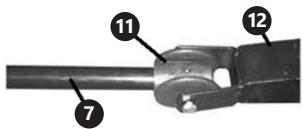
- After turning the truck onto the wheels it is necessary to fasten the handle (7) from the side of the plastic coupling (11) to the yoke (12) by means of the screw, washer and nut (A + G + B).
Usage tips:
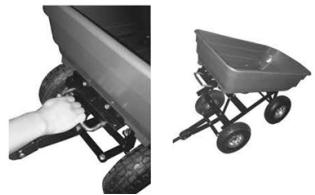
In order to remove the load, it is necessary to pull the handle of the blocking assembly outwards so as to release the plastic tube from the safety mechanism. Then this handle must be pulled up so that the truck will be tilted to the position of strewing the load.
Cleaning and maintenance
• Use cleaners without corrosive substances to clean each surface.
• Dry all parts well after cleaning before the device is used again.
• Store the unit in a dry, cool place, free from moisture and direct exposure to sunlight.
• Use a soft cloth for cleaning.
DANE TECHNICZNE
Uživatelské pokyny
Čištění a údržba
NETTOYAGE ET ENTRETIEN
- Fissare la chiusura (2) con la vite M8x20, la rondella e il dado madre (4x D + H + B) al contenitore (1).
OUR CUSTOMERS' SATISFACTION IS OUR MAIN GOAL! PLEASE CONTACT US WITH QUESTIONS AT:
NASZYM GŁÓWNYM CELEM JEST SATYSFAKCJA KLIENTÓW W PRZYPADKU PYTAŃ PROSIMY O KONTAKT Z PRZEDSTAWICIELEM W DANYM KRAJU:
NOTRE BUT PREMIER EST VOTRE SATISFACTION! POUR TOUTE QUESTION, CONTACTEZ NOUS SUR:


Brand : Hillvert
Model : HT-Q.BASS-125G
Category : Washing machine