X Bike Pro - Washing machine CECOTEC - Free user manual and instructions
Find the device manual for free X Bike Pro CECOTEC in PDF.


User questions about X Bike Pro CECOTEC
0 question about this device. Answer the ones you know or ask your own.
Ask a new question about this device
Download the instructions for your Washing machine in PDF format for free! Find your manual X Bike Pro - CECOTEC and take your electronic device back in hand. On this page are published all the documents necessary for the use of your device. X Bike Pro by CECOTEC.
USER MANUAL X Bike Pro CECOTEC

ÍNDICE
- Parts and components
- Safety instructions
- Addembly instructions
- Exercise instructions
- LCD screen
- Technical support service and warranty
- Disposal of old electrical appliances
INDICE
ES
-
Tornillo de cabeza redonda (4)
-
Arandela curva (6)
-
Tuerca ciega (4)
-
Barra estabilizadora trasera (1)
-
Pedal derecho (1)
-
Rueda de ajuste del sillín (1)
-
Tuerca (5)
-
Arandela plana (9)
-
Arandela de presión (6)
-
Tornillo Allen M8x20 mm (4)
-
Respaldo (1)
-
Reposabrazos trasero (1)
-
Asiento (1)
-
Manillar frontal (1)
-
Tornillo Allen M8x35 mm (2)
-
Tubo del soporte para tablets (1)
-
Soporte para tablets (1)
-
Monitor LCD (1)
-
Tornillo (1)
-
Soporte del monitor (1)
-
Estructura principal (1)
-
Pedal izquierdo (1)
-
Barra estabilizadora delantera (1)
-
Soporte del asiento (1)
-
Tornillo Allen M8x40 mm (2)
-
Tornillo (1)
EN
-
Carriage bolt (4)
-
Curved washer (6)
-
Dome nut (4)
-
Rear stabilizer (1)
-
Right pedal (1)
-
Seat-adjusting knob (1)
-
Nut (5)
-
Flat washer (9)
-
Spring washer (6)
-
Allen screw M8x20 mm (4)
-
Backrest (1)
-
Rear armrest (1)
-
Seat (1)
-
Front handlebar (1)
-
Allen screw M8x35 mm (2)
-
Tablet support tube (1)
-
Tablet support (1)
-
LCD monitor (1)
-
Screw (1)
-
Monitor support (1)
-
Main frame (1)
-
Left pedal (1)
-
Front stabilizer (1)
-
Seat support (1)
-
Allen screw M8x40 mm (2)
-
Screw (1)
FR
Read these instructions carefully before using the product. Keep this instruction manual for future reference or new users
2. SAFETY INSTRUCTIONS
ASSEMBLY
- Verify that you have all the components and tools listed on the next pages. Some components are pre-assembled.
- Keep children and animals away from the work area as small parts could cause a choking hazard if swallowed.
• Make sure you have enough space to layout the parts before starting. - Assemble the equipment as close to its final workout location (in the same room) if possible.
• Please, dispose of all packaging carefully and responsibly. - Use the equipment on a solid, even surface with a protective cover for your floor or carpet. For safety, the bike should have at least 0.5 m of free space around it.
USE
- It is the sole responsibility of the owner to ensure that all users of this product are properly informed as to how to use this product safely.
• This appliance must not be used by children under the age of 8. This product can be used by children aged 8 or over, as long as they are given continuous supervision. - This appliance can be used by persons with reduced physical, sensitive, or mental capabilities, or lack of experience or knowledge, as long as they have been given supervision or instruction concerning the use of the appliance in a safe way and understands the risks involved.
- Keep this appliance out of reach of children under the age of 8.
• Cleaning and maintenance tasks must not be carried out by children. - You are purchasing this equipment to exercise at your own risk. If you have any health concerns or feel you may be at risk of any serious health condition, please consult with your physician or health care professional before starting any exercise programme.
- Before using the equipment to exercise, always follow recommended warm-up, and stretching exercises.
- If you experience dizziness, nausea, chest pain, or other abnormal symptoms, stop your workout and seek immediate medical attention.
• The bike is not suitable for therapeutic use. -
Care must be taken when lifting or moving the equipment so as not to injure your back. Always use proper lifting techniques and/or assistance.
-
Be aware of your body signals. Incorrect or excessive exercise can deteriorate your health. Stop exercising if you experience any of the following symptoms: pain, tightness in your chest, irregular heartbeat, extreme shortness of breath, light-headedness, dizziness or nausea. If you experience any of these conditions, you should consult your doctor before continuing with your exercise program.
- This product is intended for domestic use only. It is not suitable for commercial or industrial use. Do not use it outdoors.
• Only one person at a time should use the equipment. - Keep hands and any loose clothing or objects away from all moving parts of the product.
- Always wear appropriate workout clothing when exercising. Do not wear loose or baggy clothing, since it may get caught in the equipment. Wear athletic shoes to protect your feet while exercising.
• Do not place any sharp objects around the equipment.
• This product is suitable for user's weight of up to 110 kg. - Always use the equipment as indicated in this instruction manual. If you find any defective component while assembling or checking the bike, or if you hear any unusual noise coming from the equipment during use, stop using the bike. Do not use the equipment until the problem has been rectified.
- The safety level of the bike can only be maintained through regular examination for damage and/or wear and tear signals.
- Check that the bolts and nuts are securely fastened before using the equipment.
- No liability is accepted for any eventual damage or personal injuries derived from misuse or non-compliance with this instruction manual.
3.ASEMBLY INSTRUCTION

STEP 1: Attach the two stabilizers (4 and 23) to the main frame (21) using four dome nuts (3), curved washers (2) and carriage bolts (1).
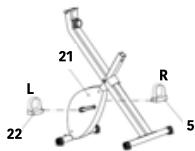
STEP 2: The pedals (5) & (22) are marked "L" and "R"- Left and Right. Place them in their appropriate crank. The right crank is on the right side of the bike. Note that the right pedal should be screwed clockwise, while the left pedal must be screwed counterclockwise.

STEP 3: Align the seat (13) with the seat support (24). Adjust the angle of the seat. Fix it tightly with nuts and flat washers (7, 8).
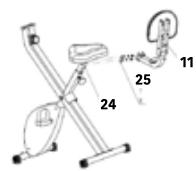
STEP 4: Fix the backrest (11) to the seat support (24) with two allen screws (25), flat washers (8), and nuts (7).
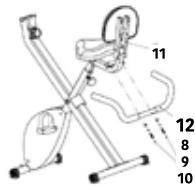
STEP 5: Remove the preinstalled bolts, washers, and nuts from the rear armrest (12). Fix the armrest to the backrest support with these parts. Make sure the handlebar faces forward.

STEP 6: Fasten the front handlebar (14) to the main frame (21) with two allen screws M8x35 (15) and curved washers (2).
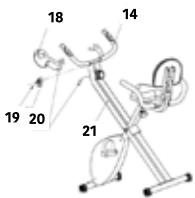
STEP 7: Remove the screw (19) from the monitor support (20). Fix the monitor support with the screw. Slide the LCD monitor (18) into the monitor support and plug it.

STEP 8: Align the tablet support tube (16) with the holes in the main frame (21) and fix it with two allen screws (10), spring washers (9), and flat washers (8).
Fix the tablet support to its tube with the screw (26).
4. EXERCISE INSTRUCTIONS
Using your X BIKE will provide you with several benefits, it will improve your physical fitness, tone up your muscles, and, together with a calorie-controlled diet, it will help you lose weight.
MUSCLE TONING
To tone up your muscles while on your exercise bike, you will need to set the resistance level quite high. This will put more strain on your leg muscles and you may not be able to train for as long as you would like. If you are also trying to improve your fitness, you need to change your training program. You should train normally during the warm up and cool down phases, but you should increase the resistance level towards the end of the exercise phase, in order to make your legs work harder. You will have to reduce your speed to keep your heart rate in the target zone, showed later on.
WEIGHT LOSS
The important factor here is the amount of effort you put in. The harder and longer your work out, the more calories you will burn. The process is the same one as when you are trying to improve your fitness.
USE
The seat height can be adjusted by removing the adjusting knob and raising or lowering the seat. There are 7 holes in the seat post, which allows you to adjust the height. Once the correct height has been chosen, refit the adjustment knob and tighten it. The tension control knob allows you to alter the resistance level of the pedals. A high resistance makes it more difficult to pedal, while a low resistance makes it easier. For best results, set the tension while the bike is in use.
This stage helps get the blood flowing around the body. It will reduce the risk of cramp and muscle injury. It is advisable to do a few stretching exercises as shown below. Each stretch should be held for approximately 30 seconds; do not force or jerk your muscles into a stretch, if it hurts, stop.

2.- The Exercise Phase
This is the stage where you have to put effort into. After regular use, the muscles in your legs will become more flexible. Work out at your own pace, but it is very important to maintain a steady tempo throughout. The workout should be enough so as to raise your heartbeat into the target zone shown in the graph below.

This stage should last for a minimum of 12 minutes, although most people start at about 15-20 minutes.
This stage lets your muscles and cardio-vascular system rest. It consists of a series of warm up exercises, e.g. reduce your tempo, continue for approximately 5 minutes. The stretching exercises should now be repeated; remember not to force or jerk your muscles. As you get fitter, you might need to train longer and harder. It is advisable to train at least three times a week, and, if possible, space your workouts evenly throughout the week.
4.- Troubleshooting
If no number appears on the computer, make sure all connections are correct.
5. LCD SCREEN
FUNCTION BUTTON
Reset: hold the button for over 3 seconds to reset all values, except the Odometer.
FUNCTIONS
• SCAN: press this button until the screen displays "SCAN". The LCD screen will automatically alternate between TIME, SPEED, DISTANCE, CALORIES, and ODOMETER
- TIME: press this button until the screen displays "TIME". The LCD screen will count up your workout time.
- SPEED: press this button until the screen displays "SPEED". The LCD screen will show the current speed.
- DISTANCE: press this button until the screen displays "DIST". The LCD screen will show the distance you have "travelled".
- CALORIE: press this button until the screen displays "CAL". The LCD screen will show the calorie consumption.
- ODOMETER: press this button until the screen displays "ODO". The LCD screen will show the total distance.
- PULSE: press this button until the screen displays "PULSE". The user's current heart rate will be displayed in beats per minute. Place the palms of your hands on both contact pads (or put the ear clip on your ear), and wait for 30 seconds for an accurate reading.
NOTE
- The LCD screen will turn on automatically if the exercise bike is in motion. If you stop exercising for over 3 minutes, the LCD screen will turn off.
- If the LCD screen does not display data properly, re-install it or replace its batteries.
- The computer uses two AA or UM-3 batteries.
6. TECHNICAL SUPPORT SERVICE AND WARRANTY
This product is under warranty for 2 years from the date of purchase, as long as the proof of purchase is submitted, the product is in perfect physical condition, and it has been given proper use, as explained in this instruction manual.
The warranty will not cover the following situations:
- The product has been used for purposes other than those intended for it, misused, beaten, exposed to moisture, immersed in liquid or corrosive substances, as well as any other fault attributable to the customer.
- The product has been disassembled, modified, or repaired by persons, not authorised by the official Technical Support Service of Cecotec.
- Faults deriving from the normal wear and tear of its parts, due to use.
The warranty service covers every manufacturing defects of your appliance for 2 years, based on current legislation, except consumable parts. In the event of misuse, the warranty will not apply. If at any point, a fault is detected, contact the official Technical Support Service of Cecotec and send us your proof of purchase via e-mail at:
sat@cecotec.es
7. DISPOSAL OF OLD ELECTRICAL APPLIANCES

The European directive 2012/19/EU on Waste Electrical and Electronic Equipment (WEEE), specifies that old household electrical appliances must not be disposed of with the normal unsorted municipal waste. Old appliances must be collected separately, in order to optimize the recovery and recycling of the materials they contain, and reduce the impact on human health and the environment.
The crossed out “wheeled bin” symbol on the product reminds you of your obligation to dispose of the appliance correctly. If the product has a built-in battery or uses batteries, they should be removed from the appliance and disposed of appropriately.
Consumers must contact their local authorities or retailer for information concerning the correct disposal of old appliances and/or their batteries.
Reset: hold the button for over 3 seconds to reset all values, except the Odometer.
FONCTIONS
This stage lets your muscles and cardio-vascular system rest. It consists of a series of warm up exercises, e.g. reduce your tempo, continue for approximately 5 minutes. The stretching exercises should now be repeated; remember not to force or jerk your muscles. As you get fitter, you might need to train longer and harder. It is advisable to train at least three times a week, and, if possible, space your workouts evenly throughout the week.
4.- Fehlerbehebung
8. RECICLAGEM APPLIANCE

www.cecotec.es
Quart de Poblet, Valencia (Spain)
- ÍNDICE
- INDICE
- ES
- EN
- FR
- SAFETY INSTRUCTIONS
- ASSEMBLY
- USE
- 3.ASEMBLY INSTRUCTION
- EXERCISE INSTRUCTIONS
- MUSCLE TONING
- WEIGHT LOSS
- 2.- THE EXERCISE PHASE
- 4.- TROUBLESHOOTING
- LCD SCREEN
- FUNCTION BUTTON
- FUNCTIONS
- NOTE
- TECHNICAL SUPPORT SERVICE AND WARRANTY
- DISPOSAL OF OLD ELECTRICAL APPLIANCES
- FONCTIONS
- 4.- FEHLERBEHEBUNG
- RECICLAGEM APPLIANCE
Brand : CECOTEC
Model : X Bike Pro
Category : Washing machine