Windowclima 9000 Inverter - Washing machine CECOTEC - Free user manual and instructions
Find the device manual for free Windowclima 9000 Inverter CECOTEC in PDF.


User questions about Windowclima 9000 Inverter CECOTEC
0 question about this device. Answer the ones you know or ask your own.
Ask a new question about this device
Download the instructions for your Washing machine in PDF format for free! Find your manual Windowclima 9000 Inverter - CECOTEC and take your electronic device back in hand. On this page are published all the documents necessary for the use of your device. Windowclima 9000 Inverter by CECOTEC.
USER MANUAL Windowclima 9000 Inverter CECOTEC
| Instrucciones de seguridad | 4 |
| Safety instructions | 8 |
| Instructions de sécurité | 13 |
| Sicherheitshinweise | 17 |
| Istruzioni di sicurezza | 23 |
| Instruções de segurança | 27 |
| Veiligheidsvoorschriften | 32 |
| Instrukcja bezpieczeństwa | 37 |
| Bezpečnostní pokyny | 41 |
ÍNDICE
- Parts and components 63
- Before use 63
- Operation 64
- Cleaning and maintenance 69
- Troubleshooting 70
- Technical specifications 72
- Disposal of old electrical and electronic appliances 77
- Technical support and warranty 78
- Copyright 78
SOMMAIRE
Read these instructions thoroughly before using the appliance. Keep this instruction manual for future reference or new users.
- This device is designed for domestic use only and is not intended for bars, restaurants, farmhouses, hotels, motels, and offices.
- This appliance can be used by children aged 8 years and above and people with reduced physical, sensory, or mental capabilities or lack of experience and knowledge if they have
been given supervision or instruction concerning use of the appliance in a safe way and understand the hazards involved. Children must not play with the appliance. Cleaning and user maintenance should not be carried out by unsupervised children.
- The device must be powered at a low safety voltage as stated on the marking.
- If the power cable is damaged, it must be replaced by the official Cecotec Technical Support Service or similar qualified personnel to avoid risks.
- Compliance with national gas regulations must be observed.
- Mechanical connections shall be accessible for maintenance purposes.
- The minimum room floor area for the room where the appliance can be placed is 7 m2.
- WARNING: keep the ventilation openings clear from obstructions.
- NOTE: servicing should be performed only as recommended by the manufacturer.
- The appliance shall be installed in accordance with national electrical installation regulations
- WARNING: the appliance must be stored in a well-ventilated area where the room size corresponds to the room area as specified for operation.
- WARNING: the appliance must be stored in a room without continuously operating open flames (e.g. an operating gas appliance) or sources of ignition (e.g. an operating electric heater).
- The appliance must be stored in such a way as to prevent mechanical damage.
- Any person involved in work or intervention on a refrigerant circuit should hold a current valid certificate issued by an
industry-accredited assessment authority, authorising their competence to handle refrigerants safely in accordance with an industry-recognised assessment specification.
- Servicing should only be carried out as recommended by the equipment manufacturer. Maintenance and repairs requiring the assistance of other qualified personnel must be carried out under the supervision of the person competent in the use of flammable refrigerants.
- Service personnel must be instructed to perform the following when servicing an appliance using a flammable refrigerant.
- Make sure that the mains voltage matches the voltage stated on the rating label of the appliance and that the wall outlet is earthed.
- Do not immerse the cable, plug, or any other non-removable part of the appliance in water or any other liquid. Do not expose the electrical connections to water. Make sure your hands are dry before handling the plug or switching on the device.
- Do not carry or pull the appliance from the power cable. Do not use the power cable as handle. Do not push the cable against corners or sharp edges. Do not crush the power cable with the full weight of the appliance. Keep the cable away from hot surfaces.
- Do not operate the appliance if its cable, plug, or body show visible damage, do not operate properly, or have been dropped.
- Do not use the appliance in confined spaces with explosive or flammable vapours.
- Keep the appliance away from heat sources.
-
Do not try to repair the appliance by yourself. Contact the official Cecotec Technical Support Service.
-
Do not install or use the vertical window air conditioner in the bathroom or other humid environments.
- The appliance is designed for indoor use only and is not compatible with other uses.
- It is important to check that the window and frame where the air conditioner will be installed are in good condition and can support the weight of the unit and the aluminium installation kit.
- Before fitting the installation kit to the window, be sure to clean the surface to ensure a secure fit.
- Be sure to follow the installation instructions step by step and do not force any parts to avoid damage to both the air conditioner and the window.
- Once the vertical window air conditioner has been installed, perform a final check to ensure that the appliance is secured to the window and that there is no risk of air leakage or appliance drop.
- If you have any questions during the installation process, do not hesitate to consult a professional or the manufacturer's customer service for assistance to ensure a safe and efficient installation.
Instructions on batteries
- Battery ingestion can cause burns, soft-tissue perforation, and death. It can cause severe burns within two hours of the ingestion.
- In case of battery ingestion, please seek medical attention immediately.
- Do not allow children to replace batteries without adult supervision.
- Do not disassemble, open, or damage the batteries.
- Keep the batteries out of the reach of children. Pay particular
attention to small batteries. In case of battery ingestion, please seek medical attention immediately.
- Do not expose batteries to heat or fire. Avoid storage in direct sunlight.
- Do not short-circuit an element or a battery. Do not store batteries in an untidy manner, in a box, or drawer where they can short-circuit each other or be short-circuited by other metal objects.
- Do not subject batteries to mechanical shock.
- Both batteries and cells can leak under extreme conditions. In the event of a battery leak, keep your skin and eyes away from the liquid. If the liquid gets into contact with skin, wash immediately with soap and water. If the liquid gets into the eyes, wash them immediately with clean water for a minimum of 10 minutes and seek medical attention. Wear gloves to handle the battery and dispose of it immediately in accordance with local regulations.
- Pay attention to the positive (+) and negative (-) marks on the batteries and the remote-control compartment to ensure they are inserted correctly.
- Do not use any batteries that are not designed for use with the appliance.
- Do not use the remote control if powered with batteries that differ in capacity, size, or type.
- Children should be allowed to handle the batteries only under adult supervision.
- Always buy recommended batteries.
- Keep the batteries clean and dry. Wipe the battery terminals with a clean, dry cloth if they become dirty.
- Keep the original instruction manual for future reference.
- Use the batteries only for their intended purpose.
- Whenever possible, remove the batteries when not in use.
INSTRUCTIONS DE SÉCURITÉ
- Front panel
- Flap (automatic swing)
- Deflectors (manual swing)
- Indoor air inlet grille
- Sliding panel
- LED display
- Power cable
- Indoor water outlet
Fig. 2
- Rear panel
- Outdoor air inlet grille
- Outdoor water outlet
- Fresh air cover (to be able to open it, the fresh air function must be activated)
- Outdoor air outlet grille
- Installation bracket
- Base plate
Refer to the installation instructions before attaching the bracket to the window to prevent it from falling out.
NOTE:
The graphics in this manual are schematic representations and may not exactly match the device.
2. BEFORE USE
- This appliance is packaged in a way as to protect it during transport. Take the appliance out of its box and remove all packaging materials. You can keep the original box and other packaging elements in a safe place. This will help you prevent damage to the appliance when transporting it in the future. In case the original packaging is disposed of, make sure all packaging materials are recycled accordingly.
- Make sure all parts and components are included and in good conditions. If there is any piece missing or in bad conditions, contact the official Cecotec Technical Support Service immediately.
Box content
- Vertical window air conditioner
- Hose
- Window installation kit
- Screws
- Instruction manual
- Remote control
- Remote control batteries (2XAAA)
3. OPERATION
1. Display indicator lights
Fig. 3
- Timer
- Child safety lock
- Wi-Fi signal indicator light
- Temperature indicator light
- Time indicator light
- Fan speed
- Dehumidification mode (DRY)
- Cooling mode (COOL)
- Automatic oscillation function (SWING)
- Child lock function button
- Timer button
- Power button
- Automatic oscillation button (SWING)
- Increase/decrease buttons
- Mode button
- Fan mode (FAN)
- Heating mode (HEAT)
- Automatic mode (AUTO)
- LED display
Fan speed levels
| Level 1 | Low speed | | |
| Level 2 | - | | | |
| Level 3 | - | | | | |
| Level 4 | Medium speed | | | | | |
| Level 5 | - | | | | | | |
| Level 6 | - | | | | | | | |
| Level 7 | Maximum speed | | | | | | | | |
| Turbo | Turbo function | | | | | | | | | | TURBO |
| Auto | Automatic function | | | | | | | | | | AUTO |
Mode selection order:
Auto→Cooling→Dehumidification→Heating→Fan (some models do not feature the Heating mode).
2. Remote control indicator lights key
Fig. 4
- Automatic mode
- Cooling mode (COOL)
- Dehumidification mode (DRY)
- Heating mode (HEAT)
- Fan mode (FAN)
- Wi-Fi signal indicator light
- Time indicator light
- Temperature indicator light
- Turbo function
- Automatic fan speed
- Fan speed levels
-
MUTE function
-
Fan speed
- FOLLOW ME function
- Fresh air function
- Automatic oscillation (SWING)
- Child lock function
- SLEEP function
Remote control operation
Fig. 5
- Power button: press this button to switch on/off the appliance.
- Mode button: press this button to select the operation mode in the order below: Auto→Cooling→Dehumidification→Heating→Fan (some models do not feature the Heating mode).
- Increase/decrease buttons: press these buttons to increase or decrease the temperature in the Auto mode, Cooling and Dehumidification modes, and to increase or decrease the set timer hours.
- Fan speed button: press this button to adjust the fan speed. You can choose from 7 preset speeds in addition to the automatic speed.
- SWING function (oscillation) button: press this button to activate or deactivate the air direction flap. This function is compatible with all modes.
- SLEEP function button: press this button to activate this function. Once activated, the corresponding indicator light will flash 5 times and the brightness of the display will decrease by 50%. The SLEEP function is only compatible with the Cooling and Heating modes (if the model is equipped with the latter).
- Timer button: press this button to set the automatic switch-off time when the appliance is on, or to set the automatic switch-on time when the appliance is in standby mode. Press the increase/decrease buttons to set the desired on or off time. Each time you press one of the buttons, the time will increase or decrease by half an hour between 0 and 10 hours, and by one hour between 10 and 24 hours. Press and hold either button and the time will increase or decrease continuously.
- FOLLOW ME function button: press this button to activate or deactivate the function. The FOLLOW ME function can only be activated in Cooling and Heating modes using the remote control. When the air conditioner is in operation, press this button on the remote control to activate the FOLLOW ME function. The corresponding indicator light will light up both on the remote control and on the air conditioner's display. The selected operating mode does not change. This function allows the remote control to detect the temperature at your current location and send this signal to the air conditioner every 3 minutes to optimise the temperature around you and therefore ensure comfort.
-
LED display on/off button: press this button to switch on/off the appliance's LED display on the front panel.
-
Turbo function button: press this button to activate or deactivate the Turbo function. The internal fan of the air conditioner will run at the highest speed for 30 minutes. After this time, the fan speed will be reset to the previous setting. This function is only compatible with the Cooling mode.
- MY MODE function button: press this button to activate the MY MODE function. Once activated, the appliance will operate in Automatic mode (AUTO) and at a preset temperature of 26° C.
- MUTE function button: press this button to activate or deactivate the MUTE function. The indoor fan of the air conditioner will run at the lowest speed, reducing the sound level to a minimum for quieter operation. To deactivate this function, press any button and the fan speed will be reset to the previous setting.
- Self-cleaning function button: switch off the appliance and press this button to activate the self-cleaning function. Once activated, "SC" will appear on the display and the indoor fan will run at the lowest speed for 30 minutes.
- Child lock function button: press the fan speed and timer buttons on the remote control at the same time to activate or deactivate the child lock function.
Modes
Automatic mode (AUTO)
- Press the mode button to select the Automatic mode. Once selected, the corresponding indicator light will light up on the front panel display.
- Under the Automatic mode, the appliance will automatically select the most suitable settings or operating mode according to the room temperature.
- The Cooling mode is activated when the room temperature is above 27 °C. The preset temperature will be 24 °C, and the fan speed will be automatic.
- The Dehumidification mode is activated when the room temperature is between 24 and 27 °C, and the preset fan speed will be low.
- The Fan mode is activated when the room temperature is between 20 and 24 °C, and the preset fan speed will be medium.
- The Heating mode is activated when the room temperature is below 20 °C. The preset temperature will be 24 °C, and the fan speed will be automatic.
- During operation, you can adjust the fan speed. The next time you activate the Automatic mode, the fan speed will be reset to the default settings.
- The FOLLOW ME, MUTE and Self-cleaning functions are compatible with the Automatic mode.
Cooling (COOL) and Heating (HEAT) modes
- Press the mode button to select the Cooling or Heating mode. You can do this while the timer is running. Once selected, the corresponding indicator light will light up on the front panel display.
ENGLISH
- Set the desired temperature by pressing the increase and decrease buttons. The setting range is 16 to 30 °C. Each time you press the increase or decrease button, the temperature will go up or down by 1 °C.
- Press the fan speed button to select the desired speed, you can choose from a range of 7 speeds or the Turbo function.
- Press the SWING button to activate or deactivate the left-right oscillation function.
- Automatic fan speed: "Tr" represents the room temperature and "Ts" the set temperature.
- When Tr-Ts is equal to or above 3 °C, the fan shall operate at maximum speed.
- When Tr-Ts + 1 °C is less than or equal to + 3 °C, but not less than 1 °C, the fan shall operate at medium speed. When Tr-Ts is less than 1 °C, the fan shall operate at the lowest speed.
- You can change the fan speed from lower to higher without waiting, unlike from higher to lower (you will have to wait 3 minutes for it to be set).
Dehumidification mode (DRY)
- Press the mode button to select the Dehumidification mode. The corresponding indicator light will light up.
- The set temperature is the same as in Cooling mode.
- The fan speed cannot be adjusted in this mode.
- Press the SWING button to activate or deactivate the left-right oscillation function.
Fan mode (FAN)
- Press the mode button to select the Fan mode. The corresponding indicator light will light up.
- Press the speed button to select the desired fan speed. You can choose between 7 speeds.
- Press the SWING button to activate or deactivate the left-right oscillation function.
- Automatic speed in Fan mode: when Tr is higher than 27 °C, the fan will operate at maximum speed. When Tr is less than or equal to 27 °C, the fan will operate at medium speed. When Tr is less than or equal to 24 °C, the fan will operate at the lowest speed.
- The fan speed changes from lower to higher without waiting, unlike when it changes from higher to lower.
SLEEP function
- Press the SLEEP function button on the remote control to activate this function. The temperature will increase (Cooling mode) or decrease (Heating mode) by 1 °C per hour during the first 2 hours of operation. After this time, the air conditioner will maintain that temperature for 6 hours, and then it will automatically switch off. This means that the SLEEP function lasts for 8 hours and then the appliance switches off automatically. This function is only compatible with Cooling mode and Heating mode (if the model features Heating mode).
- If the fan was running at a high speed, activating this function will automatically decrease it to a medium speed. On the other hand, if the fan was already running at medium speed,
the speed will decrease by one level every half hour until it reaches the lowest speed. The air conditioner will maintain this speed until it automatically switches off after the preset time has elapsed.
Warning: to deactivate or cancel the SLEEP function automatically, press the Turbo, fan, or mode button.
Fresh air function
- Press the mode button on the remote control for 3 seconds to activate or deactivate the Fresh Air function.
- This function allows fresh air from outside to enter the room.
- Before activating the function, manually open the fresh air inlet cover on the right side of the air conditioner body as shown below:
Fig. 6 and fig. 7
4. CLEANING AND MAINTENANCE
Before cleaning or servicing the appliance, switch it off and unplug it from the mains socket.
1. Cleaning the housing
Use a soft, damp cloth to clean the outer surface. Do not use chemicals such as benzene, alcohol, or petrol. Failure to do so may damage the air conditioner housing or even damage the entire air conditioner.
2. Cleaning the filter
It is normal for dust to clog the filter. To ensure proper operation of the air conditioner, clean the filter every 2 weeks.
Fig. 8
- Press the grille tab by hand to open it, rotate the air inlet grille, and then remove the dust filter from inside the grille.
(Caution: the air inlet grille can only be opened by 7 or 8 degrees, do not exert too much force to avoid breaking it). - Immerse the filter in lukewarm water (approx. 40 °C) with neutral soap. Rinse it and allow it to dry in a cool, dry place before putting it back in place.
3. Tank emptying
When the full-tank indicator light lights up, the appliance will stop operating. When this happens, it will be necessary to drain the excess condensed water from the interior. To do this, remove the inner or outer drain hose.
Note: to empty the accumulated water through the drain hose, place a container underneath to prevent water from spilling onto the floor.
End-of-season maintenance:
- Remove the inner drain hose and drain the water into a container or pull out the outer drain hose directly to drain the water from the tank through the window.
- To allow the inside of the tube to dry out, let the air conditioner run in Fan mode at the lowest speed for a few hours or activate the self-cleaning function. In this way, the inside of the unit will dry out completely, which will help prevent the formation of mould and mildew.
- Switch off the appliance, unplug it from the socket, wind up the power cable and put the drain hose back in place.
- Remove the air conditioner from the window and remove the installation bracket.
- Put the appliance in a plastic bag and store it in a cool, dry place to prevent dust accumulation. Store it out of the reach of children.
- Remove the remote control batteries.
Note: make sure that the air conditioner is installed in a dry place and that all components are well protected.
5. TROUBLESHOOTING
Do not attempt to repair or disassemble the air conditioner yourself. Any unauthorised repair will void the product warranty, as well as jeopardise the safety of the user.
| Problem | Possible causes | Solutions |
| The appliance does not work | The appliance is not plugged in or there is no power supply. | Once plugged into the power socket, press the power button. |
| The full tank warning “FL” appears on the display. | Empty the tank. | |
| The room temperature is too low or too high. | It is recommended to place the appliance in a room with a room temperature between 7 and 35 °C. | |
| The room temperature is lower than the temperature selected in Cooling mode. | Change the selected temperature. | |
| The room temperature is too low to be able to select Dehumidification mode. | Place the appliance in a room with a room temperature above 17 °C. |
| Poor cooling | The appliance is exposed to direct sunlight. | Protect the appliance from sunlight. |
| Doors and windows are open, or the installation bracket is not well sealed, and there are too many people in the room or other sources of heat. | Close the door or window or seal the bracket tightly. | |
| The air filter is dirty. | Clean or replace the filter. | |
| The air inlet or outlet is blocked. | Perform maintenance on grilles. | |
| There is a strange noise | The appliance is not well installed. | Check that the air conditioner bracket and the air conditioner itself are correctly installed. |
| The compressor does not work | The overheating protection system has been activated. | Wait for 3 minutes until the temperature is lowered, and then restart the appliance. |
| The remote control does not work | The distance between the remote control and the appliance is too great. | Move the remote control closer to the air conditioner and make sure it is pointing directly at the receiver. |
| The remote control is not correctly oriented to the air conditioner receiver. | ||
| The batteries have run out. | Replace batteries. | |
| E1 | Indoor unit pipe temperature sensor failure. | Contact the official Cecotec Technical Support Service. |
| E2 | Room temperature sensor failure | Contact the official Cecotec Technical Support Service. |
| E4 | Leakage or failure of the cooling system due to low temperature. | Place the appliance in a room with a higher room temperature. |
| Contact the official Cecotec Technical Support Service. | ||
| E5 | Water pump failure. | Contact the official Cecotec Technical Support Service. |
| EF or EC | Motor fan failure. | Contact the official Cecotec Technical Support Service. |
Should you encounter any problems that are not listed above or if the recommended solution does not work, please contact the official Cecotec Technical Support Service.
6. TECHNICAL SPECIFICATIONS
Product reference: 09285
Product: WindowClima_9000_Inverter
Rated power: 220-240 V
Rated frequency: 50 Hz
Cooling capacity: 9000 Btu/h
Cooling input power: 810 W
Rated cooling input power (IEC/EN60335): 810 W
Cooling current: 3.8 A
Nominal cooling current (IEC/EN60335): 3.8 A
Max. allowable pressure: 3.8 MPa
Max. discharge pressure: 3.8 MPa
Max. suction pressure 1.8 MPa
Outdoor sound power level: 52 dB(A)
Weight: 26.5 kg
Refrigerant/Load/GWP: R290/TBA/3
| 09285 WindowClima 9000 Inverter | |||
| Function (indicate if available) | If function includes heating: Indicate the heating season the information relates to. Indicated values should relate to one heating season at a time. Include at least the heating season 'Average'. | ||
| Cooling | S | Medium(mandatory) | S |
| Heating | N | Warmer(if designated) | N |
| Colder(if designated) | N | ||
| Item | symbol | value | unit | Item | symbol | value | unit |
| Design load | Seasonal efficiency | ||||||
| cooling | Pdesignc | 2.7 | kW | cooling | SEER | 5.4 | - |
| heating/Average | Pdesignh | - | kW | heating/Average | SCOP/A | - | - |
| heating/Warmer | Pdesignh | - | kW | heating/Warmer | SCOP/W | - | - |
| heating/Colder | Pdesignh | - | kW | heating/Colder | SCOP/C | - | - |
| Declared capacity (*) for cooling, at indoor temperature 27(19) °C and outdoor temperature Tj | Declared energy efficiency ratio (*), at indoor temperature 27(19) °C and outdoor temperature Tj | ||||||
| Function (indicate if available) | If function includes heating: Indicate the heating season the information relates to. Indicated values should relate to one heating season at a time. Include at least the heating season 'Average'. | ||||||
| Cooling | S | Average (mandatory) | S | ||||
| Heating | N | Warmer (if available) | N | ||||
| Colder (if available) | N | ||||||
| Tj = 35 °C | Pdc | 2.72 | kW | Tj = 35 °C | EERd | 3.27 | - |
| Tj = 30 °C | Pdc | 1.95 | kW | Tj = 30 °C | EERd | 4.18 | - |
| Tj = 25 °C | Pdc | 1.33 | kW | Tj = 25 °C | EERd | 5.93 | - |
| Tj = 20 °C | Pdc | 1.14 | kW | Tj = 20 °C | EERd | 11.42 | - |
| Declared capacity (*) for heating/Warmer season, at indoor temperature 20 °C and outdoor temperature T | Declared coefficient of performance (*)/Average season, at indoor temperature 20 °C and outdoor temperature Tj | ||||||
| Tj = -7 °C | Pdh | - | kW | Tj = -7 °C | COPd | - | - |
| Tj = 2 °C | Pdh | - | kW | Tj = 2 °C | COPd | - | - |
| Tj = 7 °C | Pdh | - | kW | Tj = 7 °C | COPd | - | - |
| Tj = 12 °C | Pdh | - | kW | Tj = 12 °C | COPd | - | - |
| Tj = bivalent temperature | Pdh | - | kW | Tj = bivalent temperature | COPd | - | - |
| Tj = operating limit | Pdh | - | kW | Tj = operating limit | COPd | - | - |
| Declared capacity (*) for heating/Warmer season, at indoor temperature 20 °C and outdoor temperature T | Declared coefficient of performance (*)/ Warmer season, at indoor temperature 20 °C and outdoor temperature Tj | ||||||
| Tj = 2 °C | Pdh | - | kW | Tj = 2 °C | COPd | - | - |
| Tj = 7 °C | Pdh | - | kW | Tj = 7 °C | COPd | - | - |
| Tj = 12 °C | Pdh | - | kW | Tj = 12 °C | COPD | - | - |
| Tj = bivalent temperature | Pdh | - | kW | Tj = bivalent temperature | COPd | - | - |
| Tj = operating limit | Pdh | - | kW | Tj = operating limit | COPd | - | - |
| Declared capacity (*) for heating/Colder season, at indoor temperature 20 °C and outdoor temperature Tj | Declared coefficient of performance (*)/ Colder season, at indoor temperature 20 °C and outdoor temperature Tj | ||||||
| Tj = -7 °C | Pdh | - | kW | Tj = -7 °C | COPd | - | - |
| Tj = 2 °C | Pdh | - | kW | Tj = 2 °C | COPd | - | - |
| Tj = 7 °C | Pdh | - | kW | Tj = 7 °C | COPd | - | - |
| Tj = 12 °C | Pdh | - | kW | Tj = 12 °C | COPd | - | - |
| Tj = bivalent temperature | Pdh | - | kW | Tj = bivalent temperature | COPd | - | - |
| Tj = operating limit | Pdh | - | kW | Tj = operating limit | COPd | - | - |
| Tj = -15 °C | Pdh | - | kW | Tj = -15 °C | COPd | - | - |
| Bivalent temperature | Operating limit temperature | ||||||
| heating/Average | Tbiv | - | °C | heating/Average | Tol | - | °C |
| heating/Warmer | Tbiv | - | °C | heating/Warmer | Tol | - | °C |
| heating/Colder | Tbiv | - | °C | heating/Colder | Tol | - | °C |
| Cycling interval capacity | Cycling interval efficiency | ||||||
| for cooling | Pcycc | - | kW | for cooling | EERcyc | - | - |
| for heating | Pcych | - | kW | for heating | COPcyc | - | - |
| Degradation co-efficient cooling (**) | Cdc | 0,25 | - | Degradation co-efficient heating (**) | Cdh | - | - |
| Electric power input in power modes other than 'active mode' | Annual electricity consumption | ||||||
| off mode | POFF | - | kW | cooling | QCE | 175 | kWh/a |
| standby mode | PSB | 1.0 | kW | heating/Average | QHE | - | kWh/a |
| thermo-stat-off mode | PTO | 35.0 | kW | heating/Warmer | QHE | - | kWh/a |
| crankcase heater mode | PCK | - | kW | heating/Colder | QHE | - | kWh/a |
| Capacity control (indicate one of three options | Other items | ||||||
| Function (indicate if available) | If function includes heating: Indicate the heating season the information relates to. Indicated values should relate to one heating season at a time. Include at least the heating season 'Average'. | ||||||
| Cooling | S | Average (mandatory) | N | ||||
| Heating | - | Warmer (if available) | N | ||||
| Colder (if available) | N | ||||||
| Item | symbol | value | unit | Item | symbol | value | unit |
| fixed | N | Sound power level (indoor/outdoor) | LWA | 60/65 | dB (A) | ||
| staged | N | Global warming potential | GWP | 3 | kgCO2eq. | ||
| variable | S | Rated air flow (indoor/outdoor) | - | 400 | m3/h | ||
| Contact information | Cecotec Innovaciones, S.L.Av. Reyes Católicos, 60, 46910, Alfafar, Valencia (Spain) | ||||||
| (*) For staged capacity units, two values divided by a slash (‘/’) will be declared in each box in the section ‘Declared capacity of the unit’ and ‘declared EER/COP’ of the unit.(**) If default Cd = 0,25 is chosen then (results from) cycling tests are not required. Otherwise, either the heating or cooling cycling test value is required. | |||||||
Technical specifications may change without prior notification to improve product quality. Made in China | Designed in Spain
7. DISPOSAL OF OLD ELECTRICAL AND ELECTRONIC APPLIANCES

This symbol indicates that, according to the applicable regulations, the product and/or batteries must be disposed of separately from household waste. When this product reaches the end of its shelf life, you should dispose of the cells/batteries/accumulators and take them to a collection point designated by the local authorities.
Consumers must contact their local authorities or retailer for information concerning the correct disposal of old appliances and/or their batteries.
Compliance with the above guidelines will help protecting the environment.
8. TECHNICAL SUPPORT AND WARRANTY
Cecotec shall be liable to the end user or consumer for any lack of conformity that exists at the time of delivery of the product under the terms, conditions, and deadlines established by the applicable regulations.
It is recommended that repairs be carried out by qualified personnel.
If at any moment you detect any problem with your product or have any doubt, do not hesitate to contact the official Cecotec Technical Support Service at +34 963 210 728.
9. COPYRIGHT
The intellectual property rights over the texts in this manual belong to CECOTEC INNOVACIONES, S.L. All rights reserved. The contents of this publication may not, in whole or in part, be reproduced, stored in a retrieval system, transmitted, or distributed by any means (electronic, mechanical, photocopying, recording or similar) without the prior authorization of CECOTEC INNOVACIONES, S.L.
1. PIÈCES ET COMPOSANTS
Img. 1
1. Display airconditioning
Fig. 3
5. PROBLEEMOPLOSSING
Koelvloeistof/Lading/GWP: R290/TBA/3
Tryb wentylatora (FAN)
Fig./Img./Abb./Afb./Rys. 6

Fig./Img./Abb./Afb./Rys. 7
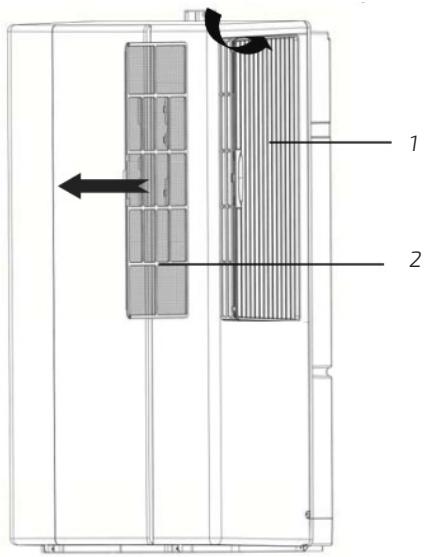
Fig./Img./Abb./Afb./ Rys. 8
www.cecotec.es
- ÍNDICE
- SOMMAIRE
- INSTRUCTIONS ON BATTERIES
- INSTRUCTIONS DE SÉCURITÉ
- FIG. 2
- NOTE
- BEFORE USE
- BOX CONTENT
- OPERATION
- DISPLAY INDICATOR LIGHTS
- REMOTE CONTROL INDICATOR LIGHTS KEY
- REMOTE CONTROL OPERATION
- MODES
- AUTOMATIC MODE (AUTO)
- COOLING (COOL) AND HEATING (HEAT) MODES
- ENGLISH
- DEHUMIDIFICATION MODE (DRY)
- FAN MODE (FAN)
- SLEEP FUNCTION
- FRESH AIR FUNCTION
- CLEANING AND MAINTENANCE
- CLEANING THE HOUSING
- CLEANING THE FILTER
- TANK EMPTYING
- END-OF-SEASON MAINTENANCE
- TROUBLESHOOTING
- TECHNICAL SPECIFICATIONS
- DISPOSAL OF OLD ELECTRICAL AND ELECTRONIC APPLIANCES
- TECHNICAL SUPPORT AND WARRANTY
- COPYRIGHT
- PIÈCES ET COMPOSANTS
- DISPLAY AIRCONDITIONING
- FIG. 3
- PROBLEEMOPLOSSING
- TRYB WENTYLATORA (FAN)
Brand : CECOTEC
Model : Windowclima 9000 Inverter
Category : Washing machine