B6250N - Laser printer OKI - Free user manual and instructions
Find the device manual for free B6250N OKI in PDF.

| Product type | Monochrome laser printer |
| Brand | OKI |
| Model | B6250N |
| Weight | 22.6 kg (50 lb) |
| Power supply | 110 V or 220-240 V (depending on configuration) |
| Standard paper tray capacity | 550 sheets (tray 2) + 150 sheets (tray 1) |
| Output tray capacity | Center output tray and rear face-up tray |
| Toner cartridge | Approximately 6000 pages at 5% coverage |
| Connectivity | Parallel, USB, serial, network (RJ-45) |
| Main functions | Manual duplex printing (optional duplex unit), management via control panel |
| Operating temperature | 10 to 32 °C (50 to 89 °F) |
| Operating humidity | 15 to 85% without condensation |
| Ventilation | Vents on side and rear panels; minimum distance from wall: 255 mm rear, 200 mm left, 300 mm right |
| Handling | Must be lifted by two people, gripping the recessed areas |
| Safety | Do not expose toner cartridge to open flame; use cold water if contact with toner |
| Network configuration | IP address configurable via Web page or Telnet; built-in Web interface |
| Driver installation | CD-ROM included; drivers for Windows and Mac; USB connection after driver installation |
| Optional accessories | Second paper tray, duplex unit, hard disk, Offset output tray |
| Maintenance | Replace toner cartridge; clean with dry cloth; do not touch the drum |
| Repairability | Spare parts available via authorized dealer; maintenance procedures in reference guide |
Frequently Asked Questions - B6250N OKI
User questions about B6250N OKI
0 question about this device. Answer the ones you know or ask your own.
Ask a new question about this device
Download the instructions for your Laser printer in PDF format for free! Find your manual B6250N - OKI and take your electronic device back in hand. On this page are published all the documents necessary for the use of your device. B6250N by OKI.
USER MANUAL B6250N OKI
Checking the package contents
Check that all items listed below are included in the printer packaging. If any items are missing or damaged, contact your dealer.
NOTE
Retain the packaging material and box for future use if there is a possibility that the printer will be moved over long distances.
- Printer
- Drum-toner cartridge (for approximately 6,000 Letter pages at 5% coverage, i.e. 5% of the addressable print area is printed)
250-sheet Paper Tray
Face Up (Rear) Tray
Power cord - Unpacking instructions and Quick Setup Guide
Safety and Warranty Booklet
CD-ROM - The CD-ROM contains printer drivers, software and documentation designed to help you fully utilize your new printer. Oki has provided an interface, under MS Windows, to assist you in selecting the appropriate document or application.
Installation and relocation procedure
The following sections guide you through the process of installing and setting up your printer right through to making a test print from an application. Complete the entire installation procedure to ensure a proper installation.
Safety precautions
This printer is available in either of the following power specifications: 110V or 220 - 240V. The specifications that apply to your printer depend on your configuration. To prevent fire or shock hazards, connect the power plug only to a properly rated power outlet.
Handling the printer
The printer is very heavy and should always be lifted by two people. The printer with consumables weighs
22.6kg (50lb). Never attempt to lift the printer alone.
- To lift the printer, have two individuals facing each other from the front and rear of the printer grasp the recessed areas on each side of the printer. Do not lift the printer by grasping any area other than these recessed areas.
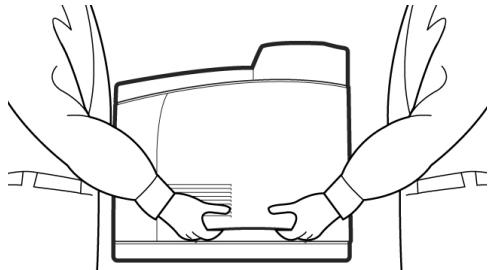
- When lifting the printer, maintain proper lifting posture to prevent injuries.
- Other safety information is contained in the Safety, Warranty and Regulatory Information booklet supplied with this product and should be read prior to setting up the printer.
Locating parts of the printer
The main parts of the printer and a brief description of their functions are shown below:
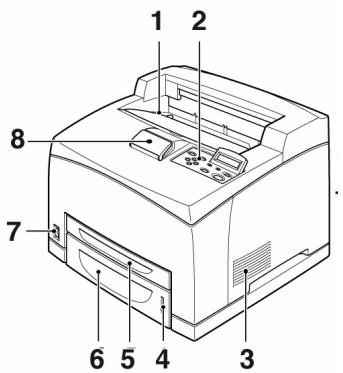
1 Center output tray
Print jobs are output here with printed side facing down.
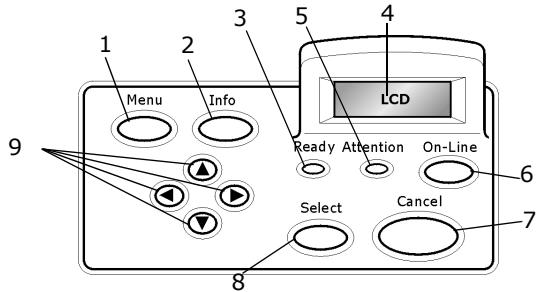
2 Control panel
Consists of the control buttons, indicators and display.
For control panel details, refer to "The Control Panel and Menu system" on page 8.
3 Ventilation slots
Provide ventilation for the interior of the printer.
4 Paper level indicator
Indicates the level of the remaining paper in the 550-sheet paper tray.
5 Tray 1
Holds 150 sheets of paper.
6 Tray 2
Holds 550 sheets of paper.
7 Power switch
Switches the printer power on and off.
8 Extension output tray
Pull this tray out to print on paper larger than Letter.
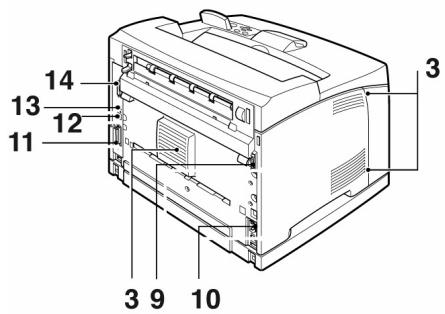
9 Duplex unit connector
For connecting the duplex unit (option).
10 Power cord connector
For connecting the power cord.
11 Parallel connector
For connecting a parallel cable.
12 Network connector
For connecting the network cable when using the printer as a network printer. (The Network Software Kit option needs to have been installed to enable networking capability.)
13 USB connector
For connecting a USB cable.
14 Serial connector
For connecting a serial cable.
Preparing a location for the printer
Place the machine on a level and sturdy surface that can withstand the machine weight, 22.6kg (50lb). If tilted, the machine may fall over and cause injuries.
Space requirements
The printer has ventilation holes on the side and rear panels. Ensure that the printer is installed with a minimum clearance of 255mm (10in) from the rear vent to any wall, 200mm (8in) from the left vent to any wall, and 300mm (12in) from the right vent to any wall. A poorly ventilated machine can cause excessive internal heat and fire. The following diagram shows the minimum clearances required for normal operation, consumables replacement, and maintenance to ensure your machine operates at peak performance.

Environment
Ensure that the installation location meets the following conditions:
- Do not place the printer in a hot, humid, dusty or poorly ventilated environment. Prolonged exposure to such adverse conditions can result in fire or electric shock.
- Temperature range 10 - 32^ C (50 - 89°F), humidity range 15 - 85% (no condensation). Humidity should be 70% or below at 32^ C (89°F), and temperature should be 28^ C (82°F) or below at 85% humidity.
NOTE
Sudden temperature fluctuations can affect print quality. Rapid heating of a cold room or moving the printer from a location with low humidity/temperature to high humidity/temperature can cause condensation inside the printer, directly interfering with image transfer. When condensation occurs, leave the printer for at least 1 hour to acclimate to the environment before using it.
- Do not expose the printer to direct sunlight.
- Do not expose the printer to the direct draft of air-conditioning or heating.
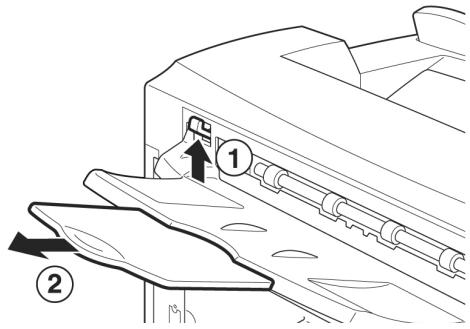
Installing the Face Up (Rear) Tray
- Insert the right and left tabs of the face up (rear) tray into the holes at the back of the printer (1), and lower the tray into position (2).
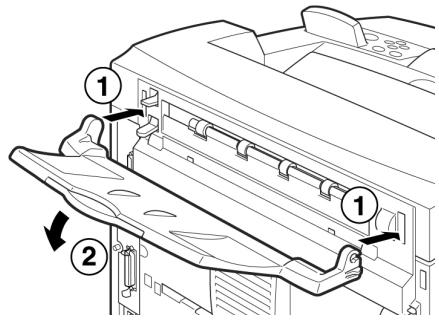
- Push up the rear output tray lever as shown in the diagram (1) and pull out the extension tray (2).
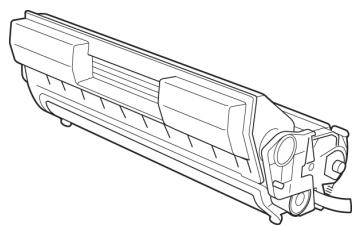
Installing the Drum-Toner Cartridge
NOTE
Your printer is supplied with a drum-toner cartridge with an approximate capacity of 6,000 Letter pages at 5% coverage. Replacement drum-toner cartridges are available with approximate capacities of 6,000 pages or 10,000 pages.
When handling the drum-toner cartridge, take note of the following points:
WARNING!
Never throw a drum-toner cartridge into an open flame as it can cause an explosion.
- Do not subject the drum-toner cartridge to direct sunlight or strong light.
- When installing the drum-toner cartridge, select a location not subject to strong light and try to finish the installation within 5 minutes.
- Do not touch the surface of the photosensitive drum. Do not let the drum-toner cartridge stand upside down or place it upside down as this may damage the drum.
- A drum shutter protects the photosensitive drum from light. Do not open the drum shutter.
Although the toner is not harmful to the body, wash it off immediately with cold water if your hands or clothes are in contact with it.
It is recommended to use up the drum-toner cartridge within one year of removing it from its packaging. - Keep the drum-toner cartridge out of the reach of children.
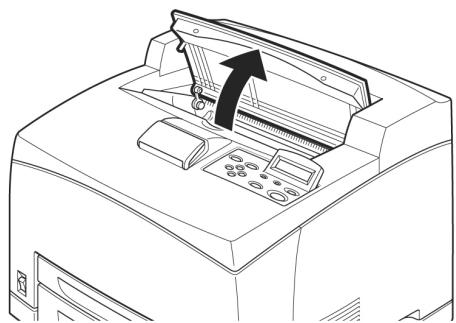
1. Open the cover.
NOTE
When the optional offset catch tray is installed, fold the tray first before opening the cover.
WARNING!
Do not touch any parts inside the printer.
- Take the drum-toner cartridge out of the packaging box and shake it seven or eight times as shown in the diagram.
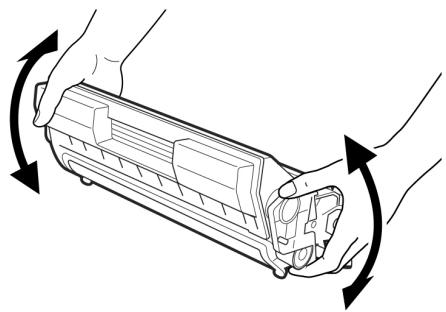
- Place the drum-toner cartridge on a flat surface and pull out the seal horizontally.
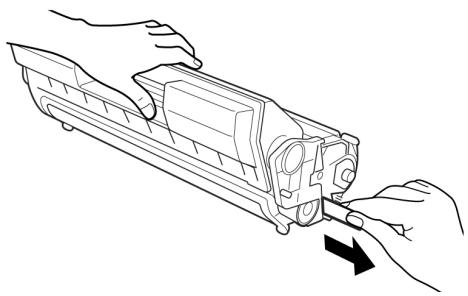
CAUTION!
When pulling out the seal, pull it out horizontally. The tape might break if it is pulled out diagonally.
After the seal has been pulled out, do not shake or bump the drum-toner cartridge.
- Hold the drum-toner cartridge by the grip and insert it into the slot inside the printer.
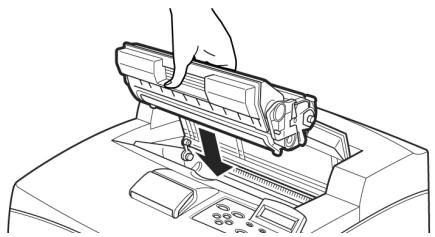
CAUTION!
Do not touch any parts inside the printer. Ensure that the drum-toner cartridge is firmly located.
- Close the cover securely.
NOTE
If the offset catch tray is folded as in Step 1, close the cover and then return the tray to its original position.
Cables
Connecting an interface cable
Connect the interface cable to be used to the printer.
NOTE
Connect a USB cable only after the printer driver has been installed on the computer.
- Connect the interface cable to the interface connector at the back of the printer: serial (1), USB (2), network (3), parallel (4).
For a parallel cable, lift up the wire clip on both sides to secure it after it has been inserted into the connector.
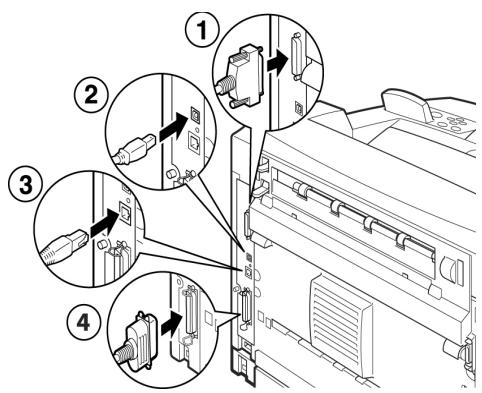
- For Parallel, USB, or Serial cables, connect the other end of the cable to the interface connector of the computer.
Connecting the power cord
When connecting the power cord, take heed of the information given in "Safety precautions" on page 3.
- Ensure that the printer power switch is in the <O> position.
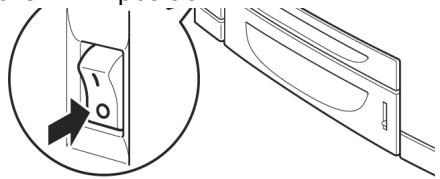
- Connect the power cord to the power cord connector at the back of the printer. Connect the other end of the power cord to the power outlet.
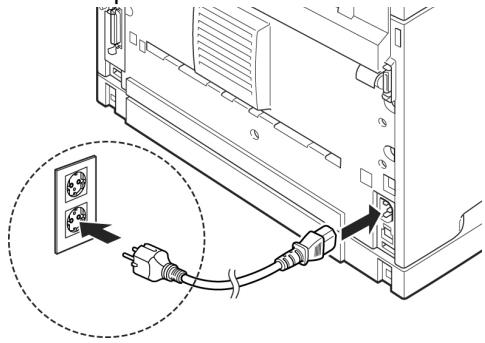
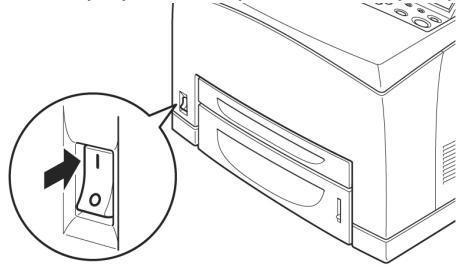
- Press the power switch of the printer to the < > position.
The power will be applied and the control panel will display that the printer is ready to print.
NOTE
If "Found New Hardware" displays on your screen, click Cancel.
Depending on the network environment used, it may take some minutes before the printer is ready for printing.
If the message that the printer is ready to print but is unable to retrieve an IP Address is displayed, continue operating as normal.
Loading paper
This section explains how to load Letter size plain paper in portrait orientation in the paper tray.
Portrait
orientation

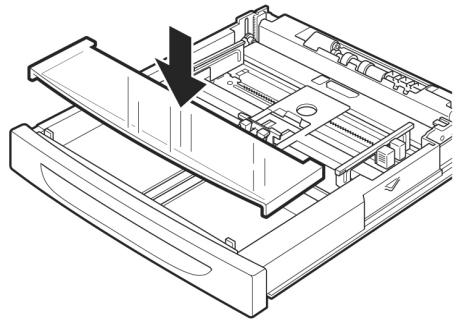
- Place the paper tray on a flat surface and remove the lid.
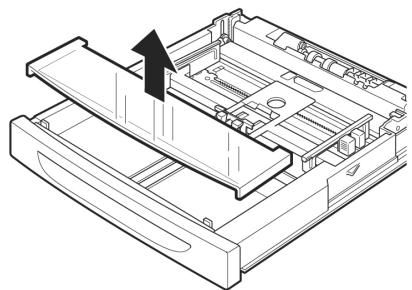
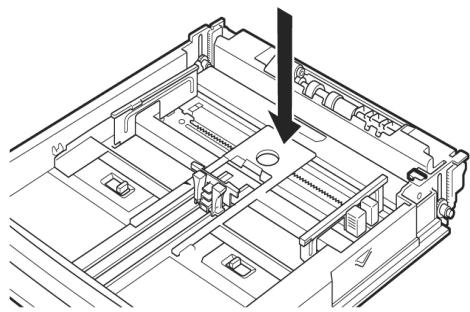
- If the base plate of the paper tray is raised, push it down.
- Squeeze the length guide and slide it to the desired paper size (1). Squeeze the right width guide and slide it to the desired paper size (2).
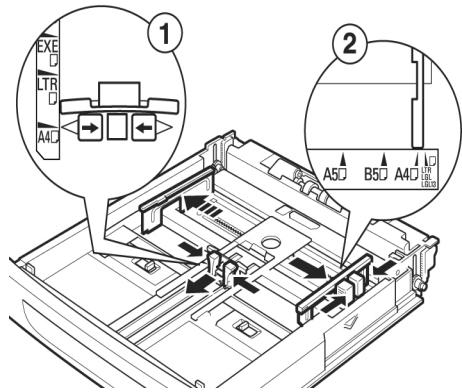
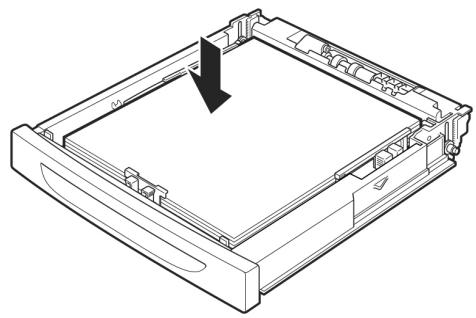
- Load the paper with the side to be printed facing up and with all four corners aligned.
CAUTION!
Do not place paper over the right width guide. Do not load paper exceeding the maximum fill line or the maximum capacity allowed. Align the right width guide with the paper width correctly. If the right width guide is not in place, the paper will not be properly fed and this may cause paper jams.
- Close the lid of the paper tray and push the tray completely into the printer.
CAUTION!
The lid of the tray must be firmly closed. If not, the paper may become misaligned.
- Depending on the types and sizes of the loaded paper, you need to configure settings on the control panel. Change the paper type when non-plain paper such as recycled paper, heavyweight paper or transparencies is loaded. Configure the paper size when custom size paper is loaded.
The Control Panel and Menu system
For full details on the control panel and menu structure, refer to the User's Guide.
The control panel components and their functions are described below:
1
Orientation portrait

Orientation vertical