Freego Washvacuum X Treme - Vacuum Cleaner CECOTEC - Free user manual and instructions
Find the device manual for free Freego Washvacuum X Treme CECOTEC in PDF.


| Brand | Cecotec |
| Model | Freego Washvacuum X Treme |
| Product type | Cordless stick vacuum with washing function |
| Dimensions (L × W × H) | 25 × 22 × 110 cm |
| Weight | 2.8 kg |
| Power source | Integrated 2200 mAh lithium-ion battery |
| Nominal voltage | 22.2 V |
| Runtime | Up to 25 minutes |
| Charging time | Approximately 4 hours |
| Clean water tank | 400 ml |
| Dirty water tank | 250 ml |
| Dust container | 600 ml |
| Filtration system | Cyclonic with high-efficiency HEPA filter |
| Main functions | Simultaneous vacuuming, washing and drying of floors |
| Operating modes | Eco, Normal and Turbo |
| Brush | Motorized brush with self-cleaning roller |
| Noise level | ≤ 80 dB(A) |
| LED lighting | Yes, on the brush for dark areas |
| Display | LED screen with battery and maintenance indicator |
| Safety | Overheat protection and automatic shut-off |
| Maintenance | Washing the tanks and roller with clean water |
| Spare parts | HEPA filter, roller, tanks available |
| Repairability | Modular design for easy parts replacement |
| Warranty | 2 years |
Frequently Asked Questions - Freego Washvacuum X Treme CECOTEC
User questions about Freego Washvacuum X Treme CECOTEC
0 question about this device. Answer the ones you know or ask your own.
Ask a new question about this device
Download the instructions for your Vacuum Cleaner in PDF format for free! Find your manual Freego Washvacuum X Treme - CECOTEC and take your electronic device back in hand. On this page are published all the documents necessary for the use of your device. Freego Washvacuum X Treme by CECOTEC.
USER MANUAL Freego Washvacuum X Treme CECOTEC
Safety instructions 8
-
Parts and components 39
-
Before use 39
-
Product installation 40
-
Operation 41
-
Cleaning and maintenance 42
-
Troubleshooting 43
-
Technical specifications 44
-
Disposal of old electrical and electronic appliances 44
-
Technical support and warranty 44
-
Copyright 45
SOMMAIRE
Read these instructions thoroughly before using the product. Keep this instruction manual for future reference or new users.
- Make sure that the mains voltage matches the voltage stated on the rating label of the appliance and that the wall outlet is earthed.
- Avoid operating the appliance under extremely high or low temperatures.
- This appliance is designed for domestic use only and is not intended for bars, restaurants, farmhouses, hotels, motels, and offices.
- Check the power cord regularly for visible damage. If the cord is damaged, it must be repaired by the official Cecotec Technical Support Service to avoid any type of danger.
- Keep the cord away from heat sources. Do not place the cord in gaps under doors or over sharp edges. Keep cables away from movement areas and from places where they may obstruct passage.
- If the appliance does not work as described in this manual, has suffered a major impact, falls from a height, is damaged, or falls into water, do not use it and contact Cecotec's Technical Support Service immediately.
- Stop using the appliance if you sense an abnormal sound or a temperature higher than usual.
- Do not try to repair the appliance by yourself. Contact the official Cecotec Technical Support Service for advice.
- Do not use any accessory that is not recommended by Cecotec, as this may cause damage to the appliance.
-
Do not place the appliance near heat sources, flammable substances, or surfaces where it can fall or be thrown into water from. Do not use outdoors.
-
Keep the packaging materials out of the reach of children, they could be dangerous.
- Turn off and unplug the appliance from the mains socket when it is not going to be used for a long period of time, before cleaning or repairing, before attaching components, and before removing the battery. Pull from the plug, not the cord, to disconnect it from the outlet.
- Do not immerse the cord, plug, or any other part of the appliance in water or any other liquid or expose electrical connections to water. Make sure your hands are dry before handling the plug or switching on the appliance.
- Do not use the appliance to vacuum flammable or explosive liquids such as gasoline or use it where such liquids or vapours may be present.
- Do not use the appliance to pick up burning or smouldering objects such as cigarette butts, matches, or hot ashes.
- WARNING: the appliance has rotating parts which may pose a risk of entrapment. Exercise extreme caution.
- Non-rechargeable batteries should not be recharged.
- This appliance can be used by children aged 8 and above, and persons with reduced physical, sensory, or mental capabilities or lack of experience and knowledge, as long as they have been given supervision or instruction concerning the use of the appliance in a safe way and understand the hazards involved. Children must not play with the appliance. Cleaning and maintenance must not be performed by unsupervised children.
- Supervise children to prevent them from playing with the appliance. Close supervision is necessary if the appliance is used by or near children.
Battery instructions
- The appliance contains a battery that should only be replaced by qualified personnel.
- Do not burn or expose the battery to high temperatures, as it may explode.
- Batteries may leak under extreme conditions. Should that be the case, do not touch the liquid. If the liquid gets into contact with skin, wash immediately with soap and water. If the liquid gets into the eyes, wash them immediately with clean water for a minimum of 10 minutes and seek medical attention. Wear gloves to handle the battery and dispose of it immediately in accordance with local regulations.
- Never modify the charger in any way.
- WARNING: to recharge the battery, use only the power supply provided with the device, with reference EBS024F-2601000BG.
INSTRUCTIONS DE SÉCURITÉ
- Mode selector
- Power button
- Auto-clean button
- Handle tube
- Display
- Water-tank release tab
- Water tank
- Waste-water tank release tab
- Waste-water tank
- Brush-cover release tab
- Wheels
- Brush cover
- Brush release wheel
- Brush
NOTE:
The graphics in this manual are schematic representations and may not exactly match the product.
2. BEFORE USE
- This appliance is packaged in a way as to protect it during transport. Take the appliance out of its box and remove all packaging materials. You can keep the original box and other packaging elements in a safe place. This will help you prevent product damage when transporting it in the future. In case the original packaging is disposed of, make sure all packaging materials are recycled accordingly.
- Make sure all parts and components are included and in good conditions. If there is any piece missing or in bad conditions, contact the official Cecotec Technical Support Service immediately.
Box content
- FreeGo Wash&Vacuum electric mop
- Charging base with auto-clean function
- Battery charger
- Instruction manual
ENGLISH
3. PRODUCT INSTALLATION
Installing the handle and body
- Insert the end of the handle into the hole at the top of the appliance's body, perpendicular to the direction of the appliance, as shown in figure 2. Once you hear a click, make sure the handle is fixed in place to ensure it was correctly installed.
- If you wish to remove the handle from the body, press the release hole with a thin object while pulling the handle from the body as shown in Figure 3.
Assembling and disassembling the water tank and the waste-water tank. Fig. 4
- To remove the water tank or waste-water tank, hold the body of the appliance with one hand, hold the handle of the tank to be removed with the other hand, and press the water-tank release tab with your thumb to remove the tank.
- To re-install it, first place the bottom of the tank to be installed against the edge of the tank bracket and press the tank into position. You will hear it click into place if correctly installed.
Filling up the water tank. Fig. 5
- Remove the water tank as explained in the previous section.
- Place the tank horizontally, open the cap, and pour clean water up to the marked line.
- Make sure the tank is tightly closed to avoid leakage.
- Install the water tank on the appliance's body as explained in the previous section. You will hear it click into place if done properly.
Warning
- This appliance is designed to work with water, but you can also add non-foaming soap. You can use either distilled water or tap water. Please note that the latter may lead to limescale deposits, which in turn can clog the appliance.
- -The maximum filling capacity of the water tank is 700 ml. Do not exceed the marked line when filling.
Installing and removing the rotary brush cover and brush. Fig. 6
- To remove the rotary brush cover, press the release tab and pull the cover upwards as shown in Figure 6. To reattach it, align the clips at both ends of the cover, then press the assembly together until it clicks into position.
- To remove the rotary brush, turn the wheel to the right of the electric mop head by 90 degrees and pull the entire rotary brush assembly outwards to remove it. To re-install it, follow the reverse procedure.
Please note
To remove the rotary brush, we recommend that you first remove the cover.
4. OPERATION
Fig. 7
- Dry mode
- Battery indicator
- Eco mode
- Max mode
- Waste-water tank warning
- Blocked brush
- Water tank warning
- LED indicator
- Auto-clean mode
Using the electric mop
- Press the power button to turn the appliance on. The appliance will work on Eco Mode by default.
- Press the mode selector button to switch between the three operating modes.
- Press the power button to switch off the appliance.
Note
- Pressing the power button or putting the electric mop in parking position (on the base) automatically activates Max mode for about 3 seconds before switching off to facilitate the absorption of any possible liquid in the circuit.
- Do not vacuum liquid soap with the appliance or add excessively soapy cleaning solutions to the water tank.
- It's recommended to use a high power level in presence of a lot of dirt or liquids on the floor.
Charging the appliance.
Place the appliance on the charging base so as to insert it in the base connector. The display will show the current charge % and the light indicator will stay red.
When using the electric mop for the first time, the battery may not be fully charged. Completely charge the battery before first use.
Auto-clean function. Fig .8
- Make sure the water tank is filled. If not, fill it up.
- Place the appliance on the self-cleaning base.
- Press the auto-clean button to start auto-clean.
- After the auto-clean cycle, the appliance will switch off automatically.
- Remove, empty, and clean the clean water and waste-water tank after each auto-clean cycle.
ENGLISH
Please note
- Before and after using the auto-clean function, empty the waste-water tank.
- If the dirty waste-water tank is filled up during the auto-clean process, you will be prompted, and auto-clean will stop automatically.
- This mode is designed to prevent the wet rotary brush from producing bacteria or unpleasant odours.
5. CLEANING AND MAINTENANCE
- Make sure the appliance is not plugged to a mains socket before cleaning it or carrying out maintenance on it.
- Make sure the charging base is not plugged to a power outlet before cleaning it
Cleaning the waste-water tank. Fig. 9.1, 9.2, and 9.3
When the waste-water tank is full, the light indicator will flash, and the appliance will switch off. When this happens:
- Once switched off, remove the tank as described in section "3.Product installation" and empty it. Fig. 9.1
- Pull the filter out of the filter housing to remove it from the waste-water tank as shown in Figure 9.2.
- Rinse the waste-water tank, filter grille, and filter with clean water. Fig. 9.3
- After cleaning it, re-install the waste-water tank in the appliance. You can then resume use.
Note:
After each use, it is recommended to clean the waste-water tank immediately.
If the water-level detection sensor is dirty, it can be cleaned with a cloth or rinsed with water and then wiped with a cloth.
Cleaning the floor brush assembly
- Remove the rotary brush cover and the rotary brush as described in section "3.Product installation".
- Use a dry cloth to clean the rotary brush area.
- Clean the cover and the rotary brush with water.
- After rinsing, place the rotary brush and cover back in position as described in section "3.product installation".
Tips
When storing the appliance, make sure it is clean and dry by drying the tanks, filtering system, and rotary brush in a well-ventilated place. This will prevent unpleasant odours caused by bacteria and dampness.
Maintenance and storage
- Clean the waste-water tank, filters, rotary brush, and its cover after each use.
- When the waste-water tank fills up during operation, empty it immediately so that it does not affect the correct operation of the appliance.
- It is recommended to replace the filter after 30-50 hours of use (depending on how it is used).
- If the appliance is not going to be used for a long period of time, it is recommended to store it as described above, in a cool and dry place. Do not store it under direct sunlight or in damp places.
6. TROUBLESHOOTING
| Problem | Possible causes | Possible solutions |
| The appliance does not work. | 1. Appliance not charged or insufficient voltage.2. You did not press the power button.3. The rotary brush is blocked. | 1. Charge the appliance.2. Press the power button.3. Clean the base and rotary brush. |
| Lower suction force. | 1. The dirt inside the waste-water tank has reached the maximum capacity.2. Rotary brush cover or waste-water tank not properly installed.3. There is tangled hair in the rotary brush.4. Not enough battery. | 1. Clean the waste-water tank.2. Correctly install the brush and cover.3. Clean the rotary brush.4. Charge the appliance before turning it back on. |
| The appliance makes strange noises. | 1. Suction port is blocked. | 1. Check and clean the air inlet and outlet. |
| The appliance moistens the roller. | 1. No water in the water tank.2. The water tank is not properly assembled | 1. Add water to tank.2. Install the water tank correctly. |
ENGLISH
7. TECHNICAL SPECIFICATIONS
Product reference: 05863/04548/04549/04550/04551
Product: FreeGo Wash&Vacuum /X/ S/ T/ M
Rated power: 150 W
Adapter:100-240 V,50-60 Hz 1A
Battery capacity: 3000 mAh
Charging time: approximately 3-4 hours.
Water tank: 700 ml
Waste-water tank: 700 ml
Technical specifications may change without prior notification to improve product quality.
Made in China | Designed in Spain
8. DISPOSAL OF OLD ELECTRICAL AND ELECTRONIC APPLIANCES
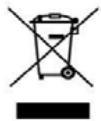

This symbol indicates that, according to the applicable regulations, the product and/or batteries must be disposed of separately from household waste. When this product reaches the end of its shelf life, you should dispose of the cells/batteries/accumulators and take them to a collection point designated by the local authorities.
For detailed information on the most appropriate way to dispose of electrical and electronic equipment and/or batteries, consumers should contact their local authorities.
Compliance with the above guidelines will help protecting the environment.
9. TECHNICAL SUPPORT AND WARRANTY
Cecotec shall be liable to the end user or consumer for any lack of conformity that exists at the time of delivery of the product under the terms, conditions, and deadlines established by the applicable regulations.
It is recommended that repairs be carried out by qualified personnel.
If at any moment you detect any problem with your product or have any doubt, do not hesitate to contact the official Cecotec Technical Support Service at +34 963 210 728.
10. COPYRIGHT
The intellectual property rights over the texts in this manual belong to CECOTEC INNOVACIONES, S.L. All rights reserved. The contents of this publication may not, in whole or in part, be reproduced, stored in a retrieval system, transmitted, or distributed by any means (electronic, mechanical, photocopying, recording or similar) without the prior authorization of CECOTEC INNOVACIONES, S.L.
FRANÇAIS
1. PIÈCES ET COMPOSANTS
Img. 1.
3. INSTALLATION DU PRODUIT
6. PROBLEEMOPLOSSING
3. INSTALACE PRODUKTU
Fig./Img./Abb./Afb./Rys./Obr. 2

Fig./Img./Abb./Afb./Rys./Obr. 3


Fig./Img./Abb./Afb./Rys./Obr. 4
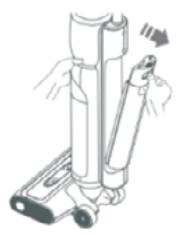


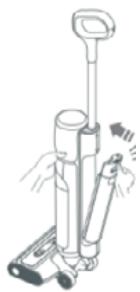
Fig./Img./Abb./Afb./Rys./Obr. 5

Fig./Img./Abb./Afb./Rys./Obr. 6

Fig./Img./Abb./Afb./ Rys./Obr. 7

Fig./Img./Abb./Afb./Rys./Obr. 8
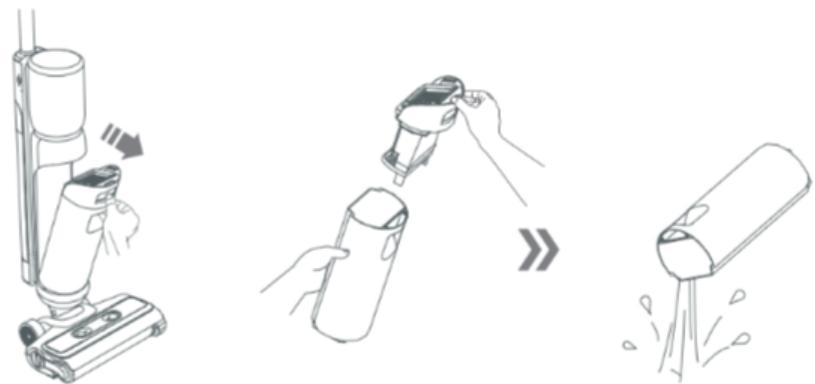
Fig./Img./Abb./Afb./Rys./Obr. 9.1

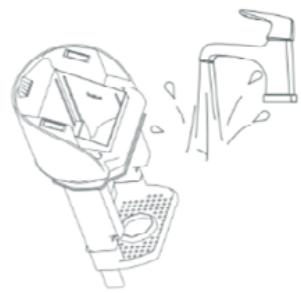
Fig./Img./Abb./Afb./ Rys./Obr. 9.2

Fig./Img./Abb./Afb./ Rys./Obr. 9.3
www.cecotec.es
Quart de Poblet, Valencia (Spain)
YV012220426
- SOMMAIRE
- BATTERY INSTRUCTIONS
- INSTRUCTIONS DE SÉCURITÉ
- NOTE
- BEFORE USE
- BOX CONTENT
- ENGLISH
- PRODUCT INSTALLATION
- INSTALLING THE HANDLE AND BODY
- ASSEMBLING AND DISASSEMBLING THE WATER TANK AND THE WASTE-WATER TANK. FIG. 4
- FILLING UP THE WATER TANK. FIG. 5
- WARNING
- INSTALLING AND REMOVING THE ROTARY BRUSH COVER AND BRUSH. FIG. 6
- PLEASE NOTE
- OPERATION
- FIG. 7
- USING THE ELECTRIC MOP
- CHARGING THE APPLIANCE
- AUTO-CLEAN FUNCTION. FIG .8
- CLEANING AND MAINTENANCE
- CLEANING THE WASTE-WATER TANK. FIG. 9.1, 9.2, AND 9.3
- CLEANING THE FLOOR BRUSH ASSEMBLY
- TIPS
- MAINTENANCE AND STORAGE
- TROUBLESHOOTING
- TECHNICAL SPECIFICATIONS
- DISPOSAL OF OLD ELECTRICAL AND ELECTRONIC APPLIANCES
- TECHNICAL SUPPORT AND WARRANTY
- COPYRIGHT
- FRANÇAIS
- PIÈCES ET COMPOSANTS
- IMG. 1
- INSTALLATION DU PRODUIT
- PROBLEEMOPLOSSING
- INSTALACE PRODUKTU
Brand : CECOTEC
Model : Freego Washvacuum X Treme
Category : Vacuum Cleaner