
IPD-5100 - Bluetooth Speakers LENCO - Free user manual and instructions
Find the device manual for free IPD-5100 LENCO in PDF.


| Product type | Portable radio with iPod docking station |
| Brand | LENCO |
| Model | IPD-5100 |
| Dimensions (W × H × D) | 352 × 176 × 178 mm |
| Weight | 1453 g |
| Mains power supply | AC adapter 230 V ~ 50 Hz, DC output 12 V 1500 mA |
| Clock backup batteries | 2 AAA batteries (UM-4) 3 V DC (not included) |
| Main batteries | 8 C batteries (UM-2) 12 V DC (not included) |
| Speaker power | 5 W + 5 W (max.) |
| Power consumption | 1 W standby, 23 W maximum |
| FM reception range | 87.5 - 108 MHz (depending on broadcasting system) |
| Number of radio presets | 20 FM stations |
| Clock formats | 12 h / 24 h |
| Audio sources | iPod (dock), FM Radio, AUX (3.5 mm line input) |
| Alarm function | Buzzer, iPod or Radio with snooze |
| Sleep timer | 15, 30, 45, 60, 90 or 120 minutes |
| Preset equalizers | Classical, Jazz, Rock, Pop |
| Display | Backlit LCD display (3 levels) |
| iPod compatibility | iPod, iPod mini, iPod nano, iPod touch, iPod classic, iPod shuffle |
| Operating temperature | -10 °C to +45 °C, humidity ≤ 70% |
| Cleaning | Damp cloth, without solvents or detergents |
| Recycling | Do not dispose of with household waste, take to a collection point |
Frequently Asked Questions - IPD-5100 LENCO
User questions about IPD-5100 LENCO
0 question about this device. Answer the ones you know or ask your own.
Ask a new question about this device
Download the instructions for your Bluetooth Speakers in PDF format for free! Find your manual IPD-5100 - LENCO and take your electronic device back in hand. On this page are published all the documents necessary for the use of your device. IPD-5100 by LENCO.
USER MANUAL IPD-5100 LENCO
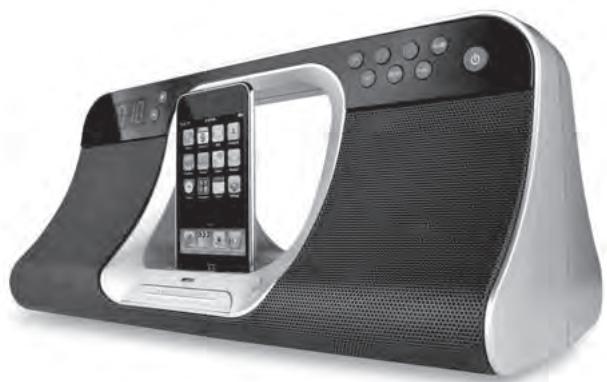
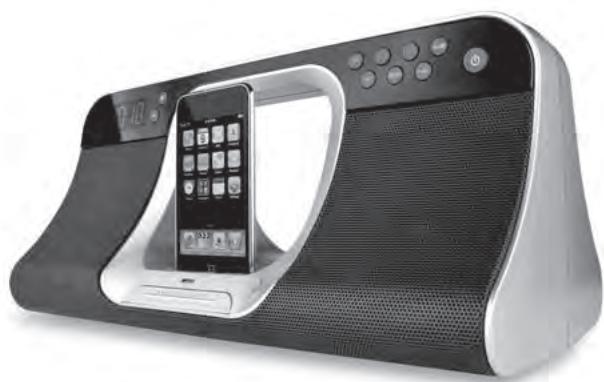
PORTABLE RADIO WITH iPod DOCKING
IPD-5100
For information and support www.lenco.eu
Table of content
Important Safety Instructions. 3
Features. 4
Installation 5
Description of Parts 6-7
Listening to iPod 8
Radio Tuner Operation 9-10
EQ preset, Loudness, Treble and Bass setting. 11
Listening to External Audio Source 12
Clock Setting. 12
Alarm Operation. 13-14
Sleep Timer Function. 14
Care and Maintenance. 15
Specifications. 16
Important Safety Instructions
When used in the directed manner, this unit has been designed and manufactured to ensure your personal safety. However, improper use can result in potential electrical shock or fire hazards. Please read all safety and operating instructions carefully before installation and use, and keep these instructions handy for future reference. Take special note of all warnings listed in these instructions and on the unit.
- Water and Moisture
The unit should not be used near water. For example: near a bathtub, washbowl, kitchen sink, laundry tub, swimming pool or in a set basement.
- Ventilation
The unit should be situated so that its location or position does not interfere with its proper ventilation. For example, it should not be situated on a bed, sofa, rug or similar surface that may block the ventilation openings. The ventilation should not be impeded by covering the ventilation openings with items, such as newspapers, table-cloths, curtains, etc. Also, it should not be placed in a built-in installation, such as a bookcase or cabinet, which may impede the flow of air through the ventilation openings.
- Heat & Flame
The unit should be situated away from heat sources such as radiators, heat registers, stoves or other appliances (including amplifiers) that produce heat. No naked flame sources, such as lighted candles, should be placed on the apparatus.
- Power Source
The unit should be connected to a power supply only of the type described in the operating instructions or as marked on the appliance. Where the AC/DC Adaptor is used as the disconnect device, the disconnect device shall remain readily operable.
- Power Cord Protection
Power supply cords should be routed so that they are not likely to be walked on or pinched by items placed upon or against them. It is always best to have a clear area from where the cord exits the unit to where it is plugged into an AC outlet.
- Cleaning
The unit should be cleaned only as recommended. See the section "Care and Maintenance" of this manual for cleaning instructions.
- Object and Liquid Entry
Care should be taken so that objects do not fall and liquids are not spilled into any openings or vents located on the product. It shall not be exposed to dripping or splashing and that no objects filled with liquids, such as vases, shall be placed on the apparatus.
- Attachments
Do not use attachments no recommended by the product manufacturer.
- Lightning and Power Surge Protection
Unplug the unit from the wall outlet and disconnect the periods of time. This will prevent damage to the product due to lightning and power-line surges.
- Overloading
Do not overload wall outlets, extension cords, or integral convenience receptacles as this can result in a risk of fire of electric shock.
- Damage Requiring Service
This unit should be serviced by qualified service personnel when:
A.The power supply cord or plug has been damaged.
B. Objects have fallen into or liquid has been spilled into the enclosure.
C.The unit has been exposed to rain.
D.The unit has been dropped or the enclosure damaged.
E.The unit exhibits a marked change in performance or does not operate normally.
- Periods of Nonuse
If the unit is to be left unused for an extended period of time, such as a month or longer, the power cord should be unplugged from the unit to prevent damage or corrosion.
- Servicing
The user should not attempt to service the unit beyond those methods described in the user's operating instructions. Service methods not covered in the operating instructions should be referred to qualified service personnel.
Features
Thank you for purchasing the PORTABLE RADIO iPod DOCKING.
This model incorporates following features :
- Different iPod models Player / Re-charger
- FM receiver with digital read out on LCD
- Clock and Alarm timer function
- Wake up to Alarm (Buzzer), Radio or iPod with Snooze function
- Sleep timer function
- LCD display with back-light
Audio line-in (AUX) for connecting other digital audio player
Built-in 2 High Fidelity Speakers - Preset EQ effect
iPod, iPod mini, iPod nano, iPod touch, iPod classic and iPod shuffle are trademarks of Apple Computer Inc., registered in the U.S. and other countries.
iPod is not included.
Installation
Clock setting battery back-up
A backup battery compartment located at bottom of the unit.
(1) Open the main battery compartment A lid then open the inner clock battery compartment lid as well.
(2) For clock setting backup, follow the polarity diagram shown inside the compartment and install 2 x AAA (UM-4) batteries (purchase separately).
(3) Close the clock battery compartment lid.
Install main battery
(4) For radio, iPod and AUX operation, follow the polarity diagram shown inside the compartment A and B and install 8 × C (UM-2) batteries (purchase separately).
(5) Close the main battery compartment lids.
AC-DC Adaptor Connection
The unit can be powered by an external AC-DC Adaptor, required the output DC 12V 1500mA (included).
(1) Firmly and securely plug the adaptor's AC plug into AC main outlet.
(2) Connect the adaptor's DC output plug to the DC-in jack of the unit.
Warnings:
Batteries (battery pack or batteries installed) shall not be exposed to excessive heat such as sunshine, fire or the like.
Description of Parts
Main Unit
Front View
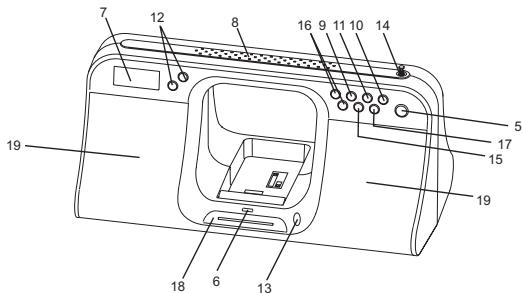
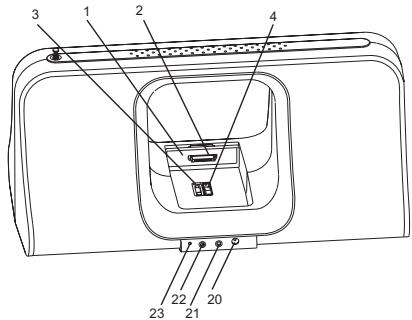
Rear View
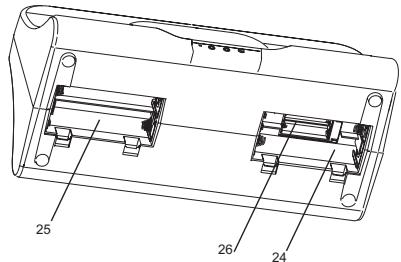
Bottom View
6
Description of Parts
Main Unit
- Movable iPod docking station
- iPod docking connector
- iPod tilt angle slider
- iPod tilt angle lever
- POWER button ---- To turn the unit on and off
- Power Status indicator: LED
- LCD display
- Handle
- SLEEP button --- Select the time duration of the sleep timer
- iPod / MEM button --- iPod Play / Pause function; Save radio preset station
- ALARM button --- Turn the alarm on and off ; Set alarm time and alarm source
- VOLUME +/- button --- Adjust volume level up or down
- MODE / EQ button --- In power off mode : Select clock setting and
12/24 hour format; Select radio broadcast system
In power on mode: Select EQ preset (CLASSIC/
JAZZ/ROCK/POP), Loudness and Treble/Bass setting
- FM rod antenna
- PRESET button --- Select preset radio station
- TUNING/CH / and / buttons ---
In radio mode: Tune the radio frequency up/down
In iPod mode : Skip tracks Forward / Backward;
perform high-speed search
- FUNC button --- Select FM stereo / FM mono / iPod / AUX modes
-
SNOOZE / LIGHT ----Activate the snooze function ; turn LCD backlight DIM / BRIGHT / OFF
-
Speakers
- DC-in jack ----For the connection of external DC power supply
- Stereo Phones jack
- AUX jack --- Auxiliary audio signal input
- RESET button ---- For resetting the unit
- Main battery compartment A
- Main battery compartment B
- Inner Clock battery compartment
7
Listening to iPod
This model adopts different iPod models. Following steps guide you listening to iPod music.
- Slide the "iPod tilt angle slider" for the "iPod tilt angle lever" to tilt at a desired angle, if apply. Recommend to lay down the iPod during the unit transportation.
- Your iPod can now be inserted into the docking port by placing the connector on the bottom of the iPod onto connector in the docking bay. Caution: Please be careful when seating the iPod into the docking to avoid damaging the 30-pin connector on the iPod or in the docking system.
- Slightly push the iPod to a desired tilt angle, if necessary.
- Press the POWER button once to turn on the unit and the power status indicator lights on.
-
Press the FUNC button to select iPod mode. In iPod mode :
-
To start playback music, press the iPod button once.
- To pause the music, press the iPod button.
- To resume music, press the iPod button again.
- You may press the VOLUME +/- button to adjust the volume to a desired level.
- When a song playback, press and hold the▶ / ← button to perform high speed search forward / backward.
-
To skip to next or previous song, prese the / button.
-
To turn off the unit, press the POWER button and the power status indicator will light off.
- When the unit is powered by external DC adaptor and once the iPod connected to the docking station, the unit recharges the iPod battery.
Note:
Once the iPod is inserted, the unit will switch to iPod mode automatically and neglect the current mode.
Radio Tuner Operation
FM Antenna
Fully extend the FM rod antenna for the best FM radio reception.
Radio Tuning
- Press the POWER button to turn on the unit, where the power status indicator light on.
- Press the FUNC button to select FM stereo or FM mono radio receiving mode.
- To manually tune to a desired station, repeatedly press the TUNING button.
- To automatically search for stations with strong signals, press and hold the TUNING / button until the frequency digits on display begins to scan then release the button. The tuner will stop on the first strong signal it finds.
Notes:
- Manual tune to select weaker stations that might be skipped during automatic tuning.
- If the automatic tuning does not stop on the exact frequency of the station, for example, it stops on 100.9 MHz instead of 100.8 MHz, use the manual tuning method to "fine tune" to the exact frequency of the desired station.
Radio Preset Stations
The units allows you to store up to 20 FM stations for easy recall at any time.
Preset Stations
- Press the POWER button to turn on the unit, where the power status indicator light on.
- Press the FUNC button to select FM stereo or FM mono radio receiving mode.
- Tune to the radio station you want to store in memory by using the TUNING / button.
- Press the MEM button. The preset channel number appears on display and blinking.
- To select desired preset station number, press the CH / button.
- To confirm preset location, press the MEM button.
- Repeat steps 3 to 6 to store other stations, if apply.
Radio Tuner Operation
Notes:
- There is a few seconds delay when programming, after this delay time, the unit will automatically switch back to normal tuner mode.
- You can overwrite a preset station by overwriting and storing the new frequency in its place.
Recalling Preset Station
- Press the POWER button to turn on the unit, where the power status indicator light on.
- Press the FUNC button to select FM stereo or FM mono radio receiving mode.
- Press the PRESET button. The preset channel number and PRESET indicator appear on display.
- To select desired preset station, press the CH / button.
Radio Broadcast System Selection
In case the unit is moved to other countries with slightly different radio broadcast system, the unit allows you to select USA, EU, Australia and Japan systems.
- Set the unit to Power Off mode.
- Press the MODE button repeatedly until the flashing indicator US, EU, "AU" or JP is seen.
- Press the VOLUME +/- button to select one of the broadcasting systems.
- Press MODE button to save the setting and exit the setting mode.
NOTE:
The followings are the specifications of the three radio broadcast systems:
- USA's Radio Broadcast System
FM 87.5 108 MHz, 0.1 MHz tuning step
-AU and EU's Radio Broadcast System
FM 87.5 108 MHz, 0.05 MHz tuning step
- Japan's Radio Broadcast System
FM 76.0 – 108 MHz , 0.05 MHz tuning step
EQ preset , Loudness, Treble and Bass Setting
Bass setting :
- Press and hold the EQ button entering Bass setting mode, the "BASS" indicator blinks on display.
- To select desired bass level, press the CH / button.
Treble setting :
- Press the EQ button again entering Treble setting mode, the "TRE" indicator blinks on display.
- To select desired treble level, press the CH / button.
Set Loudness on or off
- Press the EQ button then press CH / button to set loudness on or off.
- Press the EQ button to exit bass/treble and loudness setting mode.
EQ setting :
The unit is designed to have four EQ presets for your selection , theCLASSIC , JAZZ, ROCK and POP .
You can select the desired effect by pressing the "EQ" button repeatedly at following sequence :

Listening to an External Audio Source
- Connect an audio cable (not included) with 3.5mm stereo plug from an auxiliary audio device to the AUX jack of the unit.
- Press the POWER button to turn on the unit.
- To select auxiliary audio input, press the FUNC button. The "AUX" indicator show on display.
- Turn on the external auxiliary audio device.
- The volume and preset equalizer can now be controlled through the unit. Operate all other functions on the external device as usual.
Notes: Press the POWER button to turn off the unit when you finish listening. Don't forget to switch off the power of the external audio device as well.
Clock Setting
When the unit is OFF (power off mode):
Set Clock
- Press the MODE button and the clock digits blink.
- Press the CH / button to set hour.
- Press the VOLUME + / - button to set minute.
Set 12/24 Hour format
- Press the MODE button again entering 12/24 hour format setting mode.
- Press the VOLUME + / - button to select 12 or 24 hour display format.
Exit setting mode
- To save all settings and auto-exit the setting mode, wait for a few seconds.
Alarm Operation
When the unit is OFF (power off mode):
Select wake up alarm source
- Press and hold the ALARM button until the alarm source indicator blink.
- Press the VOLUME + / - button to select alarm source BUZ (buzzer), RAD (radio) or iPod.
Setting the alarm time
- Press the ALARM button again, alarm time digits blink.
- Press the CH / button to set alarm hour.
- Press the VOLUME +/- button to set alarm minute.
Save settings and activate alarm
- To save all settings and auto-exit the setting mode, wait for a few seconds.
- To activate the daily alarm, press the ALARM button and the corresponding alarm source indicator appears on the LCD display.
Notes :
---If "Wake to iPod" is selected but your iPod has not been docked, the alarm source will be redirected to the Alarm Buzzer automatically when the alarm is reached.
---When "Wake to Radio" is selected, make sure the radio station which you want to wake to is tuned.
Wake to Buzzer
When the alarm time is reached, the buzzer alarm will sound for 3 Minutes.
It goes into Auto-snreeze mode if no further button has been pressed.
The display shows the "SNOOZE" indicator. The buzzer turns off for the snooze time (around 10 minutes) then comes on again. This operation will be repeated three times. After the fourth alarm is finished, the alarm will shut off until the same alarm time on the next day.
You may also activate the snooze function manually after the alarm sounds by pressing the SNOOZE button. The buzzer stops for the snooze time then comes again.
To cancel the snooze before it expires, press the ALARM button.
The snooze operation (including auto-snooze and manual snooze) can be repeated by 3 times only.
To stop the alarm immediately after the buzzer sounds, you can also press the ALARM button. It resets itself for the following day.
Wake to iPod or Radio
When the alarm time is reached, the selected alarm source (iPod or Radio) will automatically turn on. It starts softly and gradually becomes louder. It plays for 30 minutes then shuts off and resets itself for the following day. During the activation of the alarm source, you may press the SNOOZE button to activate the snooze function. The alarm stops for the snooze time (around 10 minutes) then turns on again. To cancel the snooze before it expires, press the ALARM button. This manual snooze operation can be repeated three times. Each time the alarm turns on, it plays for 30 minutes (without pressing the snooze button). To stop the alarm immediately after the alarm sounds, you may also press the ALARM button. It resets itself for the following day.
Sleep Timer Function
Sleep to timer
This feature allows you to fall asleep to the radio or iPod for up to 120 Minutes. The unit shuts off automatically when the time expires.
- Press the POWER button to turn the unit on.
- Either tune to the desired radio station in radio mode or playback music from the iPod.
- To select the sleep timer to turn the unit off after 15, 30, 45, 60, 90 or 120 minutes, press the SLEEP button repeatedly. The display show the indicator Z^2 . The unit plays for the selected length of time then automatically turns off.
- To turn the unit off before the sleep timer counts down to zero, press the POWER button at any time.
Notes :
If you are falling asleep to music from an external device connected to the AUX input, the sleep timer will shut off the power to this system but it will not turn off the external device.
Care and Maintenance
- Do not subject the unit to excessive force, shock, dust or extreme temperature.
- Do not tamper the internal components of the unit.
- Clean your unit with a damp (never wet) cloth. Solvent or detergent should never be used.
- Avoid leaving your unit in direct sunlight or in hot, humid or dusty places.
- Keep your unit away from heating appliances and sources of electrical noise such as fluorescent lamps or motors.
Resetting the Unit
If the unit experiences a power surge or electric shock, it is possible that the internal micro-controller may lock up and the unit will not respond to any commands from the front panel controls.
- In this event, unplug and then reconnect the AC power plug into the wall outlet.
2.Use a straightened paper clip, toothpick or similar objects to press the RESET button located at the rear of the main unit (see the below figure). The reset operation clears the system memory and all of your previous settings will be erased.
CAUTION: DO NOT USE SHARP, POINTED OBJECT TO PRESS THE RESET BUTTON. IT MAY DAMAGE THE RESET SWITCH INSIDE THE UNIT.
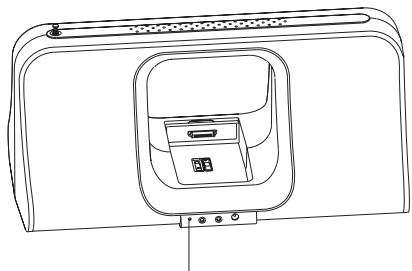
RESET button
Specifications
Power Supply
Power Adaptor
Input AC 230V 50Hz
Output DC 12V 1500mA
Battery Back-up for clock / memory: DC3V--- AAA (UM-4)type x 2 (not included)
Battery for operating the unit: DC12V --- C (UM-2) type x 8 (not included)
Speaker Output
5W+5W(Max.)
Power consumption
1 W (Standby)
23 W (Max.)
Dimensions
352× 176× 178mm
Weight
1453g
Operating Temperature
-10~+45℃
and Humidity
70%
THE SPECIFICATION AND EXTERNAL APPEARANCE OF THE SET ARE SUBJECT TO CHANGE WITHOUT PRIOR NOTICE.

If at any time in the future you should need to dispose of this product please note that: Waste electrical products should not be disposed of with household waste. Please recycle where facilities exist. Check with your Local Authority or retailer for recycling advice. (Waste Electrical and Electronic Equipment Directive)
For information and support www.lenco.eu
Lenco
TRAGBARES WECKERRADIO MIT IPOD-DOCK
IPD-5100
For information and support www.lenco.eu
Inhalt
Alarm bediening. 13-14
(UM-4) (non fournies)
When the unit is OFF (power off mode):
- PORTABLE RADIO WITH iPod DOCKING
- IPD-5100
- Table of content
- Important Safety Instructions
- Features
- Thank you for purchasing the PORTABLE RADIO iPod DOCKING.
- This model incorporates following features :
- Installation
- Clock setting battery back-up
- Install main battery
- AC-DC Adaptor Connection
- Warnings:
- Description of Parts
- Main Unit
- Listening to iPod
- Note:
- Radio Tuner Operation
- FM Antenna
- Radio Tuning
- Notes:
- Radio Preset Stations
- Preset Stations
- Recalling Preset Station
- Radio Broadcast System Selection
- EQ preset , Loudness, Treble and Bass Setting
- Bass setting :
- Treble setting :
- Set Loudness on or off
- EQ setting :
- Listening to an External Audio Source
- Clock Setting
- Set Clock
- Set 12/24 Hour format
- Exit setting mode
- Alarm Operation
- Select wake up alarm source
- Setting the alarm time
- Save settings and activate alarm
- Notes :
- Wake to Buzzer
- Wake to iPod or Radio
- Sleep Timer Function
- Sleep to timer
- Care and Maintenance
- Resetting the Unit
- Specifications
- Power Supply
- Lenco
- TRAGBARES WECKERRADIO MIT IPOD-DOCK
- Inhalt
Brand : LENCO
Model : IPD-5100
Category : Bluetooth Speakers