
L-80 USB - Turntables LENCO - Free user manual and instructions
Find the device manual for free L-80 USB LENCO in PDF.


| Product type | MP3 recording turntable |
| Rotation speeds | 33 1/3 RPM and 45 RPM |
| Motor | DC motor |
| Drive | Belt drive |
| USB function | Direct recording to MP3 (192 kbps) |
| Wow & Flutter | Less than 0.2% WRMS (33 1/3 RPM) |
| Signal-to-noise ratio | Greater than 55 dB (DIN-B) |
| Pitch variation | +/- 10% |
| Start time (33 1/3 RPM) | Less than 1 second |
| Braking time (33 1/3 RPM) | Less than 1 second |
| Speed change (33 1/3 to 45 RPM) | Less than 1 second |
| Tonearm length | 230.5 mm |
| Phono output level | 1.5 ~ 3.6 mV at 1 kHz, 5 cm/s |
| Frequency response | 20 Hz - 20 kHz |
| Channel separation | Greater than 15 dB |
| Power supply | AC mains, built-in voltage selector |
| Included accessories | RCA cable, felt mat, platter, 45 RPM adapter, cartridge, power cord, counterweight |
| Care and cleaning | Clean with a soft, dry cloth. Do not use abrasive products. |
| Safety | Do not open the device. Disconnect during a storm or if not used for a long time. |
| Repairability | Have any repairs carried out by qualified personnel. |
Frequently Asked Questions - L-80 USB LENCO
User questions about L-80 USB LENCO
0 question about this device. Answer the ones you know or ask your own.
Ask a new question about this device
Download the instructions for your Turntables in PDF format for free! Find your manual L-80 USB - LENCO and take your electronic device back in hand. On this page are published all the documents necessary for the use of your device. L-80 USB by LENCO.
USER MANUAL L-80 USB LENCO
Turntable MP3 recorder
USER MANUAL (ENGLISH) P1-P9
INDICE:
- SAFETY INSTRUCTIONS
- CONTROL AND FUNCTIONS
- SPECIFICATIONS
OPERATIONS
USER MANUAL
L-80 USB
SAFETY INSTRUCTIONS

- Read these Instructions.
- Keep these Instructions.
- Heed allWarnings.
- Follow all Instructions.
- Do not use this apparatus near water.
- Clean only with a dry cloth.
- Do not block any of the ventilation openings. Install in accordance with the manufacture's instructions.
- Do not install near nay heat sources such as radiators, heat registers, stoves, or other apparatus (including amplifiers) that produce heat.
- Do not defeat the safety purpose of the polarized plug. The wide blade is provided for your safety. If the provided plug does not fit into your outlet, consult an electrician for replacement of the obsolete outlet.
- Protect the power cord from being walked on or pinched particularly at plug, convenience receptacles, and point where they exit from the apparatus.
- Only use attachments/accessories specified by the manufacturer.
- Use only with a cart, stand, tripod, bracket, or table specified by the manufacturer, or sold with the apparatus. When a cart is used, use caution when moving the cart/apparatus combination to avoid injury from tip-over.
- Unplug this apparatus during lighting storms or when unused for long periods of time.
- Refer all servicing to qualified service personnel. Serving is required when the apparatus has been damaged in any way, such as power-supply cord or plug is damaged, liquid has been spilled or objects have fallen into the apparatus, the apparatus has been exposed to rain or moisture, does not operate normally, or has been dropped.
- The mains plug is used as the disconnect device, the disconnect device shall be readily operable.
WARNING
To reduce the risk of the fire or electric shock, do not expose this apparatus to rain or moisture. The apparatus shall not be exposed to dripping or splashing and that no objects filled with liquids, such as vases, shall be placed on the apparatus.

CAUTION: To reduce the risk of electric shock, do not remove any cover. No user-serviceable parts inside. Refer servicing to qualified service personnel only.
The lightning flash with arrowhead symbol within the equilateral triangle is intended to alert the use to the presence of un-insulated "dangerous voltage" within the product's enclosure that may be of sufficient magnitude to constitute a risk of electric shock.
The exclamation point within the equilateral triangle is intended to alert the user to the presence of important operation and maintenance (servicing) instructions in the literature accompanying this appliance.
CAUTION
To prevent electric shock, do not use this polarized plug with an extension cord, receptacle or other outlet unless the blades can be fully inserted to prevent blade exposure.
SPECIFICATIONS
TURNTABLE
| Type | 2-speed full manual |
| Motor | DC motor |
| Driving method | Belt drive |
| Turntable platter | 330mm dia. Aluminum diecast |
| Speeds | 33 1/3 and 45 rpm |
| USB function | USB REC. Function (only for MP3 format 192 kbps) |
| Wow en flutter | Less than 0.2% WRMS (JIS WTD) with 33 1/3rpm |
| S/N ratio | More than 55dB (DIN-B) |
| Pitch controls | +/- 10% |
| Starting Time | Less than 1 sec with 33 1/3 |
| Braking Time | Less than 1 sec with 33 1/3 |
| Time for Speed Change | Less than 1 sec. from 33 1/3 to 45 rpm |
| Less than 1 sec. from 45 to 33 1/3 rpm |
TONEARM
| Type | Static balanced S-shaped tonearm with detachable headshell |
| Effective Arm Length | 230.5mm |
| Phono Output Level | 1.5~3.6mV at 1KHz 5cm/sec (HP-4005) |
| Line Output Level | 90~216mV aan 1KHz 5cm/sec (HP-4005) |
| Frequency Response | 20Hz-20KHz |
| Channel Separation | More than 15dB |
| Channel Balance | Within 2.5dB at 1KHz |
GENERAL
| Power Supply | AC115/230V, 60/50Hz |
| Power Consumption | 9 Watt |
| Dimensions | 449 (W) x 370 (D) x 145 (H) mm |
| Weight | 3.8 Kg |
NOTE: Specifications and design subject to possible modification without notice, due to improvements.
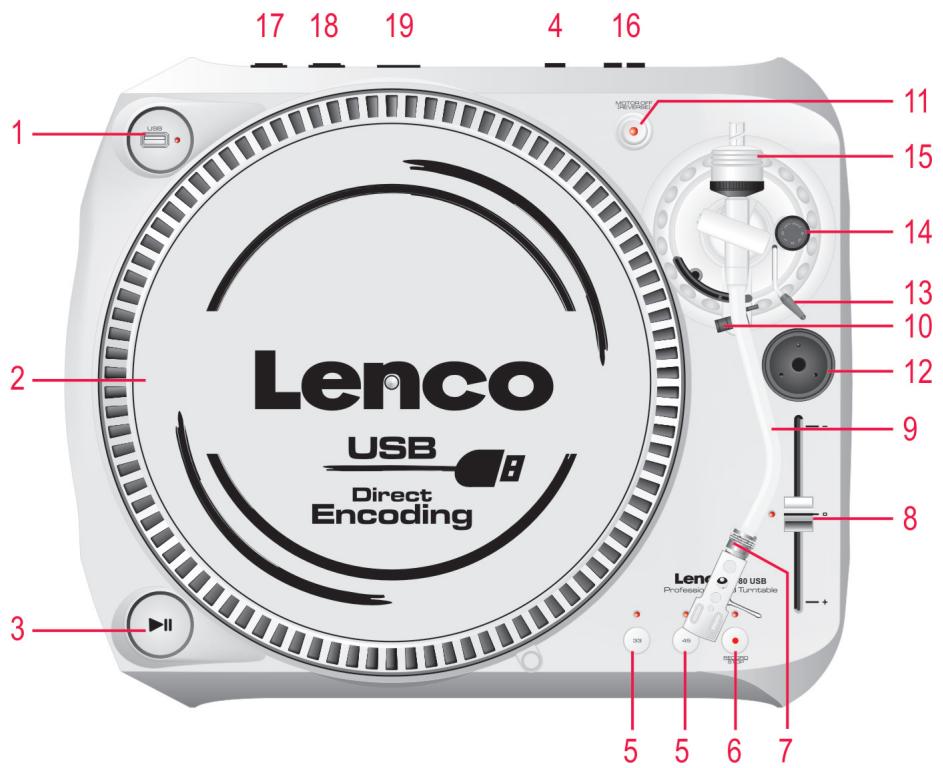
CONTROL AND FUNCTIONS
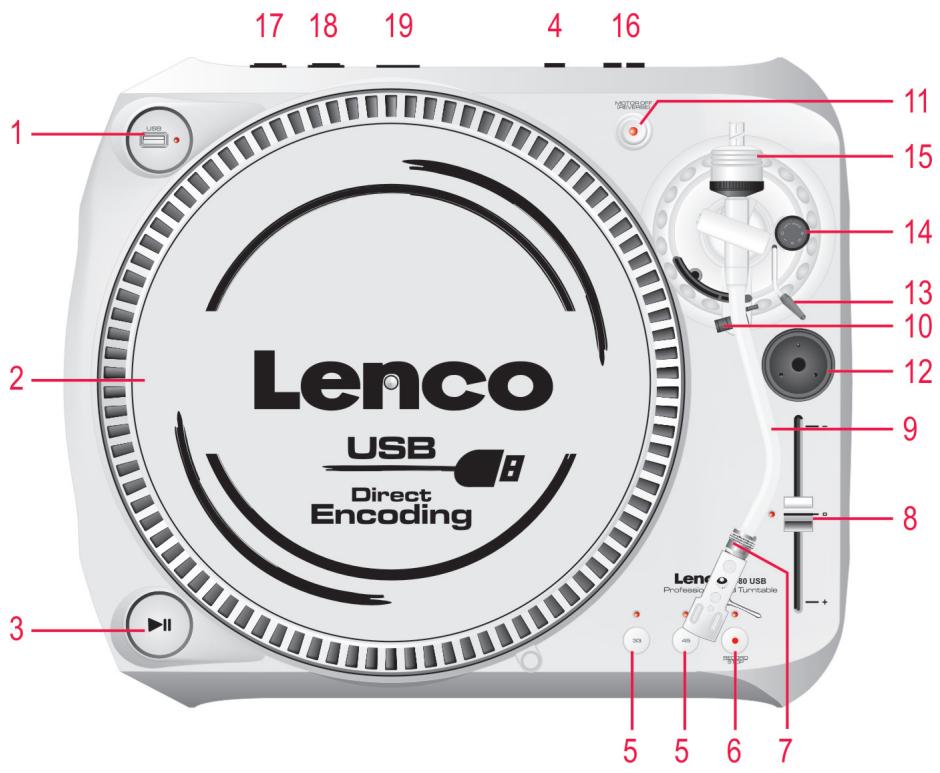
- USB SOCKET
USB record only for MP3 format. - PLATTER
- START/STOP BUTTONP
Press this button to start or stop the platter. - PHONO/LINE SWITCH
Switches the output to either Phono or Line level. - PLATTER SPEEDS
Used to select the desired speed. - Press the "33" button to select the 33rpm speed.
- Press the "45" button to select the 45rpm speed.
- RECORD/STOP BUTTON
Press the button to start recording and press again to stop recording. - HEADSHELL LOCKING NUT
Attach the headshell by inserting into the front end of the tone arm, then turn the locking nut clockwise. - PITCH SLIDER
Use this to change the speed of the platter. When you move the PITCH SLIDER, the PITCH indicator won't light; just when the PITCH SLIDER at 0% , the PITCH indicator will light. - S-SHAPED TONEARM
-
TONEARM CLAMP AND REST
Use this rest for the tone arm and clamp it in position during transportation. -
MOTOR OFF/Reverse BUTTON
Tap the button to switch Reverse/Forward playback.
Press the button more than 1sec. to enable motor off, and the led will be flash. Press the button more than 1sec again to disable motor off.
12.45 RPM ADAPTOR
"Place on center spindle for playing 7" records with large center holes. - TONEARM LEVER
Controls the up and down action of the tone arm lift. - ANTI-SKATE KNOB
When a record is playing, a force is generated drawing the stylus towards the center of the record. This control compensates for that force and needs to be set to the same value as the counterweight pressure ring. - COUNTERWEIGHT
Use the counterweight to balance the tone arm and to adjust the stylus pressure. - PHONO/LINE OUTPUT
Connect the turntable to any phono or line level input, using the supplied cinch/cinch cable. Be sure to put the phono/line switch in the right position. - AC VOLTAGE SELECTOR
Make sure the selector is set properly. - POWER SWITCH
This switch turns the power on or off. - POWER CORD CONNECTOR
Used to connect the included power cord.
OPERATIONS
- Push power button to on.
- Insert target light for illumination the stylus.
- Place a record on the turntable mat. When playing a 45rpm record with a large center hole; place the 45rpm adapter on the center spindle.
- Set the rotation speed (33/45) to match the record.
- Release the arm clamp
- Set the cueing lever to the up position.
- Press the Start/Stop button and the turntable platter will start to rotate.
- Move the tone arm over the desired groove.
- Set the cueing lever to the down position, the tone arm will descend slowly onto. The record and play begins.
- Adjust the pitch to a desirable speed, move the pitch control slider up or down to adjust the speed.
- To suspend play, lift tone arm with cueing lever.
- When play is finished, raise the cueing lever, move the tone arm to the arm-rest and secure the tone arm with the arm clamp.
- Press the Start/Stop button to stop the platter rotating.
- Push the Power button to off.
SET-UP
ASSEMBLY:
Before you begin assembly please be sure all parts and accessories have arrived intact. Please use the check list below to identify and order parts and accessories.
- Instruction manual * RCA cable * Slipmat * Platter
- 45 rpm adaptor * Headshell * AC cord * Counterweight
Note:
- Do not connect the AC power plug before assembly has been completed.
- Before turning the power on, make sure once again all the connections and power voltage settings are correct.
Always turn off the power when connecting or disconnecting
- Read this manual carefully before using the unit. Be sure to store the manual in a safe place for future reference.
- Attach a stylus cartridge to the headshell before assembling the turntable unit.
1 Removing from carton:
Carefully remove the main unit with the packing material intact from the box. Remove the packing material once the unit has been removed from the shipping carton. Be sure to locate all the accessories located in the packing material.
245 adaptor:
Locate and remove the 45-rpm adapter from the packing material and place it in the 45 adapter cut out on the top of the main unit.
3 Turntable platter:
Remove the turntable platter from the packing material and gently insert the platter into the center spindle on the base of the turntable unit.
4 Drive hub:
Pull the belt to the lower side of the turntable over the drive hub.
5 Slipmat:
Remove the black slipmat from the packaging and place it on the platter.
6 Headshell:
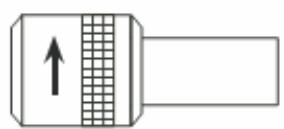
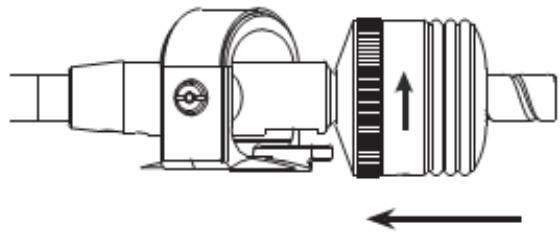
Insert the headshell into the front end of the tonearm assembly. While holding headshell firmly into the front end of the tonearm assembly, turn the headshell locking nut counter-clockwise to firmly secure the headshell to tonearm assembly.
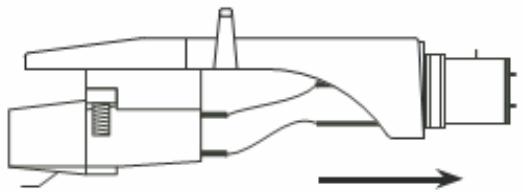
7 Counterweight:
SET-UP
a. Remove the stylus protective cover, if so equipped. Never touch the stylus tip during the adjustment.
b. Lower the tonearm lever.
c. Release the tonearm clamp and release the tonearm from the arm rest.
d. Set the anti-skate adjustment to zero.
e. Rotate the counterweight in either direction until the tonearm is perfectly balanced horizontally (floats freely)
f. Return the tonearm to the arm rest and lock it in place.
g. Hold the counterweight stationary with one hand and rotate only the stylus pressure ring to bring the number “0” of the ring into alignment with the center line on the tonearm rear shaft.
h. Rotate the counterweight clockwise until the scale value corresponding to the recommend stylus pressure.
Note: The recommended stylus pressure of the optional cartridge that may have been included with your unit is 2 grams. For all other cartridge systems please refer to the manufactures specification included with the cartridge.
HEADSHELL AND CARTRIDGE ASSEMBLY :
When installing a cartridge, refer to the operating instructions of that cartridge. During installation, attach the stylus protector to guard the stylus tip from damage.
Connect the headshell lead wires to the cartridge terminals. The terminals of cartridges and the headshell lead wires are color coded. Connect each lead wire to the cartridge terminals of the same color.
White (L^+) LCH (+)
Blue (L-) LCH(-)
Red (R + ) RCH (+)
Green (R-) R CH (-)
CONNECTIONS:
Before connecting the unit it is advised that you also consult your current equipment instruction manual. Note: Be sure to turn off the equipment before you make changes to the different connections.
- Connect the power cord to an AC outlet..
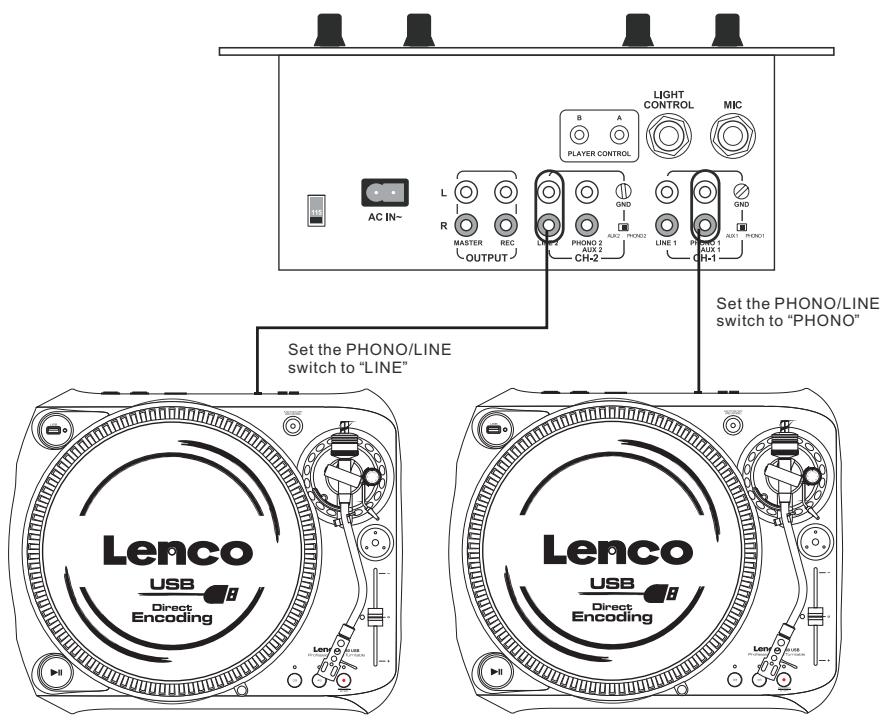
- Connect the RCA cable to the PHONO input of your amplifier.
Output terminals Amplifier(Receiver)
L (White) L CH
R (Red) R CH
You can also use a line input by setting the phono / line switch at the rear of the turntable to line.
If at any time in the future you should need to dispose of this product please note that: Waste electrical products should not be disposed of with household waste. Please recycle where facilities exist. Check with your Local Authority or retailer for recycling advice. (Waste Electrical and Electronic Equipment Directive)
Lenco
L-80 USB
KNOPPEN EN FUNCTIONS
Plateau 330mm dia. Aluminum diecast
Vitesse 331/3 and 45 rpm
Type Static balanced S-shaped tonearm with detachable headshell
Canal Balance Within 2.5dB at 1KHz
GENERAL
Alimentation AC115/230V, 60/50Hz
Consommation 9 Watt
Dimensions 449 (W) x 370 (D) x 145 (H) mm
Poids 3.8 Kg
- INDICE:
- USER MANUAL
- SAFETY INSTRUCTIONS
- WARNING
- CAUTION
- SPECIFICATIONS
- TURNTABLE
- TONEARM
- GENERAL
- CONTROL AND FUNCTIONS
- OPERATIONS
- SET-UP
- ASSEMBLY:
- Note:
- Removing from carton:
- adaptor:
- Turntable platter:
- Drive hub:
- Slipmat:
- Headshell:
- Counterweight:
- HEADSHELL AND CARTRIDGE ASSEMBLY :
- CONNECTIONS:
- Lenco
- KNOPPEN EN FUNCTIONS
Brand : LENCO
Model : L-80 USB
Category : Turntables