
DPA-35 - Portable music player LENCO - Free user manual and instructions
Find the device manual for free DPA-35 LENCO in PDF.


| Brand | LENCO |
| Model | DPA-35 |
| Product Type | Digital Photo Frame |
| Power Supply | Rechargeable built-in battery via USB; battery life: 2.5 h; full charge: 3 h |
| Connectivity | Mini-B USB port |
| Supported Image Formats | JPG, BMP, GIF, TIF, PNG |
| Display Modes | Slideshow with adjustable duration (1 s, 3 s, 6 s, 12 s, 1 min, 30 min); full screen or cropped display |
| Included Software | Photo Viewer for Windows 98/2000/ME/XP/Vista |
| Image Storage | Variable capacity depending on compression: ~1,000 to ~3,000 (low), ~1,500 to ~6,000 (medium), ~4,000 to ~14,000 (high) |
| Editing Functions | Cropping, brightness/contrast adjustment, rotation |
| Album Management | Editable groups (name up to 20 uppercase alphanumeric characters) |
| Safety Instructions | Do not expose to water or humidity; avoid heat sources; do not leave connected for more than 12 h |
| Maintenance | Clean with a soft cloth; have repairs done by qualified personnel |
| Standards | FCC Part 15, CE, NMB-003 Canada (Class B) |
| System Compatibility | Windows 98/2000/ME/XP/Vista (FAT format only) |
Frequently Asked Questions - DPA-35 LENCO
User questions about DPA-35 LENCO
0 question about this device. Answer the ones you know or ask your own.
Ask a new question about this device
Download the instructions for your Portable music player in PDF format for free! Find your manual DPA-35 - LENCO and take your electronic device back in hand. On this page are published all the documents necessary for the use of your device. DPA-35 by LENCO.
USER MANUAL DPA-35 LENCO
INSTALLATIONPROCEDURE:
** Important: Install application software before connect deviceto PC. **
1. Disconnect device USBcable from PC ifit is connected.
2. Insert CD and follow the on-screen instruction to install "Photo Album".
3. After the application software has been successfully installed, you could connect deviceto PC with theprovided USB cable.
4. Windows OS will set up hardware driver automatically.
5. Launch "Photo Viewer" and enjoy.
NOTE: The software can not initialize with the unitif plugged in while running in automaticslide show mode.
Introduction
This Digital PhotoAlbum is a stand-alone device that is designed to transfer and store images from a PC and then display the images. Using the application softwaresupplied with this device, you can organize, edit, enhance and download the images in your PC to this device using USB.
Important Safety Instructions
WARNING:
- This device will be fully charged after three hours. Do not leave the device connected to the USB for longer than 12 consecutive hours otherwise damage and overheating of the device may occur.
- Do not expose this deviceto water or moisture.
- The device should be situated away from sources of highheat such as radiators or stoves.
- The device should be connected to a power supply only of the type described in the operating instructions or as marked on the unit.
- Care should be taken sothat objects are not placed on, nor liquids spilled on or inside thedevice.
- The user should not attempt to service the device beyond those means described in these operating instructions. All other servicing should be referred to qualified service personnel.
Charging the Built-In Battery
A fully charged battery gives about 2.5 hours of playtime, when the battery is low, "Low Battery" appears on the display and the Photo Album shuts down in about 10 seconds. Following these steps to charge the battery.
- Insert one end of the USB cable into USB on PhotoAlbum and the other end into your computer's USB port. The battery level indicator flashes on the display.
- Charging time is approximately three hours, when the battery is fully charged, the battery level indicator stops flashing.
Installing the Software/ Hardware
IMPORTANT: You must install the software to your computer before connecting the device to your computer for the first time.
- Insert the CD-ROM and run the fileSETUP.EXE; Follow the on-screen instructions.
- The application Photo Viewer will be installed on your computer and a short cut to the application will appear on your desktop.
DO NOT LAUNCH THESOFTWARE YET.
- After the software is installed, connect the device to the computer with the USB cablesupplied. The hardware drivers will be installed automatically. Follow the on-screen instructions and accept the installation screens that appear.
- After hardwareinstallation is complete, launch the Photo Viewer application from the shortcutton your PC desktop.
NOTE: If you are unable to launch the software or connect to your Photo Album, goto the Troubleshooting of the manual for more information.
Downloading Photos From PC to Digital Photo Album
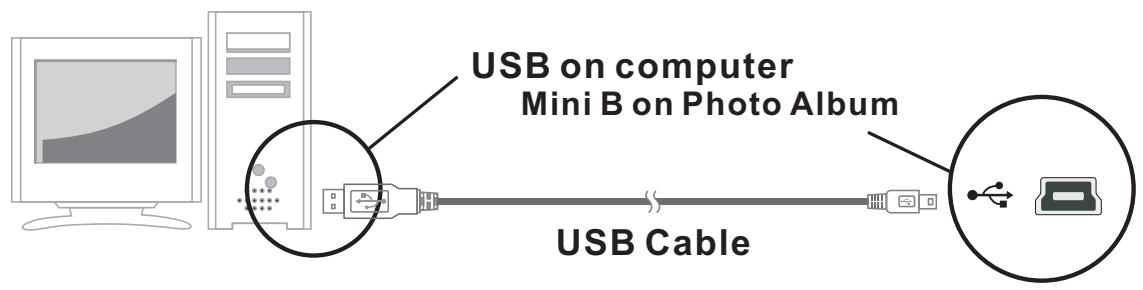
1. Connect to PC
Use the USB cable provided. Connect the large end to the computer and the smallend tothe device.
2. Launch the Photo Album Software
Double-click the Photo View shortcut on your desktop.
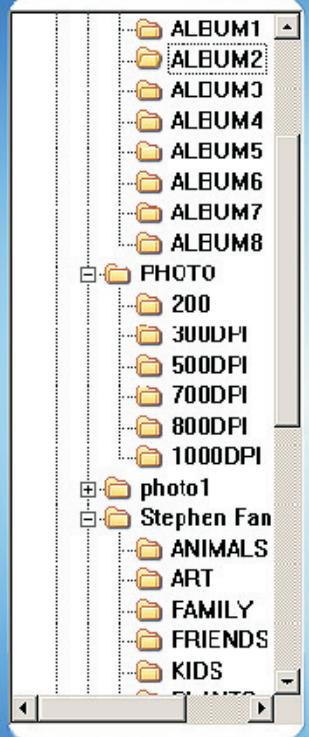
3. Browse images
Use the File Manager to browse photos on your PC.
NOTE: The device reads JPG/BMP/GIF/TIF and PNG images.
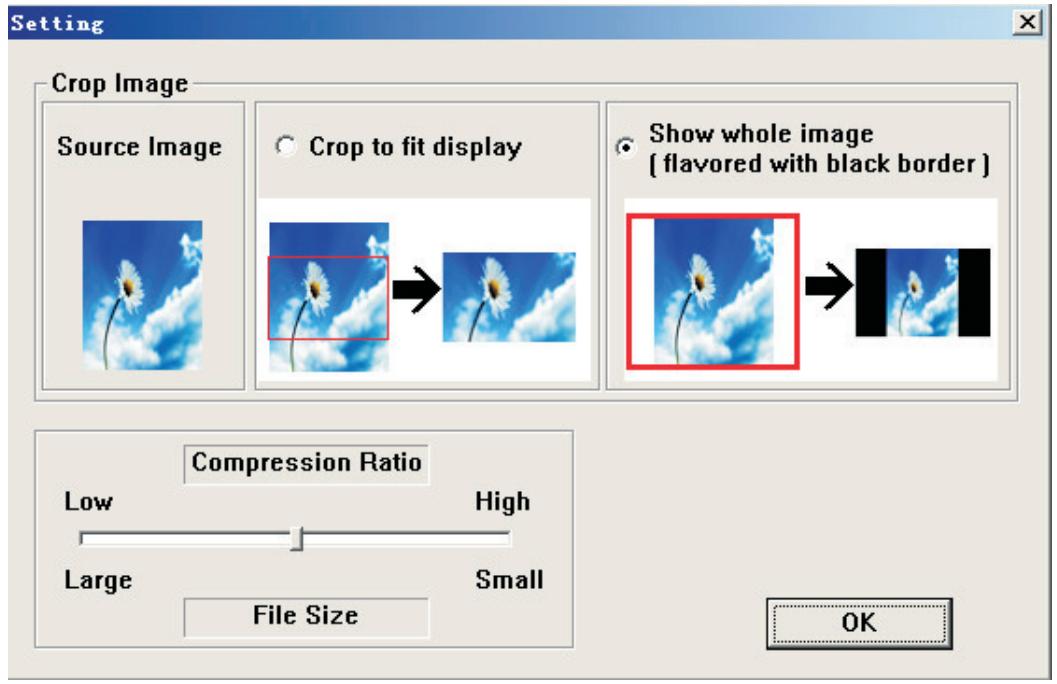
The images can be displayed as original whole image or cropped image.
(i) Press".
(ii) Select "Crop to fit display" or "Show wholeimage". Show whole image—the image is displayed in whole and original form. Crop to fit display—the image is enlarged in proportion to fill the entire window, part of the top and bottom of the image will be hidden. (iii) Press OK.
4. Select images and transferto Collection Panel
(i). Select the Album (Group 1, Group 2....) in Collection Panel that the images will be transferred to. You can change the Albumname by double clicking the Album andentering a new name.
Note: Valid album name can be combinations of up to 20 letters (Capital only) and numbers.
(ii) Select your desired photoand select the compression ratio.
(1) Press" " .
(2) Click and hold the barand drag to select thethree compression ratios: Low Medium andHigh.
(3) Press OK to confirm andexit.
(iii) Transfer the photo to Collection Panel.
You can transfer more than one images at a time by holding down Ctrl key while clicking on more than one photo. Or you can transfer the entire folder by clicking on the first image then scrolling down to the last image and click on this image while holding down the SHIFT key to highlight all.
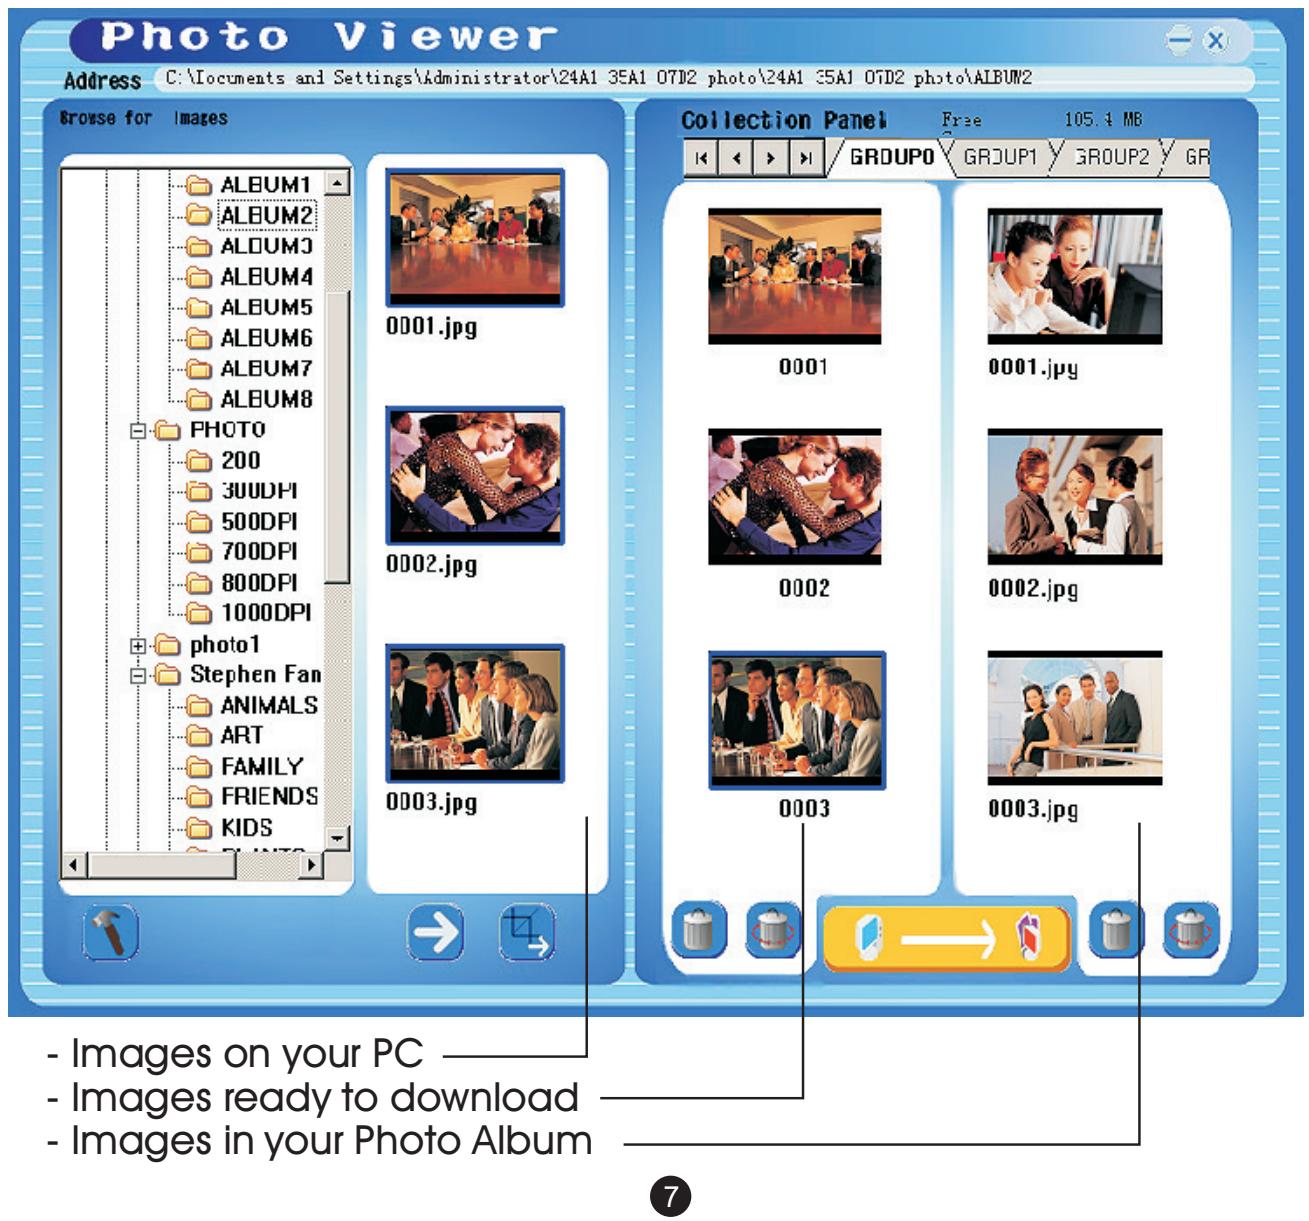
(A) To transfer "as -displayed" images.
Press " " to transfer the imageto Collection Panel.
(B) To edit "as-displayed" image then transfer.
Edit and transfer the image to Collection Panelfollowing the procedures described in section " Editing Images".
To remove animage in Collection panel, Click " ", and to remove all images click " ".
5. Transfer Collection Panel to Digital Photo Album
Press " " to compress and transfer the images in the
Collection Panel to the Digital Photo Album.
Important!
Do not disconnect the device until the download process is complete and you have exited successfully from the Photo Viewer Program.
Note:
The number of images that can be stored in this Photo Album depends on the compression settings you use as well as the resolution and complexity of the original photos.
| Low compression | Medium compression | High compression | |
| No. of Image can be stored | ~1,000 to ~3,000 | ~1,500 to ~6,000 | ~4,000 to ~14,000 |
Editing Images
1. Select an image to Edit
Select a photo you wish to edit in the image preview area. Click on " " to edit selected image in the pop up window.
2. Edit Image
In the Edit Image Window you can do the following:
- Crop: click and drag the smaller boxes (at the corners of the large box) to increase or decrease the area to be cropped.
- Reposition: click and drag in the center of the large box to change the position of the crop.
- Brightness /Contrast: click and drag the slider bars.
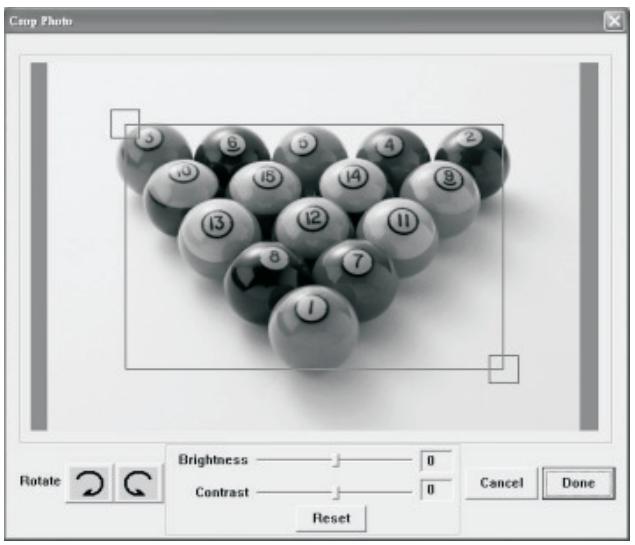
NOTE: Images that are brighter and more contrast will look better on the smaller monitor of the device.
Rotate: Use the Rotate arrows to rotate the image clockwise or counterclockwise.
3. Click DONE
The edited image will be added to CollectionPanel.
Using The Function Keys
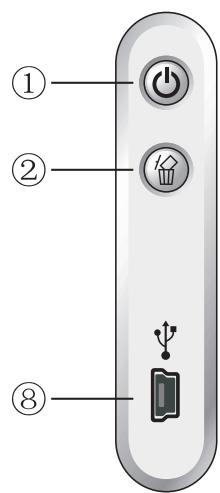
① POWER: Press Ⓞ and hold for 2 seconds to turn on the Photo Album. Press Ⓞ and hold for 2 seconds again to turn off the power.
(2) DELETE: Press ⌒ once to delete the selected file.
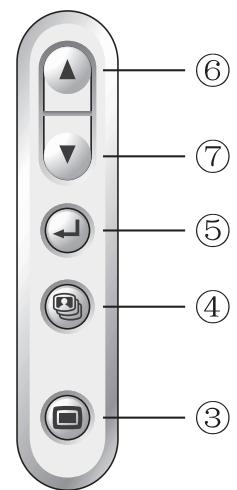
③ ALBUMS: In browse mode, press to get access to different albums.
④ SLIDE SHOW: To start the slide show, repeatedly press and select the duration of each slide (1s, 3s, 6s, 12s, 1min, 30 min) or select STOP to stop the slide show. After the slide show is on, to stop the slide show, simply press.
(5) ENTER: Press to confirm your selection.
(6) UP: Press to select next image or folder.
(7) DOWN: Press to select previous image or folder.
(8) MINI-B: for USB cable connection
Placing the photoAlbum
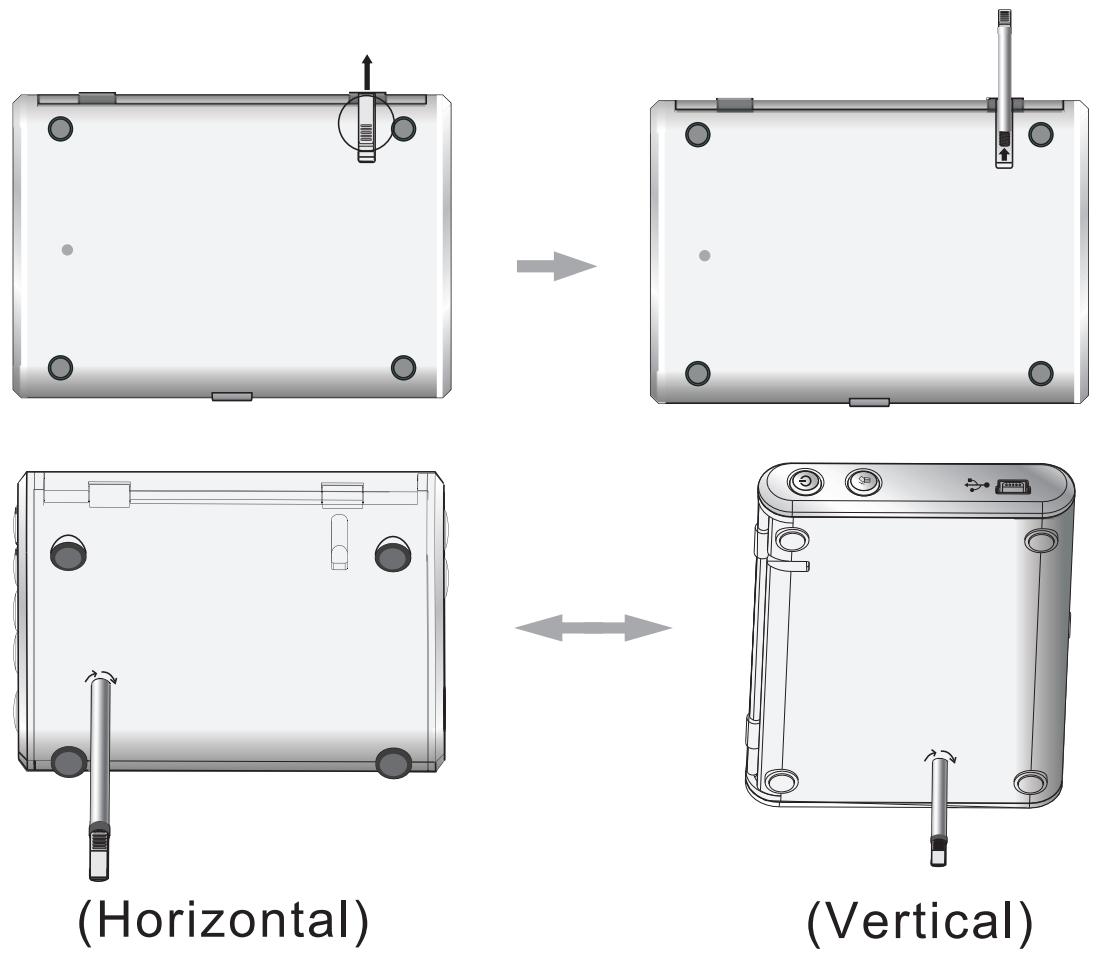
The Photo Album can be placed on the desktop using the included stand.
- Slide the standout of the storageslot in the back.
- Screw in therod into the screwhole.
- You can place the PhotoAlbum horizontally orvertically.
Electromagnetic Emissions Statement
- This device complies with Part 15 of the FCC Rules and CE. Operation is subject to the following conditions:
(1) This device may not cause harmful interference.
(2) This device must accept any interference received, including interference that may cause undesired operation.
- THIS CLASS B DIGITAL APPARATUS COMPLIES WITH CANADIAN ICES-003. / CET APPAREIL NUMÉRIQUE DE LA CLASSE B EST CONFORME À LA NORME NMB -003 DU CANADA.
Troubleshooting For Installation
If the device displays error message "Device not connected" during installation, follow these steps to resolve:
A.For Software issues (Photo Viewer software can not launch)
1. Re-insert and launch the installation CD and choose "Remove" or "Uninstall" from the Installer Menu.
2. Disconnect the USB cable and device from the computer and restart.
3. After computer has restarted, launch the installer again and reinstall the software.
NOTE: DO NOT connect the USB cable until after the software is installed.
B.For Hardware installation issues (Device not recognized)
1. With the Photo Album connected to the computerVia USB, go to the Start Menu/ Control Panels/ Add Hardware.
2. When the Dialog box comes up, click the option that says "Yes, I have already connected the hardware".
3. In the list of Devices-Find "Photo Viewer" click NEXT and this will give the status of the device. If a warning icon appears next to the Photo Album then double click the icon and select the option to "Reinstall the software".
DIGITALES FOTOALBUM
Bitteesen!
Show whole image-----the image is displayed in whole and original form.
Address C:\Documents and Settings\ADMINISTRATOR\24A1 35A1 OTD2 photo\24A1 35A1 OTD2 photo\ALBUM2
Browse for Images


0001.jpg

0002.jpg

0003.jpg




0001

0001.jpg

0002

0002.jpg

0003

0003.jpg





If at any time in the future you should need to dispose of this product please note that: Waste electrical products should not be disposed of with household waste. Please recycle where facilities exist. Check with your Local Authority or retailer for recycling advice. (Waste Electrical and Electronic Equipment Directive)


- INSTALLATIONPROCEDURE:
- Introduction
- Important Safety Instructions
- WARNING:
- Charging the Built-In Battery
- Installing the Software/ Hardware
- DO NOT LAUNCH THESOFTWARE YET.
- Downloading Photos From PC to Digital Photo Album
- Connect to PC
- Launch the Photo Album Software
- Browse images
- The images can be displayed as original whole image or cropped image.
- Select images and transferto Collection Panel
- Transfer Collection Panel to Digital Photo Album
- Important!
- Note:
- Editing Images
- Select an image to Edit
- Edit Image
- Click DONE
- Using The Function Keys
- Placing the photoAlbum
- Electromagnetic Emissions Statement
- Troubleshooting For Installation
- DIGITALES FOTOALBUM
- Bitteesen!
Brand : LENCO
Model : DPA-35
Category : Portable music player