
DPA-24 - Portable audio recorder LENCO - Free user manual and instructions
Find the device manual for free DPA-24 LENCO in PDF.


| Product type | Digital photo frame |
| Brand | LENCO |
| Model | DPA-24 |
| Supported image formats | JPG, BMP, GIF, TIF, PNG |
| Display | Integrated color screen |
| Connectivity | USB Mini-B |
| Power supply | Built-in rechargeable battery (via USB) |
| Charging time | Approximately 3 hours |
| Battery life | 2.5 hours of playback |
| Main functions | Photo viewing, slideshow, album management, image editing (crop, brightness/contrast, rotate) |
| Included software | Photo Viewer |
| Compatible operating systems | Windows 98/2000/ME/XP/Vista |
| Operating temperature | Normal room temperature |
| Maintenance | Clean with a soft, dry cloth. Do not use liquids. |
| Safety | Do not expose to water, moisture or heat sources. Do not charge for more than 12 consecutive hours. |
| Box contents | Photo frame, USB cable, installation CD-ROM, quick start guide |
Frequently Asked Questions - DPA-24 LENCO
User questions about DPA-24 LENCO
0 question about this device. Answer the ones you know or ask your own.
Ask a new question about this device
Download the instructions for your Portable audio recorder in PDF format for free! Find your manual DPA-24 - LENCO and take your electronic device back in hand. On this page are published all the documents necessary for the use of your device. DPA-24 by LENCO.
USER MANUAL DPA-24 LENCO
INSTALLATIONPROCEDURE:
** Important: Install application software before connect deviceto PC. **
1. Disconnect device USBcable from PC ifit is connected.
2. Insert CD and follow the on-screen instructionsto install "Photo Album".
3. After theapplication software has beensuccessfully installed, you could connect device to PC with theprovided USB cable.
4. Windows OS will set up hardware driver automatically.
5. Launch "Photo Viewer" and enjoy.
NOTE: The software can notinitialize with the unifit plugged in while running in automaticslide show mode.
Introduction
This Digital PhotoAlbum is a stand-alone device that is designated to transfer and store images from a PC and then display the images. Using the application softwaresupplied with this device, you can organize, edit, enhance and download the images in your PC to this device using USB.
Important Safety Instructions
WARNING:
This device will be fullycharged after three hours.Do notleave the device connected to the USBfor longer than 12 consecutivehours otherwise damage and overheating offthe device may occur.
- Do not expose this deviceto water or moisture.
- The device should be situated away from sources of highheat such as radiators or stoves.
- The device should be connected to a power supply only of the type described in the operating instructions or as marked on the unit.
- Care should be taken sothat objects are not placed on, nor liquids spilled on or inside thedevice.
- The user should not attempt to service the device beyond those means described in these operating instructions. All other servicing should be referred to qualified service personnel.
Charging the Built-In Battery
A fully charged battery gives about 2.5 hours of playtime, whenthe battery is low, "Low Battery" appears on the display and thePhoto Album shuts down inabout 10 seconds. Followingthese steps to charge the battery.
- Insert one end of the USB cable into USB on PhotoAlbum and the other end into your computer's USB port. The battery level indicator flashes on the display.
- Charging time is approximately three hours, when the battery is fully charged, the battery level indicator stops flashing.
Installing the Software/ Hardware
IMPORTANT: You must install the software to your computer before connecting the device toyour computer for the first time.
- Insert the CD-ROM and run the fileSETUP.EXE; Follow the on-screen instructions.
- The application Photo Viewer will be installed on yourcomputer and a short cut tothe application will appear on your desktop.
DO NOT LAUNCH THESOFTWARE YET.
- After the software is installed, connectthe device to the computer with the USB cablesupplied. The hardware drivers will be installed automatically. Followthe on-screen instructions andaccept the installation screens that appear.
- After hardwareinstallation is complete, launchthe Photo Viewer application from the shortcutton your PC desktop.
NOTE: If you are unable to launch the software or connect to your Photo Album, goto the Troubleshooting of the manual for more information.
Downloading Photos From PC to Digital Photo Album
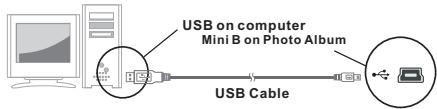
1. Connect to PC
Usethe USBcable provided. Connect the large end tothe computer and the smallend tothe device.
2. Launch the Photo Album Software
Double-click the Photo View shortcut on your desktop.
3. Browse images
Use the File Manager to browse photos on your PC.
NOTE: The device reads JPG/BMP/GIF/TIF and PNG images.
4. Select images and transfer to selected album
(I). Selectthe album(Group 1, Group 2....) InCollection Panelthat the images will be transferred to.Youcan change theAlbum name by double clicking theAlbum and entering a new name.
(ii). Select your desired photo(s) and click "to transfer the photo(s) as-is. Or click " Toedit the photo(s) beforetransferring.
(iii). Click "in the Collection Panel to remove the selected photon in the Collection Panel.
(iv). Click " " in the Collection Panel to remove all the photos in the Collection Panel.
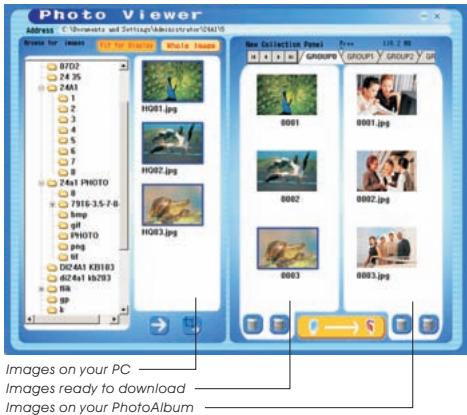
- Transfer Collection Panel to Digital Photo Album Press * to transfer the images in the Collection Panel to the Digital Photo Album.
Important!
Do not disconnect the device until the download process is complete and you have exited successfully from the Photo ViewerProgram.
1. Select an image to Edit
Select a photo you wish to edit in the image preview area. Click on "edit selected image in the pop up window.

to
2. Edit Image
In the Edit Image Window you can do the following:
- Crop: click and drag the smaller boxes (at the corners of the large box) to increase or decrease the area to be cropped.
- Reposition: click and drag in the center of the large box to change the position of the crop.
Brightness/Contrast: click and drag thesider bars.
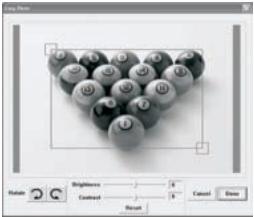
NOTE: Images that are brighter and more contrast will look better on the smaller monitor of the device.
- Rotate: Use the Rotate arrows to rotate the image clockwise or counterclockwise.
3. Click DONE
The edited image will be added to the collection panel.
Using The Function Keys
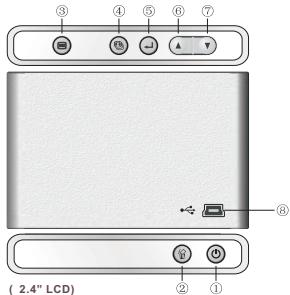
① POWER: Press and hold for 3 seconds to turn on the Photo Album.
Press and holdfor 3 seconds again to turn off the power.
② DELETE: Press once to delete the selected file.
③ ALBUMS: In browse mode, press to get access to different albums.
④ SLIDE SHOW: To start the slide show, repeatedly press and select the dura tion of each slide (1s, 3s, 6s, 12s, 1 min, 30 min) or select STOP to stop the slide show. After the slide show is on, to stop the slide show, simply press .
⑤ ENTER: Press ← to confirm your selection.
UP: Press to select next image or folder.
⑦ DOWN: Press to select previous image or folder.
⑧ MINI-B: for USB cable connection
Electromagnetic Emissions Statement
- This device complies with Part 15 of the FCC Rules and CE. Operation is subject to the following conditions:
(1) This device may not cause harmful interference.
(2) This device must accept any interference received, including interference that may cause undesired operation.
THIS CLASS B DIGITAL APPARATUS COMPLIENS WITH CANIDIAN ICES-003. / CET APPAREL NUMérique DE LA CLASSE B EST CONFORMÉ À LA NORME NMB -003 DU CANADA.
Troubleshooting For Installation
If the device displays error message "Device not connected" during installation, follow these steps to resolve:
A.For Software issues (Photo Viewer software can not launch)
1. Re-insert and launch the installation CD and choose "Remove"or "Uninstall" from the Installer Menu.
2. Disconnect the USB cable and device from the computer and restart.
3. After computer has restarted, launch the installer again and reinstall the software.
NOTE: DO NOT connect the USB cable until after the software is installed.
B.For Hardware installation issues (Device not recognized)
- With the Photo Album connected to the computerVia USB, go to the Start Menu/ Control Panels/Add Hardware.
- When the Dialog box comes up, click the option that says "Yes, I have already connected the hardware".
- In the list of Devices-Find "Photo Viewer" click NEXT and this will give the status of the device. If a warning icon appears next to the Photo Album then double click the icon and select the option to "Reinstall the software".
DIGITALES FOTOALBUM
Bitte lesen!
If at any time in the future you should need to dispose of this product please note that: Waste electrical products should not be disposed of with household waste. Please recycle where facilities exist. Check with your Local Authority or retailer for recycling advice. (Waste Electrical and Electronic Equipment Directive)


- INSTALLATIONPROCEDURE:
- Introduction
- Important Safety Instructions
- WARNING:
- Charging the Built-In Battery
- Installing the Software/ Hardware
- DO NOT LAUNCH THESOFTWARE YET.
- Downloading Photos From PC to Digital Photo Album
- Connect to PC
- Launch the Photo Album Software
- Browse images
- Select images and transfer to selected album
- Important!
- Select an image to Edit
- Edit Image
- Click DONE
- Using The Function Keys
- Electromagnetic Emissions Statement
- Troubleshooting For Installation
- DIGITALES FOTOALBUM
- Bitte lesen!
Brand : LENCO
Model : DPA-24
Category : Portable audio recorder