Cremmaet Compactccino A01 Eu01 105455 - Coffee machine CECOTEC - Free user manual and instructions
Find the device manual for free Cremmaet Compactccino A01 Eu01 105455 CECOTEC in PDF.


User questions about Cremmaet Compactccino A01 Eu01 105455 CECOTEC
0 question about this device. Answer the ones you know or ask your own.
Ask a new question about this device
Download the instructions for your Coffee machine in PDF format for free! Find your manual Cremmaet Compactccino A01 Eu01 105455 - CECOTEC and take your electronic device back in hand. On this page are published all the documents necessary for the use of your device. Cremmaet Compactccino A01 Eu01 105455 by CECOTEC.
USER MANUAL Cremmaet Compactccino A01 Eu01 105455 CECOTEC
Safety instructions 6
-
Parts and components 42
-
Before use 43
-
Operation 43
-
Cleaning and maintenance 47
-
Troubleshooting 50
-
Technical specifications 53
-
Disposal of old electrical and electronic appliances 53
-
Technical support and warranty 54
-
Copyright 54
SOMMAIRE
EN • The coding in this manual is generic and applies to all code variants of the appliance.
Read these instructions thoroughly before using the appliance. Keep this instruction manual for future reference or new users.
- The appliance can be used by people with reduced physical, sensory, or mental capabilities or lack of experience and knowledge if they have been given supervision or instruction concerning use of the appliance in a safe way and understand the hazards involved.
- The appliance is not intended to be used by children. Keep the appliance and its power cable out of the reach of children.
-
Cleaning and maintenance tasks should not be carried out by children.
-
Children must not play with the appliance.
- Check the power cable regularly for visible damage. If the power cable is damaged, it must be replaced by the official Cecotec Technical Support Service or similar qualified personnel to avoid risks.
- This appliance is designed for domestic use only and is not intended for bars, restaurants, farmhouses, hotels, motels, and offices.
- Do not immerse the cable, plug, or any other part of the appliance in water or any other liquid or expose electrical connections to water. Make sure your hands are dry before handling the plug or switching on the appliance.
- WARNING: the filling opening must not be opened during operation.
- WARNING: take precautions to avoid spillage of liquids on the cable.
- WARNING: incorrect or improper use can be dangerous for the user and damage the appliance. Use the appliance only for the purposes described in this manual. The surface of the heating element is subject to residual heat after use.
- Always disconnect the appliance from the power supply if it is left unattended and before assembly, disassembly, or cleaning.
- It is your responsibility to make sure every user is informed about the warnings and precautions stated in this instruction manual. Do not use the appliance for any use other than the one specified in this manual.
- Make sure that the mains voltage matches the voltage stated on the rating label of the appliance and that the wall outlet is earthed.
- Disconnect the appliance from the mains in any of the following circumstances:
A. Before filling up the water tank.
B. Before removing or installing any of the appliance's parts.
C. Before cleaning or maintenance.
D. When the appliance is not working properly.
E. After using the appliance.
- Empty the water tank when the appliance is not going to be used for some time.
- Make sure the appliance has cooled down completely before removing or installing parts and before cleaning it.
- Always use cold water. The use of hot water or other liquids may damage the appliance.
- Use the grinder to only grind coffee beans.
- Do not use caramelised or frozen coffee beans. This appliance can only be used with natural coffee beans.
- Never leave the appliance unattended when it is connected to a mains power supply.
- Do not let the cable protrude over the edge of the table or worktop or come into contact with hot surfaces or sharp edges.
- Place the appliance on a flat, stable surface. Do not use or place the appliance on a hot or damp surface.
- Do not use the appliance if the drip tray is not properly positioned.
- Do not use the appliance if any of its parts are damaged or if the appliance is not working properly.
- WARNING: this appliance has undergone a quality control previous to its commercialisation with the aim of ensuring its correct operation. After the quality control testing, the appliance is cleaned thoroughly, therefore, although it is unlikely to occur, there could be rests of water or coffee drops inside it.
INSTRUCTIONS DE SÉCURITÉ
- Water tank
- Coffee bean container
- Grinding level knob
- Control panel
- Cappuccinatore
- Coffee spout
- Power switch
- Drip tray
- Coffee waste tank
- Brew unit
- Side cover of the coffee machine
- Milk tank tube
- Milk tank
- Cappuccinatore
- Metal cleaning brush
- Water tank calibration reset button
Figure 2
- Temperature indicator light
- Time indicator light
- Size indicator light
- Weight indicator light
- Americano coffee icon
- Espresso coffee icon
- Cappuccino/Latte coffee icon
- Water/milk icon
- Double size/Rinse/OK icon
- Menu/Exit icon
- No coffee in tank indicator light
- Double size indicator light
- Open side cover indicator light
- Empty water tank indicator light
- Descaling indicator light
- Blocked brew unit indicator light
- Indicator light for accumulation of dregs in waste tank
Figure 6 - Cappuccinatore frame
1. Release tabs
Figure 7
-
Steam knob
-
Rubber part
NOTE:
The graphics in this manual are schematic representations and may not exactly match the device.
2. BEFORE USE
- This appliance is packaged in a way as to protect it during transport. Take the appliance out of its box and remove all packaging materials. You can keep the original box and other packaging elements in a safe place. This will help you prevent damage to the appliance when transporting it in the future. In case the original packaging is disposed of, make sure all packaging materials are recycled accordingly.
- Make sure all parts and components are included and in good conditions. If there is any piece missing or in bad conditions, contact the official Cecotec Technical Support Service immediately.
Box content
- Cremmaet Compactccino Superautomatic coffee machine
- Instruction manual
- Plastic cleaning brush
- Metal cleaning brush
- Rubber seals for replacement
3. OPERATION
Preliminary steps before brewing the first coffee
- Place the appliance on a flat and stable surface.
- Remove and clean the water tank by dragging it upwards and fill it with water. Then put it back in the same position. You will notice that it inserts smoothly and fits perfectly.
- Fill the coffee bean container after lifting the lid You must fill the container a little below the limit allowed by the lid to be able to close it.
- Plug the coffee machine into a mains socket.
- Switch on the machine, test it and wipe the coffee spout with a damp cloth.
ENGLISH
NOTE: the water may not come out at the ideal temperature during the first few uses. This is normal until the water pipes are filled with hot water and the machine reaches the desired temperature.
- Press and hold the power switch for 3 seconds to switch off the coffee machine.
Preparing an Espresso
- Adjust the height of the coffee spout and place a cup underneath. To adjust, simply slide the spout up or down.
- Press the Espresso icon to brew 1 espresso coffee.
-
As the machine starts to operate, readjust the parameters if desired.
-
During grinding (the control panel display shows "g" indicator light), press + or - to adjust the amount of coffee powder. During coffee preparation ("ml" is displayed on the right-hand side of the display), press + or - to adjust the number of millilitres of coffee.
- Press on the double size icon to brew 2 cups of coffee.
- Press EXIT to finish the operation.
Preparing an Americano
- Adjust the height of the coffee spout and place a cup underneath. To adjust, simply slide the spout up or down.
- Press the Americano icon to prepare an Americano coffee.
- As the machine starts to operate, readjust the parameters if desired.
- During grinding (the control panel display shows "g" indicator light), press + or - to adjust the amount of coffee powder. During coffee preparation ("ml" is displayed on the right-hand side of the control panel display), press + or - to adjust the amount of liquid coffee. Press on the double size icon to brew 2 cups of Americano coffee.
- Press EXIT to finish the operation.
Installing the milk tank
- The milk tank is fitted to the bottom grid due to the shape of its base.
- Open the milk tank lid and fill it to the desired level. Then, close the lid. Keep in mind that if you put more milk than you are going to use, it will stay out of the refrigerator longer than it should, which could spoil and cause unpleasant odours.
- Fit the tube connecting the milk tank to the coffee machine as shown in figure 1. To do this, you must connect the tube on the milk tank lid to the inlet on the right side of the coffee spout.
Preparing hot water or milk (using the milk tank)
- Adjust the height of the coffee spout and place a cup underneath. To adjust, simply slide the spout up or down.
- Press the Water/milk icon to dispense water.
- Press and hold the Water/milk icon for 3 seconds to prepare a glass of milk.
- If you want to stop the water or milk flow because you already have enough water or milk, press the Menu/Exit icon to stop the flow.
Preparing cappuccino or latte (using the milk tank)
- Adjust the height of the coffee spout and place a cup underneath. To adjust, simply slide the spout up or down.
- Press the Cappuccino/Latte icon to prepare a Cappuccino.
- Press and hold Cappuccino/Latte for 3 seconds to prepare a latte.
- If you want to stop the water or milk flow because you already have enough water or milk, press the Menu/Exit icon to stop the flow.
Warning: clean the milk spout immediately after the end of the process. Prevent milk residues from blocking the outlet and creating unpleasant odours.
Adjusting the steam level in the cappuccinatore
Fig. 6 and 7
- Remove the cappuccinatore from the appliance by pressing on both release tabs on the sides and pulling downwards.
- At the top, you will see a circular knob with the letters H and L, and an arrow. Turn the steam knob to the desired side until the H matches the arrow. This will increase the steam flow and improve milk frothing.
- Put the cappuccinatore back in place, aligning it in its natural position in the appliance and pushing it upwards. You will hear a click.
Adjusting the grinding level
Fig. 3
WARNING: when you need to adjust the grind level of the coffee beans, adjust the grinding level knob when the grinder is in operation; otherwise, the grinder may be damaged.
Adjust the grinding level according to the degree of roast of the coffee beans you use (medium roast beans are recommended). If the coffee comes out too slowly during preparation (the coffee powder is too fine), turn the grinding level knob clockwise until a coarser grind is obtained, like shown in figure 3. If during preparation the coffee comes out too fast and too clear (the coffee powder is too coarse), turn the grinding level knob counterclockwise until a finer grind is obtained.
ENGLISH
If the coffee powder is too coarse, turn the grinding level knob counterclockwise for a finer grind; if the coffee powder is too fine, turn the grinding level knob clockwise for a coarser grind.
Points to consider
- The knob is set to the maximum value during the first few uses. It is recommended to adjust it after the first 100-150 cups. The more repetitive the grinding process is, the more the grinder will be adjusted, and the less imperfections will be found in the future.
- Do not overfill the coffee bean container or leave the coffee beans inside for a long time so that they do not get too wet and lose freshness (especially on humid days). Moisture will affect the grind, brew, and taste of the coffee.
- If the coffee beans are wet, empty the container and fill it with fresh coffee beans for better taste. Turn the grinding level knob to maximum and try grinding the coffee beans. If the coffee machine is working properly, return the knob to its original position. This will check if there are any beans left inside.
- If the coffee beans do not grind properly, it is possible that the coffee beans are too wet or that there is too much coffee bean oil accumulated inside. In the latter case, add grinder cleaner to the bean container and try grinding again.
Menu and settings
In standby mode, press and hold the Menu icon for 3 seconds to access the settings.
Temperature settings
Press the Menu icon to access the temperature setting, press + or - to set the coffee temperature.
Automatic shutdown settings
Press the Menu icon twice to access the automatic shutdown settings. You can press + or - to select the time, it can be set to 0.5 h, 1 h, 2 h.... 24 h.
Start-up settings
Press the Menu icon three times to access the start-up settings, this function is only for professionals or after-sales personnel.
Manufacturing information
Press the Menu icon five times to access the manufacturing information, such as the date and serial number.
Warnings and cautions
1. Empty coffee bean container
When the No coffee in tank indicator light lights up, the coffee bean container is empty. Fill up the tank.
2. Double coffee
When the Double size (x2) indicator light lights up, the double coffee function is activated. In this function, the appliance will prepare two coffees at the same time.
The appliance will not prepare the second coffee if the coffee bean container runs out of coffee beans during the preparation of the first coffee.
3. Open panel
When the Open side cover indicator light lights up, the right side cover is open. Please, close it.
4. Empty water tank
When the Empty water tank indicator light lights up, the water tank is empty or low on water. Please, fill it up.
5. Brew unit not installed
When the Brew unit indicator light lights up, the brew unit is not installed. Please, install it.
6. Coffee waste tank
When the indicator light for accumulation of dregs in waste tank lights up, the waste tank is not properly positioned or installed or it is full and needs to be emptied. Empty the waste tank every 8 cups of coffee.
7. Descaling
When the descaling indicator light lights up, the appliance needs to be descaled. Refer to the "Descaling" subtitle in the "Cleaning and maintenance" section.
8. Warning of water shortage in the internal pipeline.
When the indicator light for water shortage in the internal pipeline lights up (Fig. 5), there is water shortage in the internal pipeline of the coffee machine. Make sure that there is water in the tank and that it is properly installed. Press the Exit icon to restart the water pump and expel the air accumulated in the internal pipes.
4. CLEANING AND MAINTENANCE
Cleaning/rinse
-
Adjust the height of the coffee spout and place a cup underneath.
-
Press the Rinse icon every 3 seconds to start the cleaning/rinse. This function uses about 60 ml of water and ends automatically at the end of cleaning. It is used to remove possible coffee residues in the pipes.
Dismantling parts for cleaning
Fig. 4
1) Pull the water tank upwards by grasping it at the back and guide it out.
2) Pull the right side cover until it is removed.
3) Press where the blue arrow indicates at number 3 and pull the brew unit outwards for cleaning.
4) The drip tray can be removed for cleaning by pulling it outwards. You will see the coffee
ENGLISH
dregs and all the coffee residues that have accumulated over time. You can use the plastic brush to clean everything. Afterwards, dry it before replacing it.
ATTENTION: when reinstalling the brew unit, a snapping noise will be heard; if you do not hear it, disassemble the brew unit again and reinsert it.
ATTENTION: check whether the water tank is at the same level as the top of the appliance, so that it is positioned correctly. If this is not the case, push the water tank down until it clicks into place.
Daily maintenance
Daily maintenance is important to extend the lifespan of the coffee machine and to always obtain the best coffee.
| Components | Maintenance |
| Brew unit | Remove the brew unit and wash it under running water from the top, remove the coffee dregs from the surface of the filter. Clean the brew unit by hand every 3 days.Do not wipe lubricating oil from the bottom and centre of the brew unit.Do not wash it in the dishwasher. |
| Drip tray and coffee waste tank | Remove the drip tray and the coffee waste tank after each use, rinse under running water and wipe clean with a cloth.Clean them at least every two days. |
| Water tank | Rinse the tank under running water every 3 days. |
| Coffee bean container/grinder | Clean the coffee bean container weekly. Use a soft, dry cloth to wipe oil/ coffee grounds from the inside.If a large amount of coffee oil has remained in the coffee bean container, it means that a large amount of oil could be inside the grinder, clean it.To clean the coffee bean container and the grinder, you can use a grinder cleaner for coffee machines: place the cleaner inside the container and prepare an espresso with the maximum amount of coffee.Then, remove the brew unit again and manually clean the debris inside. |
| Ground coffee channel | Open the right panel, remove the brew unit, and clean the ground coffee channel with a soft cloth on a weekly basis. |
| Milk unit | Fill the milk tank with water and press the milk icon several times, or at least until the water runs clear. This will remove the milk residue from the inside of the cappuccinatore and milk will be frothed for a longer period of time. |
Descaling
A. Pour the descaler into a container with clean water and wait for it to dissolve completely.
B. Press and hold the Menu icon, the standby mode will display the descaling indicator light.
C. Take out the water tank, pour the descaling product into the tank and add clean water until the tank is completely full.
D. Press OK to start descaling.
E. Once emptied, remove the water tank, and add clean water.
F. Press the OK icon again, the appliance will start the wash cycle.
G. When the washing cycle is finished, the appliance will return to standby mode.
0-rings
O-rings are included with the coffee machine and brushes for replacement in case of wear and tear. When they do, you will notice unwanted coffee or water leaks. To replace them, you can use any pointed tool to remove the old ones and place the new ones in exactly the same position.
Cleaning the cappuccinatore
Fig. 1, 6 and 7
A metal brush specially designed to clean the milk and cappuccinatore spouts is included with the coffee machine, the plastic brush, and the O-rings, as the milk can dry out relatively easily and clog the duct.
WARNING: the cappuccinatore must be cleaned with milk after each use if it is not to be used for a day or more. The milk can dry out inside and the ducts can become clogged, leading to poor foaming, bad odours, or a shortened lifetime of the appliance.
The cappuccinatore can be cleaned manually or using detergent. To carry out the cleaning, follow the instructions below.
Cleaning with detergent
- Connect the milk tube to the tank lid and to the cappuccinatore.
- Separate the milk tube and the lid from the tank to clean it separately.
- Place the milk tube and the lid in a container with detergent.
- Turn the appliance on and press the milk icon for 3 seconds to allow the milk tube to suck in the detergent and allow it to run through the internal ducts.
NOTE: if the appliance has not been cleaned for a long time, you will notice that the resulting liquid contains whitish solid residues. Do not worry, it is the remains of milk that have solidified inside the cappuccinatore.
ENGLISH
- Repeat the process until the resulting liquid is as clear as possible.
- When finished, repeat the process again using only water in the container until all traces of detergent have been removed from the inside of the cappuccinatore and the ducts.
- Reassemble the entire tank and enjoy your frothed coffee.
Manual cleaning
- Remove the cappuccinatore from the appliance. To do so, you will have to press both release tabs on the sides and pull downwards.
- You will notice that the cappuccinatore is composed of three parts: a small hard plastic frame, a steam knob, and a rubber part in which the steam knob is placed. You can separate the rubber part from the frame by pulling outwards. Do this.
- Once you have these two parts separated, pull the steam knob outwards to remove it.
- With the three parts separated and differentiated, use the metal cleaning accessory to insert it into as many holes as possible and manually descale the solidified milk residues. In addition, use detergent and plenty of water to get all three parts clean inside and out.
- When finished, reassemble the three parts in reverse order of disassembly.
NOTE: also, make sure to clean the tube that connects the milk tank to the cappuccinatore. There may be solidified milk residues.
5. TROUBLESHOOTING
In the event of a fall or malfunction, unplug the appliance immediately from the mains socket. If a mechanical failure occurs in the appliance, please contact the official Cecotec Technical Support Service. If the problem persists, contact only authorised technicians, the distributor, or the dealer.
| Number | Problem | Num | Possible cause | Solution |
| 1 | The control panel display shows the water tank indicator light | 1.1 | Water tank is out of water. | Fill the water tank and insert it into the appliance. |
| 1.2 | It is necessary to calibrate the water level sensor. | When the appliance is in standby mode:1. Remove the water tank.2. Remove the sticker from the reset button on the water level sensor located on the corner of the tank housing. Then, press and hold the reset button for 6 seconds.3. Unplug the appliance.4. Plug in and switch on the appliance after 10 seconds. Insert the tank when you have filled it. | ||
| 2 | The display shows a square of dashed lines (Fig. 5), and the appliance does not dispense water | 2.1 | The water tank is not correctly installed. | Install the tank properly inside the coffee machine.Push the bottom side all the way in. |
| 2.2 | No water flows through the pump. | Open the rear panel and inject water into the water pump. | ||
| 2.3 | The internal piping is blocked. | Please contact the official Cecotec Technical Support Service. | ||
| 3 | The display shows a square of dashed lines (Fig. 5), press the Exit icon and the water will exit, but the warning cannot be removed | 3.1 | Water flow meter wires are coming loose or the water flow meter is broken. | Please contact the official Cecotec Technical Support Service. |
| 4 | Watery/light coffee | 4.1 | Grinding too fine. | Turn the grind level knob to obtain a coarser ground coffee. |
| 4.2 | After filling the container with dark roasted or oily coffee beans, the grinder blades are sticky, and the coffee is not ground. | Increase the grinding level or contact Technical Support. | ||
| 4.3 | Damp coffee beans and dregs block the grinder. | Remove the wet coffee beans and clean the container and add the coffee bean cleaner. |
| Number | Problem | Num | Possible cause | Solution |
| 5 | No coffee comes out | 5.1 | The water tank is not correctly installed. | Install the tank securely inside the coffee machine. |
| 5.2 | Filter blocked. | Clean or replace the filter. | ||
| 5.3 | The internal piping of the coffee machine is blocked. | Descale the coffee machine If this does not solve the problem, contact the official Technical Support Service of Cecotec. | ||
| 6 | The grinder does not work | 6.1 | Grinder blocked by foreign objects. | Remove foreign objects from the grinder. |
| 6.2 | The grinder cables are loose. | Please contact the official Cecotec Technical Support Service. | ||
| 6.3 | The grinder motor is broken. | Please contact the official Cecotec Technical Support Service. | ||
| 7 | The brew unit does not work | 7.1 | Broken transformer. | Please contact the official Cecotec Technical Support Service. |
| 7.2 | The microswitch is broken. | Please contact the official Cecotec Technical Support Service. | ||
| 8 | Milk does not come out with foam | 8.1 | Cappuccinatore is dirty | Follow the steps described in the section “CLEANING THE CAPPUCCINATORE”. |
| 8.2 | Milk is not whole or not cold | It is the fat in the milk and the temperature of the milk that cause the greatest foaming effect. If the milk you are using is warm or hot, it will be difficult to get a good amount of foam. The same applies if you use skimmed or semi-skimmed milk. |
6. TECHNICAL SPECIFICATIONS
Product reference: EU01_105452 / EU01_105453 / EU01_105454 / EU01_105455
Product: Cremmaet Compactccino Black Superautomatic Coffee machine / Cremmaet Compactccino Black Rose Superautomatic Coffee machine / Cremmaet Compactccino White Rose Superautomatic Coffee machine / Cremmaet Compactccino Black Silver Superautomatic Coffee machine
Rated Power: 1100 - 1350 W (Coffee)
Voltage: 220-240 V
Frequency: 50/60 Hz
Technical specifications may change without prior notification to improve product quality.
Made in China | Designed in Spain
7. DISPOSAL OF OLD ELECTRICAL AND ELECTRONIC APPLIANCES

This symbol indicates that, according to the applicable regulations, the product and/or batteries must be disposed of separately from household waste. When this product reaches the end of its shelf life, you should
ENGLISH
dispose of the cells/batteries/accumulators and take them to a collection point designated by the local authorities.
Consumers must contact their local authorities or retailer for information concerning the correct disposal of old appliances and/or their batteries.
Compliance with the above guidelines will help protecting the environment.
8. TECHNICAL SUPPORT AND WARRANTY
Cecotec shall be liable to the end user or consumer for any lack of conformity that exists at the time of delivery of the product under the terms, conditions, and deadlines established by the applicable regulations.
It is recommended that repairs be carried out by qualified personnel.
If at any moment you detect any problem with your product or have any doubt, do not hesitate to contact the official Cecotec Technical Support Service at +34 963 210 728.
9. COPYRIGHT
The intellectual property rights over the texts in this manual belong to CECOTEC INNOVACIONES, S.L. All rights reserved. The contents of this publication may not, in whole or in part, be reproduced, stored in a retrieval system, transmitted, or distributed by any means (electronic, mechanical, photocopying, recording or similar) without the prior authorization of CECOTEC INNOVACIONES, S.L.
1. PIÈCES ET COMPOSANTS
Image 1
5. PROBLEEMOPLOSSING
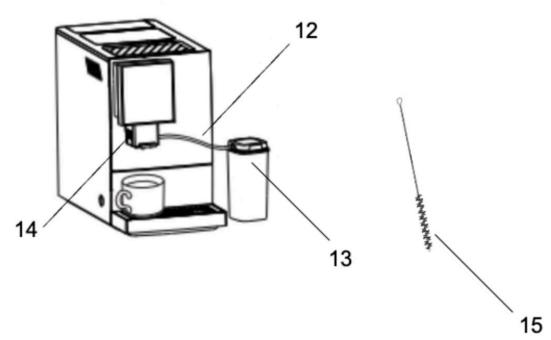
Fig. / Img. / Rys. / Obr. 1

Fig. / Img. / Rys. / Obr. 2
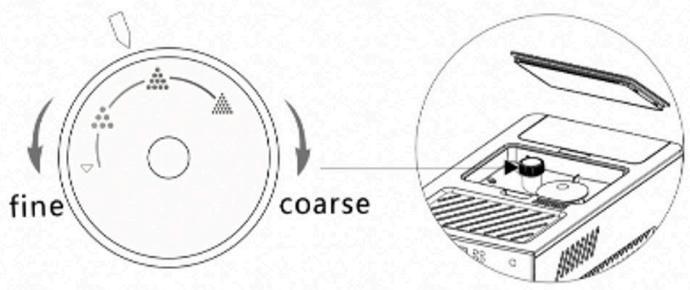
Fig. / Img. / Rys. / Obr. 3

Fig. / Img. / Rys. / Obr. 4

Fig. / Img. / Rys. / Obr. 5

Fig. / Img. / Rys. / Obr. 6

Fig. / Img. / Rys. / Obr. 7
www.cecotec.es
- SOMMAIRE
- INSTRUCTIONS DE SÉCURITÉ
- FIGURE 2
- FIGURE 6 - CAPPUCCINATORE FRAME
- RELEASE TABS
- FIGURE 7
- NOTE
- BEFORE USE
- BOX CONTENT
- OPERATION
- PRELIMINARY STEPS BEFORE BREWING THE FIRST COFFEE
- ENGLISH
- PREPARING AN ESPRESSO
- PREPARING AN AMERICANO
- INSTALLING THE MILK TANK
- PREPARING HOT WATER OR MILK (USING THE MILK TANK)
- PREPARING CAPPUCCINO OR LATTE (USING THE MILK TANK)
- ADJUSTING THE STEAM LEVEL IN THE CAPPUCCINATORE
- ADJUSTING THE GRINDING LEVEL
- POINTS TO CONSIDER
- MENU AND SETTINGS
- TEMPERATURE SETTINGS
- AUTOMATIC SHUTDOWN SETTINGS
- START-UP SETTINGS
- MANUFACTURING INFORMATION
- EMPTY COFFEE BEAN CONTAINER
- DOUBLE COFFEE
- OPEN PANEL
- EMPTY WATER TANK
- BREW UNIT NOT INSTALLED
- COFFEE WASTE TANK
- DESCALING
- WARNING OF WATER SHORTAGE IN THE INTERNAL PIPELINE
- CLEANING AND MAINTENANCE
- CLEANING/RINSE
- DISMANTLING PARTS FOR CLEANING
- FIG. 4
- DAILY MAINTENANCE
- 0-RINGS
- CLEANING THE CAPPUCCINATORE
- CLEANING WITH DETERGENT
- MANUAL CLEANING
- TROUBLESHOOTING
- TECHNICAL SPECIFICATIONS
- DISPOSAL OF OLD ELECTRICAL AND ELECTRONIC APPLIANCES
- TECHNICAL SUPPORT AND WARRANTY
- COPYRIGHT
- PIÈCES ET COMPOSANTS
- IMAGE 1
- PROBLEEMOPLOSSING
Brand : CECOTEC
Model : Cremmaet Compactccino A01 Eu01 105455
Category : Coffee machine