
EVOTOUCH - Thermostat HONEYWELL - Free user manual and instructions
Find the device manual for free EVOTOUCH HONEYWELL in PDF.
| Product Type | Wireless programmable room thermostat |
| Brand | Honeywell |
| Model | Evotouch |
| Power Supply | Mains base + rechargeable battery (approximately 2 hours autonomy off base) |
| Number of zones | Up to 8 zones |
| Screen | Color touch screen |
| Dimensions (approx.) | 120 x 80 x 25 mm (off base) |
| Weight (approx.) | 200 g (with battery) |
| Communication | Wireless Radio Frequency (RF) |
| Main functions | Time programming, manual override, eco mode, holiday mode, start-up optimization, outdoor temperature display |
| Care and cleaning | Wipe with a soft, dry cloth. Do not use abrasive products or solvents. |
| Safety | Compliant with current radio frequency standards. Use only the supplied mains adapter. |
| Spare parts and repairability | Rechargeable battery, wall bracket, table stand. The controller has an upgrade port for future updates. |
| General information | Manufactured for Honeywell Technologies Sàrl, Switzerland. Support and updates on the Honeywell website. |
Frequently Asked Questions - EVOTOUCH HONEYWELL
User questions about EVOTOUCH HONEYWELL
0 question about this device. Answer the ones you know or ask your own.
Ask a new question about this device
Download the instructions for your Thermostat in PDF format for free! Find your manual EVOTOUCH - HONEYWELL and take your electronic device back in hand. On this page are published all the documents necessary for the use of your device. EVOTOUCH by HONEYWELL.
USER MANUAL EVOTOUCH HONEYWELL
Congratulations on purchasing the Honeywell evotouch multi-zone 'wireless' comfort controller. The evotouch allows independent temperature control of up to eight zones completely automatically according to your needs.
This independent zone control means that only the occupied areas of your home are controlled at a comfortable temperature whilst the unused areas remain at a reduced temperature resulting in optimal comfort combined with maximum energy saving.
As evohome is a 'wireless' solution there is no need to run wires around your home, making installation and any future upgrades simple and convenient.
Keep in touch with your installer or visit the Honeywell website to learn of future upgrades that can deliver even more comfort and convenience into your evohome system.
Features
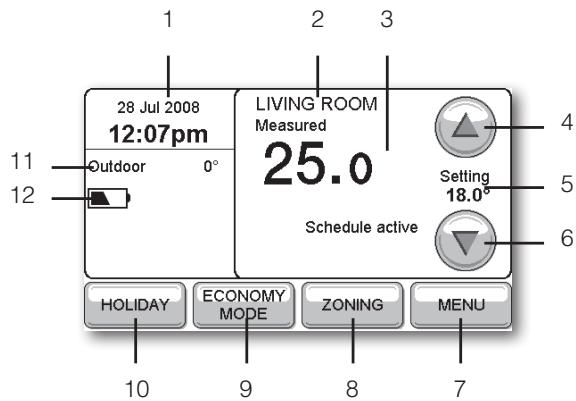
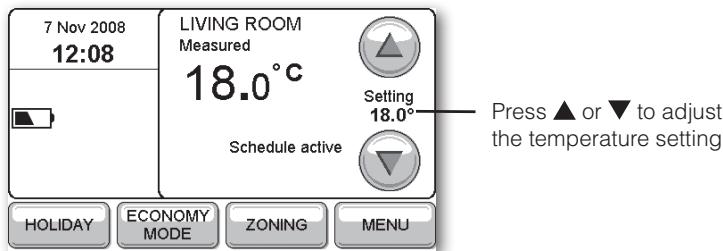
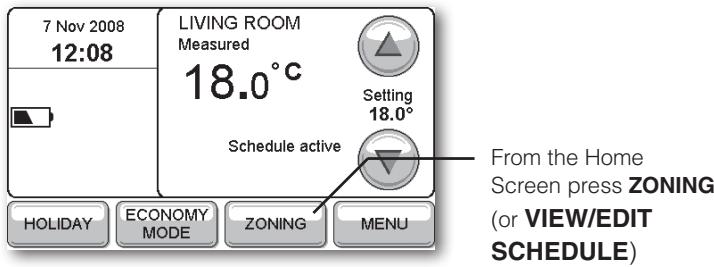
1 Current date and time
The clock is automatically adjusted for Daylight Saving Time.
2 Current zone
Shows the zone currently being controlled.
3 Measured temperature
Shows the measured temperature in the current location.
4 Increase temperature setting
Increases the set temperature until the next period.
5 Current temperature setting
Shows the set temperature defined by the schedule, or an override.
6 Reduce temperature setting
Reduces the set temperature until the next period.
7 Select other options
Allows you to display an overview of the temperatures in all zones, edit schedules, and change other settings.
8 Display/set zones
Allows you to define different schedules for different areas of your home.
9 Set economy mode
Reduces the temperature settings in all zones by 3^ at a single button press, to save energy.
10 Set holiday mode
Reduces the temperature while you are away from home, resuming normal operation on your return.
11 Outdoor temperature
Shows the outdoor temperature, when available.
12 Battery level
Shows the battery level when evotouch is not fitted to the dock.

Introduction
The Honeywell evotouch is a wireless programmable controller which can individually control up to 8 zones. It will control your heating system efficiently to provide maximum comfort and energy savings.
The evotouch is controlled via a large touch-screen display, with an intuitive user interface for easy operation.
The evotouch supports a wide range of applications, from simple single zone boiler control to multi-zone underfloor heating and radiator control using our proven RF (Radio Frequency) technology for communication with the peripheral devices.
Mounting
You can either mount your evotouch on a wall mounted dock, or on a table-top stand. For convenience you can remove evotouch from the dock and program the unit in your hands. When removed from the stand the evotouch will remain powered for about 2 hours before needing to be replaced for charging.
Wireless control
The evotouch uses wireless communication to transmit and receive information from the other control devices in the system. These can include, for example, individual radiator controllers, room sensors, under floor heating controllers, and other wireless devices depending on the application.
Zoning
You can independently control the temperature in individual rooms, or groups of rooms, according to different schedules. This allows you to optimise comfort and minimise energy usage, reducing your fuel bills.
Optimum start
You can optionally configure evotouch to automatically calculate when to start heating to achieve the correct temperature setting at the time you have specified.
Future expansion
With evotouch you have invested in an expandable system. An upgrade port on the controller allows your installer to update the unit to take advantage of future developments and new functionality.
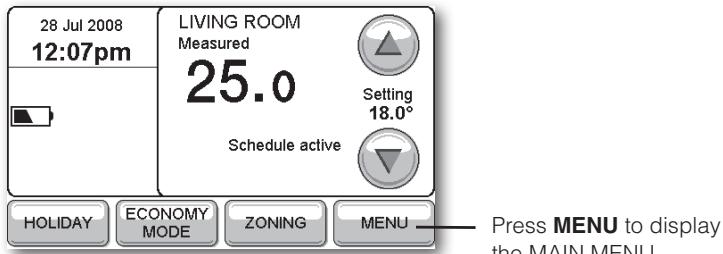
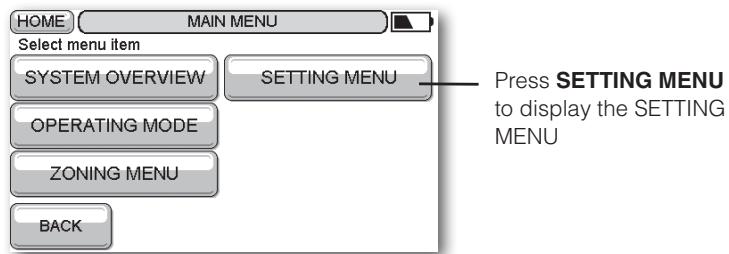
Changing the time and date
- If necessary press the main screen to display the home screen:
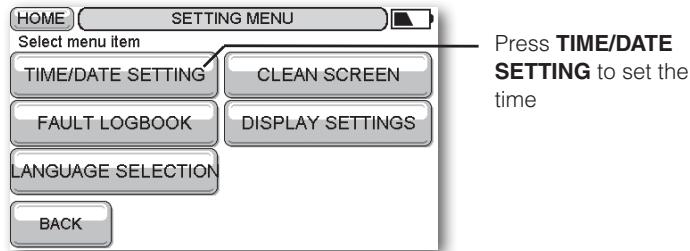
To set the time
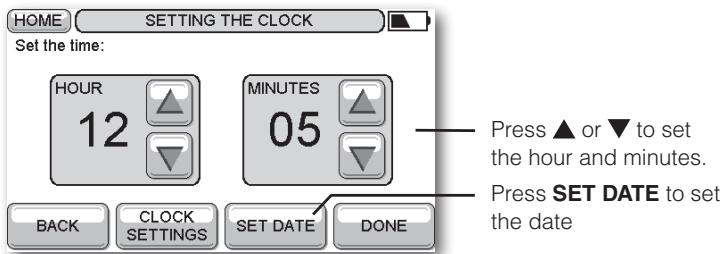
You can optionally press CLOCK SETTINGS to change the time format between 24 HR and 12 HR, and choose automatic Daylight Saving time.
To set the date
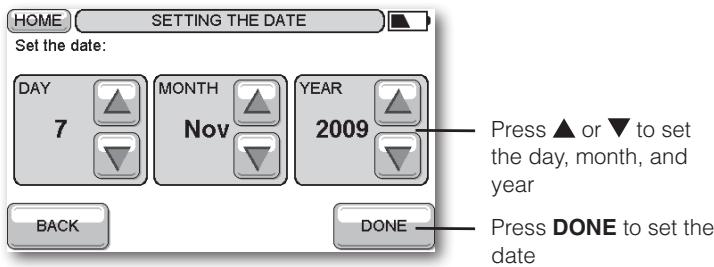
NOTE: Pressing BACK from any screen cancels any changes you made and returns to the previous screen.
Manual override
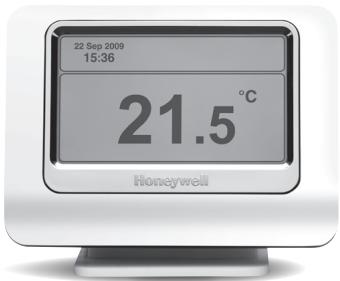
The standby display shows the measured temperature from evotouch's internal sensor, and the date and time:
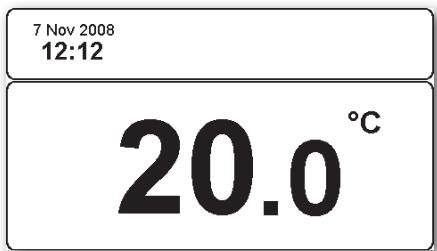
Either a static or a dynamic screenshot is available.
- Press anywhere on this screen to display the Home Screen.
To override the programmed temperature
The temperature will stay at the value you have set until the start of the next scheduled period. The time is shown below the measured temperature; for example: Set until 18:00.
To change the override duration
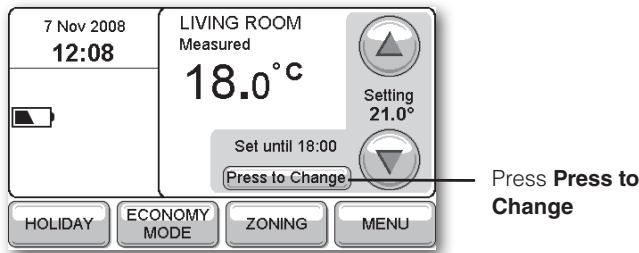
The following screen is displayed:
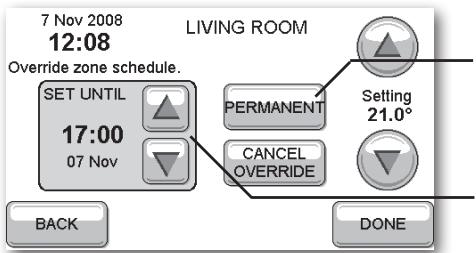
- Press DONE to confirm.
Press SET PERMANENT to make the override permanent
Press or to specify when the override should end
Once you have created an override you can change or cancel it at any time by pressing Press to Change on the Home Screen.

Changing the schedules
If there are several zones the next screen shows information about the first zone. Press PREVIOUS ZONE or NEXT ZONE to change zone.
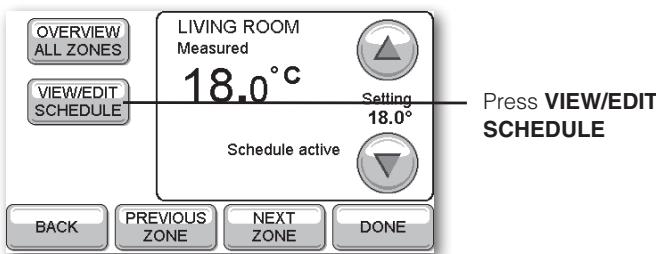
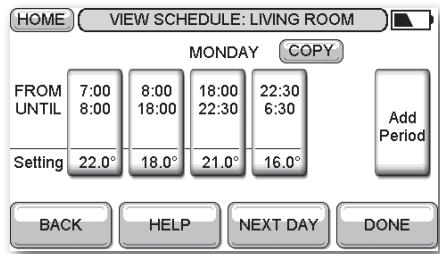
The VIEW SCHEDULE screen then shows you the schedule for MONDAY and allows you to edit it:
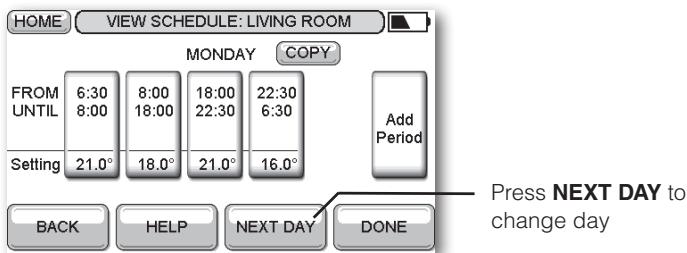
To edit a period
- Press the button of the period you want to edit.
The following screen is displayed:
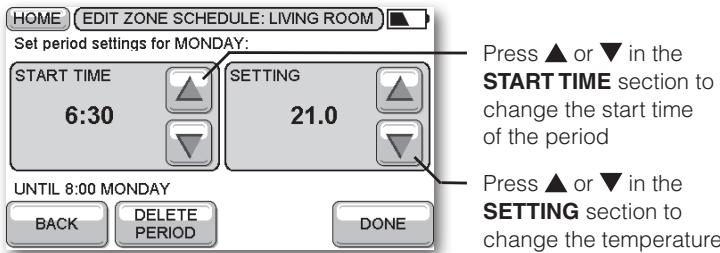
When you change the start time, the end time of the previous period will automatically be changed to match.
- Press DONE to show the changes on the VIEW SCHEDULE screen for the day.
If you have more than one zone you are given the option of copying the schedule to another zone.
Adding and deleting periods
To add a period
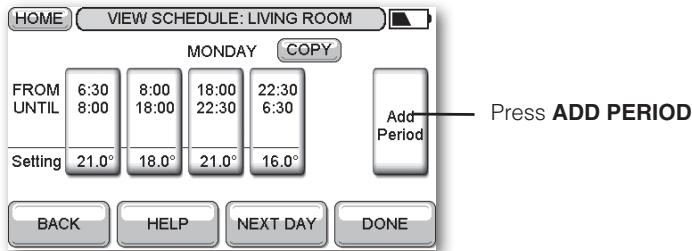
- Set the START TIME and SETTING for the new period, as described in To edit a period, page 6.
The existing periods will be adjusted accordingly. - Press DONE to show the new period on the VIEW SCHEDULE screen for the day.
To delete a period
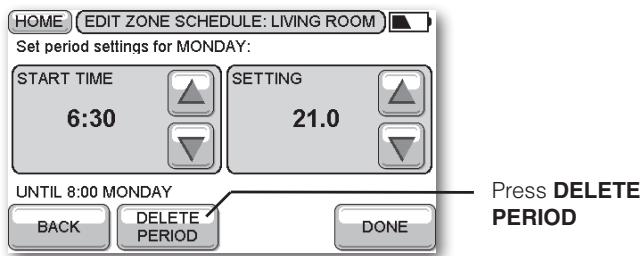
NOTE: You cannot delete the last remaining period.
To copy the schedule to other days
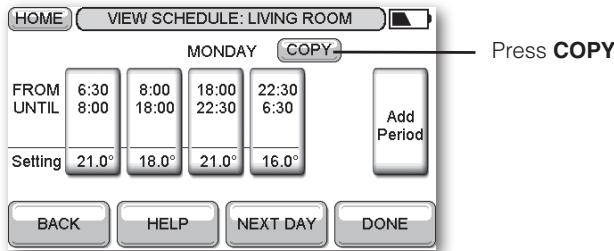
This screen lets you specify which days to copy:
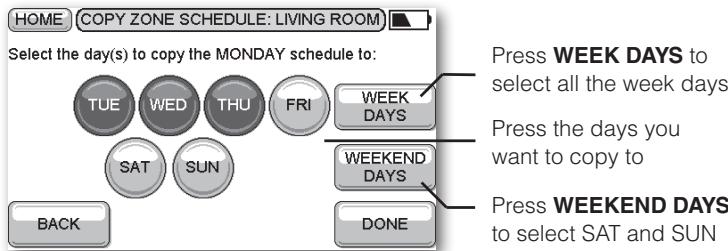
- Press DONE.
A screen will confirm which days the schedule has been copied to. - Press DONE to return to the VIEW SCHEDULE screen.
When you press DONE you will then be given the option of copying the schedule to another zone, or editing another schedule.
- Select an option, or press DONE to return to the ZONING menu.
Using Help
Many of the evotouch screens provide a HELP button, to provide additional information about what you need to do:
- Press HELP to display a help screen:
HOME
VIEW SCHEDULE
Each zone has a 7 day comfort schedule with a maximum of 6 comfort periods per day. Each comfort period has a start/stop time and temperature. By adjusting the period start time the end time of the previous period is automatically adjusted. Periods can be edited, added and deleted. A comfort schedule for a day can be copied to one or more days. The complete weekly zone schedule can also be copied to other zones.
BACK
When you've read the help press BACK to return
Honeywell Control Systems Ltd.
Arlington Business Park,
Bracknell, Berkshire
RG12 1EB
Technical Help Desk: 08457 678999
www.honeywelluk.com
Manufactured for and on behalf of the Environmental and Combustion Controls Division of Honeywell Technologies Sārl, ACS-ECC EMEA, Z.A. La Pièce 16, 1180 Rolle, Switzerland by its Authorised Representative Honeywell Inc.
Troubleshooting
This section provides suggested answers to typical problems that users may encounter with evotouch.
| Problem | Solution |
| Display stays blank | Check that power is reaching the wall plate/table-top stand. Check that power is connected correctly. |
| The evotouch fails when removed from wall plate/table-top stand. | Check that batteries are fitted correctly. Check that insulation tab has been removed. |
| I set an override to the temperature, but now it's reverted to the scheduled temperature | The override will only last until the end of the current scheduled period, unless you have explicitly set an end time, or chosen PERMANENT. |
| How do I edit the end time of a period? | The end of a period is automatically set to the beginning of the next period. Edit the START TIME of the next period. |
| When I try to add a period nothing happens | You may be trying to add a period with the same start time as an existing period. Try again with a different start time. |
| When I add a period it changes my existing periods. | When you add a period, the START TIME you specify will determine where it gets inserted in between the existing periods, and the previous period will be truncated to accommodate the new period. |
| The heating turned on before the time I specified in the period | If optimization operation has been selected, the evotouch automatically predicts the time it will take for the heating to achieve the temperature you have set. |
DEUTSCH
Automation and Control Solutions
Honeywell GmbH
Hardhofweg
D-74821 Mosbach / Germany
Tel.: 0800 / 224 46 65
Fax: 0800 / 0466 388
info.haustechnik@honeywell.com
Help line: 02/728.23.31
Honeywell SA Honeywell NV
72, chemin de la Noue Hermes Plaza, Hermeslaan 1H
74380 Cranves Sales 1831 Diegem
Tel. 04 50 31 67 30 Tel. 02/728.23.31
www.honeywell-confort.com www.honeywell.be
ACS Environmental Controls
Via Philips, 12
20052 Monza
Tel 039-21651 Fax 039-2165402
© 2009 Honeywell International Inc.