BCH160B-I - Humidifier BIONAIRE - Free user manual and instructions
Find the device manual for free BCH160B-I BIONAIRE in PDF.
User questions about BCH160B-I BIONAIRE
0 question about this device. Answer the ones you know or ask your own.
Ask a new question about this device
Download the instructions for your Humidifier in PDF format for free! Find your manual BCH160B-I - BIONAIRE and take your electronic device back in hand. On this page are published all the documents necessary for the use of your device. BCH160B-I by BIONAIRE.
USER MANUAL BCH160B-I BIONAIRE
Holmes Products (Europe) Ltd.
1 Francis Grove
London SW19 4DT
England
Fax: +44 (0)20 8947 8272
Email: enquiriesEurope@jardencs.com
Website address: www.bionaire.com/europe
UK - Free phone Customer Service Helpline – 0800 052 3615
Holmes Products France
Czech Republic: +420 48 513 03 03
Germany: +49 89 5480195-0
Hungary: +36 1 37 17 970
Latvia +371 7514081
Lebanon: +961 1 81 49 46
Lithuania +370 52 772388
Netherlands: +31 79 36 37 310
Norway: +47 55982770
© 2010 Sunbeam Products, Inc. doing business as Jarden Consumer Solutions. All rights reserved. Distributed by Holmes Products (Europe) Ltd., 1 Francis Grove, London SW19 4DT, United Kingdom Printed in PRC
By Mark Taylor at 9:58 am, Apr 19, 2010
1.8 kW COMPACT
CERAMIC HEATER
MODEL: BCH160
INSTRUCTION MANUAL
NOTICE D'UTILISATION
BETRIEBSANLEITUNG
Portugues/Portuguese 51
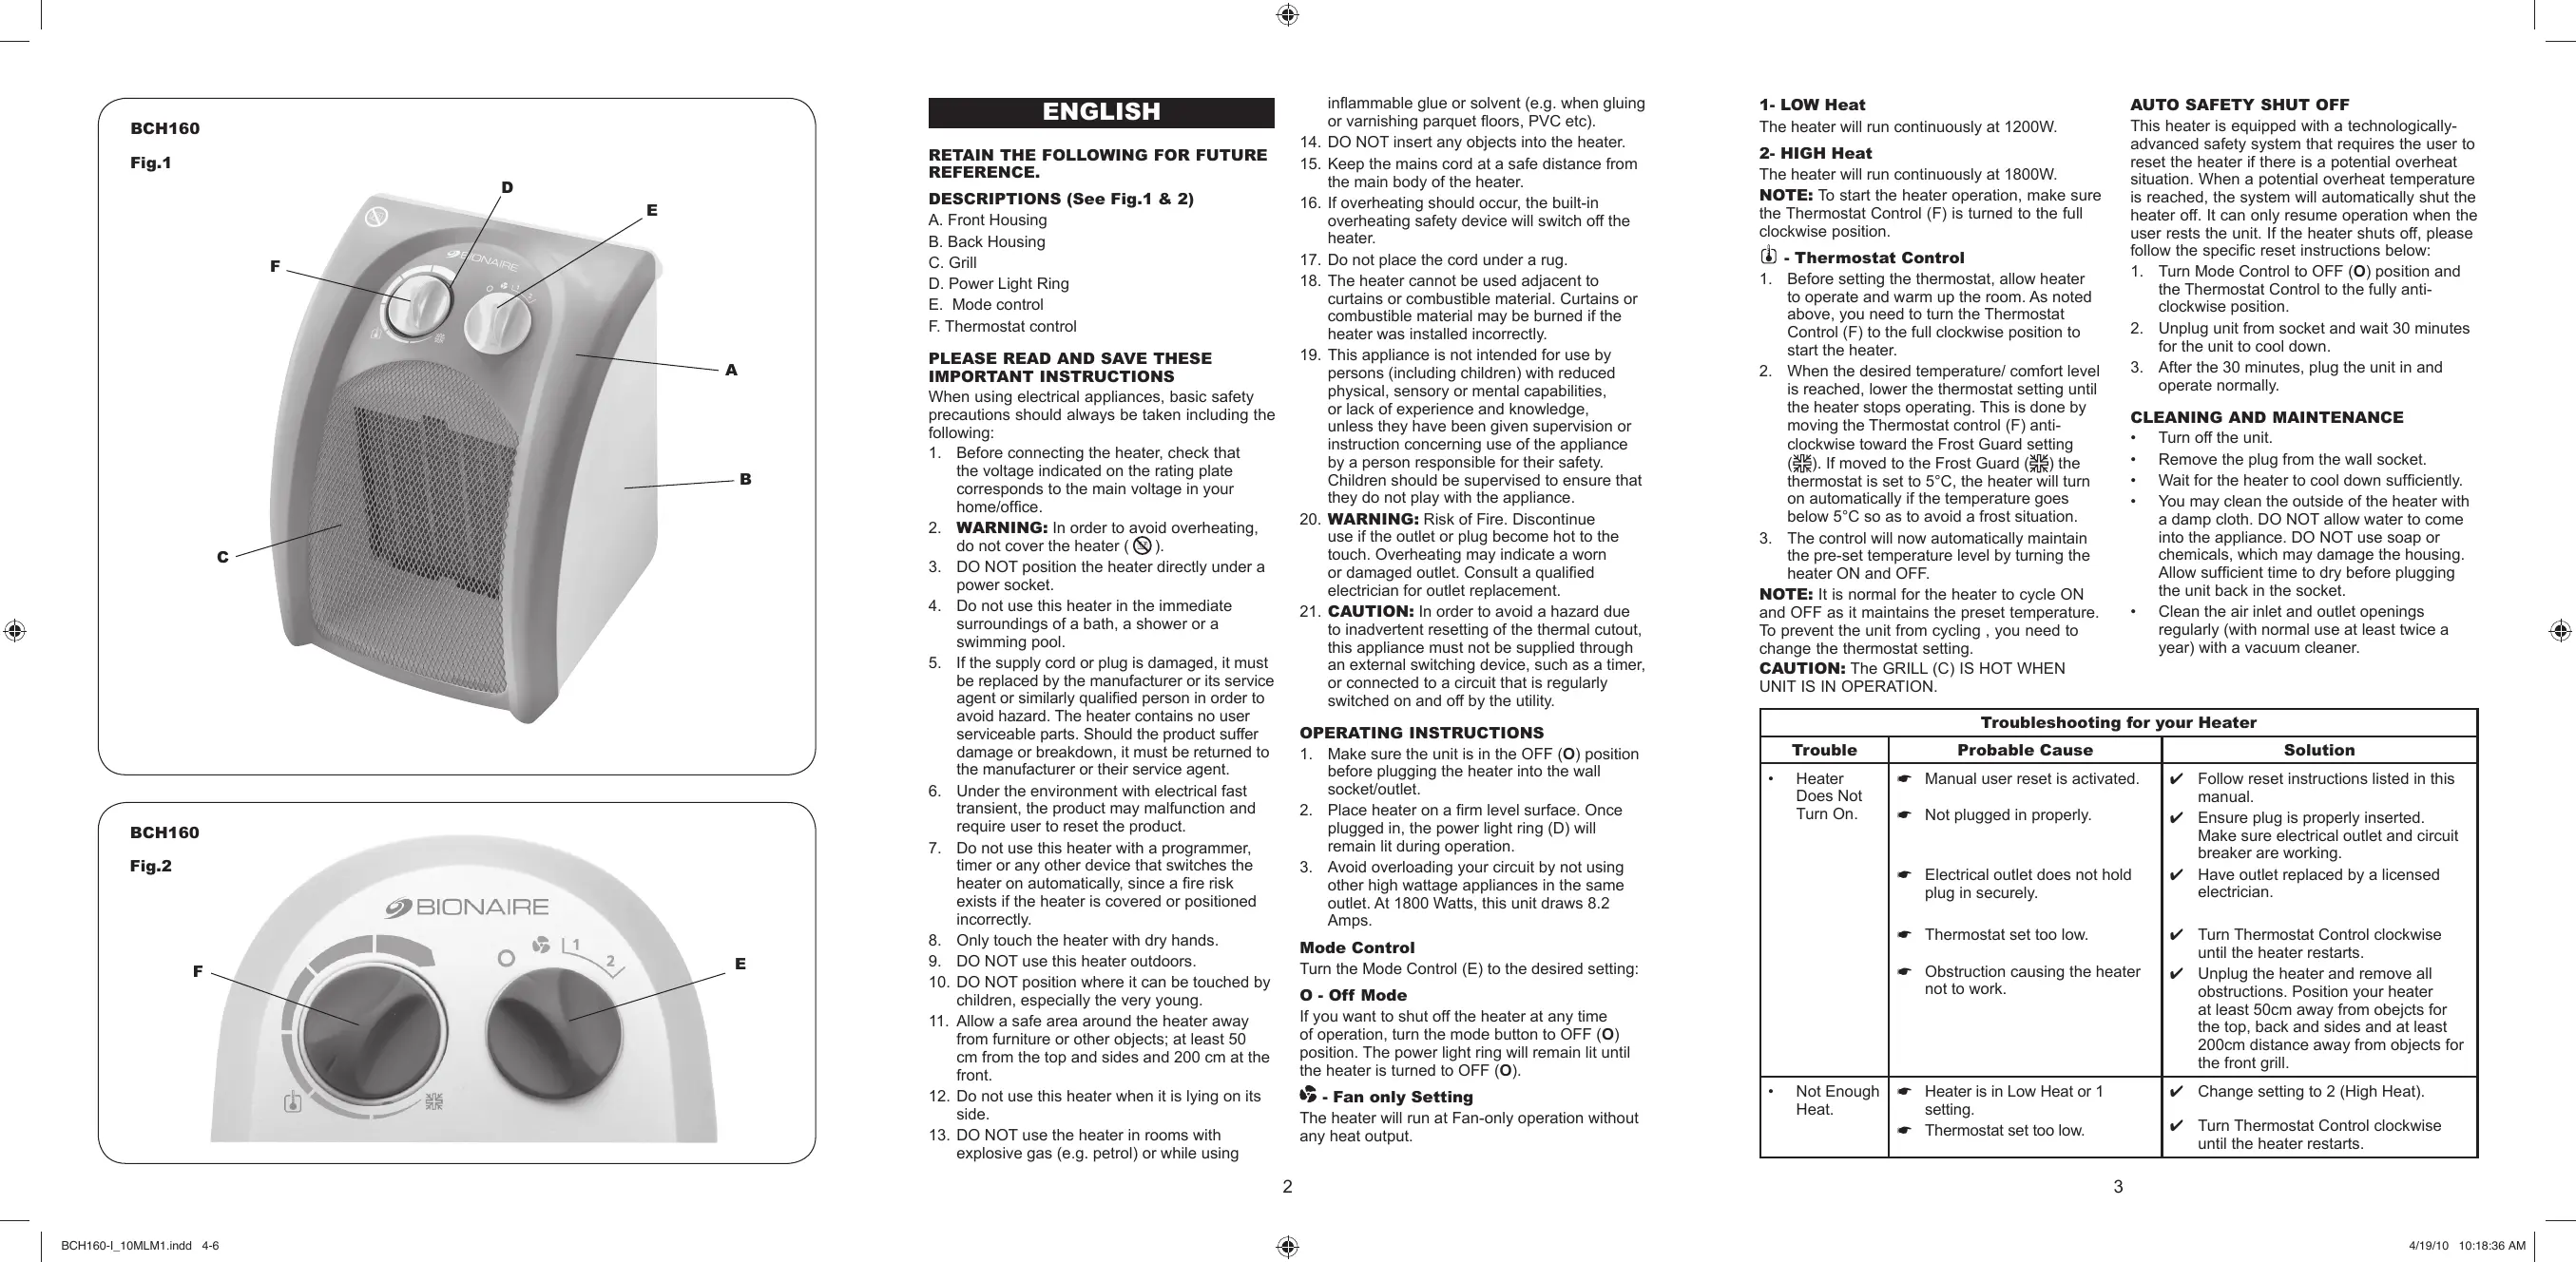
BCH160
Fig.1

BCH160
Fig.2

ENGLISH
RETAIN THE FOLLOWING FOR FUTURE REFERENCE.
DESCRIPTIONS (See Fig.1 & 2)
A. Front Housing
B. Back Housing
C. Grill
D. Power Light Ring
E. Mode control
F. Thermostat control
PLEASE READ AND SAVE THESE IMPORTANT INSTRUCTIONS
When using electrical appliances, basic safety precautions should always be taken including the following:
- Before connecting the heater, check that the voltage indicated on the rating plate corresponds to the main voltage in your home/office.
- WARNING: In order to avoid overheating, do not cover the heater ( ).
- DO NOT position the heater directly under a power socket.
- Do not use this heater in the immediate surroundings of a bath, a shower or a swimming pool.
- If the supply cord or plug is damaged, it must be replaced by the manufacturer or its service agent or similarly qualified person in order to avoid hazard. The heater contains no user serviceable parts. Should the product suffer damage or breakdown, it must be returned to the manufacturer or their service agent.
- Under the environment with electrical fast transient, the product may malfunction and require user to reset the product.
- Do not use this heater with a programmer, timer or any other device that switches the heater on automatically, since a fire risk exists if the heater is covered or positioned incorrectly.
- Only touch the heater with dry hands.
- DO NOT use this heater outdoors.
- DO NOT position where it can be touched by children, especially the very young.
- Allow a safe area around the heater away from furniture or other objects; at least 50 cm from the top and sides and 200 cm at the front.
- Do not use this heater when it is lying on its side.
- DO NOT use the heater in rooms with explosive gas (e.g. petrol) or while using
inflammable glue or solvent (e.g. when gluing or varnishing parquet floors, PVC etc).
- DO NOT insert any objects into the heater.
- Keep the mains cord at a safe distance from the main body of the heater.
- If overheating should occur, the built-in overheating safety device will switch off the heater.
- Do not place the cord under a rug.
- The heater cannot be used adjacent to curtains or combustible material. Curtains or combustible material may be burned if the heater was installed incorrectly.
- This appliance is not intended for use by persons (including children) with reduced physical, sensory or mental capabilities, or lack of experience and knowledge, unless they have been given supervision or instruction concerning use of the appliance by a person responsible for their safety. Children should be supervised to ensure that they do not play with the appliance.
- WARNING: Risk of Fire. Discontinue use if the outlet or plug become hot to the touch. Overheating may indicate a worn or damaged outlet. Consult a qualified electrician for outlet replacement.
- CAUTION: In order to avoid a hazard due to inadvertent resetting of the thermal cutout, this appliance must not be supplied through an external switching device, such as a timer, or connected to a circuit that is regularly switched on and off by the utility.
OPERATING INSTRUCTIONS
- Make sure the unit is in the OFF (O) position before plugging the heater into the wall socket/outlet.
- Place heater on a firm level surface. Once plugged in, the power light ring (D) will remain lit during operation.
- Avoid overloading your circuit by not using other high wattage appliances in the same outlet. At 1800 Watts, this unit draws 8.2 Amps.
Mode Control
Turn the Mode Control (E) to the desired setting:
O - Off Mode
If you want to shut off the heater at any time of operation, turn the mode button to OFF (O) position. The power light ring will remain lit until the heater is turned to OFF (O).
- Fan only Setting
The heater will run at Fan-only operation without any heat output.
1- LOW Heat
The heater will run continuously at 1200W.
2-HIGH Heat
The heater will run continuously at 1800W.
NOTE: To start the heater operation, make sure the Thermostat Control (F) is turned to the full clockwise position.
- Thermostat Control
- Before setting the thermostat, allow heater to operate and warm up the room. As noted above, you need to turn the Thermostat Control (F) to the full clockwise position to start the heater.
- When the desired temperature/ comfort level is reached, lower the thermostat setting until the heater stops operating. This is done by moving the Thermostat control (F) anticlockwise toward the Frost Guard setting () . If moved to the Frost Guard () the thermostat is set to 5^ , the heater will turn on automatically if the temperature goes below 5^ so as to avoid a frost situation.
- The control will now automatically maintain the pre-set temperature level by turning the heater ON and OFF.
NOTE: It is normal for the heater to cycle ON and OFF as it maintains the preset temperature. To prevent the unit from cycling, you need to change the thermostat setting.
CAUTION: The GRILL (C) IS HOT WHEN UNIT IS IN OPERATION.
AUTO SAFETY SHUT OFF
This heater is equipped with a technologically-advanced safety system that requires the user to reset the heater if there is a potential overheat situation. When a potential overheat temperature is reached, the system will automatically shut the heater off. It can only resume operation when the user rests the unit. If the heater shuts off, please follow the specific reset instructions below:
- Turn Mode Control to OFF (O) position and the Thermostat Control to the fully anticlockwise position.
- Unplug unit from socket and wait 30 minutes for the unit to cool down.
- After the 30 minutes, plug the unit in and operate normally.
CLEANING AND MAINTENANCE
- Turn off the unit.
- Remove the plug from the wall socket.
Wait for the heater to cool down sufficiently. - You may clean the outside of the heater with a damp cloth. DO NOT allow water to come into the appliance. DO NOT use soap or chemicals, which may damage the housing. Allow sufficient time to dry before plugging the unit back in the socket.
- Clean the air inlet and outlet openings regularly (with normal use at least twice a year) with a vacuum cleaner.
| Troubleshooting for your Heater | ||
| Trouble | Probable Cause | Solution |
| • Heater Does Not Turn On. | • Manual user reset is activated. | ✓ Follow reset instructions listed in this manual. |
| • Not plugged in properly. | ✓ Ensure plug is properly inserted. Make sure electrical outlet and circuit breaker are working. | |
| • Electrical outlet does not hold plug in securely. | ✓ Have outlet replaced by a licensed electrician. | |
| • Thermostat set too low. | ✓ Turn Thermostat Control clockwise until the heater restarts. | |
| • Obstruction causing the heater not to work. | ✓ Unplug the heater and remove all obstructions. Position your heater at least 50cm away from objects for the top, back and sides and at least 200cm distance away from objects for the front grill. | |
| • Not Enough Heat. | • Heater is in Low Heat or 1 setting. | ✓ Change setting to 2 (High Heat). |
| • Thermostat set too low. | ✓ Turn Thermostat Control clockwise until the heater restarts. | |
| • Heater Cycles ON and OFF Frequently. | • The thermostat automatically turns the heater on and off to maintain selected comfort level. | • To make this occur less frequently adjust the Thermostat Control clockwise to the highest setting. |
| • Heater is Blowing Cold Air. | • Mode Control is set to Fan only setting. | • Turn Mode Control to the 1 (Low Heat) or 2 (High Heat) setting. |
| • Unexpected Noise | • You may hear a popping or crackling sound as the heater heats up. This is normal and safe operation. Once the heater heats up, the crackling sound will go away. | • If the noise persists please call local Bionate service representative. |
| • Unexpected Smell. | • There may be an odor or vapor coming from the heater the first time you use it or after prolonged or seasonal storage. | • This is normal and is the result of dust or other debris accumulating on the heating element. Make sure the heater is in a well ventilated area and continue running until the odor or vapor goes away. |
FOR U.K. AND IRELAND ONLY
If the plug is not suitable for the socket outlets in your home, it can be removed and replaced by a plug of the correct type. Please refer to "Installation of a plug" below.
Installation of a plug applicable to U.K. and Ireland only
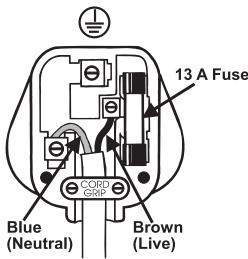
NOTE: If the terminals in the plug are not marked or if you are unsure or in doubt about the installation of the plug please contact a qualified electrician.
If a 13A 3-pin plug is fitted, it must be an ASTA approved plug, conforming to BS1363 standard. Replacement 13A fuses must be BSI or ASTA BS1362 approved.
This product is fitted with a 13A plug complying to BS1363. If this plug is unsuitable or needs to be replaced, please note the following: The wires in the mains lead are coloured as such:
BROWN - LIVE
BLUE NEUTRAL
Please note that the colour of these mains wires may not correspond with the colour markings
that identify the terminals in your plug. Please proceed as follows:
The BROWN coloured wire must be connected to the terminal, which is marked with the letter "L" or is coloured RED.
The BLUE coloured wire must be connected to the terminal, which is marked with the letter "N" or is coloured BLACK.
DO NOT CONNECT either of these wires to the earth terminal in the plug. The earth terminal plug is marked with the letter "E", or with the earth symbol , or coloured GREEN, or GREEN and YELLOW.
GUARANTEE
Please keep your receipt as this will be required for any claims under this guarantee. This appliance is guaranteed for 2 years after your purchase as described in this document.
During this guaranteed period, if in the unlikely event the appliance no longer functions due to a design or manufacturing fault, please take it back to the place of purchase, with your till receipt and a copy of this guarantee.
The rights and benefits under this guarantee are additional to your statutory rights, which are not affected by this guarantee. Only Holmes Products (Europe) Ltd. ("Holmes") has the right to change these terms.
Holmes undertakes within the guarantee period to repair or replace the appliance, or any part of appliance found to be not working properly free of charge provided that:
-
you promptly notify the place of purchase or Holmes of the problem; and
-
the appliance has not been altered in any way or subjected to damage, misuse, abuse, repair or alteration by a person other than a person authorised by Holmes.
Faults that occur through, improper use, damage, abuse, use with incorrect voltage, acts of nature, events beyond the control of Holmes, repair or alteration by a person other than a person authorised by Holmes or failure to follow instructions for use are not covered by this guarantee. Additionally, normal wear and tear, including, but not limited to, minor discoloration and scratches are not covered by this guarantee.
The rights under this guarantee shall only apply to the original purchaser and shall not extend to commercial or communal use.
If your appliance includes a country-specific guarantee or warranty insert please refer to the terms and conditions of such guarantee or warranty in place of this guarantee or contact your local authorized dealer for more information.
This marking indicates that this product should not be disposed with other household wastes and should be disposed separately throughout the EU. To prevent possible harm to the environment or human health from uncontrolled waste disposal
due to the presence of hazardous substances within the product, recycle it responsibly to promote the sustainable reuse of materials and resources. To return your used device, please use the return and collection systems available to you or contact the retailer where the product was purchased. They can take this product for environmentally safe recycling.
Holmes Products (Europe) Limited
1 Francis Grove
London
SW194DT
UK
FRANÇAIS
VEUILLEZ LIRE ET CONSERVER CE MODE D'EMPLOI.
Holmes Products (Europe) Limited
1 Francis Grove
London
SW19 4DT
UK
DEUTsCH
Holmes Products (Europe) Limited
1 Francis Grove
London
SW19 4DT
Reino Unido
NEDERLANDS
LEES EN BEWAAR DEZE
Holmes Products (Europe) Limited
1 Francis Grove
London
SW19 4DT
UK
SUOMI
LUE SEURAAVA TEKSTI JA SÄILYTÄ SE VASTAISUUDEN VARALTA.
KUVAUKSET (KUVA 1 & 2)
A. Etukotelo
B. Takakotelo
C. Säleikkö
D. Virran valorengas
E. Tilan saadin
F. Termostaatin sädin
LUE NAMÄ TÄRKEÄT OHJEET JA SÄLYTÄ NE.
Holmes Products (Europe) Limited
1 Francis Grove
London
SW19 4DT
UK
DANSK
BEVAR FØLGENDE TIL SENERE BRUG. BESKRIVELSER (Se Fig. 1 & 2)
A. Forskaerm
B. Bagskaerm
C. Gitter
D. Strömindikatorlys
E. Moduskontrol
F. Termostat
LAES OG GEM DISSE VIGTIG INSTRUKTIONER
Holmes Products (Europe) Limited
1 Francis Grove
London
SW194DT
UK
NORSK
LES DISSE INSTRUKSJONENE, OG BRUK DEM DERETTER SOM REFERANSE.
BESKRIVELSER (SE FIG. 1 & 2)
A. Fronthus
B. Bakre hus
C. Grill
D. Ring med indicatorlys
E. Modusregulator
F. Termostatregulator
VENNLIGST LES OG TA VARE PÄ DISSE VIKTIGE INSTRUKSJONENE
- Termostatregulator
- La ovnen/Sta pà til rommet er oppvarmet fór du stiller termostaten. Som nevnt ovenfor mà du vri termostatregulatoren (F) helt med klokken for á slà pà ovnen.
- Nár ønsket temperatur-/komfortniva er oppnàdd, skur du ned termostatinstillingen til ovenen gár ut av drift. Det gjøres ved à flytte termostatregulatoren (F) mot klokken mot frostverminstillingen (Nk). Hvis termostaten settes til Frost Guard (Nk), settes den til 5^ , vil varmeapparatet automatisk bl slätt på hvis temperatren gár faller lavere enn 5^ , for à unngå frost.
- Regulatoren vil nà automatisk oppretholde samme forhändsinnstilte temperaturniva ved á slá ovnen AV og PÁ.
RENGJØRING OG VEDLIKEHOLD
Slà av apparatet.
- Trekk stopslet ut av stikkontakten.
Gi oven tid til a avkjoles.
- Utsiden av ovenen kan rengjores med en faktig klut. Vann på IKKE komme inn i apparatet. Bruk IKKE sape eller kjemikalier. Det kan skade apparathuset. Gi apparatet
Holmes Products (Europe) Limited
1 Francis Grove
London
SW19 4DT
UK
POLSKI
PROSIMY ZACHOWÁNINIEJSZA INSTRUKCJE DO KORZYSTANIA W PRZYSZŁOŚCI
OPIS OGOLNY (ZOB. RYS. 1&2)
Holmes Products (Europe) Limited
1 Francis Grove
London
SW19 4DT
Wielka Brytania
EAAHNIKA
KPATHTE TIE IAPAKATΩ OΔHΠΕ ΠΑ MEΛΛONTIKH ANAΦΟΡΑ.
NEPIIgPAeEz (AeiTe Eik. 1 & 2)
Holmes Products (Europe) Limited
1 Francis Grove
London
SW19 4DT
UK
PYCCKNN
ПОЧТАЙТЕ И COXPAHITE 3ТИ ИНСТРУКЦИД分解ДАЛБHEИWEERO ИСПОЛБОВАНИЗ.
ONICAHNE (cm.Pnc.1&2)
A. Передни корпуну
B. 3aDnH KoprNc
C. PeiueTka
D. Kolbuto INHdkaTopa BkHoueHn nHTaHn
E. IpeeknHouaTeIb peKIMOB
F. IpeeknHouateneb TepMoCTaTa
BHIMATEJIbHO IPOUHTAITE COXPAHNTE 3TN BAXHBIE INHCTPYKUNI
Holmes Products (Europe) Limited
1 Francis Grove
London
SW19 4DT
UK
ITALIANO
CONSERVARE QUESTE ISTRUZIONI PER USO FUTURO.
Holmes Products (Europe) Limited
1 Francis Grove
Londra
SW19 4DT
UK
MAGYAR
OLVASSA EL ES ORIZZE MEG A KÖVETKEZOKET KÉSOBBI FELHASNZALÁS CÉLJÁRÀ!
LEÍRÁS (ESETEBEN LÁSD AZ 1. & 2 ABRÁT)
Holmes Products (Europe) Limited
1 Francis Grove
London
SW19 4DT
UK
CESKY
PřECTETESI TENTONÁVOD KPOUZITI. PO PřECTENÍ HO PECLIVEUSCHOVEJTE.
POPIs (VIZ OBR. 1 & 2)
Holmes Products (Europe) Limited
1 Francis Grove
London
SW19 4DT
UK
PORTUGUES
GUARDE AS INSTRUÇÉS SEGUIENTES PARA CONSULTA POSTERIOR.
DESCRIOES (VER FIG. 1 E 2)
A. Invólucro Frontal
B. Invólicoro Posterior
C. Grelha
D. Anel Luminoso de Corrente
E. Controlo do modo
F. Controlo do termóstato
LEIA E GUARDE ESTAS INSTRUÇÉS IMPORTANTES
Holmes Products (Europe) Limited
1 Francis Grove
London
SW19 4DT
UK