BPH1515 - Humidifier BIONAIRE - Free user manual and instructions
Find the device manual for free BPH1515 BIONAIRE in PDF.

User questions about BPH1515 BIONAIRE
0 question about this device. Answer the ones you know or ask your own.
Ask a new question about this device
Download the instructions for your Humidifier in PDF format for free! Find your manual BPH1515 - BIONAIRE and take your electronic device back in hand. On this page are published all the documents necessary for the use of your device. BPH1515 by BIONAIRE.
USER MANUAL BPH1515 BIONAIRE
Holmes Products (Europe) Ltd
1 Francis Grove
London SW19 4DT
England
Fax: +44 (0)20 8947 8272
Email: info-europe@theholmesgroup.com
Website address: www.bionaire.com/europe
UK - Free phone Customer Service Helpline - 0800 052 3615
Holmes Products France
Norway +47 51 66 99 00
Poland +48 22 847 8968
Spain +34 91 64 27 020
Sweden +46 31 29 09 80

© 2006 JCS/THG, LLC.
Bionaire®, the Bionaire logo™ and the AccuTemp Plus™ are trademarks of JCS/THG, LLC.
9100020005440
BPH1515I06MLM1

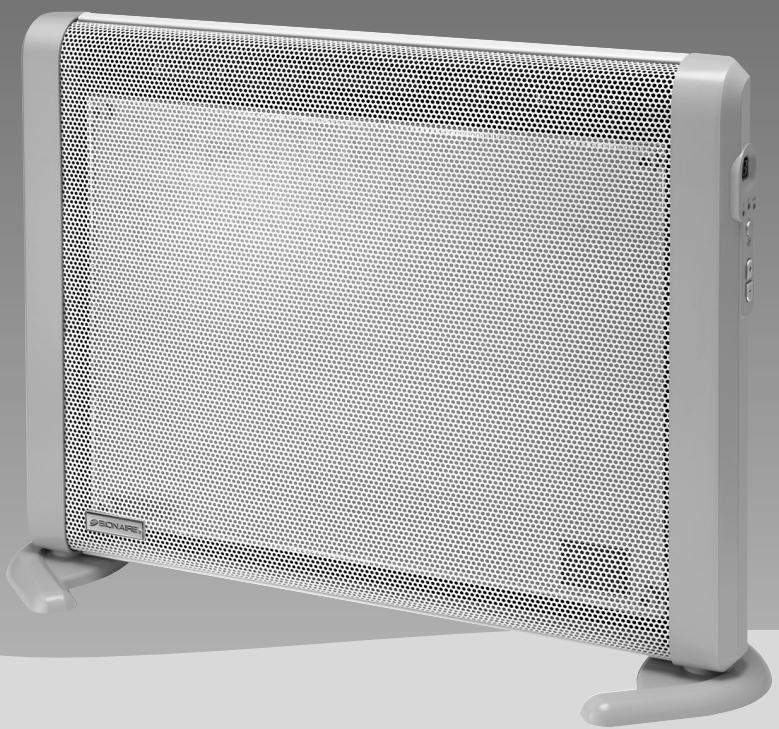
BIONAIRE
PANEL
HEATER
BPH1515
INSTRUCTION MANUAL
NOTICE D'UTILISATION
BETRIEBSANLEITUNG
Portugues/Portuguese 35
Dansk/Danish 38
BPH1515
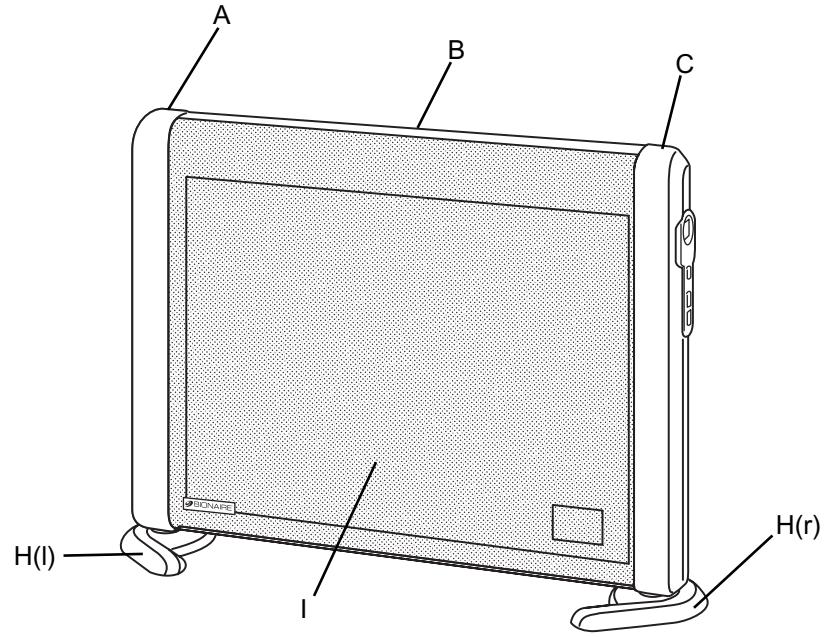
Fig.1
Fig.2
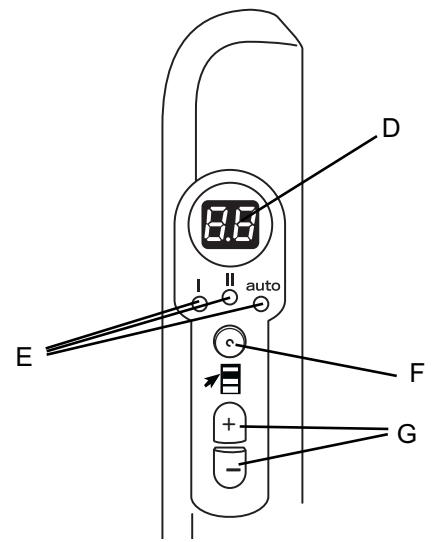
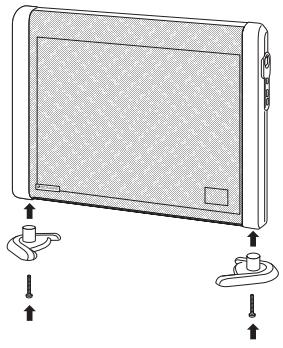
Fig.3
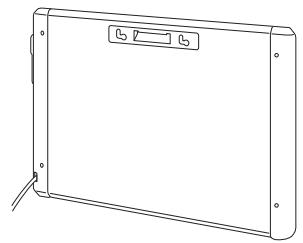
Fig.4
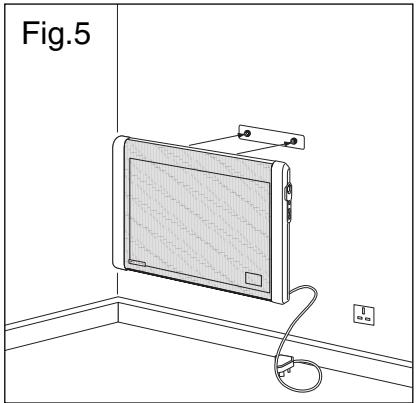
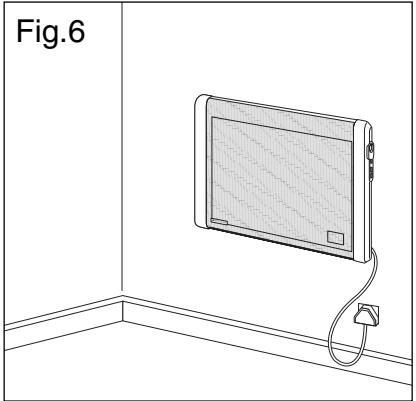

Fig.7
NOTE: Not suitable for bathroom use in the UK.
ENGLISH
REtain THE FOLLOWING FOR FUTURE REFERENCE.
DESCRIPTIONS (See Fig.1 & 2)
A.Left End Cap
B. Rear Housing
C. Right End Cap
D. Display
E. Mode Indicator Lights
F.ModeButton
G. Thermostat Adjustment Buttons
H. Foot Base (2)
I. Grill
Foot Assembly (See Fig.3)
- Insert Left Foot Base H(I) into Left End Cap (A) and tighten the Screw.
- Insert Right Foot Base H(r) into Right End Cap (C) and tighten the Screw.
Wall Mounting Assembly (See Fig.4 - Fig.6)
IMPORTANT: Before drilling into any wall ensure no electrical cables are present in the area. NOTE: Due to the multitude of potential mounting surfaces, mounting screws are not included with this product. Please seek professional assistance or visit your local hardware store to determine which type of screw is best for your particular wall.
- Remove Base Feet (H) from the End Caps (A and C), if installed.
- Secure the Mounting Bracket to the wall.
- Hang the main body on the Mounting Bracket.
SETTING THE ACCUTEMP PLUS™ THERMOSTAT
- Press (F) Mode button (F):
1^st = LO runs continuously on low.
2^nd = H1 runs continuously on high. - 3^rd = Auto Low ; press (+) or (-) to set desired temperature.
- 4^th = Auto HL ; press (+) or (-) to set desired temperature.
- Once you have selected the mode and temperature, the display returns to the current room temperature and gradually increases as the room warms.
- If you selected an Auto mode and the heater does not start, make sure the set temperature is higher than the current room temperature.
NOTE: In Auto mode, it is normal for the heater to cycle ON and OFF as it maintains the programmed temperature. To prevent the unit from cycling, raise the thermostat setting.
The AccuTemp PlusTM Thermostat remembers the previous temperature setting after the unit is turned off. However, if the unit is unplugged, the digital thermostat resets and no longer remembers the previous temperature setting.
PROGRAMMABLE TIMER
You can program your heater to turn on at a preset time or turn off after a set amount of time.
Setting the On Timer:
- With the heater off, press and hold (+) and (-) simultaneously until the display flashes.
- Press (+) or (-) to select the amount of time you would like to pass before the heater turns on.
- After setting the timer, the display shows a red dot next to the current room temperature on the display to indicate that the timer is activated.
- After the programmed length of time has passed, the heater automatically turns on Auto HI at 24^ (75^) for 2 hours.
Setting the Off Timer:
- Select the desired mode and/or temperature.
- With the heater running, press and hold (+) and (-) simultaneously until the display flashes.
- Press (+) or (-) to select the amount of time you would like the heater to run.
- After setting the timer, the display shows a RED dot next to current room temperature on the display to indicate that the timer is activated
- The heater automatically shuts off after the programmed length of time has passed.
FROST GUARD
Press the ( 日) Mode button 5 consecutive times for Anti Frost setting (AF will show in the digital display).
This special setting is automatically activated when the (AF) mode is selected. In this mode, the heater is off until the room's temperature reaches freezing and the heater automatically turns on HI power. The heater will cycle ON and OFF as it maintains the temperature between 5-8 °C.
AUTO SAFETY SHUT OFF
The heater has a built in safety device which will switch off the heater automatically in case of accidental overheating. It can only resume operation when the user has reset the unit. (OH) will display in a overheat situation.
To reset the heater:
- Unplug the heater and wait for 30 minutes for the heater to cool down.
- After the 30 minutes, plug the heater in again and operate normally.
SAFETY BACK-UP FUSE
In the unlikely case the heater does not respond to an overheat situation, the safety back-up fuse will engage. In this case, the heater will not reset. Please contact your local service number for advice.
TIP OVER PROTECTION
When the unit is accidentally knocked over, it will instantly shut off. To reset, simply place the heater in an upright position. Press the (mode) button again.
BATHROOM USE
UK ONLY:
- Regulations prevent the use of this heater in the bathroom.
IN OTHER COUNTRIES
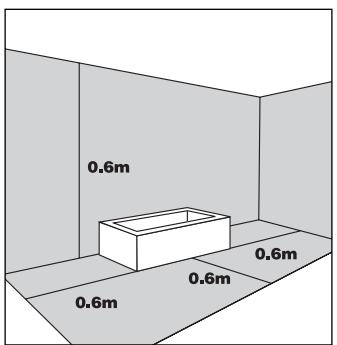
If this heater is going to be used in a bathroom, or similar room, it must be installed:
a. In such a way that the switches and other controls cannot be touched by the person in the bath or shower.
b. Outside the grey shaded areas (Fig.7).
If you are unsure about the installation of this heater in the bathroom we recommend that you seek advice from a professional electrician/installer.
PLEASE READ AND SAVE THESE IMPORTANT INSTRUCTIONS
When using electrical appliances, basic safety precautions should always be taken including the following:
- Before connecting the heater, check that the voltage indicated on the rating plate corresponds to the main voltage in your home/office.
- WARNING: In order to avoid overheating, do not cover the heater ( 念 ).
- DO NOT position the heater directly under a power socket.
- Do not use this heater in the immediate surroundings of a bath, a shower or a swimming pool.
- If the supply cord or plug is damaged, it must be replaced by the manufacturer or its service agent or similarly qualified person in order to avoid hazard. The heater contains no user serviceable parts. Should the product suffer damage or breakdown, it must be returned to the manufacturer or their service agent.
- Under the environment with electrical fast transient, the product may malfunction and require user to reset the product.
-
Do not use this heater with a programmer, timer or any other device that switches the heater on automatically, since a fire risk exists if the heater is covered or positioned incorrectly.
-
Only touch the heater with dry hands.
- DO NOT use this heater outdoors.
- DO NOT position where it can be touched by children, especially the very young.
- Allow a safe area around the heater away from furniture or other objects; at least 50~cm from the top and sides and 200~cm at the front.
- Do not use this heater when it is lying on its side.
- DO NOT use the heater in rooms with explosive gas (e.g. petrol) or while using inflammable glue or solvent (e.g. when gluing or varnishing parquet floors, PVC etc.)
- DO NOT insert any objects into the heater.
- Keep the mains cord at a safe distance from the main body of the heater.
- If overheating should occur, the built-in overheating safety device will switch off the heater.
- Do not place the cord under a rug.
- The heater is to be installed so that switches and other controls cannot be touched by a person in the bath.
- Heater must be installed at least 0.6 m above the floor.
- The heater cannot be used adjacent to curtains or combustible material. Curtains or combustible material may be burned if the heater was installed incorrectly.
- WARNING: Risk of Fire. Discontinue use if the outlet or plug become hot to the touch. Overheating may indicate a worn or damaged outlet. Consult a qualified electrician for outlet replacement.
- CAUTION: In order to avoid a hazard due to inadvertent resetting of the thermal cutout, this appliance must not be supplied through an external switching device, such as a timer, or connected to a circuit that is regularly switched on and off by the utility.
For U.K. and Ireland only:
If the plug is not suitable for the socket outlets in your home, it can be removed and replaced by a plug of the correct type. Please refer to "Installation of a plug" below.
Installation of a plug
Applicable to U.K. and Ireland
The wires in the mains lead are coloured as such:
BROWN - LIVE
BLUE NEUTRAL
Please note that the colour of these mains wires may not correspond with the colour markings that identify the terminals in your plug.
Please proceed as follows:
The BROWN coloured wire must be connected to the terminal, which is marked with the letter "L" or is coloured RED.
The BLUE coloured wire must be connected to the terminal, which is marked with the letter "N" or is coloured BLACK.
DO NOT CONNECT either of these wires to the earth terminal in the plug. The earth terminal plug is marked with the letter "E", or with the earth symbol 12 or coloured GREEN, or GREEN and YELLOW.
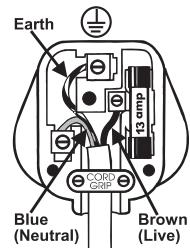
NOTE: If the terminals in the plug are not marked or if you are unsure or in doubt about the installation of the plug please contact a qualified electrician. If a 13A 3-pin plug is fitted, it must be an ASTA approved plug, conforming to BS1363 standard. Replacement 13 A fuses must be BSI or ASTA BS1362 approved.
GUARANTEE
PLEASE KEEP YOUR RECEIPT AS THIS WILL BE REQUIRED FOR ANY CLAIMS UNDER THIS GUARantee.
This product is guaranteed for 3 years.
In the unlikely event of breakdown, please take it back to the place of purchase, with your till receipt and a copy of this guarantee.
- The rights and benefits under this guarantee are additional to your statutory rights which are not affected by this guarantee.
- The manufacturer undertakes within the specific period, to repair or replace free of charge, any part of the appliance found to be defective provided that:
- We are promptly informed of the defect.
- The appliance has not been altered in any way or subjected to misuse or repair by a person other than a person authorised by the manufacturer.
- No rights are given under this guarantee to a person acquiring the appliance second hand or for commercial or communal uses.
Any repaired or replaced appliance will be guaranteed on these terms for the remaining portion of the guarantee.
THIS PRODUCT IS MANUFACTURED TO COMPLY WITH THE E.E.C. DIRECTIVES 73/23/EEC,89/336/EEC AND 98/37/EEC.
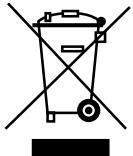
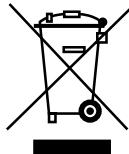
Waste electrical products should not be disposed
of with Household waste. Please recycle where facilities exist. Check on the following website for further recycling and WEEE information: www.bionaire.com/europe or e-mail info-europe@theholmesgroup.co
DEUTSCH
info-europe@theholmesgroup.com
SVENSKA
LÄS OCH SPAR FÖLJANDE FÜR FRAMTIDA BRUK.
BESKRIVNING (Se bild 1 & 2)
europe@theholmesgroup.com
SUOMI
LUE SEURAAVA TEKSTI JA SÄLYTÄ SE VASTAISUUDEN VARALTA.
KUVAUKSET (KUVA 1 & 2)
DETTE PRODUKTET ER PRODUSERT I SAMSVAR MED EU-DIREKTIVENE 73/23/EØF, 89/336/EØF, 98/37/EØF.
USTAWIANIE TERMOSTATU ACCUTEMP PLUSTM
REtain The Following For Future REFERENCE.
NEPIIpaΦeΣ (See Fig.1 & 2)
NASTAVENI TERMOSTATU ACCUTEMP PLUSTM
info-europe@theholmesgroup.com
PYCCKNN
IPOQHTAITE N COXPAHITE 3TN INCHETYKUN DIAJ DAJIbHEUSEO NCIOJIb3OBAHNI.
ONUCAHNE (CM.Pnc.1&2)
A. JIeBaJ KpbIiKka
B. 3aDnH KOpnyc
C. Правая Крьшka
D. Dicnnei
E. CBeTObIe INHdNkaTopbI peXIMOB
F. Khoonka pexkma pa60tbl
G. Khonkin perylinopobkn Tepmoctata
H. OchoBaHne (2)
I. Pewetka
Onopa (cm. pnc. 3)
-
BCTaBbTe OCHOBaHnE JeBOI OnOpbI H(I) BJeByIO TopeByIO 3aRnyuKy (A) I 3aTaNHTBeHT.
-
BCTaBbTe oChOBaHnE npaBoI onOpbl H(r) B npaByo TOpueByo 3aRnyuSy (C) n 3aTAnHTe BnHT.
KpenneHne Ha cTeHe (cm.Pnc.4-6)
Baxho. Pered Tem, kak Cbeprnltc TcHny, y6eINTecb, 70B 3TOM Mece He npolooKeH NHKAKIX 3JekTPIueCKNX ka6enei.
INPIMEYAHNE: IV3-3a 60JIbUoro KOLIyueCTBa NOTEHuaNbHbIX NocAoOHybIX NOBepxHOCTeIK KpeENKHe BInHTbI He BVQJrT B KOMNJIeKT NocTaBKn DaHOrO INdEInn. BocNoB3yIteCb ycLyramCneuAnlcta nn O6paTtEcB CooTBeTCTByoUsm Mara3HH, YTObI OnpeJeNTb NOxDJOAaI TNI BNHTO.
1.ИЗБЕКТЕОповы(H)иЗTOPUEБИХ 3агИУБЕСК(AиС),ecnOnиБиN yCTAHOBNEHbI.
2. 3aKpeNITE Ha cTeHe MOHTaXhBn KPOHHTeH.
3.ПомecntteКорпсHaMOHTaxHbIKPOHHTeH.
HACTPOIKA TEPMOCTATA ACCUTEMP PLUSTM
- Haxmnte KhONky nepeKNIoueHnpeXIMOB (F)
1- LO;pa6oTaBpeKIMeMaIOH MOUHOCTN.
2-н = Hl; pa6oTa B peXmE BbICOKO MOUHOCn.
3- = aBtOMaTmUeCKn peKIM MaIOn MOUHOCTN; HeoBXOdMHy ToEMepaTyP MyKHO HAcTpONb C NMOUbKOHN KHOIN yBENueHnra (+) nIy UMeHbSeHnra (-) 3NaueHn.
4- = aBtOMaTnueckn peKm BbICOKoM OMOHOCTN; HeO6XoDMYTO TEMNEpaTpy MOKHO HaCTponTB C NOMOuB KOHKn YBENUeHnR (+) INI yMeHbSeHnR (-) 3NaueHnR. - Послевыбopa ржима и Temператypы на дмсплес сноба удот OTБрахаться Ктушая Temрета Ромецни Сфкcaцей постеного увелоченья по мeper Нагревань ВОДуxa.
- Ecni Bb6paH aBtOMaTHueckn pexmI n oborgpeBaTeN he 3anyckaTcra, y6edntScb, yTO yCTaHOBNEHna TMe npHaTaPba YbIwe TeKyuIe TMe NmepaTpyb b NomoeHHn.
INPMEYAHNE: B aBToMaTnueckom pexHMe o6orpeBaTeIb MoKet BKIOuAtbcn OTKIOUaTbcn DnI NOdepKKn 3aDaHHoI TEMpeApTybl Bo N36ExaHne ZKKnuecko pa6Otbl np6Opa Heo6XoDMNo Noblicntb TEMpeAtpy C nOmoCbTO TepMOCTata. TepMoCTat AccuTemp PlusTM coxpanHert npdeIduyUo HacTpOky TEMpeAtpBy I nocLe OTKIOUeHnnp6Opa.Ondako ecIn np6Op OTKIOUeH ONeKtPoCteN, HacTpOka UcΦpBOrO TepMOCTa Byed c6poWeHa, a npdeIduyua HaCtPOnKa TeppeAtpBy He
6ydt coxpanha.
HxTxA6BTHxHEBKe KaebEx
Moxho 3anporpammpoBaTb o6orpeBaTeIb IyBKNIOUeHn B yCTAHOBNEHHOe BpeMa INIOTKIOUeHn Hepe3 ONpeJeHnbl POMeJxTyOBeBpeMeHNi.
YctaHObKa TaMepa Ha BkJIIOueHne
1.Пи ВькнluчehHOM o6orpeBaTeNe ODHOBPEMeHHO HAKMTEи yUepKJBMaBte KKNKn yBENeHenn()иУmEHbSeHnn(-) 3HaChEHN,POKa He 3AmNtAETIMCnIeN.
2. HauMnTe KhoNky (+) nnn (-) dnyka3aHnna 3naeHn BpeMeHn Do BKNUOeHn O6orpeBateTja.
3.Посlete настpoikи таймера на диспee OTOBрахаетс Крachedа Точka ряdom CO 3наченеTekушей TemпераТурbl В NOMESEHIN, KOTOPA NOKA3bIBaET, YTO Tаймер BKПОЧЕ.
4. Пи Истechени Задан Horo Врemeи oborpebaTeIb BKJIHouaTcB aBTOMaTnueckom peKmE BbICOKO MOUHOCIn npi TemnepaType 24°C ha 2 Yaca.
YctaHOBKa TaMepa Ha BbIKNIOeHne
- BbIbeIpTe Heo6xOuMbI pexIM uJIIN tempepatypy.
2.Bo Bpemra pabotb oObrpeBATEnOHOOBpeMeHNO HaxMMTE uYapedXuBaTe KONIKI (+) n(-),Noka He 3aMnaFaeT DcNPeN. - Haxmmate KOnkny (+) nii (-) dny Bb6opa BpeMeH, B TeueHne KOtporo OboRpeBaTeB doJnxHe npobatb.
- Посце насторки таимерна диспee otobражaelя КРACHАЯ точka ряdom co 3наченемTekушей TemпepаТурьВ NOMeшени, KOTOPAR NOKAЗыВаET,чTO таймер BKЛЮЧЕ.
- O6orpeBaTeIb ABTOMaTnueCeN OTKJIIOUaETcA Uepe3 3aDaHHbI pOMExyTOK BpEmHIn.
3AUHTA OT MOPO3A
Haxmte KhoNk Ky Mode ()(Pexn mpaOtbl) nocneobateIbHO 5 pa3 dny yctaHOBKn Anti Frost (PiHTNBOMOp03Ha yCTaHOBKa) (ha cnΦpOBOM DnCnIe NOnBraTc6yKbI AF).
3Ta CNeMaJIbHaN HaCTPoiKa aKTINBnpyETcA bTOMaTIueCKn Pn BbIbope pexIma (AF).B 3TOM pexIme o6OrpeBaTeJIb OCTaETcR
BbIKIOUeHHbIM Do TEX NOp, NOKA TemnepaTypa B NOMeUHeHIN He NOCTInrHeT TOckN 3aMeP3aHIn, IN 3aTEM OH aBTOMATNeUeCKe NpeKJIooaTeCn B pEXHM NOBbIeHNO MoUcHOnT (HI).
06orpebeTJI nepoiOnduYeCKn BKnIOHaETcN IbIKIIOAeTcI nIpoIepXaHnTeMnpaTpybl B dIaIaOHeOT 5 do 8^
ABTOMATUNCHECKOE 3AUINTHOE BbIKIQUEHNE
O6oRpeBaTeIb IMeET BCTpoEHHoe 3aunTHoe yctpOCTBO, KOTOpoe ABTOMATUeCKN BbIKIOHT o6oRpeBaTeIb B clyuae CnyauHOrO neperpeBa. O6oRpeBaTeIb MoKet BO3o6HOBNT pa60Ty toIbKO TOrDa, KOrJa nOJIb3OBaTeIb YcTaHOBNT np6ob RbcXoDHOe COtOAnHe. PnI nepeRpeBe o6oRpeBaTeIb 6ydet OToBpaKaTc8 INDInKaZIN (OH).
YtO6bI yCTaHOBnTb 6oRpeBaTeIb B nCXoHoe COCTOHNHe:
1.OTcoeINHIne o6OrpeBaTeNb OTo pO3eTkn N IOdoXnTe 30 MNHyT, NOka OH OCTbIHeT.
2. Yepe3 30 MInHyT CHOBA BKNIOHnTe npN6Op B po3eTKy INCNoJIb3yIte O6bIuHbIM o6pa3OM.
AbarnHbI npedoxpAHTeIb
B peKOM cnyae, ecn o6oRpeBaTeIb He cpeaHnpyet Ha nepeRpeB, cpa60aet abapnHbI npEdoXpAHnteB. B 3Tm cnyae o6oRpeBaTeIb He 6yEt c6poUeH. O6paNTeCb 3a nOMOuHbIO B MeCTHbI cepBcHbI ueHTp.
3aunTa OT onpOKnDbIbAHNIA
Ecnn yctpoictBO cnyaHNO ynaTe,TO nntaHne 6ydet HEMeJnEHHO OTKIOHeNo.ДЯ NOBtOPHO BKNIOHeHnO ObOrpeBaTeNl PnOCTO yCTAHOBITE erO BErTKaIbHo N BKNIOHTe 0bUHbIM O6pa3OM.HaXmITe KHNKMy MODE () (Pekim pa6oTbl).
NCIOJIb3OBAHNE B BAHHOJ KOMHATE
- Ecni 3OT o6OrpeBaTeIb 6yIeT IcNIOJIb3OBAtbcra B BaHHoI KOMHaTe IIN IOIo6HbIX NOpMeIeHNx, OH DoJIKeH 6bITb yCTaHOBJIeH:
a. TaKIM Obpa3OM, YTO6bI YeNoBcB BVAHHe INI NOI DUYSeM He MOr DTPOHyTbcJ DO NEpeKIINoUoataTeIe N dpyuNx peryUNIOBOOHybIX pyueK.
b. BHe NOBepxHoctei, 3aTeHcHHbIX cepbIM UBeTOM (Pnc.7) - Ecni y Bac ectb comHeneH no NOBody yCTAHOBK 3TOTO o6OrpeBaTeJn B BaHNOI KOMHaTe, Mbl peKoMeHnyeM Bam NocOBeTOBaTbC nPoOceCCNoHaNbHbIM 3JIeKTPiKOM.
BHIMATEJIbHO IPOUHTAITE COXPAHNTE 3TN BAXHbIE IHCTPYKlUN
PnIcNIObOBAHNaEKnTpUeCKNX PnpBOpOB BcERa CneJeT BbINOnJIHrT CneJyUoJIe OCHOBbHe MebpI npEOCTOPOXHOCTN:
- Pered nodklouehnem TnelOBeHTnIaTopa y6eNTecb, YTO HANpRAJHHeN EJIeKTPoCeTI COOTBeTCTByET HApRJaEHHO, Yka3aHHOMy HA TaTbnuKe C TexHnuecknM XapaKTepnctnKaMn npn6opa.
- BHIMAHHE. Bo n36eJahne nepeRpeBa HE HApKpbIaBte TepNoBeHTnJIaTOp ( ⑧).
- HE yctanabnBaIte TENIOBENTNIAITOP HENOCpeDCTBeHHO NOI p03ETKOH.
4.He nCnoPb3yIte 3OTN HArpeBaTeInb BHeNoCpeDCTBeHHoB 6JIi3OCTn OT BaHHo, DyaHa Nm 6aeeHna.
5.EcnnKa6eIb nITaHnI nnI StenCebhna BUNKnPobPexDeHb, B cIeJX 63oNaCHOCTn INx Heo6XoDmIO 3aMeHNb y npOn3BODntEIN IIN COTpyDNHkca CepBnCHOc cnYk6bl. TEnNoBeHTmJIaTOp He coOpExNt DeTaNe, O6cnPyKnBaHne KOTopbIX MOKeT npOn3BODntBCa Npbl3ObaTeNem.B cnUyae NOBpeJENn INn NOnOMKn pnp6Op cIeJeT BerHyTB npOn3BODntEIN IO nI npCOTpyDNKc cepBnCHOc cnYk6bl.
6. B cnyuae hapyuene 3neKtpnueckoro pekma n3dene moKet daTb c6oB, n TOrda notpe6yETc 6poct bY ctaHONIK m3denni.
7.He nCnoB3yIe TaHbI O6OrpeBaTeIb COBMeCTHO CnpoPAMMhIb MexaHn3MOM, TaMHepOM IIN DpyTMM UcTPOiCBOM,KOTOpOE MOKET BKNHOIBO6OrpeBaTeIb ABTOMaTHueCKN, NOKoBkY ecNI O6OrpeBaTeIb BydET YemJIInIO HAKpBT INI INHepaBUNbHO yCTaHOBJIe, 3TO MOKET PnBecTNI K Bo3rOpaHnIO.
8. He npikacaiTecb K TeNIOBEHTJIATOPy BnaxKhblIM pykAMN.
9. Pnp6op HE DoJxKeH HaxOuTbc8 B MeCTax, DOCTyINbIX dIra MaJIeHbKnx DeTeI.
10. HE nCnoIb3yIe TeTENIOBENTINJrTOP BHe NOMEUeHnIa.
11. UctahabnBaIte TEnNoBentnIaTOp B 6e3oNaChOM MeCTe, He paCOnanaraTe ero 6bNtKo K MeBcH N dpyrIm oBekTam. PacCTOHe OTEBxH N 6bOKBEx uacteK Kopnyca TEnNoBentnIaTOpa Do dpyrnx oBekTOB DoJXHO 6bITb He MeHee 50 cm, O t nepeIDHe J Actn KopyCa Do dpyrnx oBekToB - He MeHee 200 cm.
12.He nCnOJIb3yIte TeNIOBHeNTINJATOP,ecn OH haxoITcR B Trop3OHaNbHOM NIOJOKeHN.
13. HE nCnONb3yIe TeNIOBHeTINJATOp B NOMEueHInx, Ige BO3MOXHO CKONJIeHne B3pbIBOONaCHOrO r3a3 (HApNImEp, napOB 6eHNiHa), a TAKKe B NOMeueHInx, Ige npBOoDIIINc bpa60tBi C npIMeHNeHem roPOnHIX KneEB INPi pAcTBOpHTeNei (yKNaJaKa INI nn PONIPOBKa napKeTa, PBX i dp.).
14. HE BCTABJIaTe NocToPOHHne oBekTbI B TENIOBEHTINJATOp.
15. Ceteboy UHyp DoJxhen HaxoDnTbSca Ha 6e3onachom pacCTOraHn OT KOpnyca TENNOBENTIaTopa.
16. B cnyuae neperpeBa BCTPOEHoe yctOcTBO 3aunBbIKJIOuHT TENIOBEHTNJIATOP.
17. He npoklaabBaIe Ka6enb noKOBpOM.
18. UctaHabnBaIte O6orpeBaTeNb TaK, YtO6bl YenOBeK, NpJIb3yUoiCnBa HAnHOu INN dyUeM, He MOr pInKoCHytBcR K KHONkAM npeKeJIIOvateJeMaM npi6obaP.
19.OborpeBaTeIb Heo6xOIMO yCTaHaBJIuBaTb
Ha pacCToHm He MeHee Yem 0,6 M OT nona.
- Henb3y yctaHabnBaTb 6oBorpeBaTeIb pydOM CO uTOpAMN ININ BOCIIaMeHJIOUIMNC MaTePnaJIaMn INPi HEnpArBnBHO yCTaHOBKe 6oBorpeBaTeIe BO3MOxHO Bo3rOpaHne 6tOp ININ BOCIIaMeHJIOUXcMaTePnaIOB.
- BHIMAHHE! OnachocTb Bo3ropaHna. EcnBnIka IINP03eTKa CTAHOBraTc RopuHmHa OUynb, npeKpATIne IcNOnb3ObaTb npi6Op. PerpeRpeB npi6opa MoKet yka3bBaTb Ha HneCnpabHocTo IINI IOBpeXdHeNe p03eTKa 3Amena po3eTKn DoJOKha IPOM3BOJITcbKaJIINΦnIUPoBAHbI M 3JeKTPnKOM.
TAPAHTR
COXPAHJITE KBINTAHLNUO I NOKYUNKE, TAK KAK OHA MOKET NOTPE5OBATbCRA B CNYAE BO3N1KHOBENI PIPETEH3NI, PPEJABNEMbIX B COOTBETCTBNIC YCNOBIMIN DAHHON IAPAHTMN.
Ha 3To n3dJIeNe daeTcra rapaHTnra cPOKOM Ha 3 roJa.
- Пи Нличи Десектов Бернite пьбор в Магазин, гgedо on bblпробетен, Вмосте с KBNTAHUCIЕ O NOKYNKE И KONIEN 3TOI rapaHTTN.
PnpaBnPNBUNERN, KOToBbIMN HAdenReT 3Ta rapaHTnI, DOnONHIOIT 3aKOHHbIe PnpBa NOTpeBcTEny, EOTpAKeHbIe B 3ToI rapaHTnI.
Holmes Products Europe ob3yetcB TeueHne yCTaHOBNEHORO nepnoDA BPEMeHN 6ecPnAHO OTPeMOHTNPOBaT bnn 3AmeHtB IIObYIO HeNCpRAPHyo Detalb pnp60paB Cnyae DepeKta pnp ycNoBm, YTO:
n3rTOBHTeB 0ydt cpa3y Je I3BeUeH O deFeTe:
- npnbop He noDbErpcKaKIM-Ni6o
n3MeHEnnIaM IIO6bIM N3 CyuEcTBUOuXN
cNoCObOB, a TaKae He 6bln PnpBeDeH B
HeOrdNoctb ININ B CoCToHNe, TpeBHyOeepemOHTa, KaKIM-Ni6o LiuOm, He
yOnlHMOueHHbIM KomnaHnei Holmes
Products Europe;
3Ta rapaHTnI He daet HnKaKnx npab NmuaM, KOtboIpe Inpo6pEnI 3OT npi6bOp c pyk nnI INaICN0JIb3OBAHnI B KOMMepeCcknx INI KOMMyHaNbHbIx CEJIAX;
HaIIO6oO OTPeMOHTUPOBaHHbI INI 3aMeHeHHbI np6Op 6yDat paCnpOCTpaHrTbCra pAHrTHa H Te Xe yCNOBx B TceHne Bcero OCTaBWeOcre cPoka DaHHo rapaHTn. 3TOT PNOyKT N3TOTOBJIeH B COOTBTCTBUN C DIIPEKTKBAMN E3C: 73/23/EEC,89/336/EEC n 98/37/EEC.
YtINIMnIpyEmOe 3IeKTpInCeCKoe ObOpyIOBaHne HeJIb3A BbIpaCbIbATb BMeCTe C bIToBbIMN OTOXdAMn.
CdaBaiTe TaKoe obOpyObaHne Ha
pepepa60ky B COOTBETCTBYHoune ceHTpbI.
- Insert Left Foot Base H(I) into Left End Cap (A) and tighten the Screw.
- Insert Right Foot Base H(r) into Right End Cap (C) and tighten the Screw.
IMPOSTARE DEL TERMOSTATO ACCUTFEMP PLUSTM
a info-europe@theholmesgroup.com
PORTUGUES
GUARDE AS INSTRUÇÉS SEGUIENTES PARA CONSULTA POSTERIOR.
DESCRIOES (VER FIG. 1 E 2)
Wall Mounting Assembly (See Fig.4 - Fig.6)
ACERTAR O TERMÓSTATO ACCUTEMP PLUSTM
THIS PRODUCT IS MANUFACTURED TO COMPLY WITH THE E.E.C. DIRECTIVES 73/23/EEC,89/336/EEC AND 98/37/EEC.
Waste electrical products should not be disposed of with Household waste. Please recycle where facilities exist. Check on the following website for further recycling and WEEE information: www.bionaire.com/europe or e-mail info-europe@theholmesgroup.com