
CONTROLPAD - MIDI Control Pad ALESIS - Free user manual and instructions
Find the device manual for free CONTROLPAD ALESIS in PDF.

| Product Type | MIDI Control Pad |
| Brand | Alesis |
| Model | ControlPad |
| Number of Pads | 8 velocity-sensitive rubber pads |
| Additional Inputs | 2 1/4" trigger inputs, 2 1/4" single footswitch inputs, 1 1/4" dual footswitch input |
| Connectivity | USB (Plug-and-Play), MIDI In and MIDI Out (5-pin) |
| Power Supply | USB bus power or DC 6V power adapter (included) |
| Display | LED screen with activity indicator |
| Number of Preset Kits | 21 editable kits |
| MIDI Messages | Note On/Off, Program Change (0-127), Control Change, System Exclusive |
| Pad Adjustable Parameters | MIDI channel, note number, sensitivity (0-20), velocity curve (4 types), threshold |
| Special Functions | All Notes Off, Return to Default, Factory Reset |
| Software Compatibility | BFD Lite included, compatible with any MIDI software (Windows XP, Mac OS 9.x or higher) |
| Dimensions (approx.) | Approx. 30 cm x 20 cm x 5 cm |
| Weight (approx.) | Approx. 1 kg |
| Maintenance and Cleaning | Wipe with a dry, soft cloth. Do not use liquids or solvents. |
| Safety | Use only the supplied power adapter. Avoid exposure to water and extreme temperatures. |
| Spare Parts and Repairability | Contact Alesis support for spare parts. Repair must be performed by an authorized technician. |
| General Information | USB/MIDI electronic percussion controller, lightweight and portable design, ideal for performance and programming. |
Frequently Asked Questions - CONTROLPAD ALESIS
User questions about CONTROLPAD ALESIS
0 question about this device. Answer the ones you know or ask your own.
Ask a new question about this device
Download the instructions for your MIDI Control Pad in PDF format for free! Find your manual CONTROLPAD - ALESIS and take your electronic device back in hand. On this page are published all the documents necessary for the use of your device. CONTROLPAD by ALESIS.
USER MANUAL CONTROLPAD ALESIS
This page has been intentionally left blank.
INTRODUCTION
Congratulations on your purchase of the Alesis ControlPad USB/MIDI Percussion Controller! Combining a lightweight, portable design with the functionality of a full-size electronic drum kit, the ControlPad is a definitive solution to rhythm performance and programming. Here at Alesis, we take pride in building electronic instruments and controllers for the modern musician. We believe that the ControlPad is an intuitive and necessary tool for today's electronic musician. You no longer have to worry about feeling disembodied from your music experience. The ControlPad offers an ideal approach to controlling and sequencing rhythm content. We hope that you enjoy this product!
Sincerely,
The People of Alesis
REGISTRATION
Please go to http://www.alesis.com to register your new ControlPad. Registration helps you by ensuring that we can keep you informed on up-to-the-minute product news. Registering your product also ensures that you can get the latest updates and software available for your product. If you would like, Alesis can also send you information on other products that might interest you.
Your feedback helps us, too. When you let us know the types of music products you use and dream about, you help us bring you cutting-edge products like the ControlPad.
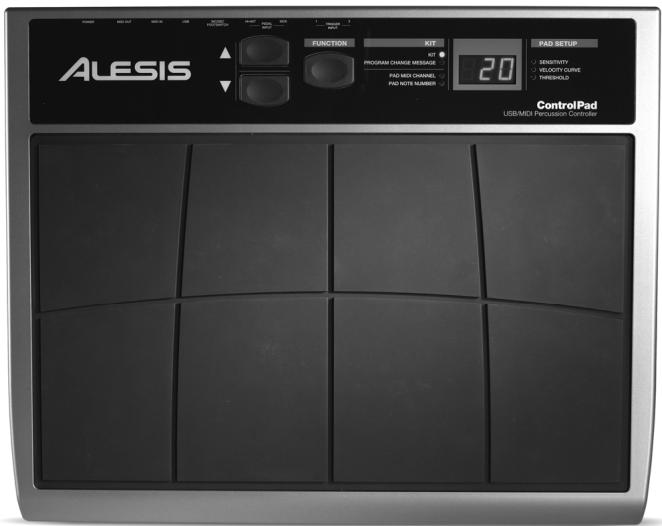
TOP PANEL OVERVIEW
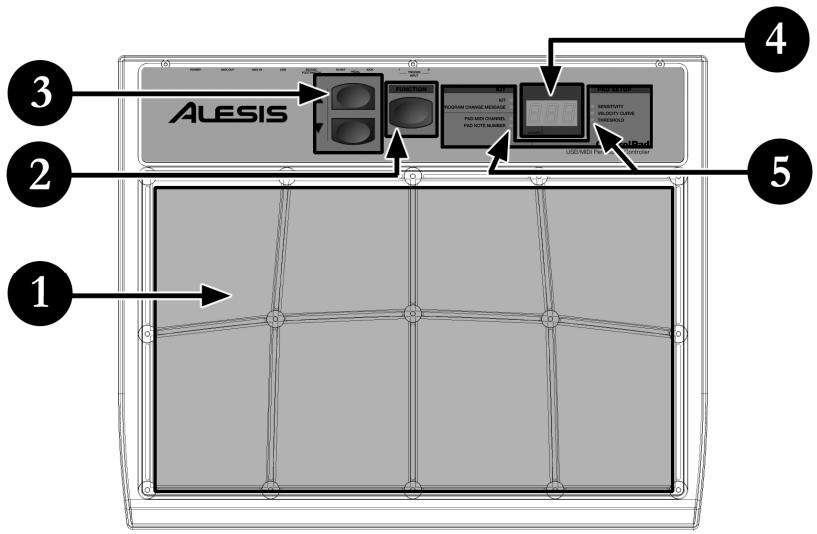
8 PLAYING PADS
These are the eight playable velocity sensitive pads.
FUNCTION BUTTON
This button is used to select different operations.
3 / ▲BUTTONS
These two buttons are used to cycle through presets, as well as increase and decrease values when a parameter is selected.
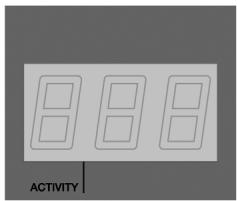
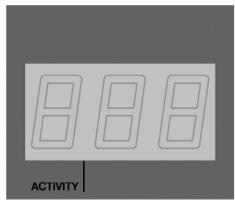
4 LED SCREEN
The LED screen displays information about the state of the ControlPad including kit number and function parameters. The screen also features a small "Activity" LED which will light up each time that a pad, trigger, or pedal is engaged.
FUNCTION LEDs
Each function in Edit Mode is paired with a corresponding LED on the panel. When in Edit Mode, these LEDs will reflect which function is currently being edited.
REAR PANEL OVERVIEW
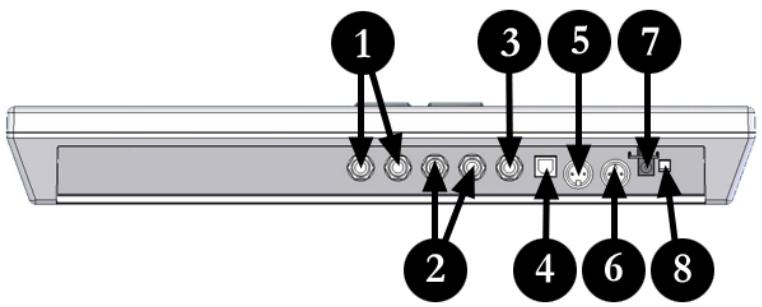
2 EXTERNAL TRIGGER INPUTS
These two 14 inputs can be used for connecting external triggers, pads, and pedals. Alesis offers a pad expansion kit, as well as a cymbal expansion kit sold separately.
2 SINGLE FOOTSWITCH INPUTS
These two 14 inputs are used for connecting external footswitches to function as a high hat pedal or bass drum pedal.
DUAL FOOTSWITCH INPUT
This is a 1 / 4 TRS input which can be used with a dual pedal footswitch for selecting kits and incrementing or decrementing values on the ControlPad.
USB PORT
The USB port is used to transmit MIDI data between the ControlPad and a computer. If you are using the USB port, there will be no need for the power adapter to be plugged in – the ControlPad will be powered through the USB bus.
MIDI IN PORT
Use a five-pin MIDI cable to connect the OUTPUT of another ControlPad to this MIDI IN port. The ControlPad will function as a MIDI interface and send the incoming MIDI data through the USB port. This input will show up on your computer as "USB Audio Device [2]" or "USB Audio Device [2] [Emulated)".
MIDI OUT PORT
Use a five-pin MIDI cable to connect the OUTPUT of the ControlPad to the MIDI IN port of an external device, such as a drum machine, synthesizer or sound module.
POWER ADAPTER INPUT
If you do not wish to power the unit through the USB port, please use the DC power adapter included in the box.
POWER SWITCH BUTTON
This button is used to power the ControlPad on and off.
HOOKUP DIAGRAM
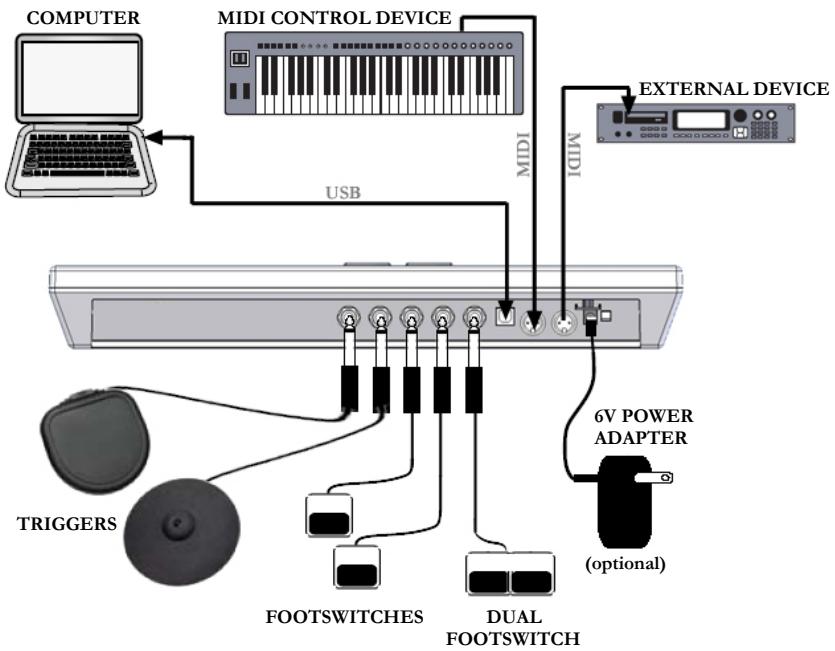
MOUNTING OPTIONS:
- Tabletop - put the ControlPad on a flat table top with enough space.
Snare stand - lay the ControlPad securely on a snare stand. -
Tom or cymbal stand - mounting brackets (sold separately) are available for mounting the ControlPad onto a tom or cymbal stand.
-
Before turning on the ControlPad, connect any additional triggers, footswitches, MIDI control or other external devices.
If you would like to use the ControlPad with a computer, connect a USB cord from the ControlPad to the computer's USB port.
- Connect a power source to the ControlPad. You have two options for powering the ControlPad:
a. Connect the ControlPad to a computer's USB port - the computer's USB bus will provide power.
b. Connect an optional 6v DC power adapter to the ControlPad.
- Use the power switch on the rear panel of the ControlPad to turn it on.
COMPUTER INSTALLATION
The ControlPad is a Plug-and-Play device so there is no driver or special software installation required. When the ControlPad is connected to a computer, it will automatically be recognized as an available USB device.
How to connect and use the ControlPad with a software application:
- Connect a USB cord from the USB port of the ControlPad to the USB port of your computer.
When the ControlPad is connected to a computer using a USB cord, the computer's USB bus will provide power to the unit. If you would like to use an alternate power source, plug in a 6v DC power adapter.
- Press the power switch on the back panel of the ControlPad. The display on the top panel will turn on to let you know that the ControlPad is on.

Tip
It is a good idea to connect and turn on the ControlPad before starting any software applications with which you intend to use the ControlPad. Otherwise the ControlPad might not function properly – or at all.
- Open up your software application.
- Next, select the ControlPad as a MIDI input device. Usually, this is done in the Preferences settings of the software application.
If you are using Windows XP, you will notice that the ControlPad may appear as 'USB Audio Device' or 'USB Audio Device (Emulated)' and the MIDI IN port of the ControlPad will appear as 'USB Audio Device [2]' or 'USB Audio Device [2] (Emulated)'. Please make sure that both of these MIDI inputs are enabled and active.
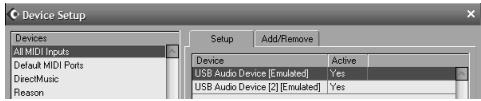
(Cubase LE example shown on left. You may access the MIDI inputs by going to Devices | Device Setup and clicking on All MIDI Inputs.)
- Now the ControlPad should be ready to use with the software application.

A Note About Audio Latency
Latency describes the time that it takes for your soundcard to respond to a command. In other words, this is the time that it takes for your computer to process incoming data (for example, MIDI Note events) and output a sound. The lower your latency is, the faster your computer will respond to commands and output sound.
Please make sure that your soundcard's latency (or buffer) is set to a low number so when you hit the pads on the ControlPad, your computer will output the sound promptly. Latency and buffering is usually adjusted in your software's Preferences settings. In general, if latency is higher than about 15-20ms, you will start to notice a significant delay between the time that you hit the pads and the time that the sound comes out of your computer.
If you still experience too much latency or "lag" with your internal soundcard audio drivers, you might want to download one of the free and widely available ASIO (Audio Stream Input/Output) drivers from the Internet. In general, ASIO drivers perform better and with lower latency since they create a more efficient communication between audio devices and software. You may download and install the free ASIO4ALL driver (PC) by visiting www.asio4all.com. (Only compatible with USB audio interfaces)
GETTING STARTED - USING KITS
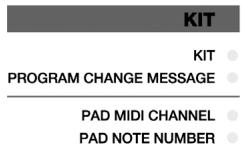
KIT
KIT
PROGRAM CHANGEMESSAGE
PAD MIDI CHANNEL PAD NOTE NUMBER

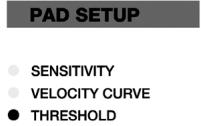
PAD SETUP
SENSITIVITY
VELOCITY CURVE
THRESHOLD
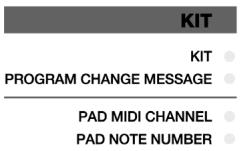
The ControlPad automatically goes into Kit selection mode each time it is turned on. Notice that the LED next to Kit is lit. If you are in a different
mode, you can always get to the Kit selection mode by pressing the function button until the LED next to Kit is illuminated.
While in Kit selection mode, you can use the and buttons to select different kits. The ControlPad will automatically load the kits as you step through the values. There are 21 available kits that you can load, modify and store.

Kit
A Kit, also known as a Preset, is a collection of parameters which describe different configurations of the ControlPad. These parameters include the MIDI Note Numbers assigned to individual pads or external triggers, as well as the MIDI Channels on which the pads or external triggers are sending information. This allows you to store and access different setups of the pads.
PROGRAM CHANGE MESSAGES
KIT
KIT PROGRAM CHANGEMESSAGE
PAD MIDI CHANNEL PAD NOTE NUMBER
PAD SETUP
SENSITIVITY
VELOCITY CURVE
THRESHOLD
A Program Change, often referred to as a Patch Change, is a MIDI message used for sending data to devices to cause them to change to a new program. This allows you to tell a hardware or software device which sound to play. For example, if your ControlPad is controlling a rock drum kit on your DAW or an external device, using a Program Change command allows you to easily switch to an electronic kit. Program Change messages also give you the freedom to re-orchestrate MIDI content without having to redo any MIDI note information.
Each kit on the ControlPad can have an associated Program Change message (0-127). This means that, effectively, you can have each kit on the ControlPad address a different set of sounds on your DAW or external MIDI device. By default, each kit on the ControlPad is set to "---". A Program Change message of "---" means that no Program Change message will be sent when the kit is loaded.
How to set a Program Change message :
- Press the function button until the LED next to Program Change message turns on.
- Select the desired Program Change message using the and buttons. The Program Change message will be sent automatically and will affect only that kit.
- Every time you load the kit thereafter, the selected Program Change message will be sent to your DAW or external MIDI device.
EDITING KITS
Editing kits is a powerful tool for customizing your ControlPad. When you are editing a kit, the information displayed on the screen will always reflect the parameters of the last pad in the current kit that was hit. To
modify the parameters of a certain pad, just strike it - this is often referred to as "chase mode". The individual parameters that you can modify for each pad are Pad MIDI Channel and Pad Note Number:

Remember
Setting Pad MIDI Channel and Pad Note Number will only affect the pad in the specific kit that you are working with.
PAD MIDI CHANNEL
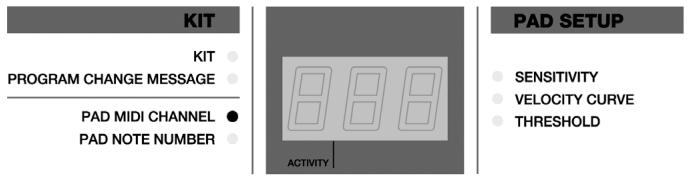
This is the MIDI Channel on which the pad or trigger is sending information. Each pad or external trigger can be set to transmit on a separate channel.
For example, this could be very useful if you are trying to control different devices or modules with different pads, and want to make sure that certain MIDI information is received only by a specific device. In this case, you can set different MIDI Channels which your external synths or sample playback engines will be "listening" to. Then assigning those different MIDI Channels to different pads will ensure that the pads only communicate with the specific device that you want them to.
How to change Pad MIDI Channel :
- Press the function button until LED next to Pad MIDI Channel turns on.
- To choose the pad or external trigger that you want to modify, just hit it.
- The current MIDI Channel for the pad or trigger will be displayed.
- Use the and buttons to select a MIDI Channel. As you move through the choices, the value will be loaded automatically.
PAD NOTE NUMBER
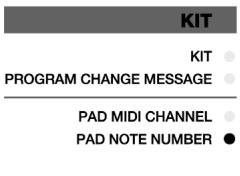

This is the MIDI Note Number that the particular pad or trigger is sending.
For example, if you are controlling an external drum machine,
there are unique MIDI Note Numbers associated with the kick drum, snare drum or hi-hat. The initial configuration may not be one that works well with your playing style. Maybe the snare is controlled by a pad whose location doesn't make much sense. The Note Number of the pad can be changed to match the Note Number associated with the snare sound on the external

Notes
When you hit a pad or trigger, the ControlPad generates a MIDI Note On message which signals your drum machine or software to essentially "play this sound". So regardless of whether you are playing drum samples, keyboards, or controlling a synth, you will always be sending notes to trigger sounds.
hardware or software device. This provides you the freedom to change the configuration of the pads, relative to the sounds they are triggering.
How to change Pad Note Number :
- Press the function button until the LED next to Pad Note Number turns on.
- To choose the pad or external trigger that you want to modify, just hit it.
- The current MIDI Note for that pad or trigger will be displayed.
- Use the and buttons to select a Note Number. These notes are based on the general MIDI specification, where C1 = 24. As you move through the choices, the value will be loaded automatically.
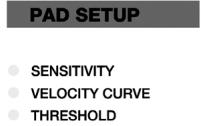
SETTING GLOBAL PARAMETERS
Global parameters change how the ControlPad functions in a general way. The following parameters will affect each pad or trigger input on a global level, regardless of the specific kit that you are working with. So even if
you change kits, the settings for each pad or trigger input will remain in place. The global parameters include Sensitivity, Velocity Curve and Threshold.

Remember
Setting global parameters will affect the specific pad or trigger in all of the kits.
Global parameters allow you to fully customize the ControlPad to fit your playing style. Adjusting the Sensitivity, Velocity Curve and Threshold settings for each pad or trigger will ensure a fully optimized performance on the ControlPad.
SENSITIVITY
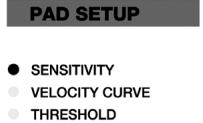
The Sensitivity parameter describes how a pad or trigger will react when it is engaged. With a high sensitivity setting, you don't have to hit the pad or trigger very hard to achieve a maximum velocity output. On the other hand, with a low sensitivity setting it is harder to achieve a maximum velocity output when hitting the pad or trigger hard. If you find it very easy to achieve maximum velocity (127) when you hit a specific pad or trigger, you might want to set its Sensitivity to a lower value. This will allow for more dynamics in your
playing style.
Adjusting a pad's Sensitivity may also prevent any "crosstalk" with adjacent pads. For example, if a pad is naturally more sensitive than another, it may trigger

Remember
Crosstalk occurs when vibrations from hitting a pad are transferred to another pad and cause it to trigger as well. Crosstalk with adjacent pads usually occurs when a pad is hit near the edge. Hit the center area of the pad to avoid this.
when its neighboring pads are hit. Reducing its Sensitivity could prevent crosstalk. On the other hand, if a pad is naturally insensitive and does not respond unless it is hit very hard, striking it may cause adjacent pads to trigger as well. Increasing its Sensitivity could prevent crosstalk.
How to change Sensitivity:
- Select the pad or trigger you would like to edit by striking it.
- Press the function button until the LED next to Sensitivity turns on.
- The current Sensitivity level for the pad or trigger will be displayed.
- Use the and buttons to select a Sensitivity value (0-20). As you move through the choices, the value will be loaded automatically.
VELOCITY CURVE
KIT
KIT
PROGRAM CHANGEMESSAGE
PAD MIDI CHANNEL PAD NOTE NUMBER
PAD SETUP
SENSITIVITY
VELOCITY CURVE
THRESHOLD
A Velocity Curve describes how the pad or trigger will output velocity information based on a certain ratio of input velocity (i.e. how hard the pads are hit). This is a useful feature when trying to customize how a pad or trigger responds to your playing style. Different Velocity Curves will have different input/output ratios associated with them
and will cause a different response, so take some time to get familiar will how the Velocity Curve setting corresponds to the way you like to play.

Velocity
Velocity is most often used to control notes' volume and/or brightness. So when you play the pads "harder", the notes typically are louder/brighter.
How to change Velocity Curve :
- Select the pad or trigger you would like to edit by striking it.
- Press function button until LED next to Velocity Curve turns on.
- The current Velocity Curve for the pads or triggers will be displayed.
- Use the and buttons to select a Velocity Curve (1-4). The value will be loaded automatically.
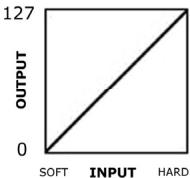

1-Linear
Outputs velocities in a linear fashion, so how hard you hit a pad or trigger directly corresponds to how loud it will sound.
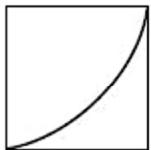
2 - Exponential
Softer hits will have a narrow dynamic range, while harder hits will be more expressive.
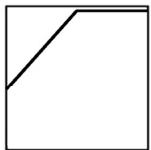
3-Offset
Outputs velocities in a linear fashion, with an offset of 49. Softer hits will output velocities between 50-127, while harder hits will output a constant velocity of 127.
4- Constant Curve
Outputs maximum velocity, regardless of how hard the pad or trigger is hit.
THRESHOLD

The Threshold setting helps prevent false triggering. The threshold value is the minimum velocity needed to be registered for the pad or trigger to output data. This Threshold should be set based on your playing style. Try different Threshold settings until you find one that best works for you.
How to change Trigger Threshold :
- Select the pad or trigger you would like to edit by striking it.
- Press the function button until the LED next to Threshold turns on.
- Select the value of the desired Threshold with the and buttons. The value will be loaded automatically.
SENDING GLOBAL MESSAGES
In addition to global parameters, there are three special functions available on the ControlPad: the All Notes Off message, the Return to Default Value message and a Factory Reset message. You might rarely have to use these but it is good to keep in mind that they are available in case you run into trouble.
ALL NOTES OFF
This function sends an All Notes Off message on all MIDI channels. An All Notes Off message will terminate any MIDI note that is still playing. This message can be used to recover from erroneous stuck notes.
How to send an All Notes Off message :
Hold and buttons simultaneously for 2 seconds or longer.
RETURN TO DEFAULT VALUE
This message will set the parameter being edited back to its default value.
How to send a Return to Default Value message :
Hold and buttons momentarily.
FACTORY RESET
This operation resets all functions back to the factory setup condition. Sometimes you might have gone a little too far changing the configuration of the ControlPad. You might want to use the Factory Reset message to restore everything, including presets, back to the way it originally was.
How to send a Factory Reset message :
- Hold and buttons simultaneously for 2 seconds while powering on the ControlPad.
MIDI SYSEX TRANSFER
MIDI System Exclusive (SysEx) messages allow you to transfer parameter and program data to and from the ControlPad over the USB or MIDI connection. Using SysEx software editors, many of which are available free over the Internet, you can quickly dump and transfer preset information to and from the ControlPad.
How to request a data dump from the ControlPad:
- Make sure that the ControlPad is connected, either via MIDI or USB, to your SysEx application.
- Hold down the function, and buttons simultaneously for 2 seconds.
How to transfer data to the ControlPad:
- Make sure that the ControlPad is connected, either via MIDI or USB, to your SysEx application.
- Simply 'play' the SysEx data that you would like to transfer to the ControlPad.
USING THE CONTROLPAD WITH BFD LITE
The ControlPad comes bundled with the BFD Lite software drum module, which includes high-quality drum samples. You can trigger these drum samples directly from the ControlPad with the authentic feel and control of playing a real drum kit.
Once you have installed the BFD Lite software, you can begin playing immediately. Following are some basic tips and suggestions on how to begin using the software.
Instructions:

BFD Lite
For instructions on installing the BFD Lite software, please refer to the Installation Procedure document included in the box.
- Install the BFD Lite software included with the ControlPad
- Plug the ControlPad into your computer's USB port with the included USB cable.

Important
If you intend to use any additional triggers or footswitches with the ControlPad, please connect them before plugging the ControlPad into your computer and turning the unit on. If you fail to do so, they might not work properly.
- If you are running Windows, go to Start | All Programs | FXpansion | BFD Lite | BFD Lite Standalone.
If you are running Mac OS, go to Applications | BFD Lite to launch the application.
This will launch BFD Lite in standalone mode. However, you may also use BFD Lite as a plug-in in your favorite sequencing environment.
- The ControlPad is a Plug and Play device, which means that it will automatically work with BFD Lite once the application has been launched.
Try striking the pads. If there is no sound, you will need to make sure that the BFD Lite software is set to use your preferred audio device (i.e. internal soundcard, external audio interface, etc.) as the sound output. If you are unable to hear a sound when you strike the pads, please make sure that the audio output is set to your preferred device.
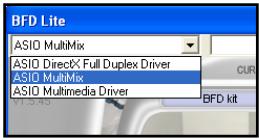
In Windows, you can select the device by clicking on the pull-down menu in the top left corner of the screen.
Please note: Depending on the soundcard you are using, you may experience different amounts of audio latency, or delay between when you hit the pads and when the sound comes out of your speakers. In BFD Lite Standalone, you can adjust the latency by
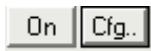
clicking on the Cfg... (Configuration) button and adjusting your soundcard's buffer settings.
For more information, please refer to A Note About Audio Latency discussion in the Computer Installation chapter of this manual.
- When you have successfully selected your audio device, you should hear sounds when you strike the pads. You are now ready to jam.
DEFAULT SETTINGS FOR THE CONTROLPAD
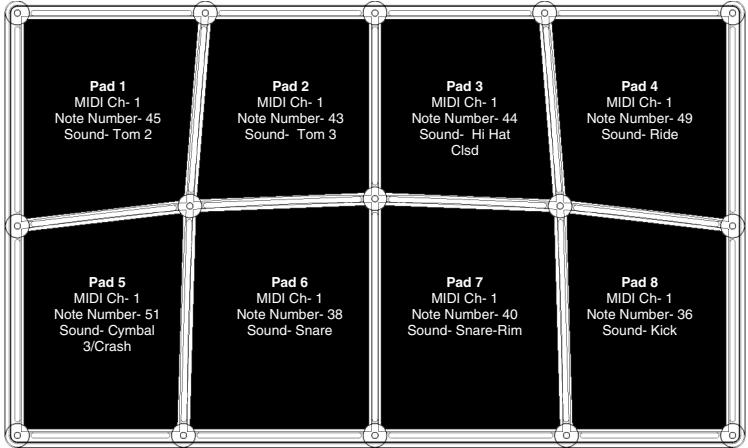
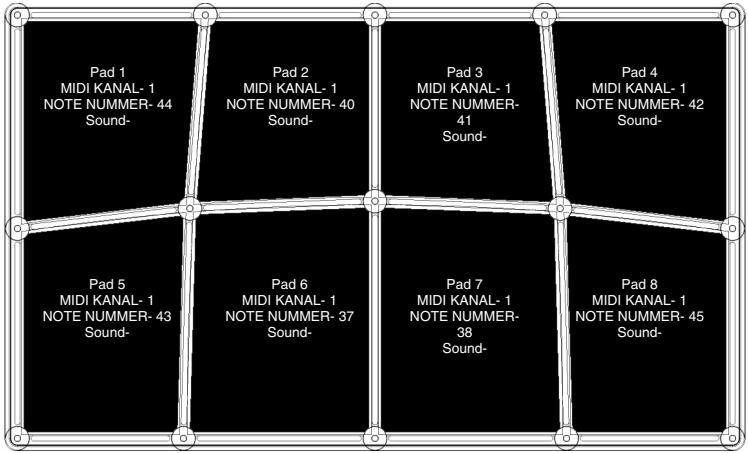
The ControlPad has been initialized with a preset which automatically maps all 8 pads to drum sounds in the BFD Lite software. You can access this configuration by selecting preset 0 on the ControlPad while in Kit mode.
The configuration of the kit is as described in the graphic below:
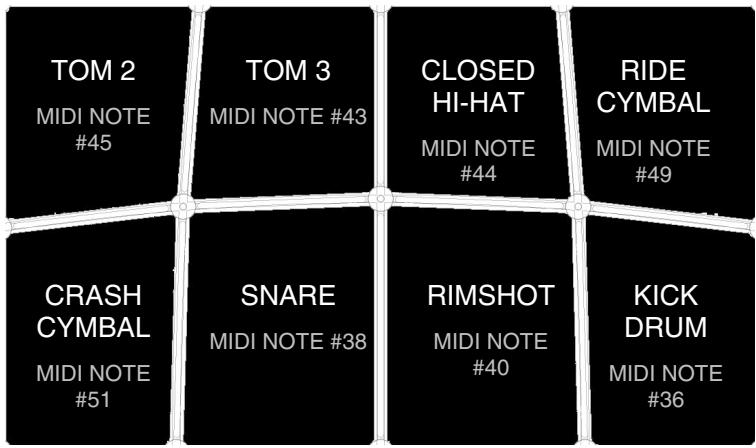
You will notice that in this configuration each pad has a different MIDI Note Number associated with it. It is these Note Numbers that will trigger the specific sound. Please refer to the Pad Note Numbers section of the Editing Kits Chapter of this manual for more information on how MIDI Notes are used.
The default settings for Preset 0 also include default mappings for any additional triggers that you may want to use with the ControlPad:
| INPUT | SOUND | MIDI NOTE NUMBER |
| KICK INPUT | KICK | 36 |
| EXT TRIGGER 1 | CLOSED HI-HAT | 46 |
| EXT TRIGGER 2 | RIDE CYMBAL | 49 |
| HIHAT INPUT | HI-HAT OPEN/CLOSE | 44 *** |
*** The hi-hat input, when used with a footswitch pedal, will toggle between an open and closed hi-hat sound when a hi-hat pad is hit.
In order to take advantage of the hi-hat input, you will need to configure the BFD Lite software in the following manner:
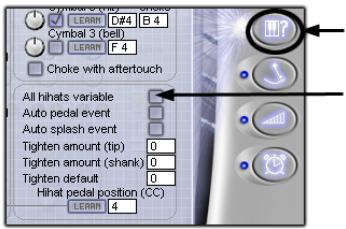
- Click on this tab.
- Check "All hihats variable" field.
ADJUSTING KIT PERFORMANCE
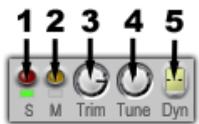
Each kit piece has a few general controls. You can use these controls to solo, mute, and adjust tuning and level for each particular kit piece.
- SOLO - Pressing this button will solo only that kit piece and no other piece will be heard.
-
MUTE - Pressing this button will mute the particular kit piece so it will not play when it is triggered.
-
TRIM - This knob functions as a volume gain knob. Use this knob to adjust the level of the kit piece.
-
TUNE - Turn this knob to tune the kit piece up and down.
-
DYNAMICS - Using this control, you can make a kit-piece play 'softer' or 'harder'. BFD Lite's sounds are recorded with many velocity layers: adjusting the Dynamics control can achieve a variety of realistic levels of striking force: from soft and jazzy to hard and loud.

Additional Information
Please refer to the BFD Lite user manual which can be found under Start | All Programs | FXpansion | BFD Lite | BFD Lite Manual for additional information about the BFD Lite Software. The concepts discussed in this chapter are quick tips on how to begin using the ControlPad with the BFD software. However, the software also offers much more in-depth control for realistic and customizable performance. Please take the time to familiarize yourself with the software by reading the BFD Lite Manual.
CUSTOMIZING YOUR KIT
You may wish to customize your kit to your desired playing style. You can quickly switch the sounds that the pads are triggering by changing the MIDI Note Number that the pad is assigned to. To do so, make sure that you are in Pad Note Number mode by pressing the function button until the LED next to Pad Note Number is lit. Then strike the pad that you want to change and use the and buttons to scroll to a different Note Number.
Below is a list of the default Note Number mappings in BFD Lite. To use one of these sounds with a pad, you will need to assign the specific Note Number to the pad by following the procedure in the paragraph above.
| NOTE NUMBER | KIT PIECE | HIT STYLE |
| 56 | CYM2 | BELL |
| 55 | CYM2 | HIT |
| 54 | CYM1 | BELL |
| 53 | CYM3 | BELL |
| 52 | HIHAT | HALF SHANK |
| 51 | CYM3 | HIT |
| 50 | HIHAT | HALF TIP |
| 49 | CYM1 | HIT |
| 48 | HIHAT | CLOSED SHANK |
| 47 | TOMH | HIT |
| 46 | HIHAT | OPEN TIP |
| 45 | TOMM | HIT |
| 44 | HIHAT | PEDAL |
| 43 | TOMF | HIT |
| 42 | HIHAT | CLOSED TIP |
| 41 | SNARE | FLAM |
| 40 | SNARE | RIM |
| 39 | SNARE | DRAG |
| 38 | SNARE | HIT |
| 37 | SNARE | SIDESTICK |
| 36 | KICK | HIT |
| 35 | KICK | NO SNARE |
| 24 | HIHAT | VARIABLE TIP |
| 33 | HIHAT | ¾ TIP |
| 32 | HIHAT | ¾ SHANK |
| 31 | HIHAT | ¼ TIP |
| 30 | HIHAT | ¾ SHANK |
| 29 | SNARE2 | FLAM |
| 28 | SNARE2 | RIM |
| 27 | SNARE2 | DRAG |
| 26 | SNARE2 | HIT |
| 25 | SNARE2 | SIDESTICK |
| 24 | KICK2 | HIT |
| 23 | KICK2 | NO SNARE |
| 22 | HIHAT | VARIABLE SHANK |
OTHER APPLICATIONS OF THE CONTROLPAD

The ControlPad can be used for a variety of applications which use MIDI as their control protocol. For example, the ControlPad can be used to trigger melodic sounds on sound modules or VST instruments. This means that you can play pitched instruments, such as vibraphones, marimbas, xylophone, even a piano or a violin, straight from the ControlPad.
As you have already seen throughout this manual, the ControlPad uses MIDI Note information to trigger events, such as drum hits. However, MIDI Notes also represent actual musical notes and pitches (much like keys on a piano). This allows pitched content to be played from MIDI devices (such as the ControlPad).
For this reason, we include a handy chart which shows you how MIDI Note Numbers correspond to musical pitches (as shown on a piano keyboard). The musical pitches are followed by their corresponding MIDI Note Numbers in().
You can use this chart to help you quickly setup the ControlPad for working with pitched content.
FACTORY PRESET MAPPINGS
PRESET 0 - BFD LITE (WITHOUT EXTERNAL TRIGGERS OR PEDALS)
INPUTS
| Hi Hat Input MIDI Ch- Note Number- Sound- Hi Hat opn/close | Kick Input MIDI Ch-1 Note Number-36 Sound- Kick | Ext Trigger 1 MIDI Ch- Note Number-46 Sound- clds hat | Ext Trigger 2 MIDI Ch- Note Number-49 Sound- ride |
PRESET 1 BFD LITE (WITH EXTERNAL PEDALS AND TRIGGERS)
INPUTS
| Hi Hat input MIDI Ch-1 Note Number-44 Sound- Pedal Hat | Kick Input MIDI Ch-1 Note Number-35 Sound- Kick | Ext Trigger 1 MIDI Ch-1 Note Number-46 Sound- Open Hat | Ext Trigger 2 MIDI Ch-1 Note Number-49 Sound- Cymbal 1-ride |
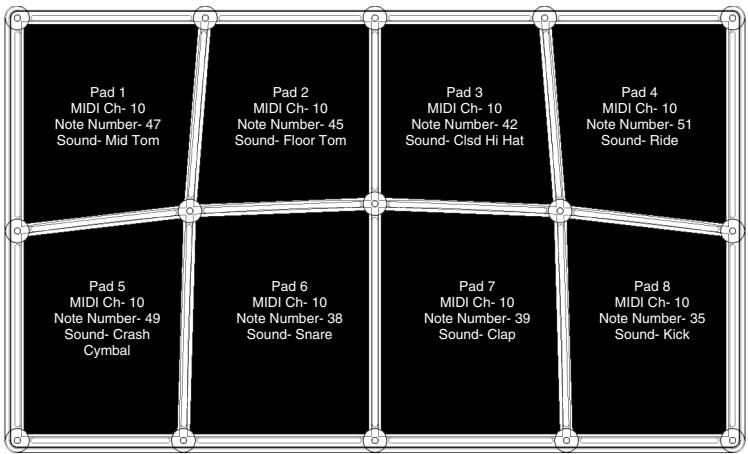
PRESET 2 GM KIT
INPUTS
| Hi Hat input MIDI Ch- 10 Note Number- 42 Sound- Pedal Foot | Kick Input MIDI Ch- 10 Note Number- 35 Sound- Kick | Ext Trigger 1 MIDI Ch- 10 Note Number- 46 Sound- open hat | Ext Trigger 2 MIDI Ch- 10 Note Number- 51 Sound- Ride |
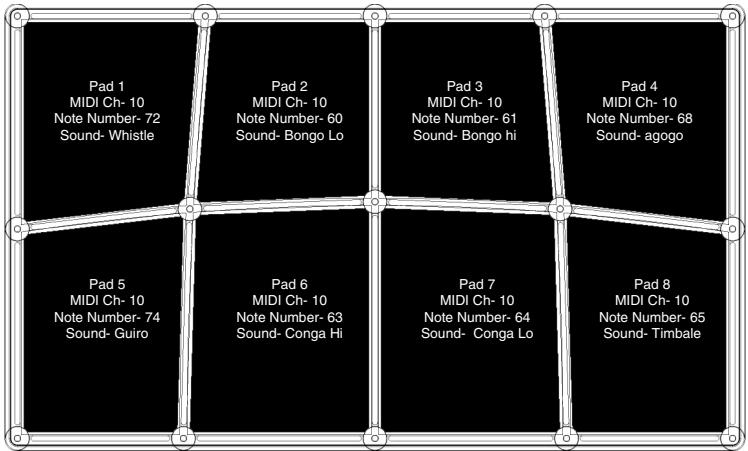
PRESET 3 GM PERC
INPUTS
| Hi Hat input MIDI Ch-10 Note Number-44 Sound- Hi Hat Foot | Kick Input MIDI Ch-10 Note Number-35 Sound- Kick | Ext Trigger 1 MIDI Ch-10 Note Number-81 Sound- open triangle | Ext Trigger 2 MIDI Ch-10 Note Number-59 Sound- ride cymbal |
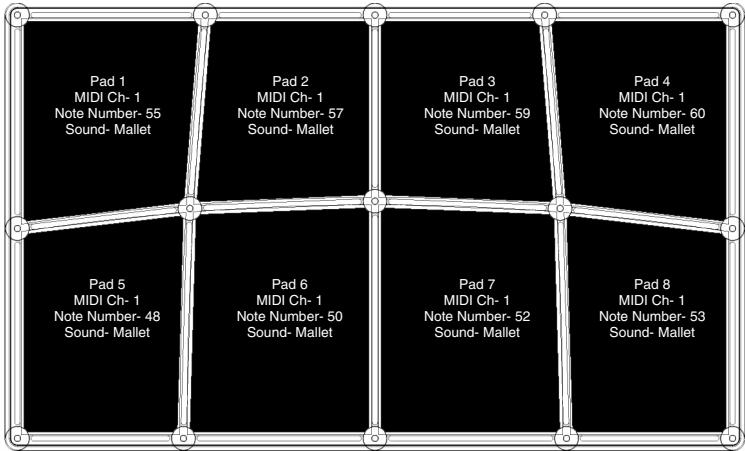
PRESET 4 GM MALLETS
INPUTS
| Hi Hat input MIDI Ch-1 Note Number-48 Sound-Mallet | Kick Input MIDI Ch-1 Note Number-36 Sound-Mallet | Ext Trigger 1 MIDI Ch-1 Note Number-72 Sound-Mallet | Ext Trigger 2 MIDI Ch-1 Note Number-80 Sound-Mallet |
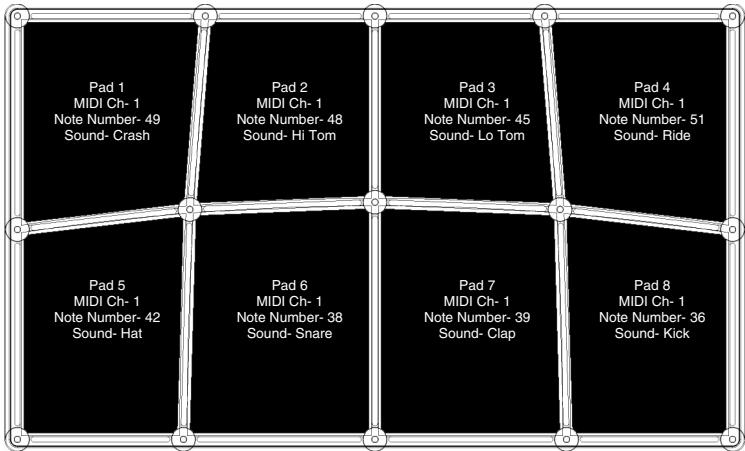
PRESET 5 SR-16
INPUTS
| Hi Hat input MIDI Ch-1 Note Number-42 Sound- hat | Kick Input MIDI Ch-1 Note Number-36 Sound- kick | Ext Trigger 1 MIDI Ch-1 Note Number-42 Sound- hat | Ext Trigger 2 MIDI Ch-1 Note Number-51 Sound- Ride |
PRESET 6 REASON - REDRUM "GRAIN KIT"
Please note that MIDI note mappings vary between different Redrum kits.
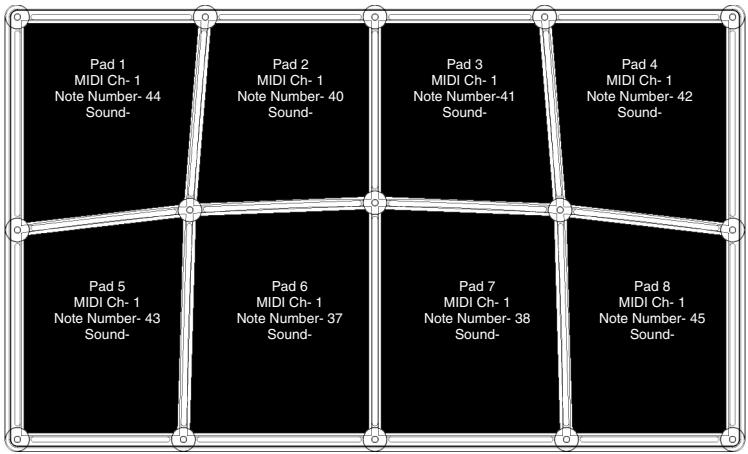
INPUTS
| Hi Hat input MIDI Ch-1 Note Number-43 Sound- | Kick Input MIDI Ch-1 Note Number-36 Sound- | Ext Trigger 1 MIDI Ch-1 Note Number-40 Sound- | Ext Trigger 2 MIDI Ch-1 Note Number-39 Sound- |
PRESET 7 REASON - DR:REX "BADABING"
EXTEND AMP RELEASE TIME TO HEAR COMPLETE SAMPLES
Please note that MIDI note mappings vary between different Dr;Rex kits.
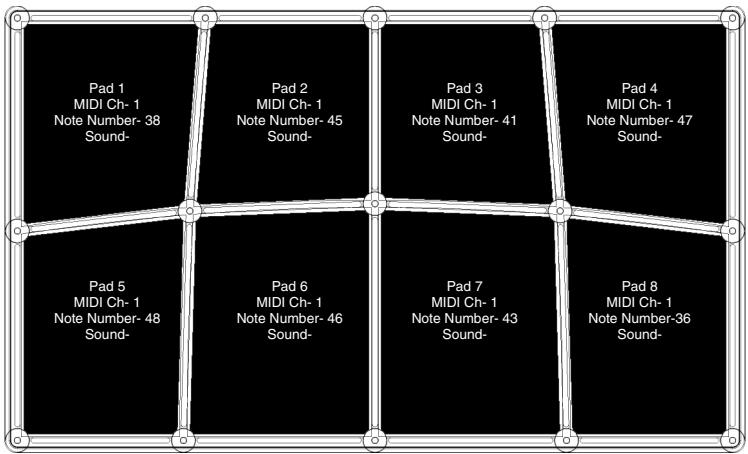
INPUTS
| Hi Hat input MIDI Ch-1 Note Number-47 Sound- | Kick Input MIDI Ch-1 Note Number-37 Sound- | Ext Trigger 1 MIDI Ch-1 Note Number-47 Sound- | Ext Trigger 2 MIDI Ch-1 Note Number-40 Sound- |
PRESET 8 BATTERY 2 "60'S GARRAGE KIT"
Please note that MIDI note mappings vary between different Battery kits.
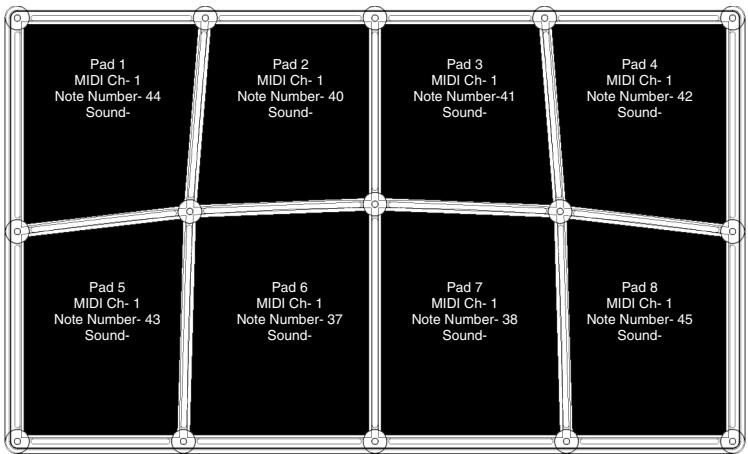
INPUTS
| Hi Hat input MIDI Ch-1 Note Number-43 Sound- | Kick Input MIDI Ch-1 Note Number-36 Sound- | Ext Trigger 1 MIDI Ch-1 Note Number-40 Sound- | Ext Trigger 2 MIDI Ch-1 Note Number-39 Sound- |
TROUBLESHOOTING
| Symptom | Cause | Solution |
| The display does not light up. | No power. | If you are using USB power, check that the power switch on the back of the ControlPad is ON. If you are using an AC adapter, check that the adapter is plugged into a live power outlet and that the power switch is ON. |
| MIDI: No sound from target device. | ControlPad USB not properly connected. | Check your computer's USB connections to confirm that the ControlPad is recognized and installed. Turn you computer off and then on again if necessary. (Choose “shut down” rather than “restart” to ensure that the USB devices are properly reset.) |
| Problems caused by use of a USB hub. | Try unplugging the ControlPad from any USB hubs and connecting directly to the computer. | |
| Software application not set up to receive MIDI data from ControlPad controller. | Ensure that the ControlPad or “USB” MIDI device is listed as an active MIDI source in your application. | |
| Software application not receiving MIDI data. | Many software applications have MIDI IN and OUT indicators. Play some pads and look for the MIDI IN light to indicate activity. | |
| ControlPad's MIDI channel not the same as application's incoming MIDI channel. | Be sure that the ControlPad is sending on the channel that the target device expects. | |
| ControlPad's 5-pin MIDI OUT not connected to sound source's MIDI IN. | Ensure that any 5-pin cables are connected to the proper inputs and outputs. |
Symptom
Footswitches or triggers behave in an opposite manner. For example, pressing down the footswitch generates a Note Off message, while releasing the footswitch generates a Note On message.
Cause
Footswitch or trigger inputs were plugged in after power was turned on.
Solution
Turn the unit's power off, wait a moment, and then turn it on again. Please always make sure that footswitches and triggers are connected to the ControlPad prior to powering on the unit.
Notes sustain continuously.
Adjacent pad triggers when pad is hit.
Stuck notes due to incomplete MIDI data.
Sensitivity is not set correctly.
Turn the unit's power off, wait a moment, and then turn it on again.
Edge of pad was hit.
Set the pad sensitivity as described in the "Setting Global Parameters" section of this manual.
There is too much delay or latency between the time that the pad is hit and the time that the sound triggers on the computer.
There is another device on your computer's USB bus.
Your software's latency settings are not correct.
If a pad is hit near the edge, it is normal for it to "crosstalk" with another pad. Hit the center area of the pad to avoid this.
Try unplugging USB devices (especially high-bandwidth devices like disc drives) from your computer.
When using MIDI-OX for SysEx transfers, the ControlPad's presets become messed up.
MIDI-OX output buffer is not set correctly.
Try adjusting the software settings on your computer. Please note that not all software has these settings. Please refer to the "Computer Installation" section of this manual for more information on latency.
Alesis does not recommend using the MIDI-OX software application for SysEx transfers. However, if you choose to use MIDI-OX, please ensure that the output buffer size is set to at least 2048.
KEY FEATURES
8 HIGH-QUALITY, VELOCITY-SENSITIVE RUBBER PADS
4 ADDITIONAL TRIGGER INPUTS FOR HOOKING UP EXTERNAL PADS AND TRIGGERS
- PLUG-AND-PLAY (NO DRIVERS NECESSARY)
USB CONNECTIVITY
MIDI I/O
PAD SENSITIVITY ADJUSTMENT
PROGRAM CHANGE CAPABILITY
COMPUTER REQUIREMENTS
PC running Windows XP or Macintosh running OS 9.x or greater
USB 1.1 or 2.0 connectivity
MIDI IMPLEMENTATION CHART
| Function | Transmitted | Recognized | Remarks | |
| Basic Channel | Default | 1-16 | 1 - 16 | Memorized |
| Changed | 1-16 | 1 - 16 | Adjustable by user per pad | |
| Note Number: True Voice | 0-127 | 0-127 | ||
| 0-127 | 0-127 | |||
| Velocity | Note On | 1-127 | O | |
| Note Off | 0 | X | ||
| After Touch Ch's | X | X | ||
| X | X | |||
| Pitch Bend | X | X | ||
| Control Change | 4 | O | O * | Foot Pedal CC message |
| Program Change | True # | 0-127 ** | X | |
| System Exclusive | O | O | ||
| System Common | Song Pos | X | X | |
| Song Sel | X | X | ||
| Tune | X | X | ||
| System Realtime | Clock | X | X | |
| Commands | X | X | ||
| Aux Messages | Local On/Off | X | X | |
| All Notes Off | O | X | ||
| Active Sense | X | X | ||
| Reset | X | X | ||
| GM On | X | X | ||
| Notes: * For use with ControlPad input via MIDI IN only ** 1 Set Per Kit | ||||
O:YES
X:NO
CÓMÖ EDITAR LOS KITS

PRESET 4 - GM MALLETS
ENTRADAS
This page has been intentionally left blank.
INHALTSVERZEICHNIS
EINFUHRUNG 111
REGISTRIERUNG 111
This page has been intentionally left blank.
EINFUHRUNG
Please note that MIDI note mappings vary between different Redrum kits.
EINGANGE
| Hi Hat Eingang MIDI KANAL-1 NOTE NUMMER-43 Sound- | Kick Eingang MIDI KANAL-1 NOTE NUMBER-36 Sound- | Ext Trigger 1 MIDI KANAL-1 NOTE NUMBER-40 Sound- | Ext Trigger 2 MIDI KANAL-1 NOTE NUMBER-39 Sound- |
PRESET 7 REASON - DR:REX "BADABING"
ERHOHEN SIE DIE AMP RELEASE ZEIT UM KOMPLETTE SAMPLES ZU HÖREN
PRIMIPASSI - USO DEI KIT
KIT
KIT
PROGRAM CHANGEMESSAGE
PAD MIDI CHANNEL PAD NOTE NUMBER
PAD SETUP
SENSITIVITY
VELOCITY CURVE
THRESHOLD
Ad esempio, Anything would be more than a good idea to have the possibility of making it easier to do so. In this case, it is necessary to make sure that the work is not too complex and that the results are accurate.