USER MANUAL PHOTONX25 ALESIS
Quick Start Owner's Manual
BOX CONTENTS
PHOTON X 25 USB AUDIO/MIDI CONTROLLER
USB CABLE
- QUICK START OWNER'S MANUAL
IMPORTANT SAFETY INSTRUCTIONS
This page intentionally left blank.
PHOTON X 25 QUICK START OWNER'S MANUAL (ENGLISH)
Introduction
Congratulations on your purchase of the Alesis Photon X 25 MIDI controller and 24-bit stereo audio interface! The Photon X 25 combines portability with a host of cutting-edge features:
MIDI
- 25 full-size, velocity sensitive keys with easily accessible octave shift buttons.
- Alesis AXYZ dome for revolutionary three-dimensional MIDI control.
- Premium pitch and modulation wheels with backlighting.
- 10 high-resolution 360^ knobs. Three layers yield the equivalent of thirty knobs per preset.
- 10 buttons, each programmable for on/off or momentary (trigger) operation.
- Simultaneously active USB and 5-pin MIDI connections.
- Pre-programmed setups. You can easily design your own custom setups, too.
AUDIO
- 24-bit stereo audio input and output via USB. Adjustable sample rate up to 48 kHz.
- Adjustable input and output gain.
- Main stereo outputs plus headphone output.
Product Registration
Please go to http://www.alesis.com to register your new Photon X 25. Registration helps you by ensuring that we can keep you up to date on any last-minute product issues. If you want, Alesis can also send you information on other products that might interest you.
Registration helps us, too. When you let us know the types of music products you use and dream about, you help us bring you cutting-edge products like the Photon X 25.
Minimum Computer Requirements
The Photon X 25 requires either Windows XP or Mac OS X, along with an available USB 1.1 or higher connection. Earlier operating systems are not supported.
Any MIDI application in which MIDI inputs can be configured should be compatible with the Photon X 25. Very basic MIDI programs will not allow you to take advantage of the Photon X 25's wheels, buttons and knobs.
Connection Diagram

This page intentionally left blank.
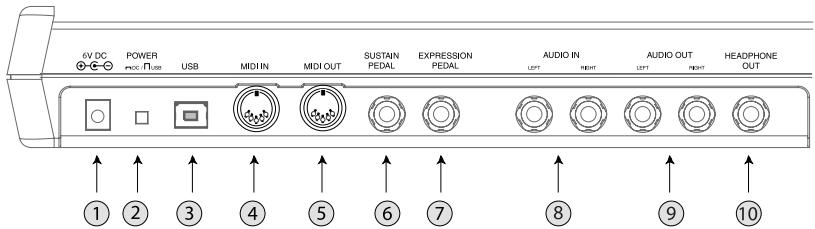
Rear-Panel Connections
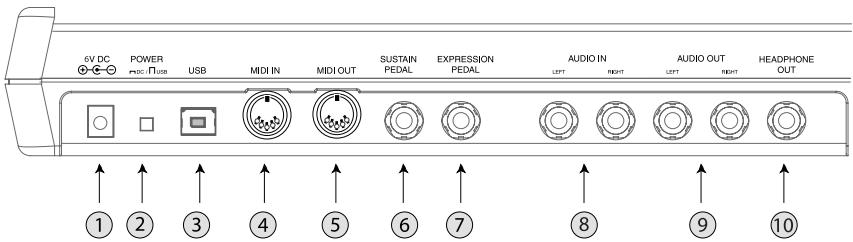
- External Adapter Jack - Plug in the AC adapter if you don't want to power the Photon X 25 through either the USB connection or four "C"-size batteries. (Use a 6VDC, negative tip, 1000mA device.)
- Power Source Selector - Press this switch IN to power the Photon X 25 from either four "C"-size batteries or the external power adapter. (If both an AC adapter and batteries are present, the AC adapter will be used rather than the batteries.)
Leave this switch in the OUT position in order to power the Photon X 25 from a computer's USB connection or to turn off the unit when USB power is not present.
Note: When using a laptop computer, consider using batteries to prolong the laptop's operating time between charges.
Load "C"-size batteries on the bottom of the Photon X 25.
- USB Connector - Plug a standard USB cable into this outlet and into a USB 1.1 or higher connector on your computer.
Plug the Photon X 25 directly into your computer, rather than using a USB hub or other intermediate device. Such devices can interfere with the Photon X 25's MIDI and audio timing signals.
- MIDI IN Connector - Use a five-pin MIDI cable to connect the OUTPUT of an external MIDI controller to the MIDI IN of the Photon X 25.
If you connect an external MIDI device to the Photon X 25 in this way, your computer will recognize the external device as a second MIDI IN controller.
- MIDI OUT Connector - Use a five-pin MIDI cable to connect the MIDI OUT of the Photon X 25 to the INPUT of an external MIDI device.
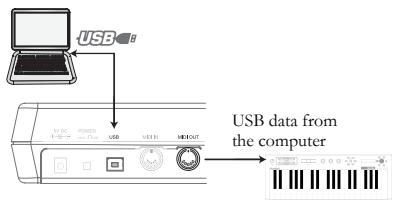
The operation of the MIDI OUT port changes depending on whether or not a USB cable is connected to the Photon.
MIDI data from your computer is passed to the MIDI OUT port.
Note: When a USB cable is connected, you should activate "MIDI echo" in your sequencer if you want the Photon to control another MIDI device.
Whatever you play on the Photon is sent to the
MIDI OUT port.
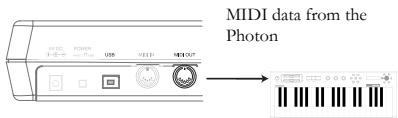
Note: If you have another device
connected to the Photon's MIDI IN port, that device's MIDI
information will be ignored.
- Sustain Pedal Input - Connect a keyboard sustain pedal (not included). Use any manufacturer's sustain pedal: when you turn on the Photon X 25, it will automatically calibrate itself to the pedal.
- Expression Pedal- Plug in an optional continuous-controller expression pedal such as the Roland EV-5 pedal.
- Stereo Audio Inputs - Use balanced (TRS) or unbalanced (TS) 14 cables to connect external audio equipment like mixers and synthesizers. You can adjust the incoming signal's gain using the INPUT control on the top of the Photon X 25.
Note: You can choose whether or not to send the audio input signal directly to the audio outputs (including the headphone output) in the GLOBAL menu.
9. Stereo Audio Outputs - Use balanced (TRS) or unbalanced (TS) 14 cables to connect the Photon X 25 to a mixer or powered monitor speakers to listen to the incoming audio sent from your computer.
10. Headphone Output - Connect a pair of stereo headphones to listen to the incoming audio.

Top Panel Controls
- Keyboard - A full-size, 25-note, velocity-sensitive keyboard.
- Octave Up/Down Buttons - Transpose the keyboard in octaves using these buttons. Press them both at the same time to reset the keyboard range.
- Pitch Wheel - Control pitch bend with this backlit wheel.
- Modulation Wheel- While you can control any parameter using this backlit wheel, its most common use is for modulation control.
- AXYZ Dome - The AXYZ dome responds to your hand position to provide three-way MIDI control. Side-to-side, top-to-bottom, and distance-from dome movements are all tracked.
- AXYZ Dome activation button - Press this button to enable or disable AXYZ Dome operation.
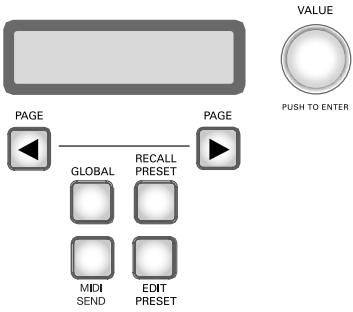
- Display- The LCD display shows current status information.
- Configuration buttons - Call up and save presets, set global parameters and more using the configuration buttons. See below for additional detail.
- VALUE/ENTER Encoder - Twirl the VALUE/ENTER encoder to select various parameters and values. Press VALUE/ENTER to toggle between parameter and value assignments and to accept your entries.
- Audio Input Level- Adjust the gain of incoming audio here.
- Audio Output Level – Adjust the level sent to the headphones and main audio outputs.
- MIDI Control Knobs - Ten high-resolution, endless knobs. Due to their high resolution, these knobs are suitable for transmitting MIDI Non-Registered Parameter Numbers (NRPNs) as well as standard 7-bit (0-127) MIDI commands.
-
MIDI Control Buttons - Ten buttons can operate in either toggle (on/off) mode or momentary (trigger) mode.
-
Layer Button - Press the LAYER button repeatedly to cycle through the Photon X 25's three independent knob layers. The lights above the LAYER button indicate which one of the three available layers is currently active.
Knob assignments can be made on each layer for a total of 30 knob assignments per preset.
Plug-and-Play Connection to a Computer
Both Windows XP and Mac OS X see the Photon as a plug-and play MIDI and Audio controller. Simply plug the Photon into your computer using a USB cable and allow the operating system to install it automatically.
Depending on your operating system, the Photon X 25 may be identified by your MIDI and Audio software applications as either a "Photon" controller or a "USB Audio Device." No need to worry: the Photon will work regardless of its designation.
The Photon is not compatible with earlier versions of Windows or Mac OS.
Check http://www.Alesis.com for driver updates and up-to-date information on operating system compatibility.
Operation:
1. Using the Keyboard with your MIDI software
Start off simply. Once you're plugged in and powered up, go to your sound module or software application and set the incoming MIDI channel.
If you're using software, you will probably need to configure it to use the Photon or "USB" device. Look for the MIDI device setup menu in your application and ensure that the Photon is designated as an active MIDI device before proceeding.
On the Photon, press EDIT PRESET. Then, press the PAGE RIGHT button to see the Common MIDI setting. This is the channel on which the Photon X 25 will send it's MIDI information. Turn the VALUE/ENTER encoder to change this setting if needed.
Play the keyboard. Your sound module or software should respond to the Photon X 25's MIDI data. If not, refer to the troubleshooting instructions later in this guide.
Experiment with the Photon X 25's OCTAVE buttons and pitch and modulation wheels. Since the two wheels are mapped to MIDI's standard pitch and modulation commands, they should work for you in most cases right off the bat.
2. Using the Knobs with the Supplied Controller Templates
If one of the supplied template sets matches your MIDI software, lift the plastic template covers with your fingernail, position the templates, and then replace the covers.
Press the RECALL PRESET button and turn the clear cursor knob to reach the program number indicated on the templates. Press the cursor knob to enter this program. You should now be able to control the software according to the templates.
Press the LAYER button to cycle through the three knob layers. Each layer is independent (though a knob can be assigned to the same controller value on two or three of the layers).
The row-selection lights on the top and bottom always move together. It's not possible to select, say, Layer 1 on the top row of knobs and Layer 2 on the bottom row.
3. Audio Recording and Playback
To record, connect the OUTPUT from an audio device to the AUDIO IN jacks of the Photon X 25. Use balanced (TRS) or unbalanced (TS) 1/4 cables. In your audio software, enable input from the Photon X 25.
If your software allows it, adjust the sample rate. The Photon X 25 will "slave" to this setting (so long as it is not out of the Photon X 25's range).
Adjust the gain of the incoming audio signal using the Photon X 25's INPUT knob. Send the loudest signal you can to your recording application before your application indicates clipping.
For playback, connect a pair of headphones to the Photon X 25's HEADPHONE OUT jack and/or connect your audio playback device's IN jacks to the Photon X 25's AUDIO OUT jacks. Adjust the level using the OUTPUT knob.
CAUTION: To protect both your hearing and your equipment, turn the OUTPUT down to its lowest setting before connecting gear and before turning on the unit.
Maximizing Your Gain Staging
For the best recorded sound, adjust each of your audio devices for maximum fidelity with minimum noise.
Start by turning UP keyboards, sound modules and mixer channels to between fifty and seventy-five percent of maximum.
If you hear distortion, first turn DOWN the preamp trim controls on your mixer (if you're using one). Then, turn DOWN the Photon's OUTPUT knob.
Listen for audible improvements as you adjust your devices' volume controls relative to one another.
A little time spent experimenting with these settings can yield big improvements in sound quality.
24-bit audio output to 16-bit recording programs
The Photon X 25 always sends audio to the computer at 24 bits (high resolution). Some recording programs will only record the 16 most significant bits (compact disc resolution), ignoring the eight additional bits sent by the Photon X 25. This is not a problem.
4. Editing and Storing Configurations
(Editing the Global settings)
Global settings are in effect at all times, in all presets.
Press the GLOBAL button to access these settings. Then use the PAGE buttons to cycle through the options. Any changes you make are stored immediately. When you are finished, press RECALL PRESET to exit this mode and return to normal operation.
a. LCD CONTRAST. Use VALUE to adjust the screen's contrast.
b. KEYBOARD CURVE. Use VALUE to select the Linear, Logarithmic, Exponential, or Always-at-Maximum velocity curve.
c. SEMITONE TRANSPOSITION. Use VALUE to cycle from -11 semitones to +11 semitones. You can also use the keyboard to set this value. 0 (no transposition) is equal to middle C.
d. DIRECT MONITOR. This function allows you to hear the audio that you send into the Photon X 25 directly, without requiring the audio to pass through the USB cable to the computer and back beforehand.
Direct Monitoring is ideal if you want to listen to your recorded signal with the lowest possible latency. However, if you turn Direct Monitoring on and also monitor your signal through your computer, you will likely hear a bit of echo due to the computer interface's higher latency.
Use VALUE/ENTER to select "enabled" or "disabled"
e. SEND SYSEX. Store your Photon X 25's preset configurations by sending them to an external device (such as your computer). Send either one preset or all of them.
What is Latency?
"Latency" is the delay between the moment when audio is generated and the moment when you actually hear it. Higher latency means a longer delay.
Generally, you want to keep latency as low as possible while still allowing your equipment to operate without glitches.
Loading presets)
Presents are snapshots of the Photon X 25's settings for its three layers of knobs and buttons, its pitch and mod wheels, and its AXYZ dome. 20 different preset locations are available.
With the Recall Setup button illuminated, move any controller to see its midi control assignment within the most recently active preset.
Recalling setups
Press RECALL PRESET. Turn VALUE/ENTER to cycle through the presets. Press VALUE/ENTER to make a preset active.
Copying presets from one location to another
Press RECALL PRESET. Then, press the PAGE RIGHT button. The lower half of the screen will read "copy to ...." Twirl the VALUE/ENTER encoder to select the destination location. Press VALUE/ENTER to copy the preset.
(Naming presets; assigning MIDI channels and controllers)
Press the EDIT PRESET button to access the settings for the current preset.
Assigning the MIDI Channel
Each preset is associated to a MIDI channel. You can assign any controller to a different MIDI channel if you want, but there is still a "common" MIDI channel for the preset.
Once you've pressed EDIT PRESET – and before you've touched any other buttons or controllers – press the PAGE RIGHT button to access the Common MIDI setting. Turn the VALUE/ENTER encoder to change the setting.
Naming the Preset
Press PAGERIGHT again to change the name of the preset. Press VALUE/ENTER to begin editing. Then, use the PAGE buttons to cycle through the characters; turn VALUE/ENTER to change the characters.
Assigning Knobs
Use the LAYER button to choose the layer you want to edit. Press EDIT PRESET then wiggle a knob to select that knob for editing.
- Press the PAGE RIGHT button.
- Turn VALUE/ENTER to change the MIDI continuous control (CC) number associated to the knob.
-
At this point, the knob is assigned and ready to use—You can push the RECALL PRESET button to return to the main menu and start twiddling the knob. However, you can access additional MIDI options by pressing the PAGE RIGHT button. These options include:
-
The MIDI channel of the knob. The default setting is Comm which sends out the CC information on the common channel (see below) but you can set the knob to send MIDI out on a channel from 1 to 16.
- The Common MIDI channel. All of the knobs set to Comm will be sent on this channel.
- The name of your preset. Use the PAGE LEFT and PAGE RIGHT buttons to move the cursor forward and back and the VALUE/ENTER knob to select letters, numbers, and spaces.
Push EDIT PRESET and press a button you want to assign.
- Press the PAGE RIGHT button.
- Turn VALUE/ENTER to change the function of the button (you can choose between CC controllers, MMC commands, or program/bank changes)
- Turn VALUE/ENTER to change the button's MIDI control number (or MMC command, or program/bank change setting depending on what function you've assigned to this button).
- Press PAGE RIGHT once again to select the MIDI Channel for this button. All buttons set to Comm will send out MIDI information on the Common MIDI channel (see below).
In Toggle mode, every button press sends changes a MIDI option from "off" to "on" (or from "on" or "off").
In Momentary mode, pressing a button sends an "on" command. Once you release the button, an "off" command is immediately
- Press PAGERIGHT to change the button's type. Turn VALUE/ENTER to select toggle or momentary. (See the sidebar for an explanation of the difference)
- Press PAGE RIGHT once again to access the Common MIDI setting. All buttons set to "Comm" will be sent on this channel.
- Finally, press PAGERIGHT to name your preset. See the section above for more on how to name your patches.
Assigning the AXYZ dome
Press the EDIT PRESET button and turn the VALUE/ENTER knob until you see X Ctrl, Y Ctrl, or Z Ctrl. For each of these settings, you can press PAGE RIGHT button and assign a different MIDI CC number to each of the three axis (left/right, near/far, and up/down). You can send out AXYZ dome data on a specific channel by pressing PAGE RIGHT and changing the channel from Comm to a specific channel from 1 to 16 (see above section for more on this).
Another Way to Assign the Controllers
You can also access and then assign controllers by first pressing EDIT PRESET and then turning the VALUE/ENTER encoder. The display will cycle through all of the available controllers.
When you see the controller you want to edit, press PAGE RIGHT. You can then assign the controller's parameters as listed above.
(Sending Program, Bank, and Reset MIDI commands)
Press MIDI SEND to send MIDI program change, bank change, and reset commands.
Sending Program Change commands
Press VALUE/ENTER. The display will read Program Number. Twirl
VALUE/ENTER to find the program change number you want to send. Press
VALUE/ENTER to send the program change message.
Sending Bank Change and Program Change commands
Turn VALUE/ENTER one click, so the display reads Program + Bank. Press VALUE/ENTER and then twirl it to set the bank number.
Select your MSB and press VALUE/ENTER. Twirl a second time to set the LSB number and press VALUE/ENTER. Finally, twirl again to set the program number and press VALUE/ENTER to send the program change.
Sending the MIDI Reset command
Turn VALUE/ENTER two clicks, so the display reads Reset All?
Press VALUE/ENTER two times to send the reset all command.
MIDI PANIC (ALL NOTES OFF)
If your sequencer or hardware device gets "stuck" and stops responding to MIDI commands, press both PAGE buttons at the same time. This operation sends the MIDI Panic (all notes off) command, which is designed to solve these sorts of MIDI problems.
Reference: List of Common MIDI Controller Values
Use this table for reference as you configure the Photon.
| Controller | Description | Range of Values |
| 1 | Modulation Wheel | 0 through 127 |
| 2 | Breath Controller | 0 through 127 |
| 4 | Foot Controller | 0 through 127 |
| 5 | Portamento Time | 0 through 127 |
| 7 | Master Volume | 0 through 127 |
| 8 | Balance | 0 through 127 |
| 10 | Pan | 0 through 127 |
| 11 | Channel Volume | 0 through 127 |
| 64 | Sustain Pedal | 0-63= off. 64-127= on. |
| 65 | Portamento Pedal | 0-63= off. 64-127= on. |
| 66 | Sostenuto Pedal | 0-63= off. 64-127= on. |
| 67 | Soft Pedal | 0-63= off. 64-127= on. |
| 67 | Hold 2 Pedal | 0-63= off. 64-127= on. |
| 91 | External Effects | 0 through 127 |
| 92 | Tremolo Depth | 0 through 127 |
| 93 | Chorus Depth | 0 through 127 |
| 94 | Detune Depth | 0 through 127 |
| 95 | Phaser Depth | 0 through 127 |
| 123 | All Notes Off | 0 |
| 126 | Monophonic Mode On | 1=on |
| 127 | Polyphonic Mode On | 0=on |
Troubleshooting:
| Symptom | Cause | Solution |
| The display does not light up. | No power. | If you are using USB power, check that the USB power switch on the back of the Photon is OUT. If you are using batteries or an AC adapter, check to see that the batteries are not drained or that the adapter is plugged in to a live power outlet and that the power switch is IN. |
| MIDI:
No sound from target device. | Photon USB not properly connected. | Check your computer's USB connections to confirm that the Photon is recognized and installed. Turn you computer off and then on again if necessary. (Choose “shut down” rather than “restart” to ensure that the USB devices are properly reset.) |
| Problems caused by use of a USB hub. | Try unplugging the Photon from any USB hubs and connecting directly to the computer. |
| Software application not set up to receive MIDI data from Photon controller. | Ensure that the Photon or “USB” MIDI device is listed as an active MIDI source in your application. |
| Software application not receiving MIDI data. | Many software applications have MIDI IN and OUT indicators. Play some keys and look for the MIDI IN light to indicate activity. |
| Photon's MIDI channel not the same as application's incoming MIDI channel. | Be sure that the Photon is sending on the channel that the target device expects. |
| Sound source's notes out of range of Photon's keyboard. | Try using a piano sound as you're first getting connected. Drums and basses and some other instruments may have a limited MIDI note range or other idiosyncrasies. Use “easier” instruments like pianos when you're setting up the Photon for the first time. |
| Sound source not active or volume set to 0. | Try using an instrument that has a virtual keyboard built in. Will the instrument sound when you use that virtual keyboard? If not, the problem may be with the software synthesizer, not the Photon connection. |
| MIDI Echo not enabled in sequencer software. | If the Photon is both (a) connected to a computer via USB and (b) connected to an external sound source via MIDI OUT, be sure that a computer sequencer program is active and that it is set to “MIDI Echo.” |
| An external MIDI IN device is present. | If you are using the 5-pin MIDI OUT port to connect to another MIDI device and another device is connected to the Photon's MIDI IN, the MIDI OUT port only sends information from the MIDI IN device, not the Photon. |
| Photon's 5-pin MIDI OUT not connected to sound source's MIDI IN. | Ensure that any 5-pin cables are connected to the proper inputs and outputs. |
| Notes sustain continuously. | Sustain pedal was plugged in after power was turned on. | Turn the unit's power off, wait a moment, and then turn it on again. |
| Stuck notes due to incomplete MIDI data. | Turn the unit's power off, wait a moment, and then turn it on again. |
| Sustain pedal works in reverse. | Sustain pedal was plugged in after power was turned on. | Turn the unit's power off, wait a moment, and then turn it on again. |
| AXYZ dome not operational. | AXYZ activation button not pressed in. | Press the button next to the AXYZ dome to activate its use. |
| AXYZ dome's MIDI control assignments not made. | Press EDIT PRESET to assign AXYZ controller values. |
| AUDIO: Computer does not “hear” the Photon. | USB connection not made. | Verify that the USB cable is plugged in and the Photon (or “USB audio Device”) is recognized as an audio device in your operating system’s device manager. |
| Audio recording program not set up to use the Photon. | Verify that your audio recording program is set to record from the Photon.
Windows: Verify that your audio recording program is set up to use WDM audio, not ASIO audio. |
Specifications
Keyboard: 25-note, full-size, full-travel, velocity-sensitive keys.
MIDI Controllers: AXYZ three-way controller. Octave Up/Down buttons. Ten programmable buttons. Ten endless (360^) knobs, with three independent layers. Full-size Pitch and Modulation wheels with variable lighting.
Master control section: Global, Recall Preset, Edit Preset, MIDI Send, and Page Forward/Back buttons. 360^ turn-and-push encoder. 2-line LCD display.
Audio interface: Stereo, 24-bit, sample-rate adjustable up to 48kHz . Separate input and output gain controls. Stereo 1/4 TRS inputs and outputs. Stereo 1/4 TRS headphone jack.
Power options: USB bus power, 4 "C"-size batteries, or external adapter (6VDC, negative tip, 1000mA )
Dimensions: 18^10^3.75^ / 45.5cm× 25.5cm× 9.5cm
Weight (net): 5~lbs / 2.2~kg
PHOTON X 25 - MANUAL DE INICIO RÁPIDO DEL USUARIO (ESPAÑOL)
Introducción
This page intentionally left blank.
Rear-Panel Connections
Plug-and-Play Connection to a Computer
This page intentionally left blank.
Requisiti minimi computer
This page intentionally left blank.