Airclima 9000 Windflow - Air Conditioning CECOTEC - Free user manual and instructions
Find the device manual for free Airclima 9000 Windflow CECOTEC in PDF.


User questions about Airclima 9000 Windflow CECOTEC
0 question about this device. Answer the ones you know or ask your own.
Ask a new question about this device
Download the instructions for your Air Conditioning in PDF format for free! Find your manual Airclima 9000 Windflow - CECOTEC and take your electronic device back in hand. On this page are published all the documents necessary for the use of your device. Airclima 9000 Windflow by CECOTEC.
USER MANUAL Airclima 9000 Windflow CECOTEC

Safety instructions 10
EU01_124598 AirClima 12000 Wind Connected
EU01_123451 AirClima 12000 Wind Connected A+++
EU01_123496 AirClima 18000 Wind Connected A+++
EN • The coding in this manual is generic and applies to all code variants of the appliance.
Please read these instructions carefully before using the appliance. Keep this instruction manual for future reference or new users.
- This appliance is intended for domestic use only and is not suitable for use in commercial establishments such as bars, restaurants, farms, hotels, motels, and offices.
- This appliance can be used by children aged 8 years and above and people with reduced physical, sensory, or mental capabilities or lack of experience and knowledge if they have been given supervision or instruction concerning the use of the appliance in a safe way and understand the hazards involved. Children must not play with the appliance. Cleaning and user maintenance must not be carried out by children without supervision.
- The appliance must be powered at a low safety voltage as stated on the marking.
- If the power cord is damaged, it must be replaced by Cecotec's Official Technical Support Service or similar qualified personnel to avoid risks.
- Piping must be protected from physical damage and must not be installed in a space without ventilation.
- Compliance with national gas regulations must be observed.
- Mechanical connections shall be accessible for maintenance purposes.
- WARNING: keep the ventilation openings clear from obstructions.
- NOTE: servicing should be performed only as recommended by the manufacturer.
- The appliance shall be installed in accordance with national electrical installation regulations
- WARNING: the appliance must be stored in a well-ventilated area where the room size corresponds to the room area as specified for operation.
- WARNING: the appliance must be stored in a room without continuously operating open flames (e.g. an operating gas appliance) or sources of ignition (e.g. an operating electric heater).
- The appliance must be stored in such a way as to prevent mechanical damage.
- Any person involved in work or intervention on a refrigerant circuit should hold a current valid certificate issued by an industry-accredited assessment authority, authorising their competence to handle refrigerants safely in accordance with an industry-recognised assessment specification.
- Servicing should only be carried out as recommended by the equipment manufacturer. Maintenance and repairs requiring the assistance of other qualified personnel must be carried out under the supervision of the person competent in the use of flammable refrigerants.
- Service personnel must be instructed to perform the following when servicing an appliance using a flammable refrigerant.
- Ensure the mains voltage matches the voltage specified on the appliance's rating label and that the socket is properly earthed.
- Children and animals should be kept away from the installation area during installation.
-
Cleaning and maintenance must be carried out by qualified personnel. In any case, the appliance must be disconnected from the power supply before carrying out any cleaning or maintenance operations.
-
Do not immerse the cord, plug, or any other non-removable part of the appliance in water or any other liquid. Do not expose electrical connections to water. Make sure your hands are completely dry before handling the plug or switching on the appliance.
- Do not carry or pull the appliance from the power cable. Do not use the cord as a handle. Do not push the cable against corners or sharp edges. Do not crush the power cable with the full weight of the appliance. Keep the cable away from hot surfaces.
- Do not operate the appliance if its cable, plug, or body show visible damage, do not operate properly, or have been dropped.
- Do not use the appliance in confined spaces with explosive or flammable vapours.
- Install the air conditioner far away from heat sources.
- Do not try to repair the appliance by yourself. Contact Cecotec's Official Technical Support Service.
- Do not install the air conditioning in the bathroom or other humid environments.
- The air conditioner is designed for indoor use only and is not compatible with other uses.
This symbol means: CAUTION! Read the instruction manual before using the appliance.
This symbol means: CAUTION! Risk of fire.
Instructions on batteries
- Battery ingestion can cause burns, soft-tissue perforation, and death. It can cause severe burns within two hours of the ingestion.
- In case of battery ingestion, please seek medical attention immediately.
- Do not allow children to replace batteries without adult supervision.
- Do not disassemble, open, or damage the batteries.
- Keep the batteries out of the reach of children. Pay particular attention to small batteries. In case of battery ingestion, please seek medical attention immediately.
- Do not expose batteries to heat or fire. Avoid storage in direct sunlight.
- Do not short-circuit an element or a battery. Do not store batteries in an untidy manner, in a box, or drawer where they can short-circuit each other or be short-circuited by other metal objects.
- Do not subject batteries to mechanical shock.
- Both batteries and cells can leak under extreme conditions. In the event of a battery leak, keep your skin and eyes away from the liquid. If the liquid comes into contact with skin, wash immediately with soap and water. If the liquid gets into the eyes, rinse them immediately with clean water for at least 10 minutes and seek medical attention. Wear gloves to handle the battery and dispose of it immediately in accordance with local regulations.
- Pay attention to the positive (+) and negative (-) marks on the batteries and the remote-control compartment to ensure they are inserted correctly.
- Do not use any batteries that are not designed for use with the remote control.
- Do not use the remote control if powered with batteries that differ in capacity, size, or type.
- Children should be allowed to handle the batteries only under adult supervision.
- Always buy recommended batteries.
- Keep the batteries clean and dry. Wipe the battery
terminals with a clean, dry cloth if they become dirty.
- Keep the original instruction manual for future reference.
- Use the batteries only for their intended purpose.
- Whenever possible, remove the batteries when not in use.
INSTRUCTIONS DE SÉCURITÉ
https://cecotec.es/es/information/declaration-of-conformity
ENGLISH
1. PARTS AND COMPONENTS
Fig. 1
- Air outlet
- Air inlet
- Charging cable
- Piping and cables
- Air inlet (rear)
- Drain pipe
- Air outlet
Note:
The graphics in this manual are schematic representations and may not exactly match the product.
2. BEFORE USE
- This appliance comes in a packaging designed to protect it during transport. Remove the appliance from its box. You can keep the original box and other packaging materials in a safe place to prevent damage to the appliance if you need to transport it in the future. If you wish to dispose of the original packaging, make sure all items are recycled properly.
- Check that all parts and components are included and in good condition. If any of them are missing or damaged, please contact Cecotec's Official Technical Support Service immediately.
Box content:
- Product
- Remote control
- Instruction manual
- Do not remove the product's serial number in order to keep proper traceability if technical assistance is required.
3. INSTALLATION
- This air conditioner complies with national safety and performance standards.
- Installation and removal must be performed by professional HVAC personnel. Installation by unqualified personnel may cause damage to property or personal injury.
- The user must provide a power supply that meets the installation and operating
requirements. Refer to the nameplate for the rated voltage of the product. Voltage outside this range will affect normal operation.
- A dedicated power point with delayed fuse or circuit breaker should be used for the air conditioner.
- The equipment must be properly and reliably earthed; otherwise, there is a risk of electric shock or fire.
- Do not energize the equipment until all piping and cable connections are completed and carefully checked.
- Do not install the appliance in laundry rooms or bathrooms.
- If necessary, consult your power company for information about the system.
- The socket must remain accessible after appliance installation.
- These instructions are subject to change without notice.
Indoor unit location
- Locate the unit away from sources of heat, steam, flammable gas leaks and smoke.
- There should be no obstacles near the air inlet or outlet. Keep the area well ventilated.
- Ensure proper drainage of condensate water.
- Keep at least 1 meter away from wireless equipment (e.g. TV, radio, etc.).
- Mount the unit on a wall capable of supporting its weight and which does not transmit noise during operation.
- The distance between the indoor unit and the floor must be greater than 2.3 meters.
- The socket must remain accessible after appliance installation.
- Observe the distances indicated in Figure 2.
- The back of the indoor unit should be close to the wall (Figure 2).
- All figures are schematic and may differ slightly from the actual device.
Figure 2 — Minimum distances for the indoor unit
- At least 15 cm to the left.
- At least 15 cm to the right.
- At least 15 cm from the top.
Outdoor unit location
- Avoid direct sunlight.
- Keep the unit away from sources of heat, steam, possible flammable gas leaks, smoke and dust.
- Select a place sheltered from rain/snow and with good ventilation.
- Locate the unit so that the expelled air, noise and discharged water do not disturb neighbors or third parties.
- The site should be easy to install and maintain.
- Mount the unit on a solid and reliable base to avoid vibration and noise.
- For good cooling performance, ensure that the front, rear, left and right sides of the unit are in an open area.
- The air outlet must be in an open space, any obstruction will affect performance.
ENGLISH
- Respect the installation distances indicated in Fig. 3.
Figure 3 — Minimum distances for the outdoor unit
A. Air inlet
B. Air outlet
C. Outdoor unit
- Avoid blockages in front of the air outlet and keep the air inlet areas clear.
- Upper: at least 10 cm.
- Left side: at least 15 cm.
- Right side: at least 40 cm.
- Front (air outlet side): at least 2 m of free space.
Piping selection
Ensure that the height difference between the indoor and outdoor unit and the length of the piping and cables meet the requirements of Table 1.
- If the length of the piping is more than 7 meters and less than 15 meters, refrigerant should be added according to Table 1.
- If the outdoor unit is located at a higher elevation than the indoor unit and the pipe length exceeds 10 meters, install an oil trap in the gas pipe for every 8 meters of rise, see Figure 4.
Figure 4 — Oil trap (when outdoor unit is higher)
A. Indoor unit
B. Outdoor unit
C. Height difference
D. Oil trap
Table 1— Piping selection (mm/inch) and additional refrigerant charge
| Pipe size (mm/inch) | Standard pipe length (m) | Maximum pipe length (m) | Height difference (m) | Additional refrigerant (g/m) | |
| Liquid tube | Gas tube | ||||
| ∅6 (1/4") | ∅9 (3/8") | 5.0 | 9 | 5 | 12 |
| ∅6 (1/4") | ∅12 (1/2") | 5.0 | 12 | 7 | 12 |
| ∅6 (1/4") | ∅15.88 (5/8") | 5.0 | 15 | 8 | 12 |
| ∅9 (3/8") | ∅15.88 (5/8") | 5.0 | 15 | 8 | 15 |
| ∅9 (3/8") | ∅19.05 (3/4") | 5.0 | 20 | 10 | 15 |
Note: The above dimensions are for guidance only, the actual product prevails.
Securing the installation plate
- Remove the metal installation plate from the indoor unit. Level it horizontally. The difference in height between the left and right sides must not exceed 5 mm (Fig. 4).
- Drill the wall and insert plastic expansion plugs at the appropriate points. Fasten the installation plate to the wall with M5×30 screws, ensuring at least 4 fixing points. Check again the horizontality of the plate.
- Drill the through hole as shown in Fig. 5. Diameter: 80 mm. The hole should slope slightly outward.
- Cut the PVC pipe at a slight angle, to a length slightly less than the thickness of the wall, and insert it into the hole (Fig. 5 - 6).
- Mount the gasket cover.
Fig. 5 — Plate levelling
A. Installation plate
- The height difference between both ends of the installation plate should be < 5 mm.
A. Joint cover
B. Indoor
C. Wall
D. Exterior
E. PVC pipe
F. Small angle
Decorative cover installation instructions
Fig. 7
The decorative cover serves to cover the Pipe and Cable assembly and the Drain Pipe at the side outlet of the indoor unit.
Installation steps
Step 1: Wrap PVC protective tape around the Drain Pipe, the copper piping (inside the Pipe and Cable assembly) and the cable. Adjust the shape of the copper tubing to a suitable bend.
Step 2: Install the decorative cover.
Step 3: Finalize the installation (visual closure check).
Note: The diagram is for reference only, the actual product prevails.
Installation of the indoor unit
The connection of pipes and cables can be placed in several directions, as shown in Figures 9, 10 and 11.
ENGLISH
-
Connection with right rear outlet (similar to right bottom outlet) (optional, see Fig. 9)
-
Remove the pipe and wires from the bottom of the chassis and connect the drain pipe. Firmly clamp the pipe joint.
- Route the cables to the indoor unit as part of the Piping and Cables. Do not connect the power cord to the mains at this time.
- Tie and secure the pipes, drain pipe, and cables with adhesive tape. Always place the drain pipe at the bottom.
- Remove the cover/piece provided on the chassis to allow the piping to pass through.
- Verify that all connections are tight (Fig. 8).
-
Hang the indoor unit on the two upper hooks of the Installation Plate. (See Fig. 10)
-
Connection with left rear outlet (similar to left bottom outlet) (optional, see Fig. 11)
-
Slide the Drain Pipe to the left side and place the drain plug on the right side.
- Fix the pipes in the guide groove of the indoor unit using the fixing clamp.
- The remaining assembly steps are the same as in "Connection with right rear outlet".
Notes
- Refer to Fig. 9 for the position of the Drain Pipe in the right rear outlet configuration.
- Refer to Fig. 11 for the position of the Drain Pipe in the left rear outlet configuration.
- Fig. 8 (schematic): identifies the connecting cables (included in Piping and Cables) and the Drain Pipe.
- Fig. 10: shows the attachment of the indoor unit to the wall mounting plate.
Fig. 8
A. Pipe
B. Connection cables
C. Drain pipe
Fig. 10
A. Installation plate
B. Wall
Outdoor unit installation
- Assemble the mounting frame and brackets with the included 6 M12×25 bolts, flat washers, Grower washers and nuts.
- Drill 4 or more holes in the wall depending on the distance between the legs of the unit. Determine the position of the left and right supports and verify that they are at the same level.
- Fasten the installation frame to the wall with expansion bolts.
- Attach the outdoor unit to the brackets with 4 M10×25 bolts.
-
All fixings must be securely screwed in place, and connections must be solid and reliable.
-
During installation of the outdoor unit, secure the unit body with ropes to prevent it from falling.
- When installing or repairing, prevent tools and components from falling.
- Periodically check the reliability of the installation frame.
Piping connection
Fig. 12
- Remove the valve cover from the outdoor unit.
- Align the flare nut with the center of the thread and screw it in by hand as far as it will go.
- Tighten the flare nut with a torque wrench until the wrench "clicks".
- It is recommended to always use a torque wrench to connect the pipe. The use of other wrenches (fixed or adjustable) may damage the flare edge by applying incorrect force.
- The pipe bending angle should not be too small, or the pipe could break. Service personnel should use a pipe bender.
- Do not allow water, dust or sand to enter the interior of the pipe.
Fig. 12
A. Thread
B. Flare nut
C. Pipe
D. Spanner
E. Torque spanner
Table 2 - Tightening torque for flare nuts
| Pipe size (mm/inch) | Torque (N·m) |
| ∅6 (1/4") | 15~20 |
| ∅9 (3/8") | 35~40 |
| ∅12 (1/2") | 50~55 |
| ∅15.88 (5/8") | 60~75 |
| ∅19.05 (3/4") | 80~95 |
Cable connection
1. Indoor unit (Fig. 13)
- Open the front panel upwards as far as it will go.
- Open the electrical cover.
- Attach the connection wires to the terminal block following the wiring diagram silk-screened on the electrical cover.
- Clamp the cables with the pressure plate to ensure a firm clamping.
- Close the electrical cover, screw it on and close the front panel.
ENGLISH
2. Outdoor unit (Fig. 14)
- Unscrew the fixing screw of the handle cover cover and open the handle cover.
- Attach the connection cables to the terminal block according to the wiring diagram on the cover.
- Press and clamp the cables with the pressure plate.
- Replace the handle cover and screw it on.
- If it is necessary to extend or replace the power cord, refer to the specifications in Table 3.
Table 3 — Wiring specifications and maximum lengths (Minimum conductor cross-section; maximum lengths in brackets)
| Models (capacity) | Power connection cables (10 m max.) | Signal control cable (10 m max.) | Power cable (5 m max.) |
| 5K/7K/9K/12K | ≥ 1.0 mm2 | ≥ 1.0 mm2 | ≥ 1.0 mm2 |
| 9K/12K (115 V) - 16K/18K/24K (220 V) | ≥ 1.5 mm2 | ≥ 1.5 mm2 | ≥ 1.5 mm2 |
| 18K/21K/24K/28K - 30K/36K | ≥ 2.5 mm2 | ≥ 0.75 mm2 | ≥ 2.5 mm2 |
Fig. 13
A. Electrical cover
B. Wiring diagram
C. Opened
D. Closed
Fig. 14
A. Handle cover
B. Wiring diagram
C. Screw
Notes
- Use a specific screw for grounding: stainless steel M4 screw or copper screw.
- Make sure that all cables are securely connected and cannot come loose or separate.
- Make the electrical connections according to the air conditioner wiring diagram.
- The figures shown are schematic and may differ slightly from the actual device.
Fixing the pipe assembly
- Carefully wrap PVC protective tape. Do not damage the piping and cables or the drain pipe.
- Start the bandaging from the bottom of the outdoor unit towards the indoor unit.
- Secure the end of the PVC tape with tape to prevent it from coming loose.
- The drainage pipe should maintain a slight slope to the outside to ensure drainage.
- When the indoor unit is located at a lower level than the outdoor unit, bend the pipe to the appropriate size to prevent water from draining into the house.
- Fasten the tube bundle to the wall with pipe clamps.
- Maintain sufficient clearance between the discharge end of the Drain Pipe and the ground. Do not insert the discharge end into water, ditches or canals.
- Seal the holes drilled in the exterior wall with caulk or sealant.
Fig. 15 — Fixing the pipe assembly to the wall
A. Wall
B. Clamp
C. PVC protective tape
Evacuation (vacuum) and valve opening
- Verify that all pipe and wire connections between the indoor unit and the outdoor unit are properly made and tight.
- Remove the caps/bonnets from the 2-way (narrow pipe/liquid) and 3-way (wide pipe/gas) service valves with a wrench.
- Connect the pressure gauge/manifold assembly to the service valve and connect the center hose to the vacuum pump.
- Open the manifold low pressure valve and run the vacuum pump until the internal pressure reaches 10 mmHg.
- After vacuuming, close the manifold low valve and then turn off the vacuum pump.
- Using a hex wrench, turn the shutter of the narrow pipe (liquid) service valve 90° counterclockwise and, after 10 seconds, turn it firmly clockwise to close it again.
- Check all indoor and outdoor unit connections for leaks with soapy water or a leak detector.
- Fully open, with hex wrench, the service valves on the narrow (liquid) and wide (gas) piping to put the equipment into service.
- Disconnect the manifold connection hose from the wide pipe (gas) service valve.
- Screw on the caps/bonnets of all valves with a torque wrench.
- Recheck all connections for leaks with soapy water or leak detector.
- Put the caps/bonnets and valve cover back in their original position.
Fig. 16 — Vacuum diagram
A. Indoor unit
B. Outdoor unit
C. Pressure gauge/manifold
D. Manifold valve
E. Vacuum pump
ENGLISH
Gas leakage inspection
- After completing the pipe connection, use a leak detector or soapy water to carefully check all joints for leaks. This is an essential step to ensure the quality of the installation.
- If refrigerant leakage is detected, ventilate the area immediately.
- The refrigerant can produce toxic gases when in contact with fire. Keep away from open flames and sources of ignition.
- Do not directly touch the leaking coolant. May cause serious injury from frostbite.
Drainage — Outdoor unit
No drainage treatment required
- In regions where it is cold in winter, do not install the drain elbow to prevent drain water from freezing and damaging the fan. This drainage treatment is not necessary for “cold only” equipment.
When drainage treatment is required
Fig. 17
- Use the drain elbow joint included in the accessory bag. The outdoor unit must be placed on blocks.
- Connect a Drain Pipe (user supplied) to the drain elbow.
Fig. 17:
A. Chassis (exterior)
B. Angled joint
C. Drainage pipe (not included)
Valve cover installation — Outdoor unit
Fig. 18
For units with individual valve cover, proceed as follows:
- After completing the piping connection between the indoor unit and outdoor unit according to the indicated method, remove the valve cover from the accessory bag.
- Attach it to the side of the outdoor unit with three corresponding screws (included in the accessory bag).
Fig. 18
A. Valve cover
B. Screw
4. OPERATION
Unit display indicators
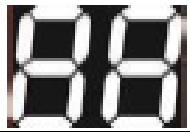


Numerical indicator: Displays the selected temperature, error codes or timer time.
Status indicator: remains steadily lit when the unit is in operation. The light flashes during defrost or in "Cooling airflow proof".
Timer indicator: lights up when the equipment has a timer activated.
Compressor indicator: lights up when the compressor is running.
Wi-Fi indicator: the indicator flashes when the network search is active and remains steady when making the Wi-Fi connection. Please note that this indicator is only available on models with Wi-Fi connectivity: EU01_124598 - AirClima 12000 Wind Connected, EU01_123451 - AirClima 12000 Wind Connected A+++ and EU01_123496 - AirClima 18000 Wind Connected A+++
Indicator of the healthy function: the indicator remains illuminated when this function is activated.
 | Heat resistance indicator: the indicator lights up when the electrical resistance is working. |
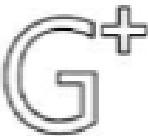 | GEN LINK mode (G+): the indicator lights up when the unit is in "GEN LINK MODE" status. |
Remote control — Description of buttons, icons and functions
Fig. 19
- Display: Displays settings and operating status.
- Power button: Press to start or stop the air conditioner.
- Temperature adjustment buttons: "<" decreases the selected temperature and "> " increases the selected temperature. They are also used for scrolling/selection in functions with direction.
- Mode button: Select the operating mode: COOL (cooling), DRY (dehumidification), FAN (air circulation), HEAT (heating), AUTO (automatic).
- Oscillation button: Changes the position of the vertical slats and activates/deactivates the vertical oscillating movement.
- Speed button: allows you to select the speed of the indoor fan (Low speed, Medium-low speed, Medium speed, Medium-high speed, High speed and Auto speed).
- Turbo function button: Activates or deactivates the Turbo function when the unit is in heating or cooling mode.
- Function button: allows you to access the function menu: sleep, self-cleaning, healthy, quiet, I Feel, H-sweep, AUH.
- Timer button: Allows you to program time on or time off.
- CARE mode button: activates the CARE mode suitable for children's health.
- Display button: Displays or hides the display screen when the air conditioner is in operation.
- ECO button: Allows to choose ECO1 or ECO2 mode and to deactivate ECO mode.
Notes:
- TURBO: Use this function to cool or heat the room quickly, press the corresponding button when the unit is in COOL or HEAT mode. The air conditioner will enter Turbo mode. Press again to deactivate this function.
- Function selection: Enter the function menu by pressing the function button. Use the arrow keys to scroll forward or backward to select the corresponding function. The
selected function element flashes.
- Confirmation/cancellation of functions. When the function button is pressed, the function cursor first moves to the last set function. You can move the position to the desired function with the arrow keys. The function to be configured flashes for 10 seconds. Press the function button within 10 seconds to confirm the function. The lower horizontal bar of the selected function icon lights up. Press the function button again to cancel the function. The lower horizontal bar on the icon will turn off.
- Temperature unit change button ( ° C/ ° F): With the unit on, press and hold both arrows at the same time for 5 seconds to change the udities.
Remote control display
- Wi-Fi indicator light: Displayed when the controller is sending a control signal to the indoor unit.
- ECO mode indicator light: Displayed when the ECO function is activated. The display may show the text "ECO" (e.g. "ECO1" or "ECO2") depending on the selection.
- Timer indicator light: Displayed when setting the air conditioner on or off time.
- Displays the setpoint temperature and, when applicable, the timer time.
-
Speed selection indicator: indicates the selected speed of the indoor fan:
-
Auto "((((★))))"
- Low speed"()
- Medium-low speed"((✿))"
- Medium speed"((( ☀ ))"
- Medium-high speed"((((★))))"
-
High speed "(((( ( * ))))"
-
Sleep function indicator light: Displayed when the Sleep function is selected.
- Self-Clean function indicator light: Displayed when the Self-Clean function is active.
- Quiet function indicator light: Displayed when the Quiet function is selected.
- Healthy Display function indicator: Displayed when the Healthy function is selected.
- Care function indicator light: Displayed when the Care function is set.
- Turbo function indicator light: Displayed when the Turbo function is activated in COOL or HEAT mode.
- Selected mode indicator light: Shows the selected operating mode: COOL, DRY, FAN, HEAT, AUTO.
- Indicated for vertical oscillation: It is displayed according to the position of the vertical slats and whether the vertical oscillation is activated or not.
- Horizontal oscillation indicator light: Displayed when Horizontal Swing is selected.
- Lock indicator light: It is displayed when the "LOCK" button is pressed.
- AUH mode indicator light: The symbol appears when pressing the AUH button in heating mode (HEAT).
- I FEEL function indicator light: Displayed when the I FEEL function is selected.
- Temperature unit indicator light: "F" indicates Fahrenheit and "C" indicates Celsius.
ENGLISH
Remote control instructions
- Supply: The remote control uses two AAA batteries. Under normal conditions, its typical duration is up to 6 months. Always use two new batteries of the same type (observe polarity when installing them).
- Emission and reception: When using the controller, point the signal emitter towards the indoor unit's receiver. There must be no obstacles between the control and the unit.
- Interference: Do not use wireless equipment (e.g. cell phones) near the indoor unit. If interference occurs, turn the equipment off, disconnect the power cord and reconnect it before turning it on again.
- Sunlight and receiver: Avoid direct sunlight on the indoor unit's receiver, as this may prevent it from receiving the signal from the controller correctly.
- Manipulation: Do not drop, hit or throw the remote control.
- Room storage/use temperature: Do not place the remote control in direct sunlight or near heat sources (e.g. an oven).
- Cleaning: Do not spill water or liquids on the control. If it occurs, wipe it with a soft, dry cloth.
- End of useful life: Remove the batteries from the device before disposal and dispose of the batteries safely and in accordance with regulations.
5. WI-FI CONNECTIVITY AND MOBILE APP
Please note that this section applies only to models with Wi-Fi connectivity: EU01_124598 - AirClima 12000 Wind Connected, EU01_123451 - AirClima 12000 Wind Connected A+++ and EU01_123496 - AirClima 18000 Wind Connected A+++.

Scan the following QR code to download the app, access the manual, guides, and technical support.
- Download the Cecotec app from Google Play or App Store.
- If this is the first time you are using the app you will need to create an account, otherwise log in.
- Within the Cecotec App, go to the top right corner and press the "+" icon. Then select the "Add device" option.
The device will appear flashing at the top of the app, indicating that it is ready to be paired. Select it to continue with the process and follow the steps shown in the app.
You can also search for and add the product manually. Go to the side menu and select the corresponding range and locate the model of your product. Tap on it to start the pairing
process and follow the steps indicated in the app. Once correctly linked for the first time, the device will be saved on your phone and you can access it from the app to control all its functions.
Notes:
- The device is in pairing mode by default when switched on. If not, disconnect it from the light for a few seconds and reconnect it. The device will then automatically enter visible mode and is ready for pairing.
- You can unlink the device from the app by accessing the device panel (where all its functions are displayed), entering Settings and selecting "Remove device", where you can also delete recorded data.
6. CLEANING AND MAINTENANCE
Careful maintenance prolongs the life of the air conditioner and reduces electricity consumption.
Caution
- Before any service or cleaning, stop the equipment with the remote control and disconnect the power supply: unplug the power cord or cut off the power supply from the electric panel.
- Do not climb on unstable objects to clean or maintain the equipment, this may cause injury.
- When removing the front panel, do not touch the internal metal parts (e.g., heat exchanger fins), they could cause cuts.
Cleaning the front panel and remote control
- If dirt is not easily removed, wipe with a soft cloth slightly dampened with warm water ( ≤ 40 °C). Caution
- Do not spray water directly onto the unit or wash it with water, there is a risk of electric shock.
- Do not clean the remote control with water or immerse it in water.
- Do not use alcohol, petrol, abrasive liquids or polishes, they may discolour or deform the surfaces.
- Do not knock or force the unit, the front panel may come off.
- Do not use metal brushes on the front panel or remote control, they may damage the surface.
Cleaning the air filter
- Open the front panel.
ENGLISH
- Lift the protruding tab on the filter and pull down to remove the air filter.
- Clean the filter with a vacuum cleaner or water. If it is very dirty, wash it with warm water and neutral washing-up liquid or mild detergent.
- Dry it in the shade completely.
- Place the filter in its original position and close the front panel.
Note
- Clean the air filter at least once every two weeks. Failure to clean will decrease the cooling or heating capacity.
- Do not clean the air filter with a wire brush, this could damage it.
Decommissioning due to prolonged inactivity
- Internal drying: To prevent odors and mold, run the unit in FAN mode with oscillation on for 30-60 minutes, or run the Self-Clean function.
- Shutdown and disconnection: Stop the equipment with the remote control and, when the fan stops, turn off the power from the dedicated switch or unplug the Power Cord (if present).
- Air filter: Clean and dry the air filter before storing the equipment at idle.
- Remote control: Remove the batteries from the controller to avoid leakage during the period of non-use.
Energy saving recommendations
- Temperature setting: Avoid extreme settings, excessive cold can be harmful to health and increases fuel consumption.
- Heat sources: Minimize the simultaneous use of heat-generating appliances when cooling the room.
- Doors and windows: Keep doors and windows closed, outside air entering the unit reduces cooling and heating efficiency.
- Clean filter: Keeping the filter clean improves air flow and efficiency.
- Good ventilation (outdoor unit): Do not place objects in front of the air inlet or outlet of the outdoor unit.
Normal operating behaviours
- Plastic dilatations: During startup or shutdown, slight cracking noises may be heard due to temperature changes in plastic parts.
- Condensation in front grille: At high indoor humidity, droplets may form on the grille of the indoor unit.
- "Whisper" sound: When starting or stopping, you may hear a soft humming sound from the circulating refrigerant, this is normal.
- Odours: Walls, carpets or fabrics may release accumulated odors when moving air.
- Protection delay: To protect the compressor, after a shutdown there may be a delay of up
to 3 minutes before restarting.
- Heating start-up: In the first few minutes, the internal fan may not blow until the heat exchanger reaches temperature.
- Water in outdoor unit (heating): During heating, it is normal for water to come out of the outdoor unit due to defrosting.
- Defrosting steam: In heating mode, steam may appear in the outdoor unit during defrosting.
2. Service information
1.1. Area verification
Before starting work on systems containing flammable refrigerants, safety checks are necessary to ensure that the risk of ignition is minimised. Before repairing the cooling system, the following precautions must be observed:
1.2. Work procedure
The work must be carried out in accordance with a controlled procedure to minimise the risk of a flammable vapour or gas being present while the work is being carried out.
1.3. General workspace
All maintenance personnel and others working in the area should be briefed on the nature of the work to be carried out. Work in confined spaces must be avoided. The area around the workspace should be divided into sections. Ensure that conditions within the workspace are safe by keeping flammable material under control.
1.4. Refrigerant verification
The area should be checked with an appropriate refrigerant detector before and during work to ensure that the technician is warned of potentially flammable atmospheres. Ensure that the leak-detection equipment used is suitable for use with flammable refrigerants, i.e. non-sparking, adequately sealed, or intrinsically safe.
1.5. Presence of fire extinguishers
If any high-temperature work is to be carried out on the refrigeration equipment or any associated parts, suitable extinguishing equipment must be available. Always have a dry-powder or CO2 fire extinguisher nearby the load area.
1.6. Absence of ignition sources
No person carrying out work related to a refrigeration system involving the exposure of piping containing or having contained flammable refrigerant should use any source of ignition in such a manner as to create a risk of fire or explosion. All possible sources of ignition, including cigarette smoking, should be kept far enough away from the installation,
ENGLISH
repair, pick-up, and disposal site, where flammable refrigerant can be released into the surrounding space. Before work starts, the area around the equipment must be thoroughly examined to ensure that no danger or risk of ignition is present. "No Smoking" signs must be displayed.
1.7. Ventilation
Ensure that the area is outdoors or adequately ventilated before intervening in the system or carrying out any work at high temperature. Proper ventilation must be kept at all times during work. Ventilation should safely disperse any refrigerant released and preferably expel it externally to the atmosphere.
1.8. Verification of refrigeration equipment
When electrical components are replaced, they must be fit for purpose and to the correct specification. The manufacturer's maintenance and service guidelines must be followed at all times. In case of doubt, refer to the manufacturer's technical department for assistance. The following checks must be applied to installations using flammable refrigerants:
- The load size is in accordance with the size of the room where refrigerant-containing parts are installed.
- Ventilation machinery and outlets can be properly operated and are unobstructed.
- If an indirect cooling circuit is used, the secondary circuit must be checked for refrigerant presence.
- Equipment marking remains visible and legible. Illegible markings and symbols should be corrected.
- The components or refrigerant piping are installed in a location where they are not susceptible to exposure to any substance that may corrode the refrigerant containing components, unless the components are constructed of materials that are inherently corrosion resistant or are adequately protected against corrosion.
1.9. Verification of electrical devices
Repair and maintenance of electrical components should include initial safety checks and component-inspection procedures. If there is a fault that may compromise safety, then no power supply should be connected to the circuit until the fault is satisfactorily dealt with. If the fault cannot be corrected immediately, but continued operation is necessary, a suitable temporary solution must be used. This should be reported to the owner of the equipment so as to inform all parties.
During initial safety checks, make sure
- that capacitors are unloaded: this must be done in a safe manner to avoid sparks;
- that no live wiring or electrical components are exposed while loading, recovering, or purging the system;
- that there is continuity in the earth connection.
2. Repair of sealed components
- During the repair of sealed components, all power supplies should be disconnected from the equipment being worked on prior to any removal of sealed covers, etc. If it is absolutely necessary to have a power supply to the equipment during service, then a permanently operating form of leak detection should be placed at the most critical point to warn of a potentially hazardous situation.
- Particular attention must be paid to the following to ensure that, when working on electrical components, the housing is not altered in such a way as to affect safety. This must include damage to cords, an excessive number of connections, terminals not conforming to the initial specification, damage to seals, incorrect fitting of the stuffing box, etc.
- Ensure that the instrumentation is securely mounted.
- Ensure that seals or sealing materials have not degraded until no longer being useful to preventing the penetration of flammable atmospheres. Spare parts must be in accordance with the manufacturer's specifications.
NOTE: the use of silicone sealant may inhibit the effectiveness of some types of leak-detection equipment. Intrinsically safe components do not have to be isolated before work.
3. Repair of intrinsically safe components
- Do not apply any permanent inductive or capacitive load to the circuit without ensuring that it will not exceed the permissible voltage and current rating for the equipment in use.
- Intrinsically safe components are the only type of components that can be worked on in a flammable atmosphere. The test instrumentation must have the correct assigned features.
- Replace components only with parts specified by the manufacturer. Other parts can ignite the refrigerant in the atmosphere from a leak.
4. Wiring
Verify that the wiring is not subject to wear, corrosion, excessive pressure, vibration, sharp edges, or any other environmental effects. The verification should also take into account the effects of ageing or continuous vibration from sources such as compressors or fans.
5. Detection of flammable refrigerants
Under no circumstances should potential ignition sources be used in the search for or detection of refrigerant leaks. Do not use a halide lamp or any other detector using a naked flame.
6. Leak-detection methods
- The following leak-detection methods are considered acceptable for systems containing flammable refrigerants.
ENGLISH
- Electronic leak detectors should be used to detect flammable refrigerants, but the sensitivity may not be adequate, or may need recalibration (the detection equipment should be calibrated in a refrigerant-free area). Ensure that the detector is not a potential ignition source and that it is suitable for the refrigerant used. The leak-detection equipment must be set to a percentage of the lower flammability limit of the refrigerant and calibrated for the refrigerant used with the appropriate percentage of gas (maximum 25%) confirmed.
- Leak-detection fluids are suitable for use with most refrigerants, but the use of detergents containing chlorine must be avoided, as chlorine can react with the refrigerant and corrode copper pipes.
- If a leak is suspected, all naked flames must be eliminated/extinguished.
- If a refrigerant leak is found and requires brazing, all refrigerant must be recovered from the system, or isolated (by means of shut-off valves) in a part of the system far away from the leak. Oxygen-free nitrogen must then be purged through the system both before and during the brazing process.
7. Removal and evacuation
When intervening in the cooling circuit for repairs or any other purpose, conventional procedures must be followed. However, it is important that best practices are followed, as flammability is a matter to be taken seriously. The following procedure is to be followed:
- Remove the refrigerant.
- Purge the circuit with inert gas.
- Evacuate.
- Purge again with inert gas.
- Open the circuit by cutting or brazing.
- The refrigerant charge must be recovered from the correct recovery cylinders. The system must be flushed with oxygen-free nitrogen to render the unit safe. This process may need to be repeated several times. Oxygen or compressed air must not be used for the task.
- Cleanliness must be achieved by breaking the vacuum in the system with oxygen-free nitrogen and continuing to fill until working pressure is reached, then venting to atmosphere, and finally pushing to a vacuum. This process must be repeated until there is no refrigerant left in the system. When using the oxygen-free nitrogen end-charge, the system must be vented to atmospheric pressure to allow for work. This operation is absolutely vital if brazing operations are to take place on pipes.
- Ensure that the vacuum pump outlet is not near any source of ignition and that ventilation is available.
8. Loading procedure
In addition to conventional loading procedures, the following requirements must be followed.
- Ensure that no contamination of different refrigerants occurs when using the loading
equipment. Hoses or lines should be kept as short as possible to minimise the amount of refrigerant contained in them.
- Cylinders must be kept in an upright position.
- Ensure that the refrigeration system is grounded before loading the system with refrigerant.
- Tag the system when charging is complete (if not already).
- Extreme care must be taken to avoid overfilling the cooling system.
Before recharging the system, it must be pressure tested with oxygen-free nitrogen. The system must be leak tested after charging is complete, but prior to commissioning. A subsequent leakage test must be carried out before leaving the site.
9. Commissioning
Before performing this procedure, it is essential that the technician is thoroughly familiar with the equipment and all its details. It is recommended good practice that all refrigerants are safely recovered. Before the task is carried out, a sample of oil and refrigerant should be taken in case an analysis is required before the recovered refrigerant is reused. It is essential for there to be power before starting with the task.
A. It is important to get familiar with the equipment and its operation.
B. Electrically isolate the system.
C. Before attempting the procedure, ensure that
- the mechanical-handling equipment is available, if required, for the handling of refrigerant cylinders;
- all personal protective equipment is available and correctly used;
- the recovery process is supervised at all times by a competent person;
- cylinders and recovery equipment conform to appropriate standards.
D. Pump the cooling system, if possible.
E. If vacuum is not possible, make a manifold so that refrigerant can be removed from various parts of the system.
F. Ensure that the cylinder is positioned on the scale before recovery takes place.
G. Switch on the recovery machine and operate it according to the manufacturer's instructions.
H. Do not overfill cylinders (no more than 80% of the liquid charge by volume).
I. Do not exceed the maximum working pressure of the cylinder, even temporarily.
J. When the cylinders have been correctly filled and the process is complete, ensure that the cylinders and equipment are promptly removed from the site and that all equipment isolation valves are closed.
K. Recovered refrigerant must not be charged to another refrigeration system, unless cleaned and checked.
10. Labelling
The equipment must be labelled stating that it has been taken out of service and drained
ENGLISH
of refrigerant. The labelling must be dated and signed. Ensure that there are labels on the equipment stating that the equipment contains flammable refrigerant.
11. Recovery
- When refrigerant is removed from a system, either for service or decommissioning, it is recommended good practice that all refrigerants are removed safely.
- When transferring refrigerant to cylinders, ensure that only suitable refrigerant-recovery cylinders are used. Ensure that the correct number of cylinders is available to support the total load of the system. All cylinders to be used are designated for the refrigerant recovered and labelled for that refrigerant (i.e. special refrigerant-recovery cylinders). Cylinders must be completed with pressure-relief valves and associated shut-off valves in good working order. Empty recovery cylinders are evacuated and, if possible, cooled before recovery takes place.
- Recovery equipment must be in good working order with a set of instructions concerning the equipment at hand and must be suitable for the recovery of flammable refrigerants. In addition, a set of calibrated weighing scales must be available and in good working order. Hoses must be complete with disconnect couplings free of leakage and in good running order. Before using the recovery machine, check that it is in good running order, properly maintained, and that all associated electrical components are sealed to prevent ignition in the event of refrigerant release. Consult the manufacturer in case of doubt.
- The flammable refrigerant must be returned to the refrigerant supplier in the correct recovery cylinder, and the applicable waste transfer note must be provided. Do not mix refrigerants in recovery units and especially not in cylinders.
- If compressors and compressor oils are to be removed, ensure that they have been drained to an acceptable level so that no flammable refrigerant remains within the lubricant. The evacuation process must be carried out before returning the compressor to the suppliers. Only electrical heating of the compressor body should be used to accelerate this process. When oil is drained from a system, it must be done in a safe manner.
6. TROUBLESHOOTING
This section will help you identify and resolve common issues before requesting technical assistance. Many anomalies are due to adjustments, air blockages or power supply problems and can be resolved by checking the tables. If, after performing these steps, the problem persists, switch off the appliance and contact Cecotec's Official Technical Support Service. For your safety, do not remove covers or tamper with internal components, any electrical or refrigeration work must be carried out by qualified personnel. Have the model, serial number and date of installation ready.
| Problem | Checks |
| The air conditioner does not work | 1) Check whether the power supply is disconnected.2) Check if the circuit breaker is on or if the fuse is blown.3) Check the remote control batteries.4) Check if any radio equipment is in use within 1 m around the unit. |
| Low cooling or heating efficiency | 1) Check whether the air inlet or air outlet is blocked.2) Check if the air filter is clogged with dust.3) There may be too many people inside.4) Check whether the doors or windows are closed.5) Check if the fan speed or setpoint temperature is inadequate. |
Remote control - The following behaviors are normal
| Problem | Checks |
| Fan stops or speed cannot be controlled | 1) In dehumidification mode (DRY) or sleep mode (SLEEP), sometimes the fan speed cannot be controlled.2) In cold air blow-out protection or in defrost (heating mode), the fan stops.3) In cooling (COOL) or dehumidification (DRY), if the equipment enters freeze prevention, the fan speed cannot be controlled.4) In heating (HEAT), if the unit goes into heating overload prevention, the fan speed cannot be controlled. |
7. TECHNICAL SPECIFICATIONS
Product: EU01_124597
Product reference: AirClima 9000 WindFlow
Pack model: P82843
Voltage: 220–240 V\~
Frequency: 50 Hz
Cooling capacity: 2500 W (660–2780)
Heating capacity: 2600 W (660–2880)
Input current (cooling): 3.6 A (1.1-8.8)
Input current (heating): 3.2 A (1.1–9.0)
ENGLISH
Input power (cooling): 770 W (250–1300)
Input power (heating): 690 W (250–1300)
Indoor supply airflow rate: 500 m³/h
Rated input power: 1300 W
Rated input current: 9.0 A
Refrigerant / charge / GWP: R32 / 0.6 kg / 675
Maximum permissible pressure: 4.3 MPa
Max. pressure: 4.3 MPa (discharge)
Max. pressure: 1.3 MPa (suction)
Indoor unit weight: 7 kg
Indoor unit sound power: 50 dB(A)
CO 2 equivalent: 0.405 tonnes
Contains fluorinated greenhouse gases
| MODEL | |||
| Function (indicate if available) | |||
| cooling | S | ||
| heating/Average | S | ||
| heating/Warmer | S | ||
| heating/Colder | N | ||
| Item | Symbol | Value | Unit |
| Design load | |||
| cooling | Pdesignc | 2.5 | kW |
| heating/Average | Pdesignh | 2.1 | kW |
| heating/Warmer | Pdesignh | 2.1 | kW |
| heating/Colder | Pdesignh | N/A | kW |
| Declared capacity (*) for cooling, at indoor temperature 27(19) °C and outdoor temperature Tj | |||
| Tj = 35 °C | Pdc | 2.5 | kW |
| Tj = 30 °C | Pdc | 1.89 | kW |
| Tj = 25 °C | Pdc | 1.26 | kW |
| Tj = 20 °C | Pdc | 1.00 | kW |
| AirClima 9000 WindFlow | ||||
| Capacity control (indicate one of three options) | ||||
| fixed | N | |||
| staged | N | |||
| variable | S | |||
| Item | Symbol | Value | Unit | |
| Seasonal efficiency | ||||
| cooling | SEER | 6.3 | - | |
| heating/Average | SCOP/A | 4.2 | - | |
| heating/Warmer | SCOP/W | 5.57 | - | |
| heating/Colder | SCOP/C | N/A | - | |
| Declared energy efficiency ratio (*), at indoor temperature 27(19) °C and outdoor temperature Tj | ||||
| Tj = 35 °C | EERd | 3.24 | - | |
| Tj = 30 °C | EERd | 4.96 | - | |
| Tj = 25 °C | EERd | 8.08 | - | |
| Tj = 20 °C | EERd | 11.15 | - | |
| Declared capacity (*) for heating/Average season, at indoor temperature 20 °C and outdoor temperature Tj | |||
| Tj = -7 °C | Pdh | 2.04 | kW |
| Tj = 2 °C | Pdh | 1.28 | kW |
| Tj = 7 °C | Pdh | 0.77 | kW |
| Tj = 12 °C | Pdh | 0.65 | kW |
| Tj = bivalent temperature | Pdh | 2.04 | kW |
| Tj = operating limit | Pdh | 1.87 | kW |
| Declared capacity (*) for heating/Warmer season, at indoor temperature 20 °C and outdoor temperature T | |||
| Tj = 2 °C | Pdh | 2.12 | kW |
| Tj = 7 °C | Pdh | 1.35 | kW |
| Tj = 12 °C | Pdh | 0.65 | kW |
| Tj = bivalent temperature | Pdh | 2.12 | kW |
| Tj = operating limit | Pdh | 2.12 | kW |
| Declared capacity (*) for heating/Colder season, at indoor temperature 20 °C and outdoor temperature Tj | |||
| Tj = -7 °C | Pdh | N/A | kW |
| Tj = 2 °C | Pdh | N/A | kW |
| Tj = 7 °C | Pdh | N/A | kW |
| Tj = 12 °C | Pdh | N/A | kW |
| Tj = bivalent temperature | Pdh | N/A | kW |
| Tj = operating limit | Pdh | N/A | kW |
| Tj= -15 °C | Pdh | N/A | kW |
| Bivalent temperature | |||
| heating/Average | Tbiv | -7 | °C |
| heating/Warmer | Tbiv | 2 | °C |
| heating/Colder | Tbiv | N/A | °C |
| Cycling interval capacity / Cooling | |||
| Declared coefficient of performance (*)/Average season, at indoor temperature 20 °C and outdoor temperature Tj | ||||
| Tj = -7°C | COPd | 2.94 | - | |
| Tj = 2°C | COPd | 4.73 | - | |
| Tj = 7°C | COPd | 4.41 | - | |
| Tj = 12°C | COPd | 5.41 | - | |
| Tj = bivalent temperature | COPd | 2.94 | - | |
| Tj = operating limit | COPd | 2.46 | - | |
| Declared coefficient of performance (*)/Warmer season, at indoor temperature 20 °C and outdoor temperature Tj | ||||
| Tj = 2°C | COPd | 3.25 | - | |
| Tj = 7°C | COPd | 6.36 | - | |
| Tj = 12°C | COPd | 5.41 | - | |
| Tj = bivalent temperature | COPd | 3.25 | - | |
| Tj = operating limit | COPd | 3.25 | - | |
| Declared coefficient of performance (*)/Colder season, at indoor temperature 20 °C and outdoor temperature Tj | ||||
| Tj = -7°C | COPd | N/A | - | |
| Tj = 2°C | COPd | N/A | - | |
| Tj = 7°C | COPd | N/A | - | |
| Tj = 12°C | COPd | N/A | - | |
| Tj = bivalent temperature | COPd | N/A | - | |
| Tj = operating limit | COPd | N/A | - | |
| Tj= -15°C | COPd | N/A | - | |
| Operating limit temperature | ||||
| heating/Average | Tol | -10 | °C | |
| heating/Warmer | Tol | 2 | °C | |
| heating/Colder | Tol | N/A | °C | |
| Cycling interval efficiency / Heating | ||||
| for cooling | Pcycc | N/A | kW |
| for heating | Pcycc | N/A | kW |
| Degradation co-efficient cooling (**) | Cdc | 0.25 | - |
| Power consumption in modes other than active mode / Cooling | |||
| off mode | POFF | 0.002 | kW |
| standby mode | PSB | 0.002 | kW |
| thermostat-off mode | PTO | 0.023 | kW |
| crankcase heater mode | PCK | 0.00 | kW |
| Annual electricity consumption | |||
| cooling | QCE | 139 | kWh/a |
| heating/Average | QHE | 700 | kWh/a |
| heating/Warmer | QHE | 527 | kWh/a |
| heating/Colder | QHE | N/A | kWh/a |
| Other items | |||
| Sound power level (indoor/outdoor) | LWA | N/A | dB (A) |
| Global warming potential | GWP | 675 | kg CO2 eq. |
| Rated air flow (indoor/outdoor) | - | N/A | m3/h |
| Contact information | Cecotec Innovaciones, S.L.Av. Reyes Católicos, 60, 46910, Alfafar, Valencia (S | ||
| (*) For staged capacity units, two values divided by a slash (‘/’) will be declared in each box in the section ‘Declared capacity of the unit’ and ‘declared EER/COP’ of the unit.(**) If default Cd = 0,25 is chosen then (results from) cycling tests are not required.Otherwise either the heating or cooling cycling test value is required. | |||
Product: EU01_124598
Product reference: AirClima 12000 Wind Connected
Pack model: P82844
| for cooling | EERcyc | N/A | - | |
| for heating | COPcyc | N/A | - | |
| Degradation co-efficient heating (**) | Cdh | 0,25 | - | |
| Power consumption in modes other than active mode / Heating | ||||
| off mode | POFF | 0.001 | kW | |
| standby mode | PSB | 0.001 | kW | |
| thermostat-off mode | PTO | 0.001 | kW | |
| crankcase heater mode | PCK | 0.00 | kW | |
| Energy efficiency class | ||||
| cooling | - | A++ | - | |
| heating/Average | - | A+ | - | |
| heating/Warmer | - | A+++ | - | |
| heating/Colder | - | N/A | - | |
| pain) | ||||
ENGLISH
Voltage: 220–240 V\~
Frequency: 50 Hz
Cooling capacity: 3500 W (660–3700)
Heating capacity: 3500 W (660–3800)
Input current (cooling): 5.5 A (1.1-9.6)
Input current (heating): 4.4 A (1.1–10.0)
Input power (cooling): 1190 W (250–1600)
Input power (heating): 950 W (250–1600)
Indoor supply airflow rate: 550 m 3 /h
Rated input power: 1600 W
Rated input current: 10.0 A
Refrigerant / charge / GWP: R32 / 0.63 kg / 675
Maximum permissible pressure: 4.3 MPa
Max. pressure: 4.3 MPa (discharge)
Max. pressure: 1.3 MPa (suction)
Indoor unit weight: 7.5 kg
Indoor unit sound power: 52 dB(A)
CO 2 equivalent: 0.425 tonnes
Contains fluorinated greenhouse gases
Frequency bands: 2400.0-2483.5 MHz
Maximum Wi-Fi RF power : 17 dBm
Maximum Bluetooth RF power : 4.5 dBm
Operating voltage: 5-12 V
| MODEL | |||
| Function (indicate if available) | |||
| cooling | S | ||
| heating/Average | S | ||
| heating/Warmer | S | ||
| heating/Colder | N | ||
| Item | Symbol | Value | Unit |
| Design load | |||
| cooling | Pdesignc | 3.2 | kW |
| AirClima 12000 Wind Connected | ||||
| Capacity control (indicate one of three options) | ||||
| fixed | N | |||
| staged | N | |||
| variable | S | |||
| Item | Symbol | Value | Unit | |
| Seasonal efficiency | ||||
| cooling | SEER | 6.33 | - | |
| heating/Average | Pdesignh | 2.5 | kW |
| heating/Warmer | Pdesignh | 2.5 | kW |
| heating/Colder | Pdesignh | N/A | kW |
| Declared capacity (*) for cooling, at indoor temperature 27(19) °C and outdoor temperature Tj | |||
| Tj = 35 °C | Pdc | 3.25 | kW |
| Tj = 30 °C | Pdc | 2.42 | kW |
| Tj = 25 °C | Pdc | 1.53 | kW |
| Tj = 20 °C | Pdc | 1.17 | kW |
| Declared capacity (*) for heating/Average season, at indoor temperature 20 °C and outdoor temperature Tj | |||
| Tj = -7 °C | Pdh | 2.32 | kW |
| Tj = 2 °C | Pdh | 1.41 | kW |
| Tj = 7 °C | Pdh | 0.93 | kW |
| Tj = 12 °C | Pdh | 0.93 | kW |
| Tj = bivalent temperature | Pdh | 2.32 | kW |
| Tj = operating limit | Pdh | 2.24 | kW |
| Declared capacity (*) for heating/Warmer season, at indoor temperature 20 °C and outdoor temperature T | |||
| Tj = 2 °C | Pdh | 2.56 | kW |
| Tj = 7 °C | Pdh | 1.67 | kW |
| Tj = 12 °C | Pdh | 0.93 | kW |
| Tj = bivalent temperature | Pdh | 2.56 | kW |
| Tj = operating limit | Pdh | 2.56 | kW |
| Declared capacity (*) for heating/Colder season, at indoor temperature 20 °C and outdoor temperature Tj | |||
| Tj = -7 °C | Pdh | N/A | kW |
| heating/Average | SCOP/A | 4.16 | - | |
| heating/Warmer | SCOP/W | 5.33 | - | |
| heating/Colder | SCOP/C | N/A | - | |
| Declared energy efficiency ratio (*), at indoor temperature 27(19) °C and outdoor temperature Tj | ||||
| Tj = 35 °C | EERd | 3.12 | - | |
| Tj = 30 °C | EERd | 4.37 | - | |
| Tj = 25 °C | EERd | 8.27 | - | |
| Tj = 20 °C | EERd | 10.52 | - | |
| Declared coefficient of performance (*)(Average season, at indoor temperature 20 °C and outdoor temperature Tj | ||||
| Tj = -7 °C | COPd | 2.98 | - | |
| Tj = 2 °C | COPd | 4.16 | - | |
| Tj = 7 °C | COPd | 4.90 | - | |
| Tj = 12 °C | COPd | 6.17 | - | |
| Tj = bivalent temperature | COPd | 2.98 | - | |
| Tj = operating limit | COPd | 2.85 | - | |
| Declared coefficient of performance (*)(Warmer season, at indoor temperature 20 °C and outdoor temperature Tj | ||||
| Tj = 2 °C | COPd | 3.32 | - | |
| Tj = 7 °C | COPd | 5.23 | - | |
| Tj = 12 °C | COPd | 6.17 | - | |
| Tj = bivalent temperature | COPd | 3.32 | - | |
| Tj = operating limit | COPd | 3.32 | - | |
| Declared coefficient of performance (*)(Colder season, at indoor temperature 20 °C and outdoor temperature Tj | ||||
| Tj = -7 °C | COPd | N/A | - | |
| Tj = 2 °C | Pdh | N/A | kW |
| Tj = 7 °C | Pdh | N/A | kW |
| Tj = 12 °C | Pdh | N/A | kW |
| Tj = bivalent temperature | Pdh | N/A | kW |
| Tj = operating limit | Pdh | N/A | kW |
| Tj = -15 °C | Pdh | N/A | kW |
| Bivalent temperature | |||
| heating/Average | Tbiv | -7 | °C |
| heating/Warmer | Tbiv | 2 | °C |
| heating/Colder | Tbiv | N/A | °C |
| Cycling interval capacity / Cooling | |||
| for cooling | Pcycc | N/A | kW |
| for heating | Pcycc | N/A | kW |
| Degradation co-efficient cooling (**) | Cdc | 0.25 | - |
| Power consumption in modes other than active mode / Cooling | |||
| off mode | POFF | 0.001 | kW |
| standby mode | PSB | 0.001 | kW |
| thermostat-off mode | PTO | 0.008 | kW |
| crankcase heater mode | PCK | 0.00 | kW |
| Annual electricity consumption | |||
| cooling | QCE | 177 | kWh/a |
| heating/Average | QHE | 841 | kWh/a |
| heating/Warmer | QHE | 656 | kWh/a |
| heating/Colder | QHE | N/A | kWh/a |
| Other items | |||
| Sound power level (indoor/outdoor) | LWA | N/A | dB (A) |
| Global warming potential | GWP | 675 | kgCO2eq. |
| Tj = 2 °C | COPd | N/A | - | |
| Tj = 7 °C | COPd | N/A | - | |
| Tj = 12 °C | COPd | N/A | - | |
| Tj = bivalent temperature | COPd | N/A | - | |
| Tj = operating limit | COPd | N/A | - | |
| Tj= - 15 °C | COPd | N/A | - | |
| Operating limit temperature | ||||
| heating/Average | Tol | - 10 | °C | |
| heating/Warmer | Tol | 2 | °C | |
| heating/Colder | Tol | N/A | °C | |
| Cycling interval efficiency / Heating | ||||
| for cooling | EERcyc | N/A | - | |
| for heating | COPcyc | N/A | - | |
| Degradation co-efficient heating (**) | Cdh | 0,25 | - | |
| Power consumption in modes other than active mode / Heating | ||||
| off mode | POFF | 0.001 | kW | |
| standby mode | PSB | 0.001 | kW | |
| thermostat-off mode | PTO | 0.001 | kW | |
| crankcase heater mode | PCK | 0.00 | kW | |
| Energy efficiency class | ||||
| cooling | - | A++ | - | |
| heating/Average | - | A+ | - | |
| heating/Warmer | - | A+++ | - | |
| heating/Colder | - | N/A | - | |
| Rated air flow (indoor/outdoor) | - | N/A | m3/h |
| Contact information | Cecotec Innovaciones, S.L.Av. Reyes Católicos, 60, 46910,Alfafar, Valencia (Spain) | ||
| (*) For staged capacity units, two values divided by a slash (‘/’) will be declared in each box in the section ‘Declared capacity of the unit’ and ‘declared EER/COP’ of the unit.(**) If default Cd = 0,25 is chosen then (results from) cycling tests are not required. Otherwise either the heating or cooling cycling test value is required. | |||
Product: EU01_123451
Product reference: AirClima 12000 Wind Connected A+++
Pack model: P82845
Voltage: 220–240 V\~
Frequency: 50 Hz
Cooling capacity: 3500 W (660–4200)
Heating capacity: 3500 W (660–4400)
Input current (cooling): 4.4 A (1.1–9.6)
Input current (heating): 4.3 A (1.1–10.0)
Input power (cooling): 980 W (250–1700)
Input power (heating): 950 W (250–1700)
Indoor supply airflow rate: 600 m³/h
Rated input power: 1700 W
Rated input current: 11.0 A
Refrigerant / charge / GWP: R32 / 0.56 kg / 675
Maximum permissible pressure: 4.3 MPa
Max. pressure: 4.3 MPa (discharge)
Max. pressure: 1.3 MPa (suction)
Indoor unit weight: 7.7 kg
Indoor unit sound power: 52 dB(A)
CO 2 equivalent: 0.378 tonnes
Contains fluorinated greenhouse gases
Frequency bands: 2400.0-2483.5 MHz
Maximum Wi-Fi RF power : 17 dBm
Maximum Bluetooth RF power : 4.5 dBm
| MODEL | ||||
| Function (indicate if available) | ||||
| cooling | S | |||
| heating/Average | S | |||
| heating/Warmer | S | |||
| heating/Colder | N | |||
| Item | Symbol | Value | Unit | |
| Design load | ||||
| cooling | Pdesignc | 3.2 | kW | |
| heating/Average | Pdesignh | 2.5 | kW | |
| heating/Warmer | Pdesignh | 2.5 | kW | |
| heating/Colder | Pdesignh | N/A | kW | |
| Declared capacity (*) for cooling, at indoor temperature 27(19) °C and outdoor temperature Tj | ||||
| Tj = 35 °C | Pdc | 3.25 | kW | |
| Tj = 30 °C | Pdc | 2.40 | kW | |
| Tj = 25 °C | Pdc | 1.56 | kW | |
| Tj = 20 °C | Pdc | 1.14 | kW | |
| Declared capacity (*) for heating/Average season, at indoor temperature 20 °C and outdoor temperature Tj | ||||
| Tj = -7 °C | Pdh | 2.43 | kW | |
| Tj = 2 °C | Pdh | 1.47 | kW | |
| Tj = 7 °C | Pdh | 1.20 | kW | |
| Tj = 12 °C | Pdh | 1.00 | kW | |
| Tj = bivalent temperature | Pdh | 2.43 | kW | |
| Tj = operating limit | Pdh | 2.39 | kW | |
| AirClima 12000 Wind Connected A+++ | ||||
| Capacity control (indicate one of three options) | ||||
| fixed | N | |||
| staged | N | |||
| variable | S | |||
| Item | Symbol | Value | Unit | |
| Seasonal efficiency | ||||
| cooling | SEER | 8.58 | - | |
| heating/Average | SCOP/A | 4.65 | - | |
| heating/Warmer | SCOP/W | 5.61 | - | |
| heating/Colder | SCOP/C | N/A | - | |
| Declared energy efficiency ratio (*), at indoor temperature 27(19) °C and outdoor temperature Tj | ||||
| Tj = 35 °C | EERd | 3.99 | - | |
| Tj = 30 °C | EERd | 6.26 | - | |
| Tj = 25 °C | EERd | 10.34 | - | |
| Tj = 20 °C | EERd | 16.27 | - | |
| Declared coefficient of performance (%)/Average season, at indoor temperature 20 °C and outdoor temperature Tj | ||||
| Tj = -7 °C | COPd | 3.00 | - | |
| Tj = 2 °C | COPd | 4.84 | - | |
| Tj = 7 °C | COPd | 5.86 | - | |
| Tj = 12 °C | COPd | 6.76 | - | |
| Tj = bivalent temperature | COPd | 3.00 | - | |
| Tj = operating limit | COPd | 2.72 | - | |
| Declared capacity (*) for heating/Warmer season, at indoor temperature 20 °C and outdoor temperature T | |||
| Tj = 2 °C | Pdh | 2.63 | kW |
| Tj = 7 °C | Pdh | 1.72 | kW |
| Tj = 12 °C | Pdh | 1.00 | kW |
| Tj = bivalent temperature | Pdh | 2.63 | kW |
| Tj = operating limit | Pdh | 2.63 | kW |
| Declared capacity (*) for heating/Colder season, at indoor temperature 20 °C and outdoor temperature Tj | |||
| Tj = -7 °C | Pdh | N/A | kW |
| Tj = 2 °C | Pdh | N/A | kW |
| Tj = 7 °C | Pdh | N/A | kW |
| Tj = 12 °C | Pdh | N/A | kW |
| Tj = bivalent temperature | Pdh | N/A | kW |
| Tj = operating limit | Pdh | N/A | kW |
| Tj = -15 °C | Pdh | N/A | kW |
| Bivalent temperature | |||
| heating/Average | Tbiv | -7 | °C |
| heating/Warmer | Tbiv | 2 | °C |
| heating/Colder | Tbiv | N/A | °C |
| Cycling interval capacity / Cooling | |||
| for cooling | Pcycc | N/A | kW |
| for heating | Pcycc | N/A | kW |
| Degradation co-efficient cooling (**) | Cdc | 0.25 | - |
| Power consumption in modes other than active mode / Cooling | |||
| off mode | POFF | 0.001 | kW |
| standby mode | PSB | 0.001 | kW |
| Declared coefficient of performance (*)/Warmer season, at indoor temperature 20 °C and outdoor temperature Tj | ||||
| Tj = 2 °C | COPd | 2.87 | - | |
| Tj = 7 °C | COPd | 5.51 | - | |
| Tj = 12 °C | COPd | 6.76 | - | |
| Tj = bivalent temperature | COPd | 2.87 | - | |
| Tj = operating limit | COPd | 2.87 | - | |
| Declared coefficient of performance (*)/Colder season, at indoor temperature 20 °C and outdoor temperature Tj | ||||
| Tj = -7 °C | COPd | N/A | - | |
| Tj = 2 °C | COPd | N/A | - | |
| Tj = 7 °C | COPd | N/A | - | |
| Tj = 12 °C | COPd | N/A | - | |
| Tj = bivalent temperature | COPd | N/A | - | |
| Tj = operating limit | COPd | N/A | - | |
| Tj= -15 °C | COPd | N/A | - | |
| Operating limit temperature | ||||
| heating/Average | Tol | -10 | °C | |
| heating/Warmer | Tol | 2 | °C | |
| heating/Colder | Tol | N/A | °C | |
| Cycling interval efficiency / Heating | ||||
| for cooling | EERcyc | N/A | - | |
| for heating | COPcyc | N/A | - | |
| Degradation co-efficient heating (**) | Cdh | 0,25 | - | |
| Power consumption in modes other than active mode / Heating | ||||
| off mode | POFF | 0.001 | kW | |
| standby mode | PSB | 0.001 | kW | |
| thermostat-off mode | PTO | 0.006 | kW |
| crankcase heater mode | PCK | 0.00 | kW |
| Annual electricity consumption | |||
| cooling | QCE | 131 | kWh/a |
| heating/Average | QHE | 752 | kWh/a |
| heating/Warmer | QHE | 624 | kWh/a |
| heating/Colder | QHE | N/A | kWh/a |
| Other items | |||
| Sound power level (indoor/outdoor) | LWA | 50/58 | dB (A) |
| Global warming potential | GWP | 675 | kgCO2eq. |
| Rated air flow (indoor/outdoor) | - | N/A | m3/h |
| Contact information | Cecotec Innovaciones, S.L.Av. Reyes Católicos, 60, 46910, Alfafar, Valencia (Spain) | ||
| (*) For staged capacity units, two values divided by a slash (‘/’) will be declared in each box in the section ‘Declared capacity of the unit’ and ‘declared EER/COP’ of the unit.(**) If default Cd = 0,25 is chosen then (results from) cycling tests are not required.Otherwise either the heating or cooling cycling test value is required. | |||
Product: EU01_123496
Product reference: AirClima 18000 Wind Connected A+++
Pack model: P82845
Voltage: 220–240 V\~
Frequency: 50 Hz
Cooling capacity: 5200 W (1610–6200)
Heating capacity: 5200 W (1610–6400)
Input current (cooling): 6.8 A (1.6-13.0)
Input current (heating): 6.5 A (1.6–14.0)
Input power (cooling): 1460 W (350–2600)
Input power (heating): 1420 W (350–2600)
| thermostat-off mode | PTO | 0.001 | kW | |
| crankcase heater mode | PCK | 0.00 | kW | |
| Energy efficiency class | ||||
| cooling | - | A+++ | - | |
| heating/Average | - | A++ | - | |
| heating/Warmer | - | A+++ | - | |
| heating/Colder | - | N/A | - | |
ENGLISH
Indoor supply airflow rate: 1000 m³/h
Rated input power: 2600 W
Rated input current: 14.0 A
Refrigerant / charge / GWP: R32 / 0.9 kg / 675
Maximum permissible pressure: 4.3 MPa
Max. pressure: 4.3 MPa (discharge)
Max. pressure: 1.3 MPa (suction)
Indoor unit weight: 11.5 kg
Indoor unit sound power: 56 dB(A)
CO 2 equivalent: 0.61 tonnes
Contains fluorinated greenhouse gases
Frequency bands: 2400.0-2483.5 MHz
Maximum Wi-Fi RF power : 17 dBm
Maximum Bluetooth RF power : 4.5 dBm
Operating voltage: 5-12 V
| MODEL | |||
| Function (indicate if available) | |||
| cooling | S | ||
| heating/Average | S | ||
| heating/Warmer | S | ||
| heating/Colder | N | ||
| Item | Symbol | Value | Unit |
| Design load | |||
| cooling | Pdesignc | 5.1 | kW |
| heating/Average | Pdesignh | 4.1 | kW |
| heating/Warmer | Pdesignh | 4.1 | kW |
| heating/Colder | Pdesignh | N/A | kW |
| Declared capacity (*) for cooling, at indoor temperature 27(19) °C and outdoor temperature Tj | |||
| Tj = 35 °C | Pdc | 5.14 | kW |
| Tj = 30 °C | Pdc | 3.60 | kW |
| Tj = 25 °C | Pdc | 2.39 | kW |
| AirClima 18000 Wind Connected A+++ | ||||
| Capacity control (indicate one of three options) | ||||
| fixed | N | |||
| staged | N | |||
| variable | S | |||
| Item | Symbol | Value | Unit | |
| Seasonal efficiency | ||||
| cooling | SEER | 8.52 | - | |
| heating/Average | SCOP/A | 4.64 | - | |
| heating/Warmer | SCOP/W | 5.79 | - | |
| heating/Colder | SCOP/C | N/A | - | |
| Declared energy efficiency ratio (*), at indoor temperature 27(19) °C and outdoor temperature Tj | ||||
| Tj = 35 °C | EERd | 4.25 | - | |
| Tj = 30 °C | EERd | 5.77 | - | |
| Tj = 25 °C | EERd | 10.47 | - | |
| Tj = 20 °C | Pdc | 1.85 | kW |
| Declared capacity (*) for heating/Average season, at indoor temperature 20 °C and outdoor temperature Tj | |||
| Tj = -7 °C | Pdh | 3.96 | kW |
| Tj = 2 °C | Pdh | 2.31 | kW |
| Tj = 7 °C | Pdh | 1.48 | kW |
| Tj = 12 °C | Pdh | 1.95 | kW |
| Tj = bivalent temperature | Pdh | 3.96 | kW |
| Tj = operating limit | Pdh | 3.48 | kW |
| Declared capacity (*) for heating/Warmer season, at indoor temperature 20 °C and outdoor temperature T | |||
| Tj = 2 °C | Pdh | 4.36 | kW |
| Tj = 7 °C | Pdh | 2.56 | kW |
| Tj = 12 °C | Pdh | 1.95 | kW |
| Tj = bivalent temperature | Pdh | 4.36 | kW |
| Tj = operating limit | Pdh | 4.36 | kW |
| Declared capacity (*) for heating/Colder season, at indoor temperature 20 °C and outdoor temperature Tj | |||
| Tj = -7 °C | Pdh | N/A | kW |
| Tj = 2 °C | Pdh | N/A | kW |
| Tj = 7 °C | Pdh | N/A | kW |
| Tj = 12 °C | Pdh | N/A | kW |
| Tj = bivalent temperature | Pdh | N/A | kW |
| Tj = operating limit | Pdh | N/A | kW |
| Tj= -15 °C | Pdh | N/A | kW |
| Bivalent temperature | |||
| heating/Average | Tbiv | -7 | °C |
| heating/Warmer | Tbiv | 2 | °C |
| heating/Colder | Tbiv | N/A | °C |
| Tj = 20 °C | EERd | 15.52 | - | |
| Declared coefficient of performance (*)/Average season, at indoor temperature 20 °C and outdoor temperature Tj | ||||
| Tj = -7 °C | COPd | 3.21 | - | |
| Tj = 2 °C | COPd | 4.54 | - | |
| Tj = 7 °C | COPd | 5.84 | - | |
| Tj = 12 °C | COPd | 7.31 | - | |
| Tj = bivalent temperature | COPd | 3.21 | - | |
| Tj = operating limit | COPd | 2.75 | - | |
| Declared coefficient of performance (*)/Warmer season, at indoor temperature 20 °C and outdoor temperature Tj | ||||
| Tj = 2 °C | COPd | 3.32 | - | |
| Tj = 7 °C | COPd | 5.48 | - | |
| Tj = 12 °C | COPd | 7.31 | - | |
| Tj = bivalent temperature | COPd | 3.32 | - | |
| Tj = operating limit | COPd | 3.32 | - | |
| Declared coefficient of performance (*)/Colder season, at indoor temperature 20 °C and outdoor temperature Tj | ||||
| Tj = -7 °C | COPd | N/A | - | |
| Tj = 2 °C | COPd | N/A | - | |
| Tj = 7 °C | COPd | N/A | - | |
| Tj = 12 °C | COPd | N/A | - | |
| Tj = bivalent temperature | COPd | N/A | - | |
| Tj = operating limit | COPd | N/A | - | |
| Tj= -15 °C | COPd | N/A | - | |
| Operating limit temperature | ||||
| heating/Average | Tol | -10 | °C | |
| heating/Warmer | Tol | 2 | °C | |
| heating/Colder | Tol | N/A | °C | |
| Cycling interval capacity / Cooling | |||
| for cooling | Pcycc | N/A | kW |
| for heating | Pcycc | N/A | kW |
| Degradation co-efficient cooling (**) | Cdc | 0.25 | - |
| Power consumption in modes other than active mode / Cooling | |||
| off mode | POFF | 0.001 | kW |
| standby mode | PSB | 0.001 | kW |
| thermostat-off mode | PTO | 0.002 | kW |
| crankcase heater mode | PCK | 0.00 | kW |
| Annual electricity consumption | |||
| cooling | QCE | 209 | kWh/a |
| heating/Average | QHE | 1238 | kWh/a |
| heating/Warmer | QHE | 992 | kWh/a |
| heating/Colder | QHE | N/A | kWh/a |
| Other items | |||
| Sound power level (indoor/outdoor) | LWA | 54/61 | dB (A) |
| Global warming potential | GWP | 675 | kg CO2 eq. |
| Rated air flow (indoor/outdoor) | - | N/A | m3/h |
| Contact information | Cecotec Innovaciones, S.L.Av. Reyes Católicos, 60, 46910, Alfatar, Valencia (Spain) | ||
| (*) For staged capacity units, two values divided by a slash (‘/’) will be declared in each box in the section ‘Declared capacity of the unit’ and ‘declared EER/COP’ of the unit. (**) If default Cd = 0,25 is chosen then (results from) cycling tests are not required.Otherwise either the heating or cooling cycling test value is required. | |||
Technical specifications may change without prior notice to improve product quality.
Made in China | Designed in Spain
| Cycling interval efficiency / Heating | ||||
| for cooling | EERcyc | N/A | - | |
| for heating | COPcyc | N/A | - | |
| Degradation co-efficient heating (**) | Cdh | 0,25 | - | |
| Power consumption in modes other than active mode / Heating | ||||
| off mode | POFF | 0.001 | kW | |
| standby mode | PSB | 0.001 | kW | |
| thermostat-off mode | PTO | 0.001 | kW | |
| crankcase heater mode | PCK | 0.00 | kW | |
| Energy efficiency class | ||||
| cooling | - | A+++ | - | |
| heating/Average | - | A++ | - | |
| heating/Warmer | - | A+++ | - | |
| heating/Colder | - | N/A | - | |
8. RECYCLING OF ELECTRICAL AND ELECTRONIC EQUIPMENT
This symbol indicates that, according to the applicable regulations, the product and/or battery must be disposed of separately from household waste. When this product reaches the end of its shelf life, you should dispose of the batteries/accumulators and take them to a collection point designated by the local authorities.

For detailed information on how to properly dispose of electrical and electronic equipment and/or the corresponding batteries, consumers should contact their local authorities.
Information regarding national packaging recycling systems and their marking can be found on our website.
Compliance with the above guidelines will help protecting the environment.
9. TECHNICAL SUPPORT AND WARRANTY
Cecotec shall be liable to the end user or consumer for any lack of conformity that exists at the time of product delivery under the terms, conditions and deadlines established by applicable regulations.
Repairs should be carried out by qualified personnel.
If at any moment you detect any problem with your product or have any doubt, do not hesitate to contact the official Cecotec Technical Support Service at +34 96 321 07 28.
10. INFORMATION ON DATA STORED BY CONNECTED PRODUCTS IN ACCORDANCE WITH REGULATION (EU) 2023/2854 ("DATA REGULATION")
Cecotec's connected products and related services are those that generate different data and information during use. In accordance with the provisions of the Data Regulation, through this document Cecotec provides you with information about your rights concerning the data generated and about how to access such data.
This right allows you to use the data for any lawful purpose, including, among others, product and/or service optimisation or contracting post-sale services with third parties.
As a user, you may exercise your right of access, within the limits provided for by the Data Regulation, through the email address data.act@cecotec.es. To protect the generated data—and in order to prevent fraud or identity theft—CECOTEC may require additional information to verify your status as a user.
Data is stored for a determined period of time.
11. COPYRIGHT
The intellectual property rights over the texts in this manual belong to CECOTEC INNOVACIONES, S.L. All rights reserved. The content of this publication may not, either in part or in its entirety, be reproduced, stored in a retrieval system, transmitted or distributed by any means (electronic, mechanical, photocopying, recording or similar) without prior authorisation from CECOTEC INNOVACIONES, S.L.
12. SIMPLIFIED EU DECLARATION OF CONFORMITY
CE Cecotec Innovaciones hereby declares that this appliance complies with the essential requirements and other relevant provisions of the regulations applicable in the European Union. This appliance has been designed, manufactured and tested in compliance with required safety and quality standards. The full text of the EU Declaration of Conformity can be found on the following website: https://cecotec.es/es/information/declaration-of-conformity
13. EU DECLARATION OF CONFORMITY
CE Cecotec Innovaciones hereby declares that these air conditioners, models EU01_124598 - AirClima 12000 Wind Connected, EU01_123451 - AirClima 12000 Wind Connected A+++ and EU01_123496 - AirClima 18000 Wind Connected A+++ comply with the Directive 2014/53/EU on radio equipment. The full text of the EU Declaration of Conformity can be found on the following website: https://cecotec.es/es/information/declaration-of-conformity
FRANÇAIS
1. PIÈCES ET COMPOSANTS
Image 1



https://storececotec.de/de/information/declaration-of-conformity
ITALIANO
1. PARTI E COMPONENTI
Figura 1

5. CONNETTIVITÀ WI-FI E APP
https://storececotec.it/it/information/declaration-of-conformity

Fig./Img./Abb./Afb./ Rys. 1

Fig./Img./Abb./Afb./Rys. 2
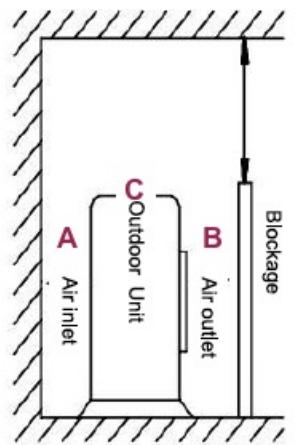
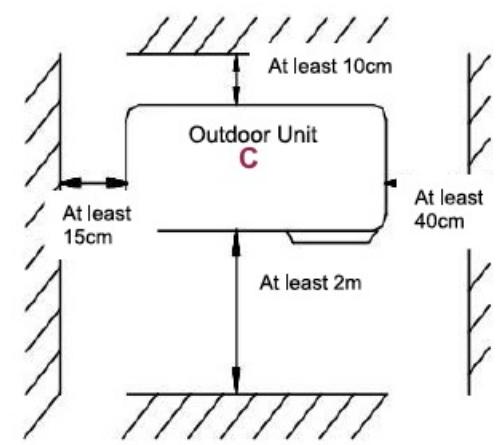
Fig./Img./Abb./Afb./Rys. 3

C
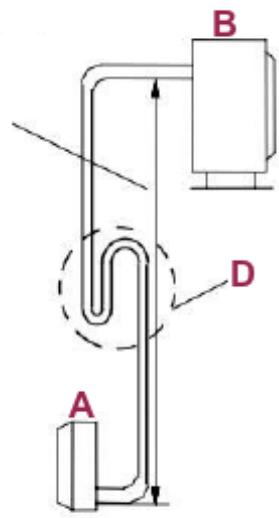
Fig./Img./Abb./Afb./Rys. 4
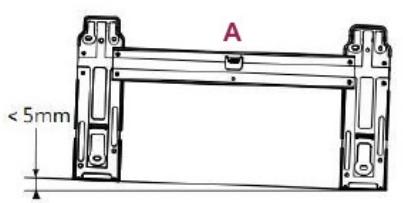

Fig./Img./Abb./Afb./Rys. 5
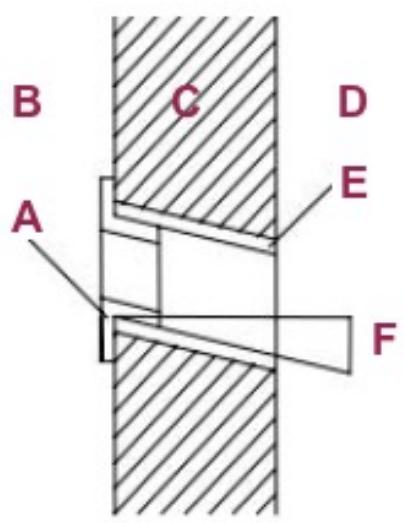
Fig./Img./Abb./Afb./Rys. 6

Fig./Img./Abb./Afb./Rys. 7

Fig./Img./Abb./Afb./Rys. 8
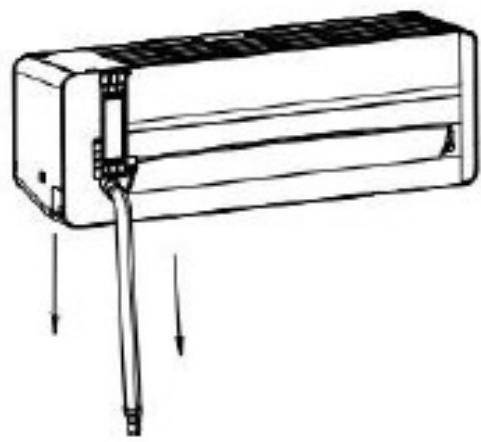
Fig./Img./Abb./Afb./Rys. 9

Fig./Img./Abb./Afb./Rys. 10
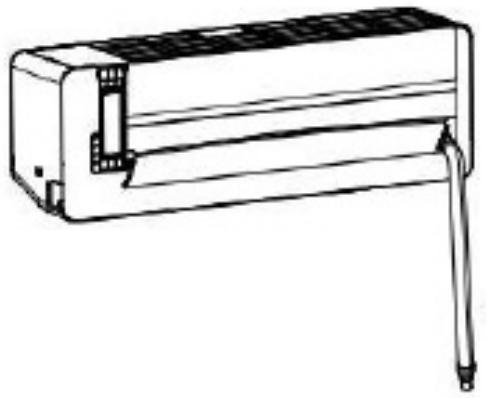
Fig./Img./Abb./Afb./Rys. 11
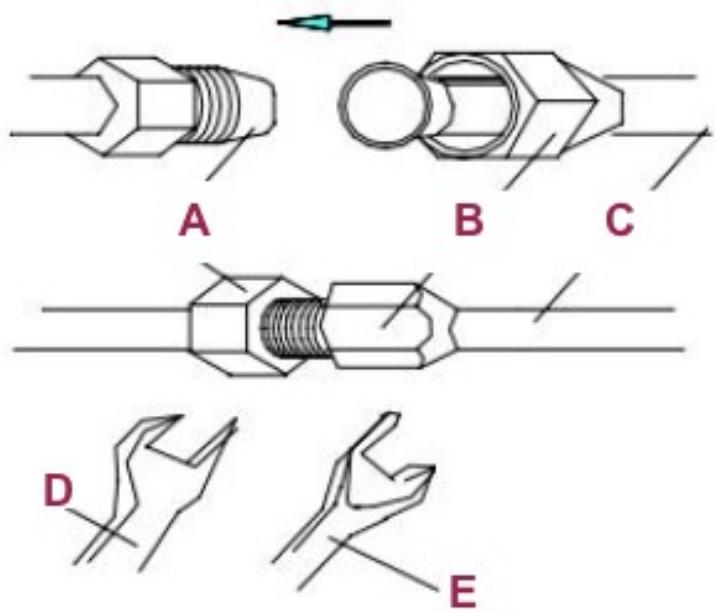
Fig./Img./Abb./Afb./Rys. 12

Fig./Img./Abb./Afb./Rys. 13

Fig./Img./Abb./Afb./Rys. 14

Fig./Img./Abb./Afb./Rys. 15
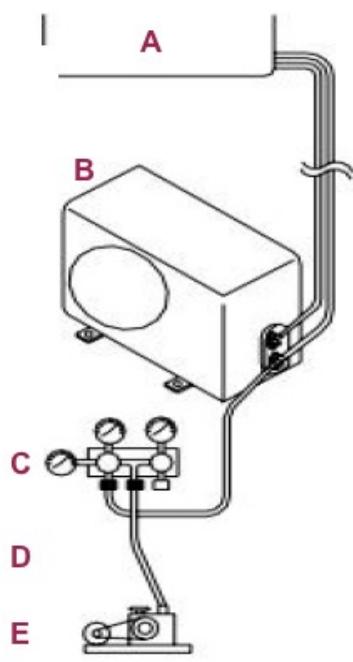
Fig./Img./Abb./Afb./Rys. 16

Fig./Img./Abb./Afb./Rys. 17
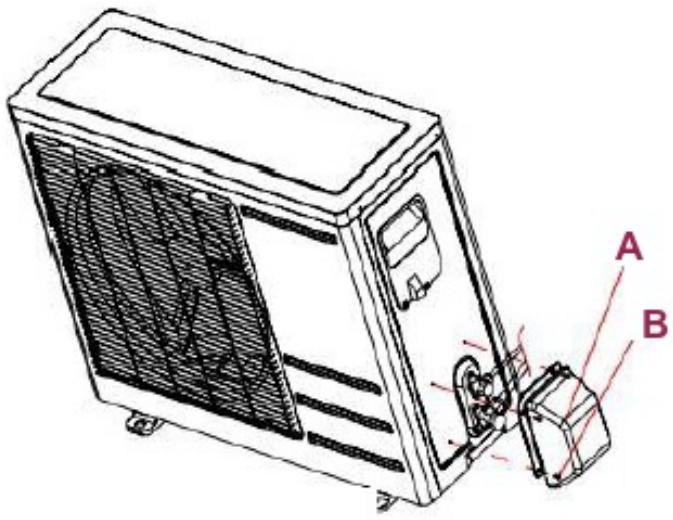
Fig./Img./Abb./Afb./Rys. 18

Fig./Img./Abb./Afb./Rys. 19
www.cecotec.es
- INSTRUCTIONS ON BATTERIES
- INSTRUCTIONS DE SÉCURITÉ
- ENGLISH
- PARTS AND COMPONENTS
- FIG. 1
- NOTE
- BEFORE USE
- BOX CONTENT
- INSTALLATION
- INDOOR UNIT LOCATION
- FIGURE 2 — MINIMUM DISTANCES FOR THE INDOOR UNIT
- OUTDOOR UNIT LOCATION
- PIPING SELECTION
- SECURING THE INSTALLATION PLATE
- FIG. 5 — PLATE LEVELLING
- DECORATIVE COVER INSTALLATION INSTRUCTIONS
- FIG. 7
- INSTALLATION STEPS
- INSTALLATION OF THE INDOOR UNIT
- NOTES
- FIG. 8
- FIG. 10
- OUTDOOR UNIT INSTALLATION
- PIPING CONNECTION
- FIG. 12
- CABLE CONNECTION
- INDOOR UNIT (FIG. 13)
- OUTDOOR UNIT (FIG. 14)
- FIG. 13
- FIG. 14
- FIXING THE PIPE ASSEMBLY
- FIG. 15 — FIXING THE PIPE ASSEMBLY TO THE WALL
- EVACUATION (VACUUM) AND VALVE OPENING
- FIG. 16 — VACUUM DIAGRAM
- GAS LEAKAGE INSPECTION
- DRAINAGE — OUTDOOR UNIT
- VALVE COVER INSTALLATION — OUTDOOR UNIT
- OPERATION
- UNIT DISPLAY INDICATORS
- REMOTE CONTROL — DESCRIPTION OF BUTTONS, ICONS AND FUNCTIONS
- FIG. 19
- REMOTE CONTROL DISPLAY
- REMOTE CONTROL INSTRUCTIONS
- WI-FI CONNECTIVITY AND MOBILE APP
- CLEANING AND MAINTENANCE
- CAUTION
- CLEANING THE FRONT PANEL AND REMOTE CONTROL
- CLEANING THE AIR FILTER
- DECOMMISSIONING DUE TO PROLONGED INACTIVITY
- ENERGY SAVING RECOMMENDATIONS
- NORMAL OPERATING BEHAVIOURS
- SERVICE INFORMATION
- AREA VERIFICATION
- WORK PROCEDURE
- GENERAL WORKSPACE
- REFRIGERANT VERIFICATION
- PRESENCE OF FIRE EXTINGUISHERS
- ABSENCE OF IGNITION SOURCES
- VENTILATION
- VERIFICATION OF REFRIGERATION EQUIPMENT
- VERIFICATION OF ELECTRICAL DEVICES
- REPAIR OF SEALED COMPONENTS
- REPAIR OF INTRINSICALLY SAFE COMPONENTS
- WIRING
- DETECTION OF FLAMMABLE REFRIGERANTS
- LEAK-DETECTION METHODS
- REMOVAL AND EVACUATION
- LOADING PROCEDURE
- COMMISSIONING
- LABELLING
- RECOVERY
- TROUBLESHOOTING
- TECHNICAL SPECIFICATIONS
- RECYCLING OF ELECTRICAL AND ELECTRONIC EQUIPMENT
- TECHNICAL SUPPORT AND WARRANTY
- INFORMATION ON DATA STORED BY CONNECTED PRODUCTS IN ACCORDANCE WITH REGULATION (EU) 2023/2854 ("DATA REGULATION")
- COPYRIGHT
- SIMPLIFIED EU DECLARATION OF CONFORMITY
- EU DECLARATION OF CONFORMITY
- FRANÇAIS
- PIÈCES ET COMPOSANTS
- IMAGE 1
- ITALIANO
- PARTI E COMPONENTI
- FIGURA 1
- CONNETTIVITÀ WI-FI E APP
Brand : CECOTEC
Model : Airclima 9000 Windflow
Category : Air Conditioning