BS 1234 - Vacuum Cleaner CLATRONIC - Free user manual and instructions
Find the device manual for free BS 1234 CLATRONIC in PDF.

User questions about BS 1234 CLATRONIC
0 question about this device. Answer the ones you know or ask your own.
Ask a new question about this device
Download the instructions for your Vacuum Cleaner in PDF format for free! Find your manual BS 1234 - CLATRONIC and take your electronic device back in hand. On this page are published all the documents necessary for the use of your device. BS 1234 by CLATRONIC.
USER MANUAL BS 1234 CLATRONIC
D-47906 Kempen/Germany
General Safety Instructions
- Read the operating instructions carefully before putting the appliance into operation and keep the instructions including the warranty, the receipt and, if possible, the box with the internal packing.
- The appliance is designed exclusively for private use and for the envisaged purpose. This appliance is not fit for commercial use. Do not use it outdoors (except if it is designed to be used outdoors). Keep it away from sources of heat, direct sunlight, humidity (never dip it into any liquid) and sharp edges. Do not use the appliance with wet hands. If the appliance is humid or wet, unplug it immediately. Do not put it in water.
- When cleaning or putting it away, switch off the appliance and always pull out the plug from the socket (pull on the plug, not the cable) if the appliance is not being used and remove the attached accessories.
- Do not operate the machine without supervision. If you should leave the workplace, always switch the machine off or remove the plug from the socket (pull the plug itself, not the lead).
- To protect children from the dangers posed by electrical appliances, make sure that the cable is hanging low and that children do not have access to the appliance.
- Check the appliance and the cable for damage on a regular basis. Do not use the appliance if it is damaged.
- Do not try to repair the appliance on your own. Always contact an authorized technician. To avoid the exposure to danger, always have a faulty cable be replaced only by the manufacturer, by our customer service or by a qualified person and with a cable of the same type.
- Use only original spare parts.
- Pay careful attention to the following "Special Safety Instructions".
Special Safety Instructions
- Do not suck up liquids!
- Do not suck up hot ashes or pointed or sharp objects!
- Do not use the appliance in humid rooms!
- Never use without the filter. Check that the filter is inserted correctly!
- hair, clothing and body parts away from the vacuum nozzle during use!
- Keep the vacuum cleaner away from sources of heat like radiators, ovens, etc.!
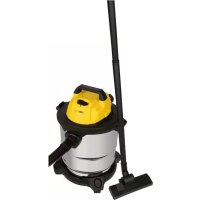
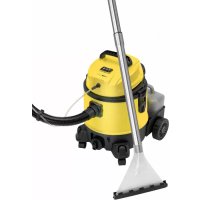
Overview of the Components
1 Cover of outlet filter
2 Hose connection
3 Carrying handle
4 Suction power regulator
5 Handle of dust container
6 Dust container with filter insert
7 Filling level indicator
8 On/off switch
9 Cable-winding key
10 Cable
11 Motor protection filter
Start-up
GB
- Insert the vacuum hose in the opening in the dust bag compartment until it locks in mechanically.
- To release the hose, press the button on the vacuum hose.
- Keep the button pressed and pull out the hose.
- Insert the vacuum tube into the handle if required.
Using the Appliance
- Fit on the accessory.
- Unwind the necessary length of cable and insert the plug in a duly installed 230V / 50Hz protective contact socket.
- Set the vacuum power with the vacuum power regulator.
- Vacuum at a steady speed. There is no need to exert pressure.
- Attention: pay attention to the range that can be covered with the cable length.
Vacuum power regulator
Low vacuum power: For curtains and delicate fabrics
Medium vacuum power: For long-pile velour carpets and textile flooring
High vacuum power: For sturdy rugs and floors
Cable winding device:
Pull out the cable up to the maximum length indicated with the yellow mark. Never pull the cable out up to the red mark as the cable winding can be damaged. Said damages are not covered by the warranty.
Winding:
Press the cable winding button and guide the cable. Hold the cable to avoid wrapping.
Telescope Vacuum Pipe:
- The height-adjustable vacuum pipe enables individual alignment to your height.
- Unlock the coupling by pressing the key in the direction of the arrow.
- Slide the vacuum pipe to the desired length.
- To lock the device, release the key until you hear it lock in place.
Nozzle accessories:
Crevicenozzle /
brush nozzle: To vacuum corners and slits.
Please note that the crevice/brush nozzle is a "2 in 1" attachment.
Upholstery nozzle: For cleaning upholstery, curtains etc.
GB
Floor nozzle:
For cleaning carpets or smooth surfaces.
In order to facilitate control, the floor nozzle is fitted with rollers and can be adjusted to suit the circumstances.
Carpet: make sure that the brushes on the floor nozzle are deactivated when cleaning carpets. If this is not the case, press the lever on the floor nozzle forwards with your foot. In order to vacuum even surfaces, for example, press the lever back with your foot. This activates the brushes (you can tell whether this is the case by checking that the brushes are visible on the floor nozzle).
Damper:
Open the damper on the hose handle to adjust the airflow or to release objects clinging to the nozzle.
Filter:
Your machine has three filter systems:
-
Transparent dust collection container
-
The traditional dust bag system has been replaced by a transparent dust collection container in which coarse dirt particles and tiny particles floating in the air are swirled out of the suction air by the high speed of the air current.
The purchase of dust bags is no longer necessary. -
Motor Protective Filter (in the Dust Container)
The filling level indicator (7) shows when the dust container has to be emptied. You should then proceed as follows, making sure you adhere to the following order of steps:
- Fold the handle (5) upwards and pull the dust container out of the vacuum cleaner together with the filter insert (6) (see illustration 1).
- Remove the contents of the dust container. In order to do this, press the button on the dust container (see illustration 2).
- Every time the vacuum cleaner is emptied the filter screen on the floor of the dust housing should be cleaned (see illustration 3).
- Clean the motor protection filter (11) by tapping and gently brushing out (see illustrations 4).
- Reinsert the components.
Every third time the dust container is emptied, or in the case of severe soiling, clean the filter by allowing water to flow through the filter fabric against the direction in which the vacuum cleaner blows. The dust container should only be reinserted when it is completely dry!
3. Outlet filter
The appliance is also equipped with an outlet filter.
- In order to ensure that the filter works correctly, we recommend that you replace it every six months.
- This filter is to be found on the rear of the vacuum cleaner behind a ventilation grille.
- Open the ventilation grille by pressing the lever on the top of the ventilation grille upwards.
Cleaning and storage
Cleaning:
Pull the plug out of the socket before cleaning!
Clean the casing with a dry cloth.
- Clean the motor protection filter approximately every 3. time the vacuum cleaner is emptied. Clean the filter in hot water without additives. Put it back into place only once it is completely dry.
Storage:
- Wind the cable completely.
- Insert the hook of the nozzle on the bottom of the vacuum cleaner into the parking assistance.
This device has been tested according to all relevant current CE guidelines, such as electromagnetic compatibility and low voltage directives, and has been constructed in accordance with the latest safety regulations.
Subject to technical changes without prior notice!
Guarantee
The device supplied by our Company is covered by a 24 month guarantee starting on the date of purchase (receipt).
During the life of the guarantee any fault of the device or its accessories *) ascribable to material or manufacturing defects will be eliminated free of charge by repairing or, at our discretion, by replacing it. The guarantee services do not entail an extension of the life of the guarantee nor do they give rise to any right to a new guarantee!
GB
Proof of the guarantee is provided by the proof of purchase. Without proof of purchase no free replacement or repair will be carried out.
If you wish to make a claim under the guarantee please return the entire machine in the original packaging to your dealer together with the receipt.
*) Damage to accessories does not mean automatic free replacement of the whole machine. In such cases please contact our hotline. Broken glass or breakage of plastic parts are always subject to a charge.
Defects to consumables or parts subject to wearing (e.g. motor pistons, kneading blades, drive shafts, spare remote control, spare toothbrushes, saw blades, etc.) as well as cleaning, maintenance or the replacement of said parts are not covered by the guarantee and hence are to be paid!
The guarantee lapses in case of unauthorized tampering.
After the expiry of the guarantee
After the expiry of the guarantee repairs can be carried by the competent dealer or repair service against the payment of the ensuing costs.
Regulator sity ssania:
Niski stopien ssania:
PnoIroTobKa K pa6oTe
- BCTaBbTe nbIeCoCHbI IJIaHr B OTBepCTne OTEcKa MeUka-PlIe6OpHnka, npocJeNTe TTObI OH MEXAHueCckn 3aФNKCuPobAICr.
- YTO6bI CHaTb IJIaHr O6paTHO, HAXMnTe Ha KhoNky OKoNo Hero.
3.Деркnte KHONky HaxaToI N NOTAHTE 3a UJNaHr. - Пи Heобхдимоctи BCTaBbTe nbIeOCCHyTOpy6bPyKoTky.
Popraok pa6obtbc 3JeKtpo np6opom
- HacaIte Heo6xOIMMyIO npHaIaIeXHocTb.
- OTMOTaIte Ka6eJIb Ha Heo6xOIMMyo DInHy, BCTaBte CeTeByo BVlnKy Bpo3ETky C HApRJeHnem Cetn 230 V, 50 Hz, OCHaSeHHyO yCTpOiCTBOM TOKOBO 3aAsTbIy U cTaHOBHeHHyO B COOTBeTCTBm C npEtnICaHnMI, 3aTEM KIOuHTe JNeKTPponPi6Op, Haxab Ha bkvIOUeTbe BKJ/BvIKJ.
- Пиnomоши ретултopa установite Heo6xOДIMyO MOUHOCtB.
- Пылесовские рабнорhoeckopoctью. ДавиъНЕТ НЕОХДИМОCTN.
- BHIMAHNE: cIeJIte 3a paIyIcOM 3axBaTa IIIeCoCA, orpaHnUeHHOrO dInHOJ OTMOtAHNO Ka6EJa!
PerjIop MoHocn:
Cna6aMOuHocTb: 13aHaBeCei,TOHKoMaTePN
CpeHnRA MOUHOCTb: IaBEJIIOPOBbIX IN TEKCTINbHbIX NOJOB
CДИINHbIMBOPCOM
Ptoaaytct He BbIgrrBaIte CteBcOy IuHaeJeAanee JxTeoMnEeTKn. HnB KoeM Cnyaeh He BbITrMaBte Ero O KaPCHOn MEtKN, 3To MOKeTn PnIBeCTN K NpOMKe MexaHn3Ma CMatbIbAHn. Ptoo6hBe NOIOMKn He NoIanaIoT PoIraHTNo.
CmatbibaHne:
Haxmnte Ha KhoNkY MexaHn3Ma CmTaBbHaN N NOMalehky NoJaBaTKe Ka6eB. Depxnte Ka6eB kpeko B pykax, YTo6bl npedotBpataTb erO xIeCTaHne.
RUS
Teleckonnuecka BcacbBaioua Tpy6a:
- I3mHeHHe DnHbI BcAcbBaIOe Tpy6bI NsBOJrEt Bam NoD6paTb yO6 Hny dIra Baawero poCTa pa6oYIO BlicOTy.
Pa36loKpyTe CoeINHeHne, HaxaB KHOkBy HAnpaBLeHn CTrpeJIKN.
CdbnHbTe nn pa3DbnHbTe BCaCbBaIOuOne Tpy6bl KaK Bam HyxHO.
-ДяФИКСAUINOTNPyCTNTeKHOJNKy,ДоЧETKO CblIIMMOrO шELHka.
Conna-Hacaikn:
Y3Koe conIIO/ conIIO-üETka: