
AMILO DESKTOP SI 3535 - Desktop computer FUJITSU SIEMENS - Free user manual and instructions
Find the device manual for free AMILO DESKTOP SI 3535 FUJITSU SIEMENS in PDF.
| Product type | Desktop computer |
| Brand | FUJITSU SIEMENS |
| Model | AMILO DESKTOP SI 3535 |
| Dimensions (L x D x H) | 108 mm x 355.5 mm x 293.6 mm |
| Weight | 6.9 kg |
| Power supply | 110 V - 240 V, 50 Hz |
| Processor | Intel low energy consumption |
| Operating system | Microsoft Windows preinstalled |
| Network connectivity | WLAN b/g/Draft n up to 300 Mbit/s, Ethernet RJ-45 |
| Ports | USB 2.0, FireWire, DVI, HDMI, audio (Line In/Out, Mic), S/PDIF |
| Memory card reader | SD, SD HC, MMC, MMC Plus, MMC mobile, Memory Stick, Memory Stick Pro |
| Keyboard and mouse | Wireless, Wireless Keyboard Set LX300 (AAA batteries) |
| Safety standards | CE, LVD 2006/95/CE, EMC 2004/108/CE, EN55022 Class B, RoHS |
| Protection class | I |
| Operating temperature | 15 °C to 35 °C |
| Care and cleaning | Use a soft, dry cloth. Do not use solvents. |
| Spare parts and repairability | Consult the user manual or the Fujitsu Siemens website for spare parts. |
Frequently Asked Questions - AMILO DESKTOP SI 3535 FUJITSU SIEMENS
User questions about AMILO DESKTOP SI 3535 FUJITSU SIEMENS
0 question about this device. Answer the ones you know or ask your own.
Ask a new question about this device
Download the instructions for your Desktop computer in PDF format for free! Find your manual AMILO DESKTOP SI 3535 - FUJITSU SIEMENS and take your electronic device back in hand. On this page are published all the documents necessary for the use of your device. AMILO DESKTOP SI 3535 by FUJITSU SIEMENS.
USER MANUAL AMILO DESKTOP SI 3535 FUJITSU SIEMENS
AMILO Desktop S Series First-time setup
Copyright
© Fujitsu Siemens Computers 2008
SAP:10600985317
FSP:440000378
Published by
Fujitsu Siemens Computers GmbH
All rights reserved, including intellectual property rights.
Technical data subject to modifi cations and delivery subject to availability. Any liability that the data and illustrations are complete, actual or correct is excluded. Designations may be trademarks and/or copyrights of the respective manufacturer, the use of which by third parties for their own purposes may infringe the rights of such owner. For further information see http://www.fujitsu-siemens.com/terms_of_use.html

10600985317
Deutsch
English
Français
Italiano
Nederlandss
We make sure

AMILO Desktop S Series
Deutsch
English
François
Italiano
Nederlandst
Erstinbetriebnahme
Copyright © Fujitsu Siemens Computers GmbH 2008
Wireless Keyboard Set LX300
MemoryStick Pro Duo
- Reduced-Size MultiMedia Card (RS-MMC)
- Mini-SecureDigital Card (Mini SD)

Wireless Keyboard Set LX300
AMILO Desktop S Series
Deutsch
English
François
Italiano
Nederlandst
Starting up for the first time
Microsoft, MS Windows and Windows Vista are registered trademarks of the Microsoft Corporation.
Adobe Reader is a trademark of Adobe Systems Incorporated.
MultiMediaCard is a registered trademark of Infineon Technologies AG
Sony and Memory Stick are registered trademarks of Sony Electronics, Inc.
All other trademarks referenced are trademarks or registered trademarks of their respective owners, whose protected rights are acknowledged.
Copyright © Fujitsu Siemens Computers GmbH2008
All rights reserved, including rights of translation, reproduction by printing, copying or similar methods, either in part or in whole.
Non-compliance is subject to compensation for damages.
All rights reserved, including rights created by patent grant or registration of a utility model or design.
Subject to availability and technical modifications.
Contents
Innovative technology 1
Further information 1
Operating instructions for the "AMILO Desktop" 1
Notational conventions 1
Important information 3
Connections and Controls 4
Connections 4
Displays and controls 6
Getting started 7
Unpacking and checking the equipment supplied 7
Steps for initial startup 7
Setting up the device 8
Connecting external devices 8
Connecting the cables 8
Disconnecting the cables 8
Connecting the monitor 9
LX300 Wireless Keyboard Set 9
Connecting external devices to the USB ports 13
Connecting the machine to the mains 14
Switching on for the first time: installing the software 14
Switch on the monitor and the machine 14
Installing the software 15
Operation 16
Switch the device on 16
Switching off the device 16
Operational display 17
Memory card reader 18
Inserting the memory card 19
Taking out the memory card 19
Opening and closing the casing for service or system expansion 20
Opening the casing 20
Closing the casing 21
Technical data 21
AMILO Desktop S 21
LX300 Wireless Keyboard Set 22
Contents
Innovative technology
... and ergonomic design make your AMILO Desktop a user-friendly and reliable Desktop PC.
Your machine is equipped with a Microsoft Windows operating system. This is already pre-installed and optimally configured for you. The machine is ready to start immediately when you first switch it on.
Your machine is equipped with the latest technology so that you can fully exploit your computer experience.
- power-saving Intel CPU
- quick WLAN to the b/g/Draft standard, at up to 300 Mbit/s
- very quiet processor fan
With the user-friendly "BIOS Setup Utility" you can control the hardware of your machine and better protect your system against unauthorised access, using the powerful password facilities.
These operating instructions show you amongst other things how to start up and operate your machine.
Further information

General information on your machine can be found in the "AMILO Desktop" operating instructions.
Software-related parts of these instructions refer to Microsoft products, where these are included in the scope of supply of your machine.
When installing other software products, refer to the operating instructions issued by the manufacturer.
Operating instructions for the "AMILO Desktop"
The operating instructions for the "AMILO Desktop" can be found in the Windows Start menu under All Programs - Fujitsu Siemens Computers or on the Internet under "www.fujitsu-siemens.com/support".
Notational conventions
| ! | Pay particular attention to text marked with this symbol. Failure to observe this warning will endanger your life, will damage the device or lead to loss of data. The warranty will be invalidated if you cause defects in the device through failure to take notice of this warning |
| i | indicates important information that is required to use the device properly. |
| ▶ | indicates an activity that must be performed in the order shown |
| ← | indicates a result |

| This style | flags data entered using the keyboard in a program dialog or command line, e.g. your password (Name123) or a command to launch a program (start.exe) |
| This style | refers to information displayed by a program on the screen, e.g.: Installation is completed |
| This style | is for • terms and texts in a software user interface, e.g.: Click Save. • names of programs or files, e.g. Windows or setup.exe. |
| "This style" | is for • cross-references to another section, e.g. "Safety information" • cross-references to an external source, e.g. a web address: For more information, go to "www.fujitsu-siemens.com" • indicates names of CDs and DVDs as well as names and titles of other materials, e.g.: "CD/DVD Drivers & Utilities" or "Safety" manual |
| Abc | refers to a key on the keyboard, e.g.: F10 |
| This style | flags concepts and text that are emphasised or highlighted, e.g.: Do not switch off device |
Important information

Comply with the safety information in the "Safety" manual and in the operating instructions "AMILO Desktop".

Connections and Controls
This chapter describes the individual hardware components of your machine. It gives you an overview of the displays and connections of the machine. Familiarise yourself with these elements before you start to use the machine.
Connections
| Description | Figure | Symbol |
| PC power supply | Mains connection | |
| Sound (external sound sources, e.g. active loudspeaker, microphone) · Sound onboard When an additional sound card is installed, there is no sound function on the motherboard, and “Sound onboard” is not available. | 3.5 mm jack sockets | Line In Line Out Mic |
| Digital sound connection, see also motherboard manual. | Cinch connection (Coax) | SPDIF Out |
| Connection for USB devices (e.g. keyboard, mouse IR sender/receiver module, scanner, printer)USB 2.0Important information on USB 2.0: In order to guarantee a reliable data transfer rate, we recommend that you use a USB connection cable no longer than 3 m. | USB socket | or USB |
| Connection for FireWire or IEEE-1394-compatible devices (e.g. video recorder, digital camera)FireWire | FireWire socket | 1394 |
| Network or DSL modem | RJ-45 socket | or LAN |
| Video input and output connection (optional)(see documentation about the VGA/TV card) | 4-pin or multi-pin socket | SVIDEO IN SVIDEO OUT |
| Connection for digital video signal (monitor) | DVI | DVI |
| Digital Audio-Video Interface | HDMI | HDMI |
Displays and controls
| Description | Symbol | Meaning |
| On/off switch | Switch for booting up the system. • On/off switch lights up white: The system is switched on. • On/off switch flashes yellow: The hard disk is being accessed. • On/off switch flashes white: The system is in power-saving mode. |
Getting started

Please observe the safety information in the "Important information", Page 3 chapter.
Unpacking and checking the equipment supplied
Keep the original packaging of the equipment in case you need to return it.
Remove all the equipment from the packaging.
After removal from the packaging, check the equipment for evidence of damage in transport.
Check that that the equipment matches the delivery note.
If you find damage in transport or a mismatch with the delivery note, inform your sales office without delay!
Steps for initial startup
Only a few steps are required to start up your machine for the first time:
- Select the position for your machine and place it there
- Connect the external devices
- Check the rated voltage and connect the machine to the mains
- Switch on the machine
You can find more details on the individual steps in the following sections.
External devices

If you wish to attach other external devices (such as a printer) to your machine, complete the initial installation of your machine before connecting them. The steps for connecting these external devices are described in the following sections.
Drives and modules

If you wish to fit other drives or modules to your machine, complete the initial installation of your machine before fitting them. The steps for fitting drives and modules are described in the "AMILO Desktop" manual in the chapter"System expansion".
Setting up the device

When installing your device, please read the recommendations and safety notes in the "Safety" manual.
Do not place the machine in any position other than the one intended (upright on its feet).
We recommend that you place your device on a surface with good anti-slip qualities. In view of the multitude of different finishes and varnishes used on furniture, it is possible that the rubber feet will mark the surface they stand on.
Do not stack several devices on top of each other.
Do not start the machine in any position other than upright on its feet.
Depending on the location of your machine, it may emit annoying vibration or noises. To avoid this, allow a minimum clearance of 3mm from other equipment or objects at the sides of the casing where there are no ventilation grilles.
Make sure that the device is adequately ventilated. In order to avoid overheating, do not cover the ventilation area of the monitor or the device.
Do not expose the device to extreme ambient conditions (see "AMILO Desktop S", Page 21, "Ambient conditions"). Protect the device against dust, humidity and heat.
Connecting external devices

Read the documentation on the external device before connecting it. With the exception of USB devices, always remove all power plugs before connecting external devices!
Do not connect or disconnect cables during a thunderstorm.
Always take hold of the actual plug. Never unplug a cable by pulling the cable itself.
Connect and disconnect the cables in the order described below.
Connecting the cables
Turn off all power and equipment switches.
Remove all power plugs from the grounded mains outlets.
Connect all the cables to the device and the external devices. Please make sure that you always observe the safety notes provided in "Important information", Page 3.
Plug all data communication cables into the appropriate sockets.
Plug all power cables into the grounded mains outlets.
Disconnecting the cables
Switch off all affected devices.
Remove all power plugs from the grounded mains outlets.
Unplug all data communication cables from the appropriate sockets.
Disconnect all of the cables from the device and from the external devices.
Connecting the monitor
Follow the instructions contained in the monitor manual to prepare the monitor for operation (e.g. connecting cables).
Plug the data cable into the monitor port of the device.

Depending on the expansion stage of your machine and your monitor, you can also connect the data cable to the DVI interface.
Plug the monitor power cable into the grounded mains outlet.
LX300 Wireless Keyboard Set
The LX300 Wireless Keyboard Set with wireless mouse and keyboard is supplied with your machine. Digital radio technology frees you from cumbersome cables.

Comply with the safety information in the safety manual and in the operating instructions for the "AMILO Desktop".
Always use type AAA batteries.
A symbol in the battery compartment shows you which way round to insert the batteries.
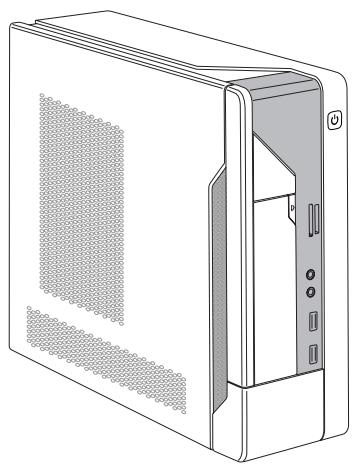
Inserting batteries in the mouse
Insert the batteries (1).
Set the on/off switch on the underside of the mouse to "ON" (2).


To save power, set the on/off switch on the underside of the mouse to "OFF" when you are not going to use the mouse for an extended period.
Inserting batteries in the keyboard

A symbol in the battery compartment shows you which way round to insert the batteries.


Insert the batteries.
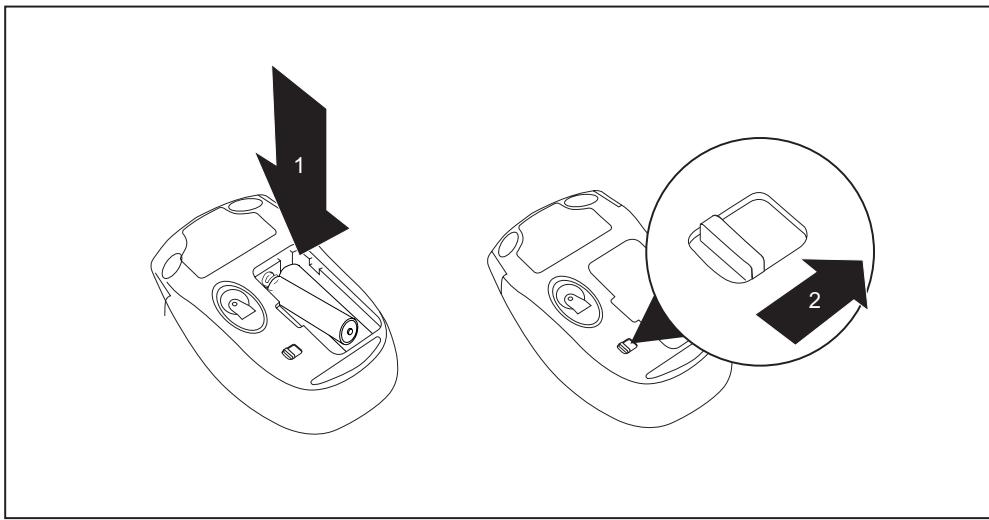
Connect the receiver
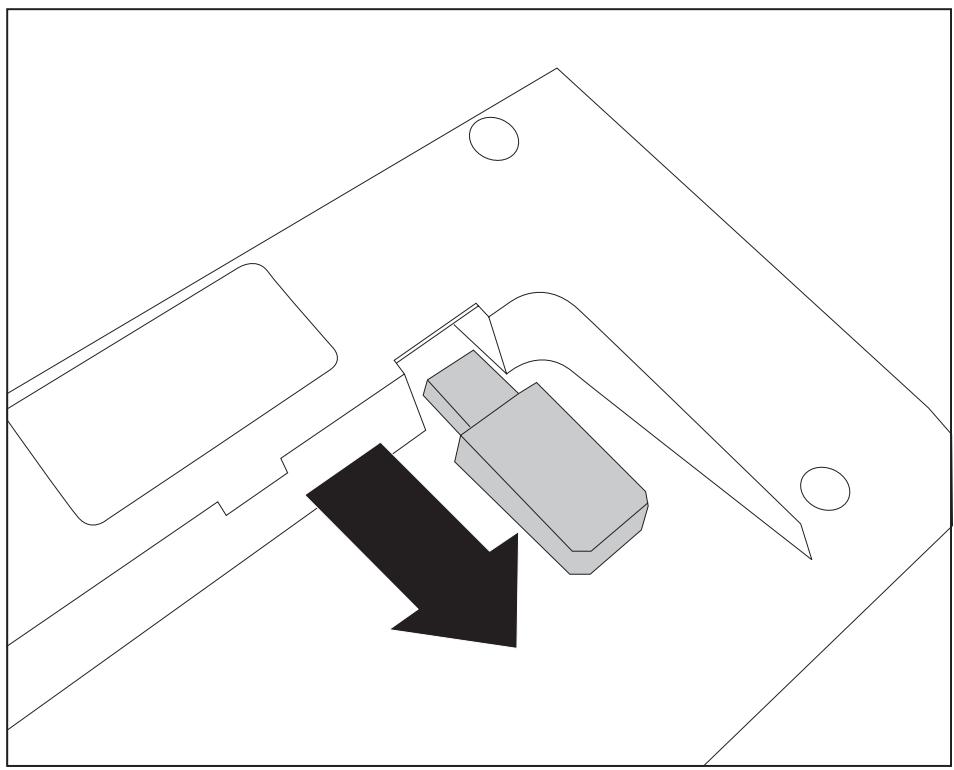
Move the receiver in the direction of the arrow to take it out of the keyboard.
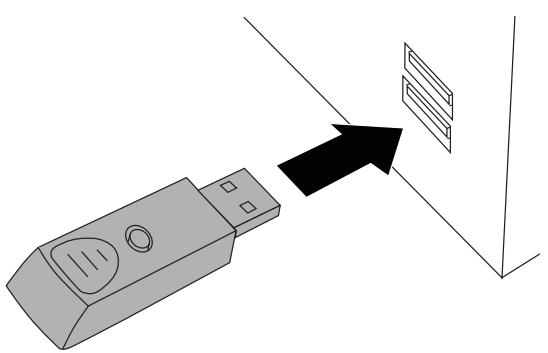
Plug the receiver into a free USB port on your computer.
The radio connection will be established automatically.
Re-establishing the radio connection to the Keyboard Set if required
Normally a radio connection code is generated automatically and the Keyboard Set is then immediately ready for operation. When the connection has successfully been established the LED on the receiver lights up green. The LEDs on the keyboard and mouse light up red if the battery voltage falls below 2.2 V.
If the connection is not established automatically, or if it breaks down, proceed as follows:
Unplug the receiver from your computer and plug it in again.
Place the mouse at a distance no greater than 30~cm from the receiver.
- Keep the left mouse button pressed for five seconds.
The LED on the receiver will flash green 4 times to indicate that the connection to the mouse has been established successfully.
- Keep the Esc key on the keyboard pressed for five seconds. Esc
The LED on the receiver will flash green 4 times to indicate that the connection to the keyboard has been established successfully.
Skip forward and back buttons on the mouse
In addition to the right and left mouse buttons and a mouse wheel, your mouse has two additional buttons (1):
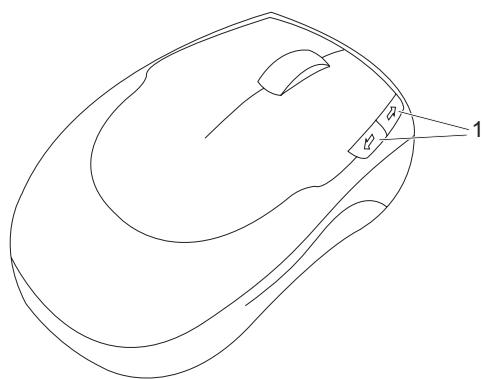
These two buttons allow you to skip easily forward and back within an application, e.g. between Internet pages in a Web browser.
Connecting external devices to the USB ports
You can connect a wide range of external devices to the USB ports (e.g. printer, scanner, modem or keyboard).

USB devices are hot-pluggable. This means you can connect and disconnect USB cables while your device is switched on.
Additional information can be found in the documentation for the USB devices.
Connect the data cable to the external device.
Connect the data cable to one of the USB ports on your device.
Device drivers

The external USB devices you connect to the USB ports usually require no driver of their own, as the required software is already included in the operating system. However, if the external USB device requires its own software, please install it from the data carrier provided with the USB device.
To ensure USB 2.0, the length of the cable used between the front USB port of your device and the external USB device must not exceed 3m .

Connecting the machine to the mains
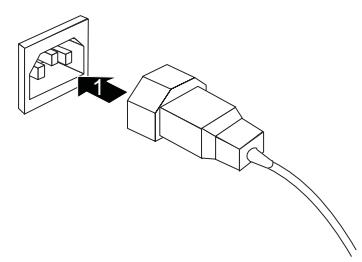
Connect the mains cable to the machine (1).
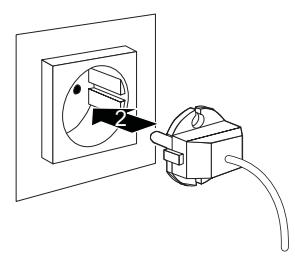
Plug the mains plug into a three-pin socket (2).
Switching on for the first time: installing the software
If the device is integrated into a network, the user and server details as well as the network protocol are required during the software installation.
When you switch on the device for the first time, the supplied software is installed and configured. Plan a reasonable amount of time for this, as this process must not be interrupted.

Once the installation has been started the device must not be switched off, unless the installation has been completed.
During installation, the device may only be rebooted when you are requested to do so! The installation will otherwise not be carried out correctly and the contents of the hard disk must be completely restored.
Switch on the monitor and the machine
Switch on the monitor (see operating instructions for the monitor).
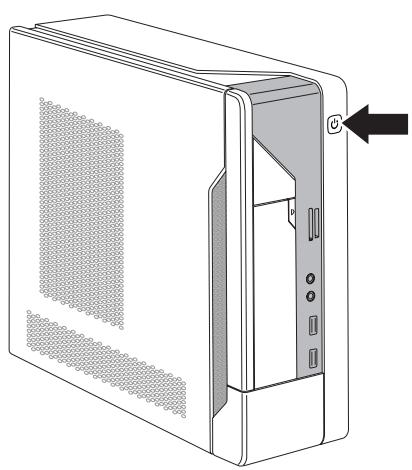
Press the on/off button on the front of the machine.
The operational display will light up and the machine will start.
Installing the software
During installation, follow the on-screen instructions.
If anything is unclear regarding the data you are asked to input, read the online Help in your operating system.

Further information on the system, its drivers, utilities and updates can be found on the DVD "Drivers & Utilities" and on the Internet under "http://www.fujitsu-siemens.com/support".
Operation
Switch the device on
If necessary, switch the monitor on (see the operating manual for the monitor).
Press the ON/OFF switch on the front of the device.
The operational display will light up white and the machine will start.
Switching off the device
Shut down the operating system properly.
If the operating system does not automatically switch the device into power-saving mode or switch it off, press the ON/OFF switch for at least 4 seconds.
The device then consumes a minimum amount of energy.

The ON/OFF switch does not fully disconnect the TV from the mains voltage. To completely disconnect the mains voltage, remove the power plug from the power socket.
If necessary, switch the monitor off (see the operating manual for the monitor).
Operational display
The operational display appears on the front of the casing.
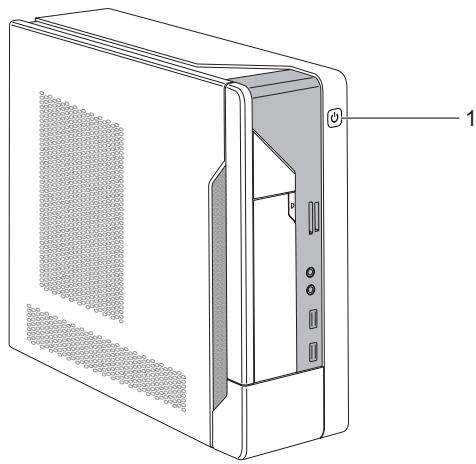
1 = Operational display

Do not disconnect the machine from the mains whilst in power-saving mode, otherwise data may be lost.
- The display lights up white: The machine is switched on.
- The display flashes white: The machine is in power-saving mode. After switching on at the on/off switch the machine switches on or reverts to the status it was in before power-saving mode was initiated.
- The display flashes yellow: The hard disk is being accessed.
- The display remains unlit: The machine is not connected to the mains or is not ready for operation. If the machine is ready for operation, it can be switched on at the on/off switch.
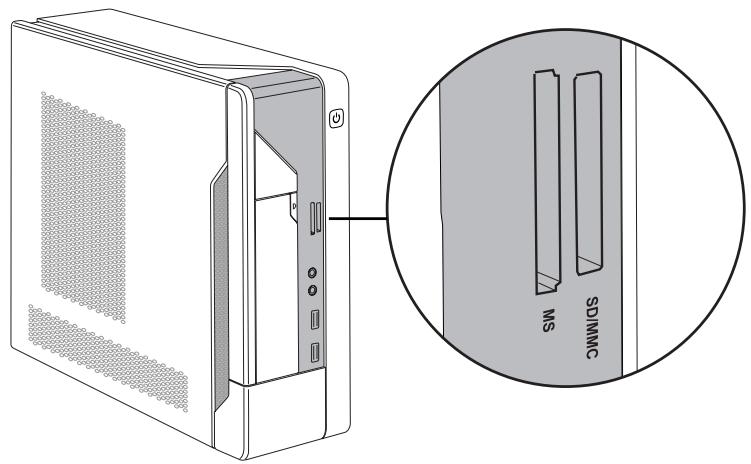
Memory card reader
A memory card reader is incorporated in the front of your machine.
Card types that can be read without an adapter:
- Secure Digital Card (SD Card)
- SecureDigital Card HC (SD HC)
MultiMedia Card (MMC)
MMC Plus
MultiMedia Card mobile (MMC mobile)
Memory Stick (MS)
Memory Stick Pro
Card types that can be read with an adapter:
MemoryStick Pro Duo
- Reduced-Size MultiMedia Card (RS-MMC)
- Mini-SecureDigital Card (Mini SD)

Always wait until the data access is completed before removing a card from the slot.

When handling memory cards, comply with the manufacturer's instructions.
Your dealer can supply you with an adapter for your memory card.
Inserting the memory card
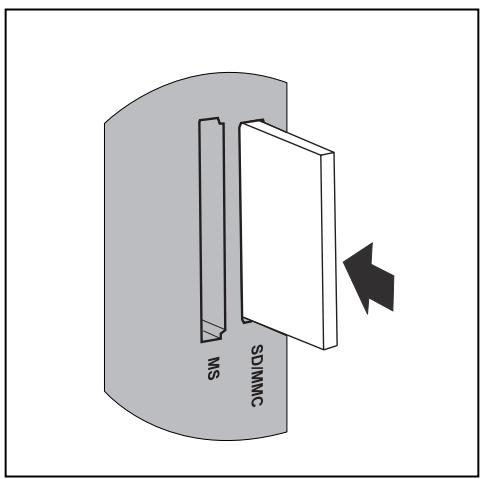
- Carefully insert the memory card into the slot. The memory card contacts must face to the right. Do not force the card in, otherwise the delicate contact surfaces can be damaged.
Taking out the memory card

Always wait until the data access is completed before removing a card from the slot.
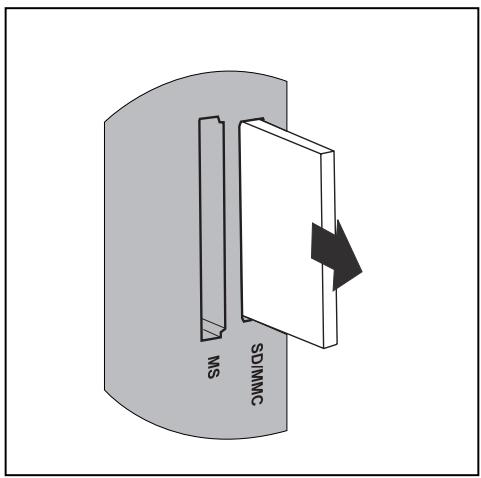
Carefully take the memory card out of the slot.

Opening and closing the casing for service or system expansion
Opening the casing

Note that various of the components on the motherboard can be still very hot if the machine had been in use a short while previously.
These components can be identified by the following symbol.
Switch the machine off. Make sure the machine is off, and not in power-saving mode!

Comply with the safety information in the "Safety" manual and in the operating instructions for the "AMILO Desktop".
Unplug the mains plug from the mains socket.
Don't plug the mains plug back into the mains socket until you have closed the casing up again.
Disconnect any cables that make access difficult.
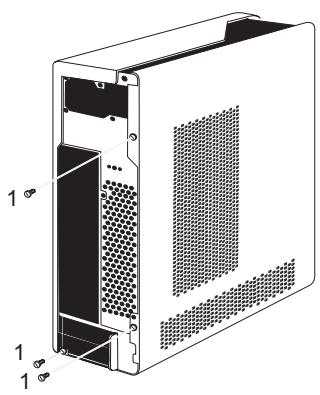
Using a cross-head screwdriver (1), unscrew the casing screws.
Place the machine on its side as shown.
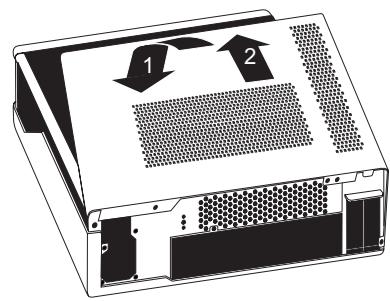
Push the side panel in the direction of the arrow (2).
Swing the side panel in the direction of the arrow (3) and lift it off the casing.
Closing the casing
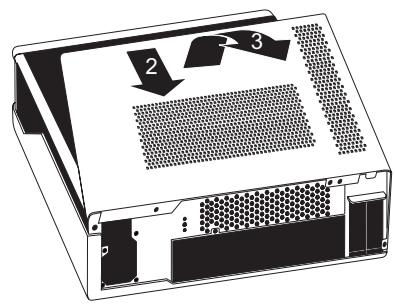
Insert the side panel into the guide rail on the base of the casing.
Swing the side panel in the direction of the arrow (1).
Push the side panel in the direction of the arrow (2) until it clicks home.
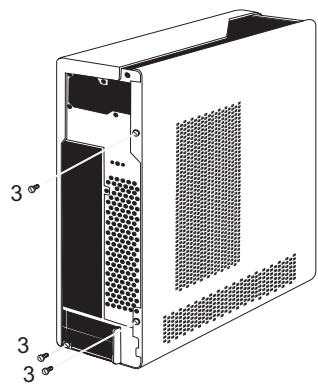
Using a cross-head screwdriver (3), tighten the casing screws.
Reconnect any cables that were disconnected.
Technical data
AMILO Desktop S
| Electrical data | |
| Safety standards complied with: | CE, product safety LVD 2006/95/EC, IEC60950-1, EN60950-1, EMC: 2004/108/EC, EN55022, class B, EN55024, EN61000-3-2/3, RTTE 1999/5/EC, environmental standards: RoHS FSC-03230 |
| Protective rating: | I |
Technical data
| Electrical data | |
| Supply voltage range | 110 V -240 V |
| Rated frequency | 50 Hz |
| Dimensions | |
| Width/depth/height: | 108 mm x 355.5 mm x 293.6 mm |
| Weight | |
| Basic set-up: | 6.9 kg (AMILO Desktop Si 3535) |
| Ambient conditions | |
| Climatic category 3K2 | DIN IEC 721 part 3-3 |
| Climatic category 2K2 | DIN IEC 721 part 3-2 |
| Temperature | |
| Operation (3K2) | 15 °C .... 35 °C |
| Transport (2K2) | -25 °C .... 60 °C |
| Make sure no condensation is present during operation! | |
i
The data sheet for this machine contains further technical data. The data sheet can be found on the Internet under "www.fujitsu-siemens.com".
LX300 Wireless Keyboard Set
| Electrical data - keyboard | |
| Safety standards complied with: | EN 60950 |
| • Power supply • Power consumption: | • 2 x AAA alkali batteries 1.5 V, 2.2 – 3.0 V • Active mode: 8 mA, standby mode: 5 μA |
| Interface: | USB 2.0 and 1.1 compatible |
| Frequency band | 2.4 GHz |
| ID codes | 8,388,608 IDs (24-bit) |
| Number of channels | 64 |
| Electrical data - mouse | |
| Safety standards complied with: | EN 60950 |
| • Power supply • Power consumption (on white paper) • Resolution (scanning sensitivity) | • 2 x AAA alkali batteries 1.5 V, 2.2 – 3.0 V • Active mode: 25 mA, standby mode: <9 mA • 1000 dpi |
| Interface: | USB 2.0 and 1.1 compatible |
| Frequency band | 2.4 GHz |
| ID codes | 8,388,608 IDs (24-bit) |
| Number of channels | 64 |
| Electrical data - mouse | |
| Receiver: | |
| • Power supply | • USB mode: 5 V DC |
| • Power consumption: | • Active mode: 100 mA |
| Ambient conditions | |
| Operating temperature: | 0 °C – 40 °C |
| Range of keyboard / mouse | Up to 10 m (dependent on radio interference in the environment) |
Technical data
AMILO Desktop S Series
Deutsch
English
François
Italiano
Nederlandst
Copyright © Fujitsu Siemens Computers GmbH 2008
Wireless Keyboard Set LX300 9
Wireless Keyboard Set LX300 22
Sommaire
Technologie innovante
Wireless Keyboard Set LX300
MemoryStick Pro Duo
- Reduced-Size MultiMedia Card (RS-MMC)
- Mini-SecureDigital Card (Mini SD)

Wireless Keyboard Set LX300
AMILO Desktop S Series
Deutsch
English
Français
Italiano
Nederlandst
Copyright © Fujitsu Siemens Computers GmbH 2008
MemoryStick Pro Duo
- Reduced-Size MultiMedia Card (RS-MMC)
- Mini-SecureDigital Card (Mini SD)

AMILO Desktop S Series
Deutsch
English
François
Italiano
Nederlandst
Copyright © Fujitsu Siemens Computers GmbH 2008
Wireless Keyboard Set LX300 23
Inhoud
Wireless Keyboard Set LX300
MemoryStick Pro Duo
- Reduced-Size MultiMedia Card (RS-MMC)
- Mini-SecureDigital Card (Mini SD)

Wireless Keyboard Set LX300