
DUOSET P141 - Headphones PLANTRONICS - Free user manual and instructions
Find the device manual for free DUOSET P141 PLANTRONICS in PDF.

User questions about DUOSET P141 PLANTRONICS
0 question about this device. Answer the ones you know or ask your own.
Ask a new question about this device
Download the instructions for your Headphones in PDF format for free! Find your manual DUOSET P141 - PLANTRONICS and take your electronic device back in hand. On this page are published all the documents necessary for the use of your device. DUOSET P141 by PLANTRONICS.
USER MANUAL DUOSET P141 PLANTRONICS
(Both Configurations Shown)
Adjustable Headband (P/N 43298-01)
2 Ear Cushion Assembly (P/N 43299-01)
3 Headset Assembly
Voice Boom
5 Cord
6 Clothing Clip (P/N 43220-01)
7 Pivot Ball Ring (P/N 45650-01)
8 Flexible Earhook (P/N 45651-01)


WELCOME
Thank you for selecting the DuoSet™
Headset from Plantronics. This User
Guide will help you install your
DuoSet™ Headset and learn its basic
operation. The Amplifier is described
in a separate guide which should be
read following familiarisation with
the headset.
If already in place, unsnap the Headband from the rear of the Headset Assembly.
If already in place, remove the Ear Cushion and Rubber Ring from the Headset Assembly.
Press the Pivot Ball Ring onto the Headset Assembly aligning the Pivot Ball Ring with the Voice Boom.
Insert the Ear Hook into either side of the Pivot Ball Ring depending on whether the headset is to be worn over the left or the right ear.
For added stability, press the Headset Cord under the Cord Guides on the Ear Hook.
Expand the Ear Hook around your ear as shown and release.
Rotating the Pivot Ball Ring on the Headset Assembly may provide a better fit.
If already in place, remove the Pivot Ball Ring and Ear Hook.
Press the Ear Cushion and Rubber Ring onto the Headset Assembly. Align the notch in the ring with the Voice Boom.
Snap the ball on the end of the Headband 1 into the socket on the rear of the Headset Assembly.
Place the Headband 1 over the top of your head, with the Ear Cushion 2 resting gently against your ear and the T-Bar positioned above the opposite ear.
If the headband is too tight or too loose, grasp the metal part of headband and gently bend in the middle. The headband length may be adjusted for fit and comfort.
POSITIONING THE BOOM
If you have the Voice Tube version of the product, pull out, push-in, rotate, or swivel the Voice Boom into a position near the corner of your mouth that best transmits your voice.
If you have the Noise-Cancelling version of the product, position the tip of the Voice Boom as near to the corner of your mouth as you comfortably can.
Attach the Clothing Clip at about chest level. The clip keeps the headset properly seated and free of the weight of the Headset Cable. This is particularly important in the Ear Hook configuration.

CONNECTING THE HEADSET
Using the Quick Disconnect™ Module
Use the Quick Disconnect™ (QD) Module to place a call on hold and move away from the phone without removing the headset.
To put your call on hold, grasp the QD Module as shown and pull straight apart.
To resume your conversation, reconnect the two halves.
Polaris™ Headset Variations
Polaris™ Headset Variations, designed for use with phones with a clearly marked headset jack, do not require an Amplifier. Insert the Polaris connector directly into the headset jack. Consult your telephone's instruction manual for more information.
You are now ready to install the Amplifier.


CALLERS CANNOT HEAR ME
For Voice Tube models, determine if the Voice Tube is clogged or positioned improperly.
For Noise-Cancelling models, make sure the microphone is positioned properly at the corner of your mouth.
If you have a separate Amplifier, verify that the Speak Volume is set properly.
If you have a separate Amplifier, verify that the Mute function has not been activated.
I CANNOT HEAR CALLERS
Verify that the Quick Disconnect Module is connected.
Make sure the Headset Assembly is centered on your ear.
If you have a separate Amplifier, verify that it is installed correctly.
If you have a separate Amplifier, verify that the Listen Volume is set properly.
EAR HOOK IS UNSTABLE
Experiment with the insertion of the Ear Hook into the Pivot Ball Ring.
Rotate the Pivot Ball Ring on the Headset Assembly.
If a comfortable fit cannot be achieved using the Ear Hook, consider using the Headband.
For information on supplies and accessories, call your Plantronics distributor or visit our website at www.plantronics.com. See also Diagram Key for additional part numbers.
Cushions (2) (P/N 43937-01)
Replace when torn or soiled.

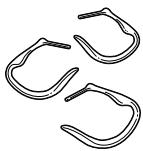
Ear Hooks (3 Sizes) (P/N 43297)
Non-flexible earhooks offer fit variations.
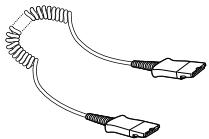
Extension Cord (P/N 40711-01)
Increase mobility in your work area; lets you stay on the line while moving away from the amplifier.
Voice Tube (P/N 29960-01)
Replace if clogged or damaged.

FCC REQUIREMENTS—PART 68
This equipment complies with Part 68 of the FCC rules. On the bottom of the modular adapter is a label that contains, among other information, the FCC registration number and ringer equivalence number (REN) for this equipment. If requested, this information must be provided to the Telephone Company.
The Telephone Company may make changes in its facilities, equipment, operation or procedures that could affect the operation of the equipment. If this happens, the Telephone Company should provide you advance notice in order for you to make the necessary modifications to maintain uninterrupted services.
If you experience problems with your headset, please refer to the warranty section for information on warranty and repair service. If the problem is causing harm to the telephone network, the Telephone Company may request that you remove the equipment until the problem is resolved. In extreme cases, the Telephone Company may be forced to disconnect your service before notifying you of the problem.
INDUSTRY CANADA NOTICE
This Class B digital apparatus complies with Canada ICES003.
Notice: The Industry Canada label identifies certified equipment. This certification means that the equipment meets certain telecommunications network protective, operational and safety requirements. The Department does not guarantee the equipment will operate to the users satisfaction.
Before installing this equipment, users should ensure that it is permissible to be connected to the facilities of the local telecommunications company. The equipment must also be installed using an acceptable method of connection. In some cases, the company's inside wiring associated with a single line individual service may be extended by means of a certified connector assembly (telephone extension cord). The customer should be aware that compliance with the above conditions may not prevent degradation of service in some situations.
Repairs to certified equipment should be made by an authorized Canadian maintenance facility designated by the supplier. Any repairs or alterations made by the user to this equipment, or equipment malfunctions, may give the
telecommunications company cause to request the user to disconnect the equipment.
Users should ensure for their own protection that the electrical ground connections of the power utility, telephone lines and internal metallic water pipe system, if present, are connected together. This precaution may be particularly important in rural areas.
Caution: Users should not attempt to make such connections themselves, but should contact the appropriate electric inspection authority, or electrician, as appropriate.
Notice: The Ringer Equivalence Number (REN) assigned to each terminal device provides and indication of the maximum number of terminals allowed to be connected to a telephone interface. The termination on an interface may consist of any combination of devices subject only to the requirement that the sum of the Ringer Equivalence Numbers of all devices does not exceed 5.
See label on unit for REN No., as applicable.
WARRANTY AND SERVICE
The following warranty and service information applies only to the U.S. and Canada. For information in other countries, please contact your local distributor.
Limited Warranty
Plantronics, Inc. ("Plantronics") warrants to the original consumer purchaser that, except for limitations and exclusions set forth below, this product shall be free from defects in materials and workmanship for a period of two (2) years from the date of original retail purchase ("Warranty Period"). The obligation of Plantronics under this warranty shall be limited to repair or replacement, at Plantronics' option, without charge, of any part or unit that proves to be defective in material or workmanship during the Warranty Period.
Exclusions From Warranty
This Warranty applies only to defects in factory materials and factory workmanship. Any condition caused by accident, abuse, misuse or improper operation, violation of instructions furnished by Plantronics, destruction or alteration, improper electrical voltages or currents, or repair or maintenance attempted by anyone other than Plantronics or an authorized service center, is not a defect covered by this Warranty. In such cases, Plantronics may charge you for materials and labor, even during the warranty period. Parts subject to wear and tear in normal usage are not covered by the Warranty.
Implied Warranties
Under state law, you may be entitled to the benefit of certain implied warranties. THESE IMPLIED WARRANTYES WILL CONTINUE IN FORCE ONLY DURING THE WARRANTY PERIOD. Some states do allow limitations on how long an implied warranty lasts, so the above limitation may not apply to you.
Incidental or Consequential Damages
NEITHER PLANTRONICS NOR YOUR RETAIL DEALER OR SELLING DISTRIBUTORS HAS ANY RESPONSIBILITY FOR ANY INCIDENTAL OR CONSEQUENTIAL DAMAGES INCLUDING WITHOUT LIMITATION, COMMERCIAL LOSS OR PROFIT, OR FOR ANY INCIDENTAL EXPENSES, EXPENSES, LOSS OF TIME, OR INCONVENIENCE. Some states do not allow exclusion or limitation of incidental or consequential damage, so the above limitation or exclusion may not apply to you.
Other Legal Rights
This Warranty gives you specific legal rights and you may also have other rights which vary from state to state.
How to Obtain Warranty Repairs
To obtain in or out of warranty service, please prepay shipment and return the unit to the appropriate facility listed below:
IN THE UNITED STATES
Plantronics Service Centre
345 Encinal Street
Santa Cruz, CA 95060
Tel. 1.800.544.4660
1.831.458.7700
Fax 1.800.279.0162
IN CANADA (ONLY)
Plantronics Service Center
1455 Pitfield Boulevard
Saint-Laurent, Quebec H4S 1G3
Tel. 1.800.540.8363
1.514.956.8363
Fax 1.514.956.1825
Please use the original container, or pack the unit(s) in a sturdy carton with sufficient packing material to prevent damage. Include the following information:
- A proof-of-purchase indicating model number and date of purchase.
- Bill-to address
- Ship-to address
- Number and description of units shipped
- Name and telephone number of person to call, should contact be necessary
- Reason for return and description of the problem
Damage occurring during shipment is deemed the responsibility of the carrier, and claims should be made directly with the carrier.
PLANTRONICS HELP DESK
The Plantronics Help Desk is ready to assist you!
Dial 1.831.458.7700 Monday through Friday 8:00 a.m. to 5:00 p.m. Pacific Standard Time or visit our website at www.plantronics.com.
The name Plantronics and the Plantronics logo are registered trademarks of Plantronics, Inc. DuoSet, Quick Disconnect, Polaris and the clear colour and curvature of the voice tube are trademarks of Plantronics, Inc.
BIENVENUE
The name Plantronics and the Plantronics logo are registered trademarks of Plantronics, Inc. DuoSet, Quick Disconnect, Polaris and the clear colour and curvature of the voice tube are trademarks of Plantronics, Inc.
BIENVENIDOS
T T T T T T T T T T T T T T T T T T T T T T T T T T T T T T T T T T T T T T T T T T T T T T T T T T T T T T T T T T T T T T T T T T T T T T T T T T T T T T T T T T T T T T T T T T T T T T T T T T T T T
Plantronics 8:00'36"5:00"1.831.458.7700'00"5:00"1.831.458.7700'00"5:00"1.831.458.7700'00"5:00"1.831.458.7700'00"5:00"1.831.458.7700'00"5:00"1