
Bolero Aguazero 4360 Dark - Dishwasher CECOTEC - Free user manual and instructions
Find the device manual for free Bolero Aguazero 4360 Dark CECOTEC in PDF.


| Product Type | Built-in Dishwasher |
| Brand | Cecotec |
| Model | Bolero Aguazero 4360 Dark |
| Dimensions (H x W x D) | 85 x 60 x 60 cm |
| Weight | 45 kg |
| Power Supply | 220-240 V ~ 50 Hz, 10 A |
| Energy Class | A+ |
| Number of Place Settings | 14 place settings |
| Wash Programs | Eco, Intensive, Rapid, Glass, Daily Clean |
| Additional Options | Delay Start, Half Load, Extra Dry |
| Control Type | Electronic with LED display |
| Tub Material | Stainless steel |
| Adjustable Baskets | Yes, upper basket height adjustable |
| Salt and Rinse Aid Indicator | Yes |
| Child Safety | Yes, key lock |
| Anti-Leak System | Yes, overflow protection |
| Self-Cleaning Filter | Yes, easy to clean |
| Noise Level | 44 dB |
| Annual Water Consumption | 2800 L |
| Annual Energy Consumption | 290 kWh |
| Spare Parts Available | Yes, on Cecotec website |
| Warranty | 2 years |
Frequently Asked Questions - Bolero Aguazero 4360 Dark CECOTEC
User questions about Bolero Aguazero 4360 Dark CECOTEC
0 question about this device. Answer the ones you know or ask your own.
Ask a new question about this device
Download the instructions for your Dishwasher in PDF format for free! Find your manual Bolero Aguazero 4360 Dark - CECOTEC and take your electronic device back in hand. On this page are published all the documents necessary for the use of your device. Bolero Aguazero 4360 Dark by CECOTEC.
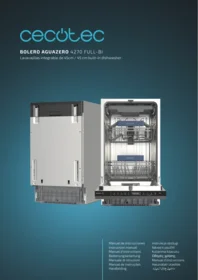
USER MANUAL Bolero Aguazero 4360 Dark CECOTEC
bolero
- Parts and components 23
- Before use 23
- Installation 24
- Operation 27
- Cleaning and maintenance 31
- Troubleshooting 34
- Recycling of electrical and electronic equipment 38
- Copyright 38
- Simplified EU Declaration of Conformity 38
SOMMAIRE
EN • The coding in this manual is generic and applies to all code variants of the appliance.
- Cutlery basket
- Upper basket
- Lower basket
- Upper spray arm
- Dispenser
- Bottom spray arm
- Salt tank
Note:
The graphics in this manual are schematic representations and may not exactly match the product.
2. BEFORE USE
- This appliance comes in a packaging designed to protect it during transport. Remove the appliance from its box. You can keep the original box and other packaging materials in a safe place to prevent damage to the appliance if you need to transport it in the future. If you wish to dispose of the original packaging, make sure all items are recycled properly.
- Check that all parts and components are included and in good condition. If any of them are missing or damaged, please contact Cecotec's Official Technical Support Service immediately.
Box content:
- Dishwasher
- Lower basket
- Upper basket
- Cutlery basket
- Drain hose
- Instruction manual
- Do not remove the product's serial number in order to keep proper traceability if technical assistance is required.
3. INSTALLATION
- The dishwasher can be built under the worktop according to your requirements.
- To do this, remove the dishwasher's top cover by loosening the two screws located at the rear. Remove both rear screws (Fig. 2) and slide the cover backwards to detach it (Fig. 3).
Drain hose connection
- Insert the drain hose into a drain pipe with a minimum diameter of 4 cm, or let it run into the sink, making sure to avoid bending or crushing it.
- The drain pipe height must not exceed 600 mm.
- The free end of the hose must not be immersed in water to prevent backflow.
- Securely fasten the drain hose in either position A or position B. Fig. 4
Fig. 4 key:
- Main cable
- Water inlet
- Drain pipe
How to drain excess water from hoses
- If the drain pipe connection is positioned higher than 600 mm, excess water may remain in the drain hose.
- It will be necessary to empty any excess water from the hose into a suitable bowl or container, positioned externally and at a lower height than the sink.
Water outlet
- Connect the drain hose. The hose must be properly installed to prevent water leakage.
- Make sure the drain hose is not bent or crushed.
Extension hose
- If a drain hose extension is required, use a hose with similar specifications.
- The extension must not exceed 4 metres in length; otherwise, the dishwasher's cleaning efficiency may be reduced.
Siphon connection
- The drainage connection must be at a height less than 600 mm (maximum) from the base of the dishwasher.
Positioning the appliance
- Place the appliance in the desired location. The rear of the appliance should rest against the back wall, with the sides aligned with adjacent cabinets or walls.
- The dishwasher is equipped with inlet and drain hoses that can be positioned on either the right or left side to facilitate proper installation.
Caution:
- Place the dishwasher on a firm, flat floor.
- Do not install the dishwasher on an elevated surface.
Before first use:
A. Adjust the water softener level according to your area's water hardness.
B. Add salt to the salt tank and then fill it with water up to the rim.
C. Fill the rinse aid dispenser.
A. Water softener
Water hardness varies by location. If hard water is used in the dishwasher, limescale deposits will form on the dishes. The dishwasher is designed to adjust salt consumption based on the water hardness level used. This optimises salt consumption. To adjust the salt consumption, follow these steps:
- Switch on the dishwasher.
- Within 60 seconds, press and hold the Start/Pause button for 5 seconds while the dishwasher is in standby mode. This will enter the setting mode and display the default water softener level: "H3".
- Press the Start/Pause button to select the appropriate setting for your local environment; the settings will change in the following sequence: H1→H2→H3→H4→H5→H6. Then switch off the dishwasher to save the settings.
It is recommended to adjust settings according to the following table:
Water softener adjustment table
| Setting | Water hardness | Salt consumption (g/cycle) | ||
| dH | dF | dE | ||
| H1 | 0-5 | 0-9 | 0-6 | 0 |
| H2 | 6-11 | 10-20 | 7-14 | 20 |
| H3 | 12-17 | 21-30 | 15-21 | 30 |
| H4 | 18-22 | 31-40 | 22-28 | 40 |
| H5 | 23-34 | 41-60 | 29-42 | 50 |
| H6 | 35-55 | 61-98 | 43-69 | 60 |
Contact your local water supplier for information about your water supply hardness.
B. Loading salt into the water softener
Fig. 5.
The salt compartment is located beneath the lower basket and should be filled as follows:
Caution: Only use salt specifically designed for dishwasher use. Any other type of salt may damage the salt softener. In case of damage caused by the use of unsuitable salt, Cecotec offers no warranty nor accepts responsibility for any damage caused.
Only fill with salt just before starting one of the complete washing programmes. This will prevent salt grains or salt water that may have spilled from remaining at the bottom of the dishwasher for any length of time, which could cause corrosion.
- Remove the lower basket, then unscrew and remove the salt tank cap.
- Place the funnel into the opening and pour in the salt. It is normal for a small amount of water to flow out of the salt tank.
- For first-time filling, completely fill the compartment with water.
- Carefully screw the cap back on.
- Typically, the salt warning light will switch off after the salt compartment has been filled.
NOTE:
- The salt tank must be refilled when the salt warning light illuminates on the control panel. Even when the tank is filled, the indicator light may remain lit until the salt has fully dissolved.
- Take care not to overfill the salt compartment and ensure any spillage is wiped clean.
C. Detergent usage
- All dishwasher cycles require detergent. Use only detergents specifically designed for dishwashers. Store detergent in a cool, dry place. Do not put powder detergent into the dispenser until you are ready to wash dishes.
- Never use soap, laundry detergent or hand washing-up liquid in your dishwasher.
- Do not ingest dishwasher detergent. Avoid inhaling the vapours.
- Dishwasher detergent contains irritants and caustic chemicals that can cause respiratory problems. If dishwasher detergent has been ingested or vapours inhaled, seek medical attention immediately.
-
Keep dishwasher detergent out of children's reach.
-
Open the detergent compartment by pressing the button.
- Add the recommended amount of detergent to the main compartment. The main compartment features measurement lines for specific amounts of detergent, marked at 15 ml or 25 ml, depending on dish soiling levels. For dishes requiring intensive washing, add 5 ml of detergent to the pre-wash section of the compartment.
- Close the detergent compartment by sliding the lid in the direction of the arrow as shown in figure 6.
NOTE: Follow the manufacturer's recommendations on the detergent packaging.
D. Rinse aid usage
The rinse aid helps ensure better washing results and improved drying performance.
To fill the rinse aid compartment, open the compartment lid. Fill the compartment with rinse aid to the MAX level, then close the lid. Take care not to overfill the rinse aid compartment and be sure to clean up any spillage.
Close the lid to lock the rinse aid compartment. Fig. 7
Rinse aid is automatically added during the final rinse, ensuring thorough rinsing and streak-free drying.
Attention! Use only rinse aid specifically designed for dishwashers. Never fill the rinse aid dispenser with other substances (e.g., dishwasher cleaning agent, liquid detergent). This would damage the appliance.
To change the rinse aid level, follow these steps before switching on the dishwasher:
- Press the power button to switch on the dishwasher.
- Within the next 60 seconds, press and hold the Delay Start button for 5 seconds to enter setting mode. The digital display will show the default rinse aid level as "R3".
- To adjust the rinse aid level, press the Delay Start button. The display will show the level and with each button press, the level will cycle through R1→R2→R3→R4→R5.
- After selecting the appropriate level, press the power button to save the settings.
Sound On/Off
By default, the sound is enabled. To modify this setting, follow these steps:
- Switch on the appliance.
- Press the ECO and Start/Pause buttons simultaneously for 3 seconds; the sound will be disabled, and the interior light will not illuminate when opening the door.
- Press the ECO and Start/Pause buttons simultaneously for 3 seconds again to enable the sound.
Note: This function can only be configured in standby mode. After disconnecting and reconnecting the appliance, the sound will be enabled by default.
4. OPERATION
Fig. 8:
- Power button: Switches the dishwasher on/off.
- Programme button: Select the appropriate washing programme; the programme indicator will illuminate.
A. ECO: Ecological mode, energy and water-saving programme suitable for general cleaning requirements.
B. INTENSIVE: Powerful cleaning mode, suitable for dishes, pots and pans with stubborn stains.
C. RAPID: Suitable for cleaning fresh and slightly sticky food residues at maximum
speed.
D. UNIVERSAL: Daily cleaning mode, suitable for moderately soiled dishes.
E. HYGIENE: Suitable for heavily soiled dishes requiring hygienic washing.
F. GLASS: Suitable for washing delicate glassware.
- Extra function button: Select the appropriate extra wash function; the corresponding indicator will illuminate. While the dishwasher is switched on, the available extra functions will flash; the indicator will remain lit once selected.
G. DELAY START: You can delay the cycle start time between 0 and 24 hours. Press the Delay Start button to adjust the time, then press the Start/Pause button.
Note: To modify the delay start time once the programme has begun, press and hold the power button and restart the dishwasher.
H. HALF LOAD: Reduces water and electricity consumption, allowing you to select three washing states: upper wash, lower wash, and upper and lower wash simultaneously.
I. SUPER DRY: Adds additional drying time to the main washing procedure for enhanced drying results.
J. SAVE+: Saves energy by reducing time and temperature during the drying phase. Recommended for a capacity of 8 place settings or less.
- Start/Pause button: Press this button to start/pause a programme. You can also use this button to cancel a programme and empty the dishwasher; to do this, press and hold for 3 seconds.
K. Auto Clean function: Press and hold the 12 HALF WASH and SUPER DRY touch icons simultaneously for 3 seconds to start the self-cleaning programme; the display will show a 90-minute countdown.
L. ChildLock function: Press and hold the Delay Start and 12 HALF LOAD touch icons simultaneously for 3 seconds; the child lock indicator illuminates, and the child lock state is activated. All touch icons become locked. Repeat the above steps to exit the child lock state.
Warning indicator light
M. Rinse aid: If the indicator light is lit, it means the dishwasher is low on rinse aid and requires refilling.
N. Salt: If the indicator light is lit, it means the dishwasher is low on salt and requires refilling.
0. Water inlet: If the indicator light is lit, it means that the water inlet is closed or blocked.
Loading the dishwasher baskets
For best dishwasher performance, follow these loading guidelines.
Attention! Tableware not suitable for dishwashing:
- Temperature-sensitive plastic items, copper and tin-coated items, aluminium and silver cutlery.
- Delicate glassware, hand-painted decorative porcelain; items with crystal elements, etc.
- Items with absorbent properties (sponges, household cloths).
- Scrape off large amounts of food debris. It is not necessary to rinse dishes under running water. For dishes or utensils with baked-on, burnt-on or stubborn food particles that are difficult to remove, soaking before washing is recommended. Place the tableware as follows:
- Items such as cups, glasses, pots/pans, etc. should be placed upside down.
- Curved items or those with recesses should be positioned at an angle to allow water to drain properly.
- All items must be stacked securely and cannot tip over.
- They must not prevent the spray arms from rotating during washing.
- Place cutlery, chopsticks, and small items in the cutlery basket. Very small items should not be washed in the dishwasher as they could easily fall from the baskets.
Removing dishes
To prevent water from dripping from the upper basket to the lower basket, we recommend emptying the lower basket first, then the upper basket.
Loading the upper basket
The upper basket is designed to hold more delicate and lighter tableware such as glasses, coffee and teacups and saucers, as well as plates, small bowls and shallow pans (as long as they are not too soiled). Position dishes and cookware so they do not move under the water spray. Always place glasses, cups and bowls upside down.
Figure 9:
- Dessert bowl
- Saucer
- Cup
- Large cup
- Glass
- Glass bowl
- Serving spoon
- Table knife
- Serving fork
- Teaspoon
- Sauce ladle
- Soup spoon
- Dessert spoon
- Fork
Adjusting the upper basket
Fig. 10
If needed, the height of the upper basket can be adjusted to create more space for large utensils in either the upper or lower basket. The upper basket height can be adjusted by fitting wheels of different heights onto the rails. Long items, serving cutlery, salad servers or knives should be placed so as not to obstruct the rotation of the spray arms. The rack can be folded down or removed when not required.
CAUTION: We recommend adjusting the upper basket height before loading dishes into the basket. Adjusting the basket after loading dishes could damage them.
Loading the lower basket
We recommend placing larger items which are more difficult to clean in the lower basket: pots, pans, lids, serving dishes and bowls, as shown in figure 10.
It is preferable to place serving dishes and lids at the sides of the baskets to avoid blocking the rotation of the upper spray arm. Pots, serving bowls, etc., must always be placed upside down. Deep pots should be tilted to allow water flow.
The lower basket features fold-down tine rows to accommodate more large pots and pans.
Figure 11:
- Small pot
- Dessert bowl
- Melamine bowl
- Melamine dessert plate
- Dessert plate
- Dinner plate
- Oval platter
- Soup plate
- Oven pot
Upper cutlery basket
The upper cutlery basket is designed for washing utensils such as forks, spoons, etc., by placing them between the basket bars.
Dishwasher startup instructions
- Pull out the lower and upper baskets, load the plates and push them back in. It is recommended to load the lower basket first, then the upper one.
- Add detergent.
- Insert the plug into the mains socket.
- Ensure the water supply is completely turned on. Close the door, press the on/off button and then the programme button to select the desired wash program. Apply slight force to ensure the door is properly closed.
NOTE: A click can be heard when the door closes correctly.
Changing the programme
A cycle in progress can only be modified if it has been running for a short time. Otherwise, the detergent may have already been released and the appliance may have already drained the washing water. If so, the detergent dispenser must be refilled.
- During the washing process, press the on/off button to turn the dishwasher off.
- Press the on/off button again to turn the dishwasher on, then select the programme to the desired cycle.
NOTE: If you open the door during washing, the machine will pause, and the status light will flash. When closing the door, the dishwasher will continue to run after 10 seconds.
The lights show the dishwasher status:
a) One of the programme lights on: cycle in progress.
b) One of the programme lights flashing: pause.
NOTE: If all the lights start flashing, it indicates that the dishwasher is faulty. Please turn off the main power and water supply before contacting Cecotec's Official Technical Support Service.
Adding a dish during washing
A forgotten dish can be added any time before the detergent dispenser opens.
- Press the Start/Pause button to stop the washing cycle.
- After the spray arms stop working, you can open the door completely.
- Add the forgotten dishes.
- Close the door and the dishwasher will start running after ten seconds.
At the end of the washing programme
When the programme ends, the display will show "00" and emit three short beeps, after that the digital display will show "END". If there are no further operations, it will automatically shut down after 3 minutes.
Open the door carefully. Hot steam may escape when opening the door!
Hot dishes are sensitive to knocks. Dishes should therefore be allowed to cool for about 15 minutes before being removed from the appliance.
Open the dishwasher door, leave it ajar and wait a few minutes before removing the dishes. This way, they will be cooler and drying will improve.
5. CLEANING AND MAINTENANCE
Before carrying out any cleaning or maintenance operation, disconnect the appliance from the mains supply and turn off the water supply.
Filtration system
The filtration system consists of a coarse filter, flat filter and microfilter.
Fig. 12
- Flat filter (1)
- Function: Retains fine food debris at the base of the tank.
- Location: Flat plate located around the base of the filter assembly.
- Coarse filter (3)
- Function: Retains large debris (e.g., bone or glass fragments) that could clog the drain.
- Point extraction of objects: To remove a trapped object, gently press the top tabs of the filter and pull it upward.
- Microfilter (2)
- Function: Retains the smallest particles in the sump and prevents them from being redeposited on the dishes during the cycle.
Inspection and Cleaning
- Check filters for clogging after each use.
- By unscrewing the coarse filter, you can remove the entire filter assembly. Remove food debris and clean the filters under running water.
Recommended cleaning procedure
- Turn off the appliance and turn off the water. Remove the lower basket.
- Turn the coarse filter counterclockwise and remove the filter system.
- Separate the microfilter, coarse filter and flat filter.
- Rinse each piece under running water Do not use metallic scouring pads or abrasive cleaning products.
- Check for damage or breaks in the mesh and seals
- Reassemble the filter system, fit the flat filter first and screw the coarse filter clockwise until it is firmly seated. Make sure that there is no play.
- Place the lower basket and, if desired, run a Prewash cycle to check the water flow.
The filter prevents food residue from the dishes from falling into the washing system. However, debris can sometimes accumulate and reduce performance. It is recommended to check the flat filter at the end of each programme and clean it if necessary. In addition, disassemble and clean the filter assembly at least once a week.
Steps to clean filters
Fig. 13
- Remove the coarse filter from the microfilter by pulling upwards.
- Turn the microfilter counterclockwise to unlock it.
- Remove the microfilter together with the flat filter from the bowl housing.
- Wash the filters under running water. Use a soft brush if necessary.
Placement procedure
- Rinse and dry. Reassemble all parts in reverse order:
- Place the flat filter on its seat.
- Insert the microfilter and turn it clockwise until it locks.
- Insert the coarse filter into the microfilter and press/rotate it until it clicks into place.
- Verify that the assembly is seated loosely before using the dishwasher.
Notes:
- Do not operate the dishwasher without the filters in place.
- Incorrect filter assembly can reduce washing performance and damage the appliance.
- When cleaning the filters, do not hit them
Cleaning the spray arms
Fig. 14
It is necessary to clean the spray arms regularly, as hard water minerals can clog the jets and bearings.
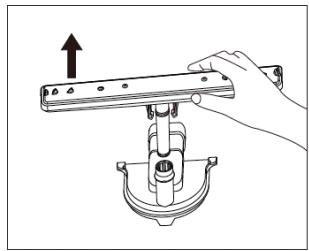
- Pull the lower spray arm upwards to remove it.
- To remove the upper spray arm, first rotate and remove the upper arm clip.
- Clean and rinse the spray arms thoroughly before reattaching them. Be sure to tighten the upper arm clamp correctly when reassembling the upper arm.
Dishwasher care
- To clean the control panel, use a clean, slightly damp cloth and then dry it thoroughly.
- To clean the exterior, use a specific wax/polish for household appliances.
- Do not use sharp objects, scouring pads or harsh cleaners on any part of the dishwasher.
Cleaning the door
- To clean the edge around the door, use only a soft, warm, damp cloth.
- To prevent water from entering the lock and electrical components, do not use spray cleaners of any kind.
- Do not use abrasive cleaners or scouring pads on external surfaces; they may scratch them. Some kitchen papers may also scratch or leave marks on the surface.
Frost protection
If the dishwasher is left in an unheated location during winter, ask a service technician to:
- Switch off the power supply to the dishwasher.
- Turn off the water supply and disconnect the inlet hose from the water valve.
- Drain water from the inlet hose and valve (use a container to catch it).
- Reconnect the inlet hose to the water valve.
- Remove the filter from the tank/bottom and, using a sponge, soak up the water in the sump.
After every wash
Turn off the appliance's water supply and leave the door slightly ajar so moisture and odours are not trapped inside.
When going on holiday
It is recommended to run a washing cycle with the dishwasher empty, then unplug it, turn off the water supply, and leave the door slightly ajar. This helps the gaskets last longer and avoids bad odours.
Moving the appliance
If the dishwasher must be moved, try to keep it in an upright position. Only if absolutely necessary, position it on its back.
Gaskets
Unpleasant odours may be caused by food debris trapped in the seals of the dishwasher. Clean them periodically with a damp sponge to avoid them.
6. TROUBLESHOOTING
Before contacting service Reviewing the tables on the following pages may save you from having to call for service.
| Problem | Possible cause | Possible solution |
| The dishwasher does not work | Fuse blown or circuit breaker tripped. | Replace the fuse or reset the circuit breaker. Disconnect other appliances sharing the same circuit as the dishwasher. |
| No electrical supply. | Ensure the dishwasher is switched on and the door is properly closed. Check that the power cord is correctly plugged into the mains socket. | |
| Low water pressure or power failure. | Check that the water supply is properly connected and that the stopcock is open. If there is a water outage, turn off the dishwasher until the water supply is restored. | |
| The drain pump does not stop | Overflow | The system is designed to detect an overflow |
| Noise | Some audible noises are normal. | It is normal to hear the dispenser opening sound during the cycle. |
| Utensils are not properly secured in the baskets, or a small item has fallen into the basket. | Properly secure all utensils and remove any loose objects inside the dishwasher. | |
| Motor humming. | The dishwasher has not been used regularly. If not used often, perform a fill and drain cycle once a week to help keep the gaskets moist. | |
| Foam in the tank | Unsuitable detergent. | Use only specific dishwasher detergent to prevent foam formation. If it occurs, open the door and allow the foam to dissipate. Add 1 approx. 3.8 litres of cold water to the tank. Close and lock the door and run the “prewash” cycle to evacuate the water. Repeat if necessary. |
| Rinse aid spill. | Wipe up any rinse aid spillage immediately. | |
| Stains on the inside of the tank | A detergent with dyes has been used. | Ensure you use colour-free detergent. |
| Dirty crockery and cutlery | Inadequate program | Select a more intense programme. Make sure that the action of the Dispenser and spray arms is not blocked by large pieces of dishware. |
| Stains and veils on glasses and cutlery | Extremely hard water. Low inlet water temperature. Dishwasher overloading. Improper loading. Old or damp powder detergent. Rinse aid dispenser empty. Incorrect detergent dosage. | Remove all metal utensils from the dishwasher. Do not add detergent. Select the longest cycle. Start the programme and let it run for about 18-22 minutes, until it is in the main wash phase. Open the door carefully and pour 2 cups (approx. 480 ml) of white vinegar into the bottom of the dishwasher. Close the door and let the dishwasher finish the cycle. If vinegar does not work: repeat the above procedure but use 1/4 cup (60ml) of citric acid crystals instead of vinegar. |
| Cloudiness on glassware | Soft water combined with excess detergent. | Use less detergent if you have soft water and select a shorter cycle to wash and clean glassware. |
| Yellow or brown film on interior surfaces | Tea or coffee stains. | Prepare a solution with 1/2 cup (120 ml) of bleach and 3 cups (720 ml) of warm water and remove stains by hand. Warning: Wait 20 minutes after a cycle finishes to allow the heating elements to cool before cleaning the interior; otherwise, you may get burned. |
| Iron deposits in the water causing a generalized film. | Contact a decalcification company to install a specific filter. | |
| White film on the interior surface | Hard water minerals. | To clean the interior, use a damp sponge with specific dishwasher detergent and wear rubber gloves. Do not use cleaners other than dishwasher detergent because of the risk of foaming. |
| Dispenser lid does not close properly | Detergent residue blocking the latch. | Clean detergent residues from the latch. |
| Detergent residue in the dispenser compartments | The dishes block the dispenser compartments. | Reposition the load correctly to avoid blocking the dispenser opening. |
| Steam | Normal phenomenon. | It is normal for some steam to escape through the vent next to the door closure during drying and draining. |
| Black or grey marks on tableware | Aluminium items have brushed against the tableware. | Use a mildly abrasive cleaner to remove these marks. |
| Water accumulated in the bottom of the tank | Water cut-off during water intake. | A small amount of clean water around the outlet on the tub bottom keeps the water seal lubricated. However, if you see a lot of residual water, it could be due to a water cut-off during the filling process. In this case, restart the dishwasher and the wash programme once the water supply is restored. |
| Dishwasher leaks | Excessive rinse aid or rinse aid spills. | Take care not to overfill the rinse aid dispenser. Spilled rinse aid could cause excessive foam and lead to overflowing. Wipe any spills with a damp cloth. |
| Dishwasher is not level. | Ensure the dishwasher is level. |
NOTE: Olive pits or similar objects can pass through the filter system and reach the drain pump area. In this case, the drain pump becomes blocked and needs cleaning. Remove the pump cover by pushing outwards, then you can clean the pump impeller yourself. After that, put the cover back in position. Fig. 15
Improper machine maintenance may endanger users' safety. Any repairs must be carried out by professionals.
Error codes
After starting the wash cycle, if there is a malfunction, the dishwasher will display an error code. The following table shows possible error codes and the faults they represent; the error indicator will flash, and the appliance will beep.
Error codes:
| Error code | Problem |
| E1 | Overflow/leakage |
| E2 | Water inlet malfunction |
| E4 | Water distribution valve malfunction |
| E5 | Fan malfunction |
| E6 | Abnormal heating |
| E7 | Thermistor open/short circuit |
| EA | Abnormal communication |
Caution:
For E2, first check the troubleshooting table before contacting Cecotec's Official Technical Support Service.
For E1, turn off the main water supply before contacting Cecotec's Official Technical Support Service.
For E4, E5, E6, E7, EA, please contact Cecotec's Official Technical Support Service.
7. RECYCLING OF ELECTRICAL AND ELECTRONIC EQUIPMENT

This symbol indicates that, according to the applicable regulations, the product and/or batteries must be disposed of separately from household waste. When this product reaches the end of its service life, you must remove the batteries/accumulators and take it to a collection point designated by local authorities.
For detailed information on how to properly dispose of electrical and electronic equipment and/or the corresponding batteries, consumers should
contact their local authorities.
Information regarding national packaging recycling systems and their marking can be found on our website.
Compliance with the above guidelines will help protecting the environment.
8. COPYRIGHT
The intellectual property rights over the texts in this manual belong to CECOTEC INNOVACIONES, S.L. All rights reserved. The content of this publication may not, either in part or in its entirety, be reproduced, stored in a retrieval system, transmitted or distributed by any means (electronic, mechanical, photocopying, recording or similar) without prior authorisation from CECOTEC INNOVACIONES, S.L.
9. SIMPLIFIED EU DECLARATION OF CONFORMITY

Cecotec Innovaciones hereby declares that this appliance complies with the essential requirements and other relevant provisions of the regulations applicable in the European Union. This appliance has been designed, manufactured and tested in compliance with required safety and quality standards. The full text of the EU Declaration of Conformity can be found on
the following website: https://cecotec.es/es/information/declaration-of-conformity
1. PIÈCES ET COMPOSANTS
Image 1:
https://cecotec.es/es/information/declaration-of-conformity
1. PEÇAS E COMPONENTES
Figura 1:
endereço web: https://cecotec.es/es/information/declaration-of-conformity
1. ONDERDELEN EN COMPONENTEN
Figuur 1:
6. PROBLEEMOPLOSSING
declaration-of-conformity
1. PARÇALAR VE BILEŞENLER
Şekil 1:
Fig./Img./Abb./Afb./ Rys./Obr. 1
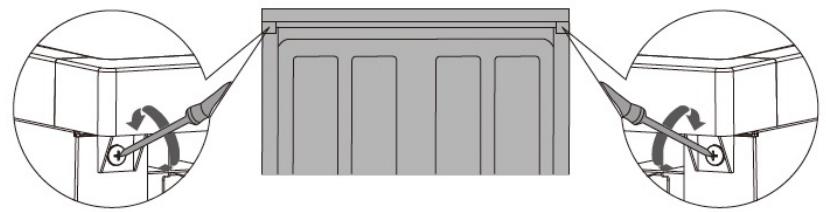
Fig./Img./Abb./Afb./Rys./Obr. 2
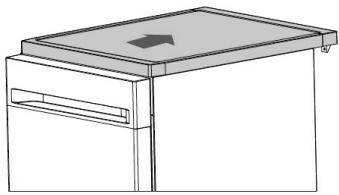
Fig./Img./Abb./Afb./Rys./Obr. 3

Fig./Img./Abb./Afb./Rys./Obr. 4

1

2

3

4

5
Fig./Img./Abb./Afb./Rys./Obr. 5

Fig./Img./Abb./Afb./Rys./Obr. 6

Fig./Img./Abb./Afb./Rys./Obr. 7


Fig./Img./Abb./Afb./ Rys./Obr. 8

Fig./Img./Abb./Afb./ Rys./Obr. 9

Fig./Img./Abb./Afb./Rys./Obr. 10

Fig./Img./Abb./Afb./Rys./Obr. 11

Fig./Img./Abb./Afb./ Rys./Obr. 12
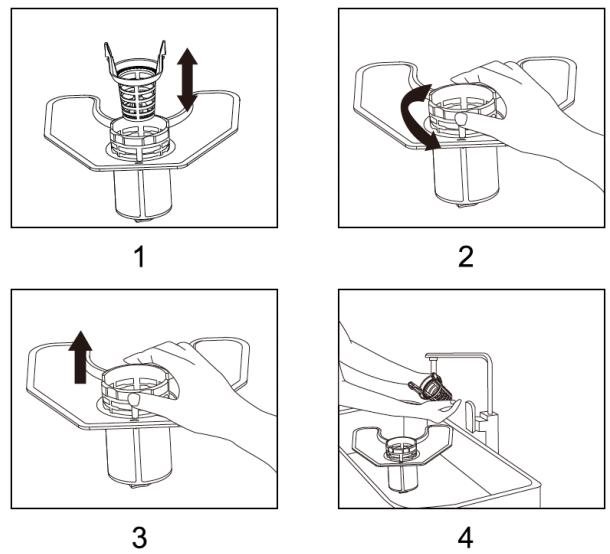
Fig./Img./Abb./Afb./Rys./Obr. 13
1
2

3

Fig./Img./Abb./Afb./ Rys./Obr. 14

Fig./Img./Abb./Afb./ Rys./Obr. 15
www.cecotec.es
- SOMMAIRE
- BEFORE USE
- Box content:
- INSTALLATION
- Drain hose connection
- How to drain excess water from hoses
- Water outlet
- Extension hose
- Siphon connection
- Positioning the appliance
- Water softener
- Loading salt into the water softener
- Detergent usage
- Rinse aid usage
- Sound On/Off
- OPERATION
- Loading the dishwasher baskets
- Removing dishes
- Loading the upper basket
- Figure 9:
- Adjusting the upper basket
- Loading the lower basket
- Upper cutlery basket
- Dishwasher startup instructions
- Changing the programme
- Adding a dish during washing
- At the end of the washing programme
- CLEANING AND MAINTENANCE
- Filtration system
- Inspection and Cleaning
- Cleaning the spray arms
- Dishwasher care
- Cleaning the door
- Frost protection
- After every wash
- When going on holiday
- Moving the appliance
- Gaskets
- TROUBLESHOOTING
- Error codes
- Caution:
- RECYCLING OF ELECTRICAL AND ELECTRONIC EQUIPMENT
- COPYRIGHT
- SIMPLIFIED EU DECLARATION OF CONFORMITY
- PIÈCES ET COMPOSANTS
- PEÇAS E COMPONENTES
- Figura 1:
- ONDERDELEN EN COMPONENTEN
- Figuur 1:
- PROBLEEMOPLOSSING
- PARÇALAR VE BILEŞENLER
Brand : CECOTEC
Model : Bolero Aguazero 4360 Dark
Category : Dishwasher