
ST-224 - Electronic musical instrument ZOOM - Free user manual and instructions
Find the device manual for free ST-224 ZOOM in PDF.
| Product type | Sampler/effects processor |
| Brand | ZOOM |
| Model | ST-224 |
| Dimensions | 15 x 10 x 3 cm |
| Weight | 300 g |
| Power supply | 4 AA batteries or 9V AC adapter (not included) |
| Main functions | Sampling, sound effects, loops, sequencer |
| Sampling memory | Up to 16 seconds (mono) |
| Number of effects | 29 built-in effect types |
| Connectivity | 6.35 mm jack input/output, MIDI In/Out |
| Display | Backlit LCD screen |
| Maintenance and cleaning | Wipe with a soft, dry cloth. Do not use solvents. |
| Safety | Avoid shocks, humidity, and extreme temperatures. |
| Spare parts and repairability | AC adapter available as an option. Repairs by an authorized technician. |
| General information | Versatile electronic musical instrument for studios and stages. |
Frequently Asked Questions - ST-224 ZOOM
User questions about ST-224 ZOOM
0 question about this device. Answer the ones you know or ask your own.
Ask a new question about this device
Download the instructions for your Electronic musical instrument in PDF format for free! Find your manual ST-224 - ZOOM and take your electronic device back in hand. On this page are published all the documents necessary for the use of your device. ST-224 by ZOOM.
USER MANUAL ST-224 ZOOM
m = 311
m = 311
一
C
J
[\frac{25}{1} - {10}]
MPIF
1
m = 311
12
D
(
D
5
U
二
一
42
so
m = 311
C
.
=
一
m = 311
m = 311 ;
m = 311
图1
m = 311
A
D.
m = 311
m = 311 ;
(
12/12
m = 311
C
WG
m = 311
/
m = 311
m = 311
)
m = 311 ;
(
,
m = 311
m = 311
m = 311
1 + u7 = 70%
m = 311
1
1
1
V
.
/
,
-
/
/
m = 311 ;
4
A
12
A
1
A
1
13/14
V
12 =
m = 311
m = 311
-
m = 311
m = 311
OM
-
m = 311
m = 311
1 + u7 = 70%
6
34
1 + u7 = 70%
7
m = 311
m = 311
/
/
1
一
%
IR
m = 311
E
D
a_n + 1 = 12^n
4
(
)
一
%
1 + u7 = 7019
m = 311
10/12
m = 311
1 + u7 = 70%
m = 311 ;
e
(1)
)
,
1 + u7 = 70%
1
1
1
A
A
1
12 =
m = 311
-
1
6
34
7
m = 311
/
/
%
ME
VR
TE
7
(
D
5
<
m = 311
=
m = 311
A
D.
m = 311
m = 311
/
C
(
m = 311
m = 311
)
,
m = 311
m = 311
1
1
A
A
1
B
7
m = 311
/
/
U
TE
一
7
:
(
D
5
<
1 + u7 = 70%
m = 311
图1
A
D2H
m = 311
13/14
/
C
(
m = 311
m = 311
)
,
m = 311
m = 311
1
/
,
一
m = 311 ;
A
A
1
12 =
m = 311
一
(2)
6
7
/
/
ME
U
TE
?
7
(
D
5
1 + u7 = 70%
<
m = 311
m = 311
1
SAFETY PRECAUTIONS
In this manual, symbols are used to highlight warnings and cautions for you to read so that accidents can be prevented. The meanings of these symbols are as follows:

Warning
This symbol indicates explanations about extremely dangerous matters. If users ignore this symbol and handle the device the wrong way, serious injury or death could result.

Caution
This symbol indicates explanations about dangerous matters. If users ignore this symbol and handle the device the wrong way, bodily injury and damage to the equipment could result.
Please observe the following safety tips and precautions to ensure hazard-free use of the SampleTrak ST-224.

Warning
- Power requirements
The SampleTrak ST-224 is powered by the supplied AC adapter. To prevent malfunction and safety hazards, do not use any other kind of AC adapter.
When using the SampleTrak ST-224 in an area with a different line voltage, please consult your local ZOOM distributor about acquiring a proper AC adapter.

Caution
- Environment
Avoid using your SampleTrak ST-224 in environments where it will be exposed to:
Extreme temperature
High humidity or moisture
- Excessive dust or sand
- Excessive vibration or shock

Caution
- Handling
The SampleTrak ST-224 is a precision instrument. Do not exert undue pressure on the keys and other controls. Also take care not to drop the unit, and do not subject it to shock or excessive pressure.

Caution
- Alterations
Never open the case of the SampleTrak ST-224 or attempt to modify the product in any way since this can result in damage to the unit.

Caution
- Connecting cables and input and output jacks
You should always turn off the power to the SampleTrak ST-224 and all other equipment before connecting or disconnecting any cables. Also make sure to disconnect all cables and the AC adapter before moving the SampleTrak ST-224.
- Electrical interference
For safety considerations, the SampleTrak ST-224 has been designed to provide maximum protection against the emission of electromagnetic radiation from inside the device, and protection from external interference. However, equipment that is very susceptible to interference or that emits powerful electromagnetic waves should not be placed near the SampleTrak ST-224, as the possibility of interference cannot be ruled out entirely.
With any type of digital control device, the SampleTrak ST-224 included, electromagnetic interference can cause malfunctioning and can corrupt or destroy data. Care should be taken to minimize the risk of damage.
- Cleaning
Use a soft, dry cloth to clean the SampleTrak ST-224. If necessary, slightly moisten the cloth. Do not use abrasive cleanser, wax, or solvents (such as paint thinner or cleaning alcohol), since these may dull the finish or damage the surface.
Please keep this manual in a convenient place for future reference.
USAGE AND SAFETY PRECAUTIONS ...... 2
SAFETY PRECAUTIONS 2
Usage Precautions 3
Introduction 5
Names of Parts 6
Front Panel 6
Rear Panel 7
Getting Connected 8
Connections toPlayback Equipment andMIDI
Equipment 8
Connection to Sound Source (1) 8
Connection to Sound Source (2) 9
Adjusting the Volume 9
Quick Guide 10
Quick Guide (1) Listening to the Demo 10
Quick Guide (2) Playing the Preset Pads 11
Quick Guide (3) Assign an Effect to a Pad 12
Quick Guide (4) Try Out Sampling 14
Introducing the ST-224 16
ST-224 Configuration 16
Samples 16
Pads and banks 17
ST-224 Memory Configuration 18
BPM 19
Let's Try Out Sampling 20
(1) Manual Sampling 20
(2) Auto Sampling 23
Pad Play Mode Operation 25
Playing Samples In Pads 1-8 25
Using the [SOURCE] Pad to Play an External Sound Source 26
Assigning a Sample to a Pad 27
Assigning a Sample to a Major Scale 28
Setting the Sample Playback Position 29
Setting the Playback Parameters for Each Pad 31
Pad Parameters 32
Copying Pad Settings 34
Clearing Pad Settings 35
Erasing a Sample 36
Optimizing Samples 37
Matching BPM of Pads (Auto Sync) 38
Using the Auto Sync Function (Basic Steps) 38
Changing BPM for Every Pad (Auto Sync Advanced Steps) 41
Using the Internal Effects 42
Applying an Effect to a Specific Pad 42
Synchronizing Effect Parameter BPM 44
Effect Types 46
Creating Songs 48
Song Recording 48
Playing a Song 51
Changing Song Settings 52
Song Function Parameters 53
Copying a Song 54
Deleting a Song 55
Playing Songs With Pads (Play List Function) 56
Assigning Songs to Pads 56
Using the Resampling Function 57
Resampling Pad Play or Songs 57
Storing and Reading Data 59
Storing/Reading Bulk Data (Backup Memory) 59
Formatting a Data Card 60
Storing Bulk Data (Data Card) 61
Loading Bulk Data (Data Card) 63
Loading Individual Pad Data/Waveform Data (Data Card/Backup Memory) 64
MIDI Application Example 66
MIDI Connections 66
Playing ST-224 Samples Under Control of External Equipment 66
Synchronizing Song Playback of the ST-224 With External Equipment 68
Other Functions 69
Resetting the ST-224 to the Factory Default (Initializing) 69
Initializing Without Loading Backup Memory Data (Quick Start) 69
Troubleshooting 70
ST-224 Specifications 71
ST-224 File Import Details 72
MIDI Implementation 73
MIDI Implementation Chart 75
Thank you for selecting the ZOOM SampleTrak ST-224 (hereafter simply called the "ST-224"). The ST-224 is a sampler with the following features:
- Versatile sampler settings
The sampler section allows selection of three sound quality grades and stereo/mono switching. Whether you want Hi-Fi for best sound or Lo-Fi for long recording time, the choice is yours. Sampled waveforms can be stored in the internal backup memory or on external data cards (option).
- Pad play feels like a rhythm machine
Sampled sounds are assigned to eight pads (x three banks) which can be played with a simple tapping motion. Playback start and end position can be selected for each pad, and parameters such as level, tuning, and panning can be easily adjusted.
- Sequencer stores 8 songs, PLAYLIST allows DJ use
An internal sequencer lets you memorize a pad playing session to create eight original songs. The songs can then be assigned to pads 1 - 8 for real-time playing (PLAYLIST).
- Useful special effects
The ST-224 also incorporates 22 powerful sound effects. A mixer function allows you to assign an effect to one or more specific pads. Knobs and rotary controls on the panel can be used to vary effect parameters in real time.
- Auto sync function-great for creating rhythm tracks
The beats per minute (BPM) of a sample assigned to a pad can be matched to the BPM of one selected sample. Changing the length of a sample is possible without changing pitch. This allows you for example to easily adjust the tempo of a drum loop and bass pattern sampled from a CD.
Sophisticated resampling feature
The ST-224 is the first unit in this price class to offer resampling. Phrases with effects played with the pads or by the internal sequencer can be sampled again in the digital domain.
- Built in presets and demo song
A number of built-in presets programmed at the factory lets you use the ST-224 right away. The unit also contains an impressive demo song making full use of the various features.
Please take the time to read this manual carefully, so as to get the most out of your ST-224 and to ensure optimum performance and reliability.
Except for special cases such as personal use, unauthorized sampling of material from copyrighted sources (including but not limited to CDs, records, tapes, video clips, broadcast material) is prohibited.
- Microsoft, Windows, MS-DOS are registered trademarks of Microsoft Corporation.
Apple and Macintosh are registered trademarks of Apple Computer Inc.

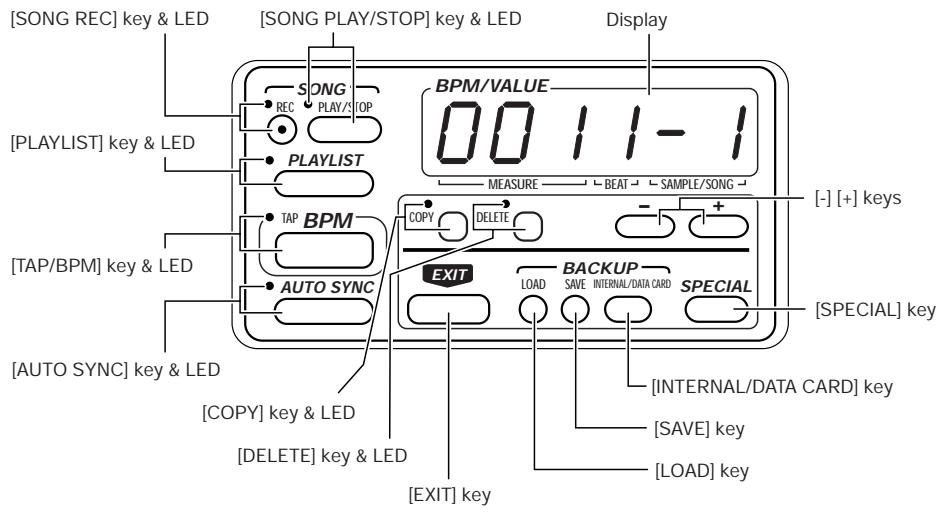
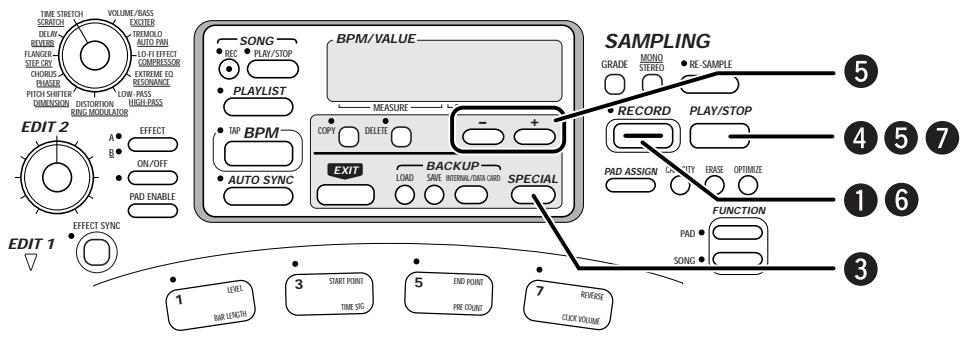
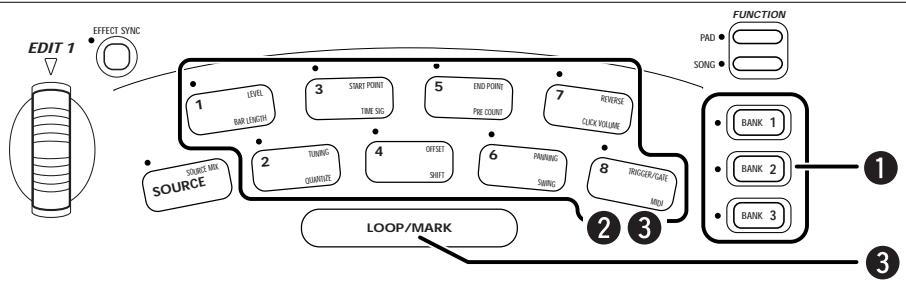
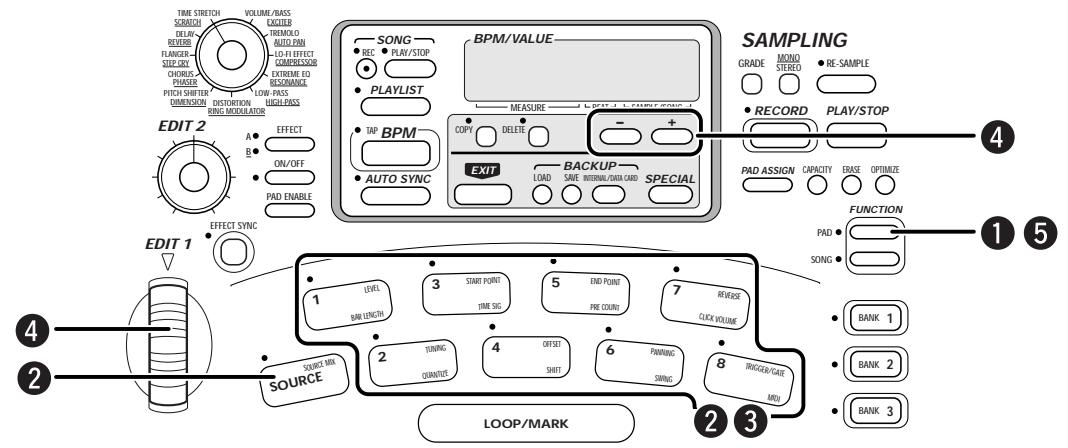
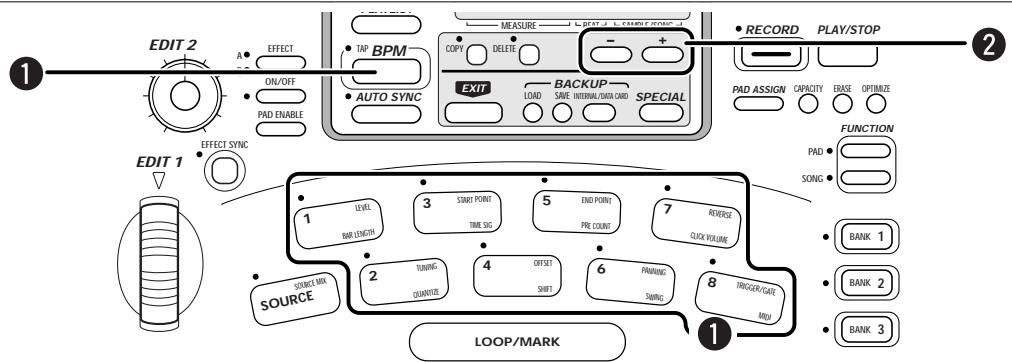
Front Panel
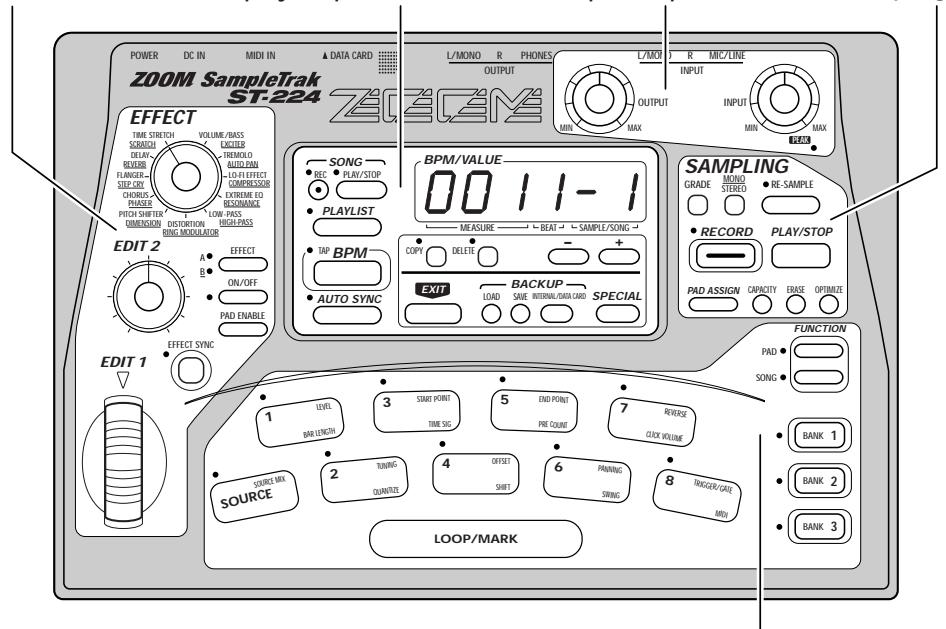
Effects section
Display/sequencer section
■ Input/output section
Sampling section
Pad section

■ Input/output section
Effects section
Sampling section
■ Display/sequencer section
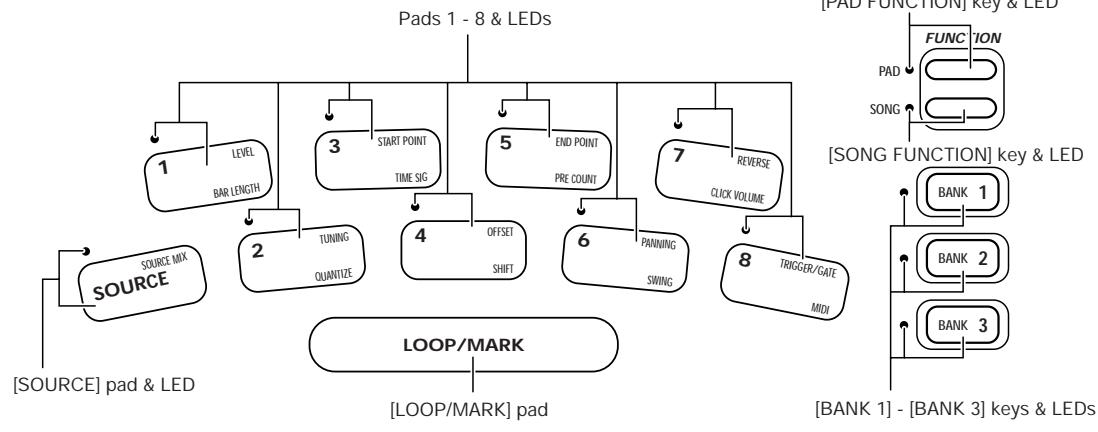
Pad section

Rear Panel
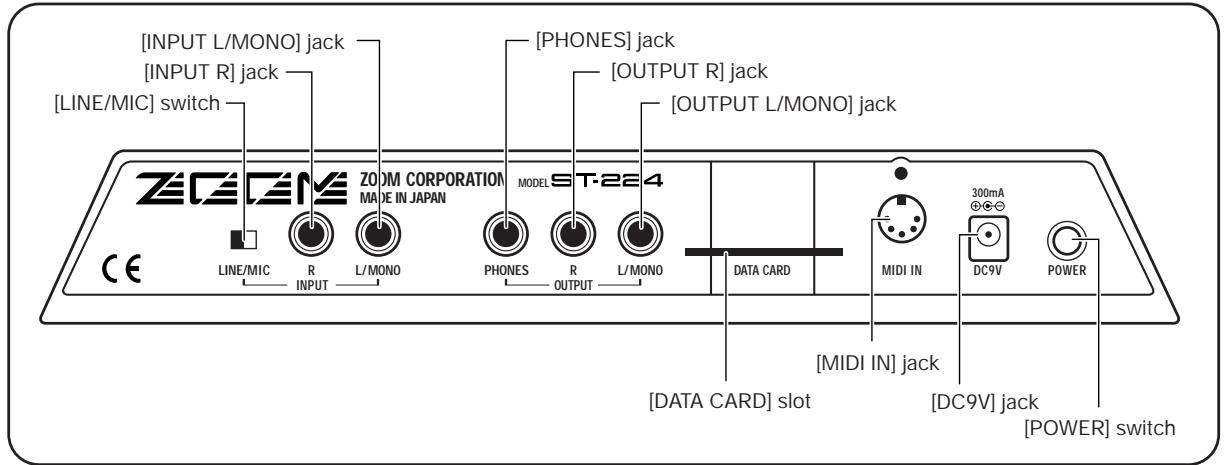

In this manual, names of front panel and rear panel controls and jacks are indicated by square brackets [ ].
Connections to Playback Equipment and MIDI Equipment
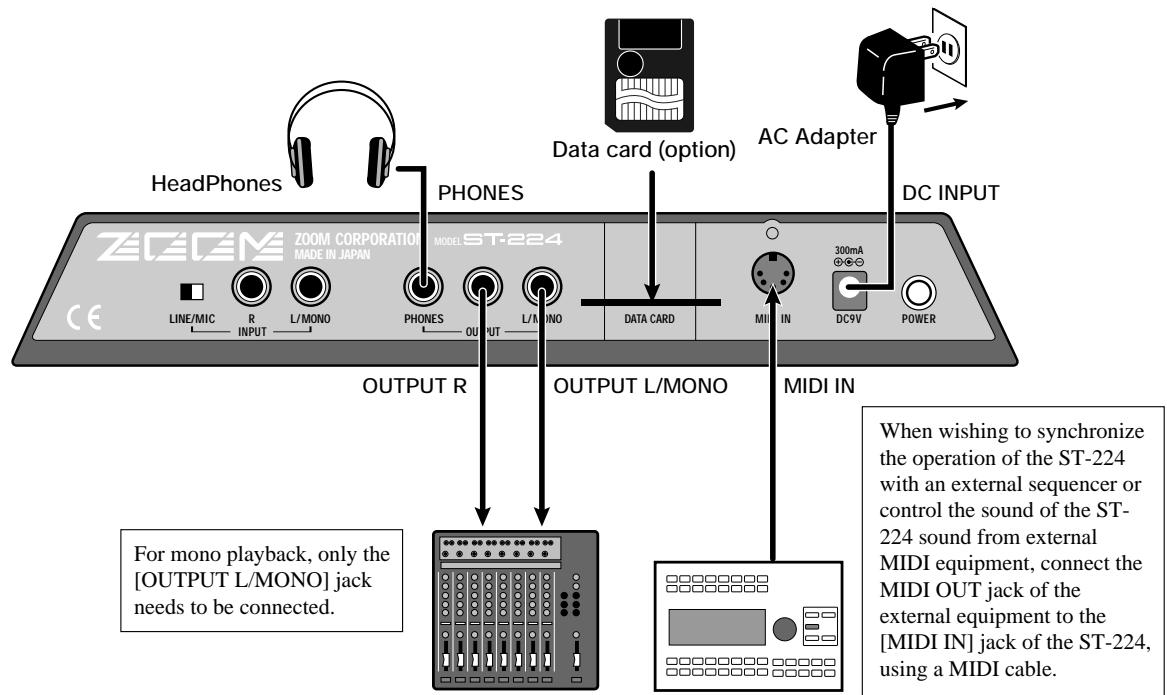
For mono playback, only the [OUTPUT L/MONO] jack needs to be connected.
Playback equipment
(mixer, audio system, radiocassette player, etc.)
MIDI OUT jack of MIDI sequencer or computer
with MIDI interface
Connection to Sound Source (1) (CD Player)
When sampling a stereo source, connect the [INPUT L/MONO] jack and the [INPUT R] jack to the source. For mono sampling, only the [INPUT L/MONO] jack needs to be connected. It is also possible to mix a stereo source internally and perform mono sampling ( p. 21).

Connection to Sound Source (2) (Microphone)
Adjusting the Volume
When connections have been established, adjust the volume as follows.
STEP1
While power to the playback equipment is still off and the volume is set to minimum, verify that all connections have been established correctly.
If cables are connected or disconnected while power to the playback equipment is on, or if power is turned on with the volume turned up, damage to the speakers may result.
STEP2
Turn on power to the ST-224.
Connect the output cable of the supplied AC adapter to the [DC9V] jack on the ST-224, and set the [POWER] switch to ON.

STEP3
Turn on power to the playback equipment.
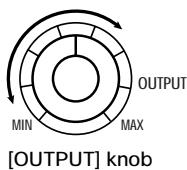
If the ST-224 is in the factory default condition, you can play preset sounds by tapping the pads. Hit pads 1 - 8 and adjust the [OUTPUT] knob on the ST-224 and the volume control on the playback equipment to obtain the desired volume (to initialize the unit to the factory default p.69).
Quick Guide (1) Listening to the Demo
The ST-224 comes with a demo song already built in. Listen to this to hear for yourself what the ST-224 can do.
[Preparations]
- Connect the ST-224 to the playback equipment ( p. 8).
- Turn power on in the order ST- 224 playback equipment, and adjust the volume ( p. 9).
![ZOOM ST-224 - [Preparations] - 1](/content/2025/01/152248/images/441f1c53d70c112675084b321c87e98b4763c873f64ec70badaebf731e64b133.jpg)
Headphones
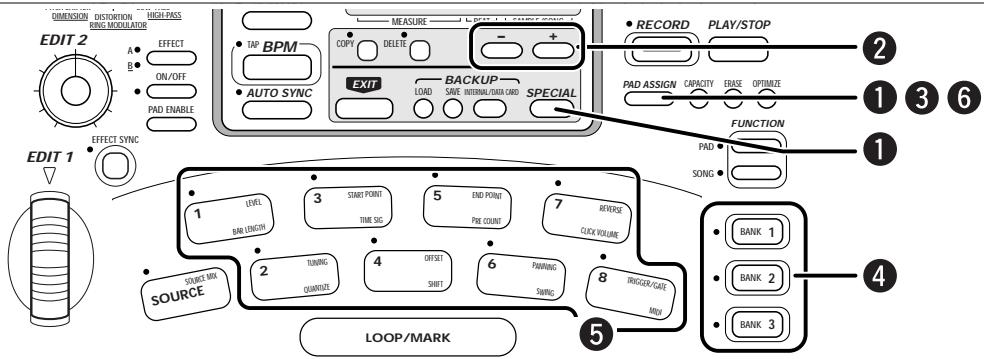
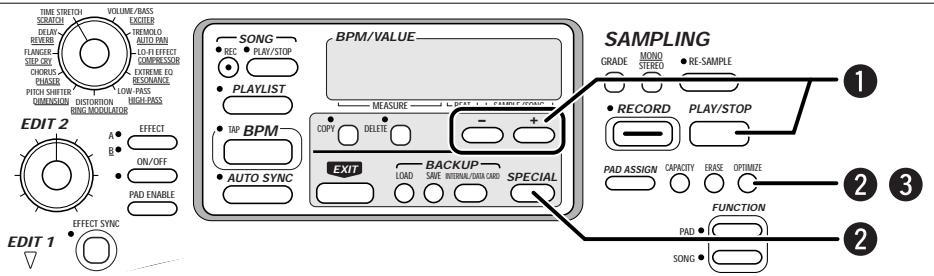
1 While holding down the [SPECIAL] key, press the [PLAYLIST] key.
The demo song starts. Playback of the song loops endlessly.
![ZOOM ST-224 - [Preparations] - 2](/content/2025/01/152248/images/68ae76f95b93621f873265288cc648592b53cd28753c88f3ac7b45f849e36a12.jpg)
Previously sampled material will be erased. Store the contents in the backup memory if desired ( p.59) .
To stop the demo song, press the [EXIT] or [SONG PLAY/STOP] key.
The ST- 224 reverts to the normal condition. The contents last stored in the backup memory will be restored.
- While the song is playing, other controls except the [EXIT] or [SONG PLAY/STOP] key have no effect.
NOTE
The [SOURCE] pad on the front panel is a special pad that allows using an external input signal as sound source. It is not used for playing internal samples.
Quick Guide (2) Playing the Preset Pads
The ST-224 allows assigning sampled sounds to pads and playing these manually (pad play). You can try out the preset sounds that are assigned to the pads at the factory.
[Preparations]
- Connect the ST-224 to the playback equipment ( p. 8).
- The Quick Guide assumes that the ST-224 is in the factory default condition. To return the ST-224 to the factory default condition, hold down the [SAVE] key while turning power to the unit on in step ① .
![ZOOM ST-224 - [Preparations] - 1](/content/2025/01/152248/images/867c8b3aee77f381f5bba14e9311e80c6b294a1d7061c8c24b4e583529755085.jpg)
![ZOOM ST-224 - [Preparations] - 2](/content/2025/01/152248/images/0987e44c7ea30699055d90f4ec54275acbf6b9d889d043c9cbc98753f15ee177.jpg)
Quick Guide (3) Assign an Effect to a Pad
The ST-224 incorporates built-in effects with 22 effect types. Among these, you can select any desired effect and assign it to a pad.
[Preparations]
- Connect the ST-224 to the playback equipment ( p. 8).
- Turn power on in the order ST-224 playback equipment.
![ZOOM ST-224 - [Preparations] - 1](/content/2025/01/152248/images/c07be9c68c953423a981326e664849e1b5107bc34b98f5a31920310f7caaafe8.jpg)
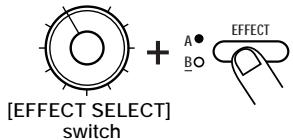
Use the [EFFECT SELECT] switch and [EFFECT BANK] key to select the desired effect type.
Turn the [EFFECT SELECT] switch so that it points to the name of the desired effect. When LED A is lit, non-underlined effects can be selected. When LED B is lit, underlined effects can be selected (→ p.46).
2 While holding down the [EFFECT PAD ENABLE] key, press the pad to which you want to assign effect.
The LED of the selected pad lights up. It is also possible to select several pads.
![ZOOM ST-224 - [Preparations] - 2](/content/2025/01/152248/images/d86d2310bf29a2a6c393cc48731940266abb0ddd33a0923c2fe9bc7ae1d045b0.jpg)
![ZOOM ST-224 - [Preparations] - 3](/content/2025/01/152248/images/308750eb803c7c68ec0de9437dce8017394223220ab43799dddfc23e61680937.jpg)
Quick Guide (4) Try Out Sampling
In Quick Guide (2), you played samples that were already preprogrammed in the unit. Now let's try out assigning a sampled sound to a pad yourself. The following description shows how to use the supplied sampling CD to sample drum and percussion sounds and assign the samples to pads.
[Preparations]
- Connect the ST-224 to the playback equipment ( p. 8).
- Connect the CD player output jacks to the [INPUT R] and [INPUT L/MONO] jacks on the ST-224. Set the [INPUT] knob of the ST-224 to a suitable position ( p. 8).
- Select a track from the CD which you want to sample and set the CD player to pause at the start of the desired track.
Press the [RECORD] key.
The ST-224 goes into the sampling standby mode, and the LED of the [RECORD] key flashes.
![ZOOM ST-224 - Press the [RECORD] key. - 1](/content/2025/01/152248/images/75ce19fac07822a9fd626955526541c1eeebdca34627d52abae089f93413c496.jpg)
Press the [RECORD] key again and then immediately release the pause condition of the CD player to start playback.
At the end of the passage that you want to sample, press the [PLAY/STOP] key.
![ZOOM ST-224 - Press the [RECORD] key. - 2](/content/2025/01/152248/images/e9b102167634e1bbaf278c0f980047498b205c275b01d5a5c817be8fa1cfb7ad.jpg)
![ZOOM ST-224 - Press the [RECORD] key. - 3](/content/2025/01/152248/images/f325da4f66c95fa8458e8c0e11e4b45ace6e1d4ff2c92b1df7ec1b9da23ecb86.jpg)
![ZOOM ST-224 - Press the [RECORD] key. - 4](/content/2025/01/152248/images/ae759dd54f34badd6814748ca1d05a2b694d1631ca61c1fbe56b463e9576d199.jpg)
Introducing the ST-224

This section explains the basic configuration of the ST-224 as well as some important terms used in this manual.
ST-224 Configuration
The illustration below shows the basic configuration of the ST-224. As can be seen from the chart, the ST-224 is made up of three main sections.
- Sampler
Samples the audio signal and performs playback using the pads and sequencer.
- Sequencer
Stores data about pad operation to enable automatic sampler playback.
- Effects
Allows alteration of the sampler signal in various ways.
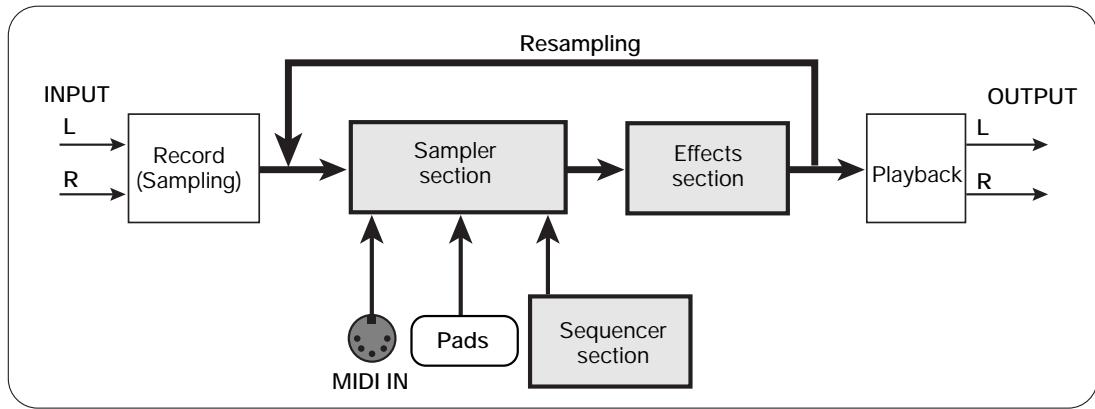
Basic Configuration of ST-224
The analog signal supplied via the [INPUT R] and [INPUT L/MONO] jacks is converted into digital form by the A/D converter and the resulting waveform data are stored in the memory of the sampler section (main memory).
Sampled and stored sounds can be played back in various ways, for example by hitting the pads on the unit, by the internal sequencer, or under control of an external sequencer connected via the [MIDI IN] jack. The maximum number of samples that can be played simultaneously is 8 mono samples or 4 stereo samples.
The sound of the samples played by the pads or sequencer can be altered if desired by the effects section, and then appears at the [OUTPUT R] and [OUTPUT L/MONO] jacks. It is also possible to return this signal to the sampling section and sample it again (resampling).
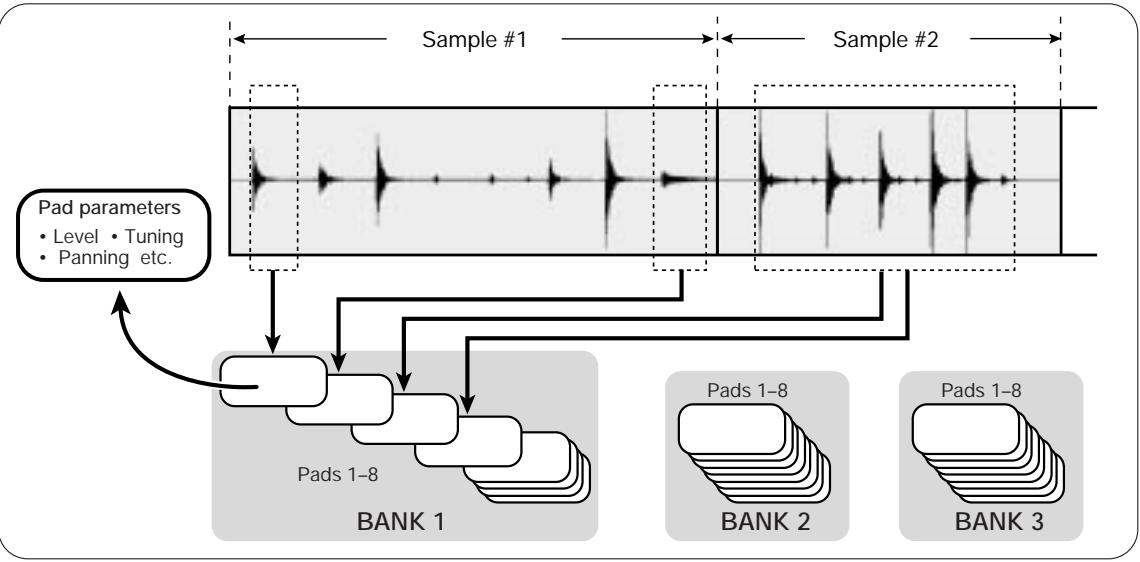
Samples
In the ST-224, a waveform that has been sampled in one sampling process is called a "sample". Each sample automatically receives a number and is stored in the main memory. The ST-224 can store a maximum of 32 samples, depending on the size of each sample.
Main Memory
Main Memory and Samples
| SAMPLE #1 | SAMPLE #2 | Empty area |
After sampling, the entire sample or a part of it can be assigned to one of the pads 1 - 8 on the front panel, for
playback by hitting the pad. For example, when sampling a drum pattern, a single drum sound or the entire pattern can be assigned to a pad.
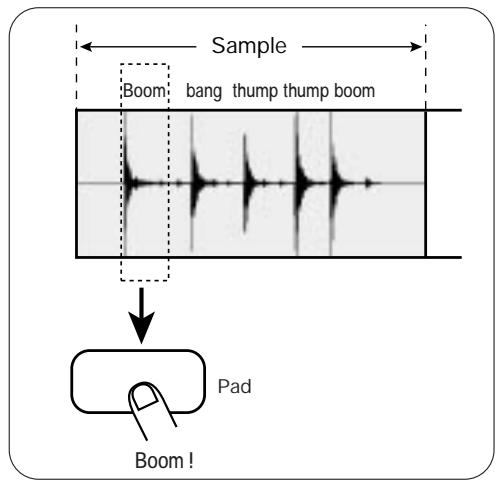
Assigning only one sound to the pad
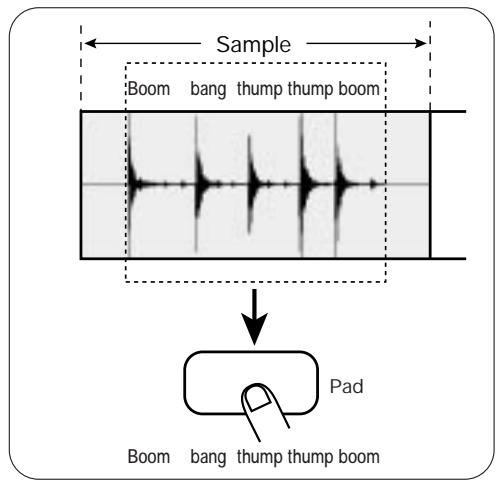
Assigning the entire pattern to the pad

Pads and banks
A combination of all settings for pads 1 - 8 is called a "bank". The ST-224 has three banks which are selected with the [BANK 1] - [BANK 3] keys. In effect, the ST-224 therefore gives the user access to a total of 24 pads.
A pad to which a sample has been assigned has various playback parameters which can be set individually.
Assigning a sample to a pad
These parameters include playback start and stop position, level, tuning, and panning.
Note that changing these parameters does not affect the original sample. Assigning one sample to several pads and setting these to different parameters result in different sound, but the original sample does not change or become a new sample.

The [SOURCE] pad on the front panel is a special pad that allows using an external input signal as sound source. It is not used for playing internal samples.

ST-224 Memory Configuration
The following three types of memory are used in the ST-224.
Main memory
Volatile memory whose contents are lost when the ST-224 is turned off. Temporarily holds waveform data, pad parameter setting data, and song data for the internal sequencer.
- Backup memory
Nonvolatile memory whose contents are retained also when the ST-224 is turned off. Serves for permanently storing the entire contents of the main memory (bulk data). Only one set of bulk data can be stored in the backup memory.
Data card (SM04)
External storage media inserted in the [DATA CARD] slot on the rear panel of the unit. Like the backup memory, it serves for storing bulk data, but it can hold more than one bulk data set (as many as the card capacity allows). When the store target is a data card, up to 99 sets of bulk data can be stored.
When sampling or song recording is performed with the ST-224, the waveform data and song data are temporarily stored in the main memory. During pad play and song playback, the ST-224 will read data directly from the main memory.
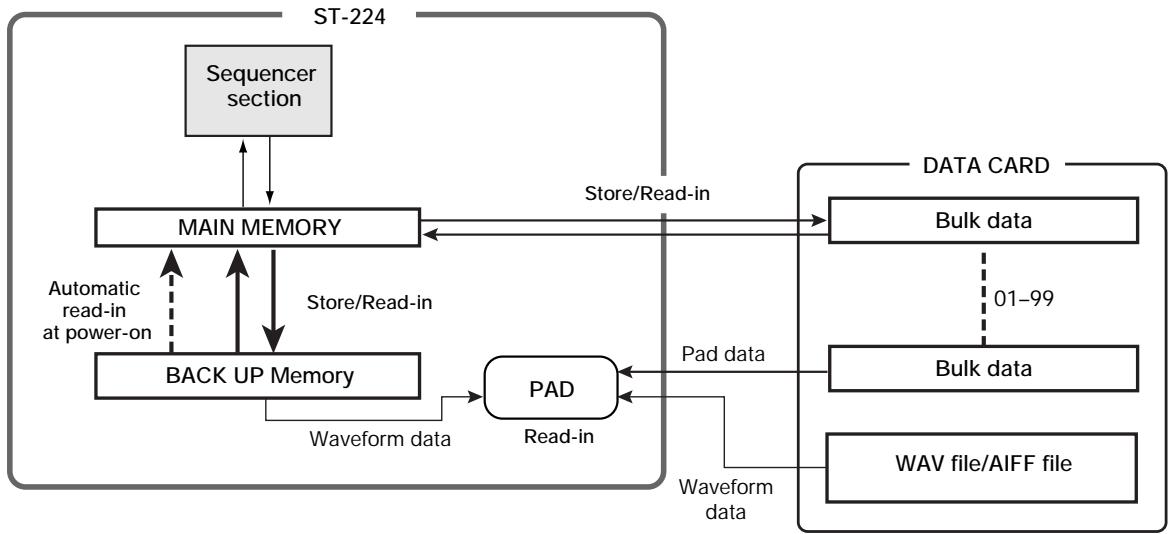
If the contents of the main memory are not saved to internal backup memory or to an external data card (SM04), they will be lost when the unit is turned off. To prevent losing important data, be sure to save them before turning the unit off, or more often if there is a possibility of power interruptions. Bulk data saved in backup memory are automatically read into the main memory the next time the unit is turned on. (This means that the unit returns to the same condition that was active before the power was switched off.) It is also possible to manually load data from backup memory or data cards into the main memory.

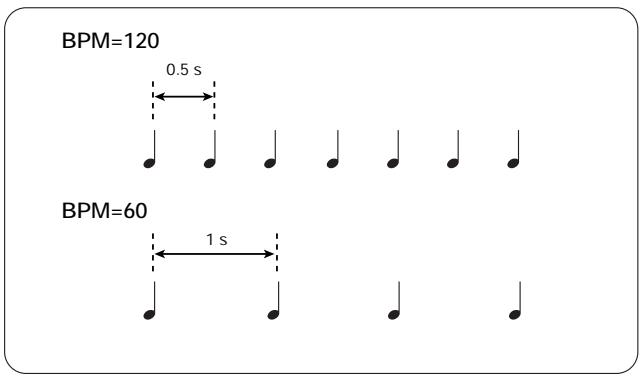
BPM
BPM (beats per minute) is a tempo unit that indicates the number of quarter notes per minute. For example, a piece where a quarter note is 0.5 seconds long will have a BPM figure of 120, whereas a piece where a quarter note is 1 seconds long will have a BPM figure of 60.
The ST-224 handles three types of BPM, which can be set individually.
Song BPM
Indicates the tempo of a stored song. This value is stored separately for each song.
- Pad BPM
Indicates the playback time of a pad. The ST-224 considers the playback time of a sample assigned to a pad to be four beats (quarter note x 4) and automatically calculates the BPM for the pad. This serves mainly for synchronizing the tempo of several pads (Auto Sync feature). When parameters such as the sample start point and end point, tuning etc. are changed, the pad BPM also is adjusted automatically.
Effect BPM
Serves for synchronizing the parameters of certain effects (delay time, flanger modulation speed, etc.) to a given tempo. The synchronized parameter depends on the effect type (some effect types do not have a parameter that can be synchronized).
The value of Effect BPM is same as Song BPM unless edited.

For each type of BPM, the setting range is 40 - 250.
(1) Manual Sampling
This section explains how to use the [RECORD] key to manually specify the start and end point of the sampling process. Manual sampling is convenient for example for quickly sampling a desired rhythm or bass pattern while listening to a CD.
Except for special cases such as personal use, unauthorized sampling of material from copyrighted sources (including but not limited to CDs, records, tapes, video clips, broadcast material) is prohibited.

- In the factory default condition, the ST-224 will read the preset sample sources from backup memory into the main memory. Also in this condition, it is possible to sample a new source and store the result in a free area of the main memory, but for maximum recording length, you should first erase some or all preset samples from the main memory ( p. 36).
- The sampled waveform is temporarily stored in the main memory, but it will be lost if the unit is turned off without first transferring the waveform data to the internal backup memory or external data cards. (The next time the unit is turned on, the contents of the backup memory will be read into the main memory.) Be sure to store important sample data ( p. 59).
STEP 1
Connect the sound source (CD player or microphone etc.) to the [INPUT R] and [INPUT L/MONO] jacks ( p. 8 - 9).
STEP 2
Press the [RECORD] key.
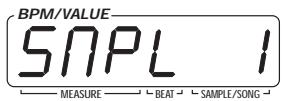
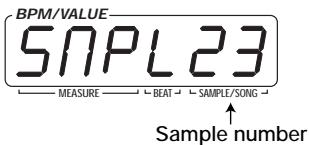
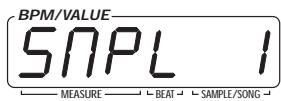
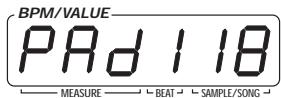
The ST-224 goes into the sampling standby mode, and the LED of the [RECORD] key flashes. A number for the new sample is shown on
the display.

Sample number

STEP3
When wishing to change the sampling grade (sound quality), press the [GRADE] key.
The currently selected grade appears on the display. You can change the grade between three settings by holding down the [GRADE] key and using the [-] and [+] keys.

GRADE
| Grade | Sampling frequency | Maximum sampling time (per sample) | Sampling time (total) |
| HiFi (High fidelity) | 32kHz | 30 seconds | Mono 60 seconds/Stereo 30 seconds |
| Stnd (Standard) | 16kHz | 60 seconds | Mono 120 seconds/Stereo 60 seconds |
| LoFi (Low fidelity) | 8kHz | 120 seconds | Mono 240 seconds/Stereo 120 seconds |

If you press the [CAPACITY] key, the approximate remaining sampling time in seconds (calculated for HiFi and Mono) will appear on the display.
STEP4 To switch between mono and stereo, use the [MONO/STEREO] key.
The indication "Mn" (Mono) or "St" (Stereo) will appear on the display. To change the setting, hold down the [MONO/STEREO] key and use the [-] or [+] key. (The default setting is "Mono".)
![ZOOM ST-224 - STEP4 To switch between mono and stereo, use the [MONO/STEREO] key. - 1](/content/2025/01/152248/images/7e072ec7379bc242bec0178e0d66b87f303e5f87384c5d3c9be6ec4ecea11f83.jpg)
![ZOOM ST-224 - STEP4 To switch between mono and stereo, use the [MONO/STEREO] key. - 2](/content/2025/01/152248/images/6dcb5d38152d6fce74ae7d623cf961eee6f17fcafe92b25eff37f062721bf183.jpg)
The grade and mono/stereo selection can be made individually for each sample. Remember that using stereo sampling will reduce the available sampling time and the number of samples that can be played simultaneously by half.
STEP5 Press the [RECORD] key and then immediately start playback of the sound source.
In manual sampling, the LED of the [RECORD] key stays lit as soon as you press the key, and sampling starts.
![ZOOM ST-224 - STEP5 Press the [RECORD] key and then immediately start playback of the sound source. - 1](/content/2025/01/152248/images/a91d181710bab34d5d70fa7e2d909817ef0a8b1013929d7ab3103ebea4969452.jpg)
STEP6 To end sampling, press the [PLAY/STOP] key.
Sampling ends as soon as the key is pressed.
![ZOOM ST-224 - STEP6 To end sampling, press the [PLAY/STOP] key. - 1](/content/2025/01/152248/images/dfacd282511026a2754031e9882ac2ae1e538ae7b2d5c68da04335c8b46a9f44.jpg)
PLAY/STOP
Manual sampling
![ZOOM ST-224 - STEP6 To end sampling, press the [PLAY/STOP] key. - 2](/content/2025/01/152248/images/6dab8076c8af14380640b1d9f48e13d0468b7c7983b1a2473eb2956d7ecdd7d4.jpg)
![ZOOM ST-224 - STEP6 To end sampling, press the [PLAY/STOP] key. - 3](/content/2025/01/152248/images/6942613522befbb2ba82c0681045add258d303381ae72d7e73e414a3c452c46c.jpg)
If sampling is not stopped manually, it continues until the main memory is full or the maximum sampling time is reached. Sampling will automatically end at that point.
STEP7 To check the result of the process, press the [PLAY/STOP] key.
The sampled sound is played back for as long as the key is held down (gate playback).
![ZOOM ST-224 - STEP7 To check the result of the process, press the [PLAY/STOP] key. - 1](/content/2025/01/152248/images/24fee9bd4501b58c5172e095d1ca076920eefb1b11edbcdd6f09cddbf30a770e.jpg)
PLAY/STOP
![ZOOM ST-224 - STEP7 To check the result of the process, press the [PLAY/STOP] key. - 2](/content/2025/01/152248/images/e43d07b41a70f75b50986b3c009e2a496b5bb1e67a6a17058d5cbf9a5872a33f.jpg)
To check the status of sampled sound, press the [GRADE] (or [MONO/STEREO]) key then the value with the number of the sample is shown on the display.
- To erase the new sample and redo the sampling process Press the [ERASE] key twice ( p.36), and then repeat steps 2 - 7.
- To keep the new sample and continue sampling the same source Repeat steps 2 - 7.
- To assign the new sample to a pad Proceed to step 8.
![ZOOM ST-224 - STEP7 To check the result of the process, press the [PLAY/STOP] key. - 3](/content/2025/01/152248/images/9fbbc9252606c6547cda4a87dc64f99c045082941ab9a9aa62dff777ced97b43.jpg)
The playback start time and end time in the sample can be changed later ( p. 29). Therefore repeated sampling is not necessary even if there is a blank at the beginning or the end of the sample.
![ZOOM ST-224 - STEP7 To check the result of the process, press the [PLAY/STOP] key. - 4](/content/2025/01/152248/images/929eaf2cffd558e6df057279a8c8ad4939fa925d0d715a3a339366f5e453ef27.jpg)
Press the [PAD ASSIGN] key.
The number of the most recent sample is shown.
![ZOOM ST-224 - STEP7 To check the result of the process, press the [PLAY/STOP] key. - 5](/content/2025/01/152248/images/8feedb919b593bbd1533dd4c79e102cdfca587812e27520a33ba21e304747d04.jpg)
![ZOOM ST-224 - STEP7 To check the result of the process, press the [PLAY/STOP] key. - 6](/content/2025/01/152248/images/bf076ad6eb609c65833a16fce3f38c816fbb29b282f78f789a5d10ab8e1bb439.jpg)
![ZOOM ST-224 - STEP7 To check the result of the process, press the [PLAY/STOP] key. - 7](/content/2025/01/152248/images/8855a8becf7c2a8ecbe225531ce7ee30d2a422e85d12241c2230b5a7be416122.jpg)
Press the [PAD ASSIGN] key once more.
![ZOOM ST-224 - STEP7 To check the result of the process, press the [PLAY/STOP] key. - 8](/content/2025/01/152248/images/5abda08deee043ecf4cfab72582c2cf7e410c77c29d24e44cac32d6173826426.jpg)
![ZOOM ST-224 - STEP7 To check the result of the process, press the [PLAY/STOP] key. - 9](/content/2025/01/152248/images/477bb9236f8be97cc3abae14cbaebf713c0ae44b6cb1bf3cdd9a4507e1a386ce.jpg)
Use the [BANK 1] - [BANK 3] keys and the pads 1 - 8 to select the pad to which you want to assign the sample.
The currently selected sample will be assigned to the pad.
![ZOOM ST-224 - STEP7 To check the result of the process, press the [PLAY/STOP] key. - 10](/content/2025/01/152248/images/02a1390bee748fa334c318a51f759349db9072cbd34afc8060ca917dfd388496.jpg)
![ZOOM ST-224 - STEP7 To check the result of the process, press the [PLAY/STOP] key. - 11](/content/2025/01/152248/images/b5997c0d0f1fe68e6eb96ba180ceb09299cae6721c9a3c08bcd5a1f3951f517b.jpg)
Press the [PAD ASSIGN] key.
The assign process is confirmed.
![ZOOM ST-224 - STEP7 To check the result of the process, press the [PLAY/STOP] key. - 12](/content/2025/01/152248/images/6f04a92afc38670f045c63da7dc8111ef637d9f807695a2bd66142e47e983d0d.jpg)
- To cancel the assign process
- Press the [EXIT] key to return to the play mode.
To make a new sample Perform steps 1 - 11 again.
(2) Auto Sampling
Besides the manual sampling procedure using the [RECORD] key as described above, the ST-224 also allows auto sampling where the start and stop of sampling is controlled automatically. There are two auto sampling modes: the auto recording mode where sampling starts automatically when the signal level exceeds a certain threshold, and the auto stop mode where sampling stops automatically after a preset interval.
STEP 1 Connect the sound source and adjust the input level. Then press the [RECORD] key.
The ST-224 goes into the sampling standby mode, and the LED of the [RECORD] key flashes.
![ZOOM ST-224 - STEP 1 Connect the sound source and adjust the input level. Then press the [RECORD] key. - 1](/content/2025/01/152248/images/ba09125a158f9d132ed4a7e15cdba6a6c7568d594a7d1a01dc6f0513ffc0ef14.jpg)
STEP2 Select the desired sampling grade and the mono/stereo setting.
STEP3 To perform sampling in auto recording mode, hold down the [SPECIAL] key.
In this mode, sampling will start when the signal level exceeds a certain threshold (trigger level). This is useful for example for sampling drums or percussion sounds.
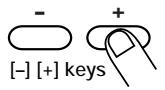
While holding down the [SPECIAL] key, the currently selected trigger level appears on the display. You can use the [-] and [+] keys to change the trigger level. The following settings are available.
![ZOOM ST-224 - STEP3 To perform sampling in auto recording mode, hold down the [SPECIAL] key. - 1](/content/2025/01/152248/images/57c6e29fd78885c9f9cb117ac7fd3b7aa7e9ac5d298b6e648599538515e3d99a.jpg)
- ArMoFF (default setting)
Sampling starts immediately when [RECORD] key is pressed (auto recording mode is off).
ArM1-ArM3
Auto recording mode is on. Higher figures mean a higher trigger level.
STEP4 To perform auto stop sampling, hold down the [PLAY/STOP] key.
In this mode, sampling will stop automatically after a certain interval (called the auto sampling time) has elapsed. This is useful for example for sampling guitar phrases that you play yourself.
While holding down the [PLAY/STOP] key, the currently selected auto sampling time appears on the display. (The default setting is oFF.)
![ZOOM ST-224 - STEP4 To perform auto stop sampling, hold down the [PLAY/STOP] key. - 1](/content/2025/01/152248/images/b5fccfd3477ac0d5a939a8fae9165c69ed98e74e82047358bac9b5425d8f263e.jpg)
PLAY/STOP
![ZOOM ST-224 - STEP4 To perform auto stop sampling, hold down the [PLAY/STOP] key. - 2](/content/2025/01/152248/images/80d78e28200e8e0dcc35944baf4fc47fc2b4bb1c404f8144dd4f5ceeedc0b240.jpg)
While holding down the [PLAY/STOP] key, use the [-] and [+] keys to change the auto stop sampling time
The value can be set in 1 second steps.
![ZOOM ST-224 - STEP4 To perform auto stop sampling, hold down the [PLAY/STOP] key. - 3](/content/2025/01/152248/images/6ff68de3083017260dbf6d1ccf54ae2a5f29ca3fa8ffe63f0863b1a58b714a88.jpg)
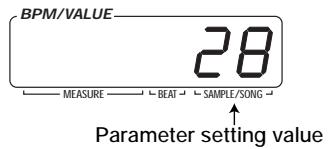
The auto sampling time can also be specified in BPM units. To do this, hold down the [BPM] key and use the [-] and [+] keys to change the time. The display will change to BPM units. The time corresponding to four beats of the displayed BPM value will be the auto sampling time. Pressing the [BPM] key again returns to the normal display.
![ZOOM ST-224 - STEP4 To perform auto stop sampling, hold down the [PLAY/STOP] key. - 4](/content/2025/01/152248/images/fb20ba03038efe6011e6e579af292d5a2652d78ab886c47ba6f7f7be124b30b3.jpg)
PLAY/STOP
![ZOOM ST-224 - STEP4 To perform auto stop sampling, hold down the [PLAY/STOP] key. - 5](/content/2025/01/152248/images/1b1f8509a96dcb1dfcb611bf8314c67bb554d1427d7d818cbdb88038244e9488.jpg)
[-] [+] keys
![ZOOM ST-224 - STEP4 To perform auto stop sampling, hold down the [PLAY/STOP] key. - 6](/content/2025/01/152248/images/7c9d1a3cbcc3816d5aba0b68dccdb60939ec04f0ba2da9d5d553035bba93da7e.jpg)
![ZOOM ST-224 - STEP4 To perform auto stop sampling, hold down the [PLAY/STOP] key. - 7](/content/2025/01/152248/images/5ff11506cffcc1521bd1b47d3a29488d2237b875bd11a10eac75ed2c61701e53.jpg)
Press the [RECORD] key to start sampling.
- When auto recording mode is selected
Sampling starts as soon as the signal exceeds the preset trigger level for the first time. Pressing the [PLAY/STOP] key stops sampling.
![ZOOM ST-224 - STEP4 To perform auto stop sampling, hold down the [PLAY/STOP] key. - 8](/content/2025/01/152248/images/42b3e4c2614f21d1755ef359c55e9b8cd957f27be6cceaec8de29807eb03feb5.jpg)
RECORD
![ZOOM ST-224 - STEP4 To perform auto stop sampling, hold down the [PLAY/STOP] key. - 9](/content/2025/01/152248/images/46fafdcdb9a0b0fff2e407bcddaab11d20885c7b5f61cd0c7c07d9e9de1abaa6.jpg)
Auto recording mode sampling
![ZOOM ST-224 - STEP4 To perform auto stop sampling, hold down the [PLAY/STOP] key. - 10](/content/2025/01/152248/images/711e290e0ac313042d36a3cccc15352c1a0a92e5c32fa251c0b039e7a8e3f7a5.jpg)
When auto recording mode is used to sample a source with a slow attack curve, the beginning of an attack sound may be cut off.
- When auto stop mode is selected
Sampling starts according to the conditions set for auto recording mode, and ends when the preset auto sampling time has elapsed.
![ZOOM ST-224 - STEP4 To perform auto stop sampling, hold down the [PLAY/STOP] key. - 11](/content/2025/01/152248/images/6d5df78d9e07133d9206174e7e4a2d5b192ca1277d41290d4c410d1d4089f262.jpg)
Auto stop sampling
![ZOOM ST-224 - STEP4 To perform auto stop sampling, hold down the [PLAY/STOP] key. - 12](/content/2025/01/152248/images/41454ac5939d6eb63eb651d26465058e8f45e0c0c1bbf9c54d50b7d36a3dde08.jpg)
Auto recording mode and auto stop mode can be used together.
![ZOOM ST-224 - STEP4 To perform auto stop sampling, hold down the [PLAY/STOP] key. - 13](/content/2025/01/152248/images/a74de36f885d334944f692d7dbaa703179f17056fab496c6bb5cc676ac98518e.jpg)
Use the [PLAY/STOP] key to check the recorded sample.
By following steps 8 - 11 shown on page 22, you can assign the sample to a pad.
![ZOOM ST-224 - STEP4 To perform auto stop sampling, hold down the [PLAY/STOP] key. - 14](/content/2025/01/152248/images/4fae70d1609a0a64f0f561115f833158ebc5a788aecc82e2eaddfa91acd96198.jpg)
PLAY/STOP
![ZOOM ST-224 - STEP4 To perform auto stop sampling, hold down the [PLAY/STOP] key. - 15](/content/2025/01/152248/images/db5a7c2fdc3c893a43113a3466d9978c86595d65a8abe6936dce563ab35564a5.jpg)
Pad Play Mode Operation

This section explains operation of the unit in pad play mode. In this mode, pads are played to produce their assigned samples. This is the basic operation mode of the ST-224. The playback position and playback mode of each sample are also adjusted in this mode.

Playing Samples In Pads 1 - 8
STEP1
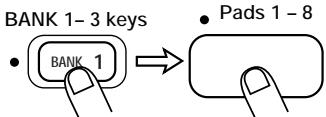
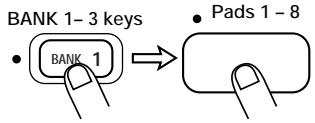
Use the [BANK 1] - [BANK 3] keys to select the desired bank.
The corresponding LED lights up.
BANK 1-3 keys
STEP2
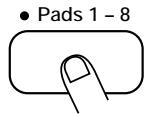
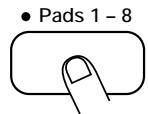
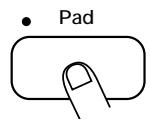
Hit one of pads 1 - 8.
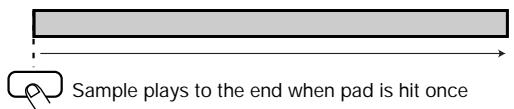
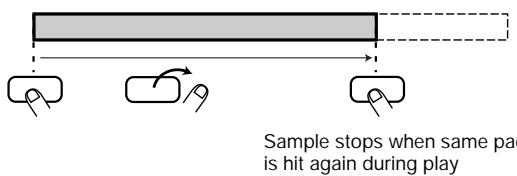
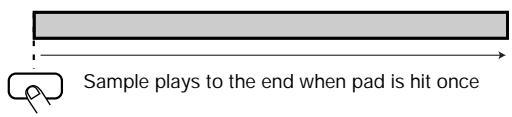
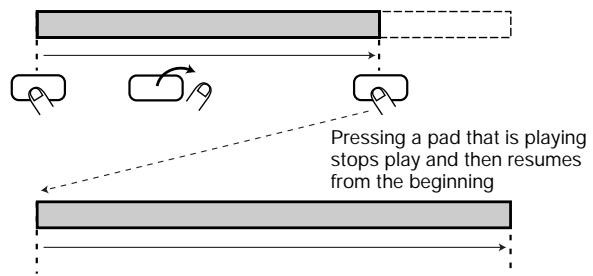
While the pad is pressed, its LED is lit and the sample assigned to the pad is played from start to end. Playback of the sample then stops. (This is called "one-shot playback".)

- The default operation mode is "gate playback" where the sample is only played for as long as the pad is held down. The mode can be changed to the trigger (or retrigger) mode as described on page 33, some of factory preset sounds are set in this mode.
- While a pad is being pushed, the bank cannot be switched. To switch banks without sound interruption, choose loop playback in step 3.
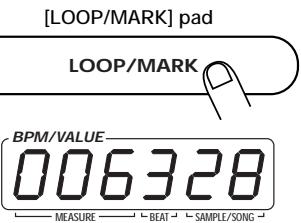
STEP3
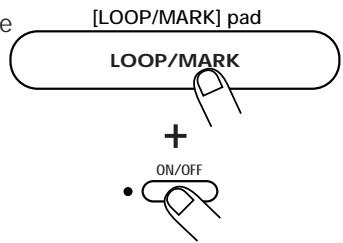
To play the sample continuously, hold the [LOOP/MARK] pad down while hitting the pad.
The sample will then be played repeatedly in a continuous loop.
(This is called "loop playback".)
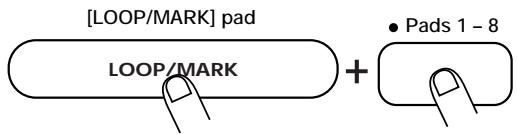

- The action of the pad when the [LOOP/MARK] pad is pressed depends on whether the pad playback mode ( p. 33) is set to gate playback or trigger (retrigger) playback.
- When a pad set to gate playback is hit while holding down the [LOOP/MARK] pad, loop playback continues in the hold state also when the pad is released. To stop playback, hit the same pad again.
- If the sound of a pad set to trigger (retrigger) playback is playing, and the pad is hit again while holding down the [LOOP/MARK] pad, the sound does not stop (loop playback will begin after the sample has played through). To stop playback, hit the same pad again.

Using the [SOURCE] Pad to Play an External Sound Source
The [SOURCE] pad is a special pad that allows using an externally connected component as sound source for pad play. For example, when a CD player or other source component is connected to the [INPUT L/MONO] jack and [INPUT R] jack, the sound from that source will be heard while the [SOURCE] pad is pressed. When the pad is released, the signal is muted ("gate playback"). By hitting the [SOURCE] pad in the rhythm of the music, the external source can be switched on and off in the manner of a DJ creating a special effect.
![ZOOM ST-224 - Using the [SOURCE] Pad to Play an External Sound Source - 1](/content/2025/01/152248/images/784d2c6f4eed866d4e28cb0b0923b483f98853ce4d45332ea1ef5bce4a33a893.jpg)
![ZOOM ST-224 - Using the [SOURCE] Pad to Play an External Sound Source - 2](/content/2025/01/152248/images/d109461388ba2dce7206d917f039d8ccb218fd9a7f88469d680ff1c0309964b3.jpg)
![ZOOM ST-224 - Using the [SOURCE] Pad to Play an External Sound Source - 3](/content/2025/01/152248/images/35c22d7a0603256126859befc38d448ba7ca60e18a0055c7851c56ce0a709e76.jpg)
Connect the sound source (CD player etc.) to the [INPUT R] and [INPUT L/MONO] jacks ( p.8 - 9) .
![ZOOM ST-224 - Using the [SOURCE] Pad to Play an External Sound Source - 4](/content/2025/01/152248/images/b328e65a730da855c8082d5e07807a4f784aa9ce5a78a283609167778a58aa96.jpg)
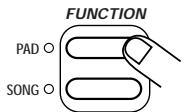
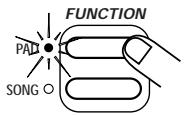
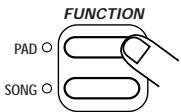
Press the [PAD FUNCTION] key and then the [SOURCE] pad.
The [PAD FUNCTION] key is a special key that allows setting the playback function for each pad. When the [PAD FUNCTION] key and then the [SOURCE] pad is pressed, you can select whether to send the signal from the input jacks constantly to the output jacks (on) or send it only when hitting the [SOURCE] pad (oFF).
![ZOOM ST-224 - Using the [SOURCE] Pad to Play an External Sound Source - 5](/content/2025/01/152248/images/aa3245eaef1b0cccb5ee94cfa0116c7100f3e090d918b6962e43473c692c01e1.jpg)
![ZOOM ST-224 - Using the [SOURCE] Pad to Play an External Sound Source - 6](/content/2025/01/152248/images/b070f3c83a11c60e2dc92aaf0a8889e2517c0cd13333598602acb9079b6529be.jpg)
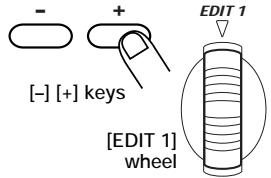
Use the [-] [+] keys or the [EDIT 1] wheel to set the display indication to "oFF".
When set to "on" the signal from the input jacks is sent constantly to the output jacks. When set to "oFF", the signal is sent only when hitting the [SOURCE] pad. (The default setting is "oFF".)
![ZOOM ST-224 - Using the [SOURCE] Pad to Play an External Sound Source - 7](/content/2025/01/152248/images/31b1ebedf1e11091de1f0752a2c9f9c34eb313f92123c68c1078f50aa131ecc6.jpg)
![ZOOM ST-224 - Using the [SOURCE] Pad to Play an External Sound Source - 8](/content/2025/01/152248/images/a1bc30a233e1eff1b39ac438340b82ebef098b7864cc453cd02f983a9a75145d.jpg)
Press the [PAD FUNCTION] key again.
![ZOOM ST-224 - Using the [SOURCE] Pad to Play an External Sound Source - 9](/content/2025/01/152248/images/4d439a7f28f1e28d9b3e28c9666b03307a32970685b832c2e2a5248ef31fa110.jpg)
Set the sound source to playback and hit the [SOURCE] pad.
The sound of the source is supplied to the output jacks only while the [SOURCE] pad is pressed.
![ZOOM ST-224 - Using the [SOURCE] Pad to Play an External Sound Source - 10](/content/2025/01/152248/images/83ae7e046ffc4c189115d6172e97a0afddf95b44ea6c51af33a538e82db4edb6.jpg)
To keep the source sound that is supplied, hit the [SOURCE] pad while holding down the [LOOP/MARK] pad.
![ZOOM ST-224 - Using the [SOURCE] Pad to Play an External Sound Source - 11](/content/2025/01/152248/images/109fb8e183d25ea97d2a83af6e9d12a3112fe65968dcfaa4c41f342a873662ed.jpg)
Assigning a Sample to a Pad
Samples stored in the main memory can be assigned to any desired pad also after sampling is completed. This section explains how to select a sample from the main memory and assign it to a pad.
STEP1
Press the [PAD ASSIGN] key.
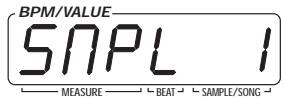
The number of the currently selected sample appears on the display.

STEP2
Use the [-] and [+] keys to select the sample number.

STEP3
Press the [PAD ASSIGN] key.

STEP4
Use the [BANK 1] - [BANK 3] keys and the pads 1 - 8 to select the pad to which you want to assign the sample.
STEP5
Press the [PAD ASSIGN] key.
The assign process is confirmed.
To continue assigning samples Repeat steps 1 - 5.
To cancel the assign process Press the [EXIT] key to return to the play mode.


To check which sample is assigned to a pad, press the [PAD ASSIGN] key while holding down the pad. The sample number appears on the display.

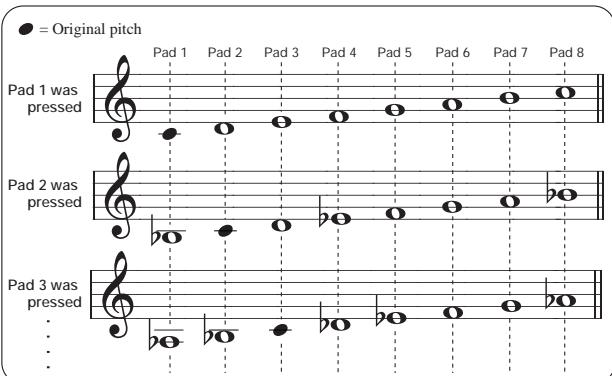
Assigning a Sample to a Major Scale
Sometimes it may be useful to assign the same sample to several pads and play the pads with changed pitch (such as when a single bass note was sampled). The ST-224 can automatically assign one sample to pads 1 - 8 and change the pad tuning using a Major scale.
STEP 1
While holding down the [SPECIAL] key, press the [PAD ASSIGN] key.
The number of the currently selected sample appears on the display.

STEP2
Use the [-] and [+] keys to select the sample number.

STEP3
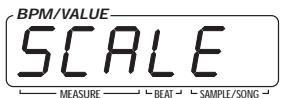
Press the [PAD ASSIGN] key again.
The indication "SCALE" appears on the display.

STEP4
Use the [BANK 1] - [BANK 3] keys to select the bank to which you want to assign the sample.
STEP5
Use pads 1 - 8 to select the pad to which the sample should be assigned with the original pitch.
STEP6
To activate the automatic assignment process, press the [PAD ASSIGN] key again.
The sample selected in step 1 is assigned to all pads 1 - 8, and the pad tuning is automatically changed using a Major scale, using pad 1 as the prime. For example, if the original pitch was middle C, the tuning for the various pads, depending on the pad chosen in step 5, will be as follows.


If the selected bank already contains pads with samples, these will be erased.

- When wishing to cancel the automatic assignment process, press the [EXIT] key.
- When wishing to use a different scale, edit the TUNING parameter for each pad in step 6 ( p. 32).

Setting the SamplePlayback Position
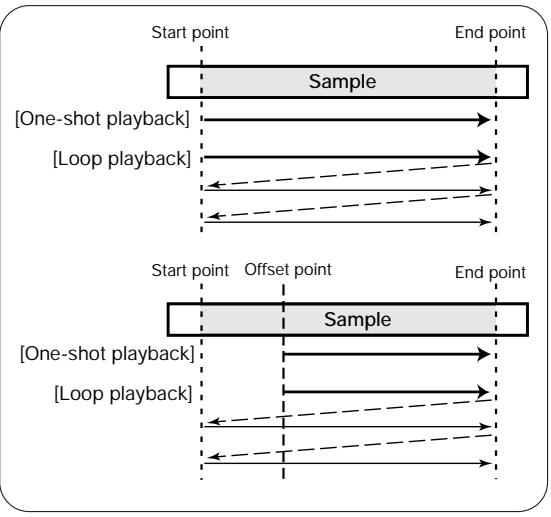
After assigning a sample to a pad, the following three parameters can be changed to specify the playback position.
- Start point
Normal playback start point. When the pad is pressed, playback starts from this point.
- End point
Normal playback end point. During one-shot playback, playback ends when this point is reached. During loop playback, playback returns to the start point when this point is reached.
- Offset
By selecting this value, the playback start position can be shifted forwards. During one-shot playback, playback starts at the offset point and stops at the end point. During loop playback, playback starts at the offset point and returns to the start point when the end point is reached.

When there is a blank at the beginning and end of the sample, it can be eliminated by moving the start point and end point.
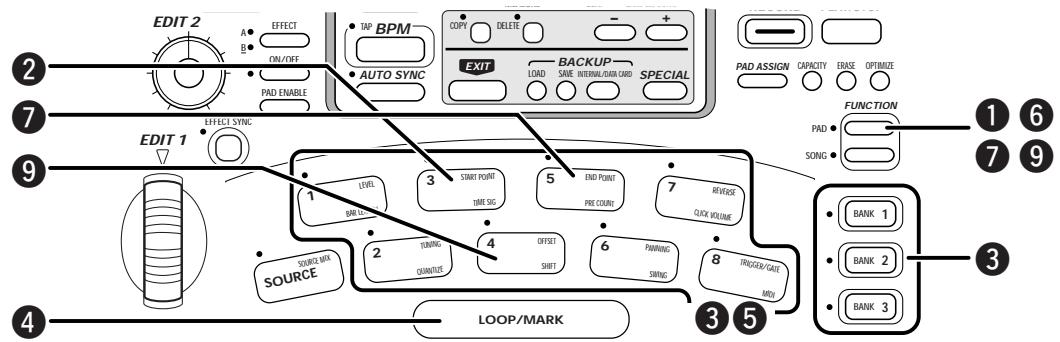

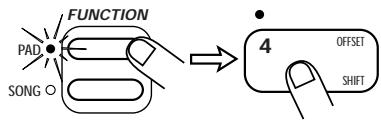
Press the [PAD FUNCTION] key.
The [PAD FUNCTION] LED flashes.
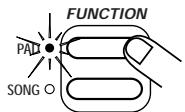

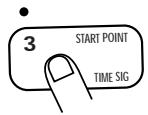
To set the start point, press pad 3 (START POINT).
The [PAD FUNCTION] LED and the LED of pad 3 are lit. Pressing the [PAD FUNCTION] key and then pad 3 enables the setting of the start point. All sample playback stops.

Use the [BANK 1] - [BANK 3] keys and the pads 1 - 8 to select the pad for which to set the start point.
While the pad is held down, the sample assigned to the pad plays in a loop.
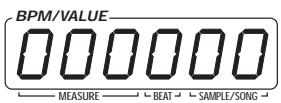
The address of the currently set start point is shown on the display. If the start point has not been set, "000000" is shown.

The display indication can be switched from number of samples to milliseconds. To do this, press the [SPECIAL] key after step 3.
STEP4
While listening to the loop playback of the sample, hit the [LOOP/MARK] pad at the point you want to designate as start point.
The address of that point (or the time in milliseconds) is shown on the display, and the new start point is set to this location.

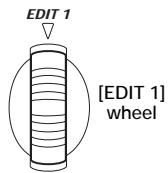
It is also possible to use the [EDIT 1] wheel for setting the start point. Moving the wheel during loop playback sets the start point to that location. For fine adjustment, hold down the [SOURCE] pad while turning the [EDIT 1] wheel.
STEP5
Press the pad selected in step 3 to confirm the new start point.
If necessary, the [-] [+] keys can be used to fine-tune the start point. It is also possible to directly specify the address with the [-] [+] keys without using the[LOOP/[MARK] pad or the [EDIT 1] wheel.

To return the start point set with the [LOOP/MARK] pad to the original position, press the [LOOP/MARK] pad again when playback has stopped.
STEP6
Press the [PAD FUNCTION] key.
The [PAD FUNCTION] LED goes out and the new start point is set.
STEP7
To modify the end point, press the [PAD FUNCTION] key and then pad 5 (END POINT).
The [PAD FUNCTION] LED and the LED of pad 5 are lit. Pressing the [PAD FUNCTION] key and then pad 5 enables the setting of the end point.


Pressing the [BPM] key while setting the end point switches the display to BPM units. This value is automatically calculated, considering the passage from the start point to the end point as 4 beats. Pressing the [BPM] key again switches back to normal display.
STEP8
Set the new end point, using the same procedure as described in steps 3 - 6.
STEP 9
To modify the offset, press the [PAD FUNCTION] key and then pad 4 (OFFSET).
The [PAD FUNCTION] LED and the LED of pad 4 are lit. Pressing the [PAD FUNCTION] key and then pad 4 enables the setting of the offset.
STEP10
Set the new offset, using the same procedure as described in steps 3 - 6.

- All settings can only be made within the length range of the current sample.
- The start point cannot be set to fall after the end point, and the end point cannot be set to fall before the start point.
- The offset point cannot be set to fall outside of the range between start point and end point.

Setting the Playback Parameters for Each Pad
The playback parameters such as level, tuning, playback position, etc. can be set individually for each pad.

Press the [PAD FUNCTION] key.
The [PAD FUNCTION] LED flashes.

Press one of pads 1 - 8 or the [SOURCE] pad to select the parameter to change.
(Parameter names are printed at the top right of the pads.) The [PAD FUNCTION] LED and the LED of the selected pad light up, and the current setting of that parameter is shown on the display. For a detailed explanation of parameters, see page 32.

Press the pad whose parameter you want to edit.

Use the [-] [+ ] keys or the [EDIT 1] wheel to change the setting.
For some parameters, the [LOOP/MARK] pad can also be used to specify a setting ( p. 32).

Press the [PAD FUNCTION] key again.
The change is made and the unit reverts to the pad play mode.

Pad Parameters
The types and values of parameters that can be set for pads 1 - 8 and the [SOURCE] pad are as follows.
- [SOURCE] pad (SOURCE MIX)
When this parameter is set to "on", the signal supplied at the input jacks is always sent to the output jacks. When the parameter is "oFF", the signal is sent only while the [SOURCE] pad is being pressed. The [-] [+] keys or the [EDIT 1] wheel can be used to change the setting. For information on use of the [SOURCE] pad, see page 26.
Setting values: on, oFF (Default settings: oFF)
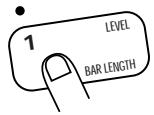
- Pad 1 (LEVEL)
Sets the output level for each sample. The [-] [+] keys or the [EDIT 1] wheel can be used to select a setting between 1 and 100. This parameter is also valid for the [SOURCE] pad. Pressing the [LOOP/MARK] pad resets the unit to the default (50).
Setting values: 1 - 100 (Default settings: 50)
- Pad 2 (TUNING)
Allows pitch tuning for each sample in units of 1 cent, over a range of + - 3 octaves.
The [-] [+] keys serve to change the setting in cent units, and the [EDIT 1] wheel in semitone units. The tuning setting can also be made in BPM units. In this case, the [BPM] key must be held down while the [-] [+] keys or the [EDIT 1] wheel are used (the indication "BPM" appears on the display).
Pressing the [LOOP/MARK] pad resets the unit to the original tuning. Pressing the [BPM] key again switches back to normal display.
Setting values: -36.00 - 36.00 (Default settings: 0) / 40 - 250 (BPM)
- Pad 3 (START POINT)
- Pad 4 (OFFSET)
- Pad 5 (END POINT)

Serve to set the start point, offset, and end point respectively. The [LOOP/MARK] pad serves to specify the point and the [-] keys allow fine-tuning. (For details, see page 29.)
Setting values: 000000 - 960000 (sample units) or 0.000 - 120.000 (S units)
(Default settings Start point: 0 Offset: 0 End point: last address)

The start point, offset, and end point can be displayed in sample units or in millisecond units. To switch the display method, press the [SPECIAL] key. The end point can also be set in BPM units.
- Pad 6 (PANNING)
Sets the panning position (left/right channel distribution) of the sample. When the setting is "L50", the sample plays only in the left channel. A setting of "0" is center, and a setting of "r50" right channel only. Use the [-] keys or the [EDIT 1] wheel to make the setting. This parameter is also valid for the [SOURCE] pad. Pressing the [LOOP/MARK] pad resets the unit to the default (0).
Setting values: L50 - 0 - r50 (Default settings: 0)
- Pad 7 (REVERSE)
Switches between reverse playback (on) and normal playback (oFF). When "on" is selected, playback proceeds from the end point to the start point. Use the [-] [+] keys or the [EDIT 1] wheel or the [LOOP/MARK] pad to make the setting.
Setting values: oFF, on (Default settings: oFF)
- Pad 8 (TRIGGER/GATE)
Selects one of the following three playback modes. Use the [-] [+] keys or the [EDIT 1] wheel or the [LOOP/MARK] pad to make the setting. This parameter is also valid for the [SOURCE] pad.
- Trigger playback
Sound starts when pad is hit once and stops when pad is hit again.
- Retrigger playback
Same as trigger playback, but hitting the pad during playback restarts from the beginning.
The [SOURCE] pad can not be set with this value.
- Gate playback
Sound is heard only while pad is held down and stops when pad is released (default).
Setting values: trGGEr/REtrG/GAtE (Default settings: GAtE)
[Trigger playback]
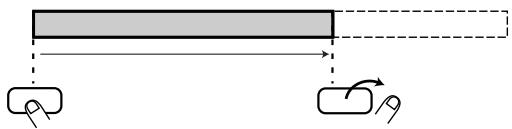
[Gate playback]
Sample plays only while pad is held down
[Re-Trigger playback]

Copying Pad Settings
The settings for a given pad (sample number, playback position, playback method, etc.) can be copied to another pad. This is useful for example when wishing to play the same sample with two pads, while changing only the tuning and panning settings.
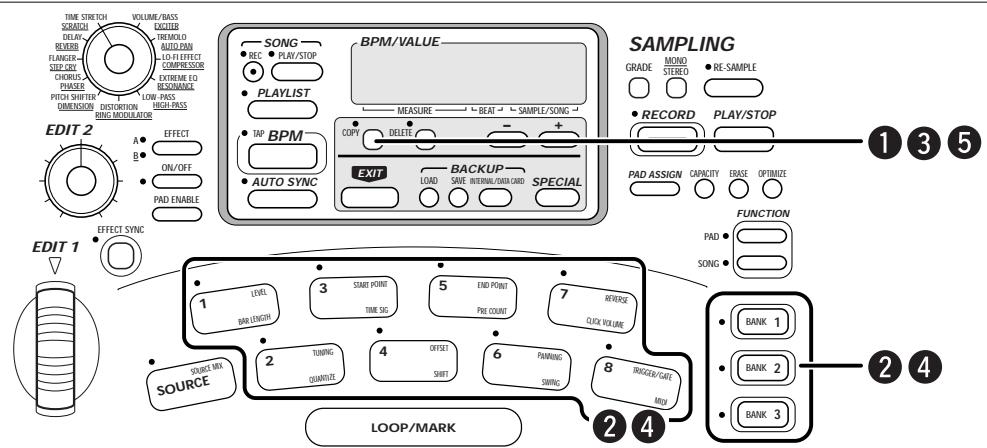

Press the [COPY] key.
The [COPY] LED flashes and the bank number (1 - 3) and pad number
(1 - 8) of the copy source are shown on the display.
![ZOOM ST-224 - Press the [COPY] key. - 1](/content/2025/01/152248/images/500289540ebadb33b1c55f552a40f958d5af944f781470882159b9d1385630ee.jpg)
Pad number
![ZOOM ST-224 - Press the [COPY] key. - 2](/content/2025/01/152248/images/8b0e259f7c9e520c12543106de36fe7f6a909bb3dee9e405e2ad6787184bb736.jpg)
![ZOOM ST-224 - Press the [COPY] key. - 3](/content/2025/01/152248/images/44f934e95cc94aed537b43885e8012e5d3acff935d30eaa1b4ded7555fe06d12.jpg)
Use the [BANK 1] - [BANK 3] keys and the pads 1 - 8 to select the pad from which to copy.
BANK 1-3 keys Pads 1-8
![ZOOM ST-224 - Press the [COPY] key. - 4](/content/2025/01/152248/images/a162887a62731510f02ae240205dcd8aea55b691902d80d6d921c0794b2ac91c.jpg)
![ZOOM ST-224 - Press the [COPY] key. - 5](/content/2025/01/152248/images/04b021edea2220ae8a9f003e9631fd3463bbc29888f7e84138a6d5ee107d1b7c.jpg)
Press the [COPY] key.
The copy source is selected.
![ZOOM ST-224 - Press the [COPY] key. - 6](/content/2025/01/152248/images/cf50d79ab7ae6ac645e3f7fb80fa43cb946cb21f77b117da4e2ced825e0de59b.jpg)
![ZOOM ST-224 - Press the [COPY] key. - 7](/content/2025/01/152248/images/cb84f4aa24765a95a6905a3063bee1870c1493058afc5ab3a3bff10b3ef36e22.jpg)
Use the [BANK 1] - [BANK 3] keys and the pads 1 - 8 to select the pad to which to copy.
![ZOOM ST-224 - Press the [COPY] key. - 8](/content/2025/01/152248/images/94bce6bbbb909e8a045a54974ebed1e9329a479e4e606015ee002a6beb3b0062.jpg)
![ZOOM ST-224 - Press the [COPY] key. - 9](/content/2025/01/152248/images/8dcbc3ce95949a4cd5ad999ab0bb8cad026d2a090ba01f63f7bc8eb31c0e9d6a.jpg)
![ZOOM ST-224 - Press the [COPY] key. - 10](/content/2025/01/152248/images/ecd5814792a519834c73161fbe9e8d1e76cdb546025e888a0dd9c27a15382cf6.jpg)
Press the [COPY] key again.
The copy is carried out. To cancel the copy process, press the [EXIT] key.
![ZOOM ST-224 - Press the [COPY] key again. - 1](/content/2025/01/152248/images/37d41061e51acc6654e90087f84427f9e31c00980ef8e027e64d3a69797c53fc.jpg)
Clearing Pad Settings
The settings for a given pad can be erased when no longer needed. When the settings for a pad are erased, the sample reverts to the original (unassigned) condition.

STEP1 Press the [DELETE] key.
The [DELETE] LED flashes and the bank number (1 - 3) and pad number (1 - 8) of the pad to be deleted are shown on the display.
![ZOOM ST-224 - STEP1 Press the [DELETE] key. - 1](/content/2025/01/152248/images/89f4be0ead57808ad490e246efc1deeeda579c0f6bc8d02f6b59213efcc95734.jpg)
![ZOOM ST-224 - STEP1 Press the [DELETE] key. - 2](/content/2025/01/152248/images/3f9a218b78a95452c1d332c89123900b515e8f3dde3af22b592e0efbddf9b760.jpg)
STEP2 Use the [BANK 1] - [BANK 3] keys and the pads 1 - 8 to select the pad to delete.
![ZOOM ST-224 - STEP2 Use the [BANK 1] - [BANK 3] keys and the pads 1 - 8 to select the pad to delete. - 1](/content/2025/01/152248/images/d37c85e99284d2c8d01d11637b719d4e21a7b5abc0dac1f70aa2c9727fbda0d4.jpg)
![ZOOM ST-224 - STEP2 Use the [BANK 1] - [BANK 3] keys and the pads 1 - 8 to select the pad to delete. - 2](/content/2025/01/152248/images/705b8259616c597f01eec386e4265e00aea5e7beb31aa49ea9bdd38dc80d6426.jpg)
STEP3 Press the [DELETE] key again.
The settings for the pad are deleted. To cancel the delete process, press the [EXIT] key instead of the [DELETE] key.
![ZOOM ST-224 - STEP3 Press the [DELETE] key again. - 1](/content/2025/01/152248/images/a6725b66e92079946099bfc669efbfadcc4ec11087718ec32324314fd63296bf.jpg)
![ZOOM ST-224 - STEP3 Press the [DELETE] key again. - 2](/content/2025/01/152248/images/d9670438e308af29e51874779e7bd9cf2f25182e5b098346c8b26c05fe8bf410.jpg)
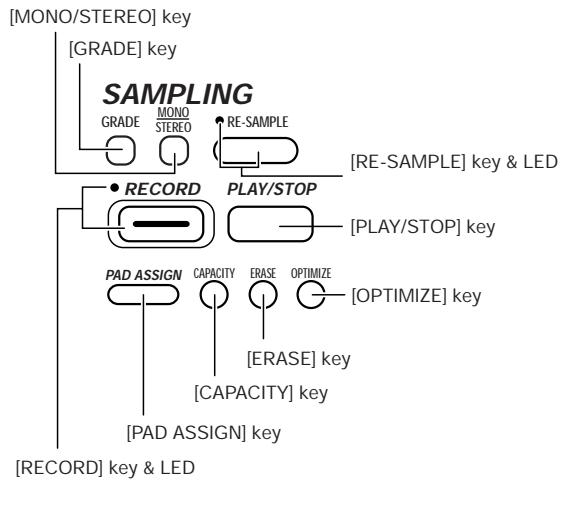
Erasing a Sample
You can delete a specific sample or all samples from the main memory. This is useful for example to remove all preprogrammed samples or to remove unwanted samples in order to free up memory.

Also when all samples are erased, the preprogrammed samples of the ST-224 can be restored by initializing the unit.
STEP1
To erase a specific sample, hold down the [PLAY/STOP] key and use the [-] [+] keys to select the sample number.
While the [PLAY/STOP] key is held down, the display shows the currently selected sample number. Use the [-] [+] keys to change the sample number.
STEP2
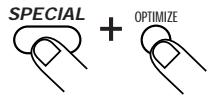
To erase the selected sample only, press the [ERASE] key. To erase all samples, hold down the [SPECIAL] key and press the [ERASE] key.
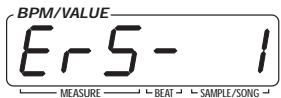
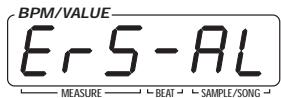
When a selected sample is being erased, the indication "ErS-XX" (XX is the sample number) is shown on the display. When all samples are being erased, the indication "ErS-AL" is shown on the display.
STEP3
Press the [ERASE] key again to carry out the erase process.
After erasing is completed, the unit reverts to the normal play mode. To cancel the erase process, press the [EXIT] key instead of the [ERASE] key.


Take care that you do not erase a sample you wish to keep. If a sample has not been transferred to the internal backup memory or an external data card, an erased sample cannot be restored.

- Also when a specific sample is erased, the numbers of the other samples do not change.
- Also when all samples are erased, the preprogrammed samples of the ST-224 can be restored by initializing the unit.

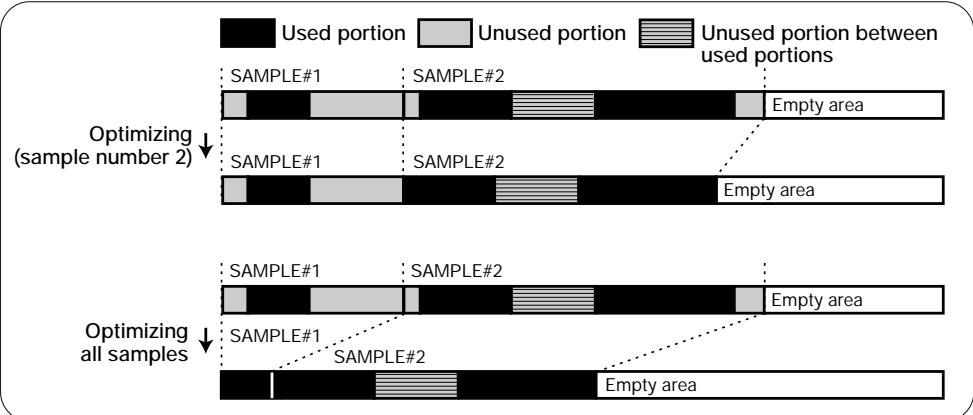
Optimizing Samples
Samples that are not assigned to pads or any unused portion can be erased to free up memory in the main memory. This is called optimizing. The process can be applied to a specific sample or to all samples.

To optimize only a specific sample, hold down the [PLAY/STOP] key and use the [-] [+ keys to select the sample number.
While the [PLAY/STOP] key is held down, the display shows the currently selected sample number. Use the [-] [+] keys to change the
sample number.
PLAY/STOP
Sample number

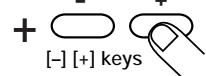

To optimize the selected sample only, press the [OPTIMIZE] key. To optimize all samples, hold down the [SPECIAL] key and press the [OPTIMIZE] key.
When a selected sample is being optimized, the indication "oPt-XX" (XX is the sample number) is shown on the display. When all samples are being optimized, the indication "oPt-AL" is shown on the display.


Press the [OPTIMIZE] key again.
After optimizing is completed, the unit reverts to the normal play mode.


- When several waveforms out of a single sample are assigned to pads, unused parts are not optimized.
- If a sample has not been transferred to the internal backup memory or an external data card, it cannot be restored after optimizing.

Matching BPM of Pads (Auto Sync)

The ST-224 incorporates an auto sync function that matches the tempo (BPM) of a pad to that of a reference pad. This is useful for example to align the tempo of a drum pattern and bass pattern sampled separately.

Using the Auto Sync Function (Basic Steps)
From the duration of a waveform assigned to a pad, the ST-224 can calculate the tempo, expressed in BPM (quarter note beats per minute). The auto sync function uses this value to match the tempo of the slave pad to that of a reference (master) pad.

Be sure to set the start point and end point so that there is a smooth rhythmic transition when using loop playback, because the ST-224 uses these points to make its calculations.

Sample the drum pattern and bass pattern or any other patterns you want to synchronize, and assign them to pads.

Adjust the start point and end point of each pad so that the sample for each pad has a smooth transition when using loop playback.
The ST-224 considers the length of the waveform assigned to a pad as being 4 beats (quarter note x 4), and automatically calculates the BPM value for this waveform. Therefore it is necessary to adjust each sample so that it loops perfectly before using the Auto Sync function.

Press the [AUTO SYNC] key.


Use the [-] keys to select the auto sync type.
The following two types are available.
-tuninG
The tuning value of the slave pitch is changed, and the sample length is changed. (A new sample is not created.)
rESMPL
The pitch is kept the same, and a new sample with changed length is created (resampling). This new sample is the assigned to the slave pad. It takes processing time to resample.

Press the [AUTO SYNC] key.
The [AUTO SYNC] LED flashes, and the indication "MAStEr" (master) appears on the display. This guides the user to specify the pad to be used as reference (master).
![ZOOM ST-224 - Press the [AUTO SYNC] key. - 1](/content/2025/01/152248/images/45f50a3789cc4d79c7762d2ee367e596679aa557096f555abc6b5ae6e4795f8a.jpg)
![ZOOM ST-224 - Press the [AUTO SYNC] key. - 2](/content/2025/01/152248/images/5662728adeba091eb14a589e6ee40626e1b5e6ccd8d40bd10f90b43a4a53d2b2.jpg)
![ZOOM ST-224 - Press the [AUTO SYNC] key. - 3](/content/2025/01/152248/images/174482ab20bd11ac920380fd962e9f71c24789d1ae87bbe43e8b632fbbbf1dee.jpg)
Use the [BANK 1] - [BANK 3] keys and the pads 1 - 8 to select the master pad for auto sync.
The LED of the selected pad lights up.
![ZOOM ST-224 - Press the [AUTO SYNC] key. - 4](/content/2025/01/152248/images/c9f10b9820df540c8688ed0df256e6f48ddcdf0f51bace4f10a8973f59ca45ea.jpg)
![ZOOM ST-224 - Press the [AUTO SYNC] key. - 5](/content/2025/01/152248/images/fafc73db594e57ea5c1527a2a620f7ff4bd70fd0b4bbe023826d183dd5f8751c.jpg)
Press the [AUTO SYNC] key.
The indication "SLAvE" (slave) appears on the display. This guides the user to specify the pad to be used as slave pad whose tempo is to be changed.
![ZOOM ST-224 - Press the [AUTO SYNC] key. - 1](/content/2025/01/152248/images/9fdfb5247cb3de22b076e422108d723a6e03eb7b54854578795a99d9763779d8.jpg)
![ZOOM ST-224 - Press the [AUTO SYNC] key. - 2](/content/2025/01/152248/images/f0ae85b91f7a00fe8a578a446963395697ae3be5b2d2419ab503fdba776f51bf.jpg)
Use the [BANK 1] - [BANK 3] keys and the pads 1 - 8 to select the slave pad for auto sync.
The LED of the selected pad lights up.
![ZOOM ST-224 - Press the [AUTO SYNC] key. - 3](/content/2025/01/152248/images/2dfdf6d8830eaed088e4ebde4ea248522da6eee6f5c221cbdd1c045705d7347f.jpg)
![ZOOM ST-224 - Press the [AUTO SYNC] key. - 4](/content/2025/01/152248/images/b1781b5179f0bec8040408749dc2a0d6c94b3ff815596cabaa865e5655aca630.jpg)
- When "rESMPL" is selected in step 4, a new sample will be created in the main memory. Therefore, sufficient free memory must be available. If not, or if the maximum number of 32 samples has already been reached, the indication "FULL" appears on the display when the slave pad is specified in step 8. In this case, delete unnecessary samples first.
- A pad which has same BPM value as the master pad can not be selected, in this case the indication "SAME" appears on the display.
![ZOOM ST-224 - Press the [AUTO SYNC] key. - 5](/content/2025/01/152248/images/a377e6b81fe4d44bcef03cc5d38e85c74824437654c18dd81df5a7bb0c7f0e67.jpg)
Press the [AUTO SYNC] key.
- When "tuninG" is selected in step 4
The tuning value of the slave pad is changed.
![ZOOM ST-224 - Press the [AUTO SYNC] key. - 1](/content/2025/01/152248/images/1d4ff661b2d94f7cf50108a0185b8fef0f92c9a0c3303f614f9f290bb4ff8442.jpg)
- If "rESMPL" is selected in step 4
The length of the sample assigned to the slave pad is changed, a new sample is created in the main memory (resampling) and assigned to the slave pad. During recording, the new sample can be monitored via the output jacks.
![ZOOM ST-224 - Press the [AUTO SYNC] key. - 2](/content/2025/01/152248/images/b8cdb25df967736aba725e96b72b86bba63ffa7f9e38f29d3cba6988d8b8e23c.jpg)
![ZOOM ST-224 - Press the [AUTO SYNC] key. - 3](/content/2025/01/152248/images/941bd52cfad9a2c5ca6efbb3438dbfa6b62bb857bd47b4c7f95cc83ec29f8cef.jpg)
When "rESMPL" is selected as auto sync type, resampling is carried out with the pitch shift effect applied. This may result in a slight alteration of the sound.
When auto sync is completed, the indication "A-SYnC" appears on the display.
![ZOOM ST-224 - Press the [AUTO SYNC] key. - 4](/content/2025/01/152248/images/0c65f7c78d4dce4fd1d3083d4fff064595ac1b082965bd0980f343fbf4e63d52.jpg)
![ZOOM ST-224 - Press the [AUTO SYNC] key. - 5](/content/2025/01/152248/images/1ad26be45c38b168e6a08954cb4ffcff8e2141ebe5d52b3d2ad87ee94f1da0f4.jpg)
Hit the master and slave pad together, to check whether the tempo is properly matched.
![ZOOM ST-224 - Press the [AUTO SYNC] key. - 6](/content/2025/01/152248/images/8fdaca45b7968c1ea47cf970e551581051c4a58fb73862b60e680fcb2cfb80be.jpg)
![ZOOM ST-224 - Press the [AUTO SYNC] key. - 7](/content/2025/01/152248/images/ce9ab48d3ffa25d32c22d9b24f013370fb86ef9b83a55fafa22b9ceb827dc0b7.jpg)
![ZOOM ST-224 - Press the [AUTO SYNC] key. - 8](/content/2025/01/152248/images/13979bac059d13ff1aca501dbd7df3e612ac08b9ab90013521ec635ec8e88516.jpg)
![ZOOM ST-224 - Press the [AUTO SYNC] key. - 9](/content/2025/01/152248/images/83ad44e4143f3762014b2c44c3144767bd2e901164798fbec6ac431d3a216938.jpg)
Examples of AUTO SYNC
![ZOOM ST-224 - Press the [AUTO SYNC] key. - 10](/content/2025/01/152248/images/6e1cc1343eecd391b01b8d9e9f1ba82280f67c7bc2eb23cdcca422213f852e36.jpg)
If auto sync was successful, press the [AUTO SYNC] key again to terminate the auto sync mode.
To redo the auto sync process, press the [EXIT] key. The unit returns to the condition before auto sync was executed. (The newly created sample is erased.)
![ZOOM ST-224 - Press the [AUTO SYNC] key. - 11](/content/2025/01/152248/images/30eea15fff53d26d19c6d539c99f9494ca24e58d8d3d80627d72a22dfb3c6382.jpg)
![ZOOM ST-224 - Press the [AUTO SYNC] key. - 12](/content/2025/01/152248/images/4d7af4bbd933a0bc5981183867c6c5b54acadb25c27084b050101448c8ee16e8.jpg)
When "rESMPL is selected as auto sync type, the sample assigned to the slave pad will be retained also after auto sync is executed. If this sample is no longer needed, erase or optimize it ( p.36 - 37 ).
![ZOOM ST-224 - Press the [AUTO SYNC] key. - 13](/content/2025/01/152248/images/7b2febab9f06bdbdda446723e8f9d863f112aa318364231c5852c6804cd258a0.jpg)
Changing BPM for Every Pad (Auto Sync Advanced Steps)
As explained in the previous section, the ST-224 regards the length of a sample assigned to a pad as 4 beats, and automatically calculates the BPM value for that pad. However, sometimes it may be desirable to synchronize phrases or patterns with a different beat pattern (such as combining a 4-beat bass pattern with an 8-beat drum pattern or a 2-beat sequencer pattern). In such a case, the BPM of a pad must be set to the actual value before using the auto sync function. Proceed as described below to change the BPM of a pad.
STEP1
Hold down the pad whose BPM you want to change, and press the [BPM] key.
The automatically calculated BPM value appears on the display.

The range of BPM values allowed by the ST-224 is 40 - 250. If the calculated BPM value is outside of this range, it is multiplied or divided by 2 until it fits in the range.
STEP2
While the BPM value is being shown, use the [-] [+] keys to set the actual BPM value of the phrase.
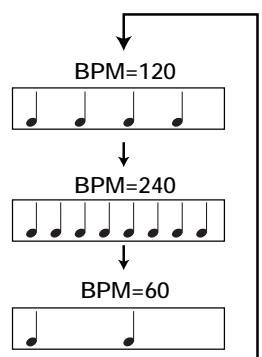
Each push of the [-] or [+] key changes the setting within the allowable range. For example, if the current setting is 120, the setting cycles as follows: 120 (4 beats) 240 (8 beats) 60 (2 beats). Choose the setting that corresponds to the number of beats in the current sample.


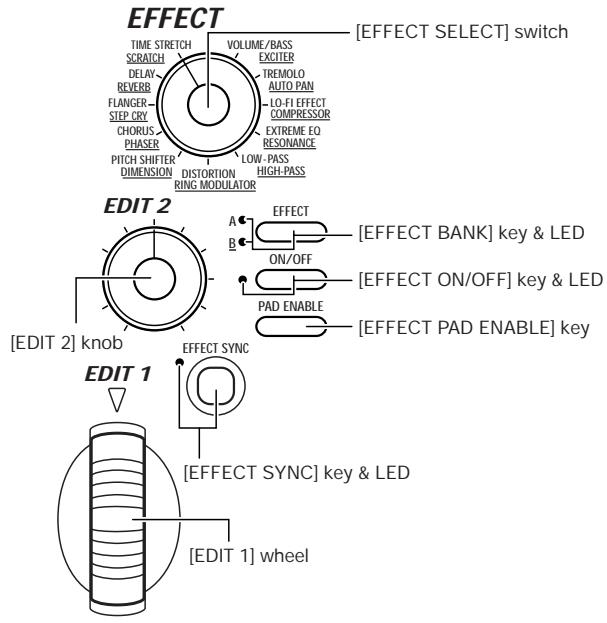
Using the Internal Effects

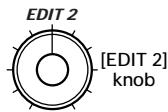
The ST-224 has 22 types of built-in effects. You can select any effect and apply it to the sound of any pad. The [EDIT 1] wheel and [EDIT 2] knob on the unit can be used to adjust effect parameters in real time. It is also possible to synchronize a specific effect parameter with a certain BPM value.

Applying an Effect to a Specific Pad
This section explains how to select an effect type, apply an effect to a pad, and how to adjust effect parameters.
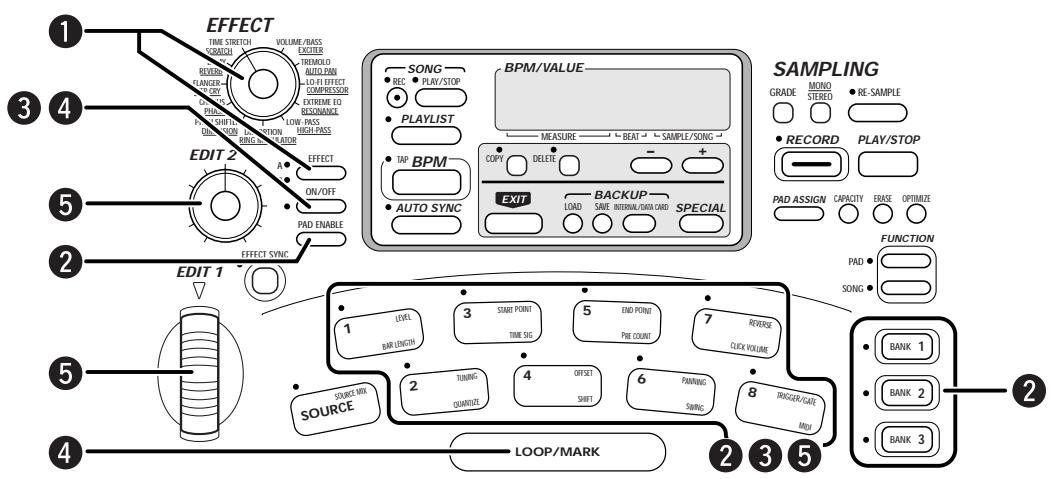

Use the [EFFECT SELECT] switch and [EFFECT BANK] key to select the effect type.
Rotate the [EFFECT SELECT] switch so that it points to the desired effect type. Use the [EFFECT BANK] key to switch between bank A (effect types without underline) and bank B (effect types with underline).

Hold down the [EFFECT PAD ENABLE] key and use the [BANK 1] - [BANK 3] keys and the pads 1 - 8 to select the pad to which to apply the effect. (Multiple pads can be selected.)
The LEDs of the selected pads light up, and the sound from these pads will be processed by the effects section.
BANK 1-3 keys


By pressing the [SOURCE] pad, the input source that is controlled by the [SOURCE] pad ( p.26) can also be routed to the effects section (excluding certain effect types).

The TIME STRETCH/SCRATCH effect can be applied only to sampled sound.

While holding down the [EFFECT ON/OFF] key, hit the pad you selected in step 2.
While the [EFFECT ON/OFF] key is held down, the [EFFECT ON/OFF] LED is lit and the effect is on.
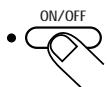

To turn the effect on permanently, hold down the [LOOP/MARK] pad and press the [EFFECT ON/OFF] key.
To turn the effect off again, press the [EFFECT ON/OFF] key once more.

When a MIDI message is used to turn an effect on, the effect will stay on until turned off by another MIDI message.

Operate the [EDIT 1] wheel and [EDIT 2] knob while hitting the pad for which effect processing has been enabled.
The [EDIT 1] wheel and [EDIT 2] knob can be used to edit effect parameters, and they also serve as real-time effect controllers during pad or sequencer playback. Which parameters are adjusted by the [EDIT 1] wheel and [EDIT 2] knob depends on the currently selected effect type ( p. 46).

Synchronizing Effect Parameter BPM
The ST-224 incorporates a special BPM function for effects (called "effect BPM") which allows synchronizing a selected effect parameter to this tempo. For example, this lets you easily match the delay time or modulation cycle to the tempo of a song.

Effect BPM can be set separately from pad BPM and the tempo of the internal sequencer. Effect BPM is the same tempo as the current Song unless you change it.
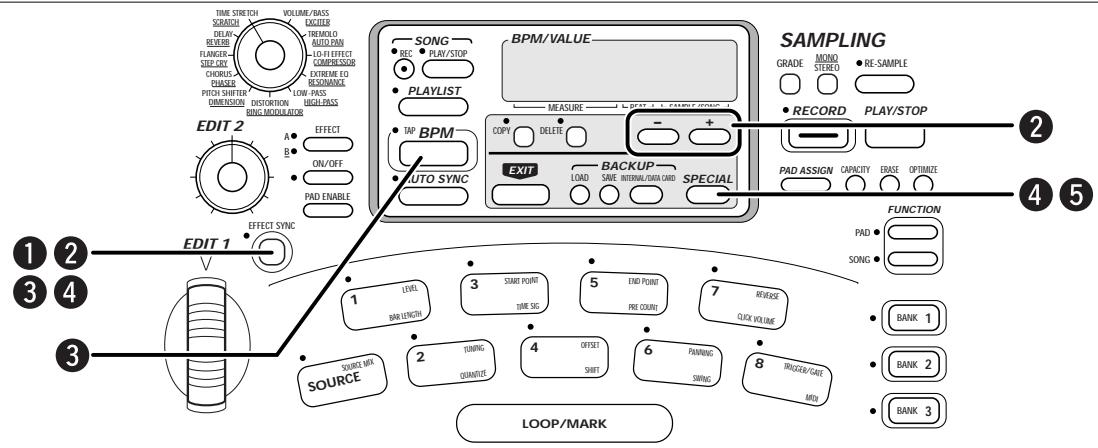

Press the [EFFECT SYNC] key.
The [EFFECT SYNC] LED lights up and the effect parameter is set automatically as to synchronize to effect BPM. To turn the effect sync off, press the [EFFECT SYNC] key once more.
![ZOOM ST-224 - Press the [EFFECT SYNC] key. - 1](/content/2025/01/152248/images/0bb564b16a131916dfab186348b6db404e2e484f5fdd09dda5ce284860e750ce.jpg)
![ZOOM ST-224 - Press the [EFFECT SYNC] key. - 2](/content/2025/01/152248/images/14b37a31b5be47944c07dabbfd583b7f34378708051e6b7557e439ccac2ceade.jpg)
Which effect parameter is synchronized to BPM depends on the effect. For some effects, there is no parameter that will be synchronized ( p. 46).
If an effect type which cannot be synchronized to BPM is selected, the indication "no SYnC" is shown on the display.
![ZOOM ST-224 - Press the [EFFECT SYNC] key. - 3](/content/2025/01/152248/images/41ebfbe980d99faef8c9a2e4c45123ee2186a43f21866688258b9f456fd08d27.jpg)
![ZOOM ST-224 - Press the [EFFECT SYNC] key. - 4](/content/2025/01/152248/images/69110eb6a177dded3f235628752ebaff4fe68245085c2339a7c5aff1a823538f.jpg)
To input the effect BPM value manually, hold the [EFFECT SYNC] key down and use the [-] [+ ] keys to change the value.
While the [EFFECT SYNC] key is held down, the effect BPM is shown on the display. Each push of a key changes the setting by one increment.
![ZOOM ST-224 - To input the effect BPM value manually, hold the [EFFECT SYNC] key down and use the [-] [+ ] keys to change the value. - 1](/content/2025/01/152248/images/6777a9cfdbad8969b9b84e20e46f492ed441f5e1823c14426b3c57c6b5d0069e.jpg)
![ZOOM ST-224 - To input the effect BPM value manually, hold the [EFFECT SYNC] key down and use the [-] [+ ] keys to change the value. - 2](/content/2025/01/152248/images/db5d21890ea23c3b6a5f6e2eeb472eaebddefc7d38f95aafdb00a77d08c0eb57.jpg)
![ZOOM ST-224 - To input the effect BPM value manually, hold the [EFFECT SYNC] key down and use the [-] [+ ] keys to change the value. - 3](/content/2025/01/152248/images/eff70282053c9770bcf06dc97b232a072eecf0e6a3f76d535701142284748419.jpg)
For tap input of the effect BPM, hold down the [EFFECT SYNC] key and tap the [BPM] key in the desired tempo.
The interval of the last 4 taps is automatically detected by the ST-224 and converted to a BPM value.
![ZOOM ST-224 - For tap input of the effect BPM, hold down the [EFFECT SYNC] key and tap the [BPM] key in the desired tempo. - 1](/content/2025/01/152248/images/5cda9e33a7fa0931ae86fafc7e7e7ea4a2df88e880f10e56f663a2fb50e57760.jpg)
![ZOOM ST-224 - For tap input of the effect BPM, hold down the [EFFECT SYNC] key and tap the [BPM] key in the desired tempo. - 2](/content/2025/01/152248/images/f2724b750dfa0e81f325a15497a368dd1f2a695611c8050d1e7cae0e92621771.jpg)
To set Effect BPM in metrical beats, hold down the [EFFECT SYNC] key and press the [SPECIAL] key.
The currently selected resolution appears on the display.
![ZOOM ST-224 - For tap input of the effect BPM, hold down the [EFFECT SYNC] key and tap the [BPM] key in the desired tempo. - 3](/content/2025/01/152248/images/439af5c8120d9a57f02cee06403270283d673fcf1510801930da17d5e2006b0a.jpg)
![ZOOM ST-224 - For tap input of the effect BPM, hold down the [EFFECT SYNC] key and tap the [BPM] key in the desired tempo. - 4](/content/2025/01/152248/images/a60a97dd1dbbaa61dd85becf1395615b7de76445872a9422aa32cf7dba8767bd.jpg)
![ZOOM ST-224 - For tap input of the effect BPM, hold down the [EFFECT SYNC] key and tap the [BPM] key in the desired tempo. - 5](/content/2025/01/152248/images/4009a4e8eadd8dc5e4251c43aa3e30430a168a6b4fa19e3073b6a3cc9be074e3.jpg)
Use the [SPECIAL] key to select the next resolution setting
![ZOOM ST-224 - For tap input of the effect BPM, hold down the [EFFECT SYNC] key and tap the [BPM] key in the desired tempo. - 6](/content/2025/01/152248/images/3289a0c2e187e204cd7d180e19ff3b07acc902e17916547ba1ac480e0e811ed9.jpg)
![ZOOM ST-224 - For tap input of the effect BPM, hold down the [EFFECT SYNC] key and tap the [BPM] key in the desired tempo. - 7](/content/2025/01/152248/images/c8958d05c05eda0ffe5aeda9dafc9fbcfebd8dcc92b2eb4c80f1a767f645a39e.jpg)
![ZOOM ST-224 - For tap input of the effect BPM, hold down the [EFFECT SYNC] key and tap the [BPM] key in the desired tempo. - 8](/content/2025/01/152248/images/ea6816f186575c9621b6ee8f9cdadcdb0b9a4892a14d8b78c1788f574ee9fecf.jpg)
Example for effect BPM synchronization
This section lists all effect types with their parameters which can be adjusted using the [EDIT 1] wheel and [EDIT 2] knob. The list also shows which parameters can be synchronized to effect BPM.
EDIT 1 = parameter can be adjusted with [EDIT 1] wheel
EDIT 2 = parameter can be adjusted with [EDIT 2] knob
SYNC = parameter can be synchronized to effect BPM
| EFFECT TYPE | BANK | EDIT 1 | EDIT 2 | SYNC | Description |
| TIME STRETCH | A | amount | tone | - | This effect stretches or compresses the sample duration without changing the pitch. The [EDIT 1] wheel adjusts the duration (amount), and the [EDIT 2] knob the sound quality (tone). This effect type cannot be used with the [SOURCE] pad. |
| SCRATCH | B | speed | tone | - | This effect stretches or compresses the sample duration and also changes the pitch, depending on the stretch or compression ratio. The [EDIT 1] wheel adjusts the duration (speed), and the [EDIT 2] knob the sound quality (tone). |
| DELAY | A | time | mix & feedback | time | This delay type effect creates an echo. The [EDIT 1] wheel adjusts the delay time (time: max. 505 ms), and the [EDIT 2] knob the number of repeats (feedback) and the mix amount (mix). When the [EFFECT SYNC] key is set to ON, the delay time parameter is synchronized to the effect BPM. |
| REVERB | B | time | mix | - | This effect adds reverberation to the sound. The [EDIT 1] wheel adjusts the reverber time (time), and the [EDIT 2] knob the mix amount (mix). |
| FLANGER | A | rate | feedback | rate | This is a stereo flanger effect. The [EDIT 1] wheel adjusts the flanger fluctuation speed (rate), and the [EDIT 2] knob the feedback intensity (feedback) and the mix amount (mix). When the [EFFECT SYNC] key is set to ON, the fluctuation cycle is synchronized to the effect BPM. |
| STEP CRY | B | rate & reso & mod-wave | sens | rate | This is a special effect that uses filters to lend a distinct, stair-like character to the sound. The [EDIT 1] wheel adjusts the sample & hold speed (rate) and the filter resonance (reso) and modulation waveform balance (mod-wave). The [EDIT 2] knob adjusts the effect sensitivity (sens). When the [EFFECT SYNC] key is set to ON, the sample & hold cycle is synchronized to the effect BPM. Turning the wheel forward intensifies the cry effect and turning it backward increases the step effect. |
| CHORUS | A | rate | mix | - | This is a stereo chorus effect with width and depth. The [EDIT 1] wheel adjusts the chorus speed (rate), and the [EDIT 2] knob the mix amount (mix). |
| PHASER | B | rate | resonance | rate | This effect adds a phase-shifted component to the original sound, resulting in a pulsating character. The [EDIT 1] wheel adjusts the pulsing speed (rate), and the [EDIT 2] knob the resonance (resonance). When the [EFFECT SYNC] key is set to ON, the resonance is synchronized to the effect BPM. |
| PITCH SHifter | A | pitch | tone | - | Pitch-shifter with a +1 octave range. The [EDIT 1] wheel adjusts the pitch shift amount (pitch), and the [EDIT 2] knob the sound quality (tone). |
| DIMENSION | B | rise level | tone | - | This effect produces a spatial broadening of the sound. The [EDIT 1] wheel adjusts the effect intensity (rise level), and the [EDIT 2] knob the sound quality (tone). |
| DISTORTION | A | gain | tone | - | This effect produces a wild-sounding distortion. The [EDIT 1] wheel adjusts the distortion gain (gain), and the [EDIT 2] knob the tone. The distortion is a mono effect. |
| RING MODULATOR | B | frequency | balance | - | This effect uses AM (amplitude modulation) to achieve a metallic sound. The [EDIT 1] wheel adjusts the modulation frequency (frequency), and the [EDIT 2] knob the level ratio between original sound and effect sound (balance). |
| LOW-PASS | A | frequency | resonance | LFO | This is a low-pass filter that cuts off high frequencies. The [EDIT 1] wheel adjusts the filter cutoff frequency (frequency), and the [EDIT 2] knob the resonance (resonance). When the [EFFECT SYNC] key is set to ON, the periodic alteration of the filter cutoff frequency (LFO) is synchronized to the effect BPM. |
| HIGH-PASS | B | frequency | resonance | LFO | This is a high-pass filter that cuts off low frequencies. The [EDIT 1] wheel adjusts the filter cutoff frequency (frequency), and the [EDIT 2] knob the resonance (resonance). When the [EFFECT SYNC] key is set to ON, the periodic alteration of the filter cutoff frequency (LFO) is synchronized to the effect BPM. |
| EXTREME EQ | A | gain | filter type | - | When the [EDIT 1] wheel is turned forward, the selected frequency band is attenuated. When the wheel is turned back, the frequency range outside the selected band is attenuated. The [EDIT 2] knob selects the LOW, MID, or HIGH range. |
| RESONANCE | B | resonance | sens | LFO | This is a filter whose effectivity varies with the signal level. The [EDIT 1] wheel adjusts the filter sensitivity (sens). When the [EFFECT SYNC] key is set to ON, the periodic alteration of the filter sensitivity (LFO) is synchronized to the effect BPM. |
| LO-FI | A | noise | tone | - | This effect makes the sound gritty and rough. The [EDIT 1] wheel adjusts the record type noise (noise), and the [EDIT 2] knob the sound quality (tone). |
| COMPRESSOR | B | ratio | threshold | - | This is a conventional compressor for compressing the dynamic range. The [EDIT 1] wheel adjusts the compression ratio (ratio), and the [EDIT 2] knob the threshold level (threshold). |
| TREMODO | A | rate & clip | depth | rate | This is a tremolo effect which shifts the volume periodically up and down. The [EDIT 1] wheel adjusts the tremolo speed (rate) and the modulation waveform clipping amount (clip). The [EDIT 2] knob adjusts the tremolo effect intensity (depth). When the [EFFECT SYNC] key is set to ON, the periodic alteration of the tremolo is synchronized to the effect BPM. |
| AUTO PAN | B | rate | width | rate | This effect periodically moves the sound back and forth between the right and left channel. The [EDIT 1] wheel adjusts the auto pan speed (rate), and the [EDIT 2] knob the stereo width (width). When the [EFFECT SYNC] key is set to ON, the auto pan cycle is synchronized to the effect BPM. |
| VOLUME/BASS | A | volume | bass boost | - | Adjusts the volume level and the low-frequency boost. The [EDIT 1] wheel adjusts the volume (volume: 0 dB at center position, max. +6 dB), and the [EDIT 2] knob the amount of bass boost (bass boost). |
| EXCITER | B | sens | frequency | - | This effect emphasizes a specified frequency range according to the signal level, giving a prominent character to the sound. The [EDIT 1] wheel adjusts the effect sensitivity (sens), and the [EDIT 2] knob the emphasized frequency (frequency). |
Creating Songs
The ST-224 lets you record and play eight songs. A song is a series of pad actions. The maximum number of sounds is 5000, and the maximum length of all songs together is 300 bars.
When a song which contains data has been selected, the song number and information about the current position (number of bars and beats) are shown on the display. When a song without data has been selected, the position information shows only "----".
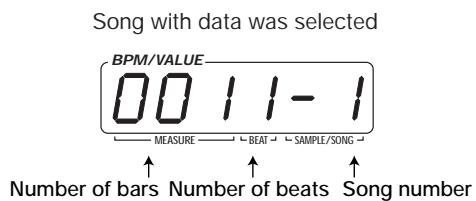

Song recording
The following procedure will record a series of pad actions as a song.
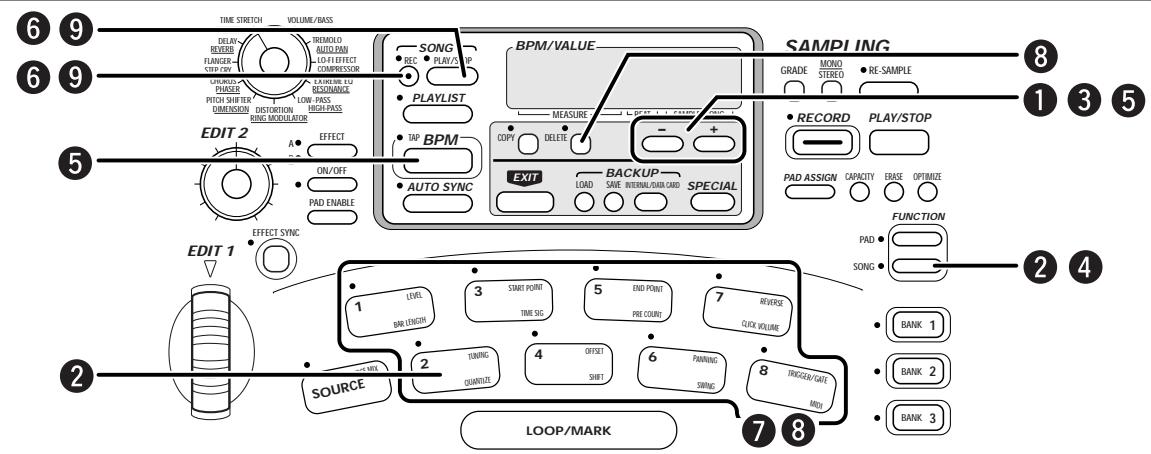
STEP1 In play mode, use the [-] [+ ] keys to select an empty song (1 - 8).
![ZOOM ST-224 - STEP1 In play mode, use the [-] [+ ] keys to select an empty song (1 - 8). - 1](/content/2025/01/152248/images/cb9979ae7efe120202a102c95392cd0ce9311abd5cb61121d872cd165e4a6205.jpg)
It is also possible to select a song which already has data and add to it.
![ZOOM ST-224 - STEP1 In play mode, use the [-] [+ ] keys to select an empty song (1 - 8). - 2](/content/2025/01/152248/images/b950a6a7fb70daa78bc16e652ba5f601a07491690374ec1f0f1df6089ad9c0c7.jpg)
![ZOOM ST-224 - STEP1 In play mode, use the [-] [+ ] keys to select an empty song (1 - 8). - 3](/content/2025/01/152248/images/096db2b7eca066becc377524b60cd9a308f052f23123b740a173eec0f2118d34.jpg)
STEP2 Press the [SONG FUNCTION] key and then pad 2.
The [SONG FUNCTION] LED flashes and the LED of pad 2 lights up, and the current quantize setting appears on the display. The quantize setting determines the amount of detail with which the notes in a pad action is recorded. Choose the quantize setting with regard to the kind of pattern you want to record. This will automatically ensure proper timing.
![ZOOM ST-224 - STEP2 Press the [SONG FUNCTION] key and then pad 2. - 1](/content/2025/01/152248/images/548cee453ac5f68d292a98bea1e097d036f015dc0b896c8cfe9879a988cdeb60.jpg)
![ZOOM ST-224 - STEP2 Press the [SONG FUNCTION] key and then pad 2. - 2](/content/2025/01/152248/images/f9d4053cfd08af4f536d83a1661e1f0afef0a38fcbcb48d4a9828838f1d450c6.jpg)
STEP3
Use the [-] [+] keys to select the desired quantize setting (minimum note).
4 quarter note
8 eighth note
12 eight note triplet
16 sixteenth note
24 sixteenth note triplet
32 thirty-second note
Hi No quantization (1/24 of a quarter note)
STEP4
Press the [SONG FUNCTION] key again.
The [SONG FUNCTION] LED goes out, and the new quantize setting becomes active.
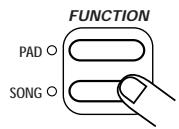
STEP5
Hold down the [BPM] key and use the [-] [+] keys to set the tempo (BPM).
While the [BPM] key is held down, the display shows the BPM setting
of the song.
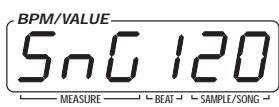
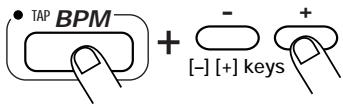
To change the BPM setting, use the [-] [+] keys. It is also possible to perform tap input. To do this, tap the [BPM] key in the desired tempo.
The interval of the last 4 taps is automatically detected by the ST-224 and converted to a BPM value.
This BPM setting can be stored for individual songs.
STEP6
Holding down the [SONG REC] key, press the [SONG PLAY/STOP] key.
The [SONG REC] LED lights up and recording starts with a metronome sound. The current bar and number of beats appear on the display.
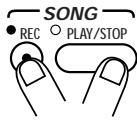

If not otherwise specified, an empty song has 4/4 beats and 4 bars. (To change the beats and length of a song, see page 53.)
STEP7
Tap the pads according to the metronome sound.
The samples assigned to the pads are heard, and the performance is recorded in the song with the selected quantize resolution. When the end of the song is reached, recording loops back to the beginning, so you can repeat the recording as often as desired. (The maximum number of sounds that may used simultaneously is 8 mono samples. If this number is exceeded, sound dropouts may occur.)

You can also switch banks with the [BANK 1] - [BANK 3] keys during recording and hit pads from other banks.

- Remember that the song records not the sound itself but only the series of pad actions. Therefore if the sample assigned to a

pad is changed after recording, the song will also be different during playback.
- Effect operations are not recorded in a song. However, if effects are enabled for a pad, the effects will be active also during playback of the song.
- The operation of the [SOURCE] pad cannot be recorded.

If you have made a mistake in playing a particular pad, hold down the [DELETE] key and hit the pad again.
While the [DELETE] key is held down, any pads that are hit will be deleted from the song.


To terminate recording, press the [SONG REC] key once more or press the [SONG PLAY] key.
The [SONG REC] LED goes out and song recording stops.
The song is temporarily stored in the main memory, but it will be lost if the unit is turned off without first transferring the song data to the internal backup memory or external data cards. Do not forget to store any songs you wish to keep. (For information on how to store songs, see page 59.)
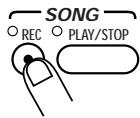

Playing a Song
This section describes how to play a song that has been recorded.
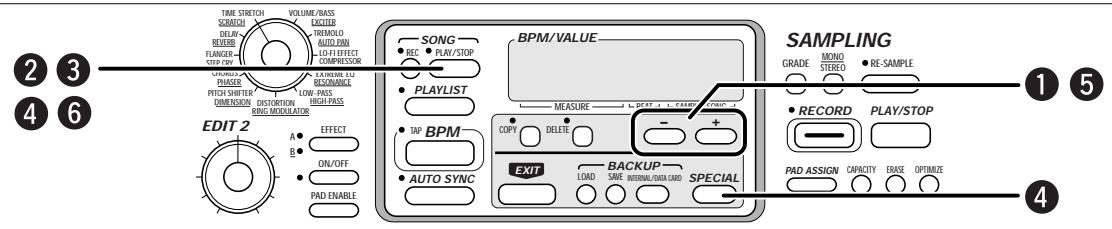
STEP1 In play mode, use the [-] [+ ] keys to select the song number (1 - 8).
STEP2 Press the [SONG PLAY/STOP] key.
The [SONG PLAY/STOP] LED lights up and playback of the song starts at the beginning.
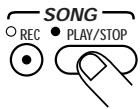

- Also during playback of a song, you can hit pads to play them manually. However, the maximum number of simultaneous sounds may not be exceeded.
- Effect operations are not recorded in the song.
- Pressing the [SONG PLAY/STOP] key while holding down the [LOOP/MARK] pad causes the song to be repeated.
STEP3 To stop the song, press the [SONG PLAY/STOP] key again.
The [SONG PLAY/STOP] LED goes out.
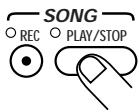
You can also change the playback position of the song. While the song is stopped, hold down the [SPECIAL] key and the press the [SONG PLAY/STOP] key.
The playback start position is indicated on the display, using the number of bars.
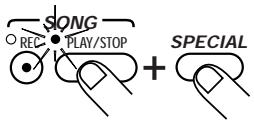
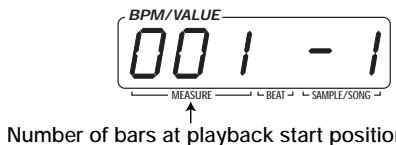
STEP5 Use the [-] [+] keys to specify the bar.
The number of bars shown on the display changes according to the [-] [+] key operation.
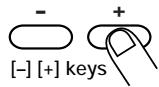

You can also use the [EDIT 1] wheel instead of the [-] keys.
STEP 6 When you have specified the desired position, press the [SONG PLAY/STOP] key.
The new start point is set. Song recording and playback can be carried out from this point.
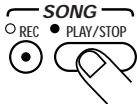

Changing Song Settings
The length of a song or the number of beats, the metronome sound volume, pre-count setting and other song settings (song function parameters) can be changed, as follows.
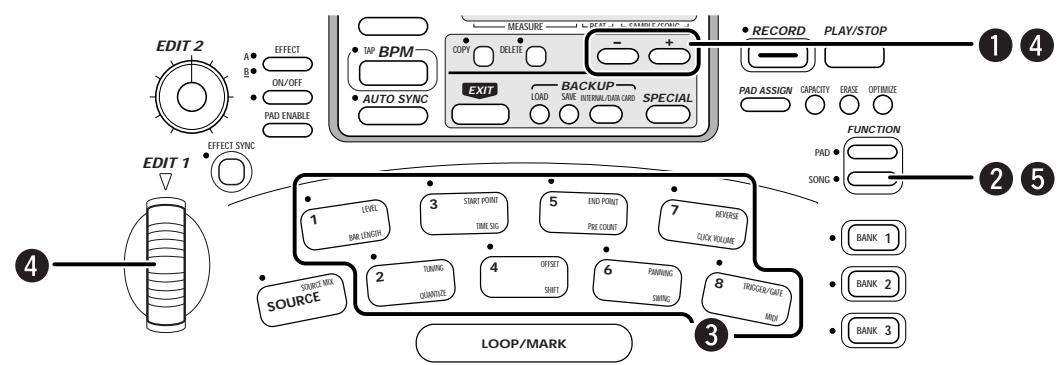
STEP1
In play mode, use the [-] [+ ] keys to select the song number (1 - 8).


[-] [+] keys
STEP2
Press the [SONG FUNCTION] key.
The [SONG FUNCTION] LED flashes.
STEP3
Select the item to be set, using pads 1 - 8.
When the [SONG FUNCTION] key is pressed, the pads serve to select the parameters printed at the bottom right. When a pad is pressed, the [SONG FUNCTION] LED and the LED of the pad are constantly lit, and the setting of the respective parameter appears on the display. (For details on the song function parameters, see page
53.)
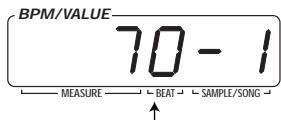
Parameter setting values
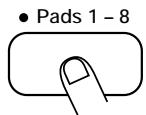
STEP4
Use the [-] [+] keys or the [EDIT 1] wheel to change the setting.
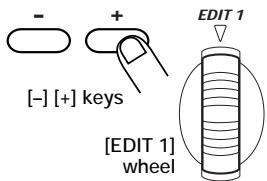
STEP5
Press the [SONG FUNCTION] key again.
The [SONG FUNCTION] LED goes out and the changed parameter is accepted. To cancel the parameter change, press the [EXIT] key instead of the [SONG FUNCTION] key.
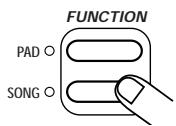

Song Function Parameters
The song function parameters assigned to pads 1 - 8 are as follows.
- Pad 1 (BAR LENGTH)
Sets the length of a bar in the song. The maximum number is 300 bars for each song. This parameter can be specified for each song individually.
Setting values: 1 - 300 (Default settings: 4)

If a song is set to a longer time after recording, blank bars are added to the end of the song. If set to a shorter time, the excess bars are cut off.
- Pad 2 (QUANTIZE)
Sets the quantization value used for recording ( p. 49). This parameter has no effect on song playback.
Setting values: 4, 8, 12, 16, 24, 32, Hi (Default settings: 16)
- Pad 3 (TIME SIG)
Sets the time of the song. This parameter can be specified for each song individually.
Setting values: 2 (2/4), 3 (3/4), 4 (4/4) (Default settings: 4)

After recording is complete, the beat of a song cannot be changed.
- Pad 4 (SHIFT)
Shifts the playback timing of the ST-224 back and forth. This is useful for example to match the playback to the timing of external equipment. The setting is made in 1-tick units (1/24 of a quarter note), and the maximum setting is 2 bars.
Setting values: -48 to +48 (Default settings: 0)

When this item is changed, the playback data stored for a song are rewritten. Excess portions at the beginning and end will be cut off.
- Pad 5 (PRE COUNT)
Determines whether the metronome sound is heard before recording.
0: No pre-count
1: Recording starts after pre-count of 1 measure.
2: Recording starts after pre-count of 2 measures.
PAd: Recording starts as soon as a pad is hit.
Setting values: 0, 1, 2, PAd (Default settings: 1)
- Pad 6 (SWING)
Sets the swing (rhythm fluctuation) during song playback. Higher values result in more pronounced swing. This parameter only affects playback, it does not alter the recorded data of a song.
Setting values: 50 - 75 (Default settings: 50)
- Pad 7 (CLICK VOLUME)
Sets the volume of the metronome click.
Setting values: 0 - 100 (Default settings: 70)
- Pad 8 (MIDI)
The internal sequencer can be controlled either by the internal clock (int) or by the MIDI clock derived from MIDI messages sent from external equipment (Midi).
Setting values: int, Midi (Default settings: int)

When "Midi" is selected, song recording is not possible.

While this song parameter is called, the MIDI receive channel can be selected by holding down any of the [BANK 1] - [BANK 3] keys and using the [-] [+] keys.

Copying a Song
The data recorded for a song can be copied to another song, for example to create a different version.
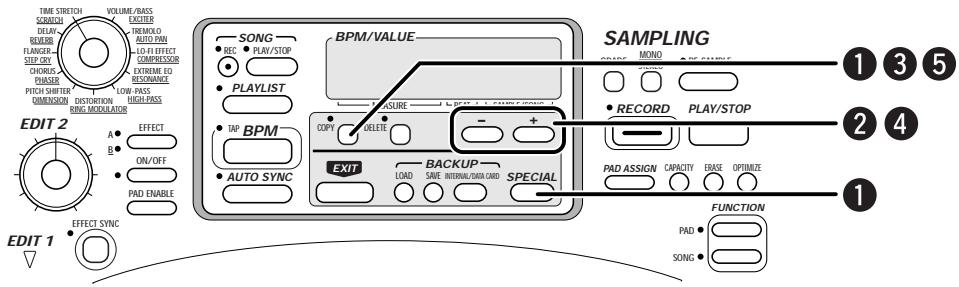
STEP1
Hold down the [SPECIAL] key and press the [COPY] key.
The [COPY] LED flashes and the song number (1 - 8) of the copy target appears on the display.
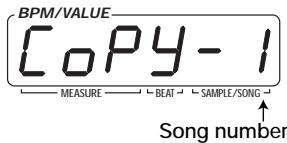
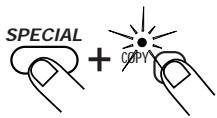
STEP2
Use the [-] [+] keys to select the song to be used as copy source.
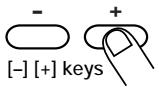
STEP3
Press the [COPY] key.
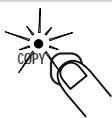
STEP4
Use the [-] keys to select the song to be used as copy target.

STEP5
Press the [COPY] key.
The [COPY] LED goes out and the copy is carried out. To cancel the copy process, press the [EXIT] key instead of the [COPY] key.


If a copy is attempted without sufficient free capacity in the main memory, the indication "FULL" appears on the display. Delete songs that are no longer needed.

Deleting a Song
The data recorded for a song can be deleted if no longer required. A deleted song is returned to the default (blank) condition.
STEP1 Hold down the [SPECIAL] key and press the [DELETE] key.
The [DELETE] LED flashes and the song number (1 - 8) of the delete target appears on the display.
![ZOOM ST-224 - STEP1 Hold down the [SPECIAL] key and press the [DELETE] key. - 1](/content/2025/01/152248/images/fddeb5aac4fb2f0d37a7556513d869cd61ca8a8e6f6e0f4cd7f36cd20c73ca61.jpg)
![ZOOM ST-224 - STEP1 Hold down the [SPECIAL] key and press the [DELETE] key. - 2](/content/2025/01/152248/images/8e158a60bb070b7011023d2297ddbf6cea9648a6450ca525138a8c9151cc1ec7.jpg)
STEP2 Use the [-] [+] keys to select the song to be deleted.
![ZOOM ST-224 - STEP2 Use the [-] [+] keys to select the song to be deleted. - 1](/content/2025/01/152248/images/c300594d356079ccb34e7ff2576fc70681ba0f4baea95297cb12481816db4195.jpg)
![ZOOM ST-224 - STEP2 Use the [-] [+] keys to select the song to be deleted. - 2](/content/2025/01/152248/images/c8d5a58dfa2fc2916bec55e9429f1d7ffb189f0507f85645c5af6548791a90be.jpg)
STEP3 Press the [DELETE] key again.
The [DELETE] LED goes out and the delete process is carried out. To cancel the delete process, press the [EXIT] key instead of the [DELETE] key.
![ZOOM ST-224 - STEP3 Press the [DELETE] key again. - 1](/content/2025/01/152248/images/080f58dbcb3f18611a34c205b78ab99fca5e867e534c5b7c7d9b8418c3166a7b.jpg)
The ST-224 incorporates a play list function which lets you assign songs 1 - 8 to pads 1 - 8 and play the songs by hitting the pads. This section explains how to use this function.
![ZOOM ST-224 - STEP3 Press the [DELETE] key again. - 2](/content/2025/01/152248/images/0b006d5743a53b751d9b53d8f058a90ea05d6fb172e36d045f82c52909994fa4.jpg)
Assigning Songs to Pads
STEP1
Record songs 1 - 8 to assign to the pads.
STEP2
While the unit is in play mode, press the [PLAYLIST] key.
The ST-224 goes into play list mode. The [PLAYLIST] LED lights up and the [BANK 1] - [BANK 3] LEDs go out. Songs 1 - 8 are now assigned to pads 1 - 8 and can be played with the pads.

STEP 3
Press one of pads 1 - 8.
The LED of the pad lights up and the song assigned to the pad is played back in loop mode.
STEP4
To switch songs, hit another pad.
Only one song can be played at a time. If another pad is pressed while a song is playing, the previous song stops and playback of the new song starts.

STEP5
To set song playback to the hold mode, press the [LOOP/MARK] pad.
The song continues to play also after the pad is released.
[LOOP/MARK] pad

STEP6
To terminate the play list mode, press the [PLAYLIST] key.
The [PLAYLIST] LED goes out and the unit reverts to normal play mode.


Also during play list playback, the internal effects and the [SOURCE] pad for input source playback can be used.
Using the Resampling Function
"Resampling" refers to returning the output of the ST-224 to the sampler section for repeated sampling in the digital domain. This can be used to create a new sample based on multi-pad play or song playback by the internal sequencer. The new sample can then again be assigned to a pad. Resampling is also possible while the internal effects are active.
Resampling Pad Play or Songs

STEP1 To resample pad play, use the [BANK 1] - [BANK 3] keys to select the bank which contains the desired pad. To resample a song, use the [-] [+] keys to select the song.
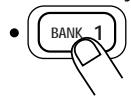
BANK 1-3 keys
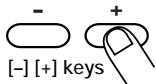
STEP2 If desired, select the internal effects.
[EFFECT SELECT] switch

STEP3 Press the [RECORD] key.
The [RECORD] LED flashes and the ST-224 goes into the sampling standby condition.

STEP4 Select the desired sampling grade and the mono/stereo setting.
STEP5 Press the [RE-SAMPLE] key.
The [RE-SAMPLE] LED lights up and the ST-224 is in the resampling standby condition.

- RE-SAMPLE
STEP 6 To terminate resampling automatically, perform the following steps, depending on the desired mode.
- To terminate resampling after a preset interval
Hold down the [PLAY/STOP] key, and use the [-] [+] keys to set the auto sampling time ( p. 24).
- To terminate resampling when one-shot playback of pad is completed Press the [PAD FUNCTION] key so that the [PAD FUNCTION] LED lights up.
- To terminate resampling when playback of song is completed Press the [SONG FUNCTION] key so that the [SONG FUNCTION] LED lights up.
STEP7 Press the [RECORD] key again.
The indication "rEAdy" appears on the display.
![ZOOM ST-224 - STEP7 Press the [RECORD] key again. - 1](/content/2025/01/152248/images/59740d247e1e6fae3e2fa2ef4e1a7db7f0d69173a5d3a2c883515d0a5d006662.jpg)
![ZOOM ST-224 - STEP7 Press the [RECORD] key again. - 2](/content/2025/01/152248/images/bfa0da975f0d2feb23b01fff0fc38cb31ad40d3d93702459dc91bd91052a2756.jpg)
STEP8 To resample a song, press the [SONG PLAY/STOP] key. To resample pad play, hit one of pads 1 - 8.
Resampling starts as soon as the [SONG PLAY/STOP] key or one of pads 1 - 8 is pressed.
![ZOOM ST-224 - STEP8 To resample a song, press the [SONG PLAY/STOP] key. To resample pad play, hit one of pads 1 - 8. - 1](/content/2025/01/152248/images/9e6669192692ce1bf14474105612a0d77991e652d51c294823bc7f1e543a4930.jpg)
![ZOOM ST-224 - STEP8 To resample a song, press the [SONG PLAY/STOP] key. To resample pad play, hit one of pads 1 - 8. - 2](/content/2025/01/152248/images/9bb957ace2e5f5d8fe76092fa55a3f67f2c614a471c68d58df5536e882b8d0bd.jpg)
![ZOOM ST-224 - STEP8 To resample a song, press the [SONG PLAY/STOP] key. To resample pad play, hit one of pads 1 - 8. - 3](/content/2025/01/152248/images/8cc6af89cf69d5044d3b54cd681fe06679e6aa846e34d228b1a953b9ac173cdd.jpg)
Resampling can be carried out while combining song playback and pad play, and while varying effect parameters in real time.
STEP9 To manually terminate resampling, press the [PLAY/STOP] key.
![ZOOM ST-224 - STEP9 To manually terminate resampling, press the [PLAY/STOP] key. - 1](/content/2025/01/152248/images/cd0fc6f3035020fd49f5536231d4dbd211f1ca983d92fdb45cbcd6a890c9ee64.jpg)
PLAY/STOP
STEP10 If desired, use the [PLAY/STOP] key to check the sample.
STEP11 Press the [PAD ASSIGN] key twice.
![ZOOM ST-224 - STEP11 Press the [PAD ASSIGN] key twice. - 1](/content/2025/01/152248/images/6c1b4de6509378a0810296bffdf888cffcdbea26d70bb0f052f80ee04d2388b0.jpg)
PAD ASSIGN
STEP12 Use the [BANK 1] - [BANK 3] keys and the pads 1 - 8 to select the pad to which you want to assign the sample.
![ZOOM ST-224 - STEP12 Use the [BANK 1] - [BANK 3] keys and the pads 1 - 8 to select the pad to which you want to assign the sample. - 1](/content/2025/01/152248/images/92fbced81db11d92eb037a4050528255de9b7288c42d2f10094005c6570a70ef.jpg)
STEP13 Press the [PAD ASSIGN] key again.
The new sample is assigned to the selected pad. (Detail of Assigning a Sample to a Pad p. 27)
![ZOOM ST-224 - STEP13 Press the [PAD ASSIGN] key again. - 1](/content/2025/01/152248/images/ce437319f2cf63487ddb51fd3f1aee7e23f7d298609deff0a3b95049d1d244d2.jpg)
PAD ASSIGN
![ZOOM ST-224 - STEP13 Press the [PAD ASSIGN] key again. - 2](/content/2025/01/152248/images/b8940bd3b8bde79be723c7380af3a261fe6538bd6de0f5d536c19eaea9eee4be.jpg)
Storing and Reading Data

This section explains how to save the entire main memory contents or the waveform data for a pad to the backup memory and how to load this data back into the main memory.

Storing/Reading Bulk Data (Backup Memory)
This section explains how to save bulk data (main memory contents) to the backup memory and how to load bulk data from backup memory into the main memory.


To save bulk data, press the [SAVE] key.
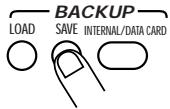

Use the [INTERNAL/DATA CARD] key to set the save target to "Int" (internal backup memory).
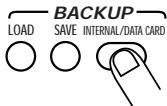

Press the [SAVE] key again.
Bulk data (all waveform data, pad parameter settings, song data for internal sequencer) are saved to the backup memory. The ST-224 then returns to the regular play mode. When wishing to cancel the store process, press the [EXIT] key instead of the [SAVE] key.
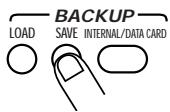

- The backup memory can hold only one set of bulk data.
The previous set will be overwritten. - During storing, all currently playing pads are stopped (including the [SOURCE] pad).
CAUTION
Never turn power to the unit off while data are being saved. Otherwise the data may be destroyed.

To load data from backup memory into the main memory, press the [LOAD] key while the unit is in play mode.
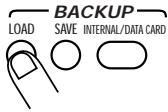

Use the [INTERNAL/DATA CARD] key to set the load target to "Int" (internal).
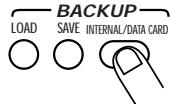

Press the [LOAD] key again.
Bulk data are copied from the backup memory into the main memory. The ST-224 then returns to the regular play mode. When wishing to cancel the load process, press the [EXIT] key instead of the [LOAD] key.
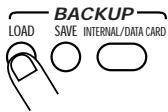

When the unit is turned on, the last bulk data saved in backup memory are copied back to the main memory.

Formatting a Data Card
Before a data card can be used for saving and loading data, it must be formatted (initialized) as follows.

Use only data cards formatted in the ST-224.


Insert a data card into the [DATA CARD] slot on the rear panel of the unit.

- Insert the data card in such a way that the corner cutout is on the far left side and the connector area faces towards the rear.
- If the card is not oriented properly, it will not go fully into the slot. Forcefully pushing the card in may damage it.


Hold down the [SPECIAL] key and press the [INTERNAL/DATA CARD] key.
The indication "ForMAt" appears on the display.
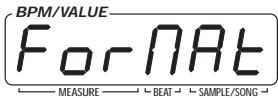


If the indication "noC Ard" appears, the data card is not recognized. Check whether the card has been inserted properly.

Press the [INTERNAL/DATA CARD] key.
The display indication flashes and formatting starts. When formatting is completed, the indication "FiniSH" appears on the display.
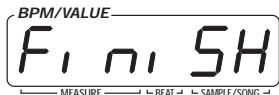
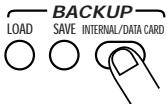

- When formatting is carried out, any data already stored on the card will be lost. Take care not to accidentally erase a card.
- If the indication "Cd Err" appears during formatting, there is a problem with the data card. Repeat the process from step 1. If the same error occurs again, use a different card.

When formatting is completed, press the [EXIT] key.
The ST-224 reverts to the play mode.


Cards formatted in other devices may not be usable in the ST-224.

Storing Bulk Data (Data Card)
This section explains how to save bulk data (main memory contents) on a data card SM04 (option) and how to load bulk data back from data card into the main memory.
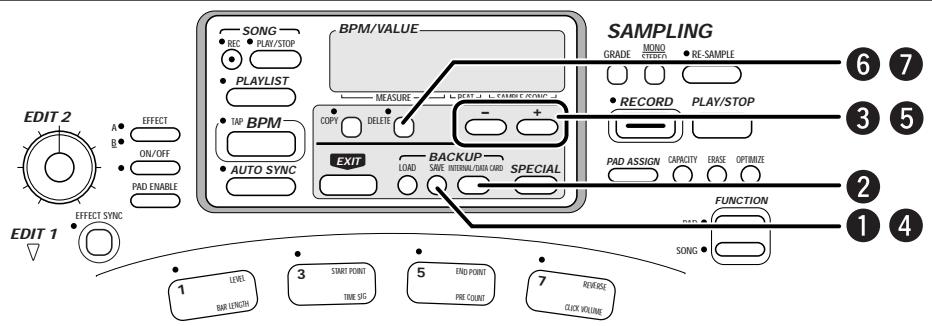
STEP1
Press the [SAVE] key while the ST-224 is in play mode.
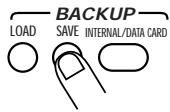
STEP2
Use the [INTERNAL/DATA CARD] key to set the save target to "CArcXX" (data card; XX is a file number from 1 to 99).
A data card can hold up to 99 sets of bulk data, within the limits of actually available capacity.
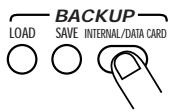

- If the indication "noC Ard" appears, the data card is not recognized. Check whether the card has been inserted properly.
- If the indication "Cd Err" appears, there is a problem with the data card. Format the card again.
- If the source of the last loaded bulk data was a data card, the original file number will appear. Otherwise a new file number will be shown.
STEP3
Use the [-] [+ ] keys to select the save target file number (1 - 99).
When the number of an already stored file is selected, the display flashes.
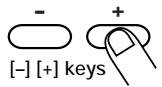
STEP4
Press the [SAVE] key again.
Bulk data (all waveform data, pad parameter settings, song data for internal sequencer) are saved to the data card. The ST-224 then returns to the regular play mode.
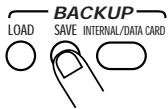

- If the indication "Cd FULL" appears after step 3, the data card does not have enough free capacity. Erase bulk data that are no longer needed. If the indication "Cd Err" appears, the data card is defective. Format the card again.
- When the number of a file where data are already stored is selected, the display flashes.
- During storing, all currently playing pads are stopped (including the [SOURCE] pad).
CAUTION
Never turn power to the unit off or remove a card while data are being saved. Otherwise the data may be destroyed.

To remove bulk data that are no longer needed, use the [-] [+] keys to choose the file number (1 - 99) when "CArdXX" is displayed in step 2.


Press the [DELETE] key.
The [DELETE] LED flashes.


Press the [DELETE] key again.
The bulk data selected in step 3 are deleted. When wishing to cancel the delete process, press the [EXIT] key to return to play mode.


Loading Bulk Data (Data Card)
This section explains how load bulk data stored on a data card SM04 (option) into the main memory.
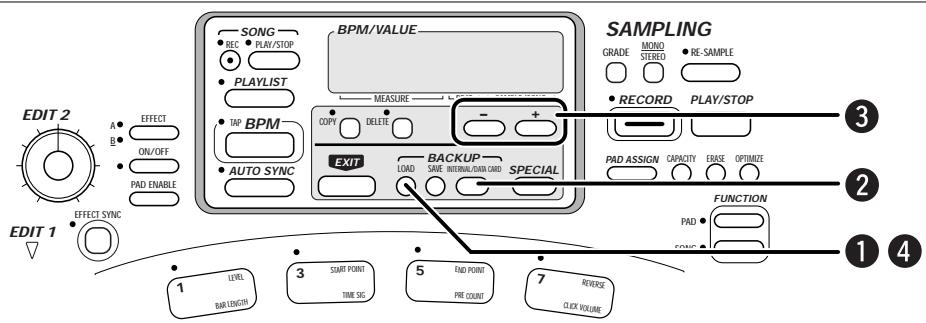
STEP1
Press the [LOAD] key while the unit is in play mode.
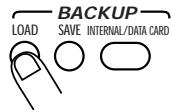
STEP2
Use the [INTERNAL/DATA CARD] key to select "CArdXX" as load source. (XX is a file number from 1 to 99.)

If the indication "noCArd" appears, the data card is not recognized.
Check whether the card has been inserted properly.
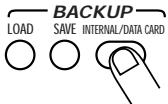
STEP3
Use the [-] keys to select the number of the bulk data source file (1 - 99).

STEP4
Press the [LOAD] key again.
Bulk data (all waveform data, pad parameter settings, song data for internal sequencer) are copied from the data card into the main memory. The ST-224 then returns to the regular play mode.

Loading Individual Pad Data/Waveform Data (Data Card/Backup Memory)
The ST-224 can individually extract pad data (waveform data and parameter setting information for a specific pad) from bulk data stored on a data card.
It is also possible to load regular waveform files (WAV or AIFF files) stored on a data card. This lets you use WAV files or AIFF files created on a computer as samples in the ST-224.

Hold down the [SPECIAL] key and press the [LOAD] key.
![ZOOM ST-224 - Hold down the [SPECIAL] key and press the [LOAD] key. - 1](/content/2025/01/152248/images/ae5aa2510344cf07c7400cd3906b9410c2c11c2702423d6279448f42237ce8f0.jpg)
- If the indication "noC Ard" appears, the data card is not recognized. Check whether the card has been inserted properly.
- If the indication "Cd Err" appears, there is a problem with the data card. Format the card again.
![ZOOM ST-224 - Hold down the [SPECIAL] key and press the [LOAD] key. - 2](/content/2025/01/152248/images/8cec344665cc3d332adebbcb55a1adfce8215099eea2b033ac78b4cc72902ba0.jpg)
![ZOOM ST-224 - Hold down the [SPECIAL] key and press the [LOAD] key. - 3](/content/2025/01/152248/images/8438ffbde6250d850bb08f526237dd3ab70af79b147baa8145f95c757f8bd647.jpg)
Use the [INTERNAL/DATA CARD] key to select the type of file to be used as a source.
With each push of the [INTERNAL/DATA CARD] key, the selection cycles through the following three settings.
![ZOOM ST-224 - Use the [INTERNAL/DATA CARD] key to select the type of file to be used as a source. - 1](/content/2025/01/152248/images/af5708aaa62b58c4f15308e196ee9b4a9007c31616403f13420d9b64419a3bc8.jpg)
- int ST-224 bulk data stored internally in the backup memory. Pad data comprised in the bulk data can be loaded into main memory and assigned as samples to pads.
- CardXX (XX = 1 - 99)
ST-224 bulk data stored on a data card. Pad data comprised in the bulk data can be loaded into main memory and assigned as samples to pads. - FileXX (XX = 1 - 99) Stereo or mono WAV files stored on a data card. Waveform data comprised in files can be loaded into main memory and assigned as samples to pads.
- AIFFXX (XX = 1 - 99) Stereo or mono AIFF files stored on a data card. Waveform data comprised in files can be loaded into main memory and assigned as samples to pads.
![ZOOM ST-224 - Use the [INTERNAL/DATA CARD] key to select the type of file to be used as a source. - 2](/content/2025/01/152248/images/49713b53f869df56fea926f7de3d7145e95ebc02d9b3420862b5a0fe43b09bf8.jpg)
- When storing WAV files or AIFF files on a data card for use with the ST-224, the files should be named ".??.WAV" or ".??.AIF" (? stands for a number from 01 - 99). Files with other names are disregarded.
![ZOOM ST-224 - Use the [INTERNAL/DATA CARD] key to select the type of file to be used as a source. - 3](/content/2025/01/152248/images/26ab4bbc426448bf27f222fc305586c8038c7d39461ae8cc260e3e1d2563ec1e.jpg)
- To store WAV files or AIFF files on a data card for the ST-224, a computer capable of reading and writing MS-DOS format data cards is required.
- If "--" is shown in place of XX, the data card does not contain any of the files described above.
- When wishing to recall a preset sound, store the contents of the main memory and backup memory to a data card as required, and then reset the ST-224 to the factory default condition ( p. 69). By storing the present sounds on a data card, recalling of specific waveform data becomes possible. This is a handy feature.
![ZOOM ST-224 - Use the [INTERNAL/DATA CARD] key to select the type of file to be used as a source. - 4](/content/2025/01/152248/images/1281e1b0687a6be8a206e261955afd5b3fdd97396d1471f59de615e98211acf5.jpg)
Use the [-] [+] keys to select the file number (1 - 99).
- If "int" or "CArgXX" was selected in step 2
Proceed to step 4.
- If "FILEXX" or "AIFFXX" was selected in step 2
Proceed to step 5.
![ZOOM ST-224 - Use the [-] [+] keys to select the file number (1 - 99). - 1](/content/2025/01/152248/images/aa354d153a91071a38aa46b0fb76bf37f8144d2ed46888e65aa7677c4e46e25d.jpg)
![ZOOM ST-224 - Use the [-] [+] keys to select the file number (1 - 99). - 2](/content/2025/01/152248/images/a06e1477c36328f3174764569620676d69822a1613f5e1288250e70b9fb61867.jpg)
If "int" or "CArgXX" was selected in step 2, press the [LOAD] key and use the [BANK 1] - [BANK 3] keys and pads 1 - 8 to select the load source bank number and pad number.
If "CArdXX" was selected in step 2, the bank number and pad number for the desired data within the bulk data must be specified before proceeding to step 5. When the [LOAD] key is pressed, the bank number (1 - 3) and pad number (1 - 8) for the source appear on the display. Specify the desired numbers here.
![ZOOM ST-224 - If "int" or "CArgXX" was selected in step 2, press the [LOAD] key and use the [BANK 1] - [BANK 3] keys and pads 1 - 8 to select the load source bank number and pad number. - 1](/content/2025/01/152248/images/176a60f50729b04949e53ea4d092b34687a39c7bcfee5ab7f94aa65b1ad7e99e.jpg)
![ZOOM ST-224 - If "int" or "CArgXX" was selected in step 2, press the [LOAD] key and use the [BANK 1] - [BANK 3] keys and pads 1 - 8 to select the load source bank number and pad number. - 2](/content/2025/01/152248/images/30a21b510defd2a8eb382c48012aefb9d539b1c9c1d2f16c8f924b786fab3c0e.jpg)
![ZOOM ST-224 - If "int" or "CArgXX" was selected in step 2, press the [LOAD] key and use the [BANK 1] - [BANK 3] keys and pads 1 - 8 to select the load source bank number and pad number. - 3](/content/2025/01/152248/images/152242da51280b7347fb894a5eb83680833bdafc0e077c60dbb7dc6530010445.jpg)
![ZOOM ST-224 - If "int" or "CArgXX" was selected in step 2, press the [LOAD] key and use the [BANK 1] - [BANK 3] keys and pads 1 - 8 to select the load source bank number and pad number. - 4](/content/2025/01/152248/images/a31c65523e6349edde36b842a7707c74f8130b062e548af96b6938368aa0df3e.jpg)
Press the [LOAD] key and use the [BANK 1] - [BANK 3] keys and pads 1 - 8 to select the load target bank number and pad number.
When the [LOAD] key is pressed, the bank number (1 - 3) and pad number (1 - 8) for the target appear on the display. Specify the desired numbers here.
![ZOOM ST-224 - Press the [LOAD] key and use the [BANK 1] - [BANK 3] keys and pads 1 - 8 to select the load target bank number and pad number. - 1](/content/2025/01/152248/images/0ba8a6872b6acddf45fc423f9d3fe707bef8ce9991403c2d62765437ad724b17.jpg)
![ZOOM ST-224 - Press the [LOAD] key and use the [BANK 1] - [BANK 3] keys and pads 1 - 8 to select the load target bank number and pad number. - 2](/content/2025/01/152248/images/78d541343a683fe0148a04b0ae0ca2d7d32f5f0a06bd9474befe90d0fd3b053b.jpg)
![ZOOM ST-224 - Press the [LOAD] key and use the [BANK 1] - [BANK 3] keys and pads 1 - 8 to select the load target bank number and pad number. - 3](/content/2025/01/152248/images/7e7cd66797a84e6cb8aba76001fb2abd40fcbb870610bffc0784a7ca298771c3.jpg)
![ZOOM ST-224 - Press the [LOAD] key and use the [BANK 1] - [BANK 3] keys and pads 1 - 8 to select the load target bank number and pad number. - 4](/content/2025/01/152248/images/5e4bdbe024a343fc7ca97a2fe37927cfdce20722b6bfffed28373c566b83186b.jpg)
To execute the loading process, press the [LOAD] key again.
If "int" or "CArgXX" was selected in step 2, the waveform data and pad parameters are loaded into the specified pad. If "FILEXX" or "AIFFXX" was selected, waveform data only are loaded into the specified pad.
![ZOOM ST-224 - To execute the loading process, press the [LOAD] key again. - 1](/content/2025/01/152248/images/f46a1da2d5d32e3572f204ea104a846a9e31d08281efa1d6af52c786a63a1b0f.jpg)
![ZOOM ST-224 - To execute the loading process, press the [LOAD] key again. - 2](/content/2025/01/152248/images/5f9aecebb3a293a38958ea3cc4747c3ca30ed82e6a631532516059462e77733d.jpg)
When reading in a WAV file or AIFF file, the sampling frequency and tuning parameters are automatically converted.
For details, see the section "ST-224 File Import Details" on page 72.
![ZOOM ST-224 - To execute the loading process, press the [LOAD] key again. - 3](/content/2025/01/152248/images/809be70f6473a79ec2b3e804190eba5539c9fbb7355fba276e6d45536c21c914.jpg)
MIDI Application Example

This section describes an example for using the MIDI capability of the ST-224.
Samples assigned to the pads of the ST-224 can be played from external MIDI equipment, or songs stored in the ST-224 can be synchronized by a MIDI sequencer or rhythm machine.

MIDI Connections
To use the MIDI capability, connect the MIDI OUT jack of the external equipment to the [MIDI IN] jack on the ST-224, using a MIDI cable.

Playing ST-224 Samples Under Control of External Equipment
Samples assigned to pads in the ST-224 (and an input source controlled by the [SOURCE] pad) can be played by an external MIDI sequencer or MIDI controller.

Press the [SONG FUNCTION] key and the pad 8 (MIDI).

Use the [-] keys to set the display indication to "Int".

STEP3
Press the [SONG FUNCTION] key again.
Note data received via the [MIDI IN] jack can now be used to play the samples assigned to the various pads of the ST-224. The correlation between note numbers/names and pads is shown below.
![ZOOM ST-224 - Press the [SONG FUNCTION] key again. - 1](/content/2025/01/152248/images/9c1e754d0ed05b85dda22874fc607d57758ba7c25742098ebc2e2a71c7225185.jpg)
Note numbers / names and pads
| BANK 1 | ||||||||
| SOURCE PAD | PAD 1 | PAD 2 | PAD 3 | PAD 4 | PAD 5 | PAD 6 | PAD 7 | PAD 8 |
| 35(B1) | 36(C2) | 37(C#2) | 38(D2) | 39(D#2) | 40(E2) | 41(F2) | 42(F#2) | 43(G2) |
| BANK 2 | ||||||||
| PAD 1 | PAD 2 | PAD 3 | PAD 4 | PAD 5 | PAD 6 | PAD 7 | PAD 8 | |
| 44(G#2) | 45(A2) | 46(A#2) | 47(B2) | 48(C3) | 49(C#3) | 50(D3) | 51(D#3) | |
| BANK 3 | ||||||||
| PAD 1 | PAD 2 | PAD 3 | PAD 4 | PAD 5 | PAD 6 | PAD 7 | PAD 8 | |
| 52(E3) | 53(F3) | 54(F#3) | 55(G3) | 56(G#3) | 57(A3) | 58(A#3) | 59(B3) | |
The velocity information of note data is not used.
![ZOOM ST-224 - Press the [SONG FUNCTION] key again. - 2](/content/2025/01/152248/images/b2ede79c7ef836ca10c2c570a5c85e5fdf0b894e6f67b3952451de259187f725.jpg)
STEP4
To set the MIDI channel, press the [SONG FUNCTION] key and then pad 8 (MIDI).
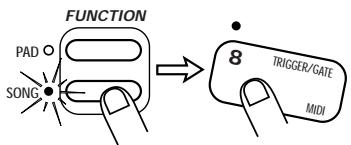
STEP5
Press and hold one of the [BANK 1] - [BANK 3] keys.
While one of the [BANK 1] - [BANK 3] keys is held down, the current MIDI channel is shown on the display. In the default condition of the ST-224, the MIDI channel 1 is selected.
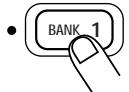
BANK 1-3 keys
STEP6
Use the [-] [+ ] keys to select the MIDI receive channel.
1 - 16: MIDI messages are received in the specified MIDI channel. oFF: No MIDI channel messages are received.
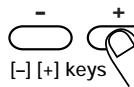
STEP7
Press the [SONG FUNCTION] key again.
The MIDI channel setting is accepted.
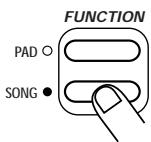

When the MIDI channel 10 is selected, the correlation between note numbers and pads changes as follows, to accommodate the GM drum kit.
Note numbers / names and pads (MIDI channel 10)
| BANK 1 | ||||||||
| SOURCE PAD | PAD 1 | PAD 2 | PAD 3 | PAD 4 | PAD 5 | PAD 6 | PAD 7 | PAD 8 |
| 95(B6) | 96(C7) | 97(C#7) | 98(D7) | 99(D#7) | 100(E7) | 101(F7) | 102(F#7) | 103(G7) |
| BANK 2 | ||||||||
| PAD 1 | PAD 2 | PAD 3 | PAD 4 | PAD 5 | PAD 6 | PAD 7 | PAD 8 | |
| 104(G#7) | 105(A7) | 106(A#7) | 107(B7) | 108(C8) | 109(C#8) | 110(D8) | 111(D#8) | |
| BANK 3 | ||||||||
| PAD 1 | PAD 2 | PAD 3 | PAD 4 | PAD 5 | PAD 6 | PAD 7 | PAD 8 | |
| 112(E8) | 113(F8) | 114(F#8) | 115(G8) | 116(G#8) | 117(A8) | 118(A#8) | 119(B8) | |

Synchronizing Song Playback of the ST-224 With External Equipment
Song playback of the ST-224 can be synchronized to an external MIDI sequencer or rhythm machine.

Set the external equipment up so that it sends the MIDI clock, song position pointer, and start/stop/continue messages.

Select the song at the ST-224 that you want to synchronize.

Press the [SONG FUNCTION] key and then pad 8 (MIDI).
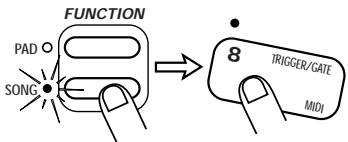

Use the [-] [+] keys to call up the indication "Midi" on the display.

While this setting is selected, song recording is not possible.


Press the [SONG FUNCTION] key again.
The ST-224 now is set up to receive the MIDI clock, song position pointer, and start/stop/continue messages via the [MIDI IN] jack.

Give the start command from the external equipment.
The ST-224 also begins playback.

Resetting the ST-224 to the Factory Default (Initializing)
You can reset the unit to the factory default condition as follows.
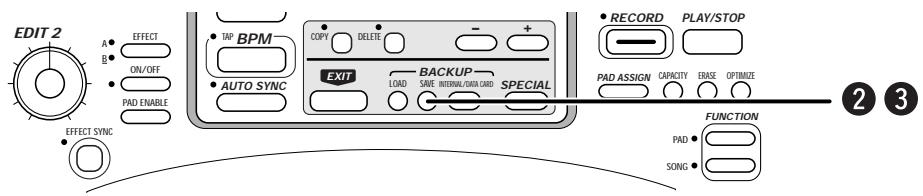
STEP1
Turn off the ST-224.

STEP 2
While holding down the [SAVE] key, turn the unit back on again.
The indication "init" appears on the display.
To cancel the initialization, press the [EXIT] key.
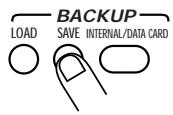

STEP3
Press the [SAVE] key again.
The ST-224 is reset to the factory default condition, and the preprogrammed sound sources (samples) are loaded into the main memory.
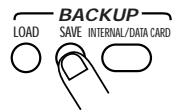

Proceed with care. When initialization is performed, all bulk data stored in the backup memory will be erased.

Initializing Without Loading Backup Memory Data (Quick Start)
Normally, the ST-224 loads data from backup memory into the main memory every time the unit is turned on. This causes a certain delay until the unit can be used for playing or sampling. When wishing to skip this step and get the unit ready for use quickly, perform the following steps.
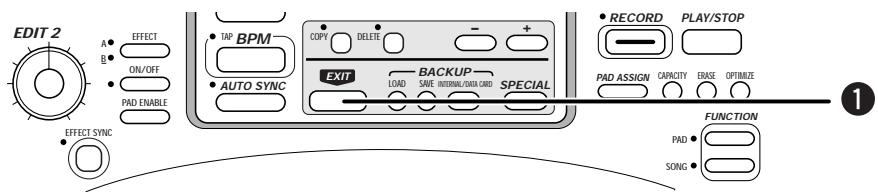
STEP1
Hold down the [EXIT] key and turn the ST-224 on.
The ST-224 becomes ready for use immediately, because the loading process from backup memory is skipped. The main memory will be empty.


If there seems to be a problem with the unit, check the following points first.
| Symptom | Check | Remedy |
| No sound, or very low volume. | Is correct AC adapter connected properly? | Refer to section "Getting Connected" (→ p. 8) and establish correct connections. Use only the supplied AC adapter. |
| Are [OUTPUT L/MONO] jack and [OUTPUT R] jack connected correctly to the playback equipment? | Refer to section "Getting Connected" (→ p. 8) and establish correct connections. | |
| Are the correct cables being used? | Try changing to another shielded cable. | |
| Is the playback equipment set up correctly? Is the volume control set to an appropriate level? | Establish appropriate settings. | |
| Is the [OUTPUT] knob of the ST-224 set up correctly? | Establish an appropriate setting. | |
| Was a pad hit to which no sample is assigned? Was playback of a song without data attempted? | Select an appropriate pad or song. | |
| Is the LEVEL pad parameter set to a low value? | Set the LEVEL pad parameter to an appropriate value. | |
| Playback sound is distorted or breaks up. | Is output level of ST-224 set too high? | Adjust [OUTPUT] knob on ST-224 to a suitable position. |
| Is level of sound source used for sampling too high? | Adjust [INPUT] knob on ST-224 to a suitable position, and repeat the sampling process. | |
| Sampling not possible. | Is level of sound source used for sampling too low? | Adjust [INPUT] knob on ST-224 to a suitable position, and repeat the sampling process. |
| Is [RE-SAMPLE] key set to ON? | Set [RE-SAMPLE] key to OFF. | |
| Is memory used up? | Delete samples and songs that are no longer needed. | |
| Sound of [SOURCE] input cannot be turned off. | Is SOURCE MIX pad parameter set to "on"? | Use [PAD FUNCTION] key and [SOURCE] pad to change setting of SOURCE MIX parameter from "on" (input source is constantly supplied to output) to "oFF" (input source is only supplied to output when [SOURCE] pad is pressed). |
| Effects do not work. | Is effect processing enabled for the pad? | Use the [EFFECT PAD ENABLE] key and the pad to send the sound of the desired pad to the effects section. |
| Are you trying to apply the TIME STRETCH or SCRATCH effect to the [SOURCE] pad? | The TIME STRETCH and SCRATCH effect does not work for the [SOURCE] pad. | |
| Song cannot be recorded. | Is mode other than pad play mode or song mode selected? | Press the [EXIT] key to terminate other modes. |
| Is MIDI receive set to ON? | Use the [SONG FUNCTION] key and pad 8 to set the MIDI parameter from "Midi" (receive MIDI messages) to "Int" (do not receive MIDI messages). | |
| Sound is heard when hitting pads, but MIDI play does not work. | Is the MIDI receive channel properly set? | Match the ST-224 MIDI receive channel (→ p. 67) to the send channel of the MIDI device. |
ST-224 Specifications
- Signal processing
DSP - Sampling frequency
Total recording time (mono)
Maximum recording time per sample
Maximum number of simultaneous samples - Tempo
Songs
Number of recorded notes
Resolution
Number of built-in effects - Pads
Controls
18-bit A/D converter / 18-bit D/A converter
ZOOM original ZFX-2
Hi-Fi: 32kHz / STANDARD: 16kHz / Lo-Fi: 8kHz
Hi-Fi: 60 s / STANDARD: 120 s / Lo-FI: 240 s
Hi-Fi: 30 s / STANDARD: 60 s / Lo-FI: 120 s
8
40 - 250 BPM
8
approx. 5000
24 clock/quarter note
22 (11 x 2 banks)
8 pads x 3 banks + SOURCE pad
EDIT 1 wheel (effects + edit)
EDIT 2 knob (effects)
EFFECT TYPE SELECT knob
INPUT knob
OUTPUT knob
MIDI IN
6-column 7-segment LED
Control input
- Display
Inputs
LINE/MIC (L/MONO, R)
Standard phone jack (mono) x 2
LINE/MIC selector x 1
Impedance: 20 kilohms
Rated input level LINE: -10 dBm
MIC: -56 dBm
- Outputs
Internal memory - Expansion memory (data card)
- Power requirements
- Dimensions
Weight - Supplied accessories
LINE (L/MONO, R) Standard phone jack (mono) x 2
Impedance: max. 1 kilohm Maximum output level: +6 dBm
Headphones Standard phone jack (stereo) x 1
Output power: 50mW (into 32 ohms)
For backup (1 data set; read/write)
For backup (max 99 data sets; read/write)
WAV files (read only)
AIFF files (read only)
9 V DC, 300 mA
(from supplied dedicated AC adapter AD-0006A)
AC adapter (AD-006A)
Sample CD
Data cards (SM04)
- Optional accessories
0dB = 0.775Vrms
* Design and specifications subject to change without notice.
The ST-224 can import standard PCM files via Data card(SM04 option).
- Windows WAV Files
PCM file type used by Microsoft Windows
Imported from .WAV files
The following types of RIFF format files can be imported:
Sampling frequency: any frequency from 8kHz - 48kHz
Quantization 16 bit or 8 bit linear
Stereo or mono
Maximum 1900 kilobytes (maximum WAV data capacity / stereo)
WAV file name conventions
Files must be named ".??.WAV" (? stands for a number from 01 - 99). Files are listed by number.
- Apple AIFF Files
The ST-224 can import AIFF standard PCM files as used on the Apple Macintosh.
PCM parameters are the same as for WAV files, but loop point information in the files is not imported.
AIFF file name conventions
Files must be named ".\AIF" (? stands for a number from 01 - 99). Files are listed by number.
PCM files to be imported must be stored in the root directory of the data card. Files not stored in the root directory cannot be imported.
1. TRANSMITTED DATA
NONE.
2.RECOGNIZED DATA
1) CHANNEL VOICE MESSAGES
STATUS SECOND THIRD DESCRIPTION
1000 nnn 0kkk kkkk 0vvv vvvv NOTE OFF kkk kkkk : Note number ( See NOTE 1 ). vvv vvvv : Note Off Velocity ( ignored).
1001 nnn 0kkk kkkk 0000 0000 NOTE OFF kkk kkkk : Note number ( See NOTE 1 ).
1001 nnn 0kkk kkkk 0vvv vvvv NOTE ON kkk kkkk : Note number ( See NOTE 1 ). vvv vvvv : Note On Velocity ( not 0 ).
1010 nnn 0kkk kkkk 0vvv vvvv POLYPRONIC KEY PRESSURE kkk kkkk : Note number ( See NOTE 2 ). vvv vvvv : Pressure value ( See NOTE 2 ).
1011 nnn 0ccc cccc 0vvv vvvv CONTROL CHANGE ccc ccccc : Control number ( See NOTE 3 ). vvv vvvv : Control value.
1100 nnn 0ppp pppp ---- ---- PROGRAM CHANGE ppp pppp : Program cahnge number( See NOTE 4 ).
NOTE : nnnn = MIDI Channel Number ( 0000 - 1111 )
1: Recognized Note numbers are 35-59 at Basic channel on normal mode, or 95-119 at channel 10 at extension mode.
2 : Note #12(bank1/pad1)-#35(bank3/pad8) control to change "REVERSE of pad_function(PAD)". Note #36(bank1/pad1)-#59(bank3/pad8) control to change "EFFECT PAD ENABLE(PAD)". Note #108.source pad) control to change "EFFECT PAD ENABLE(SOURCE)". Pressure value(0) is turning off,pressure value(not 0) is turning on.
Note #60(bank1/pad1)-#83(bank3/pad8) control to change "LEVEL of pad_function(PAD)". Note #84(bank1-pad1)-#107(bank3/pad8) control to change "PANNING of pad_function(PAD)". Note #109.source pad) control to change "LEVEL of pad_function(SOURCE)". Pressure value(0 to 99) is value of the control. If pressure value is greater than 99, internal pressure value is limited to 99. Note #110.source pad) control to change "PANNING of pad_function(SOURCE)". Pressure value(0 to 100) is value of the control. If pressure value is greater than 100, internal pressure value is limited to 100.
3: Control #12 can be used to Effect Parameter 1(control value 0..100). Control #13 can be used to Effect Parameter 2(control value 0..100). If control value is greater than 100, internal control value is Limited to 100. Control #14 can be used to Effect BPM 40bpm(control value 0)..167bpm(control value 127). Control #15 can be used to Effect BPM 168bpm(control value 0)..250bpm(control valeu 82). Control #80 can be used to EFFECT OFF(control value 0)/ON(control value 127). Control #81 can be used to EFFECT SYNC OFF(control value 0) / ON(control value 127).
| 4 : | #00 | EFFECT BANK A : TIME STRETCH | #11 | EFFECT BANK B : SCETCH |
| #01 | EFFECT BANK A : DELAY | #12 | EFFECT BANK B : REVERB | |
| #02 | EFFECT BANK A : FLANGER | #13 | EFFECT BANK B : STEP CRY | |
| #03 | EFFECT BANK A : CHORUS | #14 | EFFECT BANK B : PHASER | |
| #04 | EFFECT BANK A : PITCH SHIFTER | #15 | EFFECT BANK B : DIMENSION | |
| #05 | EFFECT BANK A : DISTORTION | #16 | EFFECT BANK B : RING MODULATOR | |
| #06 | EFFECT BANK A : LOW-PASS | #17 | EFFECT BANK B : HIGH-PASS | |
| #07 | EFFECT BANK A : EXTREME EQ | #18 | EFFECT BANK B : RESONANCE | |
| #08 | EFFECT BANK A : LO-FI EFFECT | #19 | EFFECT BANK B : COMPRESSOR | |
| #09 | EFFECT BANK A : TREMOLO | #20 | EFFECT BANK B : AUTO PAN | |
| #10 | EFFECT BANK A : VOLUME/BASS | #21 | EFFECT BANK B : EXCITER |
2) CHANNEL MODE MESSAGES
| STATUS | SECOND | THIRD | DESCRIPTION |
| 1011 mnnn | 0111 1000 | 0000 0000 | ALL SOUNDS OFF |
| 1011 nnnn | 0111 1001 | 0000 0000 | RESET ALL CONTROLLER ( See NOTE 5 ) |
| 1011 nnnn | 0111 1011 | 0000 0000 | ALL NOTES OFF |
| 1011 nnnn | 0111 1100 | 0000 0000 | ALL NOTES OFF |
NOTE : nnnn = MIDI Channel Number ( 0000 - 1111 )
5 : "REVERSE of pad_function" pressure value is 0 .
"EFFECT PAD ENABLE" pressure value is 0.
"LEVEL of pad_function" pressure value is 49.
"PANNING of pad_function" pressure value is 50.
"Effect parameter 1" control value is 0.
"Effect parameter 2" control value is 0.
"EFFECT BPM" control value is 120BPM.
"EFFECT ON/OFF" control value is 0(OFF).
"EFFECT SYNC ON/OFF" control value is 0(OFF).
3) SYSTEM COMMON MESSAGES, SYSTEM REAL TIME MESSAGES
| STATUS | SECOND | THIRD | DESCRIPTION |
| 1111 0010 | 0xxx xxxx | 0mm mm | SONG POSITION POINTER xxx xxxx : Pointer LSB Value mm mmm : Pointer MSB Value |
| 1111 0011 | 0sss ssss | ---- ---- | SONG SELECT sss ssss : Song Number 0-7 |
| 1111 1000 | ---- ---- | ---- ---- | TIMING CLICK |
| 1111 1010 | ---- ---- | ---- ---- | START |
| 1111 1011 | ---- ---- | ---- ---- | CONTINUE |
| 1111 1100 | ---- ---- | ---- ---- | STOP |
NOTE:
[ Sampling Machine ]
Data : 6.Oct.,1998
Model SampleTrak ST-224
MIDI Implementation Chart
Version : 1.00
| Function ... | Transmitted | Recognized | Remarks |
| Basic Default Channel Changed | 1 1-16 | ||
| Mode Messages Default Altered | ********** | 3 | |
| Note Number | True voice | ********** | 35-59 | 95-119 ( channel 10 ) |
| Velocity Note On Note Off | ○ × | Note On = not 0 . | |
| After Key's Touch Ch's | ○ × | ||
| Pitch Bend | × | ||
| Control Change | 12 13 14,15 80 120 121 | Effect parameter 1 Effect parameter 2 Effect BPM Effect ON/OFF All Sounds Off Reset All Controllers | |
| Prog Change True # | ********** | 0-21 × | Selects a effect_type |
| System Exclusive | × | ||
| System Song Pos Song Sel Common Tune | ○ ○ × | 0-7 | |
| System Clock Real Time Commands | ○ ○ | ||
| Aux Local On/Off All Notes Off Mes- Active Sense sages Reset | × ○ × × | ||
| Notes No Transmitted messages. | |||
Mode 1 : OMNI ON, POLY
Mode 2 : OMNI ON, MONO
: Yes
Mode 3 : OMNI OFF, POLY
Mode 4 : OMNI OFF, MONO
X:No
ZEEM
ZOOM CORPORATION
NOAH Bldg., 2-10-2, Miyanishi-cho, Fuchu-shi, Tokyo 183-0022, Japan
PHONE: 042-369-7116 FAX: 042-369-7115
- SAFETY PRECAUTIONS
- - Power requirements
- - Environment
- - Handling
- - Alterations
- - Connecting cables and input and output jacks
- - Electrical interference
- - Cleaning
- USAGE AND SAFETY PRECAUTIONS ...... 2
- Introduction 5
- Names of Parts 6
- Getting Connected 8
- Quick Guide 10
- Introducing the ST-224 16
- Let's Try Out Sampling 20
- Pad Play Mode Operation 25
- Matching BPM of Pads (Auto Sync) 38
- Using the Internal Effects 42
- Creating Songs 48
- Playing Songs With Pads (Play List Function) 56
- Using the Resampling Function 57
- Storing and Reading Data 59
- MIDI Application Example 66
- Other Functions 69
- Troubleshooting 70
- Front Panel
- Rear Panel
- Connections to Playback Equipment and MIDI Equipment
- Connection to Sound Source (1) (CD Player)
- Connection to Sound Source (2) (Microphone)
- Adjusting the Volume
- STEP1
- STEP2
- STEP3
- Quick Guide (1) Listening to the Demo
- [Preparations]
- Quick Guide (2) Playing the Preset Pads
- Quick Guide (3) Assign an Effect to a Pad
- Quick Guide (4) Try Out Sampling
- Press the [RECORD] key.
- Introducing the ST-224
- ST-224 Configuration
- Samples
- Pads and banks
- ST-224 Memory Configuration
- BPM
- Manual Sampling
- STEP 1
- STEP 2
- STEP4 To switch between mono and stereo, use the [MONO/STEREO] key.
- STEP5 Press the [RECORD] key and then immediately start playback of the sound source.
- STEP6 To end sampling, press the [PLAY/STOP] key.
- STEP7 To check the result of the process, press the [PLAY/STOP] key.
- Auto Sampling
- STEP 1 Connect the sound source and adjust the input level. Then press the [RECORD] key.
- STEP2 Select the desired sampling grade and the mono/stereo setting.
- STEP3 To perform sampling in auto recording mode, hold down the [SPECIAL] key.
- STEP4 To perform auto stop sampling, hold down the [PLAY/STOP] key.
- Pad Play Mode Operation
- Playing Samples In Pads 1 - 8
- Using the [SOURCE] Pad to Play an External Sound Source
- Assigning a Sample to a Pad
- STEP4
- STEP5
- Assigning a Sample to a Major Scale
- STEP6
- Setting the SamplePlayback Position
- STEP7
- STEP8
- STEP 9
- STEP10
- Setting the Playback Parameters for Each Pad
- Pad Parameters
- - Pad 7 (REVERSE)
- - Pad 8 (TRIGGER/GATE)
- - Trigger playback
- - Retrigger playback
- - Gate playback
- Copying Pad Settings
- Press the [COPY] key.
- Press the [COPY] key again.
- Clearing Pad Settings
- STEP1 Press the [DELETE] key.
- STEP2 Use the [BANK 1] - [BANK 3] keys and the pads 1 - 8 to select the pad to delete.
- STEP3 Press the [DELETE] key again.
- Erasing a Sample
- Optimizing Samples
- Matching BPM of Pads (Auto Sync)
- Using the Auto Sync Function (Basic Steps)
- Press the [AUTO SYNC] key.
- Changing BPM for Every Pad (Auto Sync Advanced Steps)
- Using the Internal Effects
- Applying an Effect to a Specific Pad
- Synchronizing Effect Parameter BPM
- Press the [EFFECT SYNC] key.
- To input the effect BPM value manually, hold the [EFFECT SYNC] key down and use the [-] [+ ] keys to change the value.
- For tap input of the effect BPM, hold down the [EFFECT SYNC] key and tap the [BPM] key in the desired tempo.
- Creating Songs
- Song recording
- STEP1 In play mode, use the [-] [+ ] keys to select an empty song (1 - 8).
- STEP2 Press the [SONG FUNCTION] key and then pad 2.
- Playing a Song
- Changing Song Settings
- Song Function Parameters
- Copying a Song
- Deleting a Song
- STEP1 Hold down the [SPECIAL] key and press the [DELETE] key.
- STEP2 Use the [-] [+] keys to select the song to be deleted.
- Assigning Songs to Pads
- STEP 3
- Using the Resampling Function
- Resampling Pad Play or Songs
- STEP7 Press the [RECORD] key again.
- STEP8 To resample a song, press the [SONG PLAY/STOP] key. To resample pad play, hit one of pads 1 - 8.
- STEP9 To manually terminate resampling, press the [PLAY/STOP] key.
- STEP10 If desired, use the [PLAY/STOP] key to check the sample.
- STEP11 Press the [PAD ASSIGN] key twice.
- STEP12 Use the [BANK 1] - [BANK 3] keys and the pads 1 - 8 to select the pad to which you want to assign the sample.
- STEP13 Press the [PAD ASSIGN] key again.
- Storing and Reading Data
- Storing/Reading Bulk Data (Backup Memory)
- CAUTION
- Formatting a Data Card
- Storing Bulk Data (Data Card)
- Loading Bulk Data (Data Card)
- Loading Individual Pad Data/Waveform Data (Data Card/Backup Memory)
- Hold down the [SPECIAL] key and press the [LOAD] key.
- Use the [INTERNAL/DATA CARD] key to select the type of file to be used as a source.
- Use the [-] [+] keys to select the file number (1 - 99).
- If "int" or "CArgXX" was selected in step 2, press the [LOAD] key and use the [BANK 1] - [BANK 3] keys and pads 1 - 8 to select the load source bank number and pad number.
- Press the [LOAD] key and use the [BANK 1] - [BANK 3] keys and pads 1 - 8 to select the load target bank number and pad number.
- To execute the loading process, press the [LOAD] key again.
- MIDI Application Example
- MIDI Connections
- Playing ST-224 Samples Under Control of External Equipment
- Press the [SONG FUNCTION] key again.
- Synchronizing Song Playback of the ST-224 With External Equipment
- Resetting the ST-224 to the Factory Default (Initializing)
- Initializing Without Loading Backup Memory Data (Quick Start)
- ST-224 Specifications
- TRANSMITTED DATA
- 2.RECOGNIZED DATA
- 1) CHANNEL VOICE MESSAGES
- 2) CHANNEL MODE MESSAGES
- 3) SYSTEM COMMON MESSAGES, SYSTEM REAL TIME MESSAGES
- ZEEM
Brand : ZOOM
Model : ST-224
Category : Electronic musical instrument