
RT-123 - Electronic musical instrument ZOOM - Free user manual and instructions
Find the device manual for free RT-123 ZOOM in PDF.
| Product type | Drum machine and sequencer |
| Brand | ZOOM |
| Model | RhythmTrak RT-123 |
| Dimensions | 196 × 158 × 35 mm |
| Weight | 550 g |
| Power supply | AC adapter 9 V DC / 300 mA (included AD-0006) |
| Current consumption | 300 mA |
| Number of drum kits | 80 (including percussion and SFX) |
| Number of bass programs | 25 |
| Rhythm patterns | 297 presets + 99 user |
| Song memory | 99 songs (up to 99 steps each) |
| Maximum polyphony | 30 voices |
| Resolution | 96 PPQN |
| Tempo | 40 to 250 BPM |
| Pads | 13 velocity-sensitive pads |
| Display | 7-segment 4-digit LED |
| Line input | 1 × 6.35 mm mono jack (impedance 33 kΩ) |
| Audio outputs | L/Mono and R on 6.35 mm mono jack (impedance 2.2 kΩ) |
| Headphone output | 1 × 6.35 mm stereo jack (50 mW into 32 Ω) |
| MIDI | MIDI input (5-pin DIN) |
| Optional footswitch | FS01 (start/stop, tempo change, etc.) |
| Main functions | Manual play, pattern playback, real-time and step recording, song creation, Groove Play mode, tempo change, quantization, swing, pad sensitivity, MIDI settings, pattern copy/erase, factory reset |
| Maintenance and cleaning | Use a soft, dry cloth. Do not use solvents or abrasives. |
| Safety | Use only the supplied AC adapter. Avoid extreme temperatures, humidity, dust, and shocks. Do not open the casing. |
| Supplied accessories | AC adapter AD-0006 |
Frequently Asked Questions - RT-123 ZOOM
User questions about RT-123 ZOOM
0 question about this device. Answer the ones you know or ask your own.
Ask a new question about this device
Download the instructions for your Electronic musical instrument in PDF format for free! Find your manual RT-123 - ZOOM and take your electronic device back in hand. On this page are published all the documents necessary for the use of your device. RT-123 by ZOOM.
USER MANUAL RT-123 ZOOM
In this manual, symbols are used to highlight warnings and cautions for you to read so that accidents can be prevented. The meanings of these symbols are as follows:

This symbol indicates explanations about extremely dangerous matters. If users ignore this symbol and handle the device the wrong way, serious injury or death could result.

This symbol indicates explanations about dangerous matters. If users ignore this symbol and handle the device the wrong way, bodily injury and damage to the equipment could result.
Please observe the following safety tips and precautions to ensure hazard-free use of the RT-123.

- Power requirements
The RT-123 is powered by the supplied AC adapter. To prevent malfunction and safety hazards, do not use any other kind of AC adapter.
When using the RT-123 in an area with a different line voltage, please consult your local ZOOM distributor about acquiring a proper AC adapter.

- Environment
Avoid using your RT-123 in environments where it will be exposed to:
- Extreme temperature
High humidity or moisture - Excessive dust or sand
- Excessive vibration or shock

Handling
The RT-123 is a precision instrument. Do not exert undue pressure on the keys and other controls. Also take care not to drop the unit, and do not subject it to shock or excessive pressure.

- Alterations
Never open the case of the RT-123 or attempt to modify the product in any way since this can result in damage to the unit.

- Connecting cables and input and output jacks
You should always turn off the power to the RT-123 and all other equipment before connecting or disconnecting any cables. Also make sure to disconnect all cables and the AC
adapter before moving the RT-123.
Usage Precautions
- Electrical interference
For safety considerations, the RT-123 has been designed to provide maximum protection against the emission of electromagnetic radiation from inside the device, and protection from external interference. However, equipment that is very susceptible to interference or that emits powerful electromagnetic waves should not be placed near the RT-123, as the possibility of interference cannot be ruled out entirely.
With any type of digital control device, the RT-123 included, electromagnetic interference can cause malfunctioning and can corrupt or destroy data. Care should be taken to minimize the risk of damage.
- Cleaning
Use a soft, dry cloth to clean the RT-123. If necessary, slightly moisten the cloth. Do not use abrasive cleanser, wax, or solvents (such as paint thinner or cleaning alcohol), since these may dull the finish or damage the surface.
Please keep this manual in a convenient place for future reference.
CONTENTS
USAGE AND SAFETY PRECAUTIONS
Introduction 5
Names of Parts 6
Top Panel. 6
Rear Panel. 6
Getting Connected 7
Preparations 7
Quick Guide 8
Quick Guide (1)
Listening to the Demo 8
Quick Guide (2)
Playing the Pads 10
Quick Guide (3)
Playing a Pattern 12
Quick Guide (4)
Using Groove Play 14
Playing the Pads (Manual Play).... 16
Playing by tapping the pads. 16
Selecting a kit/program for manual play... 17
Playing the Patterns
(Pattern Mode) 18
Pattern play. 18
Changing the tempo of pattern
playback. 19
Pattern Recording
(Real-Time Recording) 20
Real-time recording of a drum track 20
Real-time recording of a bass track 24
Pattern Recording
(Step Recording) 28
What is step recording? 28
Step recording of a drum track 29
Step recording of a bass track 31
Pattern Copy/Erase 33
Copying a pattern 33
Erasing a pattern 34
Creating Songs (Song Mode) 35
What is a song? 35
Recording and playing a song 36
Editing a song 39
Deleting a song 40
Using Pads to Play Patterns
(Groove Play) 41
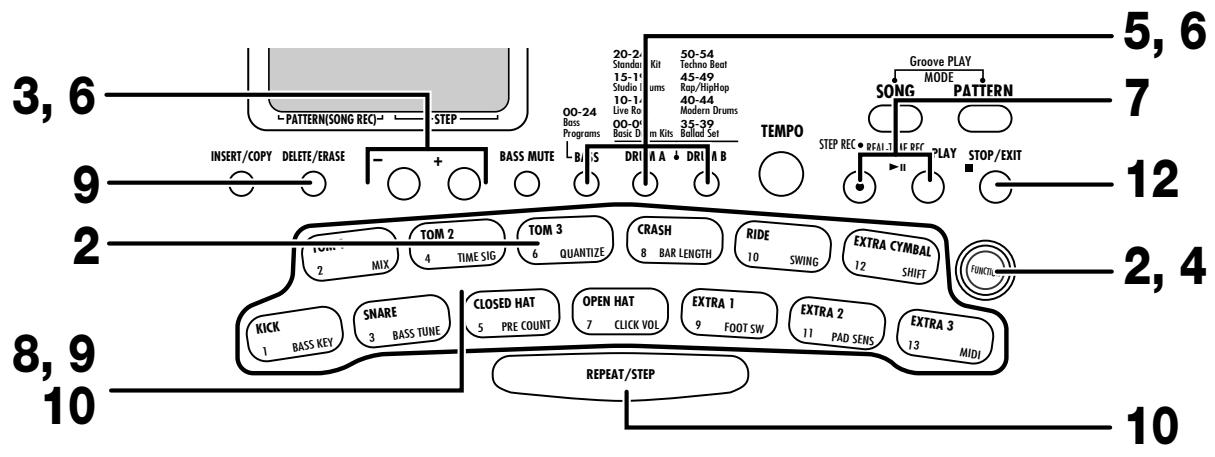
[FUNCTION] Key Settings 43
Basic [FUNCTION] key operation steps ... 43
[FUNCTION] key items 45
RT-123 Application Examples 51
Controlling the RT-123 with the FS01 .... 51
Synchronized MIDI operation 52
Using MIDI equipment to play the RT-123 53
Returning the RT-123 to the factory default condition(initialization) 54
Listening to the demo 55 Clearing all user patterns 55
Troubleshooting 56
SPECIFICATIONS 57
Reference
Program Change Table
Drum and Bass Kit Table
Preset Pattern List
MIDI Note Number Table
Drum KIT EXTRA List
MIDI Implementation
MIDI Implementation Chart
Zoom Corporation asserts its copyright for the contents of this manual.
Reproduction of this manual, in whole or in part, by any means, is prohibited without prior permission by Zoom Corporation.
Thank you for selecting the ZOOM RhythmTrak RT-123 (hereafter simply called the "RT-123"). The RT-123 is a rhythm machine with the following features and functions.
- Functionality of RhythmTrak 234 in a compact body. Play cool backing patterns made up of two drum tracks and one bass track. 297 preset patterns provide a wide variety of popular rhythms. 99 additional patterns can be programmed and stored by the user.
- Create a backing sequence (song) with up to 99 patterns. As many as 99 songs can be stored.
- Self-lighting pads indicate when sound is produced. While playing patterns or songs, you can check the rhythm visually as well.
- Choose from a variety of 105 built-in super-realistic drum and bass sounds. Practice parts as if you were playing in a band. Also great for making guitar or keyboard demo tapes.
- LINE IN jack allows connection of external instruments. Mix the sound from an instrument processed by a multi-effect such as the ZOOM 503 with the backing sound provided by the RT-123.
- Simple and intuitive controls make it a snap to operate the RT-123 even if you have never used a drum machine or sequencer before.
- Groove play mode allows changing patterns during play simply by tapping pads on the unit. Great for live performances and for DJ use.
- Optional foot switch FS01 allows pattern start/stop control or tempo switching. You can also operate an assigned sound such as bass drum or open/closed hi-hat.
- MIDI IN connector allows synchronization with external MIDI sequencer or control of the RT-123 from other MIDI equipment.
Please take the time to read this manual carefully so as to get the most out of your RT-123 and to ensure optimum performance and reliability. Retain this manual, the warranty card and all other documentation for future reference.
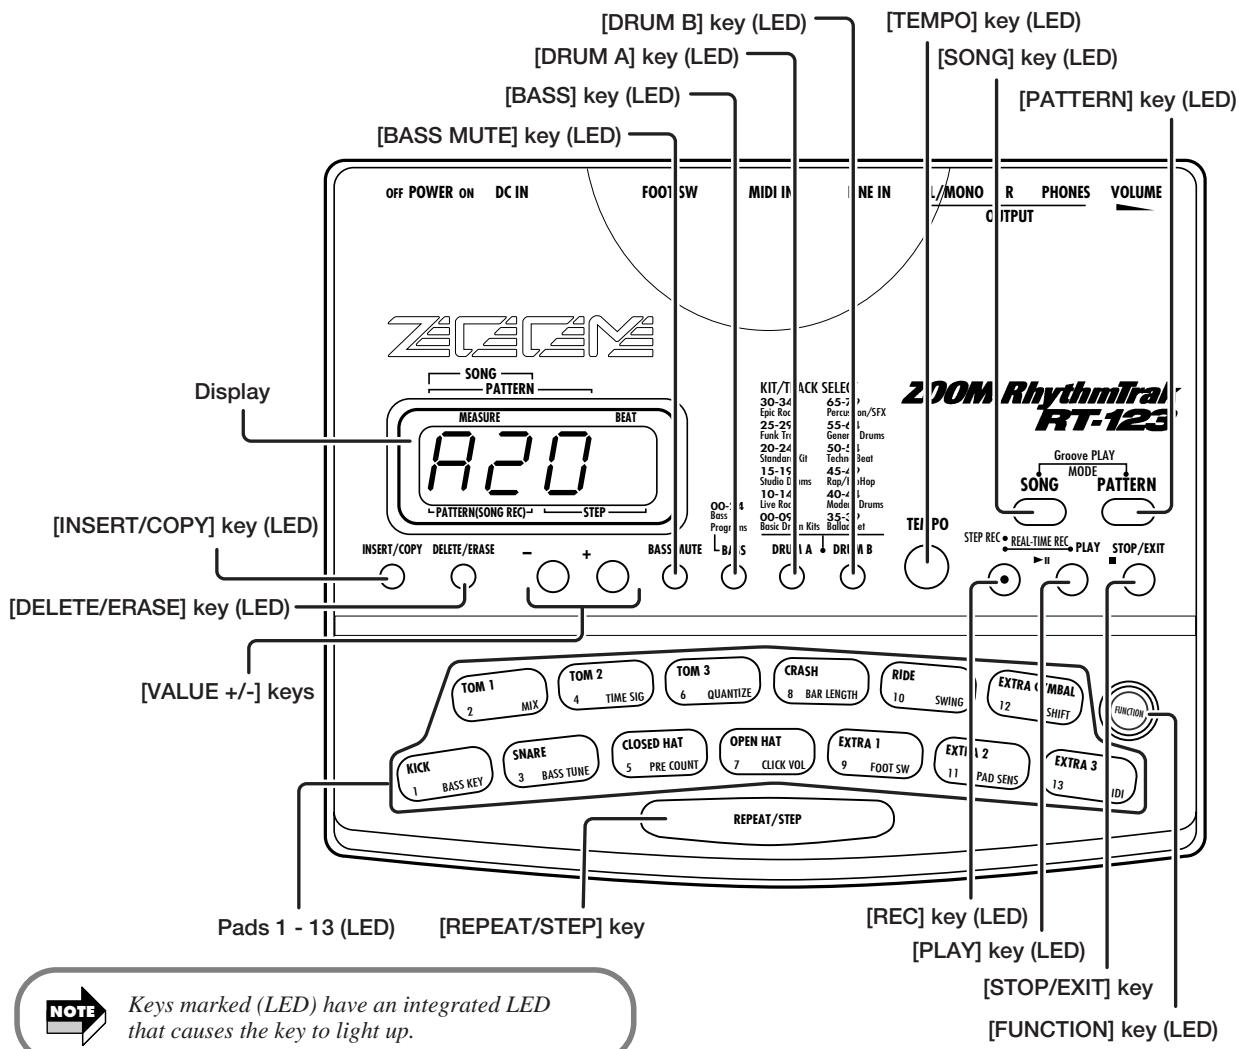
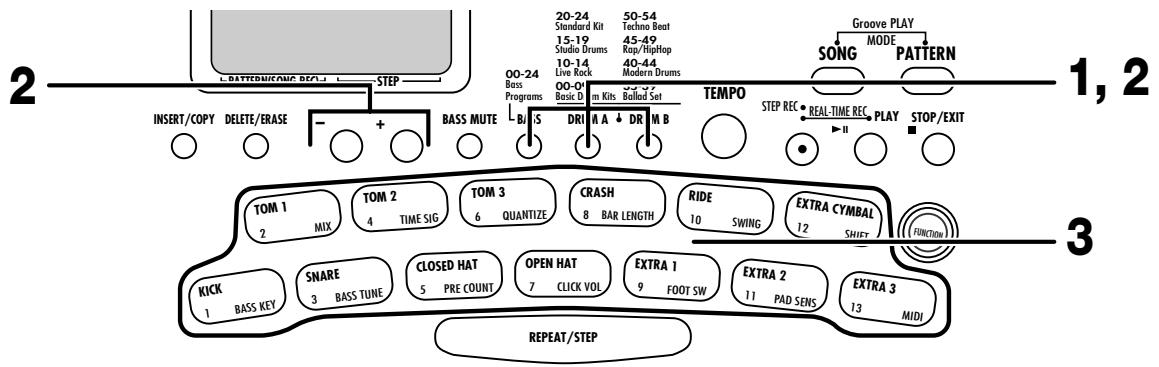
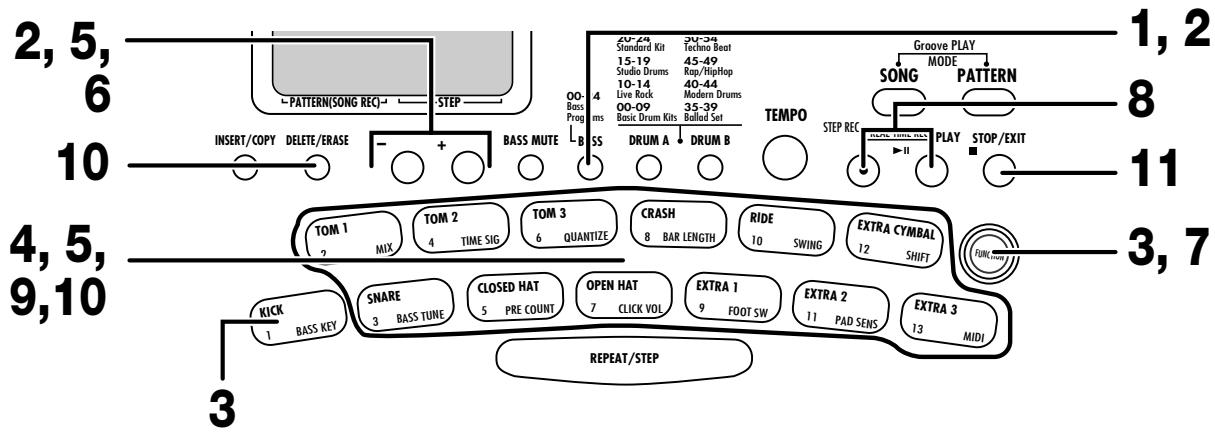
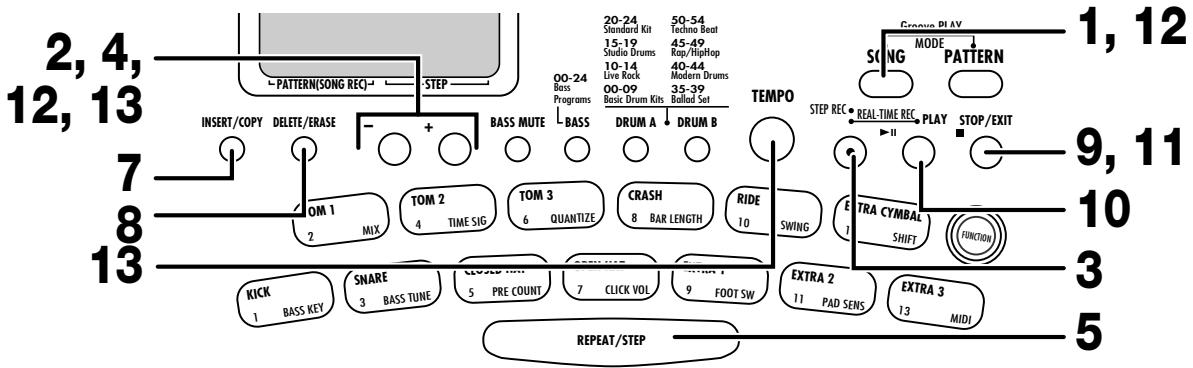
Top Panel
Rear Panel


Names of controls and connectors on the top panel and rear panel are enclosed in angle brackets in this manual.
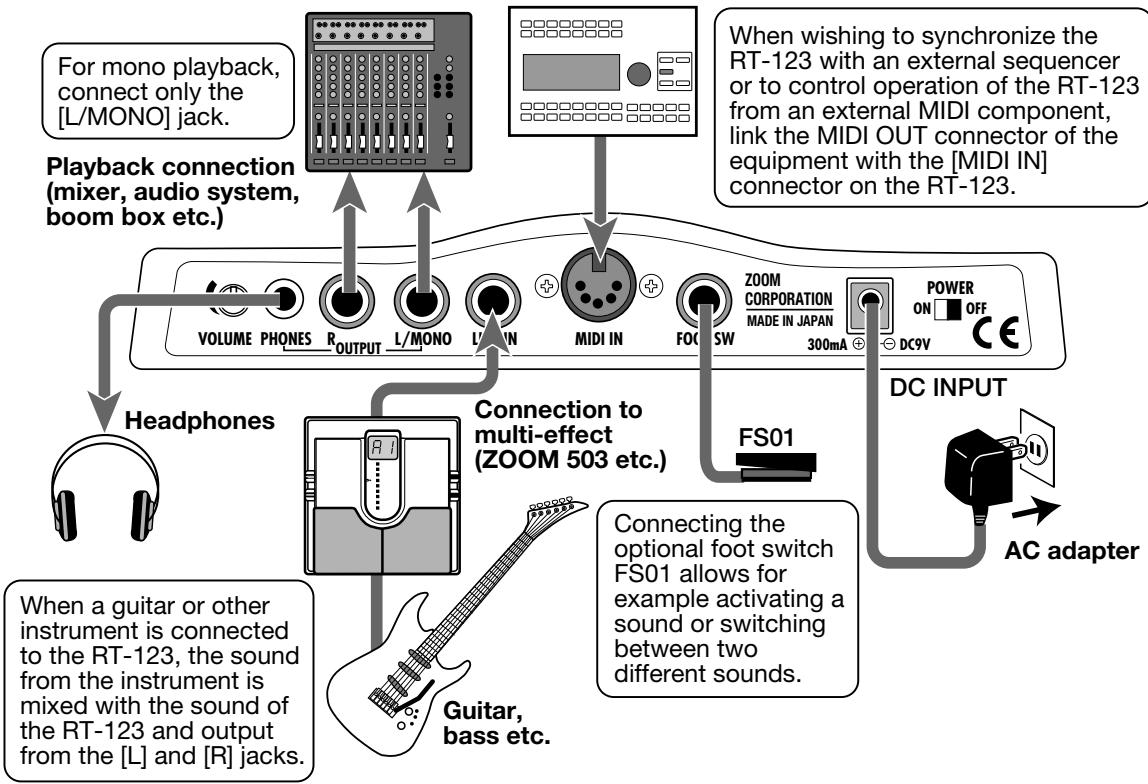
Connection to MIDI sequencer/computer MIDI interface
Preparations
After connections are established, check the sound by performing the following steps.
STEP1
While the playback system is still turned off and the volume is fully turned down, double-check whether all connections have been made correctly.
If cables are plugged in while power is turned on, or if the system is turned on with the volume control turned up, speaker damage may occur.
STEP2
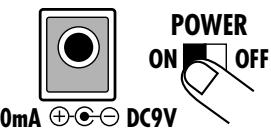
Turn power to the RT-123 on.
Connect the supplied AC adapter to the [DC IN] connector and set the [POWER] switch to ON.
STEP3
Turn power to the playback system on.
While tapping a pad to produce sound, adjust the [VOLUME] control of the RT-123 and the volume control on the playback system to a suitable position.
This Quick Guide shows how to operate your RT-123, using a few representative examples. Some of terms and concepts used in this manual are also explained here.
Quick Guide (1) Listening to the Demo
RT-123 comes with a demo song already built in. Hear for yourself what RT-123 can do.
1 Connect RT-123 to the playback system and turn the power on.
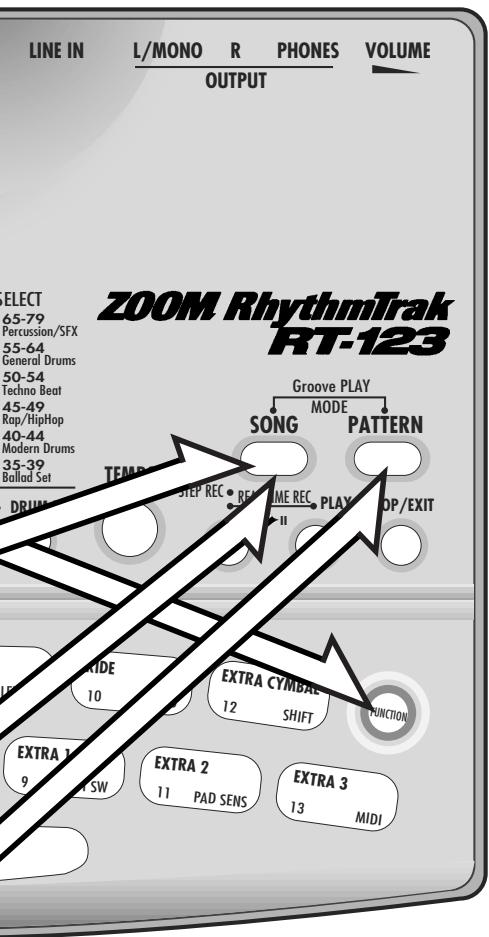
Press the [FUNCTION] key.
Verify that the LED of the [FUNCTION] key flashes.
Press the [SONG] key.
The demo song starts.
Sounds just like the backup of a live band, doesn't it?
Note how effectively various drum, percussion, and bass sounds are combined.
RT-123 can produce such a great variety of sounds with ease.
To stop the demo
Press the [PATTERN] key or [SONG] key.

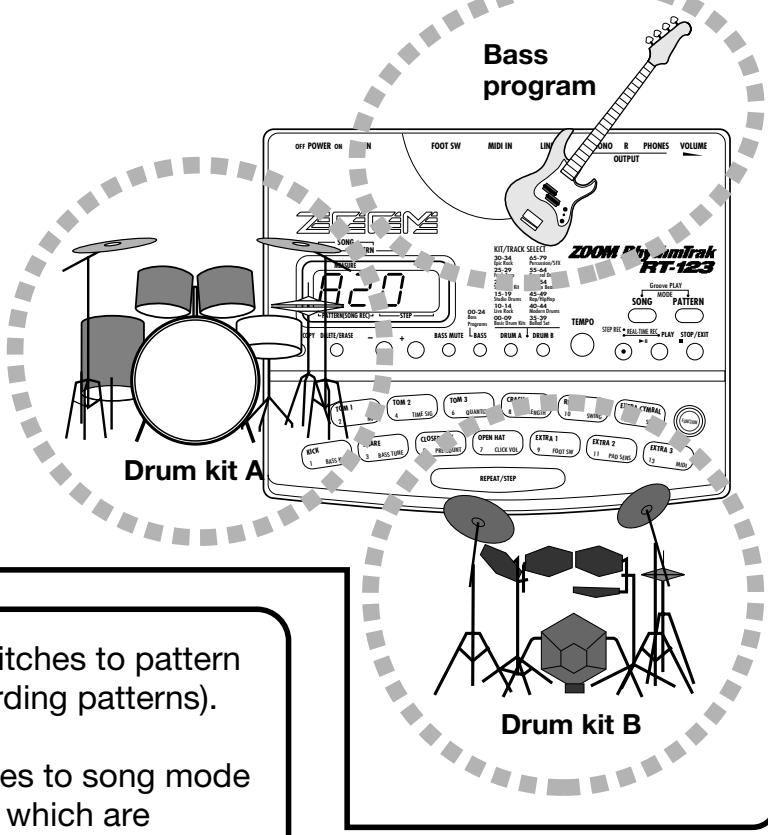
Drum kits and bass programs
The backup sound provided by the RT-123 consists of up to two drum kits and one bass program. A drum kit is a collection of drum sounds including bass drum, snares, and tom-tom, percussion sounds such as congas and bongs, and various other effect sounds. These are combined to create backing tracks for a wide range of music genres. The RT- 123 comes with 80 preprogrammed drum kits of which up to two can be used simultaneously. A bass program is a bass sound such as electric bass, acoustic bass, synthesizer bass, etc. 25 types of bass programs are available, of which one can be selected for playback.
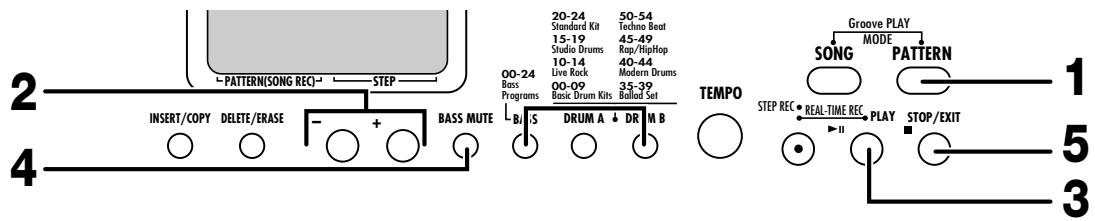
- [PATTERN] key: RT-123 switches to pattern mode (for playing and recording patterns).
- [SONG] key: RT-123 switches to song mode (for creating backing songs which are sequences of patterns).
Quick Guide (2) Playing the Pads
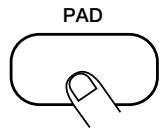
The top panel of the RT-123 has 13 pads which serve to play drum kits and bass programs.
1 Turn the power on.
Press the [PATTERN] key.
The [PATTERN] key LED lights up and the RT-123 is in pattern mode.
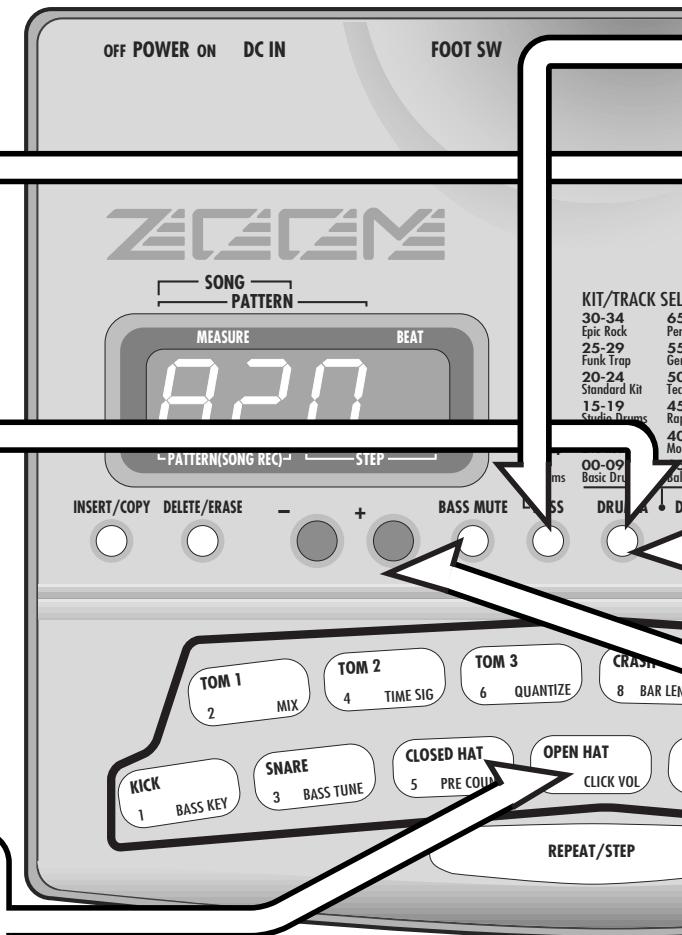
Press the [DRUM A] key.
The [DRUM A] LED lights up. Now you can use the pads to play the drum kit.
![ZOOM RT-123 - Press the [DRUM A] key. - 1](/content/2025/01/152243/images/aa9c4a69ccf6f9c6301ac08215baa1df1d34e8dc94be06e1709f52e8af8ccdf4.jpg)
You can also select the [DRUM B] key to play a different drum kit.
Tap the pads.
You will notice that the pads produce various drum sounds. The 13 pads are assigned different sounds, depending on the drum kit or bass program that has been selected. The illustration below shows an example for the drum sounds of the 13 pads
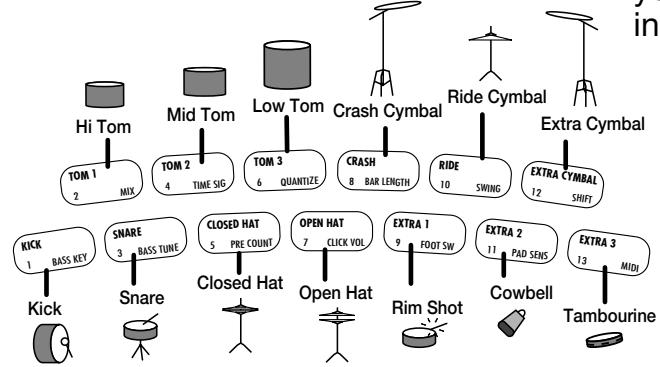
with a drum kit.
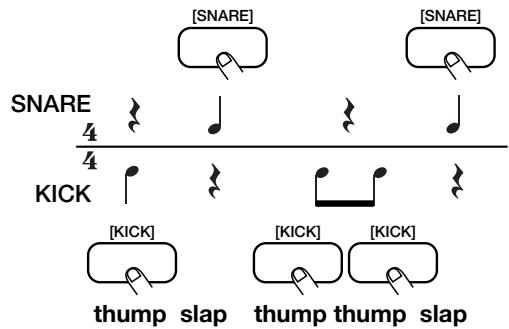
By tapping for example pad 1 (KICK) and pad 3 (SNARE) as in the illustration below, you can play bass drum and snare drum in the rhythm as shown.
To play a bass program with the pads
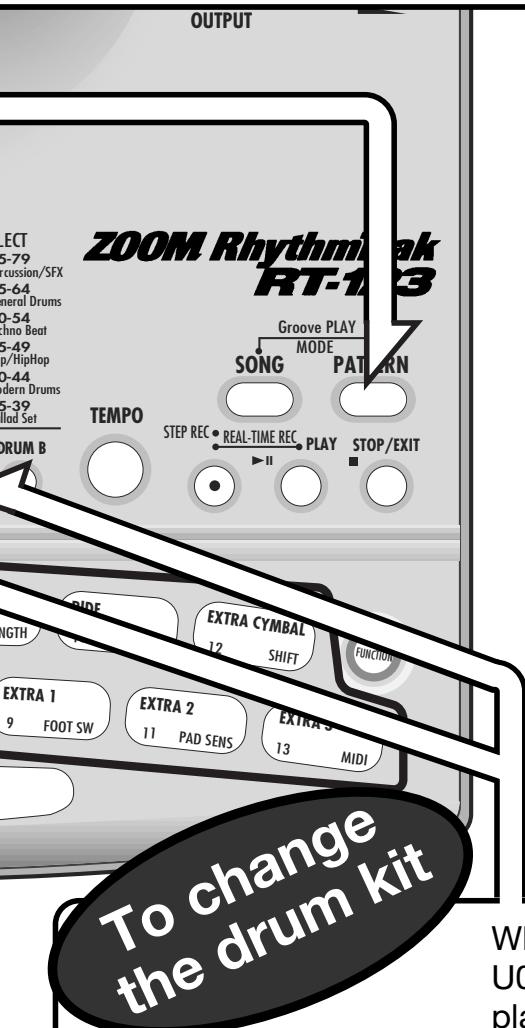
Press the [BASS] key.
The [BASS] key LED lights up and the current bass program can be played with the pads.
Give it a try! You will notice that different pads produce sound of a different pitch.
Unlike with the drum kit, the bass program does not consist of different instrument sounds. Rather, one type of bass sound is varied in pitch. You can use the 13 pads like the keys of a keyboard.
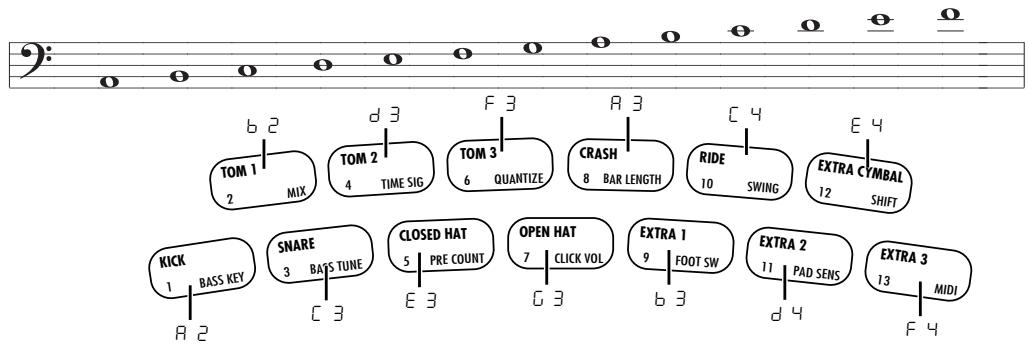
The illustration below shows an example for the notes produced by the 13 pads with a bass program.
![ZOOM RT-123 - Press the [BASS] key. - 1](/content/2025/01/152243/images/f1fe3ef2274e1b5a70dd81f8d8e597906320a864413faf1203a0b706f22f71e8.jpg)
You can also shift the pitch of each pad ( p.24) .
![ZOOM RT-123 - Press the [BASS] key. - 2](/content/2025/01/152243/images/f89be23c4574d3b51952af5eab89f59de29b8d54f1abce72186e78358ea86080.jpg)
![ZOOM RT-123 - Press the [BASS] key. - 3](/content/2025/01/152243/images/e821b0a8e4b04e8f785583af5e96c22bd49dba242473f27c3df0bc1288239a49.jpg)
Which sound is assigned to the pads depends on the pattern.
When a user pattern is selected (display shows U00 - U99; for details see page 12), the drum kit played by the pads can be changed.
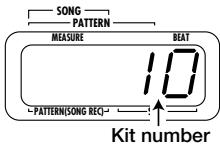
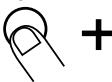
Press and hold the [DRUM A] key...
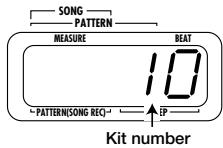
While the [DRUM A] key is being pressed, the display shows the currently selected kit number (0 - 79).
![ZOOM RT-123 - Press and hold the [DRUM A] key... - 1](/content/2025/01/152243/images/633c426c70b7fd11a66fd4f525374aa2db9454c84706cd243c7727f34731e853.jpg)
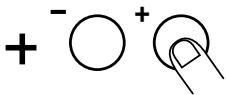
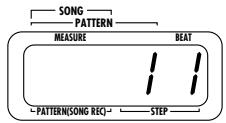
Press the [VALUE +/-] keys.
- [+] key: Selects the next higher kit number.
- [-] key: Selects the next lower kit number.
![ZOOM RT-123 - Press the [VALUE +/-] keys. - 1](/content/2025/01/152243/images/160a02f75557b6a074900a0ecfdcf2ebd68d49a92987b3784a87f1fd17014013.jpg)
Quick Guide (3) Playing a Pattern
The RT-123 already contains many preprogrammed patterns (backing sequence of several bars). Each pattern combines up to two drum kits and a bass program. Here's how you can play a pattern.
1 Turn the power on.
Press the [PATTERN] key.
The [PATTERN] key LED lights up and the RT-123 is in pattern mode. The display shows the currently selected bank and pattern number.
![ZOOM RT-123 - Press the [PATTERN] key. - 1](/content/2025/01/152243/images/9f1d048a3aae220724e63a6d28c344829ced4ebc4122e6c80cb7b881a0a9b9ad.jpg)
There are four banks, each with 99 patterns (01 - 99), resulting in a total of 396 patterns.
- Banks A - C: Read-only patterns (preset patterns)
- Bank U: Read/write patterns (user patterns)
In the factory default condition, the user patterns are empty.
![ZOOM RT-123 - Press the [PATTERN] key. - 2](/content/2025/01/152243/images/335ea63784ed8043ad2dc1cd55c76d13094e8cf218b2d37403441bb84f3d197e.jpg)
Press the [PLAY] key (▶II).
Playback of the currently selected pattern starts.
The patterns of the RT-123 can be thought of as "recordings" of up to 2 drum kits and 1 bass program. These are recorded on tracks that are combined to form the pattern. A pattern of the RT-123 therefore consists of drum track A, drum track B, and the bass track. Drum tracks A and B contain drum kit recordings and the bass track a bass program recording.
![ZOOM RT-123 - Press the [PLAY] key (▶II). - 1](/content/2025/01/152243/images/fca794fc6a012afb2a506486d6e6af620cfa85c2c872cd1b964a8e7380fee23b.jpg)
Pattern
To change the pattern
4 Press one of the [VALUE +/-] keys.
- [+] key: Selects next higher pattern number.
- [-] key: Selects next lower pattern number.
For example, repeatedly pressing the [VALUE +] key will switch the pattern in the order A01
→A99→B01→B99→C01→C99→U01
U99.
![ZOOM RT-123 - Press one of the [VALUE +/-] keys. - 1](/content/2025/01/152243/images/5ccb9167afaf55acaa984175e06f56498ac5b2a13203aa5c0d71ebf4128e7daf.jpg)
By pressing the [FUNCTION] key and then the [VALUE +/-] key, you can switch banks in the order A05 B05 C05 U05 .
![ZOOM RT-123 - Press one of the [VALUE +/-] keys. - 2](/content/2025/01/152243/images/a71b4f265d3b76651d981fa4f3b649814dd97db91d681dd2e6207ca36f4f2cc2.jpg)
Pattern number
Hold the [TEMPO] key...
To change the tempo
While the [TEMPO] key is held down, the display shows the currently active tempo.
![ZOOM RT-123 - Hold the [TEMPO] key... - 1](/content/2025/01/152243/images/f0755fc48c82b06e6100fdd31c750a40fb65bf6f6c2582fcdb2183fb7459cd96.jpg)
Tempo value (BPM)
Press the [VALUE +/-] key.
- [+] key: Increases the tempo value.
- [-] key: Decreases the tempo value.
![ZOOM RT-123 - Press the [VALUE +/-] key. - 1](/content/2025/01/152243/images/ddb3c177e345f097321e96f9aac82d278293a7498cdb4b7af96efeb92ab92f7a.jpg)
You can also tap the [TEMPO] key twice in the interval corresponding to the desired tempo ( p.19)
![ZOOM RT-123 - Press the [VALUE +/-] key. - 2](/content/2025/01/152243/images/fcd51f6df275a9265226f2f39e23fceea0b6893f14e1dc47c8370b55e1b0ac3d.jpg)
To stop pattern play
To mute the bass sound
Press the [BASS MUTE] key once.
Press the key once more to turn the bass on again.
HINT
You can also shift the pitch of the entire bass track ( p.24) .
Press the [STOP/EXIT] (■) key.
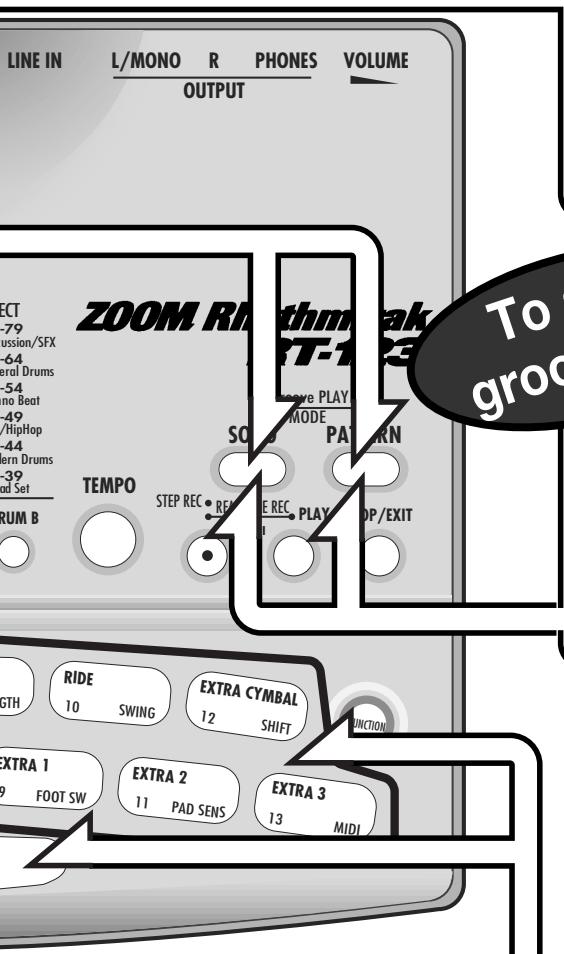
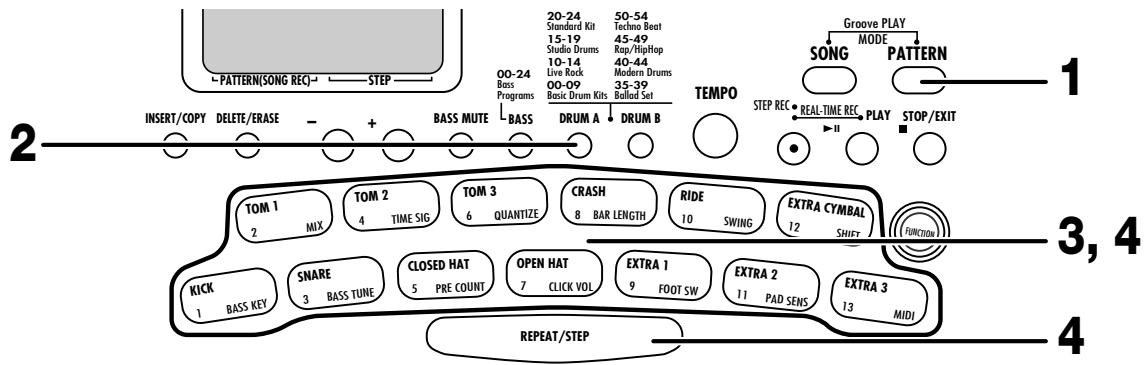
Quick Guide (4) Using Groove Play
Groove play is a special feature of the RT-123 which lets you switch among various patterns simply by tapping the pads. This makes it easy to play with patterns like a DJ spinning records.
1Turn the power on.
Press the [SONG] key and [PATTERN] key together.
The [SONG] key LED and [PATTERN] key LED light up, and the RT-123 is in groove play mode.
![ZOOM RT-123 - Press the [SONG] key and [PATTERN] key together. - 1](/content/2025/01/152243/images/c3a20e1da888cc44de53fa3d9995af13e93d9f2b15850a2a8a4aa285bdfa36e4.jpg)
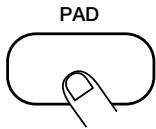
Push a pad.
While the pad is held down, the pattern assigned to that pad is played. Give it a try and check out which patterns are assigned to the various pads.

The pattern assigned to a pad can be changed ( p,41)
To play multiple patterns simultaneously
Push several pads together.
In groove play mode, up to 4 patterns can be played simultaneously. For example, while playing a basic drum pattern, you can hit another pad to overlay a bass pattern and then add a snare fill-in. By using the right timing when pushing the pads, you can create complex rhythms.
To stop groove play
Press the [SONG] key or [PATTERN] key.
- [PATTERN] key was pressed: RT-123 switches to pattern mode.
- [SONG] key was pressed: RT-123 switches to song mode.
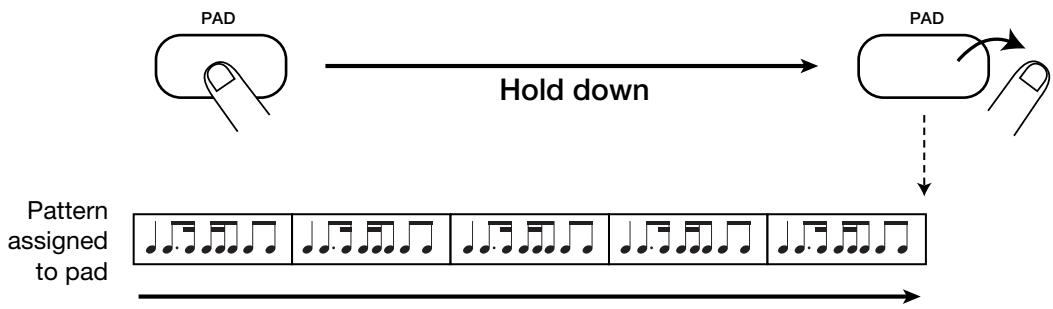
To keep playing the pattern without pressing the pad
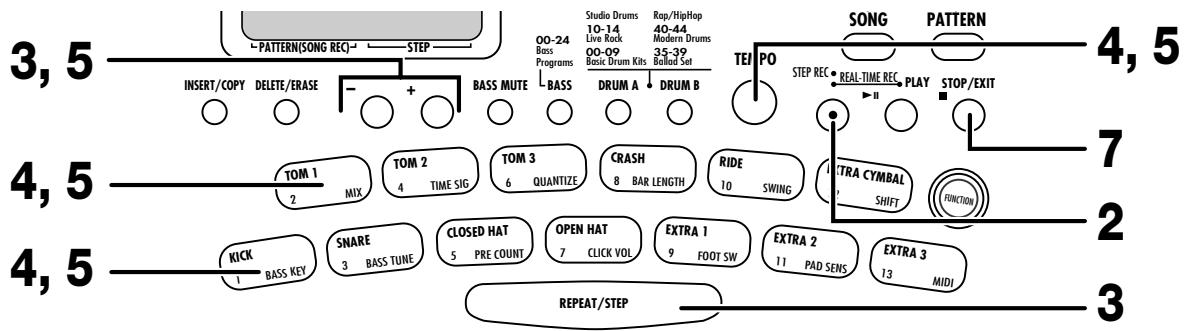
Hold the [REPEAT/STEP] key down while pushing the pad.
![ZOOM RT-123 - Hold the [REPEAT/STEP] key down while pushing the pad. - 1](/content/2025/01/152243/images/aa642876f67f3bc851ce2ba92d6eb72a4b89e7350aaf9db1859ed863365bea68.jpg)
Playing the Pads (Manual Play)
The RT-123 lets you not only play back existing patterns and songs, it also allows you to manually play the unit by tapping the pads. This section describes how to manually play the unit.
Playing by tapping the pads
The RT-123 assigns various sounds to the pads, depending on the currently selected drum kit. Play the pads to discover the realistic sounds offered by the RT-123.
STEP1 Press the [PATTERN] key.
This activates the pattern mode. The [PATTERN] key LED lights up.
![ZOOM RT-123 - STEP1 Press the [PATTERN] key. - 1](/content/2025/01/152243/images/9143765f6bb6f5b4bfba16332b8c3aa00d58f8193f4216c345374c4da8fa9488.jpg)
PATTERN
STEP2 Press the [DRUM A] key.
During manual play, you use the [DRUM A] key, [DRUM B] key, and [BASS] key to select the desired drum kit or bass program. (The LED of the selected key lights up.) Pressing the [DRUM A] or [DRUM B] selects drum kit A or B. Pressing the [BASS] key selects the bass program. In this example, let's use drum kit A.
![ZOOM RT-123 - STEP2 Press the [DRUM A] key. - 1](/content/2025/01/152243/images/379fd9cac0602635ece5c5c4067496bbd5c39b2b3b50190cb901a0d6f8e0ecb2.jpg)
DRUM A
STEP3 Tap one of the pads.
The LED of the pad lights up briefly and the sound assigned in the drum kit to that pad is heard. The volume changes according to how strongly you tap the pad.

When the [BASS] key is pressed in step 1, a bass program can be played, but there is a difference in how the pads operate. With a drum kit, the sound plays through even if the pad is released immediately. With a bass program, the sound continues only as long as the pad is pressed.
STEP4 Tap a pad while holding the [REPEAT/STEP] key down.
The sound will be produced continuously for as long as the pad is pressed. The repetition speed depends on the tempo.
![ZOOM RT-123 - STEP4 Tap a pad while holding the [REPEAT/STEP] key down. - 1](/content/2025/01/152243/images/d4f06511e7c48a3561a05baf1a66dcec179ae8750e4c9711bf5f6b7b47939fe8.jpg)
You can adjust the interval for repeated play. See the "Quantize" section on page 46.
![ZOOM RT-123 - STEP4 Tap a pad while holding the [REPEAT/STEP] key down. - 2](/content/2025/01/152243/images/8d004df46ef3f46a869c83346a6a9c703797dde9afba7487652e5260ef545852.jpg)
Selecting a kit/program for manual play
For manual play, you can select among 80 drum kits and 25 bass programs to create your own combinations.
STEP1
Press one of the [DRUM A], [DRUM B], or [BASS] keys to select the track, and hold the key down.
The current kit/program number is shown on the display.

Available drum kit types are printed on the panel.

Only kits and programs from the user pattern area can be changed. Kits and programs from the preset pattern area cannot be changed.

BASS

DRUM A

DRUM B
STEP2
While holding the key selected in step 1 down, use the [VALUE +/-] keys to select a kit/program.
The [VALUE +/-] keys switch the kit number shown on the display by 1 up or down, and the selected kit/program changes accordingly.

DRUM A

- Keeping a [VALUE + / - ] key depressed changes numbers continuously.
- To change numbers quickly, hold one of the [VALUE +/-] keys depressed and press the other key. The numbers will change continuously.
STEP3
Tap the pads to check the sound of the new kit/program.
Playing the Patterns (Pattern Mode)
This section describes how to play patterns that are built into the RT-123 or that have been recorded by the user.

Pattern play
The RT-123 incorporates 297 preset patterns (A01 - A99, B01 - B99, C01 - C99) which cannot be changed by the user, as well as 99 user-definable patterns (U01 - U99). (The unit is shipped with the user patterns blank.) This section describes how to select and play a pattern.

Press the [PATTERN] key so that the LED lights up.
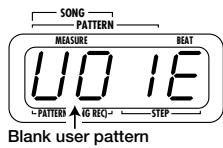
The RT-123 switches to pattern mode and the number of the currently selected pattern is shown on the display. A01 - A99, B01 - B99, C01 - C99 indicates a preset pattern, and U01 - U99 a user pattern. If an empty user pattern was selected, the display shows "E" (Empty).
![ZOOM RT-123 - Press the [PATTERN] key so that the LED lights up. - 1](/content/2025/01/152243/images/074314c0c829f7bab33f3364f582b84618794d1f49e7da2a553233a21950f396.jpg)
PATTERN
![ZOOM RT-123 - Press the [PATTERN] key so that the LED lights up. - 2](/content/2025/01/152243/images/8f9e5bb2e1071f2d293150f75dc26695f4dfc5a925f6df366bdacc0bd15b725b.jpg)
![ZOOM RT-123 - Press the [PATTERN] key so that the LED lights up. - 3](/content/2025/01/152243/images/4b2b36286ad5f9c41610153677bae185cedad13f571617aba521faa8cea202e7.jpg)
Use the [VALUE + / - ] keys to select the desired pattern number.
In pattern mode, the [VALUE +/-] keys serve to switch the pattern.
![ZOOM RT-123 - Use the [VALUE + / - ] keys to select the desired pattern number. - 1](/content/2025/01/152243/images/c6c47c0868d88993a3e14452e5c9082481547bd3b8edc6d8fd573221182c275f.jpg)
![ZOOM RT-123 - Use the [VALUE + / - ] keys to select the desired pattern number. - 2](/content/2025/01/152243/images/19a3056b94b6acd6ce9e10c4b18fd00a8190ea8e4b37c0c0b0db9c9ed54ca479.jpg)
Press the [PLAY] key.
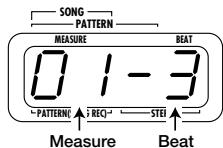
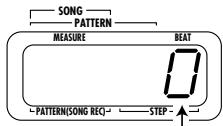
The [PLAY] key LED lights up, and the pattern is played repeatedly. The [TEMPO] key LED flashes according to the tempo of the pattern. The display shows the current position in the pattern (measure/beat).
![ZOOM RT-123 - Press the [PLAY] key. - 1](/content/2025/01/152243/images/73b742d0d7129edb1e74d410c4e9d489508d2769fb3e5c4aec96b538c04471d9.jpg)
![ZOOM RT-123 - Press the [PLAY] key. - 2](/content/2025/01/152243/images/68dd0a0fc3e31841ccb12c2954a18bcc75c9b10502511e853970f73689010d42.jpg)
- Also while playing a pattern, you can use the pads for manual play.
- Also while playing, you can switch the bank and number. In this case, the new pattern starts playing as soon as you make the switch.
![ZOOM RT-123 - Press the [PLAY] key. - 3](/content/2025/01/152243/images/8b266cd661d9884edc8217f4c7872b4fc8ccf571c6cc5b6556d527b4b223363c.jpg)
To mute only the bass track, press the [BASS MUTE] key.
The LED of the key lights up and only the drum tracks A/B are heard. To turn the bass track back on, press the [BASS MUTE] key once more.
![ZOOM RT-123 - To mute only the bass track, press the [BASS MUTE] key. - 1](/content/2025/01/152243/images/7fc8d832c7955bf5a76b2df7ffa4e6d8b9055313bd36476cedf806af20c8bf40.jpg)
BASS MUTE
![ZOOM RT-123 - To mute only the bass track, press the [BASS MUTE] key. - 2](/content/2025/01/152243/images/71c6cc7e5bee8519637b31c642a5ea745b46bfba6c4ba360e1ce63bbc16050dd.jpg)
- Also while the bass track is muted, you can play bass programs manually with the pads. To do this, press the [BASS] key so that the LED of the key is lit.
- The bass track can be muted also while the pattern is stopped.
![ZOOM RT-123 - To mute only the bass track, press the [BASS MUTE] key. - 3](/content/2025/01/152243/images/25f2fa8ace7614e180ba1513779ed4816a3d725eef5187f8a59eee2f0e599b5d.jpg)
Press the [STOP/EXIT] key when you want to stop the pattern.
Pressing the [PLAY] key instead of the [STOP/EXIT] key sets the unit to pause mode. The [PLAY] key LED flashes. Pressing the [PLAY] key again in this condition resumes playback from the point where it was paused.
![ZOOM RT-123 - Press the [STOP/EXIT] key when you want to stop the pattern. - 1](/content/2025/01/152243/images/7aa459df7f82dafe61c7e55694b876a72cb11402eaf16faae4ef816de7cce972.jpg)
STOP/EXIT
Changing the tempo of pattern playback
When playing a pattern in pattern mode, the playback tempo for the pattern can be varied over the range of 40 - 250 BPM (BPM = beats per minute, using quarter notes).


Press the [TEMPO] key.
The display shows the current tempo for about 2 seconds.
![ZOOM RT-123 - Press the [TEMPO] key. - 1](/content/2025/01/152243/images/c40ff0ddc1267395f52587a476fe41ed2297d9670a5af9cfba20edf80430b092.jpg)
![ZOOM RT-123 - Press the [TEMPO] key. - 2](/content/2025/01/152243/images/49944b153a27583be44abee7799ffd80b719d10600f34f6f1c870401ae745c6d.jpg)
![ZOOM RT-123 - Press the [TEMPO] key. - 3](/content/2025/01/152243/images/e0cf0cdcd3e2d461caac3301fe259f6521678de87bdd5e4ca7fda6e9ba8182db.jpg)
While holding the [TEMPO] key down, use the [VALUE +/-] keys to change the tempo.
![ZOOM RT-123 - Press the [TEMPO] key. - 4](/content/2025/01/152243/images/8165757e848798dac2cec5e6b5b65a613c35caea20489d9d766ef9ff963fad56.jpg)
![ZOOM RT-123 - Press the [TEMPO] key. - 5](/content/2025/01/152243/images/0f8007db94ce8b49df8334fe6895c2053187a78ca950785f8a822c3e31119eb5.jpg)
![ZOOM RT-123 - Press the [TEMPO] key. - 6](/content/2025/01/152243/images/a3b5acc1e5f1099dcebebf9c856a5ad08eabef2f7d5431712928ba98a3e2ee02.jpg)
![ZOOM RT-123 - Press the [TEMPO] key. - 7](/content/2025/01/152243/images/9cb43e63d1ec89e4acbff55b66e31a9d56e9494d45fb049338751a79be598c20.jpg)
When the tempo has been set to the desired value, release the [TEMPO] key.
![ZOOM RT-123 - Press the [TEMPO] key. - 8](/content/2025/01/152243/images/8c0505d346d16e0b782c1da63050a118a779890cd618903e12360bea63c553cf.jpg)
![ZOOM RT-123 - Press the [TEMPO] key. - 9](/content/2025/01/152243/images/f481f94ce472e9817f018536604991388dc996719ab3cef30f38d84eb67b63e8.jpg)
To input the tempo for manual play, tap the [TEMPO] key twice in the desired interval (tap tempo input).
While a pattern is paused or playing, the [TEMPO] key can be tapped twice to input a quarter note interval. When creating a pattern, this makes it easy to set the desired tempo.
![ZOOM RT-123 - Press the [TEMPO] key. - 10](/content/2025/01/152243/images/9985a8c87cea7c2390b75d44a98c72ae86742c6eef42dbc15357dc9081350008.jpg)
![ZOOM RT-123 - Press the [TEMPO] key. - 11](/content/2025/01/152243/images/d802b583d833e0953c5cba57b5034f1047b5422f04a767fdfdc86a57c68312bd.jpg)
The tempo set in pattern mode applies to all patterns. It cannot be changed for an individual pattern.
Pattern Recording (Real-Time Recording)
The RT-123 has 99 user pattern slots which can be filled with your own patterns. Creating and recording a pattern is possible in two ways: by actually playing the pattern on the pads (real-time recording), or by entering each sound individually (step recording). The procedure for real-time recording of a drum track and bass track is described below.
Real-time recording of a drum track
Real-time recording refers to the process of playing the pads while listening to a metronome sound and recording what you play. First, let's record drum tracks in real time.
STEP1 In pattern mode, select an empty user pattern (U01 - U99), and select a drum kit if desired.
When a pattern that contains nothing is selected, the display shows only "E".

You cannot record over a preset pattern.
STEP2 Press the [FUNCTION] key and then pad 6 (QUANTIZE).
The display shows the current quantize setting. Quantization refers to the degree of detail with which notes are recorded. By setting the quantize value to the shortest note that you want to use for the pattern, recording can be carried out while automatically maintaining precise timing. You can also turn the quantize function off, to retain the human touch that is characterized by slightly irregular timing.
![ZOOM RT-123 - STEP2 Press the [FUNCTION] key and then pad 6 (QUANTIZE). - 1](/content/2025/01/152243/images/9c613bebbaa474f98398522bb5de47e51dd8298b81bc1688037ad2a4406ba2ca.jpg)
The [FUNCTION] key is used to make various settings for the RT-123. For details, please refer to page 43.
![ZOOM RT-123 - STEP2 Press the [FUNCTION] key and then pad 6 (QUANTIZE). - 2](/content/2025/01/152243/images/4a9d74854ac2bd0ad83569476f8e58097da3e621468e08ad841f60817fc6b58e.jpg)
![ZOOM RT-123 - STEP2 Press the [FUNCTION] key and then pad 6 (QUANTIZE). - 3](/content/2025/01/152243/images/45e3d3dd0a595856057ff4f26a9002675bebe2b7c6559c1633477bef6b2ab4a2.jpg)
4·Quarter note
8·Eighth note
12···Eighth triplet note
16 Sixteenth note
24 Sixteenth triplet note
32.Thirty-second note
48…Thirty-second triplet note
Hi Quantize function off
![ZOOM RT-123 - STEP2 Press the [FUNCTION] key and then pad 6 (QUANTIZE). - 4](/content/2025/01/152243/images/603cdeeb45c8271c7665d2ec18633637eb9fd046e784a6e0b0a996191b4e7fdc.jpg)
STEP4 Press the [FUNCTION] key once more.
The new quantize value is set and the unit returns to the pattern mode.
![ZOOM RT-123 - STEP4 Press the [FUNCTION] key once more. - 1](/content/2025/01/152243/images/236750d19dfa476afb4913ef365cbe9e6e26d68ff75b8e90d3b6bbf966aa0dde.jpg)
After recording is completed, it is also possible to change the quantize value and record again on the same track. For example, after recording bass drum and snare drum using quarter notes, you may want to record a hi-hat sequence with sixteenth notes.
![ZOOM RT-123 - STEP4 Press the [FUNCTION] key once more. - 2](/content/2025/01/152243/images/587da82424b3c7d6eabb379005165990d3d514b38b883c28d03f8a337cce5220.jpg)
STEP5
Select the track on which to record by pressing the [DRUM A], [DRUM B], or [BASS] key. The keys select drum track A, drum track B, or the bass track.
In this example, select the [DRUM A] key. By hitting the pads in this condition, you can check the sound of the drum kit assigned to drum track A.
BASS

DRUM A

DRUM B

STEP6
While holding down the key selected in step 5, use the [VALUE] +/- keys to select the kit number.
The kit/program assigned to the track can be changed freely. While the [DRUM A] key is held down, the currently selected kit number is shown on the display. This can be changed with the [VALUE +/-] keys.
DRUM A


- Keeping a [VALUE +/-] key depressed changes numbers continuously.
- To change numbers quickly, hold one of the [VALUE +/-] keys depressed and press the other key. The numbers will change continuously.
- The kit/program for a track can be changed also after the pattern was recorded. It can also be switched while the pattern is playing.
- When the kit/program is changed for a user pattern, the pattern will be automatically stored with that kit/program.

The kit/program of a preset pattern cannot be changed.
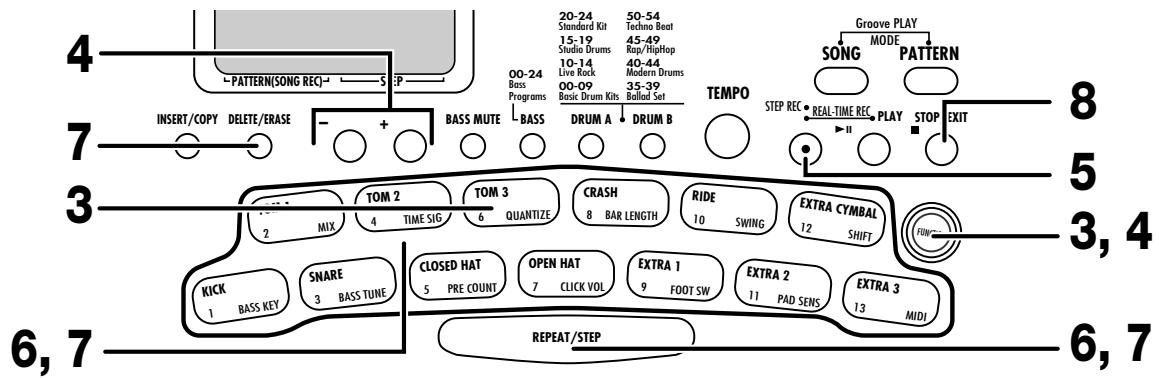
STEP7
While holding the [REC] key down, press the [PLAY] key.
The [REC] key LED and [PLAY] key LED light up and the [TEMPO] key LED flashes according to the tempo. The metronome sound starts.

If not specified otherwise, an empty pattern is set to a beat of 4/4 and a length of 2 measures. These settings can be changed, as described on page 46-47.
The sound of the respective pad is heard, and it is recorded for the duration set with the quantize value. You can verify the current position in the pattern by checking the display. When the end of the pattern is reached, the recording loops back to the beginning and continues, allowing you to add to the recording as often as desired.

When the [REC] key is pressed during real-time recording, the [REC] key LED starts to flash and pattern recording is suspended. In this condition, tapping the pads will produce sound, but it is not recorded. This is useful to check phrasing and sound before actually recording. To resume recording, press the [REC] key once more.
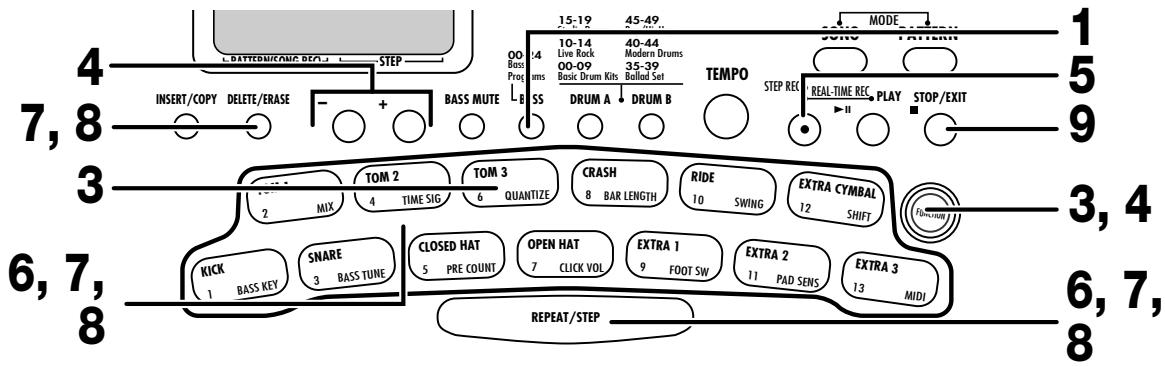
STEP9
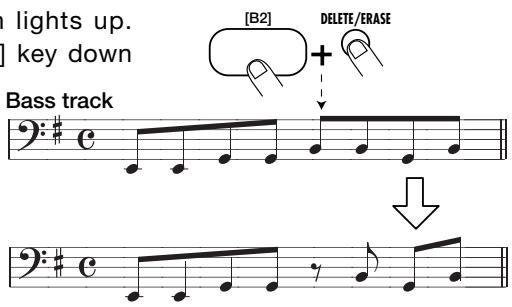
To erase the sound from a specific pad, push the pad while holding the [DELETE/ERASE] key down.
While the key is held down, the sound from that pad is erased from the pattern. To erase the entire track, push the [DRUM A], [DRUM B], or [BASS] key while holding the [DELETE/ERASE] key down. While both keys are held down, all sounds in that track are erased.
![ZOOM RT-123 - To erase the sound from a specific pad, push the pad while holding the [DELETE/ERASE] key down. - 1](/content/2025/01/152243/images/bb03a2225ced5e03b21e736d9aa467fde337eee12e30563db4958161ba071051.jpg)
![ZOOM RT-123 - To erase the sound from a specific pad, push the pad while holding the [DELETE/ERASE] key down. - 2](/content/2025/01/152243/images/6b6900428e361b2411de3e421bfc5a837b25a09d02ca65a1d6d14b3a48cb9014.jpg)
![ZOOM RT-123 - To erase the sound from a specific pad, push the pad while holding the [DELETE/ERASE] key down. - 3](/content/2025/01/152243/images/430f394474ea807212d404127a5a6dbb57b351751b3b4e73a4e669d11827b84f.jpg)
STEP10 Tap the pads while holding the [REPEAT/STEP] key down.
By holding the [REPEAT/STEP] key down while hitting a pad, a percussion sound can be recorded.
![ZOOM RT-123 - STEP10 Tap the pads while holding the [REPEAT/STEP] key down. - 1](/content/2025/01/152243/images/f4657d5844a19589ffaf294888e6d76271dcbf9776381722d5a201bbb1123bef.jpg)
STEP11 Record drum track B using the same procedure.
STEP12 When recording is completed, press the [STOP/EXIT] key.
Recording stops.
![ZOOM RT-123 - STEP12 When recording is completed, press the [STOP/EXIT] key. - 1](/content/2025/01/152243/images/4c3ae64c9ba759aa17c56f3b358f98136833403023441826ab79bce72f0aee99.jpg)
- If a MIDI clock signal is being received, real-time recording is not possible. For details, please refer to page 52.
- The sound from external MIDI components cannot be recorded.
STOP/EXIT
![ZOOM RT-123 - STEP12 When recording is completed, press the [STOP/EXIT] key. - 2](/content/2025/01/152243/images/9eab51e3a2aaf426632e79d1e2d5a08f204df74d235b9d6a808654fe610d6422.jpg)
Real-time recording of a bass track
Next, let's add a bass track to the drum track pattern recorded in the previous section.

Press the [BASS] key and hold the key down.
The bass track is selected for recording.
![ZOOM RT-123 - Press the [BASS] key and hold the key down. - 1](/content/2025/01/152243/images/83b277b818f13420be9efb1746d0dad2114bba48765970b8330c499acc24b0ae.jpg)
BASS
![ZOOM RT-123 - Press the [BASS] key and hold the key down. - 2](/content/2025/01/152243/images/bce4f0440f36594262b45ad1532d2bec712f2411cdf3485de1f96cf7e927035e.jpg)
While holding the [BASS] key down, use the [VALUE +/-] keys to select a bass program.
![ZOOM RT-123 - While holding the [BASS] key down, use the [VALUE +/-] keys to select a bass program. - 1](/content/2025/01/152243/images/0ea4420843385dc9bb2d79d90f07e61faa0ff0d4e74d2275862e1df5bc961400.jpg)
The bass program can also be changed during recording.
![ZOOM RT-123 - While holding the [BASS] key down, use the [VALUE +/-] keys to select a bass program. - 2](/content/2025/01/152243/images/8e94034efec7af0ef41830cbaf0d260902683343ba7a47befd408d82c02b6d61.jpg)
![ZOOM RT-123 - While holding the [BASS] key down, use the [VALUE +/-] keys to select a bass program. - 3](/content/2025/01/152243/images/377dced95f33e7f259894225a0dbf87a544aa659dab3f1edb4350757d76f2abb.jpg)
Press the [FUNCTION] key and then pad 1 (BASS KEY).
To record a bass track, you must first assign the pitches from the bass pattern to the pads. Pressing the [FUNCTION] key followed by pad 1 (BASS KEY) enables pitch setting for each pad. The [FUNCTION] key LED lights up and the display shows the pitch name assigned to pad 1.
![ZOOM RT-123 - Press the [FUNCTION] key and then pad 1 (BASS KEY). - 1](/content/2025/01/152243/images/8c5a22b4a373577e8c8c3e789149cdceea4416445b0d1bbef7d0f4c4a8ae6c8f.jpg)
Also if a pattern was erased, the pitches assigned to the pads in the previous pattern are retained. When wishing to use these as is, steps 3 - 7 can be omitted.
![ZOOM RT-123 - Press the [FUNCTION] key and then pad 1 (BASS KEY). - 2](/content/2025/01/152243/images/f711669383b59620f4428116d26b24e653117bb50e69571f615b3fb8161bd0d3.jpg)
![ZOOM RT-123 - Press the [FUNCTION] key and then pad 1 (BASS KEY). - 3](/content/2025/01/152243/images/da0adc751d288254b98c6722afd4970365b461ff19916dd7f86866a0d4f949bb.jpg)
Pitch name assigned to pad 1
While the pad is being pressed, the assigned pitch name (E1 - A4) is shown on the display.
![ZOOM RT-123 - Press the [FUNCTION] key and then pad 1 (BASS KEY). - 4](/content/2025/01/152243/images/2b083da37264988b0a9114b7314e182c1d345123912ac53255e12860a244bdb4.jpg)
![ZOOM RT-123 - Press the [FUNCTION] key and then pad 1 (BASS KEY). - 5](/content/2025/01/152243/images/173006d474b08c0b3fb1e76aab1aa1a2ec670992179310f6c0767e7f0188584f.jpg)
When pad 2 - 13 is released, the pitch name assigned to pad 1 is shown again. This pitch is used as reference when shifting the entire pitch of all pads up or down in semitone steps. Take care not to inadvertently change this pitch.
![ZOOM RT-123 - Press the [FUNCTION] key and then pad 1 (BASS KEY). - 6](/content/2025/01/152243/images/2a40a92be666725ba6a254cdf7294038ff3f22f39925ed21eeec02f943bba362.jpg)
![ZOOM RT-123 - Press the [FUNCTION] key and then pad 1 (BASS KEY). - 7](/content/2025/01/152243/images/b41ef5f657c7280ba0427826f5e13ff977c4c5f2b7a336cf6d2c94dc1b15af7a.jpg)
While holding the pad down, use the [VALUE +/-] keys to change the pitch assigned to the pad.
The illustration below shows an example for assigning an E minor and E major scale to the pads.
There are many possibilities for assigning pitch names. We recommend that you try out various approaches to find the one that is best suited to the bass pattern that you want to record.
![ZOOM RT-123 - Press the [FUNCTION] key and then pad 1 (BASS KEY). - 8](/content/2025/01/152243/images/59a9783f334898244480aff7745467e0c38d84a86e5f076d929078cdb804b2c2.jpg)
Example with E minor scale assigned to pads
![ZOOM RT-123 - Press the [FUNCTION] key and then pad 1 (BASS KEY). - 9](/content/2025/01/152243/images/e62abdc71e587d9416a6ecd98a31fe05449e8a309edfd3b3be591465c2519812.jpg)
Example with E major scale assigned to pads
![ZOOM RT-123 - Press the [FUNCTION] key and then pad 1 (BASS KEY). - 10](/content/2025/01/152243/images/cd20eaea0109550a344b7292cfd742b32017baed36d314fbe3c747315b1a536a.jpg)
STEP6
To shift the pitch of all pads, operate the [VALUE +/-] keys while no pad is pushed.
When the pitch assigned to pad 1 is changed, the pitch of pads 2 - 13 also changes accordingly in semitone steps. For example, if the E minor scale is assigned and you shift pad 1 from "E 2" to "A 2", the A minor scale will be assigned to the pads.
![ZOOM RT-123 - To shift the pitch of all pads, operate the [VALUE +/-] keys while no pad is pushed. - 1](/content/2025/01/152243/images/f8c06412f46c131256596ce5ec2fbd1676abfdbc575adfd98101bf2673263031.jpg)
![ZOOM RT-123 - To shift the pitch of all pads, operate the [VALUE +/-] keys while no pad is pushed. - 2](/content/2025/01/152243/images/9240cba1e17afd73217fad1ab19260bfd642ea80e3e18711b50014f924241245.jpg)
Because this operation shifts the pitch of the entire bass track, it is useful for example to create a bass line that follows chord progress.
Example with A minor scale assigned to pads
STEP7
When the pitch has been assigned as desired, press the [FUNCTION] key once more.
The [FUNCTION] key LED goes out.
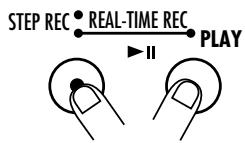
STEP8
While holding the [REC] key down, press the [PLAY] key.
The [REC] key LED and [PLAY] key LED light up and the [TEMPO] key LED flashes. The already recorded drum tracks are played back.
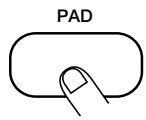
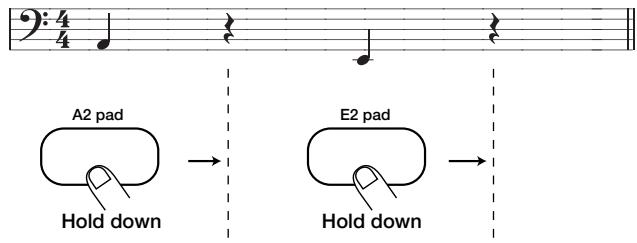
STEP9
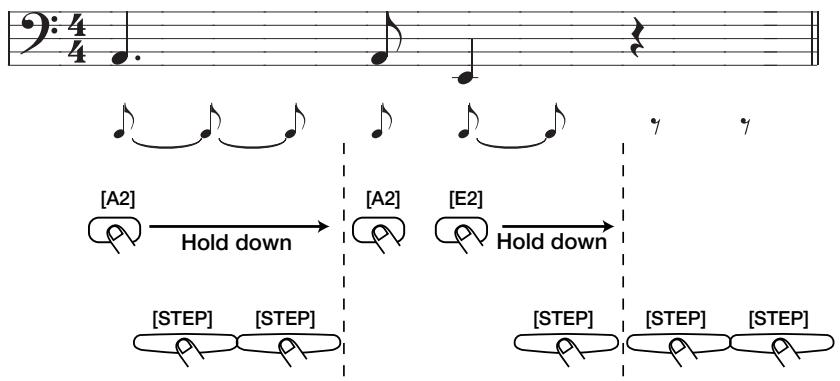
Tap the pads in accordance with the metronome sound.
As opposed to drum track recording, the bass track records for the length of which you press a pad. For example, to record the following sequence, hold the pad to which A2 has been assigned and the pad to which E2 has been assigned down for the length of a quarter note each.
STEP10 To erase the sound from a specific pad, push the pad while holding the [DELETE/ERASE] key down.
While the key is held down, the sound from that pad is erased from the pattern. To erase the entire bass track, push the [BASS] key while holding the [DELETE/ERASE] key down. While both keys are held down, the bass track is erased.
![ZOOM RT-123 - STEP10 To erase the sound from a specific pad, push the pad while holding the [DELETE/ERASE] key down. - 1](/content/2025/01/152243/images/5e29f4c1ad7aeee774db88f9b9891c873554d67f675ae63b615b70cf3ee26ce4.jpg)
![ZOOM RT-123 - STEP10 To erase the sound from a specific pad, push the pad while holding the [DELETE/ERASE] key down. - 2](/content/2025/01/152243/images/b0f585d0bbf6c168c0b4e02edcba177b3c08c1c9f12b748f676733ffd12f651f.jpg)
![ZOOM RT-123 - STEP10 To erase the sound from a specific pad, push the pad while holding the [DELETE/ERASE] key down. - 3](/content/2025/01/152243/images/37921b4cb1ea4c840375feb1ef76b656c4fa41318d273989cf6e1f141f53493f.jpg)
STEP11 When recording is completed, press the [STOP/EXIT] key.
STOP/EXIT
![ZOOM RT-123 - STEP11 When recording is completed, press the [STOP/EXIT] key. - 1](/content/2025/01/152243/images/ba1ff97b0820d6fa5c0ba10f661e81f7f9b0e4d013300a32de707e387f080c2c.jpg)
This section describes step recording, which is another recording type that is possible with the RT-123.
What is step recording?
Step recording allows you to enter and record each sound separately, step by step, while the RT-123 is in the stop condition. Even without mastering how to play the pads in real time, you can easily create complex drum and bass patterns. And you don't need to stop there, because you can even create patterns that would be impossible to play in real time.
For step recording of a drum track, you select the shortest note that is to be used as unit, and you create the pattern by pressing a pad (note) or the [REPEAT/STEP] key (rest) for each step.
For example, to create the following bass drum pattern with step recording, select an eighth note as smallest unit and make the entry as follows:
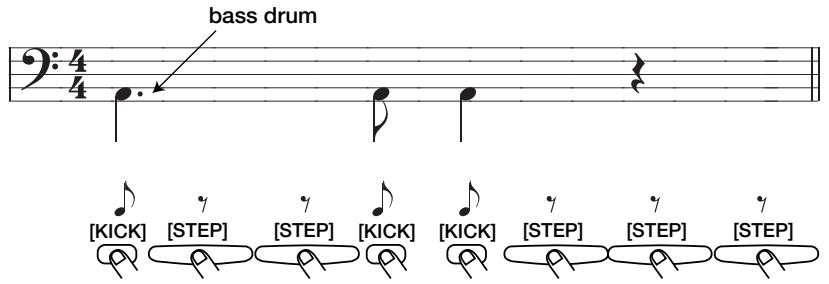
When the end of a pattern is reached, it loops automatically back to the beginning, allowing you to add for example snare and hi-hat separately, to complete the pattern. By pushing 2 pads at the same time, you can enter 2 sounds in the same position.
For step recording of a bass track, the procedure is slightly different, because unlike for the drum track, the pitch and duration of the sound must be specified. The fact that tapping a pad gives the shortest-unit note and pushing the [REPEAT/STEP] key gives the shortest-unit rest is the same. The pitch is determined by which pad you push. The length is determined by holding down the pad and down and pressing the [REPEAT/STEP] key multiple times. Each push of the [REPEAT/STEP] key increases the duration of the sound by the shortest unit note.
For example, to enter the following bass phrase, select an eighth note as smallest unit and make the entry as follows:
Step recording of a drum track
This section describes how to record drum tracks A/B using step recording.
STEP1 In pattern mode, select an empty user pattern.

When wishing to use a pattern where a track has already been recorded, the pattern must be erased first. Please refer to page 34.
STEP2 Select the drum track for recording.
The selection method is the same as for real-time recording ( p.20) . In this example, press the [DRUM A] key to select drum track A and select the kit as desired.

Selecting drum track B allows recording in the same way.
STEP3 Press the [FUNCTION] key and then pad 6 (QUANTIZE).
The current quantize setting appears on the display. The minimum unit (shortest note) for step recording is determined by this setting.
![ZOOM RT-123 - STEP3 Press the [FUNCTION] key and then pad 6 (QUANTIZE). - 1](/content/2025/01/152243/images/ed320edd3af2dcd17feb1e5c4bae0977695c7772010a3c6712fd25b743461226.jpg)
![ZOOM RT-123 - STEP3 Press the [FUNCTION] key and then pad 6 (QUANTIZE). - 2](/content/2025/01/152243/images/f34d0c2321786253f0ef56405d71b35e17793a2815551dce6765d980833ce120.jpg)
STEP4 Use the [VALUE +/-] key to set the quantize value, and then press the [FUNCTION] key once more.
4 Quarter note
8.Eighth note
12……Eighth triplet note
16 Sixteenth note
24……Sixteenth triplet note
32………Thirty-second note
48....Thirty-second triplet note
Hi...1 tick (1/96 of quarter note)
![ZOOM RT-123 - STEP4 Use the [VALUE +/-] key to set the quantize value, and then press the [FUNCTION] key once more. - 1](/content/2025/01/152243/images/c60700220cc7096f00d1ea55a1fc2493f793627f5f1d4bc43de53c7737183862.jpg)
![ZOOM RT-123 - STEP4 Use the [VALUE +/-] key to set the quantize value, and then press the [FUNCTION] key once more. - 2](/content/2025/01/152243/images/6957788417e8a3eebd06969893eb65a59d7f3a8566e39b80e490b791ae83607a.jpg)
For details on the [FUNCTION] key, please refer to page 43.
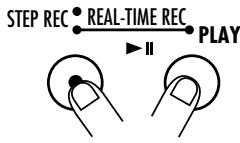
The [REC] key LED and [PLAY] key LED light up, indicating that the RT-123 is ready for recording.
STEPREC
![ZOOM RT-123 - STEP4 Use the [VALUE +/-] key to set the quantize value, and then press the [FUNCTION] key once more. - 3](/content/2025/01/152243/images/45dce6def03c8c832f522cdf17b2f8261566d2ad8ac62163d6b896b0f9897cf2.jpg)
![ZOOM RT-123 - STEP4 Use the [VALUE +/-] key to set the quantize value, and then press the [FUNCTION] key once more. - 4](/content/2025/01/152243/images/994d1e3f2b276f980bc9506d38641c062869dcfa7c38c4d6366812f975e2961a.jpg)
To enter a note, press the pad corresponding to the desired sound. To enter a rest, press the [REPEAT/STEP] key.
For example, tapping the [KICK] pad will enter a bass drum note (the [KICK] pad LED flashes briefly). The current position of the pattern then advances by one unit. The tapping intensity will of course also be recorded.
When the end of the pattern is reached, the recording loops back to the beginning and continues, allowing you to add to the recording as often as desired.
![ZOOM RT-123 - STEP4 Use the [VALUE +/-] key to set the quantize value, and then press the [FUNCTION] key once more. - 5](/content/2025/01/152243/images/fdf75c1e83904cfbcc4f1e5f24d88e7c75d31f522c25850ba2afb3261320dbfb.jpg)
![ZOOM RT-123 - STEP4 Use the [VALUE +/-] key to set the quantize value, and then press the [FUNCTION] key once more. - 6](/content/2025/01/152243/images/afaf87b39de89a05c1986c89bb6697c3996e400e20878c0569925fb84d84d69f.jpg)
The display shows the current position in the pattern (measure/beat).
![ZOOM RT-123 - STEP4 Use the [VALUE +/-] key to set the quantize value, and then press the [FUNCTION] key once more. - 7](/content/2025/01/152243/images/bd7cb4bd7bca347bd6eb1b6e37f639401516a0c95200fdf93030c7d5255b31ed.jpg)
To erase a sound, use the [REPEAT/STEP] key to move to the desired position. Then press the corresponding pad while holding down the [DELETE/ERASE] key.
As you move the position with the [REPEAT/STEP] key, the LED of a pad that has been input for the current position lights up. Pressing the pad while holding the [DELETE/ERASE] key down causes the LED to go out and the sound will be erased.
![ZOOM RT-123 - STEP4 Use the [VALUE +/-] key to set the quantize value, and then press the [FUNCTION] key once more. - 8](/content/2025/01/152243/images/c7a0c1606175a81de33cfec76bd99887fc907b8a228c6c0932c8126bcd9c1711.jpg)
![ZOOM RT-123 - STEP4 Use the [VALUE +/-] key to set the quantize value, and then press the [FUNCTION] key once more. - 9](/content/2025/01/152243/images/88fd2bb1562c874366909abf4e47f667a85d61fd195ebb0864741464c09843d7.jpg)
![ZOOM RT-123 - STEP4 Use the [VALUE +/-] key to set the quantize value, and then press the [FUNCTION] key once more. - 10](/content/2025/01/152243/images/70dc6abe7e2fc49eeb6d21e38825e0e0c57ddfa7fd57299cc9132d444bd7e1a5.jpg)
During step recording, erasing the entire track is not possible.
![ZOOM RT-123 - STEP4 Use the [VALUE +/-] key to set the quantize value, and then press the [FUNCTION] key once more. - 11](/content/2025/01/152243/images/13445955825e1f6d49ae45770f241d4023d4437d03565e324b51d35b8ce45a3b.jpg)
When recording is completed, press the [STOP/EXIT] key.
The [REC] key LED goes out, and step recording ends.
![ZOOM RT-123 - STEP4 Use the [VALUE +/-] key to set the quantize value, and then press the [FUNCTION] key once more. - 12](/content/2025/01/152243/images/e724a6cb2669f293e171e5dd3694be00340985f25c628384c61a1f93e182961a.jpg)
To record drum track B, repeat steps 3 - 8.
![ZOOM RT-123 - STEP4 Use the [VALUE +/-] key to set the quantize value, and then press the [FUNCTION] key once more. - 13](/content/2025/01/152243/images/6f452ccad639483413a4733310395f8405241c27a8ce6f6e86e79653866b321e.jpg)
If step 4 is carried out without pressing the [FUNCTION] key, the quantize value of the pattern already recorded in that track will also be changed. For example, if step recording was carried out with sixteenth notes and the quantize value was then changed to quarter notes, the pattern already recorded will also be changed to quarter notes if the [REC] key is pushed without pressing the [FUNCTION] key.
Step recording of a bass track
Now let's add a bass track to the drum tracks recorded as described in the previous section. Because pitch and duration must be specified for the bass track, the procedure is slightly different from step recording of the drum track.
STEP1 Press the [BASS] key.
The bass track is selected.
![ZOOM RT-123 - STEP1 Press the [BASS] key. - 1](/content/2025/01/152243/images/5c06beb84a6b1cee49625da8890e5024c6df766d3ae7741dcf473f1a697a128c.jpg)
STEP2 If desired, select the bass program.
The selection method is the same as for real-time recording ( ,24)
STEP3 Press the [FUNCTION] key and then pad 6 (QUANTIZE).
![ZOOM RT-123 - STEP3 Press the [FUNCTION] key and then pad 6 (QUANTIZE). - 1](/content/2025/01/152243/images/441c95fe38f9dae1b8ec59a27b37db13bd4ae37cf5320174ca774c3f88255a43.jpg)
Use the [VALUE +/-] keys to set the quantize value (smallest unit for recording). Then press the [FUNCTION] key again.
For details on the quantize value, please refer to page 28.
![ZOOM RT-123 - Use the [VALUE +/-] keys to set the quantize value (smallest unit for recording). Then press the [FUNCTION] key again. - 1](/content/2025/01/152243/images/074bf1c5b10f991870cdd1dd7f78aca9d884e8713b7286ca2218aa4ca7a76325.jpg)
STEP5 Press the [REC] key.
The [REC] key LED and [PLAY] key LED light up, indicating that the RT-123 is ready for recording.
![ZOOM RT-123 - STEP5 Press the [REC] key. - 1](/content/2025/01/152243/images/897bd8ea72cfbc0c6e11178b744ae65d74a66d4419503a4202e914e549d81e98.jpg)
STEPREC
If step 4 is carried out without pressing the [FUNCTION] key, the quantize value of the pattern already recorded in that track will also be changed. For example, if step recording of a bass track was carried out with sixteenth notes and the quantize value was then changed to quarter notes, the pattern already recorded will also be changed to quarter notes if the [REC] key is pushed without pressing the [FUNCTION] key.
![ZOOM RT-123 - STEP5 Press the [REC] key. - 2](/content/2025/01/152243/images/2b2d3193b8293e9d2d0e1e1a72a23a3fcf55e654895ccf6888af742a7cd8939c.jpg)
STEP6 Press the desired pad and/or the [REPEAT/STEP] key to enter the desired note or rest with the desired duration.
For step recording of the bass track, you perform one of three actions:
- Enter the minimum unit note: Briefly tap the pad and release it. A note of the selected minimum duration and the pitch assigned to
![ZOOM RT-123 - STEP6 Press the desired pad and/or the [REPEAT/STEP] key to enter the desired note or rest with the desired duration. - 1](/content/2025/01/152243/images/1b54439cef708c7576ff698d569d08b9254e5df99cbacad8276e4f71c408a496.jpg)
that pad is entered, and the position proceeds to the next step.
- Enter the minimum unit rest: Briefly tap the [REPEAT/STEP] key and release it. A rest of the selected minimum duration is entered, and the position proceeds to the next step.
- Enter a note longer than the minimum unit: Hold the pad down and repeatedly press the [REPEAT/STEP] key. With each push of the [REPEAT/STEP] key, the immediately preceding note is extended by one unit.
![ZOOM RT-123 - STEP6 Press the desired pad and/or the [REPEAT/STEP] key to enter the desired note or rest with the desired duration. - 2](/content/2025/01/152243/images/49c6f5e0f6ee3a6009774f33205d28851a7299e0a9d9751a47c7a72031d27735.jpg)
![ZOOM RT-123 - STEP6 Press the desired pad and/or the [REPEAT/STEP] key to enter the desired note or rest with the desired duration. - 3](/content/2025/01/152243/images/fb715ae12c8d044728a159020570d8668015a20beb9ab0cfab835b70614f7829.jpg)
When you press a pad, its LED lights up, indicating that the note has been input. The display shows the current position in the pattern (measure/beat).
![ZOOM RT-123 - STEP6 Press the desired pad and/or the [REPEAT/STEP] key to enter the desired note or rest with the desired duration. - 4](/content/2025/01/152243/images/55b86e7622a4f8a035bb4d5140cf16bec5bcc96fba802290f6f58191c9ca89ee.jpg)
A note longer than the entire pattern cannot be input. When the input exceeds the pattern length, the note will only be as long as the pattern.
STEP7
To erase a note, use the [REPEAT/STEP] key to move to the desired position. Then press the corresponding pad while holding down the [DELETE/ERASE] key.
As you move the position with the [REPEAT/STEP] key, the LED of a pad that has been input for the current position lights up. Pressing the pad while holding the [DELETE/ERASE] key down causes the LED to go out and the note will be erased.
STEP8
To decrease the length of a note, use the [REPEAT/STEP] key to move to the position where the note should stop.
Then press the corresponding pad while holding down the [DELETE/ERASE] key.
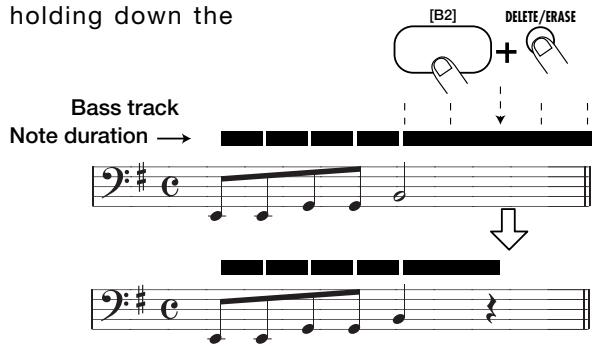

During step recording, erasing the entire track is not possible.
STEP9
When recording is completed, press the [STOP/EXIT] key.
The [REC] key LED goes out, and step recording ends.
Pattern Copy/Erase
This section explains how to copy or erase a pattern.
Copying a Pattern
The patterns in the RT-123 (preset patterns or user patterns) can be copied to a different user pattern number. This is useful for example when wishing to change only a part of a pattern, such as changing the bass track phrasing while keeping the drum track.

STEP1 In pattern mode, select the pattern to be used as the copy source.
The copy source can be a user pattern or preset pattern. However, an empty user pattern (display shows "E") cannot be selected as copy source.

When the copy is executed, the existing contents of the pattern selected as copy target will be erased. Make sure that the pattern you have selected is one that you don't mind erasing.
Copy source pattern number
STEP2 Press the [INSERT/COPY] key.
The [INSERT/COPY] key LED flashes and the current pattern is selected as the copy source.
![ZOOM RT-123 - STEP2 Press the [INSERT/COPY] key. - 1](/content/2025/01/152243/images/bce2376a23cfb661dc68167f40c70c91a0b76a865972465042b03567430b2069.jpg)
INSERT/COPY
STEP3 Use the [VALUE +/-] keys to select a user pattern (U01 - U99) as copy target.
Only user patterns can be selected as copy target.
![ZOOM RT-123 - STEP3 Use the [VALUE +/-] keys to select a user pattern (U01 - U99) as copy target. - 1](/content/2025/01/152243/images/22ce87f0cd621429076ddc2658d15af57ce7252e7de4b888ff8811c695ecfe9d.jpg)
- Keeping a [VALUE + / - ] key depressed changes numbers continuously.
- To change numbers quickly, hold one of the [VALUE +/-] keys depressed and press the other key. The numbers will change continuously.
![ZOOM RT-123 - STEP3 Use the [VALUE +/-] keys to select a user pattern (U01 - U99) as copy target. - 2](/content/2025/01/152243/images/7e769d3762e9ff41f57f62a2babc7b67974578748f4cae7f08679d64f6e2b3f5.jpg)
![ZOOM RT-123 - STEP3 Use the [VALUE +/-] keys to select a user pattern (U01 - U99) as copy target. - 3](/content/2025/01/152243/images/9db93c52465578924af536ed53f4aff10152ff3505e330349af99e3e78d82c91.jpg)
- When the copy source is a user pattern, the same pattern will be preselected after step 2. However, it is not possible to actually copy from a pattern to the same pattern.
- When the copy source is a preset pattern, the same number in the user bank will be preselected after step 2.
To execute the copy process, press the [INSERT/COPY] key. When wishing to cancel the process, press the [STOP/EXIT] key.
When copying is completed, the unit returns to the pattern mode with the copy target pattern being selected.
If copying was cancelled, the unit returns to the pattern mode with the copy source pattern being selected.
![ZOOM RT-123 - To execute the copy process, press the [INSERT/COPY] key. When wishing to cancel the process, press the [STOP/EXIT] key. - 1](/content/2025/01/152243/images/24ea66010830f33b32499ad3e7cca458c84b09ae8db0b8202c49eeb35a0014f2.jpg)
INSERT/COPY
![ZOOM RT-123 - To execute the copy process, press the [INSERT/COPY] key. When wishing to cancel the process, press the [STOP/EXIT] key. - 2](/content/2025/01/152243/images/ebe123d389d42b663ec82c3bc1b8aba2027eb136a6f18911d622dabc64fe69ae.jpg)
STOP/EXIT
Erasing a Pattern
A user pattern can be erased when it is no longer needed. This serves to make way for storing new user patterns or to free up memory space.

STEP1 In pattern mode, select the user pattern to be erased (U01 - U99).
The pattern number is shown on the display.

When a user pattern is erased, its contents cannot be restored.
Make sure that you no longer need the pattern before erasing.

STEP2 Press the [DELETE/ERASE] key.
The [DELETE/ERASE] LED flashes and the indication "dEL" and the pattern number alternately are shown on the display.
![ZOOM RT-123 - STEP2 Press the [DELETE/ERASE] key. - 1](/content/2025/01/152243/images/7e24c7cf643e839d043ffb58ebfffa0b09c93f85fc9c28b8b0b79034fcf11598.jpg)
DELETE/ERASE
STEP3 To execute the erasing process, press the [DELETE/ERASE] key once more. When wishing to cancel the process, press the [STOP/EXIT] key.
When erasing is completed, the unit returns to the pattern mode with the empty user pattern being selected. The display will show "E". If erasing was cancelled, the unit returns to the pattern mode with the original user pattern being selected.
![ZOOM RT-123 - STEP3 To execute the erasing process, press the [DELETE/ERASE] key once more. When wishing to cancel the process, press the [STOP/EXIT] key. - 1](/content/2025/01/152243/images/37c83ebed980417ee5c1dbe2ef1a57b607961daf8dbda3db36a54802027b67a4.jpg)
DELETE/ERASE
![ZOOM RT-123 - STEP3 To execute the erasing process, press the [DELETE/ERASE] key once more. When wishing to cancel the process, press the [STOP/EXIT] key. - 2](/content/2025/01/152243/images/200a205f277e12d5cb6fdf00354f5ac918e935a832fb3c89d1869ea5c5b30a25.jpg)
Creating Songs (Song Mode)
This section describes how to line up user patterns in a desired order to create the backing for an entire song. This mode of operation is called the song mode.
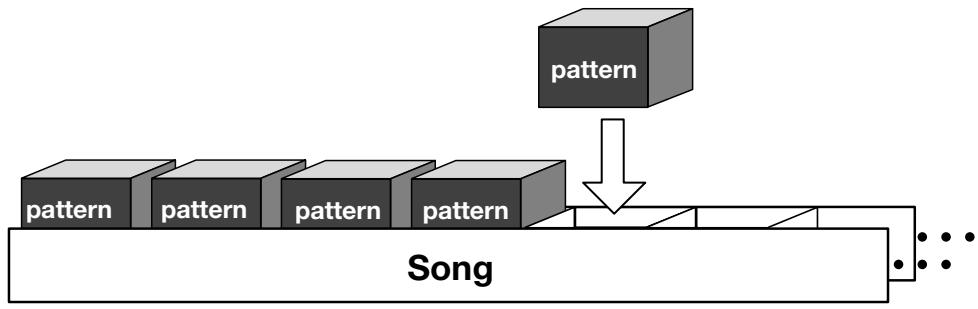
What is a song?
A song is a sequence of user patterns (preset patterns cannot be used). A song consists of multiple slots (called "steps") each of which contains one pattern. The maximum length of a song is 99 steps. The maximum number of songs that can be stored in the RT-123 is 99. (The actual number of available steps and songs will depend on the number of distinct sounds used for user patterns and other songs.) In song mode, you can change also the tempo and volume during a song.

The number of steps is not equal to the number of measures. The length of each step depends on the pattern that is contained in the step.
Besides the pattern number, each song step can contain the following settings:
- Tempo change: In song mode, the tempo is stored individually for each song. (The tempo is set with the [TEMPO] key, as described on page 38.) Using this tempo as reference, the tempo for each step can be varied in the range from -30 to 0 (no change) to +30 BPM (beats per minute = number of quarter notes per minute).
- Volume: The volume of the pattern as contained in the step can be set in the range from 0 (no change) to -30.
- Transpose: The bass track can be transposed in semitone steps in the range from -6 to 0 (no change) to +6.
Step 0
- Pattern number
- Tempo information
Volume information - Transpose information
Step 1
- Pattern number
- Tempo information
Volume information - Transpose information
Step 2
- Pattern number
- Tempo information
Volume information - Transpose information
Step 98
Recording and playing a song
Let's collect a number of patterns into a song.
STEP1 Press the [SONG] key.
The RT-123 is switched to song mode. The display shows the currently selected song number.
![ZOOM RT-123 - STEP1 Press the [SONG] key. - 1](/content/2025/01/152243/images/0650539de7ea0cc221bfdff3372c055ef4994229463503b53b01ebeb5a48891c.jpg)
![ZOOM RT-123 - STEP1 Press the [SONG] key. - 2](/content/2025/01/152243/images/62bda4b19558eaa9160532744a7c3b5dd2d1abd5668a7345b35f4583a2853baf.jpg)
STEP2 Use the [VALUE +/-] keys to select an empty song number.
In song mode, the [VALUE +/-] keys serve to select a song. If an empty song was selected, the right side of the display shows "E".
![ZOOM RT-123 - STEP2 Use the [VALUE +/-] keys to select an empty song number. - 1](/content/2025/01/152243/images/39b5e75c39a3e1e2b1f4e2e0fde5fdcdfdb74ed640db2ca65882f70d6e79a99f.jpg)
- Keeping a [VALUE + / - ] key depressed changes numbers continuously.
- To change numbers quickly, hold one of the [VALUE +/-] keys depressed and press the other key. The numbers will change continuously.
![ZOOM RT-123 - STEP2 Use the [VALUE +/-] keys to select an empty song number. - 2](/content/2025/01/152243/images/5394e78eb59d11dd78866ad3571c2e049bf04c5f44cb1f1a82dd13db0473e4a2.jpg)
STEP3 Press the [REC] key.
The [REC] key LED lights up, indicating that the RT-123 is ready for song recording.
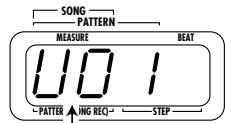
The lower two digits of the display show the step number, and the upper two digits the pattern number selected for that step.
![ZOOM RT-123 - STEP3 Press the [REC] key. - 1](/content/2025/01/152243/images/5be92aa63a9c4867f264abebcf75269cfe1c58d4bfd932c4e7df9ec266163352.jpg)
STEP4 Use the [VALUE +/-] keys to select the user pattern number to be assigned to the first step.
During song recording, the [VALUE +/-] keys select the user pattern to be assigned to the step. (Preset patterns cannot be selected.) The selected pattern number is shown by the upper two digits of the display.
![ZOOM RT-123 - STEP4 Use the [VALUE +/-] keys to select the user pattern number to be assigned to the first step. - 1](/content/2025/01/152243/images/f62c7c2e37d2b66d7bbc8792639ee5b5e3ee2d7b374fa16c903d1a565b58bda0.jpg)
![ZOOM RT-123 - STEP4 Use the [VALUE +/-] keys to select the user pattern number to be assigned to the first step. - 2](/content/2025/01/152243/images/d3a8df6ea163acb5c9e42500a2961ccdd3a50a658107148b5b34148f60c866ae.jpg)
When wishing to hear the currently selected pattern, you can use the [PLAY] and [STOP/EXIT] keys to play it. While a pattern is playing, you can also switch the step number back and forth to check the patterns in other steps.
STEP5 To proceed to the next step, press the [REPEAT/STEP] key.
The lower two digits of the display show the second step, and the upper two digits show "EE" which indicates the end of the song. In this condition, you can select the pattern for the second step. If you wish to return to the previous step, hold down the [REPEAT/STEP] key and press the [VALUE -] key.
![ZOOM RT-123 - STEP5 To proceed to the next step, press the [REPEAT/STEP] key. - 1](/content/2025/01/152243/images/11fd9b1c5b501bccfdfba8b9ac47b58ac37a7d7a2baa6c870d6eaae95ccda441.jpg)
![ZOOM RT-123 - STEP5 To proceed to the next step, press the [REPEAT/STEP] key. - 2](/content/2025/01/152243/images/4bd6721779327f89d3659608006c166f3aab7c9c4fac3cf3c9aa37e3037cd97c.jpg)
You can move back and forth in the step numbers by holding down the [SONG] key and using the [VALUE +/-] keys.
STEP6 Repeat steps 4 - 5 to create the entire song.

One song can have up to 99 steps (00 - 98) for patterns. To change a pattern selection, hold down the [REPEAT/STEP] key and use the [VALUE -] key to return to the previous step.
To insert a pattern before the currently selected step, press the [INSERT/COPY] key and perform step 4.
A new step is inserted before the currently selected step, and subsequent steps are shifted one count up.
INSERT/COPY
![ZOOM RT-123 - To insert a pattern before the currently selected step, press the [INSERT/COPY] key and perform step 4. - 1](/content/2025/01/152243/images/1cabd13fc21a1371e25832a07da7edd018258f2dd08affb9c9eff6e067f07b56.jpg)
![ZOOM RT-123 - To insert a pattern before the currently selected step, press the [INSERT/COPY] key and perform step 4. - 2](/content/2025/01/152243/images/201da10733544c016927fabe52ff16d4c91e279e3ff355dcedb73acd19150198.jpg)
STEP8 To delete the currently selected step, press the [DELETE/ERASE] key.
The currently selected step is deleted, and subsequent steps are shifted one count down.
DELETE/ERASE
![ZOOM RT-123 - STEP8 To delete the currently selected step, press the [DELETE/ERASE] key. - 1](/content/2025/01/152243/images/9fb3894940355a1af63ba1fab759c2c13ac9b8531ee9f8360c688edfe5a296f9.jpg)
![ZOOM RT-123 - STEP8 To delete the currently selected step, press the [DELETE/ERASE] key. - 2](/content/2025/01/152243/images/75347b3dcc03ce8800fffcc8f04ca49a72f62f1621a138750a21cbe017f82bb7.jpg)
STEP9 When one song is completed, press the [STOP/EXIT] key.
The [REC] key LED goes out, and song recording stops. The song position returns to step 1.
STOP/EXIT
![ZOOM RT-123 - STEP9 When one song is completed, press the [STOP/EXIT] key. - 1](/content/2025/01/152243/images/c558f4c8f2af273084e2fa98398f3115d482fc6da154651b1c4bddf33e917d79.jpg)
STEP10 To listen to the song, press the [PLAY] key.
The [PLAY] key LED lights up and the song is played back. The [TEMPO] key LED flashes according to the tempo of the song. During playback, the upper two digits of the display show the current step number, and the lower two digits show the song number. Pressing the [PATTERN] key during playback causes the display to show the number of measures since the start of the song.
![ZOOM RT-123 - STEP10 To listen to the song, press the [PLAY] key. - 1](/content/2025/01/152243/images/4b1cbb4756aaeb441cc2ecf293ff55639a2052732fbd1e88094c9cdd7e2b5518.jpg)
![ZOOM RT-123 - STEP10 To listen to the song, press the [PLAY] key. - 2](/content/2025/01/152243/images/f51574a198659e5cf767775d4eb1750c065bd47df28ba2aa0e785ef78ee596ce.jpg)
- By performing step 2 during playback, you can switch to the next song without stopping play.
- By pressing the [BASS MUTE] key during playback, the bass track can be muted. To restore the original condition, press the key once more.
![ZOOM RT-123 - STEP10 To listen to the song, press the [PLAY] key. - 3](/content/2025/01/152243/images/796230c125c2d7aa0244fe4cbd1bc2a479b2978337efc8188cc9c0236c2422e5.jpg)
![ZOOM RT-123 - STEP10 To listen to the song, press the [PLAY] key. - 4](/content/2025/01/152243/images/5df44e7b3122525f1a4f39efd27cf3bc57bcae6e8139190264213c69e55e8d92.jpg)
- To insert a rest in a song, first create a "rest pattern" in pattern mode and then select this pattern for the desired step in song mode. Note that if an empty pattern is selected as a song step, song playback will stop at this step.
- To create a rest pattern, select an empty pattern in pattern mode and press the [REC] key. The BASS KEY (bass track only), MIX, TIME SIG, BAR LENGTH, and drum kit/bass program settings active at this point will be stored.
STEP11 Press the [STOP/EXIT] key when wishing to terminate playback.
The LED goes out and the song returns to the start position.
By pressing the [PLAY] key again, you can start playback of the song again from the beginning.
![ZOOM RT-123 - STEP11 Press the [STOP/EXIT] key when wishing to terminate playback. - 1](/content/2025/01/152243/images/a876a5062c73f63a54f8311e7157fdc6f4ffcef03168800a86c1fda325a3b486.jpg)
![ZOOM RT-123 - STEP11 Press the [STOP/EXIT] key when wishing to terminate playback. - 2](/content/2025/01/152243/images/63d7d1afb58c34112b8d1849444101a73d67dc1f48e1af45924150c3eae76149.jpg)
Pressing the [PLAY] key instead of the [STOP/EXIT] key causes the PAUSE LED to flash, and playback is paused. To resume playback from the same point, press the [PLAY] key once more.
![ZOOM RT-123 - STEP11 Press the [STOP/EXIT] key when wishing to terminate playback. - 3](/content/2025/01/152243/images/a50ddaa4967b06cb7cb259348b45bc7a7b0adc38fc5cca962eef967e89a5ba44.jpg)
Also during playback of a song, you can use the pads for manual play.
STEP12 To play a song from half-way, hold the [SONG] key down and use the [VALUE +/-] keys to select the step while the song is stopped.
With each push of the [VALUE +] key, the step number shown on the display will advance by one increment. With each push of the [VALUE -] key, the step number shown on the display will decrease by one increment. Pressing the [PLAY] key in this condition will start playback from the selected step.
![ZOOM RT-123 - STEP12 To play a song from half-way, hold the [SONG] key down and use the [VALUE +/-] keys to select the step while the song is stopped. - 1](/content/2025/01/152243/images/49718d509da8adef137e6d1b798728fe3f7bdaf395c675a82b5ae84df501bbfa.jpg)
![ZOOM RT-123 - STEP12 To play a song from half-way, hold the [SONG] key down and use the [VALUE +/-] keys to select the step while the song is stopped. - 2](/content/2025/01/152243/images/c3103abb537fffeb63e2a83b716430696ae9373446d693cb386a1f5ed4bdf995.jpg)
STEP13 To change the tempo of the song, hold down the [TEMPO] key and use the [VALUE +/-] keys to adjust the tempo value (BPM).
As in pattern mode, the tempo can also be specified by tapping the [TEMPO] key 2 times.
![ZOOM RT-123 - STEP13 To change the tempo of the song, hold down the [TEMPO] key and use the [VALUE +/-] keys to adjust the tempo value (BPM). - 1](/content/2025/01/152243/images/3b9756b37bd9fd9de8429fafed3abe5d772cb7734a4ccc6e924a4770794123f6.jpg)
![ZOOM RT-123 - STEP13 To change the tempo of the song, hold down the [TEMPO] key and use the [VALUE +/-] keys to adjust the tempo value (BPM). - 2](/content/2025/01/152243/images/4dbc4c30fad00e5a459ac9c66cd86ea820e5d601749ab3c1f5429d1fd784d8c4.jpg)
The RT-123 automatically stores a so-called "master tempo" for each song. When a song is switched, the tempo last set for that song will be used.
Editing a song
This section describes how you can alter parameters such as tempo or volume for a song that has already been recorded.
STEP1 In song mode, select the song to which you want to make alterations.
STEP2 Press the [REC] key.
The [REC] key LED lights up, and song editing becomes possible.
STEPREC
![ZOOM RT-123 - STEP2 Press the [REC] key. - 1](/content/2025/01/152243/images/20d68ae9fe0de43bb4cbdf0a5bfba9be8bceb7bb67396c910cf362bc40298746.jpg)
Hold down the [REPEAT/STEP] key and use the [VALUE +/-] keys to select the step where you want to make an alteration.
The lower two digits of the display show the step number and the upper two digits show the pattern number.
![ZOOM RT-123 - Hold down the [REPEAT/STEP] key and use the [VALUE +/-] keys to select the step where you want to make an alteration. - 1](/content/2025/01/152243/images/d1fbecd80d82de2c65d0e18b5682e5e024d4c893699c267808098bff8ed0866f.jpg)
You can move back and forth in the step numbers by holding down the [SONG] key and using the [VALUE +/-] keys.
![ZOOM RT-123 - Hold down the [REPEAT/STEP] key and use the [VALUE +/-] keys to select the step where you want to make an alteration. - 2](/content/2025/01/152243/images/8cf49fe81873a2b9925c0bfb07f380bbfea7212d26c3422fb01fd49af573baef.jpg)
Currently selected Step number pattern number
STEP4 Choose the type of alteration by pressing one of the following keys:
- [TEMPO] key: to change the tempo of the pattern
- Pad 2 (MIX): To set the pattern volume
- Pad 1 (BASS KEY): To transpose the bass track
The current setting of the selected parameter is shown on the display.
Setting of selected parameter
STEP5 While holding down the pad whose parameter you want to change, use the [VALUE +/-] keys to set the value.
The adjustment range for the various parameters is as follows.
- Tempo change: -30 to 0 to 30 BPM
Volume: 0 to -30 - Transpose: -6 to 0 to 6 (in semitones)
![ZOOM RT-123 - STEP5 While holding down the pad whose parameter you want to change, use the [VALUE +/-] keys to set the value. - 1](/content/2025/01/152243/images/81a303c5f30aa3a8d7d2798c1b2c011cb3b1dcc8eddadf833a693b0dca1af993.jpg)
STEP6 Repeat steps 3 - 5 until all desired parameters are set.
STEP7 To terminate song editing, press the [STOP/EXIT] key.
Deleting a song
When you wish to delete a song, for example to make room for new recordings, proceed as follows.

STEP1 In song mode, select the song you want to delete.
STEP2 Press the [DELETE/ERASE] key.
The [DELETE/ERASE] key LED flashes, and the song number and the indication "dEL" appear alternately on the display.
![ZOOM RT-123 - STEP2 Press the [DELETE/ERASE] key. - 1](/content/2025/01/152243/images/a439c81187cf20f5f2612f1a1ac11c207e51b25a4be3fed9bbd4b05ad4230cf4.jpg)
DELETE/ERASE
![ZOOM RT-123 - STEP2 Press the [DELETE/ERASE] key. - 2](/content/2025/01/152243/images/9076c3b0155fe8a708ea3971ca9fc12c1703a2e3d420abb4f5ccfebf73746bea.jpg)
To delete the song, press the [DELETE/ERASE] key. To cancel the process, press the [STOP/EXIT] key.
When deleting is carried out, the unit returns to the song mode with an empty song selected.
When deleting is cancelled, the unit returns to the song mode with the original song selected.
DELETE/ERASE
![ZOOM RT-123 - To delete the song, press the [DELETE/ERASE] key. To cancel the process, press the [STOP/EXIT] key. - 1](/content/2025/01/152243/images/19149fe3318d173daa80474aab6507bda4d0e6b3c2e1f914ddc3ebb316ebcca4.jpg)
STOP/EXIT
![ZOOM RT-123 - To delete the song, press the [DELETE/ERASE] key. To cancel the process, press the [STOP/EXIT] key. - 2](/content/2025/01/152243/images/e68dae688f4f7389116d432dc007865aa23abe6ecf34fc558cd4cb363b6cb83c.jpg)
![ZOOM RT-123 - To delete the song, press the [DELETE/ERASE] key. To cancel the process, press the [STOP/EXIT] key. - 3](/content/2025/01/152243/images/e85584b13fd9a1f324616dde3a99da4f4ae9a3900555d7cafc07ed3695f7ea68.jpg)
Once deleted, a song cannot be restored. Proceed with care to prevent inadvertently deleting a song.
Using Pads to Play Patterns (Groove Play)
This section describes the groove play mode. In this mode, the 13 pads are used to play patterns assigned to them. This allows quick switching between patterns during a performance. Up to 4 patterns can be played simultaneously, letting you for example play two patterns with a different beat, or the same pattern twice, shifted by 1 beat, to create a complex rhythm.
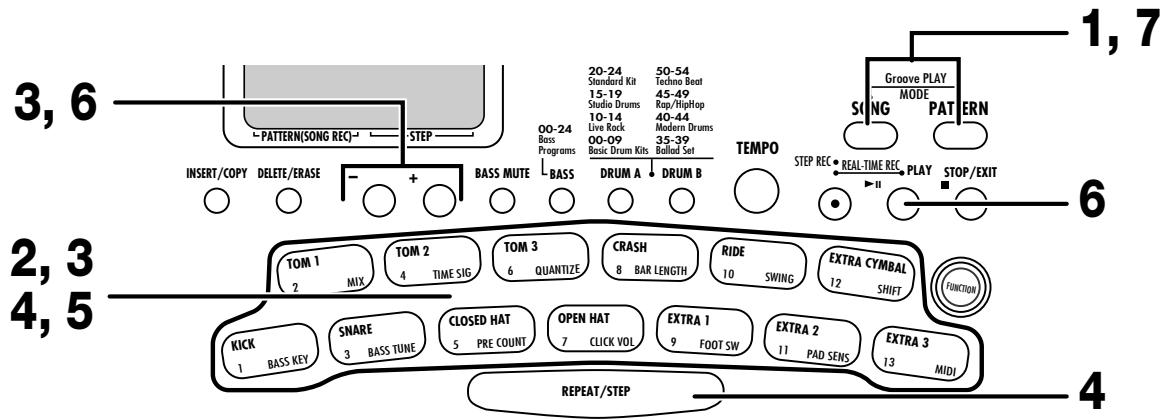
STEP1 Press the [SONG] key and the [PATTERN] together.
The RT-123 switches to groove play mode, and the [SONG] key LED and [PATTERN] key LED light up.
The song number is shown on the display.
![ZOOM RT-123 - STEP1 Press the [SONG] key and the [PATTERN] together. - 1](/content/2025/01/152243/images/0714fad0247e9415ad3d7b06c5ca31c0e1ccbb55d7a5f58d5f70010c607013ff.jpg)
In groove play mode, all patterns are played with the master tempo of the currently selected song. If desired, use the [TEMPO] key to change the song tempo.
![ZOOM RT-123 - STEP1 Press the [SONG] key and the [PATTERN] together. - 2](/content/2025/01/152243/images/d95957ad07f76c532928e78e0ff4c86dce6b9ac49a7907add8bfb1dc4a16722f.jpg)
STEP2 Try out the sound by pressing any pad.
In the factory default condition, the RT-123 has 13 patterns specially designed for groove play assigned to pads 1 - 13. If a pad is held down, the assigned pattern plays repeatedly. The intensity with which the pad is hit controls the overall pattern volume. While the pad is pressed, the pattern number is shown on the display.
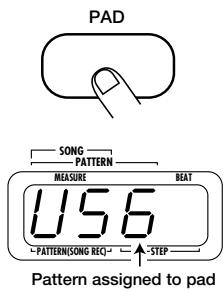
STEP3 To change the pattern assigned to a pad, hold the pad down and use the [VALUE +/-] keys to select the new pattern.
You can select either a preset pattern or a user pattern. If the [VALUE -] key is pressed while "U01" (user pattern 01) is displayed, the display indication changes to "PAd". Instead of a pattern, a pad for which "PAd" is selected will play the single sound originally allocated to the pad (such as kick drum or snare).
![ZOOM RT-123 - STEP3 To change the pattern assigned to a pad, hold the pad down and use the [VALUE +/-] keys to select the new pattern. - 1](/content/2025/01/152243/images/1d25629fd8246b778e87a308644bf42b42861ef4d8c5147ef09e226df8296761.jpg)
![ZOOM RT-123 - STEP3 To change the pattern assigned to a pad, hold the pad down and use the [VALUE +/-] keys to select the new pattern. - 2](/content/2025/01/152243/images/a93234b215bfb72ba4401201732d2d8d1b8179e320cabd76cdb7ae6a053b10f3.jpg)
The patterns assigned to the pads are retained also while the unit is turned off.
![ZOOM RT-123 - STEP3 To change the pattern assigned to a pad, hold the pad down and use the [VALUE +/-] keys to select the new pattern. - 3](/content/2025/01/152243/images/d8d59889b5a614d781013529026ecbaa19ec5a7a66f9806259c47c83a6747644.jpg)
To repeat a pattern even when the pad is released, hit the pad while holding the [REPEAT/STEP] key down.
The pattern will then be looped even when you release the pad. To stop the loop, hit the pad once more. The unit returns to normal groove play.
![ZOOM RT-123 - To repeat a pattern even when the pad is released, hit the pad while holding the [REPEAT/STEP] key down. - 1](/content/2025/01/152243/images/c19218afc3cc51bdf4002eb4476281b6583b73058dfa411e253a09f88c506b36.jpg)
![ZOOM RT-123 - To repeat a pattern even when the pad is released, hit the pad while holding the [REPEAT/STEP] key down. - 2](/content/2025/01/152243/images/b8198a7ebce5e203e46fc96843e56b4479d0d72163d46f383767934d4e336c75.jpg)
To play several patterns simultaneously, push several pads together.
Up to 4 patterns can be played simultaneously, using the same tempo. Slightly shifting the timing when you hit the pads is also possible.

If 5 or more pads are pushed, only the patterns of the last 4 pads will be played.

To play a song while groove play continues in the background, use the [VALUE +/-] keys to select the song number and press the [PLAY] key.
In groove play mode, the [PLAY] / [STOP/EXIT] keys can be used to start or stop the currently selected song. Also while a song is playing, up to four patterns assigned to pads can be played.
![ZOOM RT-123 - To play a song while groove play continues in the background, use the [VALUE +/-] keys to select the song number and press the [PLAY] key. - 1](/content/2025/01/152243/images/678ac6a4666917280d2f5c37523c3f0d9ad55255968a09c3810583136230c2ee.jpg)
![ZOOM RT-123 - To play a song while groove play continues in the background, use the [VALUE +/-] keys to select the song number and press the [PLAY] key. - 2](/content/2025/01/152243/images/fa7c0e61593f3a778e22aa3dec60f5fcb25b998fdc10a2a9edce46a28025aae7.jpg)
- When the song number is changed, the groove play tempo also changes according to the master tempo of the new song. If necessary, adjust the master tempo of the song.
- During groove playback, pad operation (press/release) is detected using the quantize value (shortest note) as the detection interval. This is aimed at matching the timing to other grooves and songs played at the same time. Playing with a fast timing is therefore facilitated by choosing a low quantize value. To play with small timing shifts, choose a higher quantize setting.
![ZOOM RT-123 - To play a song while groove play continues in the background, use the [VALUE +/-] keys to select the song number and press the [PLAY] key. - 3](/content/2025/01/152243/images/178e89e1b9d9b8ffcd8bffdba9a61151e5cbe3bcfcc978001fc6e2aabc1b4703.jpg)
![ZOOM RT-123 - To play a song while groove play continues in the background, use the [VALUE +/-] keys to select the song number and press the [PLAY] key. - 4](/content/2025/01/152243/images/627ce384f27eab289392b40d79ab04c7d07a97b17ccf455cea97d05f4fe77a26.jpg)
- In groove play mode, song editing is not possible.
- Muting the bass track in groove play does not affect the pattern played by the pad. It only affects the song that is being played back.
![ZOOM RT-123 - To play a song while groove play continues in the background, use the [VALUE +/-] keys to select the song number and press the [PLAY] key. - 5](/content/2025/01/152243/images/cd15954b97420896c10599b2a27b94889c01c41a98b2c26973aa8e69330d8176.jpg)
When wishing to terminate the groove play mode, press the [SONG] key or [PATTERN] key.
The RT-123 returns to the song mode or pattern mode.
![ZOOM RT-123 - When wishing to terminate the groove play mode, press the [SONG] key or [PATTERN] key. - 1](/content/2025/01/152243/images/ac6232b76c38ac9cebb903d1e1e50228663dc8ec58fc276762d3517c5c94aa99.jpg)
SONG
![ZOOM RT-123 - When wishing to terminate the groove play mode, press the [SONG] key or [PATTERN] key. - 2](/content/2025/01/152243/images/c87a6850339246eb5ff02e20f4e96f7ddf3df7db591b02f8edddf18e53b07400.jpg)
PATTERN
FUNCTION Key Settings
The [FUNCTION] key is used to make various settings for the RT-123. The basic steps for using the [FUNCTION] key and the setting items are described below.
Basic [FUNCTION] key operation steps
The [FUNCTION] key is used in the same way for most setting items.
![ZOOM RT-123 - Basic [FUNCTION] key operation steps - 1](/content/2025/01/152243/images/08e5944c81fb6dad18589c5933267da8ed06d585852108f36976a7bc7f5ae9d8.jpg)
STEP1 Press the [FUNCTION] key.
The [FUNCTION] LED flashes, indicating that you can select a setting item.
![ZOOM RT-123 - STEP1 Press the [FUNCTION] key. - 1](/content/2025/01/152243/images/cf2f5e804577d9e05679bfe68e9e8ea8a0637214449b06490f2d5c07f6e5bd5c.jpg)
Some items can be set only in pattern mode, while the unit is in the stop condition. For some items, the pattern must be selected before step 1.
![ZOOM RT-123 - STEP1 Press the [FUNCTION] key. - 2](/content/2025/01/152243/images/e30a940a126cae631a17dc751898caf83fbbf64ffd64e7ee75b17bb08cfbce01.jpg)
STEP2 Depending on the desired item, press one of pads 1 - 13 or the [PATTERN] key.
To select items, the pads and other keys are used. The items assigned to pads 1 - 13 and the [PATTERN] Key is listed below. (The items are indicated on the pads at the bottom right.)
- Pad 1 (BASS KEY): Shifts the bass program pitch in semitones.
- Pad 2 (MIX): Sets the pattern/track level.
- Pad 3 (BASS TUNE): Allows tuning a bass program.
- Pad 4 (TIME SIG): Sets the beat of the pattern.
- Pad 5 (PRE COUNT): Switches pre-count on or off and sets the number of measures.
- Pad 6 (QUANTIZE): Sets the quantize value.
- Pad 7 (CLICK VOL): Sets the metronome volume.
- Pad 8 (BAR LENGTH): Sets the number of measures for the pattern.
- Pad 9 (FOOT SW): Selects the foot switch function.
- Pad 10 (SWING): Sets the amount of swing for playback.
- Pad 11 (PAD SENS): Adjusts the pad sensitivity.
- Pad 12 (SHIFT): Shifts the playback timing backwards or forwards.
- Pad 13 (MIDI): Sets MIDI input on/off and assigns the MIDI channel for each track.
- [PATTERN] key: In pattern mode, the key selects the item to be shown on the display. In song mode, the key serves to display the remaining amount of memory.
![ZOOM RT-123 - STEP2 Depending on the desired item, press one of pads 1 - 13 or the [PATTERN] key. - 1](/content/2025/01/152243/images/3f8d65f636d062b959aeae354c45c889c258aa98c678840038b3f6b17493f815.jpg)
![ZOOM RT-123 - STEP2 Depending on the desired item, press one of pads 1 - 13 or the [PATTERN] key. - 2](/content/2025/01/152243/images/31def6de1d349930d849a24f23b7bd190dd5f178bcfa79c35a3453db26d1b347.jpg)
PATTERN
![ZOOM RT-123 - STEP2 Depending on the desired item, press one of pads 1 - 13 or the [PATTERN] key. - 3](/content/2025/01/152243/images/7c6e96ec6dc03737fb84d68bf7bf842feacec45fe3b3b8c6fe61d589fe3a660a.jpg)
Setting value of item selected with pad or key
The display shows the setting of the selected item.
![ZOOM RT-123 - STEP2 Depending on the desired item, press one of pads 1 - 13 or the [PATTERN] key. - 4](/content/2025/01/152243/images/afbd618ff08ed20960d74d24f03247c5c688f275743e413e2004c7fabd35afdc.jpg)
For some items, the sound or track that is to be set must be selected after selecting the item.
STEP3
Change the setting with the [VALUE +/-] keys.
![ZOOM RT-123 - Change the setting with the [VALUE +/-] keys. - 1](/content/2025/01/152243/images/3e15f8c42bbc184de47075f81fadc779cb9e47d6c601af51c5505d3e08d5d94a.jpg)
- Keeping a [VALUE +/-] key depressed changes numbers continuously.
- To change numbers quickly, hold one of the [VALUE +/-] keys depressed and press the other key. The numbers will change continuously.
![ZOOM RT-123 - Change the setting with the [VALUE +/-] keys. - 2](/content/2025/01/152243/images/41ef3183dc6245aae33117c586f07bffe9953fbfba09204bd413d250e48c0da1.jpg)
STEP4
Press the [FUNCTION] key once more.
The setting changed at step 3 is now determined, and the RT-123 puts the function settings to an end.
The beat (TIME SIG) and measure (BAR LENGTH) setting can be returned to the original setting by pressing the [EXIT] key instead of the [FUNCTION] key in step 4.
The [FUNCTION] key is also used for pattern bank switching ( p.13) , clearing all user patterns ( p.55) , and demo play ( p.8, p.55) .
![ZOOM RT-123 - Press the [FUNCTION] key once more. - 1](/content/2025/01/152243/images/9d62da354c326668377fd9c0eea65863e9847fa486c0d1ca24169377fe273fc4.jpg)
The setting range of the various items controlled with the [FUNCTION] key is described below.
Shifting bass program pitch in semitones (BASS KEY)
Setting Range Pad 1 pitch: A1 - A2
Pad 2 - 13 pitch: E1 - A4
Sets the pitch of the tones assigned to the pads for a bass program in semitones. You can either shift the pitch of the entire bass program or the pitch of pads 2 - 13 individually.
- Shifting the pitch of the entire bass program
Immediately after pressing the [FUNCTION] key and then pad 1 (BASS KEY), the pitch assigned to pad 1 (A1 - A2) is shown on the display. Use the [VALUE +/-] keys to set the pitch. This will cause the pitch of pads 2 - 13 to change accordingly.
■ Shifting the pitch of pads 2 - 13 individually
After pressing the [FUNCTION] key and then pad 1 (BASS KEY), hold down one of pads 2 - 13, and then use the [VALUE +/-] keys to set the pitch (E1 - A4) for that pad. This will not affect the pitch of other pads.
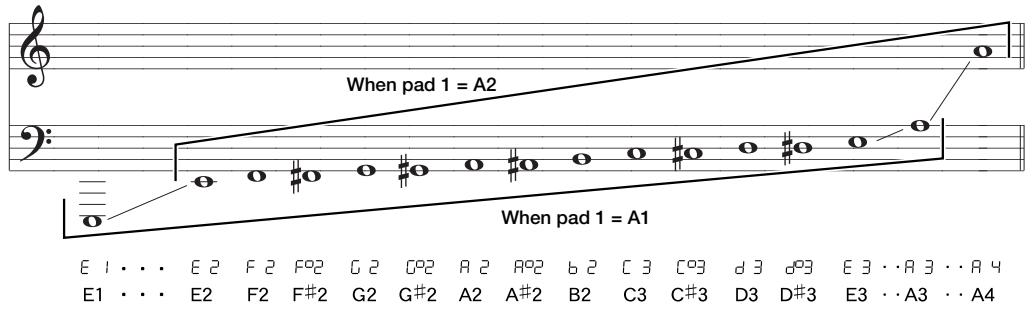

The RT-123 stores this setting for each pattern individually when the [FUNCTION] key is pressed once more to terminate the mode.
Setting the pattern/track level (MIX)
Setting Range: 0 - 99
Sets the volume for each track in the currently selected pattern over a range of 0 - 99. After selecting this item, use the [DRUM A], [DRUM B], and [BASS] keys to select the track and then use the [VALUE +/-] keys to make the setting.

The RT-123 stores this setting for each pattern individually when the [FUNCTION] key is pressed once more to terminate the mode.
Tuning a bass program (BASS TUNE)
Setting Range: 435 - 445 (Default value: 440)
Allows tuning the bass pitch keys in the range of A = 435Hz to A = 445Hz .
Setting Range: 2, 3, 4
Set the beat for the pattern to 2 (2/4 beat), 3 (3/4 beat), or 4 (4/4 beat).
Changing the beat of an already recorded pattern is also possible, but the recorded sound will change as follows. Proceed with care, especially when making the beat shorter.
Choosing a longer beat than the current beat
A blank space with the length of the additional beat is added to each measure.
Choosing a shorter beat than the current beat
The excess duration of each measure is cut off. Once the [FUNCTION] key is pressed to accept the setting, it will not be possible to restore the cut-off sections.

The RT-123 stores this setting for each pattern individually when the [FUNCTION] key is pressed once more to terminate the mode.
Setting the pre-count (PRE COUNT)
Setting Range: 0, 1, 2, PAd (Default value: 1)
The pre-count (number of metronome ticks before the start of pattern real-time recording) can be turned on and off, and the number of measures etc. can be set. This setting applies to all patterns.
The settings have the following meaning.
0: Real-time recording starts immediately when the [PLAY] key is pressed.
1: Real-time recording starts after 1 measure has been counted.
2: Real-time recording starts after 2 measures have been counted.
PAd: The unit goes into recording standby mode when the [PLAY] key is pressed, and recording starts when any pad is pressed.
Setting the pattern resolution (QUANTIZE)
Setting Range: 4, 8, 12, 16, 24, 32, 48, Hi (Default value: 16)
Sets the quantize value (shortest note) for the pattern. The quantize setting affects the following four functions:
- Shortest note for real-time recording
- Shortest note for step recording
Sound interval when [REPEAT/STEP] key is used together with pad for continuous repetition - Pad push/release detection timing during groove play
The following 8 settings are available for the quantize value.
4.Quarter note
8 .Eighth note
12 .Eighth triplet note
16 Sixteenth note
24 Sixteenth triplet note
32 .........Thirty-second note
48 ....Thirty-second triplet note
Hi .......Quantize function off
During step recording:
1 tick (1/96 quarter note)
Setting the metronome volume level (CLICK VOL)
Setting Range: 0 - 99 (Default value: 70)
The volume level of the metronome click sound heard during real-time recording can be adjusted with the [VALUE +/-] keys. This setting applies to all patterns.
Setting the number of measures for a pattern (BAR LENGTH)
Setting Range: 1 - 99
Sets the length of the pattern in the range from 1 - 99 measures. Changing the length of an already recorded pattern is also possible, but the recorded sound will change as follows. Proceed with care, especially when making the number of measures smaller.
Making the number of measures larger
Blank measures are added to the end of the pattern.
Making the number of measures smaller
The excess measures at the end of the pattern are cut off. Once the [FUNCTION] key is pressed to accept the setting, it will not be possible to restore the cut-off measures.

The RT-123 stores this setting for each pattern individually when the [FUNCTION] key is pressed once more to terminate the mode.
Selecting the foot switch function (FOOT SW)
This section describes how to set the function of a foot switch (FS01) connected to the [FOOT SW] jack on the rear panel. The setting is made by pressing the [FUNCTION] key followed by pad 9 (FOOT SW) and then the respective pad or key.
[Setting Range] 1 - 13, tAP, Cont, Strt, bMut, MutE, SoLo, rEP (Default value: Strt)
Using the FS01 to play the sound of a pad
Press the [FUNCTION] key followed by pad 9 (FOOT SW) and then one of pads 1 - 13. (The number of the pressed pad is shown on the display.) The force with which the pad is pushed is also memorized.
The FS01 will play the sound of the assigned pad when it is pushed. This is useful for example to play the bass drum with your foot.
Using the FS01 to change the sound of a pad
Press the [FUNCTION] key followed by pad 9 (FOOT SW). Then push the FS01 and press the first pad. Release the FS01 and press the second pad. The sound of the first pad can now be switched with the FS01. The lower two digits of the display show the number of the first pad, and the upper two digits the number of the second pad. When the foot switch is pushed, the sound of the first pad is heard. When it is released, the sound of the second pad is heard. When wishing for example to switch
between open hi-hat and closed hi-hat with your foot, push the FS01 and press pad 5 (CLOSED HAT). Then release the FS01 and press pad 7 (OPEN HAT). The sound of the first pad will be heard as soon as the FS01 is pushed, also when the pad itself is not pressed.
Using the FS01 to set the tempo
Press the [FUNCTION] key followed by pad 9 (FOOT SW) and then press the [TEMPO] key. (The indication "tAP" appears on the display.)
The FS01 will function in the same way as the [TEMPO] key. The tempo can be specified by pushing it two times (tap tempo function).
Using the FS01 to control start/pause
Press the [FUNCTION] key followed by pad 9 (FOOT SW) and then press the [PLAY] key. (The indication "Cont" appears on the display.)
The FS01 will function in the same way as the [PLAY] key. The unit switches between [Playback start] [Pause] [Playback start from paused position] with every push.
Using the FS01 to control start/stop
Press the [FUNCTION] key followed by pad 9 (FOOT SW) and then press the [STOP/EXIT] key. (The indication "Strt" appears on the display.)
The FS01 will function in the same way as the [STOP/EXIT] key. The unit switches between [Playback start] [Stop] [Playback start] with every push.
Using the FS01 to control bass mating
Press the [FUNCTION] key followed by pad 9 (FOOT SW) and then press the [BASS MUTE] key. (The indication "bMut" appears on the display.)
The FS01 will function in the same way as the [BASS MUTE] key. Pushing the switch once mutes the bass and pushing it once more turns the bass on again.
Using the FS01 to mute a desired track
Press the [FUNCTION] key followed by pad 9 (FOOT SW) and then press the [-] key. (The indication "MutE" appears on the display.)
When the FS01 is pushed, the currently selected track will be muted. To select the track, use the [DRUM A], [DRUM B], or [BASS] key.
Using the FS01 to play a desired track solo
Press the [FUNCTION] key followed by pad 9 (FOOT SW) and then press the [+] key. (The indication "SoLo" appears on the display.)
When the FS01 is pushed, all tracks except the currently selected track will be muted. To select the track, use the [DRUM A], [DRUM B], or [BASS] key.
Using the FS01 to control continuous percussion sound
Press the [FUNCTION] key followed by pad 9 (FOOT SW) and then press the [REPEAT/STEP] key. (The indication "rEP" appears on the display.)
When the FS01 is pushed in pattern mode while pressing a pad, the sound of that pad will be heard continuously.
Setting Range: 50 - 75 (Default value: 50)
This setting controls the swing amount (rhythm flourish). Higher values result in more pronounced swing. This item influences only the playback timing of the pattern. It does not affect the recorded data of the pattern.
Setting the pad sensitivity (PAD SENS)
Setting Range: Ehrd, HArd, norM, LItE, Loud, MEd, Soft (Default value:norM)
The [VALUE + / - ] keys are used to set the pad sensitivity.
The following 7 settings are available.
- Soft (Fixed Soft): Gives a soft sound regardless of the tapping intensity.
- MEd (Fixed Medium): Gives a medium sound regardless of the tapping intensity.
- Loud (Fixed Loud): Gives a loud sound regardless of the tapping intensity.
- Lite (Light): This setting gives the highest sensitivity.
- norM (Normal): This setting gives medium sensitivity.
- HArd (Hard): This setting gives low sensitivity.
- Ehrd (Extra Hard): This setting gives the lowest sensitivity. To achieve a loud sound, the pads must be hit very hard.
Setting the playback timing shift (SHIFT)
Setting Range: -192 to +192 (Default value: 0)
Shifts the playback timing of a specific track in the currently selected pattern back or forth in 1-tick units (1/96 of a quarter note). The maximum shift is 2 measures.
When set to a negative value (-)
The playback timing of the selected track is shifted forward. The pattern shifted forward is deleted.
When set to a positive value (+)
The playback timing of the selected track is shifted backwards. The pattern shifted backwards is deleted.
Proceed with care, because once the [FUNCTION] key is used to terminate the setting, it cannot be undone.
Setting MIDI input on/off (MIDI)
Setting Range: Int, Midi (Default value: Int)
When this item is set to "Midi", the RT-123 can receive the following MIDI messages from external components.
- MIDI clock - Start - Stop - Continue - Song select

When this item is set to "Midi", real-time recording is not possible.
Setting the MIDI receive channel for each track (MIDI)
Setting Range: oFF, 1 - 16
(Default values, drum track A: 10, drum track B: oFF, bass track: 9)
This item sets the MIDI channel for each track. Available settings for drum tracks are oFF (not received) and 1 - 16. Available settings for the bass track are oFF (not received), 1 - 16, and Auto.
"Auto" is a special setting for playing standard GM sound source compatible MIDI files. When the RT-123 receives a GM sound source bass select message, it automatically switches the bass track to that MIDI channel.
When the [DRUM A], [DRUM B], or [BASS] key is pressed immediately after pressing the [FUNCTION] key and pad 13 (MIDI), the MIDI receive channel is shown for each track. Hold the key down and use the [VALUE + / - ] keys to change the setting. This can be performed separately for each track.
Selectable settings are oFF (receive off) and 1 - 16.
Switching the information displayed in pattern mode (PATTERN) (PATTERN mode only)
[Setting Range] Auto, LoCA, Ptno (default setting: Auto)
By pressing the [FUNCTION] key and then the [PATTERN] key, you can select which information is to be shown on the display in pattern mode.
| Ruto | LoCR | Pto | |
| Pattern stopped | Pattern number | Pattern number | Pattern number |
| Pattern playing | Current position (measure/beat) | Current position (measure/beat) | Pattern number |
| Pattern switched | New pattern number shown for 1 second | Current position (measure/beat) | Pattern number |
Displaying the remaining amount of memory (PATTERN) (SONG mode only)
In song mode, pressing the [FUNCTION] key followed by the [PATTERN] key brings up a percentage display of the remaining amount of memory. This display is for information only, it cannot be changed. Pressing the [FUNCTION] key again returns to the song mode.
RT-123 Application Examples
This section describes examples for combining the RT-123 with optional equipment and external components.
Controlling the RT-123 with the FS01
When the separately available foot switch (FS01) is connected to the [FOOT SW] jack on the rear panel, it can be used to operate for example the bass drum or switch between open and closed hi-hat sound. The switch can also be used to start and stop playback of the RT-123 with your foot.
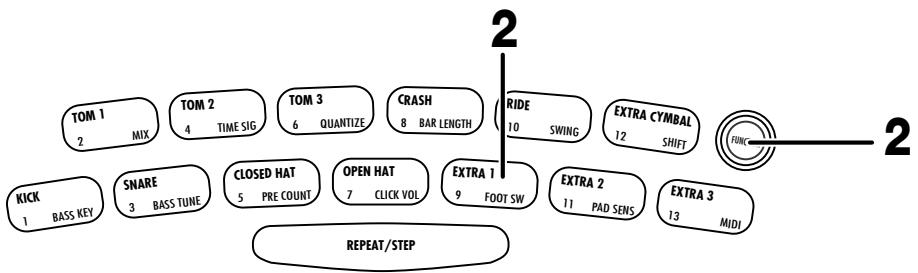
STEP1 Connect the FS01 to the [FOOT SW] jack on the rear panel.
For information on connections, see page 7.
STEP2 Use the [FUNCTION] key and pad 9 (FOOT SW) to set the FS01 function.
For information on the setting procedure, see page 47.
![ZOOM RT-123 - STEP2 Use the [FUNCTION] key and pad 9 (FOOT SW) to set the FS01 function. - 1](/content/2025/01/152243/images/76a78a84b53bf326f15de2c715f4d490235d64004a029752f6ce43b5b01c97b1.jpg)
![ZOOM RT-123 - STEP2 Use the [FUNCTION] key and pad 9 (FOOT SW) to set the FS01 function. - 2](/content/2025/01/152243/images/599ef1cabf251cc91791f6babbf1dffcf49613ff93ce5e72c9a65a66fbde3222.jpg)
STEP3 Use the FS01 in pattern mode or play mode.
Depending on the function selected in step 2, the FS01 activates the sound of a specific pad, switches between the sound of two pads, or controls playback start/stop of a song or pattern. For details, see page 47 - 48.
Synchronized MIDI operation
Operation of the RT-123 can be synchronized with a sequencer or other rhythm machine equipped with a MIDI jack. This allows playback of the patterns or songs of the RT-123 with the tempo determined by the sequencer.
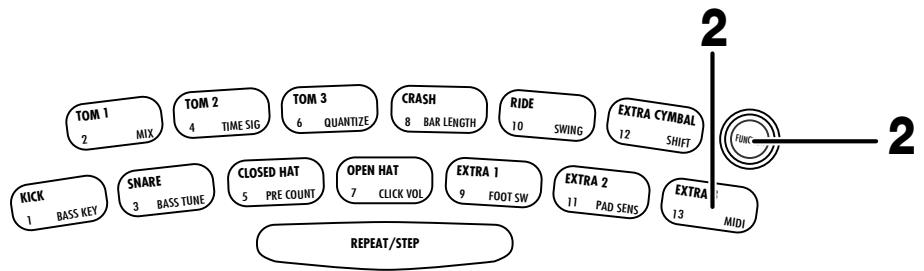

Connect the MIDI OUT jack of the MIDI sequencer, rhythm machine, or other MIDI component to the [MIDI IN] connector of the RT-123, using a MIDI cable.
For information on connections, see page 3.

Verify that the external MIDI sequencer can send the MIDI clock, start, stop, and continue signals.

Use the [FUNCTION] key and pad 13 (MIDI) and set up the RT-123 so that it can receive the MIDI clock and other messages.
For information on the setting procedure, see page 49.
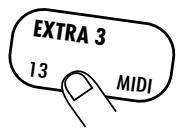

Start the external MIDI sequencer.
The RT-123 operates under control of the MIDI sequencer.
Using MIDI equipment to play the RT-123
Using a MIDI sequencer, MIDI keyboard, or similar MIDI Device you can play the built-in sound sources of the RT-123.
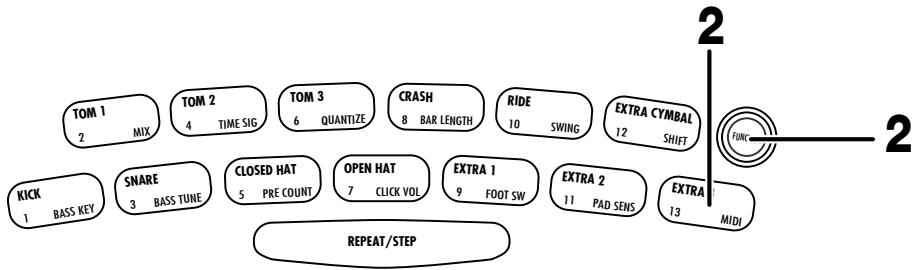

Connect the MIDI OUT jack of the MIDI sequencer or other MIDI component to the [MIDI IN] connector of the RT-123, using a MIDI cable.

Use the [FUNCTION] key and pad 13 (MIDI) to assign the tracks of the RT-123 to receive MIDI channels which are matched to the send channels of the external MIDI component.
For information on the MIDI channel setting procedure, see page 49.
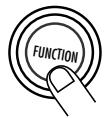
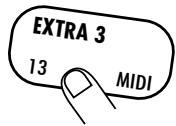

Play the MIDI sequencer or keyboard.
The RT-123 produces sound according to the note numbers received via the [MIDI IN] connector. Program change messages can be used to switch drum kits and bass programs of the RT-123. For information on program change numbers and corresponding drum kits and bass programs, please refer to the "Reference" section at the end of this manual.
Returning the RT-123 to the factory default condition (initialization)
You can reset the RT-123 to the factory default condition. Use this function with care, because it will erase all patterns and songs that have been recorded by the user.
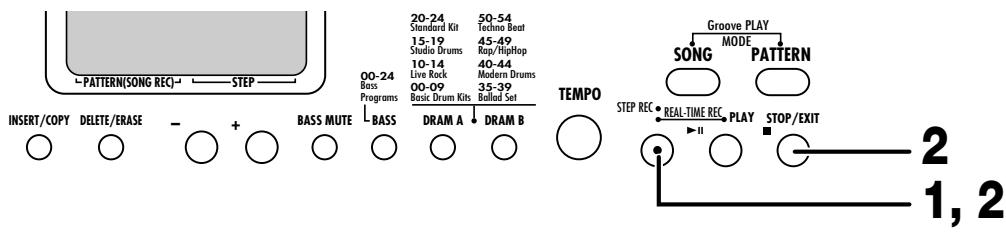
NOTE
After initialization, all user patterns U01 - U99 will be blank.

Turn power to the RT-123 on while holding the [REC] key down.
The indication "Init" flashes on the display.
STEPREC

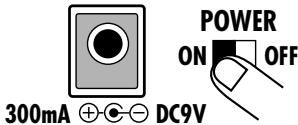

When wishing to go ahead with the initialization, press the [REC] key once more. To cancel the procedure, press the [STOP/EXIT] key.
When initialization is carried out, all settings and data of the RT-123 are reset to the factory default condition, and then the unit starts up. If the process was canceled, the unit starts up normally.
STEPREC

STOP/EXIT

Listening to the demo
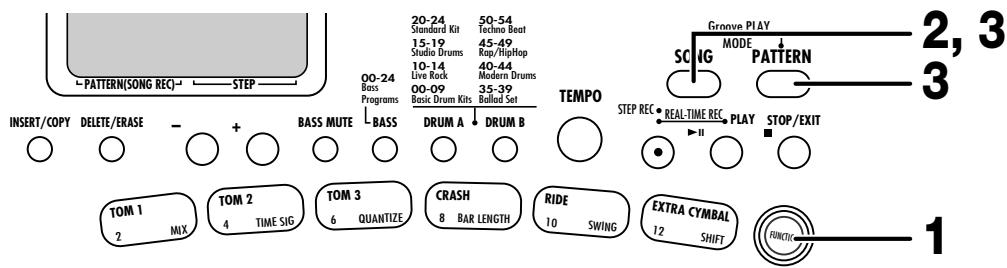
STEP1 Press the [FUNCTION] key.
The [FUNCTION] key LED flashes.
![ZOOM RT-123 - STEP1 Press the [FUNCTION] key. - 1](/content/2025/01/152243/images/23f8b4c6ebdda053e97363a1475014cfa278d1e49e91baeb9e1689466b373ccb.jpg)
STEP2 Press the [SONG] key.
Playback of the demo song starts. The demo continues to play until it is stopped by the user.
![ZOOM RT-123 - STEP2 Press the [SONG] key. - 1](/content/2025/01/152243/images/56d388329188dc572307397f5d5151618853816445258228794631f68c94dfbc.jpg)
STEP3 To stop the demo, press the [SONG] key or [PATTERN] key.
The RT-123 goes into song mode if the [SONG] key is pressed, and into pattern mode if the [PATTERN] key is pressed.
Clearing all user patterns

STEP1 Press the [FUNCTION] key.
The [FUNCTION] key LED flashes.
![ZOOM RT-123 - STEP1 Press the [FUNCTION] key. - 1](/content/2025/01/152243/images/855ee2453c883c85d07a1498354ebab1b0b82039b36c9e60f6caaccb2eb62774.jpg)
STEP2 Press the [DELETE/ERASE] key.
The indications "dEL" and "ALL" appear alternately on the display.
![ZOOM RT-123 - STEP2 Press the [DELETE/ERASE] key. - 1](/content/2025/01/152243/images/562effa883a572113c65b1441f7f8f02b53afa314f9be8a40cffabbb6a0ef441.jpg)
DELETE/ERASE
![ZOOM RT-123 - STEP2 Press the [DELETE/ERASE] key. - 2](/content/2025/01/152243/images/3010fc234f66665e73b2c946b068367d4b0d5648999aa2fa0612f61b3a3ed06c.jpg)
To carry out the operation, press the [DELETE/ERASE] key once more. To cancel the operation, press the [STOP/EXIT] key.
When the [DELETE/ERASE] key is pressed, all user patterns
U01 - U99 will become blank
Troubleshooting
Check the following items first if there seems to be a problem with the RT-123.
| Symptom | Check | Remedy |
| No sound or very low volume. | Is supplied AC adapter connected properly? | Connect AC adapter as described in "Getting Connected" (page 7). Use only the supplied AC adapter. |
| Is [OUTPUT] jack connected correctly to the playback system? | Make connections as described in "Getting Connected" (page 7). | |
| Is there a problem with the shielded cable? | Try using another cable. | |
| Is the connected playback system operating normally? | Check the system and make sure that the volume level is adjusted properly. | |
| Is volume of RT-123 set correctly? | Set [VOLUME] control to a suitable position. | |
| Sound is distorted or intermittent. | Is output level of RT-123 set too high? | Set [VOLUME] control of RT-123 to a suitable position. |
| Song cannot be recorded. | Is RT-123 set to mode other than song mode? | Activate song mode (page 34). |
| Is memory capacity limit reached? | Delete unneeded patterns and songs. | |
| FS01 has no effect. | Is FS01 connected correctly to [FOOT SW] jack? | Make connections as described in "Getting Connected" (page 7). |
| Is desired function of FS01 activated? | Use [FUNCTION] key and pad 9 (FOOT SW) to select function (→ p. 47). | |
| Simultaneous playback with MIDI components is not possible. | Is the MIDI receive function set to ON? | Use the [FUNCTION] key and pad 13 (MIDI) to change the setting from "Int" (MIDI clock receive disabled) to "Midi" (MIDI clock receive enabled). |
SPECIFICATIONS
- Drum Kits: 80 (Including Percussion, SFX kit)
- Bass Programs: 25
Rhythm Patterns: Preset; 297/User; 99
Songs: 99
Maximum Notes: 10,000 notes
Maximum Polyphony: 30 voices - Resolution: 96 PPQN
- Tempo: 40 to 250 BPM
- Pads: 13 with Velocity Sensitivity
Control: MIDI in, Control in for FS01 - Display: 4-digit, 7-segment LED
- Input: Line; 1/4" jack (Mono)X 1, Impedance 33k
- Outputs: Line (L/Mono, R); 1/4" jack (Mono)X 2, Impedance 2.2kΩ or less
- Phones; 1/4" jack (Stereo)X 1, Output Power 50mW into 32Ω
- Power Requirements: 9V DC/300mA (from supplied AC adaptor AD-0006)
- Dimensions: 196(W) X 158(D) X 35(H)mm
Weight: 550g -
Accessory: Footswitch FS01
-
All specifications and appearance subject to change without notice.
MIDI ProgramChange# to DRUM/percussion/SFX KIT Assign
| PC | KIT | |
| 0 | 9 | General Drum |
| 1 | 55 | General Drum 1 |
| 2 | 0 | Live Rock |
| 3 | 1 | Studio |
| 4 | 2 | Standard |
| 5 | 3 | Funk Trap |
| 6 | 4 | Epic Rock |
| 7 | 5 | Ballad |
| 8 | 57 | General Drum 3 |
| 9 | 6 | Modern |
| 10 | 7 | Rap/HipHop |
| 11 | 8 | Techno Beat |
| 12 | 9 | General Drum |
| 13 | 10 | Live Rock 1 |
| 14 | 11 | Live Rock 2 |
| 15 | 12 | Live Rock 3 |
| 16 | 58 | General Drum 4 |
| 17 | 13 | Live Rock 4 |
| 18 | 14 | Live Rock 5 |
| 19 | 15 | Studio 1 |
| 20 | 16 | Studio 2 |
| 21 | 17 | Studio 3 |
| 22 | 18 | Studio 4 |
| 23 | 19 | Studio 5 |
| 24 | 59 | General Drum 5 |
| 25 | 61 | General Drum 7 |
| 26 | 62 | General Drum 8 |
| 27 | 20 | Standard 1 |
| 28 | 21 | Standard 2 |
| 29 | 22 | Standard 3 |
| 30 | 23 | Standard 4 |
| 31 | 24 | Standard 5 |
| 32 | 9 | General Drum |
| 33 | 25 | Funk Trap 1 |
| 34 | 26 | Funk Trap 2 |
| 35 | 27 | Funk Trap 3 |
| 36 | 28 | Funk Trap 4 |
| 37 | 29 | Funk Trap 5 |
| 38 | 30 | Epic Rock 1 |
| 39 | 31 | Epic Rock 2 |
| 40 | 63 | General Drum 9 |
| 41 | 32 | Epic Rock 3 |
| 42 | 33 | Epic Rock 4 |
| PC | KIT | |
| 43 | 34 | Epic Rock 5 |
| 44 | 35 | Ballad 1 |
| 45 | 36 | Ballad 2 |
| 46 | 37 | Ballad 3 |
| 47 | 38 | Ballad 4 |
| 48 | 39 | Ballad 5 |
| 49 | 40 | Modern 1 |
| 50 | 78 | Kick and Snare 1 |
| 51 | 41 | Modern 2 |
| 52 | 42 | Modern 3 |
| 53 | 43 | Modern 4 |
| 54 | 44 | Modern 5 |
| 55 | 45 | Rap/HipHop 1 |
| 56 | 64 | Effected Drum |
| 57 | 64 | Effected Drum |
| 58 | 46 | Rap/HipHop 2 |
| 59 | 47 | Rap/HipHop 3 |
| 60 | 48 | Rap/HipHop 4 |
| 61 | 49 | Rap/HipHop 5 |
| 62 | 50 | Techno Beat 1 |
| 63 | 51 | Techno Beat 2 |
| 64 | 52 | Techno Beat 3 |
| 65 | 53 | Techno Beat 4 |
| 66 | 54 | Techno Beat 5 |
| 67 | 55 | General Drum 1 |
| 68 | 56 | General Drum 2 |
| 69 | 57 | General Drum 3 |
| 70 | 58 | General Drum 4 |
| 71 | 59 | General Drum 5 |
| 72 | 60 | General Drum 6 |
| 73 | 61 | General Drum 7 |
| 74 | 62 | General Drum 8 |
| 75 | 63 | General Drum 9 |
| 76 | 64 | Effected Drum |
| 77 | 65 | Drum Skins |
| 78 | 66 | Lo Percussion |
| 79 | 67 | Hi Percussion |
| 80 | 68 | Clicks and Sticks |
| 81 | 69 | Single Percussion |
| 82 | 70 | Agogo Gamelan |
| 83 | 71 | Percussion/SFX |
| 84 | 72 | Various Percussion 1 |
| 85 | 73 | Various Percussion 2 |
| PC | KIT | |
| 86 | 74 | Various Percussion 3 |
| 87 | 75 | Various Percussion 4 |
| 88 | 76 | Various Percussion 5 |
| 89 | 77 | Cymbal Set |
| 90 | 78 | Kick and Snare 1 |
| 91 | 79 | Kick and Snare 2 |
| 92 | 0 | Live Rock |
| 93 | 1 | Studio |
| 94 | 2 | Standard |
| 95 | 3 | Funk Trap |
| 96 | 4 | Epic Rock |
| 97 | 5 | Ballad |
| 98 | 6 | Modern |
| 99 | 7 | Rap/HipHop |
| 100 | 8 | Techno Beat |
| 101 | 9 | General Drum |
| 102 | 10 | Live Rock 1 |
| 103 | 11 | Live Rock 2 |
| 104 | 12 | Live Rock 3 |
| 105 | 13 | Live Rock 4 |
| 106 | 14 | Live Rock 5 |
| 107 | 15 | Studio 1 |
| 108 | 16 | Studio 2 |
| 109 | 17 | Studio 3 |
| 110 | 18 | Studio 4 |
| 111 | 19 | Studio 5 |
| 112 | 20 | Standard 1 |
| 113 | 21 | Standard 2 |
| 114 | 22 | Standard 3 |
| 115 | 23 | Standard 4 |
| 116 | 24 | Standard 5 |
| 117 | 25 | Funk Trap 1 |
| 118 | 26 | Funk Trap 2 |
| 119 | 27 | Funk Trap 3 |
| 120 | 28 | Funk Trap 4 |
| 121 | 29 | Funk Trap 5 |
| 122 | 30 | Epic Rock 1 |
| 123 | 31 | Epic Rock 2 |
| 124 | 32 | Epic Rock 3 |
| 125 | 33 | Epic Rock 4 |
| 126 | 34 | Epic Rock 5 |
| 127 | 9 | General Drum |
MIDI ProgramChange# to BASS PROGRAM Assign
| PC | KIT | |
| 0 | 0 | Live Bass |
| 1 | 1 | Studio Bass |
| 2 | 2 | Epic Bass |
| 3 | 3 | Funk Bass |
| 4 | 4 | Ballad Bass |
| 5 | 5 | Acoustic Bass |
| 6 | 6 | Modern Bass |
| 7 | 7 | Synth Bass |
| 8 | 8 | Techno Bass |
| 9 | 9 | Big Bottom Bass |
| 10 | 10 | SubSlap Bass |
| 11 | 11 | Digital Acoustic |
| 12 | 12 | Bass Harmonics |
| 13 | 13 | No Frets |
| 14 | 14 | Acoustic Jazz |
| 15 | 15 | Digital Pick |
| 16 | 16 | Techno Analog |
| 17 | 17 | Analog Touch |
| 18 | 18 | Lo Sine |
| 19 | 19 | Harmonics Bass |
| 20 | 20 | Saw Wave |
| 21 | 21 | Square Wave |
| 22 | 22 | Hi Sine |
| 23 | 23 | Drive Bass |
| 24 | 24 | Fuzz Bass |
| 25 | 0 | Live Bass |
| 26 | 1 | Studio Bass |
| 27 | 2 | Epic Bass |
| 28 | 3 | Funk Bass |
| 29 | 4 | Ballad Bass |
| 30 | 5 | Acoustic Bass |
| 31 | 6 | Modern Bass |
| 32 | 5 | Acoustic Bass |
| 33 | 14 | Acoustic Jazz |
| 34 | 1 | Studio Bass |
| 35 | 13 | No Frets |
| 36 | 3 | Funk Bass |
| 37 | 10 | SubSlap Bass |
| 38 | 7 | Synth Bass |
| 39 | 8 | Techno Bass |
| 40 | 7 | Synth Bass |
| 41 | 8 | Techno Bass |
| 42 | 9 | Big Bottom Bass |
| PC | KIT | |
| 43 | 10 | SubSlap Bass |
| 44 | 11 | Digital Acoustic |
| 45 | 12 | Bass Harmonics |
| 46 | 13 | No Frets |
| 47 | 14 | Acoustic Jazz |
| 48 | 15 | Digital Pick |
| 49 | 16 | Techno Analog |
| 50 | 17 | Analog Touch |
| 51 | 18 | Lo Sine |
| 52 | 19 | Harmonics Bass |
| 53 | 20 | Saw Wave |
| 54 | 21 | Square Wave |
| 55 | 22 | Hi Sine |
| 56 | 23 | Drive Bass |
| 57 | 24 | Fuzz Bass |
| 58 | 0 | Live Bass |
| 59 | 1 | Studio Bass |
| 60 | 2 | Epic Bass |
| 61 | 3 | Funk Bass |
| 62 | 4 | Ballad Bass |
| 63 | 5 | Acoustic Bass |
| 64 | 6 | Modern Bass |
| 65 | 7 | Synth Bass |
| 66 | 8 | Techno Bass |
| 67 | 9 | Big Bottom Bass |
| 68 | 10 | SubSlap Bass |
| 69 | 11 | Digital Acoustic |
| 70 | 12 | Bass Harmonics |
| 71 | 13 | No Frets |
| 72 | 14 | Acoustic Jazz |
| 73 | 15 | Digital Pick |
| 74 | 16 | Techno Analog |
| 75 | 17 | Analog Touch |
| 76 | 18 | Lo Sine |
| 77 | 19 | Harmonics Bass |
| 78 | 20 | Saw Wave |
| 79 | 21 | Square Wave |
| 80 | 22 | Hi Sine |
| 81 | 23 | Drive Bass |
| 82 | 24 | Fuzz Bass |
| 83 | 0 | Live Bass |
| 84 | 1 | Studio Bass |
| 85 | 2 | Epic Bass |
| PC | KIT | |
| 86 | 3 | Funk Bass |
| 87 | 4 | Ballad Bass |
| 88 | 5 | Acoustic Bass |
| 89 | 6 | Modern Bass |
| 90 | 7 | Synth Bass |
| 91 | 8 | Techno Bass |
| 92 | 9 | Big Bottom Bass |
| 93 | 10 | SubSlap Bass |
| 94 | 11 | Digital Acoustic |
| 95 | 12 | Bass Harmonics |
| 96 | 13 | No Frets |
| 97 | 14 | Acoustic Jazz |
| 98 | 15 | Digital Pick |
| 99 | 16 | Techno Analog |
| 100 | 17 | Analog Touch |
| 101 | 18 | Lo Sine |
| 102 | 19 | Harmonics Bass |
| 103 | 20 | Saw Wave |
| 104 | 21 | Square Wave |
| 105 | 22 | Hi Sine |
| 106 | 23 | Drive Bass |
| 107 | 24 | Fuzz Bass |
| 108 | 0 | Live Bass |
| 109 | 1 | Studio Bass |
| 110 | 2 | Epic Bass |
| 111 | 3 | Funk Bass |
| 112 | 4 | Ballad Bass |
| 113 | 5 | Acoustic Bass |
| 114 | 6 | Modern Bass |
| 115 | 7 | Synth Bass |
| 116 | 8 | Techno Bass |
| 117 | 9 | Big Bottom Bass |
| 118 | 10 | SubSlap Bass |
| 119 | 11 | Digital Acoustic |
| 120 | 12 | Bass Harmonics |
| 121 | 13 | No Frets |
| 122 | 14 | Acoustic Jazz |
| 123 | 15 | Digital Pick |
| 124 | 16 | Techno Analog |
| 125 | 17 | Analog Touch |
| 126 | 18 | Lo Sine |
| 127 | 19 | Harmonics Bass |
DRUM KITs
| 0 | Live Rock |
| 1 | Studio |
| 2 | Standard |
| 3 | Funk Trap |
| 4 | Epic Rock |
| 5 | Ballad |
| 6 | Modern |
| 7 | Rap/HipHop |
| 8 | Techno Beat |
| 9 | General Drum |
| 10 | Live Rock 1 |
| 11 | Live Rock 2 |
| 12 | Live Rock 3 |
| 13 | Live Rock 4 |
| 14 | Live Rock 5 |
| 15 | Studio 1 |
| 16 | Studio 2 |
| 17 | Studio 3 |
| 18 | Studio 4 |
| 19 | Studio 5 |
| 20 | Standard 1 |
| 21 | Standard 2 |
| 22 | Standard 3 |
| 23 | Standard 4 |
| 24 | Standard 5 |
| 25 | Funk Trap 1 |
| 26 | Funk Trap 2 |
| 27 | Funk Trap 3 |
| 28 | Funk Trap 4 |
| 29 | Funk Trap 5 |
| 30 | Epic Rock 1 |
| 31 | Epic Rock 2 |
| 32 | Epic Rock 3 |
| 33 | Epic Rock 4 |
| 34 | Epic Rock 5 |
| 35 | Ballad 1 |
| 36 | Ballad 2 |
| 37 | Ballad 3 |
| 38 | Ballad 4 |
| 39 | Ballad 5 |
| 40 | Modern 1 |
| 41 | Modern 2 |
| 42 | Modern 3 |
| 43 | Modern 4 |
| 44 | Modern 5 |
| 45 | Rap/HipHop 1 |
| 46 | Rap/HipHop 2 |
| 47 | Rap/HipHop 3 |
| 48 | Rap/HipHop 4 |
| 49 | Rap/HipHop 5 |
| 50 | Techno Beat 1 |
| 51 | Techno Beat 2 |
| 52 | Techno Beat 3 |
| 53 | Techno Beat 4 |
| 54 | Techno Beat 5 |
| 55 | General Drum 1 |
| 56 | General Drum 2 |
| 57 | General Drum 3 |
| 58 | General Drum 4 |
| 59 | General Drum 5 |
| 60 | General Drum 6 |
| 61 | General Drum 7 |
| 62 | General Drum 8 |
| 63 | General Drum 9 |
| 64 | Effected Drum |
| 65 | Drum Skins |
| 66 | Lo Percussion |
| 67 | Hi Percussion |
| 68 | Clicks and Sticks |
| 69 | Single Percussion |
| 70 | Agogo Gamelan |
| 71 | Percussion/SFX |
| 72 | Various Percussion 1 |
| 73 | Various Percussion 2 |
| 74 | Various Percussion 3 |
| 75 | Various Percussion 4 |
| 76 | Various Percussion 5 |
| 77 | Cymbal Set |
| 78 | Kick and Snare 1 |
| 79 | Kick and Snare 2 |
BASS Programs
| 0 | Live Bass |
| 1 | Studio Bass |
| 2 | Epic Bass |
| 3 | Funk Bass |
| 4 | Ballad Bass |
| 5 | Acoustic Bass |
| 6 | Modern Bass |
| 7 | Synth Bass |
| 8 | Techno Bass |
| 9 | Big Bottom Bass |
| 10 | SubSlap Bass |
| 11 | Digital Acoustic |
| 12 | Bass Harmonics |
| 13 | No Frets |
| 14 | Acoustic Jazz |
| 15 | Digital Pick |
| 16 | Techno Analog |
| 17 | Analog Touch |
| 18 | Lo Sine |
| 19 | Harmonics Bass |
| 20 | Saw Wave |
| 21 | Square Wave |
| 22 | Hi Sine |
| 23 | Drive Bass |
| 24 | Fuzz Bass |
| No | Name | BPM | DrumA | DrumB | Bass | |||
| A01 | Rock01 | 130 | 0 | Live Rock | ----- | ----- | 0 | Live Bass |
| A02 | Rock02 | 136 | 0 | Live Rock | 10 | Live Rock 1 | 3 | Funk Bass |
| A03 | Rock03 | 136 | 27 | Funk Trap 3 | 79 | Kick and Snare 2 | 23 | Drive Bass |
| A04 | Rock04 | 136 | 25 | Funk Trap 1 | ----- | ----- | 1 | Studio Bass |
| A05 | Rock05 | 112 | 25 | Funk Trap 1 | 25 | Funk Trap 1 | 4 | Ballad Bass |
| A06 | Rock06 | 140 | 16 | Studio 2 | ----- | ----- | 4 | Ballad Bass |
| A07 | Rock07 | 120 | 0 | Live Rock | ----- | ----- | 15 | Digital Pick |
| A08 | Rock08 | 120 | 0 | Live Rock | 25 | Funk Trap 1 | 3 | Funk Bass |
| A09 | Rock09 | 120 | 22 | Standard 3 | 67 | Hi Percussion | 4 | Ballad Bass |
| A10 | Rock10 | 92 | 0 | Live Rock | 25 | Funk Trap 1 | 0 | Live Bass |
| A11 | Rock11 | 116 | 0 | Live Rock | 25 | Funk Trap 1 | 0 | Live Bass |
| A12 | Rock12 | 96 | 23 | Standard 4 | 11 | Live Rock 2 | 4 | Ballad Bass |
| A13 | Rock13 | 96 | 0 | Live Rock | ----- | ----- | 4 | Ballad Bass |
| A14 | Rock14 | 111 | 23 | Standard 4 | ----- | ----- | 4 | Ballad Bass |
| A15 | Rock15 | 103 | 0 | Live Rock | ----- | ----- | 0 | Live Bass |
| A16 | Rock16 | 120 | 41 | Modern 2 | 21 | Standard 2 | 5 | Acoustic Bass |
| A17 | Rock17 | 120 | 6 | Modern | ----- | ----- | 2 | Epic Bass |
| A18 | Rock18 | 99 | 3 | Funk Trap | 74 | Various Percussion 3 | 5 | Acoustic Bass |
| A19 | Rock19 | 132 | 16 | Studio 2 | 8 | Techno Beat | 23 | Drive Bass |
| A20 | Rock20 | 130 | 31 | Epic Rock 2 | 2 | Standard | 4 | Ballad Bass |
| A21 | Rock21 | 96 | 43 | Modern 4 | 9 | General Drum | 4 | Ballad Bass |
| A22 | Rock22 | 160 | 21 | Standard 2 | 25 | Funk Trap 1 | 1 | Studio Bass |
| A23 | Rock23 | 160 | 25 | Funk Trap 1 | 25 | Funk Trap 1 | 1 | Studio Bass |
| A24 | Rock24 | 120 | 23 | Standard 4 | 25 | Funk Trap 1 | 1 | Studio Bass |
| A25 | Rock25 | 100 | 13 | Live Rock 4 | 74 | Various Percussion 3 | 4 | Ballad Bass |
| A26 | Rock26 | 180 | 6 | Modern | 74 | Various Percussion 3 | 13 | No Frets |
| A27 | Rock27 | 104 | 75 | Various Percussion 4 | 20 | Standard 1 | 4 | Ballad Bass |
| A28 | HardRock01 | 103 | 6 | Modern | ----- | ----- | 14 | Acoustic Jazz |
| A29 | HardRock02 | 121 | 0 | Live Rock | ----- | ----- | 4 | Ballad Bass |
| A30 | HardRock03 | 99 | 0 | Live Rock | ----- | ----- | 3 | Funk Bass |
| A31 | HardRock04 | 115 | 0 | Live Rock | 67 | Hi Percussion | 4 | Ballad Bass |
| A32 | HardRock05 | 121 | 0 | Live Rock | ----- | ----- | 0 | Live Bass |
| A33 | HardRock06 | 136 | 0 | Live Rock | 67 | Hi Percussion | 0 | Live Bass |
| A34 | HardRock07 | 120 | 0 | Live Rock | 76 | Various Percussion 5 | 0 | Live Bass |
| A35 | HardRock08 | 79 | 0 | Live Rock | 66 | Lo Percussion | 11 | Digital Acoustic |
| A36 | Metal01 | 98 | 0 | Live Rock | 30 | Epic Rock 1 | 0 | Live Bass |
| A37 | Metal02 | 100 | 3 | Funk Trap | 6 | Modern | 2 | Epic Bass |
| A38 | Metal03 | 100 | 31 | Epic Rock 2 | 38 | Ballad 4 | 0 | Live Bass |
| A39 | Metal04 | 103 | 32 | Epic Rock 3 | 32 | Epic Rock 3 | 23 | Drive Bass |
| A40 | Metal05 | 112 | 1 | Studio | 79 | Kick and Snare 2 | 0 | Live Bass |
| A41 | Metal06 | 150 | 0 | Live Rock | ----- | ----- | 0 | Live Bass |
| A42 | Thrash01 | 166 | 30 | Epic Rock 1 | 34 | Epic Rock 5 | 4 | Ballad Bass |
| A43 | Thrash02 | 186 | 0 | Live Rock | ----- | ----- | 24 | Fuzz Bass |
| A44 | Thrash03 | 136 | 34 | Epic Rock 5 | 30 | Epic Rock 1 | 24 | Fuzz Bass |
| A45 | Thrash04 | 148 | 32 | Epic Rock 3 | 34 | Epic Rock 5 | 9 | Big Bottom Bass |
| A46 | Punk01 | 120 | 30 | Epic Rock 1 | ----- | ----- | 0 | Live Bass |
| A47 | Punk02 | 160 | 14 | Live Rock 5 | ----- | ----- | 0 | Live Bass |
| A48 | Punk03 | 158 | 25 | Funk Trap 1 | 4 | Epic Rock | 24 | Fuzz Bass |
| A49 | Punk04 | 160 | 26 | Funk Trap 2 | 1 | Studio | 4 | Ballad Bass |
| A50 | Fusion01 | 105 | 41 | Modern 2 | 21 | Standard 2 | 15 | Digital Pick |
| A51 | Fusion02 | 113 | 1 | Studio | 74 | Various Percussion 3 | 5 | Acoustic Bass |
| A52 | Fusion03 | 120 | 20 | Standard 1 | 74 | Various Percussion 3 | 15 | Digital Pick |
| A53 | Fusion04 | 94 | 18 | Studio 4 | 64 | Effected Drum | 1 | Studio Bass |
| A54 | Industry01 | 111 | 64 | Effected Drum | 76 | Various Percussion 5 | 11 | Digital Acoustic |
| A55 | Industry02 | 129 | 32 | Epic Rock 3 | 8 | Techno Beat | 11 | Digital Acoustic |
| A56 | Industry03 | 137 | 32 | Epic Rock 3 | 8 | Techno Beat | 15 | Digital Pick |
| A57 | Industry04 | 120 | 32 | Epic Rock 3 | 71 | Percussion/SFX | 9 | Big Bottom Bass |
| A58 | Pop01 | 100 | 18 | Studio 4 | ----- | ----- | 4 | Ballad Bass |
| A59 | Pop02 | 124 | 3 | Funk Trap | 65 | Drum Skins | 4 | Ballad Bass |
| A60 | Pop03 | 132 | 17 | Studio 3 | ----- | ----- | 0 | Live Bass |
| A61 | Pop04 | 112 | 2 | Standard | 67 | Hi Percussion | 0 | Live Bass |
| A62 | Pop05 | 104 | 25 | Funk Trap 1 | ----- | ----- | 3 | Funk Bass |
| A63 | Pop06 | 80 | 67 | Hi Percussion | 2 | Standard | 5 | Acoustic Bass |
| A64 | Pop07 | 117 | 47 | Rap/HipHop 3 | 67 | Hi Percussion | 4 | Ballad Bass |
| A65 | Pop08 | 106 | 22 | Standard 3 | 41 | Modern 2 | ----- | ----- |
| A66 | Pop09 | 100 | 26 | Funk Trap 2 | 2 | Standard | 4 | Ballad Bass |
| A67 | Pop10 | 124 | 35 | Ballad 1 | 67 | Hi Percussion | 4 | Ballad Bass |
| A68 | Pop11 | 110 | 16 | Studio 2 | ----- | ----- | 1 | Studio Bass |
| A69 | Pop12 | 120 | 16 | Studio 2 | 31 | Epic Rock 2 | 4 | Ballad Bass |
| A70 | Pop13 | 110 | 20 | Standard 1 | 24 | Standard 5 | 2 | Epic Bass |
| A71 | R&B01 | 138 | 26 | Funk Trap 2 | 9 | General Drum | 18 | Lo Sine |
| A72 | R&B02 | 100 | 20 | Standard 1 | 67 | Hi Percussion | 0 | Live Bass |
| A73 | R&B03 | 120 | 25 | Funk Trap 1 | ----- | ----- | 0 | Live Bass |
| A74 | R&B04 | 116 | 23 | Standard 4 | 65 | Drum Skins | 4 | Ballad Bass |
| A75 | R&B05 | 120 | 45 | Rap/HipHop 1 | ----- | ----- | 3 | Funk Bass |
| A76 | R&B06 | 96 | 28 | Funk Trap 4 | 65 | Drum Skins | 4 | Ballad Bass |
| A77 | R&B07 | 168 | 26 | Funk Trap 2 | 25 | Funk Trap 1 | 0 | Live Bass |
| A78 | R&B08 | 100 | 25 | Funk Trap 1 | 67 | Hi Percussion | 3 | Funk Bass |
| A79 | R&B09 | 120 | 3 | Funk Trap | ----- | ----- | 2 | Epic Bass |
| A80 | R&B10 | 146 | 20 | Standard 1 | 0 | Live Rock | 0 | Live Bass |
| A81 | R&B11 | 112 | 25 | Funk Trap 1 | ----- | ----- | 6 | Modern Bass |
| A82 | R&B12 | 114 | 45 | Rap/HipHop 1 | 69 | Single Percussion | 18 | Lo Sine |
| A83 | R&B13 | 90 | 46 | Rap/HipHop 2 | 69 | Single Percussion | 17 | Analog Touch |
| A84 | Funk01 | 112 | 2 | Standard | 3 | Funk Trap | 3 | Funk Bass |
| A85 | Funk02 | 120 | 27 | Funk Trap 3 | ----- | ----- | 3 | Funk Bass |
| A86 | Funk03 | 120 | 41 | Modem 2 | 2 | Standard | 3 | Funk Bass |
| A87 | Funk04 | 112 | 28 | Funk Trap 4 | 2 | Standard | 3 | Funk Bass |
| A88 | Funk05 | 121 | 3 | Funk Trap | 47 | Rap/HipHop 3 | 3 | Funk Bass |
| A89 | Funk06 | 120 | 27 | Funk Trap 3 | ----- | ----- | 4 | Ballad Bass |
| A90 | Funk07 | 98 | 28 | Funk Trap 4 | 10 | Live Rock 1 | 8 | Techno Bass |
| A91 | Funk08 | 94 | 29 | Funk Trap 5 | 67 | Hi Percussion | 3 | Funk Bass |
| A92 | Funk09 | 100 | 25 | Funk Trap 1 | 65 | Drum Skins | 0 | Live Bass |
| A93 | Funk10 | 92 | 26 | Funk Trap 2 | 65 | Drum Skins | 9 | Big Bottom Bass |
| A94 | Funk11 | 112 | 2 | Standard | 3 | Funk Trap | 10 | SubSlap Bass |
| A95 | Funk12 | 99 | 22 | Standard 3 | 68 | Clicks and Sticks | 5 | Acoustic Bass |
| A96 | Funk13 | 125 | 49 | Rap/HipHop 5 | 71 | Percussion/SFX | 18 | Lo Sine |
| A97 | Funk14 | 92 | 27 | Funk Trap 3 | 6 | Modern | 10 | SubSlap Bass |
| A98 | Funk15 | 100 | 21 | Standard 2 | 67 | Hi Percussion | 18 | Lo Sine |
| A99 | Funk16 | 114 | 75 | Various Percussion 4 | 7 | Rap/HipHop | 17 | Analog Touch |
| B01 | RapHipHop01 | 110 | 46 | Rap/HipHop 2 | 11 | Live Rock 2 | 18 | Lo Sine |
| B02 | RapHipHop02 | 96 | 40 | Modern 1 | 77 | Cymbal Set | 18 | Lo Sine |
| B03 | RapHipHop03 | 102 | 7 | Rap/HipHop | 67 | Hi Percussion | 17 | Analog Touch |
| B04 | RapHipHop04 | 112 | 3 | Funk Trap | ----- | ----- | 14 | Acoustic Jazz |
| B05 | RapHipHop05 | 86 | 48 | Rap/HipHop 4 | 47 | Rap/HipHop 3 | 8 | Techno Bass |
| B06 | RapHipHop06 | 96 | 21 | Standard 2 | 67 | Hi Percussion | 10 | SubSlap Bass |
| B07 | RapHipHop07 | 99 | 52 | Techno Beat 3 | 24 | Standard 5 | 4 | Ballad Bass |
| B08 | RapHipHop08 | 112 | 3 | Funk Trap | 7 | Rap/HipHop | 5 | Acoustic Bass |
| B09 | RapHipHop09 | 100 | 7 | Rap/HipHop | ----- | ----- | 17 | Analog Touch |
| B10 | RapHipHop10 | 112 | 7 | Rap/HipHop | 2 | Standard | 18 | Lo Sine |
| B11 | RapHipHop11 | 91 | 8 | Techno Beat | 2 | Standard | 0 | Live Bass |
| B12 | RapHipHop12 | 112 | 3 | Funk Trap | 2 | Standard | 4 | Ballad Bass |
| B13 | RapHipHop13 | 112 | 2 | Standard | 7 | Rap/HipHop | 4 | Ballad Bass |
| B14 | RapHipHop14 | 104 | 62 | General Drum 8 | 67 | Hi Percussion | 18 | Lo Sine |
| B15 | RapHipHop15 | 112 | 6 | Modern | 5 | Ballad | 4 | Ballad Bass |
| B16 | RapHipHop16 | 88 | 0 | Live Rock | 3 | Funk Trap | 5 | Acoustic Bass |
| B17 | RapHipHop17 | 103 | 64 | Effected Drum | 69 | Single Percussion | 16 | Techno Analog |
| B18 | RapHipHop18 | 93 | 47 | Rap/HipHop 3 | 20 | Standard 1 | 18 | Lo Sine |
| B19 | RapHipHop19 | 92 | 7 | Rap/HipHop | 70 | Agogo Gamelan | 5 | Acoustic Bass |
| B20 | RapHipHop20 | 84 | 47 | Rap/HipHop 3 | 31 | Epic Rock 2 | 4 | Ballad Bass |
| B21 | RapHipHop21 | 99 | 47 | Rap/HipHop 3 | 67 | Hi Percussion | 4 | Ballad Bass |
| B22 | RapHipHop22 | 88 | 13 | Live Rock 4 | 8 | Techno Beat | 4 | Ballad Bass |
| B23 | RapHipHop23 | 88 | 13 | Live Rock 4 | 47 | Rap/HipHop 3 | 4 | Ballad Bass |
| B24 | RapHipHop24 | 102 | 51 | Techno Beat 2 | 49 | Rap/HipHop 5 | 18 | Lo Sine |
| B25 | RapHipHop25 | 90 | 3 | Funk Trap | 65 | Drum Skins | 11 | Digital Acoustic |
| B26 | RapHipHop26 | 85 | 8 | Techno Beat | 71 | Percussion/SFX | 18 | Lo Sine |
| B27 | RapHipHop27 | 96 | 10 | Live Rock 1 | 67 | Hi Percussion | 8 | Techno Bass |
| B28 | RapHipHop28 | 96 | 0 | Live Rock | 71 | Percussion/SFX | 18 | Lo Sine |
| B29 | RapHipHop29 | 87 | 62 | General Drum 8 | 71 | Percussion/SFX | 17 | Analog Touch |
| B30 | RapHipHop30 | 116 | 59 | General Drum 5 | ----- | -------- | 17 | Analog Touch |
| B31 | RapHipHop31 | 136 | 7 | Rap/HipHop | 69 | Single Percussion | 17 | Analog Touch |
| B32 | RapHipHop32 | 148 | 51 | Techno Beat 2 | 2 | Standard | 17 | Analog Touch |
| B33 | RapHipHop33 | 103 | 2 | Standard | 3 | Funk Trap | 5 | Acoustic Bass |
| B34 | RapHipHop34 | 107 | 3 | Funk Trap | 67 | Hi Percussion | 5 | Acoustic Bass |
| B35 | RapHipHop35 | 120 | 45 | Rap/HipHop 1 | 27 | Funk Trap 3 | 8 | Techno Bass |
| B36 | Dance01 | 111 | 8 | Techno Beat | 2 | Standard | 8 | Techno Bass |
| B37 | Dance02 | 120 | 2 | Standard | 6 | Modern | 4 | Ballad Bass |
| B38 | Dance03 | 102 | 26 | Funk Trap 2 | 47 | Rap/HipHop 3 | 4 | Ballad Bass |
| B39 | Dance04 | 107 | 50 | Techno Beat 1 | 47 | Rap/HipHop 3 | 17 | Analog Touch |
| B40 | Dance05 | 107 | 50 | Techno Beat 1 | 48 | Rap/HipHop 4 | 17 | Analog Touch |
| B41 | Dance06 | 122 | 8 | Techno Beat | 74 | Various Percussion 3 | 8 | Techno Bass |
| B42 | Dance07 | 120 | 8 | Techno Beat | 68 | Clicks and Sticks | 3 | Funk Bass |
| B43 | Dance08 | 180 | 45 | Rap/HipHop 1 | 74 | Various Percussion 3 | 18 | Lo Sine |
| B44 | Dance09 | 103 | 43 | Modern 4 | 67 | Hi Percussion | 18 | Lo Sine |
| B45 | Dance10 | 137 | 45 | Rap/HipHop 1 | ----- | -------- | 18 | Lo Sine |
| B46 | Dance11 | 120 | 6 | Modern | 67 | Hi Percussion | 10 | SubSlap Bass |
| B47 | Dance12 | 100 | 41 | Modern 2 | 76 | Various Percussion 5 | 8 | Techno Bass |
| B48 | House01 | 122 | 45 | Rap/HipHop 1 | 22 | Standard 3 | 17 | Analog Touch |
| B49 | House02 | 120 | 45 | Rap/HipHop 1 | 73 | Various Percussion 2 | 18 | Lo Sine |
| B50 | House03 | 120 | 53 | Techno Beat 4 | 71 | Percussion/SFX | 16 | Techno Analog |
| B51 | House04 | 126 | 45 | Rap/HipHop 1 | 68 | Clicks and Sticks | 18 | Lo Sine |
| B52 | House05 | 120 | 40 | Modern 1 | 76 | Various Percussion 5 | 8 | Techno Bass |
| B53 | House06 | 120 | 50 | Techno Beat 1 | 8 | Techno Beat | 8 | Techno Bass |
| B54 | House07 | 120 | 41 | Modern 2 | 68 | Clicks and Sticks | 7 | Synth Bass |
| B55 | House08 | 126 | 59 | General Drum 5 | 68 | Clicks and Sticks | 18 | Lo Sine |
| B56 | Techno01 | 148 | 46 | Rap/HipHop 2 | 50 | Techno Beat 1 | 20 | Saw Wave |
| B57 | Techno02 | 125 | 8 | Techno Beat | 54 | Techno Beat 5 | 17 | Analog Touch |
| B58 | Techno03 | 125 | 8 | Techno Beat | 54 | Techno Beat 5 | 17 | Analog Touch |
| B59 | Techno04 | 160 | 49 | Rap/HipHop 5 | 51 | Techno Beat 2 | 8 | Techno Bass |
| B60 | Techno05 | 138 | 51 | Techno Beat 2 | 68 | Clicks and Sticks | 18 | Lo Sine |
| B61 | Techno06 | 164 | 7 | Rap/HipHop | 68 | Clicks and Sticks | 18 | Lo Sine |
| B62 | Techno07 | 118 | 6 | Modern | 8 | Techno Beat | 17 | Analog Touch |
| B63 | Techno08 | 126 | 54 | Techno Beat 5 | 46 | Rap/HipHop 2 | 18 | Lo Sine |
| B64 | Techno09 | 140 | 45 | Rap/HipHop 1 | 68 | Clicks and Sticks | 18 | Lo Sine |
| B65 | Techno10 | 136 | 45 | Rap/HipHop 1 | 68 | Clicks and Sticks | 18 | Lo Sine |
| B66 | Techno11 | 120 | 49 | Rap/HipHop 5 | 71 | Percussion/SFX | 18 | Lo Sine |
| B67 | Techno12 | 119 | 30 | Epic Rock 1 | 52 | Techno Beat 3 | 17 | Analog Touch |
| B68 | Techno13 | 127 | 59 | General Drum 5 | 67 | Hi Percussion | 22 | Hi Sine |
| B69 | Techno14 | 170 | 61 | General Drum 7 | 71 | Percussion/SFX | 17 | Analog Touch |
| B70 | Techno15 | 120 | 51 | Techno Beat 2 | 46 | Rap/HipHop 2 | 2 | Epic Bass |
| B71 | Drum&Bass01 | 150 | 45 | Rap/HipHop 1 | 46 | Rap/HipHop 2 | 18 | Lo Sine |
| B72 | Drum&Bass02 | 150 | 26 | Funk Trap 2 | 7 | Rap/HipHop | 18 | Lo Sine |
| B73 | Drum&Bass03 | 158 | 46 | Rap/HipHop 2 | 78 | Kick and Snare 1 | 5 | Acoustic Bass |
| B74 | Drum&Bass04 | 166 | 60 | General Drum 6 | 61 | General Drum 7 | 18 | Lo Sine |
| B75 | Drum&Bass05 | 164 | 45 | Rap/HipHop 1 | 67 | Hi Percussion | 18 | Lo Sine |
| B76 | Drum&Bass06 | 144 | 7 | Rap/HipHop | 8 | Techno Beat | 18 | Lo Sine |
| B77 | Drum&Bass07 | 154 | 7 | Rap/HipHop | 2 | Standard | 18 | Lo Sine |
| B78 | Drum&Bass08 | 154 | 29 | Funk Trap 5 | 65 | Drum Skins | 18 | Lo Sine |
| B79 | Drum&Bass09 | 154 | 25 | Funk Trap 1 | 50 | Techno Beat 1 | 5 | Acoustic Bass |
| B80 | Drum&Bass10 | 150 | 23 | Standard 4 | 20 | Standard 1 | 14 | Acoustic Jazz |
| B81 | Drum&Bass11 | 160 | 23 | Standard 4 | 50 | Techno Beat 1 | 11 | Digital Acoustic |
| B82 | Jungle01 | 160 | 45 | Rap/HipHop 1 | 62 | General Drum 8 | 18 | Lo Sine |
| B83 | Jungle02 | 163 | 61 | General Drum 7 | 66 | Lo Percussion | 18 | Lo Sine |
| B84 | Jungle03 | 172 | 41 | Modern 2 | 65 | Drum Skins | 18 | Lo Sine |
| B85 | TripHop01 | 120 | 45 | Rap/HipHop 1 | 46 | Rap/HipHop 2 | 5 | Acoustic Bass |
| B86 | TripHop02 | 75 | 63 | General Drum 9 | 67 | Hi Percussion | 14 | Acoustic Jazz |
| B87 | TripHop03 | 152 | 47 | Rap/HipHop 3 | 71 | Percussion/SFX | 5 | Acoustic Bass |
| B88 | TripHop04 | 83 | 46 | Rap/HipHop 2 | 7 | Rap/HipHop | 18 | Lo Sine |
| B89 | TripHop05 | 110 | 67 | Hi Percussion | 47 | Rap/HipHop 3 | 8 | Techno Bass |
| B90 | TripHop06 | 101 | 41 | Modern 2 | 49 | Rap/HipHop 5 | 4 | Ballad Bass |
| B91 | TripHop07 | 101 | 61 | General Drum 7 | 66 | Lo Percussion | 13 | No Frets |
| B92 | TripHop08 | 73 | 44 | Modern 5 | 67 | Hi Percussion | 10 | SubSlap Bass |
| B93 | TripHop09 | 97 | 64 | Effected Drum | 66 | Lo Percussion | 4 | Ballad Bass |
| B94 | Ambient01 | 112 | 1 | Studio | 7 | Rap/HipHop | 18 | Lo Sine |
| B95 | Ambient02 | 98 | 60 | General Drum 6 | 68 | Clicks and Sticks | 4 | Ballad Bass |
| B96 | Ambient03 | 157 | 46 | Rap/HipHop 2 | 46 | Rap/HipHop 2 | 18 | Lo Sine |
| B97 | Ambient04 | 94 | 46 | Rap/HipHop 2 | 46 | Rap/HipHop 2 | 17 | Analog Touch |
| B98 | Ambient05 | 89 | 7 | Rap/HipHop | ----- | ----- | 18 | Lo Sine |
| B99 | Ambient06 | 96 | 7 | Rap/HipHop | ----- | ----- | 8 | Techno Bass |
| C01 | Ballad01 | 76 | 5 | Ballad | 25 | Funk Trap 1 | 4 | Ballad Bass |
| C02 | Ballad02 | 75 | 21 | Standard 2 | 77 | Cymbal Set | 4 | Ballad Bass |
| C03 | Ballad03 | 65 | 5 | Ballad | 77 | Cymbal Set | 4 | Ballad Bass |
| C04 | Ballad04 | 152 | 0 | Live Rock | 60 | General Drum 6 | 18 | Lo Sine |
| C05 | Ballad05 | 65 | 5 | Ballad | 20 | Standard 1 | 4 | Ballad Bass |
| C06 | Ballad06 | 108 | 21 | Standard 2 | 78 | Kick and Snare 1 | 0 | Live Bass |
| C07 | Ballad07 | 99 | 2 | Standard | 3 | Funk Trap | 4 | Ballad Bass |
| C08 | Ballad08 | 80 | 13 | Live Rock 4 | 26 | Funk Trap 2 | 13 | No Frets |
| C09 | Ballad09 | 75 | 30 | Epic Rock 1 | ----- | ----- | 4 | Ballad Bass |
| C10 | Blues01 | 120 | 3 | Funk Trap | ----- | ----- | 4 | Ballad Bass |
| C11 | Blues02 | 72 | 23 | Standard 4 | 2 | Standard | 4 | Ballad Bass |
| C12 | Blues03 | 120 | 3 | Funk Trap | ----- | ----- | 4 | Ballad Bass |
| C13 | Blues04 | 111 | 0 | Live Rock | 67 | Hi Percussion | 4 | Ballad Bass |
| C14 | Blues05 | 120 | 3 | Funk Trap | ----- | ----- | 4 | Ballad Bass |
| C15 | Blues06 | 111 | 24 | Standard 5 | 37 | Ballad 3 | 4 | Ballad Bass |
| C16 | Blues07 | 64 | 35 | Ballad 1 | 19 | Studio 5 | 9 | Big Bottom Bass |
| C17 | Triple01 | 126 | 20 | Standard 1 | ----- | ----- | 5 | Acoustic Bass |
| C18 | Triple02 | 102 | 1 | Studio | ----- | ----- | 4 | Ballad Bass |
| C19 | Triple03 | 94 | 67 | Hi Percussion | 2 | Standard | 5 | Acoustic Bass |
| C20 | Triple04 | 105 | 1 | Studio | 4 | Epic Rock | 2 | Epic Bass |
| C21 | Triple05 | 140 | 14 | Live Rock 5 | ----- | ----- | 4 | Ballad Bass |
| C22 | Country01 | 120 | 23 | Standard 4 | ----- | ----- | 4 | Ballad Bass |
| C23 | Country02 | 120 | 16 | Studio 2 | 78 | Kick and Snare 1 | 5 | Acoustic Bass |
| C24 | Country03 | 95 | 2 | Standard | ----- | ----- | 4 | Ballad Bass |
| C25 | Country04 | 115 | 63 | General Drum 9 | ----- | ----- | 0 | Live Bass |
| C26 | Country05 | 96 | 20 | Standard 1 | 65 | Drum Skins | 5 | Acoustic Bass |
| C27 | Country06 | 100 | 2 | Standard | ----- | ----- | 4 | Ballad Bass |
| C28 | Jazz01 | 125 | 3 | Funk Trap | 74 | Various Percussion 3 | 5 | Acoustic Bass |
| C29 | Jazz02 | 121 | 3 | Funk Trap | ----- | ----- | 5 | Acoustic Bass |
| C30 | Jazz03 | 94 | 3 | Funk Trap | 74 | Various Percussion 3 | 5 | Acoustic Bass |
| C31 | Jazz04 | 100 | 2 | Standard | 71 | Percussion/SFX | 4 | Ballad Bass |
| C32 | Jazz05 | 123 | 3 | Funk Trap | 67 | Hi Percussion | 4 | Ballad Bass |
| C33 | Jazz06 | 123 | 23 | Standard 4 | 72 | Various Percussion 1 | 5 | Acoustic Bass |
| C34 | Shuffle01 | 125 | 3 | Funk Trap | ----- | ----- | 4 | Ballad Bass |
| C35 | Shuffle02 | 120 | 0 | Live Rock | 25 | Funk Trap 1 | 11 | Digital Acoustic |
| C36 | Shuffle03 | 122 | 26 | Funk Trap 2 | 20 | Standard 1 | 17 | Analog Touch |
| C37 | Shuffle04 | 120 | 23 | Standard 4 | 65 | Drum Skins | 1 | Studio Bass |
| C38 | Ska01 | 160 | 25 | Funk Trap 1 | 73 | Various Percussion 2 | 4 | Ballad Bass |
| C39 | Ska02 | 141 | 2 | Standard | 3 | Funk Trap | 0 | Live Bass |
| C40 | Ska03 | 160 | 21 | Standard 2 | 67 | Hi Percussion | 14 | Acoustic Jazz |
| C41 | Ska04 | 150 | 3 | Funk Trap | ----- | ----- | 11 | Digital Acoustic |
| C42 | Ska05 | 130 | 3 | Funk Trap | 66 | Lo Percussion | 4 | Ballad Bass |
| C43 | Reggae01 | 150 | 25 | Funk Trap 1 | 73 | Various Percussion 2 | 4 | Ballad Bass |
| C44 | Reggae02 | 160 | 23 | Standard 4 | 67 | Hi Percussion | 5 | Acoustic Bass |
| C45 | Reggae03 | 132 | 25 | Funk Trap 1 | 67 | Hi Percussion | 4 | Ballad Bass |
| C46 | Reggae04 | 118 | 21 | Standard 2 | 16 | Studio 2 | 4 | Ballad Bass |
| C47 | Reggae05 | 161 | 3 | Funk Trap | ----- | ----- | 4 | Ballad Bass |
| C48 | Reggae06 | 129 | 3 | Funk Trap | 74 | Various Percussion 3 | 5 | Acoustic Bass |
| C49 | Reggae07 | 149 | 56 | General Drum 2 | 67 | Hi Percussion | 18 | Lo Sine |
| C50 | Reggae08 | 71 | 41 | Modern 2 | 67 | Hi Percussion | 17 | Analog Touch |
| C51 | Afro01 | 98 | 73 | Various Percussion 2 | 66 | Lo Percussion | 13 | No Frets |
| C52 | Afro02 | 142 | 41 | Modern 2 | 21 | Standard 2 | 4 | Ballad Bass |
| C53 | Afro03 | 97 | 25 | Funk Trap 1 | 65 | Drum Skins | 3 | Funk Bass |
| C54 | Afro04 | 115 | 25 | Funk Trap 1 | 66 | Lo Percussion | 3 | Funk Bass |
| C55 | Afro05 | 111 | 25 | Funk Trap 1 | 65 | Drum Skins | 2 | Epic Bass |
| C56 | Afro06 | 106 | 22 | Standard 3 | 73 | Various Percussion 2 | 3 | Funk Bass |
| C57 | Afro07 | 95 | 29 | Funk Trap 5 | 67 | Hi Percussion | 6 | Modern Bass |
| C58 | Afro08 | 92 | 67 | Hi Percussion | 66 | Lo Percussion | 4 | Ballad Bass |
| C59 | Afro09 | 115 | 66 | Lo Percussion | 78 | Kick and Snare 1 | 18 | Lo Sine |
| C60 | Afro10 | 123 | 3 | Funk Trap | 66 | Lo Percussion | 4 | Ballad Bass |
| C61 | Afro11 | 116 | 48 | Rap/HipHop 4 | 66 | Lo Percussion | 18 | Lo Sine |
| C62 | Afro12 | 106 | 67 | Hi Percussion | 66 | Lo Percussion | 5 | Acoustic Bass |
| C63 | Latin01 | 118 | 21 | Standard 2 | 74 | Various Percussion 3 | 4 | Ballad Bass |
| C64 | Latin02 | 150 | 3 | Funk Trap | 2 | Standard | 5 | Acoustic Bass |
| C65 | Latin03 | 104 | 25 | Funk Trap 1 | 71 | Percussion/SFX | 4 | Ballad Bass |
| C66 | Latin04 | 106 | 65 | Drum Skins | 67 | Hi Percussion | 11 | Digital Acoustic |
| C67 | Latin05 | 100 | 6 | Modern | 74 | Various Percussion 3 | 14 | Acoustic Jazz |
| C68 | Latin06 | 100 | 65 | Drum Skins | 67 | Hi Percussion | 5 | Acoustic Bass |
| C69 | Latin07 | 120 | 16 | Studio 2 | 2 | Standard | 5 | Acoustic Bass |
| C70 | Latin08 | 78 | 76 | Various Percussion 5 | 73 | Various Percussion 2 | 4 | Ballad Bass |
| C71 | Latin09 | 110 | 25 | Funk Trap 1 | 65 | Drum Skins | 3 | Funk Bass |
| C72 | Latin10 | 88 | 72 | Various Percussion 1 | 74 | Various Percussion 3 | 4 | Ballad Bass |
| C73 | Latin11 | 141 | 22 | Standard 3 | 74 | Various Percussion 3 | 4 | Ballad Bass |
| C74 | Latin12 | 109 | 1 | Studio | 67 | Hi Percussion | 4 | Ballad Bass |
| C75 | Latin13 | 100 | 26 | Funk Trap 2 | ----- | ----- | 3 | Funk Bass |
| C76 | MiddleEast01 | 120 | 25 | Funk Trap 1 | 65 | Drum Skins | 6 | Modern Bass |
| C77 | MiddleEast02 | 112 | 2 | Standard | 66 | Lo Percussion | 4 | Ballad Bass |
| C78 | MiddleEast03 | 106 | 23 | Standard 4 | 67 | Hi Percussion | 4 | Ballad Bass |
| C79 | Celtic01 | 122 | 2 | Standard | 66 | Lo Percussion | 5 | Acoustic Bass |
| C80 | Celtic02 | 136 | 26 | Funk Trap 2 | 39 | Ballad 5 | 4 | Ballad Bass |
| C81 | Polyrhythm01 | 100 | 66 | Lo Percussion | 67 | Hi Percussion | 22 | Hi Sine |
| C82 | Polyrhythm02 | 100 | 66 | Lo Percussion | 67 | Hi Percussion | 19 | Harmonics Bass |
| C83 | Riff01 | 132 | 0 | Live Rock | ----- | ----- | ----- | ----- |
| C84 | Riff02 | 114 | 0 | Live Rock | ----- | ----- | ----- | ----- |
| C85 | Riff03 | 114 | 1 | Studio | ----- | ----- | ----- | ----- |
| C86 | Riff04 | 114 | 1 | Studio | ----- | ----- | ----- | ----- |
| C87 | Arpeggio01 | 110 | ----- | ----- | ----- | ----- | 12 | Bass Harmonics |
| C88 | Arpeggio02 | 110 | 70 | Agogo Gamelan | ----- | ----- | ----- | ----- |
| C89 | PercussionPart01 | 110 | ----- | ----- | 65 | Drum Skins | ----- | ----- |
| C90 | PercussionPart02 | 110 | 66 | Lo Percussion | ----- | ----- | ----- | ----- |
| C91 | PercussionPart03 | 110 | ----- | ----- | 67 | Hi Percussion | ----- | ----- |
| C92 | BD&SDPart | 110 | 34 | Epic Rock 5 | ----- | ----- | ----- | ----- |
| C93 | HiHatPart | 110 | ----- | ----- | 20 | Standard 1 | ----- | ----- |
| C94 | Click&CymbalPar | 110 | ----- | ----- | 8 | Techno Beat | ----- | ----- |
| C95 | TambarinePart | 110 | 67 | Hi Percussion | ----- | ----- | ----- | ----- |
| C96 | HeavyDrumPatter | 110 | 1 | Studio | ----- | ----- | ----- | ----- |
| C97 | SpeedDrumPatter | 110 | 6 | Modern | ----- | ----- | ----- | ----- |
| C98 | SlapBassPattern | 120 | ----- | ----- | ----- | ----- | 3 | Funk Bass |
| C99 | FingerBassPatte | 110 | ----- | ----- | ----- | ----- | 4 | Ballad Bass |
| Note No | DRUM A,B | DRUM A,B KIT 65. | |
| PERCUSS & SE | |||
| 24 | KIT 00-64 | From Note 0 | |
| 25 | |||
| 26 | |||
| 27 | High Q | ||
| 28 | Slab | ||
| 29 | Scratch Push | ||
| 30 | Scratch Pull | ||
| 31 | Sticks | ||
| 32 | Spare Click | ||
| 33 | Materone Click | ||
| 34 | Matronome Bell | ||
| 35 | Kick Drum 2 | ||
| 36 | Kick Drum 1 | ||
| 37 | Side Stick | ||
| 38 | Share Drum 1 | ||
| 39 | Hand Clap | ||
| 40 | Share Drum 2 | ||
| 41 | Low Tom 2 | ||
| 42 | Closed Hi-Hat | ||
| 43 | Low Tom 1 | ||
| 44 | Mid Tom 2 | ||
| 45 | Open Hi-Hat | ||
| 46 | Open Hi-Hat | ||
| 47 | Mid Tom 1 | ||
| 48 | High Tom 1 | ||
| 49 | Crash Cymdal 1 | ||
| 50 | High Tom 1 | ||
| 51 | Chinese Cymdal | ||
| 52 | Tambourne | ||
| 53 | Rudell | ||
| 54 | Tambourne | ||
| 55 | Salash Cymdal | ||
| 56 | Cowbell | ||
| 57 | Crash Cymdal 2 | ||
| 58 | Vibraslap | ||
| 59 | Ride Ojymal 2 | ||
| 60 | High Bongo | ||
| 61 | Low Bongo | ||
| 62 | Mute High Cunga | ||
| 63 | Open High Cunga | ||
| 64 | Low Cunga | ||
| 65 | High Timbale | ||
| 66 | Low Timbale | ||
| 67 | High Alogogo | ||
| 68 | Low Alogogo | ||
| 69 | Cabasa | ||
| 70 | Maracas | ||
| 71 | Short Whistle | ||
| 72 | Long Whistle | ||
| 73 | Short Guiro | ||
| 74 | Long Guiro | ||
| 75 | Claves | ||
| 76 | High Wood Block | ||
| 77 | Low Wood Block | ||
| 78 | Mate Cuca | ||
| 79 | Open Cuca | ||
| 80 | Mute Triangle | ||
| 81 | Open Triangle | ||
| 82 | Shaker | ||
| 83 | Jingle Bell | ||
| 84 | Belltree | ||
| 85 | Castanets | ||
| 86 | Mute Sardo | ||
| 87 | Open Surro | ||
For some bass programs, the upper sound source note # changes.
DRUM A,B KIT 65 - DEPOSU 0-07
| KIT No | KIT 65 | KIT 66 | KIT 67 | KIT 68 | KIT 69 | KIT 70 | |
| KIT NAME | Drum Skins | Lo Percussion | Hi Percussion | Clicks and Sticks | Single Percussion | Agogo Gam | |
| note | PAD | ||||||
| 36 | PAD 1 | Hi Conga 1 | Lo Timbale | Agogo | LiveStick | Belltree | Agogo Gam |
| 37 | PAD 2 | Hi Conga 2 | Lo Conga 1 | LooseShaker 1 | StudioSticks | Hi Belltree | Agogo Gam |
| 38 | PAD 3 | Lo Conga 1 | Lo Conga 2 | Cowbell | X-Sticks | Jinglebells | Agogo Gam |
| 39 | PAD 4 | Lo Conga 2 | Hi Conga 1 | LooseShaker 2 | GuiroTick | Hi Jinglebells | Agogo Gam |
| 40 | PAD 5 | Mute Conga 1 | VeryLo Conga 1 | Clave | Clave 1 | Whistle | Agogo Gam |
| 41 | PAD 6 | Mute Conga 2 | Muted Conga | TightShaker | Clave 2 | Hi Whistle | Agogo Gam |
| 42 | PAD 7 | Lo Conga 3 | VeryLo Conga 2 | GuiroScrape 1 | Castenet 1 | Vibraslap | Agogo Gam |
| 43 | PAD 8 | Lo Timbale | Bass | Tamborine 1 | 909WoodTick 1 | Muted Triangle 1 | Agogo Gam |
| 44 | PAD 9 | Hi Bongo | Mid Conga | GuiroScrape 2 | Castanet 2 | Hi Vibraslap | Agogo Gam |
| 45 | PAD 10 | Hi Timbale | Lo Conga 3 | Tamborine 2 | 909WoodTick 2 | Lo Muted Triangle | Agogo Gam |
| 46 | PAD 11 | Lo Bongo | Lo Conga 4 | GuiroTick | Castanet 3 | VeryHi Vibraslap | Agogo Gam |
| 47 | PAD 12 | Stick | Lo Stick | Tamborine 3 | 909WoodTick 3 | Muted Triangle 2 | Agogo Gam |
| 48 | PAD 13 | HandTom | HandTom | Vibraslap | StudioSticks | Lo Open Triangle | Agogo Gam |
| KIT No KIT NAME | KIT 71 | KIT 72 | KIT 73 | KIT 74 | KIT 75 | KIT 76 | |
| Percussion/SFX | Various Percussion 1 | Various Percussion 2 | Various Percussion 3 | Various Percussion 4 | Various Percussion 5 | ||
| note | PAD | ||||||
| 36 | PAD 1 | Mute High Conga | <---- | <---- | <---- | <---- | <---- |
| 37 | PAD 2 | Open High Conga | <---- | <---- | <---- | <---- | <---- |
| 38 | PAD 3 | Low Conga | <---- | <---- | <---- | <---- | <---- |
| 39 | PAD 4 | Hand Clap | <---- | <---- | <---- | <---- | <---- |
| 40 | PAD 5 | Pedal Hi-Hat | <---- | <---- | <---- | <---- | <---- |
| 41 | PAD 6 | Chinese Cymbal | <---- | <---- | <---- | <---- | <---- |
| 42 | PAD 7 | Crash Cymbal 2 | <---- | <---- | <---- | <---- | <---- |
| 43 | PAD 8 | High Q | Metronome Click | High Bongo | Cabasa | High Woodblock | Shaker |
| 44 | PAD 9 | Slap | Metronome Bell | Lo Bongo | Maracas | Lo Woodblock | Jingle Bell |
| 45 | PAD 10 | Scratch Push | Splash Cymbal | High Timbale | Short Hi Whistle | Mute Cuica | Belltree |
| 46 | PAD 11 | Scratch Pull | Vibraslap | Lo Timbale | Long Low Whistle | Open Cuica | Castanets |
| 47 | PAD 12 | Sticks | Ride Cymbal 2 | High Agogo | Short Guiro | Mute Triangle | Mute Surdo |
| 48 | PAD 13 | Square Click | Claves | Lo Agogo | Long Guiro | Open Triangle | Open Surdo |
| KIT No KIT NAME | KIT 77 | KIT 78 | KIT 79 | |
| Cymbal Set | Kick and Snare 1 | Kick and Snare 2 | ||
| note | PAD | |||
| 36 | PAD 1 | Live Splash | Live Kick 1 | Epic Kick 1 |
| 37 | PAD 2 | Funk Splash | Live Snare 1 | Epic Snare 1 |
| 38 | PAD 3 | Dance Splash | Live Kick 2 | Epic Kick 2 |
| 39 | PAD 4 | Techno Splash | Live Snare 2 | Epic Snare 2 |
| 40 | PAD 5 | Funk China | Studio Kick 1 | Ballad Kick |
| 41 | PAD 6 | Dance China | Studio Snare 1 | Modern Snare |
| 42 | PAD 7 | Funk and Live Crash | Studio Kick 2 | Modern Kick 1 |
| 43 | PAD 8 | Epic and Studio Crash | Studio Snare 2 | General Snare 1 |
| 44 | PAD 9 | Techno 808 Crash | Standard Kick 1 | Modern Kick 2 |
| 45 | PAD 10 | Ride Cymbal 2 | Funk Snare 1 | General Snare 2 |
| 46 | PAD 11 | Epic Tamborine | Standard Kick 2 | General Kick |
| 47 | PAD 12 | Studio Tamborine | Funk Snare 2 | Kick Verb |
| 48 | PAD 13 | Cabasa | Funk Kick | Snare Verb |
Drum A, B KIT (0 - 64) EXTRA List
| KIT No | KIT NAME | EXTRA1 | EXTRA2 | EXTRA CYMBAL | EXTRA3 |
| 0 | LiveRock | Side Stick | Cowbell | Ride Bell | Hand Clap |
| 1 | Studio Rock | Side Stick | Cowbell | Ride Bell | Hand Clap |
| 2 | Standard Kit | Side Stick | Cowbell | Ride Bell | Hand Clap |
| 3 | Funk Rock | Side Stick | Cowbell | Ride Bell | Hand Clap |
| 4 | Epic Rock | Side Stick | Cowbell | Ride Bell | Hand Clap |
| 5 | Ballad Rock | Side Stick | Cowbell | Ride Bell | Hand Clap |
| 6 | Dance Rock | Side Stick | Cowbell | Ride Bell | Hand Clap |
| 7 | RapHipHop | Side Stick | Cowbell | Ride Bell | Hand Clap |
| 8 | Techno Beat | Side Stick | Cowbell | Ride Bell | Hand Clap |
| 9 | General Drum | Side Stick | Cowbell | Ride Bell | Hand Clap |
| 10 | LiveRock1 | Hand Clap | Cowbell | Ride Bell | Tambourine |
| 11 | LiveRock2 | Side Stick | Cowbell | Crash Cymbal2 | Tambourine |
| 12 | LiveRock3 | Cowbell | Chinese Cymbal | Ride Bell | Splash Cymbal |
| 13 | LiveRock4 | Side Stick | Hand Clap | Splash Cymbal | Tambourine |
| 14 | LiveRock5 | Hand Clap | Tambourine | Crash Cymbal2 | Splash Cymbal |
| 15 | Studio Rock1 | Hand Clap | Cowbell | Ride Bell | Tambourine |
| 16 | Studio Rock2 | Side Stick | Cowbell | Crash Cymbal2 | Tambourine |
| 17 | Studio Rock3 | Cowbell | Chinese Cymbal | Ride Bell | Splash Cymbal |
| 18 | Studio Rock4 | Side Stick | Hand Clap | Splash Cymbal | Tambourine |
| 19 | Studio Rock5 | Hand Clap | Tambourine | Crash Cymbal2 | Splash Cymbal |
| 20 | Standard Kit1 | Hand Clap | Cowbell | Ride Bell | Tambourine |
| 21 | Standard Kit2 | Side Stick | Cowbell | Crash Cymbal2 | Tambourine |
| 22 | Standard Kit3 | Cowbell | Chinese Cymbal | Ride Bell | Splash Cymbal |
| 23 | Standard Kit4 | Side Stick | Hand Clap | Splash Cymbal | Tambourine |
| 24 | Standard Kit5 | Hand Clap | Tambourine | Crash Cymbal2 | Splash Cymbal |
| 25 | Funk Rock1 | Hand Clap | Cowbell | Ride Bell | Tambourine |
| 26 | Funk Rock2 | Side Stick | Cowbell | Crash Cymbal2 | Tambourine |
| 27 | Funk Rock3 | Cowbell | Chinese Cymbal | Ride Bell | Splash Cymbal |
| 28 | Funk Rock4 | Side Stick | Hand Clap | Splash Cymbal | Tambourine |
| 29 | Funk Rock5 | Hand Clap | Tambourine | Crash Cymbal2 | Splash Cymbal |
| 30 | Epic Rock1 | Hand Clap | Cowbell | Ride Bell | Tambourine |
| 31 | Epic Rock2 | Side Stick | Cowbell | Crash Cymbal2 | Tambourine |
| 32 | Epic Rock3 | Cowbell | Chinese Cymbal | Ride Bell | Splash Cymbal |
| 33 | Epic Rock4 | Side Stick | Hand Clap | Splash Cymbal | Tambourine |
| 34 | Epic Rock5 | Hand Clap | Tambourine | Crash Cymbal2 | Splash Cymbal |
| 35 | Ballad Rock1 | Hand Clap | Cowbell | Ride Bell | Tambourine |
| 36 | Ballad Rock2 | Side Stick | Cowbell | Crash Cymbal2 | Tambourine |
| 37 | Ballad Rock3 | Cowbell | Chinese Cymbal | Ride Bell | Splash Cymbal |
| 38 | Ballad Rock4 | Side Stick | Hand Clap | Splash Cymbal | Tambourine |
| 39 | Ballad Rock5 | Hand Clap | Tambourine | Crash Cymbal2 | Splash Cymbal |
| 40 | Dance Rock1 | Hand Clap | Cowbell | Ride Bell | Tambourine |
| 41 | Dance Rock2 | Side Stick | Cowbell | Crash Cymbal2 | Tambourine |
| 42 | Dance Rock3 | Cowbell | Chinese Cymbal | Ride Bell | Splash Cymbal |
| 43 | Dance Rock4 | Side Stick | Hand Clap | Splash Cymbal | Tambourine |
| 44 | Dance Rock5 | Hand Clap | Tambourine | Crash Cymbal2 | Splash Cymbal |
| 45 | RapHipHop1 | Hand Clap | Cowbell | Ride Bell | Tambourine |
| 46 | RapHipHop2 | Side Stick | Cowbell | Crash Cymbal2 | Tambourine |
| 47 | RapHipHop3 | Cowbell | Chinese Cymbal | Ride Bell | Splash Cymbal |
| 48 | RapHipHop4 | Side Stick | Hand Clap | Splash Cymbal | Tambourine |
| 49 | RapHipHop5 | Hand Clap | Tambourine | Crash Cymbal2 | Splash Cymbal |
| 50 | Techno Beat1 | Hand Clap | Cowbell | Ride Bell | Tambourine |
| 51 | Techno Beat2 | Side Stick | Cowbell | Crash Cymbal2 | Tambourine |
| 52 | Techno Beat3 | Cowbell | Chinese Cymbal | Ride Bell | Splash Cymbal |
| 53 | Techno Beat4 | Side Stick | Hand Clap | Splash Cymbal | Tambourine |
| 54 | Techno Beat5 | Hand Clap | Tambourine | Crash Cymbal2 | Splash Cymbal |
| 55 | General Drum 1 | Hand Clap | Cowbell | Ride Bell | Tambourine |
| 56 | General Drum 2 | Side Stick | Cowbell | Crash Cymbal2 | Tambourine |
| 57 | General Drum 3 | Cowbell | Chinese Cymbal | Ride Bell | Splash Cymbal |
| 58 | General Drum 4 | Side Stick | Hand Clap | Splash Cymbal | Tambourine |
| 59 | General Drum 5 | Hand Clap | Tambourine | Crash Cymbal2 | Splash Cymbal |
| 60 | General Drum 6 | Hand Clap | Cowbell | Ride Bell | Tambourine |
| 61 | General Drum 7 | Side Stick | Cowbell | Crash Cymbal2 | Tambourine |
| 62 | General Drum 8 | Cowbell | Chinese Cymbal | Ride Bell | Splash Cymbal |
| 63 | General Drum 9 | Side Stick | Hand Clap | Splash Cymbal | Tambourine |
| 64 | Effected Drum | Side Stick | Cowbell | Ride Bell | Tambourine |
NONE.
2.RECOGNIZED DATA
1) CHANNEL VOICE MESSAGES
| STATUS | SECOND | THIRD | DESCRIOPTION |
| 1000 nnnn | 0kkk kkkk | 0vvv vvvv | NOTE OFF (See NOTE 1) kkk kkkk : Note No. vvv vvvv : Note Off Velocity (ignored) |
| 1001 nnnn | 0kkk kkkk | 0000 0000 | NOTE OFF (See NOTE 1) kkk kkkk : Note No. |
| 1001 nnnn | 0kkk kkkk | 0vvv vvvv | NOTE ON (See NOTE 1) kkk kkkk : Note No. vvv vvvv : Note On Velocity (not 0) |
| 1011 nnnn | 0ccc cccc | 0vvv vvvv | CONTROL CHANGE ccc cccc : Control No. 7 Volume 10 Panpot (See NOTE 3) vvv vvvv : Control Value |
| 1100 nnnn | 0ppp pppp | — — | PROGRAM CHANGE ppp pppp : Program Number (See NOTE 2) |
| 1110 nnnn | 0vvv vvvv | 0vvv vvvv | PITCH BENDER CHANGE (See NOTE 3) vvv vvvv vvv vvvv Pitch Bend Value |
NOTE: nnnn = MIDI Channel Number (0000 - 1111)
- Note Off Messages on Drum Channel(s) will be ignored.
- Relationship between Program Numbers and Kit Numbers are assigned as described in Drum Kits/Bass Program List.
- Pitch Bend values will be used only MS7bits. Pitch Bending will be effected continuously only on Bass Channel. Panpot Controller will also be effected only on Bass Channel.
2)CHANNEL MODEMESSAGE
| STATUS | SECOND | THIRD | DESCRIPTION |
| 1011 nnnn | 0111 1000 | 0000 0000 | ALL SOUNDS OFF |
| 1011 nnnn | 0111 1001 | 0000 0000 | RESET ALL CONTROLLER |
| 1011 nnnn | 0111 1011 | 0000 0000 | ALL NOTES OFF |
| 1011 nnnn | 0111 1100 | 0000 0000 | ALL NOTES OFF |
NOTE: nnnn = MIDI Channel Number ( 0000 - 1111 )
3)SYSTEM COMMONMESSAGE,SYSTEMREALTIMEMESSAGE
| STATUS | SECOND | THIRD | DESCRIPTION |
| 1111 0011 | 0sss ssss | — — | SONG SELECT sss ssss : Song No. 0-98 |
| 1111 1000 | — — | — — | TIMING CLOCK |
| 1111 1010 | — — | — — | START |
| 1111 1011 | — — | — — | CONTINUE |
| 1111 1100 | — — | — — | STOP |
NOTE:
| [ MultiTrack Rhythm Machine ] Model RhythmTrak RT-123 MIDI Implementation Chart | Date :1999.01.14 Version :1.00 | |||
| Function ... | Transmitted | Recognized | Remarks | |
| Basic Default Channel Changed | 1-16 1-16 | Memorized for every tracks | ||
| Default Mode Messages Altered | 3 | |||
| Note Number | True voice | ********** | 0-127 | ||
| Velocity Note ON Note OFF | o x | |||
| After Key's Touch Ch's | x | |||
| Pitch Bend | o | MS7bits | ||
| Control | 7 10 | Volume Panpot (*1) | ||
| Change | 120 121 | All Sounds Off Reset All Ctrls | ||
| Prog Change | True # | ********** | o 0-127 | ||
| System Exclusive | x | |||
| System | Song Pos | x | |||
| Common | Tune | o x | |||
| System | Clock | o o | |||
| Real Time | Commands | o | |||
| Aux | Local ON/OFF | x | |||
| Mes - Active Sense | o x | |||
| Sages | Reset | x | |||
| Notes No transmitted messages. *1: Bass only | ||||
| Mode 1: OMNI ON, POLY Mode 2: OMNI ON, MONO o: Yes Mode 3: OMNI OFF, POLY Mode 3: OMNI OFF, MONO x: No | ||||
ZEEM CATCH US IF YOU CAN
ZOOM CORPORATION
NOAH Bldg., 2-10-2, Miyanishi-cho, Fuchu-shi, Tokyo 183-0022, Japan
PHONE: 042-369-7116 FAX: 042-369-7115
- - Power requirements
- - Environment
- Handling
- - Alterations
- - Connecting cables and input and output jacks
- Usage Precautions
- - Electrical interference
- - Cleaning
- CONTENTS
- USAGE AND SAFETY PRECAUTIONS
- Names of Parts 6
- Quick Guide 8
- Playing the Pads (Manual Play).... 16
- Playing the Patterns
- (Pattern Mode) 18
- Pattern Recording
- (Real-Time Recording) 20
- (Step Recording) 28
- Pattern Copy/Erase 33
- Creating Songs (Song Mode) 35
- Using Pads to Play Patterns
- (Groove Play) 41
- [FUNCTION] Key Settings 43
- RT-123 Application Examples 51
- Troubleshooting 56
- SPECIFICATIONS 57
- Reference
- Top Panel
- Rear Panel
- Preparations
- STEP1
- STEP2
- STEP3
- Quick Guide (1) Listening to the Demo
- Drum kits and bass programs
- Quick Guide (2) Playing the Pads
- Turn the power on.
- Press the [PATTERN] key.
- Press the [DRUM A] key.
- Tap the pads.
- To play a bass program with the pads
- Press the [BASS] key.
- Press and hold the [DRUM A] key...
- Press the [VALUE +/-] keys.
- Quick Guide (3) Playing a Pattern
- Press the [PLAY] key (▶II).
- Press one of the [VALUE +/-] keys.
- Hold the [TEMPO] key...
- Press the [VALUE +/-] key.
- To mute the bass sound
- Press the [BASS MUTE] key once.
- Press the [STOP/EXIT] (■) key.
- Quick Guide (4) Using Groove Play
- 1Turn the power on.
- Press the [SONG] key and [PATTERN] key together.
- Push a pad.
- To play multiple patterns simultaneously
- Push several pads together.
- To stop groove play
- Press the [SONG] key or [PATTERN] key.
- To keep playing the pattern without pressing the pad
- Hold the [REPEAT/STEP] key down while pushing the pad.
- Playing the Pads (Manual Play)
- Playing by tapping the pads
- STEP1 Press the [PATTERN] key.
- STEP2 Press the [DRUM A] key.
- STEP3 Tap one of the pads.
- STEP4 Tap a pad while holding the [REPEAT/STEP] key down.
- Selecting a kit/program for manual play
- Playing the Patterns (Pattern Mode)
- Pattern play
- Press the [PATTERN] key so that the LED lights up.
- Use the [VALUE + / - ] keys to select the desired pattern number.
- Press the [PLAY] key.
- To mute only the bass track, press the [BASS MUTE] key.
- Press the [STOP/EXIT] key when you want to stop the pattern.
- Changing the tempo of pattern playback
- Press the [TEMPO] key.
- Pattern Recording (Real-Time Recording)
- Real-time recording of a drum track
- STEP1 In pattern mode, select an empty user pattern (U01 - U99), and select a drum kit if desired.
- STEP2 Press the [FUNCTION] key and then pad 6 (QUANTIZE).
- STEP4 Press the [FUNCTION] key once more.
- STEP5
- STEP6
- STEP7
- STEP9
- To erase the sound from a specific pad, push the pad while holding the [DELETE/ERASE] key down.
- STEP10 Tap the pads while holding the [REPEAT/STEP] key down.
- STEP11 Record drum track B using the same procedure.
- STEP12 When recording is completed, press the [STOP/EXIT] key.
- Real-time recording of a bass track
- Press the [BASS] key and hold the key down.
- While holding the [BASS] key down, use the [VALUE +/-] keys to select a bass program.
- Press the [FUNCTION] key and then pad 1 (BASS KEY).
- To shift the pitch of all pads, operate the [VALUE +/-] keys while no pad is pushed.
- Example with A minor scale assigned to pads
- STEP8
- STEP10 To erase the sound from a specific pad, push the pad while holding the [DELETE/ERASE] key down.
- STEP11 When recording is completed, press the [STOP/EXIT] key.
- What is step recording?
- Step recording of a drum track
- STEP1 In pattern mode, select an empty user pattern.
- STEP2 Select the drum track for recording.
- STEP3 Press the [FUNCTION] key and then pad 6 (QUANTIZE).
- STEP4 Use the [VALUE +/-] key to set the quantize value, and then press the [FUNCTION] key once more.
- Step recording of a bass track
- STEP1 Press the [BASS] key.
- STEP2 If desired, select the bass program.
- Use the [VALUE +/-] keys to set the quantize value (smallest unit for recording). Then press the [FUNCTION] key again.
- STEP5 Press the [REC] key.
- STEP6 Press the desired pad and/or the [REPEAT/STEP] key to enter the desired note or rest with the desired duration.
- Pattern Copy/Erase
- Copying a Pattern
- STEP1 In pattern mode, select the pattern to be used as the copy source.
- STEP2 Press the [INSERT/COPY] key.
- STEP3 Use the [VALUE +/-] keys to select a user pattern (U01 - U99) as copy target.
- To execute the copy process, press the [INSERT/COPY] key. When wishing to cancel the process, press the [STOP/EXIT] key.
- Erasing a Pattern
- STEP1 In pattern mode, select the user pattern to be erased (U01 - U99).
- STEP2 Press the [DELETE/ERASE] key.
- STEP3 To execute the erasing process, press the [DELETE/ERASE] key once more. When wishing to cancel the process, press the [STOP/EXIT] key.
- Creating Songs (Song Mode)
- What is a song?
- Step 0
- Step 1
- Step 2
- Recording and playing a song
- STEP1 Press the [SONG] key.
- STEP2 Use the [VALUE +/-] keys to select an empty song number.
- STEP3 Press the [REC] key.
- STEP4 Use the [VALUE +/-] keys to select the user pattern number to be assigned to the first step.
- STEP5 To proceed to the next step, press the [REPEAT/STEP] key.
- STEP6 Repeat steps 4 - 5 to create the entire song.
- To insert a pattern before the currently selected step, press the [INSERT/COPY] key and perform step 4.
- STEP8 To delete the currently selected step, press the [DELETE/ERASE] key.
- STEP9 When one song is completed, press the [STOP/EXIT] key.
- STEP10 To listen to the song, press the [PLAY] key.
- STEP11 Press the [STOP/EXIT] key when wishing to terminate playback.
- STEP12 To play a song from half-way, hold the [SONG] key down and use the [VALUE +/-] keys to select the step while the song is stopped.
- STEP13 To change the tempo of the song, hold down the [TEMPO] key and use the [VALUE +/-] keys to adjust the tempo value (BPM).
- Editing a song
- STEP1 In song mode, select the song to which you want to make alterations.
- STEP2 Press the [REC] key.
- Hold down the [REPEAT/STEP] key and use the [VALUE +/-] keys to select the step where you want to make an alteration.
- STEP4 Choose the type of alteration by pressing one of the following keys:
- STEP5 While holding down the pad whose parameter you want to change, use the [VALUE +/-] keys to set the value.
- STEP6 Repeat steps 3 - 5 until all desired parameters are set.
- STEP7 To terminate song editing, press the [STOP/EXIT] key.
- Deleting a song
- STEP1 In song mode, select the song you want to delete.
- To delete the song, press the [DELETE/ERASE] key. To cancel the process, press the [STOP/EXIT] key.
- Using Pads to Play Patterns (Groove Play)
- STEP1 Press the [SONG] key and the [PATTERN] together.
- STEP2 Try out the sound by pressing any pad.
- STEP3 To change the pattern assigned to a pad, hold the pad down and use the [VALUE +/-] keys to select the new pattern.
- To repeat a pattern even when the pad is released, hit the pad while holding the [REPEAT/STEP] key down.
- To play several patterns simultaneously, push several pads together.
- To play a song while groove play continues in the background, use the [VALUE +/-] keys to select the song number and press the [PLAY] key.
- When wishing to terminate the groove play mode, press the [SONG] key or [PATTERN] key.
- FUNCTION Key Settings
- Basic [FUNCTION] key operation steps
- STEP1 Press the [FUNCTION] key.
- STEP2 Depending on the desired item, press one of pads 1 - 13 or the [PATTERN] key.
- Change the setting with the [VALUE +/-] keys.
- STEP4
- Press the [FUNCTION] key once more.
- Shifting bass program pitch in semitones (BASS KEY)
- - Shifting the pitch of the entire bass program
- ■ Shifting the pitch of pads 2 - 13 individually
- Setting the pattern/track level (MIX)
- Tuning a bass program (BASS TUNE)
- Setting Range: 2, 3, 4
- Choosing a longer beat than the current beat
- Choosing a shorter beat than the current beat
- Setting the pre-count (PRE COUNT)
- Setting the pattern resolution (QUANTIZE)
- Setting the metronome volume level (CLICK VOL)
- Setting the number of measures for a pattern (BAR LENGTH)
- Making the number of measures larger
- Making the number of measures smaller
- Selecting the foot switch function (FOOT SW)
- Using the FS01 to play the sound of a pad
- Using the FS01 to change the sound of a pad
- Using the FS01 to set the tempo
- Using the FS01 to control start/pause
- Using the FS01 to control start/stop
- Using the FS01 to control bass mating
- Using the FS01 to mute a desired track
- Using the FS01 to play a desired track solo
- Using the FS01 to control continuous percussion sound
- Setting the pad sensitivity (PAD SENS)
- Setting the playback timing shift (SHIFT)
- Setting MIDI input on/off (MIDI)
- Setting the MIDI receive channel for each track (MIDI)
- Switching the information displayed in pattern mode (PATTERN) (PATTERN mode only)
- Displaying the remaining amount of memory (PATTERN) (SONG mode only)
- RT-123 Application Examples
- Controlling the RT-123 with the FS01
- STEP1 Connect the FS01 to the [FOOT SW] jack on the rear panel.
- STEP2 Use the [FUNCTION] key and pad 9 (FOOT SW) to set the FS01 function.
- STEP3 Use the FS01 in pattern mode or play mode.
- Synchronized MIDI operation
- Using MIDI equipment to play the RT-123
- Play the MIDI sequencer or keyboard.
- Returning the RT-123 to the factory default condition (initialization)
- Listening to the demo
- STEP2 Press the [SONG] key.
- STEP3 To stop the demo, press the [SONG] key or [PATTERN] key.
- Clearing all user patterns
- To carry out the operation, press the [DELETE/ERASE] key once more. To cancel the operation, press the [STOP/EXIT] key.
- Troubleshooting
- SPECIFICATIONS
- MIDI ProgramChange# to DRUM/percussion/SFX KIT Assign
- MIDI ProgramChange# to BASS PROGRAM Assign
- 2.RECOGNIZED DATA
- 1) CHANNEL VOICE MESSAGES
- 2)CHANNEL MODEMESSAGE
- 3)SYSTEM COMMONMESSAGE,SYSTEMREALTIMEMESSAGE
- ZEEM CATCH US IF YOU CAN
Brand : ZOOM
Model : RT-123
Category : Electronic musical instrument