
RT-323 - Electronic musical instrument ZOOM - Free user manual and instructions
Find the device manual for free RT-323 ZOOM in PDF.

| Product type | Electronic music instrument (drum machine and sequencer) |
| Brand | ZOOM |
| Model | RT-323 |
| Power supply | 9 V DC, 300 mA AC adapter (center negative) or 6 AA batteries (alkaline recommended) |
| Power consumption | 300 mA (with adapter) |
| Pads | 13 velocity-sensitive pads |
| Pad banks | 3 banks for drum sounds |
| Drum kits | 128 (64 preset + 64 user) |
| Bass programs | 55 |
| Preset patterns | 400 (read-only) |
| User patterns | 100 (recordable) |
| Songs | 100 |
| Max. measures per song | 999 |
| Tempo | 40 – 250 BPM (in 0.1 steps) |
| Quantization | Quarter note to 32nd note, in 1 tick steps (1/96 of a quarter note) |
| Connectors | L/MONO, R outputs (6.35 mm jack), Sub Out 1/2, Line input (3.5 mm jack), MIDI In/Out, Control In 1/2, DC In |
| Storage | SmartMedia card (internal formatting) |
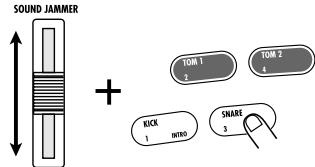
| Special functions | Groove Play, Jam Slider (pitch, volume, pan, sound), Mute per track, Tap tempo, Pad Function, Octave for bass |
| MIDI | In/Out, synchronization, remote control, full implementation |
| Included accessories | AC adapter, instruction manual |
| Maintenance | Soft dry cloth; do not use abrasive or solvent products |
| Safety | Do not open the casing; use only the specified adapter; avoid moisture, dust, and shocks |
Frequently Asked Questions - RT-323 ZOOM
User questions about RT-323 ZOOM
0 question about this device. Answer the ones you know or ask your own.
Ask a new question about this device
Download the instructions for your Electronic musical instrument in PDF format for free! Find your manual RT-323 - ZOOM and take your electronic device back in hand. On this page are published all the documents necessary for the use of your device. RT-323 by ZOOM.
USER MANUAL RT-323 ZOOM
In this manual, symbols are used to highlight warnings and cautions for you to read so that accidents can be prevented. The meanings of these symbols are as follows:

This symbol indicates explanations about extremely dangerous matters. If users ignore this symbol and handle the device the wrong way, serious injury or death could result.

This symbol indicates explanations about dangerous matters. If users ignore this symbol and handle the device the wrong way, bodily injury and damage to the equipment could result.
Please observe the following safety tips and precautions to ensure hazard-free use of the RT-323.

About power
Since power consumption of this unit is fairly high, we recommend the use of an AC adapter whenever possible. When powering the unit from a battery, use only an alkaline type.
AC adapter operation
- Be sure to use only an AC adapter which supplies 9 V DC, 300mA and is equipped with a "center minus" plug (Zoom AD-0006). The use of an adapter other than the specified type may damage the unit and pose a safety hazard.
- Connect the AC adapter only to an AC outlet that supplies the rated voltage required by the adapter.
- When disconnecting the AC adapter from the AC outlet, always grasp the adapter itself and do not pull at the cable.
- If the unit is not to be used for a long time, disconnect the AC adapter from the outlet.
Battery operation
- Use six IEC R6 (size AA) batteries (alkaline or manganese).
- The RT-323 cannot be used for recharging. Pay close attention to the labelling of the battery to make sure you choose the correct type.
- If the RT-323 is not to be used for an extended period of time, remove the battery from the unit
- If batteries leakage has occurred, wipe the battery compartment and the battery terminals carefully to remove all remnants of battery fluid.
- While using the unit, the battery compartment cover should be closed.

Environment
- Avoid using your RT-323 in environments where it is
will be exposed to:
Extreme temperature
High humidity or moisture
- Excessive dust or sand
- Excessive vibration or shock
Handling
Caution Since the RT-323 is a precision electronic device, avoid applying excessive force to the controls. Do not operate the keys or controls with your foot.
Take care that no foreign objects (coins or pins etc.) or liquids can enter the unit.
- Be sure to turn the power to all equipment off before making connections.
- Before moving the unit, turn the power off, and disconnect all cables and the AC adapter.
Alterations
Caution Never open the case of the RT-323 or attempt to modify the product in any way since this can result in damage to the unit.
In Case of Trouble
Caution If there seems to be a defect or a problem with the unit, immediately disconnect the AC adapter or remove the batteries to shut off the power. Then disconnect any other cables connected to the unit.
Usage Precautions
- Electrical interference
For safety considerations, the RT-323 has been designed to provide maximum protection against the emission of electromagnetic radiation from inside the device, and protection from external interference. However, equipment that is very susceptible to interference or that emits powerful electromagnetic waves should not be placed near the RT-323, as the possibility of interference cannot be ruled out entirely
With any type of digital control device, the RT-323 included, electromagnetic interference can cause malfunctioning and can corrupt or destroy data. Care should be taken to minimize the risk of damage.
- Cleaning
Use a soft, dry cloth to clean the RT-323. If necessary, slightly moisten the cloth. Do not use abrasive cleanser, wax, or solvents (such as paint thinner or cleaning alcohol), since these may dull the finish or damage the surface.
Please keep this manual at hand for future reference.
Contents
USAGE AND SAFETY PRECAUTIONS 2
Names of Parts 4
Top Panel 4
Rear Panel 4
Side Panel 5
Getting Connected 6
Using the Unit on Batteries 7
Preparations for Playback 7
Quick Guide 1 Listening to the Demo 8
To Start the Demo Song 8
To Stop the Demo Song 8
To Leave the Demo Mode 8
Drum Kits and Bass Programs 9
Quick Guide 2 Playing the Pads 10
Playing a Drum Kit 10
Playing a Bass Program 11
Changing the Drum Kit/Bass Program 11
Quick Guide 3 Listening to Patterns 12
Playing a Pattern 12
Changing the Pattern 12
Changing the Tempo 13
Stopping the Pattern 13
Patterns and Tracks 13
Quick Guide 4 Creating a Pattern 14
Selecting the Record Pattern/Track 14
To Start Recording 15
To Stop Recording 15
Quick Guide 5 Using Groove Play 16
To Use Groove Play 16
To Play a Pattern with a Pad 16
To Keep Playing the Pattern After Releasing the Pad 17
To Terminate Groove Play 17
Hands-on Lessons 18
What Is a Song? 18
Lesson 1 Creating a Song [Step Input] 18
- Select an empty song 18
- Enter pattern information 19
- Transposing the bass track 21
- Entering a fill-in pattern 23
Lesson 2 Editing a Song 24
Copying part of a song 24
- Changing the bass track 26
Lesson 3 Creating a Song [Real-time Input] 28
Application Guide [Pads/JAM Slider] 30
Playing the Pads 30
Adjusting pad pitch/volume/panning/sound in real time (jam function) 31
Adjusting the Pad Sensitivity 32
Application Guide
[Drum Kits/Bass Programs] 33
Drum Kit Operation 33
Bass Program Operation 37
Application Guide [Patterns] 40
Playing a Pattern 40
Using the Groove Play Function 42
Real-Time Pattern Input 43
Pattern Step Input 46
Deleting a User Pattern 49
Deleting a Track 49
Copying a Pattern 49
Changing Pattern Settings 50
Application Guide [Song] 55
SongPlayback 55
Real-time Song Input 56
Song Step Input 60
Copying Specific Measures 68
Deleting a Song 68
Copying a Song 69
Song Track Operation 69
Editing Song Settings 72
Application Guide [SmartMedia] 74
Formatting a SmartMedia Card 74
Saving Data on the SmartMedia Card 75
Loading Data from the SmartMedia Card 76
Partial Import of Data from
aSmartMediaCard 76
Deleting Data From the SmartMedia Card 78
Import/Export of PS-02 SmartMedia Data 79
Application Guide [Remote Control] 82
Controlling the RT-323 With
a Foot Pedal (FP01/FP02) 82
Controlling the RT-323 With
a Foot Switch (FS01) 83
Application Guide [MIDI] 85
Available MIDI Functions 85
Changing the MIDI Setting 85
Saving RT-323 Internal Data on
MIDI Equipment 90
MIDI Track Operation 91
Application Guide [Other Functions] 93
Metronome Operation 93
Other Special Functions 94
Troubleshooting 95
Reference 96
RT-323 Specifications 96
Index 114
![ZOOM RT-323 - [Drum Kits/Bass Programs] 33 - 1](/content/2025/01/152246/images/ef79891e016177846e1f850d231e368ca3c2623493861f62cf519382f5981f77.jpg)
Top Panel
Rear Panel
![ZOOM RT-323 - [Drum Kits/Bass Programs] 33 - 2](/content/2025/01/152246/images/06e8b1d512dde6882838aa7905704cca21e7008d1c9412407426c6bce0c09842.jpg)
Caution
If the SmartMedia card is inserted with wrong orientation, it will not go all the way into the slot. Do not try to force the card in, because this will damage the card.
Getting Connected
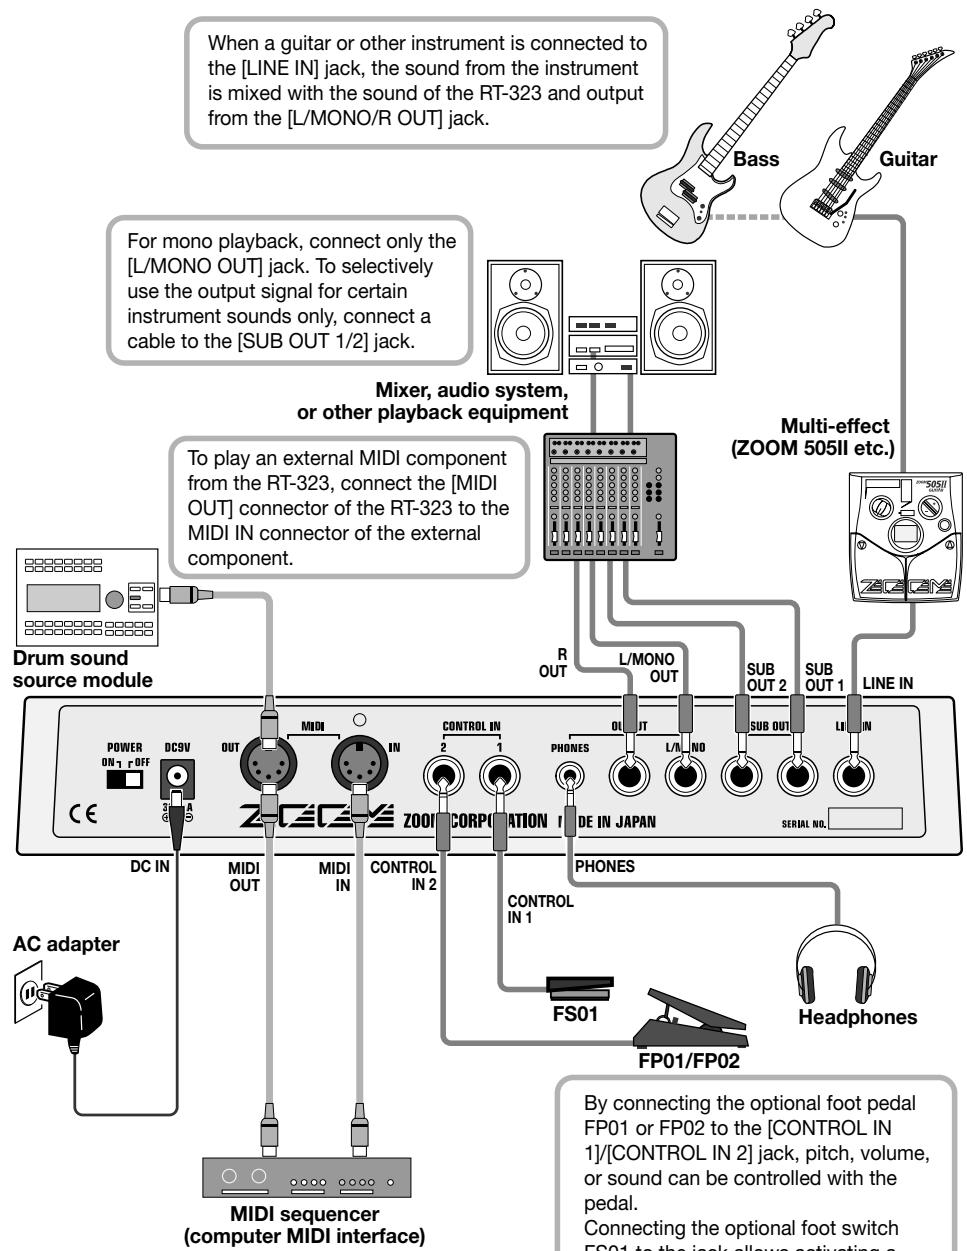
To synchronize the RT-323 with an external sequencer or to control the sound sources of the RT-323 from an external MIDI component, link the MIDI OUT connector of the equipment with the [MIDI IN] connector on the RT-323.
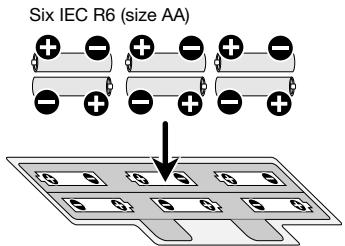
Using the Unit on Batteries
The RT-323 can be powered from six IEC R6 (size AA) batteries. Follow the steps below to insert the batteries.

Turn the unit over and open the battery compartment cover.

Insert six fresh IEC R6 (size AA) alkaline batteries.
RT-323 rear
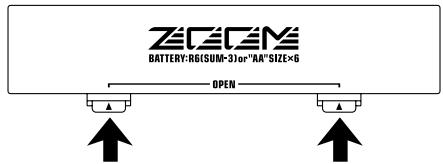

Close the battery compartment cover.

If the BATT LED lights up while the unit is powered from batteries, the batteries are exhausted. Replace the batteries as soon as possible.
Preparations for Playback
After connections are established, check the sound by performing the following steps.

While the playback system is still turned off and the volume is fully turned down, double-check whether all connections have been made correctly.

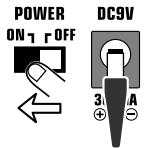
Turn power to the RT-323 on.
Connect the supplied AC adapter to the [DC IN] connector and set the [POWER] switch to ON.

Turn power to the playback system on and adjust the volume.
While tapping a pad to produce sound, adjust the [OUTPUT] dial of the RT-323 and the volume control on the playback system to a suitable position.
Quick Guide 1 Listening to the Demo
The Quick Guide section of this manual is intended to help you become familiar with the RT-323. To hear what the unit can do, we recommend that you listen to the built-in demo song which uses a variety of sounds.
To Start the Demo Song
While holding down the [SONG] key, press the [ENTER] key
![ZOOM RT-323 - While holding down the [SONG] key, press the [ENTER] key - 1](/content/2025/01/152246/images/5832a8f89913b9158670b058cfe75abc8d9dddf7f109efaec92409ccafb0b1be.jpg)
The unit goes into demo play mode, and two demo songs are played back alternately.
Sounds just like the backup of a live band, doesn't it? Note how effectively various drum, percussion, and bass sounds are combined. The RT-323 can produce such a great variety of sounds with ease.
To Stop the Demo Song
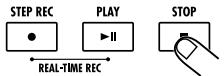
Press the [STOP] key
![ZOOM RT-323 - Press the [STOP] key - 1](/content/2025/01/152246/images/d3859b191ebe1b712d5f0b0b6f02f039000c75f566cfe82fec87bf0cdb70ddb4.jpg)
![ZOOM RT-323 - Press the [STOP] key - 2](/content/2025/01/152246/images/eab40e1bebec1443ad83b490e44084bbd4e2dd3e35560daeb66c91b0ce54ef69.jpg)
![ZOOM RT-323 - Press the [STOP] key - 3](/content/2025/01/152246/images/72fe93c4dd5838d7db7dcfc9dcfcc8b40cb3f97b8aab539edd8620b8d3a22de1.jpg)
![ZOOM RT-323 - Press the [STOP] key - 4](/content/2025/01/152246/images/3ea5f1c620f9afeaacf7ed59f26ad7122dc702736e33e46ab7ef7e253f0f28a2.jpg)
![ZOOM RT-323 - Press the [STOP] key - 5](/content/2025/01/152246/images/3d8906a6556bd31c6b0ef4825ad58453d8a86fad2ac7383ed3bb194406ae79b2.jpg)
![ZOOM RT-323 - Press the [STOP] key - 6](/content/2025/01/152246/images/5caea1b9f07db7716ea8e421abdda913478a94aa4836141d6e4194f7d8273a17.jpg)
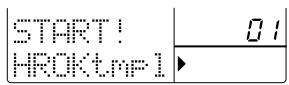
To restart demo song playback, use the [] / [] keys to select the demo song, and then press the [ ] key.
To Leave the Demo Mode
Press the [EXIT] key
![ZOOM RT-323 - Press the [EXIT] key - 1](/content/2025/01/152246/images/6d31fc5be018a1fc1a18241033d245460e4e95ffc1133a09702268f249ad9e24.jpg)
![ZOOM RT-323 - Press the [EXIT] key - 2](/content/2025/01/152246/images/dba589712b13af3d6738042b11f0ae8a2bc3c537403bc05219059e9b3e4f412b.jpg)
![ZOOM RT-323 - Press the [EXIT] key - 3](/content/2025/01/152246/images/5e6343cd3778e7cb9e56f8065172b7c9c6e5c18849f185e5a7aa63a5f0444039.jpg)
![ZOOM RT-323 - Press the [EXIT] key - 4](/content/2025/01/152246/images/ce17dc353fa911d8c8c751d4331297c7793d54f7d596142a137bd33c2821079a.jpg)
![ZOOM RT-323 - Press the [EXIT] key - 5](/content/2025/01/152246/images/fdfc074b25ddab97cd9a9f7ffe89ea8153c4260e1ddbd7a9074da10be17e31b4.jpg)
Drum Kits and Bass Programs
The backup sound provided by the RT-323 consists of "drum kits" and "bass programs"
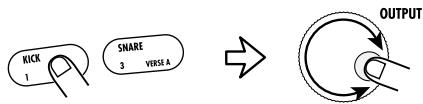
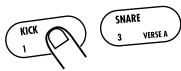
A drum kit is a collection of drum sounds including bass drums, snares, and tom-tom percussion sounds, as well congas, as bongs, and various other sound effect. The RT-323 offers 64 preset readily drum kits (00 - 63), as well as the capacity to store 64 user-programmable drum kits (64 - 127). Up to two of these can be used simultaneously.
A bass program provides various types of bass sounds including electric and acoustic bass. The RT-323 includes 55 bass programs (00 - 54), allowing use of only one bass program at a time.
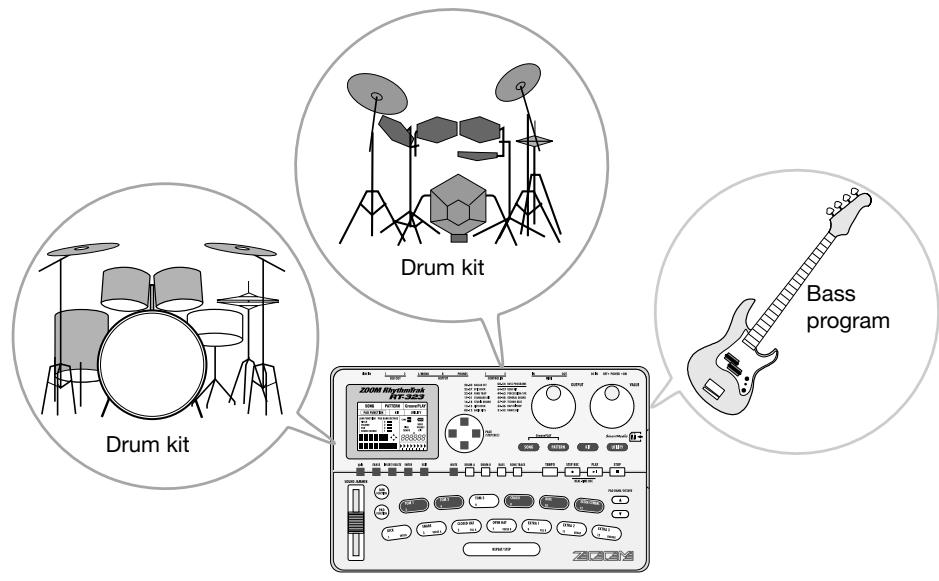
Quick Guide 2 Playing the Pads
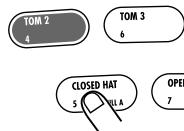
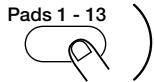
The top panel of the RT-323 has 13 pads which serve to play drum kits and bass programs.
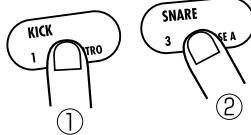
Playing a Drum Kit
Press the [PATTERN] key
![ZOOM RT-323 - Press the [PATTERN] key - 1](/content/2025/01/152246/images/5d7ac74e06f2ba6953d4022dc59cb6eef8afba2558eb312d236fa413f63a9188.jpg)
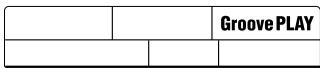
| SONG | PATTERN | Groove PLAY | |
| PAD FUNCTION | KIT | UTILITY | |
The indication "PATTERN" appears in the top part of the display, showing that the RT-323 is in pattern mode. In pattern mode, "patterns" (short backing phrases of a few measures) can be recorded and played. The normal mode for playing a drum kit by hitting the pads is the pattern mode.
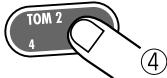
Press the [DRUM A] key (or [DRUM B] key)
![ZOOM RT-323 - Press the [DRUM A] key (or [DRUM B] key) - 1](/content/2025/01/152246/images/61119ad8e1e824160fee9c7fbcbe3f34c7732ef965e6abcb6394d461eadfea36.jpg)
The [DRUM A] key ([DRUM B] key) lights up, and you can play the drum kit with the pads.
3 Tap the pads


When a drum kit is selected, 13 drum sounds out of the maximum of 39 sounds included in that kit are assigned to the 13 pads. You can play the sounds simply by hitting the pads.
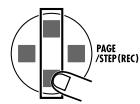
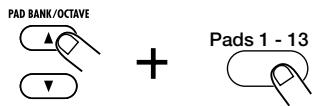
Press the [PAD BANK] key to switch the bank
PAD BANK/OCTAVE
![ZOOM RT-323 - Press the [PAD BANK] key to switch the bank - 1](/content/2025/01/152246/images/780ca9265ed11faa7ed14122bb92e2de9205cd4c1ad979ecb97763201490b17d.jpg)
![ZOOM RT-323 - Press the [PAD BANK] key to switch the bank - 2](/content/2025/01/152246/images/1522694177a7a62a46327730a28608373caf423de13b25f4fe84a7bcdd02d55f.jpg)
PAD BANK/OCTAVE
![ZOOM RT-323 - Press the [PAD BANK] key to switch the bank - 3](/content/2025/01/152246/images/de1ab36aaa946f17e5898e65e93c32d4f15f2507435a443876982047f6a3360f.jpg)
The [PAD BANK] key allows you to switch between pad banks 1 - 3, which will change the sounds that are assigned to pads 1 - 13.
Playing a Bass Program
Press the [BASS] key
![ZOOM RT-323 - Press the [BASS] key - 1](/content/2025/01/152246/images/f83bc3ff362d8077744bfa36dc80310b47bcd96fc66956f73650d58d374d6e90.jpg)
The [BASS] key lights up, and you can play the bass program with the pads.
When a bass program is selected, the same bass sound shifted in pitch by a semitone is assigned to the pads. Therefore you can use the 13 pads like the white and black keys on a keyboard.
Switch the pad pitch range by pressing the [OCTAVE] key
PAD BANK/OCTAVE
![ZOOM RT-323 - Switch the pad pitch range by pressing the [OCTAVE] key - 1](/content/2025/01/152246/images/b801d66a3c33ce773f09133dbc62e9c5738d8fff40c8c566e80ab2bb9d033537.jpg)
PAD BANK/OCTAVE
![ZOOM RT-323 - Switch the pad pitch range by pressing the [OCTAVE] key - 2](/content/2025/01/152246/images/ce406325cca623659dd72ce4beed21448f761802163c1251ef45d4d2e13ddcde.jpg)
When a bass program is selected, the [OCTAVE] key can be used to shift the pitch range of the pads over 4 octaves (octave 1 - 4).
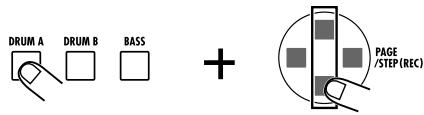
Changing the Drum Kit/Bass Program
Hold down the [DRUM A]/[DRUM B] key or the [BASS] key, and press one of the [ ] / [ ] keys
![ZOOM RT-323 - Hold down the [DRUM A]/[DRUM B] key or the [BASS] key, and press one of the [ ] / [ ] keys - 1](/content/2025/01/152246/images/5c60d225b3223423d10f88e3cb5eefd315b53122265fbddac785874f131790de.jpg)
![ZOOM RT-323 - Hold down the [DRUM A]/[DRUM B] key or the [BASS] key, and press one of the [ ] / [ ] keys - 2](/content/2025/01/152246/images/2a16a86111df37f49103c4743a2923cec3781fc9e2a704b66d1aad7e37aee120.jpg)
![ZOOM RT-323 - Hold down the [DRUM A]/[DRUM B] key or the [BASS] key, and press one of the [ ] / [ ] keys - 3](/content/2025/01/152246/images/0788f2de6ae9cf6339c9f834613f8cff7ddd25fccae5328c3dbbcf6ba14f7120.jpg)
![ZOOM RT-323 - Hold down the [DRUM A]/[DRUM B] key or the [BASS] key, and press one of the [ ] / [ ] keys - 4](/content/2025/01/152246/images/f04de23149fc71c1f5a58f67a2a379448c0f742bfc3b56fcc201ec4cf3f7b6ad.jpg)
![ZOOM RT-323 - Hold down the [DRUM A]/[DRUM B] key or the [BASS] key, and press one of the [ ] / [ ] keys - 5](/content/2025/01/152246/images/e6c5746d911fa686301491945a702c8679f9f685de28236c8b7c7e122c86bc39.jpg)
![ZOOM RT-323 - Hold down the [DRUM A]/[DRUM B] key or the [BASS] key, and press one of the [ ] / [ ] keys - 6](/content/2025/01/152246/images/a5477235c208a9b3246769e063299cf9df652aef6d7d3d9a9dc01a22354a09df.jpg)
Drum kit number
The drum kit number or bass program number is switched by one step up or down, so that the sound assigned to the pads changes. Tap the pads after switching to verify the change.
![ZOOM RT-323 - Hold down the [DRUM A]/[DRUM B] key or the [BASS] key, and press one of the [ ] / [ ] keys - 7](/content/2025/01/152246/images/03f021a24c768f1312b58241b67bb66dbc887bfc2121cc7e7d9b6c557eee8035.jpg)
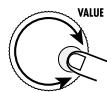
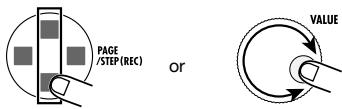
You can also use the [VALUE] dial instead of the [ ] / [ ] keys to switch the sound.
The RT-323 incorporates 400 preset read-only patterns which you can use as follows.
Playing a Pattern
Press the [PATTERN] key
![ZOOM RT-323 - Press the [PATTERN] key - 1](/content/2025/01/152246/images/f3ebc4906f105207b08734cccf53429c2d8ee3ede0892988a0286ee43a081a70.jpg)
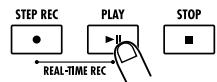
Press the [▶II] key
![ZOOM RT-323 - Press the [▶II] key - 1](/content/2025/01/152246/images/de3c67aca2eabed77031e2e335883f06e44e2a7c4782c8d5773baa3672d7c999.jpg)
Playback of the currently selected pattern starts.
Changing the Pattern
Press one of the [] / [] keys
![ZOOM RT-323 - Press one of the [] / [] keys - 1](/content/2025/01/152246/images/eba7d5835b0ccbc5bbfe398c5f0c1df71f74268bc069042602e46c48bafbe2c4.jpg)
Pressing one of the [ ] / [ ] keys causes the pattern number to be switched by one step up or down. If "EMPTY" is shown on the display, the pattern is empty and cannot be played.
![ZOOM RT-323 - Press one of the [] / [] keys - 2](/content/2025/01/152246/images/56c6c5c312d7af85af244b69e0e476bb17bf0a72f44521a302bb74c915788e95.jpg)
You can also use the [VALUE] dial instead of the []/[] keys to select the pattern.
Changing the Tempo
While holding down the [TEMPO] key, press one of the []/[] keys
![ZOOM RT-323 - While holding down the [TEMPO] key, press one of the []/[] keys - 1](/content/2025/01/152246/images/62cdac5cb12ff2a827f2c3a93cf032903d058ec382a7a2682b032491488880bc.jpg)
While you hold down the [TEMPO] key, the display shows the current tempo (BPM). Pressing one of the [ ] / [ ] keys shifts the tempo up or down in 0.1 BPM steps.
- BPM: Number of quarter note beats per minute
![ZOOM RT-323 - While holding down the [TEMPO] key, press one of the []/[] keys - 2](/content/2025/01/152246/images/3783db6f50964381c4cb4ec23c358dadbc1f380ef03877344a698598790dbc82.jpg)
You can also use the [VALUE] dial instead of the []/[] keys to select the tempo.
Stopping the Pattern
Press the [■] key
![ZOOM RT-323 - Press the [■] key - 1](/content/2025/01/152246/images/9ddd2698bd3e921156522e3e6ec1d7723a1b7fa159605c30e27be32eca4787f6.jpg)
Patterns and Tracks
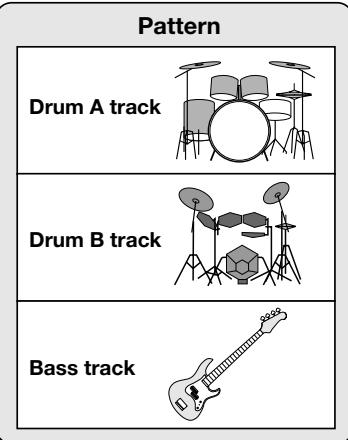
A pattern of the RT-323 is a stored combination of two drum kits and one bass program. The location for each individual drum kit or bass program is called a track. Therefore a pattern of the RT-323 consists of the drum A track, drum B track, and the bass track. Drum tracks A and B each contain a specific drum kit and the bass track contains a bass program.
The RT-323 contains 400 read-only patterns (000 - 399), and 100 read/write patterns (U00 - U99).
The user pattern feature of the RT-323 lets you create your own patterns. You can hit the pads in time with the metronome and play an original pattern to be stored.
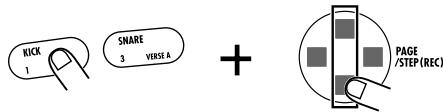
Selecting the Record Pattern/Track
Press the [PATTERN] key
![ZOOM RT-323 - Press the [PATTERN] key - 1](/content/2025/01/152246/images/ceac6e2c8055cab2a33f198e9f092734436f3181a1b7042d8dc4c4f1c89daff9.jpg)
The RT-323 switches to the pattern mode.
Use the [] / [] keys to select a user pattern (U00 - U99)
![ZOOM RT-323 - Use the [] / [] keys to select a user pattern (U00 - U99) - 1](/content/2025/01/152246/images/cb5a9a149c9b6c1847900193917368cf383c31f0a12ccc08d1c5667e906c1dd8.jpg)
![ZOOM RT-323 - Use the [] / [] keys to select a user pattern (U00 - U99) - 2](/content/2025/01/152246/images/062242981eb2c101597b7541610dc94d7f7e12ece2b40fe52fc3a1e76b23960c.jpg)
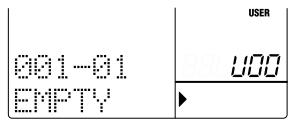
When an empty user pattern is selected, the pattern name field of the display shows "EMPTY".
In the factory default condition, all user patterns of the RT-323 are empty. If you have already created many patterns and there is no more empty user pattern erase a pattern that is no longer needed.
Erasing a pattern p 49
![ZOOM RT-323 - Use the [] / [] keys to select a user pattern (U00 - U99) - 3](/content/2025/01/152246/images/2db72280aff1b9e24770c4dec537bd8039a48a5583b4e9399f226351567a2d66.jpg)
You can also use the [VALUE] dial instead of the []/[] keys to select the pattern.
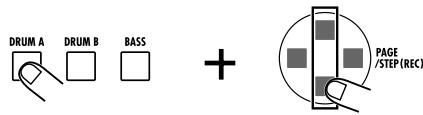
Press any of the [DRUM A]/[DRUM B]/[BASS] keys
![ZOOM RT-323 - Press any of the [DRUM A]/[DRUM B]/[BASS] keys - 1](/content/2025/01/152246/images/98d5d76d3bf7cd86c5abd1f4c2d19e19c4b7333ea420b3de4481cd9fe7ade44d.jpg)
By pressing the [DRUM A] or [DRUM B] key, you select the drum A track or drum B track for recording. By pressing the [BASS] key, you select the bass track for recording.
![ZOOM RT-323 - Press any of the [DRUM A]/[DRUM B]/[BASS] keys - 2](/content/2025/01/152246/images/154ef5d97568e475710480f9703cc2f07c87e0053174ea2cec05eceee9ed18a9.jpg)
To change the sound (drum kit/bass program), hold down the key you selected above, and press one of the [] / [] keys.
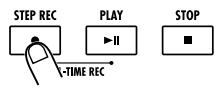
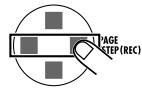
To Start Recording
While holding down the [REC] key, press the [ ] key
![ZOOM RT-323 - While holding down the [REC] key, press the [ ] key - 1](/content/2025/01/152246/images/34e1ab8d5720357d6517eba9c0720255f4a364b92a22cdc5b61eb95aeaa95bef.jpg)
![ZOOM RT-323 - While holding down the [REC] key, press the [ ] key - 2](/content/2025/01/152246/images/97879dab968a7cd954e0bc2fb8c3d8819ac1bad124984cb8bc3f207e7fafaab8.jpg)
![ZOOM RT-323 - While holding down the [REC] key, press the [ ] key - 3](/content/2025/01/152246/images/0024c3d12515ee141c7f1cca0f5b7b09d4e027f25c79824e8ff4fdea9f957f52.jpg)
![ZOOM RT-323 - While holding down the [REC] key, press the [ ] key - 4](/content/2025/01/152246/images/2666c3d0315ea11fb80c4de65501a9caa515f49d69851a93303700c63f6135a7.jpg)
The [REC] key and [key light up, a precount of four beats (one measure) is heard, and then recording starts. While listening to the metronome sound, hit the pads to record a pattern. At the end of a pattern, recording automatically loops to the beginning and continues, allowing you to record over the earlier segment.
![ZOOM RT-323 - While holding down the [REC] key, press the [ ] key - 5](/content/2025/01/152246/images/b5f951c99cb6458c0391513b2728cdabb740ebe53396a924339c70a537587d21.jpg)
[Pattern recording]
To Stop Recording
Press the [■] key
![ZOOM RT-323 - Press the [■] key - 1](/content/2025/01/152246/images/4f55ca7afb7314362787bad1a4be444cd8a7e7c80100908e636dfc9ea69f9caa.jpg)
![ZOOM RT-323 - Press the [■] key - 2](/content/2025/01/152246/images/1a18c14a1b69b315ac3d5271eb824ae32dbad5c5abad6e5d1f1b8b7b72f98c39.jpg)
![ZOOM RT-323 - Press the [■] key - 3](/content/2025/01/152246/images/88b11f83534b9eefb821a492b681f49617ffa4c7aa089a1a531b77eacf38e288.jpg)
The [REC] key and [II] key light go out and recording stops. To check the recording, press the [II] key. You can also repeat these steps to record other tracks.
Editing a recorded pattern p 47 Changing the pattern length or beat p.51 ,p52
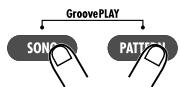
Quick Guide 5 Using Groove Play
Groove play is a special feature of the RT-323 which lets you switch among various patterns simply by tapping the pads. This makes it easy to play with patterns like a DJ spinning records.
To Use Groove Play
Press the [SONG] key and [PATTERN] key together.
![ZOOM RT-323 - Press the [SONG] key and [PATTERN] key together. - 1](/content/2025/01/152246/images/3be83320617c2a001f74774d69799b1842229648ca9f9634907f2dd629e37291.jpg)
| SONG | PATTERN | Groove PLAY | |
| PAD FUNCTION | KIT | UTILITY | |
The indication "GroovePLAY" appears on the display, indicating that the RT-323 is in groove play mode.
To Play a Pattern with a Pad
Push the pad
While you hold down the pad, the pattern assigned to the pad will play. Try out various pads to hear which patterns are assigned to them.
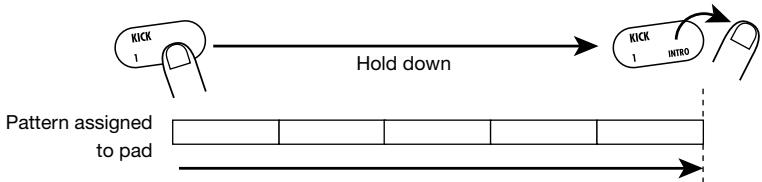

In groove play mode, up to four patterns can be played simultaneously. By shifting the pad press timing, you can create complex rhythms.
To Keep Playing the Pattern After Releasing the Pad
Hold down the [REPEAT] key and push the pad
![ZOOM RT-323 - Hold down the [REPEAT] key and push the pad - 1](/content/2025/01/152246/images/fdd662a8e9252a5f6c9ca093ec4c5a91ad80c16fc04197054f5e26466265ee90.jpg)
If you hold down the [REPEAT] key while you push a pad, the pattern will continue to play after you release the pad.
![ZOOM RT-323 - Hold down the [REPEAT] key and push the pad - 2](/content/2025/01/152246/images/a5c66235219bdfb7cf6440fb339e3e49b510ea31723395e60e9abfac1432ff78.jpg)
To stop the pattern, push the same pad once more.
To Terminate Groove Play
Press the [PATTERN] key or [SONG] key
![ZOOM RT-323 - Press the [PATTERN] key or [SONG] key - 1](/content/2025/01/152246/images/cda5421bbfb3c8c9a1563176cdb3e41abf278be9c7f21db2cefa65ab90f4fa41.jpg)
Changing the pattern assigned to the pad p 42
Hands-on Lessons
The RT-323 allows you to line up patterns in a desired order to create an entire backing sequence (song). This section contains several lessons that will show you how you can use the preprogrammed patterns to create your original songs.
What Is a Song?
A song in the RT-323 basically is a playing sequence of patterns (backing of several measures comprising the three tracks drum A, drum B, and bass). To create a song, you sequentially enter information about pattern switching from the beginning. The maximum number of measures in a song is 999.
A song contains not only pattern information. You can also enter the following information.
- Number of drum kit/bass program used for each track
- Tempo information
- Bass track pitch shift (transpose)
- Track volume
This information can also be altered during a song. This lets you for example transpose the bass track pitch according to the chord progression, continuously alter the tempo, perform fade-out at the end of a song, etc. There are no limits to your creative potential.
Lesson 1 Creating a Song [Step Input]
In this lesson, we will create a simple song by using step input. This mode allows you to enter pattern information while the RT-323 is stopped.
Select an empty song
To create a new song, select an empty song where no pattern is input.
Press the [SONG] key.
1 The indication "SONG" appears in the top part of the display, and the unit switches to the song mode for creating and playing songs.
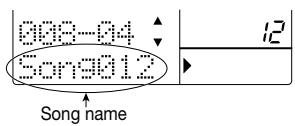
Use the [ ] / [ ] keys or the [VALUE] dial to select an empty song.
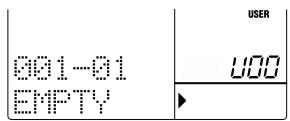
The number and name of the currently selected song appear in the bottom part of the display. When an empty song is selected, the song name field shows "EMPTY".
![ZOOM RT-323 - Use the [ ] / [ ] keys or the [VALUE] dial to select an empty song. - 1](/content/2025/01/152246/images/7225a15f434fed4e830de02e1f97048908337a46fc7b3e9e9180ffedd8289d60.jpg)
![ZOOM RT-323 - Use the [ ] / [ ] keys or the [VALUE] dial to select an empty song. - 2](/content/2025/01/152246/images/49124fdcefb8f149b4043a04ae6f645368c0c0a46a991e836ef65cf4cbb2202b.jpg)
![ZOOM RT-323 - Use the [ ] / [ ] keys or the [VALUE] dial to select an empty song. - 3](/content/2025/01/152246/images/655445e020ccc90005164910fee1849843980d40421f942ef0863aa931c6ed40.jpg)
![ZOOM RT-323 - Use the [ ] / [ ] keys or the [VALUE] dial to select an empty song. - 4](/content/2025/01/152246/images/e884a19571a226375437b48af079e7d537978dfaae97b19dfa4fdbe6e7a24188.jpg)
![ZOOM RT-323 - Use the [ ] / [ ] keys or the [VALUE] dial to select an empty song. - 5](/content/2025/01/152246/images/6908464432d3358f40d54e66099caf9fd5dcf4119ee71c1b36c05a4f1e6bec3b.jpg)
To erase an existing song to make it empty, see page 68.
Enter pattern information
For step input, you start from the beginning of an empty song. In this example, we will repeat a 2-measure pattern four times.
1
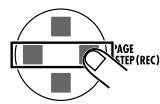
Press the [REC] key.
The [REC] lights up, and step input starts. The display shows the current measure and beat, indicating the current position. Because there is yet no pattern information in the empty song, the display also shows "End".
![ZOOM RT-323 - Press the [REC] key. - 1](/content/2025/01/152246/images/750144b116448ef33629eca059a8891dd62dd0ac70c18485b62bf1564fe86956.jpg)
2
Use the [INSERT] key to bring up the indication "INSERT?" on the display.
With each push of the [INSERT] key, the display cycles through "INSERT?" "DELETE?" "original indication".
When "INSERT?" is shown, a new pattern can be inserted at the current position.
![ZOOM RT-323 - Use the [INSERT] key to bring up the indication "INSERT?" on the display. - 1](/content/2025/01/152246/images/a7bb5e0e5ac7c4e34eec7a005ed64b44dbad6e6d920783d2f412266aee390b46.jpg)
ERASE
SERT/DELETE
ENTER
T
3
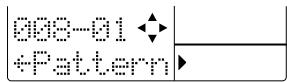
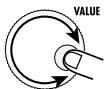
Use the [VALUE] dial to select the pattern.
Let's select the pattern number "116" here. The duration of 116 is 2 measures, and the bass track plays an E Major chord.
![ZOOM RT-323 - Use the [VALUE] dial to select the pattern. - 1](/content/2025/01/152246/images/b74b79fa362ed2bc1b55b02dc1d1c802d216a915a72f5c346391c90749f8630d.jpg)
![ZOOM RT-323 - Use the [VALUE] dial to select the pattern. - 2](/content/2025/01/152246/images/2b6a982fa6a7517f053b06e4d0a0eaa866a083bd4f2a41b6093371118c6941be.jpg)
4
The pattern "116" is entered at the current location.

To check the entered pattern, you can play the pattern with the [ ] / [ ] keys.

ERASE
BERT/DELETE
ENTER
T

1
1

A
1
1

··
.
1
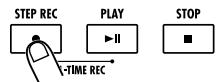
Press the [ ] key.
5
When you press the [▶] key, the display moves to the point where the next pattern can be input. (In this example, this is the start of the third measure.)
6
Repeat steps 2 - 6, to enter the same pattern in measures 3, 5, and 7.
You now have created a song with the following eight measures.

7
Press the [ ] key.
The [REC] key light goes out, and step input terminates.
![ZOOM RT-323 - Press the [ ] key. - 1](/content/2025/01/152246/images/44546555db4d68ef2e279a71f46ae6e82701cc0cd091533dbfd535fa33bdad36.jpg)
When you enter patterns in an empty song, the song name "Songxxx" (where xxx is the song number) is automatically assigned. You can change this name later ( p. 73).
8
Press the [ ] key.
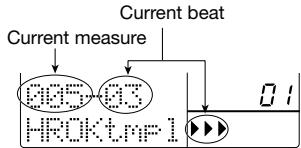
The [>] key lights up, and song playback starts. The display shows the current measure and beat.
To listen to a finished song, press the [▶■] key. At the end of the song, playback stops automatically. To stop the song midway, press the [■] key.
If you have made a mistake during pattern input, you can select the pattern and correct the input as follows.
■ Entering another pattern
(1) Press the [●REC] key.
Step input starts again, and pattern information at the current point can be changed.
(2) Use the [] / [] keys to move to the position whose pattern you want to change.
(3) Use the [VALUE] dial to select the new pattern.
(4) When the operation is completed, press the [■] key to terminate step input.

Measure Beat
O
Transposing the bass track
During step input, you can not only select a pattern number but also add various other information such as volume, tempo, bass transpose value, etc. Such pieces of information are called "events".
As an example, we will add a bass transpose value here, to shift the pitch of the bass track in accordance with chord progression.

1
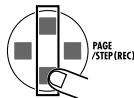
Press the [REC] key.
The [REC] key lights up, and step input again becomes possible.
![ZOOM RT-323 - Press the [REC] key. - 1](/content/2025/01/152246/images/ffea46fbf883eadd8527d392aa797c0457f084a126826a398eb5ff5f093000bc.jpg)
![ZOOM RT-323 - Press the [REC] key. - 2](/content/2025/01/152246/images/ffa7ec6eb5fdf1661dcc1a31142b070f4dce32d40aeb3f12adc829209cfbd51a.jpg)
2
Use the [] / [] keys to bring the indication "Transps" onto the display.
While "Transps" is shown, you can use the [ ] / [ ] keys to select the event type to be added to the current song position. You can add transpose information or change existing information.
![ZOOM RT-323 - Use the [] / [] keys to bring the indication "Transps" onto the display. - 1](/content/2025/01/152246/images/699ac104515270073ebf918020ad2407b93234b85219b2819e7819c2957fa897.jpg)
![ZOOM RT-323 - Use the [] / [] keys to bring the indication "Transps" onto the display. - 2](/content/2025/01/152246/images/a44e1bb0232a73cda532cdf2f1300da2ecaeb802168e3d3506b59df0d38f2835.jpg)
Use the [] / [] keys to move to the start of the third measure.
In this example, transpose information at the start of the third measure has a setting value of zero.
3

- When pattern information is input, transpose information with a zero value is also input.
- Event information including pattern information can be entered not only at the start of a measure, but anywhere within the measure (using sixteenth-note steps). For details, see page 66.

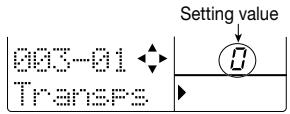
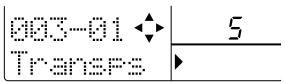
Use the [VALUE] dial to change the transpose value for the third measure.
4
The transpose value setting range is -12 - 0 - 12 (in semitone steps). For measures 3 and 4, we want to transpose the original E Major pattern to A Major. Therefore, the required
setting value is "5" (five semitones higher = perfect fourth higher).

The transpose setting remains active until the point where the next transpose value is entered (start of fifth measure in this example).
5
Use the [] / [] keys to move to the start of the fifth measure.
Use the [VALUE] dial to change the transpose value for the fifth measure.
6
For measures 5 and 6, we want to transpose the original E Major pattern to B Major. Therefore, the required setting value is "7" (seven semitones higher = perfect fifth higher).

For measures 7 and 8, we want to use E Major of the original chord. Therefore there is no need to change the transpose value of zero.
7
Press the [ ] key to terminate step input.
To listen to the song with the transpose information, press the [▶■] key.
If you have made a mistake during transpose information input, you can correct it as follows.
Modifying the transpose information setting value
After performing steps 1 - 2, use the [] / [] keys to move to the desired point, and use the [VALUE] dial to enter the new transpose information.
- Deleting accidentally entered transpose information
After performing steps 1 - 2, use the [] / [] keys to move to the desired point, and press the [ERASE] key. The current transpose information is deleted.
- Entering a fill-in pattern
With the previously described steps, we have created an 8-measure chord progression. But the rhythm simply repeats the same pattern. To add a bit of flourish, proceed as follows.
1
Press the [REC] key.
The [REC] key lights up, and step input again becomes possible.
2
Press the [A] key once.
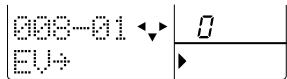
The indication "EV " appears on the display.
Other indications such as "PT" or "TS" to the right of
"EV " denote event information for the current position.
"PT" stands for pattern information and "TS" for transpose information. For details, see page 66.
While this indication is shown, position information is shown on the display to the right of the measure and beat in " ticks" (1/96 beat).
3
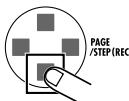
Use the [] / [] keys to move to the start of the eighth measure.
When "EV " is displayed, the [1] keys can be used to move in measures. The [STEP] key allows movement in steps of 24 ticks.

4

When you move to a point where no pattern information is input, the indication is shown to the left of "Pattern". This means that the preceding pattern will continue to play.

Use the [VALUE] dial to enter new pattern information.
5
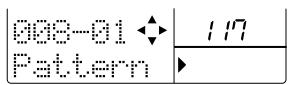
With the [VALUE] dial you can enter new pattern information at the current position. In this example, let's select pattern "117". This is a 1-measure fill-in pattern. The bass track uses the same E Major chord as pattern 116.
Now measure 7 will play the beginning of the pattern 116, and measure 8 switches to pattern 117.

6
Press the [ ] key to terminate step input.
This concludes the actions for this lesson. Press the [▶II] key to listen to the song you have created.
![ZOOM RT-323 - Press the [ ] key to terminate step input. - 1](/content/2025/01/152246/images/344a9d45cefb4ddcec83f0edf2eed127193b16c458bcfae556c05d4248d5db62.jpg)
If you have made a mistake during pattern input, you can correct it as follows.
■ Entering another pattern
Press the [REC] key and then use the []/[] keys to move to the desired point. Use the [VALUE] dial to enter the new pattern.
- Deleting accidentally entered pattern information
Press the [REC] key and then use the []/[] keys to move to the desired point. Press the [ERASE] key to delete the current pattern information.
Lesson 2 Editing a Song
Using the song created in lesson 1, this lesson demonstrates how you can extend the song with the copy function, change the bass track contents, and perform various other useful editing functions.
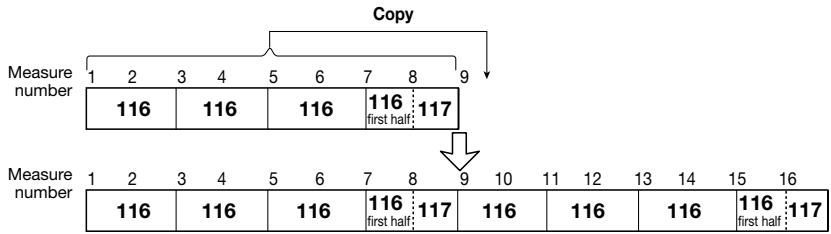
Copying part of a song
In lesson 1, we have input a song of 8 measures. In this lesson, we will copy the entire song (measure number 1 - 8) to the latter part, to extend it to 16 measures.
1
Press the [SONG] key to activate the song mode, and use the [ ] / [ ] keys to select the song created in lesson 1.

2
Press the [REC] key.
The [REC] key lights up, and step input starts again.
3
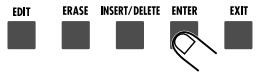
Press the [EDIT] key.
This activates the mode for copying measures.


This function can be called up at any time, regardless of the current position.
4
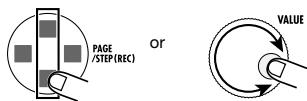
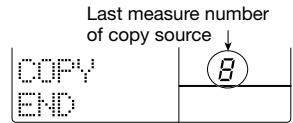
Use the [ ] / [ ] keys or the [VALUE] dial to select the first measure number to be used as copy source.
Because we want to copy 8 measures, we select measure number 1 here.
5
Press the [ENTER] key, and use the []/[] keys or the [VALUE] dial to select the last measure number to be used as copy source.
Select measure number 8 here.
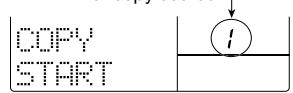
Press the [ENTER] key, and use the [ ] / [ ] keys or the [VALUE] dial to select the measure number of the copy target.
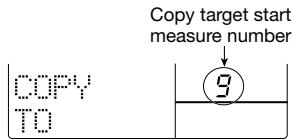
6
Because we want to copy the measures 1 - 8 as is, select measure number 9 here.

If you have made a mistake entering a value, press the [EXIT] key to return to the previous step.
7
Press the [ENTER] key to execute the copy process.
The 8 measures of the original song are copied to the end of the song, resulting in 16 measures.
。
Changing the bass track
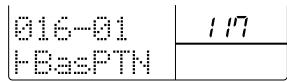
The drum B track or bass track of the pattern used in a song can be altered to that of a different pattern. In this example, we will change the bass track of measure 16 to the bass track of pattern 119.
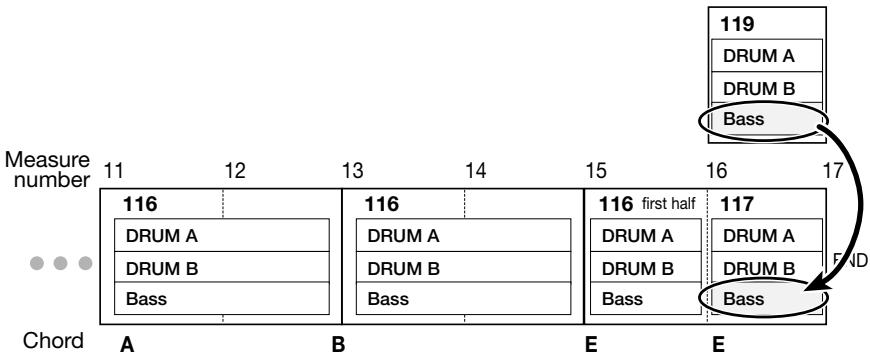
1
Use the [] / [] keys to move to the pattern that you want to replace.
Here we move to the start of measure 16. This position should have an input for pattern 117.
| 016-01 Pattern | 117 |
Use the [] / [] keys to call up "├Bas PTN" on the display.
2
The bass track replacement is now possible.

To replace the drum B track, use the [] / [] keys to call up "DrB PTN".
3
Use the [VALUE] dial to select the pattern to be used as a source for replacing.
Here we will select "119". This will cause the bass track of the last track to be replaced with the bass track of pattern 119.
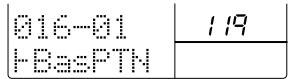
Use the [ ] / [] keys to verify that the bass track contents only have changed.

- Replacing with a user pattern (U00 - U99) is also possible. By recording a phrase on the bass track of a user pattern, you can provide your own bass track contents for use in other patterns.
- To replace the drum B track, select the drum A track or drum B track of any pattern. The drum A track is identified by an "A" appended to the pattern number (001A, U99A), and the drum B track by a "b" appended to the pattern number (001b, U99b).

4
Press the [ ] key to terminate step input.
This concludes the actions for this lesson. Press the[▶■] key to listen to the song you have created.
Lesson 3 Creating a Song [Real-time Input]
In the final lesson, we will use "real-time input", which is another method for creating a song. With this method, you assign desired patterns to the pads and play them in real time by hitting the pads. What you play is recorded by the RT-323.
1
In song mode, select the song number (00 - 11) for which you want to perform real-time input.
Normally, when you perform real-time input of a song, you must first assign the patterns you wish to use to the pads. In the default condition of the RT-323, various patterns are already assigned to the pads for songs 00 - 11. In lesson 3, we will use these preassigned patterns. (For information on how to assign your own patterns, see page 56.)

The pattern assignment for each pad is stored separately for each song.

Hit the pads.
Tapping a pad will play the pattern assigned to that pad. This function is similar to groove play mode, but it differs in the following regards.
- Pattern play continues also when you release a pad.
- When you hit another pad while a pattern is playing, the pattern will switch at the beginning of the next measure.
Only one pattern can be played at a time.
Try out which patterns are assigned to the various pads. To stop pattern play, press the [■] key.
While holding down the [REC] key, press the ] key.
3
The [REC] and [▶■] keys lights up, and the unit goes into standby mode for real-time input.

Pressing the [ ] key cancels real-time input.

Hit the pad with the first pattern to start real-time input.
Hitting a pad in this condition starts real-time input, and the first pattern starts to play. To select the next pattern, hit the desired pad. The pattern will switch at the next measure boundary.


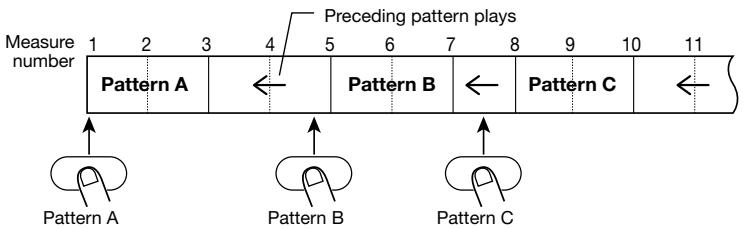

In the factory default condition, the song numbers 00 - 11 contain only short fill-in patterns assigned to the pads marked FILL 1 and FILL 2. Only when using these pads, the pattern will switch at the beat boundary.
To terminate real-time input, press the [ ] key.
5
The [ REC] and [ I] key light go out, and real-time input stops.
6
To listen to the recorded song, press the [] key.
The song created with real-time input is played back. To stop playback, press the [■] key.
![ZOOM RT-323 - To listen to the recorded song, press the [] key. - 1](/content/2025/01/152246/images/ba8d8eeb595893e9c9ace0645fe56c52f4d2a540ff170395a737b295fbb8b44c.jpg)
![ZOOM RT-323 - To listen to the recorded song, press the [] key. - 2](/content/2025/01/152246/images/78db00584a6acfa9866df95b02ce930777469dfa773d3a3eb1abd520fbf08150.jpg)
A song created with real-time input can be edited in the same way as a song created with step input.
![ZOOM RT-323 - To listen to the recorded song, press the [] key. - 3](/content/2025/01/152246/images/05c8a7cb3651c89942827bf1ce0305011ad11750fe5f224795394409744a176f.jpg)
If you have made a mistake, start the real-time input process from the beginning again. (It is not possible to make correction midway.)
Application Guide [Pads/JAM Slider]
This section explains the use of the RT-323 pads and the JAM slider.
Playing the Pads
When the RT-323 is in pattern mode, you can play drum kits and bass programs.
Press the [PATTERN] key.
The RT-323 goes into pattern mode.
![ZOOM RT-323 - Press the [PATTERN] key. - 1](/content/2025/01/152246/images/30396d2206817be8bd87801446689544f21472e349c22f90205969b87176f3b7.jpg)
![ZOOM RT-323 - Press the [PATTERN] key. - 2](/content/2025/01/152246/images/ae1907ce4c2038734b6319afc31557f8ed1ca4fa9f07b6fae5ace6a6fa0300fb.jpg)
To play a drum kit, press the [DRUM A] key or [DRUM B] key. To play a bass program, press the [BASS] key.
The selected key lights up.
![ZOOM RT-323 - To play a drum kit, press the [DRUM A] key or [DRUM B] key. To play a bass program, press the [BASS] key. - 1](/content/2025/01/152246/images/97575d5b1a77a4a3b950c32ff205f7a5e51cd0bcb7098ae66a56097566a76d36.jpg)
Hit the desired pad.
4 To continuously play a pad, hold down the [REPEAT] key while hitting the pad.
![ZOOM RT-323 - To continuously play a pad, hold down the [REPEAT] key while hitting the pad. - 1](/content/2025/01/152246/images/5128349276ea6d1def380ea9c843d990b7f50ffd18e237273fe7212ae1d288f4.jpg)
The tempo of the sound depends on the current tempo and quantize setting ( p. 41, 50).
To play another drum sound with the pad, press the [PAD BANK] key while the drum kit is selected.
![ZOOM RT-323 - To play another drum sound with the pad, press the [PAD BANK] key while the drum kit is selected. - 1](/content/2025/01/152246/images/49fd991f04593169cbb51a4ebc46c0a439389bd0ac45ca3674b78b8d06e58f94.jpg)
![ZOOM RT-323 - To play another drum sound with the pad, press the [PAD BANK] key while the drum kit is selected. - 2](/content/2025/01/152246/images/7f9cc14488151a72aacd32261c90ee675bc6b589c5b4579ac11186d28f0e5828.jpg)
The collection of drum sounds assigned to pads 1 - 13 is called a "pad bank". One drum kit comprises pad banks 1 - 3, allowing you to play up to 39 types of drum sounds. The number of the currently selected pad bank is shown on the display.
To switch the pitch range of the bass program, press the [OCTAVE] key while the bass program is selected.
![ZOOM RT-323 - To switch the pitch range of the bass program, press the [OCTAVE] key while the bass program is selected. - 1](/content/2025/01/152246/images/90d3fef6cd0d3e6de121b1b728b110f6909de1f3243ea204b13c63c7ee9931e2.jpg)
![ZOOM RT-323 - To switch the pitch range of the bass program, press the [OCTAVE] key while the bass program is selected. - 2](/content/2025/01/152246/images/33fac5eaf2aefb75c4815e0b720ec490b0b318a6fc60839d9fa7ef4056dce2fb.jpg)
The bass programs of the RT-323 allow you to play over a range of four octaves (octave 1 - 4). The number of the currently selected octave is shown on the display.
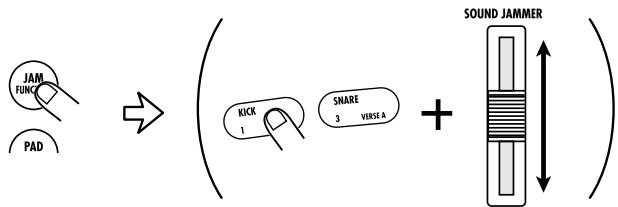
Adjusting pad pitch/volume/panning/sound in real time (jam function)
By moving the JAM slider while you hit a pad, you can adjust the pitch, volume, panning (left/right stereo balance), and sound parameters in real time.
In pattern mode, press one of the [DRUM A]/[DRUM B]/[BASS] keys.
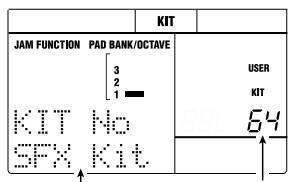
Use the [JAM FUNCTION] key to select the parameter to be controlled with the JAM slider.
The parameter currently controlled by the JAM slider is shown on the display. Each push of the [JAM FUNCTION] key cycles through the settings PITCH VOLUME PAN SOUND CHANGE no indication (JAM slider inactive).
![ZOOM RT-323 - Use the [JAM FUNCTION] key to select the parameter to be controlled with the JAM slider. - 1](/content/2025/01/152246/images/1288d42c3e6d8b1cb62b45b50f138bba871b098049f07e5600928bc0921672ca.jpg)
![ZOOM RT-323 - Use the [JAM FUNCTION] key to select the parameter to be controlled with the JAM slider. - 2](/content/2025/01/152246/images/c63b3ff162a6a6b9ae40cfd9a14b61ff39170b71cb20bbe1541582d5254ab264.jpg)
The functions of the various parameters are as follows.
PITCH
- For drum kits: The pitch of the pad is shifted continuously up or down according to the slider movement. The width of the pitch shift depends on the sound.
- For bass programs: The pitch of the pad is shifted up or down in 13 discrete steps. The actual pitch depends on the pitch setting for pads 1 - 13.
VOLUME
The pad volume changes according to the slider movement.
PAN (Panning)
As the JAM slider is moved from up to down, the pan setting (left/right position) of the sound is shifted from right to left.
■ SOUND CHANGE
According to the slider movement, the sound of the pad changes. The actual change depends on the drum kit and bass program.
3 While moving the JAM slider, hit the pad.
The sound selected in step 2 changes.

When you change the function of the JAM slider, the parameter that was controlled so far reverts to the original value.
Adjusting the Pad Sensitivity
This setting controls the degree to which the value changes depending on the intensity with which the pad is hit.
Press the [UTILITY] key, and use the []/[] keys to call up the indication "SENS" on the display.


Use the [] / [] keys or the [VALUE] dial to select the sensitivity from one of the following options.
- SOFT: Low volume regardless of pad hitting intensity
- MEDIUM: Medium volume regardless of pad hitting intensity
- LOUD: High volume regardless of pad hitting intensity
- LITE: Highest sensitivity setting. Results in loud volume even when pad is hit only lightly.
- NORMAL: Medium sensitivity setting (default)
HARD: Low sensitivity setting - EX HARD: Lowest sensitivity setting. Pads must be hit hard to produce volume.
3 To return to pattern mode, press the [PATTERN] key.

Application Guide [Drum Kits/Bass Programs]
The RT-323 comprises 128 drum kits and 55 bass programs. This section describes the operation steps to control these functions.
Drum Kit Operation
Switching drum kits
RT-323 incorporates 64 read-only preset drum kits (00 - 63) and 64 rewrites user drum kits (64 - 127). For each pattern, you can select the desired drum kit for the drum A track and drum B track.
1 In pattern mode, press the [DRUM A] key (or [DRUM B] key).
While you press the [DRUM A] (or [DRUM B]) key, the display shows the currently selected drum kit number.

The top part of the display shows "PRESET" when a preset drum kit is selected and "USER" when a user drum kit is selected.
2 While holding down the [DRUM A] key (for selecting the drum A track drum kit) or [DRUM B] key (for selecting the drum B track drum kit), press the [ ] / [ ] keys or the [VALUE] dial.
With each push of the [] / [] keys, the drum kit number is switched up or down by one increment.
Hit the pads to check out the sound of the changed drum kit.
Editing pad settings
In a user drum kit, you can change the parameters for each pad, including drum sound, volume, pitch, and output target.

The preset drum kits cannot be edited. To edit a preset drum kit, copy the contents to a user drum kit and then perform editing ( p. 37).
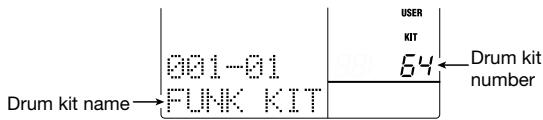
In pattern mode, press the [DRUM A] key (or [DRUM B] key) and then the [KIT] key.


The indication "KIT" appears in the top part of the display, and the name and number of the drum kit to be edited are shown.
Drum kit name
Drum kit number
Use the [ ] / [ ] keys or the [VALUE] dial to select the desired user drum kit (64 - 127), and press the [PAD FUNCTION] key.
Use the [PAD BANK] key and pads 1 - 13 to specify the pad whose sound you want to edit.
Use the [] / [] keys to select the parameter to be edited.

- INST
Selects the drum sound to be assigned to the pad from the 377 sounds incorporated in the RT-323. The setting range is 0 - 376.
PITCH
Fine-adjusts the pitch of the drum sound assigned to the pad. The setting range is -7.9 - 0 (reference pitch) - 7.9, in 0.1 (1/10 semitone) steps.
- PAN MODIFY
Adjusts the left/right position of the pad sound, as determined by the signal balance at the [L/MONO / R OUT] jack. The setting range is -7 - 0 - 7. The amount of change depends on the sound.

The PAN setting does not affect the signal at the [SUB OUT 1]/[SUB OUT 2] jack.
- INST LEVEL
Adjusts the volume for each pad over the range of 1 - 15.
OUTPUT MAIN
Adjusts the drum sound level at the [L/MONO / R OUT] jacks over the range of 0 - 15.
OUTPUT SUB 1
Adjusts the drum sound level at the [SUB OUT 1] jack over the range of 0 - 15.
OUTPUT SUB 2
Adjusts the drum sound level at the [SUB OUT 2] jack over the range of 0 - 15.

When wanting to retrieve the bass drum or snare drum sound separately from the [SUB OUT 1] jack, set the OUTPUT MAIN parameter for the respective pad to zero, and increase the value of the OUTPUT SUB 1 parameter.
GROUP
Determines the sound pattern when a pad is hit in succession (POLY = sound overlaps, MONO = sound does not overlap), and the group to which the pad belongs (0 = no group, 1 - 7 = pad belongs to specified group). Pads belonging to the same group 1 - 7 will not produce sound together.

- For example, by assigning two pads for open hi-hat and close hi-hat to the same group, the open hi-hat sound will be suppressed when you activate the close hi-hat sound, resulting in a natural effect.
- The group number applies both to POLY/MONO.
Use the [ ] / [ ] keys or the [VALUE] dial to change the setting value.
6 Repeat steps 3 - 5 as required to edit other pads.
When editing is completed, press the [EXIT] key.

The edited contents are automatically stored, and the unit returns to step 2. To return to the pattern/song mode, press the [PATTERN]/[SONG] key.
Copying a pad setting
Within the user drum kits, you can copy the settings for one pad to another. This is useful for example if you wish to create multiple patterns with very similar settings such as close hi-hat, pedal hi-hat, open hi-hat, and so on.
In pattern mode, press the [DRUM A] key (or [DRUM B] key), and then press the [KIT] key.
Use the [ ] / [ ] keys or the [VALUE] dial to select the desired user drum kit (64 - 127), and press the [PAD FUNCTION] key.
Press the [EDIT] key, and hit the pad to be used as copy source.
The copy source pad is selected.

4 Press the [ENTER] key, and hit the pad to be used as copy target.
The copy target pad is selected.
![ZOOM RT-323 - Press the [ENTER] key, and hit the pad to be used as copy target. - 1](/content/2025/01/152246/images/70d4dd6f5644e484eb1f9e9e625b71bbe780e630f87b35ce046bbe82bb5f7e27.jpg)
5 To execute the copy process, press the [ENTER] key. To cancel the copy process, press the [EXIT] key.
![ZOOM RT-323 - To execute the copy process, press the [ENTER] key. To cancel the copy process, press the [EXIT] key. - 1](/content/2025/01/152246/images/67e483d65df34abf95c49ed67b77b732b32a825438db322dd40fcfc1efe38649.jpg)
![ZOOM RT-323 - To execute the copy process, press the [ENTER] key. To cancel the copy process, press the [EXIT] key. - 2](/content/2025/01/152246/images/dd825e46a32281e3649fcacf5c32d66f2909ed219cdd54a27e631294918cfa82.jpg)
After the copy process was executed, the unit returns to the condition of step 2. To return to pattern mode, press the [PATTERN] key.
Changing the name of a user drum kit
You can assign a name of up to 8 characters (kit name) to a user drum kit.
In pattern mode, press the [DRUM A] key (or [DRUM B] key), and then press the [KIT] key.
Use the [ ] / [ ] keys or the [VALUE] dial to select the user drum kit (64 - 127) whose name you want to change.
Press the [EDIT] key, and use the []/[] keys to call up the indication "NAME" on the display.

Use the [] / [] keys to move the underline to the position you want to change.
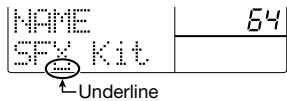
Use the [] / [] keys or the [VALUE] dial to select the character you want to change from among the following choices.
Letters: A-Z, a-z
Numerals: 0 - 9
Symbols:
6 When the name is as desired, press the [EXIT] key.
The drum kit name is updated, and the unit returns to the condition of step 2. To return to pattern mode, press the [PATTERN] key.
Copying a drum kit
You can copy an existing drum kit (preset drum kit or user drum kit) to a user drum kit. This is useful for example to create a variation drum kit where only a part is changed.
In pattern mode, press the [DRUM A] key (or [DRUM B] key), then press the [KIT] key.
Use the [] / [] keys or the [VALUE] dial to select the source drum kit (preset drum kit 00 - 63/user drum kit 64 - 127).
Press the [EDIT] key, and use the []/[] keys to bring up the indication "COPY?" on the display.
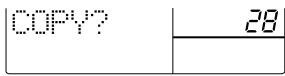
Press the [ENTER] key, and use the [ ] / [ ] keys or the [VALUE] dial to select the target user drum kit.

5 To execute the copy process, press the [ENTER] key. To cancel the copy process, press the [EXIT] key.
After the copy process was executed, the unit returns to the condition of step 2. To return to pattern mode, press the [PATTERN] key.
Bass Program Operation
Switching bass programs
The RT-323 incorporates 55 types of bass programs (00 - 54). For each pattern, you can select one bass program.
Press the [PATTERN] key to switch to pattern mode, and then press the [BASS] key.
While you press the [BASS] key, the display shows the currently selected drum kit number (00 - 54).


2 While holding down the [BASS] key, use the []/[] keys.
With each push of the [] / [] keys, the bass program number is switched up or down by one increment.
Hit the pad to check out the sound of the selected bass program.
Transposing a bass program
Using the pitch assigned to pad 1 as a reference, the pitch of the entire bass program can be shifted up or down in semitone steps.
1 In pattern mode, press the [BASS] key.
Press the [UTILITY] key, and use the []/[] keys to bring up the indication "BASKEY" on the display.
The pitch of pad 1 appears on the display.


Pitch of pad 1
Use the [ ] / [ ] keys or the [VALUE] dial to set the transpose step width.
The available settings are F# (-6 semitones) - C (transpose off) - F# (+6 semitones). When the pitch of pad 1 is switched, the other pads are transposed accordingly.
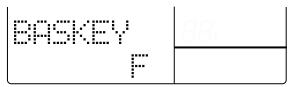
4 To return to pattern mode when the setting is complete, press the [PATTERN] key.

This setting applies to all bass programs.
Adjusting bass program tuning
The tuning of the entire bass program can be adjusted in 1-Hz steps. This makes it possible for example to match a bass program of the RT-323 to an instrument such as an acoustic piano.
1 In pattern mode, press the [BASS] key.
Press the [UTILITY] key, and use the []/[] keys to call up "TUNING" on the display.

3 Use the [ ] / [ ] keys or the [VALUE] dial to set the tuning value.
You can make the setting over the range of 435Hz - 445Hz , in 1-Hz steps. The factory default setting is 440Hz .
4 To terminate the setting and return to the pattern mode, press the [PATTERN] key.

This setting affects all bass programs.
Changing the bass program output level
The bass program output level can be set individually for the [L/MONO / R OUT] jack, [SUB OUT 1] jack, and [SUB OUT 2] jack. This is handy for separately using the bass track and drum track output.
Press the [UTILITY] key, and use the []/[] keys to call up "BASOUT" on the display.
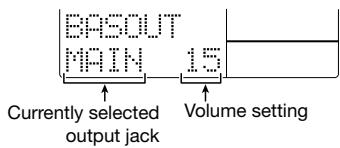
Use the []/[] keys to set the output for the bass track to "MAIN" ([L/MONO R/OUT] jack), "SUB1" ([SUB OUT 1] jack), or "SUB2" ([SUB OUT 2] jack).
In the default condition, "MAIN" ([OUTPUT L/R] jack) is selected.
3 Use the [VALUE] dial to set the bass program output level (0 - 15).
The factory default setting is MAIN = 15 , SUB1 = 0 , SUB2 = 0 .
When the setting is completed and you want to return to the pattern mode, press the [PATTERN] key.

This setting affects all bass programs.
Application Guide [Patterns]
This section explains various operation steps related to patterns. It also outlines the groove play function which lets you assign various patterns to the pads and play them in real time.
Playing a Pattern
The RT-323 comprises 400 read-only preset patterns (000 - 399) and 100 read/write user patterns (U00 - U99), resulting in a total of 500 available patterns. To select and play a pattern, proceed as follows.

Press the [PATTERN] key.
![ZOOM RT-323 - Press the [PATTERN] key. - 1](/content/2025/01/152246/images/4c4f21ab2d07f32ca90145b0422afeb599be68554d6dcffd4f48aa61f70d73af.jpg)
The RT-323 switches to pattern mode. In the lower part of the display, the currently selected pattern name and pattern number are shown.
![ZOOM RT-323 - Press the [PATTERN] key. - 2](/content/2025/01/152246/images/61d5853a7eaeab08cc210cae7f7de400b6e3f0ac26b09ce49b643c593c9d818c.jpg)
![ZOOM RT-323 - Press the [PATTERN] key. - 3](/content/2025/01/152246/images/4581acb240951fc3284ac4b80f1cc46ef02f7f63c3df1087c59ca79863ffc746.jpg)
Use the [] / [] keys or the [VALUE] dial to select the pattern to play.
![ZOOM RT-323 - Use the [] / [] keys or the [VALUE] dial to select the pattern to play. - 1](/content/2025/01/152246/images/04bcaeb35748935499cdc0d5992b0682bd26ee52a266d1886a99915eb5f736b3.jpg)
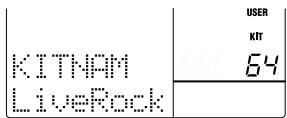
When a preset pattern was selected, the display shows "PRESET". When a user pattern was selected, the display shows "USER". When the RT-323 is in the default condition, all user patterns are empty, and the indication "EMPTY" is shown in the pattern name field.
![ZOOM RT-323 - Use the [] / [] keys or the [VALUE] dial to select the pattern to play. - 2](/content/2025/01/152246/images/2729ad68f7b3a52b1b825fc9fc3228fa3c307e031504c670f642bfcc5e195919.jpg)
With the [] / [] keys, you can switch among different categories of preset patterns. For more information on preset pattern categories, please refer to the list at the end of this manual.
![ZOOM RT-323 - Use the [] / [] keys or the [VALUE] dial to select the pattern to play. - 3](/content/2025/01/152246/images/aafbbe057326a7f1efc1f5c32e2dad0478ffe7ec4f35d4da261582a448188bae.jpg)
Press the [▶II] key.
The selected pattern starts to play.
![ZOOM RT-323 - Press the [▶II] key. - 1](/content/2025/01/152246/images/6eec24fd1075bb0d3b7f36f986b06c5eb9961db0f00ac5fdb0f175916618bc45.jpg)
![ZOOM RT-323 - Press the [▶II] key. - 2](/content/2025/01/152246/images/d572c02943d43ec804cf386c200a7e95f7bccd55d6511715759fbef2ae35adff.jpg)
![ZOOM RT-323 - Press the [▶II] key. - 3](/content/2025/01/152246/images/a2be19b4a3c8b305a4ae4d1ab145fde523e1781bf4c826bf54caf7a518f9aef4.jpg)
You can also switch patterns while playback is in progress. If you use the [] / [] keys, the pattern switches immediately. If you use the [VALUE] dial, the pattern switches only after the current pattern has ended.
![ZOOM RT-323 - Press the [▶II] key. - 4](/content/2025/01/152246/images/86e882a70b15fbe11119a1c41e44f719bbf9b753735b36719692ce446d91272d.jpg)
To stop pattern playback, press the [■] key.
![ZOOM RT-323 - To stop pattern playback, press the [■] key. - 1](/content/2025/01/152246/images/e201ab725b1e7f90a977ab5c884b08e15d8f79016f1d1c5096469eb8f62557e9.jpg)
Instead of the [■] key, you can also press the [▶■] key to set the unit to pause mode (the [▶■] key flashes). Pressing the key once more causes playback to resume from the current point.
Changing the pattern tempo
In pattern mode, you can use the [TEMPO] key to change the tempo of the pattern.

Hold down the [TEMPO] key and use the []/[] keys or the [VALUE] dial to change the tempo value.
While holding down the [TEMPO] key, the current tempo value is shown on the display.
![ZOOM RT-323 - Hold down the [TEMPO] key and use the []/[] keys or the [VALUE] dial to change the tempo value. - 1](/content/2025/01/152246/images/10ccdde1ebe5ed8e6650c3a0a358061693257bcdbd144eea6875b69eda5eff38.jpg)
The tempo value range is 40 - 250 (BPM), in steps of 0.1 BPM. When the desired tempo is set, release the [TEMPO] key.
![ZOOM RT-323 - Hold down the [TEMPO] key and use the []/[] keys or the [VALUE] dial to change the tempo value. - 2](/content/2025/01/152246/images/bb61232337e94f96d85fa30dd15da113d8cc42c34926a791bad57193a16b81dd.jpg)
To enter the tempo value manually, tap the [TEMPO] key twice in the desired interval (tempo tap input).
![ZOOM RT-323 - To enter the tempo value manually, tap the [TEMPO] key twice in the desired interval (tempo tap input). - 1](/content/2025/01/152246/images/36bc43fefcdde5edaab9ea4b1883758b32c75e569cabdab470fb9856fe3726fa.jpg)
If you tap the [TEMPO] key twice while a pattern is playing or stopped, the tapping interval is taken as the quarter note tempo. This allows you to simply set the tempo in sync with a song.
Muting a track
With the [MUTE] key, you can selectively mute the tracks of a pattern (drum A/drum B/bass).

While holding down the [MUTE] key, press the key corresponding to the track you want to mute ([DRUM A]/[DRUM B]/[BASS]).
![ZOOM RT-323 - While holding down the [MUTE] key, press the key corresponding to the track you want to mute ([DRUM A]/[DRUM B]/[BASS]). - 1](/content/2025/01/152246/images/920a204d60b9b90b156ea3920351fa3e054ae16aa304a0a6521336db22ddc119.jpg)
The key lights up, and the corresponding track is muted. While you hold the [MUTE] key, you
can check the light on/off status of the [DRUM A]/[DRUM B]/[BASS] keys to see which tracks are muted.
To cancel muting, hold the [MUTE] key down and press the [DRUM A]/[DRUM B]/[BASS] key again.
Using the Groove Play Function
When the RT-323 is in groove play mode, patterns assigned to the pads can be played in real time. Up to 4 patterns can be played simultaneously, letting you create complex rhythms or loop patterns like a DJ.
Press the [SONG] key and [PATTERN] key simultaneously.
The RT-323 switches to groove mode.
2 Press any pad you like.
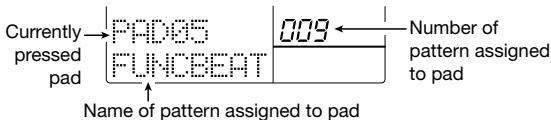
While you hold down the pad, the pattern assigned to the pad is played. The overall pattern volume depends on the hitting intensity of the pad. The pattern name and pattern number of the currently played pattern are shown on the display.
To change a pattern assigned to a pad, hold down the pad and use the [] / [] keys or the [VALUE] dial to select the pattern.
You can select either a preset or a user pattern.

When a pattern for which "PAD" is displayed is assigned to a pad, hitting the pad in pattern mode will play the original sound (drum sound for drum kit or bass sound for bass program).
4 To continuously play the pattern after releasing the pad, hold down the [REPEAT] key while hitting the pad.

The pattern is played back in a loop. Pressing the same pad again cancels the loop.
To play multiple patterns simultaneously, you can press several pads together. In groove play mode, you can play up to four patterns.

- If you press five or more pads, the most recently pressed four pads will be active.
- When you have pressed several pads, the start and stop timing is adjusted automatically, according to the selected quantize method ( p. 50).
- The various patterns are played in the same tempo as the currently selected song.


In groove play mode, the [▶]/[■] keys can be used to start/stop playback of the currently selected song.
To continuously vary the pitch, volume, panning, and sound of the pattern, use the [JAM FUNCTION] key to select the parameter and then adjust it with the JAM slider.
In groove play mode, you can use the JAM slider to adjust parameters such as pitch, volume, tone, etc. of the currently playing pattern. The JAM slider affects only the currently selected track (selected with [DRUM A]/[DRUM B]/[BASS] key). (For details on the JAM slider operation, please refer to p. 31.)
To return from the groove play mode to the pattern/song mode, press the [PATTERN]/[SONG] key.
Real-Time Pattern Input
This section explains how you can perform real-time input, using the metronome to hit pads and create a user pattern.
1 In pattern mode, select an empty user pattern (U00 - U99).
When you select an empty pattern, the indication "EMPTY" appears on the display.

You cannot perform pattern input on a preset pattern.
Use the [DRUM A]/[DRUM B]/[BASS] key to select the track (drum A/drum B/bass) for which to perform real-time input.

The key for the selected track lights up.
To change the sound (drum kit/bass program), hold down the key selected in step 2 and use the [] / [] keys or the [VALUE] dial.
The sound last selected for each track is stored for the pattern. If required, you can use the [PAD BANK]/[OCTAVE] key to select the pad bank or the bass pitch.
4 Hold down the [REC] key and press the [▶II] key.
The [ REC] and [ ] keys light up, a precount of four beats (one measure) is heard, and then real-time input starts.
5 Hit the pads in time with the metronome. When the last measure of the pattern is reached, input loops back to the first measure and continues.
Drum track recording
The drum sound assigned to the pad is heard, and the play contents are recorded in accordance with the currently selected quantize settings.
While recording the pattern, you can use the [PAD BANK] key to switch the pad bank. This changes the drum sounds assigned to pads 1 - 13.

If you press the [REC] key during recording, the key starts to flash, and recording is paused. In this condition, you can hit a pad to check which sound is assigned to it. Press the [REC] key again to resume recording.

During pattern real-time input, you can also input notes via a MIDI keyboard or other component connected to the [MIDI IN] jack.
Bass track recording
In the factory default condition, a scale with semitone pitch steps such as C, C#, D, D#,...B, C is assigned to the pads, except for pad 6. Hitting a pad produces the bass sound of the assigned pitch, and recording is performed with the currently selected quantize setting. Note that, unlike the drum track, the bass track also records the duration of the pad press. For example, to record the following example, the pad to which A2 is assigned and the pad to which E2 is assigned must be pressed for the duration of a quarter note each.

While recording the bass track, the [OCTAVE] key can be used to switch the bass range.

In the factory default condition, the quantize setting of the RT-323 is a sixteenth note, but this setting can be changed if desired ( p. 50).
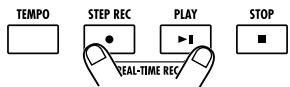
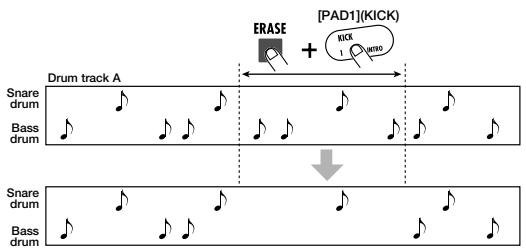
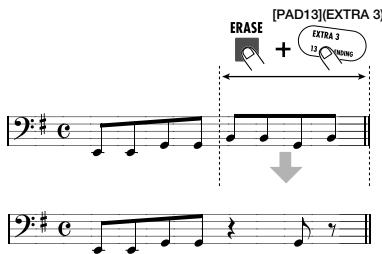
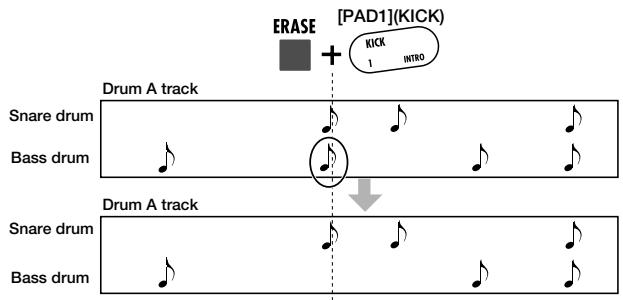
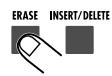
To erase the play contents from a specific pad, hold down the [ERASE] key and press the pad.

While you hold down the [ERASE] key, the sound assigned to that pad is erased from the pattern.
To erase the entire track, hold down the [ERASE] key and press the key for the track ([DRUM A]/[DRUM B]/[BASS]) key. While you keep both keys depressed, all sound from the respective track is erased from the pattern.
To record a JAM slider operation in the pattern, use the [JAM FUNCTION] key to select the function and then move the JAM slider while holding down the pad.
You can record changes in pitch, volume, panning position, and sound. (For details on using the JAM slider, see page 31.)

The JAM slider operation is only effective for a sound currently played with a current pad.
Moving the JAM slider by itself has no effect on the recorded sound.
8 To terminate real-time input, press the [ ] key.
The [REC] and [▶II] keys light go out, and real-time input finishes.

When you create a new pattern, it is assigned a name such as "Pat xxx" (where xxx is the user pattern number). This pattern name can be changed as desired ( p. 54).
9 Press the [▶II] key to check the recorded contents.
Pattern Step Input
For step input, you enter each note separately, while the RT-323 is in the stop condition. This makes it easy to enter complex drum patterns or bass lines that might be difficult to achieve with real-time input.
1 In pattern mode, select an empty user pattern (U00 - U99).
When an empty pattern is selected, the indication "EMPTY" appears on the display.
Use the [DRUM A]/[DRUM B]/[BASS] key to select the track for step input (drum A/drum B/bass).
To change the sound (drum kit/bass program), hold down the key selected in step 2, and operate the [] / [] keys or the [VALUE] dial.
The sound last selected for each track is recorded as the pattern.
4 Press the [REC] key.
The [REC] key lights up, and pattern step input becomes possible.
Use the pads and [STEP] key to enter notes and pauses.

Drum track recording
When you press a pad after pressing the [STEP] key, the drum sound assigned to the pad is entered. If you just press the [STEP] key without pressing a pad, no note is entered and the present position advances by the quantize value. For example, with a quantize setting of a
sixteenth note, to enter a rhythm kick as shown in the score below, operate the pads and [STEP] key as follows.
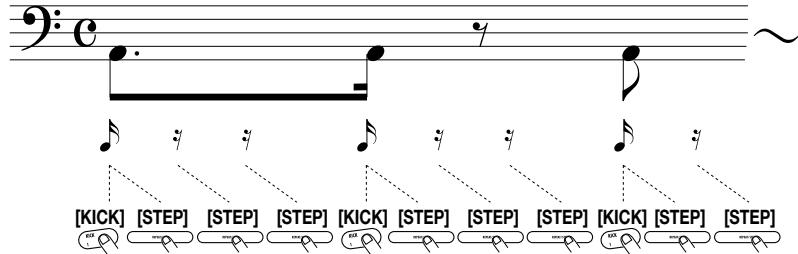
During step input, the [PAD BANK] key can be used to switch between pad banks.
Bass track recording
Pressing the [STEP] key while holding down a pad enters a note of the pitch assigned to that pad. Pressing only the [STEP] key enters no note, and the present position advances by the quantize value. The duration of the note depends on the number of times the [STEP] key is pressed while holding down a pad. For example, with a quantize setting of a sixteenth note, to enter a rhythm kick as shown in the score below, operate the pads and [STEP] key as follows.
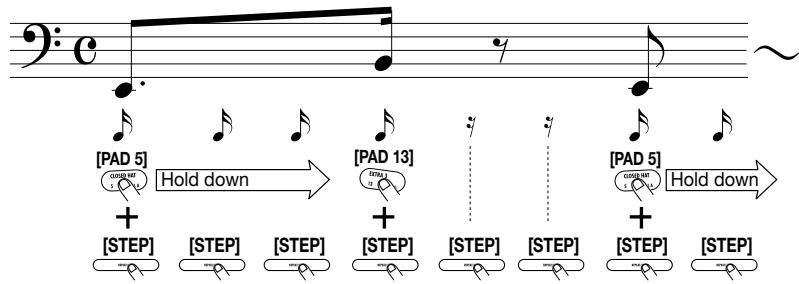
During step input, you can also use the [OCTAVE] key to switch the bass pitch.

- When entering notes with step input, the hitting intensity of the pad is also stored.
- When the end of the pattern is reached, the unit automatically returns to the first measure, allowing you to continue with step input.
- In the factory default condition, the quantize setting of the RT-323 is a sixteenth note, but this setting can be changed if desired ( p. 50).
If you have made a mistake during input, use the [STEP] key to move to the note you want to correct, and then hold down the [ERASE] key while pressing the respective pad.


■ Drum track
When you use the [STEP] key to move within the pattern, the pad input for the current position lights up. When you press a lit pad while holding down the [ERASE] key, the pad light goes out,
and the note at that position is cleared.
Bass track
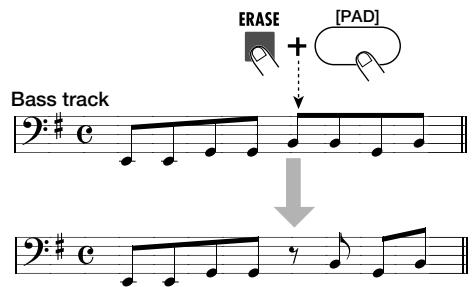
To clear a specific note from the bass track, use the [STEP] key as for the drum track to move to the start of the note (the pad for the pitch lights up). Then hold down the [ERASE] key and press the lit pad.
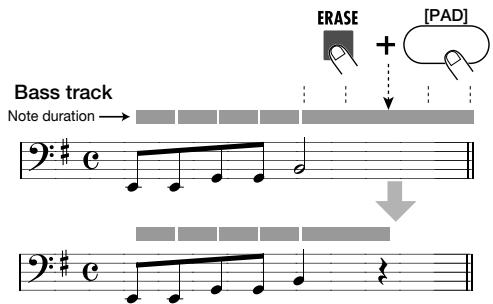
By holding down the [ERASE] key and pressing the pad at a point within the note, you can make the note shorter.
To terminate step input, press the [ ] key.
The [REC] key light goes out, and the step input condition is terminated.
Deleting a User Pattern
This clears all playing information from the currently selected user pattern, returning it to the empty condition.
In pattern mode, use the [] / [] keys or the [VALUE] dial to select the user pattern you want to delete.
2 While the pattern is stopped, press the [DELETE] key.
The indication "SURE?" appears on the display.
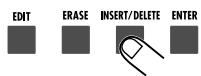
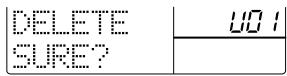
To execute the delete process, press the [ENTER] key. To cancel the delete process, press the [EXIT] key.
When the [ENTER] key is pressed, the pattern is deleted and the indication "EMPTY" is shown on the display.
Deleting a Track
You can delete any track from the currently selected user pattern.
In pattern mode, use the [] / [] keys or the [VALUE] dial to select the user pattern from which you want to delete a track.
2 While holding down the [ERASE] key, press the key for the track ([DRUM A]/[DRUM B]/[BASS] key) you want to delete.


To execute the delete process, press the [ENTER] key. To cancel the delete process, press the [EXIT] key.
When the [ENTER] key is pressed, the specified track is deleted.
Copying a Pattern
You can copy an existing pattern (preset/user pattern) to any user pattern.
In pattern mode, select the pattern to be used as copy source, and press the [EDIT] key.

Use the [] / [] keys to bring up the indication "COPY?" on the display.
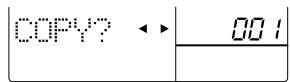
Press the [ENTER] key, and use the [ ] / [ ] keys or the [VALUE] dial to select the copy target user pattern (U00 - U99).
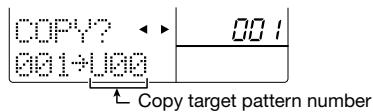
4 To execute the copy process, press the [ENTER] key. To cancel the copy process, press the [EXIT] key.
When the [ENTER] key is pressed, the copy is carried out and the unit returns to step 1.
Changing Pattern Settings
This section describes how to change settings that are common to all patterns, and settings that are user pattern specific (such as beat and tempo).
Setting the quantize value
The quantize value is the smallest unit for real-time input/step input of a pattern.
In pattern mode, press the [EDIT] key.
Use the [] / [] keys to call up the indication "QUNTIZ" on the display.
You can now select the smallest unit for the note.

Use the [] / [] keys or the [VALUE] dial to select the smallest unit note from the following available settings.
4: Quarter note
8: Eighth note
12: Eighth triplet note
16: Sixteenth note
24: Sixteenth triplet note
32: Thirty-second note
48: Thirty-second triplet note
Hi: 1 tick (quantize function off)
* 1 tick is (1/96 of quarter note)
This setting affects the following four functions.
- Smallest unit for real-time input
- Smallest unit for step input
- Smallest unit for continuous sound interval when pad is hit while holding down [REPEAT] key
- Smallest unit for pattern play start/stop timing adjustment during groove play
4 When the setting is complete, press the [EXIT] key.
The new setting becomes active and the unit returns to the pattern mode.

If you press the [REC] key instead of the [EXIT] key in step 4, the notes recorded in the current pattern are aligned to the quantize setting.
Adjusting the rhythm flourish (swing)
This lets you control the amount of rhythm flourish (swing) used by the pattern. Higher values result in more pronounced swing.

This setting affects all patterns.
In pattern mode, press the [EDIT] key.
Use the [] / [] keys to call up the indication "SWING" on the display.
You can now set the swing value.

Use the [ ] / [ ] keys or the [VALUE] dial to set the swing value (50 - 75).
The default setting is 50 (no swing).
4 When the setting is complete, press the [EXIT] key.
The setting is updated, and the unit returns to pattern mode.
Changing the pattern length
The length of a user pattern (number of measures) can be adjusted. This setting is stored for each user pattern individually.
In pattern mode, select the user pattern for which you want to make the setting, and press the [EDIT] key.
Use the [] / [] keys to call up the indication "BARLEN" on the display.

3 Use the [ ] / [ ] keys or the [VALUE] dial to set the number of measures.
The setting range is 1 - 99. The default length for empty patterns is 2 measures.
When changing the length of a pattern that has already been input, the playback content changes as follows.
■ More measures than current setting
Blank measures are added to the end of the current pattern.
Fewer measures than current setting
The excessive measures are cut off. After returning to pattern mode, the deleted measures cannot be restored.

When you change the setting with the [] / [] keys or the [VALUE] dial, the indication "E" appears on the display. When you return the setting to the original value, the "E" disappears.
4 When the setting is complete, press the [EXIT] key.
The new setting becomes active and the unit returns to the pattern mode.
Changing the pattern beat
The beat (timing signal) of a user pattern can be adjusted. This setting is stored for each user pattern individually.
In pattern mode, select the user pattern for which you want to make the setting, and press the [EDIT] key.
Use the [] / [] keys to call up "TIMSIG" on the display.

3 Use the [] / [] keys or the [VALUE] dial to set the beat.
The setting range is 1 (1/4 beat) - 16 (16/4 beat). The initial setting for empty patterns is 4 (4/4 beat).
It is possible to change the beat for a pattern that is already input. In this case, the playback content changes as follows.
■ Longer beat than current setting
Blank space is added to each measure.
Shorter beat than current setting
Excessive section of each measure is cut off. After returning to pattern mode, the deleted part cannot be restored.

When you change the setting with the [] / [] keys or the [VALUE] dial, the indication "E" appears on the display. When you return the setting to the original value, the "E" disappears.
4 To update the setting, press the [ENTER] key. To cancel the process, press the [EXIT] key.
When you press the [ENTER] key the unit returns to pattern mode.
Setting the volume balance for each track
You can adjust the volume of the drum A, drum B, and bass track in a user pattern. This setting is stored for each user pattern individually.
In pattern mode, select the user pattern for which you want to make the setting, and press the [EDIT] key.
Use the [] / [] keys to call up "MIXLVL" on the display.
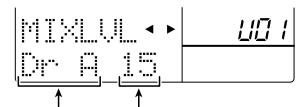
Current track Current setting
Use the [] / [] keys to select the track for which you want to change the volume.
Use the [ ] / [ ] keys or the [VALUE] dial to set the volume for the track (0 - 15).
When a new pattern is created, the volume for all tracks is set to 15. When wishing to adjust the volume for other tracks, repeat steps 3 and 4.
5 When the setting is complete, press the [EXIT] key.
The unit returns to pattern mode.
Changing the play timing (shift)
You can change the play timing of the currently selected user pattern.
In pattern mode, select the user pattern for which you want to make the setting, and press the [EDIT] key.
Use the [] / [] keys to call up "SHIFT" on the display.

3 Use the [] / [] keys or the [VALUE] dial to shift the timing.
The setting range is -192 to 192 ticks (+2 beats) in units of 1 tick (1/96 of a quarter note). For example, when the setting value is 24, the pattern changes as follows.
Shift Setting value = 24 (sixteenth note)
![ZOOM RT-323 - Use the [] / [] keys or the [VALUE] dial to shift the timing. - 1](/content/2025/01/152246/images/0fe8e4f336b7a447a03517f76f4bf04e970be91123598981f830149ebb58b4fc.jpg)
![ZOOM RT-323 - Use the [] / [] keys or the [VALUE] dial to shift the timing. - 2](/content/2025/01/152246/images/8d913516dab94e2c589d44243dcebff9d73b7f00ce6492113ee1525647044dd5.jpg)
When you change the setting with the [] / [] keys or the [VALUE] dial, the indication "E" appears on the display. When you return the setting to the original value, the "E" disappears.
4 To accept the setting, press the [EXIT] key.
The unit returns to pattern mode.
![ZOOM RT-323 - To accept the setting, press the [EXIT] key. - 1](/content/2025/01/152246/images/35751953dc3e3ea5e60341ae9d6525ee2755632269f3defb32692edb4513c944.jpg)
This setting directly alters the play data stored for the pattern. After you return to pattern mode, the original contents cannot be restored.
Changing the pattern name
When you create a new pattern, the pattern name "PTN xxx" (where xxx is the user pattern number) is automatically assigned.
In pattern mode, select the user pattern for which you want to make the setting, and press the [EDIT] key.
2 Use the [] / [] keys to call up "NAME" on the display.
The pattern name is shown under "NAME" with an underline.
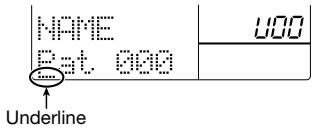
Use the [] / [] keys to move the underline, and use the [] / [] keys or the [VALUE] dial to select the desired character. (For a list of usable characteristics, see p. 36.)
4 When the pattern name has been changed, press the [EXIT] key.
The unit returns to pattern mode.
Application Guide [Song]
This section explains various operation steps related to song playback, creating new songs, and editing existing songs.
SongPlayback
The RT-323 can store up to 100 songs.
Press the [SONG] key to switch to song mode.
The RT-323 switches to the song mode which lets you create and play your own songs.
![ZOOM RT-323 - Press the [SONG] key to switch to song mode. - 1](/content/2025/01/152246/images/ca9f4f3ac41896bfeb1f5fc50556993ce3e6cc5c9ac31b415d690e2a97e0e379.jpg)
![ZOOM RT-323 - Press the [SONG] key to switch to song mode. - 2](/content/2025/01/152246/images/f9b5fa2bc5470707d61bf23624fcaffdd1d926dc867a5741109a54e503121c6e.jpg)
Use the [ ] / [ ] keys or the [VALUE] dial to select the song number (00 - 99).
You can also switch songs while a song is playing. When you use the [] / [] keys, the song is switched immediately. When you use the [VALUE] dial, the song is switched when playback of the current song completed.
![ZOOM RT-323 - Use the [ ] / [ ] keys or the [VALUE] dial to select the song number (00 - 99). - 1](/content/2025/01/152246/images/e1d89b828eb89079e0c0259d195441ea9bff8c5a5407368c8fa1f043e93e4058.jpg)
or
![ZOOM RT-323 - Use the [ ] / [ ] keys or the [VALUE] dial to select the song number (00 - 99). - 2](/content/2025/01/152246/images/3b63779e858a899f580483c7b80814889c3c59b434d01477ce3a08f7900f1601.jpg)
Song name Song-001
When you select an empty song, the indication "EMPTY" is shown in the song name field.
3 Press the [▶II] key.
The [ ] key lights up, and the selected song is played.
![ZOOM RT-323 - Press the [▶II] key. - 1](/content/2025/01/152246/images/2d75a3aedebf8d96c77bf186d3ef11c9de2ff9ad38a5194929e50f84cbfcf781.jpg)
![ZOOM RT-323 - Press the [▶II] key. - 2](/content/2025/01/152246/images/dee1781027cb32caae751c3f7ef6ec2f5f4ae6e57769254c521e33d6866b7fa9.jpg)
To change the song tempo, hold down the [TEMPO] key and use the [ ] / [ ] keys or the [VALUE] dial while the song is playing (or stopped).
![ZOOM RT-323 - To change the song tempo, hold down the [TEMPO] key and use the [ ] / [ ] keys or the [VALUE] dial while the song is playing (or stopped). - 1](/content/2025/01/152246/images/d82b4425ed4f827f19b3f80a2c65821e027124bae919a8ea2835b158c5fdc7d7.jpg)
![ZOOM RT-323 - To change the song tempo, hold down the [TEMPO] key and use the [ ] / [ ] keys or the [VALUE] dial while the song is playing (or stopped). - 2](/content/2025/01/152246/images/27619d1be6fc8a9826f63402fafb33da4eec942e4e5a62c2f0c58c5e3c465200.jpg)
+
The song tempo can be set in the range from 40 - 250 (BPM). The setting is stored together with the song.
5 To mute a specific track, hold down the [MUTE] key and press the [DRUM A]/[DRUM B]/[BASS] key.
![ZOOM RT-323 - To change the song tempo, hold down the [TEMPO] key and use the [ ] / [ ] keys or the [VALUE] dial while the song is playing (or stopped). - 3](/content/2025/01/152246/images/001213193bdedc7404f3711afe1e15ed07d56c6909b3ef17d85eca2573da5cea.jpg)
![ZOOM RT-323 - To change the song tempo, hold down the [TEMPO] key and use the [ ] / [ ] keys or the [VALUE] dial while the song is playing (or stopped). - 4](/content/2025/01/152246/images/151000a3730347161ce8cdb32a5b93e773ad0aa602799df9f24652159f398fbb.jpg)
![ZOOM RT-323 - To change the song tempo, hold down the [TEMPO] key and use the [ ] / [ ] keys or the [VALUE] dial while the song is playing (or stopped). - 5](/content/2025/01/152246/images/14ff68e2981f63275d008cc634b90bd7de2190c3679c0bf898518b7006a9c48c.jpg)
![ZOOM RT-323 - To change the song tempo, hold down the [TEMPO] key and use the [ ] / [ ] keys or the [VALUE] dial while the song is playing (or stopped). - 6](/content/2025/01/152246/images/9b723009649cf1e4cf33362b76bc253bca777a45f948fcc7059bfdef27016f6d.jpg)
The key lights up, and the selected track is muted. To cancel muted, hold down the [MUTE] key and press the same key once more.
![ZOOM RT-323 - To change the song tempo, hold down the [TEMPO] key and use the [ ] / [ ] keys or the [VALUE] dial while the song is playing (or stopped). - 7](/content/2025/01/152246/images/68917317f54ae57c6e04c855f3091f9d6de5298a7e20b1be3a9b7997bf3f2d17.jpg)
When you mute a track, the song track will also be muted at the same time. (For information on the song track, see page 69.)
To stop the song, press the [ ] key.
![ZOOM RT-323 - To change the song tempo, hold down the [TEMPO] key and use the [ ] / [ ] keys or the [VALUE] dial while the song is playing (or stopped). - 8](/content/2025/01/152246/images/ae0f120cb35edc06a20f652b1061395273da10b18dba607205718ff1bd881398.jpg)
![ZOOM RT-323 - To change the song tempo, hold down the [TEMPO] key and use the [ ] / [ ] keys or the [VALUE] dial while the song is playing (or stopped). - 9](/content/2025/01/152246/images/afca1eca30ba40258ee810e32b6c2b82c1d7978b9ebae40db487ee7cd5fe838d.jpg)
![ZOOM RT-323 - To change the song tempo, hold down the [TEMPO] key and use the [ ] / [ ] keys or the [VALUE] dial while the song is playing (or stopped). - 10](/content/2025/01/152246/images/94b74498a969ed4177c4bb8676378846db00f5204eee442c601279918279d101.jpg)
![ZOOM RT-323 - To change the song tempo, hold down the [TEMPO] key and use the [ ] / [ ] keys or the [VALUE] dial while the song is playing (or stopped). - 11](/content/2025/01/152246/images/8a41dab34a09dc8629624defce00e795792ac4180a27d643fb0eb462dbdda5f2.jpg)
REAL-TIME REC
The song returns to the start position.
![ZOOM RT-323 - To change the song tempo, hold down the [TEMPO] key and use the [ ] / [ ] keys or the [VALUE] dial while the song is playing (or stopped). - 12](/content/2025/01/152246/images/834ce4dc826065eb7376f964c965cac36f87aec39811a603ca30598272dcff04.jpg)
If you press the [▶II] key instead of the [■] key, the unit goes into pause mode. Pressing the [▶II] key again resumes playback. During pause, you can use the [VALUE] dial to adjust the position in measure units.
Real-time Song Input
This section explains how to record songs in real time by assigning patterns to pads and playing them by hitting the pads in the desired sequence.
Assigning a pattern to a pad
To perform real-time input of a song, you must first assign the patterns to be used in the song.
In song mode, use the [] / [] keys or the [VALUE] dial to select an empty song.
When you select an empty song, the indication "EMPTY" is shown in the song name field.

- In the factory default condition, songs 00 - 11 have various patterns assigned to the pads. (For more information, see the list at the end of this manual.)
- When you select a song for which "EMPTY" is shown (in the factory default condition songs 12 - 99), the pattern-to-pad assignment of the most recent song is used automatically.
2 Press the [PAD FUNCTION] key.


The various pad settings can now be edited.
3 Press the pad to which you want to assign a pattern.
You can now assign a pattern to the selected pad.
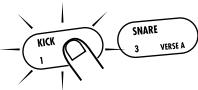

4 Use the [VALUE] dial to select the pattern number (000 - 399, U00 - U99).
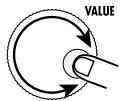
5 Repeat steps 3 - 4 to assign patterns to other pads.
6 When the required patterns have been assigned, press the [EXIT] key.
The unit returns to the song mode.
When you hit a pad in this condition, the pattern assigned to the pad is played. This allows you to play the backing for a song by switching patterns in real time. This is similar to groove play mode, but you cannot play multiple patterns at the same time, and the pattern switching occurs only at the measure (or beat) change.

The pattern information assigned to the pads is stored for each song individually.
Changing the playing information of a pattern assigned to a pad
In song mode, you can transpose the pitch of a pattern assigned to a pad, and select the operation that will be performed after the pattern is played.
1 In song mode, while the song is stopped, press the [PAD FUNCTION] key.
2 Hit the pad with the pattern you want to edit.

3 Use the [] / [] keys to select the parameter from the following.
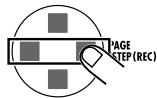
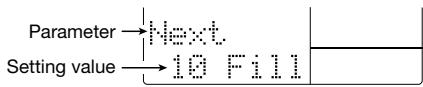
The parameters and setting ranges are as shown in the following table.
| Parameter | Content | Setting Range |
| Ptn | Pattern number assigned to pad | 000 – 399,U00 –U99 |
| Dr B | Drum B track playing information | 000A –399A, U00A –U99A, 000b –399b, U00b –U99b |
| Bass | Bass track playing information | 000 –399, U00 –U99 |
| Transp | Bass track transpose setting | -12 – 0 –12 (Semitone units) |
| Next | Operation when number of measures set with BARLEN is exceeded | 1 - 13: Play pattern of specified pad 1 Fill - 13 Fill: Switch pattern at beat boundary STOP: Stop play |

The Next parameter specifies which operation occurs when the pattern assigned to the pad was played. If set to "1" - "13", the specified pattern is played. If set to "1 Fill" - "13 Fill", the specified pattern is also played, but pattern switching occurs at the bar boundary. If set to "STOP", playback stops at that point (suitable for ending patterns).

Use the [VALUE] dial to change the setting value.


To terminate the editing process, press the [EXIT] key.


The unit returns to the song mode.

When hitting pads for song real-time input, the parameter settings will be recorded as song events.
Recording a pattern sequence
After all patterns to be used in a song have been assigned to patterns, hit the pads in the desired sequence to record the song.

Use the [] / [] keys to select the song for which the pattern have been assigned.


Hold down the [REC] key and press the [ ] key.
The unit goes into standby mode for real-time song input.

STEPREC

PLAY


STOP


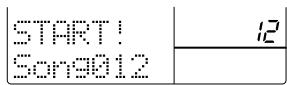

Hit the pad with the first pattern.
This starts the real-time input mode, and the pattern is played back. Also when you release the pad, the pattern will continue to play until the preset number of measures is reached, or until another pad is hit. The display shows the current measure and beat.
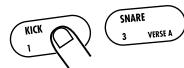
Pad with first pattern


To switch the pattern, hit the pad for the pattern within the immediately preceding measure.

Pad with next pattern
Measure number
for recording

Pad with
pattern A
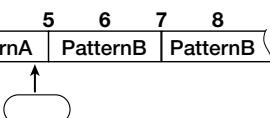
Pad with
pattern B
The pattern assigned to the pad is reserved, and will start playing from the beginning of the next measure.

When you hit a pad for which the Next parameter ( p. 58) is set to "1 Fill" - "13 Fill", the unit switches to the new pattern at the bar boundary. Because the new pattern also starts at the bar boundary, there is no bar change for this measure.

Record other patterns in the same way.

To terminate real-time input, press the [ ] key.
Real-time input stops at the beginning of the next measure.

- When wanting to automatically end real-time input after a certain pattern (for example an ending pattern), has played, set the NEXT parameter of the pad to "STOP" ( p. 58).
- A song created with real-time input can be edited in the same way as a song created with step input. For details, see page 61.
Song Step Input
For song step input, you enter various information (pattern, tempo, bass transpose, etc.) separately, while the RT-323 is in the stop condition. To do this, proceed as follows.
Pattern information step input
You can enter patterns one by one in the desired playing sequence. This is suitable for example to create the backing for a song arrangement.
In song mode, use the [] / [] keys or the [VALUE] dial to select an empty song.
Press the [REC] key.
The [●REC] key lights up, and song step input becomes possible. The display shows the current measure and beat.
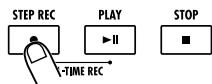
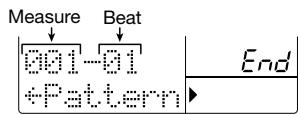
Use the [INSERT] key to bring up the indication "INSERT?" on the display.
The pattern for input to the song can be selected.
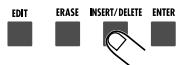
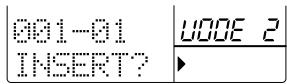

When the indication "End" is shown on the display, you can use the [VALUE] dial to call up the indication "INSERT?"
Use the [VALUE] dial to select the number of the pattern to assign to the first step (000 - 399, U00 - U99).
The pattern number and duration (number of measures) are shown on the display.
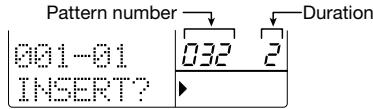

- If a user pattern is empty, the indication "E" is shown to the right of the pattern number.
- If you input an empty user pattern into a song, the sound will be muted for the duration of the pattern. (The duration is shown on the display.)
5 If required, use the [] / [] keys to change the duration of the pattern.
The pattern duration can be adjusted in the range of 1 - 99. If you make it longer than the original setting, the same pattern will be repeated. If you make it shorter, the pattern will be cut off midway when switching to the next pattern.
6 To enter the selected pattern, press the [ENTER] key.
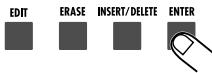

To check the entered pattern, you can play the pattern with the [ ] / [ ] keys.
To enter the next pattern, press the [▶] key.
The current position advances for the duration of the pattern.
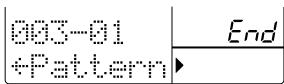

By using the [] / [] keys during pattern input, you can move directly to pattern information that has already been entered.
8 Repeat steps 3 - 7 to select the patterns for a song.
If you make a mistake during input, you can correct it as follows.
To change an entered pattern
Use the []/[] keys to move to the respective pattern, and use the [VALUE] dial to select a new pattern.
To insert a new pattern
Use the [] / [] keys to move to the respective pattern, and carry out steps 3 - 6. This inserts a pattern at the current position, and shifts all later patterns back by the duration of the inserted pattern.
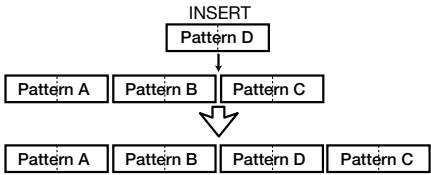
To delete a pattern
Use the [] / [] keys to move to the pattern you want to delete, and press the [ERASE] key. The song length remains the same, but the current pattern information is deleted. The display indication changes to " Pattern". This means that the preceding pattern will continue to play.
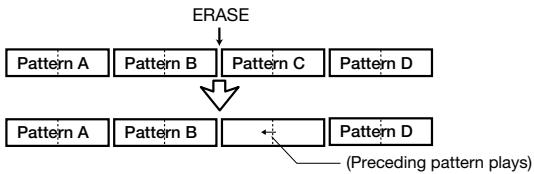

If you delete the first pattern in a song, the sound will be muted until the next pattern information.
To delete a measure
Use the [] / [] keys to move to the start of the measure you want to delete, and press the [DELETE] key. The indication "DELETE?" appears on the display. Press the [ENTER] key to delete the measure from the current song. Subsequent patterns are shifted forward. If you delete the first measure of a 2-measure pattern, the first measure remains in the song, with the indication " Pattern". This means that the immediately preceding pattern is played. If required, delete this measure using the same procedure.
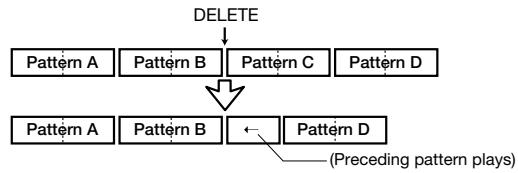
9 When one song is completed, press the [ ] key.
The [ REC] key light goes out, and song step input is terminated.
When you press the [ ] key, the song is played.
Switching midway to another pattern
It is also possible to have the unit switch to another pattern while a pattern is playing. For example, you could change the second half of a 2-measure pattern to a fill-in 1-measure pattern.
1 In song mode, select the song and press the [REC] key.
The [REC] key lights up, and song step input becomes possible.
2 Press the [A] key.
The indication "EV " is shown on the display. While this indication is shown, you can use the [▲]/[▶] keys to adjust the position in measure units. Other indications such as "PT" or "TS" to the right of "EV " denote event information for the current position. (For details, see page 66.)
![ZOOM RT-323 - Press the [A] key. - 1](/content/2025/01/152246/images/8afb1f311ea66e4e78da075e6f660493b1d934e7284c3ce71931569bb3bf91fb.jpg)
![ZOOM RT-323 - Press the [A] key. - 2](/content/2025/01/152246/images/41d384fdac4e4e268d75d286d79aba013d843e15e072234afd18736340c26093.jpg)
Use the [] / [] keys to move to the measure where you want to input pattern information.
![ZOOM RT-323 - Use the [] / [] keys to move to the measure where you want to input pattern information. - 1](/content/2025/01/152246/images/f6f04145e809f14c784dab8eb64d6fb57fe737dee3199dfe3b5b3ae609f69b31.jpg)
![ZOOM RT-323 - Use the [] / [] keys to move to the measure where you want to input pattern information. - 2](/content/2025/01/152246/images/31e93595aa3ff70d7ca5da738992503e624ad9641d40f1202571247ba229ed24.jpg)
When wishing to input pattern information midway in the measure, use the [STEP] key to shift the current position.
With each push of the [STEP] key, the current position is shifted by a sixteenth note (24 ticks).
![ZOOM RT-323 - When wishing to input pattern information midway in the measure, use the [STEP] key to shift the current position. - 1](/content/2025/01/152246/images/fe634204f453f91d4048a9d5e43b4ac4b26c7fa83ccb250b7859323d17141185.jpg)
![ZOOM RT-323 - When wishing to input pattern information midway in the measure, use the [STEP] key to shift the current position. - 2](/content/2025/01/152246/images/c32f367d7fea2e7d2b9a8a179410b620c3dcd11983ad46a36bf152235b0fed5e.jpg)
![ZOOM RT-323 - When wishing to input pattern information midway in the measure, use the [STEP] key to shift the current position. - 3](/content/2025/01/152246/images/599e020f1d5fde530798ff00025c390c86a0c41294c3a2940d59e0b3944b31fc.jpg)
The [STEP] key cannot be used to move back. If you have moved past the desired position, use the [▲] key to return to the start of the measure, and then start over with the [STEP] key.
Press the [] key once.
Pattern information can be input at the current position.
![ZOOM RT-323 - Press the [] key once. - 1](/content/2025/01/152246/images/099e9ba158d625735d0cd7e7c73ed53198cdbe70bfc0f1e0fc25544865e64133.jpg)
![ZOOM RT-323 - Press the [] key once. - 2](/content/2025/01/152246/images/dd862e7472ecf37046fe4638001aeffff9132b1f28dcfe7e95f26570720234c5.jpg)
![ZOOM RT-323 - Press the [] key once. - 3](/content/2025/01/152246/images/1266d45cd7b518a8888bd030709bca6bdd9b914fc3832c2a237b2fb14fd02adf.jpg)
Also while the "EV→" indication is not shown, you can use the [STEP] key to shift the current position by a sixteenth note (24 ticks). In this case, the current tick count is shown only while the [STEP] key is pressed.
6 Use the [VALUE] dial to select the pattern for input.
Immediately after turning the [VALUE] dial, pattern information is input for the current position. When pattern information is input midway in a measure, the indication "F" appears to the right of the pattern number.
![ZOOM RT-323 - Use the [VALUE] dial to select the pattern for input. - 1](/content/2025/01/152246/images/359012c1e68df27dd5070166cb5d0bd9ce4b6d3003da1d80e9dccfddfd09233b.jpg)
If the pattern was switched midway in a measure, the new pattern does not play from the beginning, but from the point where the pattern is switched.
![ZOOM RT-323 - Use the [VALUE] dial to select the pattern for input. - 2](/content/2025/01/152246/images/45271ddedadf86b18c4084bea47709c26888133336eefe3b3d931e43f8004456.jpg)
![ZOOM RT-323 - Use the [VALUE] dial to select the pattern for input. - 3](/content/2025/01/152246/images/fbdad2d7fbc97b21cc350d705f5e3241a7842880a10bd63bd4f6dc91b3502cb0.jpg)
- The pattern entered here is repeated until the point where the next pattern information exists.
- When you press the [ENTER] key for a pattern with "F" appended to the number, the "F" indication disappears and the pattern starts from the beginning. (In this case, the current position becomes the new start of the measure.) By pressing the [ENTER] key again, you can return to the pattern with "F".
Press the [ ] key to terminate the operation.
Transposing the bass track
This section explains how to shift (transpose) the pitch of the bass track of a pattern input for a song. Using the transpose function, you can create various chord progressions from a small number of patterns.
In song mode, select the song, and press the [●REC] key.
The [REC] key lights up, and song step input becomes possible.
Use the [ ] / [ ] keys to call up "Transps" on the display.
Transpose information can now be entered or edited. If there is already transpose information at the current position, the setting value is shown.


When pattern information is input, transpose information with a zero value is also input.
Use the [] / [] keys to move to the measure where you want to enter transpose information.
While "Transps" is shown, you can use the [] / [] keys to shift the current position in measure units. (If transpose information is entered within a measure, you can move to that position.)
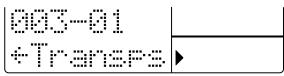

- The transpose information need not be input at the same position as the pattern information. It can be input at the start of any measure in a pattern, or within a measure.
- If no transpose information is input for the current point, the indication " " is shown. This means that the preceding transpose information continues to apply.
4 To transpose from midway through a measure, use the [STEP] key to adjust the current position.
With each push of the [STEP] key, the current position is advanced by one sixteenth note (24 ticks).
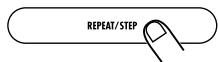

- The current tick count is shown while the [STEP] key is pressed.
- The [STEP] key cannot be used to move back. If you have moved past the desired position, use the [▲] key to return to the start of the measure, and then start over with the [STEP] key.
Use the [VALUE] dial to set the transpose value.
The transpose value can be set in semitone steps over the range of -12 (1 octave lower) - 0 - 12 (1 octave higher).
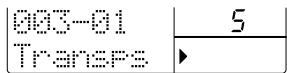

The entered transpose information remains valid until the next transpose input.
6 Repeat steps 3 - 5 to enter any desired transpose information at other points.
To terminate the operation, press the [ ] key.
Replacing the drum B/bass track
The drum B track or bass track of the pattern used in a song can be altered to that of a different pattern. This is useful for example to utilize the fill-in phrase from another pattern after pattern input for a song has been completed.
1 In song mode, select the song, and press the [●REC] key.
Use the [] / [] keys to move to the position of the pattern where you want to replace the drum B track/bass track.
Use the [ ] / [ ] keys to call up _DrBPTN (to replace the drum B track) or _BasPTN (to replace the bass track) on the display.
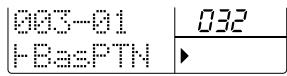

In this condition, you can use the [] / [] keys to move the current position in measure units.
4 To change the play contents from within a measure, use the [STEP] key to shift the current position.
With each push of the [STEP] key, the current position is advanced by one sixteenth note (24 ticks). If you have moved past the desired position, use the [←] key to return to the start of the measure, and then start over with the [STEP] key.
Use the [VALUE] dial to select a setting from the following.

Replacing the drum B track (DrBPTN)
- Pattern numbers ending in A (Example: 001A, U99A)
Will be replaced by the contents of the drum A track of the applicable pattern.
- Pattern numbers ending in b (Example: 001b, U99b)
Will be replaced by the contents of the drum B track of the applicable pattern.
Replacing the bass track (BasPTN)
- Pattern number (Example: 001, U99)
Will be replaced by the bass track contents of the respective pattern.

The contents replaced as described here will remain effective until the point where the next pattern information is input.
If the track contents were switched midway in a measure, the new contents are not played from the beginning, but from the point where the switch was made.
6 To terminate the operation, press the [ ] key.
Step input for various events
During step input of a song, you can not only enter pattern information and transpose information, but also add various other information such as the volume and sound of each track (drum kit/bass program). Such pieces of information are called "events". This section describes how to add new events and change the setting value of existing events.
In song mode, select the song you want to edit, and press the [REC] key.
Use the [] / [] keys to select one of the following event types for editing.
![ZOOM RT-323 - Use the [] / [] keys to select one of the following event types for editing. - 1](/content/2025/01/152246/images/e9e1ca2312d86eaaface45f52643ef6986bfde4e0f2093585a4552938bbae340.jpg)
Editable event types along with setting range and setting resolution are listed below.
| Event type | Symbol | Content | Setting range |
| Pattern | ... | Pattern number | 000 399, U00 - U99 |
| Transps | ... | Bass track transpose information | -12 - 0 - 12 (semitone units) |
| Tempo | ... | Tempo information | 40 - 250 (BPM) |
| DrBPTN | ... | Drum B track play information | ----, 000A - 399A, U00A - U99A, 000b - 399b, U00b - U00b |
| BasPTN | Bass track play information | ---, 000 - 399, U00 - U99 | |
| DrAKIT | Drum A track drum kit | 00 - 127 | |
| DrBKIT | Drum B track drum kit | 00 - 127 | |
| BasPRG | Bass track bass program | 00 - 54 | |
| DrAVOL | Drum A track volume | 0 - 15 | |
| DrBVOL | Drum B track volume | 0 - 15 | |
| BasVOL | Bass track volume | 0 - 15 |
![ZOOM RT-323 - Use the [] / [] keys to select one of the following event types for editing. - 2](/content/2025/01/152246/images/ccea2510e97ed9f6f7145c90d8ce26f2245fcfb2690619aa03a52775d05e1427.jpg)
- The smallest unit for entering each event information is one sixteenth note.
- When the DrBPTN event was set to "----" or the BasPTN event to "---", the respective track is muted until the play information of another pattern is selected (or the pattern itself is switched).
![ZOOM RT-323 - Use the [] / [] keys to select one of the following event types for editing. - 3](/content/2025/01/152246/images/876d4a96e4c0fe932bc08d41783315ed7e7998bcc286e6796c1132257f683cba.jpg)
If you press the [▲] key while a pattern event is selected, the indication "EV→" appears on the display. While this indication is shown, the number of ticks (1/96 of a beat) for the current position is shown to the right of the measure and beat, and movement in steps of 24 ticks is possible. (While "EV→" is displayed, pattern event input or editing is not possible.) Pressing the [▼] key turns off the "EV→" indication and returns to the pattern event selection mode.
Use the [] / [] keys to move to the position where you want to input event information.
If there is an event for the current position, the display will show its value. If there is no event for the current position, " " is shown on the display. This indicates that the last event setting is still active.
![ZOOM RT-323 - Use the [] / [] keys to move to the position where you want to input event information. - 1](/content/2025/01/152246/images/529c866eb8b3891a7dedf1112809181c7343a855a3ad468d31625ba3e34c9095.jpg)
![ZOOM RT-323 - Use the [] / [] keys to move to the position where you want to input event information. - 2](/content/2025/01/152246/images/68399584d6da107993762eec69d4dbc270f13f599c5c55d4efbcc6894cd3806d.jpg)
- While a pattern event is displayed, you can use the [] / [] keys to directly move to points where pattern information is input (or to the end of the song).
- When another event is displayed, you can use the [] / [] keys to move in measure units. If there is an event midway in a measure, you can move to that point.
4 If required, adjust the current position with the [STEP] key.
While any event is displayed, you can use the [STEP] key to advance the current position by one sixteenth note (24 ticks).
![ZOOM RT-323 - If required, adjust the current position with the [STEP] key. - 1](/content/2025/01/152246/images/072e9a8d0b09f169843492d70a8e0a363a66737fc17a74307f5f4cab8e473ae5.jpg)
- The current tick count is shown while the [STEP] key is pressed.
- If you have used the [STEP] key to move past the target position, press the [▲] key to return to the start of the step, and then press the [STEP] key again to move to the target position.
5 Use the [VALUE] dial to enter the value.
A new event information is now entered at the current position (for information on the setting range for each event, see the table on the previous page).
![ZOOM RT-323 - Use the [VALUE] dial to enter the value. - 1](/content/2025/01/152246/images/cccca8a16971e64aa9d6acc0477d63473b0ac9a44e41e343a362d893922709c8.jpg)
6 Repeat steps 2 - 5 until all required events have been input.
Any entered events can be edited as shown below.
Changing the event setting value
Use the [] / [] keys to select the event type. Use the [] / [] keys and [STEP] key to move to the position of the event you want to modify, and use the [VALUE] dial to change the setting.
- Deleting an event
Use the [] / [] keys to select the event type. Use the [] / [] keys and [STEP] key to move to the position of the event you want to delete, and press the [ERASE] key.
To add or edit events, press the [ ] key.
Copying Specific Measures
You can use measure units to copy a part of a song for which pattern information has been input.
This is useful for example to repeat parts of a song.
1 In song mode, press the [●REC] key.
The [REC] key lights up.
Press the [EDIT] key.
You can now specify the number of the first measure of the copy source.
Use the [VALUE] dial to specify the first measure number of the copy source, and then press the [ENTER] key.

Use the [VALUE] dial to specify the last measure number of the copy source, and then press the [ENTER] key.

Use the [VALUE] dial to specify the first measure number of the copy target.


If the copy target range exceeds the end of the song, the song duration is automatically extended.
6 To execute the copy process, press the [ENTER] key.
Deleting a Song
You can delete the currently selected song, to return it to the empty condition.
In song mode, select the song you want to delete.
Press the [DELETE] key. The following indication appears on the display.
3 To carry out the delete process, press the [ENTER] key. To cancel the process, press the [EXIT] key.
When you carry out the delete process, the unit will return to the song mode with the empty song selected.

When you delete a song, the song and MIDI track recording contents as well as the patterns assigned to the pads are also deleted.
Copying a Song
The currently selected song can be copied to any other song.
1 In song mode, select the copy source song and press the [EDIT] key.
Use the [] / [] keys to bring up the indication "COPY?" on the display, and press the [ENTER] key.
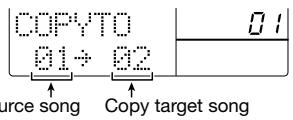
3 Use the [] / [] keys or the [VALUE] dial to specify the number of the copy target song.
4 To execute the copy process, press the [ENTER] key. To cancel the process, press the [EXIT] key.
When the copy is completed, the unit returns to the condition of step 1. To return to song mode, press the [EXIT] key.

If there is a song already stored in the copy target number, its contents will be overwritten by the new song.
Song Track Operation
The song tracks are special auxiliary tracks which are separate from the pattern information recorded for that song. These allow you to record pad playing information. For example, you could add some fill-in parts after you have finished a song.
A song in the RT-323 has three song tracks: drum A, drum B, and bass. The sound (drum kit/bass program) used by each track is the same as for the drum A/drum B/bass pattern track.

You can also select an empty song where no pattern information is recorded, and record on the song track. Later, you may add pattern information to such a song for which only the song track is recorded.
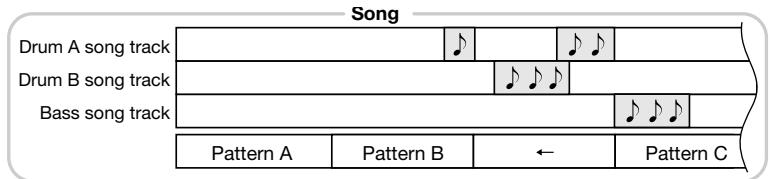
Real-time input of drum/bass to song track
This section explains how to perform real-time input of drum/bass phrases on a song track. (The song tracks do not support step input.)
In song mode, press the [SONG TRACK] key while the song is stopped.
The [SONG TRACK] key lights up.
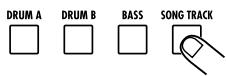
2 Use the [DRUM A]/[DRUM B]/[BASS] key to select the song track to record.
The selected key lights up, and the respective song track is selected. When you hit pads 1 - 13 in this condition, the sound of the drum kit/bass program assigned to the selected track is heard.
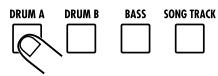
Hold down the [REC] key and [II] key.
Song playback starts, and song track real-time input becomes possible.
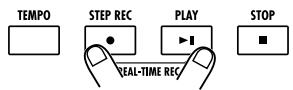
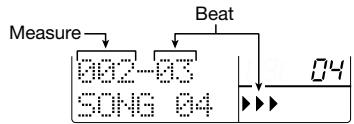
To start recording from halfway into a song, press the [▶II] (pause) key during recording, and then use the [VALUE] dial to move to the measure where you want to start. Press the [▶II] key to start recording.
While listening to the song, hit the pads.
Your pad play is recorded.
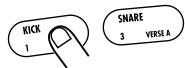

- In the factory default condition, the quantize setting of the RT-323 is a sixteenth note, but this setting can be changed if desired ( p. 72).
- Instead of hitting pads, you can also play a MIDI keyboard or other component connected to the [MIDI IN] jack and record the performance on the drum A/drum B/bass tracks.
- The song track can hold up to 999 measures, regardless of the length of the currently selected song.

- If the duration of the contents of the song track is longer than the duration of the song, the end point of the song track will become the new end point of the song. In this case, the last pattern entered for the song is repeated until the new end point.
5 To record JAM slider operation on the song track, select the parameter with the [JAM FUNCTION] key and then move the JAM slider while pressing the pad.
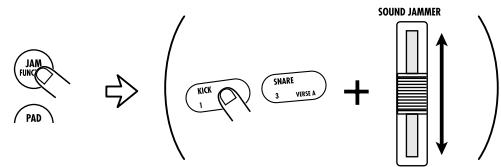
When you move the JAM slider while holding down the pad, you can record changes in pitch, volume, panning position, and sound. (For details on using the JAM slider, see page 31.)
6 To stop the recording, press the [■] key.
Song track recording stops. (When the end of the song is reached, song track recording stops automatically.) When you press the [▶■] key, the recorded song track is played back along with the song.

- If you hold down the [MUTE] key and press the [SONG TRACK] key, you can mute the entire song track. Performing the same step once more cancels the mute condition.
- The song track can be rerecorded without affecting the contents of a recorded song.
- If you hold down the [ERASE] key and press the [DRUM A]/[DRUM B]/[BASS] key during song track recording, you can mute the sound of the respective pad (or song track).
To cancel the song track selection, press the [SONG TRACK] key.
The [SONG TRACK] key light goes out. Also when the [SONG TRACK] key is out, the song track will be played back when the song is played.
Deleting a song track
The contents of each song track (drum A/drum B/bass) entered with real-time input can be deleted selectively.
1 Select the song from which you want to delete a song track, and press the [SONG TRACK] key.
The [SONG TRACK] key lights up.
Press the [ERASE] key, and use the [DRUM A]/[DRUM B]/[BASS] key to select the song track.
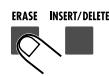


3 To delete, press the [ENTER] key. To cancel the process, press the [EXIT] key.
Editing Song Settings
This section describes how to alter settings that affect the entire song, such as tempo, song name, etc.
Transposing an entire song
The bass track of an entire song can be transposed in semitone steps. This setting also affects the bass song track.
In song mode, select the song whose settings you want to change, and press the [EDIT] key.
Use the [] / [] keys to bring up the indication "KEY" on the display.
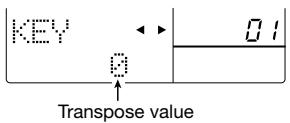
Use the [] / [] keys to set the transpose value.
The setting range is -6 - 0 - 6 (semitones).
4 When the setting is complete, press the [EXIT] key.
The setting is updated, and the unit returns to the song mode.

This setting does not affect the MIDl track data.
For information about the MIDl track, see page 91.
Setting the quantize value
For recording the song track, the quantize value must be set. In song mode, the [EDIT] key needs to be pressed first, but otherwise the procedure is the same as when setting the quantize value in pattern mode. For details, see page 50.
Song repeat playback setting
You can set song repeat to on or off, and you can control the repeat range.
In song mode, select the song whose settings you want to change, and press the [EDIT] key.
Use the [] / [] keys to bring up the indication "REPEAT" on the display.

3 Use the [] / [] keys to specify the number of the measure where repeat playback is to be triggered.
Possible settings are OFF (repeat playback disabled) and 1 - last measure of song. When a setting of 1 or higher is selected, the song plays up to the specified measure number and then is automatically repeated.
4 When the setting is complete, press the [EXIT] key.
The setting is updated, and the unit returns to the song mode.
Changing the song name
When a song is newly created, the name "SONG xxx" (where xxx is the song number) is automatically assigned.
In song mode, select the song whose name you want to change, and press the [EDIT] key.
Use the [] / [] keys to call up "NAME" on the display.
The song name is shown under "NAME" with an underline.
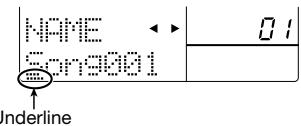
3 Use the [] / [] keys to move the underline, and use the [] / [] keys or the [VALUE] dial to select the desired character. (For a list of usable characters, see page 36.)
4 When the song name has been changed, press the [EXIT] key.
The unit returns to the song mode.
Application Guide [SmartMedia]
This section describes various uses of the SmartMedia card facility.
Formatting a SmartMedia Card
Before a SmartMedia card can be used for saving and loading data, it must be formatted (initialized) as follows.

The formatting process erases any data already present on the SmartMedia card. These data cannot be restored.
Insert the SmartMedia card into the [DATA CARD] slot on the side panel of the RT-323.
For information on how to insert the SmartMedia card, see page 5.
Press the [UTILITY] key, and use the []/[] keys to call up "CARD?" on the display.


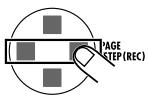
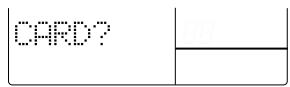
Press the [ENTER] key, and use the []/[] keys to call up "FORMAT" on the display.


If the indication "NOCARD" appears, the SmartMedia card is not recognized. Make sure that the SmartMedia card is inserted properly in the [DATA CARD] slot and that the metal section of the card is not dirty.
4 Press the [ENTER] key.
The indication "SURE?" appears on the display.
To execute the formatting process, press the [ENTER] key. To cancel the process, press the [EXIT] key.
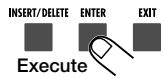
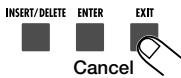
When formatting is completed, the indication "Done" appears on the display. To return to the pattern/song mode, press the [EXIT] key.
Saving Data on the SmartMedia Card
The entire data of the RT-323 can be saved (stored) on a formatted SmartMedia card as a file.
Insert a formatted SmartMedia card into the [DATA CARD] slot on the side panel of the RT-323.
Press the [UTILITY] key, and use the []/[] keys to call up the indication "CARD?" on the display. Then press the [ENTER] key.
Use the []/[] keys to call up the indication "SAVE" on the display. Then press the [ENTER] key.

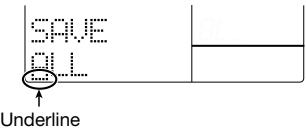
4 To give a name to the file to be saved, use the [<]/[>] keys to move the underline, and use the [VALUE] dial to change the character.
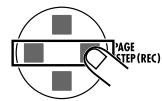

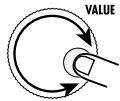
The following characters can be used.
Letters: A-Z
Numerals: 0 - 9
Symbols: ! # $ % ' _ [ ] ^ - { }
On the same SmartMedia card, there cannot be duplicate file names.
Press the [ENTER] key.
The indication "SURE?" appears on the display. If a file with the same name already exists on the SmartMedia card, the indication "Over Wr?" appears on the display.
To carry out the save process, press the [ENTER] key. To cancel the process, press the [EXIT] key.
When data saving is complete, the indication "Done" appears on the display. To return to the pattern/song mode, press the [EXIT] key several times.

- While the SmartMedia card is being accessed, the symbol shown at right appears on the display. While this symbol is shown, never remove the SmartMedia card or turn off the unit. Otherwise the data may be destroyed.
CARD


- If the indication "CARDFULL" appears while saving data, there is not enough free space on the SmartMedia card. Delete unnecessary data first ( p. 78).
Loading Data from the SmartMedia Card
To load saved data from the SmartMedia card into the RT-323, proceed as follows.
1 Insert the SmartMedia card with the saved data into the [DATA CARD] slot on the side panel of the RT-323.
Press the [UTILITY] key, and use the []/[] keys to bring up the indication "CARD?" on the display. Then press the [ENTER] key.
Use the [] / [] keys to call up the indication "LOAD", and press the [ENTER] key.

Use the [] / [] keys to select the file with the data you want to load, and press the [ENTER] key.
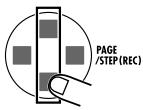
The indication "SURE?" appears on the display.

If the indication "ERROR" appears, the SmartMedia card is defective or the data are damaged. Try formatting the card again.
5 To carry out the loading process, press the [ENTER] key. To cancel the process, press the [EXIT] key.
When data loading is complete, the indication "Done" appears on the display. To return to the pattern/song mode, press the [EXIT] key several times.
Partial Import of Data from a SmartMedia Card
From any file stored on a SmartMedia card, you can load partial data such as song information, user pattern information, user drum kit information, etc.
1 Insert a SmartMedia card containing RT-323 data into the [DATA CARD] slot on the side panel.
Press the [UTILITY] key, and use the []/[] keys to bring up the indication "CARD?" on the display. Then press the [ENTER] key.
Use the [] / [] keys to call up the indication "IMPORT" on the display, and press the [ENTER] key.

Use the [] / [] keys to select the file from which you want to import data, and press the [ENTER] key.
Use the [] / [] keys to select the type of data you want to import, and press the [ENTER] key.

- KIT: Specified user drum kit
- PTN: Specified user pattern
- SONG: Specified song
GLOBAL: General RT-323 settings
If you have selected KIT/PTN/SONG as data to import, proceed to the next step.
KIT was selected
(1) Use the [ ] / [ ] keys to select the number of the user drum kit to use as import source, and press the [ENTER] key.
(2) Use the [] / [] keys to select the number of the user drum kit to use as import target.
- PTN was selected
(1) Use the [] / [] keys to select the number of the user pattern to use as import source, and press the [ENTER] key.
(2) Use the [] / [] keys to select the number of the user pattern to use as import target.
- SONG was selected
(1) Use the [] / [] keys to select the number of the song to use as import source, and press the [ENTER] key.
(2) Use the [ ] / [ ] keys to select the number of the song to use as import target.

If the song selected as import source contains user patterns, the respective user patterns will also be imported automatically, and empty user patterns are assigned as import target. (If there are no empty user patterns, allocation will be made sequentially, starting from user pattern number U00.)
7 Press the [ENTER] key.
The indication "SURE?" appears on the display.
8 To carry out the import process, press the [ENTER] key. To cancel the process, press the [EXIT] key.
When data importing is complete, the indication "Done" appears on the display. To return to the pattern/song mode, press the [EXIT] key several times.
Deleting Data From the SmartMedia Card
Files saved on the SmartMedia card can be selectively deleted. If there is not enough space on the card to save new data, you can delete data that is no longer needed.
1 Insert a SmartMedia card containing RT-323 data into the [DATA CARD] slot on the side panel.
Press the [UTILITY] key, and use the []/[] keys to bring up the indication "CARD?" on the display. Then press the [ENTER] key.
Use the [] / [] keys to call up "DELETE" on the display, and press the [ENTER] key.

Use the [] / [] keys to select the file to be deleted, and press the [ENTER] key.
![ZOOM RT-323 - Use the [] / [] keys to select the file to be deleted, and press the [ENTER] key. - 1](/content/2025/01/152246/images/54ce2dfc0ebdda41ee6f8d043cac9c638746a12b5eea610aadfeec8cb2ad6cb8.jpg)
5 To carry out the delete process, press the [ENTER] key. To cancel the process, press the [EXIT] key.
When data deleting is complete, the indication "Done" appears on the display. To return to the pattern/song mode, press the [EXIT] key several times.
Import/Export of PS-02 SmartMedia Data
The RT-323 is compatible with pattern data of the ZOOM Palmtop Studio PS-02. This section explains how you can import data saved on a SmartMedia card with the PS-02, and how you can export RT-323 data to the PS-02.
Reading a PS-02 pattern into the RT-323 (pattern import)
You can read in PS-02 pattern data stored on a SmartMedia card into the RT-323 as user pattern data. It is also possible to edit the pattern with the RT-323 and then write it back to the PS-02 SmartMedia card.
Insert a PS-02 start-up SmartMedia card into the [DATA CARD] slot on the side panel of the RT-323.
![ZOOM RT-323 - Insert a PS-02 start-up SmartMedia card into the [DATA CARD] slot on the side panel of the RT-323. - 1](/content/2025/01/152246/images/25675f4555b22b3328ff930a22acc29a64fc3488121f1cf42b57ab270802700c.jpg)
When you edit pattern data on the RT-323 and then write the data back to the PS-02 SmartMedia card, the original data will be overwritten. If you want to keep the original pattern of the PS-02, create a backup of the PS-02 SmartMedia card first. (For details, refer to the PS-02 Operation Manual.)
Press the [UTILITY] key, and use the []/[] keys to call up "PS-02?" on the display. Then press the [ENTER] key.
![ZOOM RT-323 - Press the [UTILITY] key, and use the []/[] keys to call up "PS-02?" on the display. Then press the [ENTER] key. - 1](/content/2025/01/152246/images/ffd566ab822609750889bb7aaff4d115ed3533825acfa961fa78c71abc9eb861.jpg)
Use the [] / [] keys to call up the indication "IMPORT" on the display, and press the [ENTER] key.
You now can select a pattern to import from the PS-02 SmartMedia card.
![ZOOM RT-323 - Use the [] / [] keys to call up the indication "IMPORT" on the display, and press the [ENTER] key. - 1](/content/2025/01/152246/images/30c44427de3d9d65c8dddcec3b591a2f545e9f5dcedb750be83c35c915f9b688.jpg)
Use the [] / [] keys or the [VALUE] dial to select the pattern, and press the [ENTER] key.
The target user pattern number is shown on the display.
![ZOOM RT-323 - Use the [] / [] keys or the [VALUE] dial to select the pattern, and press the [ENTER] key. - 1](/content/2025/01/152246/images/2cb68b8a32e14d4a0dcf22bb186c5b5feff9e736f8285c308848374c5447c3c2.jpg)
Use the [] / [] keys or the [VALUE] dial to select the target user pattern in the RT-323.
To carry out the import process, press the [ENTER] key. To cancel the process, press the [EXIT] key.
When data read-in is complete, the indication "Done" appears on the display. To return to the pattern/song mode, press the [EXIT] key several times.
The imported pattern can be edited in the same way as a normal pattern, using edit mode.
![ZOOM RT-323 - To carry out the import process, press the [ENTER] key. To cancel the process, press the [EXIT] key. - 1](/content/2025/01/152246/images/fa31c69699f54987741d5076b4f3727efe7f2dac3b3ad66ac85d3f16758ead5f.jpg)
- When changing the sound (drum kit/bass program) of pattern data imported to the RT-323, select only PS-02 compatible sounds. (For details, see the list at the end of this documentation.) If you select RT-323 specific drum kit/bass program sounds and export the data to the PS-02, normal playback may not be possible.
- Do not change the names of patterns imported to the RT-323. Otherwise the pattern name may not display correctly after the pattern is exported again to the PS-02.
- The bass line included in PS-02 pattern data is imported with the "C" root (no transposition) and "NON" chord (no transformation) setting.
- When editing the bass track of an imported pattern on the RT-323, note that entering a phrase with a different root or chord type may result in improper playback when the data are exported again to the PS-02.
Writing a RT-323 pattern to a PS-02 SmartMedia card (pattern export)
After editing pattern data imported from the PS-02 to the RT-323, you can write the data to the PS-02 SmartMedia card again. This lets you then use the pattern data in the PS-02.
Insert a PS-02 start-up SmartMedia card into the [DATA CARD] slot on the side panel of the RT-323.
![ZOOM RT-323 - Insert a PS-02 start-up SmartMedia card into the [DATA CARD] slot on the side panel of the RT-323. - 1](/content/2025/01/152246/images/82a445c9f243a1662042509356c63e6e262dc1ad02b94351af519e5a603753a5.jpg)
When you edit pattern data on the RT-323 and then write the data back to the PS-02 SmartMedia card, the original data will be overwritten. If you want to keep the original pattern of the PS-02, create a backup of the PS-02 SmartMedia card first. (For details, refer to the PS-02 Operation Manual.)
Press the [UTILITY] key, and use the []/[] keys to call up "PS-02?" on the display. Then press the [ENTER] key.
![ZOOM RT-323 - Press the [UTILITY] key, and use the []/[] keys to call up "PS-02?" on the display. Then press the [ENTER] key. - 1](/content/2025/01/152246/images/3d06f6ed62f359d79d57715e8e7e257edf195a01f66a2b9c8fe5ab063ea3dad9.jpg)
Use the [] / [] keys to call up "EXPORT" on the display, and press the [ENTER] key.
A PS-02 pattern on the SmartMedia card is shown as export target.
![ZOOM RT-323 - Use the [] / [] keys to call up "EXPORT" on the display, and press the [ENTER] key. - 1](/content/2025/01/152246/images/3add161f4e602155b278fb793a005e9a61a6a8bf5e0a9bb2a19bab6066dab01d.jpg)
When there is an export-enabled pattern in the RT-323, the pattern number is shown.
![ZOOM RT-323 - Use the [] / [] keys to call up "EXPORT" on the display, and press the [ENTER] key. - 2](/content/2025/01/152246/images/a12be76ccfc9f15b6e8164afa4d58c21a377cf4b438f3193f731e7c8e124890b.jpg)
When writing an edited pattern to the SmartMedia card, the data of the original pattern number on the card will be overwritten.
Use the [ ] / [ ] keys or the [VALUE] dial to select the PS-02 pattern to export to.
The RT-323 user pattern to export from is shown.
![ZOOM RT-323 - Use the [ ] / [ ] keys or the [VALUE] dial to select the PS-02 pattern to export to. - 1](/content/2025/01/152246/images/d696935108fd7168b903d00a35d29278b45c562c6df3058ec8b6ae7ec3aa6572.jpg)
Use the [ ] / [ ] keys or the [VALUE] dial to select the RT-323 pattern to export from.
To carry out the export process, press the [ENTER] key. To cancel the process, press the [EXIT] key.
When data exporting is complete, the indication "Done" appears on the display. To return to the pattern/song mode, press the [EXIT] key several times.
If you start up the PS-02 with that card, the exported pattern will be usable in the same way as an internal pattern.
![ZOOM RT-323 - To carry out the export process, press the [ENTER] key. To cancel the process, press the [EXIT] key. - 1](/content/2025/01/152246/images/c3423f2aeb042a0cfe6ac25cbed286757583b1b6dc5d8f9d6b3c23ba1817bf9d.jpg)
- The selected user pattern is exported with the contents of drum B track merged onto the drum A track.
- The maximum number of simultaneous sounds that the PS-02 can produce is four drum voices and one bass voice. If a pattern that exceeds these numbers is exported, correct playback with the PS-02 will not be possible.
Application Guide [Remote Control]
This section describes how to use the [CONTROL IN] jack in conjunction with an optional foot pedal or foot switch, to perform remote control of the RT-323.
Controlling the RT-323 With a Foot Pedal (FP01/FP02)
When you connect the separately available foot pedal (FP01/FP02) to one of the [CONTROL IN] jacks on the RT-323, you can use the FP01/FP02 instead of the JAM slider to adjust parameters such as pitch or sound change of the currently operated pad.

Connect the FP01/FP02 to the [CONTROL IN] jack on the rear panel.
For information on connections, see page 6.
![ZOOM RT-323 - Connect the FP01/FP02 to the [CONTROL IN] jack on the rear panel. - 1](/content/2025/01/152246/images/76d4ed92f4cbf4938c3dbcbcc914b5cd5256802f41826a5ada9ad36f8de3daa4.jpg)
You can connect the FP01/FP02 to the [CONTROL IN 1] or the [CONTROL IN 2] jack. The two jacks have the same function.
![ZOOM RT-323 - Connect the FP01/FP02 to the [CONTROL IN] jack on the rear panel. - 2](/content/2025/01/152246/images/e28102a64ea3c96fb8a1db482820dad169dba6a702a1f307b216158af2de497b.jpg)
Press the [UTILITY] key, and use the []/[] keys to bring up the indication "CTRLIN" on the display.
![ZOOM RT-323 - Connect the FP01/FP02 to the [CONTROL IN] jack on the rear panel. - 3](/content/2025/01/152246/images/fb478f4bb3f175eb0beef4cc0d34aef5af75162732095aa707597400799def87.jpg)
![ZOOM RT-323 - Connect the FP01/FP02 to the [CONTROL IN] jack on the rear panel. - 4](/content/2025/01/152246/images/7ee3ecf3ba787345fb7fa40d00544cdaf00033da96f3e12122103acf7eb0e122.jpg)
Operate the FP01/FP02.
The RT-323 detects the FP01/FP02, and the parameter that is controlled by the foot pedal is shown on the display.
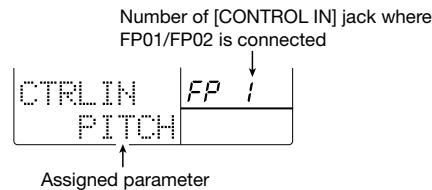

Use the [JAM FUNCTION] key to select the parameter to be controlled with the pedal.


The available settings are "PITCH", "VOLUME", "PAN" (panning), and "SOUND CHANGE" (pad sound switching).

Press the [PATTERN] key to return to pattern mode.
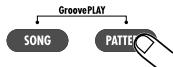

Operate the FP01/FP02 while hitting the pad.
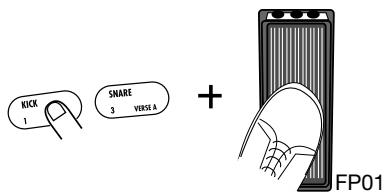
The effect of moving the pedal is the same as when operating the JAM slider.
Controlling the RT-323 With a Foot Switch (FS01)
When you connect the separately available foot switch (FS01) to one of the the [CONTROL IN] jacks on the RT-323, you can control a specific pad with the foot switch or control start/stop of song and pattern playback.

Connect the FS01 to the [CONTROL IN] jack on the rear panel.
For information on connections, see page 6.

You can connect the FS01 to the [CONTROL IN 1] or the [CONTROL IN 2] jack. The two jacks have the same function.

Press the [UTILITY] key, and use the []/[] keys to bring up the indication "CTRLIN" on the display.

Push the FS01.
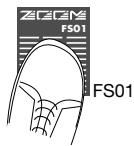
The RT-323 detects the FS01, and the parameter that is controlled by the foot pedal is shown on the display.
4 While holding down the FS01, press the key or pad that you want to control.
The function controlled by the FS01 will be assigned depending on which key or pad was operated when holding down the FS01. The available choices and the required operations are listed below.
| Push FS01 + RT-323 operation | Function | Display |
| Push one of pads 1 - 13 | In pattern mode, pushing FS01 produces sound from that pad. | (xx = pad number) |
| Push two different pads twice | The sound of the first pad can be switched with the FS01. When the FS01 is pressed, the sound of the first pad is heard. When you release the foot switch, the sound of the second pad is heard. (For example, you could use the FS01 to toggle between the sound of an open and closed hi-hat.) | PADxx→yy (xx,yy = pad number) |
| Push [■] key | In pattern mode/song mode, pushing FS01 switches through [Start play] → [Stop] → [Start play from beginning] | START |
| Push [▶■] key | In pattern mode/song mode, pushing FS01 switches through [Start play] → [Pause] → [Start play from pause position] | CONTINUE |
| Push [DRUM A]/[DRUM B]/[BASS] key | In pattern mode/song mode, pushing FS01 switches specified track muting on/off | MUTE xxx (xxx = DrA, DrB, Bas) |
| Push [TEMPO] key | In pattern mode/song mode, two subsequent pushed of FS01 specify the tempo (tap tempo input) | TAP |
| Push [REPEAT] key | In pattern mode, pushing a pad while depressing FS01 produces sound from that pad continuously | REPEAT |
Press the [PATTERN] key/[SONG] key, to return to pattern mode/song mode.
6 Operate the FS01. The FS01 performs the function set in step 4 (activating the sound of a pad or performing start/stop remote control.
Application Guide [MIDI]
This section describes the various MIDI related settings of the RT-323 and gives information on MIDI track operation.
Available MIDI Functions
The RT-323 incorporates the following MIDI functions.
- Send/receive note information
MIDI note information can be sent out when hitting the pads, and note information can be received to operate the drum kit and bass program of the RT-323 from an external component.
Send/receive control change information
Control change information triggered by JAM slider operation can be sent out. Control change information can be received to obtain the same effect as when operating the JAM slider, for adjusting the track volume or pitch.
Send/receive program change information
Program change information triggered by switching the drum kit/bass program can be sent out. Program change information can be received to switch the drum kit/bass program from an external component.
- Send/receive MIDI sync messages
MIDI sync messages such as MIDI clock, start, stop, etc. can be sent and received, to synchronize operation of the RT-323 to an external component such as a MIDI sequencer or rhythm machine.
- Save internal data as bulk dump
Internal RT-323 data and setting information can be sent out as MIDI messages and stored on an external component such as a MIDI sequencer. By sending these data back to the RT-323, a previous condition can be restored at any time.
Recording playing information on a MIDI track
The RT-323 incorporates a MIDI track which allows recording of MIDI messages in real time. This is useful for example to record a MIDI sequencer in conjunction with song accompaniment.
Changing the MIDI Setting
Basic steps
The basic steps for changing MIDI settings are similar for all MIDI items. Proceed as follows.
Press the [UTILITY] key, and use the []/[] keys to call up the indication "MIDI?" on the display.
![ZOOM RT-323 - Press the [UTILITY] key, and use the []/[] keys to call up the indication "MIDI?" on the display. - 1](/content/2025/01/152246/images/62e615ef9950ba8fff772a811b2923a134852f0a030454715a295cd3e49ab930.jpg)
![ZOOM RT-323 - Press the [UTILITY] key, and use the []/[] keys to call up the indication "MIDI?" on the display. - 2](/content/2025/01/152246/images/c22535fd3544676303d6fee652233ee07049e5ed2d1d4029243212e277d98f2d.jpg)
![ZOOM RT-323 - Press the [UTILITY] key, and use the []/[] keys to call up the indication "MIDI?" on the display. - 3](/content/2025/01/152246/images/b2ee466c4e89ddb417b4ffdcfd1a81e30c1c00979399b7c4993f94a506e33dc3.jpg)
![ZOOM RT-323 - Press the [UTILITY] key, and use the []/[] keys to call up the indication "MIDI?" on the display. - 4](/content/2025/01/152246/images/289a8c21abb79ff5f87230ead44cf3ce387b3ed59cc40b8eb64613f696b880f4.jpg)
Press the [ENTER] key, and use the []/[] keys to select the setting item.
![ZOOM RT-323 - Press the [ENTER] key, and use the []/[] keys to select the setting item. - 1](/content/2025/01/152246/images/1e758471c7e88810bfada00fdf5420c33bb82139ae18bde56ac8d8571019c040.jpg)
MIDIch: Set MIDI send/receive channel for drum A/drum B/bass separately.
CTRL: Enable/disable control change information send.
PRG: Enable/disable program change information send.
SYNC: Enable/disable MIDI send/receive of sync messages (MIDI clock etc.).
MIDI TR: Enable/disable output of data stored on MIDI track.
MIDI PC DRUM: Assign program change number to drum kit (00 - 127).
MIDI PC BAS: Assign program change number to bass program (00 - 54).
3 When the desired item is shown, use the [] / [] keys or the [VALUE] dial and other controls to make the setting.
For detailed information on operation, see the sections on the various items.
4 When the setting is complete, press the [EXIT] key.
The unit returns to the condition of step 1. To return to pattern/song mode, press the [PATTERN]/[SONG] key.
Set MIDI send/receive channel for each track (MIDlch)
This allows you to set the MIDI send/receive channel for the drum A, drum B, and bass tracks. While the indication "MIDIch" is shown on the display, use the [] / [] keys to select the track for which to set the MIDI channel. Then use the [VALUE] dial to select one of the following settings.
- 1 - 16: MIDI channel 1 - 16 (Default setting: DRUM A = 10, DRUM B = 11, BASS = 9)
- OFF: Send/receive off
HINT MIDI messages such as note information, control change information, and program change information will be sent and received in this channel.
Enable/disable control change information send (CTRL)
Determines whether the RT-323 sends control change information. While the indication "CTRL" is shown on the display, use the [] / [] keys or the [VALUE] dial to select "ON" (send enabled; default setting) or "OFF" (send disabled).

When control change send is enabled, operating the JAM slider causes control change information to be output from the [MIDI OUT] jack.

Control change receive is always On. Even if this setting is Off, control change messages sent to the [MIDI IN] jack from external equipment can be used to achieve the same effect as moving the JAM slider, or to adjust volume and pitch for a specific track. (For details on control change messages recognized by the RT-323, see the list at the end of this manual.)
Enable/disabling program change information send (PRG)
Determines whether the RT-323 sends program change information. While the indication "PRG" is shown on the display, use the [] / [] keys or the [VALUE] dial to select "ON" (send enabled; default setting) or "OFF" (send disabled).

When program change send is enabled, switching the drum kit/bass program at the RT-323 causes program change information to be output from the [MIDI OUT] jack.

- Program change receive is always On. Even if this setting is Off, program change messages sent to the [MIDI IN] jack from external equipment can be used to switch the sound (drum kit/bass program) for a specific track.
- In the factory default condition, a separate program change number is assigned to each drum kit/bass program. The program change number assignment can be changed if desired ( p. 89).
Enable/disable MIDI send/receive of sync messages (SYNC)
Determines whether the RT-323 sends and receives MIDI sync messages. While the indication "SYNC" is shown on the display, use the [] / [] keys or the [VALUE] dial to select one of the following settings.
-
INT: When the RT-323 carries out playback, MIDI sync messages are sent (default setting). This allows for example playing a MIDI sequencer in sync with the tempo of the RT-323.
-
MIDI: When MIDI sync messages are received from an external component, the RT-323 functions accordingly. This allows for example operating the RT-323 in sync with the tempo of an external MIDI sequencer.


Note that if the "MIDI" setting is selected, the RT-323 will not perform pattern or song playback unless MIDI sync messages are received.
Enable/disable output of data stored on MIDI track (MIDI TR)
This setting controls the output of data stored on the MIDI track via the [MIDI OUT] jack. (For information about the MIDI track, see page 91). While the indication "MIDI TR" is shown on the display, use the [ ] / [ ] keys to select one of the following settings.

NO OUT: Data stored on MIDI track are not output via [MIDI OUT] jack or internal sound source (default setting).
OUT: Data stored on MIDI track are sent only to [MIDI OUT] jack.
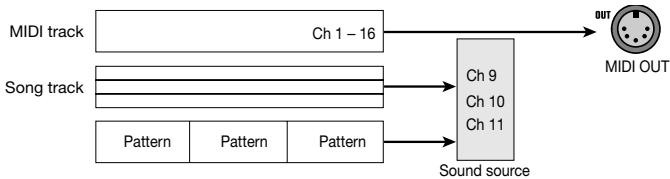
EX OUT: Among data stored on MIDI track, those matching the MIDI channel of internal sound source are sent to internal sound source, and other data are sent to [MIDI OUT] jack.
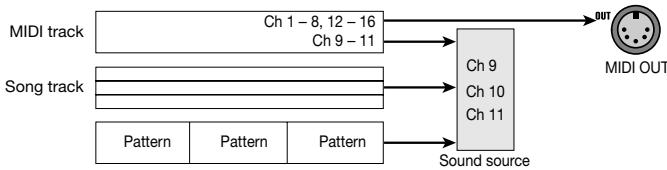

When "THRU" or "EX THRU" is selected, no MIDI messages for hitting pads or playing patterns are output via the [MIDI OUT] jack.
Assign program change number to drum kit (PC DRUM)
This item allows you to change the default program change numbers allocated to the drum kits. While the indication "MIDI PC DRUM" is shown, press the [ENTER] key, and use the [VALUE] dial to specify the drum kit number (00 - 127). Then use the [ ] / [ ] keys to set the program change number (001 - 128).
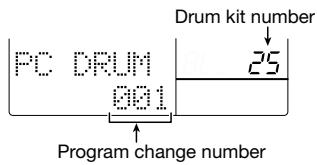
When you have made the required settings, press the [EXIT] key.

For details on factory default settings, see the list at the end of this manual.
Assign program change number to bass program (PC BASS)
This item allows you to change the default program change numbers allocated to the bass programs.
While the indication "MIDI PC BASS" is shown, press the [ENTER] key, and use the [VALUE] dial to specify the bass program number (00 - 54). Then use the [ ] / [ ] keys to set the program change number (001 - 128).
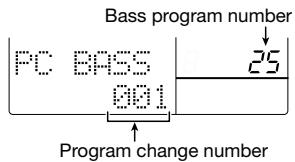
When you have made the required settings, press the [EXIT] key.

For details on factory default settings, see the list at the end of this manual.
Saving RT-323 Internal Data on MIDI Equipment
The internal data of the RT-323 including all setting information can be converted to MIDI messages and output via the [MIDI OUT] jack (bulk dump). This function allows you to store all RT-323 settings or only selected data on an external component such as a MIDI sequencer.

Before starting the bulk dump operation, make sure that the [MIDI OUT] jack of the RT-323 is connected to the MIDI IN jack of the other component.
Press the [UTILITY] key, and use the []/[] keys to bring up the indication "MIDI?". Then press the [ENTER] key.
Use the [] / [] keys to bring up the indication "DUMP" on the display, and press the [ENTER] key.
Use the [] / [] keys to select the bulk dump type from the following, then press the [ENTER] key.
- SEQUENCE: User pattern and song data
SYSTEM: Global RT-323 settings - ALL KITS: All user drum kits

4 Press the [ENTER] key.
The confirmation message "SURE?" appears on the display. Make sure that the external MIDI component is ready to record MIDI messages.
5 To carry out the bulk dump process, press the [ENTER] key. To cancel the process, press the [EXIT] key.
While bulk dump is being carried out, the indication "TX" is shown.
6 When bulk dump is completed, press the [EXIT] key.
The unit returns to the condition of step 1.
To restore the condition of the RT-323 using set data stored on an external MIDI component, connect the MIDI OUT jack of the external component to the [MIDI IN] jack of the RT-323, and send the data while the RT-323 is in the stop condition. (No special steps are required at the RT- 323.)

When setting data are sent from an external MIDI component to the RT-323, all data in the RT-323 are overwritten. Take care not to accidentally patterns or songs that you wish to keep.
MIDI Track Operation
The RT-323 incorporates a MIDI track that can record MIDI messages such as output for example by an external MIDI keyboard in real time. You can record and play such data in conjunction with an existing song. The following types of MIDI messages can be recorded.
Note data (note on/off, velocity)
- Pitch bend
Program change
Control change
- Polyphonic key player
- Channel pressure
When messages are recorded and played, their original MIDI channel (1 - 16) assignment does not change.
Note that you cannot record on a send/receive channel set to the drum A/drum B/bass track. To record on such a MIDI channel, set the send/receive channel for the respective track to OFF ( p. 86).
MIDI track recording
This section explains the steps for MIDI track recording, using the example of recording a MIDI synthesizer performance on the MIDI track.
1 Connect the RT-323 and MIDI synthesizer as shown in the illustration.
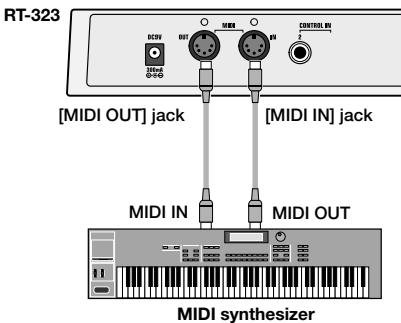

The MIDI messages input to the [MIDI IN] jack of the RT-323 are not sent through to the [MIDI OUT] jack. Therefore you must set the MIDI synthesizer to "Local = On".
Press the [UTILITY] key, and use the "MIDI TR" item to enable the MIDI track output. (For setting information, see page 88.)
3 Set the RT-323 to song mode and select a song.

You can also select an empty song where no pattern information is recorded, and record MIDI messages on the MIDI track. Later, you may add pattern information to such a song for which only the MIDI track is recorded.
4 Hold down the [SONG TRACK] key for at least 1 second.


Press for 1 second
The [SONG TRACK] key lights up and the MIDI track is ready for recording. The procedure for MIDI track recording, stop, and playback is the same as for the song track. For details, see page 69.

When the MIDI track is in the recording mode, hitting the pads will not produce sound.

-
The MIDI track is always recorded without quantize (minimum note unit = 1 tick).
-
When you record on the MIDI track again, previous data are not erased. Instead, overdubbing of MIDI data occurs. If the MIDI synthesizer supports multi-timbre, changing the MIDI channel and sending a different timbre allows you to create sound overlays.
To delete the MIDI track data, hold down the [ERASE] key and press the [SONG TRACK] key and then the [ENTER] key.
When you press the [SONG TRACK] key while holding down the [ERASE] key, the indication "ERASE MIDI?" appears on the display. When you press the [ENTER] key in this condition, all data on the MIDI track are erased.
To terminate the MIDI track recording condition, press the [SONG TRACK] key.
The [SONG TRACK] key light goes out. The MIDI track will still be played together with song playback also in this condition.

- The data recorded on the MIDI track are stored as part of the song data in the RT-323.
- The MIDI track can hold up to 999 measures, regardless of the length of the currently selected song.
- If the duration of the contents of the MIDI track is longer than the duration of the song, the end point of the MIDI track will become the new end point of the song. In this case, the last pattern entered for the song is repeated until the new end point.
Application Guide [Other Functions]
This section describes how to use the metronome, how to return the RT-323 to the factory default condition, and other auxiliary functions.
Metronome Operation
Adjusting the metronome volume
You can adjust the volume of the metronome sound heard when performing pattern real-time input.
Press the [UTILITY] key, and use the []/[] keys to bring up the indication "CLICK" on the display.

Use the [ ] / [ ] keys or the [VALUE] dial to set the metronome volume (1 - 15).
The factory default setting is 10.
3 When the setting is complete, return to the pattern/song mode by pressing the [PATTERN]/[SONG] key.
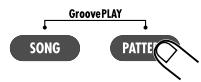
Setting the precount
When the RT-323 is in the default condition, the metronome counts down the time before the start of real-time input (precount) for 1 measure. The number of measures can be changed, and precount can also be turned off.
Press the [UTILITY] key, and use the []/[] keys to bring up the indication "COUNT" on the display.

Use the [ ] / [ ] keys or the [VALUE] key to select one of the following settings.
OFF: Precount is off. Recording starts immediately when activated.
1: A precount of 1 measure is carried out before recording starts (default setting).
2: A precount of 2 measures is carried out before recording starts.
PAD: Precount is off. Recording starts immediately when a pad is hit.
3 To terminate the setting and return to pattern mode, press the [PATTERN] key.
Other Special Functions
Checking the memory free amount
You can check the remaining memory capacity of the RT-323.
Press the [UTILITY] key, and use the []/[] keys to bring up the indication "MEMORY" on the display.

The current amount of free memory in the RT-323 is shown. This display is for information only, it cannot be changed.
2 To return to the pattern/song mode, press the [PATTERN]/[SONG] key.
Returning the unit to the factory default settings
This section shows how to initialize the RT-323. This will return all data and settings to the factory default condition.
Hold down the [●REC] key while turning power to the RT-323 on.
The following indication appears on the display, and initialization is carried out automatically.

When initialization is performed, the RT-323 will restart.

Use this function with care. Initialization will clear all user pattern and song information that you have created.
Troubleshooting
Check the following items first if there seems to be a problem with the RT-323.
Power does not come on
- Check that the correct AC adapter or batteries are used.
No sound or very low volume
- Is RT-323 connected correctly to playback system?
- Is volume of RT-323 set to a suitable position?
No sound or very low volume when hitting pad
- Press the [UTILITY] key to call up the "SENS" item and try changing the setting to an option other than "SOFT" or "EX HARD".
The indication "FULL" appears and no user pattern/song can be recorded
- There is not enough free memory in the RT-323. Delete unneeded user patterns or songs.
Song/pattern playback does not start when [ ] key is pressed
- Press the [UTILITY] key to call up the "SYNC" item, and verify that the setting is "INT".
JAM slider has no effect
- In song mode, operating the JAM slider has no effect. Switch to pattern mode or groove play mode.
No MIDI data supplied from [MIDI OUT] jack
- Press the [UTILITY] key to call up the "MIDI TR" item, and verify that the setting is "NO OUT".
- Press the [UTILITY] key to call up the items "CTRL" and "PRG", and verify that the setting is "ON".
FP01/FS01 has no effect
- The FP01/FS01 function may not be correctly assigned. To assign a function, be sure to push down the FS01 (or operate the FP01).
Data cannot be stored on SmartMedia card
- SmartMedia card is not formatted. Before a new card can be used, it must be formatted in the RT-323 ( p. 74).
- If the indication "NOCARD" is shown, the SmartMedia card is not recognized. Verify that the card is correctly inserted in the [DATA CARD] slot.
- If the indication "WRITE PROTECT" is shown, the SmartMedia card is write-protected. Remove the write-protect tab or use another card.
- If the indication "CARD FULL" is shown, the SmartMedia card does not have enough free space. Delete unneeded files ( p. 78) or use another card.
Reference
RT-323 Specifications
Sampling Frequency: 48 kHz
D/A Conversion: 24-bit, 8-times oversamoling
Maximum Polyphony: 30 voices
Resolution: 96 PPQN
Tempo: 40.0 to 250.0 BPM
Maximum Notes: 40,000
Drum Sounds: 377
Bass Programs: 55
Drum Kits: 128 (Preset: 64 User: 64)
Rhythm Patterns: 500 (Preset: 400 User: 100)
Songs: 100
Pads: 13 pad (with velocity sensor)
Display: 640-segment custom LCD
Connectors for external equipment
Control: FP-01,FP-02/FS-01 input x 2
MIDI: IN, OUT
Inputs/Outputs
LINE IN: Mono, Standard phone jack, analog mix
Input impedance 10 kilohms
Rated input level -10dBm
OUTPUT: Line Out (L/MONO) Standard phone jack
Line Out (R) Standard phone jack
SUB Out 1 Standard phone jack
SUB Out 2 Standard phone jack
Output impedance 1 kilohm max.
Rated output level -10dBm
Phones: Mini phone jack
50mW (32 ohms load)
Data card
SmartMedia: SSFDC 4 MB - 128 MB, 3.3 V
Dimensions: 265 (W) x 175 (D) x 55 (H)
Weight: 870 g
Power Requirements: 9 V DC, 300mA (from AC adapter AD-0006)
Batteries : IEC R6 (size AA) x 6;
continuous operation 7 hours minimum
Supplied accessories: Instruction Manual
AC adapter
Drum Kit List
-
The PC# can be changed as required.
-
In the factory default condition, user kits 64 - 115 contain LiveRock.
-
User kits 116 - 127 are PS-02 compatible kits.
| PRESET KIT | No. | PC# | Display | Kit name |
| BASIC KITS | 0 | 2 | LiveRock | Live Rock |
| 1 | 3 | StudioDr | Studio Drums | |
| 2 | 4 | Standard | Standard Kit | |
| 3 | 5 | FunkTrap | Funk Trap | |
| 4 | 6 | EpicRock | Epic Rock | |
| 5 | 7 | Ballad | Ballad Set | |
| 6 | 9 | Dance | Dance Kit | |
| 7 | 10 | Hiphop | Rap/Hiphop | |
| 8 | 11 | Techno | Techno Beat | |
| 9 | 0 | Drum#9 | Drum#9 | |
| 10 | 12 | GenePerc | General Percussion | |
| 11 | 13 | EnhPower | Enhanced Power | |
| 12 | 14 | Dist | DISTORTION | |
| LIVE ROCK | 13 | 15 | Live 1 | Live Rock 1 |
| 14 | 17 | Live 2 | Live Rock 2 | |
| 15 | 18 | Live 3 | Live Rock 3 | |
| STUDIO DRUMS | 16 | 19 | Studio1 | Studio Drums 1 |
| 17 | 20 | Studio2 | Studio Drums 2 | |
| 18 | 21 | Studio3 | Studio Drums 3 | |
| STANDARD KIT | 19 | 22 | Standrd1 | Standard Kit 1 |
| 20 | 23 | Standrd2 | Standard Kit 2 | |
| 21 | 26 | Standrd3 | Standard Kit 3 | |
| FUNK TRAP | 22 | 27 | Funk 1 | Funk Trap 1 |
| 23 | 28 | Funk 2 | Funk Trap 2 | |
| 24 | 29 | Funk 3 | Funk Trap 3 | |
| EPIC ROCK | 25 | 30 | Epic 1 | Epic Rock 1 |
| 26 | 31 | Epic 2 | Epic Rock 2 | |
| 27 | 33 | Epic 3 | Epic Rock 3 | |
| BALLAD SET | 28 | 34 | Ballad 1 | Ballad Set 1 |
| 29 | 35 | Ballad 2 | Ballad Set 2 | |
| 30 | 36 | Ballad 3 | Ballad Set 3 | |
| DANCE KIT | 31 | 37 | Dance 1 | Dance Kit 1 |
| 32 | 38 | Dance 2 | Dance Kit 2 | |
| 33 | 39 | Dance 3 | Dance Kit 3 | |
| RAP/HIPHOP | 34 | 41 | HipHop 1 | Rap/Hiphop 1 |
| 35 | 42 | HipHop 2 | Rap/Hiphop 2 | |
| 36 | 43 | HipHop 3 | Rap/Hiphop 3 | |
| TECHNO BEAT | 37 | 44 | Techno 1 | TechnoBeat 1 |
| 38 | 45 | Techno 2 | TechnoBeat 2 | |
| 39 | 46 | Techno 3 | TechnoBeat 3 | |
| GENERAL DRUMS | 40 | 8 | General1 | General Kit 1 |
| 41 | 32 | General2 | General Kit 2 | |
| 42 | 1 | General3 | General Kit 3 | |
| 43 | 47 | General4 | General Kit 4 | |
| 44 | 16 | General5 | General Kit 5 | |
| 45 | 40 | General6 | General Kit 6 | |
| 46 | 49 | General7 | General Kit 7 | |
| 47 | 25 | General8 | General Kit 8 | |
| 48 | 24 | General9 | General Kit 9 | |
| PERCUSSION/SFX | 49 | 50 | DrumSkin | DRUM SKINS |
| 50 | 51 | Indian | Indian Percussion | |
| 51 | 52 | Gamelan | Agogo Gamelan | |
| 52 | 53 | _clk&Stk | Clicks and Sticks | |
| 53 | 54 | SnglPerc | Single Percussion | |
| 54 | 48 | Orchestr | Orchestral Set | |
| 55 | 55 | Cymbals | CymbalSet | |
| 56 | 63 | LoPercus | Lo Percussion | |
| 57 | 57 | HiPercus | Hi Percussion | |
| 58 | 58 | VariPer1 | Various Percussion 1 | |
| 59 | 59 | VariPer2 | Various Percussion 2 | |
| 60 | 60 | VariPer3 | Various Percussion 3 | |
| 61 | 61 | VariPer4 | Various Percussion 4 | |
| 62 | 62 | VariPer5 | Various Percussion 5 | |
| 63 | 56 | SFX Kit | SFX Kit |
| USER KIT | No. | PC# | Display | Kit name |
| 64 | 64 | Default | Default | |
| 115 | 115 | |||
| PS-02 COMPATIBLE | 116 | 116 | PsStndrd | PS-02 STANDARD |
| 117 | 117 | PsRock | PS-02 ROCK | |
| 118 | 118 | PsJazz | PS-02 JAZZ | |
| 119 | 119 | PsAnalg1 | PS-02 ANALOG 1 | |
| 120 | 120 | PsPower | PS-02 POWER | |
| 121 | 121 | PsFunk1 | PS-02 FUNK 1 | |
| 122 | 122 | PsScratch | PS-02 SCRAWTH | |
| 123 | 123 | PsAnalg2 | PS-02 ANALOG 2 | |
| 124 | 124 | PsDist | PS-02 DISTORTION | |
| 125 | 125 | PsElectr | PS-02 ELECTRONIC | |
| 126 | 126 | PsBrush | PS-02 BRUSH | |
| 127 | 127 | PsFunk2 | PS-02 FUNK 2 |
Bass Program List
| No. | PC# | Display | Program name |
| 0 | 0, 63, 118 | LiveBass | Live Bass |
| 1 | 1, 34, 64, 119 | StudioBS | Studio Bass |
| 2 | 2, 65, 120 | EpicBass | Epic Bass |
| 3 | 3, 66, 121 | FunkBass | Funk Bass |
| 4 | 4, 67, 122 | BalladBS | Ballad Bass |
| 5 | 5, 32, 123 | AcostcBS | Acoustic Bass |
| 6 | 6, 69, 124 | ModernBS | Modern Bass |
| 7 | 7, 38, 70 | Synth BS | Synth Bass |
| 8 | 8, 39, 71 126 | TechnoBS | Techno Bass |
| 9 | 9, 72, 127 | BigBtmBS | Big Bottom Bass |
| 10 | 10, 37, 73 | SubSlpBS | SubSlap Bass |
| 11 | 11, 74 | DigiAcBS | Digital Acoustic |
| 12 | 12, 75 | BSHrmnic | Bass Harmonics |
| 13 | 13, 35, 76 | No Frets | No Frets |
| 14 | 14, 77 | Aco Jazz | Acoustic Jazz |
| 15 | 15, 78 | DigiPick | Digital Pick |
| 16 | 16, 79 | TechAnlg | TechnoAnalog |
| 17 | 17, 80 | Table BS | Table Bass Tones |
| 18 | 18, 81 | TightAna | Tight Analog |
| 19 | 19, 82 | Analog5# | Analog Fifths |
| 20 | 20, 83 | TempleTN | Temple Tones |
| 21 | 21, 84 | QuadraBS | Quadra Bass |
| 22 | 22, 85 | AnaTouch | Analog Touch |
| 23 | 23, 86 | Pick Aco | Picked Acoustic |
| 24 | 24, 87 | BassDive | Bass Dive |
| 25 | 25, 88 | AnaOctav | AnalogOctaves |
| 26 | 26, 89 | SynTomBS | SynthTom Bass |
| 27 | 27, 90 | Lo Sine | Lo Sine |
| 28 | 28, 91 | DigiSlap | Digi Slap Bass |
| 29 | 29, 92 | TmbaTone | Tumba Tones |
| 30 | 30, 93 | CongKeys | Conga Keys |
| 31 | 31, 94 | PowTom BS | Power Tom Bass |
| 32 | 40, 95 | BecmngBS | Becoming Bass |
| 33 | 41, 96 | HrmonicBS | Harmonics Bass |
| 34 | 42, 97 | BassHarm | Bass with Harmonics |
| 35 | 43, 98 | PickFunk | Picked Funk Bass |
| 36 | 44, 99 | PickJazz | Picked Jazz |
| 37 | 45, 100 | PickTech | Picked Techno |
| 38 | 46, 101 | Aco Tech | Acoustic Techno |
| 39 | 47, 102 | PowerFnk | Power Funk |
| 40 | 48, 103 | PopsPull | Pops/Pull Split |
| 41 | 49, 104 | EpicJam1 | Epic Bass Jam/1 |
| 42 | 50, 105 | TrblJam2 | Tribal Bass Jam/2 |
| 43 | 51, 106 | WoodBass | Wooden Bass |
| 44 | 33, 52, 107 | JazzBass | Jazz Bass |
| 45 | 36, 53, 108 | FunkPops | Funk Pops |
| 46 | 54, 109 | FunkPull | FunkPulls |
| 47 | 55, 110 | PickBass | Picked Bass |
| 48 | 56, 111 | AnalogBS | Analog Bass |
| 49 | 57, 112 | DigiBass | Digi Bass |
| 50 | 58, 113 | Saw Wave | Saw Wave |
| 51 | 59, 114 | Square | Square Wave |
| 52 | 60, 115 | Hi Sine | Hi Sine |
| 53 | 61, 116 | Drive BS | Drive Bass |
| 54 | 62, 117 | FuzzBass | Fuzz Bass |
Drum PAD NOTE# List
| PAD No | PAD NAME | BANK1 | BANK2 | BANK3 |
| PAD1 | KICK | 36 | 35 | 61 |
| PAD2 | TOM1 | 50 | 48 | 64 |
| PAD3 | SNARE | 38 | 40 | 60 |
| PAD4 | TOM2 | 47 | 45 | 62 |
| PAD5 | CLOSED HAT | 42 | 44 | 68 |
| PAD6 | TOM3 | 43 | 41 | 63 |
| PAD7 | OPEN HAT | 46 | 54 | 67 |
| PAD8 | CRASH | 49 | 57 | 66 |
| PAD9 | EXTRA 1 | 37 | 70 | 71 |
| PAD10 | RIDE | 51 | 59 | 65 |
| PAD11 | EXTRA 2 | 39 | 52 | 72 |
| PAD12 | EXTRA CYMBOL | 53 | 55 | 69 |
| PAD13 | EXTRA 3 | 56 | 58 | 73 |
MIDI NOTE # List
| Note No | DRUM KIT | BASS Programs | ||
| INST No | INST NAME | |||
| 24 | From note 0 | |||
| 25 | ||||
| 26 | ||||
| 27 | 349 | HighQ | ||
| 28 | 290 | Slap | ||
| 29 | 358 | Scratch1 | ||
| 30 | 359 | Scratch2 | ||
| 31 | 275 | ShortStk | ||
| 32 | 318 | SquamClk | ||
| 33 | 321 | MetroClk | ||
| 34 | 329 | MtrBell | ||
| 35 | PAD BANK 1\PAD BANK 3 | |||
| 36 | ||||
| 37 | ||||
| 38 | ||||
| 39 | ||||
| 66 | ||||
| 67 | ||||
| 68 | ||||
| 69 | ||||
| 70 | ||||
| 71 | ||||
| 72 | ||||
| 73 | ||||
| 74 | 74 | GuiroL1 | ||
| 75 | 75 | Claves1 | ||
| 76 | 76 | WoodBlikH | ||
| 77 | 77 | WoodBlikL | ||
| 78 | 78 | CuicaHi | ||
| 79 | 79 | CuicaLo | ||
| 80 | 80 | MtTrangl | ||
| 81 | 81 | OpTrangl | ||
| 82 | 82 | Shaker1 | ||
| 83 | 83 | JBell1 | ||
| 84 | 84 | Belltre1 | ||
| 85 | 85 | Castnet1 | ||
| 86 | 86 | MtSurdo | ||
| 87 | 87 | OpSurdo | ||
| 88 | ||||
The highest note number that can be produced depends on the bass program.
The PAD BANK 1 - 3 INST No, INST NAME depend on the kit.
The range of note numbers that can be produced by the pads of the RT-323 is 12 - 63.
Instrument List
| No. | Display | Instrument name |
| 0 | HvyKick | Heavy Kick |
| 1 | TightKic | Tight Kick |
| 2 | DistKick | Dist Kick |
| 3 | ScrchKic | Scratch Kick |
| 4 | Live K11 | Live Kick 11 |
| 5 | Live K12 | Live Kick 12 |
| 6 | Live K13 | Live Kick 13 |
| 7 | Live K14 | Live Kick 14 |
| 8 | StdioK11 | Studio Kick 11 |
| 9 | StdioK12 | Studio Kick 12 |
| 10 | StdioK13 | Studio Kick 13 |
| 11 | StdioK14 | Studio Kick 14 |
| 12 | StnddK11 | Standard Kick 11 |
| 13 | StnddK12 | Standard Kick 12 |
| 14 | StnddK13 | Standard Kick 13 |
| 15 | StnddK14 | Standard Kick 14 |
| 16 | StnddK21 | Standard Kick 21 |
| 17 | Funk K11 | Funk Kick 11 |
| 18 | Funk K12 | Funk Kick 12 |
| 19 | Funk K13 | Funk Kick 13 |
| 20 | Funk K14 | Funk Kick 14 |
| 21 | Epic K11 | Epic Kick 11 |
| 22 | Epic K12 | Epic Kick 12 |
| 23 | Epic K13 | Epic Kick 13 |
| 24 | Epic K14 | Epic Kick 14 |
| 25 | Epic K21 | Epic Kick 21 |
| 26 | Bldd K11 | Ballad Kick 11 |
| 27 | Bldd K12 | Ballad Kick 12 |
| 28 | Bldd K13 | Ballad Kick 13 |
| 29 | Bldd K14 | Ballad Kick 14 |
| 30 | Bldd K21 | Ballad Kick 21 |
| 31 | Bldd K22 | Ballad Kick 22 |
| 32 | DanceK11 | Dance Kick 11 |
| 33 | DanceK12 | Dance Kick 12 |
| 34 | DanceK13 | Dance Kick 13 |
| 35 | DanceK14 | Dance Kick 14 |
| 36 | Hip K11 | HipHop Kick 11 |
| 37 | Hip K12 | HipHop Kick 12 |
| 38 | Hip K13 | HipHop Kick 13 |
| 39 | Hip K14 | HipHop Kick 14 |
| 40 | Hip K21 | HipHop Kick 21 |
| 41 | Tec K11 | Techno Kick 11 |
| 42 | Tec K12 | Techno Kick 12 |
| 43 | Tec K13 | Techno Kick 13 |
| 44 | Tec K21 | Techno Kick 21 |
| 45 | Gene K11 | General Kick 11 |
| 46 | Gene K12 | General Kick 12 |
| 47 | Gene K13 | General Kick 13 |
| 48 | Gene K14 | General Kick 14 |
| 49 | Gene K15 | General Kick 15 |
| 50 | Gene K16 | General Kick 16 |
| 51 | Gene K17 | General Kick 17 |
| 52 | Gene K18 | General Kick 18 |
| 53 | Gene K21 | General Kick 21 |
| 54 | Gene k22 | General Kick 22 |
| 55 | Gene K23 | General Kick 23 |
| 56 | OrchKick | Orchestra Kick |
| 57 | RoomSnar | Room Snare |
| 58 | TightSnr | Tight Snare |
| 59 | HvySnare | Heavy Snare |
| 60 | DistSnar | Dist Snare |
| 61 | ScrchSnr | Scratch Snare |
| 62 | Live S11 | Live Snare 11 |
| No. | Display | Instrument name |
| 63 | Live S12 | Live Snare 12 |
| 64 | Live S13 | Live Snare 13 |
| 65 | Live S14 | Live Snare 14 |
| 66 | Live S21 | Live Snare 21 |
| 67 | StdioS11 | Studio Snare 11 |
| 68 | StdioS12 | Studio Snare 12 |
| 69 | StdioS13 | Studio Snare 13 |
| 70 | StdioS14 | Studio Snare 14 |
| 71 | StdioS21 | Studio Snare 21 |
| 72 | StdioS22 | Studio Snare 22 |
| 73 | StnddS11 | Standard Snare 11 |
| 74 | StnddS12 | Standard Snare 12 |
| 75 | StnddS13 | Standard Snare 13 |
| 76 | StnddS14 | Standard Snare 14 |
| 77 | StnddS21 | Standard Snare 21 |
| 78 | StnddS22 | Standard Snare 22 |
| 79 | Funk S11 | Funk Snare 11 |
| 80 | Funk S12 | Funk Snare 12 |
| 81 | Funk S13 | Funk Snare 13 |
| 82 | Funk S14 | Funk Snare 14 |
| 83 | Epic S11 | Epic Snare 11 |
| 84 | Epic S12 | Epic Snare 12 |
| 85 | Epic S13 | Epic Snare 13 |
| 86 | Epic S14 | Epic Snare 14 |
| 87 | Epic S21 | Epic Snare 21 |
| 88 | Bldl S11 | Ballad Snare 11 |
| 89 | Bldl S12 | Ballad Snare 12 |
| 90 | Bldl S13 | Ballad Snare 13 |
| 91 | Bldl S14 | Ballad Snare 14 |
| 92 | Bldl S21 | Ballad Snare 21 |
| 93 | Bldl S22 | Ballad Snare 22 |
| 94 | DanceS11 | Dance Snare 11 |
| 95 | DanceS12 | Dance Snare 12 |
| 96 | DanceS13 | Dance Snare 13 |
| 97 | DanceS14 | Dance Snare 14 |
| 98 | DanceS21 | Dance Snare 21 |
| 99 | Hip S11 | HipHop Snare 11 |
| 100 | Hip S12 | HipHop Snare 12 |
| 101 | Hip S13 | HipHop Snare 13 |
| 102 | Hip S14 | HipHop Snare 14 |
| 103 | Tec S11 | TechnoBeat Snare 11 |
| 104 | Tec S12 | TechnoBeat Snare 12 |
| 105 | Tec S13 | TechnoBeat Snare 13 |
| 106 | Tec S14 | TechnoBeat Snare 14 |
| 107 | Gene S11 | General Snare 11 |
| 108 | Gene S12 | General Snare 12 |
| 109 | Gene S13 | General Snare 13 |
| 110 | Gene S14 | General Snare 14 |
| 111 | Gene S15 | General Snare 15 |
| 112 | Gene S16 | General Snare 16 |
| 113 | Gene S17 | General Snare 17 |
| 114 | Gene S18 | General Snare 18 |
| 115 | Gene S19 | General Snare 19 |
| 116 | Gene S21 | General Snare 21 |
| 117 | Gene S22 | General Snare 22 |
| 118 | Gene S23 | General Snare 23 |
| 119 | Gene S24 | General Snare 24 |
| 120 | Gene S25 | General Snare 25 |
| 121 | OrchSnar | Orchestra Snare |
| 122 | Live Tm1 | Live TOM 1 |
| 123 | Live Tm2 | Live TOM 2 |
| 124 | Live Tm3 | Live TOM 3 |
| 125 | StdioTm1 | Studio TOM 1 |
| 126 | StdioTm2 | Studio TOM 2 |
| 127 | StdioTm3 | Studio TOM 3 |
| 128 | StnddTm1 | Standard TOM 1 |
| 129 | StnddTm2 | Standard TOM 2 |
| 130 | StnddTm3 | Standard TOM 3 |
| 131 | Funk Tm1 | Funk TOM 1 |
| 132 | Funk Tm2 | Funk TOM 2 |
| 133 | Funk Tm3 | Funk TOM 3 |
| 134 | Epic Tm1 | Epic TOM 1 |
| 135 | Epic Tm2 | Epic TOM 2 |
| 136 | Epic Tm3 | Epic TOM 3 |
| 137 | Bldt Tm1 | Ballad TOM 1 |
| 138 | Bldt Tm2 | Ballad TOM 2 |
| 139 | Bldt Tm3 | Ballad TOM 3 |
| 140 | DanceTm1 | Dance TOM 1 |
| 141 | DanceTm2 | Dance TOM 2 |
| 142 | DanceTm3 | Dance TOM 3 |
| 143 | Hip Tm1 | HipHop TOM 1 |
| 144 | Hip Tm2 | HipHop TOM 2 |
| 145 | Hip Tm3 | HipHop TOM 3 |
| 146 | Tec Tm1 | TechnoBeat TOM 1 |
| 147 | Tec Tm2 | TechnoBeat TOM 2 |
| 148 | Tec Tm3 | TechnoBeat TOM 3 |
| 149 | GeneTm11 | General TOM 11 |
| 150 | GeneTm12 | General TOM 12 |
| 151 | GeneTm13 | General TOM 13 |
| 152 | GeneTm21 | General TOM 21 |
| 153 | GeneTm22 | General TOM 22 |
| 154 | GeneTm23 | General TOM 23 |
| 155 | GeneTm31 | General TOM 31 |
| 156 | GeneTm32 | General TOM 32 |
| 157 | GeneTm33 | General TOM 33 |
| 158 | GeneTm41 | General TOM 41 |
| 159 | GeneTm42 | General TOM 42 |
| 160 | GeneTm43 | General TOM 43 |
| 161 | GeneTm51 | General TOM 51 |
| 162 | GeneTm52 | General TOM 52 |
| 163 | GeneTm53 | General TOM 53 |
| 164 | GeneTm61 | General TOM 61 |
| 165 | GeneTm62 | General TOM 62 |
| 166 | GeneTm63 | General TOM 63 |
| 167 | GeneTm71 | General TOM 71 |
| 168 | BrushTom | Brush TOM |
| 169 | Orch Tom | Orchestra Tom |
| 170 | DlyLivT1 | Delayed Live TOM 1 |
| 171 | DlyLivT2 | Delayed Live TOM 2 |
| 172 | DlyLivT3 | Delayed Live TOM 3 |
| 173 | DlyStuT1 | Delayed Studio TOM 1 |
| 174 | DlyStuT2 | Delayed Studio TOM 2 |
| 175 | DlyStuT3 | Delayed Studio TOM 3 |
| 176 | DlyStdT1 | Delayed Standard TOM 1 |
| 177 | DlyStdT2 | Delayed Standard TOM 2 |
| 178 | DlyStdT3 | Delayed Standard TOM 3 |
| 179 | DlyFnkT1 | Delayed Funk TOM 1 |
| 180 | DlyFnkT2 | Delayed Funk TOM 2 |
| 181 | DlyFnkT3 | Delayed Funk TOM 3 |
| 182 | DlyEpcT1 | Delayed Epic TOM 1 |
| 183 | DlyEpcT2 | Delayed Epic TOM 2 |
| 184 | DlyEpcT3 | Delayed Epic TOM 3 |
| 185 | DlyBldT1 | Delayed Ballad TOM 1 |
| 186 | DlyBldT2 | Delayed Ballad TOM 2 |
| 187 | DlyBldT3 | Delayed Ballad TOM 3 |
| 188 | DlyDncT1 | Delayed Dance TOM 1 |
| No. | Display | Instrument name |
| 189 | DlyDncT2 | Delayed Dance TOM 2 |
| 190 | DlyDncT3 | Delayed Dance TOM 3 |
| 191 | DlyHipT1 | Delayed HipHop TOM 1 |
| 192 | DlyHipT2 | Delayed HipHop TOM 2 |
| 193 | DlyHipT3 | Delayed HipHop TOM 3 |
| 194 | DlyTecT1 | Delayed TechnoBeat TOM 1 |
| 195 | DlyTecT2 | Delayed TechnoBeat TOM 2 |
| 196 | DlyTecT3 | Delayed TechnoBeat TOM 3 |
| 197 | Lrg CHH | Large Close HiHat |
| 198 | LrgHfOHH | Large Half Open HiHat |
| 199 | EpicC-HH | Epric Close HiHat |
| 200 | LiveC-HH | Live Close HiHat |
| 201 | Live PHH | Live Pedal HiHat |
| 202 | Live OHH | Live Open HiHat |
| 203 | StnddCHH | Standard Close HiHat |
| 204 | StnddOHH | Standard Open HiHat |
| 205 | SmallCHH | Small Close HiHat |
| 206 | SmallOHH | Small Open HiHat |
| 207 | Hip CHH | HipHop Close HiHat |
| 208 | Hip OHH | HipHop Open HiHat |
| 209 | Tec CHH | Techno Close HiHat |
| 210 | Tec OHH | Techno Open HiHat |
| 211 | Gane CHH | General Close HiHat |
| 212 | Gane OHH | General Open HiHat |
| 213 | DanceCHH | Dance Close HiHat |
| 214 | DanceOHH | Dance Open HiHat |
| 215 | RmHedCHH | Room Head Close HiHat |
| 216 | RmRimCHH | Room Rim Close HiHat |
| 217 | RoomOHH | Room Open HiHat |
| 218 | GenHfOHH | General Half Open HiHat |
| 219 | Gene PHH | General Pedal HiHat |
| 220 | DancePHH | Dance Pedal HiHat |
| 221 | LargCrsh | Large Crash Cymbal |
| 222 | SmlCrsh1 | Small Crash Cymbal 1 |
| 223 | SmlCrsh2 | Small Crash Cymbal 2 |
| 224 | SmlCrsh3 | Small Crash Cymbal 3 |
| 225 | HipCrash | HipHop Crash Cymbal |
| 226 | EleCrsh1 | Electric Crash Cymbal 1 |
| 227 | EleCrsh2 | Electric Crash Cymbal 2 |
| 228 | GaneCrsh | General Crash Cymbal |
| 229 | ChinsCym | Chinese Cymbal |
| 230 | RideCym1 | Ride Cymbal 1 |
| 231 | RideCym2 | Ride Cymbal 2 |
| 232 | RidBell1 | Ride Bell Cymbal 1 |
| 233 | RidBell2 | Ride Bell Cymbal 2 |
| 234 | LiveSpls | Live Splash Cymbal |
| 235 | GenSpls1 | General Splash Cymbal 1 |
| 236 | GenSpls2 | General Splash Cymbal 2 |
| 237 | TecSplsh | Techno Splash Cymbal |
| 238 | HiBongo | High Bongo |
| 239 | LowBongo | Low Bongo |
| 240 | BongoVb1 | Bongo Reverb 1 |
| 241 | BongoVb2 | Bongo Reverb 2 |
| 242 | MtHiCong | Mute High Conga |
| 243 | OpHiCong | Open High Conga |
| 244 | LowConga | Low Conga |
| 245 | LivCong1 | Live Conga 1 |
| 246 | loosCng1 | Loose Conga 1 |
| 247 | loosCng2 | Loose Conga 2 |
| 248 | LivCong2 | Live Conga 1 |
| 249 | Doumbek 1 | Doumbek 1 |
| 250 | Doumbek 2 | Doumbek 2 |
| 251 | Doumbek 3 | Doumbek 3 |
| No. | Display | Instrument name |
| 252 | Doumbek 4 | Doumbek 4 |
| 253 | Doumbek 5 | Doumbek 5 |
| 254 | Tabla 1 | Tabla 1 |
| 255 | Tabla 2 | Tabla 2 |
| 256 | Tabla 3 | Tabla 3 |
| 257 | Tabla 4 | Tabla 4 |
| 258 | Tabla 5 | Tabla 5 |
| 259 | Timbale1 | Timbale1 |
| 260 | Timbale2 | Timbale2 |
| 261 | Timbale3 | Timbale3 |
| 262 | Timbale4 | Timbale4 |
| 263 | Tumba 1 | Tumba 1 |
| 264 | Tumba 2 | Tumba 2 |
| 265 | Tumba 3 | Tumba 3 |
| 266 | HandTom | Hand Tom |
| 267 | MtSurdo | Mute Surdo |
| 268 | OpSurdo | Open Surdo |
| 269 | Claps1 | Hand Claps 1 |
| 270 | Claps2 | Hand Claps 2 |
| 271 | EleClpMn | Electric Claps Mono |
| 272 | EleClpSt | Electric Claps Stereo |
| 273 | Castnet1 | Castanet 1 |
| 274 | Castnet2 | Castanet 2 |
| 275 | ShortStk | Short Stick |
| 276 | GeneStk | General Stick |
| 277 | LiveStk | Live Stick |
| 278 | X-Stick | Cross Stick |
| 279 | StkVerb1 | Stick Reverb 1 |
| 280 | StkVerb2 | Stick Reverb 2 |
| 281 | StkVerb3 | Stick Reverb 3 |
| 282 | Claves 1 | Claves 1 |
| 283 | Claves 2 | Claves 2 |
| 284 | Claves 3 | Claves 3 |
| 285 | EleClvs | Electric Claves |
| 286 | LatnSel1 | Latin Sell 1 |
| 287 | LatnSel2 | Latin Sell 2 |
| 288 | WoodBlkH | Wood Block High |
| 289 | WoodBlkL | Wood Block Low |
| 290 | Slap | Slap |
| 291 | BrushSlp | Brush Slap |
| 292 | GuiroS1 | Short Guiro 1 |
| 293 | GuiroS2 | Short Guiro 2 |
| 294 | GuiroS3 | Short Guiro 3 |
| 295 | GuiroL1 | Long Guiro 1 |
| 296 | GuiroL2 | Long Guiro 2 |
| 297 | GuiroL3 | Long Guiro 3 |
| 298 | Vibslap1 | Vibra Slap 1 |
| 299 | Vibslap2 | Vibra Slap 2 |
| 300 | Vibslap3 | Vibra Slap 3 |
| 301 | Shaker 1 | Shaker 1 |
| 302 | Shaker 2 | Shaker 2 |
| 303 | Shaker 3 | Shaker 3 |
| 304 | Cabasa | Cabasa |
| 305 | Marcas | Maracas |
| 306 | RimBrush | Rim Brush |
| 307 | Cuica Hi | Cuica High |
| 308 | Cuica Lo | Cuica Low |
| 309 | Whistle1 | Whistle1 |
| 310 | Whistle2 | Whistle2 |
| 311 | Whistle3 | Whistle3 |
| 312 | CowBellLo | CowBell Lo |
| 313 | CowBellHi | CowBell Hi |
| 314 | GeneCwBI | General CowBell |
| No. | Display | Instrument name |
| 315 | EleCwBel | Electric CowBell |
| 316 | DancCwBI | Dance CowBell |
| 317 | EleSnap | Electric Snap |
| 318 | SquarClk | Square Click |
| 319 | StdioClk | Studio Click |
| 320 | WoodClk | Wood Click |
| 321 | MetroClk | Metronome Click |
| 322 | Agogo 1 | Agogo 1 |
| 323 | Agogo 2 | Agogo 2 |
| 324 | Agogo 3 | Agogo 3 |
| 325 | Agogo 4 | Agogo 4 |
| 326 | MtTrangl | Muted Triangle |
| 327 | OpTrangl | Open Triangle |
| 328 | Gamelan | Gamelan |
| 329 | MtrBell | Metronome Bell |
| 330 | SteelPip | Steel Pipe |
| 331 | Belltre1 | Bell tree 1 |
| 332 | Belltre2 | Bell tree 2 |
| 333 | Belltre3 | Bell tree 3 |
| 334 | JBell1 | Jingle Bell 1 |
| 335 | JBell2 | Jingle Bell 2 |
| 336 | JBell3 | Jingle Bell 3 |
| 337 | Tambrin1 | Tambourine 1 |
| 338 | Tambrin2 | Tambourine 2 |
| 339 | Tambrin3 | Tambourine 3 |
| 340 | Tambrin4 | Tambourine 4 |
| 341 | Tambrin5 | Tambourine 5 |
| 342 | Tambrin6 | Tambourine 6 |
| 343 | Ratchet1 | Ratchet 1 |
| 344 | Ratchet2 | Ratchet 2 |
| 345 | FngCym1 | Finger Cymbal 1 |
| 346 | FngCym2 | Finger Cymbal 2 |
| 347 | FngCym3 | Finger Cymbal 3 |
| 348 | FngCym4 | Finger Cymbal 4 |
| 349 | HighQ | HighQ |
| 350 | Bass 1 | Bass 1 |
| 351 | Bass 2 | Bass 2 |
| 352 | Bass 3 | Bass 3 |
| 353 | Bass 4 | Bass 4 |
| 354 | Noise 1 | Noise 1 |
| 355 | Noise 2 | Noise 2 |
| 356 | Noise 3 | Noise 3 |
| 357 | NoiseSlp | Noise Slap |
| 358 | Scratch1 | Scratch 1 |
| 359 | Scratch2 | Scratch 2 |
| 360 | Scratch3 | Scratch 3 |
| 361 | RevCym1 | Reverse Cymbal 1 |
| 362 | RevCym2 | Reverse Cymbal 2 |
| 363 | RevCym3 | Reverse Cymbal 3 |
| 364 | RevSnr | Reverse Snare |
| 365 | RvrsKick | Reverse Kick |
| 366 | BreathDr | Breath Drum |
| 367 | IndstriK | Industrial Kick |
| 368 | EleBomb | Electric Bomb |
| 369 | SineWave | SineWave |
| 370 | Whirl | Whirl |
| 371 | Sfx Clap | Sfx Clap |
| 372 | Sfx Slap | Sfx Slap |
| 373 | SfxTambr | Sfx Tambourine |
| 374 | SfxVerb1 | Sfx Reverb 1 |
| 375 | SfxVerb2 | Sfx Reverb 2 |
| 376 | SfxWhisl | Sfx Whistle |
Preset Patterns
- When you press the [] / [] keys in pattern mode, the unit jumps to the first pattern in the section divided by bold lines.
- Songs in the same frame contain similar patterns, making it easy to create songs.
- Fill-in patterns are indicated by a * in the "Fill" column.
| Pattern number | Fill | Pattern name | Recommended tempo | Kit number | |||
| DRUM A | DRUM B | BASS | |||||
| 000 | ROCK01 | 120 | 4 | 21 | 1 | ||
| 001 | ROCK02 | 140 | 4 | 9 | 3 | ||
| 002 | ROCK03 | 107 | 4 | 0 | 1 | ||
| 003 | ROCK04 | 136 | 11 | 11 | 53 | ||
| 004 | ROCK05 | 120 | 1 | 18 | 23 | ||
| 005 | ROCK06 | 115 | 22 | 4 | 1 | ||
| 006 | ROCK07 | 117 | 13 | 0 | 23 | ||
| 007 | ROCK08 | 117 | 0 | 0 | 0 | ||
| 008 | ROCK09 | 120 | 11 | 11 | 9 | ||
| 009 | ROCK10 | 136 | 22 | 0 | 1 | ||
| 010 | ROCK11 | 112 | 22 | 22 | 4 | ||
| 011 | ROCK12 | 140 | 1 | 0 | 4 | ||
| 012 | ROCK13 | 120 | 0 | 0 | 15 | ||
| 013 | ROCK14 | 120 | 20 | 22 | 3 | ||
| 014 | ROCK15 | 120 | 19 | 57 | 4 | ||
| 015 | ROCK16 | 116 | 20 | 20 | 0 | ||
| 016 | ROCK17 | 92 | 0 | 22 | 0 | ||
| 017 | ROCK18 | 96 | 21 | 0 | 4 | ||
| 018 | ROCK19 | 96 | 0 | 0 | 4 | ||
| 019 | ROCK20 | 112 | 21 | 0 | 4 | ||
| 020 | ROCK21 | 137 | 16 | 16 | 9 | ||
| 021 | ROCK22 | 103 | 0 | 0 | 0 | ||
| 022 | ROCK23 | 120 | 6 | 2 | 5 | ||
| 023 | ROCK24 | 99 | 3 | 57 | 5 | ||
| 024 | ROCK25 | 132 | 1 | 8 | 53 | ||
| 025 | ROCK26 | 96 | 33 | 40 | 4 | ||
| 026 | ROCK27 | 120 | 21 | 22 | 1 | ||
| 027 | ROCK28T | 120 | 1 | 0 | 2 | ||
| Song | 028 | ROCKs1VA | 120 | 3 | 6 | 14 | |
| 029 | * | ROCKs1FA | 120 | 3 | 6 | 14 | |
| 030 | ROCKs1VB | 120 | 3 | 6 | 14 | ||
| 031 | * | ROCKs1FB | 120 | 3 | 6 | 24 | |
| Song | 032 | ROCKs2VA | 110 | 3 | 6 | 1 | |
| 033 | * | ROCKs2FA | 110 | 3 | 6 | 1 | |
| 034 | ROCKs2VB | 110 | 3 | 6 | 1 | ||
| 035 | * | ROCKs2FB | 110 | 3 | 6 | 1 | |
| Song | 036 | ROCKs3VA | 124 | 16 | 21 | 9 | |
| 037 | * | ROCKs3FA | 124 | 16 | 21 | 9 | |
| 038 | ROCKs3VB | 124 | 16 | 21 | 9 | ||
| 039 | * | ROCKs3FB | 124 | 16 | 21 | 9 | |
| Song | 040 | ROCKs4VA | 130 | 5 | 22 | 1 | |
| 041 | * | ROCKs4FA | 130 | 5 | 22 | 1 | |
| 042 | ROCKs4VB | 130 | 5 | 22 | 1 | ||
| 043 | * | ROCKs4FB | 130 | 5 | 22 | 1 | |
| 044 | * | ROCKs4BR | 130 | 5 | 22 | 1 | |
| 045 | HRK 01 | 130 | 0 | 0 | 0 | ||
| 046 | HRK 02 | 113 | 4 | 0 | 2 | ||
| 047 | HRK 03 | 96 | 0 | 63 | 2 | ||
| 048 | HRK 04 | 120 | 16 | 18 | 1 | ||
| 049 | HRK 05 | 121 | 0 | 0 | 0 | ||
| 050 | HRK 06 | 136 | 0 | 57 | 0 | ||
| 051 | HRK 07 | 120 | 0 | 0 | 0 | ||
| Song | 052 | HRK s1VA | 120 | 1 | 4 | 1 | |
| 053 | * | HRK s1FA | 120 | 1 | 4 | 1 | |
| 054 | HRK s1VB | 120 | 1 | 4 | 1 | ||
| 055 | * | HRK s1FB | 120 | 1 | 4 | 1 | |
| Song | 056 | HRK s2VA | 115 | 11 | 0 | 14 | |
| 057 | * | HRK s2FA | 115 | 11 | 0 | 14 | |
| 058 | HRK s2VB | 115 | 11 | 0 | 14 | ||
| 059 | * | HRK s2FB | 115 | 11 | 0 | 14 | |
| Pattern number | Fill | Pattern name | Recommended tempo | Kit number | |||
| DRUM A | DRUM B | BASS | |||||
| 060 | MTL 01 | 98 | 0 | 25 | 0 | ||
| 061 | MTL 02 | 103 | 25 | 25 | 53 | ||
| 062 | MTL 03 | 112 | 1 | 5 | 0 | ||
| 063 | MTL 04 | 150 | 0 | 0 | 0 | ||
| Song | 064 | MTL s1VA | 128 | 3 | 6 | 2 | |
| 065 | * | MTL s1FA | 128 | 3 | 6 | 2 | |
| 066 | MTL s1VB | 128 | 3 | 6 | 2 | ||
| 067 | * | MTL s1FB | 128 | 3 | 6 | 2 | |
| 068 | THRS01 | 135 | 4 | 4 | 2 | ||
| 069 | THRS02 | 186 | 0 | 0 | 54 | ||
| 070 | PUNK01 | 160 | 15 | 0 | 0 | ||
| 071 | PUNK02 | 158 | 22 | 4 | 54 | ||
| Song | 072 | TP s1VA | 129 | 3 | 13 | 0 | |
| 073 | * | TP s1FA | 129 | 3 | 13 | 0 | |
| 074 | TP s1VB | 129 | 3 | 13 | 0 | ||
| 075 | * | TP s1FB | 129 | 3 | 13 | 0 | |
| 076 | FUS 01 | 124 | 26 | 13 | 14 | ||
| 077 | FUS 02 | 120 | 3 | 2 | 2 | ||
| 078 | FUS 03 | 113 | 1 | 10 | 5 | ||
| 079 | FUS 04 | 105 | 6 | 2 | 15 | ||
| 080 | FUS 05 | 120 | 3 | 2 | 2 | ||
| 081 | FUS 06 | 120 | 22 | 24 | 14 | ||
| 082 | FUS 07 | 120 | 40 | 10 | 15 | ||
| 083 | FUS 08 | 94 | 18 | 0 | 1 | ||
| Song | 084 | FUS s1VA | 110 | 24 | 2 | 1 | |
| 085 | * | FUS s1FA | 110 | 24 | 2 | 1 | |
| 086 | FUS s1VB | 110 | 24 | 2 | 1 | ||
| 087 | * | FUS s1FB | 110 | 3 | 2 | 1 | |
| Song | 088 | FUS s2VA | 124 | 9 | 0 | 39 | |
| 089 | * | FUS s2FA | 124 | 9 | 0 | 39 | |
| 090 | FUS s2VB | 124 | 9 | 0 | 39 | ||
| 091 | * | FUS s2FB | 124 | 9 | 0 | 39 | |
| Song | 092 | FUS s3VA | 118 | 4 | 0 | 0 | |
| 093 | * | FUS s3FA | 118 | 4 | 0 | 0 | |
| 094 | FUS s3VB | 118 | 4 | 0 | 0 | ||
| 095 | * | FUS s3FB | 118 | 4 | 0 | 0 | |
| Song | 096 | INDTs1VA | 134 | 8 | 63 | 7 | |
| 097 | * | INDTs1FA | 134 | 8 | 63 | 7 | |
| 098 | INDTs1VB | 134 | 8 | 63 | 34 | ||
| 099 | INDTs1VC | 134 | 0 | 63 | 11 | ||
| 100 | POP 01 | 120 | 22 | 21 | 1 | ||
| 101 | POP 02 | 142 | 16 | 9 | 4 | ||
| 102 | POP 03 | 108 | 5 | 9 | 4 | ||
| 103 | POP 04 | 120 | 22 | 21 | 1 | ||
| 104 | POP 05 | 112 | 2 | 57 | 0 | ||
| 105 | POP 06 | 80 | 57 | 2 | 5 | ||
| 106 | POP 07 | 100 | 2 | 43 | 4 | ||
| 107 | POP 08 | 117 | 34 | 57 | 4 | ||
| 108 | POP 09 | 120 | 22 | 0 | 0 | ||
| 109 | POP 10 | 120 | 22 | 21 | 0 | ||
| 110 | POP 11 | 120 | 22 | 21 | 1 | ||
| 111 | POP 12T | 140 | 5 | 18 | 4 | ||
| Song | 112 | POP s1VA | 126 | 20 | 0 | 1 | |
| 113 | * | POP s1FA | 126 | 20 | 0 | 1 | |
| 114 | POP s1VB | 126 | 20 | 0 | 1 | ||
| 115 | * | POP s1FB | 126 | 20 | 0 | 1 | |
| Song | 116 | POP s2VA | 134 | 3 | 0 | 0 | |
| 117 | * | POP s2FA | 134 | 3 | 0 | 0 | |
| 118 | POP s2VB | 134 | 3 | 0 | 0 | ||
| 119 | * | POP s2FB | 134 | 3 | 0 | 0 | |
| Song | 120 | POP s3VA | 120 | 22 | 21 | 1 | |
| 121 | * | POP s3FA | 120 | 22 | 21 | 1 | |
| 122 | POP s3VB | 120 | 22 | 21 | 1 | ||
| 123 | * | POP s3FB | 120 | 22 | 21 | 1 | |
| 124 | RnB 01 | 138 | 3 | 9 | 27 | ||
| 125 | RnB 02 | 100 | 19 | 57 | 0 | ||
| 126 | RnB 03 | 120 | 34 | 0 | 3 | ||
| 127 | RnB 04 | 168 | 3 | 22 | 0 | ||
| 128 | RnB 05 | 100 | 22 | 57 | 3 | ||
| 129 | RnB 06 | 120 | 3 | 0 | 2 | ||
| 130 | RnB 07 | 146 | 2 | 7 | 0 | ||
| 131 | RnB 08 | 92 | 2 | 55 | 4 | ||
| 132 | RnB 09 | 116 | 3 | 4 | 0 | ||
| 133 | RnB 10 | 104 | 3 | 22 | 0 | ||
| Song | 134 | RnB s1VA | 130 | 22 | 0 | 0 | |
| 135 | * | RnB s1FA | 130 | 22 | 0 | 0 | |
| 136 | RnB s1VB | 130 | 22 | 49 | 0 | ||
| 137 | * | RnB s1FB | 130 | 22 | 0 | 0 | |
| 138 | FUNK01 | 112 | 2 | 3 | 3 | ||
| 139 | FUNK02 | 120 | 22 | 0 | 3 | ||
| 140 | FUNK03 | 112 | 3 | 5 | 3 | ||
| 141 | FUNK04 | 121 | 3 | 34 | 3 | ||
| 142 | FUNK05 | 98 | 24 | 13 | 8 | ||
| 143 | FUNK06 | 94 | 24 | 57 | 3 | ||
| 144 | FUNK07 | 92 | 3 | 49 | 9 | ||
| 145 | FUNK08 | 99 | 19 | 52 | 5 | ||
| 146 | FUNK09 | 112 | 2 | 3 | 10 | ||
| 147 | FUNK10 | 125 | 36 | 58 | 27 | ||
| 148 | FUNK11 | 92 | 22 | 5 | 10 | ||
| 149 | FUNK12 | 110 | 15 | 55 | 3 | ||
| Song | 150 | FUNKs1VA | 120 | 31 | 22 | 10 | |
| 151 | * | FUNKs1FA | 120 | 31 | 22 | 10 | |
| 152 | FUNKs1VB | 120 | 31 | 22 | 10 | ||
| 153 | * | FUNKs1FB | 120 | 31 | 22 | 10 | |
| Song | 154 | FUNKs2VA | 118 | 6 | 2 | 3 | |
| 155 | * | FUNKs2FA | 118 | 6 | 2 | 3 | |
| 156 | FUNKs2VB | 118 | 6 | 2 | 3 | ||
| 157 | * | FUNKs2FB | 118 | 6 | 2 | 3 | |
| 158 | HIP 01 | 98 | 16 | 36 | 22 | ||
| 159 | HIP 02 | 91 | 7 | 50 | 32 | ||
| 160 | HIP 03 | 86 | 36 | 34 | 8 | ||
| 161 | HIP 04 | 96 | 2 | 57 | 10 | ||
| 162 | HIP 05 | 112 | 3 | 7 | 5 | ||
| 163 | HIP 06 | 112 | 2 | 7 | 4 | ||
| 164 | HIP 07 | 103 | 0 | 53 | 16 | ||
| 165 | HIP 08 | 92 | 7 | 51 | 5 | ||
| 166 | HIP 09 | 99 | 34 | 57 | 4 | ||
| 167 | HIP 10 | 85 | 8 | 10 | 27 | ||
| 168 | HIP 11 | 96 | 0 | 58 | 27 | ||
| 169 | HIP 12 | 116 | 48 | 0 | 22 | ||
| 170 | HIP 13 | 148 | 8 | 2 | 22 | ||
| 171 | HIP 14 | 107 | 3 | 57 | 5 | ||
| 172 | HIP 15 | 104 | 7 | 35 | 38 | ||
| 173 | HIP 16 | 120 | 34 | 22 | 8 | ||
| 174 | HIP 17 | 98 | 16 | 36 | 22 | ||
| 175 | HIP 18 | 102 | 7 | 6 | 22 | ||
| 176 | HIP 19 | 99 | 37 | 21 | 4 | ||
| 177 | HIP 20 | 91 | 8 | 35 | 5 | ||
| 178 | HIP 21 | 88 | 12 | 11 | 5 | ||
| 179 | HIP 22 | 88 | 35 | 37 | 4 | ||
| 180 | HIP 23 | 136 | 7 | 53 | 22 | ||
| Song | 181 | HIP s1VA | 96 | 7 | 2 | 0 | |
| 182 | * | HIP s1FA | 96 | 7 | 2 | 4 | |
| 183 | HIP s1VB | 96 | 7 | 2 | 4 | ||
| 184 | * | HIP s1FB | 96 | 7 | 2 | 4 | |
| 185 | HIP s1VC | 96 | 7 | 2 | 4 | ||
| 186 | HIP s1VD | 96 | 7 | 2 | 4 | ||
| Pattern number | Fill | Pattern name | Recommended tempo | Kit number | |||
| DRUM A | DRUM B | BASS | |||||
| Song | 187 | HIP s2VA | 110 | 12 | 63 | 0 | |
| 188 | HIP s2VB | 110 | 12 | 0 | 4 | ||
| 189 | * | HIP s2FB | 110 | 12 | 11 | 0 | |
| 190 | HIP s2VC | 110 | 12 | 11 | 4 | ||
| 191 | HIP s2VD | 110 | 12 | 11 | 4 | ||
| Song | 192 | HIP s3VA | 112 | 2 | 1 | 0 | |
| 193 | HIP s3VB | 112 | 2 | 1 | 5 | ||
| 194 | DANC01 | 111 | 8 | 2 | 8 | ||
| 195 | DANC02 | 102 | 3 | 34 | 4 | ||
| 196 | DANC03 | 120 | 8 | 52 | 3 | ||
| 197 | DANC04 | 180 | 34 | 61 | 27 | ||
| 198 | DANC05 | 103 | 33 | 57 | 27 | ||
| 199 | DANC06 | 120 | 6 | 57 | 10 | ||
| Song | 200 | DANCs1VA | 110 | 37 | 36 | 22 | |
| 201 | * | DANCs1FA | 110 | 37 | 36 | 22 | |
| 202 | DANCs1VB | 110 | 37 | 34 | 22 | ||
| 203 | * | DANCs1FB | 110 | 37 | 36 | 22 | |
| Song | 204 | DANCs2VA | 120 | 7 | 31 | 4 | |
| 205 | * | DANCs2FA | 120 | 7 | 31 | 4 | |
| 206 | DANCs2VB | 120 | 7 | 31 | 4 | ||
| 207 | * | DANCs2FB | 120 | 7 | 31 | 4 | |
| 208 | HOUS01 | 120 | 34 | 60 | 27 | ||
| 209 | HOUS02 | 126 | 34 | 52 | 4 | ||
| 210 | HOUS03 | 120 | 37 | 8 | 8 | ||
| 211 | HOUS04 | 120 | 31 | 52 | 7 | ||
| Song | 212 | HOUSs1VA | 120 | 34 | 19 | 22 | |
| 213 | * | HOUSs1FA | 120 | 34 | 19 | 22 | |
| 214 | HOUSs1VB | 120 | 8 | 58 | 22 | ||
| 215 | * | HOUSs1FB | 120 | 8 | 58 | 22 | |
| 216 | TECH01 | 148 | 7 | 37 | 50 | ||
| 217 | TECH02 | 125 | 8 | 39 | 22 | ||
| 218 | TECH03 | 125 | 8 | 37 | 22 | ||
| 219 | TECH04 | 160 | 36 | 8 | 8 | ||
| 220 | TECH05 | 164 | 7 | 52 | 27 | ||
| 221 | TECH06 | 118 | 6 | 8 | 22 | ||
| 222 | TECH07 | 140 | 34 | 52 | 27 | ||
| 223 | TECH08 | 136 | 34 | 52 | 27 | ||
| 224 | TECH09 | 119 | 25 | 37 | 22 | ||
| 225 | TECH10 | 127 | 48 | 57 | 52 | ||
| Song | 226 | TECHs1VA | 135 | 8 | 36 | 8 | |
| 227 | * | TECHs1FA | 135 | 8 | 36 | 8 | |
| 228 | TECHs1VB | 135 | 8 | 37 | 8 | ||
| 229 | * | TECHs1FB | 135 | 8 | 37 | 8 | |
| 230 | DnB 01 | 163 | 42 | 0 | 2 | ||
| 231 | DnB 02 | 150 | 3 | 7 | 27 | ||
| 232 | DnB 03 | 150 | 34 | 7 | 27 | ||
| 233 | DnB 04 | 144 | 7 | 8 | 27 | ||
| 234 | DnB 05 | 154 | 12 | 37 | 5 | ||
| 235 | DnB 06 | 154 | 24 | 49 | 27 | ||
| Song | 236 | DnB s1VA | 150 | 7 | 34 | 5 | |
| 237 | * | DnB s1FA | 150 | 7 | 34 | 5 | |
| 238 | DnB s1VB | 150 | 47 | 46 | 27 | ||
| 239 | * | DnB s1FB | 150 | 47 | 46 | 5 | |
| 240 | TRIP01 | 120 | 34 | 7 | 5 | ||
| 241 | TRIP02 | 75 | 45 | 57 | 14 | ||
| 242 | TRIP03 | 101 | 47 | 50 | 13 | ||
| 243 | TRIP04 | 97 | 63 | 56 | 4 | ||
| 244 | AMB 01 | 106 | 8 | 50 | 21 | ||
| 245 | AMB 02 | 98 | 47 | 52 | 4 | ||
| 246 | AMB 03 | 157 | 46 | 7 | 27 | ||
| 247 | AMB 04 | 89 | 7 | 0 | 27 | ||
| Song | 248 | AMB s1VA | 114 | 7 | 57 | 8 | |
| 249 | * | AMB s1FA | 114 | 7 | 57 | 8 | |
| 250 | AMB s1VB | 114 | 3 | 7 | 27 | ||
| 251 | * | AMB s1FB | 114 | 3 | 36 | 0 | |
| 252 | BALD01 | 76 | 5 | 22 | 4 | ||
| 253 | BALD02 | 75 | 2 | 55 | 4 | ||
| 254 | BALD03 | 65 | 5 | 55 | 4 | ||
| 255 | BALD04 | 65 | 5 | 19 | 4 | ||
| 256 | BALD05 | 108 | 2 | 1 | 0 | ||
| 257 | BALD06 | 99 | 2 | 3 | 4 | ||
| 258 | BALD07 | 80 | 1 | 3 | 13 | ||
| 259 | BALD08 | 75 | 25 | 0 | 4 | ||
| 260 | BALD09 | 110 | 2 | 3 | 5 | ||
| 261 | BALD10 | 105 | 22 | 21 | 4 | ||
| 262 | BALD11T | 112 | 15 | 0 | 4 | ||
| Song | 263 | BALDs1VA | 96 | 2 | 3 | 4 | |
| 264 | * | BALDs1FA | 96 | 2 | 3 | 4 | |
| 265 | BALDs1VB | 96 | 2 | 3 | 4 | ||
| 266 | * | BALDs1FB | 96 | 2 | 3 | 4 | |
| 267 | BLUS01 | 120 | 3 | 0 | 4 | ||
| 268 | BLUS02 | 72 | 21 | 2 | 4 | ||
| 269 | BLUS03 | 120 | 3 | 0 | 4 | ||
| 270 | BLUS04 | 111 | 21 | 28 | 4 | ||
| 271 | BLUS05 | 91 | 5 | 6 | 0 | ||
| 272 | BLUS06 | 105 | 31 | 21 | 5 | ||
| Song | 273 | BLUSs1VA | 136 | 16 | 0 | 1 | |
| 274 | * | BLUSs1FA | 136 | 16 | 0 | 1 | |
| 275 | BLUSs1VB | 136 | 16 | 0 | 1 | ||
| 276 | * | BLUSs1FB | 136 | 16 | 0 | 1 | |
| 277 | CNTR01 | 120 | 2 | 0 | 4 | ||
| 278 | CNTR02 | 120 | 0 | 2 | 5 | ||
| 279 | CNTR03 | 95 | 2 | 0 | 4 | ||
| 280 | CNTR04 | 115 | 45 | 0 | 0 | ||
| Song | 281 | CNTRs1VA | 118 | 16 | 0 | 5 | |
| 282 | * | CNTRs1FA | 118 | 16 | 0 | 5 | |
| 283 | CNTRs1VB | 118 | 16 | 0 | 5 | ||
| 284 | * | CNTRs1FB | 118 | 16 | 0 | 5 | |
| 285 | JAZZ01 | 102 | 9 | 21 | 5 | ||
| 286 | JAZZ02 | 100 | 2 | 58 | 4 | ||
| 287 | JAZZ03 | 110 | 40 | 7 | 5 | ||
| 288 | JAZZ04 | 125 | 3 | 61 | 5 | ||
| 289 | JAZZ05 | 110 | 40 | 27 | 5 | ||
| 290 | JAZZ06 | 123 | 19 | 59 | 5 | ||
| 291 | JAZZ07P | 180 | 21 | 9 | 5 | ||
| Song | 292 | JAZZs1VA | 150 | 9 | 21 | 5 | |
| 293 | * | JAZZs1FA | 150 | 9 | 21 | 5 | |
| 294 | JAZZs1VB | 150 | 9 | 21 | 5 | ||
| 295 | * | JAZZs1FB | 150 | 9 | 21 | 5 | |
| 296 | SHFL01 | 125 | 3 | 0 | 4 | ||
| 297 | SHFL02 | 120 | 0 | 22 | 11 | ||
| 298 | SHFL03 | 122 | 3 | 19 | 22 | ||
| 299 | SHFL04 | 120 | 22 | 21 | 6 | ||
| 300 | SHFL05 | 120 | 3 | 21 | 3 | ||
| Song | 301 | SHFLs1VA | 115 | 3 | 6 | 2 | |
| 302 | SHFLs1Va | 115 | 3 | 6 | 2 | ||
| 303 | * | SHFLs1FA | 115 | 3 | 6 | 2 | |
| 304 | SHFLs1VB | 115 | 3 | 6 | 2 | ||
| 305 | * | SHFLs1FB | 115 | 3 | 6 | 2 | |
| Pattern number | Fill | Pattern name | Recommended tempo | Kit number | |||
| DRUM A | DRUM B | BASS | |||||
| 306 | SKA 01 | 160 | 22 | 60 | 4 | ||
| 307 | SKA 02 | 141 | 2 | 3 | 0 | ||
| 308 | SKA 03 | 160 | 2 | 57 | 14 | ||
| 309 | SKA 04 | 144 | 2 | 0 | 4 | ||
| 310 | REGG01 | 132 | 21 | 57 | 4 | ||
| 311 | REGG02 | 161 | 3 | 0 | 4 | ||
| 312 | REGG03 | 129 | 3 | 50 | 5 | ||
| 313 | REGG04 | 150 | 3 | 0 | 4 | ||
| Song | 314 | REGGs1VA | 132 | 2 | 1 | 4 | |
| 315 | * | REGGs1FA | 132 | 2 | 1 | 4 | |
| 316 | * | REGGs1VB | 132 | 2 | 4 | 0 | |
| 317 | REGGs1FB | 132 | 2 | 1 | 4 | ||
| 318 | AFRO01 | 123 | 5 | 49 | 4 | ||
| 319 | AFRO02 | 98 | 50 | 56 | 13 | ||
| 320 | AFRO03 | 115 | 22 | 56 | 3 | ||
| 321 | AFRO04 | 111 | 22 | 49 | 5 | ||
| 322 | AFRO05 | 106 | 19 | 10 | 3 | ||
| 323 | AFRO06 | 92 | 57 | 56 | 4 | ||
| 324 | AFRO07 | 116 | 36 | 56 | 27 | ||
| 325 | AFRO08 | 106 | 57 | 56 | 5 | ||
| Song | 326 | * | AFROs1VA | 117 | 24 | 10 | 6 |
| 327 | AFROs1FA | 117 | 24 | 10 | 6 | ||
| 328 | * | AFROs1VB | 117 | 24 | 10 | 6 | |
| 329 | AFROs1FB | 117 | 24 | 10 | 6 | ||
| 330 | LATN01 | 116 | 9 | 21 | 4 | ||
| 331 | LATN02 | 130 | 9 | 21 | 4 | ||
| 332 | LATN03 | 118 | 2 | 10 | 4 | ||
| 333 | LATN04 | 88 | 10 | 10 | 4 | ||
| 334 | LATN05 | 109 | 1 | 57 | 4 | ||
| 335 | LATN06 | 150 | 3 | 2 | 5 | ||
| 336 | LATN07 | 141 | 19 | 10 | 4 | ||
| 337 | LATN08 | 112 | 9 | 3 | 4 | ||
| 338 | LATN09 | 104 | 22 | 10 | 4 | ||
| 339 | LATN10 | 100 | 49 | 57 | 5 | ||
| 340 | LATN11 | 78 | 10 | 56 | 4 | ||
| 341 | LATN12 | 109 | 22 | 56 | 0 | ||
| Song | 342 | * | LATNs1VA | 126 | 9 | 0 | 4 |
| 343 | LATNs1FA | 126 | 9 | 0 | 4 | ||
| 344 | * | LATNs1VB | 126 | 9 | 0 | 4 | |
| 345 | LATNs1FB | 126 | 9 | 21 | 4 | ||
| Song | 346 | * | LATNs2VA | 112 | 3 | 0 | 5 |
| 347 | LATNs2FA | 112 | 3 | 0 | 5 | ||
| 348 | * | LATNs2VB | 112 | 3 | 0 | 5 | |
| 349 | LATNs2FB | 112 | 3 | 0 | 5 | ||
| 350 | MidE01 | 112 | 2 | 56 | 4 | ||
| 351 | MidE02 | 122 | 2 | 56 | 5 | ||
| 352 | MidE03 | 122 | 16 | 49 | 4 | ||
| 353 | MidE04T | 112 | 57 | 2 | 5 | ||
| Song | 354 | * | MidEs1VA | 118 | 19 | 57 | 4 |
| 355 | MidEs1FA | 118 | 19 | 57 | 4 | ||
| 356 | * | MidEs1VB | 118 | 19 | 50 | 4 | |
| 357 | MidEs1FB | 118 | 19 | 50 | 4 | ||
| 358 | INTRO01 | --- | 3 | 6 | 14 | ||
| 359 | INTRO02 | --- | 22 | 21 | 0 | ||
| 360 | INTRO03 | --- | 11 | 21 | 14 | ||
| 361 | INTRO04 | --- | 16 | 21 | 1 | ||
| 362 | INTRO05 | --- | 3 | 21 | 0 | ||
| 363 | INTRO06 | --- | 3 | 21 | 0 | ||
| 364 | INTRO07 | --- | 22 | 21 | 0 | ||
| 365 | INTRO08 | --- | 6 | 0 | 2 | ||
| 366 | INTRO09 | --- | 3 | 21 | 0 | ||
| 367 | INTRO10 | --- | 3 | 21 | 0 | ||
| 368 | INTRO11 | --- | 3 | 21 | 0 | ||
| 369 | INTRO12 | --- | 9 | 21 | 39 | ||
| 370 | COUNT | --- | 3 | 21 | 0 | ||
| 371 | INTRO14 | --- | 2 | 1 | 4 | ||
| 372 | INTRO15 | --- | 9 | 21 | 5 | ||
| 373 | INTRO16 | --- | 3 | 0 | 0 | ||
| 374 | INTRO17 | --- | 40 | 21 | 1 | ||
| 375 | INTRO18 | --- | 3 | 21 | 0 | ||
| 376 | INTRO19 | --- | 3 | 0 | 0 | ||
| 377 | ENDING01 | --- | 3 | 0 | 0 | ||
| 378 | ENDING02 | --- | 3 | 21 | 0 | ||
| 379 | ENDING03 | --- | 3 | 21 | 1 | ||
| 380 | ENDING04 | --- | 3 | 0 | 0 | ||
| 381 | ENDING05 | --- | 9 | 21 | 5 | ||
| 382 | ENDING06 | --- | 3 | 21 | 1 | ||
| 383 | ENDING07 | --- | 9 | 21 | 4 | ||
| 384 | Grv Arp1 | PAD 2 | 0 | 0 | 12 | ||
| 385 | Grv Arp2 | PAD 4 | 0 | 0 | 12 | ||
| 386 | Grv Drm1 | PAD 1 | 42 | 40 | 0 | ||
| 387 | Grv Drm2 | PAD 5 | 6 | 0 | 0 | ||
| 388 | Grv Drm3 | PAD 7 | 7 | 0 | 0 | ||
| 389 | Grv Drm4 | PAD 8 | 7 | 8 | 0 | ||
| 390 | Grv Perc | PAD 6 | 14 | 0 | 0 | ||
| 391 | Grv Bas1 | PAD13 | 0 | 0 | 5 | ||
| 392 | Grv Bas2 | PAD 9 | 0 | 0 | 4 | ||
| 393 | Grv Bas3 | PAD12 | 0 | 0 | 34 | ||
| 394 | Grv Bas4 | PAD11 | 0 | 0 | 2 | ||
| 395 | Grv Pad | PAD10 | 0 | 0 | 51 | ||
| 396 | GrvSnrFl | PAD 3 | 4 | 0 | 0 | ||
| 397 | METRO4/4 | --- | 2 | 55 | 0 | ||
| 398 | METRO3/4 | --- | 2 | 55 | 0 | ||
| 399 | All Mute | --- | 0 | 0 | 0 | ||
Preset Song Pad Parameter Defaults
| SONG00 | ROCK tpl | 120BPM | KEY=E | ||
| PAD No | PtnA | DrumB | Bass | Transp | Next |
| PAD 1 | 358 | 358 | 358 | 0 | 3 |
| PAD 2 | 28 | 28 | 28 | 5 | 2 |
| PAD 3 | 28 | 28 | 28 | 0 | 3 |
| PAD 4 | 28 | 28 | 28 | 7 | 4 |
| PAD 5 | 29 | 29 | 29 | 0 | 7 FILL |
| PAD 6 | 30 | 30 | 30 | 5 | 6 |
| PAD 7 | 30 | 30 | 30 | 0 | 7 |
| PAD 8 | 30 | 30 | 30 | 7 | 8 |
| PAD 9 | 31 | 31 | 31 | 0 | 3 FILL |
| PAD10 | 28 | 28 | 28 | -2 | 10 |
| PAD11 | 379 | 379 | 379 | 0 | 3 FILL |
| PAD12 | 30 | 30 | 30 | -2 | 12 |
| PAD13 | 377 | 377 | 377 | 0 | 0 |
| SONG03 | TRSHTmpI | 129BPM | KEY=D | ||
| PAD No | PtnA | DrumB | Bass | Transp | Next |
| PAD 1 | 363 | 363 | 363 | -2 | 3 |
| PAD 2 | 72 | 72 | 72 | 3 | 2 |
| PAD 3 | 72 | 72 | 72 | -2 | 3 |
| PAD 4 | 72 | 72 | 72 | 5 | 4 |
| PAD 5 | 73 | 73 | 73 | -2 | 7 FILL |
| PAD 6 | 74 | 74 | 74 | 1 | 6 |
| PAD 7 | 74 | 74 | 74 | -2 | 7 |
| PAD 8 | 74 | 74 | 74 | 5 | 8 |
| PAD 9 | 75 | 75 | 75 | -2 | 3 FILL |
| PAD10 | 72 | 72 | 72 | -2 | 12 FILL |
| PAD11 | 377 | 67 | 377 | -2 | 11 |
| PAD12 | 74 | 74 | 74 | -2 | 12 |
| PAD13 | 377 | 377 | 377 | -2 | 0 |
| SONG01 | HROKtpl | 115BPM | KEY=G | ||
| PAD No | PtnA | DrumB | Bass | Transp | Next |
| PAD 1 | 360 | 360 | 360 | 3 | 3 |
| PAD 2 | 56 | 56 | 56 | 6 | 2 |
| PAD 3 | 56 | 56 | 56 | 3 | 3 |
| PAD 4 | 56 | 56 | 56 | 8 | 4 |
| PAD 5 | 57 | 57 | 57 | 3 | 7 FILL |
| PAD 6 | 58 | 58 | 58 | 6 | 6 |
| PAD 7 | 58 | 58 | 58 | 3 | 7 |
| PAD 8 | 58 | 58 | 58 | 8 | 8 |
| PAD 9 | 59 | 59 | 59 | 3 | 3 FILL |
| PAD10 | 49 | 49 | 49 | 1 | 12 |
| PAD11 | 58 | 58 | None | 3 | 11 FILL |
| PAD12 | 50 | 50 | 50 | 3 | 12 |
| PAD13 | 378 | 378 | 378 | 3 | 0 |
| SONG04 | FUS tpl | 124BPM | KEY=C | ||
| PAD No | PtnA | DrumB | Bass | Transp | Next |
| PAD 1 | 369 | 369 | 369 | -4 | 3 |
| PAD 2 | 88 | 88 | 88 | -2 | 2 |
| PAD 3 | 88 | 88 | 88 | -4 | 3 |
| PAD 4 | 88 | 88 | 88 | -1 | 4 |
| PAD 5 | 89 | 89 | 89 | -4 | 7 FILL |
| PAD 6 | 90 | 90 | 90 | 11 | 6 |
| PAD 7 | 90 | 90 | 90 | 8 | 7 |
| PAD 8 | 90 | 90 | 90 | 1 | 8 |
| PAD 9 | 91 | 91 | 91 | -2 | 3 FILL |
| PAD10 | 386 | 386 | None | -4 | 10 |
| PAD11 | 386 | None | None | -4 | 11 |
| PAD12 | 386 | 386 | 88 | -4 | 12 |
| PAD13 | 378 | 378 | 378 | -4 | 0 |
| SONG02 | METLtpl | 128BPM | KEY=D | ||
| PAD No | PtnA | DrumB | Bass | Transp | Next |
| PAD 1 | 365 | 365 | 365 | -2 | 3 |
| PAD 2 | 64 | 64 | 64 | 3 | 2 |
| PAD 3 | 64 | 64 | 64 | -2 | 3 |
| PAD 4 | 64 | 64 | 64 | 5 | 4 |
| PAD 5 | 65 | 65 | 65 | -2 | 7 FILL |
| PAD 6 | 66 | 66 | 66 | 1 | 6 |
| PAD 7 | 66 | 66 | 66 | -2 | 7 |
| PAD 8 | 66 | 66 | 66 | 5 | 8 |
| PAD 9 | 67 | 67 | 67 | -2 | 3 FILL |
| PAD10 | 65 | 65 | 66 | -2 | 12 FILL |
| PAD11 | 64 | 64 | None | -2 | 11 |
| PAD12 | 63 | 63 | 66 | -2 | 12 |
| PAD13 | 380 | 380 | 380 | -2 | 0 |
| SONG05 | R&B tpl | 130BPM | KEY=D | ||
| PAD No | PtnA | DrumB | Bass | Transp | Next |
| PAD 1 | 364 | 364 | 364 | -2 | 3 |
| PAD 2 | 134 | 134 | 134 | 0 | 2 |
| PAD 3 | 134 | 134 | 134 | -2 | 3 |
| PAD 4 | 134 | 134 | 134 | 1 | 4 |
| PAD 5 | 135 | 135 | 135 | -2 | 7 FILL |
| PAD 6 | 136 | 136 | 136 | 0 | 6 |
| PAD 7 | 136 | 136 | 136 | -2 | 7 |
| PAD 8 | 136 | 136 | 136 | 3 | 8 |
| PAD 9 | 137 | 137 | 137 | -2 | 3 FILL |
| PAD10 | 131 | 131 | 131 | 1 | 10 |
| PAD11 | 137 | 67 | None | 0 | 3 FILL |
| PAD12 | 131 | 131 | 131 | 4 | 12 |
| PAD13 | 380 | 380 | 380 | -2 | 0 |
| SONG06 | HIP tpl | 96BPM | KEY=E | ||
| PAD No | PtnA | DrumB | Bass | Transp | Next |
| PAD 1 | 181 | 181 | 181 | 0 | 1 |
| PAD 2 | 182 | 182 | 182 | 0 | 3 FILL |
| PAD 3 | 183 | 183 | 183 | 0 | 3 |
| PAD 4 | 183 | 190 | 183 | 0 | 4 |
| PAD 5 | 184 | 184 | 184 | 0 | 7 FILL |
| PAD 6 | 185 | 176 | 185 | 0 | 6 |
| PAD 7 | 185 | 185 | 185 | 0 | 7 |
| PAD 8 | 399 | 186 | 185 | 0 | 8 |
| PAD 9 | 186 | 186 | 186 | 0 | 3 FILL |
| PAD10 | 158 | 158 | 183 | 0 | 10 |
| PAD11 | 158 | 158 | None | 0 | 11 |
| PAD12 | 158 | 158 | 185 | 0 | 12 |
| PAD13 | 399 | 399 | 186 | 0 | 0 |
| SONG09 | JAZZmpl | 150BPM | KEY=Bb | ||
| PAD No | PtnA | DrumB | Bass | Transp | Next |
| PAD 1 | 372 | 372 | 372 | -6 | 3 |
| PAD 2 | 292 | 292 | 292 | -1 | 2 |
| PAD 3 | 292 | 292 | 292 | 6 | 3 |
| PAD 4 | 292 | 292 | 292 | 1 | 4 |
| PAD 5 | 293 | 293 | 293 | -6 | 7 FILL |
| PAD 6 | 294 | 294 | 294 | -1 | 6 |
| PAD 7 | 294 | 294 | 294 | -6 | 7 |
| PAD 8 | 294 | 294 | 294 | 1 | 8 |
| PAD 9 | 295 | 295 | 295 | -6 | 3 FILL |
| PAD10 | 285 | 285 | 285 | -1 | 10 |
| PAD11 | 285 | 285 | 285 | 6 | 11 |
| PAD12 | 285 | 285 | 285 | 1 | 12 |
| PAD13 | 381 | 381 | 381 | 6 | 0 |
| SONG07 | TECHtmpI | 135BPM | KEY=F# | ||
| PAD No | PtnA | DrumB | Bass | Transp | Next |
| PAD 1 | 221 | 221 | 221 | 2 | 1 |
| PAD 2 | 219 | 221 | 221 | 2 | 3 |
| PAD 3 | 226 | 226 | 226 | 2 | 3 |
| PAD 4 | 226 | 228 | 226 | 2 | 4 |
| PAD 5 | 227 | 227 | 227 | 2 | 7 FILL |
| PAD 6 | 221 | 226 | 226 | 2 | 6 |
| PAD 7 | 228 | 228 | 228 | 2 | 7 |
| PAD 8 | 228 | 234 | 228 | 2 | 8 |
| PAD 9 | 229 | 229 | 229 | 2 | 3 FILL |
| PAD10 | 224 | 222 | 224 | 2 | 10 |
| PAD11 | 224 | 224 | 224 | 2 | 11 |
| PAD12 | 224 | 219 | 217 | -1 | 12 |
| PAD13 | 223 | 223 | 223 | 2 | 0 |
| SONG10 | LATNtpl | 126BPM | KEY=E | ||
| PAD No | PtnA | DrumB | Bass | Transp | Next |
| PAD 1 | 343 | 343 | None | 0 | 3 |
| PAD 2 | 342 | 342 | 342 | 1 | 2 |
| PAD 3 | 342 | 342 | 342 | 0 | 3 |
| PAD 4 | 342 | 342 | 342 | 3 | 4 |
| PAD 5 | 343 | 343 | 343 | 0 | 7 FILL |
| PAD 6 | 344 | 344 | 344 | 1 | 6 |
| PAD 7 | 344 | 344 | 344 | 0 | 7 |
| PAD 8 | 344 | 344 | 344 | 3 | 8 |
| PAD 9 | 345 | 345 | None | 0 | 3 FILL |
| PAD10 | 342 | 342 | 342 | 5 | 10 |
| PAD11 | 345 | None | None | 0 | 3 FILL |
| PAD12 | 344 | 344 | 344 | 5 | 12 |
| PAD13 | 383 | 383 | 383 | 0 | 0 |
| SONG08 | METLtmpI | 136BPM | KEY=A | ||
| PAD No | PtnA | DrumB | Bass | Transp | Next |
| PAD 1 | 361 | 361 | 361 | 5 | 3 |
| PAD 2 | 273 | 273 | 273 | 10 | 2 |
| PAD 3 | 273 | 273 | 273 | 5 | 3 |
| PAD 4 | 273 | 273 | 273 | 0 | 4 |
| PAD 5 | 274 | 274 | 274 | 5 | 7 FILL |
| PAD 6 | 275 | 275 | 275 | 10 | 6 |
| PAD 7 | 275 | 275 | 275 | 5 | 7 |
| PAD 8 | 275 | 275 | 275 | 0 | 8 |
| PAD 9 | 276 | 276 | 276 | 5 | 3 FILL |
| PAD10 | 44 | 44 | 44 | 10 | 10 |
| PAD11 | 44 | 44 | 44 | 5 | 11 |
| PAD12 | 44 | 44 | 44 | 0 | 12 |
| PAD13 | 377 | 377 | 377 | 5 | 0 |
| SONG11 | RAGGtmpI | 135BPM | KEY=F# | ||
| PAD No | PtnA | DrumB | Bass | Transp | Next |
| PAD 1 | 371 | 371 | 371 | 0 | 3 |
| PAD 2 | 314 | 314 | 314 | 3 | 2 |
| PAD 3 | 314 | 314 | 314 | 0 | 3 |
| PAD 4 | 314 | 314 | 314 | 5 | 4 |
| PAD 5 | 315 | 315 | 315 | 0 | 7 FILL |
| PAD 6 | 316 | 316 | 316 | 3 | 6 |
| PAD 7 | 316 | 316 | 316 | 0 | 7 |
| PAD 8 | 316 | 316 | 316 | 5 | 8 |
| PAD 9 | 317 | 317 | 317 | 0 | 3 FILL |
| PAD10 | 314 | 314 | 314 | -2 | 10 |
| PAD11 | 312 | 312 | None | 0 | 3 FILL |
| PAD12 | 316 | 316 | 316 | -2 | 12 |
| PAD13 | 378 | 378 | 378 | 0 | 0 |
MIDI Implementation
- Recognized Messages
| Status | 1st | 2nd | Description |
| 8nH | kk | vv | Note Off kk: note number vv: velocity will be ignored |
| 9nH | kk | 00H | Note Off kk: note number |
| 9nH | kk | vv | Note On kk: note number vv: velocity |
| BnH | 07H | vv | Channel Volume vv: volume value |
| BnH | 10H | vv | Channel Panpot vv: panpot value |
| BnH | 11H | vv | Channel Expression vv: expression value |
| BnH | 51H | vv | Channel JamPitch vv: JamPitch value |
| BnH | 52H | vv | Channel JamPan vv: JamPan value |
| BnH | 53H | vv | Channel JamSound vv: JamSound value |
| BnH | 78H | xx | All Sounds Off |
| BnH | 79H | xx | Reset All Controllers |
| BnH | 7BH | xx | All Notes Off |
| CnH | pp | Program Change pp: program number | |
| EnH | bl | bh | Pitch Bender bh: bender value high bl: bender value low will be ignored |
| F2H | sl | sh | Song Position Pointer shs1: song position |
| F3H | ss | Song Select ss: song number | |
| F8H | Timing Clock | ||
| FAH | Start | ||
| FBH | Continue | ||
| FCH | Stop |
- Transmitted Messages
| Status | 1st | 2nd | Description |
| 8nH | kk | 40H | Note Off kk: note number |
| 9nH | kk | vv | Note On kk: note number vv: velocity |
| BnH | 07H | vv | Channel Volume vv: volume value |
| BnH | 51H | vv | Channel JamPitch vv: JamPitch value |
| BnH | 52H | vv | Channel JamPan vv: JamPan value |
| BnH | 53H | vv | Channel JamSound vv: JamSound value |
| BnH | 78H | 00H | All Sounds Off |
| BnH | 79H | 00H | Reset All Controllers |
| BnH | 7BH | 00H | All Notes Off |
| CnH | pp | Program Change pp: program number | |
| F2H | sl | sh | Song Position Pointer shsl: song position |
| F3H | ss | Song Select ss: song number | |
| F8H | Timing Clock | ||
| FAH | Start | ||
| FBH | Continue | ||
| FCH | Stop |
- System Exclusive Messages
1) Identity Request : Recognized Only
Byte Description
FOH System Exclusive Message Status
7EH Universal System Exclusive non real time header
cc MIDI Channel 00H - OFH
06H Sub ID #1 : General Information
01H Sub ID #2 : Identity Request
F7H End Of Exclusive
2) Identity Reply : Transmitted Only
Byte Description
FOH System Exclusive Message Status
7EH Universal System Exclusive non real time header
cc MIDI Channel 00H-OFH
06H Sub ID #1 : General Information
02H Sub ID #2 : Identity Reply
52H Manufacturer : ZOOM Corporation
26H Machine ID low : RT-323
00H high:
00H Family ID low
00H Family ID high
rr Revision 1st digit in ASCII code
rr Revision 10th digit in ASCII code
rr Revision 100th digit in ASCII code
rr Revision 1000th digit in ASCII code
F7H End Of Exclusive
3) All Kits Dump
Byte Description
FOH System Exclusive Message Status
52H ZOOM Corporation
cc MIDI Channel of DrumA,00H-OFH
26H RT-323
26H All Kit Dump data All kit data
F7H EOX
4) Sequence Dump
Byte Description
FOH System Exclusive Message Status
52H ZOOM Corporation
CC MIDI Channel of DrumA,00H-OFH
26H RT-323
27H SequenceDump
data Sequence data
F7H EOX
Note: All sequence in user area will be cleared and replaced
when this message is received.
Empty patterns/songs should not be sent.
5) System Dump
Byte Description
FOH System Exclusive Message Status
52H ZOOM Corporation
CC MIDI Channel of DrumA, 00H-OFH
26H RT-323
28H SystemDump
data System data
F7H EOX
- Recordable Messages
Status 1st 2nd Description
8nH kk vv Note Off kk: note number
vv: velocity will be ignored
9nH kk 00H Note Off kk: note number
9nH kk vv Note On kk: note number
vv:velocity
AnH kk vv Polyphonic Key Pressure kk: note number
vv: pressure value
BnH cc vv Control Change cc: control number 0-119
vv:controlvalue
BnH 78H xx All Soun
BnH 79H xx Reset All Controllers
BnH 7BH xx All Notes Off
CnH pp Program Change pp: program number
DnH vv Channel Pressure vv: pressure value
EnH bh bl Pitch Bender bh: bender value high
bl: bender value low will be ignored
MIDI Implementation Chart
[MultiTrackRhythmMachine
Date :15.DEC.2000
Model RhythmTrack RT-323 MIDI Implementation Chart Version :1.00
| Function ... | Transmitted | Recognized | Remarks | ||
| Basic Channel Default Changed | 1-16,OFF 1-16,OFF | 1-16,OFF 1-16,OFF | Memorized See Note1 | ||
| Mode Default Messages Altered | 3 x ********** | 3 x | |||
| Note Number | True voice | 0-127 ********** | 0-127 | ||
| Velocity Note ON Note OFF | o x | o x | |||
| After Key's Touch Ch's | x x | x x | |||
| Pitch Bend | x | o | MS7bits | ||
| Control Change | 80 81 82 83 | 7 10 80 81 82 83 120 121 | Volume Panpot JAM VOLUME JAM PITCH JAM PAN SOUND CHANGE All Sounds Off Reset All Controls | ||
| Prog Change | True # | o 0-127 ********** | o 0-127 | ||
| System Exclusive | o | o | |||
| System Common | Song Pos Song Sel Tune | o o x | o o x | ||
| System Real Time | Clock Commands | o o | o o | ||
| Aux Mes-sages | Local ON/OFF All Notes OFF Active Sense Reset | x x x x x | x o o x | ||
| Notes | No transmitted messages. | ||||
Mode 1 : OMNI ON, POLY Mode 2 : OMNI ON, MONO o : Yes
Mode 3 : OMNI OFF, POLY Mode 4 : OMNI OFF, MONO x : No
B
"BARLEN" 51
"BASKEY" 38
"BASOUT" 39
"BasPRG" 66
"BasPTN" 66
"Bass" 58
Bass program 9,37
Adjusting the bass output level 39
Selecting the bass output 39
Bass program tuning 38
Bass program transposing 38
Switching 37
"BasVOL" 66
Batteries 7
BPM 13
Bulkdump 90
C
"CARD?" 74
"CLICK" 93
[CONTROL IN 1/2] jack 82, 83
"COPY?" 37,49,69
"COUNT" 93
"CTRL" 87
"CTRLIN" 82
D
"DELETE" 78
Demo mode 8
Demo song 8
"Dr B" 58
"DrAKIT" 66
"DrAVOL" 66
"DrBKIT" 66
"DrBPTN" 66
"DrBVOL" 66
Drum kit 9,33
Changing the name of a user drum kit 36
Copying 37
Copying pad settings 35
Editing pad settings 33
Presetdrum kits 33
Switching 33
Userdrum kits 33
"DUMP" 90
E
Error messages
"CARD FULL" 95
"ERROR" 76
"FULL" 95
"NOCARD" 95
"WRITE PROTECT" 95
Event 21,66
Export 79
"EXPORT" 80
F
Factory default settings, returning to 94
Foot pedal 82
Foot switch 83
"FORMAT" 74
Formating 74
FP01 82
FP02 82
FS01 83
G
Groove play 16,42
Groove play mode 16,42
"GROUP" 35
#
Import 76, 79
"IMPORT" 76, 79
Initialization 94
"INST LVL" 34
"INST" 34
J
Jam function 31
[JAM FUNCTION] key 31
JAM slider 31
K
"KEY" 72
[KIT] key 33
L
[LINE IN] jack 6
"LOAD" 76
Loading data 76
M
"MEMORY" 94
Memory free, checking 94
Metronome 93
MIDI 85
Changingdrumkitprogramchange 89
Control change send setting 87
Enabling MIDI output of MIDI track 88
MIDI clock 87
Program change for bass program 89
Program change send setting 87
Saving internal data on MIDI component 90
Setting MIDI channel for each track 86
Sync MIDI message send/receive setting 87
MIDI track 88,91
"MIDI?" 85
"MIDICH" 86
"MidTR" 88
"MIXLVL" 53
[MUTE] key 41, 56, 71
N
"NAME" 36,54,73
"Next" 58
0
Octave 31
"OUTPUT" 34
[OUTPUT] dial 7
P
Pad 10,30
Adjusting the pad sensitivity 32
Playing 30
Pad bank 30
[PAD FUNCTION] key 34,57
"PAN" 34
Pattern 10, 13, 40
Adjusting the swing 51
Changing the length of a pattern 51
Changing the pattern beat 52
Changing the pattern name 54
Changing the play timing 53
Changing the tempo of a pattern 41
Copying 49
Copying a specific measure 49
Deleting a track 49
Deleting a user pattern 49
Empty user pattern 14
Muting a track 41
Pattern mode 10
Playback 40
Preset patterns 13,40
Real-time input 43
Setting the quantize value 51
Setting the volume balance for each track 53
Step input 46
User pattern 13,40
"Pattern" 66
"PCBASS" 89
"PCDRUM" 89
"PITCH" 34
Precount 93
"PRG" 87
PS-02 79
"PS-02?" 79
"Ptn" 58
Q
Quantize 50
"QUNTIZ" 50
R
"REPEAT" 72
S
Save 73
"SAVE" 75
"SENS" 32
Shift 53
"SHIFT" 53
SmartMedia 5,74
Deleting data from SmartMedia 78
Formatting a SmartMedia card 74
Import/export of PS-02 data on
SmartMedia card 79
Loading data from SmartMedia 76
Partial import of SmartMedia data 76
Saving data to SmartMedia 75
Song 18,55
Blank song 18
Changing the song name 73
Copying 69
Copying specific measures 68
Deleting 68
Event 21,66
Playing 55
Real-time input 28, 56
Setting the quantize value 72
Setting the song tempo 55
Song mode 18,55
Song repeat setting 72
Step input 18, 60
Transposing 72
Song track 69
Deleting 71
Drum/bass real-time input 70
[SONG TRACK] key 70,92
[SUB OUT 1/2] jack 34, 39
Swing 51
"SWING" 51
"SYNC" 87
Sync playback 87
T
Tap tempo 41
"Tempo" 66
[TEMPO] key 13,41,55
Tick 23,50
"TIMSIG" 52
Track 13
Bass track 13
Drum A track 13
Drum B track 13
"Transp" 58
Transpose 21,64
"Transps" 66
Tuning 38
"TUNING" 38
ZEBM
CATCH US IF YOU CAN
ZOOM CORPORATION
NOAH Bldg., 2-10-2, Miyanishi-cho, Fuchu-shi, Tokyo 183-0022, Japan
PHONE: +81-42-369-7116 FAX: +81-42-369-7115
Web Site: http://wwwzoomo.co.jp
Printed in Japan RT-323 - 5000-2
- About power
- AC adapter operation
- Battery operation
- Environment
- Handling
- Alterations
- In Case of Trouble
- Usage Precautions
- - Electrical interference
- - Cleaning
- Contents
- Application Guide
- [Drum Kits/Bass Programs] 33
- Caution
- Getting Connected
- Using the Unit on Batteries
- Preparations for Playback
- Quick Guide 1 Listening to the Demo
- To Start the Demo Song
- While holding down the [SONG] key, press the [ENTER] key
- To Stop the Demo Song
- Press the [STOP] key
- To Leave the Demo Mode
- Press the [EXIT] key
- Drum Kits and Bass Programs
- Quick Guide 2 Playing the Pads
- Playing a Drum Kit
- Press the [PATTERN] key
- Press the [DRUM A] key (or [DRUM B] key)
- Tap the pads
- Press the [PAD BANK] key to switch the bank
- Playing a Bass Program
- Press the [BASS] key
- Switch the pad pitch range by pressing the [OCTAVE] key
- Changing the Drum Kit/Bass Program
- Hold down the [DRUM A]/[DRUM B] key or the [BASS] key, and press one of the [ ] / [ ] keys
- Playing a Pattern
- Press the [▶II] key
- Changing the Pattern
- Press one of the [] / [] keys
- Changing the Tempo
- While holding down the [TEMPO] key, press one of the []/[] keys
- Stopping the Pattern
- Press the [■] key
- Patterns and Tracks
- Selecting the Record Pattern/Track
- Use the [] / [] keys to select a user pattern (U00 - U99)
- Press any of the [DRUM A]/[DRUM B]/[BASS] keys
- To Start Recording
- While holding down the [REC] key, press the [ ] key
- To Stop Recording
- Quick Guide 5 Using Groove Play
- To Use Groove Play
- Press the [SONG] key and [PATTERN] key together.
- To Play a Pattern with a Pad
- Push the pad
- To Keep Playing the Pattern After Releasing the Pad
- Hold down the [REPEAT] key and push the pad
- To Terminate Groove Play
- Press the [PATTERN] key or [SONG] key
- Hands-on Lessons
- What Is a Song?
- Lesson 1 Creating a Song [Step Input]
- Select an empty song
- Press the [SONG] key.
- Use the [ ] / [ ] keys or the [VALUE] dial to select an empty song.
- Enter pattern information
- 1
- Press the [REC] key.
- 2
- Use the [INSERT] key to bring up the indication "INSERT?" on the display.
- 3
- Use the [VALUE] dial to select the pattern.
- 4
- Press the [ ] key.
- 5
- 6
- Repeat steps 2 - 6, to enter the same pattern in measures 3, 5, and 7.
- 7
- 8
- Press the [ ] key.
- ■ Entering another pattern
- O
- Transposing the bass track
- Use the [] / [] keys to bring the indication "Transps" onto the display.
- Use the [] / [] keys to move to the start of the third measure.
- Use the [VALUE] dial to change the transpose value for the third measure.
- Modifying the transpose information setting value
- - Deleting accidentally entered transpose information
- - Entering a fill-in pattern
- Press the [ ] key to terminate step input.
- - Deleting accidentally entered pattern information
- Lesson 2 Editing a Song
- Copying part of a song
- 。
- Changing the bass track
- Lesson 3 Creating a Song [Real-time Input]
- In song mode, select the song number (00 - 11) for which you want to perform real-time input.
- Hit the pads.
- While holding down the [REC] key, press the ] key.
- Hit the pad with the first pattern to start real-time input.
- To terminate real-time input, press the [ ] key.
- To listen to the recorded song, press the [] key.
- Application Guide [Pads/JAM Slider]
- Playing the Pads
- Press the [PATTERN] key.
- To play a drum kit, press the [DRUM A] key or [DRUM B] key. To play a bass program, press the [BASS] key.
- Hit the desired pad.
- To continuously play a pad, hold down the [REPEAT] key while hitting the pad.
- To play another drum sound with the pad, press the [PAD BANK] key while the drum kit is selected.
- To switch the pitch range of the bass program, press the [OCTAVE] key while the bass program is selected.
- Adjusting pad pitch/volume/panning/sound in real time (jam function)
- In pattern mode, press one of the [DRUM A]/[DRUM B]/[BASS] keys.
- Use the [JAM FUNCTION] key to select the parameter to be controlled with the JAM slider.
- PITCH
- VOLUME
- PAN (Panning)
- ■ SOUND CHANGE
- Adjusting the Pad Sensitivity
- Application Guide [Drum Kits/Bass Programs]
- Drum Kit Operation
- Switching drum kits
- Editing pad settings
- Copying a pad setting
- Press the [ENTER] key, and hit the pad to be used as copy target.
- To execute the copy process, press the [ENTER] key. To cancel the copy process, press the [EXIT] key.
- Changing the name of a user drum kit
- When the name is as desired, press the [EXIT] key.
- Copying a drum kit
- Bass Program Operation
- Switching bass programs
- Transposing a bass program
- Adjusting bass program tuning
- Changing the bass program output level
- Application Guide [Patterns]
- Use the [] / [] keys or the [VALUE] dial to select the pattern to play.
- Press the [▶II] key.
- To stop pattern playback, press the [■] key.
- Changing the pattern tempo
- Hold down the [TEMPO] key and use the []/[] keys or the [VALUE] dial to change the tempo value.
- To enter the tempo value manually, tap the [TEMPO] key twice in the desired interval (tempo tap input).
- Muting a track
- While holding down the [MUTE] key, press the key corresponding to the track you want to mute ([DRUM A]/[DRUM B]/[BASS]).
- Using the Groove Play Function
- Real-Time Pattern Input
- Drum track recording
- Bass track recording
- Pattern Step Input
- ■ Drum track
- Bass track
- Deleting a User Pattern
- Deleting a Track
- Copying a Pattern
- Changing Pattern Settings
- Setting the quantize value
- Adjusting the rhythm flourish (swing)
- Changing the pattern length
- Fewer measures than current setting
- When the setting is complete, press the [EXIT] key.
- Changing the pattern beat
- Use the [] / [] keys or the [VALUE] dial to set the beat.
- ■ Longer beat than current setting
- Shorter beat than current setting
- To update the setting, press the [ENTER] key. To cancel the process, press the [EXIT] key.
- Setting the volume balance for each track
- Changing the play timing (shift)
- Use the [] / [] keys or the [VALUE] dial to shift the timing.
- To accept the setting, press the [EXIT] key.
- Changing the pattern name
- Application Guide [Song]
- SongPlayback
- Press the [SONG] key to switch to song mode.
- Use the [ ] / [ ] keys or the [VALUE] dial to select the song number (00 - 99).
- Press the [▶II] key.
- To change the song tempo, hold down the [TEMPO] key and use the [ ] / [ ] keys or the [VALUE] dial while the song is playing (or stopped).
- Real-time Song Input
- Assigning a pattern to a pad
- Changing the playing information of a pattern assigned to a pad
- Recording a pattern sequence
- Song Step Input
- Pattern information step input
- To delete a measure
- When one song is completed, press the [ ] key.
- Switching midway to another pattern
- In song mode, select the song and press the [REC] key.
- Press the [A] key.
- Use the [] / [] keys to move to the measure where you want to input pattern information.
- When wishing to input pattern information midway in the measure, use the [STEP] key to shift the current position.
- Press the [] key once.
- Use the [VALUE] dial to select the pattern for input.
- Press the [ ] key to terminate the operation.
- Replacing the drum B/bass track
- Replacing the bass track (BasPTN)
- To terminate the operation, press the [ ] key.
- Step input for various events
- In song mode, select the song you want to edit, and press the [REC] key.
- Use the [] / [] keys to select one of the following event types for editing.
- Use the [] / [] keys to move to the position where you want to input event information.
- If required, adjust the current position with the [STEP] key.
- Use the [VALUE] dial to enter the value.
- Repeat steps 2 - 5 until all required events have been input.
- Changing the event setting value
- - Deleting an event
- To add or edit events, press the [ ] key.
- Copying Specific Measures
- Deleting a Song
- Copying a Song
- Song Track Operation
- Real-time input of drum/bass to song track
- Deleting a song track
- Editing Song Settings
- Transposing an entire song
- Song repeat playback setting
- Changing the song name
- Application Guide [SmartMedia]
- Formatting a SmartMedia Card
- Saving Data on the SmartMedia Card
- Loading Data from the SmartMedia Card
- Partial Import of Data from a SmartMedia Card
- - SONG was selected
- Press the [ENTER] key.
- To carry out the import process, press the [ENTER] key. To cancel the process, press the [EXIT] key.
- Deleting Data From the SmartMedia Card
- Use the [] / [] keys to select the file to be deleted, and press the [ENTER] key.
- To carry out the delete process, press the [ENTER] key. To cancel the process, press the [EXIT] key.
- Import/Export of PS-02 SmartMedia Data
- Reading a PS-02 pattern into the RT-323 (pattern import)
- Insert a PS-02 start-up SmartMedia card into the [DATA CARD] slot on the side panel of the RT-323.
- Press the [UTILITY] key, and use the []/[] keys to call up "PS-02?" on the display. Then press the [ENTER] key.
- Use the [] / [] keys to call up the indication "IMPORT" on the display, and press the [ENTER] key.
- Use the [] / [] keys or the [VALUE] dial to select the pattern, and press the [ENTER] key.
- Use the [] / [] keys or the [VALUE] dial to select the target user pattern in the RT-323.
- To carry out the import process, press the [ENTER] key. To cancel the process, press the [EXIT] key.
- Writing a RT-323 pattern to a PS-02 SmartMedia card (pattern export)
- Use the [] / [] keys to call up "EXPORT" on the display, and press the [ENTER] key.
- Use the [ ] / [ ] keys or the [VALUE] dial to select the PS-02 pattern to export to.
- Use the [ ] / [ ] keys or the [VALUE] dial to select the RT-323 pattern to export from.
- To carry out the export process, press the [ENTER] key. To cancel the process, press the [EXIT] key.
- Application Guide [Remote Control]
- Controlling the RT-323 With a Foot Pedal (FP01/FP02)
- Connect the FP01/FP02 to the [CONTROL IN] jack on the rear panel.
- Operate the FP01/FP02.
- Controlling the RT-323 With a Foot Switch (FS01)
- While holding down the FS01, press the key or pad that you want to control.
- Press the [PATTERN] key/[SONG] key, to return to pattern mode/song mode.
- Operate the FS01. The FS01 performs the function set in step 4 (activating the sound of a pad or performing start/stop remote control.
- Application Guide [MIDI]
- Available MIDI Functions
- - Send/receive note information
- Send/receive control change information
- Send/receive program change information
- - Send/receive MIDI sync messages
- - Save internal data as bulk dump
- Recording playing information on a MIDI track
- Changing the MIDI Setting
- Basic steps
- Press the [UTILITY] key, and use the []/[] keys to call up the indication "MIDI?" on the display.
- Press the [ENTER] key, and use the []/[] keys to select the setting item.
- When the desired item is shown, use the [] / [] keys or the [VALUE] dial and other controls to make the setting.
- Set MIDI send/receive channel for each track (MIDlch)
- Enable/disable control change information send (CTRL)
- Enable/disabling program change information send (PRG)
- Enable/disable MIDI send/receive of sync messages (SYNC)
- Enable/disable output of data stored on MIDI track (MIDI TR)
- Assign program change number to drum kit (PC DRUM)
- Assign program change number to bass program (PC BASS)
- Saving RT-323 Internal Data on MIDI Equipment
- MIDI Track Operation
- MIDI track recording
- Application Guide [Other Functions]
- Metronome Operation
- Adjusting the metronome volume
- Setting the precount
- To terminate the setting and return to pattern mode, press the [PATTERN] key.
- Other Special Functions
- Checking the memory free amount
- Returning the unit to the factory default settings
- Troubleshooting
- Power does not come on
- No sound or very low volume
- No sound or very low volume when hitting pad
- The indication "FULL" appears and no user pattern/song can be recorded
- Song/pattern playback does not start when [ ] key is pressed
- JAM slider has no effect
- No MIDI data supplied from [MIDI OUT] jack
- FP01/FS01 has no effect
- Data cannot be stored on SmartMedia card
- Reference
- RT-323 Specifications
- Drum Kit List
- Preset Patterns
- MIDI Implementation
- MIDI Implementation Chart
- B
- C
- D
- E
- F
- G
- #
- J
- K
- L
- M
- N
- 0
- P
- Q
- R
- S
- T
Brand : ZOOM
Model : RT-323
Category : Electronic musical instrument