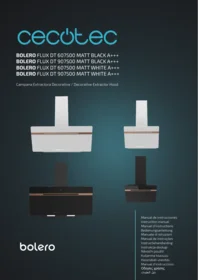
Bolero Flux Dt 907500 Matt A - Range hood CECOTEC - Free user manual and instructions
Find the device manual for free Bolero Flux Dt 907500 Matt A CECOTEC in PDF.


| Product type | Decorative hood |
| Brand | Cecotec |
| Model | Bolero Flux Dt 907500 Matt A |
| Dimensions (W x D x H) | 900 x 500 x 600 mm |
| Weight | 15 kg |
| Power supply | 220-240 V ~ 50 Hz |
| Motor power | 250 W |
| Maximum airflow | 650 m³/h |
| Maximum noise level | 65 dB(A) |
| Energy class | A |
| Control type | Push buttons |
| Lighting | 2 x LED 3 W |
| Filters | 2 washable metal grease filters |
| Exhaust diameter | 150 mm |
| Recirculation function | Possible with optional carbon filter |
| Material | Brushed stainless steel and tempered glass |
| Installation | Wall-mounted |
| Warranty | 2 years |
Frequently Asked Questions - Bolero Flux Dt 907500 Matt A CECOTEC
User questions about Bolero Flux Dt 907500 Matt A CECOTEC
0 question about this device. Answer the ones you know or ask your own.
Ask a new question about this device
Download the instructions for your Range hood in PDF format for free! Find your manual Bolero Flux Dt 907500 Matt A - CECOTEC and take your electronic device back in hand. On this page are published all the documents necessary for the use of your device. Bolero Flux Dt 907500 Matt A by CECOTEC.
USER MANUAL Bolero Flux Dt 907500 Matt A CECOTEC
Safety instructions 10
-
Parts and components 87
-
Before use 87
-
Installation 88
-
Operation 91
-
Cleaning and maintenance 95
-
Troubleshooting 96
-
Recycling of electrical and electronic equipment 97
-
Copyright 98
-
Simplified EU Declaration of Conformity 98
SOMMAIRE
EN • The coding in this manual is generic and applies to all code variants of the appliance.
Read the following instructions carefully before using the appliance. Keep this instruction manual for future reference or new users.
- This appliance can be used by children aged 8 years and above and people with reduced physical, sensory or mental capabilities or lack of experience and knowledge if they have been given supervision or instruction concerning the use of the appliance in a safe way and understand the hazards involved. Children must not play with the appliance. Cleaning and user maintenance must not be carried out by children without supervision.
- Children under 8 years of age should be kept away from the appliance unless continuously supervised.
This appliance is intended for domestic use only and is not suitable for use in commercial establishments such as bars, restaurants, farms, hotels, motels, and offices.
Clean the appliance and filter regularly to maintain efficient operation.
The kitchen hood installation must be carried out by a qualified electrician or competent person. Before use, ensure that the Voltage (V) and Frequency (Hz) indicated on the
rating plate match your household's mains power supply.
If the power cord is damaged, it must be replaced by Cecotec's Official Technical Support Service or similar qualified personnel to avoid risks.
Means for disconnection must be incorporated in the fixed wiring in accordance with the wiring rules.
There must be adequate ventilation of the room when the kitchen hood is used at the same time as gas or other fuel burning appliances.
There is a risk of fire if cleaning is not carried out according to the instructions.
Do not flambé under the kitchen hood.
CAUTION: Accessible parts and the kitchen hood surface may become hot during operation.
The air must not be discharged into a flue that is used for exhausting fumes from appliances burning gas or other fuels (not applicable to appliances that only discharge the air back into the room).
The minimum distance between the worktop and the lowest part of the kitchen hood, when it is located above a gas appliance, must be at least 70-80 cm. If the installation instructions for the gas appliance specify a greater distance, this must be taken into account. This distance could be reduced for:
I. Non-combustible parts of kitchen hoods.
II. Parts operating at safety extra-low voltage (provided that these parts do not give access to live parts if they are deformed).
The air discharge regulations must be complied with.
The kitchen hood is intended for installation only over a hob with four cooking zones.
Things you should never do:
I. Do not attempt to use the kitchen hood without the mesh filter or if the filter is excessively dirty or greasy!
II. Do not install the kitchen hood above a cooker with a high-level grill.
III. Do not leave pans unattended during use because overheated fats or oils may catch fire.
Accumulation of grease in the kitchen hood can cause a fire hazard. Clean the appliance according to the instructions in this manual.
Exercise extreme caution when cleaning the appliance. Risk of burns and/or cuts. We recommend the use of gloves.
Never leave open flames under the kitchen hood.
If the kitchen hood is damaged, do not attempt to use it.
Important! Always disconnect the power supply during installation, cleaning and maintenance.
The kitchen hood must be installed in accordance with the installation instructions and in compliance with all safety measurements.
All installation work must be carried out by a competent person or a qualified electrician.
Dispose of the packaging material carefully. Children are vulnerable to it.
Pay attention to sharp edges inside the kitchen hood, especially during installation and cleaning.
Make sure that the duct does not have bends sharper than 90 degrees, as this will reduce the efficiency of the kitchen hood.
Warning: Failure to install the screws or fastening device in accordance with these instructions may result in electrical hazards.
Warning: Before accessing the electrical terminals, all power supply circuits must be disconnected.
There must be adequate ventilation of the room when the kitchen hood is used at the same time as gas or other fuel burning appliances.
Caution: The appliance and its accessible parts may become hot during operation. Be careful not to touch any accessible parts. Children under 8 years old must stay away, unless they are supervised.
You must comply with the current local regulations regarding air discharge and ventilation system installation.
For safety reasons, only use the supplied fixing or mounting screws (if applicable, depending on the model) or screws of the same size as those recommended in this instruction manual.
Do not use a steam cleaner.
NEVER try to put out the fire with water. Instead, turn off the appliance and smother the flame with, e.g., a fireproof lid or blanket.
Never use extension leads, multiple socket connections or external timer connection elements.
If the power cord is damaged, it must be replaced by the official Cecotec Technical Support Service or by similarly qualified technicians to prevent hazards.
The appliance must not be operated if the power supply cord is damaged or cut.
If the appliance stops working or malfunctions abnormally, disconnect it from the mains and contact the official Cecotec Technical Support Service.
WARNING: Danger of poisoning from exhaust gases being drawn back in! Do not operate the appliance in exhaust air mode if it is used together with a room-air dependent chimney and sufficient air circulation is not guaranteed.
Room-air dependent chimneys (e.g. gas, oil, wood or
coal-operated heaters, continuous flow heaters or water heaters) take combustion air from the room in which they are installed and discharge the exhaust gases outdoors through an exhaust system (e.g. chimney). In exhaust air mode, air is extracted from the kitchen and adjacent rooms. Without sufficient supply air, negative pressure is created. Toxic gases from the chimney or exhaust duct may be drawn back into the living space.
Ensure that fresh air supply is guaranteed and that air can circulate, ensuring compliance with the limit value.
Safe operation is possible only when the negative pressure in the chimney location does not exceed 4 Pa (0.04 mbar). This can be achieved if the air needed for combustion can flow through openings that cannot be sealed in doors and windows, together with wall air intake/exhaust air duct. In any case, a qualified technician should evaluate the entire ventilation system of the house, indicating the necessary measures for ventilation.
If the kitchen hood is used exclusively in recirculation mode, operation is possible without restrictions.
Important note on disassembling the appliance: Disassembly is the same as assembly/installation but in reverse order. Ask for assistance from another person during disassembly to avoid injury.
Cecotec disclaims all liability for any damage or injury caused as a result of failure to follow the installation and/or operating instructions contained in this instruction manual. Cecotec is not responsible for any damage, accident, or incident resulting from the misuse of this appliance. It is the responsibility of the user to operate and maintain the appliance according to the instructions and recommendations detailed in this manual. Failure to follow
instructions may result in personal injury, property damage, or loss of product warranty.
INSTRUCTIONS DE SÉCURITÉ
- The graphics in this manual are schematic representations and may not exactly match the product.
- To improve quality, our products are constantly updated, and their appearance and specifications may change.
2. BEFORE USE
- This appliance comes in a packaging designed to protect it during transport. Take the appliance out of its box and remove all packaging materials. You can keep the original box and other packaging materials in a safe place to prevent damage to the appliance if you need to transport it in the future. If you wish to dispose of the original packaging, make sure all items are recycled properly.
- Check that all parts and components are included and in good condition. If any of them are missing or damaged, please contact Cecotec's Official Technical Support Service immediately.
Box content
- Kitchen hood
- Instruction manual
- Assembly kit (depending on model)
- Carbon filters
- Do not remove the product's serial number in order to keep proper traceability if technical assistance is required.
ENGLISH
3. INSTALLATION
Product dimensions
Figure 2 shows the external dimensions of the following kitchen hoods:
EU01_110308 Bolero Flux DT 607500 Matt Black A+++
EU01_110310 Bolero Flux DT 607500 Matt White A+++
Figure 3 shows the external dimensions of the following kitchen hoods:
EU01_110309 Bolero Flux DT 904400 Matt Black A+++
EU01_110311 Bolero Flux DT 904400 Matt White A+++
Ventilation requirements
- The ventilation system outlet must lead outdoors, except when using a recirculation system (ductless).
- Do not place the ventilation system outlet in an enclosed area.
- Use only a rigid metal ductwork. Plastic ventilation grilles are not recommended.
- The ventilation system must have a damper. If the roof or wall cap already has a damper, do not use the one supplied with the kitchen hood.
- To maximise ventilation system performance:
o Minimise the duct length and number of turns and bends. - Do not change the duct size.
- Seal all connections with duct tape to prevent leaks.
- Seal around the exterior wall or roof cap with caulking.
- The kitchen hood must be installed 70-80 cm above the hob.
Ventilation systems
Figure 4 shows the different ventilation systems.
Fig. 4 key:
OPTION 1
A. Roof ventilation outlet.
B. Kitchen hood.
C. Round ductwork.
D. Roof cap.
OPTION 2
E. Wall ventilation outlet.
F. Kitchen hood.
G. Round ductwork.
H. Wall cover.
OPTION 3
I. Recirculation system (ductless).
J. Kitchen hood.
K. Deflector.
NOTE: To ensure optimal air extraction, the following rules must be strictly observed:
- Failure to follow these basic instructions will reduce performance and increase noise levels of the kitchen hood.
- Installation must be carried out by a qualified technician.
- Do not connect the hood's air outlet pipe to an existing ventilation system being used for another appliance, such as a chimney.
- The bend angle of the air outlet pipe must not be less than 120^ .
- Position the duct horizontally. Alternatively, the duct can rise from the hood and be directed to an exterior wall.
- After installation, ensure the kitchen hood is level and perfectly balanced to prevent grease from accumulating on one side.
- Make sure the chosen extraction duct complies with all regulations and is fire-resistant.
Kitchen hood installation
NOTE: Remove the protective film before installation.
Figure 5 shows the accessories included for installation.
STEP 1
Valve installation.
Install the non-return valve to the hood's air outlet as shown in Figure 6.
Fig. 6 key:
1.- Non-return valve
2.- Air outlet
STEP 2
- Drill 3 x 8 mm holes for the hood support bracket (Figure 7).
- Fasten the bracket to the wall with the dowels and screws provided, tighten them properly (Figure 7).
Fig. 7 key:
Lift the hood and hang it on the wall bracket (Figure 8).
STEP 4 (Figure 9)
- Open the glass cover (1) and remove the metal grease filter (2-3).
- Mark the 4 mounting holes from the inside of the hood.
- Remove the hood again. Drill 4 holes of 8 mm diameter in the wall, over the points marked above and insert the dowels into the holes.
- Hang the hood on the bracket and attach the assembly to the wall with the screws from inside the hood (4).
- Connect the fume extraction pipe to the hood air outlet (5).
STEP 5
- Slide the upper part of the protective casing into the lower part, paying attention to the position of the ventilation slots, taking into account the type of use of the hood (fume extraction by piping or air recirculation).
- Attach the protective housing to the bottom/outside of the protective housing.
- Fig. 10 key:
- Use by means of smoke extraction piping.
- Use by air recirculation (without piping).
- Upper/inner part of the protective casing
- Axle support
-
Bottom/outside of the protective casing
-
Pull out the top/inside of the protective housing to the desired height, mark the mounting holes for the upper protective housing bracket on the wall and pre-drill the marked points.
- Fasten the upper protective housing bracket with 2 dowels and 2 ST4x30 mm screws to the wall at the drilled points.
- Fasten the upper/inner part of the protective housing to the bracket with 2 ST4x8 mm screws.
- Fig. 11 key:
- Dowel
- Mount
- 4 mm x 8 mm screw
- 4 mm x 30 mm screw
Replacing the LED light
Note:
- The LED light must only be replaced by qualified technicians or by Cecotec's Official Technical Support Service.
-
Unplug the power cord before replacing it.
-
Before replacing the light, make sure that it is not hot.
- Always use gloves or cloths to avoid direct contact with LED lights.
To replace the light bulb, follow the steps below (Figure 12):
- Remove the metal grease filter.
- Place one hand in the cavity to gently push the LED light out, use the other hand to grasp the lamp and pull it out, then pull the light cord carefully.
- After replacing the lamp, connect its cable and place the lamp in its original position.
Carbon filter installation (Figure 13)
- If using the air recirculation system, it is recommended to install carbon filters. Carbon filters can filter unpleasant food odours from the environment.
- Remove the mesh filters before installing the carbon filters.
- Place the carbon filter on the fan housing shaft by aligning the carbon filter holes with the housing shaft.
- Rotate the carbon filter clockwise.
- Turn until it cannot move further. Turn the carbon filter cover anticlockwise to remove it.
- Finally, reinstall the mesh filters.
Note:
- Make sure the filter is properly locked, otherwise it could become loose and pose a hazard.
- When carbon filters are installed, the suction power decreases.
- Carbon filter dimensions: Face A diameter 12.9 cm; Face B diameter 13.3 cm.
- IMPORTANT: Install carbon filters only if using the hood in air recirculation mode (WITHOUT EXTERNAL EXHAUST DUCT).
Power cord installation
You must connect the plug to a 220-240 V\~, 50/60 Hz power line.
The kitchen hood must be connected to an earthed installation.
4. OPERATION
4.1 Power touch icon

- After switching on the cooker hood by pressing the "ON/OFF" touch icon (1), the cooker hood will be switched on at low speed.
- Once switched off, when it is switched on again, it will remember the speed at which it was running the last time.
- With the hood in operation, pressing this touch icon only switches off the current speed. If we press again, we return to the previous speed.
ENGLISH
- With the hood in operation, press and hold the "ON/OFF" touch icon (1) to switch off the hood together with the light.
4.2 Light on/off touch icon

- Press the touch icon (2) to switch on the extractor hood light. Press it again to switch it off.
4.3 Extraction power increase and decrease touch icons

- With the hood in operation, press these icons (3) (5) to increase or decrease the speed (low, medium or high).
- Press and hold the "+" touch icon to activate the "Booster 1" function.
- With the hood operating at "Booster 1" level, press and hold a "+" touch icon to activate the "Booster 2" function.
- The operating time of the "Booster 1" and "Booster 2" functions is 5 minutes, after which the hood will return to high speed.
4.4 Extraction level indicator light
- The current speed level will be indicated by the colour of the light (4), according to the following code:
Green indicator light: Low speed
Yellow light: Medium speed
Blue light: High speed
Blue light flashing: Booster 1
Rapid blue light flashing: Booster 2

4.4 Delay End function
- With the hood in operation, press the touch icon (6) and the light will flash, indicating that the hood has entered the "Delayed Off" mode.
- Press and hold the touch icon (6) to cancel the "Delayed power off" function.
- The delay time is 5 minutes.
- After 5 minutes, the bell will beep and turn off.
4.5 Grease filter metal cleaning reminder
- The indicator light of the "+" and "-" touch icons will flash simultaneously when the total working time reaches 20 hours.
- Press and hold the two touch icons "+" and "-" simultaneously to cancel the reminder. An acoustic warning (beep) will sound twice, and the total working time will be reset.
4.6 "Wi-Fi" activation

- In standby mode, press and hold this touch icon (7) to activate the Wi-Fi signal.
- The icon (7) will start flashing.
-
As soon as the connection is successfully established, the icon (7) will light up steadily.
-
If the connection is not established after approximately 3 minutes, the icon (7) will stop flashing and the device will automatically switch to standby mode.
- By linking the device to your home WiFi network, you can conveniently control it via the "Tuya" APP.
- First download the "Tuya" APP directly from the Google Play Store (Android) or App Store (iOS).
- Make sure your smartphone is connected to the same WiFi network as your "Tuya" device.
- Log in to your account. If you do not have it yet, register in the APP "Tuya".
- In the main APP window, click "+" / "Add device" in the upper right corner or directly on the "Add device" button.
- Select the extractor hood.
- If you now click on the image of the cooker hood, the control window with all available functions will appear (Figure 14).
- There are 4 speed settings available: High / Medium / Low / "Booster 2".

Low > Low speed
Middle > Average speed
High > High speed
Strong > Booster 2
- NOTE: The "Booster 1" speed cannot be controlled via the APP control window.
- In "Booster 2" mode, it will flash for 5 minutes. After this time, it will stop flashing and the hood will return to high-speed operation.
- The filter cleaning reminder icon in the APP (Filter Cleaning Reminder) will light up the first time you switch on the cooker hood. Press the icon to cancel the reminder and reset the total running time. It will light up again when the total operating time reaches 20 hours.
- Press the on/off touch icon to switch on the hood at low speed. Press the on/off touch icon again to deactivate all functions and enter standby mode.
- Light: Briefly press the Light icon to turn the light on or off.
- Air Cleaning Function (Air Cleaning Function): Press the More icon to activate and deactivate this function.
- Press the button icon to activate the "Delayed shutdown" function, you can confirm a time between 1 and 100 minutes.


ENGLISH
*Function available only on selected cooker hood models. The configurable time can be modified in the APP.
- Press the icon to contact Customer Service via WhatsApp.
- The following icon Gear has no functionality
IMPORTANT: The APP may undergo modifications and/or updates with respect to the description indicated in this manual. These changes can affect both the windows and the APP's own functionalities.
IMPORTANT: The Wi-Fi wireless connection only supports networks in the 2.4 GHz frequency band and does not support the 5 GHz frequency band.
4.7 Air Purification function = activation
- In standby mode, press and hold the touch icon for about 1 second to activate this function.
- The hood will start running at low speed for 5 minutes, after which it automatically shuts off for 55 minutes.
- After this 55-minute period, the hood will automatically turn back on for 5 minutes before repeating the 55 minutes off cycle.
- Once this function is enabled, it can only be disabled by pressing the touch icon again for 1 second. Disabling the function does not affect other normal operations.
- During the 5-minute operating phase, the icon will flash green. At the start of the 55-minute shutdown period, the icon will be solid green. If the "Air Purification" function is activated and the cooker hood is switched on manually, the function will stop automatically. However, when the hood is turned off, the function will resume automatically.
4.8 "Gesture control" function
- The sensors that control gesture operation are located to the left and right of the control panel.
- In standby mode, the "Gesture Control" function is switched off. Press and hold the "+" touch icon for 3 seconds to activate the function and press again for 3 seconds to deactivate it.
- In standby mode, move your hand from left to right to activate low extraction power. The green light will turn on.
- At low power, move your hand from left to right to activate medium extraction power. The yellow light will turn on.
- At medium power, move your hand from left to right to activate high extraction power. The blue light will turn on.
- In high-speed mode, move your hand from left to right to activate "Booster 1" level. The blue light will flash.
-
In level "Booster 1", move your hand from left to right to activate level "Booster 2". The blue light will flash rapidly.
-
With the bell activated, move your hand from right to left to activate the "Delayed shutdown" function.
- Move your hand from right to left again and the hood will turn off.
- In standby mode, move the hand from right to left and it will not change status.
NOTE: To ensure optimal gesture control operation, the hand must be placed close to the extractor hood.
4.6 Recommendations for use
- Ensure there is sufficient clean airflow during cooking for the hood to operate efficiently and quietly.
- Adjust the speed according to the amount of steam/smoke produced while cooking. Only use the "Booster" functions when necessary. The lower the speed, the lower the energy consumption.
- If substantial steam/smoke is produced during cooking, select a higher speed setting. If the steam/smoke has already spread throughout the kitchen, the hood should be operated for a longer period.
- Switch off the hood when it is no longer needed.
- Turn off the light when it is no longer needed.
- Clean the metal grease filters regularly and replace them if necessary to increase the ventilation system's efficiency and prevent fires.
- Always cover pots and pans with their lids while cooking to reduce steam/smoke and condensation.
NOTE: The hoods are equipped with an overheating protection system that activates to prevent possible incidents when the motor temperature exceeds the operating limit value.
5. CLEANING AND MAINTENANCE
Cleaning and maintenance
Switch off the kitchen hood and unplug it from the mains socket before performing any cleaning or maintenance tasks. The hood's external surfaces are susceptible to scratches and stains. Therefore, use mild cleaning products and remove any alkaline or acidic substance residues (lemon juice, vinegar) immediately.
Stainless steel surfaces
Stainless steel must be cleaned regularly to ensure a long service life. To do this, use a suitable cleaner.
ENGLISH
Control panel surface
The control panel can be cleaned with a damp cloth and a neutral cleaning product. Make sure the cloth is clean and well wrung out before cleaning the kitchen hood. Use a soft, dry cloth to remove any excess moisture that may remain after cleaning.
Cleaning of metal grease filters
Clean the filter every month to prevent fire hazards. The filter accumulates grease, smoke and dust, which affects the efficiency of the kitchen hood. If the filter is not cleaned, grease residues will accumulate. Clean the filter with water and a suitable cleaning product, allow it to air dry before replacing it.
Carbon filters
If carbon filters are installed, they should be replaced regularly to ensure optimum performance in the removal of odours and fumes. Its service life depends on the frequency of use of the cooker hood.
6. TROUBLESHOOTING
| Problem | Possible causes | Solution |
| The light turns on, but the motor does not run. | The ventilation system is blocked. | Clear the obstruction. |
| The capacitor is faulty. | Contact Cecotec's Official Technical Support Service. | |
| The motor is faulty. | Contact Cecotec's Official Technical Support Service. | |
| The light does not turn on and the motor does not run. | The LED light does not work. | Replace the LED light bulb.Contact Cecotec's Official Technical Support Service. |
| The plug is loose. | Make sure the plug is properly connected to the power socket. | |
| The kitchen hood vibrates. | The fan is damaged. | Contact Cecotec's Official Technical Support Service. |
| The motor is not properly secured. | Contact Cecotec's Official Technical Support Service. | |
| The hood is not properly fixed to the wall. | Make sure the kitchen hood is completely secure. | |
| Smoke or steam cannot be properly extracted. | The distance between the kitchen hood and the hob is too great. | Reduce the distance between the hood and the hob. |
| The hob is exposed to a high airflow. | Reduce the airflow in the cooking area by closing doors or windows. |
Note:
- These instructions are intended for qualified technicians, do not attempt to carry them out if you do not have the necessary training and knowledge, as any damage caused by an incorrect repair will void the warranty.
- If none of these situations match your problem, do not attempt to disassemble or repair the device by yourself. Repairs carried out by unqualified people may result in injury or serious malfunctions. Contact Cecotec's Official Technical Support Service. Repairs must be carried out by an authorised technician using only original spare parts.
- Unauthorised self-maintenance or maintenance will affect the safe use of the product and the application of the warranty policy.
WARNING:

Any electrical repairs to this appliance must conform to local and/or state laws. Please contact the official Cecotec Technical Support Service in case of doubt and before carrying out any of the above operations. Always disconnect the appliance from the power supply.
7. RECYCLING OF ELECTRICAL AND ELECTRONIC EQUIPMENT

This symbol indicates that, according to the applicable regulations, the product and/or battery must be disposed of separately from household waste. When this product reaches the end of its service life, you must remove the batteries/accumulators and take it to a collection point designated by local authorities.
For detailed information on how to properly dispose of electrical and electronic
equipment and/or the corresponding batteries, consumers should contact their local authorities.
Compliance with the above guidelines will help to protect the environment.
ENGLISH
8. COPYRIGHT
The intellectual property rights over the texts in this manual belong to CECOTEC INNOVACIONES, S.L. All rights reserved. The content of this publication may not, either in part or in its entirety, be reproduced, stored in a retrieval system, transmitted or distributed by any means (electronic, mechanical, photocopying, recording or similar) without prior authorisation from CECOTEC INNOVACIONES, S.L.
9. SIMPLIFIED EU DECLARATION OF CONFORMITY
CE Cecotec Innovaciones hereby declares that this appliance complies with the essential requirements and other relevant provisions of the regulations applicable in the European Union. This appliance has been designed, manufactured and tested in compliance with required safety and quality standards. The full text of the EU Declaration of Conformity can be found on the following website: https://cecotec.es/es/information/declaration-of-conformity
1. PIÈCES ET COMPOSANTS
link: https://storececotec.it/it/information/declaration-of-conformity
PORTUGUÊS
1. PEÇAS E COMPONENTES
Fig. 1 Painel de controlo
Low > Lage snelheid
6. PROBLEEMOPLOSSING
Düşük > Düşük hız
Orta > Ortalama hız
Yüksek > Hız yüksek
information/declaration-of-conformity
1. MEPH KAI E≡APTHMATA
Fig./Img./Abb./Afb./Rys. 4

Fig./Img./Abb./Afb./Rys. 5

1
2
Fig./Img./Abb./Afb./Rys. 6

Fig./Img./Abb./Afb./Rys. 7

Fig./Img./Abb./Afb./Rys. 8

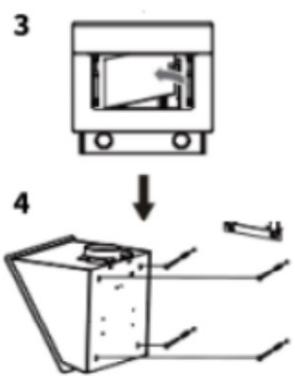

Fig./Img./Abb./Afb./Rys. 9
1

2

Fig./Img./Abb./Afb./Rys. 10
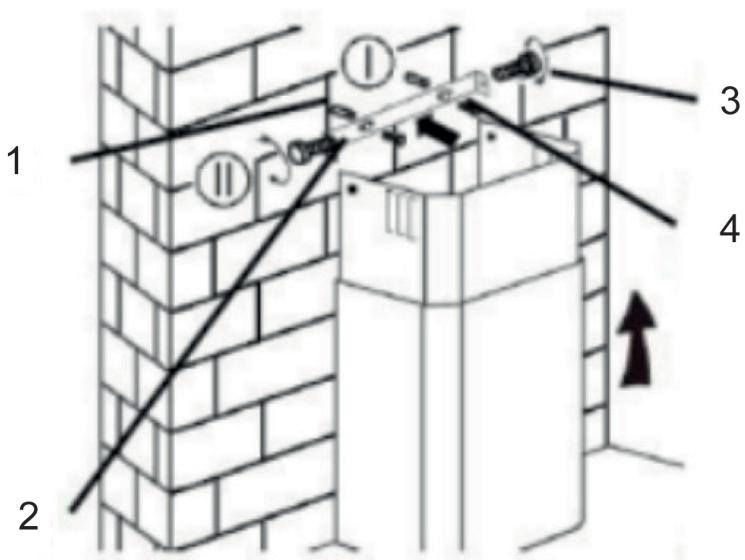
Fig./Img./Abb./Afb./ Rys. 11

Fig./Img./Abb./Afb./Rys. 12

Fig./Img./Abb./Afb./Rys. 13
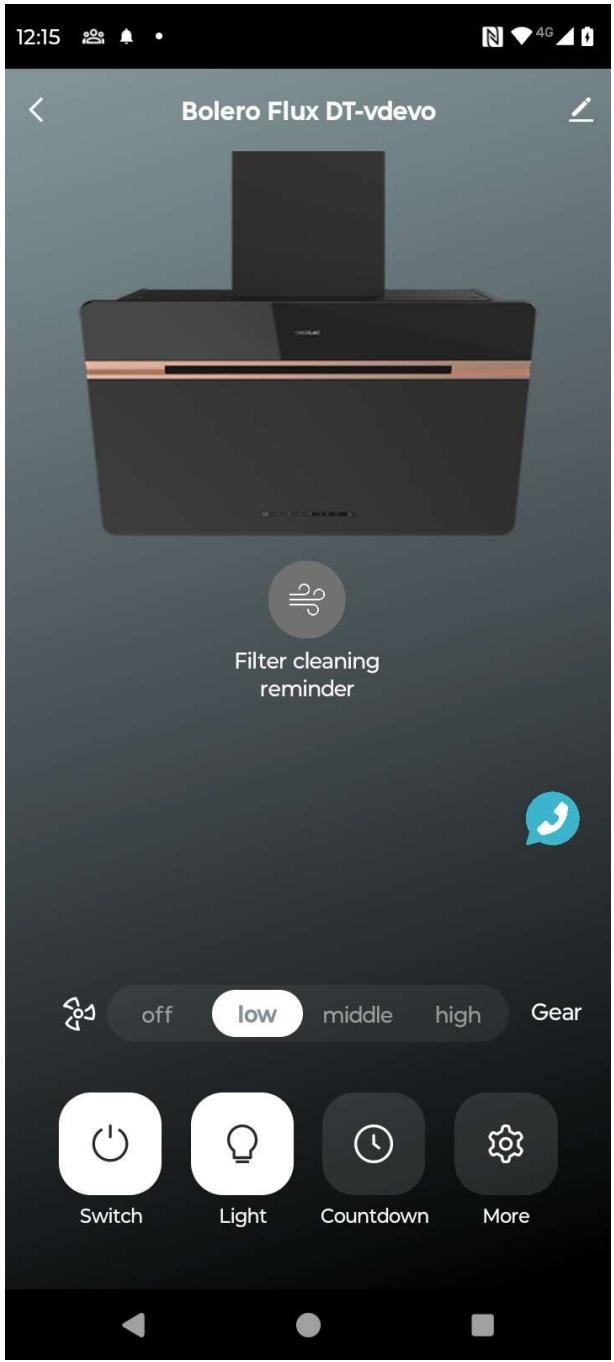
Fig./Img./Abb./Afb./Rys. 14
www.cecotec.es



- SOMMAIRE
- INSTRUCTIONS DE SÉCURITÉ
- BEFORE USE
- Box content
- ENGLISH
- INSTALLATION
- Product dimensions
- Ventilation requirements
- Ventilation systems
- OPTION 3
- Kitchen hood installation
- STEP 1
- STEP 2
- STEP 4 (Figure 9)
- STEP 5
- Replacing the LED light
- Note:
- Carbon filter installation (Figure 13)
- Power cord installation
- OPERATION
- Power touch icon
- Light on/off touch icon
- Extraction power increase and decrease touch icons
- Extraction level indicator light
- Delay End function
- Grease filter metal cleaning reminder
- "Wi-Fi" activation
- Air Purification function °= activation
- "Gesture control" function
- Recommendations for use
- CLEANING AND MAINTENANCE
- Cleaning and maintenance
- Stainless steel surfaces
- Control panel surface
- Cleaning of metal grease filters
- Carbon filters
- TROUBLESHOOTING
- WARNING:
- RECYCLING OF ELECTRICAL AND ELECTRONIC EQUIPMENT
- COPYRIGHT
- SIMPLIFIED EU DECLARATION OF CONFORMITY
- PIÈCES ET COMPOSANTS
- PORTUGUÊS
- PEÇAS E COMPONENTES
- Fig. 1 Painel de controlo
- PROBLEEMOPLOSSING
- MEPH KAI E≡APTHMATA
Brand : CECOTEC
Model : Bolero Flux Dt 907500 Matt A
Category : Range hood