
SPRAY STATION 3500 - Paint gun EARLEX - Free user manual and instructions
Find the device manual for free SPRAY STATION 3500 EARLEX in PDF.
| Product Type | HVLP spray gun (High Volume Low Pressure) |
| Brand | EARLEX |
| Model | SPRAY STATION 3500 |
| Power | 575 W |
| Supply Voltage | 230 V |
| Sound Pressure Level | 85 dB(A) |
| Maximum Allowable Viscosity | 160 DIN/sec |
| Paint Tank Capacity | 1 L |
| Dynamic Air Pressure | 0.14 bar |
| Supplied Nozzle Diameter | 2 mm (nozzle-needle set) |
| Spray Technology | HVLP (High Volume Low Pressure) |
| Electrical Class | Class II (double insulation) |
| Available Spray Patterns | Horizontal, vertical, round |
| Air Filter | Removable and washable |
| Air Hose Length | Not specified |
| Warranty | 24 months against manufacturing defects |
| Certifications | CE (LVD, EMC, RoHS) |
Frequently Asked Questions - SPRAY STATION 3500 EARLEX
User questions about SPRAY STATION 3500 EARLEX
0 question about this device. Answer the ones you know or ask your own.
Ask a new question about this device
Download the instructions for your Paint gun in PDF format for free! Find your manual SPRAY STATION 3500 - EARLEX and take your electronic device back in hand. On this page are published all the documents necessary for the use of your device. SPRAY STATION 3500 by EARLEX.
USER MANUAL SPRAY STATION 3500 EARLEX
^
EARLEX SPRAY STATION 3500
GB OPERATING INSTRUCTION MANUAL
RU INHCTPYKUЯ ПО 3KcPJIyATAUIN
FR MODE D'EMPLOI
UA IHCTPYKlI3 EKCJIyATAUII
Thank you for purchasing the Earlex Spray Station.
BEFORE USE - PLEASE READ THE MANUAL AND SAFETY INSTRUCTIONS.
Please retain for future reference.

- Never under any circumstances aim the Spray Gun at another person or animal. In the event of injury occurring seek expert medical advice immediately.
The Spray Gun must only be used with paints and solvents that have a flash point suitable for spraying. If in doubt, consult the paint or solvent manufacturer's data. - Always ensure there is adequate ventilation when spraying.
- NEVER spray near a naked flame, including appliance pilot light.
- NEVER smoke whilst spraying.
- NEVER allow children to operate or play with the Spray Gun.
- Always read the solvent manufacturer's instructions before use.
- Always disconnect unit from mains supply when filling the paint container.
Always wear a suitable protective mask when spraying. We would also recommend the use of gloves, goggles and overalls.
After each use, thoroughly clean the Spray Gun.
This appliance is not intended for use by persons (including children) with reduced physical, sensory or mental capabilities, or lack of experience and knowledge, unless they have been given supervision or instruction concerning use of the appliance by a person responsible for their safety. - Use only genuine manufacturer replacement parts.
- Always disconnect the Spray Station from the mains supply before cleaning the appliance.
- Warning: The use of any accessory or attachment, other than those recommended in this instruction manual, may present a risk of personal injury.
- Use the Spray Gun for the job it was designed for only. Mis-use of the Spray Gun will invalidate the guarantee.
- Wear ear protection.
WARNING: The substances used with this Spray Gun (paints, solvents, etc.) may contain dangerous, harmful, explosive or corrosive materials. ALWAYS COMPLY WITH THE SAFETY INSTRUCTIONS ISSUED WITH THIS PRODUCT AND THE MATERIAL BEING USED.
Only use the Spray Station as described in this manual.
TECHNICAL SPECIFICATION:
Wattage: 575 Watts
Voltage: 230 V
Sound pressure level: 85 dB (A)
Maximum viscosity: 160DIN/sec
Container capacity: 1 litre
Air hose length: 2.7m
Dynamic air pressure: 0.14 bar
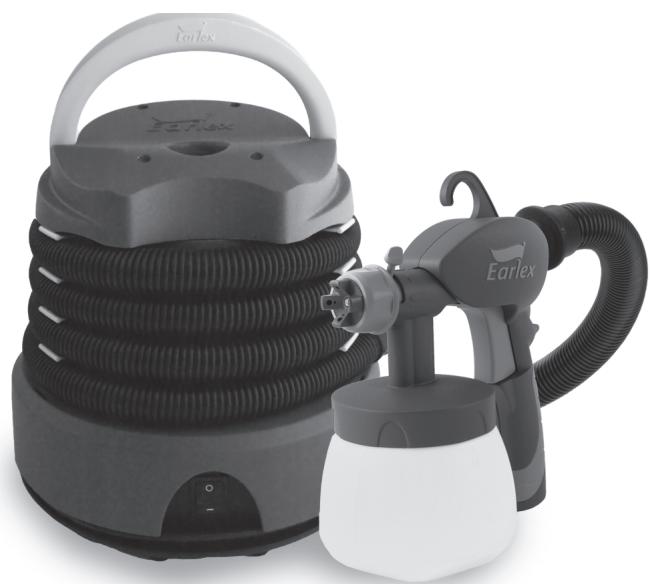
PARTS LIST Fig.1
No.Description
- Needle and Fluid Tip Tool
- Air Cap Ring
- Air Cap
- Spray Direction Plate
- Fluid Tip 2.0mm
- Fluid Tip O-Ring
- Fluid Needle 2.0mm
Part Code
V0018
V0001
V0002
V0003
V0004
V0005
V0006
No.Description
- Lip Seal - Fluid Needle
- Paint Flow Adjuster
- Paint Container Seal
- Pick-up Tube
- Paint Container
13.Hose
14.Filter
Part Code
V0007
V0011
L0682
V0012
V0014
L0896
L0290
INTRODUCTION
The concept
A motor feeds out a high volume of air (HV) and enables products to be sprayed at a low pressure (LP). The Hose feeds the air produced by the motor to the Spray Gun. The solution is released from the Fluid Tip of the Spray Gun at a very low pressure (0.14 bar) and is enclosed in a high volume of air.
The powerful motor can spray a wide range of solutions with or without dilution. However, there will always be some which will not be suitable for the Spray Gun. Good quality paint contains a high percentage of solids which make the dilution easier. The users must keep in mind that low temperatures make the paint thicker, that's why we recommend spraying with the Spray Gun at a 15^ minimum temperature.
PREPARATION
- Carefully cover areas which are not to be painted with a plastic cover and protective tape.
- Wear a suitable mask when spraying products (and make sure there is adequate ventilation in the room when working indoors).
- Clean the surface you are going to paint. As well as being clean, it must also be dry and smooth.
- Practice first on some old wooden planks to make sure you are holding the Spray Gun correctly.
- We recommend you wear protective clothing.
- Stir the paint well using a mixer where possible.
- Make sure there are no solid particles in the paint.
- Many products can be sprayed without being thinned. However, if the application is not good, thin the product progressively in stages of 5% .
- Most paints can be sprayed by being thinned just a little, e.g. by 5% or 10% .
- Some thick paints such as outer wall paints and certain undercoats will need to be thinned by 20% or 25% .
- Use water to thin a water-based product.
- Use appropriate thinner to thin solvent-based products.
- Certain manufacturers will indicate on the can whether a specific thinner is to be used.
- Certain paint manufacturers have specific paints available for HVLP application.
Your Spray Station, is a powerful and versatile solution, and comes with two sizes of Needle and Fluid Tip:
- The smaller Needle and Fluid Tip is the most commonly used size for decorative paints.
- The larger Needle and Fluid Tip, which can be easily assembled to the Spray Gun (with the Needle and Fluid Tip Tool (1)), is for thick paints such as undercoats and smooth masonry paints.
There are other optional Needle and Fluid Tip sizes available to purchase for more specific applications.
SETUP
- Fill the Paint Container (12) with the product to be sprayed. Stir well (as mentioned previously) and strain to remove any bits which will interfere with a smooth consistent spray.
- Make sure the Paint Container Seal (10) and Pick-up Tube (11) are firmly fitted into the base of the Spray Gun.
- Screw the Paint Container (12) to the base of the Spray Gun and tighten accordingly.
- Start with the Paint Flow Adjuster (9) at its minimum setting so the Trigger can not be pulled. Do not forget that the Paint Flow Adjuster controls the quantity of paint sprayed (Fig.4).
- Uncoil the air Hose and attach it to the back of the Spray Gun and the other end to the Spray Station.
- Uncoil the power cable and attach the plug to the mains supply.
- Switch the Spray Station on. This will immediately cause some air to be produced, which is quite NORMAL. However, none of the product will be sprayed until the Spray Gun Trigger is pulled.
- Very important: when spraying for the first time, we recommend that you always leave the motor unit to run for 1 to 2 minutes before applying the product. Do not forget that the Paint Flow Adjuster controls the quantity of paint sprayed (Fig.4).
ALWAYS MAKE SURE THAT THE MOTOR UNIT IS ON A RIGID SURFACE AND FREE FROM DUST.
SPRAYING TECHNIQUE
| 3 spray patterns | |
| Horizontal and Vertical Spray with varying widthsVertical and Horizontal for normal sized jobs | Round SprayRound for small and precise jobs |
The most commonly used technique for painting a large surface is the 'crisscross' technique, i.e. you apply the product in a horizontal strips and then cross over these strips by applying the product in a vertical strips (Fig. 3).
1) To achieve a horizontal strip adjust the Spray Direction Plate to the vertical position then pull the Trigger and move your arm across to the right.
2) When you get to the end of the line, release the Trigger for a moment and then apply the product in the opposite direction just beneath the line you have sprayed.
3) Next, to achieve a vertical strip adjust the Spray Direction Plate to the horizontal position then pull the Trigger and move your arm up and down over the horizontal strips you just have sprayed.

Through gradual movement of the Spray Direction Plate (4) between Horizontal, Vertical and Round spray pattern you can vary the width of the pattern (Fig.3)
HINT: To obtain the best results always keep your Spray Gun level and at an equal distance from the object you are spraying, ideally 25-30cm (10"-12") (Fig.5/6). Let your arm control the movement rather than your wrist (Fig.5/6). This will help give you an even paint distribution.
HINT: HVLP technology produces warm air through the Air Cap allowing the paint to dry quicker which can enhance the final effect.
HINT: For ceilings and floors make sure the Pick-up Tube is properly oriented towards the handle of the Spray Gun.
CLEANING INSTRUCTIONS
SPRAY GUN
| Type of paint | Cleaning |
| Water based paint | Clean with water |
| Oiled based paint | Clean with appropriate thinner e.g. White Spirit |
HINT: Before removing or re-inserting the Needle and Fluid Tip ensure the Spray Gun has been flushed through with water or the appropriate thinner so the inner tube is clean.
HINT: When done immediately the cleaning operation can take you less than 5 minutes. If taking a break, leave the Spray Gun in a plastic bag to prevent the paint from drying.
- Remove the Paint Container (12).
- Pour any leftover paint into its container so that it can be used for the future. Pull the Trigger to allow paint to run out of the Pick-up Tube (11).
Pour a quantity of the respective thinner into container, shake the Spray Gun lightly, reassemble the Spray Gun, then spray this liquid though the Spray Gun. Repeat this until the thinner being sprayed is coming through with no traces of paint. - Clean any traces of paint off the outside of the Spray Gun.
- Clean the Paint Container Seal (10).
FLUID TIP AND NEEDLE
- Unscrew Air Cap Ring (2).
- Remove the Air Cap (3).
- Remove the Spray Direction Plate (4).
- It is recommended that you push the Trigger forward to help release the Fluid Tip (5).
- Using the Needle and Fluid Tip Tool - pincer end A (1) remove the Fluid Tip (5).
- Insert the Needle and Fluid Tip end B (1) into the inner tube and unscrew the Needle anticlockwise, then pull to release the Needle.
- Place all of these items into a container and clean, then using a brush and the respective thinners.
- Clean the inside of the body of the Spray Gun.
- Thoroughly dry all parts before reassembling.
- Reassemble parts in reverse order.
- Ensure the Air Cap Ring (2) is fully tightened and the Fluid Tip is pushed into place so that the Spray Gun Needle will shut off. NB: Ensure the Spray Direction Plate is free to move. If necessary loosen the Air Cap Ring (2) slightly.
- NEVER DISPOSE OF PAINTS OR SOLVENTS DOWN THE DRAIN. ALWAYS USE YOUR LOCAL WASTE COLLECTION SITE.
- The motor unit itself does not require any specific maintenance apart from checking that the filter is not clogged up (the filter can be removed and washed). The filter can be found in the base of the motor unit.
Important: Each Fluid Needle is manufactured to fit the size of the corresponding Fluid Tip. Do not try to fit a 2.0mm Fluid Needle to a 3.0mm Fluid Tip.
| TROUBLESHOOTING | ||
| PROBLEM | CAUSE | ACTION REQUIRED |
| The paint drips onto item being painted | Paint too diluted | Add undiluted paint |
| Paint output too high | Reduce the paint output by adjusting the Paint Flow Adjuster (9) | |
| Moving too slowly | Increase speed of application | |
| Spray Trigger held for too long | Release Trigger sooner | |
| Spray Gun too close | Increase the distance between the Spray Gun and the work surface | |
| Paint is too thin or irregular | Paint too diluted | Add undiluted paint |
| Paint output too low | Increase the paint output by adjusting the Paint Flow Adjuster (9) | |
| Moving too fast | Reduce speed of application | |
| Spray Gun clogged | Clean the Spray Gun | |
| Spray Gun too far away | Move the Spray Gun closer to the work surface | |
| No paint being released | Paint too thick | Add thinner |
| Fluid Tip clogged | Clean the Fluid Tip (5) | |
| Pick-up Tube clogged | Clean Pick-up Tube (11) | |
| Air Hose split | Replace air Hose (13) | |
| Grainy paint | Filter the paint | |
| Paint Container almost empty | Refill Paint Container (12) | |
| Spray Gun at an angle | Check that the Pick-up Tube (11) is pointing towards the paint | |
| Air inlet blocked | Check the condition of the Filter (14) and clean if necessary | |
| Too much paint in an area | You move your wrist | Move your fore arm instead |
| Application | Either too much or not enough paint | Use the Paint Flow Adjuster (9) to control the flow |
Please note: We have done all we can to ensure that when used correctly and in accordance with these instructions the spray gun has a long and fault-free life. We accept no responsibility for damage caused by the use of incorrect or unsuitable substances, paints or liquids which have not been thinned correctly or which are not suitable for the surfaces to which they are applied, health hazards arising from a lack of ventilation when working in confined spaces or equipment which is faulty due to inadequate cleaning of the components after use. If in doubt, test a small inconspicuous area first. Always read the manufacturer's instructions before use. Neither our guarantee nor the above statement affects your statutory rights.
MAINS CONNECTION
This unit is a Class II appliance which means it is double insulated for your protection, no earthing wire is necessary. If the supply cord is damaged, it must be replaced by Earlex Ltd or our appointed agents.
If you are using an extension lead it must be rated at a minimum of 6 amps and fully unwound. Do not operate with a lead rated at less the 6 amps as this will cause premature failure of the motor which is not covered by the guarantee.
If the plug is cut off from the mains lead, it must be disposed of safely. NEVER under any circumstances insert a plug which is cut off from the mains lead into socket.
Information on the disposal of waste electrical equipment is known as WEEE. Please do not dispose of tools with your household waste collected by the council. It is your responsibility to dispose of this type of waste by handing it over to a special designated collection point for recovery and recycling.
EC Declaration of Conformity We declare that the unit: HV3500 Conforms to LVD 2006/95/EC, EN60335-1, EMC 2004/108/EC, EN55014-1, EN55014-2, EN61000-3-2, EN61000-3-3, EMF EN50366.
Tim Hopper Technical Director
All rights reserved © 2009
Design Registrations and Patents:
Spray Gun Design Registration
ECD 001096218-0001
CN 200930004457.X
Spray Gun Patent
GB 0903275.6
HVLP Turbine Design Registration
ECD 001096242-0001
CN 200930004458.4
US 29/314,080
EARLEX LTD. WILL ACCEPT NO RESPONSIBILITY FOR THE USE OF THIS PRODUCT IF USED FOR ANY OTHER PURPOSES THAN THOSE DETAILED HEREIN.
GUARANTEE and HELPLINE
This product is guaranteed for a period of 24 months against faulty manufacture or materials. It is not guaranteed for industrial or hire purposes. This guarantee does not affect your statutory rights. For further information or any user advice, please phone our helpline between 9am to 12pm and 2pm to 5pm Mondays to Fridays (excluding Bank Holidays), or visit our website www.earlex.fr.
Earlex Ltd.
Earlex Ltd, Tel: +44 (0)1483 454666
Email: enquires@earlex.co.uk Website: www.earlex.co.uk
Earlex Sarl.
Earlex Sarl, Tel: +33 (0)4 76 67 18 46
Email: contact@earlex.fr Website: www.earlex.fr
CONSIGNES DE SECURITÉ
VEUILLEZ LIRE CES CONSIGNES AVANT UTILISATION
ENSEMBLE BUSE POINTEAU
RACCORDEMENT AU SECTEUR
Tim Hopper Technical Director
Copyright & design reserve © 2009 design déposé
Email: contact@earlex.fr Website: www.earlex.fr
Tim Hopper Technical Director
Todoosdedearesthoservados ©2009Registrosdedisenos
Email: contact@earlex.fr Website: www.earlex.fr
Tim Hopper Technical Director
Email: contact@earlex.fr Website: www.earlex.fr
Tim Hopper Technical Director
Email: contact@earlex.fr Website: www.earlex.fr
INSTRUÇÉS PARA UTILizar COM SEGURANCA
POR FAVOR LEIA ANTES DE UTILizar
Tim Hopper Technical Director
Email: contact@earlex.fr Website: www.earlex.fr
ZASADY BEZPIECZNEGUZYTKOWANIA
IGLICA I KONcOwKa FARBY
Tim Hopper Technical Director
Email: contact@earlex.fr Website: www.earlex.fr
ПРавиля БЕЗПАС"HОУ 3КСПЛYATALUIN
CAMODEHbI KPACKOITbT
EcnBbNcNoIb3yeTe ydHnHtBnHbI npoBOd, nocJeHm DOJIxHe 6bITb paCCHTaH KaK MHHMym Ha 6 A. KpOme TOrO, ydHnHtEnb Heo6XoHMo NOHOCTBIO pa3MOtaTb. He ncNoB3yIte ydHnHtEni, paccHTaHHbIe MeHee qem Ha 6 A: 3TO NOBLeYET 3a c6oBn npexkDeBpeMeHHbI OTKa3 DBuRatJIa, Ha KOToPbI He paCnpOcTpaHraeTc rapaHTnIa.
OTpe3aHnyo OT ceTeBoro npoBoDa BnIky CneIyet 6e3oNaChbIM o6pa3OM yTnIIn3npoBaTb. KATEGOpUcECKN 3AIPPEuAETCBACTabIbTB pO3eTKy BnIKy, OTpe3aHnyo OT ceTeBoro npoBoDa.
CbeHn 6yTnI3aun OTxOIOB 3JeKtpo06OpuOBAHn coepXaTcB DnpeKTHBe EC 6OTxOax 3JeKtpueckoro n 3JeKtpoHHoro 6OpuyOBAHn (WEEE). He BbI6paCbIbAte np6Opby B MeCTax dnn c6opa 6bITOBbIX OTxOIOB MyHnUINaJIbHbIMn CnyJ6Amn. Bbl 683aHbI yTnI3npOBaTb OTxOdbI 3TOBO BnDa NytEm nx nepedauN B CneuaJIbHO PpeHa3HaueHHbI dnn 3TOrO pNYKT dnn noCneDuOSe nepepa60TKn.
3aBJIeHne O COOTBeTCTBnI DnpeKTHBaM I CTaHdApTaM EC
3aBnem, yTo yCTpoiCTBO HV3500 COOTBeTCTByeT DInpeKtNBe NIO Hn3KOBoIbTHbIM yCTpoiCTBaM: LVD 2006/95/EC, EN60335-1, EMC 2004/108/EC, EN55014-1, EN55014-2, EN61000-3-2, EN61000-3-3, EMF EN50366.
Tim Hopper Technical Director
Bce npaba 3aunuenebI © 2009
Perncpaunna n naTeHTbHa npomblJeHHb o6pa3e:
Pernctpaun npomblneHHoro o6pa3za KpackonylbTa
ECD 001096218-0001
CN 200930004457.X
PateHT Ha Kpackonylt
GB 0903275.6
Pernctpaun npomblneHoro 6pa3ua Typ6nhb HN3KOrO daBHeHra
ECD 001096242-0001
CN 200930004458.4
US 29/314,080
EARLEX LTD. HE IPIHIMAET HA CEBY HNKAOKI OTBETCTBEHHOCTN 3A ICSIOJIb3OBAHNE DAHHORO IPODyKTA DJIa CEJIe, HE YIOMAHyTbIX B 3TOM JOKUMEHTE.
TAPAHTRN N CIPABOHYC JLYKBA
Ha daHbI npOdyKT pacnpoctpaHareTc rapaHTn8 OT dekeKTOB npOn3BOdCTBa nn
MaTepeHnAIOB cpoKOM Ha 24 Meca. Ha o6OpyDObaHne, npImeHReMoE dIeJIeN
PpombyIeHHoro npo3BOcCTBa IIN Cdaun B apenHy, rapaHTn He paocpoctpaHareTc. DaHHa rapaHTn He BInreT Ha Baun 3aKOHHbIe npaba.ДЯ NOyueHna BOlee noDpo6HOH INHOFOpMaUNI INI KOHNbTyauN IOBPOCAM nCNOJIbOBAHNA YCtPOJCTBa ObauaIteCb B cnpaBOUHy cnyk6b hy ase KOMNaHm c 9:00 do 12:00 n 14:00 do 17:00 no 6ydnM dHm (3a NCKLIuOHeHem OfHnuaJIbHbIX npa3dHnKOB). Kpome TOrO, bbl MoKeTe nocetntb Hau We6-caIIT: www.earlex.fr.
Earlex Sarl.
Earlex Sarl, Tel: +33 (0)4 76 67 18 46
Email: contact@earlex.fr Website: www.earlex.fr
IHCTPYKl3 3 TEXHIKU B63NEKU
TEXHIHYXAPAKTEPNUKIN:
CnoxmbaHa NotyXHictb:575BaT
Hanpyra: 230 B
PibHeB 3ByKOBOrO TnCKy:85Db(A)
MaKcImaJIbHa B'ЯЗкICTb: 160 DIN/ceK
MicTkictb KOHTeHepa:1 nItp
IobxHa nHeBMaTHuHOro 7aHa:2,7M
Диhamчни ТИСК NOВИТРЯ: 0,14 ap
CNCOK DETAJIEN Fig.1
No. OnncaHn
-
IHCtpymeHT dIa BCTaHOBJIeHHI 3aMnKaIOOIT roIKn Ta coNla φap6Op03nIIHOBaHa
-
Kijbue KpnuKn NHeBMOunHnpa
YCYHENHHECINPABHOCTE
YKIO BVKNOPNCOTByETbCn IOOBKyBaIbHn IPOBID, BIN Ma€ 6yTn PO3paxOBaHn IIOHaMHe Ha 6 A Ta NOBHcTIO PO3MOTAHn. He BVKNOPNCOTByTe IOOBKyBaU, PO3paxOBaHn MeHwe HIX Ha 6 A, OckInbKn Ie cnpuHHtB nepeDyachy BiDMOby DBNrhya, rapaHTiHa JkN He p03NoBcIooJxCyETbc.
Bidi3aHy BiEeKtpnpoBOy BnIky Heo6xIHO yTuI3yBaTN 6e3neuHm cnoCo6OM. KATEOPUHYO 3ABoPOHReTbCByCTabIaTN Bpo3eTK BuNKy, BiDi3aHy BiEeKtpnpoBOy.
Bidomocti npo ytni3aio Bixxodib eektpoo6naHaHH npuBeHcI B DnpeKTHBi EC npo BiXoHn
eneKtpnuHoro Ta eektpoHHoro 6bHaHHa (WEEE).
He Iinae npunaB Micua 36paHnno6yToBnx BixxoIB MyHicnPbHmN cnyk6amn. Bu MaTe
ytni3yBaTu BixxOu Tnpy, nepeabun ix do CneuaIbHO npn3HaueHOro nyHKty dIra noaIbWoRo
nepepo6enneHra.
3aBa Ipo BiNObiHicTh bIupeKTHBam i cTaHapTAm EC
3aBnEMo, 10 npicrpii HV3500 BiIIOIaE DnpeKtNbi npo HsblkOBoJIbTI npicrpo (LVD 2006/95/EC), ctaHdaptY EN 60335-1, DnpeKtNbi npo eJleKtpomarHITy cymicHCTb (EMC 2004/108/EC), cTaHdaptTam EN 55014-1, EN 55014-2, EN 61000-3-2, EN 61000-3-3 Ta EMF EN 50366.
Tim Hopper Technical Director
Yci npaba 3axuieho © 2009
Peectpaia Ta nataeHTn Ha npomncIOBn 3pa3OK:
Peectpaia npomocloBOrO 3pa3ka fap6onylbTa
ECD 001096218-0001
CN 200930004457.X
PnteHT Ha 4ap6onybT
GB 0903275.6
Peectpaia npomncloBOrO 3pa3Ka typ6iHn Hn3bkOro TnCKy
ECD 001096242-0001
CN 200930004458.4
US 29/314,080
EARLEX LTD. HE BEPH A CEBE BIДПОВIДАЛБНСТI 3A BИКОРИСТAHнЯ LьОTO ПОДУКТУ ДлЯ ZILJIEN, HE 3A3HAUECHINB LьOMY DOKUMEHTI.
TAPAHTN IN CIPABOUYHAR CJyXbA
Ha uei npOdykT pO3NOBcIqJyEYbc rapaHTiB iD nefeKTI Bnpo6HnCTBa a6o MaTepiAIN CTPOKOM Ha 24 Mciu. Ha oBnaIHaHHa, BnKOpNCtOByBaHe IJrnpMncIOBO Bnpo6HnCTBa a6o 3dABAHn B opEnHy, rapaHTi He po3NOBcIqJyEYbc. Lra rapaHTi He BnJIbAc H a BaSi 3aKOHNI npaba. lO6 OtpMaTn DOKlaHniU IHopMaCIIO a6o KOHCyIbTaCIIO 3 NITaHb BnKOpNCtAHN PrnCtPOIO, 3BepTaIeCb y DoBIIDKOby cny6b hy hawoi KOMnHi 3 9:00 do 12:00 i 3 14:00 do 17:00 no 6yDnX (3a BInrTkOM ophiuiHnx CBAT) a6o BiDiJaNe TaH We6-caNT: www.earlex.fr
Earlex Sarl.
Earlex Sarl, Tel: +33 (0)4 76 67 18 46
Email: contact@earlex.fr Website: www.earlex.fr
ANAYTIKH NAPOYΣIAH EAPTHMATQN
O△HΓIEΣ AΣΦΑΛΟΥΣ ΛΕΙΤΟΥΡΙΑΣ
- Noté μη ΜΟTEXEETE, UNO ΜΟΙΕδΗΝΤΟ Συνθήκες, με το πισόλι ψεκασμου σε αλλο ἀτομού Κώ. Στήν περίπτωπ Πραυματισμου, αναζήσοτε αμέως τήν ταρική συμβουλή εἰδικόύ.
To ntoi yekaoou (Spray Gun) npenl v xpnoiomoleitai m ovo u xpuuata kai dlalutec nou exouv kaotaaanlo onneio avapalegs yia tov yekaoo. Av exete aupolaiie, ouubauveite Ta otixei aou divei o kataaekuaotnc tou xpawatocn Tou dlautn. - iασφαλiζετe návTOTe Tov επαρή αερισό o Θη διαρκελο Tou Ψεκασμού.
Mv NOTE kovt a o yuun ploy, eoupiiaaavovoevo poylotpo oukeunC.
MnyKanviZeTE NOTE KATn dlApkeia Tou eKaosou.
Mv oipnevTE IOTE naiidia vxaonoiouov To nioTol yekaaou h va naiouv e auto. - návtote TIG oyniec Tou kataoakeuaotn Tou dlautkou npiv ano tn xphon.
AIOOUVBEETE NAVTOE Tn MOVAda aTNO TNV npoxn peuMaTOc oTav YEmuIeTe To doxEio xpUmaToC.
ΦopαTE nαVTOE KαTαλnηn npoσαTeUTiκ n ασκα KαTα Tn διαρεια Tou Ψεκασμού. Σας συμβουλεύουμε επίσης vα χρησιμοιeite γαντια, yαuλι προσασιας και φρμα εργασιας.
-MetaxoKoXpHon,KaOxpiZeTnpoEeTKaTOIToAoiyekaouO.
Autn n ouoKEun dev npooipcetaxi xpnon ano atoua (oumuepiauxvovevw Tuvnolv) uowuvecs oomegaatike, aonnpie c n vontukc icavotntec n xwpic emelpi kai yvwon, ktoc k av enlneovrntai n kcoobnyovvtal oxetikα me tn xpion tnc ouoKeun c ano ato mo uneuhvo yi tnv axopaxia touc.
Xpnoiounoleite movo yvnoia avtalaktou kataokuaotn.
AIOOUVBETe NAO TnA Spray Station nTo TnV npoxn pUaTOC npOTou KAthetaTn OuaKEuH. - PpoeIbOIoN: n xPonn aAaWv BonThnTikwv n OuvoBcUTikwv EApntmuAtwv T a Onioa dev OuvIoTuwVtAl oE auto To EYxelipidlo odnyuov Evexetal v Aevexk Kivduo Tpaumatouo.
Xpnoiopoile To nioI cyekoo mu ovo yia Tnv epyaoia yia Tnv onoia oxediocntke. H ovoptofox npon Tou niotoaiou sekoo th akupwoei tnv eyyunon.
ΦopATE pOoTAtEutLKαUTluV.
IPOEI OIOIHs: O ouie c nou xpoi oonolovv t a e To mToa (xpuoau (xpuoau, dlautikk k.π.) evexetai v a neipexuv Ekmivduva, bαβερα, εκρηktikα ἡιαβρωτικα uλικα. THPEITE IANTOTE TIZ ODHIEZ AΦAIAEIA ΠOY ΣYNODEYOYN TH ΣYΣKEYH KAI TO YAIKO XPHΣH.
TEXNIKEZ IPOΔIAPAΦE:
Ioxuc:575Watt
Táon: 230 V
Tim Hopper Technical Director
All rights reserved © 2009
Kataxwpnoeic oxediou kai dianwmaTa eupeotexviac
Email: contact@earlex.fr Website: www.earlex.fr
SPLITTEGNING
SIKKERHEDSVEJLEDNING
Tim Hopper Technical Director
Email: contact@earlex.fr Website: www.earlex.fr
OPENGEWERKTE TEKENING VAN ONDERDELEN
VEILIGHEIDSINSTRUCTIES
Tim Hopper Technical Director
Email: contact@earlex.fr Website: www.earlex.fr
PAYLAYAN PARÇALARIN iNCELENMESI
GÜV ENLI KULLANIM TALIMATLARI
Tim Hopper Technical Director
Email: contact@earlex.fr Website: www.earlex.fr
Tim Hopper Technical Director
All rights reserved © 2009
HVLP turbinens design registering
ECD 001096242-0001
CN 200930004458.4
US 29/314,080
EARLEX LTD. TAR EJ ANSVAR FÖR ANVÄNDNING AV DENNA PRODUKT FÖR ANDRA ÄNDAMÄL ÅN VAD SOM BESKRIVS HÄR.
Email: contact@earlex.fr Website: www.earlex.fr
Notes


- ^
- EARLEX SPRAY STATION 3500
- PARTS LIST Fig.1
- No.Description
- Part Code
- INTRODUCTION
- The concept
- PREPARATION
- SETUP
- SPRAYING TECHNIQUE
- CLEANING INSTRUCTIONS
- SPRAY GUN
- FLUID TIP AND NEEDLE
- MAINS CONNECTION
- GUARANTEE and HELPLINE
- CONSIGNES DE SECURITÉ
- VEUILLEZ LIRE CES CONSIGNES AVANT UTILISATION
- ENSEMBLE BUSE POINTEAU
- RACCORDEMENT AU SECTEUR
- INSTRUÇÉS PARA UTILizar COM SEGURANCA
- POR FAVOR LEIA ANTES DE UTILizar
- ZASADY BEZPIECZNEGUZYTKOWANIA
- IGLICA I KONcOwKa FARBY
- ПРавиля БЕЗПАС"HОУ 3КСПЛYATALUIN
- CAMODEHbI KPACKOITbT
- IHCTPYKl3 3 TEXHIKU B63NEKU
- TEXHIHYXAPAKTEPNUKIN:
- CNCOK DETAJIEN Fig.1
- No. OnncaHn
- TAPAHTN IN CIPABOUYHAR CJyXbA
- ANAYTIKH NAPOYΣIAH EAPTHMATQN
- O△HΓIEΣ AΣΦΑΛΟΥΣ ΛΕΙΤΟΥΡΙΑΣ
- TEXNIKEZ IPOΔIAPAΦE:
- SPLITTEGNING
- SIKKERHEDSVEJLEDNING
- OPENGEWERKTE TEKENING VAN ONDERDELEN
- VEILIGHEIDSINSTRUCTIES
- PAYLAYAN PARÇALARIN iNCELENMESI
- GÜV ENLI KULLANIM TALIMATLARI
Brand : EARLEX
Model : SPRAY STATION 3500
Category : Paint gun