PABS 18-2 SL - Drill PARKSIDE - Free user manual and instructions
Find the device manual for free PABS 18-2 SL PARKSIDE in PDF.

User questions about PABS 18-2 SL PARKSIDE
0 question about this device. Answer the ones you know or ask your own.
Ask a new question about this device
Download the instructions for your Drill in PDF format for free! Find your manual PABS 18-2 SL - PARKSIDE and take your electronic device back in hand. On this page are published all the documents necessary for the use of your device. PABS 18-2 SL by PARKSIDE.
USER MANUAL PABS 18-2 SL PARKSIDE
(89/392 EC), (91/368 EC), (93/44 EC), (93/68 EC)
(73/23/EEC), (93/68 EEC)
(89/336 EEC), (92/31 EEC), (93/68 EEC)
Before reading, fold out the page with the illustrations and make yourself familiar with all the functions of the equipment.
The following pictograms/symbols are used in these operating instructions:

Please read the operating instructions!

Observe all warnings and safety advice!

Watt (effective output power)


direct current

Design no-load speed

Spindle lock

Chuck

not in with the household waste

Mark for torque preselect

Drill setting (torque preselect)

turn anti-clockwise/close

turn clockwise/open
Introduction
Proper use 14
Features
Technical data
Safety
- Important safety advice for the charger and the battery pack
Operation
Insertion and removal of your battery pack
- Charging the battery pack
- Checking the battery condition
Perfectly designed - the ergonomics package
- Switch speeds - the 2 gear drive
- Robust and strong - the motor
Controllable-the torque selector Page 16
Automatic-spindle lock - a simple way to change bits
·Sensitive-switch operation
· Tips and tricks from the professionals
Cleaning/Disposal
- Maintenance and Cleaning
· Disposal
Information
Manufacturer's declaration of conformity
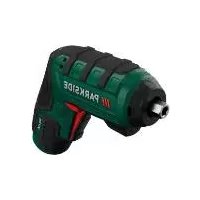
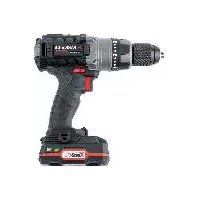
Cordless 2 gear drill driver PABS18-2 SL
For drilling and screwdriving into wood, plastic and metal
Before you use it for the first time, it is essential that you make yourself fully familiar with the functions of the equipment and find out how to handle electrically powered tools. Please read the following operating instructions carefully along with the enclosed safety advice. These instructions are to be considered as a constituent part of the product.
Proper use
This device is designed for drilling and screwing into wood, plastic and metal. Use the device only as described and for the indicated purposes. Any other use or modification shall be deemed improper use and could give rise to considerable dangers. The manufacturer will not accept liability for loss or damage arising from improper use. The tool is not intended for commercial use.
Features PABS 18-2 SL
① Screwdriver /drill selector switch
② Spirit level
③ Battery condition indicator
(4) Ventilation air inlet
⑤ Forward/reverse switch
(6) ON/OFF switch
⑦ Button for unlocking the battery
⑧ Battery pack
⑨ Torque selector
Keyless chuck RHM
Fast charger
(Charging time only 50-60 minutes)
Green charge check light
Red charge check light
14 Contact
Technical data
Cordless 2 gear drill driver PABS 18-2 SL
Nominal no-load
speed 1st gear: n_0 0 - 500 / ^-1
Nominal no-load
speed 2nd gear: n0 0-1400/min-1
Nom. d.c. voltage: 18 V = -
Chuck size: 1,0 - 10 mm
Max. drill diameter: Steel: 10 mm, Aluminium: 15 mm, wood: 20 mm
Var. driver torque: 1 - 8 Nm
Max. drilling torque: 18Nm
Sound level: 74.35 dB (A)
Vibration value: 2.5 m/s^2
Weight: 2100 g
Fast battery charger JDA-22K
Charging current: 2600 mA
Charging time: 50-60 minutes
Battery pack
Nom.d.c.voltage: 18V-
Battery capacity: 1500 mAh
Capacity: 27 Wh
Power consumption/Watt
The power consumption in watts changes with the load. The measured power consumption during various types of use is e.g.:
in 2^nd gear with a 3 mm
drill bit in softwood: 90 watts
in 1^st gear with a 10mm
drill bit in (ST37) steel strip: 215 watts
in 1st gear with a 20mm
drill bit in softwood: 330 watts
Power output/Torque/Newton metres (Nm)
The maximum torque is 18 Nm (soft screwing). The power consumption can reach over 1000 W.
Do not overload the drill! As the speed of the motor drops, the speed of the fan reduces and this may lead to the motor overheating.

Important safety advice for the charger and the battery pack
Warning! If you come into contact with alkali from the battery pack, wash off the alkali thoroughly with water. If alkali gets into your eyes, flush them out with water and seek immediate medical attention.
- Read and take note of the operating instructions and this safety advice for the charger and the battery pack before use.
- Warning! Use only the charger and battery pack supplied by the manufacturer. Use of any other can be hazardous.
- Protect the charger, battery pack and electrical equipment from moisture, e.g. rain or snow.
Always check that the mains lead is correctly connected before using the charger. - Caution! If you find that the mains lead has been damaged, do not continue to use the charger. Have the mains lead changed immediately.
- When you are not using the charger, remove the plug from the mains socket. Do not pull the plug out by the mains lead. A damaged mains lead presents a danger to life through electric shock.
- If the tool is dropped or otherwise subjected to mechanical stress, you should have it examined by an appropriate specialist for damage before using it again. Damaged parts must be repaired.
- Handle the battery pack carefully. Do not let it fall or be subject to impact.
- Warning! Do not attempt to repair the charger or the battery pack yourself. Repairs must always be carried out by an appropriate specialist. Not complying with this can lead to danger.
Always remove the plug from the mains socket before you clean or maintain the charger or the battery pack. - Do not charge the battery pack if the ambient temperature is less than 10^ or greater than 40^ .
Air must be able to flow freely around the charger. - Warning! Do not short circuit the battery pack. A short circuit gives rise to a heavy current, over heating, the danger of fire or to the battery pack
exploding. Any of these can cause damage to the battery pack or danger to the user. Therefore:
- Do not connect a cable to the battery pack terminals.
-
Make sure that the battery connections cannot be short-circuited by other metal parts (nails, screws, etc.).
-
Do not expose the battery pack to water or rain.

A damaged battery pack or one which no longer holds its charge must be disposed of specially and not placed in normal household rubbish.
- Caution! Never throw the battery pack into fire or water. This can cause it to explode.
Operation
Insertion and removal of your battery pack
Before removing the battery pack from the charger or inserting it into the charger, always ensure the plug a is not in the mains socket.
- When attaching the battery unit, the contact ④ of the battery unit must align with the guide on the cordless drill driver.
The battery pack should insert easily into the charger. Do not use any disproportionate force during insertion or the battery pack may not end up in its correct position.
After the battery pack has been inserted check that the retaining clips ⑦ have engaged and the battery pack is seated firmly in the charger.
To remove the battery pack from the charger press the retaining clips ⑦ on the sides of the battery pack and remove it.
Charging the battery pack
Before inserting the battery pack into the charger or removing it from the charger, always ensure the plug is not in the mains socket.
Insert the battery pack so that it is firmly held in the charger. Push the plug into the mains socket.
The red charging light ③ indicates that charging has begun. The red light will go out after about 1 hour.
The green charging light ② lets you know when charging is complete and the battery pack is ready for use.
If you wish to charge a second battery pack, pull out the plug from the mains supply and keep the charger off for at least 15 minutes. Then you can start to charge the second battery.
Note: If you do not remove the plug from the mains socket before the second charging process starts then the second battery cannot be charged.
Caution!
A new battery pack is not charged and must be fully charged before first use.
- Never charge the battery pack again immediately after a fast charging process has been completed. This can give rise to the battery pack being overcharged and a reduced life of the battery and charger.
- Switch off the charger for at least 15 minutes between charges by removing the plug from the mains socket.
If you use a multiway socket adapter, unplug all other electrical equipment from the adapter.
Checking the battery condition
You can check the condition of the battery with the battery in place. To do this, press the button (refer to Fig. D) on the battery indicator ③. The remaining charge is displayed.
All lights on = full power / battery fully charged
Perfectly designed - the ergonomics package
The motor housing is aligned at an angle of approx. 12^ to the handle. This ensures that for typical working and handling situations the drill is at the correct angle to the workpiece surface. In this way you can work precisely and much more effectively - try it out yourself ...
The particularly generously-sized controls ⑥①⑤⑦ make it particularly quick to adjust the way the tool works to the suit the task in hand.
The SOFTGRIP handle reduces vibrations and makes working with your drill more comfortable, refer to Fig. A.
The integrated hand guard is another ergonomic feature. It protects you from injuries, e.g. when you are drilling.
Switch speeds - the 2 gear drive
In first gear (switch ① in setting: Screw) a speed of up to approx. 500 rpm can be achieved. This setting is intended for use with old screws and for accessories.
In second gear (switch ① in setting: Drill/2) the speed is up to approx. 1400 rpm for drilling.
Robust and strong - the motor
The powerful motor guarantees a high torque. It works on 18 Volts, provides a maximum torque of 18 Nm and reaches speeds of approx. 1400 rpm. The integral electric brake ensures the tool comes to a halt almost immediately, so that you can work more safely and quickly.
Controllable - the torque selector
Before you start screwdriving you can set the torque selector ⑨ in any of 16 torque settings to obtain the desired torque.
A finely adjusted torque ensures the highest precision in all screwdriving conditions. Start off with a low setting (1 or 2 on the scale ) and try increasing it by stages until the best setting is reached.
The 16 torque settings cover the range up to approx. 8 Nm.
If the value of the set torque is reached, the machine disengages the drive connection to the chuck. By doing this, screws can be driven to a predetermined depth, which is ideal for repetitive work.
For drilling, turn the selector to the setting.
- Slide the selector ① forward (setting: Drill) to work with the tool set at its optimum for drilling. The full torque of approx. 18 Nm is applied.
Automatic - spindle lock - a simple way to change bits
Your rechargeable electric drill driver has a fully automatic spindle lock SPINDLE and is fitted with an enclosed keyless chuck incorporating the latest technology "Made in Germany".
Once the motor has come to a halt, the drive shaft is automatically locked so that the chuck ⑩ can be opened simply by turning it C.
After you have inserted the required bit and fixed it in place by turning the chuck , you can immediately continue working (the symbols above show the direction of rotation viewed into the workpiece, i.e. with the chuck pointing away from you). The spindle lock releases itself automatically when the motor is started (by operation of ON/OFF switch 6).
Sensitive - switch operation
The trigger switch ⑥ allows you to exercise fine control over the speed of the drill to suit the particular circumstances. On delicate workpieces for example, you can work carefully by using light pressure on the trigger switch.
Increasing the pressure on the trigger switch al
lows you to increase the speed as necessary up to the maximum.
To take screws out, just reverse the direction by moving the switch ⑤ to rotate the shaft anticlockwise.
The integral electric brake ensures the shaft quickly stops rotating - as soon as the trigger switch is released - so that you can get to work again fast.
Tips and tricks from the professionals
When screwing into wood, metal and other materials you must always observe the following advice:
- Before you use the drill driver, check whether the screw or drill bit is properly fitted, i.e. centralised in the chuck.
- The dimensions and shape of the screw bits make them readily recognisable. If you are unsure always try the particular screw bit out to see whether it sits in the screw head without play. Try a number of different bits.
- Torque: Smaller screws and bits in particular can be easily damaged or become worn if they are used with too high a torque and/or speed.
- Hard screw bed: Particularly high torques can occur e.g. with metal screws used with socket tool bits. Select a low speed.
- Soft screw bed: The torque is small. You should however also select a low speed in order not to damage the workpiece surface by contact with the metal screw head. Use a countersink.
When drilling into wood, metal and other materials you must always observe the following advice:
- With small diameter drill bits use a high drill speed. For large diameter drill bits, use a low drill speed.
- For hard materials, select a low drill speed. For soft materials, select a high drill speed.
- Take the rotating drill bit out of the hole frequently
so that swarf or drill dust can be removed and the hole and tool is ventilated.
- Secure or fix down the workpiece (if possible) in a clamp or vice.
- Mark the intended position of the hole with a centre punch or a nail and select a low drill speed.
- Drilling in metal: Use a metal drill bit (HSS). For the best results, you should cool the bit with oil. Metal drill bits can also be used to drill into plastic.
- Drilling in stone: Use a circular shafted masonry drill bit with a hardened metal tip.
- Drilling in wood: Normally you should use a wood drill with a centring point. For deep holes, use an auger type bit. For large diameter holes, use a forstner bit. You can screw small screws into soft wood without the need for pre-drilling.
Maintenance and Cleaning
- Do not allow any liquids to enter the tool. Use a soft cloth to clean the housing. Never use petrol, solvents or cleaning agents that might attack plastic.
The ventilation openings must always be kept free.
Disposal
The packaging is wholly composed of environmentally-friendly materials that can be disposed of at a local recycling centre.
Please contact your local council office to find out about disposal facilities for your worn-out appliances.
Defective or exhausted batteries must be recycled in accordance with Directive 91/157 EEC.
Please refer to the special safety advice in relation to the charger and battery pack.
Return the battery and/or the equipment to the provided collection facilities.
Manufacturer's declaration of conformity C
We, Kompernaß Handelsgesellschaft mbH, Burgstr. 21, D-44867 Bochum, Deutschland, hereby declare that this product complies with the requirements of the following EU directives:
EC machine guideline:
(89/392 EC), (91/368 EC), (93/44 EC), (93/68 EC)
EC low voltage regulations:
(73/23/EEC), (93/68 EEC)
Electromagnetic compatibility:
(89/336 EEC), (92/31 EEC), (93/68 EEC)
Applicable harmonised standards:
Description of the device:
Cordless 2 gear drill driver PABS 18-2 SL
Bochum, 31.01.04

Hans Kompernaß
- Managing Director -
We reserve the right to make technical modifications in the course of further development.

Watts (puissance effective)


Courant continu

(89/392 EC), (91/368 EC), (93/44 EC), (93/68 EC)
(73/23/EEC), (93/68 EEC)
(89/336 EEC), (92/31 EEC), (93/68 EEC)
(89/392 EC), (91/368 EC), (93/44 EC), (93/68 EC)
(73/23/EEC), (93/68 EEC)
(89/336 EEC), (92/31 EEC), (93/68 EEC)
(89/392 EC), (91/368 EC), (93/44 EC), (93/68 EC)
(73/23/EEC), (93/68 EEC)
Compatible electromagnética:
(89/336 EEC), (92/31 EEC), (93/68 EEC)
Involutro do accumulator
(89/392 EC), (91/368 EC), (93/44 EC), (93/68 EC)
(73/23/EEC), (93/68 EEC)
(89/336 EEC), (92/31 EEC), (93/68 EEC)
(89/392 EC), (91/368 EC),
(93/44 EC), (93/68 EC)
KATEUovtnipia ypaum nTs EK nepi xanncn kptiknc taonc:
(73/23/EEC), (93/68 EEC)
(89/336 EEC), (92/31 EEC), (93/68 EEC)
Ovouaia tou nxaivnauo:
(89/392 EC), (91/368 EC), (93/44 EC), (93/68 EC)
(73/23/EEC), (93/68 EEC)
(89/336 EEC), (92/31 EEC), (93/68 EEC)
Nazwa maszyn:
(93/44 EC), (93/68 EC)
(73/23/EEC), (93/68 EEC)
(89/336 EEC), (92/31 EEC), (93/68 EEC)
Název stroje:
(89/392 EC), (91/368 EC), (93/44 EC), (93/68 EC)
Pienjanniteohje:
(73/23/EEC), (93/68 EEC)
(89/336 EEC), (92/31 EEC), (93/68 EEC)
Koneen merkki:
(89/392 EC), (91/368 EC), (93/44 EC), (93/68 EC)
(73/23/EEC), (93/68 EEC)
(89/336 EEC), (92/31 EEC), (93/68 EEC)
This appliance is guaranteed for 3 years from the date of purchase. It has been carefully produced and meticulously checked before delivery. Please keep your receipt as proof of purchase. For claims under warranty, please contact the customer service in your own country.
The warranty covers only material or manufacturing faults, not normal wear or damage to fragile parts such as switches.
The appliance is intended solely for private, not commercial, use. If this product has been subjected to improper or inappropriate handling, abuse, or interventions not carried out by one of our authorised sales and service outlets, the warranty will be considered void. This warranty does not affect your statutory rights.
Beaver Electronic Services · Alpine House, Premier Business Park · Long Street, Walsall West Midlands, WS2 9DY
Tel.: 087 07/876177 • Fax: 01922/725417
e-mail: support.uk@kompernass.com
IRL Warranty
This appliance is guaranteed for 3 years from the date of purchase. It has been carefully produced and meticulously checked before delivery. Please keep your receipt as proof of purchase. For claims under warranty, please contact the customer service in your own country.
The warranty covers only material or manufacturing faults, not normal wear or damage to fragile parts such as switches. The appliance is intended solely for private, not commercial, use. If this product has been subjected to improper or inappropriate handling, abuse, or interventions not carried out by one of our authorised sales and service outlets, the warranty will be considered void. This warranty does not affect your statutory rights.
Irish Connection Ltd
41 Harbour View · Howth, Co. Dublin
Tel: 087-9962077 • Fax: 18398056
e-mail: support.ie@kompernass.com