
CEHCDVD211 - DVD player CONTINENTAL EDISON - Free user manual and instructions
Find the device manual for free CEHCDVD211 CONTINENTAL EDISON in PDF.

| Product type | DVD player with 2.1 audio system |
| Brand | Continental Edison |
| Model | CEHCDVD211 |
| Power supply | 230 V ~ 50 Hz |
| Supported disc formats | DVD, VCD, CD, MP3, CD photo, SVCD, JPEG, MPEG-4 |
| Video outputs | HDMI, SCART, Composite (video jack) |
| Audio outputs | Audio left/right (Jack), Coaxial, HDMI |
| USB input | Yes (USB port) |
| Remote control | Yes, with AAA batteries |
| TV system | PAL / AUTO / NTSC |
| Frequency response | 20 Hz - 20 kHz |
| Signal-to-noise ratio (audio) | ≥ 90 dB |
| Audio distortion + noise | ≤ -60 dB |
| Analog audio output | 2.0 Vrms |
| Composite video output | 1.0 Vp-p, impedance 75 Ω |
| Audio system | 2.1 integrated channels |
| Parental control | Yes, levels 1 to 8 |
| Menu languages | English, French, Spanish |
| Safety | Class 1 laser, double insulation |
| Maintenance and cleaning | Soft dry cloth, no solvents |
Frequently Asked Questions - CEHCDVD211 CONTINENTAL EDISON
User questions about CEHCDVD211 CONTINENTAL EDISON
0 question about this device. Answer the ones you know or ask your own.
Ask a new question about this device
Download the instructions for your DVD player in PDF format for free! Find your manual CEHCDVD211 - CONTINENTAL EDISON and take your electronic device back in hand. On this page are published all the documents necessary for the use of your device. CEHCDVD211 by CONTINENTAL EDISON.
USER MANUAL CEHCDVD211 CONTINENTAL EDISON
Dual Mono (Mono dual)
Please read and keep these instructions
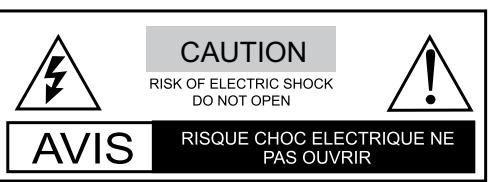

THE LIGHTNING FLASH WITH APPROWHEAD SYMBOL WITHIN AN EQUILATERAL TRIANGLE IS IN TENDED TO ALERT THE USER TO THE PRESENCE OF UNINSULATED « DANGEROUS VOLTAGE » NIT'S CABINET THAT MAY BE OF MAGNITUDE TO CONSTITUTE A RISK OF OCK TO PERSONS.

THE EXCLAMATION POINT WITHIN AN EQUILATERAL TRIANGLE IS INTENDED TO ALERT THE USER TO THE PRESENCE OF IMPORTANT OPERATING AND
MAINTENANCE (SERVICING) INSTRUCTIONS IN THE MANUAL ACCOMPANYING THE UNIT.

THE MAINS PLUG USED AS THE DISCONNECT DEVICE, THE DISCONNECT DEVICE SHALL REMAIN READILY OPERABLE.

THE APPARATUS SHALL NOT BE EXPOED TO DRIPPING OR SPLASHING AND THAT ON OBJECTS FILLED WITH LIQUIDS, SUCH AS VASES, SHALL BE PLACED THE APPARATUS.

THE APPLIANCE COUPLER IS USED AS THE DISCONNECT DEVICE, THE DISCONNECT DEVICE SHALL REMAIN READILY OPERABLE.

ALWAYS REMEMBER TO REMOVE THE PLUG FROM THE MAINS SOCKET BEFORE DISCONNECTING THE POWER LEAD FROM THE BACK OF THE UNIT.
WARNING
TO PREVENT FIRE OR ELECTRIC SHOCK, DO NOT EXPOSE THE UNIT TO RAIN OR MOISTURE. NEVER ATTEMPT TO OPEN THE CABINET, DANGEROUS HIGH VOLTAGES ARE PRESENTED IN THE UNIT. REFER SERVICING TO QUALIFIED SERVICE PERSONNEL.
CAUTION
TO PREVENT ELECTRIC SHOCK, MATCH WIDEBLADE PLUG WITH WIDE SLOT AND FULLY INSERT. THE APPARATUS SHALL NOT BE EXPOSED TO WATER AND NO OBJECTS FILLED WITH LIQUID SUCH AS VASES SHALL BE PLACED ON THE APPARATUS.
CAUTION
THE UNIT EMPLOYS A LASER SYSTEM. TO ENSURE THE PROPER USE OF THE UNIT, READ THEIS MANUAL CAREFULLY AND KEEP IT FOR FUTURE REFERENCE.
IF THE UNIT REQUIRES SERVICING, CONTACT THE SELLER OR SEE "TROUBLESHOOTING".
TO PREVENT DIRECT EXPOSURE TO THE LASER RADIATION,DO NOT OPEN THE CABINET. VISIBLE LASER MAY RADIATE WHEN THE CABINET IS OPENED OR THE INTERLOCK ARE DEFEATED.DO NOT STARE INTO THE LASER BEAMS.
CAUTION
THIS PLAYER IS A CLASS 1 LASER PRODUCT. USE OF CONTROLS OR ADJUSTMENTS OR PERFORMANCE OF PROCEDURES OTHER THAN THOSE SPECIFIED HEREIN MAY REULT IN HAZARDOUS RADIATION EXPOSURE. AS THE LASER BEAM USED IN THIS DVD VIDEO PLAYER IS HARMFUL TO THE EYES,DO NOT ATTEMPT TO DISASSEMBLE THE CABINET. REFER SERVICING TO QUALIFIED PERSONNEL ONLY.
WARNING
FCC REGULATIONS STATE THAT ANY CHANGE OR MODIFICATION TO THE EQUIPMENT, NOT EXPRESSLY APPROVED BY MAKER OR ITS AUTHORIZATIOND PARTIES, COULD VOID USER'S AUTHORITY TO OPERATE THIS EQUIPMENT.
This symbol indicates that this product incorporates double insulation between hazardous mains voltage and user accessible parts. When servicing use only identical replacement parts.]
WARNING: To reduce the risk of fire or electric shock, do not expose this apparatus to rain or cords.
1. Read Instructions
All the safety and operating instructions should be read before the product is operated.
2. Retain Instructions
The safety and operating instructions should be retained for future reference.
3. HeadWarnings
All warnings on the product and in the operating instructions should be adhered to.
4. Follow Instructions
All operating instructions should be followed.
5. Cleaning
Unplug this product from the wall outlet before cleaning. Do not use liquid cleaners or aerosol cleaners. Use a damp cloth for cleaning.
6. Attachments
Do not use attachments not recommended by the product manufacturer as they may cause hazards.
7. Water and Moisture
Do not use this product near water for example, near a bathtub, wash bowl, kitchen sink, or laundry tub; in a wet basement; or near a swimming pool; and the lake.
8. Accessories
Do not place this product on an unstable cart, stand, tripod, bracket, or table. The product may fall, causing serious injury to a child or adult, and serious damage o the product. Use only with a cart, stand, tripod, bracket, or table recommended by the manufacturer, or sold with the product. Any mounting of the product should follow the manufacturer's instructions, and should use a mounting accessory recommended by the manufacturer.
9. Portable Cart Warning

(Symbol provided by RETAC)
A product and cart combination should be moved with care. Quick stop, excessive force, and uneven surface may cause the product and cart combination to overturn. 10. Ventilation.
Slots and openings in the cabinet are provided for ventilation and to ensure reliable operation of the product and to protect if from overheating, and these openings must not be blocked or covered. The openings should never be blocked by placing the product on a bed, sofa, rug, or other similar surface. This product should not be placed in a built-in installation such as a bookcase or rack unless proper ventilation is provided or the manufacturer's instructions have been adhered to.
11. Power Sources
This product should be operated only from the type of power source indicated on the marking label. If you are not sure of the type of power supply to your home, consult your product dealer or local power company. For products intended to operate from battery power or other sources, refer to the operating instructions.
12. Power Cord Protection
Power supply cords should be routed so that they are not likely to be walked on or pinched by items placed upon or against them, paying particular attention to cords at plugs, convenience receptacles, and the point where they exit from the product.
13. Power Lines
An outside antenna system should not be located in the vicinity of overhead power lines or other electric light or power circuits, o where it can fall into such power lines or circuits. When installing an outside antenna system, extreme care should be taken to keep from touching such power lines or circuits as contact with them might be fatal.
14. Overloading
Do not overload wall outlets, extension cords, or integral convenience receptacles, as this can result in a risk of fire or electric shock.
15. Object and Liquid Entry
Never push objects of any kind into this product through openings as they may touch dangerous voltage points or short-out parts that could result in a fire or electric shock. Never spill liquid of any kind to the product.
16. Servicing
Do not attempt to service this product yourself as opening or removing covers may expose you to dangerous voltage or other hazards. Refer all servicing to qualified service personnel.
17. Replacement Parts
When replacement parts are required, be sure the service technician has used replacement parts specified by the manufacturer or have the same characteristics as the original part. Unauthorized substitutions may result in fire, electric shock, or other hazards.
18. Safety Check
Upon completion of any service or repairs to this product, ask the service technician to perform safety checks to determine that whether the product is in proper operating condition.
19. Heat
The product should be situated away from heat sources such as radiators, heat registers, stoves, or other products (including amplifiers) that product heat.
Note on environmental protection

m = 311 ;
After the implementation of the European Directive 2002/96/EU in the national legal system, the following applies: Electrical and electronic devices may not be disposed of with domestic waste. Consumers are obliged by law to return electrical and electronic devices at the end of their service lives to the public collecting points set up for this purpose or point of sale. Details to this are defined by the national law of the respective country. This symbol on the product, the instruction manual or the package indicates that a product is subject to these regulations. By recycling, reusing the materials or other forms of utilizing old devices, you are making an important contribution to protecting our environment.
CONTENTS
- PREPARATIONS BEFORE OPERATION 4
- FRONT PANEL AND REAR PANEL ILLUSTRATION 5
- REMOTE CONTROL 7
- CONNECTIONs 9
- SYSTEM SETUP. 11
6.BASIC OPERATIONS. 15 - TROUBLESHOOTING 16
- TECHNICAL SPECIFICATIONS 17
PREPARATIONS BEFORE OPERATION
PRECAUTIONS FOR DISCS
PLACEMENT
Put the unit where ventilation is good enough to prevent overheating. Never put the unit in direct sunlight or near heat sources.
Put the unit horizontally, never put any heavy object on the unit.
To protect the laser, do not put the unit where there is dust. If there is dust on the laser, use a cleaning disc to clean it.
Refer to the operation instructions of the cleaning disc before use.
CONDENSATION
Water will appear on the pickup lens in the following cases:
The unit is suddenly moved from a cold place to a warm place.
The unit had been used in a humid place. In this case, the unit will not work. Unload the disc and leave the unit on for about one hour to evaporate the condensation.
CLEANING
Use a soft cloth with a little neutral detergent to wipe the cabinet, panel and controls. Never use abrasive paper, polishing powder or solvent like alcohol.
HANDLING DISC
To keep the disc clean, do not touch the play sides of the disc.
Do not attach paper or tape to the disc.


Keep the disc away from direct sunlight or heat sources.
Store the disc in a disc case after use.
CLEANING DISC
Wipe the disc outwards from the center with clean cloth.

Do not use any type of solvent such as thinner, benzine, commercially available cleaners or anti-static spray.
REMOTE CONTROL
- Open the battery cover.
- Insert two AAA batteries, make sure to match "+" and "-" of the batteries to marks inside the battery compartment.
- Point the remote control at the remote sensor, operate in the range of 5 meters and 60^ from the front of the remote sensor. Make sure there is no obstruction between them.
① Batteries can last about 6 months Change the batteries if the remote does not work.
② If the remote control is not used for a long time, remove the batteries to prevent battery leakage.
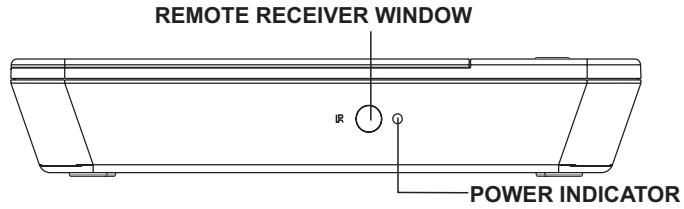
FRONT PANEL AND REAR PANEL ILLUSTRATION
1.DVD PLAYER
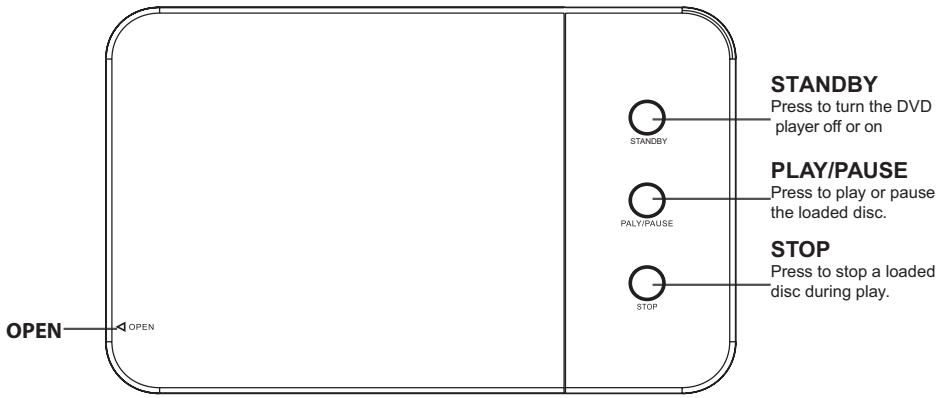
FRONT PANEL
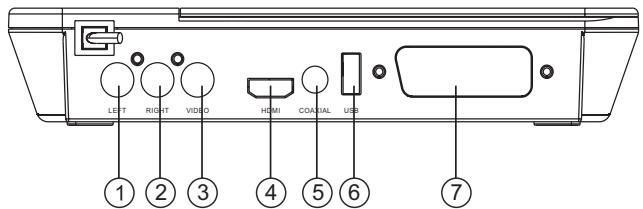
REAR PANEL
- AUDIO LEFT OUTPUT JACK
- AUDIO RIGHT OUTPUT JACK
3.VIDEO OUTPUT JACK - HDMI AV OUTPUT JACK
- COAXIAL OUTPUT
- USB JACK
- SCART OUTPUT
FRONT PANEL AND REAR PANEL ILLUSTRATION
2.SPEAKERS
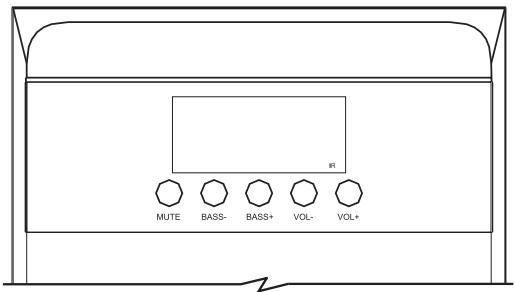
FRONT PANEL
IR--------The remote sensor to receive the window way.
MUTE----Mute
BASS----Bass down function key
BASS+---Bass up function key
VOL- ----Volume down function key
VOL + ----Volume up function key
Caution:
- Do not expose to dripping or splashing.
- Do not place any objects filled with water over the apparatus.
- Do not block the ventilation holes.
- For indoor use only.
- When using high output signal don't turn the volume to maximum to avoid distortion.
SPEAKER TERMINALS
Connect front speakers, center speaker, and surround speakers to
2.1 speaker output terminals.
NOTE:
Do not leave objects generating magnetism near the speakers.
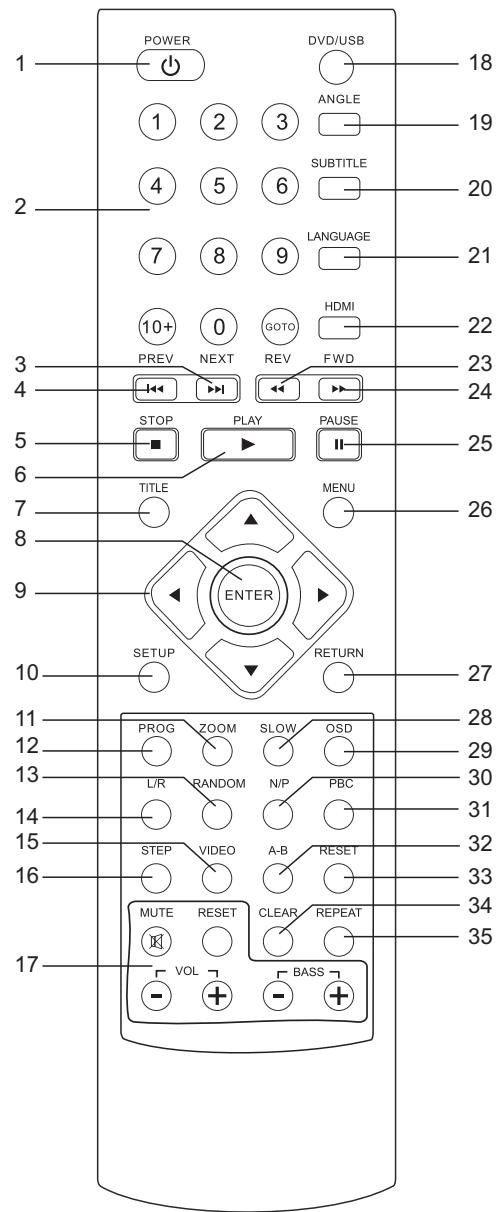
Using the Remote Control
Unless stated other wise, the remote control can operate all the features of the DVD Player, Always point the remote control directly at the remote sensor on the front of the DVD Player, not the TV.
REMOTE CONTROL
- POWER:to enter standby mode or resume normal playback.
- NO. KEYS: to input time, title, chapter and track number.
- NEXT: to play next chapter/title/track.
- PREV: to play previous chapter/title/track.
- STOP: to stop playing.
- PLAY: to resume normal playback
- TITLE: to enter appointed titles.
- ENTER: to confirm.
- LEFT/RIGHT/DOWN/UP: to move cursor for selection
- SETUP: to enter system setup menu
- ZOOM: to enlarge/shrink the image.
- PROG: to programme.
13: RANDOM: to play random. - L/R : to change audio output mode: left, right, stereo or mixed soundtrack.
15: Video :to select different video output mode.
16: STEP:to catch motions step by step.
17: The button is for setting speaker. - DVD/USB : switch DVD and USB.
19: ANGLE: to switch different viewing angles. - SUBTITLE: to display captions.
- LANGUAGE: to select the audio track language.
- HDMI: to change HD resolutions(in HDMI mode)
23: REV: to scan in reverse
24: FWD: to scan forward. - PAUSE: to pause playing.
- MENU: to display the disc menu.
- RETURN: to go back to disc main menu (with PBC on)
- SLOW: to slow down the playing speed.
- OSD: to display info. of the current playing disc.
- N/P: to choose TV system: NTSC/PAL
- PBC: to select PBC modes: on/off.
- A-B: to repeat A-B period.
- RESET: to reset.
- CLEAR: to delete numbers having been input.
- REPEAT: to choose repeat modes: single/all/off.
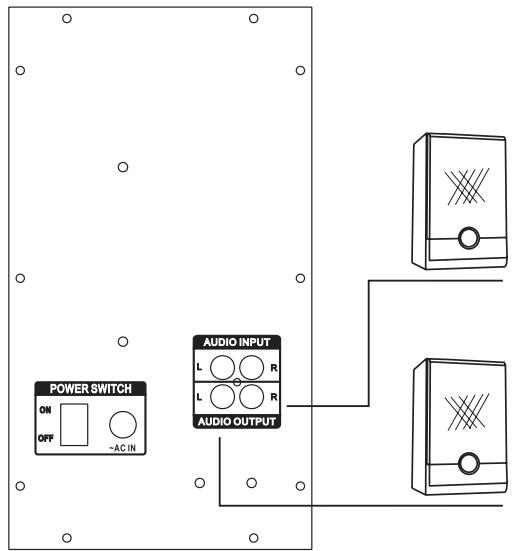
CONNECTIONS
- Turn off the power before connection.
- Turn on the power after finishing connection.
Wires must be firmly connected; especially the plug shall be fully inserted.
Connection to Television
There are several possible configurations, depending on your television:
- It is recommended that you connect the player to your television with an HDMI cable in order to enjoy the image of optimal resolution and quality (cable not included).
- In case your television does not have any HDMI input, connect a SCART cable (cable not included) or an Audio/Video cable from the player to your television.
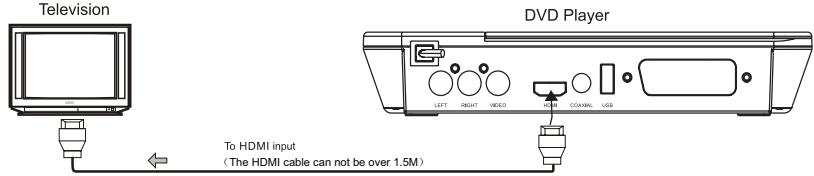
Connection to the television using an HDMI cable

Connecting to a TV with Audio/Video cable
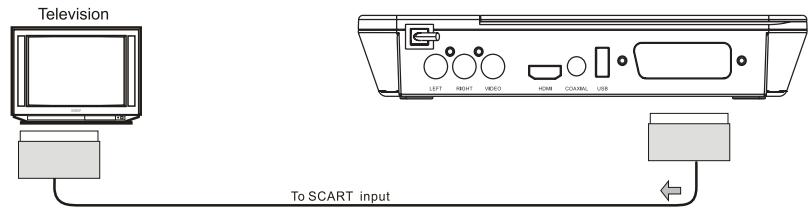
Connecting to a TV with SCART cable.
CONNECTIONS
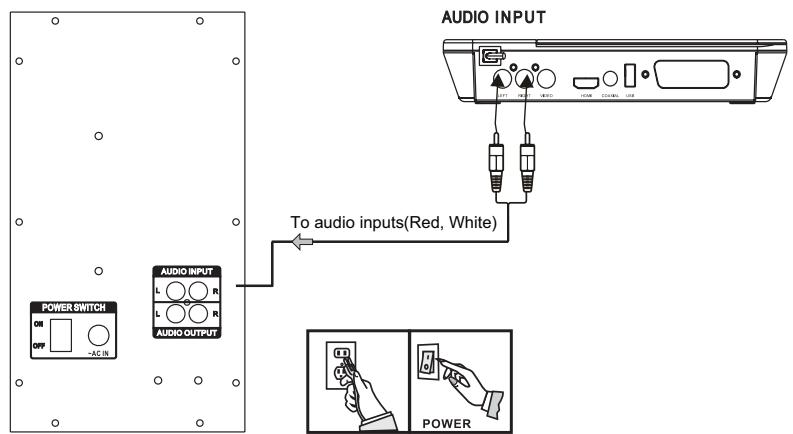
Connecting to 2.1 audio system
Connecting equipment
Jacks and plugs of the connecting cord are color-cored as follows :
Red jacks and plugs: for the left channel of audio signals
NOTE:
Insert the plugs fully into the jacks. Loose connections may produce a humming sound or other noise interference.
Important:
Connect the speakers and all other external equipment, and finally connect the AC power cord.
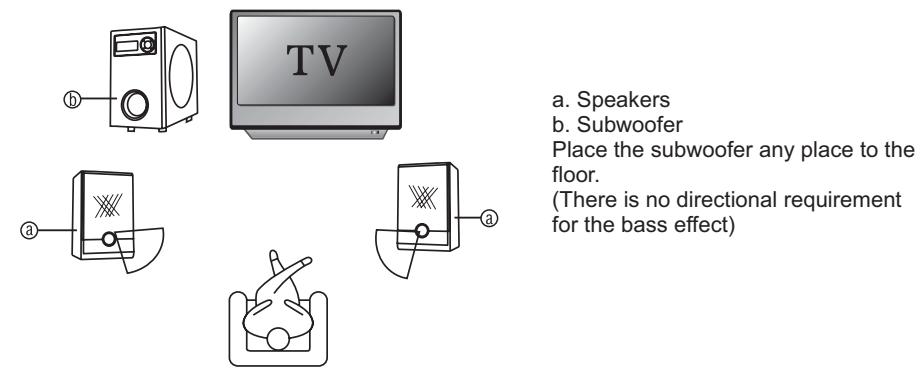
Positioning the speakers
Setting of TV system
If you find the image like non-fully zoomed picture, brim picture covered or black & white picture etc, please select PAL or NTSC by systems setting or press N/P button to switch the TV system on the remote control. This DVD disc is capable of supporting different scales picture, as a result, non-full zoomed picture could appear or picture be partially covered on users TV set.
SYSTEM SETUP
Using the setup menu, you may select different play mode setting, the various outputs, etc.
In each menu page, the menu items are shown on the left. Use the button on the remote to go to the option list or setting on the right. Use the button to go back to the left menu item.
- Press SETUP button on the remote control, setup menu will come out

SETUP
- Select the main menu item desired by using / , the selected main menu item is highlighted and its option list is shown at the right of the screen.
- Press to go to the option list.
- Select the option desired using / , then press the ENTER button.
5.Use to go back to the left menu item. - Press the button SETUP to leave the setup menu main page.
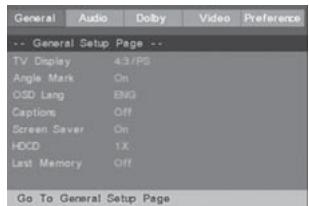
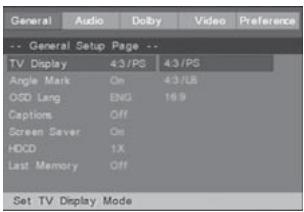
GENERAL SETUP
GENERAL SETUP
Select GENERAL SETUP in the SETUP MENU and then select the desired option using the cursor ( , , ,) buttons to navigate through the menus/ screens and press the ENTER button to confirm.
TV Display
4:3/PS: Pan scan. Select when the unit is connected to a conventional TV. Video material formatted in the Pan Scan style is played back with the left and right edges cut off.
4:3/LB: Letter Box. Select when the unit is connected to a normal TV. Wide-screen images are shown on the screen with a black band at the top and bottom.
16:9: Select when the unit is connected to a wide-screen TV.
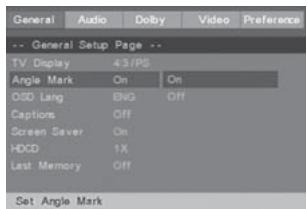
Angle Mark
Select display angle, when playing multi-angle DVD disc.
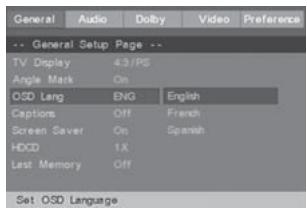
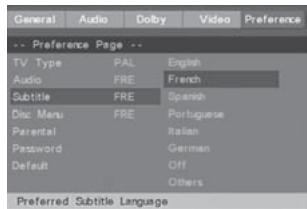
On-Screen Display Language
You can set the SETUP and on-screen messages to display in English, French, Spanish. This language Selection will not affect the languages of DVD disc or Title menus or any-audio or subtitle languages.
SYSTEM SETUP
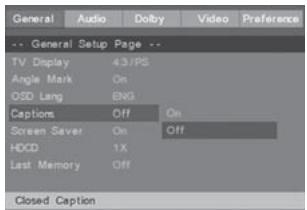
Captions
This option can show or hide the captions.
ON (show captions)
OFF (hide captions)
Note: This function can only work for DVD disc with captions.
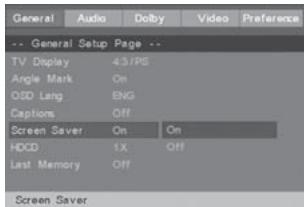
Screen Saver
The Screen Saver is the moving DVD logo that appears on your TV screen when Disc playback is stopped and you do not use the player or its remote control for about few minutes. The screen saver prevents damage to your TV caused by leaving a still image on the screen for a long time.
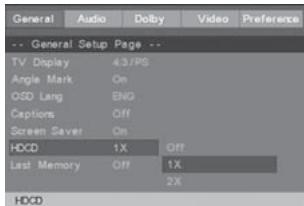
HDCD
User can setup the filter.
- Off
1X
2X
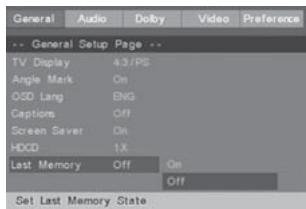
Last Memory
Remember the current playtime, if this function setup is on. It can play from
the memorized playtime when playing the current disc again. If powering off the unit gives up.
AUDIO SETUP
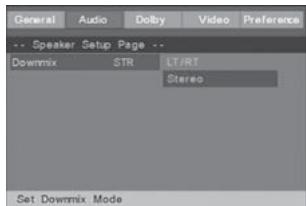
AUDIO SETUP
Speaker setup, For example: at Downmix mode user can choose among "LT/RT、stereo.
Digital Sound Setup
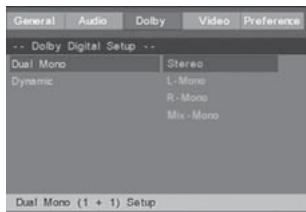
Dual mono
This is the output mode of the L and R signals of the set audio output. If it is set to "MIX MONO", the function only works when the DVD being played is 5.1-channel.
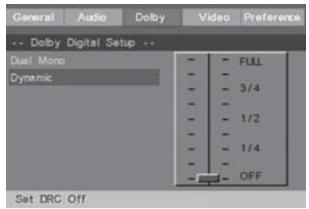
Dynamic
Select "Dynamic range compact" mode from "Dolby Digital setup" page, press play button into setting & selection mode by UP, Down arrow button, setting
SYSTEM SETUP
Dynamic range compact rate, the rate more big, the difference between low sound and high sound will be more unconscious.
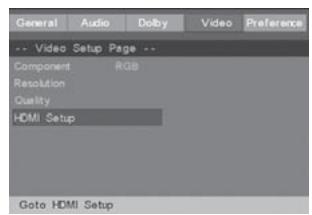
VIDEO SETUP
SelectVIDEO SETUP in the set up menu, then press ENTER.
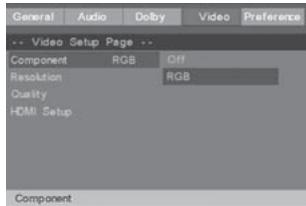
Component
Press or to select RGB, Off then press ENTER.
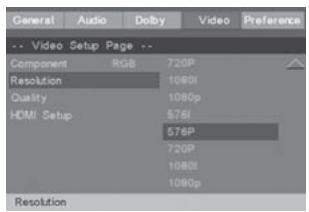
Resolution
On this page you can set the resolution of HDMI image output.
Quality
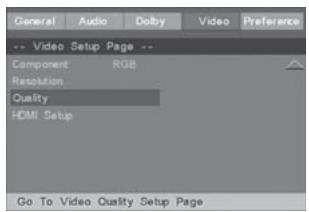
Select the Quality, you can adjust the Sharpness, Brightness, Contrast, Gamma, Hue, Saturation, Luma Delay to this machine.
HDMI setup
On this page, there is HDMI on-off setting
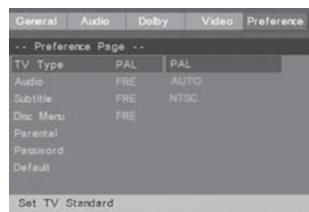
PREFERENCE SETUP MENU
TV Type
TV type will be selected. Press
Press or to select PAL, Auto or NTSC mode then press ENTER.
- Choose PAL if your TV is PAL-compatible.
Choose Auto if your TV is Auto-compatible.
Choose NTSC if your TV is NTSC-compatible.
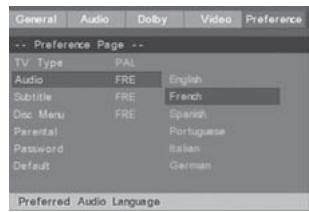
Audio
Press . to select different audio mode
Press or to select the desired audio language and then press ENTER.
SYSTEM SETUP
Subtitle
Subtitle will be selected. Press
Press or to select the desired subtitle language and then press ENTER.
Disc Menu
Disc menu will be selected. Press
Press or to select the desired disc menu language and then press ENTER.

Parental control levels
Press . Parental lock will be selected.
Press or to select a parental control level (1-8), then press enter or select off to completely turn off the parental controls.
- Press the number buttons to enter your 4-digit password as requested, then press ENTER. You cannot play DVD discs rated higher than the level you selected unless you cancel the parental lock function.
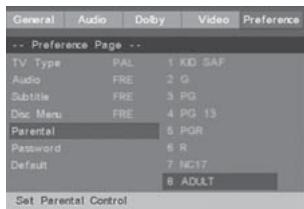
RATING EXPLANATIONS
- KID SAF - Kid safe; it is safe even for children.
- G - General Audience; recommended as acceptable for viewers of all ages.
-
PG - Parental Guidance suggested.
-
PG 13 - Material is unsuitable for children under age 13.
- PGR - Parental Guidance-restricted; recommended that parents restrict children under age 17 from viewing or allow children to view only when supervised by a parent or adult guardian.
- R - Restricted, under 17 requires accompanying parent or adult guardian.
- NC 17 - NO children under age 17; not recommended viewing for children under age 17.
- ADULT - Mature material; should be viewed only by adults due to graphic sexual material, violence, or language.
Notes: Parental control is a relatively new feature encoded into DVD discs. Currently very few DVD titles (if any) include parental control.
Password
Please go into the "password" setting, then go to "CHANGE" and press enter. You will see "OLD PASSWORD", "NEW PASSWORD", and "CONFIRM PWD". Input the old password and enter your new password to change. If it is the fist time you use this function, the password is the default password, "0000".

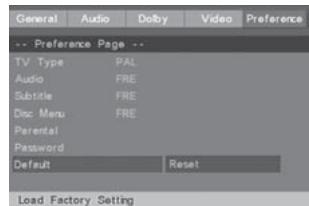
Default
To restore the original settings of the player, follow the steps below.
Press and to select DEFAULT. RESET will be highlighted. Press ENTER.
- The original settings of the player will be restored.
BASIC OPRATIONS
Loading a Disc
1.Open the DISC DRAWER.
2. Load a disc into the DVD player, label side facing up.
3. Close the DISC DRAWER.
After a disc is loaded, it will begin playing automatically.
Playing a Loaded Disc
- Follow the instructions for Loading a Disc.
- If the disc does not begin playing automatically, press the PLAY/PAUSE button.
Programming a Loaded Disc
- Follow the instructions for Loading a Disc and Playing a Loaded Disc.
- While the loaded disc is playing, press the PROG button on the remote.
- Use the DIRECTION/ENTER buttons to highlight and select a DVD title and chapter, or CD track.
DVD Titles and chapters or CD tracks will play in the order they are programmed.
4. Repeat step 3 until the desired DVD titles and chapters or CD tracks are programmed.
Playing a JPEG CD
- Load a JPEG photo disc into the player by following the instructions for
Loading a Disc.
A slide show of JPEG photos from the CD will begin playing automatically.
- Press the STOP button to access a file view of the loaded JPEG disc.
- Use the DIRECTION/ENTER buttons on the remote to select and view photos.
Troubleshooting
Before Requesting Service
Check the following guide for the possible cause of a problem before contacting service.
| Symptom | Correction |
| No power | Plug the power cord into the wall outlet securely. |
| No picture | • Select the appropriate video input mede on the TV so the picture from the DVD player appears on the TV screen. • Connect tba video cable into the jacks securely. • Turn on the TV |
| NO sound | • Check audio connections. • If you are using a HiFi amplifier, try another sound source. |
| The playback picture is poor | • Clean the disc. • Correct the TV / DVD player colour system. |
| The DVD player does not start playback | • Insert a disc, if no disc inside the player. • Insert a playable disc. (Check the disc type, color system and Regional code.) • Place the disc with the playback side down. • Clean the disc. • Cancel the Rating function or change the rating level. |
| Severe hum or noise is heard. | • Wipe them with a cloth slightly moistened with alcohol. • Clean the disc • Connect the speakers and components securely. • Move your TV away from the audio components. |
| The remote control does not work properly. | • Point the remote control at the remote sensor of the DVD receiver. • Operate the remote control within about 5m. • Remove the obstacle. • Replace the batteries with new ones. |
| Completely distorted picture or no colour | If the picture is distorted completely or if the picture rolls vertically, make sure the NTSC/PAL setting at the DVD player matches the colour system of your television. |
| The icon appears on screen | • The DVD's software restricts it. • The DVD's software doesn't support the feature (eg., angles). • The feature is not available at the moment. |
This product incorporates copyright protection technology that is protected by method claims of certain U.S. patents and other intellectual property rights owned by Macrovis on Corporation and other rights owners, Use of this copyright protection technology must be authorized by Macrovision Corporation, and is intended for home and other limited viewing use only unless otherwise authorized by Macrovision Corporation. Reverse engineering or disassembly is prohibited.
| Signal system | PAL/AUTO/NTSC |
| Frequency Response | 20HZ-20KHZ (at 1KHz 0 dB) |
| Signal-toNoisy Ratio(Audio) | ≥90 dB (at 1KHz 0 dB) |
| Audio Distortion + Noise | ≤-60dB (at 1KHz0dB) |
| Audio Output (Analog audio) | 2.0+0-1.0Vrms |
| Video Output | Composite: 1.0±0.2Vp-p Load impedance: 75Ω, imbalance, negative polarity |
| Power Supply | 230V~50 Hz |
| Supported Disc | DVD/VCD/CD/MP3/Photo CD/SVCD/JPEG/MPEG-4 |

Note on environmental protection:
After the implementation of the European Directive 2002/96/EU in the national legal system, the following applies: Electrical and electronic devices may not be disposed of with domestic waste. Consumers are obliged by law to return electrical and electronic devices at the end of their service lives to the public collecting points set up for this purpose or point of sale. Details to this are defined by the national law of the respective country. This symbol on the product, the instruction manual or the package indicates that a product is subject to these regulations. By recycling, reusing the materials or other forms of utilizing old devices, you are making an important contribution to protecting our environment.
REFERENCE:
To protect your DVD player, the interval between two consecutive Power button operations must be above 30 seconds.
No using for a period of time, please pull out the plug from the electronic outlet.
The player should be operated only on condition that the type of power supply corresponds to the marking label. Otherwise, it does not work or even be damaged.
The player may not be compatible with some encrypted discs.
If the player stops playback by accident, please power it on again.
Appearance and function is subject to change without notice.