
CEHCDVD511 - DVD player CONTINENTAL EDISON - Free user manual and instructions
Find the device manual for free CEHCDVD511 CONTINENTAL EDISON in PDF.
| Product type | DVD player |
| Brand | Continental Edison |
| Model | CEHCDVD511 |
| Power supply | 230 V ~ 50 Hz |
| Supported disc formats | DVD, VCD, SVCD, CD, MP3, JPEG, MPEG-4 |
| Maximum video resolution | 1080p via HDMI |
| Video outputs | HDMI, SCART, Composite (RCA) |
| Audio outputs | 5.1 analog channels, digital coaxial output, stereo RCA |
| USB port | Playback of audio, video, and photo files (FAT/FAT32) |
| Playback functions | Play, pause, stop, fast forward/rewind, slow motion, zoom, repeat, shuffle, program |
| Parental control | Yes, with password (default 0000) |
| OSD languages | Multilingual (configurable) |
| Subtitles | Supported (depending on disc) |
| Camera angles | Up to 9 angles (depending on disc) |
| Aspect ratio | 4:3 / 16:9 (configurable) |
| TV system | PAL / NTSC / AUTO |
| Screen saver | Yes (on/off) |
| Night mode | Yes (reduced audio output) |
| Maintenance and cleaning | Unplug before cleaning; use a damp cloth; do not use solvents |
| Safety | Class 1 laser; do not open the casing; avoid moisture and shocks |
| Spare parts and repairability | Use manufacturer-recommended parts; entrust any repairs to a qualified technician |
Frequently Asked Questions - CEHCDVD511 CONTINENTAL EDISON
User questions about CEHCDVD511 CONTINENTAL EDISON
0 question about this device. Answer the ones you know or ask your own.
Ask a new question about this device
Download the instructions for your DVD player in PDF format for free! Find your manual CEHCDVD511 - CONTINENTAL EDISON and take your electronic device back in hand. On this page are published all the documents necessary for the use of your device. CEHCDVD511 by CONTINENTAL EDISON.
USER MANUAL CEHCDVD511 CONTINENTAL EDISON
SETUP (CONFIGURATION)
OPEN/CLOSE (OUVRIR/FERMER)
POWER (MISE SOUS TENSION)
Press this button can switch 2.1 to 5.1 underDVD DOOR opened mode.
5.LIRE DES CD ET DES MP3
- 1280x720p (720p)
-1920x1080i(1080i) - 1920x1080p (1080p)
Press this button can switch 2.1 to 5.1 underDVD DOOR opened mode.
5.REPRODUCIR CD Y MP3
- 1280x720p (720p)
1920x1080i (1080i) - 1920x1080p (1080p)
Note: "p" progresivo e "i" entrelazado.
Off: desactivar down-sample.
7.4 AJUSTES DEL NIVEL DE CONTROL PATERNO
Please read and keep these instructions

THE LIGHTNING FLASH WITHAPPROWHEAD SYMBOL WITHIN ANEQUILATERAL TRIANGLE IS IN TENDED TOALERT THE USER TO THE PRESENCE OFUNINSULATED « DANGEROUS VOLTAGE »
WITHIN THE UNIT'S CABINET THAT MAY BE OF SUFFICIENT MAGNITUDE TO CONSTITUTE A RISK OF ELECTRIC SHOCK TO PERSONS.

THE EXCLAMATION POINT WITHIN AN EQUILATERAL TRIANGLE IS INTENDED TO ALERT THE USER TO THE PRESENCE OF IMPORTANT OPERATING AND
MAINTENANCE (SERVICING) INSTRUCTIONS IN THE MANUAL ACCOMPANYING THE UNIT.

THE MAINS PLUG USED AS THE DISCONNECT DEVICE, THE DISCONNECT DEVICE SHALL REMAIN READILY OPERABLE.

THE APPARATUS SHALL NOT BE EXPOED TO DRIPPING OR SPLASHING AND THAT ON OBJECTS FILLED WITH LIQUIDS, SUCH AS VASES, SHALL BE PLACED THE APPARATUS.

THE APPLIANCE COUPLER IS USED AS THE DISCONNECT DEVICE, THE DISCONNECT DEVICE SHALL REMAIN READILY OPERABLE.

ALWAYS REMEMBER TO REMOVE THE PLUG FROM THE MAINS SOCKET BEFORE DISCONNECTING THE POWER LEAD FROM THE BACK OF THE UNIT.
WARNING
TO PREVENT FIRE OR ELECTRIC SHOCK, DO NOT EXPOSE THE UNIT TO RAIN OR MOISTURE. NEVER ATTEMPT TO OPEN THE CABINET, DANGEROUS HIGH VOLTAGES ARE PRESENTED IN THE UNIT. REFER SERVICING TO QUALIFIED SERVICE PERSONNEL.
CAUTION
TO PREVENT ELECTRIC SHOCK, MATCH WIDE-BLADE PLUG WITH WIDE SLOT AND FULLY INSERT.
THE APPARATUS SHALL NOT BE EXPOSED TO WATER AND NO OBJECTS FILLED WITH LIQUID SUCH AS VASES SHALL BE PLACED ON THE APPARATUS.
CAUTION
THE UNIT EMPLOYS A LASER SYSTEM. TO ENSURE THE PROPER USE OF THE UNIT, READ THEIS MANUAL CAREFULLY AND KEEP IT FOR FUTURE REFERENCE.
IF THE UNIT REQUIRES SERVICING, CONTACT THE SELLER OR SEE "TROUBLESHOOTING".
TO PREVENT DIRECT EXPOSURE TO THE LASER RADIATION, DO NOT OPEN THE CABINET. VISIBLE LASER MAY RADIATE WHEN THE CABINET IS OPENED OR THE INTERLOCKS ARE DEFEATED. DO NOT STARE INTO THE LASER BEAMS.
CAUTION
THIS PLAYER IS A CLASS 1 LASER PRODUCT. USE OF CONTROLS OR ADJUSTMENTS OR PERFORMANCE OF PROCEDURES OTHER THAN THOSE SPECIFIED HEREIN MAY REULT IN HAZARDOUS RADIATION EXPOSURE. AS THE LASER BEAM USED IN THIS DVD VIDEO PLAYER IS HARMFUL TO THE EYES, DO NOT ATTEMPT TO DISASSEMBLE THE CABINET. REFER SERVICING TO QUALIFIED PERSONNEL ONLY.
WARNING
FCC REGULATIONS STATE THAT ANY CHANGE OR MODIFICATION TO THE EQUIPMENT, NOT EXPRESSLY APPROVED BY MAKER OR ITS AUTHORIZED PARTIES, COULD VOID USER'S AUTHORITY TO OPERATE THIS EQUIPMENT.
This symbol indicates that this product incorporates double insulation between hazardous mains voltage and user accessible parts. When servicing use only identical replacement parts.]
WARNING: To reduce the risk of fire or electric shock, do not expose this apparatus to rain or cords.
1. Read Instructions
All the safety and operating instructions should be read before the product is operated.
2. Retain Instructions
The safety and operating instructions should be retained for future reference.
3. HeadWarnings
All warnings on the product and in the operating instructions should be adhered to.
4. Follow Instructions
All operating instructions should be followed.
5. Cleaning
Unplug this product from the wall outlet before cleaning. Do not use liquid cleaners or aerosol cleaners. Use a damp cloth for cleaning.
6. Attachments
Do not use attachments not recommended by the product manufacturer as they may cause hazards.
7. Water and Moisture
Do not use this product near water for example, near a bathtub, wash bowl, kitchen sink, or laundry tub; in a wet basement; or near a swimming pool; and the lake.
8. Accessories
Do not place this product on an unstable cart, stand, tripod, bracket, or table. The product may fall, causing serious injury to a child or adult, and serious damage o the product. Use only with a cart, stand, tripod, bracket, or table recommended by the manufacturer, or sold with the product. Any mounting of the product should follow the manufacturer's instructions, and should use a mounting accessory recommended by the manufacturer.
9. Portable Cart Warning

(Symbol provided by RETAC)
A product and cart combination should be moved with care. Quick stop, excessive force, and uneven surface may cause the product and cart combination to overturn. 10. Ventilation.
Slots and openings in the cabinet are provided for ventilation and to ensure reliable operation of the product and to protect if from overheating, and these openings must not be blocked or covered. The openings should never be blocked by placing the product on a bed, sofa, rug, or other similar surface. This product should not be placed in a built-in installation such as a bookcase or rack unless proper ventilation is provided or the manufacturer's instructions have been adhered to.
11. Power Sources
This product should be operated only from the type of power source indicated on the marking label. If you are not sure of the type of power supply to your home, consult your product dealer or local power company. For products intended to operate from battery power or other sources, refer to the operating instructions.
12. Power Cord Protection
Power supply cords should be routed so that they are not likely to be walked on or pinched by items placed upon or against them, paying particular attention to cords at plugs, convenience receptacles, and the point where they exit from the product.
13. Power Lines
An outside antenna system should not be located in the vicinity of overhead power lines or other electric light or power circuits, o where it can fall into such power lines or circuits. When installing an outside antenna system, extreme care should be taken to keep from touching such power lines or circuits as contact with them might be fatal.
14. Overloading
Do not overload wall outlets, extension cords, or integral convenience receptacles, as this can result in a risk of fire or electric shock.
15. Object and Liquid Entry
Never push objects of any kind into this product through openings as they may touch dangerous voltage points or short-out parts that could result in a fire or electric shock. Never spill liquid of any kind to the product.
16. Servicing
Do not attempt to service this product yourself as opening or removing covers may expose you to dangerous voltage or other hazards. Refer all servicing to qualified service personnel.
17. Replacement Parts
When replacement parts are required, be sure the service technician has used replacement parts specified by the manufacturer or have the same characteristics as the original part. Unauthorized substitutions may result in fire, electric shock, or other hazards.
18. Safety Check
Upon completion of any service or repairs to this product, ask the service technician to perform safety checks to determine that whether the product is in proper operating condition.
19. Heat
The product should be situated away from heat sources such as radiators, heat registers, stoves, or other products (including amplifiers) that product heat.
Note on environmental protection

m = 311 ;
After the implementation of the European Directive 2002/96/EU in the national legal system, the following applies: Electrical and electronic devices may not be disposed of with domestic waste. Consumers are obliged by law to return electrical and electronic devices at the end of their service lives to the public collecting points set up for this purpose or point of sale. Details to this are defined by the national law of the respective country. This symbol on the product, the instruction manual or the package indicates that a product is subject to these regulations. By recycling, reusing the materials or other forms of utilizing old devices, you are making an important contribution to protecting our environment.
Contents
- Front Panel and Rear Panel Illustration 4
- Remote Control- 5
- Connections 7
- Function Operation 8
- CD&MP3 Playing 11
- Connecting a USB device 12
- System Setup 13
- Troubleshooting 17
- Technical Specification 18
1. FRONT PANEL AND REAR PANEL ILLUSTRATION
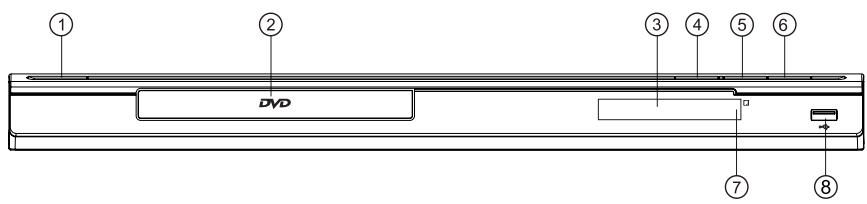
Front panel
- STANDBY BUTTON
- DVD DOOR
- DISPLAY WINDOW
-
OPEN/CLOSE BUTTON
-
PLAY/PAUSE BUTTON
- STOP BUTTON
- REMOTE RECEIVER WINDOW
- USB JACK
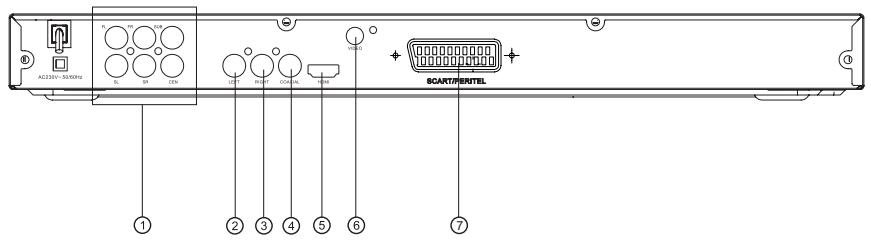
Rear panel
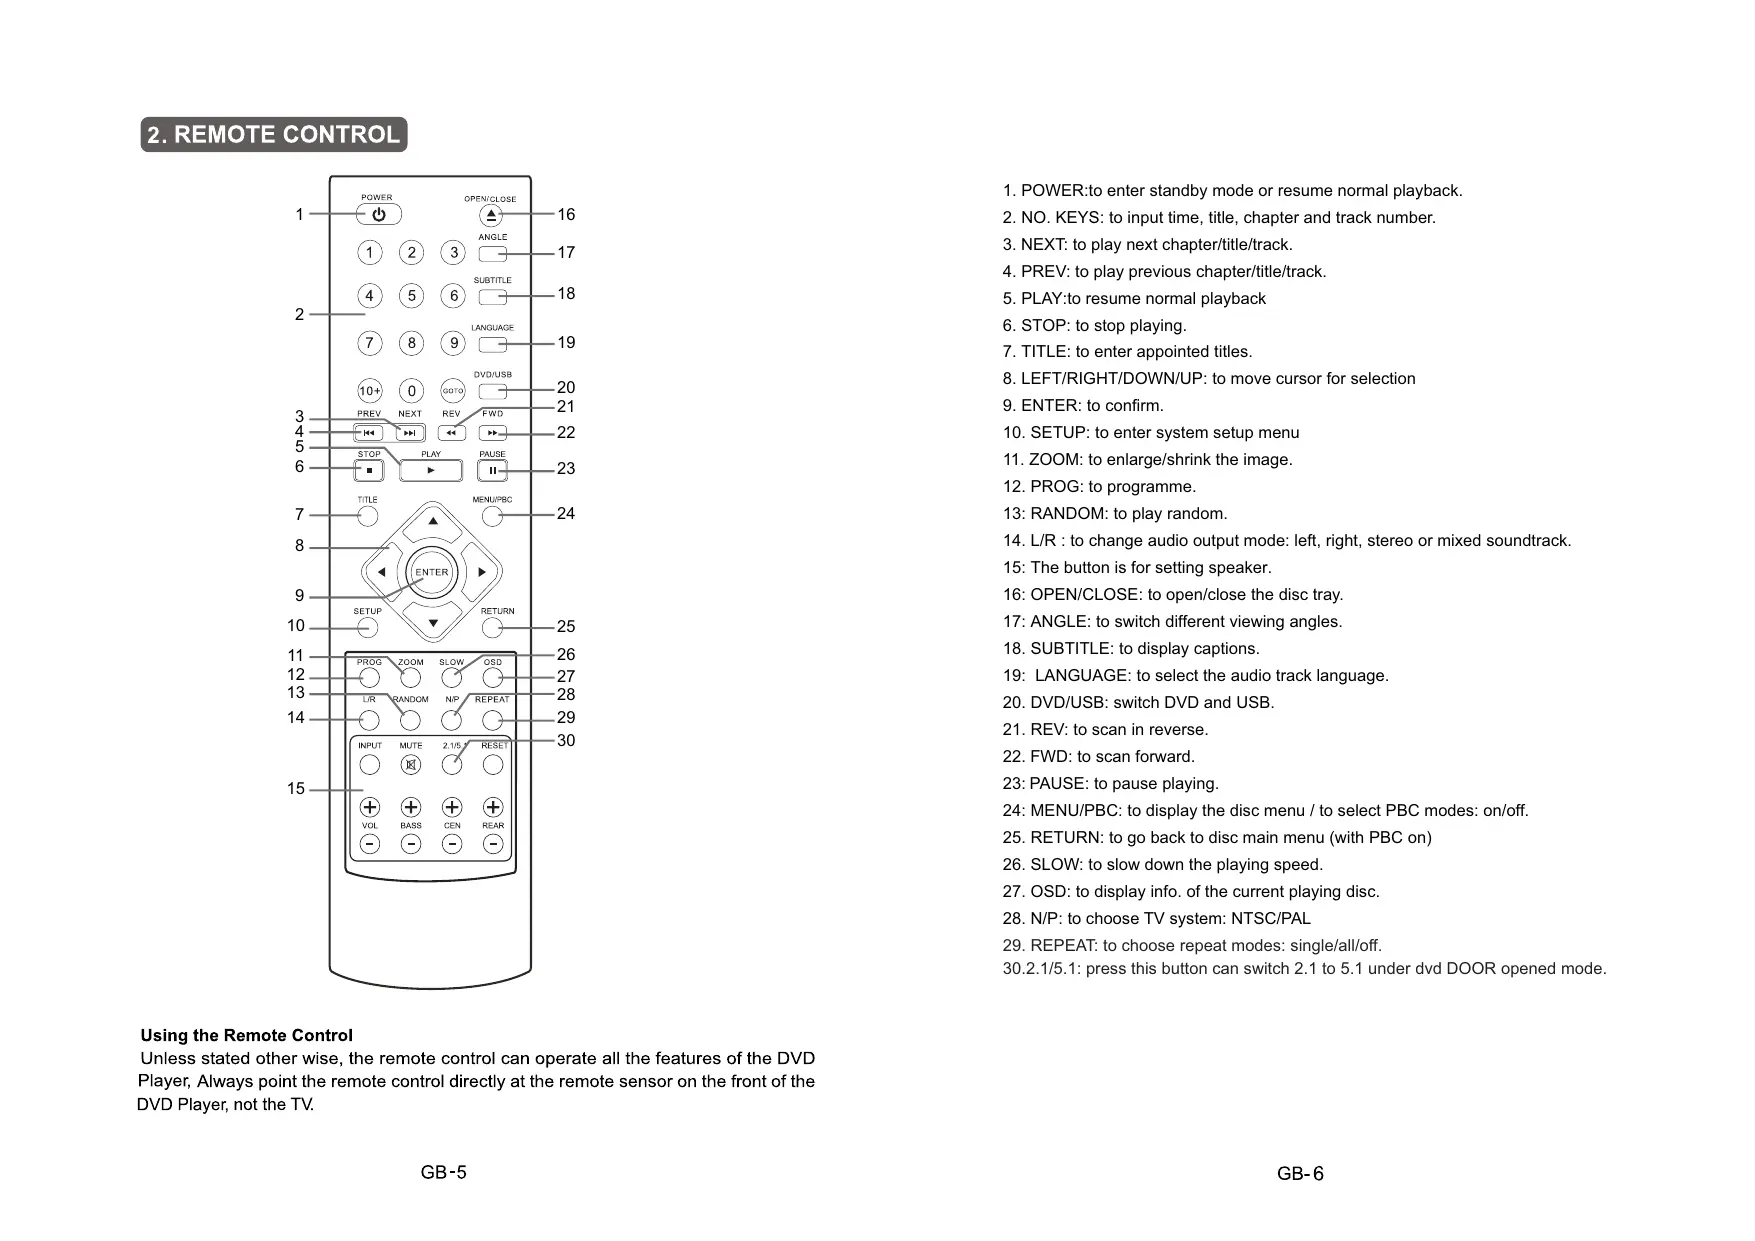
Using the Remote Control
Unless stated other wise, the remote control can operate all the features of the DVD Player, Always point the remote control directly at the remote sensor on the front of the DVD Player, not the TV.
- POWER:to enter standby mode or resume normal playback.
- NO. KEYS: to input time, title, chapter and track number.
- NEXT: to play next chapter/title/track.
- PREV: to play previous chapter/title/track.
- PLAY: to resume normal playback
- STOP: to stop playing.
- TITLE: to enter appointed titles.
- LEFT/RIGHT/DOWN/UP: to move cursor for selection
- ENTER: to confirm.
- SETUP: to enter system setup menu
- ZOOM: to enlarge/shrink the image.
- PROG: to programme.
13: RANDOM: to play random. - L/R : to change audio output mode: left, right, stereo or mixed soundtrack.
15: The button is for setting speaker.
16: OPEN/CLOSE: to open/close the disc tray.
17: ANGLE: to switch different viewing angles. - SUBTITLE: to display captions.
19: LANGUAGE: to select the audio track language. - DVD/USB: switch DVD and USB.
- REV: to scan in reverse.
- FWD: to scan forward.
23: PAUSE: to pause playing.
24: MENU/PBC: to display the disc menu / to select PBC modes: on/off. - RETURN: to go back to disc main menu (with PBC on)
- SLOW: to slow down the playing speed.
- OSD: to display info. of the current playing disc.
- N/P: to choose TV system: NTSC/PAL
- REPEAT: to choose repeat modes: single/all/off.
30.2.1/5.1: press this button can switch 2.1 to 5.1 underDVD DOOR opened mode.
3. CONNECTIONS
- Turn off the power before connection.
- Turn on the power after finishing connection.
Wires must be firmly connected; especially the plug shall be fully inserted.
Connection to Television
There are several possible configurations, depending on your television:
- It is recommended that you connect the player to your television with an HDMI cable in order to enjoy the image of optimal resolution and quality (cable not included).
- In case your television does not have any HDMI input, connect a SCART cable or an Audio/Video cable from the player to your television (cable not included).
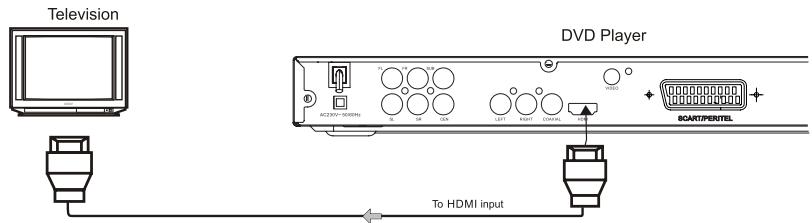
Connection to the television using an HDMI cable

Connecting to a TV with Audio/Video cable
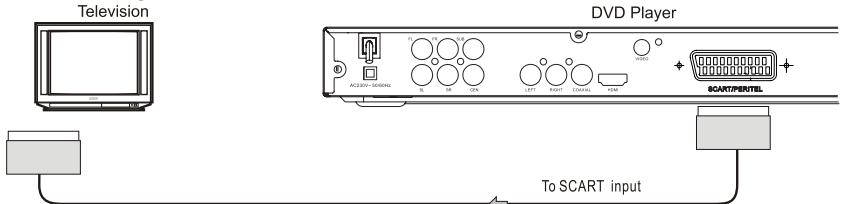
Connecting to a TV with SCART mode.
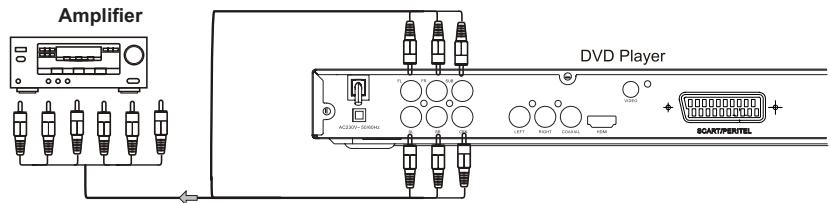
Connecting to a amplifier with 5.1 CH
Setting of TV system
If you find the image like non-fully zoomed picture, brim picture covered or black & white picture etc, please select PAL or NTSC by systems setting or press N/P button to switch the TV system on the remote control. This DVD disc is capable of supporting different scales picture, as a result, non-full zoomed picture could appear or picture be partially covered on users TV set.
4.1 Function Buttons On the Front Panel
These buttons function is the same as the corresponding buttons on the remote control. For the detail information, please see the following texts.
4.2 Function Buttons On the Remote Control
0-10+keys
These keys are used to input the time, as well as title, chapter and track numbers. When a numeric item is displayed on the screen, press the 0-10+ keys to select the desired entry, and press ENTER to confirm.
When a CD or VCD is playing (with PBC off), press the 0-10+ keys to select a track directly, then press ENTER to confirm.
NEXT
During DVD, CD or VCD playback, press NEXT to play the next chapter, title or track.
PREV
During DVD, CD or VCD playback, press PREV to play the previous chapter, title or track.
STOP
Press the button once and the player will be in memory stopstate. Continuously press this button twice and the player will be in complete stop state.
L/R:
Press this button to change audio output mode: left, right, stereo or mixed soundtrack.
Language:
Press this button to select the soundtrack languages(DVD/SVCD).
Return:
In PBC-on mode, press this button to go back to the main menu(VCD/DVD/SVCD).
DVD/USB:
In stop mode, press the key from the remote control to switch the input source Disc, and USB.
SETUP
Press the button to enter the system setting menu. press the button again to exit the menu.
MENU/PBC
During DVD playback, press MENU to display the disc menu of the current title.
During VCD/SVCD playback, Press PBC to select the mode of PBC On or PBC Off.
PROG
For CD/MP3 Program
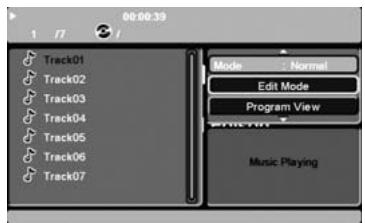
1.Put in a MP3/CD format disc.
2.There is Edit Mode at the right side of the list. Press enter to choose Edit Mode, then move the LEFT button to enter song selection, press ENTER to confirm. Then move the cursor to Add to Program at the right side, press ENTER to confirm. Move the cursor and enter Program View to choose program playing.
Note: If song is being played while programming, press STOP button to stop current playing before you choose program playing.
3.To clear the program, it must be in STOP status, After choosing the sound needed to clear, move the cursor to Clear Program. Press ENTER to confirm.
Notes: To play randomly, preset repeat state as "Repeat: off" at the right side, mode state as "Shuffle on". Press NEXT from the remote control to play without sequence.
- There are 3 Repeat modes and 3 Mode states at the right side, Repeat Single is to repeat single track. Repeat Folder is to repeat tracks in the whole folder. Repeat Off is to cancel repeat. Mode normal is to play normally, Shuffle on is to play randomly. Music intro is to play the prelude only.
Notes: To play randomly, preset repeat state as "Repeat: off" at the right side, mode state as "Shuffle on". Press NEXT from the remote control to play without sequence.
For DVD Program
Press this button and the screen will display info window, press digits button to input the program number what you want, when finished, move the cursor to select the START logo at this time the unit will start program playback and the screen will display PROGRAM logo.
OPEN/CLOSE
To open the disc tray, press OPEN/CLOSE; To close the disc tray, press OPEN/CLOSE again.
POWER
Press the button once and the player will go into standby state.
Press the button again and the player will resume operating as before.
ANGLE
While playing back a DVD disc, press the ANGLE button repeatedly to select the desired camera angle. A DVD disc may contain to 9 selectable angles.
OSD
Press OSD button.
To show the time and status information.
REPEAT
Each press of the REPEAT button will change the repeat mode.
During VCD, CD playback, there are three modes: repeat Single, repeat All and Off.
During DVD, playback, there are three modes: Repeat Chapter, Repeat Title and Off.
REV
During DVD, CD or VCD playback, press REV to scan in reverse. The player will review the disc at different times speed. Press PLAY to resume normal playback.
FWD
During DVD, CD or VCD playback, press FWD to scan forward.
The player will cue the disc at different speed. Press PLAY to resume normal playback.
ENTER
Press the button to confirm your choice on screen.
Direction key(UP/DOWN/RIGHT/LEFT)
Press the keys to move the highlighted bar or cursor on any menu to your selection.
Play/Pause
In play state, press the button for the first time and the player will be in pause state. To resume normal playback press the button again, In pause state or stop state, press the button, the player will be in playing state.
SLOW
During DVD, VCD or SVCD playback, press SLOW for slow motion playback.
Once you press SLOW, the disc will play at different speed. Press PLAY to resume normal playback.
N/P
Please press stop key, then Press the button on the remote control and choose or
Auto NTSC PAL for the TV system.
ZOOM
As you press the button you view the different ZOOM magnifications of the picture.
Note: This function may differ for different types of discs
SUBTITLE
Press the button to display different captions(Requires support from disc)
TITLE
Press the button to enter the appointed title. (Requires disc support)
2.1/5.1
Press this button can switch 2.1 to 5.1 underDVD DOOR opened mode.
5. CD&MP3 PLAYING
MP3 is a method to compress the voice signal with a scale of 12:1 with international standard MPEG layer 3 audio compressing mode.
Adopting MP3, one disc can record more than 600 minutes audio frequency or 170 songs, with the similar timbre with CD.
The player will automatically play the first song (file) in the menu.
You can use number keys to select your favorite song (file).
Press arrow keys to select the file, and the cursor will move at time, press ENTER to confirm, the player will play this song selected by cursor in the file window.
6CONNECTING A USB DEVICE
1) Power-on the unit.
2) Make sure no disc has been inserted inside the tray.
3) Insert a USB key inside the connector.
4) Press the USB key from the remote control to start.
Remark: Depending on the capacity of the device, the reading can take more than 1 minute before launching the video.
The unit cannot read my USB device.
- Once you have plugged your device to the unit, you may need to switch on the USB device before it can operate.
- This unit does not support a direct USB connection with a computer. You need to use a USB device, a MP3 player or a PMP (Portable Multimedia Player with hard disk).
- If you are using a USB external hard disk: you need to connect your device simultaneously to an external power source and to the unit. If you are using a self-powered PMP, make sure that the battery is sufficiently loaded.
- Check that the files system of your USB device is formatted into the FAT or FAT 32 format. USB device formatted into NTFS are not compatible with this unit. Caution: if you attempt to modify your file system, formatting your device will erase all data. Please refer to your USB device's instruction manual first.
- Warning: Connect your USB device directly to the USB port of the device. Using an extension cable is not recommended and may cause interference and failure of data transfer.
7. SYSTEM SETUP
DVD menu setup
Press the SETUP button on the remote control, the SETUP MENU (main) will be displayed. After accessing the setup menu, press the direction buttons for up and down movement to select an item desired, then press the ENTER button to confirm .Press LEFT direction button return to the menu of upper level.
To exit the setup, press the SETUP button again. In the SETUP MENU, you may choose any of the following options as you like.
7.1 LANGUAGE SETUP
Select Language in the setup menu, and display the Language submenu:
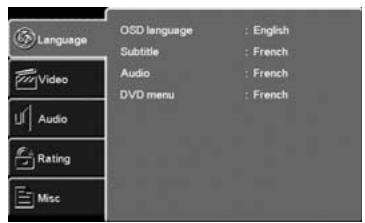
7.1.1 OSD Language
Use this item to select the language of the setup menu and screen display.
7.1.2 Subtitle
This option provides the preset subtitle language.
Follow the operating instructions stated in "DVD MENU SETUP" in combination with the desired option.
7.1.3 Audio
Follow the operating instructions stated in "DVD MENU SETUP" in combination with the desired option. This option provides the built-in disc dubbing language options.
7.1.4 DVD Menu
This option provides the film's menu language options.
Follow the operating instructions stated in "DVD MENU SETUP" in combination with the desired option.
7.2VIDEO SETUP
Select Video in the setup menu, and display the Video submenu:
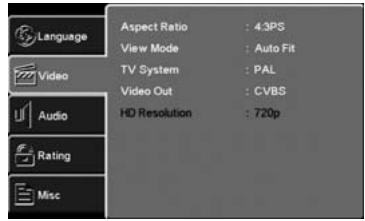
7.2.1 Aspect Ratio
4:3 : Choosing this setting if your DVD player is connected to a normal ratio TV. You can fill the movie to the entire screen of your TV. This might mean that parts of the picture (the left and right edges) won't be seen.
16:9 : Choose this setting if your DVD player is connected to a wide screen TV. If you choose this setting and you don't have a wide screen TV, the images on the screen may appear distorted due to vertical compression.
Note:
The image display ratio is related to the recorded disc format. Some disc can not display images in the aspect ratio you choose. If you play a disc recorded in 4:3 format on a wide screen TV, black bars will appear on the left and right side of the screen. You must adjust the screen setting depending on the type of the television you have.
7.2.2 View Mode
With this option you can select the different video vision mode on the screen.
7.2.3 TV System
This product supports output of various systems, including AUTO, NTSC, PAL. If your TV set has only NTSC or PAL system, the screen will blink and become colorless when a wrong system is selected. In this case, press the N/P button on the Remote Control to switch the TV TYPE..
Note: For more information of output format, refer to the instructions of your TV set.
7.2.4Video Out
Selecting the Video Output setting to switch between different video outputs
7.2.5 HD Resolution

The High-Definition Multimedia Interface (HDMI) is a digital audio/video connector interface for transmitting uncompressed digital streams. HDMI supports, on a single cable, all video formats including standard, enhanced and high-definition, as well as multi-channel digital audio. To enjoy the enhanced audio and .video quality that HDMI offers, you need an HD Ready television with HDMI connections
You then simply need to select the maximum resolution supported by your television in the menu:
- 1280x720p (720p)
- 1920x1080i (1080i)
- 1920x1080p (1080p)
Note: "p" signifies progressive, while "i" signifies interlaced.
HDMI Mode Display Problem: When you select an HDMI display mode which is not supported by your television (if you choose, for example, 1080i while your television supports up to 720p only), you get a black screen. As a result, you cannot change the HDMI resolution in the setup menu. You should then use a SCART cable to connect your television. Once the screen displays normally again, you can change to an appropriate HDMI setting in the menu.
7.3 Audio setup
Select Audio in the setup menu, and display the Audio submenu.
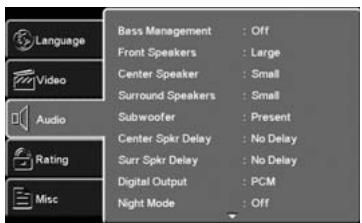
7.3.1 Bass management
Setup bass on or off.
Off: no bass output
On: bass output
7.3.2 Front speakers
Adjustement of the prespeaker sound.
7.3.3 Center speakers
Three central speaker adjustments of sound: Large, Small and None sound.
7.3.4 Surround speakers
Three surround speaker adjustments of sound: Large, Small and None suond
7.3.5 Subwoofer
Bass speaker adjustment of suond: None or Present.
7.3.6 Center spkr delay
Central speaker prolong setup.
7.3.7 Surr spkr delay
Sur round speaker prolong setup
7.3.8 Digital Output
Selecting the Digital Output setting allows the user to adjust the audio output on S/PDIF ports to work in harmony with the audio equipment (e.g. receiver, speakers) connected to the player. Off: Digital audio output is disabled.
PCM: Select this option when you are going to use stereo signals (2 channels). You should combine this option with "lower sampling rate", which is explained further on.
Raw: If you select this option the player will play the DVD's original audio track. Use this option when you want to use the Dolby Digital AC3 signals through the optical or coaxial audio output.
7.3.9 Night Mode
This listening mode is most suitable at night for softest audio output and least disturbance.
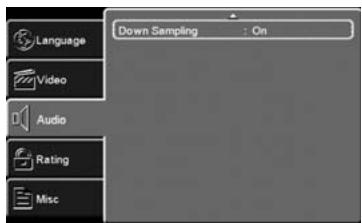
7. 3.10 Down Sampling
Down sampling: Down sampling enable the user use less sampling rate. A higher sampling frequency/rate enables user get a better audio quality.
On: enable the Down Sampling this operation will set down Audio Sampling frequency.
Off: disable the Down Sampling.
7.4 RATING SETUP
Select
Note: Not all DVDs support ratings.
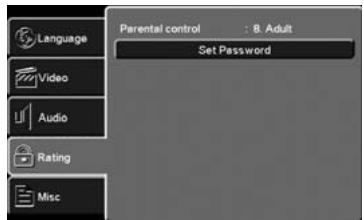
7. 4.1 Parental Control
Selecting a Rating allows the user to set the parental control feature of the player
Select Parental Control, and press ENTER to change the different mode.
Note: Unlock the password before setting Parental Control
7.4.2 Set Password
Use the 0-9 keys to input four digits (password), then press ENTER to confirm. Note: If you forget your password, please use the universal password 0000 to unlock.
7.5 Misc SETUP
Select Misc in the setup menu, and display the submenu:
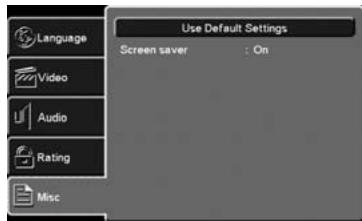
7.5.1 Use Default Settings
Reset setup data to factory default and re-load disc
7.5.2 Screen Saver:
On:Screen Saver function will be opened.
Off:Screen function will be closed.
8. Troubleshooting
Before Requesting Service
Check the following guide for the possible cause of a problem before contacting service.
| Symptom | Correction |
| No power | Plug the power cord into the wall outlet securely. |
| No picture | • Select the appropriate video input mede on the TV so the picture from the DVD player appears on the TV screen. • Connect tba video cable into the jacks securely. • Turn on the TV |
| NO sound | • Check audio connections. • If you are using a HiFi amplifier, try another sound source. |
| The playback picture is poor | • Clean the disc. • Correct the TV / DVD player colour system. |
| The DVD player does not start playback | • Insert a disc, if no disc inside the player. • Insert a playable disc. (Check the disc type, color system and Regional code.) • Place the disc with the playback side down. • Clean the disc. • Cancel the Rating function or change the rating level. |
| Severe hum or noise is heard. | • Wipe them with a cloth slightly moistened with alcohol. • Clean the disc • Connect the speakers and components securely. • Move your TV away from the audio components. |
| The remote control does not work properly. | • Point the remote control at the remote sensor of the DVD receiver. • Operate the remote control within about 5m. • Remove the obstacle. • Replace the batteries with new ones. |
| Completely distorted picture or no colour | If the picture is distorted completely or if the picture rolls vertically, make sure the NTSC/PAL setting at the DVD player matches the colour system of your television. |
| The icon appears on screen | • The DVD's software restricts it. • The DVD's software doesn't support the feature (eg., angles). • The feature is not available at the moment. |
This product incorporates copyright protection technology that is protected by method claims of certain U.S. patents and other intellectual property rights owned by Macrovis on Corporation and other rights owners. Use of this copyright protection technology must be authorized by Macrovision Corporation, and is intended for home and other limited viewing use only unless otherwise authorized by Macrovision Corporation. Reverse engineering or disassembly is prohibited.
9. Technical specifications
| Signal system | PAL/AUTO/NTSC |
| Frequency Response | 20HZ-20KHZ (at 1KHz 0 dB) |
| Signal-toNoisy Ratio(Audio) | ≥90 dB (at 1KHz 0 dB) |
| Audio Distortion + Noise | ≤-60dB (at 1KHz0dB) |
| Audio Output (Analog audio) | 2.0+0-1.0Vrms |
| Video Output | Composite: 1.0±0.2Vp-p Load impedance: 75Ω, imbalance, negative polarity |
| Power Supply | 230V~50 Hz |
| Supported Disc | DVD/VCD/CD/MP3/Photo CD/SVCD/JPEG/MPEG-4 |
REFERENCE:
To protect your DVD player, the interval between two consecutive Power button operations must be above 30 seconds.
No using for a period of time, please pull out the plug from the electronic outlet.
The player should be operated only on condition that the type of power supply corresponds to the marking label. Otherwise, it does not work or even be damaged.
The player may not be compatible with some encrypted discs.
If the player stops playback by accident, please power it on again.
Appearance and function is subject to change without notice.
- SETUP (CONFIGURATION)
- OPEN/CLOSE (OUVRIR/FERMER)
- POWER (MISE SOUS TENSION)
- 5.LIRE DES CD ET DES MP3
- 5.REPRODUCIR CD Y MP3
- AJUSTES DEL NIVEL DE CONTROL PATERNO
- WARNING
- CAUTION
- Read Instructions
- Retain Instructions
- HeadWarnings
- Follow Instructions
- Cleaning
- Attachments
- Water and Moisture
- Accessories
- Portable Cart Warning
- Power Sources
- Power Cord Protection
- Power Lines
- Overloading
- Object and Liquid Entry
- Servicing
- Replacement Parts
- Safety Check
- Heat
- Note on environmental protection
- Contents
- FRONT PANEL AND REAR PANEL ILLUSTRATION
- Using the Remote Control
- CONNECTIONS
- Connection to Television
- Setting of TV system
- Function Buttons On the Front Panel
- Function Buttons On the Remote Control
- 0-10+keys
- NEXT
- PREV
- STOP
- L/R:
- Language:
- Return:
- DVD/USB:
- SETUP
- MENU/PBC
- PROG
- OPEN/CLOSE
- POWER
- ANGLE
- OSD
- REPEAT
- REV
- FWD
- ENTER
- Direction key(UP/DOWN/RIGHT/LEFT)
- Play/Pause
- SLOW
- N/P
- ZOOM
- SUBTITLE
- TITLE
- 2.1/5.1
- CD&MP3 PLAYING
- 6CONNECTING A USB DEVICE
- The unit cannot read my USB device.
- SYSTEM SETUP
- DVD menu setup
- LANGUAGE SETUP
- OSD Language
- Subtitle
- Audio
- DVD Menu
- 7.2VIDEO SETUP
- Aspect Ratio
- View Mode
- TV System
- 7.2.4Video Out
- HD Resolution
- Audio setup
- Bass management
- Front speakers
- Center speakers
- Surround speakers
- Subwoofer
- Center spkr delay
- Surr spkr delay
- Digital Output
- Night Mode
- 3.10 Down Sampling
- RATING SETUP
- 4.1 Parental Control
- Set Password
- Misc SETUP
- Use Default Settings
- Screen Saver:
- Troubleshooting
- Before Requesting Service
- Technical specifications
- REFERENCE:
Brand : CONTINENTAL EDISON
Model : CEHCDVD511
Category : DVD player