
TEAM POD - Sports accessory SUUNTO - Free user manual and instructions
Find the device manual for free TEAM POD SUUNTO in PDF.
| Product type | Sports accessory |
| Brand | SUUNTO |
| Model | TEAM POD |
| Dimensions | 171 x 75 x 50 mm |
| Weight | 180 g (with tripod adapter and antennas) |
| Power supply | USB, power consumption 50 mA |
| Transmission range | Up to 100 meters |
| Transmission frequency | 2.4 GHz, ANT compatible |
| Main functions | Real-time heart rate monitoring for up to 30 athletes; analysis with Suunto Monitor and Suunto Team Manager software |
| Maximum number of athletes | 30 |
| Mounting | On tripod (quick-release adapter) or on flat surface |
| Recommended positioning | Antenna parallel to the training area |
| Water resistance | Rainproof but not for water activities |
| Compatible software | Suunto Monitor (real-time), Suunto Team Manager (in-depth analysis) |
| PC compatibility | Windows 98/2000/XP |
| Package contents | Receiver with antenna, USB cable, software, transmitter belts (not included in package?) |
| Warning | Not recommended for pacemaker wearers without medical test; do not use in water |
| Certifications | CE, FCC Class B, ISO 9001 |
| Warranty | 2 years (subject to conditions) |
| After-sales service | Contact Suunto Oy or authorized dealer |
Frequently Asked Questions - TEAM POD SUUNTO
User questions about TEAM POD SUUNTO
0 question about this device. Answer the ones you know or ask your own.
Ask a new question about this device
Download the instructions for your Sports accessory in PDF format for free! Find your manual TEAM POD - SUUNTO and take your electronic device back in hand. On this page are published all the documents necessary for the use of your device. TEAM POD by SUUNTO.
USER MANUAL TEAM POD SUUNTO
European Call Center
Phone +358 2 284 11 60
Suunto Website
www.suunto.com
TABLE OF CONTENTS
- INTRODUCTION TO SUUNTO TEAM POD 5
2.SUUNTO TEAM POD IN ACTION 5 - ASSEMBLING SUUNTO TEAM POD 9
- ATTACHING SUUNTO TEAM POD TO A TRIPOD 10
- POSITIONING SUUNTO TEAM POD 12
- PUTTING ON THE HEART RATE TRANSMITTER BELT 13
- OPERATION 14
8.SUUNTO SOFTWARE 15
8.1. REAL-TIME ANALYSIS - SUUNTO MONITOR SOFTWARE 15
8.2.DEeper ANALYSIS - SUUNTO TEAM MANAGER SOFTWARE 16
- INSTALLING SUUNTO SOFTWARE 17
9.1 INSTALLING THE SOFTWARE 17
9.2. INSTALLING THE USB DRIVERS 17
9.3. INSTALLING SUUNTO SPORTS INSTRUMENT ON WINDOWS 2000/XP ... 17
- TECHNICAL SPECIFICATIONS 18
- INTELLECTUAL PROPERTY 18
11.1.COPYRIGHT 18
11.2. TRADEMARK 18
11.3.PATENT 18
12.DISCLAIMERS 19
12.1. USER'S RESPONSIBILITY 19
12.2.CE 19
12.3.FCC COMPLIANCE 19
12.4. LIMITS OF LIABILITY AND ISO 9001 COMPLIANCE 19
12.5.AFTER SALES SERVICE 20
- DISPOSAL OF THE DEVICE 21
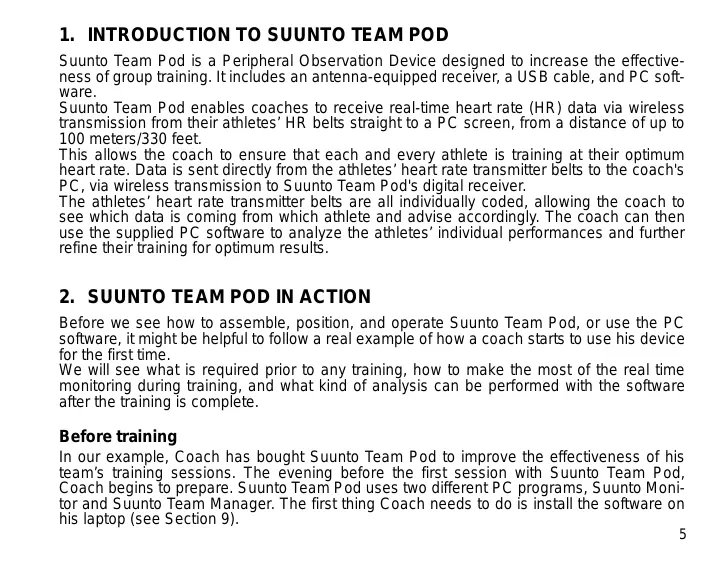
1. INTRODUCTION TO SUUNTO TEAM POD
Suunto Team Pod is a Peripheral Observation Device designed to increase the effectiveness of group training. It includes an antenna-equipped receiver, a USB cable, and PC software.
Suunto Team Pod enables coaches to receive real-time heart rate (HR) data via wireless transmission from their athletes' HR belts straight to a PC screen, from a distance of up to 100 meters/330 feet.
This allows the coach to ensure that each and every athlete is training at their optimum heart rate. Data is sent directly from the athletes' heart rate transmitter belts to the coach's PC, via wireless transmission to Suunto Team Pod's digital receiver.
The athletes' heart rate transmitter belts are all individually coded, allowing the coach to see which data is coming from which athlete and advise accordingly. The coach can then use the supplied PC software to analyze the athletes' individual performances and further refine their training for optimum results.
2. SUUNTO TEAM POD IN ACTION
Before we see how to assemble, position, and operate Suunto Team Pod, or use the PC software, it might be helpful to follow a real example of how a coach starts to use his device for the first time.
We will see what is required prior to any training, how to make the most of the real time monitoring during training, and what kind of analysis can be performed with the software after the training is complete.
Before training
In our example, Coach has bought Suunto Team Pod to improve the effectiveness of his team's training sessions. The evening before the first session with Suunto Team Pod, Coach begins to prepare. Suunto Team Pod uses two different PC programs, Suunto Monitor and Suunto Team Manager. The first thing Coach needs to do is install the software on his laptop (see Section 9).
After installing the software, Coach logs into Suunto Team Manager by creating his own coach profile. From the Team dropdown list in the menu bar, he selects Create Team and adds the name of his team. The newly created team then appears in the My Training window. He right clicks the newly created team and chooses Create Athlete. A new window opens and Coach fills in the team captain's details, such as name, date of birth, height, weight, and an activity level figure (descriptions of which can be found in the window). This information is needed to calculate the athlete's maximum heart rate, performance capacity, and other values required for analysis. When the captain's details are complete, Coach clicks the Create Athlete button and repeats the process for the other members of the team. When the team is complete, Coach highlights each team member's name in turn and clicks the Personal button in the Athletes window to further customize their profile. Coach fine tunes his athletes' data by adding the real max HR that they recorded during a recent performance test.
Having finished creating his team and all the athletes' profiles, Coach closes Suunto Team Manager and turns his attention to Suunto Team Pod itself. He assembles the device (as described in Section 3) and connects it to his laptop. He then needs to test the system, by placing a heart rate transmitter belt on himself and watching the monitor for his own heart rate. Satisfied that everything is working correctly, Coach turns off his laptop and then unplugs Suunto Team Pod.
He then takes out his team's heart rate transmitter belts and sticks a team member's name to each one. On a piece of paper, he writes the last five digits of the first number on the back of the belt next to the name of the athlete who will receive it.
Coach is at the training field bright and early. He positions Suunto Team Pod correctly, so that it covers the whole field (see Section 5) and connects Suunto Team Pod to his laptop. He then opens Suunto Monitor. When the team arrives, he hands out their heart rate transmitter belts and tells them how to put them on properly (see section 6).
The Belts window of Suunto Monitor shows the ID numbers of all the heart rate transmitter belts that Suunto Team Pod is receiving a signal from. Coach takes out his piece of paper and starts to check the box next to each belt in turn. When he checks the box, a popup appears and in the drop down menu all the members of the team that he created in Suunto
Team Manager the evening before appear. He selects the name that goes with each belt and also adds the athlete's maximum heart rate. If the real maximum heart rate is not known, it can be calculated using the formula 220 minus the athlete's age.
When all the belts have been allocated to the team, the list of numbers has been replaced by a list of names in the Athletes window. In the same window, Coach puts a mark into the box next to the name of each athlete he wants to monitor.
One of the team members has brought a friend to try out for the team. Because Coach didn't add his details in Suunto Team manager the evening before, Coach gives him a spare HR belt to put on and adds him straight to Suunto Monitor. Coach selects Athletes and Edit in the main menu, and then clicks Add. Here he adds the name of the newcomer, his maximum heart rate, and the ID number of the belt. The training session can now begin.
NOTE: If you suspect that the HR belts may have been misallocated, the best way to make sure that each belt is correctly named is to collect all the belts back and then give them out again one at a time. As each team member puts on his belt, and Suunto Monitor detects it, name the belt before giving out the next one.
During Training
The heart rate data of all the monitored athletes appears on the screen either as beats per minute or as a percentage of their maximum heart rate. The colors represent the athletes' heart rates in relation to the target heart rate zone - red means the monitored athlete's heart rate is above the target zone, green within the zone, and blue below the zone. Coach sets the target zone to match the purpose of the session. Using the colors, he can easily see which athletes are training too hard - or not hard enough.
At the start of the session, Coach clicks the Record Session button and Suunto Monitor starts recording the data received from each athlete's belt. During the session, Coach clicks the View Session Graph button to see a graphical representation of the athletes' real-time heart rates and offers specific advice to each athlete based on the data. At the end of the training session, Coach clicks the Stop Session button, a pop-up appears and he names the session with, for example, the date and activity. He then clicks Save, closes Suunto Monitor, unplugs Suunto Team Pod, and follows his team off the field for some post-training refreshments.
After Training
Once back at home, Coach logs in to Suunto Team Manager to perform in-depth analysis of his team's performance. From the Actions menu, he chooses Log Analyze and a dropdown list of all the athletes who took part in the morning's session is displayed. He highlights the athletes whose data he wants to analyze. In the tree view of the My Training window, under each athlete's name, is an analyzed log from the recorded session. Each log can be analyzed in detail by clicking it. Information such as duration, training effect, heart rate, ventilation, and a number of other body parameters valuable for assessing training effectiveness is available.
Coach uses the analyzed data to refine the training program of each athlete.
For more information on the functionality of Suunto Team Manager and Suunto Monitor software, Coach refers to the Help files of the software. Using Suunto Team Pod, and the associated programs, encourages Coach to find out more about issues such as training effect and EPOC, so he downloads Suunto Training Guidebook from www.suunto.com.
After a season of training with Suunto Team Pod, Coach's athletes are among the fittest in the league!
3. ASSEMBLING SUUNTO TEAM POD

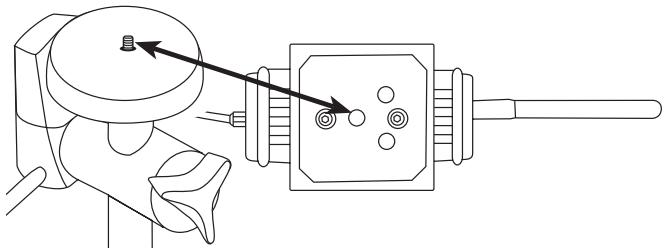
4. ATTACHING SUUNTO TEAM POD TO A TRIPOD
Suunto Team Pod has a quick-release system so that it can be conveniently mounted on a camera tripod.
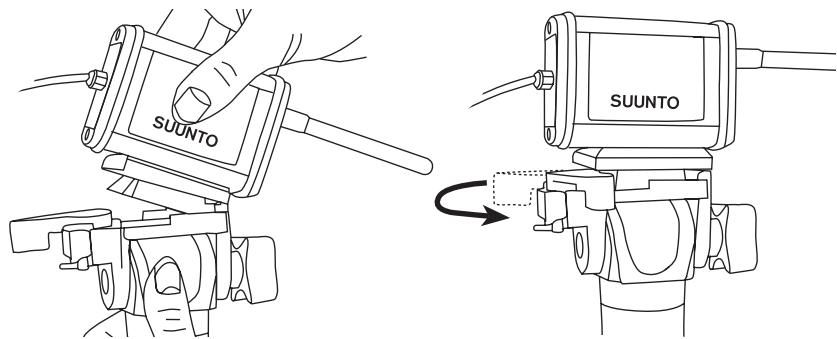
Alternatively, Suunto Team Pod can be locked in place with the 6 mm-diameter thread located on the bottom of the device.
NOTE! In addition to placing the Suunto Team Pod on a tripod, you can place it on a table, bench or other raised surface.
5. POSITIONING SUUNTO TEAM POD
To achieve the best results, it is important to position the Suunto Team Pod correctly. It should be placed on a camera tripod or similar raised surface and positioned so that the antenna is parallel to the area that is to be monitored.
The figure below illustrates factors that may hinder the reception from HR belts and therefore affect the accuracy of the heart rate recording.
Athlete number 1: Facing away from the Suunto Team Pod
Athlete number 2: Standing directly in front of the antenna
Athlete number 3: Standing outside the reception range
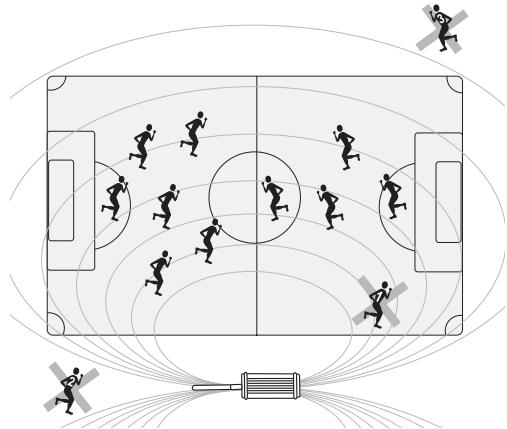
NOTE: Though water resistant, the Suunto Team Pod should be protected from rain when training outside.
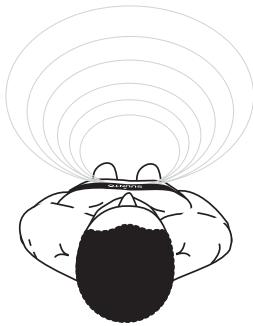
6. PUTTING ON THE HEART RATE TRANSMITTER BELT
The heart rate transmitter belt should be put on as shown in the figure below.
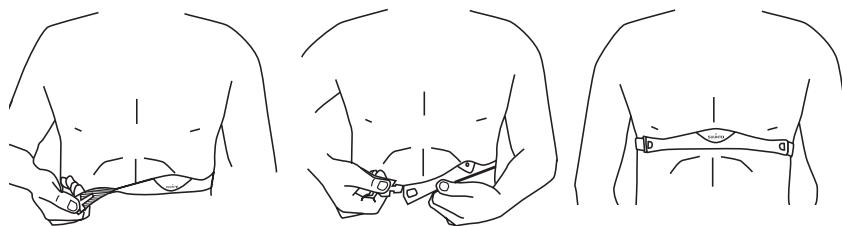
We recommend that you wear the transmitter against your bare skin to ensure flawless operation.
The electrodes must be wet during the exercise. Raise the transmitter a little off your chest and moisten the grooved electrode area on the side in contact with your skin.
Check that the wet electrode areas are firmly against your skin and that the logo is in a central upright position.
WARNING
People who have a pacemaker, defibrillator, or other implanted electronic device use the transmitter belt at their own risk. Before starting the initial use of the transmitter belt, we recommend an exercise test under a doctor's supervision. This will ensure the safety and reliability of the pacemaker and transmitter belt when being used simultaneously.
Exercise may include some risk, especially for those who have been sedentary. We strongly advise you to consult your doctor prior to beginning a regular exercise program.
7. OPERATION
Under normal circumstances, the receiver has a range of 100 meters/330 feet, but factors that interfere with transmission from the HR belts - such as humidity and obstacles like trees, other athletes, and walls - can affect the range.
As a 2.4 GHz signal does not go through water, and therefore neither through the human body, the transmission from the HR belt is hindered if the monitored athlete is facing away from the Suunto Team Pod. In this case, there may be disruptions in the recording of the HR signal. For the same reason, the Suunto Team Pod is not suitable for water-based activities. In indoor sports the reception is more continuous than outside thanks to signals reflected from walls and ceiling.
For information on alternative HR recording products, such as Suunto t6, please contact your local Suunto representative.
8. SUUNTO SOFTWARE
Suunto Team Pod's functionality is maximized when it is used in conjunction with Suunto Monitor and Suunto Team Manager PC software. The figure below illustrates the relationship between Suunto Team Pod and the software.
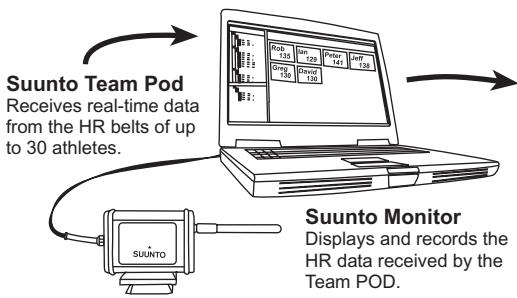
Suunto Team Manager
Stores athlete profiles and analyses logs recorded by Suunto Monitor.
8.1. REAL-TIME ANALYSIS - SUUNTO MONITOR SOFTWARE
Suunto Monitor PC software is an integral part of Suunto Team Pod's functionality. It displays and records the heart rate data of up to 30 athletes, in real time during training. With illustrative color coding, the software gives an overview of each team member's heart rate status within, below, or above the target heart rate zone of the session. Suunto Monitor also links athlete names and heart rate belt ID numbers for automatic detection of active athletes.
Suunto Monitor PC software offers three ways of displaying the heart rate during exercise. It shows the value as beats per minute, as a percentage of maximum heart rate, or as a continuous graph. The logs that Suunto Monitor software records can be analyzed in more detail with Suunto Team Manager software.
The latest update of Suunto Monitor software can be downloaded from www.suunto.com.
8.2. DEeper ANALYSIS - SUUNTO TEAM MANAGER SOFTWARE
Although Suunto Team Manager software doesn't function directly with the Suunto Team Pod, it provides extended post-training analysis possibilities and is therefore an excellent addition to Suunto Monitor software. With Suunto Team Manager software, the coach can create profiles of each member of the team or group, including information such as height, weight, age and maximum heart rate, that the software uses for analyzing the recorded beat-to-beat heart rate data. This analysis provides graphs of training effect, training load EPOC, oxygen consumption (VO_2) , energy consumption, ventilation, respiratory rate, and heart rate.
If an athlete with a profile in Suunto Team Manager is active, Suunto Monitor will identify him and display his name and profile instead of his belt ID number. The data from the recorded session is then automatically stored from the Suunto Monitor software under the athlete's profile in Suunto Team Manager.
The latest update of Suunto Team Manager software can be downloaded from www.suunto.com.
9. INSTALLING SUUNTO SOFTWARE
9.1. INSTALLING THE SOFTWARE
- Insert the Suunto software CD-ROM into the drive.
- Wait for the installation to begin and follow the installation instructions.
NOTE: If the installation does not start automatically, click Start --> Run, and type D:\setup.exe.
9.2. INSTALLING THE USB DRIVERS
These instructions assume that you are installing Suunto Sports Instrument drivers on a clean system, i.e. one that does not already contain any Suunto Sports Instrument drivers. If this is not the case, uninstall the previously installed drivers before proceeding with the installation.
9.3. INSTALLING SUUNTO SPORTS INSTRUMENT ON WINDOWS 2000/XP
- Insert the Suunto software CD-ROM into the drive.
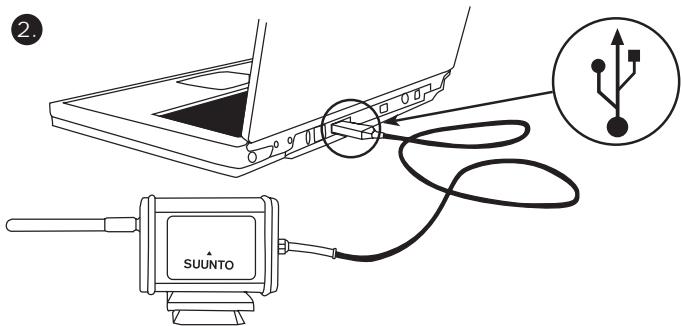
- Attach the Suunto Sports Instrument PC interface cable to your computer's USB port. The Wizard is automatically activated.
- Click Next.
- Search for a suitable driver on your system and click Next. If you are using Windows XP, select Install the software automatically in the Wizard and click Next. If an installation warning is displayed, click Continue Anyway.
- Browse for the driver folder on the CD-ROM and click Next.
- Click Next to install the located driver.
- Click Finish to end the installation.
10. TECHNICAL SPECIFICATIONS
Suunto Team Pod
width 50mm / 2.0^ , length 171mm / 6.7^ height 75mm / 3.0^
weight 180 g/6.35 oz (including the tripod adapter and antenna)
- operation range up to 100m/330 ft
- frequency 2.4 GHz, ANT compatible
- USB-powered, power consumption approximately 50mA . Depending on the laptop's battery capacity, Suunto Team Pod will reduce the battery life by only a few minutes.
11. INTELLECTUAL PROPERTY
11.1. COPYRIGHT
This publication and its contents are proprietary to Suunto Oy and are intended solely for the use of its clients to obtain knowledge and information regarding the operation of Suunto products.
Its contents shall not be used or distributed for any other purpose and/or otherwise communicated, disclosed or reproduced without the prior written consent of Suunto Oy.
While we have taken great care to ensure that information contained in this documentation is both comprehensive and accurate, no warranty of accuracy is expressed or implied. Its content is subject to change at any time without notice. The latest version of this documentation can always be downloaded from www.suunto.com.
© Suunto Oy 03/2006
11.2. TRADEMARK
Suunto and Replacing Luck are registered trademarks of Suunto Oy. Suunto product, feature, and content names are registered or unregistered trademarks of Suunto Oy. Other product and company names are trademarks of their respective owners.
11.3. PATENT
This product is protected by the following patents or patent applications: WO2004016173, WO03099114 and US 11/169712. Other patents have been applied for.
12. DISCLAIMER
12.1. USER'S RESPONSIBILITY
This instrument is intended for recreational use only. Suunto Team Pod must not be used as a substitute for obtaining measurements that require professional precision and must not be used to obtain measurements that require laboratory-quality measurements.
12.2. CE
The CE mark is used to mark conformity with the European Union EMC directives 89/336/EEC and 99/5/EEC.
12.3. FCC COMPLIANCE
This device complies with Part 15 of the FCC limits for class B digital devices. This equipment generates, uses, and can radiate radio frequency energy and, if not installed or used in accordance with the instructions, may cause harmful interference to radio communications. There is no guarantee that interference will not occur in a particular instance. If this equipment does cause harmful interference to other equipment, try to correct the problem by relocating the equipment.
Consult an authorized Suunto representative or other qualified service technician if you cannot correct the problem. Operation is subject to the following conditions:
(1) This device cannot cause harmful interference.
(2) This device must accept any interference received, including interference that may cause undesired operation.
Repairs should be made by authorized Suunto service personnel. Unauthorized repairs will void warranty.
Tested to comply with FCC standards. For home or office use.
FCC WARNING: Changes or modifications not expressly approved by Suunto Oy could void your authority to operate this device under FCC regulations.
12.4. LIMITS OF LIABILITY AND ISO 9001 COMPLIANCE
If this product should fail due to defects in materials or workmanship, Suunto Oy will, at its sole option, repair or replace it with new or rebuilt parts, free of charge, for two (2) years
from the date of its purchase. This warranty is only extended to the original purchaser and only covers failures due to defects in materials and workmanship that occur during normal use while in the period of the warranty.
It does not cover damage or failures resulting from accident, misuse, neglect, mishandling, alteration or modifications of the product, or any failure caused by operation of the product outside the scope of its published specifications, or any causes not covered by this warranty.
There are no express warranties except as listed above.
The client can exercise the right to repair under the warranty by contacting Suunto Oy's Customer Service department to obtain a repair authorization.
Suunto Oy and its subsidiaries shall in no event be liable for any incidental or consequential damages arising from the use of or inability to use the product. Suunto Oy and its subsidiaries do not assume any responsibility for losses or claims by third parties that may arise through the use of this device.
Suunto's Quality Assurance System is certified by Det Norske Veritas to be ISO 9001 compliant in all Suunto Oy's operations (Quality Certificate No. 96-HEL-AQ-220).
12.5. AFTER SALES SERVICE
If a claim under warranty appears to be necessary, return the product, freight prepaid, to your Suunto representative who is responsible for having your product repaired or replaced. Include your name, address, proof of purchase and/or service registration card, as required in your country. The claim will be honored and the product repaired or replaced at no charge and returned in what your Suunto representative determines a reasonable amount of time, provided that all necessary parts are in stock. All repairs that are not covered under the terms of this warranty will be made at the owner's expense. This warranty is non-transferrable from the original owner.
You can locate your local Suunto representative at www.suunto.com.
13. DISPOSAL OF THE DEVICE

Please dispose of the device in an appropriate way, treating it as electronic waste. Do not throw it in the garbage. If you wish, you may return the device to your nearest Suunto representative.
COORDONNEES DU SERVICE CLIENTELE
Suunto Oy
Tél. +358 9 875870
FR
Fax +358 9 87587301
Suunto USA
Tél. 1 (800) 543-9124
Canada
Tel.1 (800)776-7770
12.3. CONFORMITE FCC
12.3. CONFORMITA FCC
European Call Center
Tel +358 2 284 11 60
Suunto Website
www.suunto.com
NL
INHOUDSOPGAVE
- KENNISMAKING MET DE SUUNTO TEAM POD 5
2.SUUNTO TEAM POD IN ACTIE 5 - DE SUUNTO TEAM POD AANSLUITEN 10
- DE SUUNTO TEAM POD OP EEN STATIEF BEVESTIGEN 11
- DE SUUNTO TEAM POD POSITIONEREN 13
- DE HARTSLAGBAND OMDOEN 14
7.WERKING 15
8.SUUNTO-SOFTWARE 16
8.1. SUUNTO MONITOR: DIRECT BEKIJKEN VAN DE GEMETEN HARTSLAGGEJEVENS 16
8.2.SUUNTO TEAM MANAGER:ANALYSE VAN DE VASTGELEGDE GEGEVENS 17
9.SUUNTO-SOFTWARE INSTALLEREN 18
9.1. DE SOFTWARE INSTALLEREN 18
9.2. USB-STUURPROGRAMMA'S INSTALLEREN 18
9.3. ONDER WINDOWS 2000/XP INSTALLLEERT U UW SUUNTO SPORTSINSTRUMENT ALS VOLGT: 18
INNEHALLSFÖRTECKNING
- INTRODUKTION TILL SUUNTO TEAM POD 5
2.ANVANDA SUUNTO TEAM POD 5 - MONTERA SUUNTO TEAM POD 9
- SÄTTA FAST SUUNTO TEAM POD PÅ ETT STATIV 10
5.STALLA IN SUUNTO TEAM POD 12 - TA PÁ SIG PULSGIVARBÄLTET 13
7.ANVANDNING 14
8.SUUNTO-PROGRAMVARA 15
8.1. ANALYS I REALTID - PROGRAMVARAN SUUNTO MONITOR 15
8.2. DJUPARE ANALYS - PROGRAMVARAN SUUNTO TEAM MANAGER .. 16
- INSTALLERA SUUNTO-PROGRAMVARAN 17
9.1. INSTALLERA PROGRAMVARAN 17
9.2. INSTALLERA USB-DRIVRUTINERNA 17
9.3. INSTALLERA SUUNTO SPORTS INSTRUMENT PÅ SYSTEM MED
WINDOWS 2000/XP 17
- TEKNISKA SPECIFICATIONER 18
- IMMATERIALRÄTTIGHETER 18
11.1.UPPHOVSRATT 18
11.2. VARUMARKE 18
11.3.PATENT 19
- FRISKRIVNINGSKLAUSULER 19
12.1.ANVANDARENS ANSVAR 19
12.2. CE 19
12.3.ÖVERENSSTÄMMELSE MED FCC-STANDARDER 19
12.4. ANSVARSBEGRÄNSNING OCH ÖVERENSSTÄMMELSE MED ISO 9001 20
12.5. SERVICE EFTER FÖRSALJING 21
- KASSERING AV ENHETEN 21
1. INTRODUKTION TILL SUUNTO TEAM POD
9.1. INSTALLERA PROGRAMVARAN
This publication and its contents are proprietary to Suunto Oy.
Suunto, Wristop Computer, Suunto Team Pod, Replacing Luck and their logos are registered or unregistered trademarks of Suunto Oy. All rights reserved.
While we have taken great care to ensure that information contained in this documentation is both comprehensive and accurate, no warranty of accuracy is expressed or implied. Its content is subject to change at any time without notice.
www.suunto.com
© Suunto Oy 3/2006
- TABLE OF CONTENTS
- INTRODUCTION TO SUUNTO TEAM POD
- SUUNTO TEAM POD IN ACTION
- Before training
- During Training
- After Training
- ASSEMBLING SUUNTO TEAM POD
- ATTACHING SUUNTO TEAM POD TO A TRIPOD
- POSITIONING SUUNTO TEAM POD
- PUTTING ON THE HEART RATE TRANSMITTER BELT
- WARNING
- OPERATION
- SUUNTO SOFTWARE
- Suunto Team Manager
- REAL-TIME ANALYSIS - SUUNTO MONITOR SOFTWARE
- DEeper ANALYSIS - SUUNTO TEAM MANAGER SOFTWARE
- INSTALLING SUUNTO SOFTWARE
- INSTALLING THE SOFTWARE
- INSTALLING THE USB DRIVERS
- INSTALLING SUUNTO SPORTS INSTRUMENT ON WINDOWS 2000/XP
- TECHNICAL SPECIFICATIONS
- Suunto Team Pod
- INTELLECTUAL PROPERTY
- COPYRIGHT
- TRADEMARK
- PATENT
- DISCLAIMER
- USER'S RESPONSIBILITY
- CE
- FCC COMPLIANCE
- LIMITS OF LIABILITY AND ISO 9001 COMPLIANCE
- AFTER SALES SERVICE
- DISPOSAL OF THE DEVICE
- COORDONNEES DU SERVICE CLIENTELE
- CONFORMITE FCC
- CONFORMITA FCC
- INHOUDSOPGAVE
- INNEHALLSFÖRTECKNING
- INTRODUKTION TILL SUUNTO TEAM POD
- INSTALLERA PROGRAMVARAN
Brand : SUUNTO
Model : TEAM POD
Category : Sports accessory