
PHOTO VIEWER 7 - Software PARROT - Free user manual and instructions
Find the device manual for free PHOTO VIEWER 7 PARROT in PDF.

User questions about PHOTO VIEWER 7 PARROT
0 question about this device. Answer the ones you know or ask your own.
Ask a new question about this device
Download the instructions for your Software in PDF format for free! Find your manual PHOTO VIEWER 7 - PARROT and take your electronic device back in hand. On this page are published all the documents necessary for the use of your device. PHOTO VIEWER 7 by PARROT.
USER MANUAL PHOTO VIEWER 7 PARROT
Parrot PHOTO VIEWER 7''

English - User Guide
CONTENTS
IMPORTANT SAFETY INSTRUCTIONS P7
INTRODUCTION. P 8
KIT CONTENTS. P 9
CHOOSING AND CREATING A SLIDESHOW 17
FRAME ORIENTATION p 18
MANAGING THE FRAME'S SCREEN p 18
UPDATING THE SOFTWARE 19
HOTLINE 19
SPECIFICATIONS p 20
NOTES p 20
GENERAL INFORMATION p 18
IMPORTANT SAFETY INSTRUCTIONS

- This apparatus shall not be exposed to dripping or splashing and no object filled with liquid, such as vases, shall be placed on the apparatus.
- The AC/DC adaptor which provides disconnection from mains supply shall remain readily operable. Unplug this apparatus when unused for long periods of time.
- Read these instructions
- Keep these instructions
- Heed all warnings
- Follow all instructions
- Do not use this apparatus near water
- Clean only with dry cloth
- Do not block any ventilation openings. Install in accordance with the manufacturer's instructions.
- Do not install near any heat as radiators. Heat registers, stoves or other apparatus (including amplifiers ) that produce heat.
- Do not defeat the safety purpose of the polarized or grounding type plug. A polarized plug has two blades with one wider than the other. A grounding type plug has two blades and a third grounding prong. The wide blade or the third prong are provided for your safety. If the provided plug does not fit into your outlet, consult an electrician for replacement of the obsolete outlet.
- Only use attachments/accessories specified by the manufacturer
- Unplug this apparatus during lightning storms or when unused for long periods of time.
- Refer all servicing to qualified service personnel. Servicing is required when the apparatus has been damaged in any way, such as power supply cord or AC/DC adaptor is damaged, liquid has been spilled or objects have fallen into the apparatus, the apparatus has been spilled or objects have fallen into the apparatus, the apparatus has been exposed to rain or moisture, does not operate normally, or has been dropped.
- WARNING: To reduce the risk of fire or electric shock, do not expose this apparatus to rain or moisture. This apparatus is designed for indoor use only.
INTRODUCTION
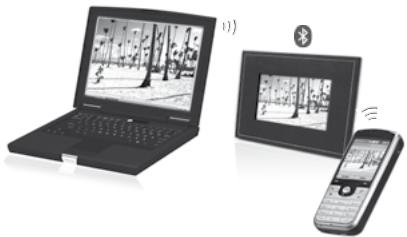
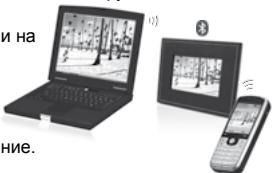
The Bluetooth® technology enables voice and data to be sent via a short-distance radio link. It allows several electronic devices to communicate with each other.
Parrot draws on its long years of experience in the Bluetooth technology to offer you the Parrot PHOTO VIEWER 7'' , an innovative photo frame. You can send your photos to the Parrot PHOTO VIEWER 7'' from your mobile phone, PDA or computer by Bluetooth.
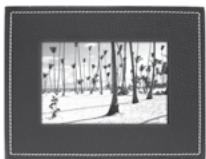
The Parrot PHOTO VIEW 7" is an LCD photo frame (720 x 480 pixels) that can store over 500 photos. You can configure the display by programming slideshows or by rotating the frame. The Parrot PHOTO VIEW 7" sports a stylish design, blending in seamlessly inside the home, and also adapts its brightness setting to suit the room. The Parrot PHOTO VIEW 7" can tell you the time just like a clock.
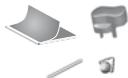
KIT CONTENTS
The kit contains:
An LCD frame
A transformer
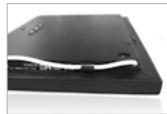
- A metal rod to be screwed into the frame (the rod helps to support the frame)
A wall bracket
- A clip system (for fixing the power lead along the side of the frame)
A user guide
A Parrot product guide

QUICK START GUIDE

- Screw the metal rod into the back of the frame.
- Plug the power lead connector into the transformer.
- The Parrot PHOTO VIEWER 7" automatically switches on.
- Choose the language to be used by the Parrot PHOTO VIEW 7" (refer to the section entitled «Description of the Icons and Features» in the «Settings» chapter)
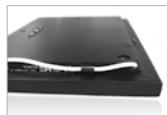
NOTE: THE FRAME CAN ALSO BE HUNG ON THE WALL. IN THIS CASE, SCREW THE HOOK INTO THE BACK, INSERT THE CLIPS INTO THE SLOTS PROVIDED AND RUN THE POWER LEAD THROUGH THE CLIPS. IF YOU ROTATE THE FRAME, THE PHOTO DISPLAYED TURNS TO MATCH THE NEW POSITION OF THE PARROT PHOTO VIEWER!
MENUSTRUCTURE
Scrolling Through the Menus
Moving Through the Menus
- You can scroll through the menus using the buttons on the back of the Parrot PHOTO VIEWER 7".
To access the main menu, press the button on the back of the frame.
Select buttons:
: Move left or up, depending on the frame's orientation. It can also be used to select the previous photo.
: Move right or down, depending on the frame's orientation. It can also be used to select the next photo.
Enter button:
- The button : 📦 📦 📦 📦 📦 📦 📦 📦 📦 📦 📦 📦 📦 📦 📦 📦 📦 📦 📦 📦 📦 📦 📦 📦 📦 📦 📦 📦 📦 📦 📦 📦 📦 📦 → Enters the selected menu or selects a photo.
The icon takes you back to the previous menu or exits the menus.
Main Menu
Description of the Icons and Features

: Returns to the previous menu.

Turns the photo to the right.

: Displays the photos as thumbnails.

: Organises the order in which the photos are displayed.

: -Delete Current Picture: deletes the picture currently displayed.
-
Delete Several Pictures: delete the selected pictures.
-
Delete All Pictures: deletes all the pictures.

: For choosing and creating slideshows.

: For adjusting the display and Bluetooth settings.
: Provides information on the software built into the Parrot PHOTO VIEWER 7", the memory status and the picture displayed.
Settings
The «Settings» menu can be accessed from the main menu.
Description of the Icons and Features

: Returns to the main menu.

: - Visibility: makes the Parrot PHOTO VIEWER 7" visible or invisible to other Bluetooth devices.
-
Frame name: for selecting the pre-recorded Bluetooth name by which the frame will be detected by other Bluetooth devices.
-
Advanced mode: for selecting a specific or standard pairing mode depending on the model of your Bluetooth phone (for further information, visit the Support heading on our website at www.parrot.com).

: Adjusts the brightness of the display. You can adjust the screen brightness using the «Select» buttons on the back of the Parrot PHOTO VIEWER 7"; press the «Enter» button to confirm.

-
Automatic: the screen's backlight level is controlled by an algorithm that uses a light sensor built into the frame. This is the default setting.
-
Manual: the backlight is always on. Use the ON\OFF button on the power lead to enable thescreensaver.
-
Predefined Time: a predefined time range determines when the screen is backlit.
You will be prompted to set the time on the Parrot PHOTO VIEWER 7".
NOTE: YOU CAN ACTIVATE THE SCREENSAVER BY QUICKLY PRESSING THE ON/OFF BUTTON ON THE POWER LEAD. IF THE STANDBY MODE IS SET TO 'AUTOMATIC' OR 'PREDEFINED TIME' MODE, THEN THE PARROT PHOTO VIEWER 7' IS SET TO 'MANUAL' MODE UNTIL THE NEXT ILLU-MINANCE LEVEL OR PREDEFINED HOUR IS REACHED.

: Select the required language.

: - Adjustment: adjust the time using the «Select» buttons. Press the «Enter» button to confirm.
-
Visibility: Enable / Disable the permanent time display. This is the default setting.
-
Format: Select the format of the displayed time.(AM/PM)

: Restores the factory settings (doing so does not delete your photos).
USING FOR THE FIRST TIME
Prior to using your Parrot PHOTO VIEWER 7" with your phone / computer for the very first time, you must initially pair the two devices. This procedure allows both devices to exchange information in order to configure a Bluetooth connection.
Pairing Your Phone or Computer with the Parrot PHOTO VIEWER 7"
- Ensure that the Parrot PHOTO VIEWER 7" is adjusted so that it is visible to all Bluetooth devices. Refer to the «Settings» chapter in this guide.
- Activate the Bluetooth feature on your phone/computer (refer to your phone's or computer's user guide or visit the Support heading on our website at www.parrot.com).
- Search for Bluetooth devices on your phone/computer.
- Select the Parrot PHOTO VIEWER 7" in the list of Bluetooth devices proposed by your phone / computer.
- On your phone / computer, enter the code «0000».
- Your two devices are now paired.
Note: with some phones, you must enable the «Specific reception mode» option in the «Advanced mode...» menu prior to pairing your phone with the Parrot PHOTO VIEWER 7" (available in the «Settings \ Bluetooth» menu). For further information, visit our website at www.parrot.com
NOTE: DEPENDENT ON THE MODEL OF YOUR PHONE / COMPUTER, THIS PHASE MIGHT BE OPTIONAL. HOWEVER, IT WILL ENABLE YOU TO SEND YOUR PHOTOS TO THE PARROT PHOTO VIEWER 7" MORE QUICKLY.
Sending Photos
Sending from a Phone or PDA:
- Ensure that the Parrot PHOTO VIEWER 7" is adjusted so that it is visible to all Bluetooth devices. Refer to the «Settings» chapter in this guide.
- Activate the Bluetooth feature on your phone or PDA.
- On your phone/PDA, go to the «Pictures» menu. Select a picture and choose «Send by Bluetooth». Your device starts searching for Bluetooth peripherals.
- Once the search has finished, select your Parrot PHOTO VIEWER 7". If your device prompts you to enter a code, type «0000». The picture is then sent to the Parrot PHOTO VIEWER 7". Several pictures can be sent at the same time, though this feature will depend on your device.
- During transmission, the Bluetooth icon appears on the screen and the picture is displayed.
Sending from a Computer:
- Ensure that the Parrot PHOTO VIEWER 7" is adjusted so that it is visible to all Bluetooth devices. Refer to the «Settings» chapter in this guide.
- Activate the Bluetooth feature on your computer.
- Right-click on the picture that you wish to send and choose «Send by Bluetooth».
- Your PC will search for any nearby Bluetooth peripherals.
- Select your Parrot PHOTO VIEWER 7". Type «0000» if your PC prompts you to enter a code.
- During transmission, the Bluetooth icon appears on the screen and the picture is displayed.
Note: if you are unable to detect the Parrot PHOTO VIEWER 7", you might have inadvertently made the Bluetooth frame invisible to other devices. Refer to the «Settings» chapter in this guide. However, if your Bluetooth device is already paired to the frame, it can always connect to the Parrot PHOTO VIEWER 7".
NOTE: FOR FURTHER INFORMATION ON THE MODE FOR SENDING PHOTOS, REFER TO YOUR PHONE'S USER GUIDE OR VISIT OUR WEBSITE AT
www.parrot.com
SETTINGS
The Parrot PHOTO VIEW 7" allows you to adjust several settings. You can fully manage the frame's display, such as determining the order in which pictures appear, creating slideshows and displaying the time. You can also change the orientation of the Parrot PHOTO VIEW 7".
Picture Display Order
- Access the main menu of the Parrot PHOTO VIEWER 7" and then select the «Arrange the pictures» menu.
- Your pictures are displayed as thumbnails. The display may run over several pages: holding down one of the «Select» buttons will allow you to scroll through the previous and next pages. Simply release the button to stop scrolling.
- Select the picture with the «Select» buttons and then press the «Enter» button on the back of the frame to confirm your choice.
- The selected photo is placed at the top of the screen on the Parrot PHOTO VIEWER 7" and a cursor indicates the photo's position in the album. Press the «Select» buttons to change the photo's position. You can change its position in all the pages of your album.

- Once the cursor is in the position where you want to place the image, press the «Enter» button.
Choosing and Creating a Slideshow
The «Slideshow» submenu provides you with the following options:
- None: No滑片是滑动的.
The Parrot PHOTO VIEWER 7" proposes four slideshows, one of which featuring all the photos stored on your frame in their order of appearance. Once the slideshow has been selected, you can enable / disable or configure it.
The following options are available for creating a slideshow:
- Picture choice: use the «Select» and «Enter» buttons to select the photos for your slideshow.
The selected photos are marked with a tick (not available for the default slideshow). - Timer: defines the slideshow display time.
- Picture order: used to define the order in which the photos are displayed in the slideshow (not available for the default slideshow).
- Random: arranges the photos in the slideshow at random.
-
Delete slideshow: resets the slideshow (the selected images will no longer be part of the slideshow, but they will not be deleted from the frame's memory).
Transition: defines the transition effect between the photos in your slideshow: -
None
-Fade - Tile
- Wipe
- Checkerboard
- Random
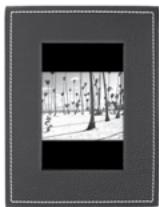
Frame Orientation
- Portrait mode.
- Landscape mode.
NOTE: THE FRAME CAN ALSO BE HUNG ON THE WALL. IN THIS CASE, SCREW THE HOOK INTO THE BACK, INSERT THE CLIPS INTO THE SLOTS PROVID AND RUN THE LEAD THROUGH THE CLIPS. IF YOU ROTATE THE FRAME, THE PHOTO DISPLAYED TURNS TO MATCH THE NEW POSITION OF THE PARROT PHOTO VIEWER 7".
Managing the Frame's Screen
The Parrot PHOTO VIEWER 7" lets you put your device on standby as well as activate the screenshot.
- On / Standby mode: long press of the ON/OFF button on the power lead. In standby mode, the Bluetooth function of the Parrot PHOTO VIEWER 7" is disabled.
- Screenshotaver mode: the Parrot PHOTO VIEWER 7" displays the time during the periods when the backlight is off.
This feature is enabled by quickly pressing the ON/OFF button (refer to the section entitled «Description of the Icons and Features» in the «Settings» chapter in this guide).
UPDATING THE SOFTWARE
The Parrot PHOTO VIEWER 7" can be updated by Bluetooth. Download the utilities and the update procedure from our website at www.parrot.com. Doing so will increase the compatibility of the Parrot PHOTO VIEWER 7" with other Bluetooth devices.
HOTLINE
- Our hotline is at your disposal. You can contact us by email or telephone.
Europe: [+33] (0) 148036069
Italy: [+39] 02 86 39 14 63
Spain: [+34] 902 404 202
UK: [+44] (0)870 112 5872
Germany: 0900 172 77 68
USA: [+1] (877) 9 PARROT (toll-free)
China: [+ 86] (0)2164 601 944
Check out our website at www.parrot.com for further information.
SPECIFICATIONS
NOTES
Screen:
- LCD screen size: 6.5"
- Screen resolution: 720 × 480 pixels (QVGA)
262 144 colours - Internal memory of 64 MB for storing over 500 photos
Light sensor for the automatic backlight mode
Weight (frame only): 415 g - Dimensions: 192 × 146 mm
- Power supply: 100V - 240V , 0.2A and 50 / 60Hz
Bluetooth:
- Bluetooth 2.0 + EDR qualified
- Bluetooth PIN code: 0000
-
Profiles supported:
-
FTP (File Transfer Profile)
-
OPP (Object Push Profile)
-BIP (Basic Imaging Profile) -
Software updates by Bluetooth
- Photo / Picture files supported: JPEG
- Up to 10 devices paired
Parrot PHOTO VIEWER 7''

Parrot PHOTO VIEWER 7''

Parrot PHOTO VIEWER 7''

z Parrot photo viewer 7" p 62
Parrot PHOTO VIEWER 7''

Pycckn - HNctpykunno no ekcnnyatau
Copepkanhe
HNCYKUNI NOJIb3OBATEJNIO BE3ONACHOCTN 71
BBEHEHNE 72
CODEPJKMoe YNAKOBKN 73
OBHOBJIeHne IPOrPAMMbI p 83
TOPRAJIINHNA 83
TEXHNUECKNE XAPAKTEPNUCTIKN p 84
ПОНМЕЧАНО … p 84
OBsue CBeDHeHn .p 181
INCHTPyKlI NIOJIb3OBATEJI NO BE3OJNACHOCTN

- He donyuckaTe nonadaHnB Obbl Ha daHHoe yCTpoiCTBO n He CTaBbTe Ha Hero PpeMtebl, 3aONHeHHbIe KNDKcOtBu, TAKMe KaK Ba3bl.
- AC/DC ADanTep nepemehHoro/IOCToHoro TOka, o6eCnueHbAOuIIN OTKlnOHe OE cTeN nHTaHnO, octaTc pod AnnaprOte EbyKnUoyAte erO u3 cTeN, eCnY yCtpoCTBO He 6yDet NcOnlb30BaTcB B TeHeHne dInTEnbHO BPemEHn.
BVEDEHNE
TexhnoTn Bluteoth® n03B0nT npOn3B0nTb nepeaHy peuN daHbX c nmoCbNo paHIOCBa3n Ha He6oBbIe pacCTOAnr. OHa n03B0nTp a3nUHOMy 3neKtPOHOMy obopyoBaHNIO B3aHMOdEiCTBOBaTb Mekdy co6oN.
KOMnAnHn Parrot, 6bnOdpar cBcmy dInTbeHbOMy onbTY bOcbnTexHoONrGn Bluteoth, padnpeNOnkntb Bam n3dene Parrot PHOTO VIEW 7": nHOBaunOHnbIe kpan dI I FOtorpaPn. Uep3 Bluetooth bbl MoKeTe nepeDaBaTb na yctpoIcTbO Parrot PHOTO VIEW 7" Bauin FOtorpaPn C moUlnHoro TenePhoA, KTK iIN KomnBtoEpa.
Parrot PHOTO VIEW 7" -3to JXK-pamka (720x480 pKcenei), KOtopa MOKet XpaHntb do 500 foTOrpaΦn. Bby MoKte Te cKoHfNpyRIOBaTb Ha ne 3anpOgPARMMPOBaHnBn NOKa cIaIDb IN MHeMTeOp bPHTaUcMo KApA. UCTpoCTBO Parrot PHOTO VIEW 7" d3aHn KOToporo npeKpacho BnCbIbaeTc B Baal HNTBep, ATOmatWneckn aAdantnpyETc K OceBeeHHocn TBAuero nomueHenia. Parrot PHOTO VIEW 7" TaKke MOKet NOKa3bIbaTb Tekyuee BpEmr NcNOn3BoTaBsc
B KaueCTBe HAcToJIbHbIX YaCoB.

CODEPJKMIOE YNAKOBKN
Bynakovke haxoJrTc:
- Pamka c KK-KpaHOM.
TpaHcΦopMaTop. - MetaIIInuecka Wtahra, npikpyuHaemaj K pamke (YbIeTcO npOpou pamkn).
KpOyOKdIg KpeJIeHnHaCTHe. - 3aüeIKN (no3B0JIaIOT 3aKpeINb 7Hyp nITaHnB BDOJIb paMkn).
PykoBoDCTBO NO 3KcPnyatauIN.
CnpabOuHnK no npOduKyun Parrot.


БыICTPOE BKJIIOUYEHNE YCTPONCTBA


- 3aBepHnte MeTaNIIueckyUo UTaHry B 3aIHNIO YacTh paMkn.
-Подклочиразьем Кабеля петаня Ктрасформатopy. - Parrot PHOTO VIEWER 7" BKNIOUHTCRA ABTOMATUHECKN.
Bb6epnte y3blk, KOTOpb bbl 6ydeTe nCnOlb30BaTb B Parrot PHOTO VIEW 7" (o6patnttec bpKa4dny «OnncanHe 3HaKOB u nCnOlb30BaHneФyHKnI) TnaBb «PapametbI» daHnHO rykoBODCTBA).
PIMMEUHHE: Bbl TAKKE MOKETE POBECITb PAMKY H A CTEHV. B 3TOM CIVYAE 3ABEPHINE KIPOJOK IJI R KPEIPIEHNA HCTEH B 3AHDIOU CTENKU PAMKIN, BCTABLe CNTEMY 3AUJIENO K I PENEUCMOTPEHHOE IJI 3TOI O MECTO IN 3AKPENITE UHPI NITAHAN, ECII BNI MEHRETE OPNEHTALIO PAMKIN, NOKA3bIBAEMAR FOOTOPAΦN IOBOPAHBAETC JDI COOTBTCTBIA HOBOI OPNEHTALI PARROT PHOTO VIEWER 7".
CXEMA MEHIO
HabiratuaBMeHIO
IpeMeueHneB MeHIO
:Bo3BpaT B npedeIyUye MeHIO.

:PobopotΦoTOrpaФmBnPaBO.

:OTo6paXeHHe MInHaTHOpHbIX N3o6paXeHn.

:Co3dAnHe np8aKa noka3a 3o6paXeHn.

-
YdaTb TeKuSyIO KapTNHy: YdaIaET Noka3bIbAemoe N3O6paKeHne.
-
YdaNTb HeCKoBko KapTHOK: ydaNTb Bbl6paHHyO KapTHKy.
- YdaJIbTB BCE KapTNHKn: YdaJIeHne BCex N3O6paKeHH.

:BbIbOp n coCTaBneHne cnaI-d-woy.

: PerynipoBkA npaMeTPOB OTo6paXeHnI yCTpoCTBa Bluetooth.

::Ioka3 INHΦopmaunO nporpaMMHom oBcepehen Parrot PHOTO VIEW 7", COCTOHNHe nAMrTn I NOKa3bIbAeMoe u3o6paXeHne.
IAPAMETPbI
OoctynK MeHIO «NapametpbI» OcyuceCTbIaTeCn3 rnaBHoro MeHIO.
Oncahne 3NaKOB uФyHKm

:Bo3BpaT K rIaBHOMy MeHIO.

- BvDnMoCTb: DeIaET BvDnMbIM IIN HeBvDnMbIM Parrot PHOTO VIEWER 7"ДЯpyrnx yctpoiCTB Bluetooth.
-Hasbaine kaipa: Bb6op 3apahee 3apeHcTnpOBaHHo rMeHNu Bluetooth, noK KOtOpbl MMKK-pamka 6ydt ObhApxmbatcbn npymmu yCTpoiCTBAMn Bluetooth.
:BocstahOBHeHne 3aBODCKoKoHpyaun. (To He npBODNT K ydaJeHIO n3obpaKeHH).
INEPBOE INCNOJIb3OBAHNE
Ipeed nepebim nocnlo3b0aBaanem yctpoiCTBa Parrot PHOTO VIEWER 7" c bauim TMepehOM / kombloTePOM Bbl doJxHbI b nepyo uOepeB bblonHnTb Cz3bBAHne dByx yctpoiCTB. 3Ta fa3a no3Bolaret yctpoiCTBa m o6MeHrTcBnHfOpmauei dny konfnpuraqnC b8y1 Bluetooth.
Повлочене вашег телфona илkomьтета к устору Parrot PHOTO VIEWER 7"
- Y6eIntecb, yTO yCTpoIcTBO Parrot PHOTO VIEWER 7" hAcTpoEHO TaK, yTObI eR OMOxHO bIIO ObHApXmTB BCEMI yCTpoIcTbAMn Bluetooth. ObpatIteB K pa3dEny «Ipaametpbl» daHOrO pyKOBoIDtBA.
- Bкнчnte Функию Bluetooth BAшero TEneфona/KOMьтета. (obpaTnTeCb K INHCTpykци BAшero TEneфona Ии зади Te web-caT www.parrot.comВ раздел Полдержka).
C Baawero TeeneoHa/KomnbIbTepa BbINONHIne TnONCK yCTPOINCTB Bluetooth.
-Из сиза устюгBluetooth,празларьх вальtenефон/komньотерам,Быбете«Рагot PHOTOVIEWER7"».
·HaBaWemTepeHcKOMbHOTepe BBeDHTeKoD 0000
-ПосnéЗТОВВашиДВа усточТВа 6удтСВЯЗаны.
PIMMEUHANIE:HEKOTOPBIXTEJIΦHOHAXELOXODIMOAKT/BNPOBATbIAPAMETP《CIEJI,PEKIMIPINHEMA》BE MEOHIOJIOHTENBLH BPEKMM...PEEPEDBIIONIHEMC B3bBAHNI C PARROT PHOTO VIEWER 7"(D0CTYTHOB MEHO《TIAPAMETpbluBTOOTH》.BOJIE NOPDPOHSIO HIOHOPMALIO CMOTPIVE HAHAEM CAMTE:WWW.PARROT.COM
PIMMEAHJHE: B 3ABAHMOCTO MT OLEJIAN BAIEUO TELEHOVA/KOMBIHTEPOEA 3TA ΜΑ3A 0MOKET bIbTb HEOB3ATEHBIOH. ODAHKO OHA NO3BOITN BAM BOJEE BICTPO IEPENATB BAIUN FOOTOPFADIN B PARROT PHOTO VIEW 7".
IPEPDAU AΦOTOPAΦN
IpeepaФOTorpaФm c TepeOHa nIe KIIK:
- Y6eIntecb, yTO yCTpoNCTBO Parrot PHOTO VIEWER 7" nactpoEHO TAK, yTObI eR OMO KOHNO bIIO ObHApYKNTb BCEMN yCTpoNCTBaMn Bluteoth. ObpaTInTeCb K pa3dEny «IpaMaTePbI» daHOrO pyKOBoDCTBa.
BknHnTe cyHKnIO Bluetooth Ha BaWem TeneOHe/KnK.
Ha Bawem Tepefoe/KPk 3aJnTe B MeHIO «I3o6paKeHnA. BbIbePeNte I3o6paKeHne N BbIbePeNTe «OTnpaBnTb Upe3 Bluetooth>. Bawa yctpoiCTBO NaHT EONCK nepupeepnHbIX yctpoiCTB Bluetooth.
-Посе заBERшени посяк BAберпг «Parrot PHOTO VIEWER 7"».Еслу усторов Загорит Кд, ВБел� «0000».3aTeM Изборенье Будет Oтправлно на Зкан.ВЗвсимости OТьМохностей YСТРОИCTBA,MOКHо OTправNTbHECKOLKИ Изборжени OДнOBpeMuEHNO. - Bo Bpemr nepeaunn 3o6paqhenn OHO 6ydt nocTeHNO nOraBnTbCn Ha 3kpaH. Ha 3kpaH noRbntc 3NaOHk Bluetooth.
Ipepa c KOMbIOTepa:
- YbEintecb, yTo yctpoictBO Parrot PHOTO VIEW 7" hactpoeHToT, yTo6bl ETo MoXHo 6blJIO oBapyKntb BcEMn
yctpoiCTbAmn Bluetooth.ObpaTntecb K pa3dJeY «IpamEtpbl» daHOro pykoBODCTBa.
Bukhoynte Phykhniu BluTooth HA bauHem KOMbIbTepe. IeKNIHMe npABo HONIKO BMuHa Ha 3o630BeKHN, KOTOpoe BbXOTHe nepaTeBa, NbE6pBeTe (PpeMaTb Chepe BLluTooth). - Bāw kōmnbótep hauhēn nonck yctpoič TB C Bluetooth.
- Bb6epnte Parrot PHOTO VIEWER 7".
Ecln Kombltep 3anpaunBaet Kod, BBeDnTe «0000». - Bo Bpemr nepepaunn 3o6paqkeHnna 3kpane nnoBnreTcra 3aouK Bluetooth n 3o6paqkeHne.
PIMMEYAHIE: ECNI BAM HE YAETC8B OSHAUYKITB PARROT PHOTO VIEWER 7", BBI, BO3MOKHO, CDEPAH 3KPAH BLUETOOTH HEBNIMBMJ DIIA DPYTHX YCTPOINCTB. OBPATENCEb K PA3DEIY "IAPAMETbI" DAHOTO PYKOBOCTBA. TEM HE MEHEE, ECNI BAILE YCTPOINCTBO BLUETOOTH YKE COEQDHEHO C 3KPAHOM, OHO BCERTDA MOKET IIOKDIOHQUHTCB K PARROT PHOTO VIEWER 7".
IPMNMEAHINEI JIINI JOONIHHTEJIH HIOHNOTOCIMALNI OHOTOCIMELHO PEKMAI OITPNABKMI OTPTAPNTECB K PYKOBQCTBYBAUEIOYCTPOCTBAI IVAI 3AUIVTE HA HIU WEB-CAYI IO ADEPCV WWW.PARROT.COM
YCTAHOBKA IAPAMETPOB
VctpoBCTBO Parrot PHOTO VIEW 7" no30Bnert BAM yCTAHOBt MHOXeCTBO napametpOB. Bbl MOKete noHIOCTbO uynpaBnIbT bokAmoNIO6paehen H aBaWem 3kpaHe - nopRdOK noPBAJIeHnI NIO6paehen, coZdaHne cnaI-d-woy, noka3 yaocB. Bbl TAKe MoKete IImeHnIbOPrHNTPOAT VIEW 7".
PopdoK noka3n3o6paXeHn
3aIbIte B IaBHOe MeHIO Parrot PHOTO VIEWER 7", 3aTeM BbIbepIte MeHIO «CopTIpOBKa».
- Baunn 1306paXeHnna 8dyT nokA3bIbTaBcB yMHeNbWeHOM BnE. POKa3 1306paXeHn mOKeT 3aHmAtb HEckONbKO cTpaHlN: NOCToHnHOe HAnKahtne Ha KOnKn bVbOpa No3BnIT Bam COOTBeTcHEBNOpeMeCTnBcHa NPeDbIyUne IIN NoCnElyDyUe n TcPaHnCb.Длг octaHOBkn npOkpyTKn Bam DOCTaTOHNo OTNyCTnB KOnKn.
- Bb6epnte 3no6paqxeHne KhoNkamn Bb6opa n 3aTe m Haxmnte Ha KOnky noTBepxdHna 3aDHei cToPOHe pAMKn dIy noTBePxdHnBaUero Bb6opa.
Bb6paHHe 306paJcHHe 6ydt NOMeUaTbC B BepxHIOO cAcbTB 3KpaHa Parrot PHOTO VIEWER 7" n Kypoc 6ydt nOKa3bBaTb nIOnoXeHn BAWero 3IO6paKeHn B aIb6Ome. PnHn HaxaTNn Ha KONKn bYbopa nOIOXeHn 3IO6paKeHn 6ydt MeHrbc. Bbl MoXeTe N3MeHnTb 3TO nIOIOXeHn 3IO6paKeHn n nepemeCTNb erno No BCem cTpaHnAm BaWero anb6Oma.
- После тoro кak kypcop betyet paclonaratbca tam, kya BaI xOITe nepemecHTb n3obpaKeHne, HaxMITE ha KONkY NOdTBepKdEHHa.
BbI6Op n co3dAnHe cnaI-woy
IopmEnIO «ДиanaHopaMa»пpeOCTabJЯET BAM cNeDyUOJIne OIIuIN:
- Het: otknquene cnai-d-ooy.
YcTpoCTBO Parrot PHOTO VIEWER 7" npednaeraet Bam 4 cna-d-woy, oNo H3 KOtopbIX COCTOIT N3 BCex N3obpaJxHn 3KpaHa, noka3bBaembIX B nopAKe IN pazMeUeHn B paMke.
Iocne BbIbopa cnaI-d-woy Bb MOKeTe aKTbIbPOBaTb,OTKJIIOHTb erO nII N BblIOHnITb erO KOHpIgpyaUHO. CnaI-d-woy npedocTabJrET Bam cIeDyUoIe BO3MOXHOCTN:
- Bb6op KapTHKn: Bb6op npn NMOOn KHOJok Bb6op nIOITBeRKeHNe I3O6paXeHn, BXoJxN X B COCTAB cAaI. looy. Bb6pAHbIe I3O6paXeHne 6ydyT mTeB tOMteKy. (HeIOctynHO dIra CnaId-LoW, npednaraeMoro no ymOLuaHNIO).
3aadHnaJdNtEnbHOCTb: onpeedeHne dNtEnbHOCTn noka3a cnaI-d-ooy. - CoptnpoBka: no3B0JnAeT onpeDEnHb nopraDKoN poka3a H3OpaKeHH, BxOJaXH X COCTAB cnaI-D-ooy. (HeNoctynH O nlaCnAid-ooy, npednaraemoro no ymOnuHaHIO).
- PpOu3B0bHbI pexKIM: nOKa3 n3o6paXeHn, BXoJaIuxN B COCTaB CnaI-D-Isoy, B CnyaHOM NopJKe.
- CtepeTb dianopamy: Bo3BpT K hauJIbHbIM npaMeTpam BaWero cIaI-d-woy (BbI6paHbIe IIO6paJxHeN 6oJIbWe He bdyT BkIIOUeHbI B COCTAB cIaI-d-woy, Ho He bdyT ydaJIeHbI n3 pAMKn).
-
PēpexoJ: onpejeneHne 3ΦΦeKtape nepexoJa MExJy n3O6paXeHnMy cnaJ-d-ooY.
-
Het
-
B Ctopohy
-3aTeMHeHne
- JlaxmatHO
-Mozanka
- CnyauHno
ПОЛOXЕНЕ PAMКИ
BbIbePnte noLoKeHne paMkn:
TEXHINCHECKNEXAPAKTEPNCTNIK
PIMMEUHIN
Ekran:
Parrot PHOTO VIEWER 7''

Türkçé - Kulanim kilavuzu
icindekiler
KULLANICI GUVENLIK TALIMATLARI p 87
GIRIS 88
AMBALAJIN ICINDEKILER p 89
Aletin cabuk calistirilmasi p 89
MENÜLERIN AYARI p 90
MENÜLER IÇERISINDE DOLASMA p 90
ANA MENU p91
TERCIHLER P92
ILK KULLANIM p 94
TELEFONUNUZUN YA DA BILGISAYARINIZIN
PARROT PHOTO VIEWER 7"ILE SERVISE ACILMASI ...... p 94
FOTOGRAFLARIN GONDERILMESI p 95
AYARLAMALAR p96
RESIMLERIN GÖRUNME SIRALARI p 96
DIAPORAMANIN SEÇILMESİ VE YARATILMASİ 97
CERÇERVENİN POZİSYONU p 98
ALETIN EKRANININ IDARESI p 98
PORGRAMIN GUNCELLENMESI p 99
SERVIS HATTI p 99
TEKNIK OZELLLIKLER p 100
NOTLAR p 100
Parrot PHOTO VIEWER 7''

FCC Compliance Statement: (FCC ID: RKXKEA)
This device complies with part 15 of the FCC rules. Operation is subject to the following two conditions:
(1). this device may not cause harmful interference, and
(2). this device must accept any interference received, including interference that may cause undesired operation.
Note: The manufacturer is not responsible for any radio or tv interference caused by unauthorized modifications to this equipment. Such modifications could void the user's authority to operate the equipment.
Declaration of Conformity

We, Parrot S.A. of 174 quai de Jemmapes, 75010 Paris, France, declare under our sole responsibility that our product, the Parrot PHOTO VIEWER 7'' to which this declaration relates is in conformity with appropriate standards EN300328, EN301489-1, EN60065 following the provision of Radio Equipment and Telecommunication Equipment directive (1999/5/EC R&TTE), with requirements covering EMC directive 89/336/EEC and Low Voltage directive 73/23/EEC.
Bluetooth®
The Bluetooth® word mark and logos are owned by the Bluetooth® SIG, Inc. and any use of such marks by Parrot S.A. is under license. Other trademarks and trade names are those of their respective owners.
JPEG
This software is based in part on the work of the Independent JPEG Group
Correct Disposal of This Product ( Waste Electrical & Electronic Equipment )
(Applicable in the European Union and other European countries with separate collection systems). This marking shown on the product or its literature, indicates that it should not be disposed with other household wastes at the end of its working life. To prevent possible harm to the environment or human health from uncontrolled waste disposal, please separate this from other types of wastes and recycle it responsibly to promote the sustainable reuse of material resources. Household users should contact either the retailer where they purchased this product, or their local government office, for details of where and how they can take this item for environ, mentally safe recycling. Business users should contract their supplier and the terms and conditions of the purchase contract. This product should not be mixed with other commercial wastes for disposal
Copyrights
Copyright © 2006 Parrot. All rights reserved. The total or even partial reproduction, transmission or storage of this guide in any form or by any process whatsoever (electronic, mechanical, photocopy, recording or otherwise) is strictly prohibited without prior consent from Parrot.
Registered trademarks
All the names and trademarks mentioned in this document are copyright-protected and are the property of their respective owners.
Parrot S.A.
All Rights reserved. The Parrot Trademarks appearing on this document are the sole and exclusive property of Parrot S.A. All the others Trademarks are the property of their respective owners and are used under licence by Parrot S.A.
Modifications
The explanations and specifications in this guide are given for information purposes only and may be modified without prior notice. They are deemed to be correct at time of going to press. The utmost care has been taken when writing this guide, as part of the aim to provide you with accurate information. However, Parrot shall not be held responsible for any consequences arising from any errors or omissions in the guide, nor for any damage or accidental loss of data resulting directly or indirectly from the use of the information herein. Parrot reserves the right to amend or improve the product design or user guide without any restrictions and without any obligation to notify users. The information in this guide is deemed to be correct at time of going to press. As part of our ongoing concern to upgrade and improve our products, the product that you have purchased may differ slightly from the model described in this guide. If so, a later version of this guide might be available in electronic format at Parrot's website at www.parrot.com.