USER MANUAL HS 70 AEG
HS 40
HS 50
HS 60
HS 70
GB Instructions for use
Please read and save these instructions.
| Introduction | You demand the best and buy quality - quality provided by Atlas Copco.
We have built for you a reliable and lasting tool. Working effectively and without endangering your health is only possible if these instructions for use are being read carefully before first using this tool. We want to satisfy our customers and would like you to buy again AEG Electric Power Tools from Atlas Copco. |
| Technical Data | HS 40 HS 50 HS 60 HS 70 Nominal power 500 W 500 W 500 W 500 W No-load speed 2600 min-1 2600 min-1 2600 min-1 Cutting length 40 cm 50 cm 60 cm 70 cm Cutting capacity max. dia. 20 mm 20 mm 20 mm 20 mm Distance between teeth 26 mm 26 mm 26 mm 26 mm Weight 3,6 kg 3,7 kg 3,8 kg 3,9 kg |
| Advice for your safety | Please pay attention to the safety instructions in the attached leaflet! Always disconnect the plug from the socket before carrying out any work on the machine. Appliances used at many different locations including open air must be connected via a current surge preventing switch. Always wear goggles when using the machine. It is recommended to wear gloves, sturdy non slipping shoes and apron. Sawdust and splinters must not be removed while the machine is running. Before use check machine, cable, and plug for any damages or material fatigue. Repairs should only be carried out by authorised Service Agents. Only use splash proof extension cables approved for outdoor purposes. Keep mains lead clear from working range of the machine. Always lead the cable away behind you. No person under 16 years of age is allowed to operate the machine. Do not pierce the motor housing as this could damage the double insulation (use adhesives). Never hold the machine by the blades. It should be transported and kept in the storage sheath. During operation the machine must be guided with both hands while keeping a safe footage. Should blades be blocked (for instance by big branches), disconnect machine by pulling the plug and remove the obstacle. Use trimmer only for cutting hedges and shrubs. Do not use trimmer in rain or on wet hedges. |
| Measured sound value | Typically the A-weighted sound pressure level of the tool is 85 dB (A). The noise level when working can exceed 85 dB (A). Wear ear protectors! |
| Measured vibration value | Typically the hand-arm vibration is below 2.5 m/s2. |
| Use | The hedgetrimmer is suitable for trimming and shaping of hedges, bushes and shrubs. It can also shred garden refuse for composting. Do not use this product in another way as stated for normal use. |
| ENGLISH | 2 HS 40, HS 50, HS 60, HS 70 |
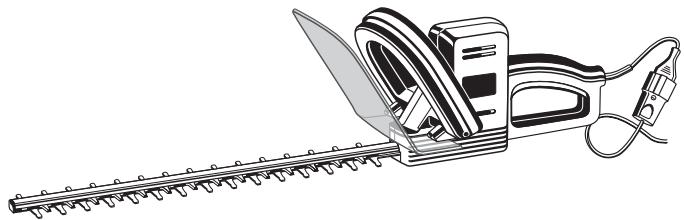
Brief description
The safety two-hand operation interrupts the function as soon as one hand leaves the handle. The quick-stop brakes the blades in 0.03 seconds, if one hand leaves either switch.
The wrap-around switch handle, the long switch and the soft grip at the rear handle facilitate a fatigueless operation in all positions.
The transparent hand guard protects against injuries through twigs or thorns without obscuring the view on the working area.
Symbols:
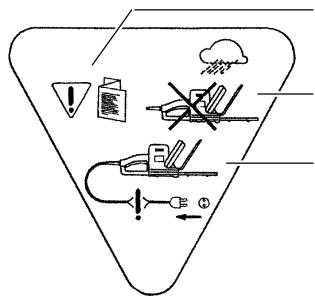
Please read the instructions carefully before starting the machine.
Do not use the hedgetrimmer during rain or on wet hedges.
Should the cable be damaged, remove plug from socket. Never use a damaged cable.
The impact protection at the head of the blade set prevents kick-back should the blades hit a solid obstacle like a tree or a wall.
To secure the plug connection a cable tension release is situated at the rear handle.
Two counter acting blades cutting on both sides warrant smooth running of the hedgetrimmer and optimum cutting results. The lower teeth are slightly shorter than the upper ones and feature round ends. This prevents accidental injuries.
The blade assembly can easily be removed and exchanged. Different cutting lengths can be applied.
Modifications: Text, diagrams and data are correct at the time of printing. In the interest of continuous improvement of our products, technical specifications are subject to alteration without prior notice.
| Mains
connection | Connect only to a single-phase AC current supply and only to the mains voltage
specified on the rating plate. Connection to sockets without earth protection is
possible as the appliance features protective insulation to DIN 57 740/ VDE 0740
and CEE 20. Radio suppression complies with the European standard EN 55014.
When fitting the plug, make sure that the brown (live) wire of this appliance is
connected to the plug terminal marked L or coloured red, and the blue (neutral) wire
of this appliance is connected to the plug terminal marked N or coloured black.
Under no circumstances must the wires of this appliance be connected to the earth
terminal of the plug marked either E, with the earth symbol or coloured green or
green/yellow.
Connect the plug of the machine with the
extension cable and secure the connection
against unintended interruption with the
cable tension release in the handle.
The cable on the machine is short on
purpose. Should you ever cut through the
cable, it will be the extension, which can
easily be replaced or repaired. | |
| Tool assembly | 1. Attach the guard with the carrying
handle to the machine as illustrated. The
guard must be inserted in the gap of the
housing. | |
| 2. Insert two screws and tighten. | |
| On/off switch | Switching on: Press switch handle and
switch simultaneously and hold. The
sequence of switching is unimportant as
the machine only starts when both
switches are activated.
Out of safety reasons, there is no locking
button in the switches.
Switching off: Release either switch
handle or switch.
Due to the quick stop, the machine will
stop within 0.03 seconds after the release of either switch. | |
| Advice for
operation | Before using the tool please read the instructions. If possible have the tool
demonstrated.
Always keep a safe footing and hold machine with both hands. Keep children or
animals away from working area.
Keep a safe distance between the blades and your body.
To avoid damage to the extension cable always start work near the power supply
and work away from socket, trailing the cable behind you.
When working near the ground avoid earth or stones getting caught between the
blades. | HS 40, HS 50, HS 60, HS 70 |
| ENGLISH | 4 |
| Shapes of hedges | Apply the machine at a right angle to the cutting direction along the hedges. Thick branches should be cut back with garden pliers
With some training it is possible to remove cut-off branches from the hedges by exercising a pendulum cutting action. |
| Cutting sequence | A hedge can be cut in any shape, your personal taste is your limit. The illustrated trapez shape is only a suggestion. |
| 1. Cut hedge to desired height. |
| 2. Cut sides in trapeze shape. |
| 3. Round upper edgers. |
| 4. Thin out lower part of hedge. |
| ENGLISH | 5 | HS 40, HS 50, HS 60, HS 70 |
| Cutting time | | Leaf hedges: June and October.
Pine hedges: April and August.
Fast growing hedges: from May every 6 weeks. |
| Storage and transport | | Always keep the machine in the storage sheath. The storage sheath can also be mounted on a wall. |
| Cleaning | | Never clean the machine with water.
After cutting resin-containing hedges clean blades with a resin solvent spray. |
| Changing the blades | 1. | Always disconnect the plug from the socket before carrying out any work on the machine.
Should the blades become blunt or damaged they can be exchanged for a set of new ones. Dismantle blade assembly as stated below and send it to the AEG Service Centre.
Before changing the blade assembly, make sure that blades are in a symmetrical position. If not, let the machine run again.
The change of blades can be effected with the protection sheath in place. This prevents injuries and keeps the hands clean. |
| 2. | Turn machine around, the underside pointing upwards. |
| 3. | Remove 6 screws (A) and the gearbox lid (B).
To loosen the screws, only use Torx screwdrivers. |
| 4. | Undo the two locking screws (C).
Pull out the blade assembly (D). |
| 5. | The assembly is done in reverse order. Observe that the heart shaped profiles of the eccentric drive (E) and the driving sleeve (F) fit together. |
| Maintenance | | Use only AEG accessories and spare parts. Should components need to be replaced which have not been described, please contact one of our AEG service agents (see our list of guarantee/service addresses).
Please clean the cutting blades after each use. For easy and quick care of the blades we recommend to spray the blades with cleansing agent. This keeps up the cutting efficiency. |
| ENGLISH | 6 | HS 40, HS 50, HS 60, HS 70 |
We declare under our sole responsibility that this product is in conformity with the following standards or standardized documents. EN 50144, EN 55104, EN 55014, EN 60555, HD 400 in accordance with the regulations 89/392/EEC, 73/23/EEC, 89/336/EEC
DEUTSCH