
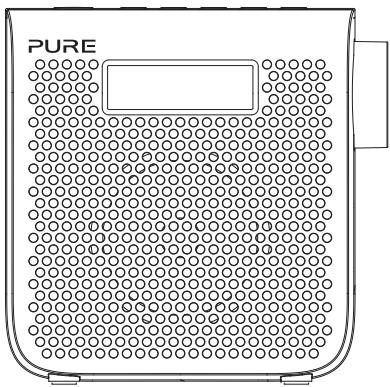
ONE MINI SERIES 3 - Air purifier PURE - Free user manual and instructions
Find the device manual for free ONE MINI SERIES 3 PURE in PDF.

| Product type | DAB/DAB+ and FM digital alarm clock radio |
| Brand | PURE |
| Model | ONE MINI SERIES 3 |
| Dimensions (W × H × D) | 143 × 140 × 78 mm |
| Weight | 0.575 kg |
| Power supply | Mains adapter 230 V AC → 5.5 V DC / 1.0 A (models KSAA0550100W1UK/EU/AU) or rechargeable battery ChargePAK B1 (optional) |
| Power consumption | Operation: 1.9 W; Standby: 0.70 W |
| Frequency ranges | DAB/DAB+: Band III (174-240 MHz); FM: 87.5-108 MHz |
| Audio power | 1.6 W RMS |
| Speaker | 3 inch extended range |
| Input connections | Mains adapter socket 5.5 V DC; mini USB port (software update); 3.5 mm mini-jack auxiliary input |
| Output connections | 3.5 mm mini-jack stereo headphone socket |
| Preset memory | 8 DAB and 8 FM stations |
| Main functions | DAB/DAB+ and FM reception, auto tuning, presets, scrolling text pause, language selection (English, French, German, Italian), reset, software update |
| Certifications | CE, C-Tick, EMC and Low Voltage Directive compliance (2004/108/EC and 2006/95/EC), ETSI EN 300 401 |
| Warranty | 3 years (excluding accidental damage, normal wear and tear, neglect or unauthorized modifications) |
| Optional accessories | Rechargeable battery ChargePAK B1 |
| Safety instructions | Do not expose to water, moisture, heat sources or direct sunlight; use only the supplied adapter; do not open the casing |
| Care and cleaning | Wipe with a dry, soft cloth. Do not use liquid or abrasive products |
| Country of manufacture | China (implied) |
Frequently Asked Questions - ONE MINI SERIES 3 PURE
User questions about ONE MINI SERIES 3 PURE
0 question about this device. Answer the ones you know or ask your own.
Ask a new question about this device
Download the instructions for your Air purifier in PDF format for free! Find your manual ONE MINI SERIES 3 - PURE and take your electronic device back in hand. On this page are published all the documents necessary for the use of your device. ONE MINI SERIES 3 by PURE.
USER MANUAL ONE MINI SERIES 3 PURE
Thank you for choosing One Mini. This manual will help you get your product up and running in no time and explains how to get the best out of all its great features. If you need any further assistance, please visit the support pages on our website at support.pure.com.
EN
DE
FR
IT
NL
DA/NO
Safety instructions
- WARNING: Do not use the included power supply (with model number KSAA0550100W1UK, KSAA0550100W1EU or KSAA0550100W1AU) to power up another apparatus as this may cause damage.
- Use only power supplies listed in the user manual/user instructions (supplied by Pure with model number KSAA0550100W1UK, KSAA0550100W1EU or KSAA0550100W1AU.
- Fit the mains adapter to an easily accessible socket, located near the radio and ONLY use the mains power adapter supplied.
- WARNING: To reduce the risk of fire or electric shock, do not expose this apparatus to rain or moisture. The apparatus shall not be exposed to dripping or splashing and objects filled with liquids, such as vases, shall not be placed on apparatus.
- WARNING: The direct plug-in adapter is used as a disconnect device, the disconnect device shall remain readily operable.
- Keep the radio away from heat sources such as radiators, heaters or other appliances that produce heat.
- Do not expose the unit to direct sunlight.
- Do not use the radio near water.
- Avoid objects or liquids getting into the radio.
- Do not remove screws from or open the radio casing.
- Should not be immersed in water, used in shower or bathroom if plugged into the mains.
- The mark label is on the exterior of the bottom of the apparatus.
Contents
4 Getting started
4 Quick set up
5 Controls at a glance
6 Rear connectors
6 Display
7 Listening to radio
7 Adjusting the volume
7 Selecting digital radio
7 Changing digital stations
7 Selecting FM radio
7 Seek tuning
7 Manual tuning
8 Using radio presets
9 Basic options
9 Autotune
9 Pausing and controlling scrolling text
9 Changing the language
10 Advanced options
10 Upgrade
10 Reset
11 Installing the ChargePAK B1
12 Technical specifications
Getting started
Quick set up
Note: If you have a ChargePAK B1 rechargeable battery (sold separately) fit it now before plugging One Mini in. See page 11 for more information.
1 Unclip the aerial and fully extend it (steps A and B).
Insert the jack of the supplied mains adapter into the socket on the rear of the radio (C).
Plug the mains adapter into the mains supply (D).

2 Wait for the radio to complete an Autotune for all available stations.
When the Autotune is complete, a station will be selected.

Note: By default, the menus on One Mini are displayed in English. To use another language (Italian, German or French) see page 9.
Controls at a glance
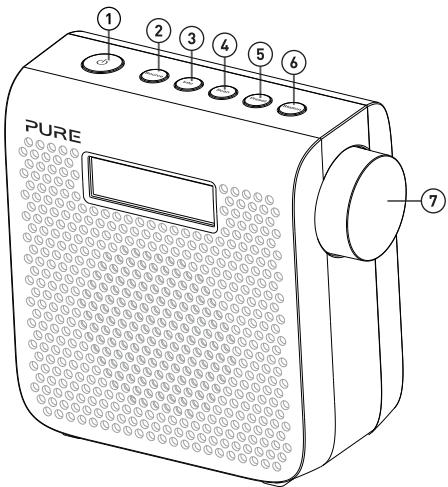
| No. | Name | Description |
| 1 | Standby | On/standby switch (mains powered) or on/off switch (ChargePAK powered). |
| 2 | Source | Press to switch between digital and FM radio. |
| 3 | Info | Press to switch between scrolling text and the date. |
| 4 | Scan | Digital radio: Press then use the Dial to scan for new stations and remove inactive ones.FM radio: Press then use the Dial to seek to the next or previous FM station. |
| 5 | Preset | Store and select presets. See page 8. |
| 6 | Station | Press then use the Dial to change stations. See page 7. |
| 7 | Dial | Turn to adjust volume or scroll stations. See page 7. |
Rear connectors
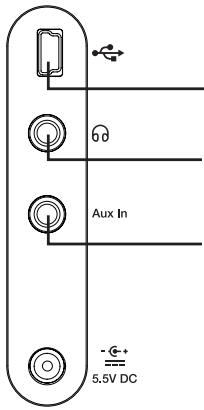
Mini-B type USB connector For software updates only.
3.5 mm stereo headphone socket
Aux in
Analogue stereo input for your mobile, tablet etc.
Note: One Mini automatically switches from the digital or FM source to the Aux in source if you connect an auxiliary device to the Aux in connector.
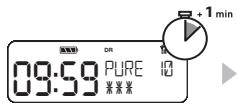
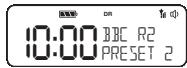
Display
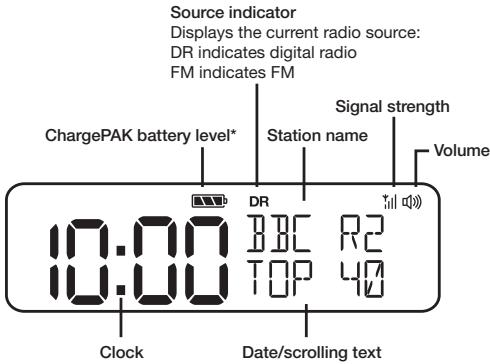
*ChargePAK B1 sold separately.
Listening to radio
Selecting digital radio
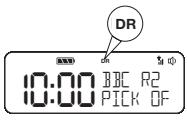
Press the Source button to switch to digital radio 'DR'.

Changing digital stations
- Press the Station button so that the scroll symbols < > are shown on the display.
- Turn the Dial to the station you want to listen to.
- Push the Dial to tune into the station.
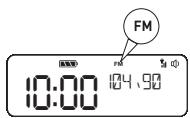
Selecting FM radio
Press the Source button to switch to FM radio 'FM'.

Seek tuning
- Press the Scan button so that 'SEEK' is shown on the display.
- Turn the Dial to automatically scan for the next station. The scan will stop when a station with a strong signal is found.

Manual tuning
- Press the Station button so that 'TUNE' is shown on the display.
- Turn and press the Dial to the required frequency.
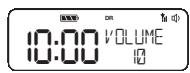
Adjusting the volume
Turn the Dial to adjust the volume.


Using radio presets
Store up to 8 digital and 8 FM radio stations for quick access.


Storing a radio preset
- Tune into the radio station that you want to store.
- Press the Preset button.
- Turn the Dial to the required preset number.
- Push and hold the Dial for two seconds to store the radio station as a preset.
Note: To overwrite a radio preset, tune into the station that you want to store and follow the above steps.
Selecting a radio preset
- Press the Preset button.
- Turn the Dial to the preset that you want to listen to.
- Push the Dial to tune in to the station.
Basic options


Autotune
You can use the autotune function to automatically scan for new digital radio stations and remove inactive ones.
Note: Autotune is only available when you have selected digital radio as the radio source.
- Press the Scan button.
- Push the Dial. The number of stations found will be displayed during the autotune.
- When the autotune has finished, One Mini will tune to the last station that you were listening to.

Pausing and controlling scrolling text
- When scrolling text information is displayed in either digital or FM radio, push the Dial to pause the scrolling text.
- Turn the Dial again to scroll forwards and backwards through the text. To exit push the Dial again.

Changing the language
- Press and hold the Info button until 'LANGUAGE' is displayed on the screen and push the Dial.
- Turn the Dial until the language you want to use is displayed.
- Push the Dial to save your changes.
Advanced options

Upgrade
Contact Pure technical support (http://support.pure.com) for more information on how to update One Mini to the latest software version.

Reset
Resetting your One Mini removes all presets, stored stations and resets all other options to default settings.
- Ensure your aerial is fully extended and vertical.
- Press and hold the Info button for two seconds.
- Turn the Dial to 'RESET'.
- Press the Dial to confirm that you want to reset your One Mini to default settings.
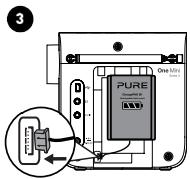
Installing the ChargePAK B1
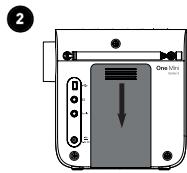
- Switch One Mini off and disconnect from the mains power supply.
- Open the battery compartment.
- insert the ChargePAK connector plug into the socket in the compartment. Line up the ridges on the plug with the slots in the socket to ensure correct orientation. Do not force the plug.
- Insert ChargePAK into the battery compartment, logo side out.
- Replace the battery cover and connect One Mini to the mains.
- ChargePAK will begin charging.
Note: When charging your ChargePAK for the first time or after an extended period of inactivity it is recommended that it is charged for around 24 hours to ensure full battery power. If ChargePAK is in a highly discharged state there may be a slight delay before the battery charging indicator is displayed.

Technical specifications
Radio
DAB/DAB+, FM radio 87.5-108 MHz.
Audio
1.6W RMS. Full-range 3" drive unit.
Input connectors
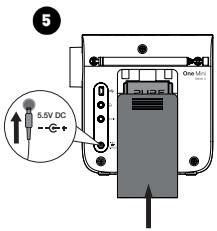
5.5V DC power adaptor socket (230V supplied), Mini USB connector for product upgrades, 3.5mm auxiliary input for auxiliary devices
Output connectors
3.5mm stereo headphone socket.
Power
230V AC to 5.5V (1.0A) DC external power adapter or optional ChargePAK B1.
Power consumption
Standby: 0.70W, Active: 1.9W.
Dimensions
140mm high x 143mm wide x 78mm deep
Weight
0.575kg
Approvals

CE marked. Compliant with the EMC and Low Voltage Directives (2004/108/EC and 2006/95/EC) ETSI EN 300 401 compliant. Australian C-Tick N1600 and Electrical Safety.
Warranty information
Imagination Technologies Limited warrants to the end user that this product will be free from defects in materials and workmanship in the course of normal use for a period of three years from the date of purchase. This guarantee covers breakdowns due to manufacturing or design faults; it does not apply in cases such as accidental damage, however caused, wear and tear, negligence, adjustment, modification or repair not authorised by us. Should you have a problem with your unit please contact your supplier or contact Pure Support at http://support.pure.com.
Disclaimer
Imagination Technologies Limited makes no representation or warranties with respect to the content of this document and specifically disclaims any implied warranties of merchantability or fitness for any particular purpose. Further, Imagination Technologies Limited reserves the right to revise this publication and to make changes in it from time to time without obligation of Imagination Technologies Limited to notify any person or organization of such revisions or changes.
Trademarks
One Mini Series 3, ChargePAK, Pure, the Pure logo, Imagination Technologies, and the Imagination Technologies logo are trademarks or registered trademarks of Imagination Technologies Limited.
Copyright
Copyright © 2015 Imagination Technologies Limited. All rights reserved. No part of this publication may be copied or distributed, transmitted, transcribed, stored in a retrieval system, or translated into any human or computer language, in any form or by any means, electronic, mechanical, magnetic, manual or otherwise, or disclosed to third parties without the express written permission of Imagination Technologies Limited. Version 1 November 2015.
Correct disposal of this product

This symbol on the product or on its packaging indicates that this product should not be treated as household waste. Instead it should be handed over to a suitable collection point for the recycling of electrical and electronic equipment. By ensuring this product is disposed of correctly, you will help prevent potential negative consequences for the environment and human health, which could otherwise be caused by inappropriate waste handling of this product. The recycling of materials will help to conserve natural resources. For more detailed information about recycling of this product, please contact your local council office, your household waste disposal service or the shop where you purchased the product.
One Mini Series 3

m = 311 ;
11 Installation of ChargePAK B1
Installation of ChargePAK B1

2
- Sluk for One Mini, og træk stikket ud af kontakten.
- Abn batterirummet.
- Sæt forbindelsessstikket på ChargePAK i stikket i batterirummet. Sørg for, at tapperne på hanstikket flugter med sporene i stikket, på batteriet vendrigtigt. Batteriet migkke forceres i.
- Saet ChargePAK i batterirummet, sa logosiden vender udad.
- Saet batteridaekslet pa, og tilslut strommen til One Mini.
- ChargePAK begynder at lade op.

3
1.6W RMS. Full-range 3'' -drivenhed.
Indgangsstik
Imagination Technologies Limited
Home Park Estate
Kings Langley
Herts,WD4 8LZ
United Kingdom
www.pure.com
http://support.pure.com
Pure
Friedrich-Ludwig-Jahn
StraBe 2-14
64589Stockstadt/Rhein
Deutschland
http://support.pure.com