USER MANUAL BLACK & DECKER GK1640T BLACK & DECKER
Warning! When using electric tools, basic safety precautions should always be taken to reduce the risk of fire, electric shock and personal injury.

Read this user manual carefully, observing all of the recommended safety instructions before, during and after use of your chainsaw. Maintain your chainsaw in good working order. Familiarise yourself with the controls on your chainsaw before attempting to operate it, but above all, be sure you know how to stop the tool in an emergency. Retain this user manual and all other literature supplied for future reference.
SAFETY INSTRUCTIONS
Know your chainsaw. Please read this user manual carefully and familiarise yourself with your chainsaw, in particular with regard to the sawing of round wood. We strongly recommend that first time users practice sawing logs on a saw horse or cradle.
- Avoid dangerous environments. Keep your work area clean and remove clutter. Keep the work area well lit. We strongly recommend the use of a sawhorse or cradle whenever possible.

Do not saw wet wood or use your chainsaw when it is raining.
- Keep people away while your chainsaw is in use. Do not allow children, other people or animals near your chainsaw while you are using it.
-
Maintain your chainsaw when not in use. Do not store your chainsaw for any length of time without first removing the saw chain and guide bar which should be kept immersed in oil. Store all parts of your chainsaw in a dry, secure place out of reach of children. We recommend you drain the oil reservoir prior to storage.
-
Do not force your chainsaw. It will do the job better and more safely at the rate for which it was intended.

Protective clothing. Wear close fitting and protective clothing including a safety helmet with visor/goggles, ear protectors, safety shoes, protective bib trousers and strong leather gloves.
- Do not abuse the cable. Never carry a chainsaw by the cable or jerk it to disconnect the plug from the socket. Keep the cable away from heat, oil or sharp edges. Check the cable frequently for damage.
Secure your work using clamps or chocks. Be sure that you use both hands when operating your chainsaw.

Remove the plug from the mains before changing the work location, adjusting, sharpening or cleaning, changing any accessory such as the chain, or if the cord becomes entangled or damaged.
Adjusting wrenches. Form a habit of checking to see that adjusting wrenches are removed from your chainsaw before starting.
Extension cables. Before use, inspect the extension cable and replace if damaged. When using the tool outdoors, only use extension cables intended for outdoor use. Up to 30m of Black & Decker extension cable can be used without loss of power.
- Only use extension cable type HO7RN-F 2 x 1mm^2 , as a minimum only.
Stay alert. Never operate your chainsaw when you are tired.
- Check damaged parts. Before further use of your chainsaw, a guard or other part that is damaged should be carefully checked to determine whether it will operate properly and perform its intended function. Check for alignment of moving parts, binding of moving parts, breakage of parts, mounting and any other conditions that may affect its operation.
A guard or other part that is damaged should be properly repaired or replaced by an authorised service agent. Do not use your chainsaw if the switch does not turn it on and off.
Repairs. This tool complies with relevant safety requirements. Repairs should only be carried out by qualified persons using original spare parts; otherwise this may result in considerable danger to the user.

Warning! The use of an accessory or attachment other than those recommended in this user manual may present a risk of personal injury.
- For all types of cutting, always hold the saw firmly with both hands, with thumbs and fingers encircling the saw handles. Do not release your grip until your chainsaw has stopped moving.
Be sure of your footing and pre-plan a safe exit from a falling tree or branches.
- Use wedges to help control felling and prevent binding the guide bar and saw chain in the cut.
- Keep all parts of your body and clothing away from the saw chain when running your chainsaw. Before you switch on make sure your chainsaw is not contacting anything. Do not touch or try to stop a moving saw chain with your hand.
- Carry your chainsaw carefully with the mains supply disconnected and with the guide bar and saw chain to the rear and the blade sheath fitted.
- Keep your chainsaw clean. Do not allow dirt, oil or sawdust to build up on your chainsaw. Pay particular attention to the air inlet and outlet slots; these must not become clogged. Clean your chainsaw with a dry cloth but do not use any solvents or cleaning fluids.
Saw chain care. Keep the saw chain sharp and snug on the guide bar. Ensure the saw chain and guide bar are clean and well oiled.

Beware of kickback. Kickback is upward/ backward motion of the guide bar that may occur when the nose of the saw chain unexpectedly comes in contact with an object. Hold your chainsaw firmly with both hands when the motor is running.
Use a firm grip with thumbs and fingers encircling the handles and watch carefully what you cut.
Kickback can be caused by:
Striking branches or other objects accidentally with a tip of the saw while the saw chain is moving.
Striking metal, cement or any other hard material near the wood, or buried in the wood.
A dull or loose chain.
Cutting above shoulder height.
- Lack of attention when holding or guiding the saw while cutting.
Over-reaching. Keep proper footing and balance at all times and do not overreach.
- Do not try to insert into a previous cut, as this could cause kickback. Make a fresh cut every time.
- We strongly recommend you do not attempt to operate your chainsaw while in a tree, on a ladder or on any other unstable surface. If you decide to do so, be advised that these positions are extremely dangerous.
- When cutting a branch that is under tension, be alert for spring back so that you will not be struck when the tension is released.
Avoid cutting:
Prepared timber.
Into the ground.
Into wire fences, nails, etc.
Into small sized brush and saplings because slender material may catch the saw chain and be whipped towards you, or pull you off balance.
- Do not use your chainsaw above shoulder height.
Ensure someone is nearby (but at a safe distance) in case of an accident.
- If for any reason you have to touch the chain, make sure your chainsaw is disconnected from the mains.
- The noise from this product can exceed 85 dB(A). We therefore recommend you take appropriate measures for the protection of hearing.
Warning symbols on your chainsaw

Read all of this manual carefully.
ENGLISH

Do not use your chainsaw in wet conditions or expose it to rain.

Always wear ear and eye protection.

Always remove the plug from the socket before inspecting a damaged cable.
Be careful not to use your chainsaw if the cable is damaged.
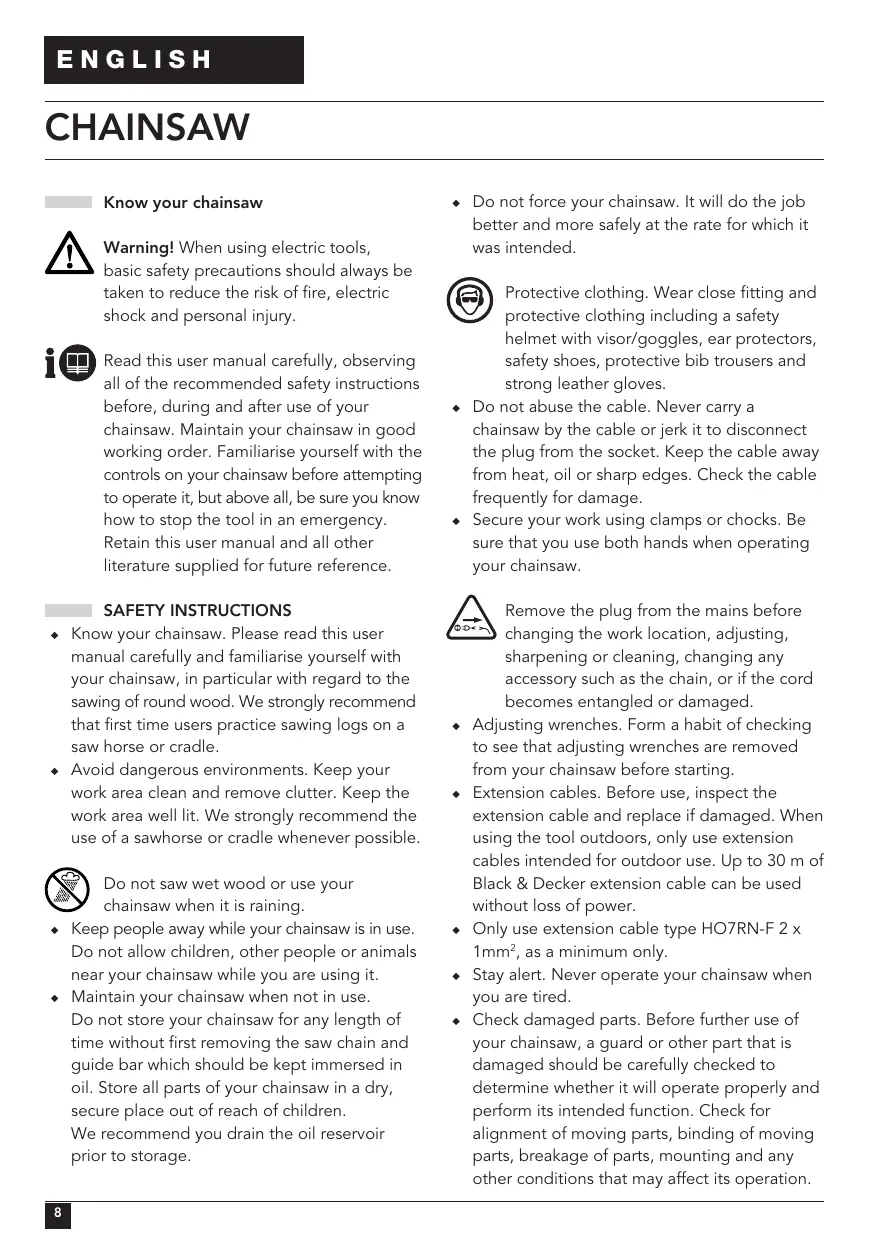
To ensure continued safe operation, check the chain tension as described in this manual after every 10 minutes of use, and adjust back to 3mm as required.
Double insulation

Your chainsaw is double insulated.
This means that all external metal parts are electrically isolated from the power supply. This is achieved by placing an extra insulation barrier between the electrical and mechanical parts. Double insulation means greater electrical safety and obviates the necessity of having the machine earthed.
Electrical safety
- Make sure your chainsaw is correct for your supply. The voltage can be found on the rating plate.
Technical data
| Bar length | 30 cm | 35 cm | 40 cm |
| Supply voltage (V) | 230 | 230 | 230 |
| Rated input (W) | 1600 | 1600 | 1600 |
| Max. cutting length (cm) | 30 | 35 | 40 |
| Chain speed (no load m/s) | 8 | 8 | 8 |
| Weight (kg) | 3.7 | 3.8 | 3.9 |
| Oil capacity (ml) | 180 | 180 | 180 |
| Safety class | II | II | II |
OVERVIEW (fig. A)
- On/off switch
- Lock-off button
- Oil cap
-
Oil level indicator
-
Front guard/chain brake
- Chain cover
- Control knob
- Guide bar
- Chain
- Chain sheath
ASSEMBLY

Before assembly, make sure that the tool is switched off and unplugged.
Oiling the chain (fig. A)
- You must do this whenever you use a new chain for the first time. Take the new chain out of its plastic bag and soak it in chain oil for at least an hour before using it. Use Black & Decker chain oil (cat. no. A6027).
We recommend that you use only one brand of oil during the lifetime of your chainsaw because mixtures of different oils could lead to the oil becoming degraded, which can drastically shorten the lifetime of the saw chain.
- Never use waste oil, thick oil or very thin sewing machine oil. These may damage your chainsaw.
Fitting the guide bar and chain (fig. B & C)

Always wear protective gloves when working on your chainsaw and ensure that the plug is not in the electrical outlet.
Fit the saw chain (9) over the guide bar (8), making sure that the cutters are the right way round and that the slider tensioner (11) is facing towards you (fig. B).
With the tool horizontal on a stable surface, put the bar and chain onto the bar mounting studs (13), ensuring the chain is around the drive sprocket (12). Make sure that the cutters on the upper part of the guide bar face towards the front (fig. B).
- Before fitting the chain cover check that the cam (18) is in the correct position. If necessary, press and turn the control knob (7) clockwise to rotate the cam into the correct position.
Fit the chain cover by locating the bolt and using the control knob (7) to tighten the chain cover finger tight. To tension the chain, loosen the control knob one full turn, press in firmly and rotate clockwise. As the bar moves forward make sure that the chain links feed into the guide bar. When the control knob stops rotating apply further light pressure. Do not over-tension. Allow the control knob to spring back to the "out" position and rotate further clockwise to tighten the guide bar. Apply moderate pressure to tighten.
Checking and adjusting the chain tension (fig. D)
Before use and after every 10 minutes of use, you must check the chain tension.
- Check the chain tension. The tension is correct when the chain snaps back after being pulled 3mm away from the chain bar with light force from the middle finger and thumb. There should be no „sag" between the guide bar and chain on the underside.
Note: Do not over-tension the chain as this will lead to excessive wear and will reduce the life of the bar and chain.
Note: When the chain is new, check the tension frequently (after disconnecting from the mains) during the first 2 hours of use as a new chain stretches slightly.

USE

Let the tool work at its own pace.
Do not overload.
Filling oil into the reservoir (fig. E)
- Remove the oil cap (3) and fill the reservoir with the recommended chain oil. You can see the oil level in the indicator slot (4). Refit the oil cap.
Periodically switch off and check the oil in the indicator; if it is less than a quarter full, disconnect your chainsaw from the mains and refill with the correct oil.
Auto-stop chainbrake (fig. F & G)
This tool is fitted with an auto-stop chainbrake which will stop the chain within 150 ms each time you release the rear trigger, or if kickback should occur. This brake should be tested before every use.
How to set the chainbrake
Make sure that the tool is disconnected from the mains supply.
Pull the front guard (5) back into the „set" position
The tool is now ready to use.
How the anti-kickback chainbrake works In the event of kickback, your left hand comes in contact with the front guard, pushing it backwards, and stops the tool within 150 ms.
How the inertia activated chainbrake works
The chainbrake is activated when the front hand guard is pushed forward, either manually, by the back of the users hand or by its own weight. The advantage of the inertia brake is that it is activated by a severe kickback, eg. when the chain hits metal, even if the users hand does not contact the front guard, ie. when the saw is in the felling position.
How to test the anti-kickback chainbrake
Grip the tool firmly in both hands on a firm surface - make sure the chain is clear of the ground and switch on (see „How to switch your chainsaw on”).
- Rotate your left hand forward around the front handle so that the back of your hand comes in contact with the front guard and pushes it backwards (fig. G). The chain should stop within a few fractions of a second.
To reset after the operation of the chainbrake
Follow the instructions for setting the chainbrake.
Notes:
- It will not be possible to switch the tool on if the front guard is not in the „set“ position.
-
Avoid re-starting the tool until you hear the motor come to a complete rest.
-
If the chain does not come to rest immediately then this indicates that it needs tensioning (see „Fitting the guide bar and chain").
Grip your chainsaw firmly with both hands. Push the lock-off button (2) forward and then push the on/off switch (1) to start.
When the motor starts, remove your thumb from the lock button and grip the handle firmly.
Do not force the tool - allow it to do the work. It will do a better and safer job at the speed for which it is designed. Excessive force will stretch the chain.
If the saw chain or bar becomes jammed:
- Switch the tool off.
Disconnect the tool from the mains supply.
Open the cut with wedges to relieve the strain on the guide bar. Do not try to wrench the saw free. Start a fresh cut.
Felling (fig. H-J)
Pre-plan a safe exit from falling trees or branches.
Cut one third of the diameter of the tree (Fig. H). Then cut down from above to make a notch of about 45^ . This way you will avoid pinching the saw.
- Make a single felling cut from the other side but stop before you cut through to the notch (fig. 1).
Drive a wedge or wedges into the felling cut to open it and drop the tree (fig. J).
Logging (fig. K - M)
How you should cut depends on how the log is supported. Use a saw horse whenever possible. Always start a cut with the chain running and the spiked bumper (17) in contact with the wood (fig. K). To complete the cut use a pivoting action of the spiked bumper against the wood.
When supported along its whole length
Make a downward cut, but avoid cutting the earth as this will blunt your saw quickly.
When supported at both ends
- First, cut one third down to avoid splintering and second, cut again to meet the first cut.
When supported at one end
- First, cut one third up to avoid splintering and second, cut down to prevent splintering.
When on a slope (fig. L)
Always stand on the uphill side.
When using a saw horse (fig. M)
This is strongly recommended whenever possible.
Position the log in a stable position. Always cut on the outside of the saw horse arms.
MAINTENANCE (fig. N)
Regular maintenance ensures a long effective life for the tool. We recommend you make the following checks on a regular basis.
TROUBLESHOOTING
If the tool does not operate correctly, check the following.
| Fault | Possible cause | Action |
| Tool will not start. | Blown fuse. | Replace fuse. |
| Tripped RCD. | Check RCD. |
| Mains lead not connected. | Check mains supply. |
| Tool will not start button will not slide. | Front guard in the brake position | Reset front guard. |
| Chain does not stop instantly when the tool is switched off. | Chain tension is too slack. | Check chain tension. |
| Bar/chain appear hot/smoking. | Oil tank empty. | Check oil tank level. |
| Chain tension is too tight. | Check chain tension. |
| Guide bar sprocket nose needs greasing. | |
Oil level
The level in the reservoir should not be allowed to fall below a quarter full.
Chain and guide bar
- After every few hours of use, remove the guide bar and chain and clean thoroughly.
Ensure the hole between the tensioning/oil hole (18) and the bar groove is clear.
- On reassembling, the guide bar should be turned through 180^ and the sprocket nose greased via the sprocket lubrication hole (19). This ensures an even distribution of wear around the guide bar rails.
To turn the guide bar through 180^ remove the small screw from the slider and re-fasten to the opposite side of the bar.
Saw chain sharpening
If you are to get the best possible performance from the tool it is important to keep the teeth of the saw chain sharp. Guidance for this procedure is found on the sharpener package. For this purpose we recommend the purchase of the Black & Decker saw chain sharpening kit (available from Black & Decker service agents and selected dealers).
Replacing worn out chains
Replacement chains are available through retailers or Black & Decker service agents. Always use genuine spare parts.
Saw chain sharpness
The cutters will blunt immediately if they touch the ground or a nail whilst cutting.
Saw chain tension
Regularly check the chain tension.
Oil level
Top up if low.
What to do if your chainsaw needs repair
Your chainsaw is in accordance with the relevant safety requirements. Repairs should only be carried out by a qualified persons using original spare parts, otherwise this may result in considerable danger to the user.
We recommend you keep this user manual in a safe place.
ACCESSIONS
| Cat. no. | Description |
| A6154 | 300 mm / 12" chain |
| A6155 | 350 mm / 14" chain |
| A6156 | 400 mm / 16" chain |
| A6039 | Sharpening kit |
| A6027 | 0.5 l chain oil |
Protecting the environment

Separate collection. This product must not be disposed of with normal household waste.
Should you find one day that your Black & Decker product needs replacement, or if it is of no further use to you, do not dispose of it with household waste. Make this product available for separate collection.

Separate collection of used products and packaging allows materials to be recycled and used again. Re-use of recycled materials helps prevent environmental pollution and reduces the demand for raw materials.
Local regulations may provide for separate collection of electrical products from the household, at municipal waste sites or by the retailer when you purchase a new product.
Black & Decker provides a facility for the collection and recycling of Black & Decker products once they have reached the end of their working life. To take advantage of this service please return your product to any authorised repair agent who will collect them on our behalf.
You can check the location of your nearest authorised repair agent by contacting your local Black & Decker office at the address indicated in this manual. Alternatively, a list of authorised Black & Decker repair agents and full details of our after-sales service and contacts are available on the Internet at: www.2helpU.com
Guarantee
Black & Decker is confident of the quality of its products and offers an outstanding guarantee. This guarantee statement is in addition to and in no way prejudices your statutory rights. The guarantee is valid within the territories of the Member States of the European Union and the European Free Trade Area.
If a Black & Decker product becomes defective due to faulty materials, workmanship or lack of conformity, within 24 months from the date of purchase, Black & Decker guarantees to replace defective parts, repair products subjected to fair wear and tear or replace such products to ensure minimum inconvenience to the customer unless:
- The product has been used for trade, professional or hire purposes;
- The product has been subjected to misuse or neglect;
- The product has sustained damage through foreign objects, substances or accidents;
Repairs have been attempted by persons other than authorised repair agents or Black & Decker service staff.
To claim on the guarantee, you will need to submit proof of purchase to the seller or an authorised repair agent. You can check the location of your nearest authorised repair agent by contacting your local Black & Decker office at the address indicated in this manual. Alternatively, a list of authorised Black & Decker repair agents and full details of our after-sales service and contacts are available on the Internet at: www.2helpU.com
Please visit our website www.blackanddecker.co.uk to register your new Black & Decker product and to be kept up to date on new products and special offers. Further information on the Black & Decker brand and our range of products is available at www.blackanddecker.co.uk
CE GK1640T/GK1635T/GK1630T series Black & Decker declares that these products conform to: 98/37/EC, 89/336/EEC, EN 50144, EN 55014 2000/14/EC, Chainsaw ≤ 1600 W, Annex V
Level of sound pressure, measured according to 2000/14/EC:
| LpA | sound pressure) | dB(A) | 88 |
| LwA | (acoustic power) | dB(A) | 101 |
| LwA | (guaranteed) | dB(A) | 103 |
Always wear ear protection if the sound pressure exceeds 85 dB(A).
Hand/arm weighted vibration value according to EN 50144:
3.5m / s^2

Kevin Hewitt
Director of Consumer Engineering
Spennymoor, County Durham DL16 6JG, United Kingdom
KETTENSÄGE
Director of Consumer Engineering
Spennymoor, County Durham DL16 6JG
United Kingdom
TRONCONNEUSE
98/37/CEE, 89/336/CEE
EN 50144, EN 55014,
2000/14/CEE, motosega ≤ 1600W
Annex V
Director of Consumer Engineering Spennymoor, County Durham DL16 6JG, United Kingdom
MOTOSIERRA
Kevin Hewitt
Engenheiro Responsavel
Spennymoor, County Durham DL16 6JG, United Kingdom
KEDJESAG
Lär kännä din kedjesag

Kevin Hewitt
Director of Consumer Engineering
Spennymoor, County Durham DL16 6JG, United Kingdom
KJEDESAG
VEDLIKEHOLD (fig. N)
Kevin Hewitt
Director of Consumer Engineering
Spennymoor, County Durham DL16 6JG, United Kingdom
KAEDESAV
Kend din kaedesav

Reservedele / reparationer
98/37/EØF, 89/336/EØF,
EN 50144, EN 55014,
2000/14/EØF, kædesav ≤ 1600 W, Annex V
Lydniveauet mål'ti henhold til 2000/14/EØF:
L_pA (lydniveau) dB(A) 88
L_WA (akustisk styrke) dB(A) 101
L_WA (garanteret) dB(A) 103

Anvend horevaern, his lydniveauet
overstiger 85 dB(A).
Director of Consumer Engineering
Spennymoor, County Durham DL16 6JG
United Kingdom
KETJUSAHA
Tunne ketjusahasi

Kevin Hewitt
Director of Consumer Engineering
Spennymoor, County Durham DL16 6JG, United Kingdom
AAYΣΟΠΡΙΝΟ
Vwpiot to aluooonpiovo oac

Npooox!Kata n xpnon nEeptikwv
epyaieiw, 0 npenei naVta va laubavovtai
oi baiakec npouplaeeic aoaaleiac, yia
toV ppiopio tokivou npkaayiac,
nEeTPOPIAeK

Spennymoor, County Durham DL16 6JG
United Kingdom
| België/Belgique | Black & Decker (Belgium) N.V. | Tel. | 016 68 91 00 |
| Nieuwlandlaan 321 | Fax | 016 68 91 11 |
| 3200 Aarschot | | |
| Danmark | Black & Decker | Tel. | 70 20 15 10 |
| Sluseholm 2-4, 2450 København SV | Fax | 70 22 49 10 |
| Internet: www.blackanddecker.dk | | |
| Deutschland | Black & Decker GmbH | Tel. | 06126/21 - 0 |
| Black & Decker Str. 40, D - 65510 Idstein | Fax | 06126/21 29 80 |
| Ελλάδα | Black & Decker (Ελλάς) A.E. | Tηλ. | 210 8981616 |
| Στράβωνος 7 & Λεωφ. Bouλιαγμένης 159 | Φαξ | 210 8983285 |
| 166 74 Γλυφάδα - Αθήνα | www.blackanddecker.eu | |
| Espana | Black & Decker Ibérica, S.C.A. | Tel. | 934 797 400 |
| Parc de Negocis "Mas Blau" | Fax | 934 797 419 |
| Edificio Muntadas, c/Bergadá, 1, Of. A6 | | |
| 08820 El Prat de Llobregat (Barcelona) | | |
| France | Black & Decker (France) S.A.S. | Tel. | 04 72 20 39 20 |
| B.P. 21, 69571 Dardilly Cédex | Fax | 04 72 20 39 00 |
| Helvetia | ROFO AG | Tel. | 026-6749391 |
| Gewerbezone Seeblick | Fax | 026-6749394 |
| 3213 Kleinössingen | | |
| Italia | Black & Decker Italia SpA | Tel. | 039-23871 |
| Viale Elvezia 2 | Fax | 039-2387592/2387594 |
| 20052 Monza (MI) | Numero verde | 800-213935 |
| Nederland | Black & Decker Benelux | Tel. | 0164 - 283000 |
| Joulehof 12, 4622 RG Bergen op Zoom | Fax | 0164 - 283100 |
| Norge | Black & Decker (Norge) A/S | Tlf. | 22 90 99 00 |
| Postboks 4814, Nydalen, 0422 Oslo | Fax | 22 90 99 01 |
| Internet: www.blackanddecker.no | | |
| Österreich | Black & Decker Vertriebsges.m.b.H | Tel. | 01 66116-0 |
| Oberlaaerstraße 246, A1100 Wien | Fax | 01 66116-14 |
| Portugal | Black & Decker | Tel. | 214667500 |
| Rua Egas Moniz 173 | Fax | 214667580 |
| S. João do Estoril | | |
| 2766-651 Estoril | | |
| Suomi | Black & Decker Oy | Puh. | 010 400 430 |
| Keilasatama 3, 02150 Espoo | Faksi | (09) 2510 7100 |
| Black & Decker Oy, | Tel. | 010 400 430 |
| Kägelhammen 3, 02150 Esbo | Fax | (09) 2510 7100 |
| Sverige | Black & Decker AB | Tel. | 031-68 60 60 |
| Fabriksg. 7, 412 50 Göteborg | Fax | 031-68 60 80 |
| United Kingdom | Black & Decker | Tel. | 01753 511234 |
| 210 Bath Road | Fax | 01753 551155 |
| Slough, Berkshire SL1 3YD | Helpline | 01753 574277 |
| Middle East & Africa | Black & Decker (Overseas) A.G. | Tel. | +971 4 2826464 |
| PB 5420, Dubai, United Arab Emirates | Fax | +971 4 2826466 |

GUARANTEE CARD GARANTIEKARTE CARTE DE GARANTIE TAGLIANDO DI GARANZIA GARANTIEKAART TARJETA DE GARANTIA CARTAO DE GARANTIA GARANTIBEVIS GARANTI KORT GARANTI KORT TAKUUKORTTI KAPTA EFGYHHE
| English | Please complete this section immediately after the purchase of your tool and send it to Black & Decker in your country. | Português | Por favor, recorte esta parte, colocque-a num envelope saldo e endereçado e envie-o logo après a compra do seu produto para o endereço da Black & Decker do seu pais. |
| Deutsch | Bitte schneiden Sie diesen Abschnitt ab, steckenihn in einen frankierten Umschlag und schickenihn an die Black & Decker Adresse Ihres Landes. | Svenska | Var vänlig klipp urenna del och sänd den i ett frankerat kuvert til Black & Deckers adress i Ditt land. |
| Français | Découpez cette partie et envoyez-la sous enveloppe timbrée à l'adresse de Black & Decker dans votre pays, ceci immédiatement après votre achat. | Norsk | Vennligst klipp ut这部分 delen umidelbart erter du har pakket ut ditt produit og legg det i en adressert konvoluttil Black & Decker (Norge) A/S. |
| Italiano | Per favore ritagliate esta parte, insertela in una busta con francobollo e speditela subito après l'acquisto del prodotto all'indirizzo della Black & Decker nella suazione. | Dansk | Venligst klip deren del ud og send frankeret til Black & Decker i dit land. |
| Nederlands | Knip dit gedeelte uit en zend het direct na aankoop in een gefrankeerde, geadreseerde envelopaar het adres van Black & Decker in uw land. | Suomi | Leikkaa irti tämä osa, laite se kuoreen ja postita kuori paikalliseen Black & Decker osoitteeseen. |
| Espanol | Després de haber comprado su herramienta envie usted, por favor, esta tarjeta a la central de Black & Decker en su Pais. | Eλληνικα | Παρακαλώ κόψετε autó to koμμāti kai taúxúðρούσατε to αμέσως μετá tny αγορá tou προίοντος σας στην δειúθυση της Black & Decker στην Ελλάδα. |