USER MANUAL MW 7848 - FOUR A MICRO-ONDES SEVERIN
Re-heating a 1-course meal (approx. 450g )
Turn rotary control (display A1) + press + turn rotary control until (display 450 g) +
press 0 QUICK
Microwave operation at maximum power for 60 seconds
Press 2x QUICK
Microwave operation for 5 minutes at 80% power (720 W)
Press 2x ≈ +QUICK + turn rotary control until (display 5:00) + QUICK
Hot-air operation for 45 minutes at 160^
Press 2x (display 160^) + + turn rotary control until (display 45:00) +
8 minutes' grilling time
Press 1 x × (display G-1) + + turn rotary control until (display 8:00) +
Defrost function for 10 minutes
Press 2 x 串&串 (display dEF2) + turn rotary control until (display 10:00) +
Combination microwave/grill for 20 minutes
Press 3 x (display C-2) + QUICK + turn rotary control until (display 20:00) + QUICK
Combination microwave/hot-air for 30 minutes
Press 2 x × (display C-1) + + turn rotary control until (display 30:00) +
Defrost function for 4 minutes + 100% (900W) microwave operation for 6 minutes
Press 2x 串&串 (display dEF2) + turn rotary control until (display 4:00) + ≡ + turn rotary
control until (display 6:00) + QUICK
Dear Customer
Before using the appliance, please read the following instructions carefully and keep this instruction manual for future reference. The appliance must only be used by persons familiar with these instructions.
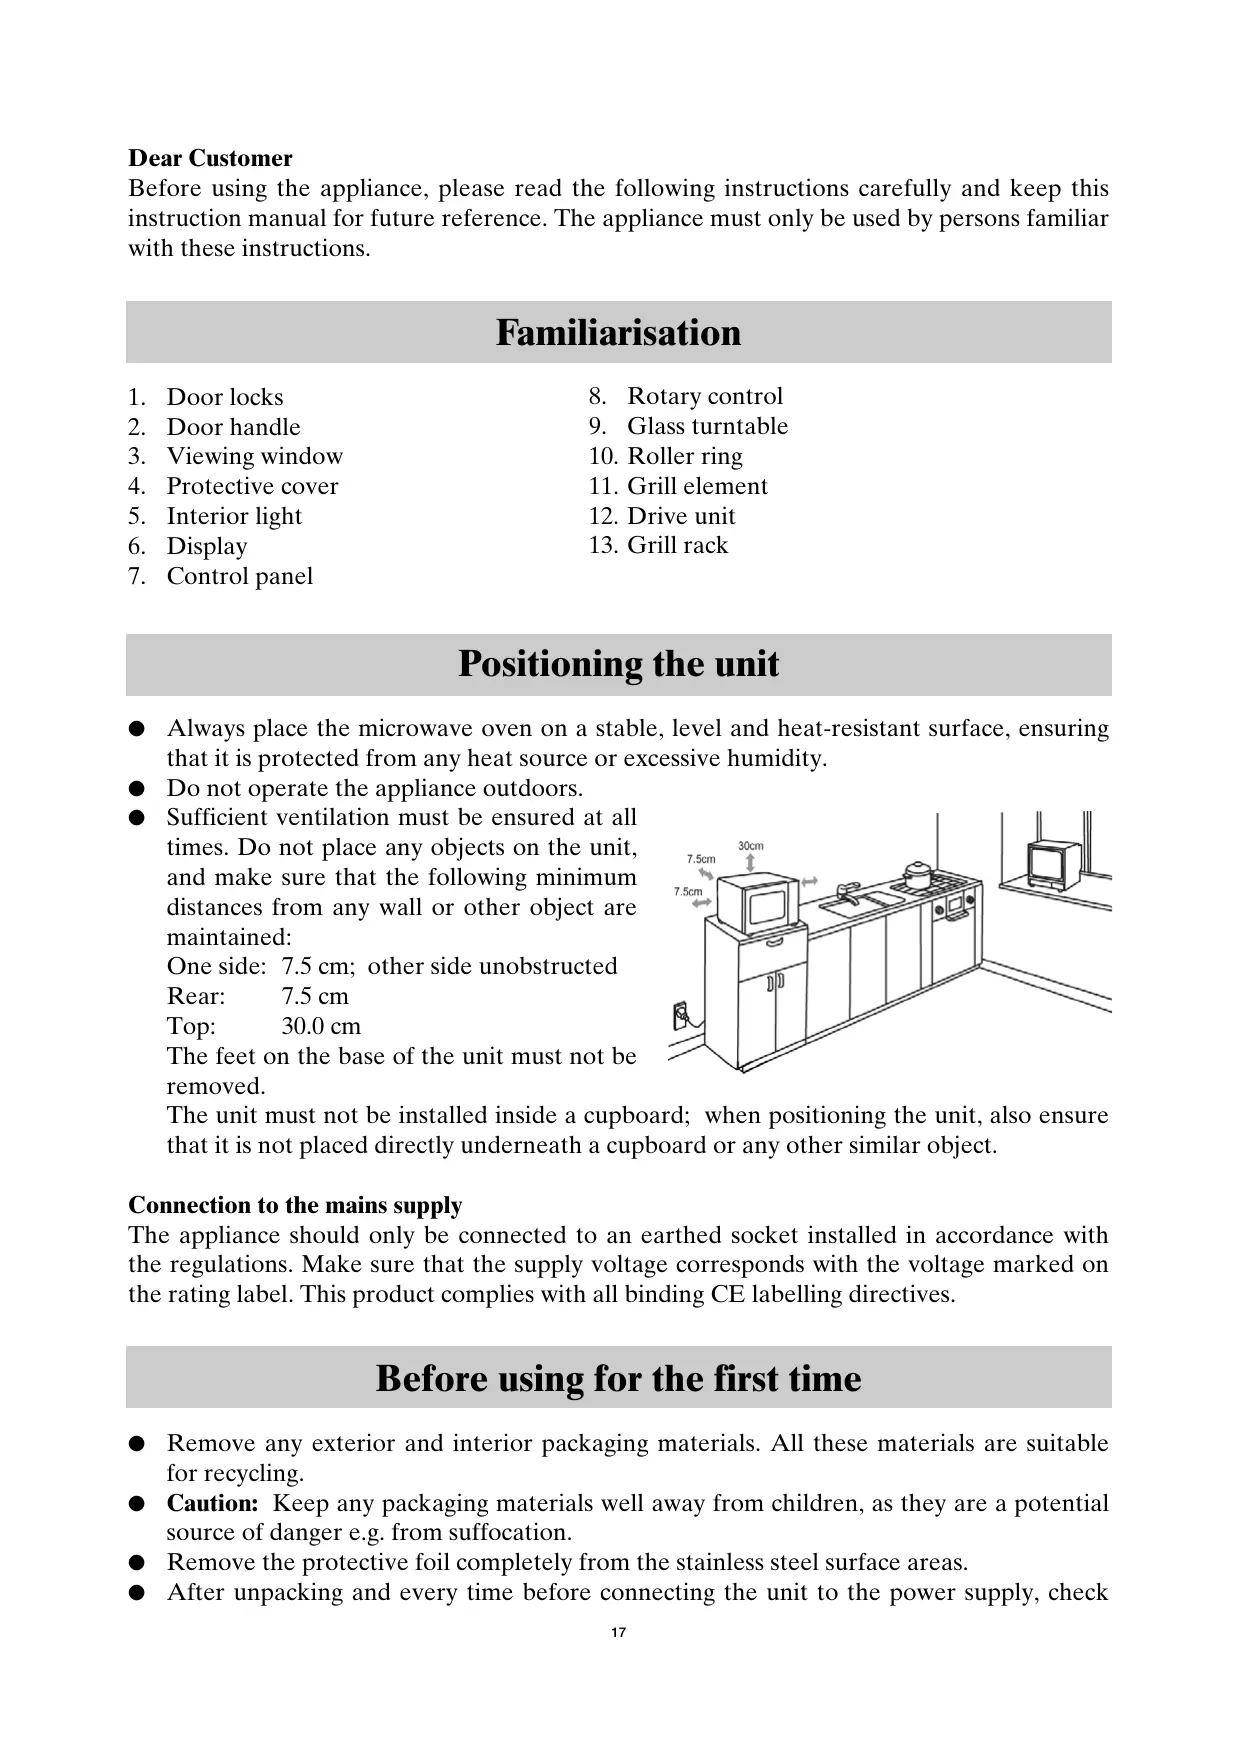
Familiarisation
-
Door locks
-
Rotary control
-
Door handle
-
Glass turntable
-
Viewing window
-
Roller ring
-
Protective cover
-
Grill element
-
Interior light
-
Drive unit
-
Display
-
Grill rack
-
Control panel
Positioning the unit
- Always place the microwave oven on a stable, level and heat-resistant surface, ensuring that it is protected from any heat source or excessive humidity.
- Do not operate the appliance outdoors.
- Sufficient ventilation must be ensured at all times. Do not place any objects on the unit, and make sure that the following minimum distances from any wall or other object are maintained:
One side: 7.5cm ; other side unobstructed
Rear: 7.5 cm
Top: 30.0 ~cm
The feet on the base of the unit must not be removed.
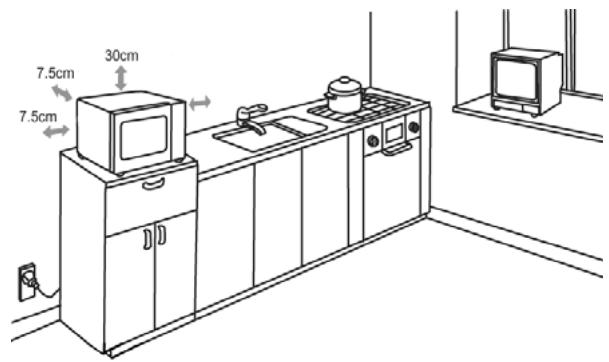
The unit must not be installed inside a cupboard; when positioning the unit, also ensure that it is not placed directly underneath a cupboard or any other similar object.
Connection to the mains supply
The appliance should only be connected to an earthed socket installed in accordance with the regulations. Make sure that the supply voltage corresponds with the voltage marked on the rating label. This product complies with all binding CE labelling directives.
Before using for the first time
- Remove any exterior and interior packaging materials. All these materials are suitable for recycling.
- Caution: Keep any packaging materials well away from children, as they are a potential source of danger e.g. from suffocation.
- Remove the protective foil completely from the stainless steel surface areas.
- After unpacking and every time before connecting the unit to the power supply, check
the unit and its power cord carefully for any signs of damage. Also ensure that the door, including the viewing window and door locks, are not damaged or bent and that it closes firmly against the support. This is important to ensure that no microwave energy is allowed to escape during operation. For the same reason, the entire casing as well as the inside of the oven must be carefully checked.
- Should the unit show any signs of damage, it must not be used under any circumstances until it has been repaired by a qualified technician.
- Do not remove the protective film covering the inside of the door, nor the turntable drive unit or the grey-brown protective cover (4) next to the light on the right of the interior.
- Insert the roller ring and the glass turntable into the unit.
- Before the microwave appliance is used for the first time, let it heat up on the grill setting (without the microwave function activated) for approximately 10 minutes. This will remove the smell typically encountered when first switching on a grill. A little smoke may be emitted; this is quite normal, but ensure there is sufficient ventilation.
Note: Do not switch the unit on unless the food to be heated or cooked has been placed inside the oven. Operating the appliance empty could result in damage to the unit.
Important notes
- When heating liquids in your microwave oven, the liquid may heat up beyond boiling-point without visible evidence of bubbling. It is therefore important to exercise extreme caution when handling any containers, e.g. when removing them from the oven.
The risk of such over-boiling may be reduced by placing a heat-resistant glass rod in the container during the heating process.
- Eggs in their shells or whole hard-boiled eggs must not be heated up in a microwave oven, since they may explode even after the microwave heating process has finished.
- Caution: It is also highly dangerous to heat up liquids or any kind of solid food items in closed containers in the unit, since there is a real danger of explosion.
- The contents of baby bottles or glass containers with baby food must be thoroughly stirred or shaken to ensure that the temperature is evenly distributed. To avoid painful and dangerous scalding, always check the temperature before feeding a child.
- When heating or cooking food contained or wrapped in combustible materials such as plastic or paper, there is a danger of those materials igniting. It is also possible that food will dry out or even ignite if the selected cooking time is excessive. Fat or oil are also inflammable substances. It is therefore important to supervise the appliance during operation. Highly volatile or inflammable liquids such as concentrated alcohol must of course not be heated up.
- Should any smoke be noticed during operation, keep the door closed to inhibit or smother any flames. Switch the unit off immediately and remove the plug from the wall socket.
- To prevent danger of burns, a suitable oven-cloth must always be used when removing food items from the oven, since the utensils and cooking containers heat up not only during use of the grill or hot-air functions, but also during microwave operation.
- Special food thermometers (as used in conventional baking ovens) are not suitable for use with microwave ovens.
Important safety instructions
- Caution: certain types of food may tend to catch fire. Do not, under any circumstances, leave the appliance unattended when using the microwave, grill, hot-air or combination functions.
- This microwave oven is intended for the defrosting, heating and cooking of food only. No responsibility will be accepted if damage results from improper use, or if these instructions are not complied with.
- This appliance is not intended for use by any person (including children) with reduced physical, sensory or mental capabilities, or lacking experience and knowledge, unless they have been given supervision or instruction concerning the use of the appliance by a person responsible for their safety.
Children should be supervised to ensure that they do not play with the appliance.
- Caution: The use of the microwave oven by children without supervision must not be permitted, unless specific and clear instructions have been given prior to use, allowing the child not only to operate the microwave oven in a safe manner, but also to understand the dangers resulting from improper use or non-compliance with the instructions.
- Warning because of the high temperatures that occur during operation in the combination functions, children must not use the appliance unless they are properly supervised by an adult.
- Always switch the appliance off and remove the plug from the wall socket: - before cleaning, - in case of any malfunction.
- Caution: The exterior surfaces of the appliance may become hot during operation. There is also a danger of steam being emitted through the ventilation slots, with a consequent risk of scalding.
- Do not allow the appliance or its power cord to touch hot surfaces or come into contact with any heat sources. Do not let the power cord hang free, and keep it away from any hot parts.
- If the unit is not kept properly clean, deterioration in the quality of its surfaces may be caused, with possible subsequent shortening of its life-cycle, as well as potential risk to the user's safety.
- This microwave oven is intended for domestic use only and not for commercial applications. (Class B in compliance with EN 55011:1998+A1+A2)
- Caution: Any maintenance or repair work requiring the removal of any microwave radiation protection cover represents a serious hazard to unqualified persons. This includes the replacement of the special power cord or an interior light bulb. The unit must not be opened, except by qualified personnel. If repairs are needed, please send the appliance to one of our customer service departments. The address can be found in the appendix to this manual.
The microwave function (Group II in compliance with EN 55011:1998+A1+A2)
Electromagnetic energy is generated inside the unit, causing the molecules in the food (mainly water molecules) to oscillate and subsequently causing the food to become hot. Food with high water content will therefore heat up faster than relatively dry food. The heat is generated gradually inside the food. Any utensils, container or plates used are heated up only indirectly as a result of the food temperature.
Always use suitable kitchen utensils
- Do not place the food directly onto the glass turntable; always use a suitable plate or cooking container. Make sure that the container does not protrude over the rim of the glass turntable.
- Metal objects are to be avoided since microwaves are reflected from metal surfaces and might not reach the food to be cooked. Any metal in the oven might also cause sparks, resulting in possible damage to the unit.
- As a general rule, cutlery or metal containers must not be used in the microwave oven. Some food wrappings contain aluminium foil or wires underneath a layer of paper and are therefore also unsuitable for use with microwave appliances.
- Should the use of aluminium foil be recommended in a recipe, ensure that the food is tightly wrapped in the aluminium foil (avoiding any air blisters). Ensure a minimum distance of 2.5 ~cm between the aluminium foil and the interior walls of the oven.
- Always make sure that the cooking container or plate used does not have any metal decoration, such as a gold rim, or colour containing metal particles. Lead crystal objects are also not suitable. Always make sure that the cooking containers used are not hollow in any part (e.g. in the handles). Porous materials may have absorbed water during cleaning and are again not suitable. Cooking containers or utensils made of 'Melamine' plastic material absorb energy and are also unsuitable.
- Using the microwave function
- Containers made from heat-resistant glass or porcelain, however, are well suited for use in microwave appliances.
- Plastic is suitable only if it is heat-resistant up to 180^ C. Cooking bags etc. should be punctured to release any high pressure during cooking.
Cooking containers especially designed for use with microwave ovens are available at most kitchenware dealers.
- Cooking containers or plates can be tested for their suitability in a microwave appliance by placing the item (without any food) on the glass turntable, switching the unit on, adjusting the microwave power setting to 'High', and letting the appliance operate for approximately 20 seconds. Listen and watch carefully for crackling sounds and sparks. Should any be observed, switch the unit off immediately. It is also important to check the temperature of the container: a suitable container will only be lukewarm.
- Using the grill or hot-air function
- When using the grill or hot-air function, any heat-resistant containers or plates suitable for conventional ovens may be used. Do not use plastic items when the grill or hot-air function is used.
- The food to be cooked can be put directly on the grill rack, which is then placed on the glass turntable.
- Microwave/grill or microwave/hot-air combinations
- When using the microwave + grill or microwave + hot-air combinations, each function is activated alternately. The containers or plates must therefore be suitable for use in a microwave as well as being heat-resistant. Because of the relatively high temperatures, plastic items must not be used. The grill rack of this unit is also
suitable for use with the microwave. Make sure that container or plate used does not contain any metal parts.
Operation
To ensure optimum results, this microwave oven uses state-of-the-art electronics.
- When any control button is pressed, the correct input is acknowledged by one beep signal.
- While a programme sequence is running, the current setting can be called up by pressing the appropriate key. E.g., if during the microwave programme the ≅key is pressed, the display will show the selected power setting.
- A programme can be interrupted or restarted by pressing the key
General operating sequence
-
Place the food to be heated in a suitable container. Place the container onto the turntable in the oven.
-
When food is placed in the microwave, it should be covered to prevent it from drying out. Glass or plastic covers especially designed for use with microwave appliances are available at most kitchenware dealers.
-
When using the grill, hot-air or any of the combination functions, do not cover the food to be cooked. The grill rack may be put directly on the glass turntable with the food itself on the grill rack.
-
Close the door and set the desired programme.
- As the programme is started, the turntable starts to rotate. During operation, the interior light remains on.
- If a programme is not started within 5 minutes, the unit will automatically go back to Stand-by mode.
- If, during operation, the door is opened or the key is pressed (e.g. to stir or to turn the food in order to ensure that the temperature is evenly distributed), the timer and programme functions are automatically suspended. The programme will automatically resume only after the door is closed again and the key is pressed.
- Press twice to interrupt the programme.
- 5 beeps indicate that the pre-programmed period has elapsed; at the same time, the interior lighting switches off.
- Open the door and remove the container with the food.
- In order to achieve an even heat distribution through the food, the container should be set aside for several minutes.
-
The cooking times generally depend on several factors.
-
The microwaves penetrate the surface of the food. For larger pieces of food, a longer cooking time is therefore needed than for the same amount of food if cut into pieces. The food should also be evenly distributed on the plate.
- To ensure that any germs in the food are safely destroyed, the food needs to be exposed to high temperatures for a sufficiently long period.
- As a basic rule:
- half the amount
- half the time recommended (for the full amount).
- double the amount
- almost double the time recommended.
Setting the clock:
Once the unit has been connected to the power supply, the display shows 0:00 and an acoustic signal is heard.
Note: The time display does not start counting, unless the clock has been set. The time setting process can be cancelled by pressing the key.
The clock must be set when the appliance is connected for the first time, and also if a power failure has reset the clock.
- Press ① once or twice to select the 24- or 12-hour display. The display shows 24H or 12H.
- Turn the rotary control to set the correct hour. The hour must be in the range 0-23 (for 24H) or 1-12 (for 12H).
- Press ① . The minute digits start flashing.
- Turn the rotary control to set the correct minutes. The range must be 0-59.
- Press ① to finish setting the time. The symbol ‘:’ flashes and the correct time is shown.
The microwave function
To programme the unit for cooking, the correct mode (microwave), the required power setting and the cooking time must be selected, before the programme sequence can be started. The power setting is selected by repeatedly pressing ≈ . The cooking time can be pre-set to a maximum of 95 minutes.
| ≈ | Power settings | |
| Power (P) | Display | Type |
| 1 x | 900W | P100 (100%) | High | Heating up liquids, cooking |
| 2 x | 720W | P 80 (80%) | Medium high | Defrosting and heating up deep-frozen dishes |
| 3 x | 450W | P 50 (50%) | Medium | Cooking delicate food |
| 4 x | 270W | P 30 (30%) | Defrosting | Defrosting |
| 5 x | 90W | P 10 (10%) | Low | Defrosting delicate food |
Example: to programme the microwave function for a cooking time of 5 minutes at 50% power.
- Press ≈ 3 times. The display shows P 50 and
- Press to confirm the microwave function.
- Turn the rotary control until the display shows 5:00.
- Press . The symbol starts flashing on the display.
Note: The following steps are used for setting the cooking time:
0-1 minute 5-second steps
1 - 5 minutes : 10-second steps
5 - 10 minutes : 30-second steps
0 - 30 minutes : 1-minute steps
30 - 95 minutes : 5-minute steps
The grill function
The grilling process uses radiation heat to process the food. This programme is suitable for cooking 'au gratin' or for grilling thin pieces of meat.
Select the desired grilling time. The grilling time can be pre-set to a maximum of 95 minutes.
The power setting of the grill function cannot be changed. As the meat needs to be turned
after one side is sufficiently browned, and taken out once it is done on both sides, this process should be closely monitored.
Example: programming the grill function for 30 minutes.
- Press once. 'G-1' is flashing in the display, and the symbol is shown.
- Press to confirm the grill function.
- Turn the rotary control until the display shows 30:00.
- Press to start the grill process. The symbol W starts flashing in the display.
Note:
Halfway through the programmed grilling time, a double-beep is heard and the programme automatically stops; this allows you to turn the food to be grilled. Open the door, turn the food, then close the door again and press to continue the programme.
Combination functions
When using the combination functions, the microwave, hot/air and grill functions are activated alternately at different time settings. Using the various combinations helps to reduce the overall cooking time. These programmes are useful for fish, potatoes, soufflés or cooking 'au gratin'.
| Function | Display | Microwave | Hot air | Grill |
| Combi 1 | C-1 | ● | ● | |
| Combi 2 | C-2 | ● | | ● |
| Combi 3 | C-3 | | ● | ● |
| Combi 4 | C-4 | ● | ● | ● |
- Press ≈ repeatedly until the desired combination function is shown.
- “C-1”, “C-2”, “C-3” or “C-4” are flashing in the display, in addition, the corresponding symbols (^, S^, W^) are shown.
- Press to confirm the selected combination function.
- Turn the rotary control to select the cooking time.
- Press to start the cooking process. The corresponding symbol for the selected function flashes on the display.
The hot-air function
With this function, hot air circulates inside the oven, achieving an even cooking and browning process. By pressing the key, the cooking temperature can be set within a range of 150^ and 240^ . The cooking time can be pre-set to a maximum of 95 minutes.
If required, the appliance may also be pre-heated. Select the desired temperature level and press twice.
Example: the appliance is to be pre-heated to 200^ , followed by a cooking time of 30 minutes.
- Press 6 times. 200^ starts flashing on the display, and the symbol 出 appears.
- Press to confirm the temperature setting.
- Press x to start the pre-heating process.
-
The symbol and the illuminated indicator bar start flashing while pre-heating is in progress.
-
As soon as the pre-set temperature has been reached, two beeps are heard and the indicator ‘ 200^ ’ starts flashing.
- Open the door, place the food inside the oven compartment and close the door again.
- Turn the rotary control until 30:00 appears in the display.
- Press to start the cooking process. The symbol flashes on the display.
Note:
- The cooking time cannot be set while pre-heating is in progress.
- If the cooking time is not set within 5 minutes after pre-heating is complete, 5 beep signals are heard and the unit will automatically go back to Stand-by mode.
Note: Steps 3 and 7 can be omitted, if pre-heating is not required.
Defrost programme according to time or weight (串)
This defrosting programme is useful for defrosting food by either setting the weight of the food to be defrosted, or by directly setting the defrosting time. For delicate food we recommend defrosting on the level 'Low' (see table Power setting), to ensure that the food is defrosted with an even, low temperature setting.
The indicator ‘dEF1’ represents weight-based defrosting; ‘dEF2’ represents time-based defrosting.
Helpful notes:
- The defrosting process should be interrupted at regular intervals and those food portions already defrosted should be taken out; this is to ensure that food already defrosted will not take away heat from food that still requires defrosting.
- Should the food not be completely defrosted after the pre-set defrosting time has elapsed, it is advisable to limit any further defrosting times to 1-minute periods until the food is fully defrosted.
- Food stored in plastic containers or wrapped in plastic should be left standing for a while after it has been taken from the freezer. Wait until the food can be easily detached from the plastic, before it is put into the oven inside a container suitable for use with microwave ovens.
- Press 4 once or twice. The display shows 'dEF1' or 'dEF2' and, in addition, the symbols and .
- Use the rotary control to set the weight of the food to be defrosted (between 100g and 2000g) or the desired defrosting time (between 00:05 and 95:00).
- Press to start the defrosting process. An acoustic signal is heard, and the symbols and start flashing.
Quick-programming
The most commonly used microwave time-settings can be called up simply by pressing 1 QUICK . With this function, the microwave power setting is always 100% . Each press on the key adds 30 seconds to the cooking time.
Note: the cooking process starts as soon as the key is pressed for the first time.
Example: to programme the microwave function for a cooking time of 2 minutes at 100% power.
- Press 4 times. The display shows 2:00, and the symbol starts flashing.
Automatic cooking programmes
These automatic cooking programmes are helpful when cooking food without having to select any particular settings, e.g. for power or cooking time. Once a programme has started, the currently selected function is indicated by the appropriate symbols on the display (e.g. for microwave).
- Use the rotary control to select the desired programme. The display shows the corresponding programme symbol and 'Auto', and the programme indicator 'A-1'starts flashing.
- Press to confirm the programme.
- Use the rotary control to set the desired weight.
- Press to start the programme.
Note: The menu 'A-8' (Cakes) uses the hot-air function. It first pre-heats to 160 degrees and then starts with the automatic cooking programme. Once pre-heating is complete, 2 beep signals are heard and the temperature display starts flashing. Place the cake into the microwave and press to start the programme.
| Menu | Weight | Display |
| A-1
re-heating | 150 g | 150 |
| 250 g | 250 |
| 350 g | 350 |
| 450 g | 450 |
| 600 g | 600 |
| A-2
potatoes | 230 g | 1 |
| 460 g | 2 |
| 690 g | 3 |
| A-3
meat | 150 g | 150 |
| 300 g | 300 |
| 450 g | 450 |
| 600 g | 600 |
| A-4
vegetables | 150 g | 150 |
| 350 g | 350 |
| 500 g | 500 |
| A-5
fish | 150 g | 150 |
| 250 g | 250 |
| 350 g | 350 |
| 450 g | 450 |
| 650 g | 650 |
| A-6
noodles / pasta | 50 g (with cold water 450 g) | 50 |
| 100 g (with cold water 800 g) | 100 |
| 150 g (with cold water 1200 g) | 150 |
| A-7
soup | 200 ml | 200 |
| 400 ml | 400 |
| 600 ml | 600 |
| A-8 cakes | 475 g | 475 |
| A-9
pizza | 200 g | 200 |
| 300 g | 300 |
| 400 g | 400 |
| A-10
chicken / poultry | 500 g | 500 |
| 750 g | 750 |
| 1000 g | 1000 |
| 1200 g | 1200 |
Setting multiple programmes
The unit may be set for a maximum of 2 programmes running consecutively, e.g. defrosting, followed by microwave cooking. Any defrosting, microwave, grill or hot-air programmes as well as the combination of the programmes may be selected. Any defrosting programme must of course run before any cooking programme can be started.
Example: to defrost food before it is cooked using the microwave function.
- Programme the defrost function (without pressing GICK)
- Programme the microwave function.
- Press . The display shows the appropriate symbols for the selected programmes.
5 beeps indicate that the entire programme has finished.
Hint: This memory function is especially helpful when using the microwave to cook food at different power settings. While a higher power setting is selected initially, the
power can be reduced at a later stage in order to keep the food hot, and to ensure that the heat is evenly distributed when the food is already done.
Timer
The microwave can be pre-programmed in such a way that it starts operating at a predetermined time. However, always check first that the time on the unit has been correctly set prior to using the timer delay function.
- Set the time (see Setting the clock).
- Set the desired programme. The unit allows you to set 2 programmes; however, none of the defrosting programmes can be selected with the timer delay.
Note: Do not yet press after the current programme selection. Automatic cooking programmes can only be started individually.
- Press ① . The current time is displayed and the hour display flashes.
- Use the rotary control to select the desired hour setting (between 0-23 resp. 1-12) at which you want the unit to start operating.
- Press () . The minute display flashes.
- Use the rotary control to select the desired minute setting (between 0-59) at which you want the unit to start operating.
- Press . The selected programme will start at the pre-programmed time, when 2 acoustic signals will be heard.
Childproof safety device:
This safety device prevents children from operating the appliance without supervision.
To activate the safety device, press for 3 seconds. The symbol 0 appears on the display.
To switch off the safety device, press l again for 3 seconds. The symbol 0 disappears.
Note: Should you experience a problem switching the appliance on, first verify that the safety device is not activated.
Cleaning
- Before cleaning the appliance, ensure it is switched off, disconnected from the power supply and has cooled down completely.
- Do not clean the unit with water. Make sure that no water - however small an amount - is allowed to enter the ventilation slots on the inside or outside of the unit. Do not use any steam cleaning appliances.
- The interior surfaces must be cleaned thoroughly after each cycle of use. The inside of the door as well as the door frames must be kept clean at all times.
- The entire unit may be wiped with a slightly damp lint-free cloth and a mild household detergent. Wipe thoroughly dry afterwards.
- Do not use abrasives or harsh cleaning solutions. Commercially available sprays specifically developed for cleaning conventional baking ovens are not to be used.
- The glass turntable and roller ring are dishwasher-safe. The roller ring as well as the guiding track area underneath the glass turntable must be kept clean at all times.
- The grill rack may be cleaned in hot, soapy water.
Technical specifications
Outside dimensions: 456mm (W) x 511 mm (D) x 305 mm (H)
Inside dimensions
glass turntable: 315mm
clearance above the glass turntable: 185 mm
Unit weight: approx. 17kg
Operating voltage: 230V 50Hz
Total power consumption:
- grill: 1400 W
- microwave: 1500 W
- hot-air: 2400 W
- microwave/grill combination: 1500 W
Microwave output: 90 W - 900 W
Disposal

Old or damaged units should be rendered unusable by removing the power cord. Should you be unsure about the recycling facilities available for such appliances in your area, please inquire at the relevant local authority department.
Guarantee
This product is guaranteed against defects in materials and workmanship for a period of two years from the date of purchase. Under this guarantee the manufacturer undertakes to repair or replace any parts found to be defective, providing the product is returned to one of our authorised service centres. This guarantee is only valid if the appliance has been used in accordance with the instructions, and provided that it has not been modified, repaired or interfered with by any unauthorised person, or damaged through misuse.
This guarantee naturally does not cover wear and tear, nor breakables such as glass and ceramic items, bulbs etc. This guarantee does not affect your statutory rights, nor any legal rights you may have as a consumer under applicable national legislation governing the purchase of goods. If the product fails to operate and needs to be returned, pack it carefully, enclosing your name and address and the reason for return. If within the guarantee period, please also provide the guarantee card and proof of purchase.
Examples de programmation
Chere cliente, Cher client,
Observations utilities:
Technical specifications
Nota: No pulse toda ♦ ♦ ♦ ♦ ♦ ♦ ♦ ♦ ♦ ♦ ♦ ♦ ♦ ♦ ♦ ♦ ♦ ♦ ♦ ♦ ♦ ♦ ♦ ♦ ♦ ♦ ♦ ♦ ♦ ♦ ♦ ♦ ♦ ♦ ♦ ♦ ♦ ♦ ♦ ♦ ♦ ♦ ♦ ♦ ♦ ♦ ♦ ♦ ♦ ♦ ♧ ♧ ♧ ♧ ♧ ♧ ♧ ♧ ♧ ♧ ♧ ♧ ♧ ♧ ♧ ♧ ♧ ♧ ♧ ♧ ♧ ♧ ♧ ♧ ♧ ♧ ♧ ♧ ♧ ♧ ♧ ♧ ♧ ♧ ♧ ♧ ♧ ♧ ♧ ♧ ♧ ♧ ♧ ♧ ♧ ♧ ♧ ♧ ♧ ♧ ♬ se pudir.
For at sikre det bedste resultat benytterijke mikrobolgeovn avanceret elektronik.
Aetovoyiec ovvduaouo
'Otau v xonouoie tis 1ovoyic s ovduaoou, oI 1otovoyic moxoxuataov, 0eouv aea oyaq evoyoiouvtai evaalas yia diaopoeixc g ovthetaic xovou. H xonon twv diapogow ovvduaoov bonthei orn meiow tov ouvoianov xovov maayiemuato. Ta poyqaata auta eiva xonouma yia yaoia, patatec, oovpé n maayieqma «oyxqatev>.
He cJIeIyEt cHIMaTb HOJKN, IIpHKpeIIeHHbIe K HIXHeY aHaIapata.
He cJIeIyET yCTaHaBJIiBaTb MKNKpOBOJIHOByIO IIeYb B IIIKaΦy; KpOME TOrO, IIprN yCTaHOBKe aIIIapata CJIeIHTe 3a TeM, YTO6bI OH He HAXOJINcI pyMo IOD IIIKaΦOM IJIIN IOJIIObIM IpyTm IIOXOXIM IpeIMetOM.
BkJIIOueHHe B ceTb
BkJIIOuHaTb aIIIpaAT cJIeIyET TOJbKO B 3a3eMJIeHHUO p03eTKU, yCTaHOBJeHHUO B COOTBeTCTBnC dIeIcTBYIOUHMMN HopMaMn. Y6eIITecb, YTO HaIppJxKeHne IHTaHnIa COOTBeTCTByET 3HaueHnIO HaIppJxKeHnI, yKa3aHHOMy Ha Ta6JIuYke. DaHHoe n3JeJIne COOTBeTCTByET Tpe6OBaHnI M dIpeKTHB, O6J3aTeJIbHbIX IJIЯ IIOJIyuEHNr IpaBa Ha HcIIIOJB3OBaHnE MapKnipOBKn CE.
BbIPbIBaTbc8 Nap: MoXHo 06BaPHTbc8.
CJIeIHTe 3a TeM, YTO6bI aIIIapaT HJIN IHHyp IIITaHnI He KacaJIncb rOpaynx IOBepxHOCTeI HJIN IcToUHnKOB TeIIJa. He IOnyscAitE CBO6OJHOrO IPOBnCaHnI IHHypa IIITaHnI, I IepXHTe eRO IIOJaJIbIe OT HaIpeBaIOJHXcY cAcTeI aIIIapaTa.
Heo6xOIMo coepKaTb IaHHbI Ipr6op B uHcToTe, TaK KaK ero 3aqr3HeHne MoKeT IIpNBecTH K yXyIIeHNIO KaueCTBa NOKpbITnA, YTO B CBOIO OUpeB MoKeT IIprNBecTH K yMeHbIIeHNIO cPoKa eRO cJyX6bl, a TaKxe JABNTbcN HcTOHNKOM ONaCHOCTH IJIa POJIb3OBaTeJIa.
MnKpOBoJIHOBaI Neyb IpeIHa3HaueHa NcKJIIOHTeJIbHO IJIa IOMaIIHerO, a He IIJ KOMMepueckoro IprHMeHHeN. (KJIacc B B COOTBeTCTBnH co cTaHApToM EN 55011:1998+A1+A2)
- Ппсдурждени. Любая олерашия по ремонту мнкроблноь пechи плпee Тхнчeckomу obcIJyЖИВaHHIO, Тpe6уша снггя 3aIHTHоК крblIKN,прedoхраняЮшей OT мнкроблнового ИЗЛУЧЕНЯ, прдтаблгет срbeb3HyOОпасость Ддя HeKBaJIHФИПОВaHHого ПОЛБ3OBaTeJЯ. 3TO kacaetca TaKke 3amHebICIIHAJBHOTo IIIHypa ПИТАнЯ и ЛAMПБI OCBeIeHЯ. OTKpbIBaTB KOPIyc aIIIapaTa может TOJbKO KBaJIHФИПОВaHHь спeИнajnct. Пprn Heo6xODIMocTN peMOHTA, прсим HaIIpaBt b aIIIapaT B OДIH N3 HaIIINx ПУHKTOB obcIyЖИВaHHЯ. AIDpeca nx yka3aHbI B PrnIoJxehnn K RykoBDCTBy NO 3KcIIpyaTuIN.
Функция CBY (Грушиа II B COOTBETCTBин co CTaHДapTom EN 55011:1998+A1+A2)
B aIIIapate reHepnpyetc 3JIeKTPOMaHHTHaJ 3HePnJ, KOtOpa BbI3bIBaet KoJIe6aHHe MOJIeKUJI (rJIaBHbIM o6pa3OM MOJIeKUJI BOIbI) B IIIISe, I BIOCSJIcTBHN HaRpeB IIIIIN. IIoTOMy IIIIa C BbICOKHM COePkaHHem BOIbI HaRpeBaETc 6bICTpee, Yem OTHOCHTeJIbHO cyXa IIIIa. TeIIIO reHepnpyetc B IIIIe IOCTePEHNO. JIO6bIe IIpN6OpbI N IIO6a IocuJa HArpeBaIOTc TOJIbKO OIOscpeIOBaHNO, Upe3 HaRpeB IIIIIN.
BceIa npIMeHnTe COOTBeTCTByIOIIne KyXOHHbIe npNoopbl N IOcyd
He KJIaIInTe PIIuY HeIOcePcCTBeHHO Ha CTeKJIaHHbI IOBOPOTbI cToJI; BCeTla HcIOJIb3yIe IJIra rOToBKN IIOxOJaIHy IOcyU yJIN eMKoCTb. Iocya / eMKoCTb He IIOJXHa BbICTyPaTb 3a KpaI IOBOPOTHO cToJIa.
He cIeIyEt IOMeIaTb B IIeYb MTeJIINueCKHe IIpeIMeTbI, TaK KaK MHKpOBOJIHbI OTpaJxIoTcR OT MTeJIINueCKo IIOBepXHOCTn IMoRyT He IOCTNIGHTb CO6CTBeHHO IIuH, KOTOpU HxKHO IIprHOrTOBHTb. KpOme TOrO, HaxOxJeHne JIO6Oro MTeJIJa B IIeH MoKeT Bbl3BaTb NckpeHne, CIOOC6Hoe IIOBpeiNTb aIIIapaT.
- KaK IIpaBnIIO, He cJIeIyET IIpIMHeTb MeTaJIINueCKHe cToIOBbIe IIpIbOpbI INII MeTaJIINueCKHe eMKocTb. B HeKOtOpbIX yIIaKOBOUHbIX MaTePnaJIax, IcIIoJIb3YeMbIX IJIa IIINIIeBbIX IIPOJyKTOB, IIOI cJIoE M6yMaH N HaxOJNTc4 0JbRa INI IIpoBOJIOKa, INIO3TOMY OHI He COBMeCTHMbI C IIpIMeHHeM E MNIKpOBOJHOBoI PeuN.
EcJIN IpoIyKT peKOMeHJyETcra rOTOBHTb BAJIOMHHHeBOI FOJIbRe, y6eIHTecb, YTO IIIIa IIIOTHO 3aBepHyTa B FOJIbry H YTO B UYNaKOBKe HeT BO3dUHbIX IY3bIpei. CJIeIInTe 3a TeM, YTO6bIMexJy aJIOMHHeBOI FOJIbRoH IN BHYTpEHHMN cTeHKaMI NeuN 6blIO He MeHee 2,5 cm.
BcerIa IIpoBepnTe, UTO IocuHa HJIH TapeJka He JeKOpHpOBaHbI MeTaJILOm, HaIIpImep, 3OJOToIIOJcOIO KpaIO HJIH KpacKOc MTeAJIINueCKHM
YacTnIaMn. Nocya n3 xpycTaJIc c coJepXaHHe m CbHua ToKe He roIHTc. BceIa IpoBepaIte, YTO y NocyIbI HeT POJIbIX YacTei (HaIprIMep, POJIbIX pyueK). IopNCTbIe MaTePnaJIbI, KOtOpBIE MOrYT BInITbIBaTb BOdy IIpn YnCtKe, TaKxe He IIpIroIbI. Nocya n3 PJIaCTMaCCbI "MeJIaMnH" IORIOIIaET 3HeprINIO I IO3ToMy He RoIHTcI.
- Pa60Ta B pexHme CB4
BbI3BaTb HaXaTHEm COOTBeTCTByIOIIeK HHOIIKN. HaIIpHMeP, ecJIN IIpiN BbIIOJIHeHHI IIporpaMMbI CBU HaXaTa KHOIIKa ≌, Na IINcIIJIee 6yJeT OTO6paXeHa BbI6paHHaYCTaBkA MOIIHOCTN.
- PpOgpaMMy MoJHo IIpeBaTb HJIH IIepe3aIyCTnTb HaJaTHem KHOIIKN
IocJeIOBaTeJIbHocTb onepaun
- IomeCTHte PIIuB IIIOxOJaIyIOIocUy, a IocUy Ha IIOBOpOTbI CToJI B IeHi.
- Korga Пиша нахочь в CBU-пechи, то седует HaKpbIb, чTo6blпpeIoTbpaTHTb ee 3acbIXaHne. B mara3HHax KuxOHHO yTBapN можно КуПИТспeц�льные сTeКЛЯHHье Илп пlaCTMaCCOBые КрblIKN, пpeДHa3HaYeHHьe ДлЯпrimeHeHЯВ MнКрОВЛHOвБIX Пeчax.
-Прн ИспОЛьЗОВаHиКOMБИнрОВaHHbIX Функи CBU/грИь ИЛСВЧ/торячи BO3dYx, He HabKpbIBAITE ПprHrOtaBJIbBaEmyTOПИу. PeIeTKy cПИшЕДЯ ГИЛINРОВАнHA MOXHO ПОJOXHTb ПЯМо HA ПОВOPOTНь CTOLI.
- 3aKpoIte IBePuN uCtahOBHTe HxHHyIO IpOprpaMMy.
-При 3aIyCske IIpoIgpaMMbI IOBOpOTbI CTOJI NaHHaeT BpaIaTbcS.Bo BpeMpa60tBi BHyTpEHHra IIOcCBeTKa OCTaETcR BKJIIOUeHHoH.
- EcJIN IIpoIpaMMA He 3aIyuctnJIacb B TeueHne 5 MInHyT, IIpIbOp aBTOMaTHUeCKN BO3BpaIIaETCa B peXIM OxNJaHnJ.
- EcJn npHa6oTe NeuH 6bIa OTKpbIta DBepb HJIH 6blJa HaXaTa KHOIIKa (HaIprImep, TTo6bI IOMeIaTb HJIN IpeBepHyTb PIIy DJIpaBHOMepHO IporpeBa), BbIOJIHeHne fYHKII TaMepa II pOIRpaMMNPOBaHHa ABTomAtNuCeKN BpeMeHNO IpeKpAaTcra. PPr eTOM, ecJIn Tpe6yeTcra, MOxHO N3MeHHTb BpeMa IOTOBKn. IporpaMA aBTOMaTHueCKN BO3O6HOBHT pa6Otu TOJIbKO IocJIe 3aKpbITna IBePbI HauKaTHN KHOIIKN GQUICK
-ДлЯпpeКраишЕня ВыПОЛHeHЯ ПрогpaMMbI ДВаЖДБI НжМITE KHOПКу
-Подача5Звкobьix снгналов O3нчаeT,ЧTOВрмя,заданhoeДлЯБылHeHnIпpoГраMMы,ИСTeКЛIO;ОДНOBрЕмEHО OTKЛЮчaetсь BHyTpEHHЯ ПОДCBeTKa.
-
OTKpoIe Ibepu H BbIHbTe Nocuyc PIIuei.
-Пусъ посуда с пиший пocтоNT Heckoько МнHyT Для paBHomepHoro paCпpeДeJIeHЯ TeПla по Всему объему пиши.
-Boo6iue,BpeMraO6pa6OTKn 3aBnCHT OT HeCKoJIbKnxΦaKTOpOB.
-
МнкpoBOJIHbI поннkaIOT chepe3 NOBepxHocTb ПИПи. ПОэТOMy obpa6OTka KpyINbIX KycKOB Tpe6yeT 6OJIbIe BpeMeHn, Yem ecJN TOT JKe O6beM TaKoJ JKe ПИПи ПОpe3aH Ha MeJКne KycKn. ПИПу Ha TapeJIke HuxHo paCppeJeIЯTb paBHHomepHo.
-Дя rapaHTnpOBaHHOуHNUTOJKeHЯ Bcex MmKpO6OB ПИШа ДОЛЖHA 6bITb ПОДВергHyTa BO3ДeICTBnIO BbICOKOЯ TeMпepaTypb I B TeYeHne IOCTaTOUHOВ ВpeMeHN.
- O6iuee npaBnIo: 1/2 peKOMeHIOBaHHOrO o6bema - ^1/^2 BpeMeHN. IByKpaTHoO o6bema - IOHTN B 2 pa3a 60JIbIe BpeMeHN.
BbictabJIeHHe BpeMeHH
BbI3BaHHoro aBapHbIM IpeKpaIIeHNem IOaUNIITaHn.
1.HaXMnTe KJIaBnIy ① OINH INI IN IBa pa3a, YTO6bI BbI6paTb 24- INI IN 12- YacOBoi IINcIIe. Ha INcIIe ee IIOBJIeTcra HAIINCb 24H INI IN 12H.
2.ПовернITE IOBOPOTHyO pyUKy, YTO6bI BbICTaBHTb IIpaBnJIbHoe BpeMЯВЧасax. ВремяДОЛЖHO 6bITb BДиаПЗоHe 0-23 (ДлЯ 24-часOBOrO ДИСПJIeЯ) ИЛN 1-12 (ДлЯ 12-часOBOrO ДИСПJIeЯ).
3. HaKMnTe KJIaBnIy ①. HaunHaIOT MNaTb IIuΦpbl MNHyT.
4.Повернite поворOTHyO рчКу,ЧTOбы ВьICTaВNTb ПраВиЛьhoe Врем в МИнуТax. ВьICTaВЛeHHOE Врем IDOLЖHO 6bITB ДДиаПЗоHe 0-59.
5. HaKMnte KJIaBnIy ① , YTO6bI 3aKOHHTb BbICTaBJeHne BpeMeH. HauNHaet MInrA Tb cHMBOJ ':' I OTO6paXJaTcI PpaBnJIbHOe BpeM.
Функин CBH
BbIXOHa MOnHocTb CBU: 90BT-900BT
yTHJIN3aIIH

YTO6bI cIeJIaTb HeBO3MOxH0N 3KcIIyatauio CTaporo NIN IOBpeJdeHHO
aIIIapapaT, oTcoeINHHTe OT HeO IHHyp IIITaHnI. EcJN BbI He 3HaTe, KaK
opraHn3ObaHa yTHJIn3aunr TaKHX aIInapaTOB B BaIeM paHOHe, o6paTHTecb K
COOTBeTCTByIOIIe CJyK6e MeCTHO aMmHnCtpaIIH.
TapaHTma
TapaHTnHbI cPOK Ha np6OpbI fHpMbI "Severin" - 2 roJa co dHЯ nx npOaJx. B TeueHne 3TOro BpeMeHN Mbl 6ecIIaTHO ycTpAHM BCE IeΦeKtBi, BO3HnKIIHe Bpe3yJIbTaTe npOn3BOJcTBeHHoro 6paKa HIn npImeHnHa HeKaUeCTBeHHbIX MaTeepNaIOB. TapaHTnHa pacIproctpaHaeTcH a IeΦeKtBi, BO3HnKIIHe N3-3a HecO6IoJeHnpyKOBoJcTBa II O KcIJIyatauHn, rpy6Oro o6paIeHnC np6Opom, a TaKxe Ha 6bIoIeSc (CTeKJIaHHbIe N KepaMHueCKHe) qactH. DaHHa rapaHTnHa HApYIIaET BaIIHX 3aKOHbIX IpaB, a TaKxe JIO6bIX IpyrHx IpaB IOTpe6HTeJIa, YcTAHOBJEHbIX HaIIIOHAJIbHBIM 3aKOHODaTeJIbCTBOM, peYJIpyIOIIHM OTHOIIeHnA, BO3HnKaIOIIHe MeJdy IOTpe6HTeJIaMn II npOdaBuaMn II npIPOdaXe TOBaOB. TapaHTnHaHHyInpuyetc, ecIn np6OppeMOHTnpOBaJIsc He B yka3aHHbIX HaMI pYNKTax cepBnCHOrO obcIyJXbAHN. Bbl MoXeTe II IOUte OTpabNTb np6Op c IpeeyHem HeNCpabHocTei II npILOXeHHbIM KaccOBbIM YeKOM Ha HAII 6JIjXaIIHm
IyHKT cepBnCHoro 06cJIyXHBaHn. KaKHe-JIn6o IOnOJIHnTeJbHbIe rapaHTn IpoJaBua 3aBODOM-H3ROTOBnTeJem He IIpHHMaIOTc.
Philippines Business Center
Agias Anastasias & Laertou, Pilea
Service Post of Thermi
570 01 Thessaloniki, Greece
Tel.: 0030-2310954020
Iran
IRAN-SEVERIN KISH CO. LTD.
No.668,7th.Floor
Bahar Tower
Ave. South Bahar
TEHRAN - IRAN
Tel.:009821-77616767
Fax:009821-77616534
Info@iranseverin.com
www.iranseverin.com
Israel
Eatay Agencies
109 Herzel St.
Haifa
Phone: 050-5358648
Email: service@severin.co.il
Italia
via Dino Col 52r-54r-56r,
I-16149 Genova
Green Number: 800240279
Tel.: 010/6 45 11 02 - 01041 86 09
Fax: 010/6425009
e-mail: videoelettronica@panet.it
Jordan
F.A. Kettaneh
P.O.Box 485
Amman, 11118, Jordan
Tel: 00962-6-4398642
e-mail: app@kettaneh.com.jo
Korea
Jung Shin Electronics co., Ltd.
501, Megaventuretower 77-9
Moonrae-Dong 3ga, Yongdeungpo-Gu
Seoul, Korea
Tel: +82-22-637 3245~7
Fax: +82-22-637 3244
Service Hotline: 080-001-0190
Latvia
SERVO Ltd.
Mr. Janis Pivovarenoks
Tel: +371 7279892
servo@apollo.lv
Lebanon
Khoury Home
7th Floor, Cité Dora 3 Building, Dora
P.O.Box 70611
Antelias, Lebanon
Telephone 01 244200, Fax 01 253535
eMail: info@khouryhome.com
Internet: www.khouryhome.com
Luxembourg
Ser-Tec
Serbia and Montenegro
tel: + 381-21-524-638
tel: +381-21-553-594
fax: +381-21-522-096
Slowak Republic
PREMT,s.r.o.
Skladova 1
91701Trnava
Tel: 033/544 7177
Finland
Oy Harry Marcell Ab
Rälssitie 6, PL 63
01511 Vantaa
Puh 0207 599 860
Fax 0207 599 803