
LCD TV MD 32532 - LCD TV MEDION - Free user manual and instructions
Find the device manual for free LCD TV MD 32532 MEDION in PDF.

| Product type | LCD TV |
| Brand | MEDION |
| Model | LCD TV MD 32532 |
| Screen size | 32 inches (81 cm), 16:9 format |
| Resolution | 1366 x 768 pixels |
| Power consumption | 180 W (operation), 3 W (standby) |
| Power supply | 230 V ~ 50 Hz |
| Weight | Approx. 16 kg |
| Dimensions (H x W x D) | 620 x 835 x 250 mm |
| Video inputs | HDMI, VGA, SCART (x2), Component (Y Pb Pr), S-Video, Composite |
| Audio inputs | PC Audio In (3.5 mm jack), Audio RCA (R/L) |
| Audio output | Headphone jack (3.5 mm) |
| Antenna connectivity | 75 ohms, coaxial antenna input |
| Number of programs | 100 preset positions |
| TV standards | PAL, SECAM, B/G, D/K, I, L/L' |
| Main functions | Teletext 1000 pages, PIP/PAP, multilingual OSD menu, sleep timer, child lock, picture modes (Natural, Cinema, Dynamic), sound equalizer |
| Wall mounting | Possible, kit provided (rails, screws, wall plugs) |
| Maintenance and cleaning | Clean with a soft, lint-free cloth, without solvents or harsh products |
| Safety | Do not open the housing, avoid humidity and excessive heat, keep batteries out of reach of children |
| Spare parts and repairability | Repairs by an authorized professional; R03 (AAA) batteries for remote control |
| General information | Manual available in several languages; manufacturer warranty; environmentally friendly disposal |
Frequently Asked Questions - LCD TV MD 32532 MEDION
User questions about LCD TV MD 32532 MEDION
0 question about this device. Answer the ones you know or ask your own.
Ask a new question about this device
Download the instructions for your LCD TV in PDF format for free! Find your manual LCD TV MD 32532 - MEDION and take your electronic device back in hand. On this page are published all the documents necessary for the use of your device. LCD TV MD 32532 by MEDION.
USER MANUAL LCD TV MD 32532 MEDION
Colocar as pilhas no telecomando 13
Ligar a antenna 13
Ligar a alimentacao de corrente 13
Funções base 14
Ligar e desligar o televator LCD 14
Colocar as pilhas no telecomando
Notes to these instructions 3
About this device 3
HD ready 3
Included in delivery 3
Safety instructions 4
Operating safety 4
Installation Location 4
Repairs 5
Intended environment 5
Power Supply 5
Standards / electromagnetic compatibility 6
Handling batteries 6
Getting to know the device 7
Side view 7
Front view. 7
Connections 8
Connection options 9
Headphones 9
PC 9
Video recorder 10
SAT receiver or DVD recorder 10
Video recorder and SAT receiver. 11
DVD player 11
Device with HDMI or DVI output. 11
The remote control 12
Starting up 13
Unpacking 13
Placing the batteries into the remote. 13
Connecting an aerial. 13
Connect power supply. 13
Basic functions 14
Switching the LCD TV on and off 14
After switching the device on for the first time. 14
Channel selection 14
Sound settings. 14
Screen settings 15
Displaying information 16
Selecting an external device 16
Videotext 17
To operate Videotext 17
PIP mode. 19
PAP mode 19
The OSD menu 20
Navigating in the menu 20
MenuPICTURE 20
Menu SOUND 21
Menu FEATURE 22
Menu INSTALL 22
Menu PROGRAM (Channel table) 24
Menu SOURCE 24
25
Menu PC PICTURE POSITION 25
Menu PC PICTURE 25
SOUND, FEATURE and SOURCE menus 25
Troubleshooting 26
DO YOU REQUIRE ADDITIONAL SUPPORT? 27
Cleaning 28
Technical data 28
Warranty 29
LCD TV pixel faults 29
Disposal 30
Liability limitations 31
Wall mounting 32
Notes to these instructions
Please read through this section carefully and follow the instructions given. In this way you will guarantee reliable operation and a long life for your LCD TV. Always keep these instructions handy and close to your LCD TV. Keep the instructions and the packaging so that if you sell or give away your LCD TV you can give them to the new owner.
About this device
- This device serves to receive and play back television programmes. The different connection possibilities enable an additional enlargement of the sources of reception and playback (receiver, DVD player, DVD recorder, video recorder, PC, etc.).
This device is only suitable for using in dry interior rooms. - This device has been manufactured for private use and not designed for operation in a heavily industrial company or commercial use. The use of it under these conditions could lead to damage to your device and void your Warranty.
HD ready
- Your LCD TV is equipped with the 'HD Ready' feature. This means that it can playback high resolution television programmes (HDTV) in principle.
The prerequisite is that an HDTV signal is being transmitted to the LCD TV from an external set-top box (HD-STB).
Included in delivery
Please check the completeness of the delivery and please inform us within 14 days after purchase, if the delivery is not complete. You will have received the following articles with the LCD TV that you have purchased:
- LCD TV
- Network connection cable
- Remote control including 2 batteries type RO3 (AAA) 1.5V
- Wall mounting set (see page 32).
- Operating instructions
- Warranty card
Operating safety
- Do not let children play with electrical appliances without supervision.
Children cannot always recognise potential hazards correctly. - Keep packaging material such as plastic film away from children.
- There is a risk of suffocation if used improperly.
- Never open the casing of the LCD TV (electrical shock, short circuit and fire hazard)!
- Never insert any objects through the slots and openings into the inside of the LCD TV (electrical shock, short circuit and fire hazard)!
- The slots and openings on the LCD TV are for ventilation purposes. Do not cover these openings (overheating, fire risk)!
- Do not put any pressure on the display. There is a risk that the screen may break.
- Caution! There is a risk of injury if the screen is damaged!
- Recover all broken pieces using protective gloves and send them to your Service Centre for proper waste disposal.
- Then wash your hands with soap because chemicals may have leaked out.
- To avoid damaging the screen do not touch it with fingers or sharp objects.
Contact customer services, if:
- The mains cable or mains adaptor is scorched or damaged.
- Liquid has penetrated the appliance.
The appliance is not operating correctly. - The appliance has fallen, or the casing is damaged.
Installation Location
- In the first few hours of use new appliances can release a typical, unavoidable but totally safe smell, which reduces with time.
To help reduce the amount of odour build-up, we recommend that you ventilate the room at regular intervals. We have taken appropriate measures during the development of this product so that levels are explicitly below legislative limits. - Keep your LCD TV and all connected appliances away from moisture and avoid dust, heat and direct sunlight. Non-compliance with this advice can damage the LCD TV or lead to faults. Do not use the appliance outdoors because other effects such as rain, snow etc. can also damage the appliance.
- Do not place objects that are filled with water (such as vases) on the device.
- The object may tip over and the liquid can impair the electrical safety.
- Do not place any exposed sources of ignition (candles or similar) on the device.
- Make sure that there is enough clearance in the wall units! Ensure a minimum separation of 10 ~cm around the appliance for sufficient ventilation.
- Operate all components on a stable, level and vibration-free base, to prevent the LCD TV from falling over.
- Avoid dazzle, reflections and strong bright-dark contrast in order to protect your eyes.
- The optimal viewing distance is 5 times the screen diagonal.
Repairs
- Repairs to your LCD TV should only be carried out by qualified specialists.
- if a repair must be carried out please contact our authorised service partner only.
Intended environment
- The appliance can be operated at an ambient temperature of +5^ C to +35^ C and a relative humidity of 20% - 85% (non condensing).
- In the switched-off state the LCD TV can be stored from -20^ C to +60^ C .
- Keep the appliance at a distance of at least one metre from high frequencies and magnetic sources of interference (television, loudspeaker boxes, mobile telephones etc.) to avoid malfunctioning.
- After transporting the LCD TV wait until the appliance has reached ambient temperature before switching it on.
- Large changes in temperature or fluctuations in humidity can cause moisture to build up due to condensation within the LCD TV, which can cause an electrical short circuit.
- During thunderstorms or if the appliance is not going to be used for long periods, remove the plug from the mains socket and the aerial cable from the aerial socket.
Power Supply
Please note: Even when the mains switch is off some components of the appliance are live. In order to disconnect the power to your LCD TV or to completely isolate the appliance from voltage sources remove the mains plug from the mains socket.
- Operate your LCD TV mains (power supply) only on grounded sockets with AC 220V-240V~/50 Hz. If you are not sure about the power supply at your location, check with your power company.
- Use only power adapter provided.
- For additional safety we recommend use of an excessive voltage protection device to protect your LCD TV from damage resulting from voltage surges or lightning.
- The mains switch installed does not detach the LCD TV from the mains supply completely.
- The power socket must be in the vicinity of your LCD TV and within reach of the power cables.
- If you use an extension cable, ensure that it fulfils the VDE requirements. Please ask your electrician.
- You should lay the LCD TV cables in a manner that no one can trip or step on them.
- To avoid damage to cable, do not place any objects or furniture on the cable.
- To avoid power consumption when the device is switched off, either pull out the power plug when the device is not being used or connect the device to a master-/slave power bar.
- Your device has an On and Off switch. The LCD TV can be switched on or off by means of it. No electricity is consumed if the switch is at OFF.
Standards / electromagnetic compatibility
The LCD TV fulfils the electromagnetic compatibility requirements and the following electrical safety standards:
EN 55013 Sound and television broadcast receivers and associated equipment. Radio interference characteristics. Limits and methods of measurement.
EN 55020 Sound and television broadcast receivers and associated equipment. Immunity characteristics
EN 60065 Audio, video and similar electronic apparatus. Safety requirements
EN 61000-3-2 Electromagnetic compatibility (EMC); part 3: Limits; Section 2: Limits for harmonic currents (appliance input power < 16A per phase).
EN 61000-3-3 Electromagnetic compatibility (EMC); part 3: Limits; Section 3: Limits for voltage fluctuations and flicker in public low-voltage supply systems, for equipment with rated current <= 16 A per phase.
Handling batteries
Batteries can contain combustible materials. If not handled correctly, batteries can leak, become very hot, ignite or even explode, which could damage your appliance or/and your health.
Please ensure compliance with the following advice:
- Keep batteries away from children.
Contact your doctor immediately if a battery is swallowed. - Never charge batteries (unless it is clearly indicated).
- Never discharge batteries by high power output.
- Never short-circuit the batteries.
- Keep batteries away from heat sources and never throw them into a fire.
- Do take apart or deform the batteries.
- Your hands or fingers could get injured or battery fluids could get into your eyes or you're your skin. Your hands or fingers could get injured or battery fluids could get into your eyes or onto your skin.
- If this should happen then rinse the affected areas immediately with a large amount of clean water and contact your doctor immediately.
- Avoid heavy impacts and vibrations.
Always observe the correct polarity. - Make sure that the plus (+) and minus (-) poles are correctly inserted in order to avoid short circuits.
. Never mix new and old batteries or different types of batteries.
This could cause your appliance to malfunction. - In addition, the weaker batteries would discharge too much.
- Immediately remove used batteries from the appliance.
- Remove the batteries from the appliance if you do not intend to use it for a long period of time.
- Replace all the old batteries in an appliance with new batteries of the same type.
Isolate the contacts of the batteries with sticky tape if you want to store or dispose of them.
Getting to know the device
Side view
| Operating element | Function |
| STANDBY | Switch the device to standby mode with this button. |
| TV/AV | Change the source of reception with this button: EXT - 1, EXT - 2,EXT - 3, EXT - 4, EXT - 4S EXT - 5, PC, aerial. |
| MENU | Call up the OSD1 menu with this button, in order to carry out the settings on your device. |
| + P/CH - | Switch the programme by means of these buttons. . |
| + Volume - | Set the volume of your device with these buttons |
Front view
| Display | Meaning |
| Sensor | Reception field for the infra-red signal of the remote. |
| Indicator of operation | Shines blue when the device is switched on Extinguishes when the device is switched on. |
Connections
The connections are at the back of the device behind the detachable cover.
| Connection | Connection options | |
| EXT - 4S | S-VHS | S-VHS input (S-VIDEO) for connecting a device with an S-VIDEO output (e.g. camcorder). You will need an S-VIDEO cable for this connection. |
| EXT - 4 | ∅ | VIDEO input (yellow) for connecting the following devices: camcorder, DVD player, decoder (e.g. satellite receiver) etc. |
| EXT - 4S | R | Audio inputs (red/white): Connect the left and right audio channels to the source of the sound that you want to send to the LCD TV (e.g. camcorder). |
| EXT - 4 | L | You will need a cinch cable for this connection. |
| ∅ | Headphone connection Connect your headphones here so that you can hear the sound from your device. | |
| VGA | VGA connection. Here you can connect your PC or your notebook. You will need a VGA cable. | |
| EXT - 3 | Y···PB···PR | Y - PB - PR: Component inputs for connecting devices with component output, e.g.: 1. Camcorder 2. DVD player 3. Decoder (e.g. satellite receiver) etc. You will need a component cable green/blue/red for this socket for the video connection as well as a cinch cable red/white for the audio connection. |
| R···O···L | ||
| EXT - 5 | HDMI | For connecting a device with an HDMI input. For this you will need an HDMI cable. |
| EXT - 1 | SCART input for connecting to the following devices: 1. Video recorder 2. DVD player 3. Games console 4. Decoder (e.g. satellite receiver) etc. You will need a SCART cable for this connection (not included in the delivery). | |
| EXT - 2 | Like EXT - 1. For EXT - 2 you can select an input source in the FEATURE menu (see page 22). | |
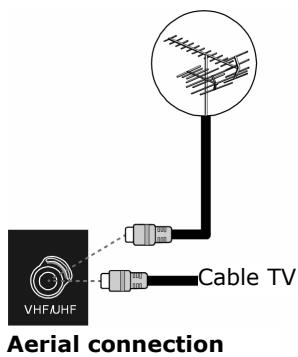
| AERIAL ○ | Connection for the aerial cable (not included in the delivery). | |
| PC AUDIO IN | Audio input for 3.5 mm stereo jack plug, e.g. for PCs. | |
| 220V-240V AC-50Hz | Connection for the mains power cable (supplied). | |
| POWER | Operating switch: Switches device to standby mode and to off again | |
Connection options
Headphones
The headphones connection is located on the side of the device.
The main loudspeakers remain switched on if headphones are connected. The volume button and the mute switch regulate the main loudspeakers.
Regulate the volume of the headphones in the menu SOUND, see page 21.
PC
The LCD TV can be connected as a monitor or an additional monitor to your PC or your notebook. The display from your notebook or PC can be transmitted to the LCD TV.
This is how you connect the LCD TV:
- Switch both devices off.
- Connect a VGA cable (monitor cable; not supplied) to the VGA input of the LCD TV and to the graphic card output of the PC or notebook.
- Tighten up the screws of the monitor cable with your fingers, so that the plug is correctly seated in the socket.
- If you want to send a sound signal then connect an audio cable to the PC AUDIO-IN socket.
- First switch on the LCD TV.
-
Then switch on the PC/notebook.
-
Press the PC button on the remote control to switch to PC mode.
- The PC display appears on the LCD TV. Use the TV button to return to the TV mode.
If you use the LCD TV as a second monitor for your PC you might have to change the display properties of your operating system. To do this please read the operating instructions of your PC/notebook to find out the operational requirements if more than one monitor is used.
Video recorder
You can connect a video recorder by either aerial or by means of a SCART cable (or with RCA cables, using the SCART/RCA adapter):

- A SCART connection between the video recorder and the LCD TV is recommended for a high image and sound quality. A SCART connection will be necessary if you want to transmit stereo sound.
- Set the VCR entry in the INSTALL menu to ON (page 22) if you have connected a video recorder to the EXT - 1, EXT - 2 or EXT - 4 inputs.
SAT receiver or DVD recorder
A SAT receiver or DVD recorder can be connected up using an aerial and SCART cable.
LCD TV
Video recorder and SAT receiver
Use the following connection method for connecting a SAT receiver and a video recorder at the same time:
DVD player
- Connect a DVD player to the EXT-1 or EXT-2 socket with a SCART cable or with RCA cables, using the SCART/RCA adapter.
- If the DVD player has YUV outputs (Y Pb Pr), connect it to the EXT-3 component outputs of the LCD TV with a component cable (cinch green/blue/red).
Device with HDMI or DVI output
HDMI ("High Definition Multimedia Interface") is the only interface in the consumer entertainment electronics sector that can digitally transmit audio and video data simultaneously. It can process all currently known picture and sound formats, including HDTV (High Definition Television), and can do this also at a resolution of 1080 i without losing quality.
- Connect an HDMI cable (monitor cable; not supplied) to the HDMI input of the LCD TV and to the HDMI output of the external device.
- Once you have connected the HDMI device then switch on the LCD TV.
- Then switch on the external HDMI play-back device.
If the external device has a DVI output then you can also connect it to the HDMI input (HDMI is downwards compatible to DVI - "Digital Visual Interface"). For this you will need an HDMI-DVI adapter. Also connect an audio cable with a jack plug to the PC AUDIO IN because the DVI output does not transmit any sound.
The remote control
- Standby button For switching the LCD TV off temporarily.
- Directional buttons
- SELECT / OK
This button serves to freeze the television image in the television mode.
You will be able to confirm a selection with OK in certain menus. - INFO To display information, such as the current channel number and the image format.
- Number buttons These buttons serve to select the channel in the television mode. They serve to enter the three-digit number with which the page is selected in the videotext mode.
- This button is not used.
- Switching back to the channel previously displayed (more than 5 seconds).
- Channel selection button P/CH + / -
You will select the next (+) or the previous (-) channel in the television mode.
You will select the next (+) or the previous (-) page in the videotext mode. - Volume + / - To increase (+) or reduce (-) the volume.
- TV mode: Display current settings
- Input selection: To select the input signal of devices connected to your LCD TV.
- Yellow button / Open FUNCTION menu
- Blue button / Open PROGRAM (CHANNEL) menu
- Stop videotext The current page will be stopped.
- Videotext: Concealed search / PAP mode
- Show videotext / PC mode
- Videotext Index page
- Videotext mix (transparent image) / PIP on and off
- Enlarge videotext / image format
- Switch videotext on and off
- Display time / videotext sub-page
- Red button / Open SOUND menu
- Green button / Open PICTURE menu
- Mono / Stereo / DUAL A / DUAL B
- Switch to mute
- Select image mode
- Call up menu; close menu
Starting up
Note
Before starting up please make sure that you read the "Safety instructions" section on page 4ff.
Unpacking
- Get somebody to help you when unpacking the device.
- Do not carry the device by yourself, in order to prevent damaging the LCD TV and/or injuring yourself.
- Open the box very carefully, in order to prevent potential damage to the device. This can happen if a knife or a long blade is used to open it.
- Various small parts (batteries, screws, among other items) will be in the packaging. Keep these away from children; there will be the danger of them being swallowed.
- Please keep the packaging material carefully and use it exclusively for transporting the television.
Placing the batteries into the remote
- Remove the battery compartment cover on the back of the remote.
- Place two type R03 (AAA) 1.5V batteries into the battery compartment of the remote. Pay attention to the polarity of the batteries (marked on the base of the battery compartment) during this.
- Close the battery compartment.
Attention!
Remove the batteries from the remote if the device will not be used for a long time. The remote could be damaged by leaking batteries.
Connecting an aerial
- Connect the aerial connector to the LCD TV with a aerial cable (not included in the delivery), in order to connect to the external area or cable facility.
Connect power supply
Connect the device connector of the cable supplied to the device with the AC 220-240V connector on the device and the mains connector to a well accessible 230 ~V AC, 50 ~Hz mains plug.
Basic functions
Switching the LCD TV on and off
- Press the operating switch on the back of the device. The device will go into the standby mode and the front display will shine blue
- Press either a number button on the remote or a P/CH channel selection button of the remote or on the device, to switch the device on. The front display will turn off.
- You will switch the device back to the standby mode with the Standby button of the remote or the Standby button on the top of the device.
- Press the operating button on the back of the device again, in order to switch off the device completely.
After switching the device on for the first time
The AUTO PROGRAM (CHANNEL) Menu will appear when you switch your device on for the first time.
Use the directional buttons, to make a different selection, if you would like to change the language and country setting.
The country setting influences the sequence in which the channels are stored.
Then confirm the PLEASE CHECK ANTENNA CABLE message, by pressing the OK button or the red button.
Press the blue button to terminate the process.
APS
The automatic channel search (APS) will begin subsequently. It will take several minutes.
You can terminate the process with the blue button.
The channels will be stored in the channel positions in a country-specific sequence. One hundred channels can be stored.
The channels table will appear after the end of the automatic channel storage. The table will close after a few minutes if it is not edited further. The channel at channel position 1 will be broadcast.
Channel selection
- Either press the P/CH button (on the device or on the remote) or select the channel directly by means of a number button, in order to select a channel. Enter the two numbers rapidly, one after the other, for a two-digit number.
- Select the last channel broadcast with the P < P buttons.
Sound settings
- You will increase or reduce the volume the volume with the - ^+ volume buttons on the remote or on the device.
- Press the Mute button, to switch the sound off completely or to restore it.
- Choose between mono and stereo output, DUAL A and DUAL B, with the I-II button.
Screen settings
Zoom mode (WIDE button)
Press the WIDE button to switch between the following screen formats:
- Auto: The format sent is automatically adjusted to match the input signal.
Full: The screen is automatically stretched to full screen width.

4:3: For undistorted screen display in 4:3 format.
- Panoramic: The screen is stretched at the left and right margins in order to fill out the screen; the top and/or lower margins are somewhat reduced as a result.
- 14:9 zoom: A screen in 14:9 format ("letterbox") is stretched at the top and bottom screen margins.
- Cinema: A screen in 16:9 format ("letterbox") is zoomed to the full screen size.
- 16:9 Subtitle: Same as "Cinema" settings. However, the screen is shifted to the top so that any necessary lower lines or scrolling text can be seen.


For some formats arrow buttons appear next to the format information. For these format you can move the screen upwards and downwards using the direction buttons .
Zoom in PC mode
Formats 4:3 and Full are available in the PC mode.
Additional screen settings
Using the SELECT button you can freeze the screen and release it again.
- Using the PP ("personal preferences") button you can select the screen mode: Natural, Cinema, Dynamic.
Displaying information
-
Press the INFO button, in order to have the following current settings displayed:
-
Channel position and channel name;
- Sound setting (Mono, Stereo, DUAL A, DUAL B);
-
Image setting.
-
You will receive the same information in the TV mode with the DTV/TV button and when switching to a different channel.
- You can have the time displayed in the TV mode, by pressing the button (time/ videotext sub-page).
Selecting an external device
- You will select the available inputs with the AV button:
-EXT - 1: Device at the SCART 1 socket;
-EXT-2:Deviceat theSCART2socket;
- EXT - 3: Device at the component video and audio outputs;
-EXT-4:Deviceat the video and audio inputs device side);
-EXT-4S:DeviceattheS-VHSinput device side);
-EXT-5:HDMI input;
- PC (you can also select the PC input directly with the PC button)
-Aerial (TV operation).
Videotext
Your LCD TV will support 1000 Videotext pages. This means that the device does not have to search, after one of these 1000 pages has been entered, but is able to display the page directly.
Videotext is a free service that is broadcast by Channel 7 and offers current information in relation to news, the weather, television programs, share prices, sub-titles and other subjects. Your TV offers many useful functions for operating Videotext and multi-page text, storing sub-pages or fast navigation.
To operate Videotext
- Select a TV station on which Videotext is being transmitted.
- Press the Videotext Button once, to display the Videotext basic / Index page.
- Switch the Videotext Mode off by pressing the Videotext Button again. The device will change back to the TV Mode.
Selecting videotext pages
Number keys
- Enter the number of the desired videotext page as a three digit number using the number keys.
- The selected page number is displayed in the top left corner of the screen. The videotext counter searches as long as it takes to find the selected page number.
Programme selection buttons
- The programme selection buttons can be used to scroll forwards or backwards through the videotext pages.
Colour buttons
- If coloured text entries are displayed at the lower edge of the screen then you can select the contents directly by pressing the appropriately coloured button RED, GREEN, YELLOW and BLUE.
Sub-pages
- Some videotext pages have sub-pages. At the lower edge of the screen 1/3 is displayed for example. The sub-pages are displayed one after another at an interval of about half a minute. You can call these sub-pages by pressing the button. A four-digit input box appears in which you can enter the number of the sub-page (e.g. 0002). Alternatively you can page through the sub-pages using the direction buttons .
Useful videotext functions
TXT/MIX
- Press the TXT/MIX button to display the videotext transparently (the TV picture appears in the background).
Xi INDEX
- Use this button to select the index page that has a list of the videotext content.
STOP
The videotext page that you have selected may contain more information than can fit on a single screen. In this case the information will be divided up over several sub-pages. The sub-pages are scrolled at regular time intervals.
- Press the STOP button to prevent the page changing automatically. The STOP symbol will be displayed in the top left hand corner of the screen and the automatic page changing is interrupted.
- Press the STOP button once more to permit the automatic paging to take place again.

Hidden search
If you press the button in videotext mode then the TV unit switches the videotext display to the background. This can be used to bridge the waiting time until the desired page is displayed.
- Select the desired page number in videotext mode.
- Press the button to switch to TV mode while you wait for the videotext page. A box or the symbol appears in the top corner of the screen showing the page number being searched for, as long as searching takes place.
- The page number appears as soon as the desired page is found instead of the hyphen.
- Then press the button again to display the desired page.

Display hidden text
- To display hidden information, such as the solutions to games, puzzles, or quizzes press the button once.
- Pressing the 三? button hides the answers again.

Double the page size
This function displays the videotext information in double size.
- Press the 三 button to enlarge the top half of the page.
- Press the 三 button again to display the enlarged bottom half of the page.
- Renewed pressing of the button displays the videotext again in normal size.
PIP mode
You will be able to insert a small channel window within the main picture with the PIP (Picture in Picture) function.
- Press the PIP button. The PIP window will appear in a corner of the screen. The currently set channel will appear initially. The channel most recently selected will appear in the main window.
- You will be able to move the PIP window to a different corner of the screen with the 三 button.
- Press PIP again, in order to close the PIP window.
The PIP window will be the active window initially (the sound emitted will belong to the PIP window). This means that you will, for example, be able to do the following:
- To change the channel in the PIP window with the channel selection buttons;
- To open the menu for the PIP window with the M button (the OSD menu for the PIP window does not contain the PROGRAM (CHANNEL) and INSTALL menus);
- To open different input sources for the PIP window with the AV button.
Inserted information also belongs to the PIP window.
- You will be able to switch the function of the PIP and the main window with the directional buttons.
- Press INFO, if you want to check which window is currently active.
The Freeze Image function (SELECT/OK button) is always applied to the main window.
PAP mode
Two channel windows will stand side-by-side in the PAP mode. The picture side ratios of both windows are fixed.
- Press the / buttons. The active window will appear initially on the right. The most recently selected channel will appear on the left.
- The functions of the active window and the subsidiary window can be switched with the directional buttons. The functions will be applied to the active window as described in the PIP mode section.
- Press × / again, to close the PAP window.
You will be able to call up the videotext of the active window on the right in the PAP mode (按钮). It will replace the subsidiary window and will stand next to the television image in this way.
PIP and PAP in the PC mode
You will be able to insert the television channel (or another source) next to the picture on the PC in the PC mode, by pressing the or buttons.
You will be able to edit the television channel, as well as continuing to work with the PC.
The OSD menu
You will be able to set certain parameters of the LCD TV by means of the OSD menu (On Screen Display).
Navigating in the menu
- Press the M menu button, in order to activate the OSD.
- Select the options from the Main menu with the directional buttons.
- Select the options from one menu with the directional buttons.
- Return to the Main Menu with the directional button.
- Open a sub-menu with directional button (not available in every menu).
- Return to the higher menu with the M menu button.
- Set the required value or make a different selection with the directional buttons.
- Close the menu and confirm the selection at the same time with the M menu button.
Please pay attention to the fact that the menu will close automatically after approx. 15, 30 or 60 seconds, if no button has been pressed (setting in the FEATURE menu, page 22).
Note
The menus described here can differ from those on your screen because of potential technical changes.
Menu PICTURE
| Menu point | Settings |
| Mode | Select picture mode: NATURAL, CINEMA, DYNAMIC. This function corresponds to the PP button. |
| Contrast | Reduce or increase the contrast (scale 0 - 63). |
| Brightness | Reduce or increase the brightness (scale 0 - 63). |
| Sharpness | Reduce or increase the sharpness (scale 0 - 31). |
| Colour | Reduce or increase the colour density (scale 0 - 99). |
| Colour temp | Select the colour tone: NORMAL, COOL, WARM. |
| Noise reduction | You will be able to reduce the picture noises and to improve the image quality in the case of a weak signal with this function. Select between OFF, LOW, MEDIUM and HIGH. |
| Film Mode | Movies are recorded with a different number of individual images per second to television broadcasts. Select ON, if you are watching a movie, in order to be able to see the picture quality of scenes with fast movements better. |
| 3D Comb | The 3D comb filter is used, in order to improve the colour transitions and the colour quality of the images. Select ON or OFF. |
| Reset | Reset all image settings to the factory settings with ➔ or OK. |
| I | The TV colour standard currently received will appear here as information (see also INSTALL menu). |
Menu SOUND
| Menu Point | Settings |
| Volume | Basic setting of the volume when switching on (scale 0 - 63). Select a moderate basic volume. |
| Equalizer | Open EQUALIZER sub-menu: See the next section |
| Balance | Balance between the left and the right loudspeakers (scale -31 - 31). |
| Headphone | Open HEADPHONE sub-menu: See section after next. |
| Sound Mode | Choose between Stereo and Mono. You will be able to choose between DUAL A and DUAL B (original language and synchronization) here apart from this, if the current broadcast supports the DUAL mode (e.g. in the case of dual language broadcasts). The functions correspond to the I-III button. |
| AVL | The AVL (Automatic Volume Limiting) function balances the different volumes of the various broadcasts. OFF: Original volumes; ON: Even volume. |
| Effect | Set the sound effect on or off. The sound will be perceived like a stereo noise if the current SOUND MODE has been set to Mono, when the sound effect has been activated. The ambient sound will be deeper if the current SOUND MODE has been set to Stereo. |
| Dynamic Bass | Set the bass sounds to LOW, HIGH or OFF. The HIGH setting is not recommended in the case of a high volume. |
Sub-menu EQUALIZER
| Menu point | Settings |
| Sound Mode | Select between different equalizer pre-settings. The sound settings have been optimized for the respective musical genre, in the case of the POP, ROCK, JAZZ and CLASSIC settings; FLAT is the normal setting. |
| USER | You will be able to make your own setting in the case of the USER setting: Select a frequency band with▲▼. Set a value with◇. |
Sub-menu HEADPHONE
| Menu Point | Settings |
| Volume | Set the volume of the headphones (scale 0 - 63). (You set the volume of the main loudspeaker with the ① ② volume buttons). |
| Sound mode | Choose between Stereo and Mono for the headphones. You will be able to choose between DUAL A and DUAL B (original language and synchronization) apart from this here, if the current broadcast supports the DUAL mode (e.g. in the case of two-language broadcasts). |
| Balance | Balance between the left and the right headphones loudspeaker (scale -31 - 31). |
Menu FEATURE
| Menu point | Settings |
| Sleep Timer | Select a time, after which the device will switch off independently. You can set the time in 10-minute steps (Maximum two hours) with the directional buttons. The Sleep Timer time will start immediately after the setting with←▶. |
| Child Lock | The buttons on the device will be blocked (with the exception of the mains switch) if the setting is at ON. |
| Language | Select the language of the OSD menu. It will switch immediately. |
| Ext-2 Out | You will be able to select the input that SCART EXT - 2 should access here, when another device is connected to one of the inputs, if you are using the EXT - 2 SCART connection as the output for a different device. Select between TV, EXT - 1, EXT- 3, EXT- 4, EXT- 5 and PC |
| Default Zoom | Set the pre-setting for the zoom here. Choose between the following settings: PANORAMIC, 4:3, 14:9 ZOOM. The zoom value selected will be set, if you have set the zoom to AUTO with the WIDE button and provided that no other WSS signals containing the picture ratio are being transmitted in the broadcast signal or in the signal from an external device. |
| Menu background | Choose whether the menu background should be clear (TRANSLUCENT) or non-transparent (OPAQUE). |
| Menu timeout | You can set the time after which the OSD will close automatically here: 15, 30 or 60 seconds. |
| Videotext language | The pre-setting is WEST. You will be able to change the language setting if you are in a different language area: EAST, CYRILLIC, TURK/GRE or ARABIC. |
Menu INSTALL
Available channels will be searched for with the automatic channel search and stored in the channel positions in the sequence found in the normal case. You will also be able to rearrange the channel positions in the channel table (see PROGRAM (CHANNEL) menu, page 24).
Apart from this, the INSTALL menu allows you to carry out a manual search, to store individual channels and to make a fine adjustment of the image.
| Menu point | Settings |
| Program | You will see the number of the channel position of the channel currently playing here. You can select a different channel position (0 to 99) with the ↓ > directional buttons or with the number buttons. Store the new channel position with the OK button, or by selecting the STORE PROGRAM (CHANNEL) point and pressing▶. There will be the PROGRAM STORED message. Pay attention to the fact that the existing channel at the channel position selected will be overwritten. The channel will be stored in the channel table with its channel number (e.g. C-25), not with its channel name. |
| It is recommended to reserve channel position 0 for a video recorder, if you want to connect one. | |
| Band | The television frequency band is divided into the C (normal channel) and S (special channel) types of channel. The type of channel of the channel types of the channel currently set will appear here. |
| Channel | You will see the channel number of the currently set here. Select a different channel with ↙ . |
| Colour System | You select the country-specific TV colour standard here: AUTO (the correct colour system will be set automatically), PAL (for PAL 50 MHz), PAL 60 and SECAM. SECAM will not be available if the SOUND SYSTEM (see the following point) has been set to I. NTSC 3.58 and NTSC 4.43 (the usual colour format in North America) will be available in addition, if an external source has been selected (EXT - 1, etc.). The selection of an incorrect colour system will lead to a faulty picture. The colour system currently received will appear in the information box if the PICTURE menu. |
| Sound System | You set the country-specific television system here: BG (Australia and Western Europe), I (United Kingdom) or DK (East European countries). |
| Fine Tune | You will be able to make a fine adjustment to the image of the currently selected channel with ↙ ↙ here. |
| Search | You will be able to carry out a manual channel search here. Start a search upwards or downwards with the ↙ ↙ directional buttons. The search will pause at each channel found. You will see the MHz value. You will be able to allocate the channel to a position under the PROGRAM (CHANNEL) menu point. Pay attention to the fact that another channel at this position will be overwritten during storage. You will be able to carry out another fine adjustment at the FINE TUNE menu point (see the next section). Press OK or select the STORE PROGRAM (CHANNEL) point and press ↙ , to store the channel. There will be a PROGRAM STORED message. |
| VCR | Choose the ON setting if a video recorder has been connected at the EXT - 1, EXT -2 or EXT -4 connections. |
| Store Program | Store the channel selected. (See PROGRAM (CHANNEL) and SEARCH points). |
Storing a video recorder manually
You will be able to use the manual search to set a video recorder to the LCD TV, for example.
- Set your video recorder to the test signal after the LCD TV and the video recorder have been connected by means of the aerial (see Examples of Connections, page 9).
- Carry out a manual search with the LCD TV.
- Store the test signal at channel position 0 when it has been found (this channel position will not be occupied by a television channel).
Menu PROGRAM (Channel table)
You will see the channels currently stored in the channel table. The channels will appear with their channel names if the channel search has been carried out with APS (see below). Channels sought for manually will appear with their channel number (C - or S -).
The channel memory comprises 100 positions. Activate the cursor in the table with the directional button. You will open an additional column, by moving to the right-hand column with the directional button and pressing again.
| Menu point | Settings |
| Name | You can change the names of the channels here. Mark the channel name required and press the red button. Now, you will be able to change the first letter: Select a symbol with the ▲▼ directional buttons. The symbols will appear in the following sequence: A B C [to] Z 0 1 2 [to] 9 ( ) * + , . / [space] -. Move to the next letter, etc., with the ▷ directional button. Press the red button again at the end, in order to store the name. |
| Delete | Select the channel that you want to delete from the list and press the yellow button. Press the yellow button again to confirm your choice. The following channels will move up in the table. |
| Insert | You can move a channel to a different position here. Select the channel and press the green button. Move the channel to the required position with ▲▼ and press the green button again. The other channels will be moved with it accordingly. |
| APS | You will carry out the automatic channels search with APS. Press the blue button. The following message will appear: WARNING! All pre-stored programs will be deleted. Press the blue button if you want to terminate the function. Press the red button or OK, in order to start the search. The channels table will appear after the end of the search. |
Menu SOURCE
You will be able to select a different input source in this menu. You will see the currently selected source in the top line.
The function corresponds to the AV button.
Select the source with . Change to this source, by pressing OK or the directional button.
The PROGRAM (CHANNEL) and INSTALL menus will not be available, or the INSTALL menu will have fewer entries, according to external source selected.
Menu in the PC mode
The OSD menu will have the following entries in the PC mode:
Menu PC PICTURE POSITION
| Menu point | Settings |
| Autoposition | You will be able to select the AUTOPOSITION entry and press OK or ➔, to push the image back into the centre, if it is intended to shift the image. uThis function should be used with a full image, so that the settings will be correct. |
| H Position | You can change the horizontal position of the image with ⇌ here. |
| V Position | You can change the vertical position of the image with ⇌ here. |
| Dot Clock | This setting will correct faults that can arise as vertical stripes in the case of pixel-intensive presentations (such as tables or text in a small font). |
| Phase | A dirty or faulty image can arise, depending on the resolution and sampling frequency of the connected PC. Try to achieve as clear image by changing the PHASE value in this case. |
Menu PC PICTURE
| Menu point | Settings |
| Contrast | Reduce or increase the contrast (scale 0 – 63). |
| Brightness | Reduce or increase the brightness (scale 0 – 63). |
| Colour Temp | Select the colour tone: NORMAL, COOL, WARM; MANUAL (see the next point). |
| R, G, B | You will be able to set the values for R (red), G (green) and B (blue) yourself, if COLOUR TEMPERATURE has been set to MANUAL. |
| Reset | Reset the picture settings to the factory setting with OK or ↕. |
SOUND, FEATURE and SOURCE menus
The SOUND, FEATURE and SOURCE menus correspond to the menus in the TV mode.
Troubleshooting
Many times, problems have simple causes. We would like to give you some tips to solve some common problems. Please call us if these tips do not help!
There is no picture or sound.
- Make sure the AC adapter is properly inserted in the power outlet.
- Make sure the input mode is set correctly.
- Make sure the main power switch of the main unit is on.
There is no picture. There is no picture from AV.
- Make sure the Contrast/Brightness is properly adjusted.
- Make sure all external devices are connected properly.
- Check that the correct AV setting has been selected.
There is no sound.
- Make sure the volume is not set to minimum.
- Make sure the sound is not set to mute.
- Make sure that headphones are not connected.
There is no picture or sound, just noise.
- The reception may be weak. Make sure the aerial is not disconnected.
Picture is not clear.
The reception may be weak.
- Make sure the aerial is not disconnected.
The picture is too bright or too dark.
- Check the settings of contrast / brightness / Backlight in the menu picture settings.
Remote control does not work.
- Check the batteries in the remote control are not flat.
- Make sure the remote sensor window is not under strong lighting.
- Switch the device on and on again with the main switch on the back of the device.
The picture is not sharp.
The reception may be weak.
- Make sure the aerial is not disconnected.
- Check the settings of the picture sharpness and the noise reduction in the Picture Menu.
The picture is doubled or tripled.
- Make sure the aerial is facing the right direction.
- There may be reflected electric waves from mountains or buildings.
The picture is spotted.
- There may be interference from automobiles, trains, high voltage lines, neon light, etc.
- There may be interference between the antenna cable and power cable. Try moving them further apart.
There are stripes on the screen or colours fade.
- Is the unit receiving interference from other devices? Transmission antennas of radio broadcasting station and transmission antennas of amateur radio and cellular phones may also cause interference.
- Place the unit as far apart as possible from device that may cause possible interference.
The operating buttons on the device do not function.
- Perhaps the child lock has been activated.
DO YOU REQUIRE ADDITIONAL SUPPORT?
If the suggestions in the above section have not solved your problem, please contact us. We will try and help you over the telephone. However, before you contact us, please keep the following information available:
What additional units do you use?
What messages, if any, appear on your screen?
During which operational step did the problem arise?
- If you have connected a PC to the device:
-
What is your computer configuration?
-
Which software did you use while the error occurred?
What were you doing when the error occurred?
What steps have you already undertaken to solve the problem?
If you have already been given a customer number, please keep this available.
Cleaning
You can extend the useful life of the LCD TV by means of the following measures:
- Always pull out the mains connector and all connection cables before cleaning.
- Do not use any solvents or corrosive or gaseous cleaners.
- Clean the screen with a soft lint free cloth.
- Pay attention to the fact that no drops of water remain on the LCD TV. Water can cause permanent discolorations.
- Do not subject the screen to either glaring sunlight or ultra-violet radiation.
- Please keep the packaging material carefully and use it exclusively to transport the LCD TV.
Attention!
There are no parts to be serviced or cleaned within the screen casing.
Technical data
Operating voltage: AC 220 V -240V\~/50 Hz
Screen size: 32" (81 cm) TFT; 16:9 display
Power consumption: 180 Watt
Power consumption Standby: 3 W
TV transmission:
Reception channels:
Audio: Stereo
Number of preset channels: 100
RF aerial input: 75 Ohm
Dimensions (W x H x D) 620 x 835 x 250 mm
Weight: 16 kg
180 Watt
3 W
PAL/SECAM B/G D/K K' I/I L/L'
VHF (Band I/III)
UHF (BAND U)
HYPERBAND
CABLE TELEVISION (S1-S20)/ S21-S41)
Stereo
100
75 Ohm
620 × 835 × 250 mm
16 kg
Warranty
The receipt serves as proof of first purchase and should be kept in a safe place. Your legal rights are not limited by these warranty conditions. It is required should you need to make use of the guarantee. We guarantee that this equipment is in perfect working order. Upon production of the receipt, the remaining period of guarantee shall pass on from the original parts to the respective replacement parts. If you hand in this equipment to make use of the guarantee, you must remove all programs, data and removable storage media. Products which are sent without accessories will be replaced without accessories. The warranty obligation does not apply in the case of the problem being caused by an accident, a catastrophe, vandalism, misuse, incorrect use, ignoring the safety and maintenance regulations, changes by software, viruses or another piece of equipment or accessories or by other modifications not approved by ourselves. This limited guarantee declaration replaces all other guarantees of express or implied nature. This includes the guarantee of saleability or the suitability for a certain purpose but is not limited to this. In some countries the exclusion of implied guarantees is not permissible upon principle. In this case the validity of all express and implied guarantees is limited to the guarantee period. Once this period has expired, all guarantees become invalid. In some countries limiting the period of validity for implied guarantees is not permitted, so that the above limitation does not come into force. If you have any questions with regard to these guarantee conditions, please contact us.
LCD TV pixel faults
Despite the most modern production methods as a result of the highly complex technology, in rare cases there may be individual or multiple pixel drop-outs (dead pixels).
For active matrix TFTs with a resolution of 1366 × 768 pixels, which are each made up of three sub-pixels (red, green, blue), there are a total of approx. 3 million control elements in use. Occasionally one or more pixels can fail or become incorrectly controlled because of this very high number of transistors and the associated extremely complex manufacturing processes used.
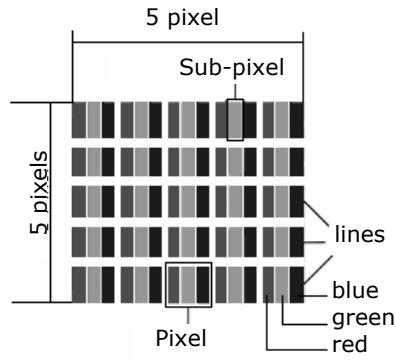
| Description | Accepted number | |
| Bright sub-pixel | 1 sub-pixel | Max. 2 |
| Two next to each other (horizontal/vertical) | 0 | |
| Separation | Minimum separation between bright and dark sub-pixels | Min. 5 mm |
| Dark sub-pixel | Single | Max. 7 |
| Two next to each other | Max. 2 | |
| Separation | Minimum separation between bright and dark sub-pixels | Min. 5 mm |
| Total number of bright and dark sub-pixels | Max. 7 | |
The table describes the maximum number of pixel failures allowed on the screen, without a warranty claim arising. A warranty claim can be made in some cases if the above number of defects in a category is exceeded.
Disposal
Packaging

All packaging and packaging materials that are no longer required can and should be recycled.
Device

At the end of its life, the device must not be disposed of in household rubbish. Enquire about the options for environmentally-friendly disposal.
Batteries

Do not dispose of used batteries in the household rubbish! They must be deposited at a collection point for used batteries.
Liability limitations
The contents of this manual are subject to unannounced changes caused by technical progress. Manufacturer and sales shall not be responsible for any damages which have been caused as a result of omissions or errors in the information provided in this manual.
Under no circumstances shall we be liable for any of the following:
- Claims made against you by third parties based on loss or damage.
- Loss or damage to your blanks, recordings or data.
- Economic follow-on damage (including lost profit or savings) or associated damage even in the case that we have been informed of the possibilities of this type of damage.
In some countries the exclusion or limitation of accompanying or follow-on damage is not legally accepted so that the above limitations do not come into force.
Copyright © 2007
All rights reserved.
This manual is protected by copyright. All rights reserved. Copying mechanically, electronically and any other way is prohibited unless written permission from the manufacturer is obtained.
The company Medion®. owns the copyright.
Subject to technical and optical changes as well as printing errors.
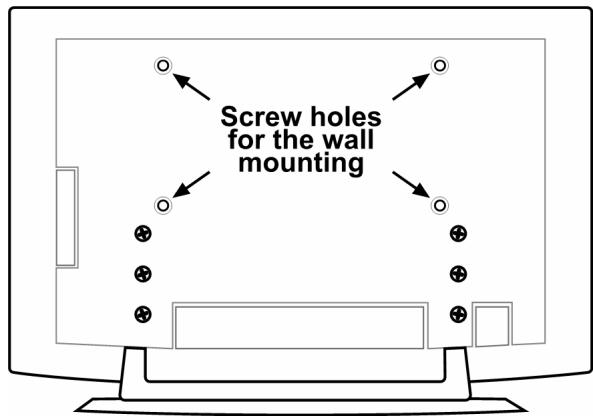
Wall mounting
The LCD TV can be fixed to the wall.
Accessories
The following accessories are included:
2 steel rails, 4 screws M4 x 10. 4 plastic suspension fittings, 1 drill template, 1 illustrated mounting instructions (applicable to many types of appliance).
In addition you will need 8 rawl plugs and screws for your wall (obtainable at specialist stores).
Safety instructions for wall mounting
Please make sure that you observe the following safety instructions for wall mounting:
- The LCD TV should only be mounted on vertical walls.
- Before you carry out the mounting, check whether the wall has the capability of carrying three times the weight of the unit (16 kg). If in doubt ask the advice of a qualified fitter.
- Switch off the LCD TV before mounting. Power cable and aerial cable must be disconnected.
- A minimum of two people are required to mount the TV.
- You will need a drill and a Phillips-type screwdriver to mount the TV.
CAUTION! When choosing the rawl plugs and screws make sure that they are suitably designed for your wall.
Mount suspension devices to appliance
- Feed the M4 x 10 screws through the plastic suspension fittings. The side of the plastic suspension fittings with the smallest diameter
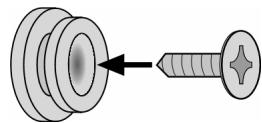
- Tighten the screws with the plastic suspension fittings into the screw holes provided in the rear of the unit.
See fig 5A in the illustrated instructions.
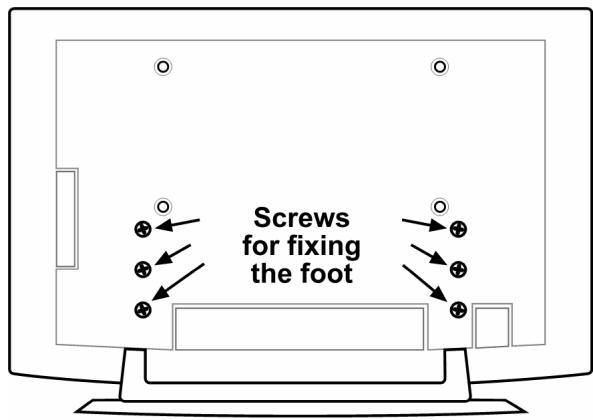
Removing the base
The base of the unit has six screws which are fixed to the back.
- Release these six screws with a Phillips-type screwdriver.
- Lift the device upwards.
See fig 6A in the illustrated instructions.
Fix the steel rails to the wall
- Choose a position on the wall where the LCD TV will have enough distance from other objects (cf. "Installation location" section, page 4).
When doing this ensure that the suspension fittings at the rear of the unit sit in the small end of the suspension openings in the steel rails (cf. the drawing on the next page).
- Use the drill template supplied to mark the eight holes on the wall.
- Drill eight holes for the rawl plugs in the wall. See the illustrated instructions - Fig 1.
- Insert the rawl plugs. See the illustrated instructions Fig 2.
CAUTION! The rawl plugs must be fixed securely! Do not hang the unit up if the rawl plugs are not completely inserted into the wall.
- Firmly screw both of the steel rails using four screws each. The small side of the suspension fittings must face outwards. See the illustrated instructions Figs. 3 and 4.
- Now you can hang the LCD TV into the steel rails. See the illustrated instructions - Figs. 8 and 9.
Inhalt
Inhalt 1
Videorecorder manuell speichern 25
PROGRAMMTABELLE 25
Menu QUELLE 26