MICROSTATION - Synthesizer KORG - Free user manual and instructions
Find the device manual for free MICROSTATION KORG in PDF.
| Product Type | Workstation synthesizer |
| Brand | KORG |
| Model | MICROSTATION |
| Dimensions (W × D × H) | 778 × 210 × 82 mm |
| Weight | 2.6 kg |
| Power Supply | DC 9V 1700mA AC adapter |
| Sound Generation | EDS (Enhanced Definition Synthesis) with 49 MB of PCM data |
| Polyphony | Up to 16 layerable Programs |
| Internal Memory - Programs | 512 (480 factory presets) |
| Internal Memory - Combinations | 384 (256 factory presets) |
| Arpeggiator | Dual polyphonic arpeggiator with 512 user patterns |
| Effects | 5 stereo inserts, 2 stereo masters, 1 stereo total, 134 types |
| Sequencer | 16 MIDI tracks + 1 Master track, 480 PPQN resolution |
| Controllers | Joystick, 4 REALTIME CONTROLS knobs (modes A, B, C, External) |
| Connectivity | USB MIDI, SD card slot (up to 2 GB) |
| Keyboard | 61-key mini keyboard with velocity sensitivity (no aftertouch) |
| Maintenance and Cleaning | Clean with a soft, dry cloth. Do not use benzene, thinner, or flammable substances. |
| Safety Instructions | Avoid exposure to sun, heat, humidity, dust, and vibrations. Do not spill liquids. Disconnect if problems occur. |
| Operating Temperature | 0°C to +40°C (non-condensing) |
| Included Accessories | AC adapter, quick start guide, disk with PDF manuals and software |
| Options | XVP-10, EXP-2, DS-1H, PS-1 pedals |
Frequently Asked Questions - MICROSTATION KORG
User questions about MICROSTATION KORG
0 question about this device. Answer the ones you know or ask your own.
Ask a new question about this device
Download the instructions for your Synthesizer in PDF format for free! Find your manual MICROSTATION - KORG and take your electronic device back in hand. On this page are published all the documents necessary for the use of your device. MICROSTATION by KORG.
USER MANUAL MICROSTATION KORG
Enhanced Definition Synthesis - integrated
REMS

KORG
Easy Start Guide 3
Guide de démarrage 21
Blitzstart 39
Guia Rapa . 57
microSTATION
MUSIC WORKSTATION
Precautions
Location
Using the unit in the following locations can result in a malfunction.
- In direct sunlight
- Locations of extreme temperature or humidity
- Excessively dusty or dirty locations
- Locations of excessive vibration
- Close to magnetic fields
Power supply
Please connect the designated AC adapter to an AC outlet of the correct voltage. Do not connect it to an AC outlet of voltage other than that for which your unit is intended.
Interference with other electrical devices
Radios and televisions placed nearby may experience reception interference. Operate this unit at a suitable distance from radios and televisions.
Handling
To avoid breakage, do not apply excessive force to the switches or controls.
Care
If the exterior becomes dirty, wipe it with a clean, dry cloth. Do not use liquid cleaners such as benzene or thinner, or cleaning compounds or flammable polishes.
Keep this manual
After reading this manual, please keep it for later reference.
Keeping foreign matter out of your equipment
Never set any container with liquid in it near this equipment. If liquid gets into the equipment, it could cause a breakdown, fire, or electrical shock.
Be careful not to let metal objects get into the equipment.
If something does slip into the equipment, unplug the AC adapter from the wall outlet. Then contact your nearest Korg dealer or the store where the equipment was purchased.
THE FCC REGULATION WARNING (for USA)
This equipment has been tested and found to comply with the limits for a Class B digital device, pursuant to Part 15 of the FCC Rules. These limits are designed to provide reasonable protection against harmful interference in a residential installation. This equipment generates, uses, and can radiate radio frequency energy and, if not installed and used in accordance with the instructions, may cause harmful interference to radio communications. However, there is no guarantee that interference will not occur in a particular installation. If this equipment does cause harmful interference to radio or television reception, which can be determined by turning the equipment off and on, the user is encouraged to try to correct the interference by one or more of the following measures:
- Reorient or relocate the receiving antenna.
- Increase the separation between the equipment and receiver.
- Connect the equipment into an outlet on a circuit different from that to which the receiver is connected.
- Consult the dealer or an experienced radio/TV technician for help. Unauthorized changes or modification to this system can void the user's authority to operate this equipment.
Notice regarding disposal (EU only)

When this "crossed-out wheeled bin" symbol is displayed on the product, owner's manual, battery, or battery package, it signifies that when you wish to dispose of this product, manual, package or battery

you must do so in an approved manner. Do not discard this product, manual, package or battery along with ordinary household waste. Disposing in
the correct manner will prevent harm to human health and potential damage to the environment. Since the correct method of disposal will depend on the applicable laws and regulations in your locality, please contact your local administrative body for details. If the battery contains heavy metals in excess of the regulated amount, a chemical symbol is displayed below the "crossed-out wheeled bin" symbol on the battery or battery package.
Data handling
Incorrect operation or malfunction may cause the contents of memory to be lost, so we recommend that you save important data on media. Please be aware that Korg will accept no responsibility for any damages which may result from loss of data.
Table of Contents
About this manual 6
Main features 7
Front and rear panels 8
Front panel 8
Rear panel 9
Connections and power 10
Selecting modes 11
Selecting and playing sounds 12
Selecting programs 12
Selecting combinations 13
Using controllers to modify the sound 14
Using the arpeggiator 15
Saving (writing) a program or combination 16
Loading and playing the demo songs 17
Loading the demo songs 17
Playing the demo songs 18
Auto song setup 18
Saving to SD card 19
Specifications (abbreviated) 20
Thank you for purchasing the Korg microSTATION Music Workstation. To help you get the most out of your new instrument, please read this manual carefully.
About this manual
About the documentation and how to use it
The microSTATION is shipped with the following documentation.
- microSTATION Easy Start Guide
- microSTATION Operation Guide (PDF)
- microSTATION Parameter Guide (PDF)
- microSTATION USB-MIDI Setup Guide (PDF)
- microSTATION Editor/Plug-In Editor User's Guide (PDF)
- microSTATION Voice Name List (PDF)
The PDF files listed above are in the "MANUALS" folder of the included disc. The manual for the KORG USB-MIDI driver is located in the same folder as the driver.
microSTATION Easy Start Guide
Read this first. It explains how to perform basic operations.
microSTATION Operation Guide
This explains what each part of the microSTATION does, how to connect the device and perform basic operations, as well as providing a summary of each mode, and explaining the basic knowledge you'll need in each mode to edit sounds and record on the sequencer. This manual also explains the arpeggiator and effects.
In addition, it provides troubleshooting help, a list of error messages, and specifications.
microSTATION Parameter Guide
This provides a detailed explanation of the microSTATION's parameters, organized by mode and page. Refer to this guide when you would like to learn more about an unfamiliar parameter.
microSTATION USB-MIDI Setup Guide
This explains how to install the Korg USB-MIDI driver and set up the microSTATION.
microSTATION Editor/Plug-In Editor User's Guide
This explains how to set up and use the microSTATION Editor/Plug-In Editor and the microSTATION Editor/Plug-In Editor.
microSTATION Voice Name List
This lists the names of the multisamples, drum samples, and factory-set combinations, programs, drum kits, user arpeggio patterns, and demo songs inside the microSTATION. Refer to this when you want to learn more about the preloaded content.
Conventions in this manual
Abbreviations for the manuals: OG, PG
In the documentation, references to the manuals are abbreviated as follows.
OG:Operation Guide
PG: Parameter Guide
Parameters in the LCD display screen " "
Parameters displayed in the LCD screen are enclosed in double quotation marks".
Symbols, MDI, Note, Tips
These symbols respectively indicate a caution, a MIDI-related explanation, a supplementary note, or a tip.
Example screen displays
The parameter values shown in the example screens of this manual are only for explanatory purposes, and may not necessary match the values that appear in the Display of your instrument.
MIDI-related explanations
CC# is an abbreviation for Control Change Number. In explanations of MIDI messages, numbers in square brackets [ ] always indicate hexadecimal numbers.
Main features
EDS-i (Enhanced Definition Synthesis - integrated)
This sound engine integrates the main functionality such as oscillator, filter, amp, LFO/EG, and effects from the "EDS" (Enhanced Definition Synthesis) sound engine of the M3 and M50, delivering the rich and vivid sound inherited from the EDS system.
49 MB (calculated as 16-bit linear) of PCM data
The microSTATION contains 49 MB of PCM data featuring Korg's voicing technology, as well as 480 preload programs using this PCM data and 256 preload combinations using these programs.
Combinations
Up to 16 programs can be layered, split, or velocity-switched to create complex and powerful sounds.
Dual polyphonic arpeggiator
In addition to the classic arpeggio patterns of the past, the microSTATION's arpeggiator can also play guitar or bass riffs, or drum patterns. Combinations and songs allow you to use two arpeggiators simultaneously. The built-in 512 user arpeggio patterns bring you a vast amount of performing potential.
Five stereo insert effects, two stereo master effects, and one stereo total effect
Add the finishing touches to your sound, using your choice of 134 types of high-quality effect, and a mixer section that lets you control the effect routing.
Realtime controls and joystick
The realtime controls let you modify the sound in realtime, and can also be used to control other Korg products or popular software.
High-resolution (480 ppq) sequencer
The built-in sequencer provides 16 MIDI tracks and 1 master track. A full range of functionality for music production and performance are provided, including Auto Song Setup, Grid Sequence, and Template Songs.
Computer connection via USB, as well as an SD slot
You can connect the microSTATION to your computer via USB for easy transfer of MIDI data. Commercially available SD cards can be used for convenient management of microSTATION data files.
microSTATION Editor and microSTATION Plug-In Editor are included
You can edit while viewing a large number of parameters on your computer screen, or use the microSTATION from within your DAW as if it were a plug-in synthesizer. Detailed sound parameters, effect parameters, drum kits, and user arpeggio patterns that cannot be accessed from the panel of the microSTATION itself can be edited and created by using the microSTATION Editor / Plug-In Editor.
Front and rear panels
Front panel
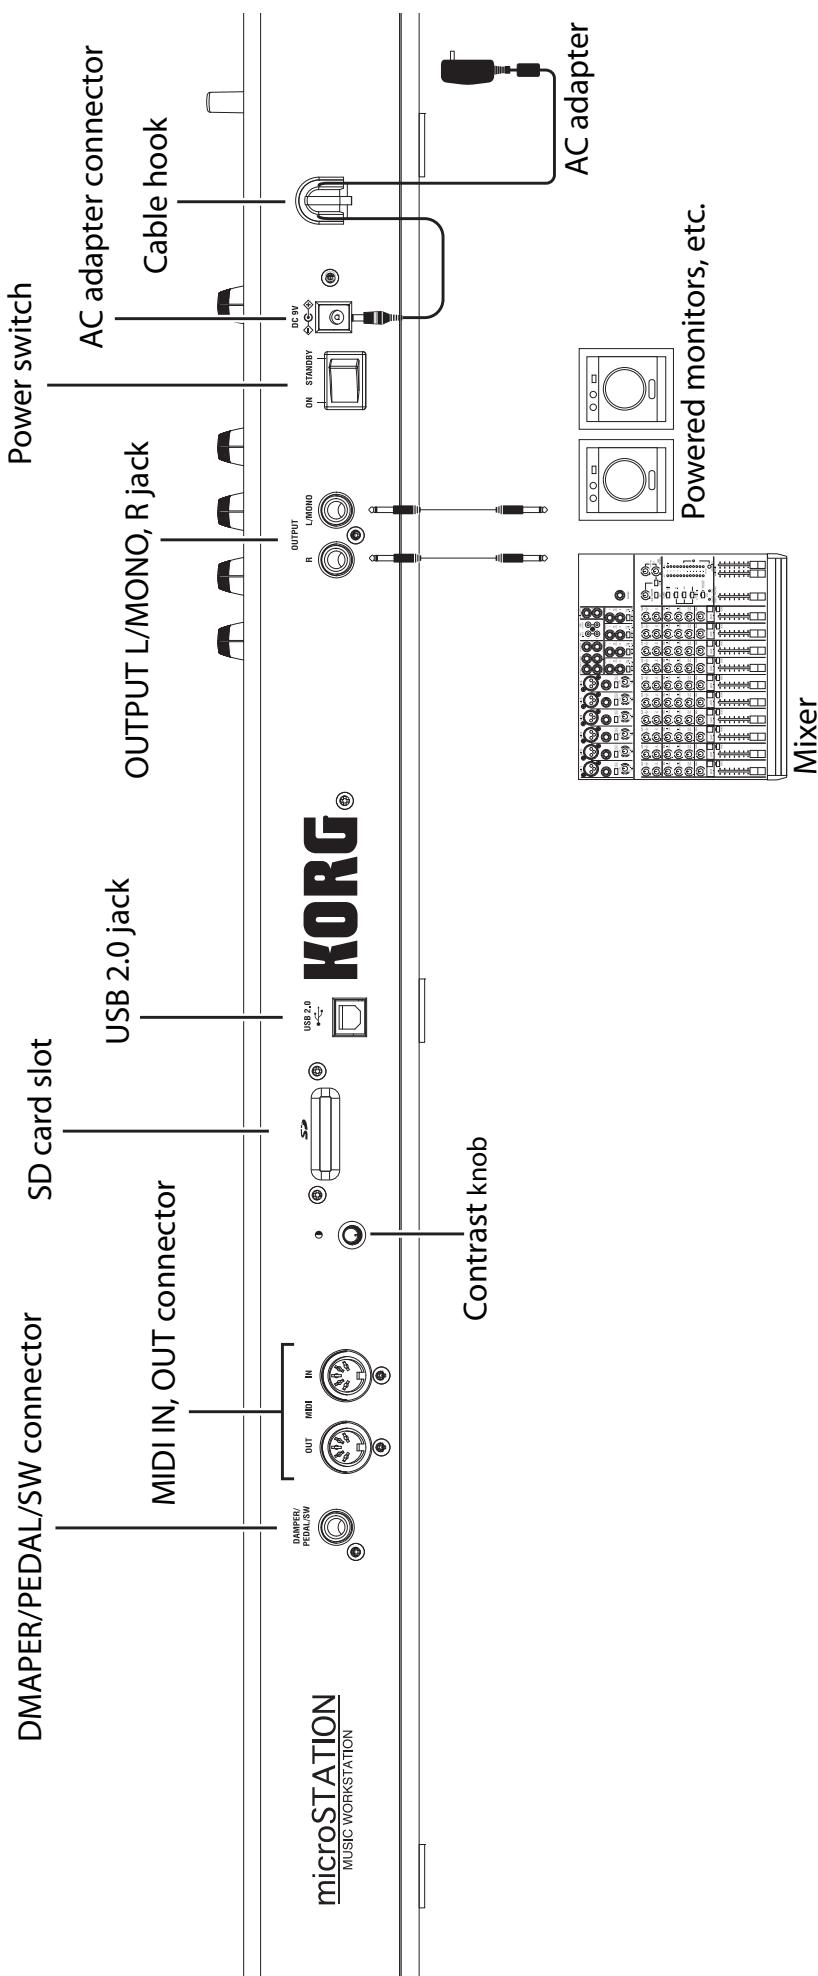
Rear panel
Connections and power
Use only the included AC adapter.
- Using the included AC adapter, connect the microSTATION to an AC outlet.
a Connect the AC adapter's plug to the microSTATION's rear panel power connector.
b To prevent the plug from being accidentally disconnected, wrap the AC adapter cable around the cable hook located on the microSTATION's rear panel.
c Connect the AC adapter to an AC outlet.
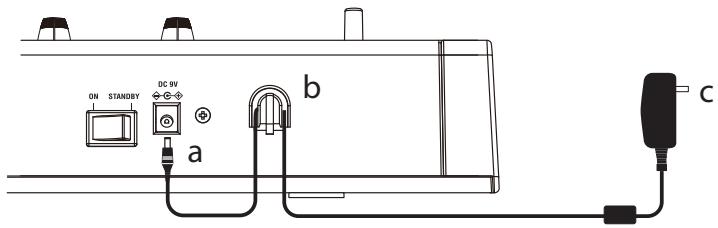
Connecting the AC adapter
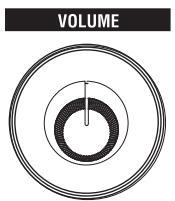
- Lower the microSTATION's VOLUME knob.
- Connect the microSTATION to your mixer or monitor system.
Connect the microSTATION's OUTPUT L/MONO and R jacks to your mixer or amplified monitor speakers (p. 9 "Rear panel").
If you're using headphones, connect them to the microSTATION's PHONES jack. The PHONES jacks is located on the left side of the microSTATION (p. 8 "Front panel").
- Lower the volume of the connected equipment.
- On the microSTATION's rear panel, press the power switch to turn on the power.
- Raise the volume of the connected equipment to an appropriate level. Then gradually raise the microSTATION's VOLUME to an appropriate level.
Selecting modes
The microSTATION provides four modes that you'll use to play, record, and adjust settings. Press one of the MODE buttons PROG, COMBI, SEQ, or GLB/MEDIA to select the desired mode.

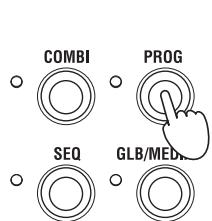
Program mode
When you press the PROG button, the LED located to the upper left of the button will light-up, and you'll be in Program mode.
In Program mode you can play "programs," which are the basic sounds of the microSTATION.
The microSTATION can hold 512 programs in its internal memory. When shipped from the factory, the internal memory contains 480 programs that cover a wide range of musical uses, organized into 7 sound categories.
Combination mode
When you press the COMBI button, the LED located to the upper left of the button will light-up, and you'll be in Combination mode.
In Combination mode you can play "combinations," which combine up to 16 programs to create complex and powerful sounds. The sounds in a combination can be played in different regions of the keyboard (split or layer), or differentiated by your playing strength (velocity switch).
The microSTATION can hold 384 combinations in its internal memory. When shipped from the factory, the internal memory contains a versatile array of 256 combinations organized into 7 sound categories.
Sequencer mode
When you press the SEQ button, the LED located to the upper left of the button will light-up, and you'll be in Sequencer mode.
In Sequencer mode you can record and play back your performance using the 16-track MIDI sequencer. If inspiration strikes while you're playing a combination or program, you can use the sequencer to immediately record your idea or phase.
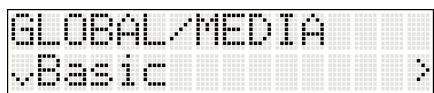
Global/Media mode
When you press the GLB/MEDIA button, the LED located to the upper left of the button will light-up, and you'll be in Global/Media mode.
In Global/Media mode you can adjust overall settings such as tuning and MIDI. You can also use an SD card (commercially available) to save your song, program, and combination data, or to load this data into the microSTATION.
Selecting and playing sounds
Selecting programs
To begin, let's enter Program mode and select a program.
When shipped from the factory, the microSTATION's internal memory contains 480 programs organized into 7 categories. In this example, we'll specify the SYNTH category and select a program from that category.
1. Press the PROG button to enter Program mode.
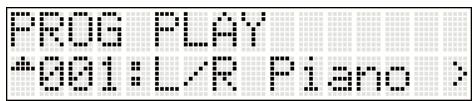
The display will show the PROG PLAY page. The PROG PLAY page will always appear when you press the PROG button.
The lower line of the display shows the index number and the program name.
2. Use the CATEGORY SELECT buttons to make the SYNTH indicator light-up. (The category indicators are located to the left of the display.)
The category indicators show the category that's currently selected.
OALL
O—KEYBOARD
OSTRINGS/BRASS/WOODWIND
O-GUPTAR
0 2400-2400DUT
BASS&
SYNTH
LEAD&SOLOPLT
LEAD & COOL OF LIT O PRUM/MALLET/UTS
O-DRW USER

CATEGORY

3. Use the buttons to select a program.
Play the keyboard and listen to the sound.
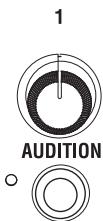
4. When selecting programs, you can use the Audition function to play a riff or phrase.
Press the AudITION button located below the REALTIME CONTROLS knob 1; the LED at the left of the button will light-up, and a riff (phrase) suitable for that program will be played automatically.
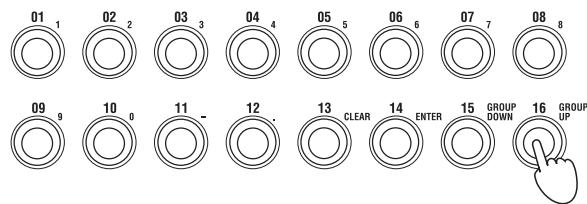
5. As an alternative to using the buttons to select a program, you can also use the function 01-16 buttons. For example, try pressing function button 16.
Program number 16 of the SYNTH category will be selected.
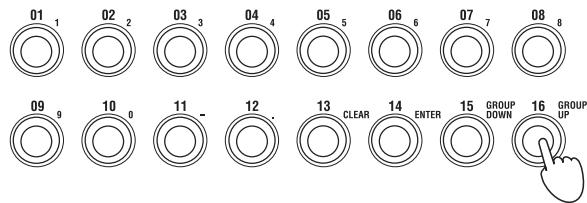
In this way, you can use the function 01-16 buttons to select program numbers 1-16 of the category that's currently selected.
Next we'll explain how to select program 17 and after.
6. Press the NUM LOCK button to the left of the function 01-16 buttons, so that the indicator to its left is lit-up.
This is the "Num Lock on" state.
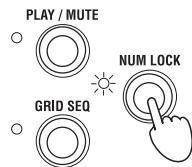
7. Press the function 16 button (GROUP UP) once.
Then press the NUM LOCK button once again to make its indicator go dark ("Num Lock off").
8. Now you can press the function 01-16 buttons to select program numbers 17-32 of the category that's currently selected.
Turn Num Lock on once again, and press the function 16 button (GROUP UP); now the function 01-16 buttons will select programs 33-48.
If you press the function 15 button (GROUP DOWN), then the function 01-16 buttons will once again select programs 1-16.
In this way, you can turn Num Lock on and press the function 15 button (GROUP DOWN) or 16 button (GROUP UP) to change the set of sixteen programs selected by the function 01-16 buttons; programs 1-16, 17-32, 33-48, and so on.
Go ahead and select programs from a variety of categories to hear how they sound.
Selecting combinations
You'll select combinations in essentially the same way as selecting programs (described above). Let's select a combination, and play the keyboard to hear the sound.
1. Press the COMBI button to enter Combination mode.
The display will show the COMBI PLAY page. The COMBI PLAY page will always appear when you press the COMBI button.
The lower line of the display shows the combination number and the combination name.
2. The method for selecting combinations is the same as for selecting programs. Use the CATEGORY SELECT buttons to specify a category, and then use the buttons to select a combination.
Alternatively, you can use the function 01-16 buttons to select a combination in the same way.
Using controllers to modify the sound
The microSTATION lets you modify the sound using the joystick and the realtime control knobs 1-4 as well as the keyboard.
Different settings are assigned to these controllers as appropriate for each program or combination, allowing you to modify the tone, pitch, or volume in effective ways.
The force used to play the keyboard can affect the sound's attack, volume, and brightness. In addition, some programs (such as wind instrument programs) will add breath noise when you play strongly.
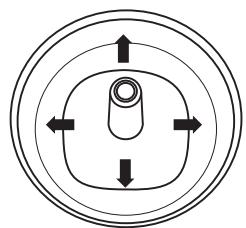
You can move the joystick in four directions (up/down/left/right) to modify the sound. With the most common settings, the pitch will rise when you move the joystick to the right, and fall when you move it to the left. Moving the joystick up (away from yourself) will apply vibrato, and moving it downward (toward yourself) will apply filter LFO (wah). A wide variety of other effects can be applied as well as the settings described above.
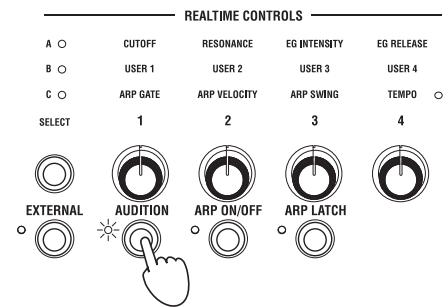
The realtime controls let you use four knobs to control the sound or arpeggiator. These knobs operate in one of three modes: A mode and B mode control the sound, and C mode controls the arpeggiator. There's also an External mode that lets you use the knobs to control an external MIDI device or software synthesizer.
In the explanation that follows, we'll use these knobs in realtime control A, B, and C modes to control the sound and the arpeggiator.
1. Press the REALTIME CONTROLS SELECT button.
The A, B, or C LEDs located above the SELECT button will light-up. There are three realtime control modes, A, B, and C, and you'll cycle through these modes each time you press the button.
| REALTIME CONTROLS | ||||
| A | CUTOFF | RESONANCE | EG INTENSITY | EG RELEASE |
| B | USER 1 | USER 2 | USER 3 | USER 4 |
| C | ARP GATE | ARP VELOCITY | ARP SWING | TEMPO |
| SELECT | 1 | 2 | 3 | 4 |
| EXTER | AUDITION | ARP ON/OFF | ARP LATCH | |
- When A (A mode) is lit-up, knobs 1-4 will respectively adjust the brightness (cutoff), resonance, EG depth, and EG release time.
- Press the REALTIME CONTROLS SELECT button to make B (B mode) light-up.
Turning the knobs will apply the effect that's specified for each program or combination. Normally, B mode assigns knobs 3 and 4 to control the chorus and reverb depth.
4. Once again press the REALTIME CONTROLS SELECT button to make C (C mode) light-up.
Turning the knobs will vary the arpeggio pattern and the pattern playback tempo (p. 15 "Using the arpeggiator").
You can also use a foot controller, damper pedal, or pedal switch (sold separately) to control the sound; for example, you can control the filter or effects, or turn portamento on/off. For details, refer to "microSTATION Operation Guide" and "microSTATION Parameter Guide."
Each program lets you use one polyphonic arpeggiator. In Combination mode or Sequencer mode, you can use two polyphonic arpeggiators.
- Select the program or combination that you want to play.
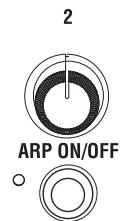
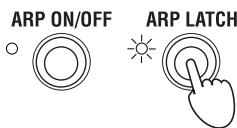
- Press the ARP ON/OFF button to make the LED located to the left of the button light-up.
Depending on the combination or program, the arpeggiator might already been turned on. You can press the front panel ARP ON/OFF button to switch the arpeggiator on/off.
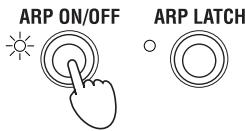
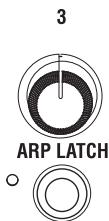
- Press the ARP LATCH ON/OFF button to make the LED to the left of the button light-up; this turns the Latch function on.
If Latch is on, the arpeggiator will continue playing even after you take your hand off the keyboard.
- Press some keys.
The arpeggio pattern will start.
- Press the REALTIME CONTROLS SELECT button to make the C mode LED light-up.
Then turn knobs 1-3 (GATE, VELOCITY, SWING), and notice how the pattern changes.
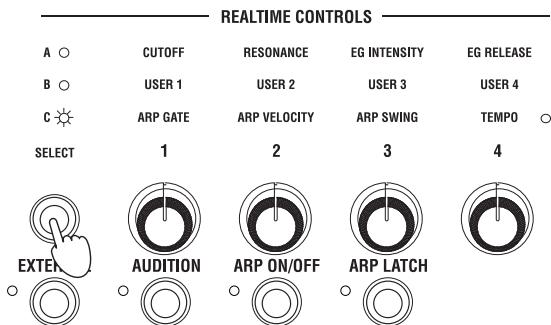
- Turning knob 4 (TEMPO) will adjust the tempo.
It's also effective to switch to realtime control A or B mode and modify the sound while the arpeggiator is playing ( ^艹 p. 14 "Using controllers to modify the sound").
Arpeggio patterns suitable for the sounds have been assigned to each of the factory-set programs and combinations. Go ahead and select programs or combinations from various categories, and turn on the arpeggiator to hear the results.
Saving (writing) a program or combination
In addition to the parameters mentioned in the preceding pages, such as the changes you make when using the realtime control knobs to modify the sound, arpeggio pattern, and tempo etc., the microSTATION has many more parameters, all of which can be saved. (However, some of the parameters adjusted in realtime control B mode are not saved. Nor are the realtime control A mode changes saved for a combination.)
Be aware that the changes you make by editing will be lost when you select another program or combination, or when you turn off the power. We recommend that you save your program or combination when you've come up with a sound that you like.
In the following example, we'll explain how to save a program in Program mode.
- Use the realtime controls to modify (edit) a program.
( p. 14 "Using controllers to modify the sound")
- Press the button to enter PROG EDIT.
The PROG EDIT screen OSC Common will appear first.

- Use buttons to select "Write Program."

- Press the button.
The program name page will appear.

- If you want to edit the program name, press the button.
The program name edit page will appear.
- Use the buttons to move between character positions, and use the buttons to specify the character at each position.
When you've finished editing the name, use the button to return to the first program name page (the screen shown in step 4).
- Press the button.
A page allowing you to specify the category will appear.
If you want to change the category, press the button.

Use the buttons to specify the desired category.
When you've changed the category, use the button to return to the first category page.

8. Press the button.
A page allowing you to specify the writing-destination will appear.
Press the button, and then use the buttons to specify the writing-destination.

When you've specified the writing-destination, press the button to return to the first writing-destination page.
When saving for the first time, we recommend that you save to one of the initialized programs (bank D096-D127). (initialized combinations are stored in bank C096-C127.)
9. Press the button.
The display will ask "OK?"

10. Press the button to save the data.
When saving is completed, the screen will indicate "Completed."

Loading and playing the demo songs
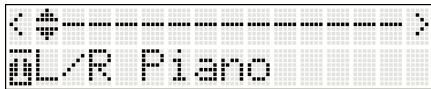
The microSTATION contains three built-in demo songs.
Here's how to load these demo songs into the microSTATION and play them.
Loading the demo songs
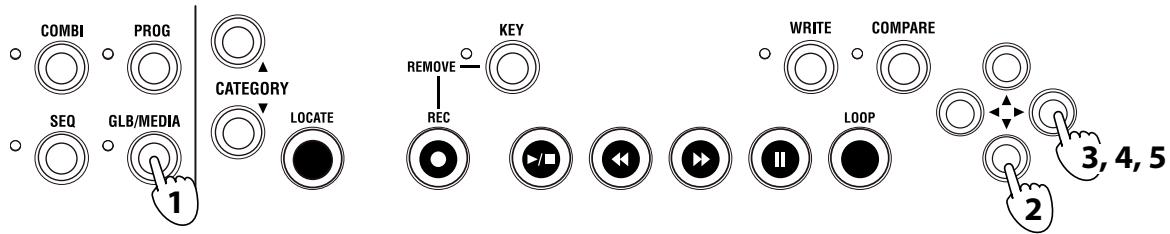
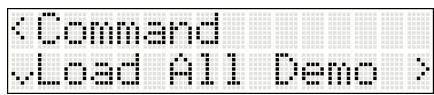
1. Press the GLB/MEDIA button to enter Global/Media mode.
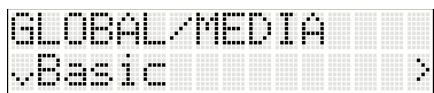
2. Use the buttons to select "Command."
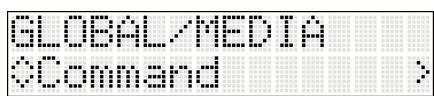
3. Press the button.
The display will indicate "Load All Demo."
4. Press the button.
The display will ask "OK?"
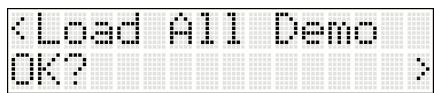
5. Press the button to load the demo songs.
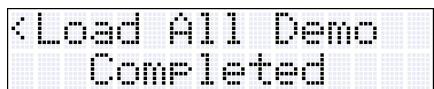
When loading is completed, the screen will indicate "Completed."
Playing the demo songs
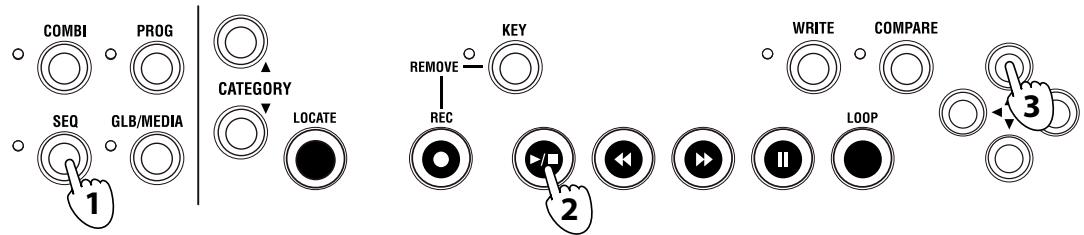
- Press the SEQ button to enter Sequencer mode.

- Press the START/STOP (▶■) button to start playback. To stop playback mid-way through the song, press the START/STOP button once again.
- To listen to another song, use the buttons to select the song and then press the START/STOP button.
Auto song setup
When you're playing a combination or program, you can copy its settings to Sequencer mode as song data, so that you're ready to start recording. This function is called "Auto Song Setup." You can use this function to immediately start recording the moment you have an idea or inspiration while playing a program or combination.

-
Select the combination or program that you want to use for recording. Also check the arpeggiator's on/off status.
-
Press the REC button. The display will ask "Auto Song Setup OK?"
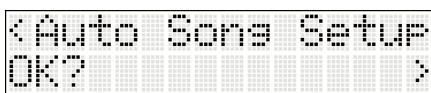
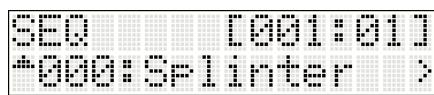
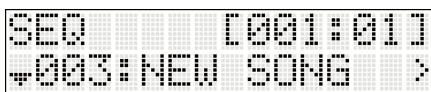
- Press the button. The microSTATION will switch to Sequencer mode, and will automatically be in the record-ready state. The upper right side of the display shows the location, and the lower line shows the song name (initially this will be NEW SONG).
-
Press the START/STOP (▶/■) button. After a two-measure count, recording will begin. Go ahead and play.
-
When you've finished recording, press the START/STOP button; recording will stop.
- Play back the performance that you just recorded. Press the START/STOP button and playback will begin. Press the START/STOP button once again to stop playback.
If you want to re-record, proceed as follows
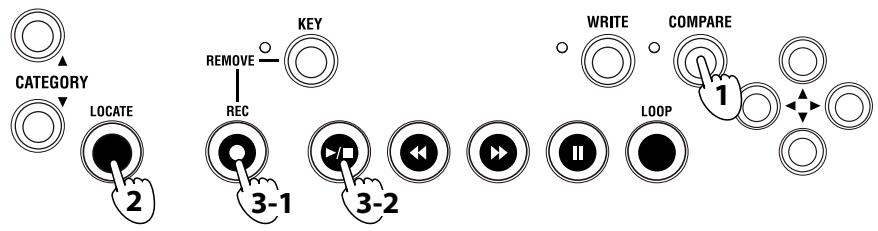
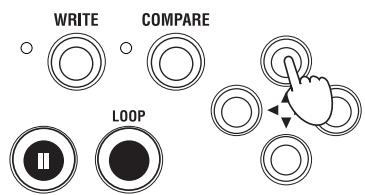
- Press the COMPARE button.
You will return to the state prior to recording.
- Press the LOCATE button to return to the starting measure.
- Press the REC button. You'll be in record-ready mode. Press the START/STOP (▶/■) button to record. When you've finished recording, press the START/STOP button to stop.
After recording, you can record additional measures or other tracks. For details, refer to "microSTATION Operation Guide" and "microSTATION Parameter Guide" (PDF).
The microSTATION's Sequencer mode also provides a Loop Recording function that lets you repeatedly record a specified region of measures, and a Grid Sequence function that lets you easily create drum patterns.
There is also a wide range of other functionality, such as template songs suitable for various musical styles. By selecting a template before you record, you can automatically make the appropriate preset settings for each track (instrument assignment, volume settings, etc.).
For details on this and other functions, refer to "microSTATION Operation Guide" and "microSTATION Parameter Guide."
Saving to an SD card
You can save the microSTATION's programs, combinations, and songs on an SD card (sold separately). SD cards are a good way to back up this data, or to load it into another microSTATION unit in a different location, such as in a studio.
Songs cannot be saved (written) to the microSTATION's internal memory. Song data will be lost when you turn off the power, so you must save it to an SD card if you want to keep it. Here's how to save your song.
-
Insert an SD card (sold separately) into the microSTATION's rear panel SD card slot.
When inserting a card, make sure that it's oriented correctly. Forcing a card into the slot the wrong way will damage the slot or the card, and may result in data loss. -
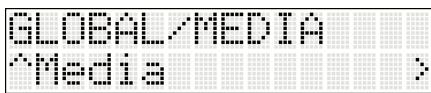
Press the GLB/MEDIA button to enter Global/Media mode.
- Use the buttons to select "Media," and then press the button.
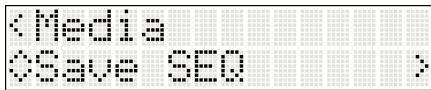
- Use the buttons to select "Save SEQ," and then press the button.
The screen shows the name that the data will be saved to on the SD card.
Note: You can change the name after saving.

- Press the u button.
The display will ask "OK?"

- Press the button to save the data.
When saving is completed, you will return to the "Save SEQ" screen.
Never remove the SD card from the slot during a save, load, or format operation.
Note: To remove the SD card, gently press the card inward. You will hear a click, and the SD card will pop out partway, allowing you to remove it.
Specifications (abbreviated)
Operating conditions:
0 - + 40^ (non-condensing)
Keyboard:
61-note (natural-touch mini keyboard, velocity sensitive, afttouch not supported)
SD card slot:
Supports up to 2 GB. SD and SDHC memory cards are supported.
Power supply:
AC adapter connector (DC 9V 1700 mA C), POWER switch
Dimensions (mm) (W× D× H)
778 × 210 × 82(mm) / 30.63'' × 8.27'' × 3.23''
Weight:
2.6kg / 5.73 lbs
Power consumption:
6W
Included items:
AC adapter, microSTATION Easy Start Guide, Accessory disc (microSTATION Operation Guide PDF, microSTATION Parameter Guide PDF, USB-MIDI Setup Guide PDF, microSTATION Editor/Plug-In Editor User Guide, External Setups PDF, Korg USB-MIDI driver, microSTATION Editor / Plug-In Editor, etc.)
Options:
XVP-10 expression/volume pedal
EXP-2 foot controller
DS-1H damper pedal
PS-1 pedal switch
microSTATION
MUSIC WORKSTATION
Guide de démarrage
Précautions
Emplacement
EDS-i (Enhanced Definition Synthesis - integrated)
EDS-i (Enhanced Definition Synthesis - integrated)
EDS-i (Enhanced Definition Synthesis - integrated)
This product has been manufactured according to strict specifications and voltage requirements that are applicable in the country in which it is intended that this product should be used. If you have purchased this product via the internet, through mail order, and/or via a telephone sale, you must verify that this product is intended to be used in the country in which you reside. WARNING: Use of this product in any country other than that for which it is intended could be dangerous and could invalidate the manufacturer's or distributor's warranty. Please also retain your receipt as proof of purchase otherwise your product may be disqualified from the manufacturer's or distributor's warranty.