
MINI KP - Audio Effects KORG - Free user manual and instructions
Find the device manual for free MINI KP KORG in PDF.
| Product Type | Dynamic effects processor with touchpad |
| Brand | KORG |
| Model | MINI KP |
| Power Supply | 4 LR6 (AA) alkaline batteries 6V or optional AC adapter |
| Battery Life | Approximately 5 hours (with alkaline batteries) |
| Weight (without batteries) | 154 g |
| Inputs | LINE IN (RCA jacks) |
| Outputs | LINE OUT (RCA jacks), headphones (3.5 mm stereo jack) |
| Main Functions | 100 effect programs (00-99), X/Y touchpad, memory buttons A/B, effect hold (HOLD), FX Release, BPM tap setting, link mode selection (direct/send) |
| Maintenance and Cleaning | Clean with a dry, clean cloth. Do not use liquid or flammable products. |
| Safety | Avoid exposure to sun, moisture, dust and vibrations. Do not place liquids nearby. Disconnect if problems occur. |
| Included Accessories | User manual, 4 test AA batteries |
Frequently Asked Questions - MINI KP KORG
User questions about MINI KP KORG
0 question about this device. Answer the ones you know or ask your own.
Ask a new question about this device
Download the instructions for your Audio Effects in PDF format for free! Find your manual MINI KP - KORG and take your electronic device back in hand. On this page are published all the documents necessary for the use of your device. MINI KP by KORG.
USER MANUAL MINI KP KORG
Using the unit in the following locations can result in a malfunction.
- In direct sunlight
- Locations of extreme temperature or humidity
- Excessively dusty or dirty locations
- Locations of excessive vibration
- Close to magnetic fields
Power supply
Please connect the designated AC adapter to an AC outlet having the correct voltage. Do not connect it to an AC outlet having a voltage other than that specified for your unit.
Interference with other electrical devices
Radios and televisions placed nearby may experience reception interference. Operate this unit at a suitable distance from radios and televisions.
Handling
To avoid breakage, do not apply excessive force to the switches or controls.
Care
If the exterior becomes dirty, wipe it with a clean, dry cloth. Do not use liquid cleaners such as benzene or thinner, or cleaning compounds or flammable polishes.
Keep this manual
After reading this manual, please keep it for later reference.
Keeping foreign matter out of your equipment
Never set any container with liquid in it near this equipment. If liquid gets into the equipment, it could cause a breakdown, fire, or electrical shock.
Be careful not to let metal objects get into the equipment. If something does slip into the equipment, unplug the AC adapter from the wall outlet. Then contact your nearest Korg dealer or the store where the equipment was purchased.
- Company names, product names, and names of formats etc. are the trademarks or registered trademarks of their respective owners.
THE FCC REGULATION WARNING (for U.S.A.)
This equipment has been tested and found to comply with the limits for a Class B digital device, pursuant to Part 15 of the FCC Rules. These limits are designed to provide reasonable protection against harmful interference in a residential installation. This equipment generates, uses, and can radiate radio frequency energy and, if not installed and used in accordance with the instructions, may cause harmful interference to radio communications. However, there is no guarantee that interference will not occur in a particular installation. If this equipment does cause harmful interference to radio or television reception, which can be determined by turning the equipment off and on, the user is encouraged to try to correct the interference by one or more of the following measures:
- Reorient or relocate the receiving antenna.
- Increase the separation between the equipment and receiver.
- Connect the equipment into an outlet on a circuit different from that to which the receiver is connected.
- Consult the dealer or an experienced radio/TV technician for help.
Unauthorized changes or modification to this system can void the user's authority to operate this equipment.
CE mark for European Harmonized Standards
CE mark which is attached to our company's products of AC mains operated apparatus until December 31, 1996 means it conforms to EMC Directive (89/336/EEC) and CE mark Directive (93/68/EEC).
And, CE mark which is attached after January 1, 1997 means it conforms to EMC Directive (89/336/ EEC), CE mark Directive (93/68/EEC) and Low Voltage Directive (73/23/EEC).
Also, CE mark which is attached to our company's products of Battery operated apparatus means it conforms to EMC Directive (89/336/EEC) and CE mark Directive (93/68/EEC).
IMPORTANT NOTICE TO CONSUMERS
This product has been manufactured according to strict specifications and voltage requirements that are applicable in the country in which it is intended that this product should be used. If you have purchased this product via the internet, through mail order, and/or via a telephone sale, you must verify that this product is intended to be used in the country in which you reside.
WARNING: Use of this product in any country other than that for which it is intended could be dangerous and could invalidate the manufacturer's or distributor's warranty.
Please also retain your receipt as proof of purchase otherwise your product may be disqualified from the manufacturer's or distributor's warranty.
Thank you for purchasing the KAOSS PAD mini-KP Dynamic Effect Processor. For trouble-free enjoyment of the mini-KP's fullest potential, please read this manual carefully and use the mini-KP only as directed.
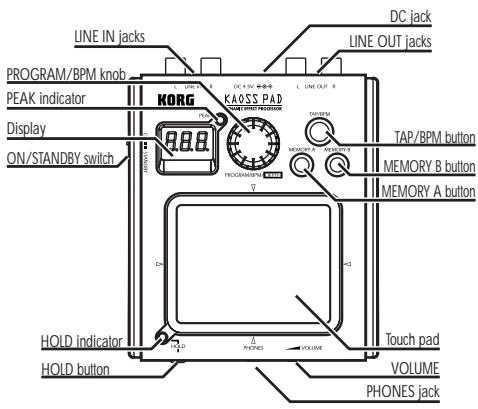
Parts of the mini-KP
Replacing the batteries
The display will indicate "Lo" when the batteries are running low. Please replace the batteries as soon as possible.
You must turn off the power switch before replacing the batteries.
The included batteries are provided so that you can verify that the unit operates correctly, and may have a shorter lifespan than expected.
Use only alkaline batteries.
If the batteries become unusable, remove them immediately. You should also remove the batteries if you won't be using the unit for an extended time.
- On the bottom panel, slide the battery case cover in the direction of the arrow to open it.
- Install four AA batteries. Make sure that the
batteries are inserted in the correct polarity (+, -) .
- Close the battery case cover.

Turning the power on/off
Turning the power on
Set the ON/STANDBY switch to the ON position; this turns the power on.
Turning the power off
Set the ON/STANDBY switch to the STANDBY position; this will turn the power off.
If you're using the mini-KP on battery power, don't forget to turn the power off when you are done using it.
Connection setting
Hold down the MEMORY A button and press the B button. Use the PROG/VALUE knob to select "dir" (direct) or "snd" (send).
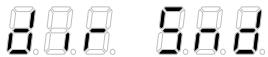
Choose the "dir" setting if you are connecting an instrument or audio device directly to the mini-KP (as in the diagram above). Choose the "snd" setting if the mini-KP will be connected to the effect send and return jacks of your mixer or other device.
To return to the normal play mode, once again hold down the MEMORY A button and press the B button. The mini-KP will also return to the normal play mode (program selection state) after about three seconds if no additional setting operations are performed.
This setting will be remembered even when the power is turned off.
About the input level
The PEAK indicator will light red if the input signal level is too high. In this case, reduce the output volume of the device that's connected to the mini-KP.
Use the VOLUME knob on the front to adjust the.
headphone volume.
Operation
Operating the touch pad
You can control the sound by rubbing or tapping your finger on the touch pad. Each axis (X, Y) will provide realtime control of a different effect parameter.
Hold
If you press the HOLD button while your finger is on the touch pad, you can take your finger away and the effect will continue to play as if your finger was still on the touch pad, and at the same location as when you pressed the HOLD button.
Selecting an effect program
Turn the PROG/VALUE knob to select an effect program 00-99.
FX RELEASE setting
Hold down the MEMORY B button and press the TAP button, and then use the PROG/VALUE knob to select "r.On" (FX Release On) or "r.OF" (FX Release Off).


To return to the normal play mode, once again hold down the MEMORY B button and press the TAP button. The mini-KP will also return to the normal play mode (program selection state) after about three seconds if no additional setting operations are performed. This setting will be remembered even when the power is turned off.
What is FX RELEASE?
With FX RELEASE, the moment you take your hand off the touch pad, a delay effect synchronized to the current BPM will be applied, and will then gradually diminish. This allows you to make smoother transitions and avoid the abrupt change from a hard-edge effect back to the original—and unaffected—signal.
Adjusting the effect depth
Hold down the MEMORY A button and press the TAP button, and then use the PROG/VALUE knob to set the effect depth. To return to the normal play mode, once again hold down the MEMORY A button and press the TAP button. The mini-KP will also return to the normal play mode (program selection state) after about fifteen seconds if no additional setting operations are performed.
Using the MEMORY A/B buttons
Each of the MEMORY A/B buttons be used to store an effect program, the effect depth, the HOLD button on/off status and the held position on the touch pad. Then you can simply press the MEMORY A or B button to instantly recall the stored settings.
Storing the current settings to a MEMORY button
Select the program that you want to store, and adjust the effect depth. If you want to store the Hold state, press the HOLD button to turn it on.
The position at which you last touched the pad will be stored as the held position on the touch pad. Hold down one of the MEMORY buttons (A or B) and press the HOLD button; the current settings will be stored to that MEMORY button.
Setting the BPM
When you press the TAP button, the current BPM setting will be displayed. Hit the TAP button several times in tempo with your song, and the mini-KP will detect the corresponding BPM value and use it as the current setting. While the BPM value is displayed, you can also adjust the BPM value by turning the PROG/VALUE knob. If you hold down the TAP button for an extended time, the mini-KP will switch from the BPM setting back to program selection.
The mini-KP will also return to the program selection state if you haven't performed any setting operation for five seconds.
Restoring the factory settings
Hold down the TAP button and the MEMORY A button as you turn on the power; all settings will return to their factory-set state.
Specifications
| Connectors: | LINE IN jacks (RCA phono jacks) |
| LINE OUT jacks (RCA phono jacks) | |
| HEADPHONES jack (Stereo 1/ 8" mini phone jack) | |
| Power supply: | four alkaline AA (LR6) batteries (6 V) |
| Battery life: | approximately five hours (with alkaline batteries) |
| Dimensions: | 106 mm (W) x 129 mm (D) x 29 mm (H) / 4.17" (W) x 5.08" (D) x 1.14" (H) |
| Weight: | 154 g / 5.43 oz. (without batter- ies) |
| Included items: | owner's manual, four AA "test" batteries |
| Options (sold separately): AC adapter (◇◇◇) | |
- Specifications and appearance are subject to change without notice for improvement.
Précautions
Emplacement
Dimensions: 106 mm (L) X 129 mm (P) X 29 mm (H)
| Program Name | X AXIS← | Y AXIS↑ | Fx Release | BPM Sync | |
| 00 | LPF(Low Pass Filter) | Cutoff Frequency | Resonance | ○ | --- |
| 01 | HPF(High Pass Filter) | Cutoff Frequency | Resonance | ○ | --- |
| 02 | BPF+(Band Pass Filter+) | Cutoff Frequency | Resonance | ○ | --- |
| 03 | 72dB/oct LPF | Cutoff Frequency | Resonance | ○ | --- |
| 04 | LPF & Delay | Delay Time | LPF Cutoff & Resonance | --- | ↓ |
| 05 | HPF & Delay | Delay Time | HPF Cutoff & Resonance | --- | ↓ |
| 06 | BPF+ & Delay | Delay Time | BPF Cutoff & Resonance | --- | ↓ |
| 07 | LPF & Reverb | Reverb Depth | LPF Cutoff & Resonance | --- | --- |
| 08 | HPF & Reverb | Reverb Depth | HPF Cutoff & Resonance | --- | --- |
| 09 | BPF+&Reverb | Reverb Depth | BPF Cutoff & Resonance | --- | --- |
| 10 | Morphing Filter | LPF - BPF+ - HPF | Cutoff & Resonance | ○ | --- |
| 11 | Radio Filter | Band Width | Noise Level | ○ | --- |
| 12 | Radio Isolator | Mid+Low - Mid - Mid+Hi | Level & Drive | --- | --- |
| 13 | Isolator | Low - Mid - Hi | Level & Drive | --- | --- |
| 14 | Isolator & Distortion | Low - Mid - Hi | Distortion | ○ | --- |
| 15 | Isolator & Delay | Low - Mid - Hi | Delay Depth | ○ | ↓ |
| 16 | Jet(Manual Flanger) | Delay Time | Feedback | ○ | --- |
| 17 | Manual Phaser | Frequency | Resonance | ○ | --- |
| 18 | Talk Filter | 1st Formant | 2nd Formant | --- | ↓ |
| 19 | Digi Talk | 1st Formant | 2nd Formant | ○ | --- |
| 20 | Ring Mod & HPF | Ring Mod Frequency | HPF Cutoff & Resonance | ○ | --- |
| 21 | Pitch Shifter & HPF | Pitch Shift | HPF Cutoff & Resonance | ○ | --- |
| 22 | Mid Pitch Shifter | Pitch Shift | Mix Balance(Original - Mix - Pitch Shift). | ○ | --- |
| 23 | Pitch Shifter & Delay | Pitch Shift | Delay Depth | --- | ↓ |
| 24 | Broken Modulation | Frequency | Depth | ○ | --- |
| 25 | Fuzz Distortion | Low Boost - Low Cut | Distortion | ○ | --- |
| 26 | Decimator | Sampling Frequency | Sampling Bit | --- | --- |
| 27 | Decimator & HPF | Decimator Frequency & Bit | HPF Cutoff & Resonance | ○ | --- |
| 28 | LFO LPF | LFO Speed | Resonance | ○ | --- |
| 29 | LFO HPF | LFO Speed | Resonance | ○ | --- |
| 30 | LFO BPF+ | LFO Speed | Resonance | ○ | --- |
| 31 | LFO HPF+ & Delay | Delay Time | HPF Level, Delay Depth | --- | ↓ |
| 32 | Infinite LFO HPF+ | LFO Speed | Resonance | ○ | --- |
| 33 | Random LFO LPF | LFO Speed | LFO Depth | ○ | --- |
| 34 | Random LFO HPF+ | LFO Speed | LFO Depth | ○ | --- |
| 35 | Flanger | LFO Speed | Feedback | ○ | --- |
| 36 | Deep Flanger | LFO Speed | Feedback | ○ | ↓ |
| 37 | Mid Flanger | LFO Speed | Feedback | ○ | ↓ |
| 38 | Flanger & LPF | Flanger LFO Speed | LPF Cutoff & Resonance | ○ | ↓ |
| 39 | Flanger & Delay | Delay Time | Flanger Feedback, Delay Depth | --- | ↓ |
| 40 | Infinite LFO Flanger | LFO Speed | Feedback | ○ | ↓ |
| 41 | Phaser | LFO Speed | Resonance | ○ | ↓ |
| 42 | Mid Phaser | LFO Speed | Resonance | ○ | ↓ |
| 43 | Phaser & Delay | Delay Time | Phaser Resonance, Delay Depth | --- | ↓ |
| 44 | Step Phaser | Frequency | Resonance | ○ | ↓ |
| 45 | Auto Pan | LFO Speed | Mono Mix - Auto Pan | --- | ↓ |
| 46 | Mid Auto Pan | LFO Speed | LFO Depth | --- | ↓ |
| 47 | Slicer | LFO Speed | LFO Depth | --- | ↓ |
| 48 | Mid Slicer | LFO Speed | LFO Depth | --- | ↓ |
| 49 | Slicer & LPF | Slicer LFO Speed | LPF Cutoff & Resonance | ○ | ↓ |
| Program Name | X AXIS ↔ | Y AXIS ↓ | Fx Release | BPM Sync | |
| 50 | Slicer & HPF | Slicer LFO Speed | HPF Cutoff & Resonance | ○ | ↓ |
| 51 | Delay | Delay Time | Delay Depth | --- | ↓ |
| 52 | Smooth Delay | Delay Time | Delay Depth | --- | --- |
| 53 | Low Cut Delay | Delay Time | Delay Depth | --- | ↓ |
| 54 | Ping Pong Delay | Delay Time | Delay Depth | --- | ↓ |
| 55 | LCR Delay | Delay Time | Delay Depth | --- | ↓ |
| 56 | 3 band Delay | Low - Mid - Hi | Delay Depth | --- | ↓ |
| 57 | Multi Tap Delay | Delay Tone | Delay Depth | --- | --- |
| 58 | BPF Time Slide | Delay Time | BPF Frequency | --- | ↓ |
| 59 | Reverse Delay & HPF | Delay Time | HPF Cutoff & Resonance | ○ | ↓ |
| 60 | Reverse Delay Mix | Delay Time | Delay Depth | --- | ↓ |
| 61 | Gate Reverb & Delay | Delay Time | Delay Depth, Reverb Depth | --- | ↓ |
| 62 | Delay & Reverb | Delay Time | Delay Depth, Reverb Depth | --- | ↓ |
| 63 | Tape Echo | Delay Time | Delay Depth | --- | ↓ |
| 64 | Dub Echo | Delay Time | Delay Tone | --- | ↓ |
| 65 | Feedback Echo | Delay Time | Delay Depth | --- | ↓ |
| 66 | Reverb | Reverb Time | Reverb Depth | --- | --- |
| 67 | Reverb 2 | Reverb Time | Reverb Depth | --- | --- |
| 68 | Spring Reverb | Reverb Time | Reverb Depth | --- | --- |
| 69 | Gate Reverb | Gate Time | Reverb Depth | --- | --- |
| 70 | Reverse Gate Reverb | Gate Time | Reverb Depth | --- | --- |
| 71 | 3 band Gate Reverb | Low - Mid - Hi | Reverb Depth | --- | --- |
| 72 | Grain Shifter | Cycle Speed | Length | ○ | ↓ |
| 73 | Mid Grain Shifter | Cycle Speed | Length | ○ | ↓ |
| 74 | Mid Grain Shifter+ | Cycle Speed | Length | ○ | ↓ |
| 75 | Grain&HPF | Grain Cycle Speed & Length | HPF Cutoff & Resonance | ○ | ↓ |
| 76 | Grain&HPF+ | Grain Speed | HPF Cutoff & Resonance | ○ | ↓ |
| 77 | Looper Forward/Rverse | Looper Beat | Reverse - Forward(Cross Fade) | ○ | ↓ |
| 78 | Vinyl Looper | Looper Beat | Reverse - Forward (Pitch) | ○ | ↓ |
| 79 | Rewind Spin Looper | Looper Beat | Rewind Spin - Forward | ○ | ↓ |
| 80 | Looper & LPF | Looper Beat | LPF Cutoff & Resonance | ○ | ↓ |
| 81 | Looper & HPF | Looper Beat | HPF Cutoff & Resonance | ○ | ↓ |
| 82 | Looper & Flanger | Looper Beat | Flanger Feedback | ○ | ↓ |
| 83 | Looper & Pitch Shifter | Looper Beat | Pitch Shift | ○ | ↓ |
| 84 | Looper & Decimator | Looper Beat | Decimator Frequency & Bit | ○ | ↓ |
| 85 | Looper, Isolator & HPF | Looper Beat | HPF Cutoff & Resonance | ○ | ↓ |
| 86 | Looper & Isolator+ | Looper Beat | Low - Mid - Hi | ○ | ↓ |
| 87 | Bass Looper | Looper Beat | Reverse - Forward(Cross Fade) | ○ | ↓ |
| 88 | Looper & Oscillator | Looper Beat | Oscillator Pitch, etc. | ○ | ↓ |
| 89 | Looper & Noise | Looper Beat | Noise Level, etc. | ○ | ↓ |
| 90 | Unison Saw Bass | Synth Pitch | HPF Cutoff & Resonance | --- | ↓ |
| 91 | Unison Squ Bass | Synth Pitch | HPF Cutoff & Resonance | --- | ↓ |
| 92 | Unison Saw Synth | Synth Pitch | HPF Cutoff & Resonance | --- | ↓ |
| 93 | Unison Squ Synth | Synth Pitch | HPF Cutoff & Resonance | --- | ↓ |
| 94 | Metalic Synth | Synth Pitch, BPF Cutoff etc... | LFO Speed etc... | --- | ↓ |
| 95 | Siren | LFO Speed etc... | LFO Intensity | --- | ↓ |
| 96 | LFO Sin | Synth Pitch, LFO Speed | HPF Cutoff & Resonance | --- | ↓ |
| 97 | LFO Squ | Synth Pitch, LFO Speed | HPF Cutoff & Resonance | --- | ↓ |
| 98 | Noise | Noise Tone | Noise Level | --- | ↓ |
| 99 | Synth & Looper | Synth Tone | Looper Off - Looper On (Beat) | --- | ↓ |
- Power supply
- Interference with other electrical devices
- Handling
- Care
- Keep this manual
- Keeping foreign matter out of your equipment
- THE FCC REGULATION WARNING (for U.S.A.)
- CE mark for European Harmonized Standards
- IMPORTANT NOTICE TO CONSUMERS
- Parts of the mini-KP
- Replacing the batteries
- Turning the power on/off
- Turning the power on
- Turning the power off
- Connection setting
- About the input level
- Operation
- Operating the touch pad
- Hold
- Selecting an effect program
- FX RELEASE setting
- What is FX RELEASE?
- Adjusting the effect depth
- Using the MEMORY A/B buttons
- Storing the current settings to a MEMORY button
- Setting the BPM
- Restoring the factory settings
- Précautions
- Emplacement
Brand : KORG
Model : MINI KP
Category : Audio Effects