
KP3 - Performance effect KORG - Free user manual and instructions
Find the device manual for free KP3 KORG in PDF.
User questions about KP3 KORG
0 question about this device. Answer the ones you know or ask your own.
Ask a new question about this device
Download the instructions for your Performance effect in PDF format for free! Find your manual KP3 - KORG and take your electronic device back in hand. On this page are published all the documents necessary for the use of your device. KP3 by KORG.
USER MANUAL KP3 KORG
OWNER'S MANUAL (p.4-27)
MANUEL D'UTILISATION (p.28-51)
Using the unit in the following locations can result in a malfunction.
- In direct sunlight
- Locations of extreme temperature or humidity
- Excessively dusty or dirty locations
- Locations of excessive vibration
- Close to magnetic fields
Power supply
Please connect the designated AC adapter to an AC outlet of the correct voltage. Do not connect it to an AC outlet of voltage other than that for which your unit is intended.
Interference with other electrical devices
Radios and televisions placed nearby may experience reception interference. Operate this unit at a suitable distance from radios and televisions.
Handling
To avoid breakage, do not apply excessive force to the switches or controls.
Care
If the exterior becomes dirty, wipe it with a clean, dry cloth. Do not use liquid cleaners such as benzene or thinner, or cleaning compounds or flammable polishes.
Keep this manual
After reading this manual, please keep it for later reference.
Keeping foreign matter out of your equipment
Never set any container with liquid in it near this equipment. If liquid gets into the equipment, it could cause a breakdown, fire, or electrical shock.
Be careful not to let metal objects get into the equipment. If something does slip into the equipment, unplug the AC adapter from the wall outlet. Then contact your nearest Korg dealer or the store where the equipment was purchased.
THE FCC REGULATION WARNING (for U.S.A.)
This equipment has been tested and found to comply with the limits for a Class B digital device, pursuant to Part 15 of the FCC Rules. These limits are designed to provide reasonable protection against harmful interference in a residential installation. This equipment generates, uses, and can radiate radio frequency energy and, if not installed and used in accordance with the instructions, may cause harmful interference to radio communications. However, there is no guarantee that interference will not occur in a particular installation. If this equipment does cause harmful interference to radio or television reception, which can be determined by turning the equipment off and on, the user is encouraged to try to correct the interference by one or more of the following measures:
Reorient or relocate the receiving antenna.
- Increase the separation between the equipment and receiver.
- Connect the equipment into an outlet on a circuit different from that to which the receiver is connected.
- Consult the dealer or an experienced radio/TV technician for help.
Unauthorized changes or modification to this system can void the user's authority to operate this equipment.
CE mark for European Harmonized Standards
CE mark which is attached to our company's products of AC mains operated apparatus until December 31, 1996 means it conforms to EMC Directive (89/336/EEC) and CE mark Directive (93/68/EEC).
And, CE mark which is attached after January 1, 1997 means it conforms to EMC Directive (89/336/EEC), CE mark Directive (93/68/EEC) and Low Voltage Directive (73/23/EEC).
Also, CE mark which is attached to our company's products of Battery operated apparatus means it conforms to EMC Directive (89/336/EEC) and CE mark Directive (93/68/EEC).
Introduction
Thank you for purchasing the KP3 KAOSS PAD dynamic effect/sampler. For trouble-free enjoyment of the KP3's fullest potential, please read this manual carefully and use the KP3 only as directed.
Overview
The KP3 features Korg's KAOSS technology, allowing the X-Y touch pad to control multiple effect parameters in realtime. Simply touch, tap and/or rub your finger across the surface of the touch pad. A protective sheet to preserve the touch pad surface is included.
Internally, the KP3 holds 128 effect programs, ranging from delays and filters to vocoders and even synthesizers. Pad Motion, Hold and Mute features add even more versatility to the touch pad control. Your eight favorite programs can be modified and saved to the Program Memory buttons for quick access.
Our new FX Release function can automatically provide a delay effect when you remove your hand from the touch pad, making it easier to perform smooth transitions during a performance.
In addition, the KP3 is also a sophisticated sampler. Both Mic and Line inputs are provided, allowing you to sample from a variety of audio sources. Resampling allows you to record the output of the KP3 itself, as well as to sample incoming signals through the onboard effects. Both Loop and One-Shot samples can be recorded and played from the Sample Bank buttons. Sample editing tools provide automatic sample slicing, and the start point of the loop can be manually adjusted to keep your samples in sync.
Auto-BPM detect, MIDI Clock and Tap Tempo keep sample playback speed and tempo-based effects moving together. Samples and setting can be saved to Secure Digital (SD) cards, or saved to a computer via USB and reloaded quickly. Enjoy your new KP3!
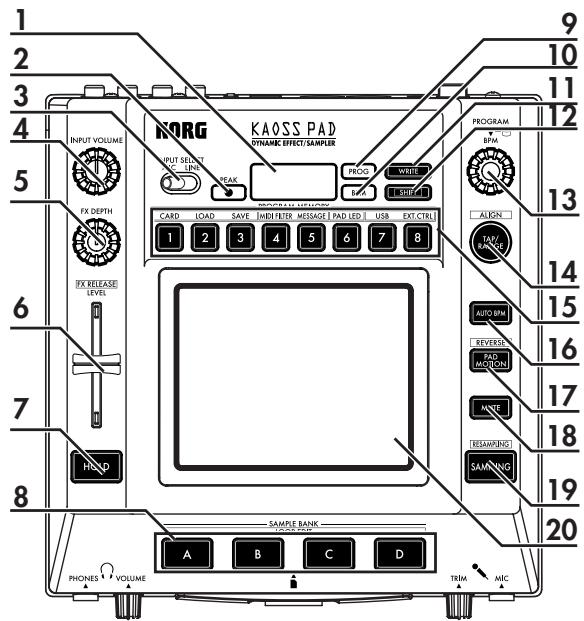
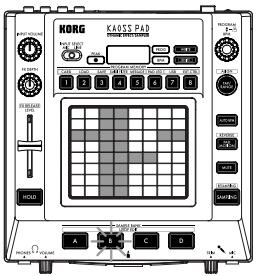
Parts of the KP3 and their functions
Top panel
- Display
- [PEAK] indicator
- [INPUT SELECT] switch
- [INPUT VOLUME] knob
- [FX DEPTH] knob
- LEVEL slider
(Sample Bank playback level—see page 14)
- [HOLD] button
- [SAMPLE BANK] buttons
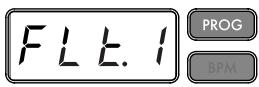
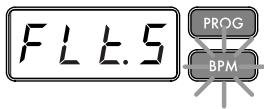
- [PROG] indicator
- [BPM] indicator
(Blinks when a BPM program is selected.)
-
[WRITE] button
-
[SHIFT] button
- [PROGRAM/BPM] knob
- [TAP/RANGE] button
- [PROGRAM MEMORY 1-8] buttons
- [AUTO BPM] button
- [PAD MOTION] button
- [MUTE] button
- [SAMPLING] button
- Touch pad
Care of the touch pad
Never press the touch pad with excessive force, or place heavy objects on it. It may crack or break if handleufroughly. Press the touch pad only with your finger, since rubbing or pressing the touch pad with a sharp object will scratch it. To clean the touch pad, wipe it lightly with a soft dry cloth. Do not use solvents such as thinner, since this may cause deformation.
Front panel
- [PHONES VOLUME] knob
- [PHONES] output jack
- [MIC TRIM] knob
- [MIC] input jack
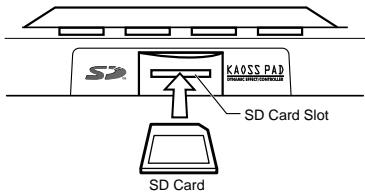
- SD Card Slot
The KP3 must be turned off before you insert or remove the SD card!

Rear panel
- [MIDI IN], [MIDI OUT] connectors
- DC 12V jack
- [POWER] switch
- [USB] jack
- [CONNECTION] switch
6.[LINE OUT]jacks - [LINE IN] jacks

Connections
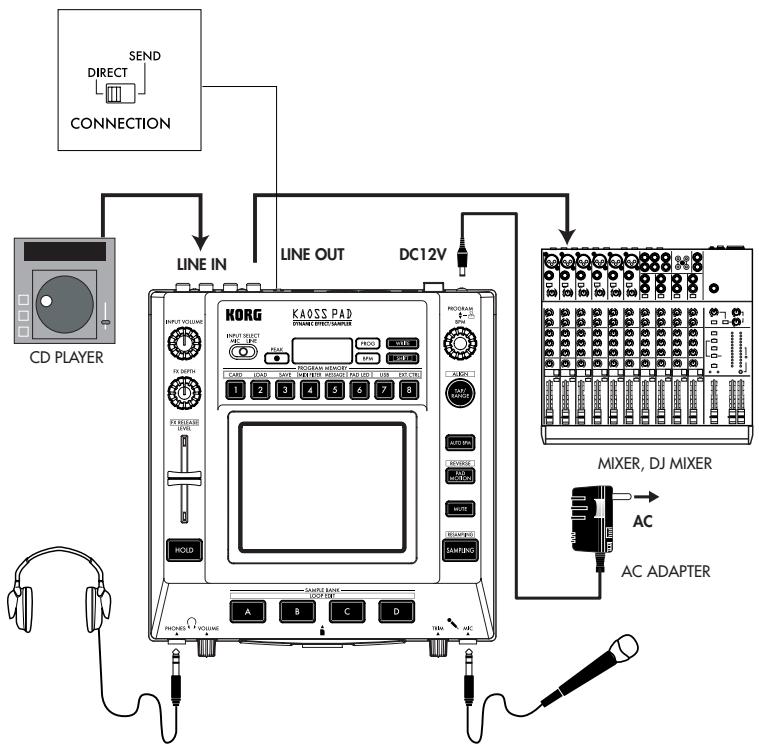
Basic connections
In the example shown below, the KP3 is being used "in-line" between the audio source and the mixer inputs. In this case, effects can be applied to the incoming audio signal, and the incoming audio signal can be sampled. In this type of application, the CONNECTION switch on the rear panel should be set to DIRECT. The KP3 has line and mic input jacks. Use the jacks that are appropriate for your situation.
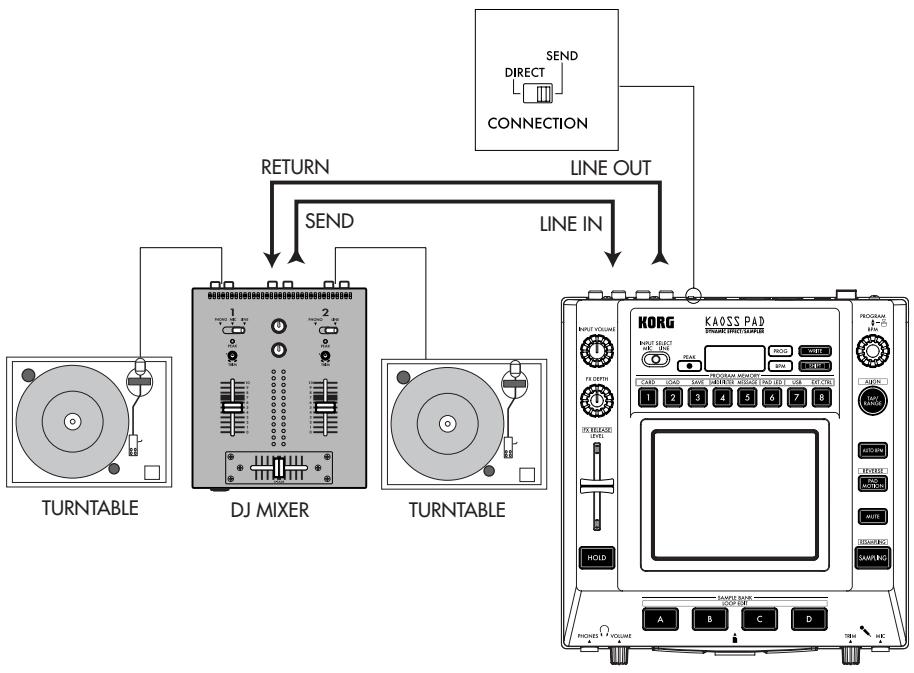
DJ mixer connections
The KP3 can also be used as an external effect processor by connecting it to the effect send and return jacks on a DJ (or other style) mixer. This allows the KP3 effects to be applied to any audio signal connected to the mixer. For this type of application, the CONNECTION switch on the rear panel should be set to SEND. With this setting, the output from the KP3 will contain only the processed signal, and will not include the original signal being sent to the KP3's inputs. Use the send level and return level controls of your mixer to adjust the depth of the effect.
Operation
Using the power switch
- Connect the KP3 to your other equipment as shown in the diagrams on the preceding pages, and connect the AC adapter to an electrical outlet.
NOTE Never use any AC adapter other than the included one. - Press the Power switch to turn the KP3 on. The display will light.
To turn the KP3 off, press the Power switch once again to return it to the standby position.
Selecting the audio input
- Use the Input Select switch to choose which of the KP3's input jacks will be used. MIC: The effect will be applied to the mic input.
LINE: The effect will be applied to the line inputs.
Adjusting the volume
- Use the Input Volume knob to adjust the input level. The Peak indicator will light in either green, orange, or red to indicate the level of the incoming signal. Adjust the Input Volume so that the peak indicator does not light red.
- If you are using the mic jack, adjust the MIC Trim knob as appropriate for the sensitivity of the mic, so that the sound is not distorted.
- If you are listening through headphones, use the Phones Volume knob to adjust the headphone level.
Selecting a program
Programs can be selected three ways.
- If the display is currently showing a program number, you can select a program by turning the Program Knob. If the display is showing the current BPM, press the PROGRAM/BPM knob to switch to the program display.
The BPM indicator will blink if you select a program that synchronizes to the BPM.
- If you hold down the SHIFT button as you rotate the PROGRAM/BPM knob, you will advance to the first program in each category, rather than having to scroll through all 128 programs. Once you have selected the correct category, release the SHIFT button and use the PROGRAM/BPM button to select the program from within that category.
- Finally, your eight favorite programs can be selected by simply pressing one of the PROGRAM MEMORY buttons. (Refer to page 9).
The PROGRAM/BPM knob is a continuous knob. When you've reached the last program number, you'll wrap around to the beginning of the list.
Controlling the effect depth
- If the CONNECTION switch on the rear panel is set to DIRECT, use the FX/DEPTH knob to adjust the depth of the effect. Turning the knob to the right will increase the effect depth.
- If the CONNECTION switch on the rear panel is set to SEND, you will need to use the effect send and return levels on your mixer to control the effect depth.
Hold
If you press the HOLD button as your finger is on the touch pad, you can take your finger away and the effect will continue as if your finger was still on the touch pad and at the same location as when you pressed the HOLD button. The pad LEDs will remain lit at that position.
Mute function
Holding down the MUTE button will momentarily cut the input signal, but the effected signal will continue to play.
Transformer effect
By rapidly tapping the MUTE button, you can create rhythmic effects from a continuous audio input, as in the "transformer" technique used by DJs.
FX RELEASE
What is FX RELEASE?
Making the transition from a very hard-edge effect back to the original unaffected signal can often times be very abrupt or sudden. With FX RELEASE, the moment you take your hand off the touch pad (i.e., the moment you turn off the effect), a delay effect synchronized to the current BPM will be applied, and will then gradually diminish. This lets you smoothly and musically transition from a aggressive effect such as Distortion or Decimator back to the "thru" state.
Saving the FX RELEASE setting
You can save a different FX RELEASE setting for each program.
- To adjust the depth of the FX RELEASE effect for the currently selected program, hold down the SHIFT button and use the FX RELEASE slider.
- Press the WRITE button.
The WRITE button and PROGRAM MEMORY button will blink. The SHIFT button will be lit, and will operate as an EXIT button.
3. Press the WRITE button once again.
The program will be written, and the KP3 will return to normal operation.
NOTE If you've selected an effect program that already uses delay, the FX Release function will not be used, but the delay sound within that effect program will remain the moment you take your finger off the touch pad, producing a similar effect.
Pad Motion
Pad Motion allows you to record and playback the motion of your finger on the touch pad. This allows you to accurately reproduce the same complicated movements over and over again. In addition, the pad LEDs will provide a visual indication of the movement.
You can even save pad motion recording as part of the Program Memory. ( p.9)
Recording a pad motion
Hold down the PAD MOTION button. As soon as your finger hits the touch pad, the PAD MOTION button will begin blinking, indicating that the pad motion is being recorded. To stop recording, release the PAD MOTION button, and pad motion playback will begin. Pad motion is only recorded a few seconds, so if the Pad Motion button stops blinking and is lit red, pad motion recording has stopped, and pad motion playback will begin immediately. To stop the pad motion playback, touch the PAD MOTION button once again. the button will go dark (unlit).
NOTE When you begin recording, the previously-recorded motion will be overwritten.
Playing back a pad motion
Press the PAD MOTION button; the button will light, and the pad motion will begin playing as a loop.
The pad LEDs will show the recorded movement. When you press the PAD MOTION button once again, the button will go dark and playback will stop.
Reverse playback
If you hold down the SHIFT button and press the PAD MOTION (REVERSE) button, the pad motion will play back in reverse. You can repeat this operation to alternate between "reverse playback" "forward playback" "reverse playback."
Saving a pad motion
To save the pad motion you've just recorded, write (or re-write) the current program into Program Memory ( p.13)
Specifying the BPM
What is BPM?
BPM (Beats Per Minute) is the tempo of the song expressed as the number of beats (quarter notes) that occur in one minute. A higher BPM value means a faster tempo.
Viewing the BPM
When you turn on the KP3, the BPM will be set to 120.0.
If the display shows the current program, press the PROGRAM/BPM knob to switch to the BPM display.


NOTE If the clock is set to external synchronization, "Ext" will be shown in the display, and you won't be able to specify the BPM value.
Manually setting the BPM
- If the display shows the current program, press the PROGRAM/BPM knob to switch to the BPM display.
- Use the PROGRAM/BPM knob to adjust the BPM value in steps of 0.1. By turning the PROGRAM/BPM knob while holding down the SHIFT button, you can adjust the integer portion of the value in steps of 1.
NOTE The Auto BPM is automatically turned off.
Using Tap Tempo to set the BPM
If you're not certain of the BPM value of a song, you can set the BPM by pressing the TAP/RANGE button in rhythm with the beat of the song.
- Press the TAP/RANGE button three or more times in rhythm with the beat of the song. The KP3 will detect the interval at which you press the button, the corresponding BPM value will appear in the display, and that BPM value will be set.
Auto BPM detection
The KP3 can set the BPM value automatically by detecting the beat of the song. If the song's BPM changes, the KP3's BPM value will change in sync.
- Press the AUTO BPM button to turn on Auto BPM detection.
- The AUTO BPM button will light, and the BPM of the incoming audio source will be detected automatically.
If the KP3 is unable to detect the BPM
Press the TAP/RANGE button several times in time with the beat of the song; the KP3 will automatically detect the BPM using the beat you manually tapped as a guideline.
Because of the way that the Auto BPM function operates, it may erroneously detect a value that is 1/2 or 2/3 of the correct BPM value, or small deviations may arise. In such cases, you can use the TAP/RANGE button to make compensations. If you press the TAP/RANGE button while Auto BPM detection is active, the value you specify by tapping will become the center value of the BPM range.
NOTE It's not possible to detect the BPM value from music that does not have a clear sense of beat. The detectable BPM range is from 80 to 160.
Specifying the beginning of the measure While Auto BPM detection can accurately capture the tempo, you can manually reset which beat will be considered the start of the measure. Hold down the SHIFT button and press the TAP/RANGE (ALIGN) button; that moment will be specified as the beginning of a measure. The button will blink green at the beginning of the beat. (This is fixed for 4/4 ; green red red) NOTE This setting will also re-align the beginning of each sample.
Turning off Auto BPM
Press the AUTO BPM button to make the button go dark. The Auto BPM function will turn off, and the current BPM value will be fixed.
MIDI Sync function
The BPM of the KP3 can be set to follow MIDI Time Clock messages from an external MIDI device. Connect the MIDI OUT connector of an external MIDI device (such as a sequencer set to transmit MIDI time clock messages) to the MIDI IN connector of the KP3.
NOTE This function will not synchronize sequence data with the KP3's rhythm pattern programs. If you want to synchronize sequenced data and the KP3's internal rhythm patterns, you will either have to insert a Touch Pad On message into the beginning of each measure of your sequence data, or touch the touch pad at the beginning of each KP3 phrase to start the pattern.
NOTE If you want the KP3 to receive Timing Clock and Touch Pad On messages, go to MIDI Setting ( p.20) , and make "Changing the MIDI message filter settings" ( p.21) so that these messages will be received.
NOTE You can not use the Tap Tempo or Auto BPM functions while the KP3 is receiving Timing Clock from an external MIDI device
Storing settings to a PROGRAM MEMORY
The PROGRAM MEMORY buttons allow you to save and instantly recall your eight favorite KP3 programs and settings.
The following data will be stored:
- Effect program
FX/DEPTH knob setting - Pad motion
- The on/off status of the HOLD button and its position (coordinates)
Saving
- Press the WRITE button.
The PROGRAM MEMORY buttons and the WRITE button will blink. - Press the PROGRAM MEMORY button where you want the settings to be stored.
The button you pressed will blink, the display will indicate "WRT," and the settings will be written. When writing is complete, the KP3 will return to its normal state.
Recalling
- Press one of the PROGRAM MEMORY buttons (1-8); the settings stored in that memory location will be recalled.
Sampling
The KP3 can record both looped phrases and one shot samples from an external source. The KP3 can also resample; allowing you to sample external audio sources through the internal effects, or capture the entire output of the KP3 as a new sample.
Loop samples can be up to four measures (16 beats) long, at the current BPM when you begin recording. (for example, at a tempo of 140, 16 beats would be approximately 7 seconds).
If the tempo value is 73 or lower, the maximum of beats that can be sampled is 8. If the tempo value is 39 or lower, the maximum of beats that can be sampled is 4.
For a loop sample you can specify a beat length of 16, 8, 4, 2, or 1.
When a loop sample is created, it will begin playing as soon as it is done being recorded (the corresponding SAMPLE BANK button will be lit orange.)
Sampling
- Press the SAMPLING button.
In this sample-ready mode, the SAMPLE BANK buttons will blink red, and the display will indicate "[16]" (the default value is 16 beats). To exit without sampling, press the SHIFT button.
NOTE The Auto BPM is automatically turned off. - Use the PROGRAM/BPM knob to specify the length of sampling (in beats).
The display will switch between [16], [8], [4], [2], or [1] accordingly. -
When you are ready to record, press one of the blinking SAMPLE BANK buttons - A, B, C, or D. The selected SAMPLE BANK button will blink green, the display will indicate "REC," and sampling will begin.
The PROGRAM MEMORY buttons will consecutively blink to indicate the beat you're recording. -
If you want to record a one-shot sample, press the same SAMPLE BANK button before reaching the specified BEAT. Sampling will end, and a one-shot sample will be created. The SAMPLE BANK button used for recording will light red. It will be easier to record a one-shot sample if you specify a longer setting such as "16."
- If the specified BEAT time elapses before you press the SAMPLE BANK button, sampling will end, and a loop sample will be created. The KP3 will automatically switch to playback, and the SAMPLE BANK button will light orange.
NOTE The data that had been in the selected SAMPLE BANK button will be overwritten.
Playing back samples
The SAMPLE BANK buttons will light green if they contain a loop sample or red if they contain a one-shot sample. Keys that contain no sample data will be dark. When you press a button that contains a loop sample, loop playback will start. The button will be lit orange during playback. Press the button once again to stop playback.
When you press a button that contains a one-shot sample, the button will momentarily go dark and the one-shot sample will play.
NOTE If a sample effect is selected for the program, playback will begin when you touch the touch pad after selecting a SAMPLE BANK button.
Sample playback levels
If you want to adjust the sample playback volume for all banks, use the level slider.
Adjusting the level of an individual sample bank
- Hold down the SHIFT button and press the desired SAMPLE BANK button; the button will blink green.
-
The pad LEDs corresponding to the selected bank (i.e., located above the button) will display a bar graph, and LEDs above the remaining banks will indicate their respective level points.
-
Touch the pad to adjust the playback level of the sample for that bank.
Editing playback settings for loop samples
To edit the playback settings for a loop sample, hold down the SHIFT button and press a SAMPLE BANK button that contains a loop sample.
NOTE If you press a SAMPLE BANK button that contains a one-shot sample, you won't be able to edit settings other than the level.
Start Point setting
- The SHIFT button will be lit and the specified SAMPLE BANK button will change to blinking green.
The display will show the loop start point setting.

- Use the PROGRAM/BPM knob to adjust the start point in steps of 1/32nd of a beat, over a range of ± 1 beat.
Slice setting
Loop samples can be sliced into equal parts. You can select whether each sliced part will play or not play. Sliced parts that do not play are skipped, so the overall length of the loop will be made shorter. This allows you to create a variety of new rhythmic figures and loops from the same original data. For example by playing only the first two beats and last two beats of a
four-measure sample to create a one-measure loop.
- The SHIFT button will light and the specified SAMPLE BANK button will blink green.
- All eight PROGRAM MEMORY buttons will light (by default).
By pressing the corresponding button you can turn on or off each sample slice.
Resampling
By resampling, you can create a sample that combines multiple existing samples, or create a new sample from an existing sample processed by an effect. You can resample to create both loop and one-shot samples. Remember that with resampling, the output of the KP3 is being recorded, so all of the effects created using the touch pad will be recorded as part of the sample data.
- Hold down the SHIFT button and press the SAMPLING button.
- The SAMPLE BANK buttons will blink orange, and the KP3 will be in the record-ready mode.
- From here, follow the same instructions for loop and one shot sampling in the previous section.
NOTE When you press a SAMPLE BANK button, the playback of the data assigned to that BANK button will stop and will be overwritten.
Function settings
By holding down the SHIFT button and press one of the PROGRAM MEMORY 1-8 buttons you can execute various functions such as formatting a card or saving/ loading samples. Use the following procedure to access any of the Function settings and to edit their various parameters.
- Hold down the SHIFT button and press one of the PROGRAM MEMORY buttons 1-8.
- Use the PROGRAM/BPM knob to select a sub-parameter.
- Press the PROGRAM/BPM knob to view the value options for that parameter.
- Use the PROGRAM/BPM knob to select a value.
- Press the TAP/RANGE button (lit orange) to return to the parameter list. Repeat steps 2-5 to edit additional parameters.
- At this point, you can either press the WRITE button (blinking) to save the changes you have made, or you can press the SHIFT button to exit without saving.
NOTE While the TAP/RANGE button is lit orange, you can press the TAP/RANGE button to return to the preceding page.
About each function
[1] CARD
Info: Displays the total capacity of the SD card.
Free: Displays the remaining capacity of the SD card.
Form: Formats the SD card.
[2] LOAD
Loads data from the SD card into the KP3.
[3] SAVE
Saves data from the KP3 to the SD card.
[4] MIDI FILTER
Specifies the MIDI clock setting and MIDI message filtering.
[5]MESSAGE
Specifies the channel on which MIDI messages will be transmitted/received, and
assigns a control change to each controller. You can specify note numbers for the SAMPLE BANK buttons.
GLCH (Global channel)
SAMPA, B, C, D (Sample Bank buttons)
PAD X, PAD Y, PAD T (Pad Touch)
FX.DP (FX Depth knob)
SLDR (Level/FX RELEASE Slider)
HOLD (HOLD button)
[6] PAD LED
Prog: This turns on/off the function that displays the program name in the touch pad LED when a program change occurs.
ILLU: This specifies the illumination shown in the pad LED when a certain time has elapsed since you took your hand off the touch pad.
"oFF": Illumination will be off.
"ChAr": A text string will be scrolled. You can use the included editor software to edit this text string.
"TYP.1-8": Illumination in a variety of patterns will be displayed.
"TYP.C": Illumination patterns TYP.1 through TYP.8 will be switched automatically.
NOTE Illumination will not operate if Hold is active, nor when you're making function settings.
Scrl: Specifies the speed at which the text will scroll.
This setting determines the speed at which the pad LED will scroll.
You can choose Slow, Mid, or Fast speeds.
NOTE You can't change the speed of the illumination display.
[7] USB
You can connect the KP3 to your computer and read/write the contents of the inserted card via USB. For details, refer to "Connecting a computer."
[8]EXT.CTRL
This lets you use the KP3 as a MIDI controller. The effects will not function in this mode.
The KP3 will transmit the MIDI messages you assigned to each controller using the included PC editor. For the touch pad, you
can choose from eight different MIDI message assign map patterns.
You can assign MIDI messages to the following controllers: PROGRAM/BPM knob, PROGRAM MEMORY 1-8, SAMPLE BANK A-D, FX DEPTH, LEVEL SLIDER, PAD (X, Y, TOUCH), and HOLD.
NOTE Use the SHIFT button to exit EXT.CTRL.
SD card
You can use an SD card to save or load data to and from the KP3's internal memory.
You can also load samples (WAV files or AIFF files) created on a computer into the KP3 by using a card.
NOTE Before you can use the SD card, you must format it on the KP3. Don't use your computer or digital camera to format (initialize) a card you plan to use with the KP3. If the card was formatted on a different device, it may not work correctly with the KP3.
NOTE The KP3 must be turned off before you insert or remove the card.
NOTE The SD card is not included. It must be purchased separately.
NOTE The KP3 supports SD cards with a power supply voltage of 2.7-3.6V and capacities of 16 MB-2 GB, and SD card with ID.
SD card handling
- The SD card may be hot immediately following use. Power-off the KP3 and wait for the card to cool before removing it.
- SD cards are precision parts. Do not bend them, drop them, or subject them to physical shock.
- Avoid using or storing SD cards in locations of extremely high or low temperature such as in direct sunlight, a closed automobile, or near a heater, or in locations of high humidity or excessive dust.
- Avoid using or storing SD cards in locations where they may be subject to strong static electricity or electrical noise.
- Do not allow dirt or foreign matter to adhere to the contacts of an SD card. If the contacts should become soiled, gently wipe them off using a dry cloth.
- When you are not using an SD card, keep it in the protective case that was included with the card to prevent it from being damaged by static electricity.
- Do not leave an SD card where it is accessible by infants or children who might place it in their mouth and swallow it.
- Carefully read and observe the owner's manual included with your SD card.
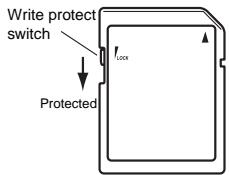
About the write protect setting of an SD card
SD cards have a write protect switch that prevents the data from being overwritten
accidentally and lost. If you set the card's switch to the protected setting, it will be impossible to write or erase data on the card, or to format it. If you need to save edited data on the card, move the switch back to its original unprotected setting.
Inserting/exchanging cards
Inserting a card
Insert the card, making sure that it is oriented correctly. The gold contacts should be facing down, and the angled corner to your right.
Removing a card
Press the card inward and release it, and the card will pop out.
NOTE Before you can use an SD card, you must format it on the KP3. The card may not work if it was formatted on another device.
Using SD memory cards
Checking the total capacity of the card
- Hold down the SHIFT button and press the PROGRAM MEMORY 1 (CARD) button.
- Use the PROGRAM/BPM knob to select "InFo" (card capacity).
In F 0
- Press the PROGRAM/BPM knob to view the total capacity of the card.
Press the TAP/RANGE button (lit orange) to return select another parameter, press the SHIFT button to return to normal operation.
Checking the remaining capacity of the card
- Hold down the SHIFT button and press the PROGRAM MEMORY 1 (CARD) button.
- Use the PROGRAM/BPM knob to select "FrEE" (remaining card capacity).
F - E E
- Press the PROGRAM/BPM knob to view the remaining capacity of the card.
Press the TAP/RANGE button (lit orange) to return select another parameter, press the SHIFT button to return to normal operation.
Formatting the card
- Hold down the SHIFT button and press the PROGRAM MEMORY 1 button.
- Use the PROGRAM/BPM knob to select "ForM."
For
- Press the PROGRAM/BPM knob; the display will indicate "NO."
- Use the [PROGRAM/BPM] knob to select "yes" and press the PROGRAM/BPM knob to format the card. When formatting is complete, the display will indicate "End."
Press the TAP/RANGE button (lit orange) to return select another parameter, press the SHIFT button to return to normal operation.
NOTE The entire contents of the card will be lost when you format it. If the KP3 was unable to format the card, the display will indicate "Err" (Error).
NOTE Don't use your computer or digital camera to format (initialize) a card you plan to use with the KP3. You must use the KP3 to perform the formatting operation. If the card was formatted on a different device, it may not work correctly with the KP3.
Saving to card
You can save sample data, program memory, global settings, or all settings to the card.
- Hold down the SHIFT button and press the PROGRAM MEMORY 3 (SAVE) button.
- Use the PROGRAM/BPM knob to select the type of data you want to save.
"SMP.A" - "SMP.D": Sample data
"ProG": Contents of program memory
"ALL": All files
"GLOB": Global setting file
- Press the PROGRAM/BPM knob; the file numbers available for saving will appear; 00-99 for each of the sample bank buttons, 00-09 for all other data types.
Use the PROGRAM/BPM knob to select the number you want to save.
"-01-": The selected file number is empty.
"[01]": The selected file number (in this case, "01") already contains data, and will be replaced (overwritten) with the data you are saving now.
“[-]”: There is an identically-named file or folder that cannot be written.
4. Press the PROGRAM/BPM knob, then use the PROGRAM/BPM knob to select "yes," and press the PROGRAM/BPM knob to execute the Save operation. When saving is complete, the display will indi
cate "End."
Press the SHIFT button to return to normal operation.
NOTE You won't be able to save if the SD card is protected.
Never turn off the power or remove the SD card while saving or formatting. Doing so may render the SD card unusable.
Loading from card
Here's how to load previously-saved data from the card.
- Hold down the SHIFT button and press the PROGRAM MEMORY 2 (LOAD) button.
- Use the PROGRAM/BPM knob to select the type of data that you want to load.
"SMP.A"-"SMP.D": Sample data
"Snd.A"-"Snd.D":WAVE,AIFF
"ProG": Contents of program memory
"ALL": All files
"GLOB": Global setting file
- Turn the PROGRAM/BPM knob to see the file numbers that are available for loading; 00-99 for each of the sample bank buttons, 00-09 for all other data types.
Use the PROGRAM/BPM knob to select the file number you want to load.
If you're loading a WAVE file or AIFF file, select the desired file.
NOTE In the case of WAVE files or AIFF files, the KP3 will recognize only file names consisting of a two-digit number plus filename extension, such as "00.wav" or "99.aif". If both .wav and .aiff files with the same two-digit number exist, the WAVE file will take priority.
NOTE WAVE files and AIFF files will be loaded as loop samples. You can resample a loop sample and capture it as a one-shot sample by stopping the recording before it stops automatically. Then you can save the one-shot loop as a KP3 sample and always use it as a one-shot.
- Use the PROGRAM/BPM knob to select "yes." Press the PROGRAM/BPM knob to load the data. When loading is completed, the display will indicate "End."
Press the SHIFT button to return to normal operation.
MIDI functions
What is MIDI?
MIDI stands for Musical Instrument Digital Interface, and is a world-wide standard for exchanging a variety of performance-related information between electronic musical instruments and computers.
About the MIDI implementation chart The owner's manual of each MIDI device includes a "MIDI implementation chart." This chart lets you check the types of MIDI message that can be transmitted or received. When you use two (or more) MIDI devices together, compare their MIDI implementation charts to see which types of MIDI message they are able to transmit and receive between themselves.
- Details on the MIDI functionality are provided in the separate MIDI implementation. To obtain the MIDI implementation, please contact Korg distributor.
MIDI connections
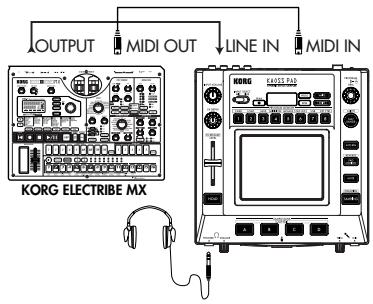
Commercially available MIDI cables are used to transmit and receive MIDI messages. Connect these cables between the MIDI connectors of the KP3 and the MIDI connectors of the external MIDI device with which you want to transfer data.
MIDI IN connector: This connector receives MIDI messages from another MIDI device. Connect it to the MIDI OUT connector of the external device.
MIDI OUT connector: This connector transmits messages from the KP3. Connect it to the MIDI IN connector of the external device.
NOTE If you connect the USB connector to your computer and install the USB MIDI driver, the USB connection will transmit and receive the same MIDI messages as the MIDI connectors.
Using the KP3 as an effect processor under MIDI control
Using the KP3 as a MIDI controller (EXT CTRL mode)

MIDI settings
In addition to using the KP3 as an effect processor, you can transmit MIDI messages from the KP3 to use it as a realtime controller for a synthesizer or other external MIDI device.
You can also connect the KP3 to a MIDI sequencer, and record the MIDI messages that are transmitted when you operate the touch pad. By playing back the recorded MIDI messages you can reproduce your touch pad operations.
Changing the MIDI channel
- Hold down the SHIFT button and press the PROGRAM MEMORY 5 (MESSAGE) button.
- Use the PROGRAM/BPM knob to choose "GL.Ch" and then press the PROGRAM/BPM knob. The currently-specified MIDI channel is shown.
- Use the PROGRAM/BPM knob to change the MIDI channel.
- Press the TAP/RANGE button (lit orange) to return to theMESSAGE parameter list.
- At this point, you can either press the WRITE button (blinking) to save the changes you have made, or you can press the SHIFT button to exit without saving.
About MIDI channels
In order to independently transmit information to multiple MIDI devices over a single MIDI cable, MIDI uses sixteen channels (1-16). If the transmitting device is set to MIDI channel "1," the MIDI messages will not be received unless the receiving device is also set to MIDI channel "1."
Changing the control change numbers or note numbers
- Hold down the SHIFT button and press the PROGRAM MEMORY 5 (MESSAGE) button.
- Use the PROGRAM/BPM knob to select the controller whose setting you want to change.
Pad X, Pad Y, PAD touch, Fx Depth, slider, HOLD, and MUTE transmit/receive control change messages. The Sample A-D pads transmit/receive note messages.
- Use the PROGRAM/BPM knob to select a control change number or note number in a range of 0-127.
If you select a control number that has already been assigned to another controller, the decimal point will light. If you assign this value, the corresponding controller will transmit and receive the same control change messages as the other controller.
- Press the TAP/RANGE button (lit orange) to return to theMESSAGE parameter list.
- At this point, you can either press the WRITE button (blinking) to save the changes you have made, or you can press the SHIFT button to exit without saving.
Changing the MIDI message filter settings
- Hold down the SHIFT button and press the PROGRAM MEMORY 4 (MIDI FILTER) button.
The display will show the messages to be filtered.
2. Use the PROGRAM/BPM knob to select the message you want to filter.
You can specify filter settings for CLOCK, ProG, CC, and SYS.E transmission and reception.
3. Use the PROGRAM/BPM knob to enable or disable transmission/reception.
Choose either diS (disable) or EnA (enable). For the Clock setting, choose Int, Ext, Auto.
NOTE If Clock is set to "Ext" and clock data is received via both MIDI and USB, the data from the USB connection will take priority.
- To save your settings, press the WRITE button. If you decide not to save your settings, press the SHIFT button.
- Press the TAP/RANGE button (lit orange) to return to theMESSAGE parameter list.
- At this point, you can either press the WRITE button (blinking) to save the changes you have made, or you can press the SHIFT button to exit without saving.
To save your edited settings
Press the WRITE button to save the MIDI settings you edited. If you press the SHIFT button, you will return to normal operation without saving.
NOTE If you turn off the power without saving your settings, they will revert to the previous state.
Messages transmitted and received
With the factory settings (except for EXT CTRL*), the KP3 can transmit and receive the following MIDI messages.
| Data transmitted/received | MIDI message transmitted/received | (Factory setting) |
| Touch pad X-axis | Control change | (#12) |
| Touch pad Y-axis | Control change | (#13) |
| Touch pad on/off | Control change | (#92) |
| LEVEL Slider | Control change | (#93) |
| FX DEPTH knob | Control change | (#94) |
| HOLD button | Control change | (#95) |
| SAMPLE BANK A button | note on/off | (#36) |
| SAMPLE BANK B button | note on/off | (#37) |
| SAMPLE BANK C button | note on/off | (#38) |
| SAMPLE BANK D button | note on/off | (#39) |
| PROGRAM/BPM knob | Program change | (0-127) |
| Timing clock |
- For details on the messages when the KP3 is in EXT CTRL mode, refer to the manual for the KP3 Editor provided in the CD-ROM.
Sharing data with your KP3 and computer
The KP3 is equipped with a USB connector, and by connecting it directly to your computer you can transfer sample data and settings files saved on the card into your computer for backup.
The USB connection allows you to use the KP3 as a USB-MIDI device that transmits and receives MIDI messages without having to connect the MIDI cables.
NOTE When you're in USB mode, you can press the SHIFT button to return to normal operation. If you press the SHIFT button while the KP3 is communicating with your computer, a warning will appear and you won't be able to exit USB mode.
Connecting the USB connector
If you connect the KP3's USB connector directly to your computer, you'll be able to use your computer to manage the data on the card that's currently in the KP3's card slot.
Follow the procedure for the operating system of your computer.
Windows XP users
NOTE Before you continue, power-on your computer and start up the operating system.
- Use a USB cable to connect the KP3 to your computer.
Plug the connector of the USB connected to your computer into the KP3's USB connector.
Make sure that the connector is oriented correctly, and insert it as far as it will go.
NOTE When you connect the KP3 for the first time, the standard Windows device driver will be installed automatically. - The drive name of the card in the card slot will appear on your computer.
- Hold down the SHIFT button and press the PROGRAM MEMORY 7 (USB) button. The display will indicate "USB."
The contents of the KP3's card won't be visible from your computer until you execute "USB Storage Mode."
From this point until you've completed step 5, you must not disconnect the USB cable, remove the card from the slot, or switch the power of your computer on or off. Doing so may damage the data.
- To view the contents of the KP3's card, open the drive that was added to your computer in step 2.
Copy the desired data onto your computer. You can also copy data from your computer onto the card.
- Exit USB mode.
In Explorer or My Computer, right-click the "Removable Disk" icon and choose "Remove." Then press the KP3's SHIFT button to exit USB mode.
NOTE When you're ready to disconnect the KP3 from your computer, you must first exit USB mode and then disconnect the USB cable.
Macintosh users (Mac OS9.0.4 or later, OSX 10.3.9 or later)
- Use a USB cable to connect the KP3 to your computer.
Plug the USB connector into the KP3's USB connector. Make sure that the connector is oriented correctly, and insert it as far as it will go.
If you're using Mac OS9, a message indicating that "The necessary driver is not available" will appear, but you should simply close the dialog box without installing the driver. - Hold down the SHIFT button and press the PROGRAM MEMORY 7 (USB) button. The display will indicate "USB."
- The drive name of the card in the card slot will appear on your computer.
While this screen is shown, you must not disconnect the USB cable, remove the card from the slot, or switch the power of your computer on or off. Doing so may damage the data.
-
To view the contents of the KP3's card, open the drive that was added to your computer in step 2.
Copy the desired data onto your computer. You can also copy data from your computer onto the card. -
When you're ready to disconnect the KP3, drag the drive from the desktop into the Trash.
Then press the KP3's SHIFT button to exit USB mode.
NOTE When you're ready to disconnect the KP3 from your computer, you must first exit USB mode and then disconnect the USB cable.
About the contents of the card
The following files and folders will be created in the root directory of the card.
Files you can save
| SAMPLE Data | 00-99.KPS |
| GLOBAL Data | 0-9.KPG |
| PROGRAM Memory Set | 0-9.KPP |
| All Data | 0-9.KPA |
| Files you can load | |
| SAMPLE Data: | 00-99.KPS |
| 00-99.WAV | |
| 00-99.AIF | |
| GLOBAL Data: | 0-9.KPG |
| PROGRAM Memory Set : | 0-9.KPP |
| All Data: | 0-9.KPA |
NOTE If an All data file named "0.KPA" exists on the card, this file will automatically be loaded when you start up the KP3.
NOTE The WAVE or AIFF files that can be loaded are 8/16/24-bit linear PCM Mono/Stereo files. If the data has a bit depth other than 16 it will be truncated to 16-bit data starting from the most significant bits, and if the bit depth is less the data will be packed with zeros. Place the files in the root directory of the card. WAVE or AIFF files whose sampling frequency is other than 48kHz will play back at a different pitch than on your computer. If you want the pitch to be correct, use the included PC editor software to convert your audio file into KP3 format.
NOTE WAVE and AIFF files do not contain data that the KP3 needs in order to play back the sample, so they will be loaded with settings of Tempo = 120 and Beat = 16 . If the actual data is shorter than this, the missing region will be handled as silence.
Software Installation
Installing the software
Contents of the CD-ROM
The included CD-ROM contains the following.
Editor software
KORG USB-MIDI driver
KP3 Editor owner's manual (PDF)
□ Software license agreement (PDF)
Please note before use
- All copyrights to the software associated with this product is the property of Korg Corporation.
- The license agreement for the software associated with this product is included separately. You must read this license agreement before you install the software. Your installation of the software will be taken as indicating your acceptance of this license agreement.
Operating requirements
KORG USB-MIDI driver
Windows XP
Supported operating systems
Microsoft Windows XP Home Edition/ Professional Edition Service Pack 2 or later Compatible computers (MIDI driver for the x64 Edition is a Beta version)
Compatible computers
A computer that meets the operating requirements for Microsoft Windows XP and is equipped with a USB port. (An Intel CPU is recommended.)
Mac OS X
Supported operating systems
Mac OS X 10.3.9 or later
Compatible computers
An Apple Macintosh computer that meets the operating requirements for Mac OS X and is equipped with a USB port
KP3 Editor
Windows XP
Supported operating systems
Microsoft Windows XP Home Edition/ Professional Edition Service Pack 2 or later Compatible computers
A computer that meets the operating requirements for Microsoft Windows XP and is equipped with a USB port
Mac OS X
Supported operating systems
Mac OS X 10.3.9 or later
Compatible computers
A computer that meets the operating requirements for Mac OS X and is equipped with a USB port
Installing the KORG USB-MIDI driver and editor software for Windows XP
NOTE You must have Administrator user privileges in order to install or uninstall software in Windows XP. For details, consult your system administrator.
NOTE Before you connect the KP3 to your computer via USB, you must use the KP3 application installer to install KORG USB-MIDI Driver Tools.
KP3 Application Installer
The KP3 Application Installer automatically installs the KORG USB-MIDI Driver Tools and Sample Librarian/MIDI Editor software into your computer.
- Insert the included CD-ROM into your computer's CD-ROM.
Normally, "KP3 Application Installer" will start up automatically.
If your computer is set so that the installer does not start up automatically, navigate to the CD-ROM and double-click "KorgSetup.exe."
- Follow the on-screen directions to install the KORG USB-MIDI Driver Tools and KP3 Editor software.
NOTE You must install KORG USB-MIDI Driver Tools if you want to use Sample Librarian/MIDI Editor via a USB port.
- When you've installed all of the software you selected, exit the installer.
- If necessary, install the KORG USB-MIDI driver.
For details on the installation procedure, refer to "Installing the KORG USB-MIDI driver" below.
Installing the KORG USB-MIDI driver
In order to use Sample Librarian/MIDI Editor via a USB connection, you must install the "KORG USB-MIDI driver" in your computer.
You'll use KORG USB-MIDI Driver Tools to install the KORG USB-MIDI driver.
- Before you proceed, finish installing KORG USB-MIDI Driver Tools into your computer.
- Connect a USB cable between your computer's USB port and the KP3's USB port. Then power-on the KP3.
When your computer detects that the KP3 is connected, the standard Windows driver will be installed automatically. (This is not the KORG USB-MIDI driver.)
NOTE The driver must be installed separately for each USB port. If you want to connect the KP3 to a USB port that's different than the one you used when installing the KORG USB-MIDI driver, you'll have to reinstall the KORG USB-MIDI driver again for that port.
3. From the taskbar, click [Start] [All Programs] [KORG] [KORG USB-MIDI Driver Tools] [Install KORG USB-MIDI device].
The setup utility will start up.
4. Follow the on-screen directions to install the KORG USB-MIDI driver.
During the installation, you may see a dialog box warning you that "... has not passed Windows logo testing." Simply click [Continue] to proceed.
NOTE If you're unable to install, it may be that your computer is set to block installation of drivers that do not have a digital signature. Check the settings of your computer as described in "Unblocking installation of unsigned drivers".
- When you've finished installing the KORG USB-MIDI driver, exit the installer. If you are asked whether you want to restart your computer now, choose [Yes] to restart the computer.
For details on installing, setting-up, or uninstalling the KORG USB-MIDI driver, refer to the installation manual (HTML).
To view the installation manual, click the taskbar [Start] button and choose [All Programs] [KORG] [KORG USB-MIDI Driver Tools] [Installation Manual].
The KP3 and MIDI driver ports
PAD port
MIDI messages from the KP3 (controller data etc.) are received by your computer application via this port.
CTRL port
MIDI messages are transmitted from your computer to the KP3 via this port.
Setting up KP3 Editor
For details on setting-up and using KP3 Editor, refer to the "KP3 Editor owner's manual."
Unblocking installation of unsigned drivers
If your computer is set to block installation of unsigned drivers, you won't be able to install the KORG USB-MIDI driver. Proceed as follows to change the setting so that the driver can be installed.
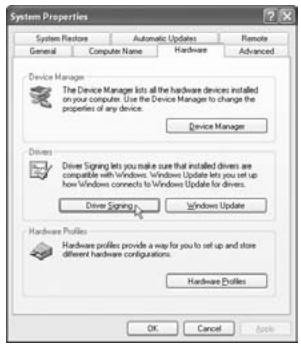
- From the task bar, click [Start] [Control Panel] to open the Control Panel.
- In the Control Panel, double-click [System], and then click the [Hardware] tab.
- In the "Driver" area, click [Driver Signing Options].
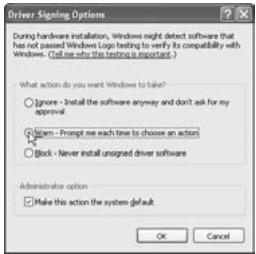
- In the "What action do you want Windows to take?" choose [Ignore] or [Warn], and then click [OK].
If necessary, return this setting to its previous state when you've finished installing the KORG USB-MIDI driver.
Installing the KORG MIDI driver and editor software for Mac OS X
Installing the software
Here's how to start up the individual installers for the KORG USB-MIDI or KP3 Editor software and install them separately.
- Insert the included CD-ROM into your computer's CD-ROM drive.
- In the CD-ROM, double-click the installer (.pkg) of the desired software to start up the installer.
The installers are located in the following folders.
KORG USB-MIDI driver
"KORG USB-MIDI DRIVER" folder KORG USB-MIDI DRIVER.pkg
KP3 Editor
"KP3 Editor" folder KP3 Editor.pkg
- Follow the on-screen directions to install the KORG USB-MIDI driver or the KP3 Editor software.
NOTE You must install the KORG USB-MIDI driver into your computer if you want to use KP3 Editor via a USB port.
4. When you've installed the software, exit the installer.
The KP3 and MIDI driver ports
PAD port
MIDI messages from the KP3 (controller data etc.) are received by your computer application via this port.
CTRLport
MIDI messages are transmitted from your computer to the KP3 via this port.
Setting up Sample Librarian/MIDI Editor
For details on setting-up and using Sample Librarian/MIDI Editor, refer to the "KP3 Editor owner's manual."
Specifications
Number of programs: 128
Input: Mic input jack / monaural phone jack
Line input jacks / RCA phono jacks
Output: Line output jacks / RCA phono jacks
Headphone jack / stereo phone jack
MIDI: IN, OUT
USB: Type B
Power supply: DC 12V 700mA
Included items: AC adapter, touch pad protective sheet
Weight: 1.3kg / 2.87lbs
Dimensions: 210(W) X 226 (D) X 49 (H) mm / 8.27"(W) X 8.90"(D) X 1.93"(H)
- Appearance and specifications are subject to change without notice.
Précautions
Emplacement
FX.DP (bouton FX Depth)
SLDR (potentiomètre LEVEL/FX RELEASE)
HOLD (touche HOLD)
[6] PAD LED
Dimensions: 210 (L) X 226 (P) X 49 (H) mm
This product has been manufactured according to strict specifications and voltage requirements that are applicable in the country in which it is intended that this product should be used. If you have purchased this product via the internet, through mail order, and/or via a telephone sale, you must verify that this product is intended to be used in the country in which you reside.
WARNING: Use of this product in any country other than that for which it is intended could be dangerous and could invalidate the manufacturer's or distributor's warranty.
Please also retain your receipt as proof of purchase otherwise your product may be disqualified from the manufacturer's or distributor's warranty.