
PANDORA PX4D - Guitar Multi-Effects KORG - Free user manual and instructions
Find the device manual for free PANDORA PX4D KORG in PDF.
| Product Type | Portable multi-effects for guitar/bass |
| Brand | KORG |
| Model | PANDORA PX4D |
| Dimensions (W x D x H) | 76 mm x 112 mm x 27 mm |
| Weight (without batteries) | 138 g |
| Power supply | 4 AAA alkaline batteries or DC 4.5V AC adapter (sold separately) |
| Battery life (backlight off) | Approx. 10 hours |
| Battery life (backlight on) | Approx. 7 hours |
| Number of effects | 158 types, up to 7 simultaneous effects |
| Programs | 100 user programs + 100 preset programs |
| Amp modeling | 25 amp types (15 guitar, 10 bass) + synthesizer |
| Inputs | Guitar/bass jack, stereo mini-jack AUX input |
| Output | Stereo jack (line/headphones) |
| Built-in functions | Tuner, rhythms and bass (100 patterns), phrase trainer, AUX pitch, key lock, bypass/mute |
| Rhythms and bass | 100 rhythmic patterns with bass lines, adjustable tempo 40-208 bpm |
| Phrase trainer | Recording up to 31.7 seconds, loop playback, slowdown without pitch change |
| AUX pitch | Transposition of CD player sound (+/- 1 octave) and Bass Cancel function |
| Included accessories | User manual, 4 AAA alkaline batteries, strap holder |
| Optional accessories | AC adapter KA191 |
| Care and cleaning | Clean, dry cloth; do not use benzene, thinner, or flammable substances |
| Safety precautions | Avoid exposure to sun, heat, moisture, dust, vibrations; do not place liquids nearby; disconnect if object enters device |
| CE certification | Compliant with European EMC and Low Voltage directives |
Frequently Asked Questions - PANDORA PX4D KORG
User questions about PANDORA PX4D KORG
0 question about this device. Answer the ones you know or ask your own.
Ask a new question about this device
Download the instructions for your Guitar Multi-Effects in PDF format for free! Find your manual PANDORA PX4D - KORG and take your electronic device back in hand. On this page are published all the documents necessary for the use of your device. PANDORA PX4D by KORG.
USER MANUAL PANDORA PX4D KORG
Using the unit in the following locations can result in a malfunction.
In direct sunlight
- Locations of extreme temperature or humidity
- Excessively dusty or dirty locations
- Locations of excessive vibration
- Close to magnetic fields
Power supply
Please connect the designated AC adapter to an AC outlet of the correct voltage. Do not connect it to an AC outlet of voltage other than that for which your unit is intended.
Interference with other electrical devices
Radios and televisions placed nearby may experience reception interference. Operate this unit at a suitable distance from radios and televisions.
Handling
To avoid breakage, do not apply excessive force to the switches or controls.
Care
If the exterior becomes dirty, wipe it with a clean, dry cloth. Do not use liquid cleaners such as benzene or thinner, or cleaning compounds or flammable polishes.
Keep this manual
After reading this manual, please keep it for later reference.
Keeping foreign matter out of your equipment
Never set any container with liquid in it near this equipment. If liquid gets into the equipment, it could cause a breakdown, fire, or electrical shock. Be careful not to let metal objects get into the equipment. If something does slip into the equipment, unplug the AC adapter from the wall outlet. Then contact your nearest Korg dealer or the store where the equipment was purchased.
CE mark for European Harmonized Standards
CE mark which is attached to our company's products of AC mains operated apparatus until December 31, 1996 means it conforms to EMC Directive (89/336/EEC) and CE mark Directive (93/68/EEC). And, CE mark which is attached after January 1, 1997 means it conforms to EMC Directive (89/336/ EEC), CE mark Directive (93/68/EEC) and Low Voltage Directive (73/23/EEC).
Also, CE mark which is attached to our company's products of Battery operated apparatus means it conforms to EMC Directive (89/336/EEC) and CE mark Directive (93/68/EEC).
THE FCC REGULATION WARNING (for U.S.A)
This equipment has been tested and found to comply with the limits for a Class B digital device, pursuant to Part 15 of the FCC Rules. These limits are designed to provide reasonable protection against harmful interference in a residential installation. This equipment generates, uses, and can radiate radio frequency energy and, if not installed and used in accordance with the instructions, may cause harmful interference to radio communications. However, there is no guarantee that interference will not occur in a particular installation. If this equipment does cause harmful interference to radio or television reception, which can be determined by turning the equipment off and on, the user is encouraged to try to correct the interference by one or more of the following measures:
- Reorient or relocate the receiving antenna.
- Increase the separation between the equipment and receiver.
- Connect the equipment into an outlet on a circuit different from that to which the receiver is connected.
- Consult the dealer or an experienced radio/TV technician for help.
Unauthorized changes or modification to this system can void the user's authority to operate this equipment.
Contents
Introduction 6
Main features 6
Turning on the power 8
Battery Low display 8
Using the strap holder 8
Controls and connectors 9
LCD screen 11
Making connections 12
Initial Settings 13
Quick Edit 13
Play mode 14
- Selecting a program 14
- Master level 14
- Bypass/Mute 14
4.Tuner 15
5. Specifying the function of the Value Dial 16
6. Key Lock function 17
Rhythm & Bass mode 17
- Rhythm Pattern 18
- Tempo 18
- Bass On/Off & Bass Key 18
- Rhythm & Bass Reverb Level.... 19
- Rhythm & Bass Level 19
- Chain Pattern settings 19
- Select the recording mode 20
- Recording 22
- Playback 22
4.Pause 23
AUX Pitch mode 23
Edit mode 24
- Select the effect that you wish to edit 25
- Editing each effect 25
1) DYNA (Dynamics & Pickup Modeling) 25
2)AMP(Amp Modeling) 25
3) CAB (Cabinet Modeling) 26
4) MOD (Modulation & Filter Effect Modeling) 26
(5) DLY (Delay Modeling) 27
6) REV (Reverb Modeling) 27
7) NR (Noise reduction) 27
8) RENAME 27
9)WRITE 28
- Reloading the factory programs ... 28
Troubleshooting 29
Effect Parameter 30
DYNA (Dynamics & Pickup modeling) 30
AMP (Amp Modeling) 32
Synth parameters 36
CAB (Cabinet modeling) 37
MOD (Modulation & Filter Effect
Modeling) 39
About the Intelligent Pitch Shifter 42
DLY (Delay Modeling) 43
REV (Reverb Modeling) 44
Preset Program Name 45
Rhythm Pattern List 46
Specifications 48
Introduction
Thank you for purchasing the TONEWORKS PANDORA PX4D personal multi-effect processor. In order to enjoy your PANDORA PX4D, please read this owner's manual carefully and retain it for future reference.
Main features
The PX4D is a versatile multi-effect unit that packs an incredible range of guitar/bass amps and effects into a compact unit which utilizes Korg's proprietary "REMS" modeling technology to create detailed and powerful modeling sounds.
158 types of effect variations with a maximum of seven effects that can be used simultaneously.
IPE (Integrated Parameter Edit) system allows easy to adjust effect settings.
100 user and 100 preset programs
Amp modeling selector and control knobs
The PX4D includes 25 different amp types including 15 types of guitar amp models, 10 types of bass amp models, plus a synth, each of which can be edited quickly and easily.
Backlit LCD
The LCD screen can be easily viewed even in dark locations.
Auto Tuner function
This feature makes tuning fast and easy. You can also tune without being heard (i.e., while muted).
Rhythm and Bass function
100 types of rhythm and bass patterns or a metronome can be used. 16 multiple patterns can also be connected for successive playback.
AUX pitch function
You can transpose audio from a CD player or other device connected to the AUX jack of the PX4D, and "erase" the bass from a song for play along purposes with Bass Cancel function.
Phrase Trainer function
Audio from a CD player, guitar or bass can be recorded (maximum of 31.7 seconds), and then played back as a loop. The playback speed can also be slowed down without affecting the pitch of the audio. The rhythm selected in Rhythm & Bass mode and the effect output can also be recorded simultaneously.
TAP button
You can easily set the Delay Time or the tempo of the Rhythm & Bass function to match the tempo of the song.
Value dial
This lets you rapidly select programs or edit the effects.
What is REems?
Items (Resonant structure and Electronic circuit Modeling System) is KORG's proprietary sound modeling technology which precisely reproduces the complex character and nature of both acoustic and electric instruments as well as electronic circuits in real world environments. Items emulates a wide variety of sound generation characteristics including instrument bodies, speakers & cabinets, acoustic fields, microphones, vacuum tubes, transistors, etc.
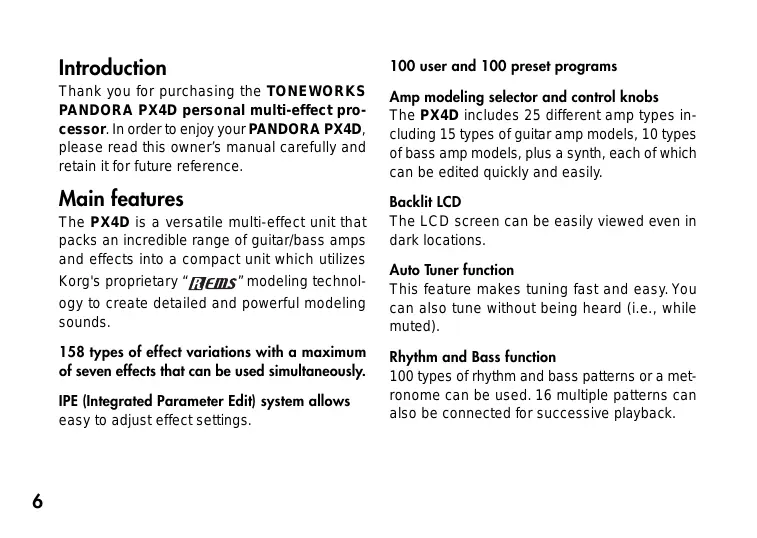
Turning on the power
Remove the battery cover located
on the bottom of the PX4D by sliding it in the direction of the arrow. Insert four AAA alkaline batteries as shown in the illustration. Be sure to insert the batteries observing the correct p
Battery Low display
When the battery begins to run low, the Low Battery icon will light. When this icon lights, replace the batteries as soon as possible.
Programs and other data (except for the data being edited) will not be lost even if the battery is removed and changed.

Batteries that have run down must be removed from the PX4D. If you leave dead batteries in the unit, malfunctions (battery leakage, etc.) may occur. You should also remove the batteries when you do not expect to use the PX4D for an extended period of time.

An AC adapter is not included with this product. It must be purchased separately.
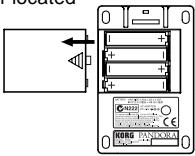
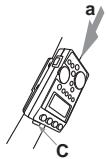
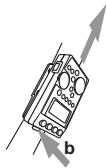
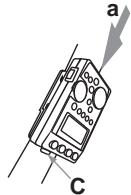
Using the strap holder
- Pass your strap through the strap holder.
- Slide the protrusion (A) of the strap holder into the attachment slot (B) on the rear of the PX4D.

- Press in the direction of the arrow (a) until locking tab (C) clicks into place.
- Shake the PX4D lightly to verify that it does not fall off.
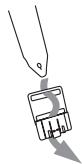
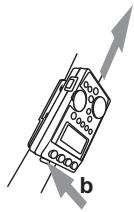
Removal
- Press the strap holder locking tab (C) in the direction of arrow (b) to release the lock.
- With the lock released, slide the PX4D in the opposite direction from when attaching it, and remove it from the holder.
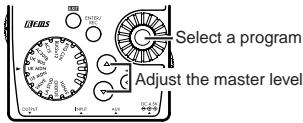
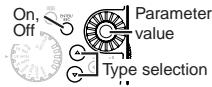
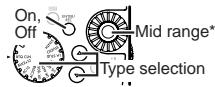
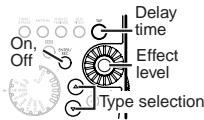
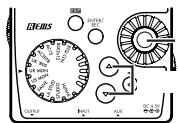
Controls and connectors
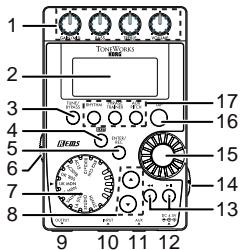
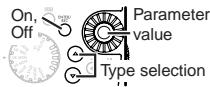
1. Control knobs
These knobs control the gain, tone, and volume of the amp models and synth parameters.
2. LCD (Liquid Crystal Display)
3. TUNE/BYPASS button
4. EXIT button
This button returns you back to Play mode from any mode.
5. ENTER/REC button
This button is used to switch an effect on/off, or to start recording in Phrase Trainer mode.
6. Input level switch
Use this to adjust the input level depending on the output level of your guitar or bass.
7. Amp Modeling selector
Selects the amp models.
8. / buttons
Use these buttons to select programs and edit effects.
9. OUTPUT jack
Connect this jack to your guitar amp, bass amp, or headphones etc.
10. INPUT jack
Connect your guitar or bass to this jack.
11. AUX jack (stereo)
Connect this jack to a CD player or other audio source.
12. DC4.5V
The separately sold AC adapter (DC4.5V S) should be connected here.
13. buttons
Use these buttons to select the parameter that you wish to edit, and to operate the Phrase Trainer function.
14. Power switch/Backlight switch
This switch turns the power on/off, and also turns the backlight on/off.

If you are operating the PX4D on batteries, the operating time will be shorter if the backlight is on.
15. Value dial
Use this to adjust the master level, edit effects, and select programs.
16. TAP button
Use this button to set the delay time or the tempo in Rhythm & Bass mode.
17.Mode buttons
Use these buttons to enter Rhythm & Bass, Phrase Trainer, or AUX Pitch modes.
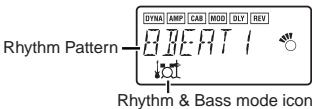
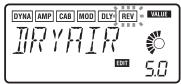
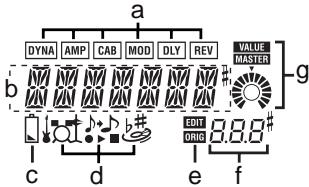
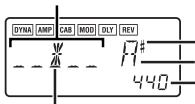
LCD screen
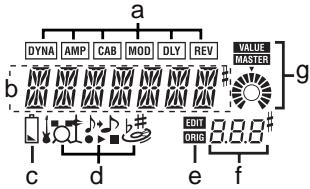
a. Effect chain
This area indicates the on/off status of the DYNA, AMP, CAB, MOD, DLY, and REV effects.
b. Program name/Effect type display
This area shows the program name or effect type. When the PX4D is bypassed or muted, this will function as the tuner.
c. Low Battery icon
This icon will light when the batteries run low.
d. Mode icons
These icons will light when you are in AUX Pitch, Phrase Trainer, or Rhythm & Bass modes.
e. Edit/Original icons
The EDIT icon will light when you enter Edit mode. If the parameter or value being edited matches the value that is written in the program, the ORIG icon will light.
f. Program number / value display
This displays the program number.
When you change the Master Level, its value will be displayed here for several seconds. During editing, this displays the parameter values.
g. Master/Value icons, bar graph
When MASTER is lit, the master level of the program is indicated graphically. When VALUE is lit, the value of the parameter is indicated graphically.
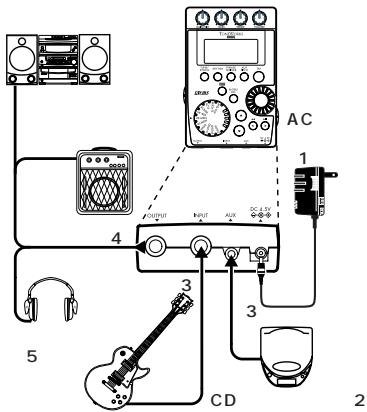
Making connections
When connecting an external device (ie-guitar amp, bass amp, CD player, ac adapter, etc.) be sure to turn the unit off.
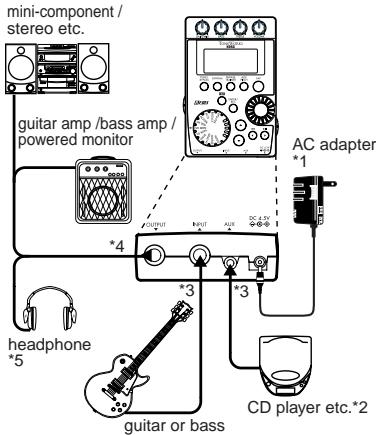
1 Be sure to use only the specified AC adaptor (DC4.5V ◆-◇).
2 If a CD player or other audio source is connected to the AUX jack, you can play along with your guitar or bass. However the volume must be adjusted from the connected device.
3 Connecting cables are sold separately.
4 PX4D's output jack is stereo. If you use a standard mono cable to connect it to a guitar or bass amp etc., only the L (left) output will be heard.
*5 PX4D's output level and sound quality will vary depending on which headphones are used. We recommend using good quality low impedance headphones, 32 Ohms or less with a sensitivity rating near 100dB/mW or above. Many headphones sold for use with portable CD or cassette players will work just fine.
Initial Settings
-
When you finish making connections, set the power switch to the "ON" position. (This setting is referred to as Play mode.) Use the buttons to select a program.
-
Set the input level switch for the output level of your guitar or bass.
Hi: High-output pickups (e.g., humbucking pickups or pickups with a preamp)
Lo: Low-output pickups (e.g., single-coil type pickups)
- Set the volume control of your guitar or bass to its usual position. Use the Value dial to adjust the master level.
Quick Edit
In each mode (except when Mute/Bypass or Key Lock are active), you can use the Amp Modeling selector to quickly change the amp modeling type, or use the control knobs to adjust the gain, tone, or volume of amp modeling. When you use the amp model selector to change the amp model type, the cabinet type will automat-
ically change to the recommended type. When you move a control knob, the parameter name and value will appear for several seconds in the value display. If the setting matches the original setting, the ORIG icon will light.
The Delay Time can also be set by pressing the TAP button twice at the desired interval (except when in Rhythm & Bass mode). To check the Delay Time that was specified, press and hold the TAP button for two seconds or longer.

Settings that you make using Quick Edit will return to the original saved settings if you change programs or turn off the power before Writing (see p.28).
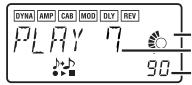
Play mode
Play mode is the mode in which you will normally use the PX4D.
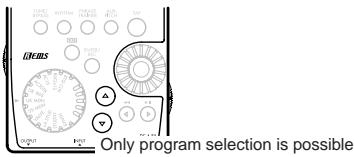
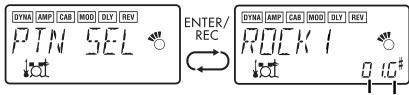
1. Selecting a program
You can choose from 100 user programs (U00...U99) and 100 preset programs (P00...P99). Use the / buttons to select a program. Programs can be selected even when you are in Rhythm & Bass mode, AUX Pitch mode, or Phrase Trainer mode (except while recording).
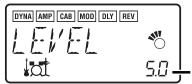
2. Master level
When the MASTER icon is lit, the value graph will indicate the master level.
When you turn the Value dial to adjust the master level, the master level value will be shown in
the program number / value display for several seconds. The master level is remembered even when the power is turned off.
You can also adjust the settings so that the / buttons will adjust the master level. (See p.16)
3. Bypass/Mute
When you press the TUNE/BYPASS button, the PX4D will be bypassed, and the original sound will be dry (no effect).
The effect chain will blink, and the display will indicate "BYPASS" for approximately one second.
If you press and hold the TUNE/BYPASS button for longer than one second, the output signal will be muted.
The effect chain will blink rapidly, and the display will indicate "MUTE" for approximately one second.
Bypass/mute will be turned off when you press the TUNE/BYPASS button once again.
You can also return to Play mode by pressing the EXIT button.
Bypass or Mute can also be entered from modes other than Play mode.
4. Tuner
The tuner will operate when you bypass or mute.
Play a single string on your guitar or bass. The LCD will show the note name and the calibration. If the pitch is more than a semitone higher than the note name, a sharp symbol will appear at the upper right of the note name.
The display area will act as a meter to show the pitch.
Tune each string of your guitar or bass so that the indicator above the center mark is lit.
The tuner (bypass/mute) will be turned off when you press either the TUNE/BYPASS button.
You can also return to Play mode by pressing the EXIT button.
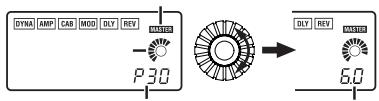
Calibration (frequency of the standard A = 440 pitch)
You can use the Value dial to adjust calibration in the range of A = 438Hz 445Hz
The calibration setting you make will be valid until the power is turned off. Once the power is turned off, calibration will be reset to A = 440 Hz.
5. Specifying the function of the Value Dial
You can specify the function that the Value dial will perform in Play mode. In Play mode, hold down the EXIT button and press either the button or the button to assign the following functions.
Hold down the EXIT button and press the button.
The LCD will indicate "MASTER" for approximately one second.
The Value dial will adjust the master level, and the buttons will select programs. You can use the Value dial to adjust the master level quickly. Each time the power is turned on, this setting will be in effect.
- Hold down the EXIT button and press the button.
The LCD will indicate "PROGRAM" for approximately one second.
The Value dial will select programs, and the buttons will adjust the master level.
You can use the Value dial to select programs quickly.
If you want to change the function of the Value dial so that it will adjust the master level, again, hold down the EXIT button once and press the button, or turn on the power.
6. Key Lock function
By activating the Key Lock function, you can disable all operations except for selecting programs. This is a convenient way to prevent accidental operation during a live performance.
Hold down the EXIT button and press the TUNE/BYPASS button.
The LCD will indicate "KEYLOCK" for approximately one second.
The / buttons will select programs, and the other buttons and Value dial will not function.
The Key Lock function will be cancelled when the power is turned off. You can also cancel the Key Lock function by performing "5.
Specifying the function of the Value Dial." (p.16).
Rhythm & Bass mode
To enter Rhythm & Bass mode, press the RHYTHM button once when in Play mode (except for mute/bypass or key lock), AUX Pitch mode, or Phrase Trainer mode.
When you enter this mode, the Rhythm Pattern selection screen will appear, the selected rhythm will start, and the Rhythm & Bass mode icon will light. The indication of the value graph will change according to the pattern or tempo.
This mode contains the following five parameters. Use / buttons to select parameters, and use the Value dial and the ENTER/REC button to set the value of each parameter.
If you select "CHAIN" as the rhythm pattern, there will be more chain pattern settings. (Refer to p.19, "Chain pattern settings")
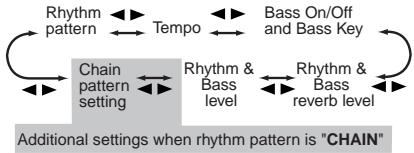

If you select "JAM" as the recording mode in Phrase Trainer mode, the rhythm will sound with the pattern and tempo that you specify here.

The settings you select here are remembered even when the power is turned off.
1. Rhythm Pattern
Use the Value dial to select the rhythm pattern (p.46)
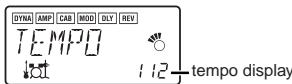
2. Tempo
Set the tempo in the range of 40-208 bpm.
You can also set the tempo by pressing the TAP button twice at the desired rhythm.
For a 6/8 time signature, the tempo can be set in a range of = 40 - 208
3. Bass On/Off & Bass Key
Here you can switch the bass on/off, and specify the key in which the bass will play.
If you press the ENTER/REC button in this screen, the bass will play in time with the rhythm. Depending on the rhythm pattern that you have selected, some bass lines will include a chord progression. When the bass note is on, you can use the Value dial to set the key in a range of C, C#,..A#, B, allowing you to practice your guitar or bass in a scale that matches that key.
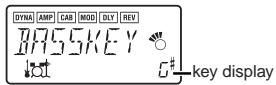

If "METRONM" - METROT"(metronome) is selected as the rhythm pattern, there will be no bass notes, and this screen will not appear.

When using Chain Patterns, the Bass Key setting will be ignored.
4. Rhythm & Bass Reverb Level
Use the Value dial to set the amount of Reverb for the Rhythm & Bass.
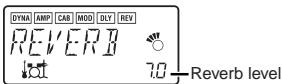

This uses the same reverb as the program effect. This parameter has no effect if you have selected a program that does not use reverb modeling, or if the reverb effect level is "0."
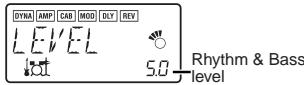
5. Rhythm & Bass Level
Use the Value dial to set the level of Rhythm & Bass sound. The bass note will be affected only if Bass is turned on.
6. Chain Pattern settings
These parameters are added only if you select "CHAIN" as the rhythm pattern. Press the ENTER/REC button to access the Chain Parameter Select screen. Use the buttons to select the location (1...16) for which you want to change the pattern, and use the Value dial to select the pattern (p.46) that will be used at that location. Use the buttons to specify the bass key of the selected pattern.
Up to 16 patterns can be connected. If you want to create a chain of 15 or fewer patterns, select "PTN END" for the last pattern.
Press the ENTER/REC button to exit the Chain Pattern Select screen.

If you change the pattern location by turning the value dial while holding down the or button, the pattern at which you were located will be copied to the destination pattern location. This function is convenient when you want to place the same pattern again.
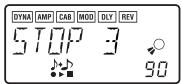
Phrase Trainer mode
An audio source from the AUX jack or a phrase you play on your guitar or bass can be recorded, and played back repeatedly as a loop.
This provides a convenient way to practice by playing along with the repeating phrase.
You can slow down the playback speed without affecting the pitch, which can help you to learn difficult phrases.
If you select "JAM" as the recording mode, the rhythm you specified in Rhythm & Bass mode will be recorded simultaneously with the guitar or bass input, and looped.
1. Select the recording mode
In Play mode (except during bypass/mute or key lock), Rhythm & Bass mode, or AUX Pitch mode, press the PHRASE TRAINER button to enter Phrase Trainer mode.
When you enter this mode, the recording mode and time select screen will appear, and the Phrase Trainer icon will blink. In this screen, the PX4D will be ready to record.

The recording mode will cycle through the following choices each time you press the PHRASE TRAINER button.
AUX Records only the AUX in
GTR/BAS Records only the guitar or bass
AUX+G/B Records both the AUX input and guitar or bass
JAM Records the guitar or bass together with the rhythm that was last selected in Rhythm & Bass mode
Use the value dial to select the recording time (for "JAM," the number of measures).
8 Approximately 7.9 seconds
16 Approximately 15.8 seconds
32 Approximately 31.7 seconds
1, 2, 3... Number of measures
If the recording mode is "JAM," the recording quality will be set automatically, based on the tempo and the specified number of measures.

If you select a long recording time (16 or 32), the audio quality of the recording will be lower.
If the tempo of the rhythm is extremely slow, it will not be possible to record a large number of measures. Please re-specify the tempo in Rhythm & Bass mode (maximum length is approximately 31.7 seconds)
Start playback on your CD or other audio source, and at the point where you wish to begin recording, press the ENTER/REC button. Recording will begin.
If the recording mode is "JAM," recording will begin after precount.
If, after recording, you want to change the recording mode or recording time, press the PHRASE TRAINER button while playback is paused.
The recorded content will be lost when the power is turned off.
2. Recording
When you begin recording, the recording time will be indicated as a numerical value and by a value graph.
When you want to stop recording, press the EN-TER/REC button or the [▶II]. Recording will stop, and loop playback will begin automatically. If you do not stop recording, recording will continue until the selected recording time has elapsed, and loop playback will begin automatically. If the recording mode is "JAM," recording will end automatically at the specified number of measures, and will switch to loop playback.

The phrase will be recorded and played back in mono.
3. Playback
The recorded phrase will playback as a loop. During playback or while paused, you can use the / buttons to select programs.
Rotating the Value dial toward the left will slow down the playback speed without affecting the pitch.
You can choose from six levels of playback speed: 100% , 90% , 80% , 75% , 66% , and 50% . During playback, you can press the [▲] button to rewind.
By pressing the PHRASE TRAINER button, you can hold the sound that was being played at the moment you pressed the button (the Hold function). This is convenient when you need to hear individual notes in a phrase.
4. Pause
When you press the [▶II] button, the playback will pause. Press the [▶II] button once again, and playback will resume.
Pressing the [<] button while playback is paused will return you to the beginning of the recorded phrase.
If you wish to re-record the phrase, press the [▶II] button to pause playback.
Start the CD or other audio source, and press the ENTER/REC button at the beginning of the desired phrase.
If you want to change the recording mode or time, press the PHRASE TRAINER button while paused.
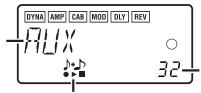
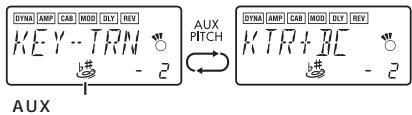
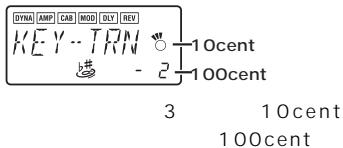
AUX Pitch mode
In this mode you can transpose the key (pitch) of the sound from a CD or other audio source connected to the AUX jack. You can also apply the Bass Cancel effect to eliminate the low-frequency range.
Press the AUX PITCH button to enter AUX Pitch mode and the icon will light.
Each time you press the AUX PITCH button, you will alternate between Key Transpose Only and Key Transpose + Bass Cancel.
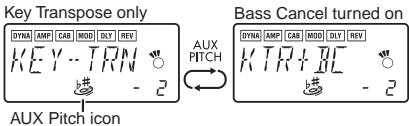
By setting the Key Transpose setting to 0 and selecting Key Transpose + Bass Cancel, you can turn on the Bass Cancel function only. Press the EXIT button to return to Play mode.

The output will be mono in AUX Pitch mode.

The AUX Pitch setting is remembered even when the power is turned off.

For some recordings, Bass Cancel may not be as effective as you would like.
Use the Value dial to specify the amount of key transposition. The key can be transposed in a range of +/-1 octave.
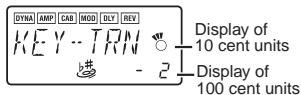
The value can be adjusted upward and downward for 3 semitones in 10 cent steps, and in semitone steps (100 cents) for the remainder of the range.
Edit mode
In this mode you can turn each effect on/off, and edit the effect type, parameter values, and program name.
In Play mode, press the (or ) button to access the DYNA effect edit screen.
In any screen of Edit mode, you can use the control knobs to edit the Amp models, or use the TAP button to set the delay time.
Press the EXIT button to re
turn to Play mode.
If a program was not written after it was edited, the decimal point of the program number will light.
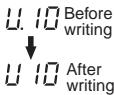

The edited settings will return to the settings of the original program if you switch programs or turn off the power without Writing (see p.28).
1. Select the effect that you wish to edit
Each time you press the buttons, you will cycle through the effects in the order shown below. When an effect is selected, its icon will blink.
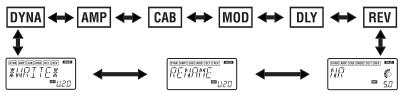
2. Editing each effect
For each effect, you can select the effect type and set its parameter values.
Effects that are turned "OFF" will automatically be turned on if you press the ENTER/REC button or use the / buttons to select the effect type.
For details on the effect types and parameters, refer to Effect Parameters (p.30). Renaming the program and writing the program are also performed here.
1) DYNA (Dynamics & Pickup Modeling) These are dynamics-type effects such as compressor and auto-wah that modify the tone, and pickup modeling effects.
2)AMP (Amp Modeling)
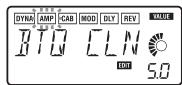
The fifteen types BTQ CLN-FUZZ are guitar amps, and the ten types VALVE-UKMAJOR are bass amps. SYNTH is a synth for both guitar and bass.

*Operation will be different if SYNTH is selected as the type.
The value display will indicate "Gt" for approximately one second if you've selected a guitar model, or "bA" if you've selected a bass model. The amp type selected by the amp modeling selector can be selected and edited even without entering Edit mode. When you use the Amp Modeling selector to select an amp, the PX4D will automatically select the most appropriate cabinet model and turn it on.
The VOLUME control knob can be used to adjust the VOLUME even when the amp modeling effect is "OFF."
3) CAB (Cabinet Modeling)
This simulates the acoustical characteristics of the amp's cabinet. This is especially effective when you are not using an amp (e.g., when using headphones, or when connecting to a mixer, hard-disk recorder, or audio device). The eleven types 1X8TWD-4X12VIN are guitar amp cabinets, and the twelve types LA 4X10-COMBI are bass amp cabinets.
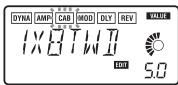

The value display will indicate "Gt" for approximately one second if you've selected a guitar amp cabinet, or "bA" if you've selected a bass amp cabinet.
You are free to use a guitar AMP with a bass CAB, or a bass AMP with a guitar CAB.
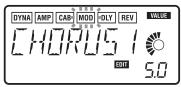
4) MOD (Modulation & Filter Effect Modeling) These are modulation and filter-type effects such as chorus, flanger, phaser, and pitch shifter.
5) DLY (Delay Modeling)
These are spatial-type effects for which you can set the delay time by the interval at which you press the TAP button.
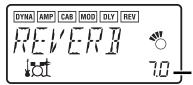
6) REV (Reverb Modeling)
These are spatial-type effects that add spaciousness to the sound.
7) NR (Noise reduction)
Use the Value dial to adjust the depth of the noise reduction that is applied.
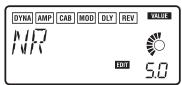

Adjust the depth of noise reduction
Increasing this value will produce more noise reduction. Normally you will adjust this so that you do not hear obtrusive noise when the strings are lightly muted.

If the NR value is raised excessively, the sound may be cut off prematurely, depending on the device that is connected. If this occurs, reduce the value.

Adjust the NR level as suitable for your guitar, bass, or pickup.
8) RENAME
Here you can specify a name for each program. The following characters can be used: space, 0-9,A-Z,“,‘,*,+,,-,I.

9)WRITE
Here you can write (store) a program that you created.
Use the Value dial to select the writing destination (User programs only). When you do so, the name of the program that currently occupies the writing destination will be displayed briefly.
If you decide not to write, press the (or ) button to select a different screen.
When you press the ENTER/REC button, the edited program will be written into memory.
When the program has been written, the LCD will indicate "COMPLT" for approximately one second.

Before writing an edited program into a different program number, be sure that you do not mind overwriting the data that is currently in that program number. The program data that is overwritten will be lost.
It is not possible to write to a preset program.
3. Reloading the factory programs
While holding down the RHYTHM button and the button, turn on the power. The LCD will ask "RELOAD?"
If you press the ENTER/REC button, the factory-set programs will be re-loaded into the user program area. The display will indicate "RELOAD", "VERIFY", "COMPLT" for a short time, and then the power-on screen will appear.
Never turn off the power during the reload operation.
If you decide not to reload, press the EXIT button while the "RELOAD?" indication is still shown. The factory programs will not be reloaded; the normal power-on screen will appear, and the PX4D will be in Play mode.
Be aware that if you reload the factory programs, the user programs and any settings that are remembered when the power is turned off (master level etc.) will all be rewritten.
Troubleshooting
If the PX4D does not operate as you expect, please check the following points first. If this does not resolve the problem, contact your dealer.
1. Power does not turn on.
- Are batteries installed? Alternatively, is the correct AC adapter connected to an AC outlet?
2.No sound
- Are your guitar or bass, amp and/or headphones connected to the correct jacks?
- Is your amp turned on and set correctly?
- Are any cables broken?
Is the master level of the PX4D set to "0" or to a low level? - The VOLUME control knob may have been turned down.
Is the PX4D muted?
Be aware that if all effects are off, the chain display will disappear, and it will not be possible to distinguish Bypass or Mute from the LCD display.
- Is the volume of your guitar turned down?
3. The volume from the device connected to the AUX jack is too loud or too soft, or cannot be heard.
- Adjust the output level of the connected device.
Make connections to the headphone jack of the device, instead of to its line output.
- Are you in Phrase Trainer mode?
Exit Phrase Trainer mode.
- Are you using a connection cable with a built-in resistor?
4. Effects do not apply
- Is the PX4D bypassed? (the effect chain will be blinking)
- Are the effects used in the program turned on?
5. Tuner does not work.
- Is the PX4D bypassed or muted?
Effect Parameter
DYNA (Dynamics & Pickup modeling)
| TYPE (▲/▼ button) | VALUE (Value Dial) | |
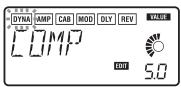
| COMP | This compressor produces consistent levels and sustain. | Adjusts sensitivity. (1.0...10.0) |
| DYNAEXC | This effect dynamically applies an exciter according to your picking strength. (This is especially effective when you want to give more sparkle to clean sounds.) | Adjusts sensitivity. (0...10.0) |
| VOX WAH | Models a VOX V847 wah pedal. | Adjusts location of a pedal. (1.0...10.0) |
| WAHUP1 | Positive-polarity auto-wah that responds sensitively to attacks. | Adjusts sensitivity. (0...10.0) |
| WAHUP2 | Positive-polarity auto-wah that responds smoothly to attacks. | |
| WAHDWN1 | Negative-polarity auto-wah that responds sensitively to attacks. | |
| WAHDWN2 | Negative-polarity auto-wah that responds smoothly to attacks. | |
| SLOWATK | Smooths the attack to create a violin-like effect. | Specify the attack speed. (1.0...10.0) |
| OCTAVE | This generates a pitch one octave lower than the original sound, and mixes it with the original sound to add a sense of depth and low end. This effect may not operate correctly if two or more strings are played simultaneously, or when low-pitched strings are played. | Adjusts effect level. (0...10.0) |
| RING | An effect that produces bell-like sounds. (For the cleanest effect, use the neck pickup, turn down the tone control of your instrument, and play near the 12th fret.) | Specify the frequency. (1.0...10.0) |
| RINGUP RINGDWN | A ring modulator in which the effect changes dynamically depending on your picking strength. | Adjusts sensitivity. (0...10.0) |
| AC SIM | An effect that simulates the tonal character of an acoustic guitar. | Adjusts tone. (0...10.0) |
| HUM>SGL | Pickup modeling that transforms the sound of a humbucking pickup into the sound of a single-coil pickup. | |
| SGL>HUM | Pickup modeling that transforms the sound of a single-coil pickup into the sound of a humbucking pickup. | |
| HF TONE | Pickup modeling that simulates the "half-tone" position between two pickups. | |
| PHASOUT | Pickup modeling that simulates the "out of phase" sound when two pickups are connected out of phase. | |
| COMP2 | A compressor with an emphasized attack. | Adjusts sensitivity. (1.0...10.0) |
| LIMITER | A limiter that makes the level more consistent. | Specify the compression ratio. (0...10.0) |
| B OD | Overdrive for bass.* | Amount of distortion. (1.0...10.0) |
| B DIST | Distortion for bass.* | |
| B FUZZ | Fuzz for bass.* | |
| PREAMP1 | Preamp set to a clear tone for bass. | Adjusts tone. (0...10.0) |
| PREAMP2 | Preamp set to a muted tone for bass. | |
| BALANCE | Creates the sound of blending the output of two pickups for bass. | |
| LOWCUT | Filter that cuts the unwanted low-frequency range. Effective for recording. | Adjusts frequency. (0...10.0) |
| FRETLES | Settings that simulate the sound of a fretless bass. | Adjusts tone. (0...10.0) |
*: This is usually an effect for bass, but you can use it with the SYNTH amp model to produce a thick sound when using a guitar.
AMP (Amp Modeling)
When using Amp Modeling, the control knobs (GAIN/MID, BASS, TREBLE, VOLUME) and Value dial will be active. The VOLUME knob can still be used even when Amp Modeling is "OFF."
If SYNTH is selected as the type, the control knobs will control oscillator selection, VCF setting, direct level, and synth level respectively. Types marked by an asterisk* can also be selected by the amp modeling selector. In order to take full advantage of the characteristics of Amp Modeling, we recommend that you use it in conjunction with Cabinet Modeling when listening through head-
phones or when recording from line output.
| TYPE (▲/▼ button or Amp modeling selector) | VALUE (Value Dial & Control Knobs) | |
| BTQ CLN* | Clean channel of a high-end 100 W hand made guitar amp. (recommended CAB: 4x12CLS, 4x12VIN, 4x12MDN) | GAIN/MID amount of distortion BASS low range TREBLE high range VOLUME output volume Value dial |
| BTQ OD | Overdrive channel of a high-end 100 W hand-made guitar amp. (recommended CAB: 4x12CLS, 4x12VIN, 4x12MDN) | |
| TWD1X12 | Combo guitar amp covered in tweed cloth. (recommended CAB: 1x12TWD) | |
| TWD4X10 | 4x10 combo guitar amp designed for bass guitar. (recommended CAB: 4x10TWD) | |
| BLK2X12* | 2x12 combo guitar amp indispensable for country or blues players. (recommended CAB: 2x12BLK) | |
| AC15* | VOX AC15 manufactured in 1962. (recommended CAB: 1x12VOX) | |
| AC30 | VOX AC30 modeling. (recommended CAB: 2x12VOX) | |
| AC30TB* | Brilliant channel of a VOX AC30TB. (recommended CAB: 2x12VOX) | |
| UKBLUES | UK-manufactured vintage stack guitar amp head. (recommended CAB: 4x12CLS) | |
| UK '70S | High treble channel of a UK-manufactured 1969 model 100 W guitar amp head. (recommended CAB: 4x12CLS) | |
| UK '80S* | UK-manufactured 1983 model 100W guitar amp head with master volume. (recommended CAB: 4x12CLS, 4x12VIN, 4x12MDN) | GAIN/MID amount of distortion BASS low range TREBLE high range VOLUME output volume Value dial mid range (0...10.0) |
| UK MDN* | UK-manufactured 100 W modern guitar amp. (recommended CAB: 4x12VIN, 4x12MDN) | |
| US HI-G | 1991 model 100 W guitar amp head covered in snake skin. (recommended CAB: 4x12VIN, 4x12MDN) | |
| US MDN* | High-gain guitar amp with eye-catching metal plate. (recommended CAB: 4x12VIN, 4x12MDN) | |
| FUZZ | Vintage fuzz. | |
| VALVE* | A vacuum tube bass amp with the ULTRA LO switch turned ON. (recommended CAB: CLS8X10) | GAIN/MID mid range BASS low range TREBLE high range VOLUME output volume Value dial mid range (1...5) |
| VALVE2 | A vacuum tube bass amp ideal for rock. (recommended CAB: CLS8X10) | |
| CLASSIC | A vacuum tube bass amp whose basic character changes according to the setting of the value dial. (recommended CAB: COMBI) | |
| SCOOPED | A bass amp that is typical of 80's sounds. (recommended CAB: MTL4X10) | |
| LA STUD* | A bass amp that is typical of the LA sound. (recommended CAB: LA 4X10, LA 1X18) | GAIN/MID ........................... mid range BASS ........................... low range TREBLE ........................... high range VOLUME ........................... output volume Value dial ... mid-range frequency (1...5) |
| GOLDPNL | A bass amp distinctive for its eye-catching gold panel and clean sound. (recommended CAB: MDN4X10) | |
| JAZZ | A combo bass amp favored by jazz bassists. (recommended CAB: JAZ1X15) | |
| STUDIO* | A vacuum tube combo bass amp ideal for the Motown sound. (recommended CAB: STU1X15) | GAIN/MID ........................... gain setting BASS ........................... low range TREBLE ........................... high range VOLUME ........................... output volume Value dial ........................... mid range (0...10.0) |
| AC100 | A 100W vacuum tube bass amp made by Vox. (recommended CAB: AC 2X15) | |
| UKMAJOR | A 200W vacuum tube bass amp made in the UK. (recommended CAB: UK 4X15, UK 4X12) | |
| SYNTH* | Chromatic synth modeling. (recommended CAB:4X12MDN) | Refer to separate Synth parameters |
Synth parameters
| Oscillator selection: 0...15 (GAIN/MID knob) | 0: Sawtooth wave 2 octaves down 1: Sawtooth wave 1 octave down 2: Sine wave 1 octave down 3: Sawtooth wave 4: Sine wave 5: Sawtooth wave 1 octave up 6: Sine wave 1 octave up 7: Sine wave 2 octaves up Oscillators 8...15 are oscillators 0...7 with portamento turned on. |
| VCF setting: 0...10.0 (BASS knob) | Voltage Controlled Filter sensitivity adjustment. 0...4.7 is sensitivity adjustment in the positive (+) direction, and 5.0...10.0 is sensitivity adjustment in the negative (-) direction. Set this to 5.0 for a sine wave oscillator. |
| Direct level: 0...10.0 (TREBLE knob) | Adjusts the volume of the guitar or bass. |
| Synth level: 0...10.0 (VOLUME knob) | Adjusts the volume of the synth. |
| Threshold adjustment: 1.0...10.0 (Value dial) | Adjusts the sensitivity of the synth in response to the volume of the guitar or bass. Adjust this as appropriate for your guitar, bass, or pickup. |

The Synth is effective only when single notes are played. The desired effect will not be obtained if chords are played.

If your instrument is not tuned correctly, the results may not be as you expect. In this case, re-tune your instrument.
CAB (Cabinet modeling)
| TYPE (▲/▼ button) | VALUE (Value Dial) | |
| 1X8TWD | This model simulates an open back cabinet with one 8-inch speaker for guitar. | PRESENCE: Adjusts tone of the high-frequency range. (0...10.0) |
| 2X10BLK | This model simulates an American open back cabinet with two 10-inch speakers for guitar. | |
| 4X10TWD | This simulates an open back cabinet with four 10-inch speakers for guitar. | |
| 1X12TWD | This model simulates an open back cabinet with one 12-inch speaker for guitar typically used for blues. | |
| 1X12VOX | This model simulates a Vox open back cabinet with one 12-inch "Blue" speaker for guitar. | |
| 2X12BLK | This model simulates an American open back cabinet with two 12-inch speakers for guitar. | |
| 2X12VOX | This model simulates a Vox open back cabinet with two 12-inch "Blue" speakers for guitar. | |
| 4X12VOX | A closed-back guitar cabinet used in recent VOX amps, containing four neodymium speakers | |
| 4X12CLS | This simulates a closed back cabinet with four 25W 12-inch speakers for guitar. | |
| 4X12MDN | This simulates a closed back cabinet with four 75W 12-inch speakers for guitar. | |
| 4X12VIN | This simulates a closed back cabinet with four 30W 12-inch speakers for guitar. | PRESENCE: Adjusts tone of the high-frequency range. (0...10.0) |
| LA 4X10 | Four 10-inch speakers / LA sound cabinet model for bass. | |
| MDN4X10 | Four 10-inch speakers / modern-type cabinet model for bass. | |
| MTL4X10 | Four 10-inch aluminum-cone speakers / modern cabinet model for bass. | |
| CLS8X10 | Eight 10-inch speakers / classic-type cabinet model for bass. | |
| UK 4X12 | Four 12-inch speakers / UK-manufactured cabinet model for bass. | |
| STU1X15 | One 15-inch speaker studio combo cabinet model for bass. | |
| JAZ1X15 | One 15-inch speaker jazz combo cabinet model for bass. | |
| AC 2X15 | Two 15-inch speakers / cabinet model for AC100. | |
| US 2X15 | Two 15-inch speakers / US-manufactured cabinet model for bass. | |
| UK 4X15 | Four 15-inch speakers / UK-manufactured cabinet model for bass. | |
| LA 1X18 | One 18-inch speaker / LA sound cabinet model for bass. | |
| COMBI | One 12-inch and one 18-inch speaker combination cabinet model for bass. | |
MOD (Modulation & Filter Effect Modeling)
| TYPE (▲/▼ button) | VALUE (Value Dial) | |
| CHORUS1 | Vintage chorus in which the effect sound is output to the left and the direct sound to the right. | Adjusts modulation speed. (0.1...10.0 [Hz]) |
| CHORUS2 | Vintage stereo chorus that inverts the phase of the effect sound between left and right, creating more spaciousness. | |
| FLANG1...3 | Vintage flanger with a distinctive sound. (1, 2, 3 have feedback amounts of 0%, 22%, and 60% respectively) | |
| FLANG4 | Vintage flanger that inverts the phase of the feedback. | |
| PHASER1 | A popular four-stage vintage phaser. | |
| PHASER2 | A four-stage vintage phaser with a thick mid-range. | |
| PHASER3 | A ten-stage vintage phaser with a mild effect. | |
| U-VIBE1 | Simulation of a pedal vibe set to chorus mode. | Adjusts modulation speed. (1.0...10.0 [Hz]) |
| U-VIBE2 | Simulation of a pedal vibe set to vibrato mode. | |
| TREM1 | Smooth tremolo. | |
| TREM2 | Tremolo built into a guitar amp. | |
| TREM3 | Strong and deep tremolo. | |
| AT PAN1 | Auto Pan. (LFO: square wave□□) | Adjusts modulation speed. (0.1...10.0 [Hz]) |
| AT PAN2 | Auto Pan. (LFO: sine wave△⁄¨) | |
| ROTARY1 | Rotary speaker simulation. | Adjusts modulation speed (1.0...10.0 [Hz]) |
| ROTARY2, 3 | Rotary speaker simulation in which your playing dynamics control the speed. 2 switches from slow to fast when you play strongly. 3 switches from slow to fast when you play softly. | Specify the level at which switch rotor speeds. (1.0...10.0) |
| PITCH1...3 | Pitch shifter (PITCH1, 2, 3 differ in the level of the effect). | Amount of pitch shift (-24, -17, -12...-1, -d, d, 1...12, 19, 24) (d = detune) |
| MAJ3UP | Intelligent pitch shifter; a 3rd up in a major key. | Specify the key (C, C#...A#, B) |
| MAJ3DWN | Intelligent pitch shifter; a 3rd down in a major key. | |
| MIN3UP | Intelligent pitch shifter; a 3rd up in a minor key. | |
| MIN3DWN | Intelligent pitch shifter; a 3rd down in a minor key. | |
| PER4TH | Intelligent pitch shifter; a 4th up in a major key. | |
| PER5TH | Intelligent pitch shifter; a 5th up in a major key. | |
| MAJ6TH | Intelligent pitch shifter; a 6th up in a major key. | |
| FEEDBK1, 2 | An effect that artificially generates feedback, and operates when a note is held for an extended time. 2 generates feedback one octave higher. | 0...4.7 adjusts the effect level. 5.0...10.0 adjusts the vibrato depth. |
| FEEDBK3, 4 | An effect that artificially generates feedback, and operates constantly when sustained. 4 generates feedback one octave higher. | |
| FILTER | Fixed filter effect. | Adjusts frequency (1.0...10.0 [Hz]) |
| FILTUP1 | Positive-polarity low-pass filter type auto-wah. | Adjusts sensitivity (0...10.0) |
| FILTUP2 | Low-pass filter auto-wah with positive-polarity and a strong peak. | |
| FILTDWN1 | Negative-polarity low-pass filter type auto-wah. | |
| FILTDWN2 | Low-pass filter auto-wah with negative-polarity and fast response. | |
| TALK 1...4 | An effect that simulates a "talking guitar". 1:YAH-YAH, 2:U-WAH, 3:YOI-YOI, 4:YESH | Adjusts sensitivity (0.0...10.0) |
| RANDOM 1...4 | Random step filter that moves a filter randomly. 1, 2, 3, and 4 by changing the frequency band affected by the filter. | Adjusts modulation speed (0.10...10.0 [Hz]) |
About the Intelligent Pitch Shifter
The Intelligent Pitch Shifter creates musically useful harmonies by varying the amount of pitch shift according to the note you play and the key in which you are playing. For example if you select a pitch shift of a 3rd up in a major key (MAJ3UP), the amount of pitch shift will vary automatically between three semitones (a minor third) and four semitones (a major third).
- When MAJ3UP is used with a key setting of C

The pitch created by the intelligent pitch shifter is shown in parenthesis ( ).
The PX4D provides seven types of intelligent pitch shifting, with intervals of a 3rd, 4th, 5th, and 6th. (For the 3rd, you can select either the upper or lower part, and a major or minor key.)

If your instrument is not tuned correctly, the results may not be as you expect. In this case, re-tune your instrument.

The intelligent pitch shifter will function when you play individual notes. It cannot produce the effect for chords.
DLY (Delay Modeling)
Each delay type, (1, 2, 3, 4, 5) have different amounts of feedback.
The delay time is set by the interval at which you press the TAP button twice. The specified delay time can be a maximum of 500 ms for SLAP or a maximum of 2 sec for MULTI, and can be checked by holding down the TAP button.
| TYPE (▲/▼ button) | VALUE (Value Dial) | |
| SLAP1...5 | Slap-type delay whose delay time is 1/4 of the interval at which you press TAP. | Adjusts effect level (0...10.0) |
| DELAY1...5 | Stereo delay. | |
| PPDLY1...5 | Dual-tapped ping-pong delay that pans the sound left and right. | |
| ECHO1...5 | Tape echo simulation with a warm tone. | |
| MULTI1...5 | Dual-head tape echo simulation with special stereo design. (creates a spacious reverberation) | |
REV (Reverb Modeling)
| TYPE (▲/▼ button) | VALUE (Value Dial) | |
| DRYAIR | Reverb that produces a sensation of dry air. | Adjusts effect level (0...10.0) |
| WETAIR | Reverb that produces a sensation of wet air. | |
| ROOM1 | Bright-sounding room reverb. | |
| ROOM2 | Mellow-sounding room reverb. | |
| PLATE1 | Tight-sounding plate reverb. | |
| PLATE2 | Bright-sounding plate reverb. | |
| HALL1 | Reverberation of a mid-sized hall. | |
| HALL2 | Reverberation of a large hall. | |
| SPRING1 | Spring reverb of a guitar amp. | |
| SPRING2 | Dense spring reverb. | |
00...69:Guitar program,70...99:Bass program
Preset Program Name
| No. | Name | No. | Name | No. | Name | No. | Name | No. | Name |
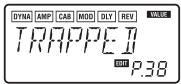
| P00 | TRAPPED | P20 | DARK | P40 | SLOWPAN | P60 | SURF | P80 | THUMB |
| P01 | J-CLEAN | P21 | BOWATTK | P41 | FILTER | P61 | CHARLOT | P81 | COUNTRY |
| P02 | VELVET | P22 | LUCKY | P42 | E MINOR | P62 | SUBSYNT | P82 | MOTOWN |
| P03 | PHASCLN | P23 | STEVIE | P43 | CHORUS | P63 | ADD6MOR | P83 | B JAZZ |
| P04 | WILD'04 | P24 | NEMO | P44 | OCTAVE | P64 | PARALIZ | P84 | B BLUES |
| P05 | ACOUSTC | P25 | MELISSA | P45 | C MAJOR | P65 | SWEETOD | P85 | FRETLES |
| P06 | ROCK | P26 | POP | P46 | SLIPNOT | P66 | PAPA | P86 | B RNB |
| P07 | BUBBLES | P27 | JAZZY | P47 | AC CLN | P67 | YAH VOC | P87 | VALVERY |
| P08 | JIMI 69 | P28 | UK'80 | P48 | ZEBRA | P68 | SHADOWS | P88 | PICKER |
| P09 | AWHOSTX | P29 | HUMBLE | P49 | COMP CL | P69 | RINGER | P89 | SLAPIT |
| P10 | NUGLORY | P30 | G SYNTH | P50 | SOLOPAN | P70 | STUFUNK | P90 | CANYON |
| P11 | VOXTREM | P31 | PIEZO | P51 | FLANGE | P71 | STUFING | P91 | DRIVEN |
| P12 | PUDDLE | P32 | US MDN | P52 | LINKIN | P72 | STUCORD | P92 | B CHORS |
| P13 | FABTONE | P33 | ROTARY | P53 | FLOYD | P73 | STUHARM | P93 | PHASOLO |
| P14 | ULI JON | P34 | FEEDBK | P54 | WHOTOWN | P74 | STUSOLO | P94 | THUMPER |
| P15 | 50TWEED | P35 | HRM SYN | P55 | HI SYN | P75 | BONEHED | P95 | TALKER |
| P16 | EC WAH | P36 | PASS | P56 | AUDIO | P76 | TAPROOM | P96 | FAXMAN |
| P17 | TROWER | P37 | BLUES | P57 | ARPGVIB | P77 | OCTBASS | P97 | DISTORT |
| P18 | MR SG | P38 | VOXWAH | P58 | STACKED | P78 | OVERDRV | P98 | FILTERD |
| P19 | CL FLNG | P39 | US HI-G | P59 | OCTFILT | P79 | STUWAVE | P99 | B SYNTH |
Rhythm Pattern List
| No. | Name | C | P | No. | Name | C | P | No. | Name | C | P | No. | Name | C | P | ||||
| 1 | METRONM | 1 | 1 | 21 | 8FILL4 | 1 | 1 | 41 | 16FILL5 | 1 | 1 | 61 | METAL2 | 1 | 1 | 81 | REGGAE2* | 1 | 1 |
| 2 | METRO2 | 1 | 1 | 22 | 8FILL5 | 1 | 1 | 42 | 16BRK | 1 | 1 | 62 | MTLFILL | 1 | 1 | 82 | REGGAE3* | 2 | 2 |
| 3 | METRO3 | 1 | 1 | 23 | 8BRK 1 | 1 | 1 | 43 | 16SHFL1 | 1 | 2 | 63 | R'NB | 1 | 2 | 83 | DANCE1 | 2 | 2 |
| 4 | METRO4 | 1 | 1 | 24 | 8BRK 2 | 1 | 1 | 44 | 16SHFL2 | 1 | 1 | 64 | BLUES* | 1 | 12 | 84 | DANCE2 | 2 | 2 |
| 5 | METRO5 | 1 | 1 | 25 | 8SHFL1 | 1 | 2 | 45 | 16SHFL3 | 1 | 1 | 65 | BLUEFIL | 1 | 1 | 85 | DANCE3 | 1 | 1 |
| 6 | METRO6 | 1 | 1 | 26 | 8SHFL2 | 1 | 1 | 46 | SHUFILL | 1 | 1 | 66 | COUNTRY | 1 | 1 | 86 | DANCE4* | 1 | 1 |
| 7 | METRO7 | 1 | 1 | 27 | 8SHFL3 | 2 | 2 | 47 | 3/4 | 2 | 2 | 67 | BALLAD | 1 | 1 | 87 | DISCO1 | 1 | 1 |
| 8 | 8BEAT1 | 1 | 4 | 28 | 16BEAT1 | 2 | 2 | 48 | 3/4SHFL | 2 | 2 | 68 | JAZZ1 | 2 | 2 | 88 | DISCO2 | 1 | 1 |
| 9 | 8BEAT2 | 1 | 1 | 29 | 16BEAT2 | 2 | 2 | 49 | 6/8 1* | 2 | 4 | 69 | JAZZ2* | 2 | 2 | 89 | EURO | 1 | 1 |
| 10 | 8BEAT3 | 2 | 2 | 30 | 16BEAT3 | 1 | 1 | 50 | 6/8 2* | 2 | 4 | 70 | FASTJAZ* | 1 | 1 | 90 | NEW RNB* | 2 | 2 |
| 11 | 8BEAT4 | 1 | 2 | 31 | 16BEAT4 | 2 | 2 | 51 | 5/4* | 1 | 1 | 71 | II-V* | 2 | 8 | 91 | BOSSA | 2 | 2 |
| 12 | 8BEAT5* | 2 | 2 | 32 | 16BEAT5 | 1 | 1 | 52 | 6/4 | 1 | 1 | 72 | FUNK1 | 2 | 2 | 92 | SAMBA1 | 1 | 1 |
| 13 | 8BEAT6 | 1 | 1 | 33 | 16BEAT6 | 1 | 1 | 53 | 7/4 1 | 1 | 1 | 73 | FUNK2 | 2 | 2 | 93 | SAMBA2 | 1 | 1 |
| 14 | 8BEAT7 | 1 | 1 | 34 | 16BEAT7 | 1 | 1 | 54 | 7/4 2 | 1 | 1 | 74 | FUNK3 | 1 | 1 | 94 | TANGO | 1 | 1 |
| 15 | 8BEAT8 | 1 | 1 | 35 | 16BEAT8 | 1 | 1 | 55 | POP1* | 2 | 4 | 75 | LINEAR | 1 | 1 | 95 | AFRO* | 1 | 1 |
| 16 | 8BEAT9 | 2 | 2 | 36 | 16BEAT9* | 1 | 2 | 56 | POP2* | 1 | 4 | 76 | MOTOWN1* | 1 | 2 | 96 | LATIN1* | 1 | 1 |
| 17 | 8BEAT10 | 1 | 1 | 37 | 16FILL1 | 1 | 1 | 57 | ROCK1 | 1 | 1 | 77 | MOTOWN2 | 1 | 1 | 97 | LATIN2* | 1 | 1 |
| 18 | 8FILL1* | 1 | 1 | 38 | 16FILL2 | 1 | 1 | 58 | ROCK2 | 1 | 2 | 78 | SURF1 | 1 | 1 | 98 | SONGO | 1 | 1 |
| 19 | 8FILL2 | 1 | 1 | 39 | 16FILL3 | 1 | 1 | 59 | 70ROCK | 1 | 2 | 79 | SURF2* | 1 | 4 | 99 | POLY | 1 | 1 |
| 20 | 8FILL3 | 1 | 1 | 40 | 16FILL4 | 1 | 1 | 60 | METAL1 | 1 | 1 | 80 | REGGAE1 | 2 | 2 | 100 | ONDO | 2 | 2 |
C: Number of measures when used in a pattern chain.
P: Number of measures.
- The bass line of these rhythm patterns follow the chord progressions shown below. (The chord progressions when used in a pattern chain is shown in parenthesis [ ]).
12 8BEAT5 I - IV 71 II-V [Im - IV] - VIIIm - III - VIm - II - V
18 8FILL1 I-V 76 MOTOWN1 [I]-IV
36 16BEAT9 [I(m)-V(m)]-bVI-bVII 79 SURF2 [I]-VIm-IV-V
49 6/81 [I-VIm]-IV-V 81 REGGAE2 I-VIm
50 6/8 2 [Im-bIII]-IV-V 82 REGGAE3 I-VII
51 5/4 Im-Vm 86 DANCE4 I-VII
55POP1 [I-V-VIm-V]-IV-IIIIm-IIm-V 90 NEW RNB Im-VII-bVI-V
56POP2 [I]-VIm-IV-V 95 AFRO I-VII
64 BLUES [I]-IV-I-V-IV-I-V 96 LATIN1 I-IV
69 JAZZ2 I () - IV - (m)-I11 97 LATIN2 I-VII
70 FASTJAZ Im-IV
Specifications
- Effects: 158 types (Maximum number of effects available simultaneously: 7)
Number of programs: User: 100, Preset: 100 - Inputs: guitar input (1/4" jack) AUX (mini stereo jack)
Output: line/headphone dual-purpose output (stereo phone jack) - Tuner section: detection range: 27.5 Hz-2,093 Hz (A0-C7) calibration: A = 438 Hz-445 Hz
Rhythm section: 40-208 bpm - Power supply: four AAA alkaline batteries:
- Allows 10 hours of continuous use (backlight OFF)
- Allows 7 hours of continuous use (backlight ON)
- separately sold AC adapter (DC4.5V: )
- Dimensions (W x D x H): 76 mm x 112 mm x 27 mm (2.99" x 4.41" x 1.06")
- Weight (not including batteries): 138g (0.30lbs.)
- Included items: Owner's manual, four AAA alkaline batteries for checking operation, Strap holder
- Option: AC adapter
Appearance and specifications are subject to change without notice for product improvement.
Precautions
Emplacement
REV(Reverb Modeling) 93
Fonction Rhythm and Bass
32 Environ 31,7 seconds.
CAB (Cabinet modeling)
REV(Reverb Modeling)
Quick Edit (Schnellzugriff)
3. Bass On/Off & Bass-Tonart
5. Rhythm & Bass Level
1) DYNA (Dynamics & Pickup Modeling)
6) REV (Reverb Modeling)
DYNA (Dynamics & Pickup modeling)
CAB (Cabinet modeling)
MOD (Modulation&Filter Effect Modeling)
DLY (Delay Modeling)
REV (Reverb Modeling)
IPE Integrated Parameter Edit
AUX
AUX
CD
CD
30
TAP
BEMS ?
RESONANT STRUCTURE AND ELECTRONIC CIRCUIT Modeling System
/
4
4
1.
LCD
2.
A
PX4D

AC

- a
C
- PX4D

1.
C
2.
PX4D
1.
- LCD
- TUNE/BYPASS
-
EXIT
-
ENTER/REC
-
/
6.
14.
/
LCD
7.

- /
15.
- OUTPUT
16.TAP
- INPUT
11.AUX
CD
12.DC4.5
17.
KA191 DC4.5V
AUX
LCD
d.
AUX
e.
/
EDIT
ORIG
f.
/
a.
DYNA AMP CAB MOD DLY REV
b.
C.
g. /
MASTER
VALUE
*1
DC4.5V

*2 AUX
CD
*3
*4 OUTPUT
*5
100dB/mW
32
AC
L
PX4D
- "ON"
2.
i
0
3.
ORIG
TAP
2
TAP
2


P.172
1.
100
100
P99
/
2.
MASTER
U00 U99
POO
AUX
/
P.160
- /
TUNE/BYPASS
LCD
1
" BYPASS "
TUNE/BYPASS
1 "MUTE"
TUNE/BYPASS
EXIT
4.
TUNE/BYPASS
EXIT
A
A=438 445Hz
A=440Hz
LCD
5
EXIT
EXIT
LCD
1
"MASTER"

EXIT
LCD
1
H

/


EXIT
6.
/
EXIT
PASS
"KEYLOCK" /
TUNE/BY -
LCD 1
AUX
RHYTHM
5.
5

ENTER/REC
"CHAIN"
P.163
- TAP 2

40 208
6/8

3.

1.
P.191
ENTER/REC
C C A B
0

METRONM METRO7

4.

5.
6.
"CHAIN" ENTER/REC

16
P.191
/
16
15
ENTER/REC
"PTN END"

AUX
JAM
1.
AUX PHRASE TRAINER
JAM

16 32

31.7
PHRASE TRAINER
AUX AUX
GTR/BAS
AUX+G/B AUX
JAM
JAM
CD
ENTER/REC

JAM

PHRASE
TRAINER
8 7.9
16 15.8
32 31.7
1 2 3...

2.

ENTER/REC

JAM
3.
100 90 80 75
66 50 6

PHRASE TRAINER
)

4.


CD
ENTER/REC
PHRASE TRAINER
AUX
AUX
CD
MD
AUX PITCH
AUX
AUX
AUX PITCH
0
EXIT

AUX

AUX

±1
DYNA
EXIT


TAP

P.172

2
OFF
ENTER/REC
/
1 DYNA
2 AMP
BTQ CLN FUZZ 15
VALVE UKMAJOR
10
SYNTH
P.175


*
SYNTH
Gt 3 CAB
bA
1
HDR
1× 8TWD 4× 12VIN 11
This product has been manufactured according to strict specifications and voltage requirements that are applicable in the country in which it is intended that this product should be used. If you have purchased this product via the internet, through mail order, and/or via a telephone sale, you must verify that this product is intended to be used in the country in which you reside.
WARNING: Use of this product in any country other than that for which it is intended could be dangerous and could invalidate the manufacturer's or distributor's warranty. Please also retain your receipt as proof of purchase otherwise your product may be disqualified from the manufacturer's or distributor's warranty.